the seed challenge - fastplants.org · the seed challenge was designed in collaboration with k-8...
TRANSCRIPT

Seeds germinate
Day 3 Day 7 Day 14 Day 16 Day 20 Day 40
Flowers begin to bloomand the plant grows taller
Seed pods grow
True leaves grow
Time topollinate the
flowers
Time toharvest the seeds
How Many Seeds Can You Getfrom a Single Seed?
Grade Level: K-4Catalog Number: 15-8973
The Seed Challenge

The Seed Challenge was designed in collaboration with K-8 teachers and the Wisconsin Fast PlantsProgram at the University of Wisconsin - Madison. Acknowledgements: Deb Spencley (VeronaSchool District, Wisconsin), Julie Walworth, (Minneapolis School District, Minnesota), and BeckyRosenberg (Madison Metropolitan School District, Wisconsin); Dan Lauffer, Paul H. Williams, andCoe Williams (Wisconsin Fast Plants Program); Lisa Darmo and Kathy Douglas (Carolina BiologicalSupply Company).
Written by Sarah Lauffer and illustrated by Amy Kelley. For more information about WisconsinFast PlantsTM, go to www.fastplants.org or www.carolina.com/fastplants.
© 2002by Tetrad Inc., Madison, WI, and Carolina Biological Supply Company, Burlington, NC
Table of Contents
IntroductionHow many seeds can you get from a single seed? ............. 3Objectives ............................................................ 3Materials List......................................................... 4Getting Started ...................................................... 5Calendar .............................................................. 6Drawings of Plants during the Life Cycle ........................ 8Student Plant Journals ........................................... 11
The Seed Challenge ActivityPlanting Seeds (Day 0) ............................................ 14Germination (Days 1-4) ........................................... 16Growth and Development (Days 5-12) ......................... 18Flowering, Pollination, and Fertilization( Days 13-18) ...... 20Seed Development (Days 19-40)................................. 22
Supplemental MaterialsWord Match......................................................... 24Word Bank .......................................................... 26Seed Sponge Germination ....................................... 27Life Cycle Graph ................................................... 28Culminating Activities ............................................ 29Glossary ............................................................. 30Other Wisconsin Fast PlantsTM Materials....................... 31

How many seeds can you get from a single seed?
Is this a riddle? Yes...and the answer lies at the end of the life cycle of Wisconsin FastPlantsTM!
Wisconsin Fast PlantsTM are easy to grow, and their small size makes them perfect for aclassroom bustling with kids. With this kit, an entire classroom of students can growplants through a complete life cycle, in just over 40 days. Wisconsin Fast PlantsTM areBrassica rapa, a member of the crucifer family. They are closelyrelated to broccoli, cabbage, canola, chinese cabbage, turnips,and many other foods you can find at the market.
In The Seed Challenge, students tend their own plantsthrough an entire life cycle. They are responsiblefor recording the many changes that they witness,using words, drawings, or measurements. Fromtheir own observations, students ask questionsabout what plants need to stay healthy andproduce seeds. As each day passes, studentsget closer to an answer to the riddle: Howmany seeds can you get from a single seed?
And the best part...the new seeds can be usedto plant more generations of Wisconsin FastPlantsTM, over and over again!
What willthese seeds
become?
Life Science Standardsand the Objectives of the Seed Challenge Activity
K-4 Life Science Standards• Characteristics of organisms• Life cycles of organisms• Organisms and environment
At the end of this activity, students will be able to:• Explain how plants grow and reproduce (how they change over time)• Identify the parts of a plant• Describe stages in the life cycle of a plant• Recognize what plants need to grow

Materials List
The following materials are includedwith The Seed Challenge Kit:
Written Materials
• The Seed Challenge Book• Wisconsin Fast PlantsTM Growing
Instructions
Growing Materials
• 8 Growing Systems
Each growing system includes:1 lid1 circular watermat1 long watermat wick1 small container1 large reservoir4 pots4 small blue watermat wicks
• Potting Mix• Fertilizer• Stakes and ties• Labels• Bees (dehydrated)• Wisconsin Fast PlantsTM Standard
Seeds
Materials that you may need tosupply or order separately
• Plant Light House or Plant Light Bank(Purchase through Carolina Biological SupplyCompany, Catalog Number 15-8997 or 15-8998) or make your own (seewww.fastplants.org for instructions).
Growing System Assembly

Getting Started
One day before starting:
• Read through the Wisconsin Fast PlantsTM GrowingInstructions. The Growing Instructions describe how to plantseeds, tend plants, pollinate flowers, and harvest seeds. Theicon (at right) will remind you to refer to them frequentlythroughout the activity.
• Assemble a lighting system (a Plant Light House or a Plant Light Bank). Plan toleave it on 24 hours a day throughout the entire life cycle. See Growing Instructionsfor details.
• Set up to plant seeds.There are enough materials for 4 groups of 2-4 students.Each group will share one reservoir of 4 pots, with 2-3 plants per pot.
?Need a quick refresher on your plant biology?
The Seed Challenge includes a synopsis of plant biology ateach stage of the life cycle.
Look for the title “What’s Happening?”
Refer toRefer toRefer toRefer toRefer toGrowingGrowingGrowingGrowingGrowing
InstructionsInstructionsInstructionsInstructionsInstructions
Plant Light Bank
Successful Wisconsin Fast PlantsTM requirecontinuous water, fertilizer, and fluorescent light,
24 hours a day. The optimal temperature is65—78 °F (18—26 °C).
Plant Light House

The Seed Challenge Calendar
Monday Tuesday Wednesday Thursday
0 1 2 3Plant Seeds
7 8 9 10
14 15 16 17Pollinate Pollinate
21 22 23 24
28 29 30 31
35 36 37 38Stop watering
42 43 44Harvest seeds

Key
Tend Plants
Check Nutrient Solution
Observe and MeasurePlants
Time
This investigation spansthe entire life cycle of theplants (about 44 days, withproper care).
It is recommended thatyou begin this activity ona Monday.
Plan on a full class forplanting seeds, pollinatingflowers, terminating buds,and harvesting seeds.
All other observation orplant care days require 10-30 minutes.
Friday Sat. Sun.
4 5 6Thin plants
11 12 13
18 19 20Cut off unpollinated buds
25 26 27
28 29 30
39 40 41

Stages in the Life Cycle of Wisconsin FStages in the Life Cycle of Wisconsin FStages in the Life Cycle of Wisconsin FStages in the Life Cycle of Wisconsin FStages in the Life Cycle of Wisconsin Fast Plantsast Plantsast Plantsast Plantsast PlantsTMTMTMTMTM
24 hours
Day 4-5
24-48 hours 48-72 hours
Day 7 Day 9

Day 11
Stages in the Life Cycle of Wisconsin FStages in the Life Cycle of Wisconsin FStages in the Life Cycle of Wisconsin FStages in the Life Cycle of Wisconsin FStages in the Life Cycle of Wisconsin Fast Plantsast Plantsast Plantsast Plantsast PlantsTMTMTMTMTM
Day 13

Stages in the Life Cycle of Wisconsin FStages in the Life Cycle of Wisconsin FStages in the Life Cycle of Wisconsin FStages in the Life Cycle of Wisconsin FStages in the Life Cycle of Wisconsin Fast Plantsast Plantsast Plantsast Plantsast PlantsTMTMTMTMTM
Day 18Day 28

Student Plant Journals
With guided phrases and observation cues, the student Plant Journals are designed tohelp young children hone their skills in observation, questioning, and journaling. Thelarge, blank spaces encourage students to draw pictures, record measurements, andwrite observations, questions, and hypotheses.
On each day that students observe or tend their plants, they should record their plants’growth and their own actions on a new Plant Journal sheet. Over the course of the lifecycle, they will create their own journal of their plants’ growth. On the back of eachpage, students can write poems, glue pictures, or tape pressed plants to help themremember their plants at each stage. At the end of the activity, have students make aLife Cycle Log that binds all their Plant Journal pages together as a journal, so they cansee how their plants grew.
The Plant Journal pages prompt students to:
1. Write their name and identify the date/day.
2. Make observations about their plants’ growthand development:• Draw pictures of their seeds or plants (large
box)Count how many units (centimeters, inches, orother measurement) tall their plants are, then color the same number of boxes(tower of boxes on the right)
• Use words to describe their seeds or plants (“The ___ is ___.” and “Today, I ___ myplant.”)
3. Ask questions and make predictions, based on their observations:• Wonder how and why the plants will grow and produce seeds (“I think...” and “I
wonder...”)• Predict how many seeds their plants will produce.
4. Gather evidence that will help them answer their questions and predictions.
TTTTTwwwwwoooooPlant JournalPlant JournalPlant JournalPlant JournalPlant Journal
PPPPPagagagagages:es:es:es:es:
GrGrGrGrGrades Kades Kades Kades Kades K-2-2-2-2-2GrGrGrGrGrades 3-4ades 3-4ades 3-4ades 3-4ades 3-4

Name: _______________________
Date
Monday Tuesday Wednesday Thursday Friday
The ______________________ is ____________________ .
I think my plant will have this many seeds:
Plant Journal (K-2)Plant Journal (K-2)Plant Journal (K-2)Plant Journal (K-2)Plant Journal (K-2)
Draw your plant here.

Plant Journal (3-5)
Name: _________________________
1 Your Plant’s Age
Planting Date (Day 0): ____________
Today’s Date: _________________
My plant is _______ days old.
2 Measurements
My plant is _______ cm tall.
3 Tending Plants
Fill in the blank with a phrase fromthe Word Bank:
Today, I ______________________
___________________ my plant.
4 Questions
I wonder _______________________
_________________________________?
5 Draw Your Plant Here

Day 0Planting Seeds
What’s Happening?
A seed contains a tiny, new plant. The outside of the seed is called the seed coat.Inside the seed is an embryo (baby plant).
A seed can remain quiescent (sleeping) for years, as long as it stays dry and cool. Whenit gets wet and warm, the seed expands until the seed coat cracks, and the tiny plantbegins to grow.
Seed Cafe
PeanutsBeansSprouts
Environmental MattersEnvironmental MattersEnvironmental MattersEnvironmental MattersEnvironmental Matters
Seeds need water, air, and warmthto germinate.
Plants need water, air, warmth,nutrition, light,
and space to grow.
Quick Activity
Name 3 types of seedsthat you can eat.

Day 0Activities and Investigations
Plant JournalsDraw and color a seed (K-4).Measure the seed (3-4) or compare its size to anothertype of seed (K-2).Complete the prompted sentences (K-4) and word bankmatches (3-4).
ActionPlant seeds according to the Growing Instructions. Eachgroup (2-4 students) should plant 3-4 seeds in 1 pot.
Some Discussion Ideas...• Where do seeds come from?• What can this seed become?• What’s inside the seed?• What does this seed need to grow?• Are seeds alive?
ExtensionLearn about variation!
Each seed is different, and each plant will be different, just like every person isdifferent. Measure the height of each student in the class. Is everyone the same height?Will all your plants be the same height? Are all your seeds the same size?
Plant Journal
Refer toRefer toRefer toRefer toRefer toGrowingGrowingGrowingGrowingGrowing
InstructionsInstructionsInstructionsInstructionsInstructions
Easy Activity
Seed Sponge Germination
Cut a sponge into a seedling shape,then watch it germinate in water!
(See page 27 for details.)
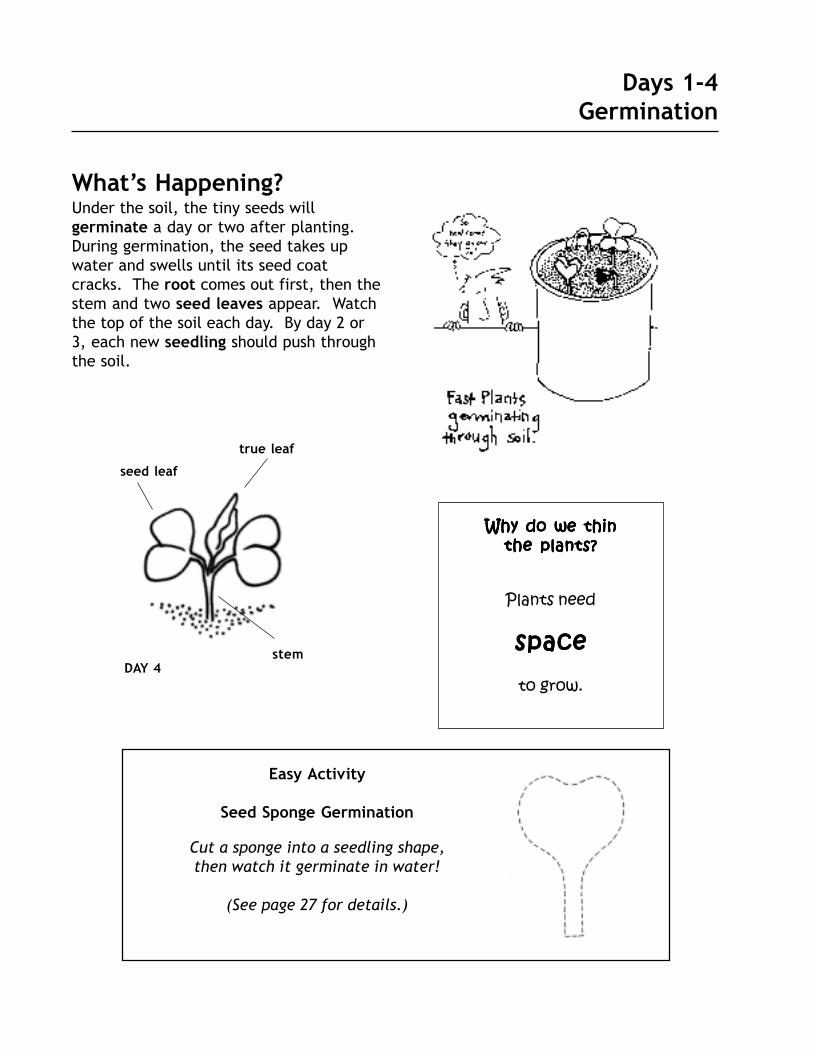
Days 1-4Germination
What’s Happening?Under the soil, the tiny seeds willgerminate a day or two after planting.During germination, the seed takes upwater and swells until its seed coatcracks. The root comes out first, then thestem and two seed leaves appear. Watchthe top of the soil each day. By day 2 or3, each new seedling should push throughthe soil.
Why do we thinWhy do we thinWhy do we thinWhy do we thinWhy do we thinthe plants?the plants?the plants?the plants?the plants?
Plants need
spacespacespacespacespace
to grow.
seed leaf
true leaf
stemDAY 4

Day 4Activities and Investigations
Plant JournalsDraw and color your seedling (K-4).Measure how tall your plant is. Fill in the samenumber of boxes on the growth chart (K-4), or recordthe number (3-4).Complete the prompted sentences (K-4) and word bankmatches (3-4).
ActionSnip off all but two plants per pot. This is calledthinning.Check the nutrient solution.
Some Discussion Ideas...• What came out of each seed?• How many days did it take for the
seedlings to push through the topof the soil?
• Did all the seeds germinate?• What is germination?
ExtensionCompare germination of different seeds!
Try beans, peas, alfalfa sprouts, corn, sunflowers, or any other seed you can find.Place a few seeds in a plastic bag with a moist paper towel, then tape the bag to awindow or to the inside of your plant light house. In a few days, the seeds will takeup water and begin to germinate. Do they all look the same when they are seeds,or when they are sprouts? Did they all germinate on the same day?
Plant Journal
Refer toRefer toRefer toRefer toRefer toGrowingGrowingGrowingGrowingGrowing
InstructionsInstructionsInstructionsInstructionsInstructions
Days 5-12Growth and Development
What’s Happening?
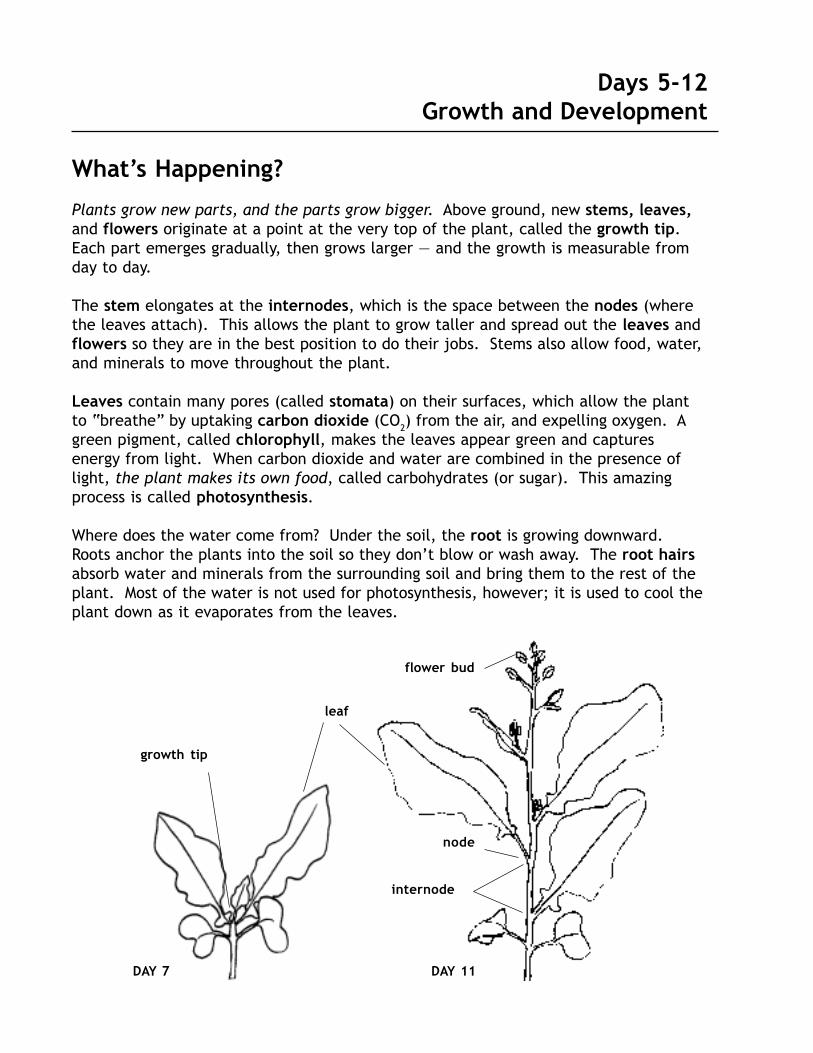
Plants grow new parts, and the parts grow bigger. Above ground, new stems, leaves,and flowers originate at a point at the very top of the plant, called the growth tip.Each part emerges gradually, then grows larger — and the growth is measurable fromday to day.
The stem elongates at the internodes, which is the space between the nodes (wherethe leaves attach). This allows the plant to grow taller and spread out the leaves andflowers so they are in the best position to do their jobs. Stems also allow food, water,and minerals to move throughout the plant.
Leaves contain many pores (called stomata) on their surfaces, which allow the plantto “breathe” by uptaking carbon dioxide (CO2) from the air, and expelling oxygen. Agreen pigment, called chlorophyll, makes the leaves appear green and capturesenergy from light. When carbon dioxide and water are combined in the presence oflight, the plant makes its own food, called carbohydrates (or sugar). This amazingprocess is called photosynthesis.
Where does the water come from? Under the soil, the root is growing downward.Roots anchor the plants into the soil so they don’t blow or wash away. The root hairsabsorb water and minerals from the surrounding soil and bring them to the rest of theplant. Most of the water is not used for photosynthesis, however; it is used to cool theplant down as it evaporates from the leaves.
leaf
flower bud
growth tip
node
DAY 7 DAY 11
internode
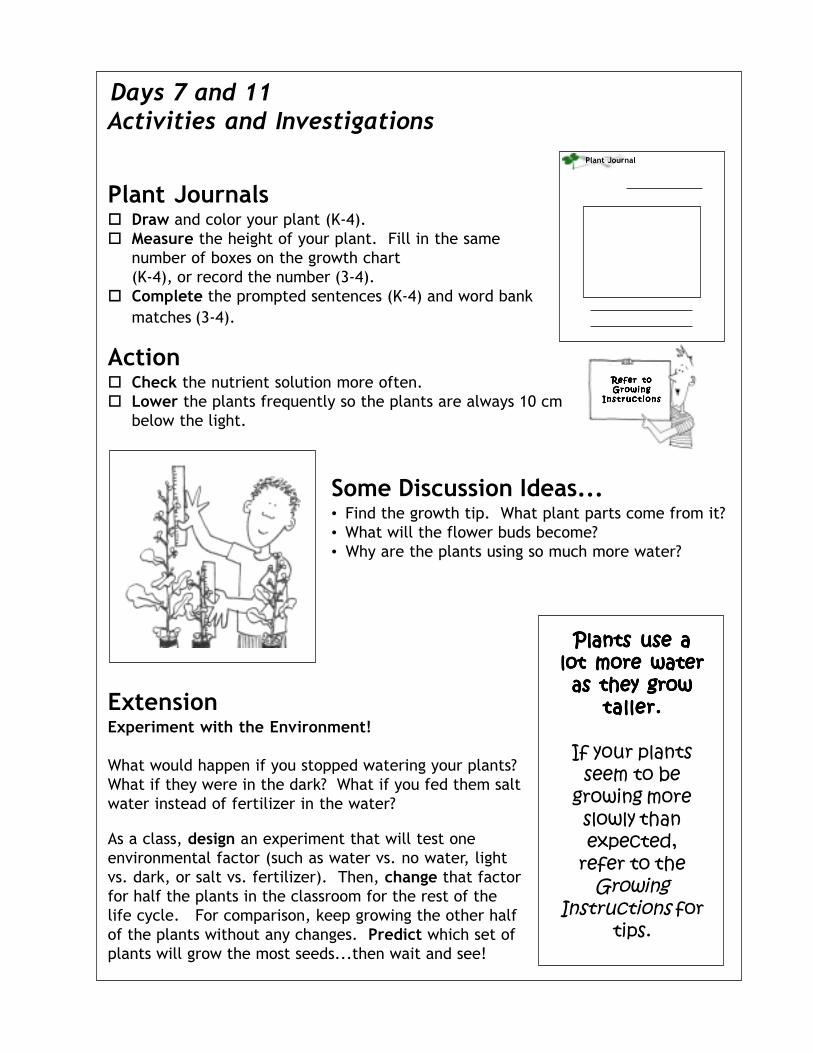
Days 7 and 11Activities and Investigations
Plant JournalsDraw and color your plant (K-4).Measure the height of your plant. Fill in the samenumber of boxes on the growth chart(K-4), or record the number (3-4).Complete the prompted sentences (K-4) and word bankmatches (3-4).
ActionCheck the nutrient solution more often.Lower the plants frequently so the plants are always 10 cmbelow the light.
Some Discussion Ideas...• Find the growth tip. What plant parts come from it?• What will the flower buds become?• Why are the plants using so much more water?
ExtensionExperiment with the Environment!
What would happen if you stopped watering your plants?What if they were in the dark? What if you fed them saltwater instead of fertilizer in the water?
As a class, design an experiment that will test oneenvironmental factor (such as water vs. no water, lightvs. dark, or salt vs. fertilizer). Then, change that factorfor half the plants in the classroom for the rest of thelife cycle. For comparison, keep growing the other halfof the plants without any changes. Predict which set ofplants will grow the most seeds...then wait and see!
Plants use aPlants use aPlants use aPlants use aPlants use alot more waterlot more waterlot more waterlot more waterlot more water
as they growas they growas they growas they growas they growtaller.taller.taller.taller.taller.
If your plantsseem to be
growing moreslowly thanexpected,
refer to theGrowing
Instructions fortips.
Plant Journal
Refer toRefer toRefer toRefer toRefer toGrowingGrowingGrowingGrowingGrowing
InstructionsInstructionsInstructionsInstructionsInstructions

Days 13-18Flowering, Pollination, and Fertilization
What’s Happening?
The flowers bloom. At the growth tip, new flower buds begin to appear. Each bud isprotected by four green sepals. Once a flower opens, the sepals are hidden beneathfour bright yellow petals. The flower’s center holds a single pistil, which is the femalepart of the flower. The pistil is surrounded by six yellow stamens, which are the maleparts of the flower. Each stamen is covered with lots of powdery, yellow pollen.
The bright yellow petals may catch your eye — and the eye of insects. The petals forma beacon that lets insects know that there is food available.
What food? Hidden deep inside the flowers are nectaries, which produce nectar.Nectar is a sweet, sugar-rich substance that insects love to eat. That’s why bees andbutterflies are attracted to flowers — they’re hungry!
In exchange for food, insects pollinate flowers. When an insect moves from flower toflower looking for nectar, pollen from each flower gets caught in the insect’s body hairsand is transferred to other flowers. After pollen has landed on the tip of anotherflower’s pistil, it grows a tube down into the pistil, where the eggs are housed. Sperm(from inside the pollen) are then able move down the tube until they reach the eggs andfertilize them. The fertilized eggs then become new seeds.
flower
bud
DAY 15
6 stamens
1 pistil
4 petals
4 sepals
Flower

Days 15, 17, and 18Activities and Investigations
Plant JournalsDraw and color your plant (K-4).Measure the height of your plant. Fill in the samenumber of boxes on the growth chart (K-5), or record thenumber (3-4).Complete the prompted sentences (K-4) and word bankmatches (3-4).
ActionWhen the flowers begin to open, make one beestick per group.Days 15 and 17: Pollinate the flowers each day. Make surethat each bee visits several plants — and picks up lots of dustypollen — then comes back to the first plant so every flowergets pollen from other plants each day.Day 18: After the final pollination, pinch off the remainingunopened flower buds. Do not pinch off any flowers that werepollinated!
Some Discussion Ideas...• If you were a bee, why would you want to land on
a flower?• If you were a flower, why would you want a bee to
land on you?• Name a flower that is
important to you, andsay why.
ExtensionFlowers in Bloom!
Observe a flower with a hand lens, then draw it on anew worksheet. Carefully dissect a flower with atweezers and place each part on a strip of double-sticktape on your worksheet. When done, cover it withanother piece of tape to protect it. Identify and countthe parts.
In order toproduce seeds,
each flower mustreceive pollen
from a differentplant. Pollen from
a plant will notfertilize its owneggs. So makesure that your
beestick visits lotsof plants!
Plant Journal
Refer toRefer toRefer toRefer toRefer toGrowingGrowingGrowingGrowingGrowing
InstructionsInstructionsInstructionsInstructionsInstructions

Mama!Mama!Mama!Mama!Mama!
Days 19-40Seed Development
What’s Happening?
As the fertilized eggs grow into seeds, the outside of the pistil swells to become theseed pod (or fruit) that encases several seeds. The seed pod grows longer and fatter asthe seeds ripen inside. Meanwhile, the leaves and flowers slowly wilt and fall off, oneby one.
After the seeds have dried out completely, they are ready to be planted or stored.Inside each seed is a tiny embryo, waiting for water and warmth so it can germinateinto a new plant, and another life cycle can begin.
Day 44
seed pod
seeds
Who are theparents?
The plant where theseeds and pods growis the mother plant.Each of the mother’seggs was fertilized by
a pollen grain thatcame from a different
plant — the fatherplant. The fertilized
eggs develop intoseeds, each of whichmay or may not have
a different father.

Days 25, 32, 37, and 44Activities and Investigations
Plant JournalsDraw and color your plant (K-4).Measure the height of your plant. Fill in the samenumber of boxes on the growth chart (K-4), or record thenumber (3-4).Complete the prompted sentences (K-4) and word bankmatches (3-4).Guess how many seeds did your plant produce? Althoughit is can be emotional to see the plants die, the harvestbrings to life a new generation of seeds... and begin tothe answer to the Seed Challenge!
ActionDays 25 and 32: Check the nutrient solution.Day 37: Stop watering the plants 20 days after pinching offthe flower buds.Day 44: One week after you stop watering, the plants willbecome brown and crispy. Harvest the seeds by gentlycutting the seed pods off the plant. Carefully open the seedpods over a tray, or make a tape envelope (see below right).Plant the seeds or store them in a cool, dry place for another life cycleinvestigation!
Some Discussion Ideas...• All the seeds harvested from one plant have
the same mother. But who was the father?(Hint: Where did the pollen come from?)
• What can these seeds become?
tab
pod
tapeEasy Activity: Tape Envelope
Place a seed pod between two pieces of clear tape. Foldback the ends to make two tabs. Crush the pods insidethe tape envelope. Pull the tabs to open the envelope
and collect the seeds.
Plant Journal
Refer toRefer toRefer toRefer toRefer toGrowingGrowingGrowingGrowingGrowing
InstructionsInstructionsInstructionsInstructionsInstructions

seedseedseedseedseed
seedseedseedseedseedleavesleavesleavesleavesleaves
stemstemstemstemstem
leafleafleafleafleaf
rrrrrootootootootoot
grgrgrgrgrowth tipowth tipowth tipowth tipowth tip
flowerflowerflowerflowerflower
WWWWWord Matchord Matchord Matchord Matchord Match
It has a baby plant insidethat grows into a big plant.
The tiny leavesthat come out of a seed.
The part of a plantthat holds the leaves and flowers.
The part of the plantthat collects sunlight.
The underground part that absorbswater & minerals from soil.
The top part of a plant wherenew leaves and flowers appear.
The reproductive part of the plantthat attracts bees and butterflies.
DirectionsDirectionsDirectionsDirectionsDirections1. Cut the words out on the lines.2. Match each word with its meaning.3. Glue the words to your picture onthe Plant Journal Pages.

flower budflower budflower budflower budflower bud
pistilpistilpistilpistilpistil
stamensstamensstamensstamensstamens
petalspetalspetalspetalspetals
sepalssepalssepalssepalssepals
pollenpollenpollenpollenpollen
seed podseed podseed podseed podseed pod
An unopened flower.
The flower partthat has the eggs.
The six flower partsthat produce the pollen.
The four flower partsthat are yellow.
The four flower partsthat are under the petals.
The yellow, powdery stuffon the stamens.
It has seeds inside it.

Word Bank
Directions
Use the following phrases to complete the sentence on your Plant Journal pages:
“Today, I ____________ my plant.“
removed the extra plants to make room for
harvested seeds from
watered
pollinated the flowers on
planted seeds of
stopped watering
pinched the buds off
fertilized

Directions
1. Cut the pattern (Figure A) out of a thin household sponge.
2. Cut the seed leaves in half, lengthwise to form two seed leaves (Figure B).
3. Thoroughly wet the sponge and roll it into a ball, with the root inside the seed leaves.
4. Wrap it tightly with a piece of string and let it dry for a few days (Figure C).
5. Once dry, remove the string, and wrap the “seed” with one layer of tissue to simulatea seed coat. Secure the tissue with a tiny piece of tape.
6. Toss the “seed” into a large bowl of water, and watch it “germinate”!
Seed Sponge Germination
Figure A
Figure C

Nam
e:
____
____
____
____
____
____
_G
raph
Tit
le:
___
____
____
____
____
____
____
____
____
____
____
____
___
Plan
ting
Dat
e(D
ay 0
)
Plant Height (in cm)
28 26 24 22 20 18 16 14 12 10 8 6 4 2 0
Life
Cyc
le G
raph
Day

Culminating Activities
1 Create a Life Cycle Log (Grades K-4)
Have students make a cover for their Life Cycle Log with a picture, poem, or drawing about their plants.Put all their Plant Journal pages in order with the cover on top, then punch them with a 3-hole punch.Tie them together with yarn or string. Do they remember how their plants grew? Share them with eachother and talk about the differences and similarities.
2 Life Cycle Pictures
Cut & Color (Grades K-2)Instead of drawing plants on their Plant Journal pages, have younger students cut and color pictures.Make one copy per student of the Stages in the Life Cycle of Wisconsin Fast PlantsTM pages and WordMatch pages and cut them apart. Let students color the picture that looks most like their plant oneach observation day, and choose the words that go with the picture. Have them paste the pictureand words on their Plant Journal pages.
Sequence of Events (Grades 3-4)Make one copy per student group of the Stages in the Life Cycle of Wisconsin Fast PlantsTM pages —but cover up the words. Have students cut out each picture, and place them in the order that theyoccur during the life cycle.
3 Graphing (Grades 3-4)
Make one copy per student of the Life Cycle Graph. Have students plot the height of their plants on eachobservation day, then connect the points. Do their graphs show a pattern? Try plotting otherobservations too, such as the number of leaves or flowers each day.
4 Word Match (Grades 3-4)
Make one copy per student group of the Word Match pages. Cut out the words and their definitions, thenhave students match them.

Glossary
Carbon dioxide .... A gas from the air that is used by plants for photosynthesis; alsoknown as CO2.
Chlorophyll......... Green pigment in plants; see photosynthesis.Egg ................... Female gamete.Embryo.............. Young plant in a seed before germination.Fertilization ....... Union of egg and pollen to produce a new embryo.Flower .............. Reproductive part of a plant.Flower bud......... Flower that has not yet opened.Fruit ................. What the pistil becomes after fertilization; seed pod.Germination ....... Beginning of growth by a seed.Growth tip ......... Tip of the plant where new leaves, stems, and flower buds form.Internode .......... Part of the stem between the nodes.Leaf .................. Green part of the plant that collects light and CO2 for
photosynthesis; green color comes from chlorophyll.Nectar ............... Sugar-rich food in flowers that insects and birds eat.Nectary ............. Tiny structure found deep within a flower that produces nectar.Node ................. Where the leaves and flowers attach to the stem.Petal ................. Flower part that is usually colored yellow in WFP.Photosynthesis .... The process of converting CO2 and water (in the presence of light
and chlorophyll) into carbohydrates (sugar) and oxygen (that webreathe).
Pistil ................. Female reproductive part of a flower.Pollen ............... Produced by stamens; contains the male gametes.Pollinate ............ Transfer pollen from one flower to another.Root.................. Underground part of the plant that absorbs and conducts water and
minerals; anchors the plant in soil.Root hair............ Tiny outgrowths of the root that absorb water and minerals from the
soil.Seed ................. Part of a plant that will grow into a new plant under the right
conditions.Seed coat ........... Outermost part of a seed.Seed leaves ........ First :leaves” to germinate; also called cotyledons.Seed pod ........... Contains the seeds.Seedling ............ Young plant that grows from a seed.Sepal ................ Green part of the flower that encloses the flower bud.Stamen .............. Male reproductive part of a flower.Stem ................. Aboveground part of the plant that bears the leaves and flowers.Stomata ............. Pores in leaves that allow plants to uptake CO2 and to expel oxygen
and water.Thin.................. Remove extra plants.

Wisconsin Fast PlantsTM Manuals and Resources
Exploring with Wisconsin Fast PlantsTM
Catalog Number: 15-8951
Exploring is an elementary/middle school teacher resource manual. This fully indexedversion includes:
• A multitude of activities throughout the plant life cycle• A bonus section on “Variation, Heredity, and Evolution”• Objective statements about how the activities address the National Science
Standards
Exploring is targeted to elementary grades, but its breadth and depth attracts highschool teachers and college educators for pre-service training.
Bottle BiologyCatalog Number: 15-8959
Bottle Biology is designed for grades 2-12. Developed by the Wisconsin Fast PlantsProgram, this innovative book is a perfect companion to Exploring.
Bottle Biology is chock full of ideas for using plastic soda bottles and other recyclablematerials to teach students about science and the environment. The low-cost projectspromote science as a tool that anyone can use to explore the world. Each chaptercontains background information, activities, teaching tips, and instructions.
Spiraling through Life with Fast PlantsCatalog Number: 15-8951A
Spiraling is an exciting, new, inquiry-based manual with over 25 explorations ingermination, growth and development, flowering, pollination, fertilization, and embryodevelopment. Geared for middle and high school, the activities can easily be adaptedfor K-6. The hand-drawn illustrations bring each topic to life.

Wisconsin Fast PlantsTM Seed Stocks Available:Standard • Purple Stem, Hairy • Non-Purple Stem, Hairless
Non-purple Stem, Yellow-Green Leaf • Yellow-Green Leaf • PetiteRosette-Dwarf • Tall Plant • Variegated • F1 and F2 Genetic Stocks
To order Wisconsin Fast PlantsTM materials and seeds:Carolina Biological Supply Company, 2700 York Road, Burlington, NC 27215 1-800-334-5551 Ordering info: www.carolina.com/fastplants
Activity ideas: www.fastplants.org