the seasons of creative living 5400 series
TRANSCRIPT

The Seasons ofCreative Living5400 Series
Crafts Section
Table of Contents
2
Crafts
For the following information/instructions, type (or copy and paste) thewebsites into your browser.
Water Drop Cloth - http://www.kenw.org/cl/clvol5crafts1.pdf - go to page 4
Painting on Candles - http://www.kenw.org/cl/clvol5crafts3.pdf - go to page 19
Making Simple Rubber Stamps ............ 3Basic Rubbings ..................................... 4Just Jinger ............................................. 4Making Albums .................................... 5Wire & Beads ....................................... 7Power Layouts ...................................... 7Easy Papermaking ............................... 9Picture Frame ........................................ 11Guests ................................................... 13

423
MAKING SIMPLE RUBBERSTAMPS
You have probably used rubber stamps before, choosing from the varietyavailable in stationery and art supply stores. Now you will make yourown stamps of simple graphic shapes and use them to print repeatingdesigns. A repeat pattern can add a rich texture across a page, provide anarchitectural border for a free-flowing picture, enhance a journal page, orwork as an interesting visual statement by itself. If you love thistechnique, you can buy eraser-like Soft-Kut blocks and linoleum-cuttingtool, and carve larger blocks with any graphic designs or specific imageryyou choose. For this project, look for white vinyl erasers with sharpcorners and edges.
YOU WILL NEED:• ruler• 3 white vinyl rectangular erasers• X-acto knife with no. II blades• metal straightedge• pencil• 3 to 4 sheets rice paper such as Mulberry or
Kitakata, torn into rectangles approximately 7by 8 inches, or 20 sheets laser printer paper
• black ink stamp pad
Measure the short side of an eraser, and use themeasurement to mark off 2 squares on each eraser.Using the X-acto knife against the metal straightedge,cut the squares. If necessary, trim to make the squaresuniform in size. Discard the trimmings. Set one ofthe 6 eraser squares aside to use.
MAKE YOUR MARK -STAMP TWO
On the second eraser square, using the pencil draw adiagonal line on the surface of the eraser from onecorner to its opposite corner. It can be a straight line,a curving line or a jagged line. Holding your X-actoknife perpendicular to your work surface, cut alongthe line down into the eraser, about one-third of theway through its thickness. Holding the knife bladeparallel to your work surface and pointed away fromyou, and beginning about one-third of the way down
the side of the eraser where the vertical cut ends, cutaway half of your design like this:
It isn’t important if the new surface of the part you cutaway is neatly cut or not, you just want it cut awayenough so that when you press your stamp into theink pad and onto the paper, the cut side won’t pickupink and make a mark on the page.
COURTESY: Margaret PeotAuthor

BASIC RUBBINGS
You don’t have to go to the cemetery to make a rubbing.Anything with a raised pattern or texture can make for anexciting page. Look around you. What do you see that has a
texture and might make an interesting rubbing? A tile or linoleumfloor? A brick wall? A woven placemat or patterned silverware? An oldbook with an embossed cover? A feather or leaf? How about acolander with holes in it, a slotted spoon, a screen door? Of course, thetechnique is incredibly simple, but you can get quite an interesting effect by varying the pressure withwhich you rub and by using a variety of different papers. Tracing paper is the obvious choice, but youmight also try a more opaque paper, such as typing paper or stationery. Look for paper with a highcotton content that is marked “acid free.” You can try a lightweight printmaking paper, such as RivesLightweight, or rice paper such as Kitakata.
Lay a sheet of tracing paper over the textural surface you have found: a tile floor, for example. Securethe paper with masking tape at the corners. Using the side of the black crayon, rub over the paper. Rublightly at first, then rub harder as the texture begins to become apparent on the paper. Remove the tapeand lift the paper from the floor. What do you see? How does the rubbing of the floor differ from the
floor itself?
To make a rubbing of a small object, you may find that you have to tape the object down.For example, to make a rubbing of a coin, use a small piece of masking tape rolled sticky-side out into a cylinder to secure the coin to your work surface. Place a piece of tracingpaper over the coin and tape the paper down. Using the side of the blackcrayon, rub over the paper and coin. How distinct can you make the rubbingpicture? Don’t worry about the scuff marks or extraneous marks made by thecrayon. This adds to the interest of the image.
To make a rubbing of a three-dimensional object like a box, wrap the tracing paperaround the object as you would if you were wrapping a gift, then rub the crayon allover the top, bottom, and sides of the object. Unwrap the object and flatten the paper.When you are making rubbings of dimensional objects, you can flatten the rumpledpaper by leaving it overnight under some heavy books.
COURTESY: Margaret PeotAuthor
COURTESY: Jinger AdamsJust Jinger/Wilton
http://www.justjingeronline.com/
For information on pre-made scrapbook pages and embellishments
and kits, you can visit Jinger at her website.
4

5
Sometimes just one layout won’t do it! Minialbums are a fun, compact way to preserveyour holiday memories. There are so manyphotos to take during the holidays or othermemorable occasions, and a mini album is agreat way to get them all together. Preplanningyour album by picking paper and embellish-ments will help your your project go faster.
Paper Bag Mini AlbumUse of any size from paperlunch bag to miniaturepaper bags. Fold bags inhalf, stack them up andpunch holes down the foldedsides and tie ribbons throughto bind. Embellish the pagesjust as you would on atraditional album, then use the “pockets”created (by the bag openings) to include extraphotos and journaling.
Index Divider MiniAlbumUse any size indexcard dividers mixedwith card stock pages,stack them up andpunch holes down the
side. Bind with book rings or snap rings.Embellish with ribbons, shipping tags, etc.
Use for any occasion or document the “12Days of Christmas” by making a page in thisbook for each of your family’s holidayactivities, then slip in a tag with journalingabout the activity behind the photos. Startwith preparing for the holiday, mailing your
Making Albumscards,trimmingyour tree,holidaybaking,holidayshopping, etc.
Mini Album in Tinor BoxAn accordion albumfolded inside adecorated tin or boxmakes a great giftfor someone special.Tins that work wellinclude Altoid tinsand other flat tins. Cut your paper accord-ing to box size, measure, score and fold. Achipboard or gift box also makes greatholders for your album. Attach one side toinside of box lid or leave loose.
Tag Mini AlbumUse shipping tags ortags cut from card-stock or heavy paperabout 3 1/2” x 7 1/2”,trim top corners fortag shape. Punch holesand use 2 book binder or snap rings orribbon to make book.

6
Fisherman Mini AlbumFor a fun and uniquealbum, cut two 3”x 5“covers and three 2 1/2“ x4 1/2”pages from browncard stock. Use a stencilbrush to apply brown inkto edges and random marks across tops. Re-move hooks from a lure. Center lure loops oncover; mark cover and punch holes throughboth covers. Center pages to cover, mark andpunch holes. Stack pages between covers,aligning holes. Attach split rings to the lure.
Thread snap swivels through holes in coversand pages, then through split rings. Attachadditional snap swivels. Mat your photos onblack card stock, journal by hand or computer.Arrange photos, fine fish netting and smallfishing supplies to covers and paper.
Canvas Frame or CanvasBoard Mini AlbumsMini stretched canvasframes and canvas boardsmay also be used as coversfor accordion albums outof cardstock.
Other mini albums are available for purchase.The sky is the limit on all the possibilities.
Accordion Albums
Filled with favorite photos, this is just thepresent for a relativeor special familyfriend, particularlyone your family seesless often than you’dlike.
Supplies:Assorted photosCraft knife4-ply and 2-ply rag board (sold at artsupply stores)Colored paperGlue stick
Choose seven favorites from a stack offamily photos. Use a craft knife to cut two5 x 6 1/2-inch rectangles from the 2-plyrag board. Lightly mark 6 1/2-inchincrements along the edges of the 2-plyrag board, and accordion-fold the sheet atthose marks. Use a ruler edge to press thefolds into sharps creases.
Lay the ribbon on a table topand center the folded rag boardon top so that the side with threecreases is on the left and linesup with the midpoint of the ribbon.Apply glue to the top of the folded ragboard. Then lay the left side of the ribbonover the glued pages and top with one of thebook covers, pressing firmly until wellstuck. Flip over the book and use the samemethod to attach the right side of theribbon and the back cover.
Now, cut the colored paper into seven 4 x 51/2-inch rectangles. Glue one onto thecenter of each page and the front cover.Then glue the photos onto the colored paper.Finally print the year on the front cover.
Open the album into a full circle, tie theribbon binding into a bow, and it’s readyto display on an end table or dresser.
COURTESY: Connie MoyersNM Cooperative Extension Service
7
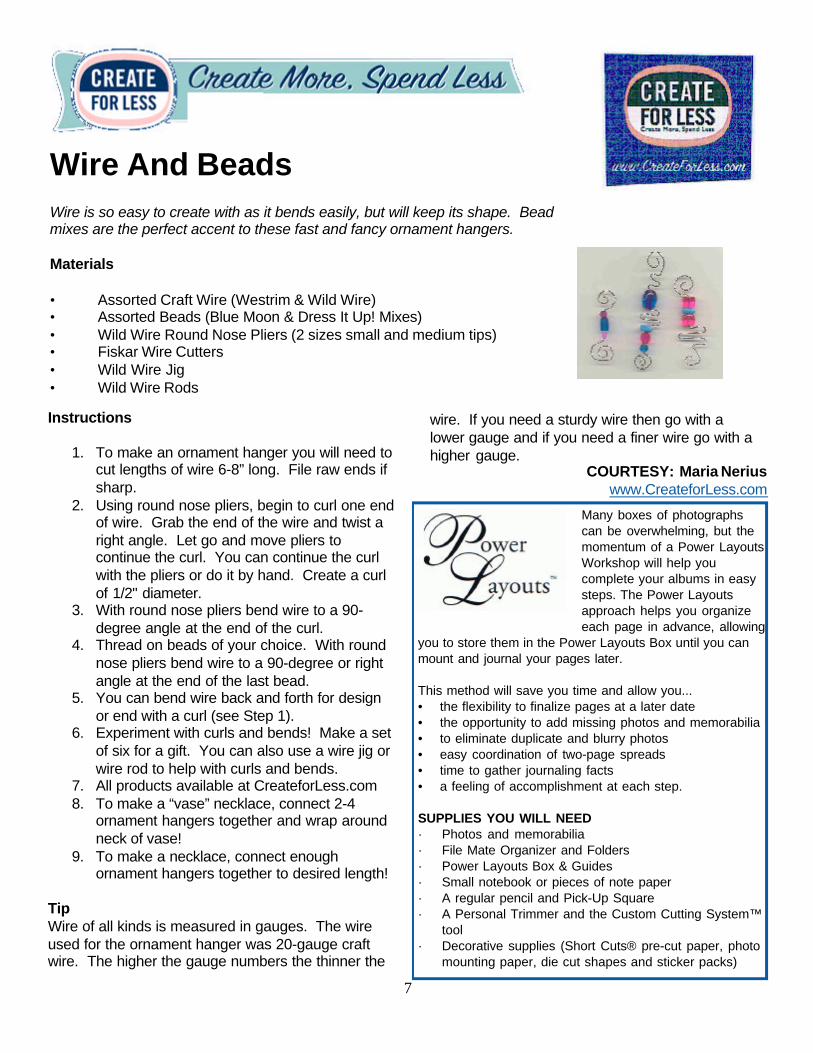
COURTESY: Maria Neriuswww.CreateforLess.com
Wire And BeadsWire is so easy to create with as it bends easily, but will keep its shape. Beadmixes are the perfect accent to these fast and fancy ornament hangers.
Materials
• Assorted Craft Wire (Westrim & Wild Wire)• Assorted Beads (Blue Moon & Dress It Up! Mixes)• Wild Wire Round Nose Pliers (2 sizes small and medium tips)• Fiskar Wire Cutters• Wild Wire Jig• Wild Wire Rods
Instructions
1. To make an ornament hanger you will need tocut lengths of wire 6-8” long. File raw ends ifsharp.
2. Using round nose pliers, begin to curl one endof wire. Grab the end of the wire and twist aright angle. Let go and move pliers tocontinue the curl. You can continue the curlwith the pliers or do it by hand. Create a curlof 1/2" diameter.
3. With round nose pliers bend wire to a 90-degree angle at the end of the curl.
4. Thread on beads of your choice. With roundnose pliers bend wire to a 90-degree or rightangle at the end of the last bead.
5. You can bend wire back and forth for designor end with a curl (see Step 1).
6. Experiment with curls and bends! Make a setof six for a gift. You can also use a wire jig orwire rod to help with curls and bends.
7. All products available at CreateforLess.com8. To make a “vase” necklace, connect 2-4
ornament hangers together and wrap aroundneck of vase!
9. To make a necklace, connect enoughornament hangers together to desired length!
TipWire of all kinds is measured in gauges. The wireused for the ornament hanger was 20-gauge craftwire. The higher the gauge numbers the thinner the
wire. If you need a sturdy wire then go with alower gauge and if you need a finer wire go with ahigher gauge.
Many boxes of photographscan be overwhelming, but themomentum of a Power LayoutsWorkshop will help youcomplete your albums in easysteps. The Power Layoutsapproach helps you organizeeach page in advance, allowing
you to store them in the Power Layouts Box until you canmount and journal your pages later.
This method will save you time and allow you...• the flexibility to finalize pages at a later date• the opportunity to add missing photos and memorabilia• to eliminate duplicate and blurry photos• easy coordination of two-page spreads• time to gather journaling facts• a feeling of accomplishment at each step.
SUPPLIES YOU WILL NEED· Photos and memorabilia· File Mate Organizer and Folders· Power Layouts Box & Guides· Small notebook or pieces of note paper· A regular pencil and Pick-Up Square· A Personal Trimmer and the Custom Cutting System™
tool· Decorative supplies (Short Cuts® pre-cut paper, photo
mounting paper, die cut shapes and sticker packs)

8
COURTESY: Debbie SorensonCreative Memories Consultant
www.creativememories.com
Organize your workplace like the diagram below. Remember, ifyour first page will start an album, there will be no companionpage to create a two-page spread.
• Lay all of your photosonto the guides in aproposed order• Separate photos bythemes, day and events• Add an memorabilia tothe appropriate pages
• Start again from thebeginning and eliminate anyphotos that will not fit.• Crop your photos andarrange them on the guides.• For a new two-pagespread, insert additional
Plan out any enhancements for the photoson your guides.• Choose paper, stickers and die cutshapes to complement your photos, andlaythem on the guidesUse your note paper to…• Write down specific memorabilia orjournaling facts you will need to locate.
• Finalize the order of theguides the way you would likeyour album to flow, stack yourPower Layouts guides inorder and mount with thecorrect order later.
• Place the guides into thePower Layouts Box. Do nottiltthe box; if you’re careful, your page layouts will remainintact. Remember, while the Power Layouts Box & Guidesare photo-safe, they are not recommended for long-termstorage. The sooner your memories get into albums, thesooner they can be enjoyed.
Tip: Treat digital prints as memorabilia. Place them in PhotoMounting Sleeves to protect them prior to mounting in thealbum.
• Record the volume and page number of layout ideas youwant to use from the Page Patterns™ Organizer or FastFormulas® books.
• Mount and journal at yourconvenience.
Since the goal of Power Layoutsis to mount continuous two-page spreads, you may want tomount your photos andmemorabilia in an assembledalbum to ensure an accurateflow of your pre-planned albumpages. Be sure to protect your finished pages from finger-prints,accidental spills and abrasions with Creative Memories Page Protectors.

9
These basic steps are the foundation of all pour mold sheetmaking. These directions are for pour molds because they offer moreoption,s are easier to use, and are more flexible and less work.
Step 1 – Place the moldupside-down on a flat surface
Step 2 – Lay the paper-making screen on the mold.Lay the drain rack grid onthe screen
Step 3 – Pull the straps tightlyacross the drain rack. Push thelong straps firmly against theshort straps on the mold’s side.
Step 4 – Lower the mold at aslanted angle into the water in avat (tub or dishpan). The watermust be deep enough to comewithin 1/4” of the mold’s top.
Step 5 – Pour pulp into thedeckle.
Step 6 – By wiggling yourfingers or stirring with a plasticspoon, spread the pulp evenlyin the water in the deckle.
Step 7 – Lift the mold out ofthe water. Hold it level andlet all the water drain. Step 8 – Set the mold down in a
drain pan (cookie tray, etc.)Loosen the straps.
Step 9 – Lift the deckle up from overthe screen and drain rack. If thescreen lifts with the deckle, separatethe two with your fingernail or aknife blade.
Step 10 – Having set the deckleaside, carefully put cover(protective) screen over the newsheet.
Step 11 – Press a sponge firmly down on thescreen. Wring the sponge. Press again.Continue until the sponge removes no morewater.

10
Step 12 – Carefully lift a cornerof the cover screen. Peel thescreen off slowly. If the sheetcomes up with the screen, try theother corners.
Step 13 – Pick up the papermaking screenwith the new sheet. Turn it over. Place it –new sheet down – on a dry couch sheet(absorbent material). The new sheet will bebetween the screen and couch sheet.
Step 14 – Firmly press a sponge downall over the screen’s surface. Wring thesponge and press again.
Step 15 – Place one hand on the middleand one hand at the corner of thescreen. Slowly lift the corner and peeloff the screen. Slide one hand back asthe other lifts. If the sheet comes upwith the screen, press down hard oneach corner and try lifting at each.
Step 16 – Put a dry couch sheet over thenew sheet.
Step 17 – With a press bar (flat piece ofwood, plastic or metal), press down hardover the entire surface of the couchsheet.
Step 18 – Take off the top couch sheet.Carefully lift one corner of the new sheet.(If the new sheet is too weak, repeat Step17 with a dry couch sheet.)
Step 19 – Peel the new sheet off thecouch sheet. Step 20 – Place the new sheet on an
ironing board or on a cloth-covered flatsurface. Place a thin cloth over the sheet.Iron the new sheet dry with an iron turnedup to maximum heat (no steam.)
Step 21 – Admire your new sheet
11
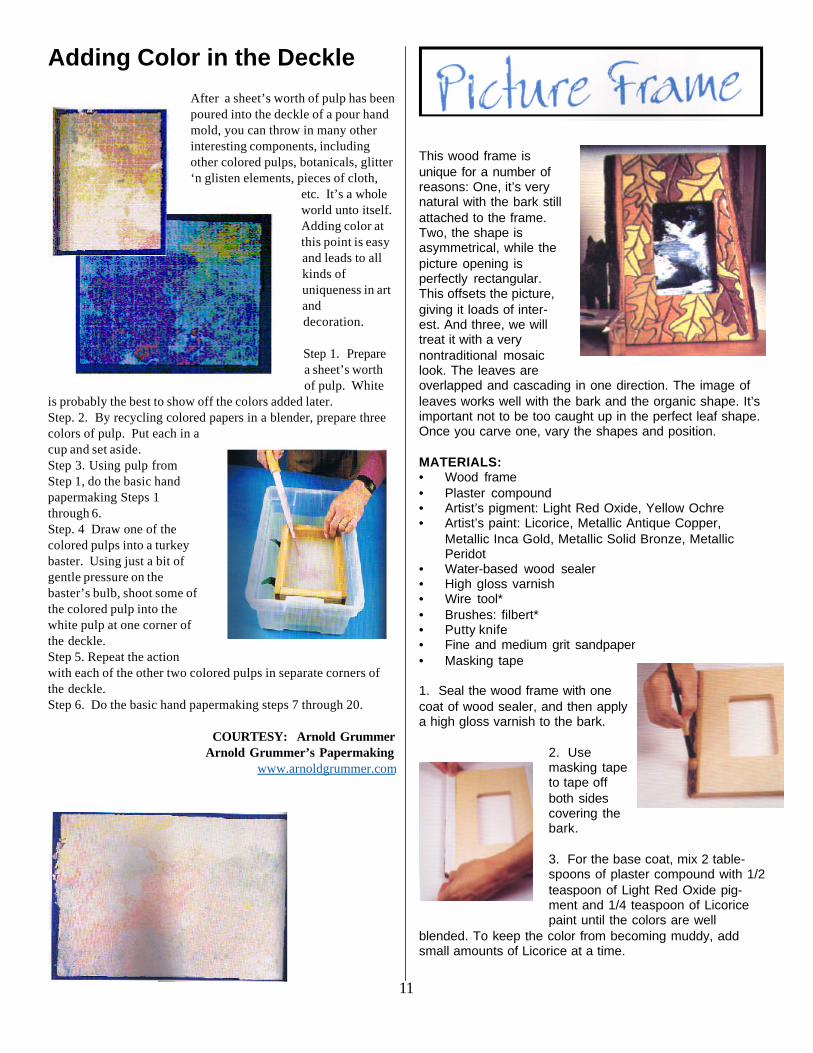
Adding Color in the Deckle
After a sheet’s worth of pulp has beenpoured into the deckle of a pour handmold, you can throw in many otherinteresting components, includingother colored pulps, botanicals, glitter‘n glisten elements, pieces of cloth,
etc. It’s a wholeworld unto itself.Adding color atthis point is easyand leads to allkinds ofuniqueness in artanddecoration.
Step 1. Preparea sheet’s worthof pulp. White
is probably the best to show off the colors added later.Step. 2. By recycling colored papers in a blender, prepare threecolors of pulp. Put each in acup and set aside.Step 3. Using pulp fromStep 1, do the basic handpapermaking Steps 1through 6.Step. 4 Draw one of thecolored pulps into a turkeybaster. Using just a bit ofgentle pressure on thebaster’s bulb, shoot some ofthe colored pulp into thewhite pulp at one corner ofthe deckle.Step 5. Repeat the actionwith each of the other two colored pulps in separate corners ofthe deckle.Step 6. Do the basic hand papermaking steps 7 through 20.
COURTESY: Arnold GrummerArnold Grummer’s Papermaking
www.arnoldgrummer.com
This wood frame isunique for a number ofreasons: One, it’s verynatural with the bark stillattached to the frame.Two, the shape isasymmetrical, while thepicture opening isperfectly rectangular.This offsets the picture,giving it loads of inter-est. And three, we willtreat it with a verynontraditional mosaiclook. The leaves areoverlapped and cascading in one direction. The image ofleaves works well with the bark and the organic shape. It’simportant not to be too caught up in the perfect leaf shape.Once you carve one, vary the shapes and position.
MATERIALS:• Wood frame• Plaster compound• Artist’s pigment: Light Red Oxide, Yellow Ochre• Artist’s paint: Licorice, Metallic Antique Copper,
Metallic Inca Gold, Metallic Solid Bronze, MetallicPeridot
• Water-based wood sealer• High gloss varnish• Wire tool*• Brushes: filbert*• Putty knife• Fine and medium grit sandpaper• Masking tape
1. Seal the wood frame with onecoat of wood sealer, and then applya high gloss varnish to the bark.
2. Usemasking tapeto tape offboth sidescovering thebark.
3. For the base coat, mix 2 table-spoons of plaster compound with 1/2teaspoon of Light Red Oxide pig-ment and 1/4 teaspoon of Licoricepaint until the colors are well
blended. To keep the color from becoming muddy, addsmall amounts of Licorice at a time.

4. Use the putty knife to spread an1/8” base coat evenly over theframe. Spread the plaster over theedges of the tape and along theinside edges of the frame opening.Do not worry about jagged or un-even edges. These can be sandedoff once the plaster has dried.
5. To pull the masking tape fromthe frame, push down on one end ofthe masking tape and immediatelylift the top edge of the other end and pull it towards you.Allow the base coat to completely dry before moving on tothe next step.
6. Use medium grit sandpaper to sand the base coatsmooth. Any rough edges along theframe opening should be sanded off alittle at a time. Depending on the amountof plaster that was put on the frameopening, the edge can be sandedsquare or the opening can be slightlyrounded to give a softer appearance.
7. Again, usemasking tape totape off bothsides of theframe, coveringthe bark.
8. For the top coat, mix 2tablespoons of plaster with 1/2teaspoon of Yellow Ochre until thecolor is well blended.
9. Use the putty knife to spread a1/8” top coat evenly over the framefront. Do not cover the inside frameopening. The color of the base coatwill show on the finished project.
10. Graspthe top of thetape, andimmediatelypull themaskingtape from the frame.
11.Once thetop coathas
firmed up, use the wire tool tocarve out leaves in a randompattern. Keep the leaves runningin the same direction. It is easierto carve out whole leaves
randomly around the frame, andthen fill in with partial leaves.
12. Allow the top coat to dry, anduse fine grit sandpaper to sand thesurface smooth. Then use the wiretool to clean out any grout joints orfinish any leaf shapes.
13. Paint the leaves in variousmetallic shades.
14. Seal the entire surface, including the bark, with a highgloss varnish. Apply two coats for maximum shine anddurability.
Practice your leaves by drawing them freehandon a piece of paper before you begin the project.
COURTESY: Kristen PeckAuthor & Designer
12

Crafts Guests
Jinger AdamsJust Jinger/Wilton Industries548 W. 9400 S.Sandy, UT 84065801-898-0885 (cell)801-302-8069e-mail: [email protected] Page: www.justjingeronline.com
Kris CranfordOne Stroke Certified Instructor2245-A S. Roosevelt Rd. 6Portales, NM 88130505-478-2514E-Mail: [email protected]
Carolyn Dahl2130 Southgate Blvd.Houston, TX 77030713-660-9488E-Mail: [email protected]
Arnold GrummerArnold Grummers’ Paper Making316 N. Milwaukee St., Suite 40Milwaukee, WI 53202800-453-1485 or 414-347-9296e-mail: [email protected] or [email protected] Page: www.arnoldgrummer.com
Evelyn LangstonOzark CraftsP.O. Box 67Gilbert, AR 72636-0067870-439-2990800-648-5084FAX: 870-439-2991E-Mail Address: [email protected] Page Address: http://www.ozcrafts.com
Connie MoyersRoosevelt Co. Coop. Ext. ServiceP. O. Box 455Portales, NM 88130505-356-4417E-Mail Address: [email protected]
Maria NeriusCreateforless.com6932 SW Macadam Ave., Ste. APortland, OR 97219e-Mail: [email protected] Page: www.createforless.com
Kristin Peck3400 Dandelion CresVirginia Beach, VA 23453757-368-8322E-Mail Address: [email protected]
Margaret PeotAuthor116 Pinehurst Ave. A54New York, NY 10033212-923-7800, ext. 1154e-mail address: [email protected] Page: www.margaretpeot.com
Debbie SorensenCreative Memories1612 Mountain Shadow Dr.Carlsbad, NM 88220505-885-2577E-Mail: [email protected] Page: www.creativememories.com/dsorensen
13