the saviour pst repair - technician · the saviour pst repair - technician offers a complete...
TRANSCRIPT

The Saviour PST
Repair -
Technician
User Guide
Version 1.0

Overview
The Saviour PST Repair - Technician offers a complete solution to repair damaged Microsoft Outlook
Personal Storage (PST) files.
The software repairs corrupt PST files and restores all its content such as e-mails, attachments, contacts,
calendars, tasks and journals. The Saviour PST Repair - Technician scans and extracts data from a
damaged PST file, repairs it and then saves it as a new usable PST file. To view repaired items, you need
to import the new PST file into MS Outlook.
The Saviour PST Repair - Technician also ensures recovery of accidentally deleted e-mails that you
have emptied from the deleted items folder. After recovering the PST file, the software shows its original
content. All folders from the original PST file are shown along with their content in a three-pane structure.
Key features:
Option to save in DBX and MBOX format.
Option to compact and save a PST file.
Option to split and save a PST file.
Enables you to view messages in a 3-view format.
Selective recovery of mails.
Find option to search mails faster.
Repairs e-mails, calendar entries, contacts, notes, tasks and journals from damaged PST files.
Restores formatting from RTF and HTML messages.
Repairs encrypted PST files.
Support for MS Office 2016 / 2013 / 2010 / 2007 / 2003.
Look and feel matches MS Office 2007 / 2010 / 2013 GUI.
Repairs corrupt MS Outlook 98 / 2000 / 2002 / 2003 / 2007 / 2010 / 2013 / 2016 PST files.
Repaired file is saved as new PST file on any (including network) disk visible by the host
operating system.
Right-click option to save emails in any one of the following formats from preview section itself -
MSG, EML, RTF, HTML, and PDF.
Option to arrange scanned emails and messages as per Date, From, To, Subject, Type,
Attachment, and Importance. You can also arrange the scanned emails in form of groups.

Enhanced preview feature for calendars, tasks, journals, notes and contacts.
Installation Procedure
Before installing the software, ensure that your system meets the minimum system requirements.
Minimum System Requirements
Processor: Pentium Class
Operating System: Windows 10 / Windows 8 / Windows 7 / Windows Vista / Windows XP
Memory: 1 GB
Hard Disk: 100 MB of free space
MS Outlook: 2016 / 2013 / 2010 / 2007 / 2003
Internet Explorer: Version 7.0 or later
To install the software:
1. Double-click TheSaviourPSTRepair-Technician.exe executable file to start installation. Setup -
The Saviour PST Repair - Technician dialog box is displayed.
2. Click Next. License Agreement dialog box is displayed.
3. Choose I accept the agreement option. Next button will be enabled. Click Next. Select
Destination Location dialog box is displayed.
4. Click Browse to select the destination path where the setup files will be stored. Click Next.
Select Start Menu Folder dialog box is displayed.
5. Click Browse to provide path for program's shortcuts. Click Next. Select Additional Tasks
dialog box is displayed.
6. Select check boxes as per your choice. Click Next. Ready to Install dialog box is displayed.
7. Review your selections. Click Back if you want to change them. Click Install to start installation.
The Installing window shows the installation process.
8. On completion of the installation process, Completing the The Saviour PST Repair -
Technician Setup Wizard window is displayed. Click Finish.
Note: Clear Launch The Saviour PST Repair - Technician check box to prevent the software from
launching automatically.
Launching the Software
To launch The Saviour PST Repair - Technician in Windows 10:
Click Start icon -> All apps -> The Saviour PST Repair - Technician -> The Saviour PST Repair - Technician Or,
Double click The Saviour PST Repair - Technician icon on the desktop. Or,
Click The Saviour PST Repair - Technician tile on the home screen.
To launch The Saviour PST Repair - Technician in Windows 8:
Click The Saviour PST Repair - Technician tile on the home screen. Or,
Double click The Saviour PST Repair - Technician icon on the desktop.
To start the application, do one of the following in Windows 7 / Vista / XP:
Click Start -> All Programs -> The Saviour PST Repair - Technician -> The Saviour PST Repair - Technician. Or,
Double click the The Saviour PST Repair - Technician icon on the desktop. Or,
Click The Saviour PST Repair - Technician icon in Quick launch.
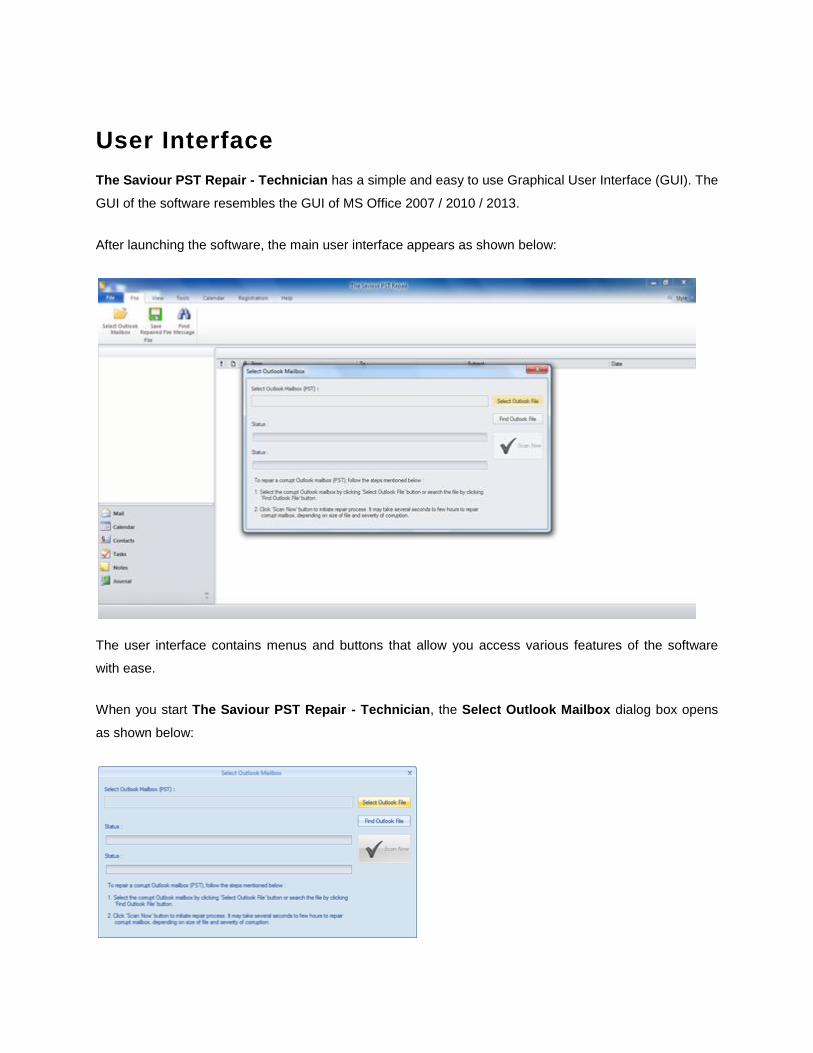
User Interface
The Saviour PST Repair - Technician has a simple and easy to use Graphical User Interface (GUI). The
GUI of the software resembles the GUI of MS Office 2007 / 2010 / 2013.
After launching the software, the main user interface appears as shown below:
The user interface contains menus and buttons that allow you access various features of the software
with ease.
When you start The Saviour PST Repair - Technician, the Select Outlook Mailbox dialog box opens
as shown below:

To select a PST file, click on Select Outlook File button. Select the PST file that needs to be repaired
and then click Scan Now to start the repairing process.
The Saviour PST Repair - Technician also allows you to search for PST files, in case you don't know
the location of the PST files to be repaired. Click on Find Outlook File button, Find Mailbox dialog box
opens. Use Look in to specify the drive in which you wish to search for PST files, and then click Start to
search for files.
Note: Select Outlook Mailbox dialog box can also be opened by selecting Select Outlook Mailbox in
File menu.
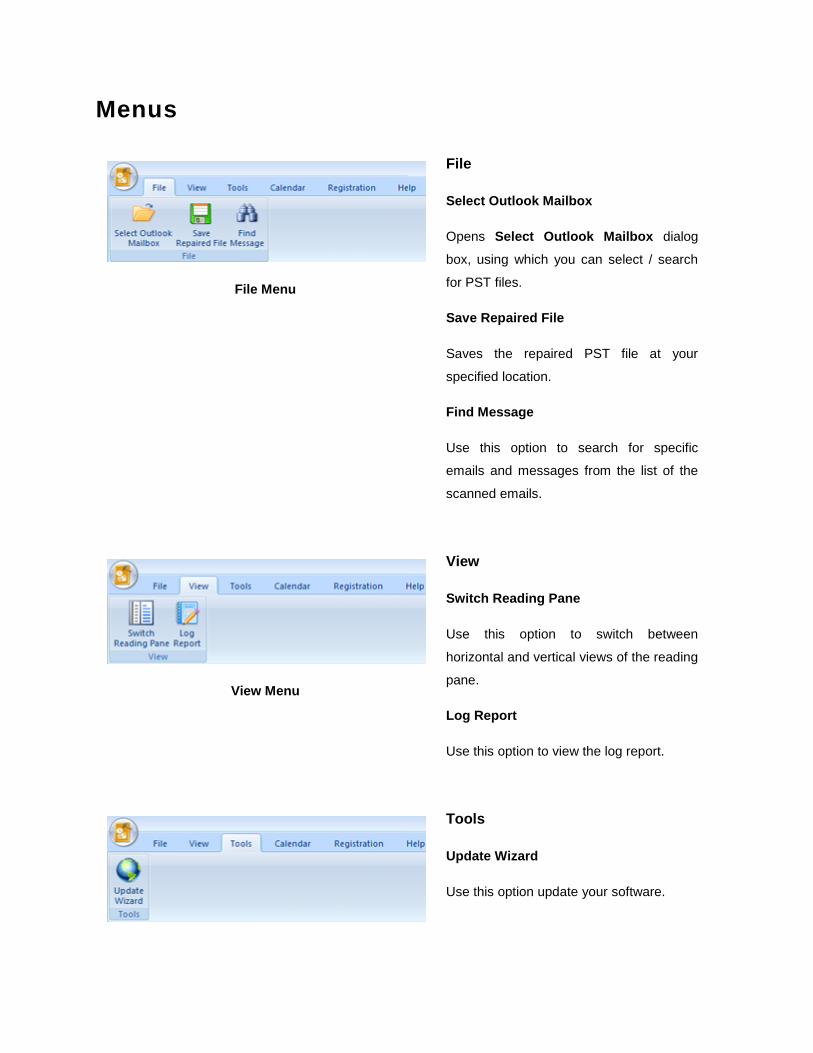
Menus
File Menu
File
Select Outlook Mailbox
Opens Select Outlook Mailbox dialog
box, using which you can select / search
for PST files.
Save Repaired File
Saves the repaired PST file at your
specified location.
Find Message
Use this option to search for specific
emails and messages from the list of the
scanned emails.
View Menu
View
Switch Reading Pane
Use this option to switch between
horizontal and vertical views of the reading
pane.
Log Report
Use this option to view the log report.
Tools
Update Wizard
Use this option update your software.

Tools Menu
Calendar Menu
Calendar
Day
Use this option to list all the entries of a
particular day from the calendar.
Work Week
Use this option to list all the entries of a
work week (from Monday to Friday).
Week
Use this option to list all the entries of a
week (from Monday to Sunday).
Month
Use this option to list all the entries of a
particular month.
GoTo
Use this option to list all the entries of the
current date or any particular date.
Registration Menu
Registration
Register
Use this option to register the software
after purchasing the software.

Help Menu
Help
Help Topics
Use this option to open the help manual of
the software.
Order
Use this option to buy The Saviour PST
Repair - Technician.
About
Use this option to read information about
the software.
Style Menu
Style
Use this option to switch between various themes for the
software, as per your choice. The Saviour PST Repair -
Technician offers the following themes: Office 2007 (Blue,
Black, Silver, Aqua), Office 2010 (Blue, Black, Silver), and
Office 2013 Theme.

Buttons
The Saviour PST Repair - Technician toolbar has following buttons / options:
Click this button to open Select Outlook Mailbox dialog box.
Click this button to save the repaired PST file to a location of your choice.
Click this button to switch between horizontal and vertical views of the reading pane. When you click on a folder in left-pane, by default, the right pane shows the details in horizontal columns position. You can click Switch Reading Pane icon to change the position to vertical columns.
Click this button to view the log report, which contains the details of the repairing process.
Click this button to open Find Message dialog box, using which you can search for specific emails using sender's email, recipient's email, subject, or date.
Click this button to update your software. Use this option to check for both, major and minor versions of the software.
Click this button to list all the entries of one particular day from the calendar.

Click this button to list all the entries of a work week (from Monday to Friday).
Click this button to list all the entries of a week (from Monday to Sunday).
Click this button to list all the entries of a particular month.
Click this button to list all the entries of the current date.
Click this button to list all the entries of a particular day (any single day except the current date).
Click this button to register the software after purchasing.
Click this button to open the help manual for The Saviour PST Repair - Technician.
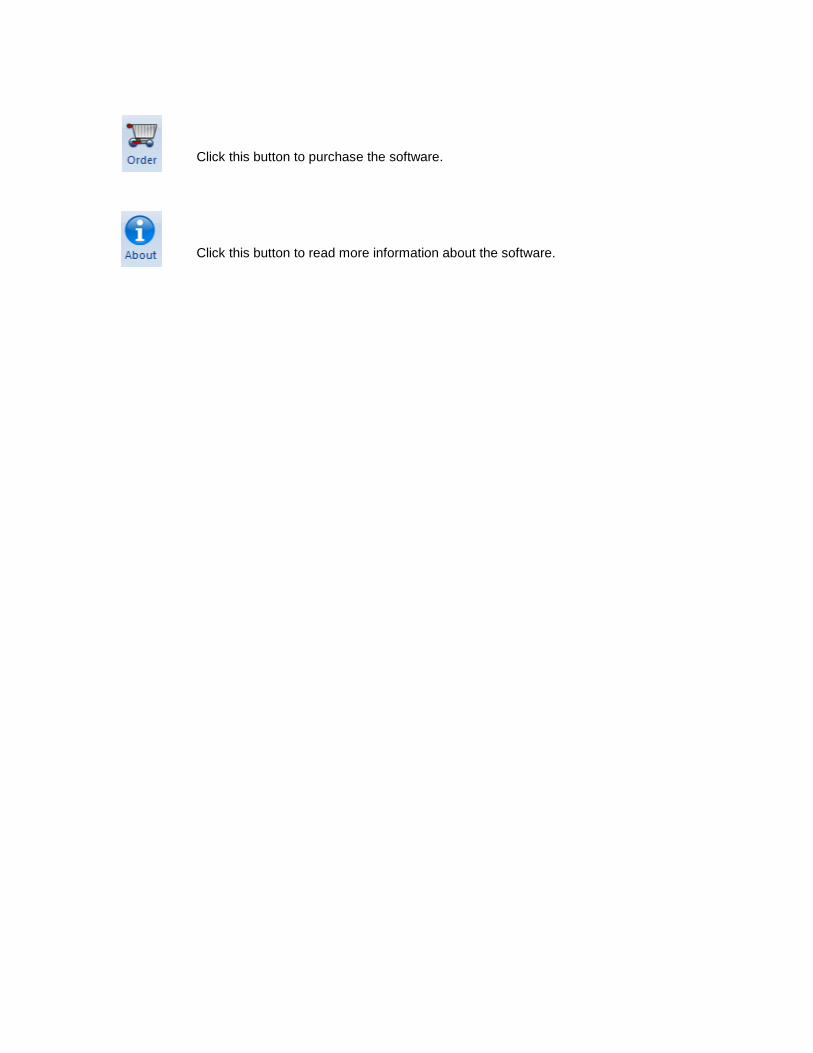
Click this button to purchase the software.
Click this button to read more information about the software.

Ordering the Software
To know more about The Saviour PST Repair - Technician, click here.
To purchase the software online, please visit http://www.dsaviour.com/buy-now.php
Alternatively, click on Order icon in Help Menu on Menu Bar to purchase the software online.
Select either of the methods given above to purchase the software.
Once the order is confirmed, a serial number will be sent to you through e-mail, which would be required
to activate the software.

Registering the Software
You can download demo version of The Saviour PST Repair - Technician software from here. The
demo version is just for evaluation purposes and you must eventually register the software to use its full
functionality. Once you purchase the software, you will receive a key using which you can register the
software.
You can register the software using any of the following methods:
Online Registration
After purchasing the software, a serial number will be sent via email, which is required to register
the software. You need to enter the serial number, which is then verified by a license server and
on verification, the software is registered.
Manual Registration
To register the software manually, you will need to generate a PHX_REG.txt file. After verification
of the serial number and purchase details, the site key, which is required to register the software
manually, will be sent to your email address.
Note: If the software is downloaded from http://www.dsaviour.com/ (i.e., ESD version), it must be
registered using Serial Number (received through email after purchasing the product) to use all the
features of the software.
If the software is installed using the product installation CD (i.e., BOX version), hardware lock, that is
available with the software kit, is mandatory for the functioning of the software.

Online Registration
To register the software online:
Registration Screen
1. Launch demo version of
The Saviour PST
Repair - Technician
software.
2. From Menu Bar, select
Registration. Click
Register.
3. In Registration Option
dialog box, select I
have the registration
key.
4. Select Online
Registration. Click OK.
A warning will appear,
click OK to continue.
5. In Welcome to The
Saviour - Electronic
Registration wizard,
click Next.
6. Type the serial number
(received through email
after purchasing the
product) in serial
number field. Click
Next.
7. The software would
automatically
communicate with the
license server. After the

registration is done,
click Finish to complete
the registration process.
Note: You can generate PHX_REG.txt file manually via online activation. View Manual Registration to
perform the process of generating PHX_REG.txt file.

Manual Registration
To register the software manually:
1. Launch the demo version of The Saviour PST Repair - Technician.
2. From Menu Bar, select Registration option. Click Register.
3. In Registration Option dialog box, select I have the registration key.
4. Select Online Registration. Click OK. A warning will appear, click OK to continue.
5. In Welcome to The Saviour - Electronic Registration wizard, click Cancel.
6. The Saviour PST Repair - Technician dialog box will open, click OK.
7. In Manual Software Registration dialog box, enter the serial number that you receive once you
purchase the software. Click Next.
8. A file named PHX_REG.txt is created on your desktop. Click Finished.

9. After verifying the purchase details, you will receive the site key, which is required to register the
software manually.
10. After receiving the Site Key, open The Saviour PST Repair - Technician. In Registration
Option dialog box, select I have the registration key.
11. Select Manual Registration and Click OK.
12. Enter the Site Key in The Saviour PST Repair - Technician dialog box. Click Validate.
Note: The site key is delivered to the email address through which the serial number is sent.

Updating the Software
The Saviour releases periodical software updates for The Saviour PST Repair - Technician software.
You can update the software to keep it up-to-date. These updates can add a new functionality, feature,
service, or any other information that can improve the software. Update option of the application is
capable of checking for latest updates. This will check for both latest minor and major versions available
online. You can easily download minor version through the update wizard. However, the major version, if
available, has to be purchased. While updating the software, it’s recommended to close all the running
programs. Note that demo version of the software cannot be updated.
To update The Saviour PST Repair - Technician:
1. Go to Tools option in Menu Bar. Click Update Wizard.
2. The Saviour Update Wizard window will open. Click Next. The wizard will search for latest
updates, and if it finds any new updates, a window will pop up indicating its availability.
3. Click Next and the software will download the files from the update server. When the process is
complete, the software will upgrade to the latest version.
Live Update may not happen due to following reasons:
Internet connection failure
Updates are not available
Unable to download configuration files
Unable to locate updated files or version
Unable to locate executable file
Note: If a major version is available, you need to purchase the software in order to upgrade it.

Find PST Files
The Saviour PST Repair - Technician allows you to search for PST files in your computer. Using the
Find Outlook File option, you can search for PST files in your computer's drives, folders and sub folders.
However, you can only select one drive at a time to search for PST files.
To Find PST files in drives:
1. From File menu, click on Select
Outlook Mailbox icon to open Select
Outlook Mailbox dialog box.
2. Click Find Outlook File button. Find
Mailbox dialog box opens.
3. From Look in field under Find
Options section, select the drive you
want to search for PST files. Click
Start.
4. After the search is finished, a list of
PST files found in the selected drive
is shown in Find Mailbox dialog box,
under the Find Results section.
To Find PST files in folders and subfolders:
1. From File menu, click on Select Outlook Mailbox icon to open Select Outlook Mailbox dialog
box.
2. Click Find Outlook File button. Find Mailbox dialog box opens.
3. In Find Mailbox dialog box, click Find in folder button. Browse for Folder dialog box opens.
4. Select the folder from which you want to search PST files. Click Start. Also, if you want to search
subfolders within that folder, select Search Subfolders checkbox.
5. After the search is finished, list of PST files found in the selected drive is shown in Find Mailbox
dialog box, under Find Results section.
Note: Click Clear List button to clear the search result.
Repair PST Files
If you know the location of PST files, then you can directly specify the location and start repairing e-mails
from that file. If you do not know the location, then you can search the required PST file by using the
search functionality of The Saviour PST Repair - Technician software.
To repair PST files:
1. Run The Saviour PST Repair - Technician software. From the Select Outlook Mailbox dialog
box, select / find the PST files that you want to repair. Click Scan Now to start scanning the
selected PST file.
2. The time required for scanning depends on the size of the selected PST file. You can stop the
scanning process by clicking Stop button, which appears during the scanning process.
3. After completion of the scanning process, The Saviour PST Repair - Technician application
window shows the preview of the PST file. The repaired file, along with its original content is
shown in a three-pane structure.
All repaired folders with number of files in them will be listed in the left-pane, under the root node.
Click on a folder to view its emails. Click an email to view its content. In addition to emails,
calendar, contacts, tasks, notes, and journals can also be viewed by clicking on their respective
tabs.
To switch between vertical and horizontal reading panes, click Switch Reading Pane icon in View
Menu.
4. To save the repaired PST file, click Save Repaired File icon in File Menu. The Saviour PST
Repair - Technician dialog box opens. Click Browse.
5. In Browse for Folder dialog box, select the location where you want to save the repaired PST
file. Click OK.
6. The PST file will be saved at your specified location. You will need to import the repaired PST file
to MS Outlook in order to use it.
Note: You can stop the scan and repair process individually. If you stop the scanning process, then no
files will be recovered. If you stop the repairing process, then those files will be shown, that were repaired
until the process was stopped. Also, Microsoft Outlook should be closed before saving the repaired PST
file.

Find, View and Save a Single Message
The Saviour PST Repair - Technician allows you to find and repair a particular message from the PST
file. The software offers a Find Message feature, which helps you narrow the search using various
search options. You can save a message directly from the search result in MSG, EML, RTF, HTML or
PDF format.
Find Message
To find messages:
1. Click on Find Message
icon in File Menu. Find
Message dialog box opens.
2. Specify the search criteria
in Find Message dialog
box.
In To field, specify all or
few characters of email
ids of recipients. Key
words should be
separated by a
semicolon (;).
In From field, specify all
or few characters of
email ids of senders.
Key words should be
separated by a
semicolon (;).
In Subject field, specify
the subject that you
need to search.
If you want to search for
emails sent or received
on a particular date,
select Select Date
Field checkbox, and
select date from Date
drop box.
3. Click Find Now button
to start search.
To view messages:
1. After the search is complete, a list of emails that match the search criteria is shown.
2. Double-click on an email to open it in a new window.
To save messages:
To save any message from the search result list, simply right-click on it and:
o Select Save as MSG to save the message in MSG format.
o Select Save as EML to save the message in EML format.
o Select Save as RTF to save the message in RTF format.
o Select Save as HTML to save the message in HTML format.
o Select Save as PDF to save the message in PDF format.
Or,
Select an appropriate format from The Saviour PST Repair - Technician to save the message
and click OK.
o Select Save as MSG to save the message in MSG format.
o Select Save as EML to save the message in EML format.
o Select Save as RTF to save the message in RTF format.
o Select Save as HTML to save the message in HTML format.
o Select Save as PDF to save the message in PDF format.
o Select Save as DBX to save the message in DBX format.

Note: DBX files will be saved at the default location of Outlook Express with original tree hierarchy.
Launch Outlook Express to view the repaired data from the newly created DBX files. Also the default
location of Outlook Express must have free space more than that of the original PST file. The files
created at the destination path selected by you will have temporary files which you can remove later
on.
o Select Save as MBOX to save the message in MBOX format.
You need to import the message in MS Outlook in order to view it.
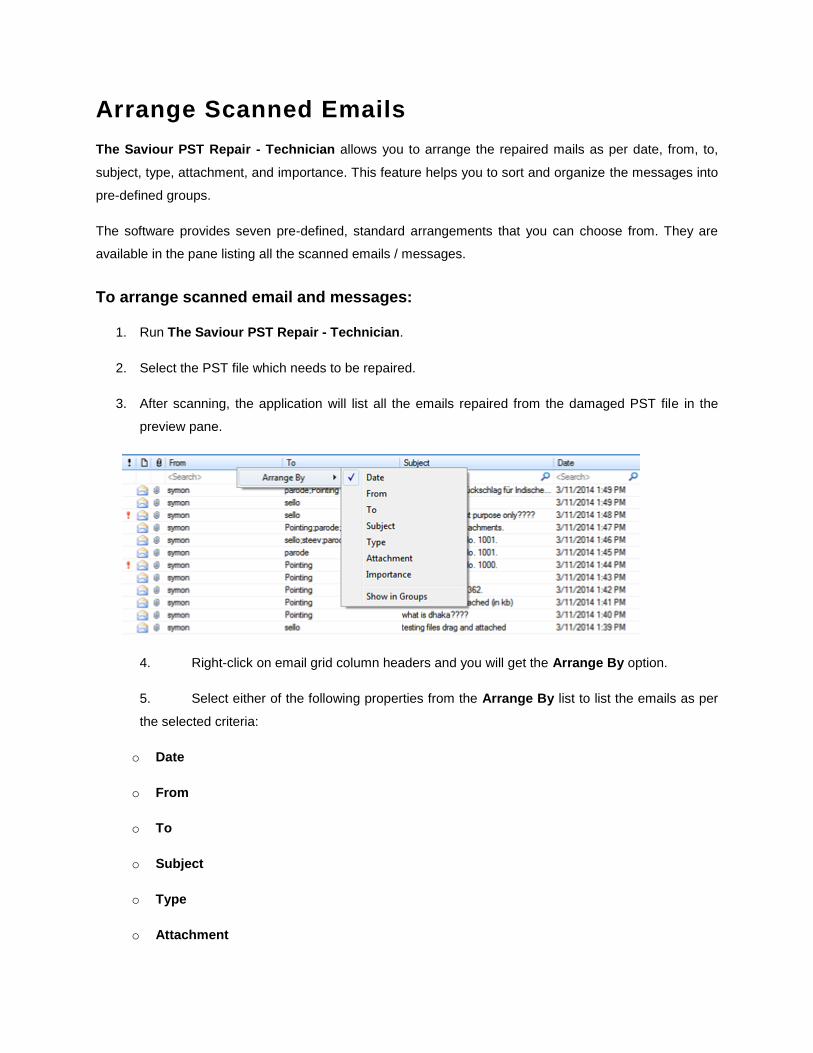
Arrange Scanned Emails
The Saviour PST Repair - Technician allows you to arrange the repaired mails as per date, from, to,
subject, type, attachment, and importance. This feature helps you to sort and organize the messages into
pre-defined groups.
The software provides seven pre-defined, standard arrangements that you can choose from. They are
available in the pane listing all the scanned emails / messages.
To arrange scanned email and messages:
1. Run The Saviour PST Repair - Technician.
2. Select the PST file which needs to be repaired.
3. After scanning, the application will list all the emails repaired from the damaged PST file in the
preview pane.
4. Right-click on email grid column headers and you will get the Arrange By option.
5. Select either of the following properties from the Arrange By list to list the emails as per
the selected criteria:
o Date
o From
o To
o Subject
o Type
o Attachment
o Importance
o Show in Groups
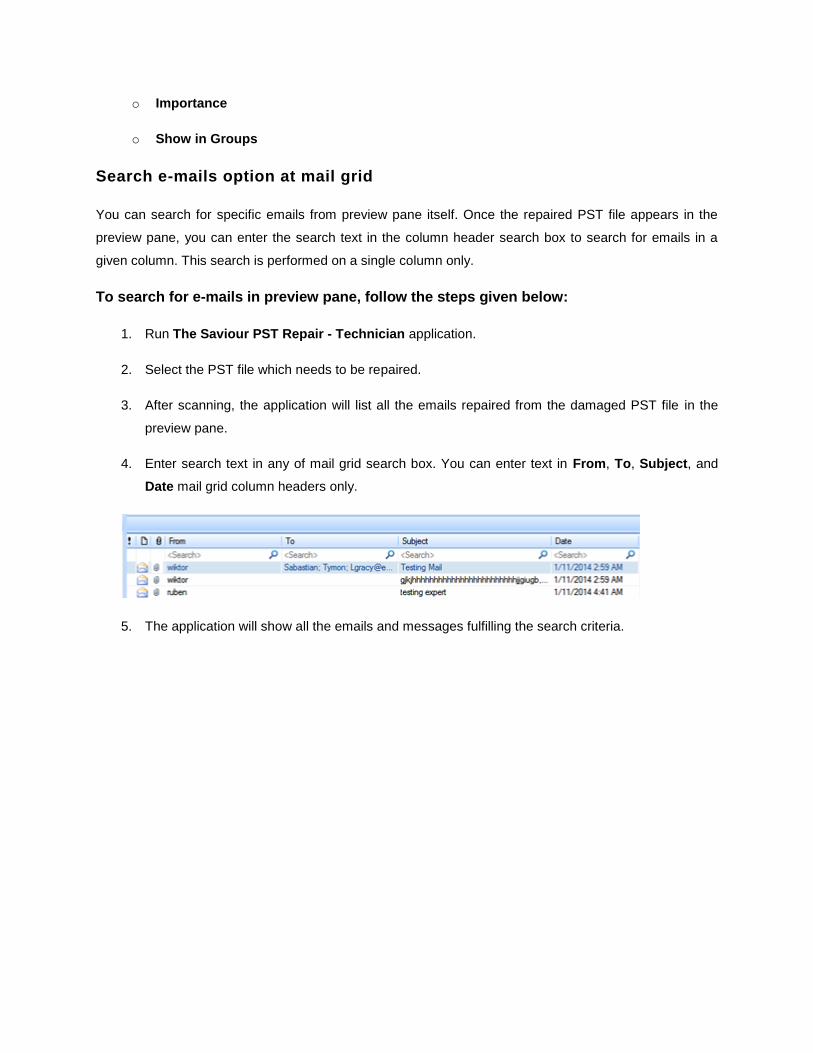
Search e-mails option at mail grid
You can search for specific emails from preview pane itself. Once the repaired PST file appears in the
preview pane, you can enter the search text in the column header search box to search for emails in a
given column. This search is performed on a single column only.
To search for e-mails in preview pane, follow the steps given below:
1. Run The Saviour PST Repair - Technician application.
2. Select the PST file which needs to be repaired.
3. After scanning, the application will list all the emails repaired from the damaged PST file in the
preview pane.
4. Enter search text in any of mail grid search box. You can enter text in From, To, Subject, and
Date mail grid column headers only.
5. The application will show all the emails and messages fulfilling the search criteria.

Import PST file in MS Outlook
To import PST file in Microsoft Outlook 2010 / 2013 / 2016:
1. Open Microsoft Outlook. From File Menu, select Open -> Import. (For MS Outlook 2013 / 2016,
select Open and Import from File Menu).
2. From Import and Export Wizard window, select Import from another program or file, click
Next.
3. In Import a File dialog box, select Outlook Data File (.PST), click Next.
4. Click Browse to locate the PST file that needs to be imported. In the options box, select an
appropriate option. Click Next.
5. In Import Outlook Data File dialog box, select the folders that should be imported in Microsoft
Outlook. Click Finish.
To import PST file in Microsoft Outlook 2007 / 2003:
1. Open Microsoft Outlook. From File menu, select Import and Export.
2. From Import and Export Wizard window, select Import from another program or file, click
Next.
3. In Import a File dialog box, select Personal Folder File (PST), click Next.
4. Click Browse to locate the PST file that needs to be imported. In the options box, select an
appropriate option. Click Next.
5. In Import Personal Folders dialog box, select the folders that should be imported in Microsoft
Outlook. Click Finish.
Read MSG, EML, RTF, HTML and PDF Files
To read an e-mail saved as a MSG file:
1. Navigate to the location where MSG file is saved or click on the link displayed in success
message dialog box.
2. Double-click to open the file as a regular e-mail in MS Outlook window.
To read an e-mail saved as an EML file:
1. Navigate to the location where EML file is saved or click on the link displayed in success message
dialog box.
2. Double-click to open the file as a regular e-mail in MS Outlook window.
To read an e-mail saved as a RTF file:
1. Navigate to the location where RTF file is saved or click on the link displayed in success message
dialog box.
2. Double-click to open the file in Wordpad.
To read an e-mail saved as a HTML file:
1. Navigate to the location where HTML file is saved or click on the link displayed in success
message dialog box.
2. Double-click to open the file in your default browser.
To read an e-mail saved as a PDF file:
1. Navigate to the location where PDF file is saved or click on the link displayed in success message
dialog box.
2. Double-click to open the file in a PDF file reader.

Compact and Save PST Files
The Saviour PST Repair - Technician software compresses the PST files and decrease the size
acquired by them in the disk. This enhances greater use of memory and also saves PST files from being
corrupted.
To compact a PST file, follow the steps given below:
1. Run The Saviour PST Repair - Technician software.
2. Select an Outlook Mailbox (PST file) and click Scan Now.
3. After all the folders and their items are listed, click on Save Repaired File button from File menu.
A dialog box with various saving option appears.
4. From the dialog box, choose a format (either PST, MSG, EML, RTF, HTML, PDF, DBX or
MBOX) in which you want to save the data from the scanned PST file, from the Save Options
section.
5. From Advance Options section, choose Compact and Save PST option. Another dialog box will
open.
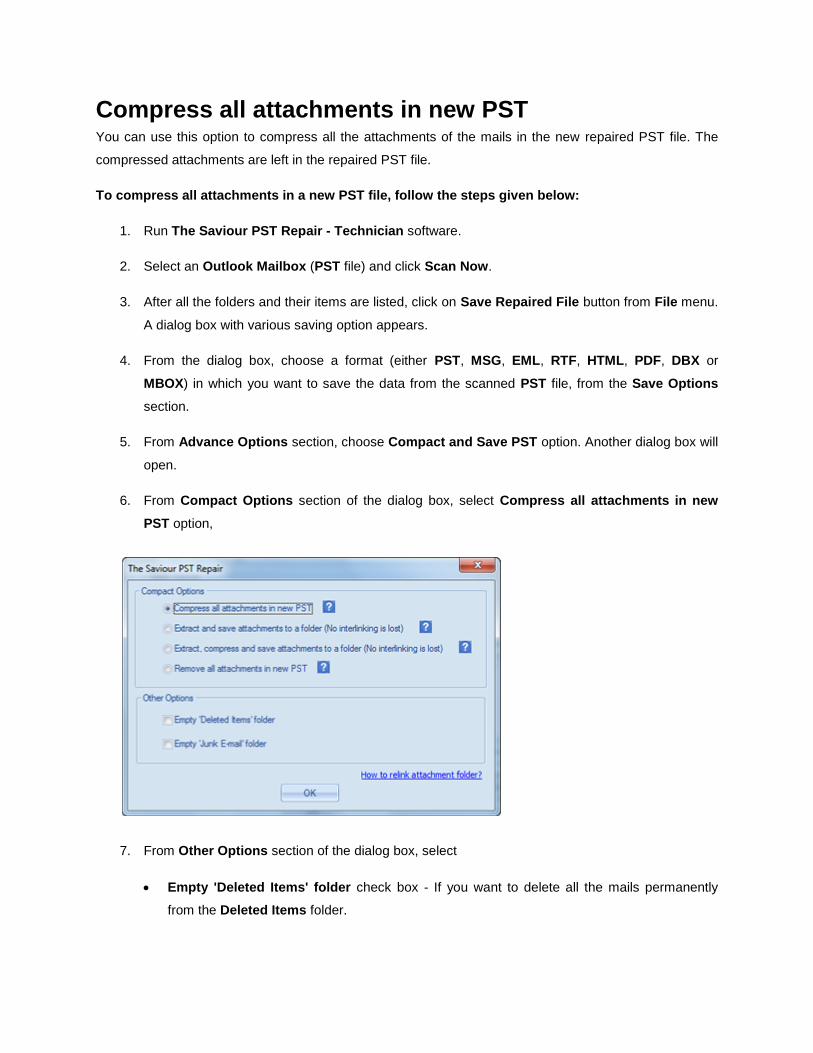
6. From Compact Options section of the dialog box, select any one from the following four options:
Compress all attachments in new PST
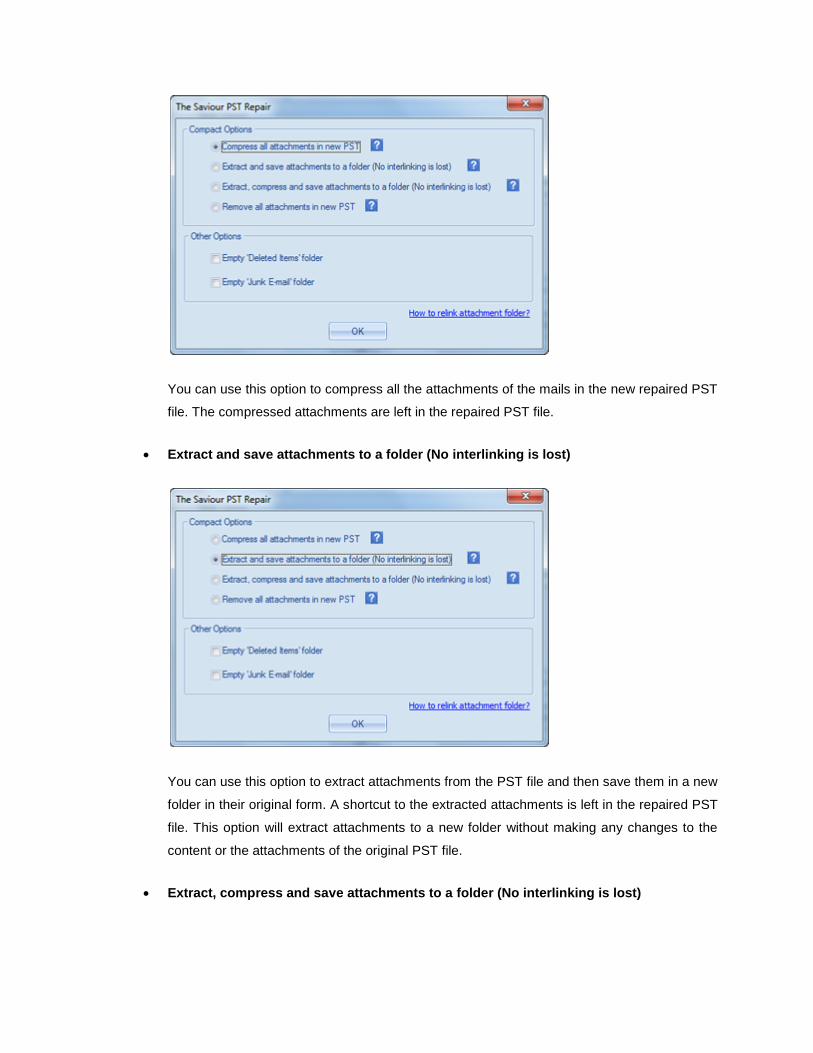
You can use this option to compress all the attachments of the mails in the new repaired PST
file. The compressed attachments are left in the repaired PST file.
Extract and save attachments to a folder (No interlinking is lost)
You can use this option to extract attachments from the PST file and then save them in a new
folder in their original form. A shortcut to the extracted attachments is left in the repaired PST
file. This option will extract attachments to a new folder without making any changes to the
content or the attachments of the original PST file.
Extract, compress and save attachments to a folder (No interlinking is lost)

You can use this option to extract attachments from the PST file, compress them and then
save them in a new folder in compressed format. A shortcut to the extracted attachments is
left in repaired PST file.
Remove all attachments to new PST
You can use this option to remove all the attachments in repaired PST file. This option retains
only the mail but not any of its attachments. No changes are made to the original PST file.
7. From Other Options section of the dialog box, select

Empty 'Deleted Items' folder check box - If you want to delete all the mails permanently
from the Deleted Items folder.
Empty 'Junk E-mail' folder check box - If you want to delete all the mails permanently from
the Junk E-mail folder.
8. Click OK and you will go back to the previous dialog box.
9. Select a Destination Path using Browse button to specify where to save the repaired PST file.
10. Click OK. A progress dialog box will indicate the status of compaction process. You can click on
Stop button anytime to abort the process.
11. On successful completion of compact process, a message box displays the repaired PST file's
location. Click OK.
Compress all attachments in new PST
You can use this option to compress all the attachments of the mails in the new repaired PST file. The
compressed attachments are left in the repaired PST file.
To compress all attachments in a new PST file, follow the steps given below:
1. Run The Saviour PST Repair - Technician software.
2. Select an Outlook Mailbox (PST file) and click Scan Now.
3. After all the folders and their items are listed, click on Save Repaired File button from File menu.
A dialog box with various saving option appears.
4. From the dialog box, choose a format (either PST, MSG, EML, RTF, HTML, PDF, DBX or
MBOX) in which you want to save the data from the scanned PST file, from the Save Options
section.
5. From Advance Options section, choose Compact and Save PST option. Another dialog box will
open.
6. From Compact Options section of the dialog box, select Compress all attachments in new
PST option,
7. From Other Options section of the dialog box, select
Empty 'Deleted Items' folder check box - If you want to delete all the mails permanently
from the Deleted Items folder.

Empty 'Junk E-mail' folder check box - If you want to delete all the mails permanently from
the Junk E-mail folder.
8. Click OK and you will go back to the previous dialog box.
9. Select a Destination Path using Browse button to specify where to save the repaired PST file.
10. Click OK. A progress dialog box will indicate the status of compaction process. You can click on
Stop button anytime to abort the process.
11. On successful completion of compact process, a message box displays the repaired PST file's
location. Click OK.
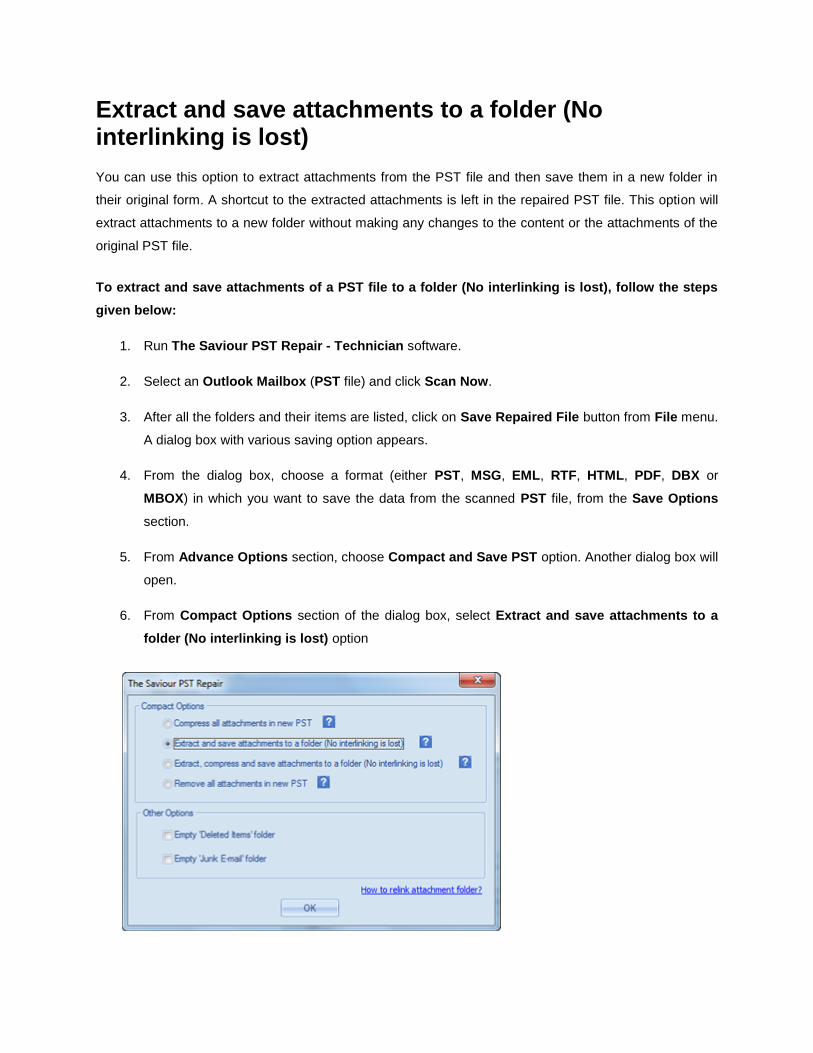
Extract and save attachments to a folder (No interlinking is lost)
You can use this option to extract attachments from the PST file and then save them in a new folder in
their original form. A shortcut to the extracted attachments is left in the repaired PST file. This option will
extract attachments to a new folder without making any changes to the content or the attachments of the
original PST file.
To extract and save attachments of a PST file to a folder (No interlinking is lost), follow the steps
given below:
1. Run The Saviour PST Repair - Technician software.
2. Select an Outlook Mailbox (PST file) and click Scan Now.
3. After all the folders and their items are listed, click on Save Repaired File button from File menu.
A dialog box with various saving option appears.
4. From the dialog box, choose a format (either PST, MSG, EML, RTF, HTML, PDF, DBX or
MBOX) in which you want to save the data from the scanned PST file, from the Save Options
section.
5. From Advance Options section, choose Compact and Save PST option. Another dialog box will
open.
6. From Compact Options section of the dialog box, select Extract and save attachments to a
folder (No interlinking is lost) option
7. From Other Options section of the dialog box, select
Empty 'Deleted Items' folder check box - If you want to delete all the mails permanently
from the Deleted Items folder.
Empty 'Junk E-mail' folder check box - If you want to delete all the mails permanently from
the Junk E-mail folder.
8. Click OK and you will go back to the previous dialog box.
9. Select a Destination Path using Browse button to specify where to save the repaired PST file.
10. Click OK. A progress dialog box will indicate the status of compaction process. You can click on
Stop button anytime to abort the process.
11. On successful completion of compact process, a message box displays the repaired PST file's
location. Click OK.

Extract, compress and save attachments to a folder (No interlinking is lost)
You can use this option to extract attachments from the PST file, compress them and then save them in a
new folder in compressed format. A shortcut to the extracted attachments is left in repaired PST file.
To extract, compress and save attachments of a PST file to a folder (No interlinking is lost), follow
the steps given below:
1. Run The Saviour PST Repair - Technician software.
2. Select an Outlook Mailbox (PST file) and click Scan Now.
3. After all the folders and their items are listed, click on Save Repaired File button from File menu.
A dialog box with various saving option appears.
4. From the dialog box, choose a format (either PST, MSG, EML, RTF, HTML, PDF, DBX or
MBOX) in which you want to save the data from the scanned PST file, from the Save Options
section.
5. From Advance Options section, choose Compact and Save PST option. Another dialog box will
open.
6. From Compact Options section of the dialog box, Extract, compress and save attachments to
a folder (No interlinking is lost) option
7. From Other Options section of the dialog box, select

Empty 'Deleted Items' folder check box - If you want to delete all the mails permanently
from the Deleted Items folder.
Empty 'Junk E-mail' folder check box - If you want to delete all the mails permanently from
the Junk E-mail folder.
8. Click OK and you will go back to the previous dialog box.
9. Select a Destination Path using Browse button to specify where to save the repaired PST file.
10. Click OK. A progress dialog box will indicate the status of compaction process. You can click on
Stop button anytime to abort the process.
11. On successful completion of compact process, a message box displays the repaired PST file's
location. Click OK.

Remove all attachments in new PST
You can use this option to remove all the attachments in repaired PST file. This option retains only the
mail but not any of its attachments. No changes are made to the original PST file.
To compact a PST file, follow the steps given below:
1. Run The Saviour PST Repair - Technician software.
2. Select an Outlook Mailbox (PST file) and click Scan Now.
3. After all the folders and their items are listed, click on Save Repaired File button from File menu.
A dialog box with various saving option appears.
4. From the dialog box, choose a format (either PST, MSG, EML, RTF, HTML, PDF, DBX or
MBOX) in which you want to save the data from the scanned PST file, from the Save Options
section.
5. From Advance Options section, choose Compact and Save PST option. Another dialog box will
open.
6. From Compact Options section of the dialog box, select Remove all attachments in new PST
option
7. From Other Options section of the dialog box, select

Empty 'Deleted Items' folder check box - If you want to delete all the mails permanently
from the Deleted Items folder.
Empty 'Junk E-mail' folder check box - If you want to delete all the mails permanently from
the Junk E-mail folder.
8. Click OK and you will go back to the previous dialog box.
9. Select a Destination Path using Browse button to specify where to save the repaired PST file.
10. Click OK. A progress dialog box will indicate the status of compaction process. You can click on
Stop button anytime to abort the process.
11. On successful completion of compact process, a message box displays the repaired PST file's
location. Click OK.

Relink Attachment Folder
Once you install The Saviour PST Repair - Technician software, you also get a software called The
Saviour Attachment Links Updater - Technical. You will need this software to relink the attachment
folder when you move it after using Extract and save attachments to a folder (No interlinking is lost)
or Extract, compress and save attachments to a folder (No interlinking is lost) option.
Note: You can move the attachments folder to a different location on the same local machine or you can
move both the repaired PST file and the attachments folder to another machine. This software will link the
attachments folder to the PST file in both these scenarios.
In these two cases, you can use The Saviour Attachment Links Updater - Technical software to relink
the attachments to the mails.
Follow the steps given below to update the attachment links of the repaired emails:
1. Go to Start -> Programs -> The Saviour PST Repair - Technician -> The Saviour Attachment
Links Updater - Technical. A Relink Attachment Folder dialog box will appear.
2. Click on Select PST and Select Folder button to browse to and select the repaired PST file and
it's attachment folder.
3. Click on Relink Attachment button to relink the attachments to the mails.

Split and Save PST Files
You can split a PST file according to mail ids, date and/or size. Splitting a PST file according to mail ids or
date will create a single PST file which will have data as per the criteria selected by you. Splitting a PST
file by size means that you can split a PST file into many PST files of preset size. You can also split a
large PST file by pre-defined sizes of 500 / 1000 / 1500 or 2000 MB files.
For splitting By Mail ID option, you must always select at least one mail Id for splitting the PST file.
To Split PST files:
1. Run The Saviour PST Repair - Technician software.
2. Select an Outlook Mailbox (PST file) and click Scan Now.
3. After the folders and their items are listed, click on Save Repaired File button from File menu. A
dialog box with various saving option appears.
4. From the dialog box, choose a format (either PST, MSG, EML, RTF, HTML, PDF, DBX or
MBOX) in which you want to save the data from the scanned PST file, from the Save Options
section.
5. From Advance Options section, choose Split and Save PST option. Another dialog box will
open.
6. From Split PST File dialog box,
in By Mail ID section, select e-mail ids under Mail ID scroll box to split the PST file according
to e-mail ids. Alternatively, you can also use the Select All / Unselect All buttons to select /
unselect all the email ids. All selected email ids will be stored in the repaired PST file and no
change is made to the source PST file.
in By Date Range section, select Split By Date Range checkbox and then select either of
the two options:
o Select in the last radio option if you want to split the PST file according to months. All e-
mails that are send and received in the specified months will be stored in the repaired
PST file.
o Select between radio option if you want to split the PST file according to a specific time
period. All e-mails from the specific time period will be stored in the repaired PST file.
Select the start and end date from the list boxes.

in By Size section, select By Size checkbox and then select a size from the Select Size drop
down list to split the PST file according to preset sizes. By using this option you will get
multiple split PST files. You can choose the split file size to be either 500, 1000, 1500 or 2000
MB.
Note: In case you select all the three split option check boxes (By Mail Id, By Date Range and By
Size), application will queue them and will split PST files using all the three methods.
7. Click Apply Settings and you will go back to the previous dialog box.
8. Select a Destination Path using Browse button to specify where to save the repaired PST file.
9. Click OK. A progress dialog box will indicate the status of split process. You can click on Stop
button anytime to abort the process.
10. On successful completion of split process, a message box displays the repaired PST file's
location. Click OK.
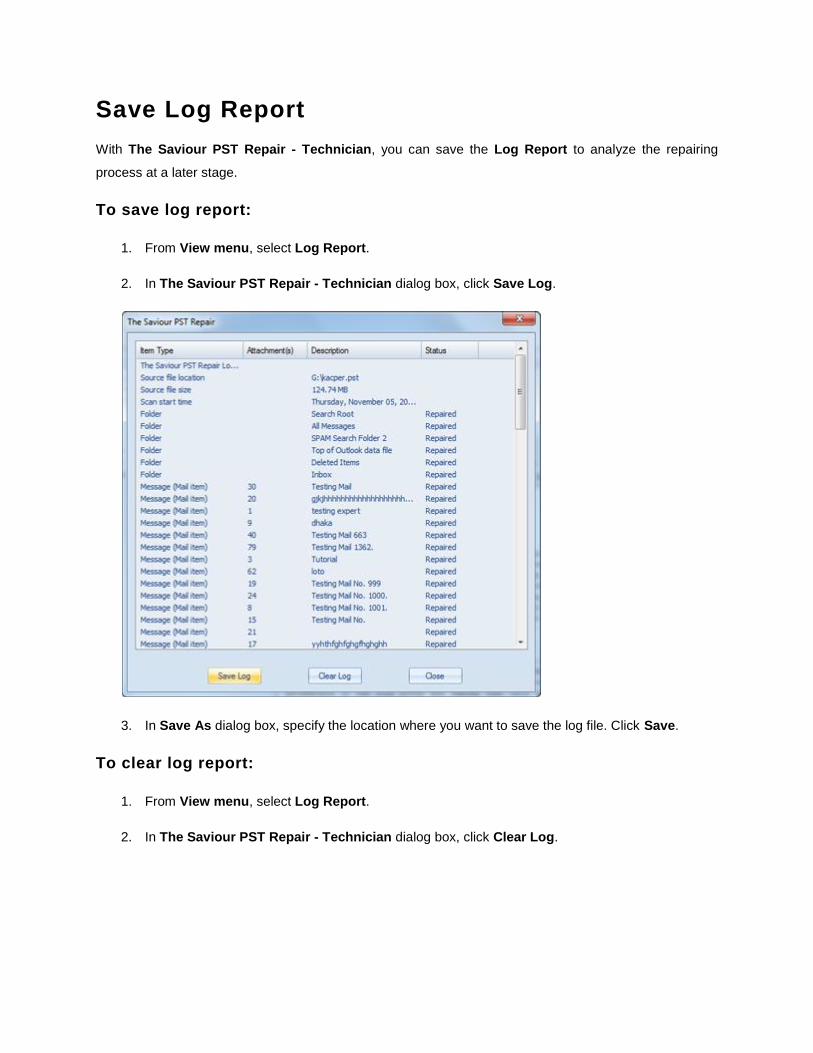
Save Log Report
With The Saviour PST Repair - Technician, you can save the Log Report to analyze the repairing
process at a later stage.
To save log report:
1. From View menu, select Log Report.
2. In The Saviour PST Repair - Technician dialog box, click Save Log.
3. In Save As dialog box, specify the location where you want to save the log file. Click Save.
To clear log report:
1. From View menu, select Log Report.
2. In The Saviour PST Repair - Technician dialog box, click Clear Log.
FAQs
1. Can I save repaired the PST files in any other format?
Yes absolutely, The Saviour PST Repair - Technician can save repaired messages in MSG,
EML, RTF, PDF, HTML, DBX and MBOX formats as well.
2. I have forgotten the path of my PST file. Can this application search it for me?
Yes, the application can look for PST file on your system and find it for you easily. There is a
dedicated Find PST option in the application through which you can locate a particular PST and
run repair on it.
3. I had run demo and can see preview correctly in PST Repair software window. Do I need to
rescan the corrupted file?
Not at all, through the Demo version you can preview repaired file after scanning. This special
feature has been included in the tool to make sure that you are able to first preview the repair
results on your damaged PST file and only after you are satisfied with the results, you should
decide on making the purchase and saving your repaired files.
4. I repaired my PST file, but I’m unable to open my Outlook after repair. How can I solve this
problem?
That can happen but we are sure if you follow the steps below you can easily resolve this:
Open Windows -> Control Panel.
Double click Mail. In Mail Setup dialog box, select E-mail Accounts to configure your
email account.
After configuring, close the dialog box and open MS Outlook.
To view the repaired PST file, you can either select Open -> Outlook Data File from File
Menu or, Import the PST file in MS Outlook.
5. How much time will the Outlook PST Repair software take to repair a PST file?
The scanning time depends upon the corruption level and size of PST file. If the process is
running that means that software is still scanning the corrupted file and you have to wait for this
scanning process to complete. Once scanning has been completed you will be able to save the
repaired file at a desired location.

6. I have repaired my corrupt PST file. But I’m unable to find my contacts. How can I find
them?
You can easily locate and access your contacts by following these simple steps:
Import your repaired PST file into MS Outlook.
Open MS Outlook.
Then press "Ctrl+Shift+F".
"Find Message / Advanced Find" window will open. Please select "Contacts" under
"Look For" tab.
Click on the "Browse" button and select the imported PST file.
Then, click "Find Now".
Now you will be able to see all the contacts that you were able to preview with the
software’s Demo Version. You may select the entire contacts listed and drag it to your
original contacts list, so that you may use it further.
7. Can I repair a corrupt PST file of size more than 2 GB ?
Absolutely yes, this tool is capable of repairing PST files that are more than 2 GB. Please
download the demo version and scan your PST file. You can preview all emails and other mailbox
items which can be recovered through this tool.
8. I want to analyze the repair process. Can I see the log report at a later stage?
Certainly. The application gives you an option to save and view log reports at any point of time.
To view and save log reports just follow the following steps:
On View menu, select 'View Log Report'.
In The Saviour PST Repair - Technician dialog box, click 'Save Log' and save it at a
desired location for viewing it anytime.
9. What does the compact feature of The Saviour PST Repair - Technician do?
As the name suggests, the compact feature of The Saviour PST Repair - Technician application
helps in reducing the size of PST files and attachments on MS Exchange Server. It has various
options for attachments of mails that can be selected for compaction and extraction.
10. Why do I need to compact PST files?

MS Outlook stores all data like e-mails, personal data, calendar, tasks, etc. in a PST file.
Eventually the file becomes over sized. Such PST files are prone to corruption, so you need to
compact them. The Saviour PST Repair - Technician has a compaction feature using which you
can compact the PST file.
11. Can I extract all my attachments in a separate folder while compacting the PST file?
Yes, you can extract the attachments in a separate folder. To do this, choose the Extract
attachments and leave shortcuts in mails in Compacting Option before starting the compact
process. The attachments are left as shortcut links in the mails.
12. Can I restore the links of attachments to the PST file?
Yes, you can restore the links by using the The Saviour Attachments Links Updater -
Technical application which is installed with The Saviour PST Repair - Technician software.
You will use this option when you separate or move either the PST file or its attachments folder.
13. I want to run the software on select folders of the PST file. Can I choose some selected
mailbox folders in the application?
Yes, you can apply extraction and compaction settings on only the selected folders of the PST
file.
14. In how many ways can I split a PST file using The Saviour PST Repair - Technician
software?
There are three ways in which you can split a PST file using The Saviour PST Repair -
Technician software. They are as follows:
By Mail Id - You can select e-mail ids under Mail Ids scroll box to split the PST file
according to e-mail ids. Alternatively, you can also use the Select All / Unselect All
buttons to select / unselect all the email ids. All selected email ids will be stored in the
repaired PST file and no change is made to the source PST file.
By Date Range - You can select Split By Date Range checkbox and then select either of
the two options:
o Select in the last radio option if you want to split the PST file according to months. All
e-mails that are send and received in the specified months will be stored in the repaired
PST file.

o Select between radio option if you want to split the PST file according to a specific time
period. All e-mails from the specific time period will be stored in the repaired PST file.
Select the start and end date from the list boxes.
By Size - You can select By Size checkbox and then select a size from the Select Size
drop down list to split the PST file according to preset sizes. By using this option you will
get multiple split PST files. You can choose the split file size to be either 500, 1000, 1500 or
2000 MB.
Note: In case you select all the three split option check boxes (By Mail Id, By Date Range and By
Size), application will queue them and will split PST files using all the three methods.
Legal Notices
Copyright
The Saviour PST Repair - Technician software, accompanied user manual and documentation are
copyright of The Saviour with all rights reserved. Under the copyright laws, this user manual cannot be
reproduced in any form without the prior written permission of The Saviour. No Patent Liability is
assumed, however, with respect to the use of the information contained herein.
Copyright © The Saviour. INDIA
All rights reserved.
Disclaimer
The Information contained in this manual, including but not limited to any product specifications, is subject
to change without notice.
THE SAVIOUR PROVIDES NO WARRANTY WITH REGARD TO THIS MANUAL OR ANY OTHER
INFORMATION CONTAINED HEREIN AND HEREBY EXPRESSLY DISCLAIMS ANY IMPLIED
WARRANTIES OF MERCHANTABILITY OR FITNESS FOR ANY PARTICULAR PURPOSE WITH
REGARD TO ANY OF THE FOREGOING THE SAVIOUR ASSUMES NO LIABILITY FOR ANY
DAMAGES INCURRED DIRECTLY OR INDIRECTLY FROM ANY TECHNICAL OR TYPOGRAPHICAL
ERRORS OR OMISSIONS CONTAINED HEREIN OR FOR DISCREPANCIES BETWEEN THE
PRODUCT AND THE MANUAL. IN NO EVENT SHALL THE SAVIOUR, BE LIABLE FOR ANY
INCIDENTAL, CONSEQUENTIAL SPECIAL, OR EXEMPLARY DAMAGES, WHETHER BASED ON
TORT, CONTRACT OR OTHERWISE, ARISING OUT OF OR IN CONNECTION WITH THIS MANUAL
OR ANY OTHER INFORMATION CONTAINED HEREIN OR THE USE THEREOF.
Trademarks
The Saviour PST Repair -Technician® is a registered trademark of The Saviour.
Windows XP®, Windows 2003®, Windows Vista®, Windows 7®, Windows 8®, Windows 10® are
registered trademarks of Microsoft® Corporation Inc.
All Trademarks Acknowledged.
All other brands and product names are trademarks or registered trademarks of their respective
companies.
License Agreement - The Saviour PST Repair - Technician

The Saviour PST Repair - Technician
Copyright © The Saviour. INDIA
All rights reserved.
All product names mentioned herein are the trademarks of their respective owners.
This license applies to the standard-licensed version of The Saviour PST Repair - Technician.
Your Agreement to this License
You should carefully read the following terms and conditions before using, installing or distributing this
software, unless you have a different license agreement signed by The Saviour.
If you do not agree to all of the terms and conditions of this License then do not copy, install, distribute or
use any copy of The Saviour PST Repair - Technician with which this License is included, you may return
the complete package unused without requesting an activation key within 30 days after purchase for a full
refund of your payment.
The terms and conditions of this License describe the permitted use and users of each Licensed Copy of
The Saviour PST Repair - Technician. For purposes of this License, if you have a valid single-user
license, you have the right to use a single Licensed Copy of The Saviour PST Repair - Technician. If you
or your organization has a valid multi-user license, then you or your organization has the right to use up to
a number of Licensed Copies of The Saviour PST Repair - Technician equal to the number of copies
indicated in the documents issued by The Saviour when granting the license.
Scope of License
Each Licensed Copy of The Saviour PST Repair - Technician may either be used by a single person or
used non-simultaneously by multiple people who use the software personally installed on a single
workstation. This is not a concurrent use license.
All rights of any kind in The Saviour PST Repair - Technician, which are not expressly granted in this
license, are entirely and exclusively reserved to and by The Saviour. You may not rent, lease, modify,
translate, reverse engineer, decompile, disassemble or create derivative works based on The Saviour
PST Repair - Technician nor permit anyone else to do so. You may not make access to The Saviour PST
Repair - Technician available to others in connection with a service bureau, application service provider
or similar business nor permit anyone else to do so.
Warranty Disclaimers and Liability Limitations

The Saviour PST Repair - Technician and all accompanying software, files, data and materials are
distributed and provided AS IS and with no warranties of any kind, whether expressed or implied. In
particular, there is no warranty for the quality of data recovered. You acknowledge that good data
processing procedure dictates that any program including The Saviour PST Repair - Technician must be
thoroughly tested with non-critical data before there is any reliance on it and you hereby assume the
entire risk of all use of the copies of The Saviour PST Repair - Technician covered by this License. This
disclaimer of warranty constitutes an essential part of this License. In addition, in no event does The
Saviour authorize you or anyone else to use The Saviour PST Repair - Technician in applications or
systems where its failure to perform can reasonably be expected to result in a significant physical injury or
in loss of life. Any such use is entirely at your own risk and you agree to hold The Saviour harmless from
any and all claims or losses relating to such unauthorized use.
In no event shall The Saviour or its suppliers be liable for any special, incidental, indirect, or
consequential damages whatsoever (including, without limitation, damages for loss of business profits,
business interruption, loss of business information, or any other pecuniary loss) arising out of the use of
or inability to use the software product or the provision of or failure to provide support services, even if
The Saviour has been advised of the possibility of such damages. In any case, The Saviour’s entire
liability under any provision shall be limited to the amount actually paid by you for the software product.
General
This License is the complete statement of the agreement between the parties on the subject matter and
merges and supersedes all other or prior understandings, purchase orders, agreements and
arrangements. This License shall be governed by the laws of the State of Delhi, India. Exclusive
jurisdiction and venue for all matters relating to this License shall be in courts and fora located in the
State of Delhi, India and you consent to such jurisdiction and venue. There are no third party beneficiaries
of any promises, obligations or representations made by The Saviour herein. Any waiver by The Saviour
of any violation of this License by you shall not constitute nor contribute to a waiver by The Saviour of any
other or future violation of the same provision or any other provision of this License.
Copyright © The Saviour. All rights reserved.