the panty pack skill level: intermediate - pellonprojects.com · graphic artist alexandra henry...
TRANSCRIPT

Graphic Artist Alexandra HenryPERMISSION IS GIVEN TO REPRODUCE FOR PERSONAL USE ONLY ©2012 - PCP Group, LLC
The Panty Pack Skill Level: Intermediate
Fabrics NeededMain fabric for handle and exterior 1/2 yardlining fabric 1/2 yard Materials Needed Pellon® 987F Fusible Fleece 1/2 yardPellon® 542 Stick-N-Washaway™ 1/2 yardPellon® 805 Wonder-Under® 1/2 yardPellon® ST-805 Wonder-Under® Tape Optional 1 Package Dritz™ Fray Check™ (optional) Small bottleAssorted Trims and Ribbon1/4” Grosgrain Ribbon (optional) 1 yard12“ zippers Two3/4” Velcro Four 3/4” x 1 1/2” piecesThreadEmbroidery Thread
Tools NeededEmbroidery MachineSewing Machine and related supplies4 x 4 Embroidery Hoop
What girly girl wouldn’t want a special bag to hold her delicate undies when she travels, especially when that special bag is as cute as this one? The pattern includes detailed instructions with lots of pictures, an applique pattern for the panties, and embroidery �les for the lettering in the most popular formats.
http://www.pellonprojects.com
Designed ByMichelle Dorsey
Sewn ByMichelle Dorsey
Graphic Artist Alexandra HenryPERMISSION IS GIVEN TO REPRODUCE FOR PERSONAL USE ONLY ©2012 - PCP Group, LLC
http://www.pellonprojects.com
The Panty Pack Page 2
Cutting and Assembly Instructions
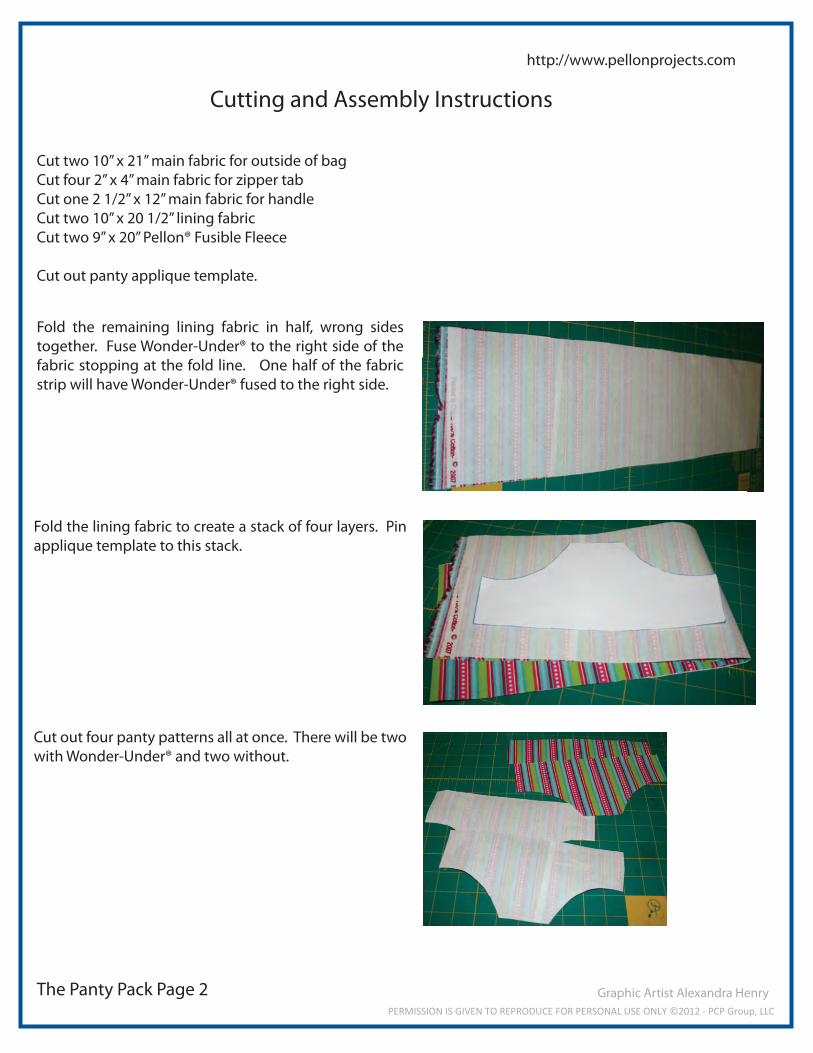
Cut two 10” x 21” main fabric for outside of bagCut four 2” x 4” main fabric for zipper tabCut one 2 1/2” x 12” main fabric for handleCut two 10” x 20 1/2” lining fabricCut two 9” x 20” Pellon® Fusible Fleece
Cut out panty applique template.
Fold the remaining lining fabric in half, wrong sides together. Fuse Wonder-Under® to the right side of the fabric stopping at the fold line. One half of the fabric strip will have Wonder-Under® fused to the right side.
Fold the lining fabric to create a stack of four layers. Pin applique template to this stack.
Cut out four panty patterns all at once. There will be two with Wonder-Under® and two without.
Graphic Artist Alexandra HenryPERMISSION IS GIVEN TO REPRODUCE FOR PERSONAL USE ONLY ©2012 - PCP Group, LLC
http://www.pellonprojects.com
The Panty Pack Page 3
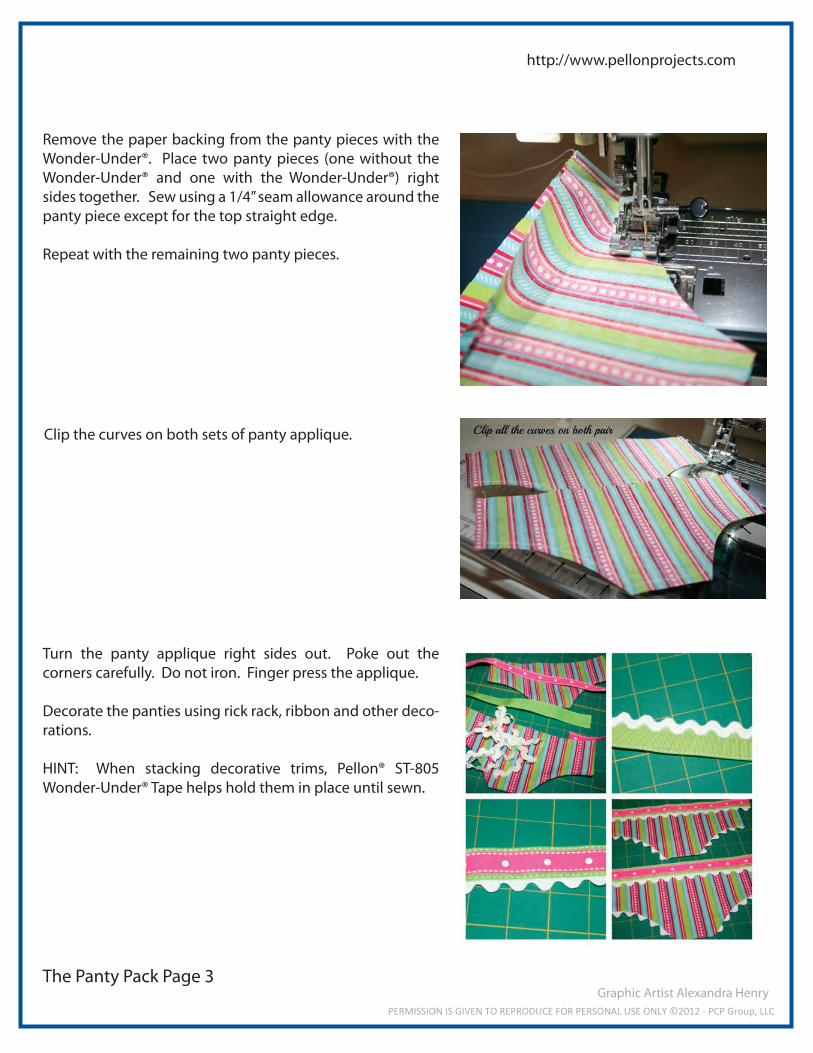
Clip the curves on both sets of panty applique.
Turn the panty applique right sides out. Poke out the corners carefully. Do not iron. Finger press the applique.
Decorate the panties using rick rack, ribbon and other deco-rations.
HINT: When stacking decorative trims, Pellon® ST-805 Wonder-Under® Tape helps hold them in place until sewn.
Remove the paper backing from the panty pieces with the Wonder-Under®. Place two panty pieces (one without the Wonder-Under® and one with the Wonder-Under®) right sides together. Sew using a 1/4” seam allowance around the panty piece except for the top straight edge.
Repeat with the remaining two panty pieces.
Graphic Artist Alexandra HenryPERMISSION IS GIVEN TO REPRODUCE FOR PERSONAL USE ONLY ©2012 - PCP Group, LLC
http://www.pellonprojects.com
The Panty Pack Page 4
Assembling the Body
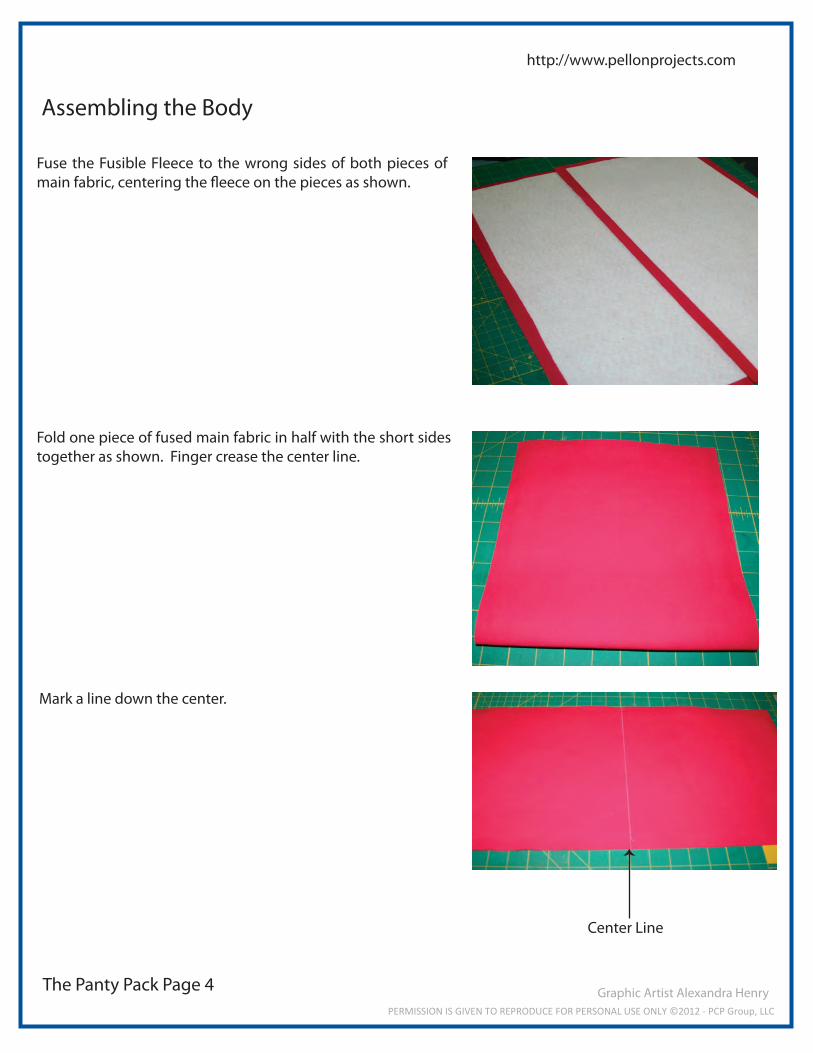
Fuse the Fusible Fleece to the wrong sides of both pieces of main fabric, centering the �eece on the pieces as shown.
Fold one piece of fused main fabric in half with the short sides together as shown. Finger crease the center line.
Mark a line down the center.
Center Line
Graphic Artist Alexandra HenryPERMISSION IS GIVEN TO REPRODUCE FOR PERSONAL USE ONLY ©2012 - PCP Group, LLC
http://www.pellonprojects.com
The Panty Pack Page 5
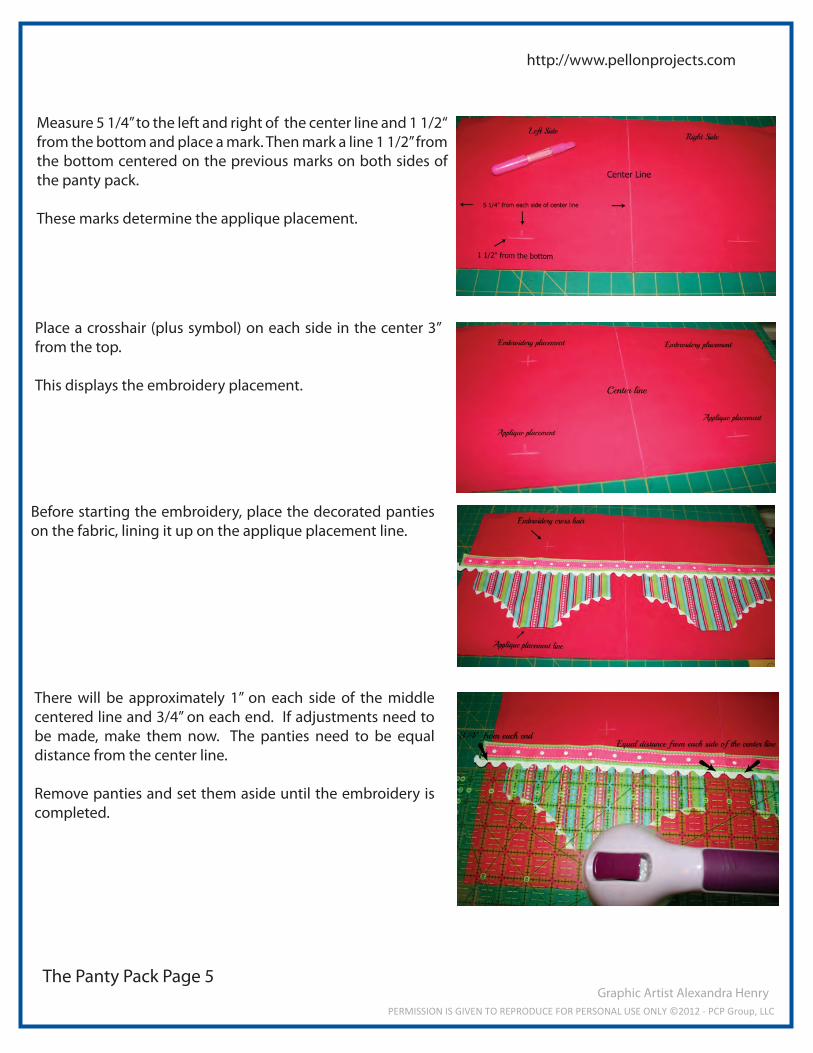
Measure 5 1/4” to the left and right of the center line and 1 1/2“ from the bottom and place a mark. Then mark a line 1 1/2” from the bottom centered on the previous marks on both sides of the panty pack.
These marks determine the applique placement.
Place a crosshair (plus symbol) on each side in the center 3” from the top.
This displays the embroidery placement.
Before starting the embroidery, place the decorated panties on the fabric, lining it up on the applique placement line.
There will be approximately 1” on each side of the middle centered line and 3/4” on each end. If adjustments need to be made, make them now. The panties need to be equal distance from the center line.
Remove panties and set them aside until the embroidery is completed.
Graphic Artist Alexandra HenryPERMISSION IS GIVEN TO REPRODUCE FOR PERSONAL USE ONLY ©2012 - PCP Group, LLC
http://www.pellonprojects.com
The Panty Pack Page 6
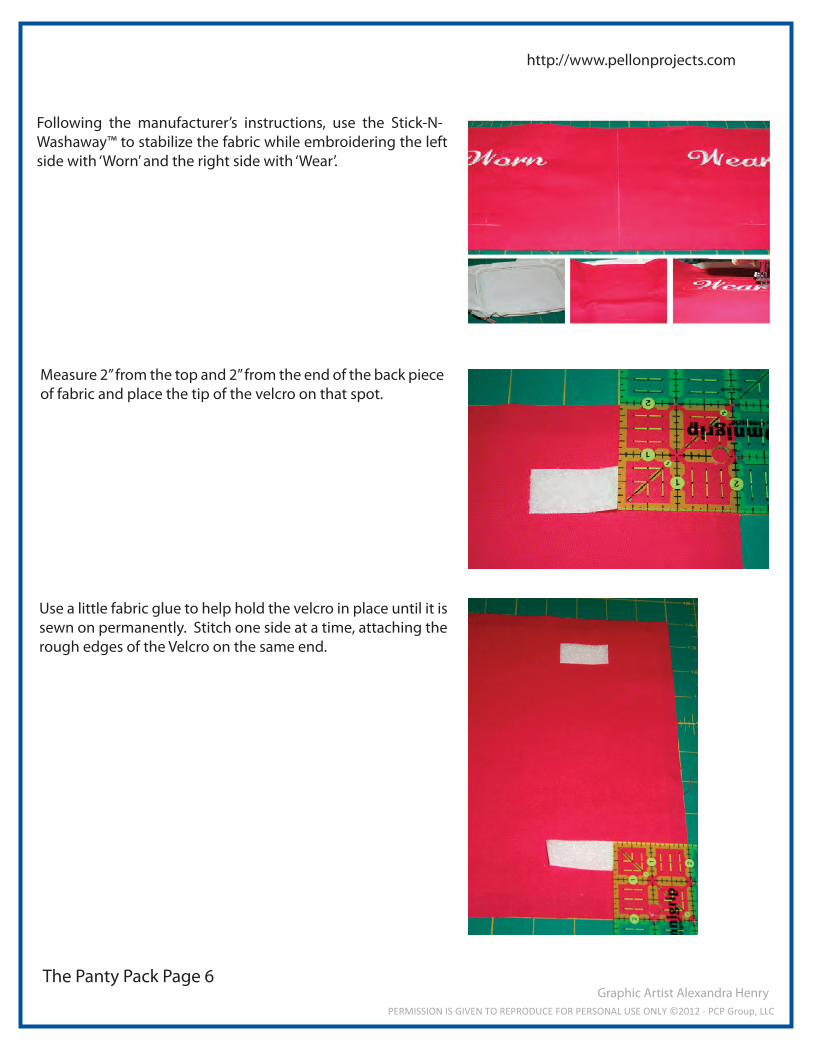
Following the manufacturer’s instructions, use the Stick-N-Washaway™ to stabilize the fabric while embroidering the left side with ‘Worn’ and the right side with ‘Wear’.
Measure 2” from the top and 2” from the end of the back piece of fabric and place the tip of the velcro on that spot.
Use a little fabric glue to help hold the velcro in place until it is sewn on permanently. Stitch one side at a time, attaching the rough edges of the Velcro on the same end.
Graphic Artist Alexandra HenryPERMISSION IS GIVEN TO REPRODUCE FOR PERSONAL USE ONLY ©2012 - PCP Group, LLC
http://www.pellonprojects.com
The Panty Pack Page 7
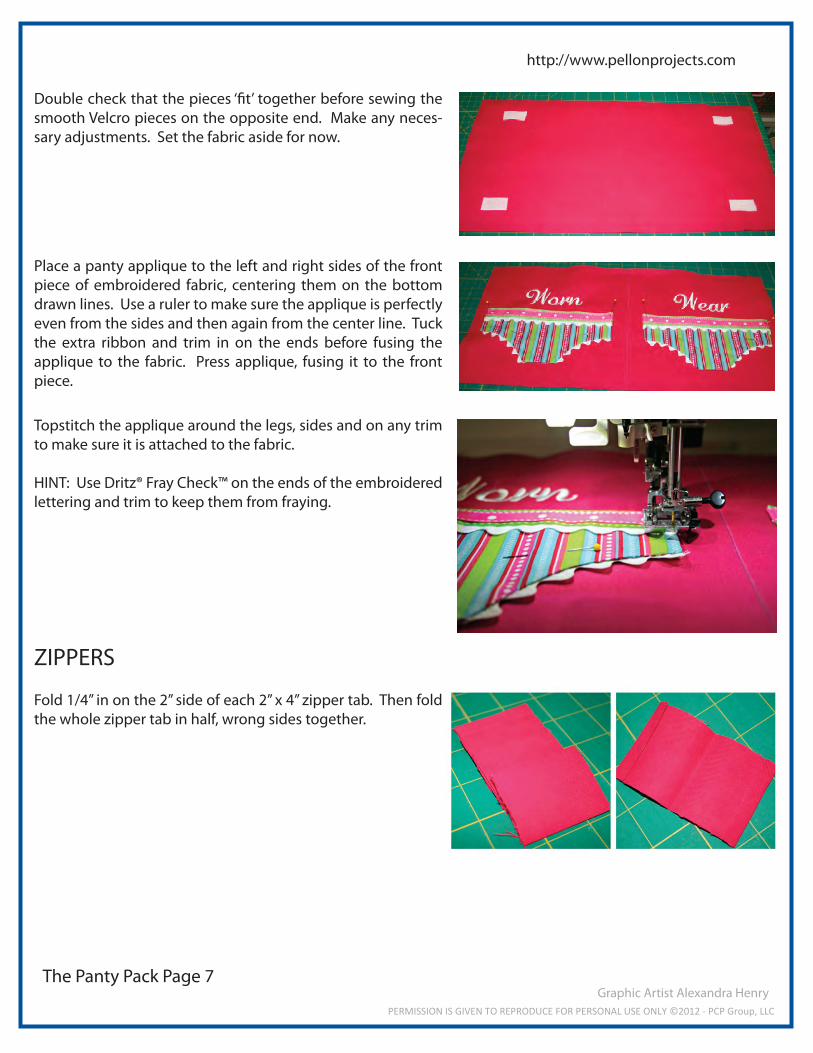
Double check that the pieces ‘�t’ together before sewing the smooth Velcro pieces on the opposite end. Make any neces-sary adjustments. Set the fabric aside for now.
Place a panty applique to the left and right sides of the front piece of embroidered fabric, centering them on the bottom drawn lines. Use a ruler to make sure the applique is perfectly even from the sides and then again from the center line. Tuck the extra ribbon and trim in on the ends before fusing the applique to the fabric. Press applique, fusing it to the front piece.
Topstitch the applique around the legs, sides and on any trim to make sure it is attached to the fabric.
HINT: Use Dritz® Fray Check™ on the ends of the embroidered lettering and trim to keep them from fraying.
ZIPPERS
Fold 1/4” in on the 2” side of each 2” x 4” zipper tab. Then fold the whole zipper tab in half, wrong sides together.
Graphic Artist Alexandra HenryPERMISSION IS GIVEN TO REPRODUCE FOR PERSONAL USE ONLY ©2012 - PCP Group, LLC
http://www.pellonprojects.com
The Panty Pack Page 8
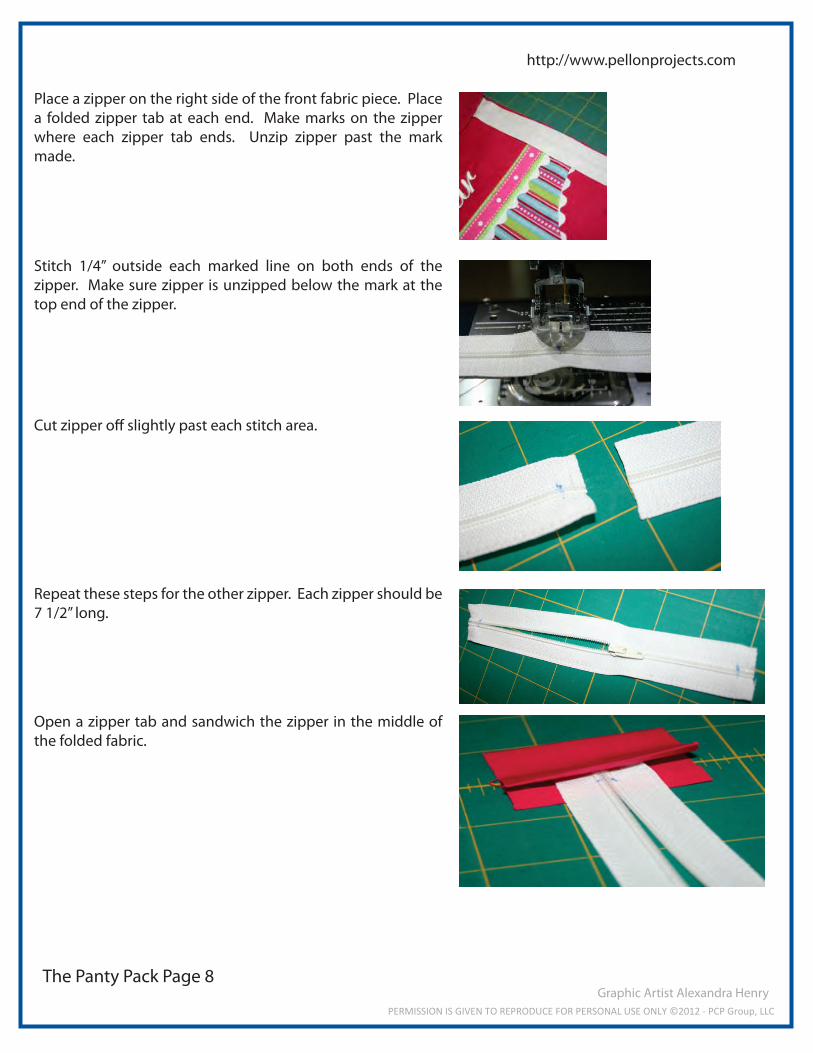
Place a zipper on the right side of the front fabric piece. Place a folded zipper tab at each end. Make marks on the zipper where each zipper tab ends. Unzip zipper past the mark made.
Stitch 1/4” outside each marked line on both ends of the zipper. Make sure zipper is unzipped below the mark at the top end of the zipper.
Cut zipper o� slightly past each stitch area.
Repeat these steps for the other zipper. Each zipper should be 7 1/2” long.
Open a zipper tab and sandwich the zipper in the middle of the folded fabric.
Graphic Artist Alexandra HenryPERMISSION IS GIVEN TO REPRODUCE FOR PERSONAL USE ONLY ©2012 - PCP Group, LLC
http://www.pellonprojects.com
The Panty Pack Page 9
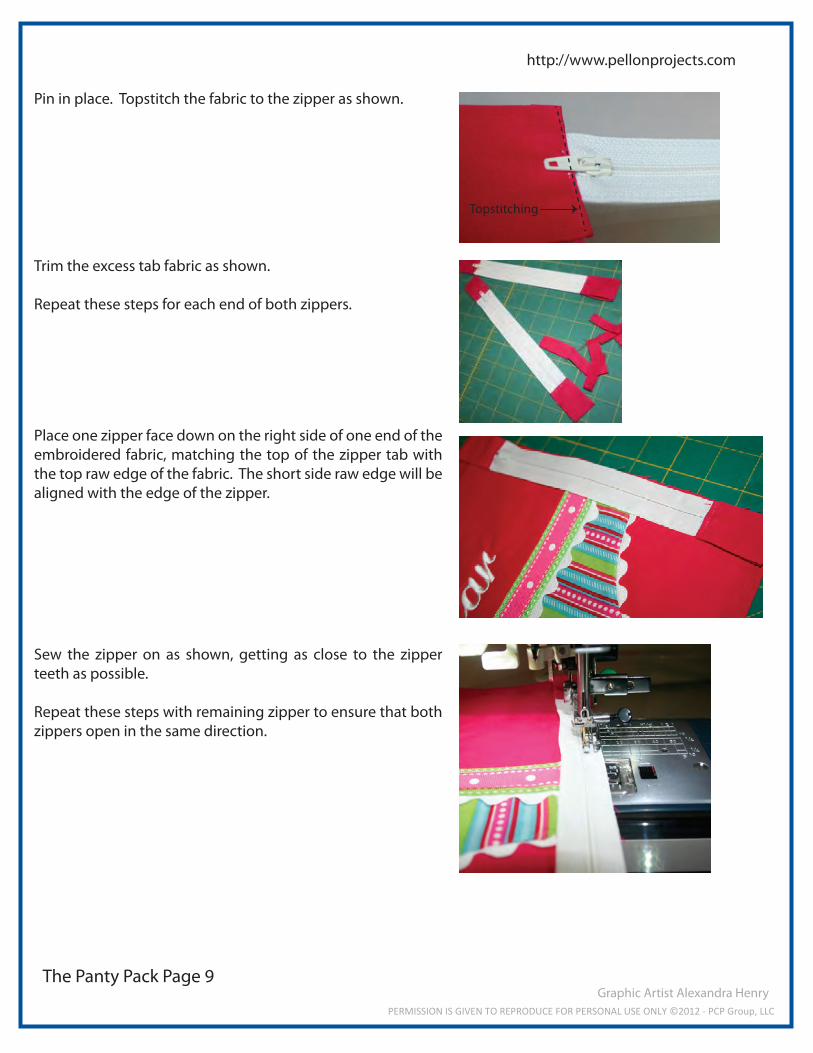
Pin in place. Topstitch the fabric to the zipper as shown.
Trim the excess tab fabric as shown.
Repeat these steps for each end of both zippers.
Place one zipper face down on the right side of one end of the embroidered fabric, matching the top of the zipper tab with the top raw edge of the fabric. The short side raw edge will be aligned with the edge of the zipper.
Sew the zipper on as shown, getting as close to the zipper teeth as possible.
Repeat these steps with remaining zipper to ensure that both zippers open in the same direction.
Topstitching
Graphic Artist Alexandra HenryPERMISSION IS GIVEN TO REPRODUCE FOR PERSONAL USE ONLY ©2012 - PCP Group, LLC
http://www.pellonprojects.com
The Panty Pack Page 10
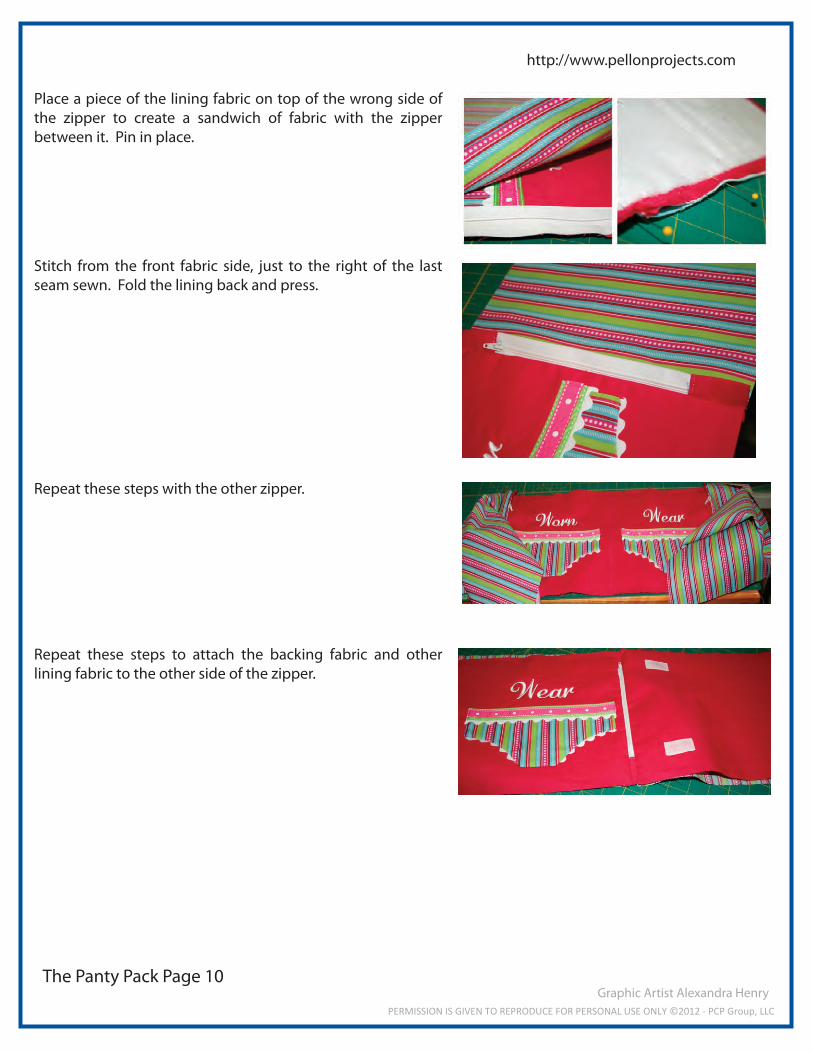
Place a piece of the lining fabric on top of the wrong side of the zipper to create a sandwich of fabric with the zipper between it. Pin in place.
Stitch from the front fabric side, just to the right of the last seam sewn. Fold the lining back and press.
Repeat these steps with the other zipper.
Repeat these steps to attach the backing fabric and other lining fabric to the other side of the zipper.
Graphic Artist Alexandra HenryPERMISSION IS GIVEN TO REPRODUCE FOR PERSONAL USE ONLY ©2012 - PCP Group, LLC
http://www.pellonprojects.com
The Panty Pack Page 11
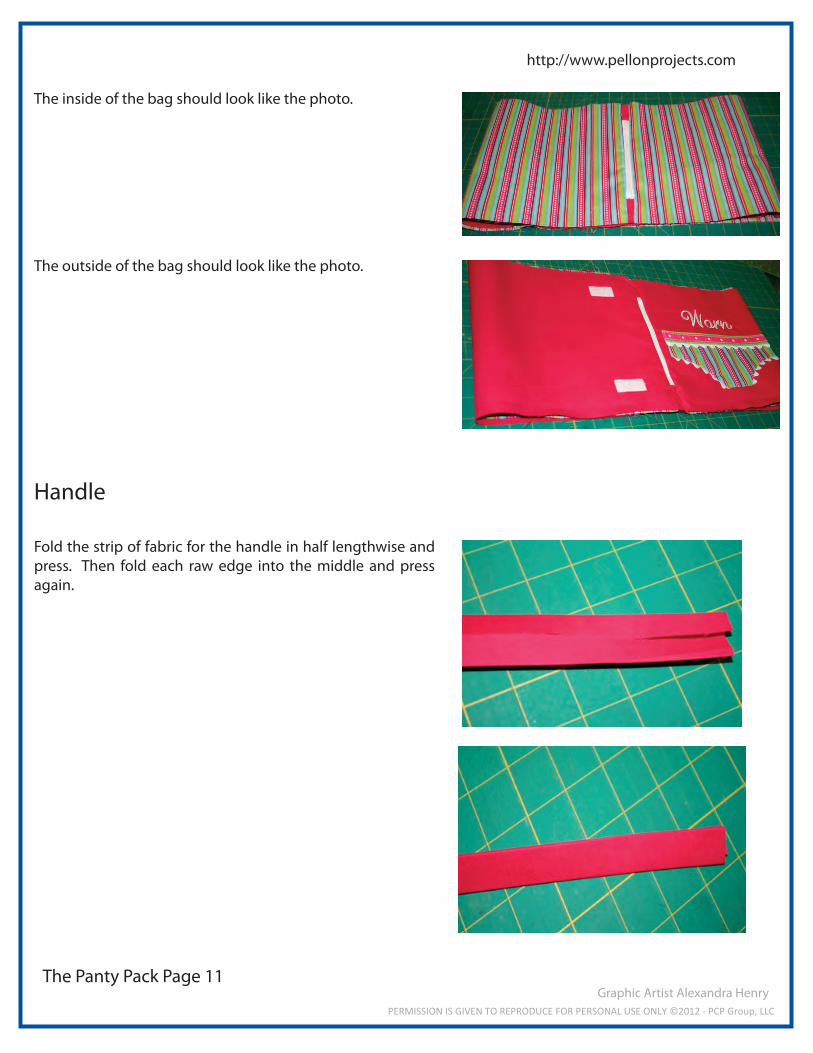
The inside of the bag should look like the photo.
The outside of the bag should look like the photo.
Handle
Fold the strip of fabric for the handle in half lengthwise and press. Then fold each raw edge into the middle and press again.
Graphic Artist Alexandra HenryPERMISSION IS GIVEN TO REPRODUCE FOR PERSONAL USE ONLY ©2012 - PCP Group, LLC
http://www.pellonprojects.com
The Panty Pack Page 12
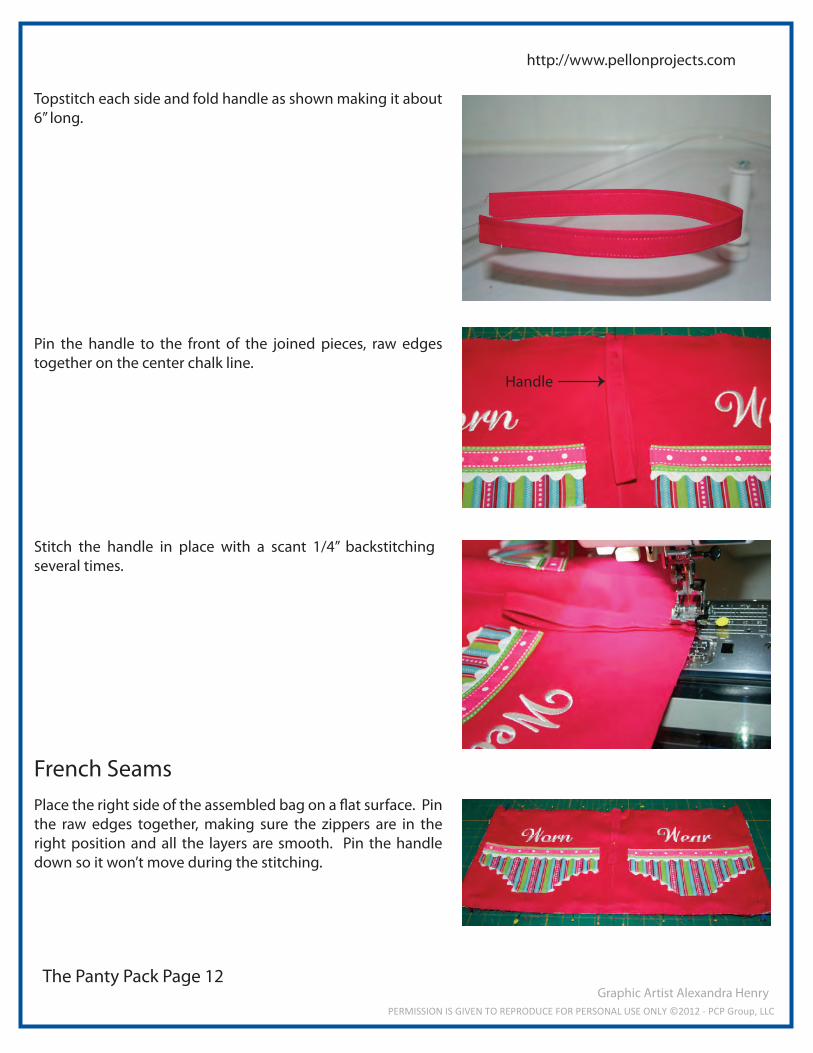
Topstitch each side and fold handle as shown making it about 6” long.
Pin the handle to the front of the joined pieces, raw edges together on the center chalk line.
Stitch the handle in place with a scant 1/4” backstitching several times.
French SeamsPlace the right side of the assembled bag on a �at surface. Pin the raw edges together, making sure the zippers are in the right position and all the layers are smooth. Pin the handle down so it won’t move during the stitching.
Handle
Graphic Artist Alexandra HenryPERMISSION IS GIVEN TO REPRODUCE FOR PERSONAL USE ONLY ©2012 - PCP Group, LLC
http://www.pellonprojects.com
The Panty Pack Page 13
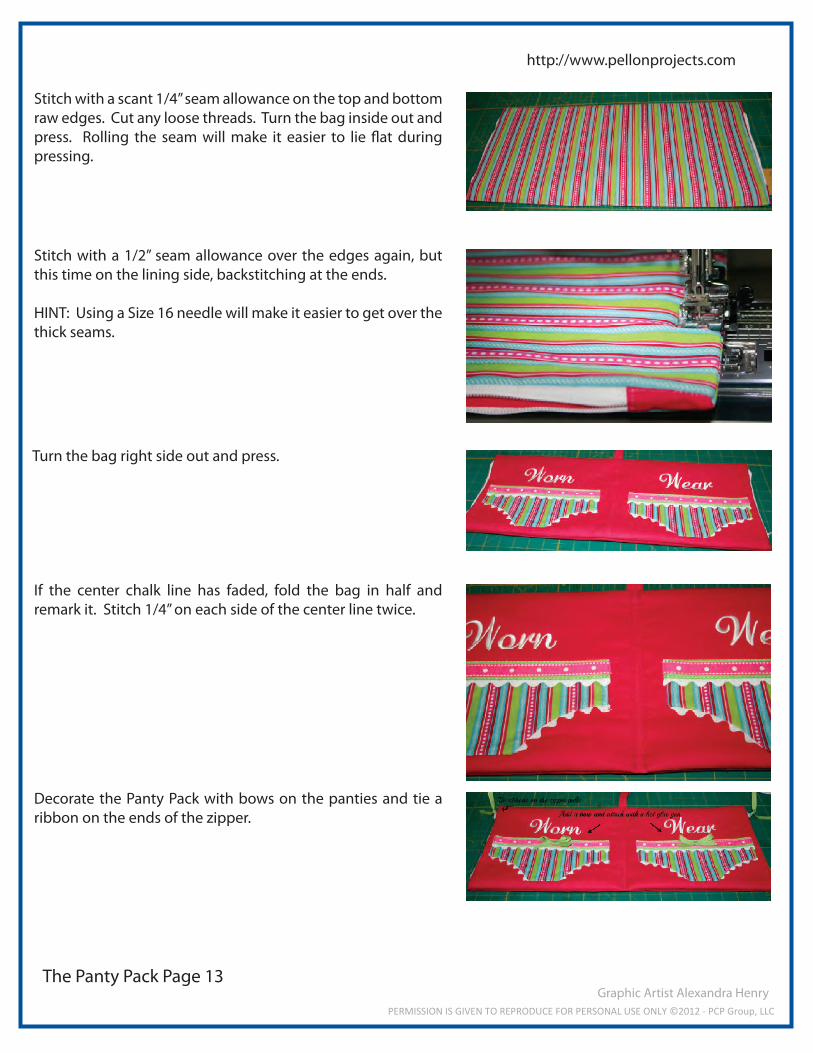
Stitch with a scant 1/4” seam allowance on the top and bottom raw edges. Cut any loose threads. Turn the bag inside out and press. Rolling the seam will make it easier to lie �at during pressing.
Stitch with a 1/2” seam allowance over the edges again, but this time on the lining side, backstitching at the ends.
HINT: Using a Size 16 needle will make it easier to get over the thick seams.
Turn the bag right side out and press.
If the center chalk line has faded, fold the bag in half and remark it. Stitch 1/4” on each side of the center line twice.
Decorate the Panty Pack with bows on the panties and tie a ribbon on the ends of the zipper.
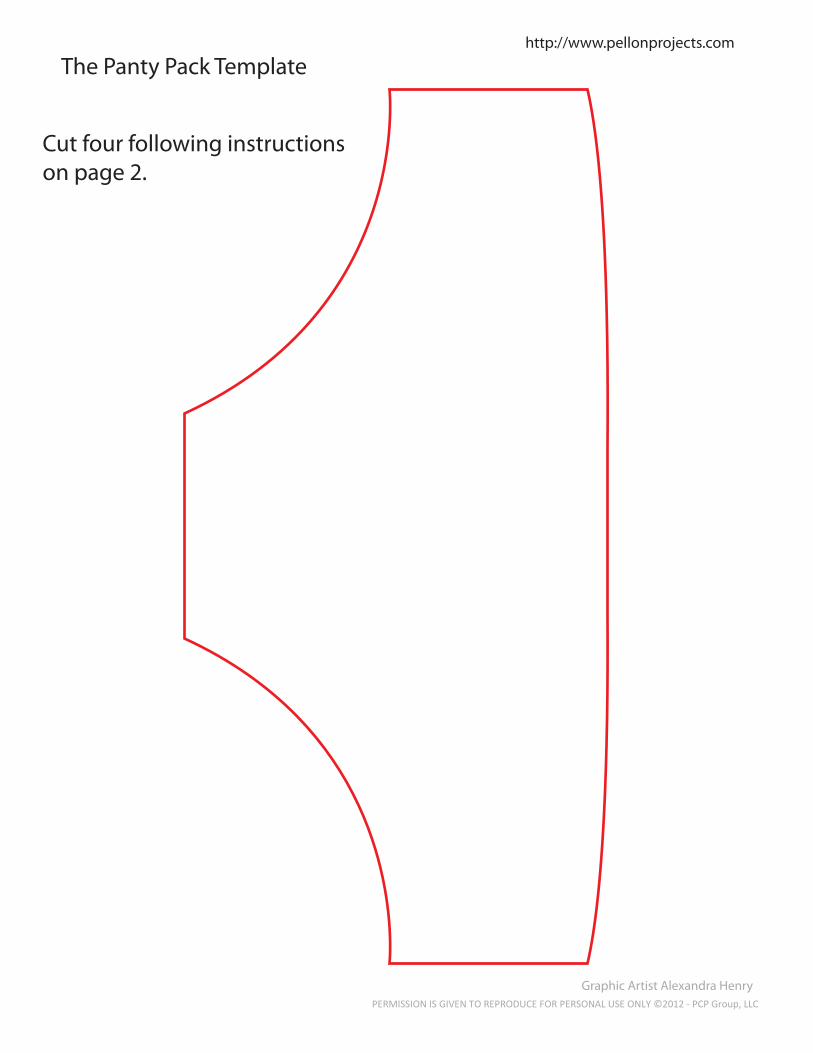
The Panty Pack Template
Cut four following instructionson page 2.
Graphic Artist Alexandra HenryPERMISSION IS GIVEN TO REPRODUCE FOR PERSONAL USE ONLY ©2012 - PCP Group, LLC
http://www.pellonprojects.com