the musk duck photography special - direct.birdlife.org.au
TRANSCRIPT

The Musk Duck
Photography Special
Compiled by Ian Ashton November 2020
Chaffinch 1977 UK England, Mamiya SLR and 135mm prime lens with extension tubes. Ian Ashton
Here we are in November 2020 and most of Birdlife Ballarat’s planned syllabus meetings and outings have been cancelled including this year’s photography
competition due to the Pandemic. I was to give a talk back in June, it was titled, ‘How
times have changed’, an old-fashioned slide show. So, in place of that and to acknowledge that some of our members are not just bird watchers, this Musk Duck
photography special was conceived. Birdlife Ballarat does not have a dedicated photography group, but
many members do own cameras. It may be that in these uncertain times some members have
contemplated buying a camera or upgrading their equipment or their knowledge. I thought it would be
good to share some ideas and techniques. Left, my very first SLR was a Mamiya 500 like this one. The 500 related to the shutter speed, 1,500th of a
second. My present camera can take photos at 1,4000th Of a second. Times and technology have changed.

MD Photo Special
2
Birdwatching and bird photography do not always sit well together, but of course
most birdwatchers enjoy seeing photographs of birds. At one end we have the birdwatcher and at the other end the photographer and between these two ends there
are as many combinations of the two as you can imagine.
The best bird photographers know their subject and can have immense amounts of knowledge and patience to achieve the outcome they are aiming for.
Personally I think of myself as a birdwatcher who takes photographs. I rarely have a particular species in mind when I have my camera with me (except of course on the
rare occasion I go twitching!). I am an opportunistic bird photographer. This means I will never win any photographic competitions! But over the years I have kept my
interest in photography.
To start we will assume you are just beginning your photographic journey, that you
know little about photography or that you don’t have a camera.
The first question is what are you trying to achieve? The answer to this may influence
what you buy or use. Are you a birdwatcher that wants to capture or record what you
have seen? Or perhaps you want to photograph those birds you can’t identify or you
might want to take exceptional bird portraits. All these and many more reasons might
lead you to photographing our birdlife. Of these three examples one stands out.
Although photography might be a great aid in identification in some situations, using
photography as your main identification tool is perhaps the worst reason for taking up
bird photography. A pair of binoculars, purchasing and learning to use a field guide is
a much better and far cheaper option.
The type of camera you use will to some extent effect which sort of birds you photograph and the way you photograph them and also the quality you end up
achieving. To take a photograph of a bird, literally any camera will do. To take close up photos of small birds may require a zoom lens but to take good photos of birds in
flight for instance may take both a zoom lens a DSLR type camera and some
particular skills.
So what do you own or what will you buy?
If you have a small camera with a zoom of any size, head
out and try and take some bird photographs. Lake
Wendouree is always good no matter the season, there is
always something to photograph. By doing this you may
be able to work out if the results you get are good enough
or it’s time for a change.
If you don’t want to spend a lot of money a bridge camera
will certainly enable you to take some very acceptable
photos. Back in 2010 I took an SLR and 600mm Zoom lens on a trip to Canada and Europe, I had also just
bought a small Nikon Bridge camera with an equivalent size zoom. For most of the trip I found the bridge camera
both handy and in many cases performed better.

MD Photo Special
3
The quality of bridge cameras is good enough for photo books, social media platforms
or as part of a power point presentation.
The problems start when you crop your photos, although this has improved to some degree on newer models, it can still be an issue. This is due to the sensor size which
is about the same size as many modern phones. The great thing about small sensors is that you end up with sometimes phenomenal magnification. This literally can give
you an equivalent lens size from 600mm to 3000 mm (Nikon P 1000). But even with some help from inbuilt stabilisation 600mm or more is hard to hand hold. The zoom
range of most of this type of camera starts around 24mm, so you get wide angle to super zoom without changing lenses.
Some bridge cameras have a slightly larger 1 inch sensor. This improves quality but at the cost of less magnification usually up to 400mm maximum, but with patience
and some field craft these may give better results.
Mirrorless cameras are a bit more expensive than most bridge cameras but you can
choose a lens (or two or three!) to suite your needs. There are two main sensor sizes, Full
Frame and Micro four thirds. If you put a 300mm lens on a full frame camera you get
just that, a 300mm lens, on a micro four thirds camera the same size lens is
equivalent to roughly 600mm. There is always a payoff in terms of quality, the
larger sensor is nearly always better. The big advantage with mirrorless cameras is size
and weight, although if you splash out on a 600mm lens for a full frame version, it is
generally only the camera body that is lighter.
Lastly, the DSLR. This is the weapon of choice for most professional and serious amateur
photographers. The price range starts relatively cheaply for a base model camera and small
zoom lens. There are again two sensor sizes APS-C and
Full Frame. The cheaper cameras all have an Aps-C sensor.
This will give 1.5 or 1.6 x magnification to any given lens, a 300mm lens becomes, roughly
(depending on the actual sensor size), a 450mm lens. There are many models with this
size sensor and there are many factors besides sensor size that will make the best of these cameras that cost in excess of several thousand dollars.

MD Photo Special
4
More and more photographers are
turning to full frame cameras and Prime lenses. These are big, heavy
and expensive. But they are undoubtedly the best option if you are
really serious.
Once you have bought your camera DO NOT look at reviews, there is
always some killjoy who will say that what you just spent a fortune on is
rubbish! They are usually not the best judges.
A few explanations.
Cropping simply means you cut out parts of the photo you don’t want such as removing distracting elements like twigs, you may remove part of your image to
make your subject look bigger. There is always a down side of this and it is usually a loss of quality.
Sensors these are electronic devices that capture the images you take, they are placed in the camera where film was in days gone by. They are measured in two
ways, Physical size as compared to 35 mm. Full Frame sensors are roughly the same size as 35mm film, Aps-c Sensors are about 2/3 that of 35mm and Micro four thirds
half the size. The other is Mega Pixels, this is perhaps the most confusing. A physically small sensor with a lot of mega pixels might be nowhere near as good as a
larger sensor with fewer mega pixels. Anything above 16 megapixels can give good results. Although the largest sensors with a big pixel count might still prove to be the
best. Zoom and Prime lenses Zoom lenses have a variable focal length in many
combinations. Simply put, this might enable you to go from a wide angle view
capturing perhaps a building or landscape, to “zooming” in on small objects making small birds fill the image.
A Prime lens has a fixed focal length, useable lenses for bird photography start around 300 mm.
Extenders and converters Well these two things are in fact the same device, back in the days of film they were
invariably called converters but these days they are referred to as extenders. They generally come in two sizes 1.4 X and 2 X. In rough terms they extend a lenses
focal length. A 300 mm lens becomes 1.4 times bigger to 420 mm or 2 X to 600 mm. There are three main problems with extenders. A, they can effect a cameras Auto
Focus when used with some zoom lenses. B, they usually reduce the amount of light into the camera. An f4 lenses might end up as f 5.6 or slower. C, Older or
mismatched extenders can effect quality. Best used as a Prime lens and extender matched pair.
Depth of Field this is the amount of the subject that is in focus, front to back.
Imagine an Albatross with its great wingspan flying across your view. A small depth of field may mean only the body will be in focus but with a larger depth of field the body
and both wingtips will be in focus.

MD Photo Special
5
Who uses what?
I sent out a short questionnaire to several members who take photographs of birds.
I also asked John Barkla, Ed Dunens and Geoff Park. I thank you all for your generosity in sharing. Lastly I have lifted a few bits and pieces off the internet by
mainly Australian bird photographers.
Firstly what camera or camera/lens combination do they use?
Ian Ashton I began taking photos in my
early teens but the bird photos did not start until the mid-1970’s and has always
been secondary to birdwatching. In 1981 I bought a Pentax ME Super and a Sigma
600 mm Mirror lens. Until recently this was my most loved combo. Sadly the lens is
unusable on my Pentax Digital SLRs. 600mm is equivalent to 900 mm on my
cameras but the depth of field is so shallow it is impossible to focus accurately.
I have just bought an Olympus OMD 10 Mk3 micro four thirds camera with a 75mm
-300mm zoom lens. (150-600 equivalent)
I own but rarely use a Monopod or tripod for bird photography.
This is my latest, take a picture of a bird while out birding kit. This Brown Treecreeper was photographed at the
Campbelltown Cemetery September 2020
Jenny Garley has a Canon
Powershot SX60HS with a 65 x zoom lens
This is a “Bridge” camera
with a 1/2.3 16.1MP CMOS
sensor and a lens covering a
whopping 21-1365mm
equivalent. This is used hand
held. Jenny says, “my
camera is lightweight, simple
to use and relatively
inexpensive”. “It suits me for
bushwalking and kayaking”.
Jenny has been taking bird
photos for five years.
This photo of a Wedge-tailed Eagle was taken in 2015 during our Ned’s Corner camp, not long after Jenny had bought her camera.

MD Photo Special
6
Mario Gross owns a Sony full frame mirrorless camera with a 70-300 zoom lens and uses the
camera hand held.
Mario’s Gang Gang photo was taken in Mt Helen in 2017.
He has been taking bird photographs for two years.
Indra Bone uses a Canon 90D an APS-C type sensor camera with a Sigma 150–600 mm Zoom lens. This is equivalent very roughly to 225-900mm equivalent. Indra has
been taking bird photographs for 6 years. Indra invariably uses a tripod.
Great photo proving you don’t always have to fill the frame with the bird.

MD Photo Special
7
Check out Indra’s photo of a Silver Gull in the September 2020 issue of the Australian
Birdlife magazine (Vol. 9 No. 3) don’t forget to read the back story to the photo.
Ambika Bone has a Canon 5D mark IV, Full Frame SLR and a Canon 500
mm Prime Lens with a 1.4 x extender giving roughly 750 mm lens. Ambika
has been taking bird photos for about five years. Ambika uses a tripod or
monopod depending on the situation.
This type of photo requires
knowledge of the subject and patience.
Ambika’s photo of two White-fronted
Honeyeaters is a great example of bird portraiture.
Neil Capey has a Canon EOS 7D MkII, which has an APS-C type Sensor with a Canon EF 100-400mm lens (150- 600 equivalent). I also have a 100mm macro lens for insects, plants and fungi. Neil says ‘I have only been photographing birds seriously since I got my current camera which is 3 or 4 years old’, Neil rarely uses a tripod. This photo of Neil’s was taken through his living room window. Tip: keep your windows clean!

MD Photo Special
8
Jenny Sedgwick has a
20 mega pixel Olympus
OMD1 MK2 micro four thirds camera with a
75-300mm zoom lens (150-600mm
equivalent). Jenny has been taking bird
photos for 8 years.
The early bird...White-necked Heron. Jenny Sedgwick 1/800 f7.1 ISO320
Olympus OMD EM1 MkII, 75-300mm lens.
Pete Sedgwick also has an Olympus micro four
thirds camera OMD5 Mk2 16 megapixels
with a 75mm -300mm zoom lens. (150-600
equivalent) and has been photographing
birds for just 6
months.
Who’s a handsome bird?
1/1280 f5.6 iso200 OMD
EMSMk2 75-300mm
‘Twas a lucky shot! I
actually set out to try for a
bird in flight and snuck up
on a tree of cockies, none
of whom would fly! Finally
this one came from afar to
join them and I took this one shot as it swooped up. It was this August and was my first try for a flight
pic and has spoiled me cause I thought this would be my style of pic from now on….but alas, I haven’t
been able to produce any as good even though I can now use multi shots.’

MD Photo Special
9
So that is the equipment as used by just some of our members. Remember the
camera you have with you is much better than the one left at home. I also asked our photographers about any tips they could share. There were many
common themes that emerged from this question. So as not to repeat things I will just list them below.
Know Your Camera
Whatever camera you end up buying or are using, the first thing most of our photographers agreed on was, “Know your camera”, read the manual (many have to
be downloaded; it is worth the effort). Spend time finding out what everything does, take pictures of anything and in all conditions. The better you know your camera the
less you have to think about it. When you were first learning to drive there seemed to be so many things to worry
about at once, now you just steer, accelerate, adjust the air con and brake without a second thought. It has all become automatic, that is what you want to achieve with
your camera.
Look at websites and watch YouTube related to your camera and lenses. There are many bird related tutorials available, on just about anything you need to know.
Some of you will have known Warren Palmer a local bird photographer who sadly died
recently. I was talking to him one day and he told me, “I never look directly at the bird I am stalking, I can then get a lot closer”.
This is a great tip, if a bird does not feel threatened you may be able to get much closer.
Lenses, how big is big enough? + A few more tips.
This Cape Petrel (right), was taken with a 75mm lens
(105 mm equivalent). Kaikoura NZ 2016
The Weka on the left was taken on Ulva Island NZ 2009, with a 20 mm Lens (30 mm Equivalent)
Proving you can get results from small focal lenses;
both photos taken with a Pentax K20 14MP DSLR.

MD Photo Special
10
If you buy a bridge camera, everything is all together. You do not have to worry
about lenses and usually there is no need to buy a tripod. Mario has a 300 mm lens this can be limiting, but he has learnt to be patient and
one word he used was stealth. Learning to be quiet and approaching slowly is important, take a photo, move nearer,
take another photo and so on. Photographers talk about “reach”, this very roughly translates to how big the subject
appears in the viewfinder and ultimately the final image. A 600 mm lens will have twice the reach as a 300 mm on the same camera.
So: what lens do you require to get up close and personal with your friendly Pardalote?
A quick look at our photographers equipment tells you that generally speaking 500 mm or more is ideal, the longer the reach the further away you can be to get a shot.
But, another tip from several of our photographers is to get as close to your subject as you can! So it’s not all about reach.
Sweet Spot
Without getting too technical, lenses have a “sweet spot” that is to say that it will work at its best with certain settings. Put to one side your big prime lenses as they
are less affected by the following. A modest priced lens of say 150mm-600mm may be at its best at somewhat less than that when used at infinity. The lens may work
perfectly well at 600mm if you can fill the screen with an image at close range. It may be wide open at f5 but it may perform better at f8 or even f11. This has always
been the case and even very expensive lenses do have a sweet spot. Exposure = getting the right amount of light into your camera to replicate what you
are seeing with your eyes. Your camera will have an automatic setting that lets you point and shoot. This is less
than ideal as your camera is making decisions on your behalf, don’t let it! There are three variables in getting the correct exposure, Aperture, Shutter and ISO.
Aperture can affect how much is in focus (depth of field), Shutter speed will affect how long your aperture stays open and ISO will affect how fast the shutter operates.
ISO
This is the sensitivity setting for the sensor, it is somewhat equivalent to film speed. With film we bought say, Kodak film rated at 100 ASA, all 36 photos were then
subject to that film speed. With a digital camera that speed (ISO) can be changed with every shot if desired. Ranges typically vary from 200 to 1600/3200 and in some
cases much higher. In most cases I would suggest setting the ISO manually. Aperture.
This is the opening that lets the light into your camera. The higher the number the smaller the opening and the less light is let in. The lower the number the bigger the
opening and more light that reaches the sensor. These are called f stops. They generally range from f1.4-f22. An f4 500mm telephoto lens would be classed as a
“fast” lens. One that only reached f8 might be regarded as slow. Smaller lenses typically can be f2.8 or even as low as 1.4.

MD Photo Special
11
Shutter or Shutter speed. This affects the amount of time that the aperture lets in
light. A fast shutter speed enables you to stop movement in our case birds. They rarely sit completely still. The very first cameras would have required the shutter to
be open for several minutes. Shutter speeds these days can be amazingly fast 1,4000th second or faster.
Neil uses AV or Aperture priority this means you set the aperture manually and the
camera sets the speed (shutter). The ISO can also be set either to Auto or Manual. I suspect this is the most common exposure setting for bird photography, again I
would recommend setting the ISO manually. Another tip is take lots of photos, 20 shots cost no more than 1!
Point, shoot and hope says Jenny Garley. Spray and prey says Jenny Sedgwick.
I found this the hardest thing to get used to with a digital camera, my mindset was stuck firmly in the heyday of Kodachrome! Take one photograph very carefully.
The Bird Portrait This is the area that most bird photographers try to master. The results can be very
pleasing, but if all your shots are nearly identical (but with different species) they can be less than exciting to your audience. Mix it up.
Jenny Sedgwick says, watch photography competitions, and look up people on social
media to check their techniques and composition. Many have blogs on their work and share these willingly.
Jenny Garley uses, set fixed point focus on manual setting. Ambika says, choose your light carefully and avoid harsh shadows around mid-day.
Indra says, get in close with as smooth a background as possible and contrasting with or complimenting the birds colour.
The flight shot This area of photography can be difficult, shots of birds of prey, taken from below
with a clear blue sky can be great for identification, but can be boring if all your shots
are the same. Clouds and grey sky may need some exposure compensation so that you don’t end up with a silhouette. Try and take flight shots of low flying birds so
there is some background. Panning can enable shooting at lower speeds but takes practice.
As a general rule small birds fly faster than big ones. Landing and taking off, get the light and wind behind you if possible, birds tend to
land into the wind so if the wind is blowing towards you the bird will often have its back to you as it lands. Try not to shoot into the sun unless for a special effect.
Neil uses exposure compensation when necessary. Jenny Garley uses sports mode on her bridge camera.
Indra uses manual exposure, spot metering and a single focus point. Ambika says use a fast shutter speed, 2000 or faster.
I found my bridge camera useless for flight shots, but that was probably me.
I invariably use aperture priority and exposure compensation.
From The internet: try setting both Aperture f8-f11 and Shutter 1600th 2000th manually, but set your ISO on automatic.

MD Photo Special
12
This sounded counterintuitive to me, but it does have some merits, I have yet to try it
in earnest. In certain light conditions you may also need exposure compensation. Telling a Story
If you are interested in bird behaviour, birds in their habitat or perhaps sharing your birding holiday story, then one photo is not going to be enough. Although the quality
of your photos should be as good as can be, this is secondary to the story. A poor quality image may be all you get of a particular bird or behaviour, don’t leave it out.
It may take time, perhaps years to put together, but a portfolio of images around a particular theme can be very rewarding.
Need a Sherpa! How much are you prepared to carry?
Going out for a day’s birdwatching is relatively simple, put your binoculars around your neck and walk out the door. Not so easy if you need a scope and tripod, but still
you can do it. Add a camera and the fact that I can’t operate anything without spectacles and things begin to get a bit tricky, you do not want to drop anything.
Choices have to be made and this is perhaps the start of some conflict. If you are a
birder the scope wins, but if you are a photographer the large lens wins. For photographers who use a monopod or tripod then carrying your camera may be
enough. I often use what is called a snoot bag
rather than my photographic back pack or traditional camera bag.
Jenny Sedgwick has a small neat
backpack to carry her gear in.
Neil bought a clip that enables him to carry his camera on his
belt leaving his hands free for binoculars. A traditional camera strap is less than ideal when also using binoculars.
There are many types of camera bags but you will require some sort of protection for
your camera and lenses. I use a Lowepro back pack when travelling, it keeps all my gear together.
The following three photographers have all spoken at our Birdlife branch meetings.
They are all serious and very competent photographers who are approachable and generous with their time and Knowledge.
Ed Dunens a Ballarat based photographer who has taken thousands of photographs of
Lake Wendouree and its birdlife. Over the past few years he has been a regular on the Port Fairy Pelagic trips. Ed uses two Canon SLR type cameras a Canon 7D MarkII
with an APS-C Type Sensor and a full frame Canon 1DX MarkIII. These are used with
Canon lenses, Canon 100-400mm f/4.5-5.6L IS II zoom and two smaller prime lenses, a
200mm f/2.8 II and 100mm f/2.8 Macro. Ed has been taking photographs for 15 years.

MD Photo Special
13
Soft-plumaged Petrel Port Fairy Pelagic Ed Dunens
Ed’s photos can be found by searching Ed Dunens on flickr.
David Whelan has a passion for taking pictures of birds of prey, especially Black Falcons. David uses a Nikon D 500 camera and a Nikon 200-500 Lens.
Find David’s Photos at David Whelan2018 / wildpix.com.au
MD Photo Special
14
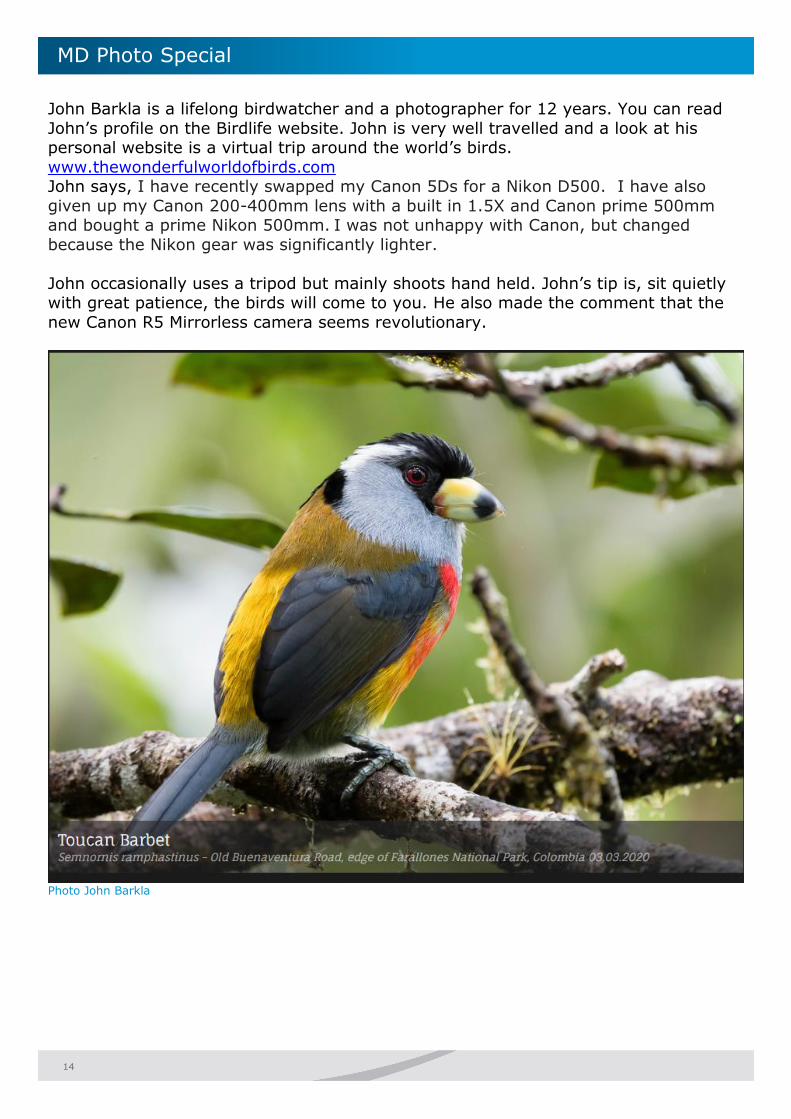
John Barkla is a lifelong birdwatcher and a photographer for 12 years. You can read
John’s profile on the Birdlife website. John is very well travelled and a look at his personal website is a virtual trip around the world’s birds.
www.thewonderfulworldofbirds.com John says, I have recently swapped my Canon 5Ds for a Nikon D500. I have also
given up my Canon 200-400mm lens with a built in 1.5X and Canon prime 500mm and bought a prime Nikon 500mm. I was not unhappy with Canon, but changed
because the Nikon gear was significantly lighter.
John occasionally uses a tripod but mainly shoots hand held. John’s tip is, sit quietly with great patience, the birds will come to you. He also made the comment that the
new Canon R5 Mirrorless camera seems revolutionary.
Photo John Barkla

MD Photo Special
15
Geoff Park is a resident of Newstead and another birdwatcher turned photographer
over the last ten years. You can see Geoff’s photographs on his website (search Natural Newstead). Geoff uses a Canon 7D Mk2 Aps-c Sensor Camera and a Full
frame 5D Mk4 with a Canon EF 100-400mm f/4.5-5.6L IS II USM lens and a Canon EF 600mm f4L IS II USM lens. Geoff also uses a tripod a GITZO GT 3533LS Systematic
Carbon Fibre Tripod with Gitzo GHFG1 Gimbal and a Manfrotto Monopod – 680B.
Geoff’s tips.
Bird Portraits: Patience, move slowly, learn to recognise good habitat and the
patterns that birds follow (e.g. moving between favoured perches, visiting water etc.)
Birds in Flight: Practice (Silver Gulls are a great subject). Use Aperture priority setting
and monitor shutter speed. Learn optimal use of focus points.
Peregrine Falcon Geoff Park
Geoff also hosts, bird photography workshops with Chris Tzaros These popular workshops, led by renowned wildlife photographer Chris Tzaros, are held on an occasional basis. Please contact [email protected] if you would like to
participate or be added to the waiting list for future events.

MD Photo Special
16
So you get home, you have filled your memory card to the brim, what’s next? Believe
it or not there are photographers who are mainly interested in the taking or the getting of an image of some bird rare or otherwise and not in the final result: a photo.
We will put these outlandish ideas aside. You may want to photograph birds to illustrate a talk, make a photo book, create a
web page or blog. You might have ambitions to turn professional. Whatever the reason, you have to deal with the next step.
There are two main ways of capturing an image onto your cameras memory card, JPG or RAW. If you take RAW images you are required to process them in some way. This
is akin to developing and printing. JPGs on the other hand are processed in camera. Note: some point and shoot (Snapshot) cameras only capture JPGs.
If you are trying to achieve the very best quality images then you should be shooting
in RAW. This means you will need some sort of RAW processing program. Probably the most widely used of these is Adobe Lightroom. You can no longer buy this
outright; you effectively hire the program on a monthly or yearly basis.
A word of warning if you opt out of Lightroom and your images are in their cloud storage there are issues accessing them. There are some free programs/apps, I have
used RawTherapee. I only use RAW for landscapes, I find the processing of hundreds of bird images affects my will to live. I should get over this!
However for those with patience and an eye to perfection, it is probably necessary. If you choose to shoot in RAW, as a minimum you will have to adjust Exposure and
Sharpness. A friend has Lightroom on a monthly plan this also gives him the full version of
Photoshop for both his computer and a tablet. I think it costs $14 or $15 per month.
Adobe Photoshop Elements can be bought outright and is more than satisfactory for those shooting JPGs. I have an older version 7 that works just as it did when I bought
it many years ago. You can open and adjust RAW files in Elements but it is slow going.
Apple have their own free photo processing app as do many other companies. But
why do you require these programs? In short if you are happy with your photos as taken, and you only shoot JPGs, then you don’t. But if you wish to crop your image,
adjust brightness, contrast, sharpness, remove dust spots then you will need some sort of program or app.
If I am putting together a Power Point presentation I generally use the tools available in that program. Cropping and sharpening are easy, brightness is not subtle but
adequate and you are never affecting the original image, this is important. Dust Spots
If you have a camera system with interchangeable lenses and you change lenses frequently, it is almost inevitable that your sensor will end up with dust spots or
marks on it. Keeping your equipment clean is important. Unwanted marks/spots on an image can be removed in most modern apps/programs but it can become tedious.
The sensor is protected by a layer of glass so it is actually the glass you are cleaning. There are several commercially available products specifically designed for this
purpose. If you are faced with this problem buy one from your local camera store and
follow the instructions. The sensor although tougher than you might imagine is still susceptible to damage. If you are not confident get your local camera shop to clean
the sensor.

MD Photo Special
17
Image Storage
Now here is something we really need to think about, we can just simply download
our images onto our home computer or laptop, but you should back them up onto a
USB stick or portable hard drive or both, but never have all your photos in one place.
There is also “cloud storage”. I have never used this but it is worth considering if you
take alot of high quality photos. When editing the same applies, always have an
original and edited version in more than one place. Even back in the days of colour
slides it was devastating to lose an image, like my best photo of the Cape Gannet in
Port Philip or a Little Bittern at Lake Wendouree. Luckily I have other versions and
digital copies of those, but what is gone is gone.
Hides and camo gear Most of us will not need to buy a hide
but they do have their place.
Public hides can be good to get closer to some species, but they are rarely
in the right place and often hard to approach without disturbing the birds.
Patience is required to let the birds settle.
I took this photo of Latham’s Snipe from a public hide on the outskirts of
Robe S.A. It overlooks a tidal inlet but is just across the road from a small
housing estate.
We visited the WWT Slimbridge Wetland Centre in the UK back in 1993. There were
many birders in full camo gear sitting in the various bird hides, they were easy to spot! In 1981, myself and and a friend were effectively shunned for wearing blue not green
raincoats on the Isles of Scilly. The next day in fair autumn weather and wearing T-shirt
and jeans, we went unnoticed in the throng of birders dressed in similar fashion. Luckily times have changed!
When out birding or photographing birds, it is best to wear subdued coloured clothing.
However moving slowly, patiently and above all quietly is probably far more important.
It is important to wear weather appropriate clothing. We need to feel comfortable and of course a good hat is a must. Protection from the elements, especially the sun, should
always be our first consideration when going on a field trip.
Presenting a talk Most speakers presenting to our branch use a Power Point presentation. I recommend
limiting the number of slides to between 50 and 75 depending on how much talking you do. As in alot of things less is more. The best talks rarely go longer than 45 minutes.
Leave your audience wanting more. Keep dialogue to a minimum on each slide, but do
name each species, (don’t assume everyone will know what a particular bird is).

MD Photo Special
18
Speaking in public, especially for the first time, can be daunting but knowing your
subject and having written notes will help. The branch meetings are both friendly and supportive. Always finish on a really good photo (especially if you want a return gig!).
That last statement was a joke.
Just a couple of the many excellent bird photographers to check out.
Australia, Duade Paton https://photos.duadepaton.com/ Duade also has a series of helpful video clips.
UK, David Tipling https://davidtipling.com/

MD Photo Special
19
Australia
Georgina has a downloadable PDF titled ‘The Art of Bird Photography’ 10 insprational ideas to help you turn common birds into Art.
There are many more, some are listed in the publication above.
And lastly we come to the question of ethical birding/photography.
There are a number of resources covering this subject.
If you search for Ethical Bird Photography you will not be short of reading material. For Australian guidelines you can try-
Birdlife Australia Birdlife Photography group
Georgina Steytler
Basically there are recurring themes,
Do not use call back or bait (feed) birds in order to get a photograph. Try not to disturb breeding birds.
The use of flash and torches on Nightbirds should be kept to the absolute minimum and preferably use a red filter.
I truly feel that both photography and birdwatching are best done with the smallest of
groups but birding is perhaps the more amenable to social interaction. Photography is best done alone or in very small groups.

MD Photo Special
20
Listed below just a few sites to check out, there are many more. You have to open an
account (free) for most of these. Instagram is very popular with bird photographers
http://www.feathersandphotos.com.au/forum/forum.php
https://www.facebook.com/groups/birdphotographyaustralia/
https://birdlifephotography.org.au/index.php/forum
https://www.instagram.com/?hl=en
https://www.instagram.com/birdsofaustralia/?hl=en
https://www.instagram.com/georgina_steytler/
https://www.instagram.com/adamblythphotography/?hl=en
https://www.instagram.com/shelley_pearson_/?hl=en
There will be spelling and grammar mistakes no matter how many times I have used “Spell
Check” . I hope it doesn’t detract from the “Vibe” of this Newsletter.
The information given is as accurate as possible.
The views in this document are entirely the authors.
I have no affiliation to any company/website mentioned in the text.
Ian Ashton November 2020
One last story
There was a great photographer called Alan (Curly) Hartup who lived in Newstead.
We were talking cameras one day on an outing he was leading. Alan said he had been out with
the Ballarat Field Naturalists photographing Orchids, : Alan “ I set up my camera on a tripod
with two flash units and had spent some time setting focus and deciding on what aperture I
needed, when Bon Strange leaned over and took a photo with her little Olympus Trip. Her
photo was much better than mine!” Alan’s face beamed as he told the story.