the most popular line of spas in the world - catalina spas · the most popular line of spas in the...
TRANSCRIPT

the most popular line of spas in the world
www.catalinaspas.com
2
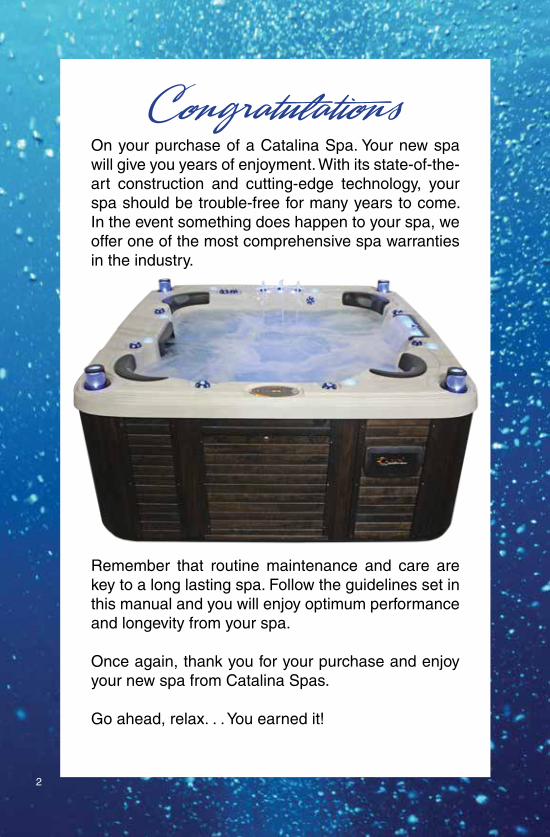
CongratulationsOn your purchase of a Catalina Spa. Your new spa will give you years of enjoyment. With its state-of-the-art construction and cutting-edge technology, your spa should be trouble-free for many years to come. In the event something does happen to your spa, we offer one of the most comprehensive spa warranties in the industry.
Remember that routine maintenance and care are key to a long lasting spa. Follow the guidelines set in this manual and you will enjoy optimum performance and longevity from your spa.
Once again, thank you for your purchase and enjoy your new spa from Catalina Spas.
Go ahead, relax. . . You earned it!
Table of Contents
WELCOME . . . . . . . . . . . . . . . . . . . . . . . . . . . . . . . . . . . . . . . . . . . . . . . . . . . . 5IMPORTANT SAFETY INSTRUCTIONS . . . . . . . . . . . . . . . . . . . . . . . . . . . 6ELECTRICAL REQUIREMENTS . . . . . . . . . . . . . . . . . . . . . . . . . . . . . . . . . 8INSTALLATION AND SURFACE PLACEMENT . . . . . . . . . . . . . . . . . . . . 9STARTUP PROCEDURES . . . . . . . . . . . . . . . . . . . . . . . . . . . . . . . . . . . . . . 10 Filling Up Your Spa . . . . . . . . . . . . . . . . . . . . . . . . . . . . . . . . . . . . . . 10 Important Note to Purge The Air Out Of The System . . . . . . . . . 10 Water Testing . . . . . . . . . . . . . . . . . . . . . . . . . . . . . . . . . . . . . . . . . . . 11 pH Control . . . . . . . . . . . . . . . . . . . . . . . . . . . . . . . . . . . . . . . . . . . . . 11EQUIPMENT RESET . . . . . . . . . . . . . . . . . . . . . . . . . . . . . . . . . . . . . . . . . . . 11OPERATION INSTRUCTIONS . . . . . . . . . . . . . . . . . . . . . . . . . . . . . . . . . . 12 Catalina CAT8000 . . . . . . . . . . . . . . . . . . . . . . . . . . . . . . . . . . . . . . . 12 Catalina CAT 200 . . . . . . . . . . . . . . . . . . . . . . . . . . . . . . . . . . . . . . . 18 Catalina CAT2000 . . . . . . . . . . . . . . . . . . . . . . . . . . . . . . . . . . . . . . 21 Catalina CAT100/102/105 . . . . . . . . . . . . . . . . . . . . . . . . . . . . . . . . 23 Catalina CAT500 . . . . . . . . . . . . . . . . . . . . . . . . . . . . . . . . . . . . . . . 25 Catalina CAT100/75 . . . . . . . . . . . . . . . . . . . . . . . . . . . . . . . . . . . . 27GENERAL MAINTENANCE . . . . . . . . . . . . . . . . . . . . . . . . . . . . . . . . . . . . 29 Cleaning Your Spa . . . . . . . . . . . . . . . . . . . . . . . . . . . . . . . . . . . . . . 29 Draining The Water . . . . . . . . . . . . . . . . . . . . . . . . . . . . . . . . . . . . . 29 Filter Maintenance . . . . . . . . . . . . . . . . . . . . . . . . . . . . . . . . . . . . . . 29 Refilling Your Spa . . . . . . . . . . . . . . . . . . . . . . . . . . . . . . . . . . . . . . . 29 Filter Sizes . . . . . . . . . . . . . . . . . . . . . . . . . . . . . . . . . . . . . . . . . . . . 30 Cleaning The Filter . . . . . . . . . . . . . . . . . . . . . . . . . . . . . . . . . . . . . . 30 Removal Of Large Side-by-Side Filter . . . . . . . . . . . . . . . . . . . . . 30 Mahogany Cabinet Maintenance . . . . . . . . . . . . . . . . . . . . . . . . . 31 Spa Light Lens Installation . . . . . . . . . . . . . . . . . . . . . . . . . . . . . . . 31 Jet Removal . . . . . . . . . . . . . . . . . . . . . . . . . . . . . . . . . . . . . . . . . . . 31 Spa Cover & Pillows . . . . . . . . . . . . . . . . . . . . . . . . . . . . . . . . . . . . 31 Vacation Care / Winterizing . . . . . . . . . . . . . . . . . . . . . . . . . . . . . . 32 Sanitation . . . . . . . . . . . . . . . . . . . . . . . . . . . . . . . . . . . . . . . . . . . . . . 32 Balancing the pH . . . . . . . . . . . . . . . . . . . . . . . . . . . . . . . . . . . . . . . 33SPECIAL PRODUCTS & FEATURES . . . . . . . . . . . . . . . . . . . . . . . . . . . 35 Air Control Valves . . . . . . . . . . . . . . . . . . . . . . . . . . . . . . . . . . . . . . . 35 Water Control Valves . . . . . . . . . . . . . . . . . . . . . . . . . . . . . . . . . . . . 35 LED Lighting . . . . . . . . . . . . . . . . . . . . . . . . . . . . . . . . . . . . . . . . . . . 35 Topside Stereo Control . . . . . . . . . . . . . . . . . . . . . . . . . . . . . . . . . . 35 Entertainment Systems. . . . . . . . . . . . . . . . . . . . . . . . . . . . . . . . . . 36 Cool Mist System . . . . . . . . . . . . . . . . . . . . . . . . . . . . . . . . . . . . . . . 36 Diamond LED Lights . . . . . . . . . . . . . . . . . . . . . . . . . . . . . . . . . . . . 36 Jet Varieties . . . . . . . . . . . . . . . . . . . . . . . . . . . . . . . . . . . . . . . . . . . . 36OZONE BENEFITS . . . . . . . . . . . . . . . . . . . . . . . . . . . . . . . . . . . . . . . . . . . . 37TROUBLESHOOTING . . . . . . . . . . . . . . . . . . . . . . . . . . . . . . . . . . . . . . . . . 38WIRING DIAGRAM . . . . . . . . . . . . . . . . . . . . . . . . . . . . . . . . . . . . . . . . . . . . 40RCD WIRING DIAGRAM (Europe) . . . . . . . . . . . . . . . . . . . . . . . . . . . . . . . 41WIRING INSTALLATION INSTRUCTIONS . . . . . . . . . . . . . . . . . . . . . . . 42WARNINGS . . . . . . . . . . . . . . . . . . . . . . . . . . . . . . . . . . . . . . . . . . . . . . . . . . . 43
3
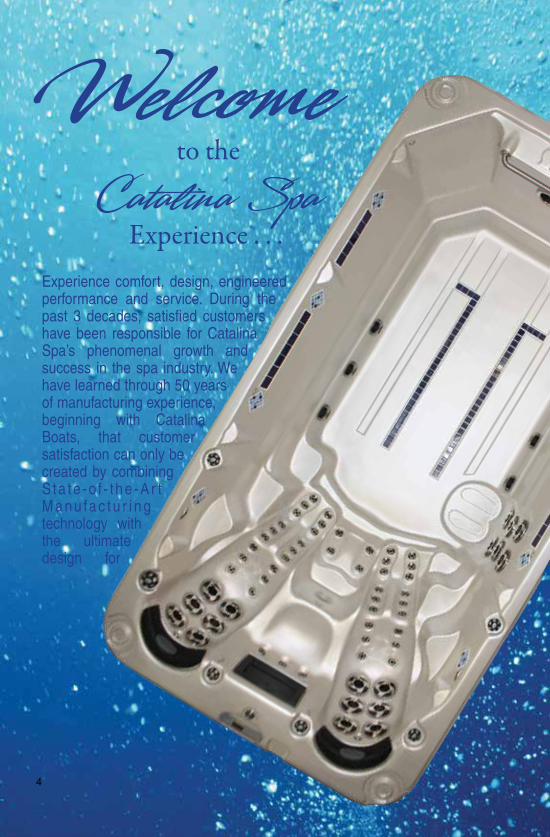
Experience comfort, design, engineered performance and service. During the past 3 decades, satisfied customers have been responsible for Catalina Spa’s phenomenal growth and success in the spa industry. We have learned through 50 years of manufacturing experience, beginning with Catalina Boats, that customer satisfaction can only be created by combining S ta te -o f - the -Ar t M a nu fa c t u r i n g technology with the ultimate design for
4
Welcometo the
Experience . . .Catalina Spa

comfort and performance that is engineered years ahead of it’s time.
Catalina Spas possesses all these features, explaining why more customers are demanding the best —
CatalinaCatalina Spas are listed by the nationally recognized safety experts UL Laboratories. After months of
rigorous testing of our spas, we met or exceeded all requirements. We are proud of the Catalina trademark.
Outstanding quality with the ultimate performance built into every Catalina Spa.
Our 100% filtration system will keep your spa clean when combined with regular water maintenance. The easy to clean
front loading filter and skimmer have been designed to trap dirt and oil while larger floating objects are caught by the leaf basket,
providing total water filtration. We have developed an insulation system like a thermos bottle to keep your water hot and energy bills
low.
Our sophisticated control system allows the user to monitor and control all spa functions, including water temperature and silent air venturis, while
comfortably seated in the spa. Our optional Mobile App system for the iPhone allows you to control all functions from virtually anywhere. For a genuine therapy whirlpool massage, simply turn the dial and our unique whirlpool system will create the ideal relaxation. The same flow can be returned to high volume hydro jets, providing individual massage that is out of this world. Other features include Low Voltage LED Lighting Systems, State-of-the-Art Sound Systems, Water Features, Cup Holders, genuine Mahogany Wood Spa Cabinets, Soft Headrests and a Modular Equipment Pack available in 220V, designed for simplified service.
Relax . . . You Earned It!
Welcome to the Catalina family!5
6
IMPORTANT SAFETY INSTRUCTIONS
READ AND FOLLOW ALL INSTRUCTIONS.
DANGER – Do not lay across the foot well. Always sit in an upright position.
WARNING – To reduce the risk of injury, do not permit children to use this product unless they are closely supervised at all times.
CAUTION – Water temperature may rise when jets are operating on “high” speed for extended durations.
A bonding lug has been provided on the outside of the Equipment Package electrical control box. The lug permits the connection of No.8 AWG (8.42mm) solid copper bonding conductor between the Equipment Module and all other electrical equipment and exposed metal in the vicinity, as may be needed to comply with local regulations.
WARNING – This unit must be hardwired only to a supply circuit that is protected by a Ground Fault Circuit Interrupter. (GFCI). See diagram 1. Such a GFCI is required by most building codes and should be provided by the installer and must be tested before each use. Consult the GFCI manufacturer’s instructions for correct testing, and operation.
The electrical supply for this product must include a suitable rated switch or circuit breaker to open all ungrounded supply conductors to comply with the National Electrical Code. The disconnection means must be readily accessible to the tub occupant, but installed at least 5 feet (1.5M) from spa water.
Spas must be installed with drainage for electrical equipment compartment.
Be sure the water always flows freely from the hydrotherapy jets within the spa. Any blockage or restriction of this water flow by persons or objects may damage system components, create an electrical shock hazard and/or cause water damage to the surrounding area.
To avoid damage to the pump(s) and heater, the Equipment must never be operated unless the spa is filled with water.
DANGER – Extreme caution must be exercised to prevent unauthorized access by children. To avoid accidents, ensure that children cannot use the spa unless they are supervised at all times. Also keep the spa cover on when the spa is not in use.
WARNING – WATER TEMPERATURE. Never heat your spa water above 104°F (40°C). If you do, it could cause serious health hazards.
1.
2.
3.
4.
5.
6.
7.
8.
9.
10.
11.
12.
7
IMPORTANT SAFETY INSTRUCTIONS CONTINUED
DANGER – RISK OF ELECTRICAL SHOCK. Install at least 5 feet (1.5M) from all metal surfaces. (A spa may be installed within 5 feet of metal surfaces if each metal surface is permanently connected by a minimum No. 8 AWG (8.4mm^2) solid copper conductor attached to the wire connector on the terminal box that is provided for this purpose.)
DANGER – RISK OF ELECTRICAL SHOCK. Do not permit any electrical appliance such as a light, telephone, radio or television within 5 feet (1.5M) of a spa.
The ideal temperature of your spa or hot tub should be between 95°F and 104°F (35°C-40°C). This range is not only healthier, but will also result in easier care of your spa.
Since excessive water temperatures have a high potential for causing fetal damage during the early months of pregnancy, pregnant or possibly pregnant women should limit spa temperatures to 100°F or less.
Before entering a spa, the user should measure the water temperature with an accurate thermometer since the tolerance of water temperature regulating devices may vary as much as +- 5 degrees.
The use of alcohol, drugs or medication before or during spa use may lead to unconsciousness with the possibility of drowning.
Persons suffering from obesity or with a medical history of heart disease, low or high blood pressure, circulatory system problems or diabetes, should consult a physician before using a spa.
Persons using medication should consult a physician before using a spa since some medication may induce drowsiness while other medications may effect heart rate, blood pressure or circulation.
Because occasional users of the spa may not be aware of all the potential risks associated with spa usage, they should be made aware of these Important Safety Instructions.
CHEMICAL SAFETY – Play it safe with all chemicals.
Maintain sanitizer level of 3-5 ppm of bromine or chlorine.
Do not mix chemicals with each other before adding them to the water. Add only one chemical at a time.
Never add concentrated liquid chemicals directly to the water. Always dilute chemicals in a large plastic bucket or pail before adding them.
13.
14.
15.
16.
17.
18.
19.
20.
21.
22.
23.
24.
25.
8
IMPORTANT SAFETY INSTRUCTIONS CONTINUED
ELECTRICAL REQUIREMENTS FOR 220V INSTALLATION
When diluting chemicals, always add the chemical to the water, not water to the chemical.
Always dilute the chemical slowly and evenly before adding into spa water. Never add any chemical, diluted or otherwise, into any skimmer device.
Always store chemicals according to the manufacturer’s label directions and keep them out of the reach of children.
During freeze conditions spas and swim spas must be set on Standard Mode.
Before installing spas or swim spas in special installations such as a vault, below ground level or next to retaining walls, make sure to add additional freeze sensor. Install sensor above ground level.
The Equipment Package is designed to operate at 220 volts, 60 Hz. Hardwired directly to the equipment pack; a 50 amp dedicated circuit is required.
This unit must be hardwired only to a supply circuit that is protected by a Ground Fault Circuit Interrupter (GFCI) See Diagram 1. Such a GFCI is required by most building codes, should be provided by the installer of the circuit and should be tested before each use. Consult the GFCI manufacturer’s instructions for correct testing and operation.
When the Equipment Package is connected to 220 volts, the Heater will provide approximately 4000 watts of heat when the Pump is operating in LOW or HIGH speed and the thermostat is calling for heat.
IMPORTANT NOTE: All electrical connections to the Equipment Package must be accomplished by a qualified electrician in accordance with the National Electrical Code and in accordance with any local electrical codes in effect at the time and place of installation. NOTE: Do not attempt to use a dryer, stove or other 220 volt appliance on the same circuit as the spa. A separate breaker and a dedicated circuit from your panel to the spa is required.
All electrical connections must be made in accordance with the wiring information contained in the manual (see Diagram 1), in the electrical control box or on the back of the field wiring access panel of the Equipment Package. Failure to provide proper electrical power to your spa will void your warranty. Installation by a licensed electrician is recommended.The electrical supply for his product must include a suitably rated switch or circuit breaker to open ALL ungrounded supply conductors to comply with Local and National Electrical Codes. The disconnecting means must be within sight, and readily accessible to the user of the spa, but installed at least 5 feet (1.5M) from the spa.
26.
27.
28.
29.
30.
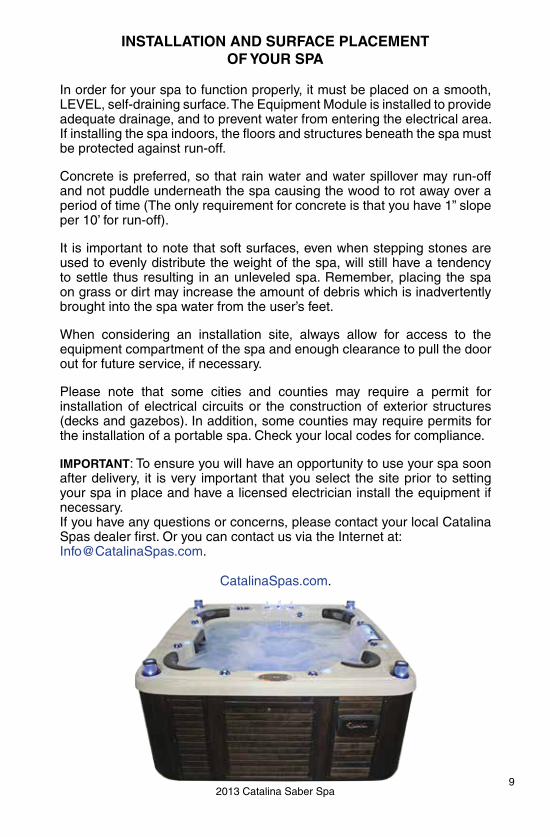
2013 Catalina Saber Spa9
INSTALLATION AND SURFACE PLACEMENTOF YOUR SPA
In order for your spa to function properly, it must be placed on a smooth, LEVEL, self-draining surface. The Equipment Module is installed to provide adequate drainage, and to prevent water from entering the electrical area. If installing the spa indoors, the floors and structures beneath the spa must be protected against run-off.
Concrete is preferred, so that rain water and water spillover may run-off and not puddle underneath the spa causing the wood to rot away over a period of time (The only requirement for concrete is that you have 1” slope per 10’ for run-off).
It is important to note that soft surfaces, even when stepping stones are used to evenly distribute the weight of the spa, will still have a tendency to settle thus resulting in an unleveled spa. Remember, placing the spa on grass or dirt may increase the amount of debris which is inadvertently brought into the spa water from the user’s feet.
When considering an installation site, always allow for access to the equipment compartment of the spa and enough clearance to pull the door out for future service, if necessary.
Please note that some cities and counties may require a permit for installation of electrical circuits or the construction of exterior structures (decks and gazebos). In addition, some counties may require permits for the installation of a portable spa. Check your local codes for compliance.
IMPORTANT: To ensure you will have an opportunity to use your spa soon after delivery, it is very important that you select the site prior to setting your spa in place and have a licensed electrician install the equipment if necessary.If you have any questions or concerns, please contact your local Catalina Spas dealer first. Or you can contact us via the Internet at: [email protected].
CatalinaSpas.com.

10
START UP PROCEDURES
FILLING UP YOUR SPA
Once you have installed your spa on its foundation and all electrical requirements have been met, you may begin the necessary steps in filling your spa.
All gate valves must be OPEN. There are two “twist and turn” locking gate valves located under the skirt (See Fig. 1) on each side of the Equipment Pack.
To open the gate valves, pull handle upward approximately 3” until it stops and snaps into place (See Fig. 2). These must be opened prior to operating the spa to allow water to flow through the Equipment Pack (dual-pump models have 4 valves).
Make sure the filter cartridge (Basket and Weir, if so equipped) is in place. Fill the spa using a garden hose until the water is halfway up the “throat” of the skimmer, otherwise it will suck air, and cause the pump to “run dry” and burn up. This repair would not be covered under warranty. You should check the water level of your spa each day as there is normal evaporation each day, and more often when the spa is used frequently.
IMPORTANT: Purge the Air Out Of The System
When purging air out of the system, be sure the pump(s) are turned OFF. Open air relief valves (See Fig. 3) counterclockwise to release air until water runs out. Then close the valves. There will be one (1) relief valve per pump. So a two pump system will have two valves.
Check and tighten the PUMP UNIONS. The pump unions might have become loose during shipment. There are two unions per pump. So a two pump system will have four unions. (See Fig 4)
Figure 1
Figure 2
Figure 3
Figure 4

ONMANUFACTURER DIP SWITCH “B” SETTINGS
1 2 3 4 5 6 7 8 9 10 11 12
OFF
ONMANUFACTURER DIP SWITCH “A” SETTINGS
1 2 3 4 5 6 7 8 9 10 11 12
OFF
11
Press the function button switch on. It is important that the pump run on HIGH speed for several minutes to assure that all air has been removed from the system.
Check to see if all functions of the spa are operational. Low speed is used for filtering and heating. High speed is used for jet action. Additional functions may include operation of a blower and/or pump and blower together. Please refer to the Special Products & Features section starting on page 36, for specific product functions.
To avoid damage to the pump and heater, the Equipment Package MUST NEVER be operated unless the spa is filled with water.Be sure that water always flows freely from the hydrotherapy jets within the spa. Any blockage or restriction of this water flow by persons or objects may damage system components, create an electrical shock hazard and/ or cause water damage to the surrounding area.
WATER TESTING
It is recommended that you test your spa water regularly with an accurate test kit or test strips. These are available from your local Authorized Catalina Spa Dealer. Also, be sure to follow chemical manufacturer’s instructions for use.
pH CONTROL
All water solutions have pH, which is a measure of the acid to base relationship. A pH reading of 7.0 is neutral. A lower reading is acidic and a higher reading is basic. The proper pH for a spa is between 7.4 and 7.6. High pH (above 7.6) can reduce sanitizer efficiency, cloud the water, promote scale formation on surfaces and equipment, and interfere with filter operations. When pH is too high, add a pH decreaser. Low pH (below 7.2) is equally damaging and can cause equipment corrosion, water that is irritating, and rapid sanitizer dissipation. Add pH increaser to bring up the pH level.
EQUIPMENT RESET
Resetting the Balboa Digital Control Pack is not covered under warranty. The EL8000 Equipment Control Pack can malfunction when an electrical spike occurs. To reset it, you will need to disconnect electricity to the spa (turn off breaker). Remove the stainless steel cover plate of the equipment pack. On the backside of that cover plate is a diagram of the circuit board and descriptions of “DIP” switch settings. Locate switch bank 1 (S1) and switch pin #12 to the “ON” position. Leave it there for 1 minute before switching it back to “OFF”. Replace the cover plate and restore the electricity to the spa.

Catalina CAT8000 Topside Controller
12
OPERATIONAL INSTRUCTIONS FOR DELUXE DIGITAL CONTROL SYSTEMS
Depending on your spa features, the control buttons may not respond or be arranged as shown and described in this manual. The pump responsible for heating and filtration (pump 1 on low speed) will be referred to simply as the pump. Timeouts refer to a preset length of time that a function is programmed to operate before automatically shutting off. Certain conditions (filters or freeze control) can cause a function to operate longer, while faults can cause a function to operate for a shorter length of time. The system keeps track of timeouts regardless of other conditions occurring.
Initial Start-upWhen your spa is first activated, it will go into Priming mode (after displaying some configuration information). The Priming mode will last for up to 4 minutes and then the heater will begin to heat the spa and maintain the water temperature in the Standard mode. You can exit Priming mode early by pressing the”Warm” or “Cool” buttons. or
TEMP SET (80.0°F - 104°F / 26.0°C - 40.0°C)The start-up temperature is set at 100°F / 37.5°C. The last measured temperature is constantly displayed on the LCD. Note that the last measured spa temperature displayed is current only when the pump has been running for at least 2 minutes.
WARM / COOLPress the or button once to display the set temperature. Each time either button is pressed again, the temperature setting will increase or decrease depending on which button is pressed. After three seconds, the LCD will automatically display the last measured spa temperature.
TIMEWhen the time hasn’t been programmed, the “Time” icon flashes in the display. To set the time press “Time” then “Mode” and follow prompts, using the
or buttons to adjust time. If your spa has an optional pH/Orp sensor, Pressing twice will display the current pH level, pressing it three times will display the current Orp.
INVERTPress the “Invert” button to reverse the display if it appears upside down. You may also press the or button, followed by the “Blower” button to reverse the display.
Auxiliary Topside Panel (Models Vary)
13
Jets 1Press the “Jets 1” button once to turn pump 1 on or off, and to shift between low and high speeds (if equipped). If left running, the low speed turns off after 2 hours and the high speed turns off after 15 minutes. The low speed of pump 1 runs when the blower or any other pump is on. It may also activate for at least 2 minutes every 30 minutes to detect the spa temperature (polling) and then to heat to the programmed temperature setting if needed, depending upon mode. When the low speed turns on automatically, it cannot be deactivated from the pane; however, the high speed mode may be started.
Jets 2Press the “Jets 2” button once to turn pump 2 on or off. If left running, the pump will turn off after 15 minutes.
Jets 3 (optional)Press the “Jets 3” button once to turn pump 3 on or off. If left running, the pump will turn off after 15 minutes.
LightPress the “Light” button to turn the spa light on or off. If left on, it will automatically turn off after 4 hours.
Fiber Optics (optional)If a fiber-optic light with wheel is installed, press the “Fiber” button once to start the light and wheel. Press it again to stop the wheel. Press again to turn fiber-optics off. The fiber icon stands still when the fiber optic light is on by itself and rotates when the color wheel is on. Both spa light and the fiber-optics can be used at the same time. If left on, they will automatically turn off after 4 hours.
Mister (optional)Press the “Mister” button once to turn the mister pump on or off.
Mode/ProgThis button is used to switch between standard, economy and sleep modes. Press the “Mode/Prog” button once to enter programming mode, press to cycle through to desired mode (LCD display flashes until confirmed), then press “Mode/Prog” to confirm selection.Standard Mode is programmed to maintain the desired temperature. Note that the last measured spa temperature displayed is current only when the pump has been running for at least 2 minutes. The “Standard” icon will display until the mode is changed.Economy Mode heats the spa to set temperature only during filter cycles. The “Economy” icon will display until the mode is changed. Pressing “Jets 1” while in Economy mode puts the spa in Standard-in-Economy Mode, which operates the same as Standard Mode, except reverts to Economy mode after 1 hour. During this time, a press of the “Mode/Prog” button will revert to Economy Mode immediately.Sleep Mode heats the spa to within 20°F of the set temperature only during filter cycles. The “Sleep” icon will display until the mode is changed.

14
Blower (optional)Press the “Blower” button once to turn blower on. The blower will turn off automatically after 15 minutes. (Thermal overload protection will shut blower down automatically if it gets too hot. Blower will resume normal operation after cooling off. This is a normal function of the blower.)
Standby ModePressing or then “Jets 2” will turn off all spa functions temporarily. This is helpful when changing a filter. Pressing any button resets the spa.
Preset Filter CyclesThere are two filter cycles per day. The start/end times of each cycle are programmable. To program start/end times, follow prompts after setting the time as indicated on page 12, pressing “Mode/Prog” to advance to the next setting (or to exit after the last setting). The default cycles are as follows:The first filter cycle activates at 8:00 am and operates the pump until 10:00 am. The F1 indicator light will illuminate when cycle 1 is running.The second filter cycle activates at 8:00 pm and operates the pump until 10:00 pm. The F2 indicator light will illuminate when cycle 2 is running. The pump and ozone generator (if equipped) will run during filtration. At the start of each filter cycle, the blower will run for 30 seconds to clean out the air channels.
Cleanup Cycle (optional)When the pump or blower is turned on, a clean-up cycle begins 30 minutes after the pump or blower is turned off or times out. The pump and ozone generator will run for one hour.
Ozone Generator (optional)The ozone generator (if equipped) runs during filter cycles, except during clean-up cycles and when operating pump at high speed.
Freeze ProtectionIf the temperature sensors detect a drop to 44°F within the heater, the pump and blower will automatically activate to provide freeze protection. The equipment stays on 4 minutes after the sensors detect that the water temperature has risen to 45°F or higher. In colder climates, an additional optional sensor may be added to protect against these conditions, standard sensors might not. Ask your dealer for details. During freeze conditions spas and swim spas must be set on Standard Mode.
Locking the PanelLocking the panel will prevent unwanted program changes. To lock the panel, press “Time” , “Jets 1” then “Warm” within 3 seconds. When locked, the PL indicator is illuminated. All buttons are frozen except the “Time” button. To unlock the panel, press “Time” , “Jets 1”
then “Cool” .

15
Locking the Set TemperatureTo lock the temperature setting, press or then “Time” “Jets 1” and within 3 seconds to activate the lock. The TL indicator light will illuminate when locked. To unlock the set temperature, press or then “Time” “Jets 1” and .
Setting the TimeWhen the spa has been activated for the first time, you will see the word “Time” flashing on the LCD screen. Press then . Select the hour by pressing or (each press advances the time by an hour). Press
to set the hour. Select the minutes by pressing or (each press advances the time by a minute). Press to set the time and enter the optional filter cycle programming, or simply press to set the time and exit.
Optional Filter Cycle ProgrammingYou are not required to set filter cycles, however it is an option if you want to lengthen or shorten the filter cycles. To change the filter cycle times:Press within 3 seconds. You will see “Set Filter 1” (morning cycle) and a flashing “Start Time” icon appears on the display. Press or to choose the hour. Press to set the hour. Press or
to choose the minutes, in 5 minute increments. Press to set the minutes. Press to see “Set Filter 1” (morning cycle) and a flashing “End Time” icon appears on the display. Set end time in the same manner as above.Press to see “Set Filter 2” (evening cycle) and a flashing “Start Time” icon appears on the display. Set start time in the same manner as above.Press to see “Set Filter 2” (evening cycle) and a flashing “End Time” icon appears on the display. Set end time in the same manner as above. Setting the start and end times to the same time will provide continuous filtration. Press to enter times and exit program. Pressing at any time saves any changes and exits program.
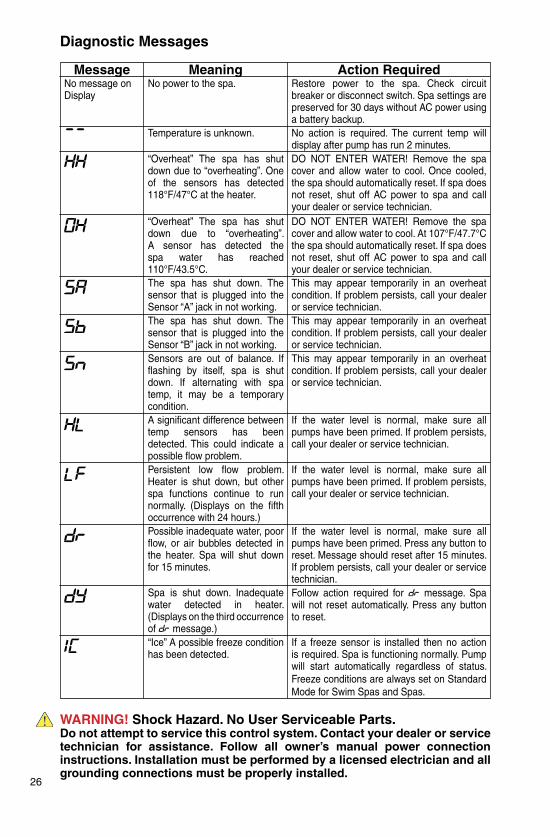
MessageNo message on Display
HTR TEMP LMT
SPA TEMP LMT
No power to the spa.
The spa has shut down due to “overheating”. A sensor has detected 118°F at the heater.
The spa has shut down due to “overheating”. A sensor has detected 110°F water temperature.
Restore power to the spa. Check circuit breaker or disconnect switch. Spa settings are preserved for 30 days without AC power using a battery backup.DO NOT ENTER WATER! Remove the spa cover and allow water to cool. Once the heater has cooled, reset by pushing any button. If spa does not reset, shut off AC power to spa and call your dealer or service technician.DO NOT ENTER WATER! Remove the spa cover and allow water to cool. Once the heater has cooled, reset by pushing any button. If spa does not reset, shut off AC power to spa and call your dealer or service technician.
Diagnostic Messages
Meaning Action Required
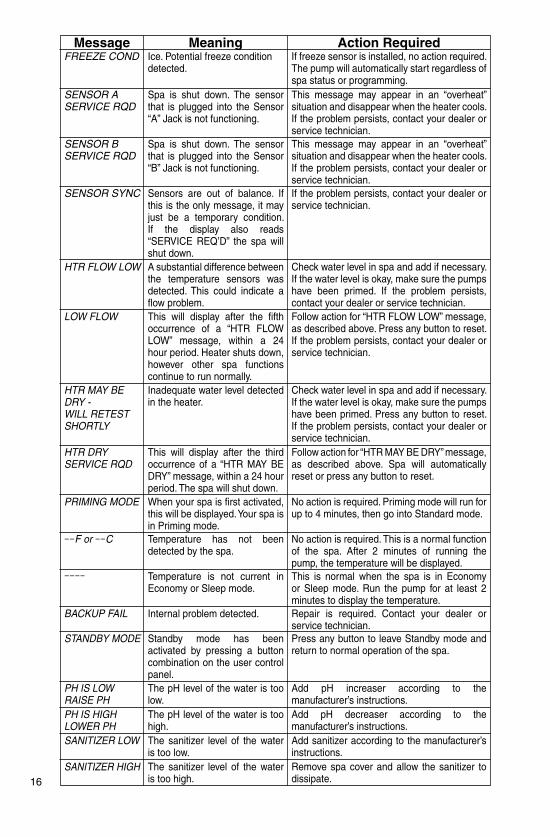
16
MessageFREEZE COND
SENSOR ASERVICE RQD
SENSOR BSERVICE RQD
SENSOR SYNC
HTR FLOW LOW
LOW FLOW
HTR MAY BE DRY -WILL RETEST SHORTLY
HTR DRY SERVICE RQD
PRIMING MODE
––F or ––C
––––
BACKUP FAIL
STANDBY MODE
PH IS LOWRAISE PHPH IS HIGHLOWER PHSANITIZER LOW
SANITIZER HIGH
Ice. Potential freeze condition detected.
Spa is shut down. The sensor that is plugged into the Sensor “A” Jack is not functioning.
Spa is shut down. The sensor that is plugged into the Sensor “B” Jack is not functioning.
Sensors are out of balance. If this is the only message, it may just be a temporary condition. If the display also reads “SERVICE REQ’D” the spa will shut down.A substantial difference between the temperature sensors was detected. This could indicate a flow problem.This will display after the fifth occurrence of a “HTR FLOW LOW” message, within a 24 hour period. Heater shuts down, however other spa functions continue to run normally.Inadequate water level detected in the heater.
This will display after the third occurrence of a “HTR MAY BE DRY” message, within a 24 hour period. The spa will shut down.When your spa is first activated, this will be displayed. Your spa is in Priming mode.Temperature has not been detected by the spa.
Temperature is not current in Economy or Sleep mode.
Internal problem detected.
Standby mode has been activated by pressing a button combination on the user control panel.The pH level of the water is too low.The pH level of the water is too high.The sanitizer level of the water is too low.The sanitizer level of the water is too high.
If freeze sensor is installed, no action required. The pump will automatically start regardless of spa status or programming.This message may appear in an “overheat” situation and disappear when the heater cools. If the problem persists, contact your dealer or service technician.This message may appear in an “overheat” situation and disappear when the heater cools. If the problem persists, contact your dealer or service technician.If the problem persists, contact your dealer or service technician.
Check water level in spa and add if necessary. If the water level is okay, make sure the pumps have been primed. If the problem persists, contact your dealer or service technician.Follow action for “HTR FLOW LOW” message, as described above. Press any button to reset. If the problem persists, contact your dealer or service technician.
Check water level in spa and add if necessary. If the water level is okay, make sure the pumps have been primed. Press any button to reset. If the problem persists, contact your dealer or service technician.Follow action for “HTR MAY BE DRY” message, as described above. Spa will automatically reset or press any button to reset.
No action is required. Priming mode will run for up to 4 minutes, then go into Standard mode.
No action is required. This is a normal function of the spa. After 2 minutes of running the pump, the temperature will be displayed.This is normal when the spa is in Economy or Sleep mode. Run the pump for at least 2 minutes to display the temperature.Repair is required. Contact your dealer or service technician.Press any button to leave Standby mode and return to normal operation of the spa.
Add pH increaser according to the manufacturer’s instructions.Add pH decreaser according to the manufacturer’s instructions.Add sanitizer according to the manufacturer’s instructions.Remove spa cover and allow the sanitizer to dissipate.
Meaning Action Required

17
MessageCHECK PH
CK SANITIZER
CLEAN FILTER
TEST GFCI
DRAIN WATER
CHANGE MINERAL CARTRIDGECLEAN COVER
TREAT WOOD
NEW FILTER
Every 7 days
Every 7 days
Every 7 days
Every 30 days
Every 90 days
Every 90 days
Every 180 days
Every 180 days
Every 365 days
Test and adjust the pH level per manufacturer’s instructions.Test and adjust the sanitizer level per manufacturer’s instructions.Remove, clean and re-install filter cartridge. Follow filter manufacturer’s cleaning directions.Test and Reset GFCI device per manufacturer’s directions.Drain and refill spa. Follow the directions in this manual.If your spa is equipped with a mineral cartridge, replace the cartridge.
Clean and condition the spa cover per manufacturer’s instructions.Clean and condition the cabinet wood. Follow manufacturer’s instructions for applying finish.Install a new filter.
Frequency Action Required
Periodic Reminder Messages (Press the “Mode” button to clear a displayed reminder.)
WARNING! Shock Hazard. No User Serviceable Parts.Do not attempt to service this control system. Contact your dealer or service technician for assistance. Follow all owner’s manual power connection instructions. Installation must be performed by a licensed electrician and all grounding connections must be properly installed.

18
Catalina CAT200 Topside Controller
Don’t Panic! No Programming is Necessary!
Initial Start-upWhen your spa is first activated, it begins running in “Economy” mode. This setting is designed for periods of little or no spa use, but the spa continues to filter twice a day to maintain water quality. Press the button to switch the spa to “Standard” mode and your spa will automatically heat and maintain the water temperature at the desired program setting. The factory default temperature setting is 100°F.
Setting the Time of DayWhen your spa is first powered up, the words “SET TIME” will flash on the display. To set the time, press , then or . After or is pressed once,the time will begin changing in one-minute increments. Press either pad to stop the time from advancing. Press to enter the time into the system.
Water Temperature AdjustmentThe water temperature can be adjusted from 80°F - 104°F. Press either or
to increase or decrease the water temperature. After three seconds, the LCD will display the current spa temperature.
Optional Filter Cycle ProgrammingYour spa will automatically filter itself twice a day. The low speed of the pump and ozone generator (if equipped) will run the duration of each filter cycle.While you are not required to set filter cycles, you can make changes anytime by pressing within 3 seconds. “SET START FILTER 1” (a.m. cycle) will appear on the display. Press or to reset the filter start time.When “SET HEAT” appears on the display, press to warm the water during the filter cycle or to disable the heater.Press to see “SET STOP FILTER 1” and adjust the time in the same manner as above.Press to see “SET START FILTER 2” and proceed as above. Pressing will enter the new cycle times and display the current water temperature.
19
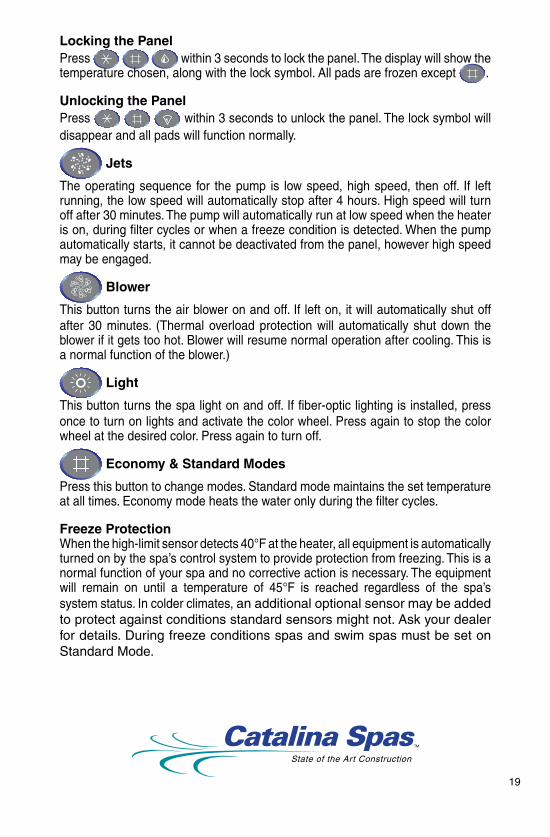
Locking the PanelPress within 3 seconds to lock the panel. The display will show the temperature chosen, along with the lock symbol. All pads are frozen except .
Unlocking the PanelPress within 3 seconds to unlock the panel. The lock symbol will disappear and all pads will function normally.
Jets
The operating sequence for the pump is low speed, high speed, then off. If left running, the low speed will automatically stop after 4 hours. High speed will turn off after 30 minutes. The pump will automatically run at low speed when the heater is on, during filter cycles or when a freeze condition is detected. When the pump automatically starts, it cannot be deactivated from the panel, however high speed may be engaged.
Blower
This button turns the air blower on and off. If left on, it will automatically shut off after 30 minutes. (Thermal overload protection will automatically shut down the blower if it gets too hot. Blower will resume normal operation after cooling. This is a normal function of the blower.)
Light
This button turns the spa light on and off. If fiber-optic lighting is installed, press once to turn on lights and activate the color wheel. Press again to stop the color wheel at the desired color. Press again to turn off.
Economy & Standard Modes
Press this button to change modes. Standard mode maintains the set temperature at all times. Economy mode heats the water only during the filter cycles.
Freeze ProtectionWhen the high-limit sensor detects 40°F at the heater, all equipment is automatically turned on by the spa’s control system to provide protection from freezing. This is a normal function of your spa and no corrective action is necessary. The equipment will remain on until a temperature of 45°F is reached regardless of the spa’s system status. In colder climates, an additional optional sensor may be added to protect against conditions standard sensors might not. Ask your dealer for details. During freeze conditions spas and swim spas must be set on Standard Mode.

WARNING! Shock Hazard. No User Serviceable Parts.Do not attempt to service this control system. Contact your dealer or service technician for assistance. Follow all owner’s manual power connection instructions. Installation must be performed by a licensed electrician and all grounding connections must be properly installed.
20
MessageNo message on Display
No power to the spa.
“Overheat” The spa has shut down due to “overheating”. Either the spa water has reached 112°F or the high-limit sensor has detected 118°F at the heater.“Flow” (Flashing) The flow of water is inhibited.“Flow” (Not Flashing) A pressure switch has malfunctioned.“Cool” The water temperature is 20°F or more below the programmed temperature.“Ice” A potential freeze condition has been detected.
“Sensor 1” Spa is shut down. High-limit sensor is not working.“Sensor 3” Spa is shut down. Water temperature sensor is not working.
Restore power to the spa. Check circuit breaker or disconnect switch. Spa settings are preserved for 30 days without AC power using a battery backup.DO NOT ENTER WATER! Remove the spa cover and allow water to cool. At 110°F the spa should automatically reset. If spa does not reset, shut off AC power to spa and call your dealer or service technician.
Check to be sure all flow valves are open. Be sure the water level is correct. Clean filter. If problem persists, call your dealer or service technician.No action is required. Spa is functioning normally.
If a freeze sensor is installed then no action is required. Spa is functioning normally. Pump will start automatically regardless of status.Contact your dealer or service technician.
Contact your dealer or service technician.
Diagnostic Messages
Meaning Action Required
Catalina’s Cool Mist System
21
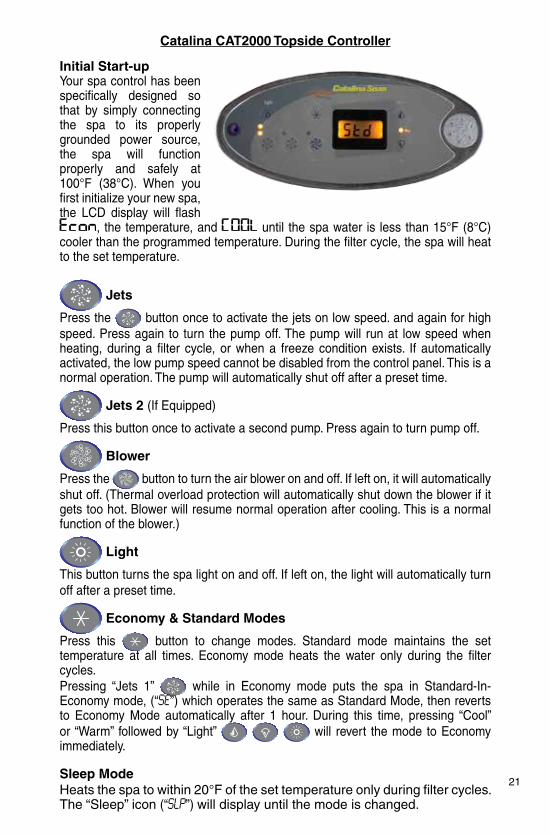
Catalina CAT2000 Topside Controller
Initial Start-upYour spa control has been specifically designed so that by simply connecting the spa to its properly grounded power source, the spa will function properly and safely at 100°F (38°C). When you first initialize your new spa, the LCD display will flash
, the temperature, and until the spa water is less than 15°F (8°C) cooler than the programmed temperature. During the filter cycle, the spa will heat to the set temperature.
Jets
Press the button once to activate the jets on low speed. and again for high speed. Press again to turn the pump off. The pump will run at low speed when heating, during a filter cycle, or when a freeze condition exists. If automatically activated, the low pump speed cannot be disabled from the control panel. This is a normal operation. The pump will automatically shut off after a preset time.
Jets 2 (If Equipped)
Press this button once to activate a second pump. Press again to turn pump off.
Blower
Press the button to turn the air blower on and off. If left on, it will automatically shut off. (Thermal overload protection will automatically shut down the blower if it gets too hot. Blower will resume normal operation after cooling. This is a normal function of the blower.)
Light
This button turns the spa light on and off. If left on, the light will automatically turn off after a preset time.
Economy & Standard Modes
Press this button to change modes. Standard mode maintains the set temperature at all times. Economy mode heats the water only during the filter cycles.Pressing “Jets 1” while in Economy mode puts the spa in Standard-In-Economy mode, (“SE”) which operates the same as Standard Mode, then reverts to Economy Mode automatically after 1 hour. During this time, pressing “Cool” or “Warm” followed by “Light” will revert the mode to Economy immediately.
Sleep Mode Heats the spa to within 20°F of the set temperature only during filter cycles. The “Sleep” icon (“Slp”) will display until the mode is changed.
WARNING! Shock Hazard. No User Serviceable Parts.Do not attempt to service this control system. Contact your dealer or service technician for assistance. Follow all owner’s manual power connection instructions. Installation must be performed by a licensed electrician and all grounding connections must be properly installed.
22
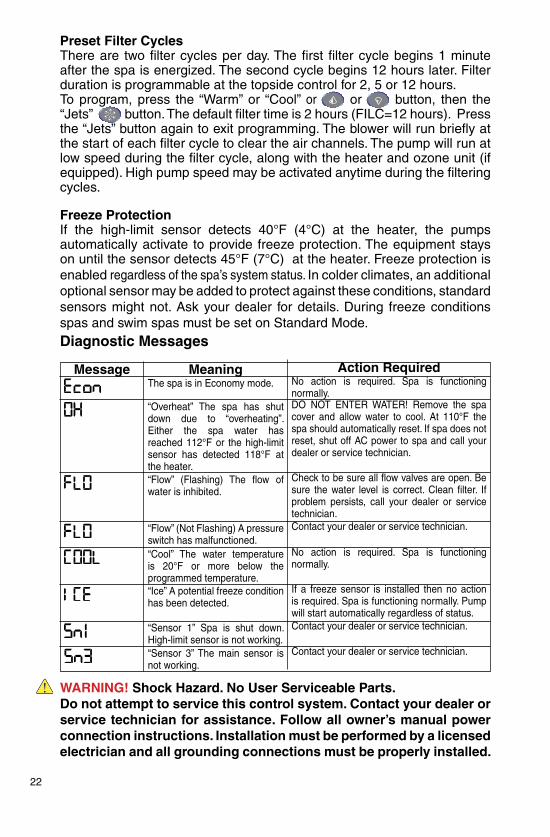
Preset Filter CyclesThere are two filter cycles per day. The first filter cycle begins 1 minute after the spa is energized. The second cycle begins 12 hours later. Filter duration is programmable at the topside control for 2, 5 or 12 hours.To program, press the “Warm” or “Cool” or or button, then the “Jets” button. The default filter time is 2 hours (FILC=12 hours). Press the “Jets” button again to exit programming. The blower will run briefly at the start of each filter cycle to clear the air channels. The pump will run at low speed during the filter cycle, along with the heater and ozone unit (if equipped). High pump speed may be activated anytime during the filtering cycles.
Freeze ProtectionIf the high-limit sensor detects 40°F (4°C) at the heater, the pumps automatically activate to provide freeze protection. The equipment stays on until the sensor detects 45°F (7°C) at the heater. Freeze protection is enabled regardless of the spa’s system status. In colder climates, an additional optional sensor may be added to protect against these conditions, standard sensors might not. Ask your dealer for details. During freeze conditions spas and swim spas must be set on Standard Mode.Diagnostic Messages
MessageThe spa is in Economy mode.
“Overheat” The spa has shut down due to “overheating”. Either the spa water has reached 112°F or the high-limit sensor has detected 118°F at the heater.“Flow” (Flashing) The flow of water is inhibited.
“Flow” (Not Flashing) A pressure switch has malfunctioned.“Cool” The water temperature is 20°F or more below the programmed temperature.“Ice” A potential freeze condition has been detected.
“Sensor 1” Spa is shut down. High-limit sensor is not working.“Sensor 3” The main sensor is not working.
No action is required. Spa is functioning normally.DO NOT ENTER WATER! Remove the spa cover and allow water to cool. At 110°F the spa should automatically reset. If spa does not reset, shut off AC power to spa and call your dealer or service technician.
Check to be sure all flow valves are open. Be sure the water level is correct. Clean filter. If problem persists, call your dealer or service technician.Contact your dealer or service technician.
No action is required. Spa is functioning normally.
If a freeze sensor is installed then no action is required. Spa is functioning normally. Pump will start automatically regardless of status.Contact your dealer or service technician.
Contact your dealer or service technician.
Meaning Action Required
23
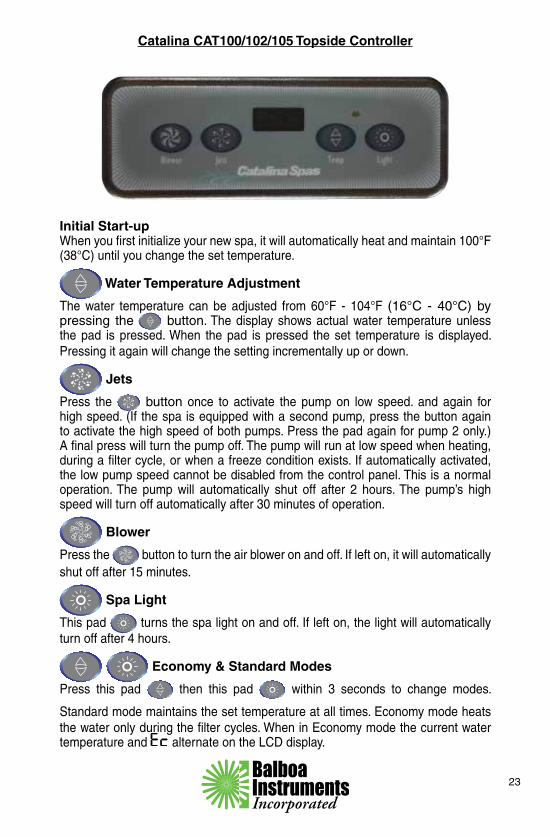
Catalina CAT100/102/105 Topside Controller
Initial Start-upWhen you first initialize your new spa, it will automatically heat and maintain 100°F (38°C) until you change the set temperature.
Water Temperature Adjustment
The water temperature can be adjusted from 60°F - 104°F (16°C - 40°C) by pressing the button. The display shows actual water temperature unless the pad is pressed. When the pad is pressed the set temperature is displayed. Pressing it again will change the setting incrementally up or down.
Jets
Press the button once to activate the pump on low speed. and again for high speed. (If the spa is equipped with a second pump, press the button again to activate the high speed of both pumps. Press the pad again for pump 2 only.) A final press will turn the pump off. The pump will run at low speed when heating, during a filter cycle, or when a freeze condition exists. If automatically activated, the low pump speed cannot be disabled from the control panel. This is a normal operation. The pump will automatically shut off after 2 hours. The pump’s high speed will turn off automatically after 30 minutes of operation.
Blower
Press the button to turn the air blower on and off. If left on, it will automatically shut off after 15 minutes.
Spa Light
This pad turns the spa light on and off. If left on, the light will automatically turn off after 4 hours.
Economy & Standard Modes
Press this pad then this pad within 3 seconds to change modes.
Standard mode maintains the set temperature at all times. Economy mode heats the water only during the filter cycles. When in Economy mode the current water temperature and alternate on the LCD display.

WARNING! Shock Hazard. No User Serviceable Parts.Do not attempt to service this control system. Contact your dealer or service technician for assistance. Follow all owner’s manual power connection instructions. Installation must be performed by a licensed electrician and all grounding connections must be properly installed.24
Fiber Optics (optional)If a fiber-optic light with wheel is installed, press the “Fiber” button once to start the light and wheel. Press it again to stop the wheel at the desired color. Press again to turn fiber-optics off. The fiber icon stands still when the fiber optic light is on by itself and rotates when the color wheel is on. Both spa light and the fiber-optics can be used at the same time. If left on, they will automatically turn off after 4 hours.
Preset Filter CyclesThere are two filter cycles per day. The first filter cycle begins 1 minute after the spa is energized. The second cycle begins 12 hours later. Filter duration is programmable at the topside control for 2, 4, 6, or 8 hours. The default filter time is 2 hours.To program, press the “Temp” pad , then the “Jets” button. Press the “Temp” pad again to select the filter duration. Press the pad again to exit programming. The pump will run at low speed during the filter cycle, along with the ozone unit (if equipped). The mister will clean out for 5 seconds during each filter cycle. The blower will run for 30 seconds at the start of each filter cycle to clear the air channels.
Freeze ProtectionIf the high-limit sensor detects 40°F (4°C) at the heater, the pump(s) automatically activate to provide freeze protection. The equipment stays on until the sensor detects 45°F (7°C) at the heater. Freeze protection is enabled regardless of the spa’s system status. In colder climates, an additional optional sensor may be added to protect against these conditions, standard sensors might not. Ask your dealer for details. Freeze conditions are always set on Standard Mode for Swim Spas and Spas.
Auxiliary Panel (optional)If your spa is equipped with an Auxiliary panel, use it to activate the mister feature. If the mister is left on, it will automatically shut off after 15 minutes. The mister system will purge twice a day for 5 seconds.
Diagnostic Messages
MessageThe spa is in Economy mode.
“Overheat” The spa has shut down due to “overheating”. Either the spa water has reached 112°F or the high-limit sensor has detected 118°F at the heater.“Flow” A pressure switch is not working properly.“Sensor 1” Spa is shut down. High-limit sensor is not working.
No action is required. Spa is functioning normally.DO NOT ENTER WATER! Remove the spa cover and allow water to cool. At 110°F the spa should automatically reset. If spa does not reset, shut off AC power to spa and call your dealer or service technician.
Call your dealer or service technician.
Contact your dealer or service technician.
Meaning Action Required
25
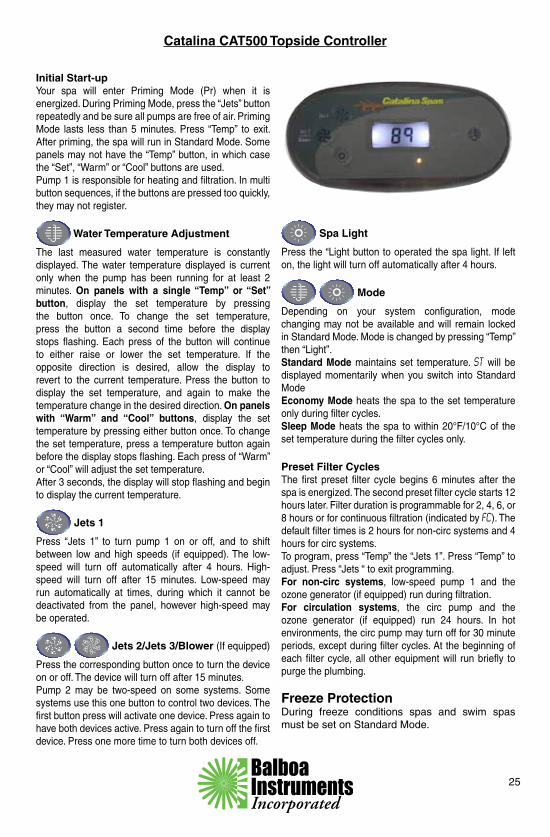
Catalina CAT500 Topside Controller
Initial Start-upYour spa will enter Priming Mode (Pr) when it is energized. During Priming Mode, press the “Jets” button repeatedly and be sure all pumps are free of air. Priming Mode lasts less than 5 minutes. Press “Temp” to exit. After priming, the spa will run in Standard Mode. Some panels may not have the “Temp” button, in which case the “Set”, “Warm” or “Cool” buttons are used.Pump 1 is responsible for heating and filtration. In multi button sequences, if the buttons are pressed too quickly, they may not register.
Water Temperature Adjustment
The last measured water temperature is constantly displayed. The water temperature displayed is current only when the pump has been running for at least 2 minutes. On panels with a single “Temp” or “Set” button, display the set temperature by pressing the button once. To change the set temperature, press the button a second time before the display stops flashing. Each press of the button will continue to either raise or lower the set temperature. If the opposite direction is desired, allow the display to revert to the current temperature. Press the button to display the set temperature, and again to make the temperature change in the desired direction. On panels with “Warm” and “Cool” buttons, display the set temperature by pressing either button once. To change the set temperature, press a temperature button again before the display stops flashing. Each press of “Warm” or “Cool” will adjust the set temperature.After 3 seconds, the display will stop flashing and begin to display the current temperature.
Jets 1
Press “Jets 1” to turn pump 1 on or off, and to shift between low and high speeds (if equipped). The low-speed will turn off automatically after 4 hours. High-speed will turn off after 15 minutes. Low-speed may run automatically at times, during which it cannot be deactivated from the panel, however high-speed may be operated.
Jets 2/Jets 3/Blower (If equipped)
Press the corresponding button once to turn the device on or off. The device will turn off after 15 minutes.Pump 2 may be two-speed on some systems. Some systems use this one button to control two devices. The first button press will activate one device. Press again to have both devices active. Press again to turn off the first device. Press one more time to turn both devices off.
Spa Light
Press the “Light button to operated the spa light. If left on, the light will turn off automatically after 4 hours.
Mode
Depending on your system configuration, mode changing may not be available and will remain locked in Standard Mode. Mode is changed by pressing “Temp” then “Light”.Standard Mode maintains set temperature. ST will be displayed momentarily when you switch into Standard ModeEconomy Mode heats the spa to the set temperature only during filter cycles.Sleep Mode heats the spa to within 20°F/10°C of the set temperature during the filter cycles only.
Preset Filter CyclesThe first preset filter cycle begins 6 minutes after the spa is energized. The second preset filter cycle starts 12 hours later. Filter duration is programmable for 2, 4, 6, or 8 hours or for continuous filtration (indicated by FC). The default filter times is 2 hours for non-circ systems and 4 hours for circ systems.To program, press “Temp” the “Jets 1”. Press “Temp” to adjust. Press “Jets “ to exit programming.For non-circ systems, low-speed pump 1 and the ozone generator (if equipped) run during filtration.For circulation systems, the circ pump and the ozone generator (if equipped) run 24 hours. In hot environments, the circ pump may turn off for 30 minute periods, except during filter cycles. At the beginning of each filter cycle, all other equipment will run briefly to purge the plumbing.
Freeze ProtectionDuring freeze conditions spas and swim spas must be set on Standard Mode.
WARNING! Shock Hazard. No User Serviceable Parts.Do not attempt to service this control system. Contact your dealer or service technician for assistance. Follow all owner’s manual power connection instructions. Installation must be performed by a licensed electrician and all grounding connections must be properly installed.
26
Diagnostic Messages
Message
Temperature is unknown.
“Overheat” The spa has shut down due to “overheating”. A sensor has detected the spa water has reached 110°F/43.5°C.
“Overheat” The spa has shut down due to “overheating”. One of the sensors has detected 118°F/47°C at the heater.
The spa has shut down. The sensor that is plugged into the Sensor “B” jack in not working.
The spa has shut down. The sensor that is plugged into the Sensor “A” jack in not working.
Sensors are out of balance. If flashing by itself, spa is shut down. If alternating with spa temp, it may be a temporary condition.A significant difference between temp sensors has been detected. This could indicate a possible flow problem.Persistent low flow problem. Heater is shut down, but other spa functions continue to run normally. (Displays on the fifth occurrence with 24 hours.)Possible inadequate water, poor flow, or air bubbles detected in the heater. Spa will shut down for 15 minutes.
Spa is shut down. Inadequate water detected in heater. (Displays on the third occurrence of message.)“Ice” A possible freeze condition has been detected.
No action is required. The current temp will display after pump has run 2 minutes.
DO NOT ENTER WATER! Remove the spa cover and allow water to cool. At 107°F/47.7°C the spa should automatically reset. If spa does not reset, shut off AC power to spa and call your dealer or service technician.
DO NOT ENTER WATER! Remove the spa cover and allow water to cool. Once cooled, the spa should automatically reset. If spa does not reset, shut off AC power to spa and call your dealer or service technician.
This may appear temporarily in an overheat condition. If problem persists, call your dealer or service technician.
This may appear temporarily in an overheat condition. If problem persists, call your dealer or service technician.
This may appear temporarily in an overheat condition. If problem persists, call your dealer or service technician.
If the water level is normal, make sure all pumps have been primed. If problem persists, call your dealer or service technician.
If the water level is normal, make sure all pumps have been primed. If problem persists, call your dealer or service technician.
If the water level is normal, make sure all pumps have been primed. Press any button to reset. Message should reset after 15 minutes. If problem persists, call your dealer or service technician.Follow action required for message. Spa will not reset automatically. Press any button to reset.
If a freeze sensor is installed then no action is required. Spa is functioning normally. Pump will start automatically regardless of status. Freeze conditions are always set on Standard Mode for Swim Spas and Spas.
Meaning Action RequiredNo message on Display
No power to the spa. Restore power to the spa. Check circuit breaker or disconnect switch. Spa settings are preserved for 30 days without AC power using a battery backup.
27
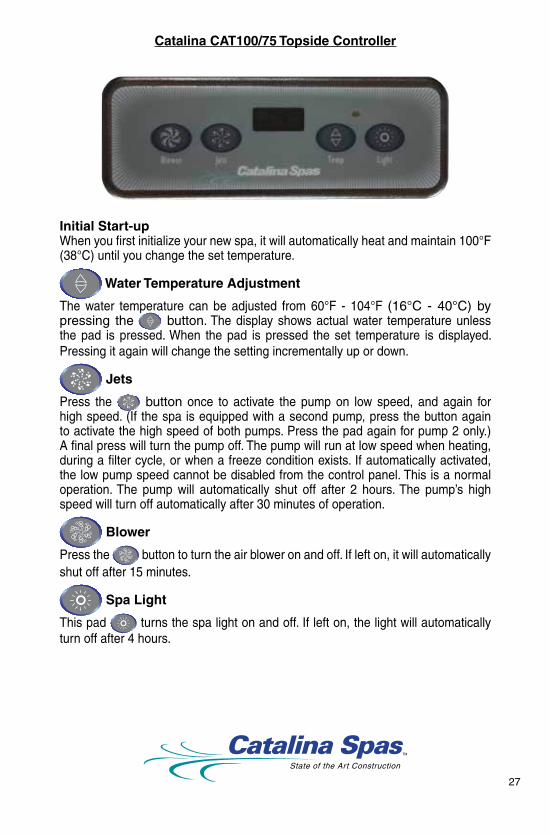
Catalina CAT100/75 Topside Controller
Initial Start-upWhen you first initialize your new spa, it will automatically heat and maintain 100°F (38°C) until you change the set temperature.
Water Temperature Adjustment
The water temperature can be adjusted from 60°F - 104°F (16°C - 40°C) by pressing the button. The display shows actual water temperature unless the pad is pressed. When the pad is pressed the set temperature is displayed. Pressing it again will change the setting incrementally up or down.
Jets
Press the button once to activate the pump on low speed, and again for high speed. (If the spa is equipped with a second pump, press the button again to activate the high speed of both pumps. Press the pad again for pump 2 only.) A final press will turn the pump off. The pump will run at low speed when heating, during a filter cycle, or when a freeze condition exists. If automatically activated, the low pump speed cannot be disabled from the control panel. This is a normal operation. The pump will automatically shut off after 2 hours. The pump’s high speed will turn off automatically after 30 minutes of operation.
Blower
Press the button to turn the air blower on and off. If left on, it will automatically shut off after 15 minutes.
Spa Light
This pad turns the spa light on and off. If left on, the light will automatically turn off after 4 hours.
28
WARNING! Shock Hazard. No User Serviceable Parts.Do not attempt to service this control system. Contact your dealer or service technician for assistance. Follow all owner’s manual power connection instructions. Installation must be performed by a licensed electrician and all grounding connections must be properly installed.
Preset Filter Cycles
There are two filter cycles per day. The first filter cycle begins 1 minute after the spa is energized. The second cycle begins 12 hours later. Filter duration is programmable at the topside control for 2, 4, 6, or 8 hours. The default filter time is 2 hours.To program, press the “Temp” pad , then the “Jets” button. Press the “Temp” pad again to select the filter duration. Press the pad again to exit programming. The pump will run at low speed during the filter cycle, along with the ozone unit (if equipped). The mister will clean out for 5 seconds during each filter cycle. The blower will run for 30 seconds at the start of each filter cycle to clear the air channels.
Freeze ProtectionIf the high-limit sensor detects 40°F (4°C) at the heater, the pump(s) automatically activate to provide freeze protection. The equipment stays on until the sensor detects 45°F (7°C) at the heater. Freeze protection is enabled regardless of the spa’s system status. In colder climates, an additional optional sensor may be added to protect against these conditions, standard sensors might not. Ask your dealer for details. During freeze conditions spas and swim spas must be set on Standard Mode.
Diagnostic Messages
Message“Overheat” The spa has shut down due to “overheating”. Either the spa water has reached 112°F or the high-limit sensor has detected 118°F at the heater.“Flow” A pressure switch is not working properly.“Sensor 1” Spa is shut down. High-limit sensor is not working.
DO NOT ENTER WATER! Remove the spa cover and allow water to cool. At 110°F the spa should automatically reset. If spa does not reset, shut off AC power to spa and call your dealer or service technician.
Call your dealer or service technician.
Contact your dealer or service technician.
Meaning Action Required
Spa with Optional LED Lighting Package

29
GENERAL MAINTENANCE AND CARE
Cleaning Your Spa
Spa ShellEach time you drain you spa, before you refill it, you should clean your spa shell with an acrylic cleaner. An acrylic cleaner is a non-oil based product specifically formulated to clean and protect the spa’s finish from chemical and mineral damage associated with normal spa use. 1. Spray Acrylic Multi-Purpose Cleaner directly onto spa’s finish. 2. Wipe clean with a soft cloth. 3. Repeat on heavily calcified areas. 4. Wipe spa thoroughly with a wet sponge, rinsing often in a bucket of clean water. 5. Allow the spa to dry completely. 6. Apply a coat of Fast Sheen to the spa’s entire finish with a soft clean cloth or sponge. 7. Allow Fast Sheen to dry until white and powdery. 8. Buff clean with a soft cloth, rotating frequently.
Important: Do not use any of these products on spas full of water. Do not use in direct sunlight. Only apply to clean, cool and dry surfaces. Follow the manufacturer’s product directions carefully. Incorrect product usage may cause water clarity issues.
Draining the WaterEvery two to five months, you should drain and clean your spa. Locate the drain hose near the Equipment Pack (see photo below). Remove the cap and attach a garden hose. Open the green valve to drain the spa. Clean the spa as described above.(See page 22 covering disposal of spa water.)
To temporarily remove foam, apply anti foaming agent to affected areas. To correct the condition, be sure the water is balanced.
Refilling Your SpaUsing a garden hose, refill your spa as described in the Start Up Procedures on page 10. Be sure to add a metal build-up inhibitor to the water, each time you refill your spa. Shock treat the water with a non-chlorine shock each week.
Filter MaintenanceAt least once a week, check and clean the skimmer basket and weir to insure proper filter flow. Remove leaves, foreign matter and debris when present. It is very important to keep your spa filter cartridge clean and free of particles that can obstruct water flow. (continued on next page)

30
Filter Maintenance (continued)A clean filter will allow the hydrotherapy system to function at optimum conditions and allows for more efficient filtering. Depending on how frequently your spa is used, we recommend cleaning the filter every four to six weeks. If this is not done, the filter may clog and restrict water flow. This will cause inadequate filtering and poor jet performance.
Filter Sizes
Cleaning the FilterTurn filter basket clockwise to unlock and pull basket and weir out. Carefully pull the filter cartridge up and bring it out of the spa. Rinse cartridge using a garden hose and spray nozzle. Rotate and separate the filter pleats while spraying water to remove as much debris as possible. Let the filter dry and look for calcium deposits (scaling) or an oil film. If you see these conditions, you will need to deep clean the cartridge with a “spa filter” cleaning solution. This will break down and remove the deposits and oils. Follow cleaner manufacturer’s directions closely for best results.
Removal of Large Side-by-Side Filter
Step 1: Remove weir gate assembly or skimmer door by pulling it up towards you and lift out. (Fig. 2)
Step 2: Remove basket assembly by sliding out and lifting away. (Fig. 3)
Step 3: To remove the two filter cartridges, turn counter-clockwise to loosen, then lift up and out. (Fig. 4)
Step 4: To install, reverse the process.
Filter types will vary. Follow manufacturer’s directions for filter removal or consult your spa dealer for more information.
Type15 Sq. Ft. 046 (Sapphire Models Only)
050
054
058
Single Cartridge
Set of 2
Set of 2
Set of 2
35 Sq. Ft.
50 Sq. Ft.
120 Sq. Ft.
Total Square Feet Catalina Part No.
Figure 1
Figure 2
Figure 3
Figure 4
31
Mahogany Cabinet MaintenanceThe Mahogany wood cabinet must be refinished with Superdeck Duckback Oil every six months or so, to keep the wood looking new and give it lasting protection. The Superdeck Duckback Oil can be purchased at your local Catalina Spa Dealer. Follow manufacturer’s directions when applying the finish. If the spa is indoors, less cabinet maintenance will be required. Make sure to have proper ventilation before refinishing the cabinet.
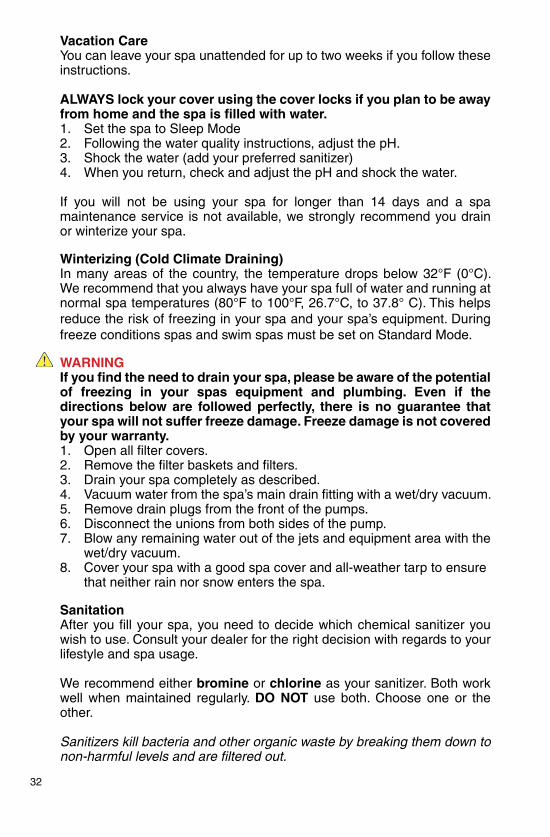
Spa Light Lens InstallationColored lenses may be included with older spa lights. To install, simply push on over the light. Pull off to remove. Newer spa models are now equipped with LED lights and no lenses are required.
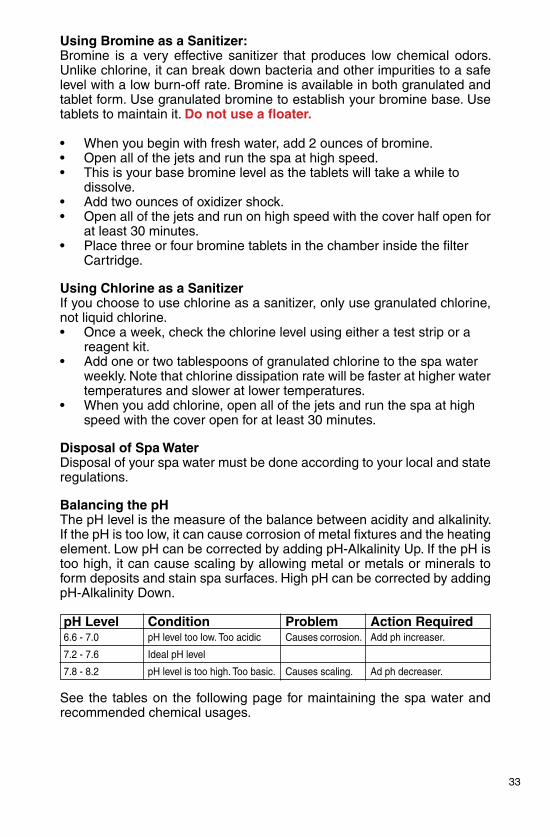
Jet RemovalTurn the Jet counter-clockwise to loosen, then slide out to remove.
Spa Cover and PillowsDue to constant punishment, your spa cover and pillows should be protected by using a vinyl and leather cleaner. This should be part of your monthly maintenance plan. Make sure you use a product that is specifically designed to protect spa covers and pillows from harmful chemical and U.V. exposure. These cleaners will protect without leaving any oily residue. These products are available at your local Catalina Spa Dealer.
WARNINGDO NOT use automotive vinyl protectors on spa covers or pillows. These products are generally petroleum-based and will cause severe water clarity issues that are difficult to correct.
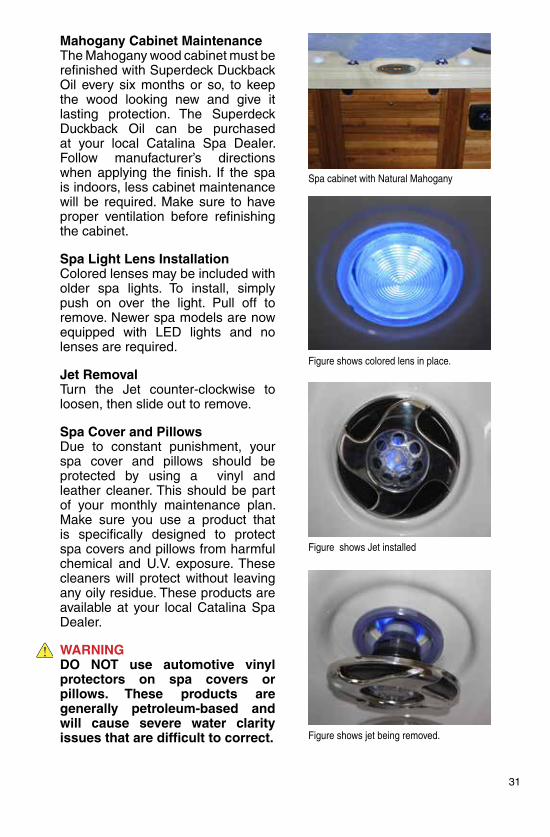
Spa cabinet with Natural Mahogany
Figure shows colored lens in place.
Figure shows Jet installed
Figure shows jet being removed.
32
Vacation CareYou can leave your spa unattended for up to two weeks if you follow these instructions.
ALWAYS lock your cover using the cover locks if you plan to be away from home and the spa is filled with water.1. Set the spa to Sleep Mode2. Following the water quality instructions, adjust the pH.3. Shock the water (add your preferred sanitizer)4. When you return, check and adjust the pH and shock the water.
If you will not be using your spa for longer than 14 days and a spa maintenance service is not available, we strongly recommend you drain or winterize your spa.
Winterizing (Cold Climate Draining)In many areas of the country, the temperature drops below 32°F (0°C). We recommend that you always have your spa full of water and running at normal spa temperatures (80°F to 100°F, 26.7°C, to 37.8° C). This helps reduce the risk of freezing in your spa and your spa’s equipment. During freeze conditions spas and swim spas must be set on Standard Mode.
WARNINGIf you find the need to drain your spa, please be aware of the potential of freezing in your spas equipment and plumbing. Even if the directions below are followed perfectly, there is no guarantee that your spa will not suffer freeze damage. Freeze damage is not covered by your warranty.1. Open all filter covers.2. Remove the filter baskets and filters.3. Drain your spa completely as described.4. Vacuum water from the spa’s main drain fitting with a wet/dry vacuum.5. Remove drain plugs from the front of the pumps.6. Disconnect the unions from both sides of the pump.7. Blow any remaining water out of the jets and equipment area with the wet/dry vacuum.8. Cover your spa with a good spa cover and all-weather tarp to ensure that neither rain nor snow enters the spa.
SanitationAfter you fill your spa, you need to decide which chemical sanitizer you wish to use. Consult your dealer for the right decision with regards to your lifestyle and spa usage.
We recommend either bromine or chlorine as your sanitizer. Both work well when maintained regularly. DO NOT use both. Choose one or the other.
Sanitizers kill bacteria and other organic waste by breaking them down to non-harmful levels and are filtered out.
33
Using Bromine as a Sanitizer:Bromine is a very effective sanitizer that produces low chemical odors. Unlike chlorine, it can break down bacteria and other impurities to a safe level with a low burn-off rate. Bromine is available in both granulated and tablet form. Use granulated bromine to establish your bromine base. Use tablets to maintain it. Do not use a floater.
• When you begin with fresh water, add 2 ounces of bromine.• Open all of the jets and run the spa at high speed.• This is your base bromine level as the tablets will take a while to dissolve.• Add two ounces of oxidizer shock.• Open all of the jets and run on high speed with the cover half open for at least 30 minutes.• Place three or four bromine tablets in the chamber inside the filter Cartridge.
Using Chlorine as a SanitizerIf you choose to use chlorine as a sanitizer, only use granulated chlorine, not liquid chlorine.• Once a week, check the chlorine level using either a test strip or a reagent kit.• Add one or two tablespoons of granulated chlorine to the spa water weekly. Note that chlorine dissipation rate will be faster at higher water temperatures and slower at lower temperatures.• When you add chlorine, open all of the jets and run the spa at high speed with the cover open for at least 30 minutes.
Disposal of Spa WaterDisposal of your spa water must be done according to your local and state regulations.
Balancing the pHThe pH level is the measure of the balance between acidity and alkalinity. If the pH is too low, it can cause corrosion of metal fixtures and the heating element. Low pH can be corrected by adding pH-Alkalinity Up. If the pH is too high, it can cause scaling by allowing metal or metals or minerals to form deposits and stain spa surfaces. High pH can be corrected by adding pH-Alkalinity Down.
pH LevelpH level too low. Too acidic6.6 - 7.0 Causes corrosion. Add ph increaser.
Causes scaling. Ad ph decreaser.
7.2 - 7.6
7.8 - 8.2
Ideal pH level
pH level is too high. Too basic.
Condition Problem Action Required
See the tables on the following page for maintaining the spa water and recommended chemical usages.

34
Testing For
Problem
Chlorine pH Total Alkalinity Calcium Hardness
80
150
7.4
3
2
6.7
5.7
120
200
7.6
5
4
11
10
Total Alkalinity
Calcium Hardness
pH
Chlorine/Bromine Odor
1.0 - 3.0 ppm 7.2 - 7.8 80 - 150 ppm 180 - 250 ppm
Water Odor
Cloudy Water
Foaming
Eye/Skin Irritation
Scum Ring Around Spa
Excessive Chlorine or Bromine levelLow pH
Low level of sanitizer
pH out of rangeBacteria or algae growth
Dirty filter or inadequate filtrationWater chemistry is not balancedSuspended particles or organic materialOld Water
High levels of body oils, lotions, etc.
Unsanitary WaterFree chlorine level above 5ppmPoor sanitizer/pH levels
Build up of oils, dirt or organic material
Shock spa with non-chlorine shock treatmentAdjust pH if necessary
Shock spa with non-chlorine shock treatment or adjust sanitizer levelAdjust pH if necessaryAdjust sanitizer if necessary
Clean filter(s) and adjust filtration timeAdjust chemistry levelsAdd spa clarifierChange the spa water
Add a small amount of defoamer
Shock spa with non-chlorine shock treatmentAllow level to drop below 5ppmAdjust according to spa test strip results
Wipe off with a clean towel
Chlorine Level
Without Ozonator
With OzonatorBromine Level
Without Ozonator
With Ozonator
Alkalinity up
Liq. Hardness Increaser
pH up
Chlorination Granules
Bromine Granules
Alkalinity down
Stain & Scale Defense
pH down
Ideal Range (ppm)
Possible Causes
Min. To RaiseMax. To LowerChemicals to Use
How To Fit It
Water pH Maintenance Table
Spa Water Maintenance Trouble-Shooting Guide
Spa Water Maintenance Trouble-Shooting Guide

35
SPECIAL PRODUCT FEATURES
Air Control ValvesTo adjust the amount of air in the jet steam, turn the air control valves counter-clockwise to open. For maximum hydrotherapy, open fully. When the valves are closed, only the water circulates from the jets. When heating and ozonating, make sure the air valves are closed. (full clock-wise) When using the blower, make sure all air control valves are open. Control valves come in two styles, illuminated and non-illuminated.
Water Control Valves/Diverter ValvesWARNING: Do Not Turn Water Control Valves When Pump Is OnThe water control valves direct the flow from one jet system to another. It is used to operate different sets of jets, ie, neck jets, waterfall, massaging pillows, etc.
Note: Waterfall equipped spas must leave the on/off valve open 1/4 turn to allow the plumbing to drain when spa is not in use.
LED LightingYour spa may have the LED lighting option. LED lights give your spa it’s unique highlights and flair. They should provide years of illumination.
Topside Stereo ControlIf your spa is equipped with a stereo, the water-proof topside stereo control allows for easy access to control the stereo without getting out of the water.
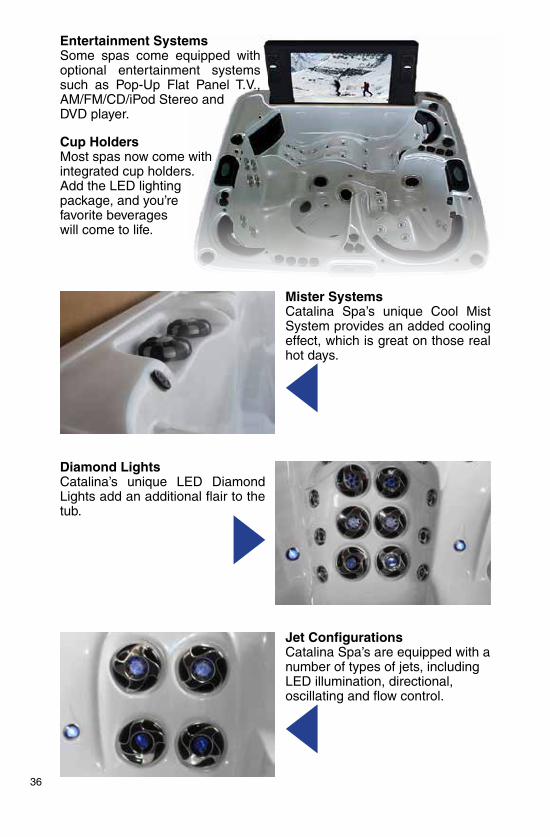
Diamond LightsCatalina’s unique LED Diamond Lights add an additional flair to the tub.
Jet ConfigurationsCatalina Spa’s are equipped with a number of types of jets, including LED illumination, directional, oscillating and flow control.
36
Entertainment SystemsSome spas come equipped with optional entertainment systems such as Pop-Up Flat Panel T.V., AM/FM/CD/iPod Stereo andDVD player.
Cup HoldersMost spas now come withintegrated cup holders.Add the LED lightingpackage, and you’refavorite beverageswill come to life.
Mister SystemsCatalina Spa’s unique Cool Mist System provides an added cooling effect, which is great on those real hot days.
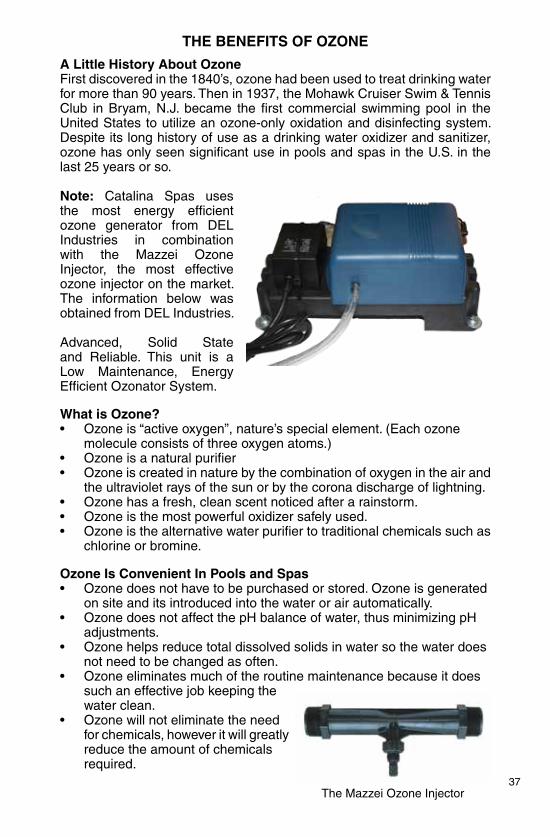
The Mazzei Ozone Injector37
THE BENEFITS OF OZONE
A Little History About OzoneFirst discovered in the 1840’s, ozone had been used to treat drinking water for more than 90 years. Then in 1937, the Mohawk Cruiser Swim & Tennis Club in Bryam, N.J. became the first commercial swimming pool in the United States to utilize an ozone-only oxidation and disinfecting system. Despite its long history of use as a drinking water oxidizer and sanitizer, ozone has only seen significant use in pools and spas in the U.S. in the last 25 years or so.
Note: Catalina Spas uses the most energy efficient ozone generator from DEL Industries in combination with the Mazzei Ozone Injector, the most effective ozone injector on the market. The information below was obtained from DEL Industries.
Advanced, Solid State and Reliable. This unit is a Low Maintenance, Energy Efficient Ozonator System.
What is Ozone?• Ozone is “active oxygen”, nature’s special element. (Each ozone molecule consists of three oxygen atoms.)• Ozone is a natural purifier• Ozone is created in nature by the combination of oxygen in the air and the ultraviolet rays of the sun or by the corona discharge of lightning.• Ozone has a fresh, clean scent noticed after a rainstorm.• Ozone is the most powerful oxidizer safely used.• Ozone is the alternative water purifier to traditional chemicals such as chlorine or bromine.
Ozone Is Convenient In Pools and Spas• Ozone does not have to be purchased or stored. Ozone is generated on site and its introduced into the water or air automatically.• Ozone does not affect the pH balance of water, thus minimizing pH adjustments.• Ozone helps reduce total dissolved solids in water so the water does not need to be changed as often.• Ozone eliminates much of the routine maintenance because it does such an effective job keeping the water clean.• Ozone will not eliminate the need for chemicals, however it will greatly reduce the amount of chemicals required.

38
ProblemMotor will not function
Noisy Pump or Motor
Spa not Heating Properly
Pump motor runs, but Improper Water Flow
Water Not Clean
• House circuit beaker tripped or in “Off” position.• Defective start switch inside motor• Motor overload condition
• Mode switch failure• Damaged electrical cord• Pump cord not plugged in• GFCI tripped or in “Off” position
• Clogged floor suction or skimmer• Leakage of air into suction line• Low water level• Debris inside pump• Gate valves closed• Damaged or worn motor bearings• Improper or defective wiring
• Temperature set too low
• Improper electrical service• Dirty filter cartridge• Gate valve(s) closed• Spa cover improperly positioned• Improper water level• High temperature safety switch tripped
• Clogged or blocked suction or skimmer• Dirty filter cartridge• Suction or discharge line partially plugged• Gate valves partially or fully closed• Spa jets improperly adjusted• Air control valve closed or blocked• Low water level• Improper or defective wiring• Jet blocked• Air trapped in pump
• Insufficient filtering time• Dirty filter cartridge• Clogged or blocked suction or skimmer• Improper water chemistry
• High content of solids in water
• Reset circuit breaker.
• Contact your dealer.• Let cool for one hour. Motor overload will reset automatically. If problem persists, contact your dealer.• Contact your dealer.• Contact your dealer.• Plug pump cord into red receptacle• Rest GFCI
• Clean floor suction or skimmer• Locate and repair leak• Add water to proper level• Contact your dealer• Open gate valves• Contact your dealer.• Contact your dealer.
• Set control panel to a higher temperature• Contact your dealer• Clean filter cartridge• Open gate valve(s)• Align spa cover• Add water to proper level• Allow the spa to cool to below 100F. Press the “Cool” pad to reset.
• Clean floor suction or skimmer
• Clean filter cartridge• Contact your dealer
• Open gate valves• Adjust jets for desired output• Open and clean air valves• Add water to proper level• Contact your dealer• Reseat the jets or replace• With pump operating, loosen the pump inlet union to release air, then tighten union securely.
• Increase filtering time• Clean filter cartridge• Check floor suction or skimmer for debris and remove if present.• Refer to the water maintenance section in this manual and be sure your chemical levels are correct.• Use a water clarifier or drain and refill your spa.
Possible Causes Solutions
Troubleshooting

39
OLYMPIC SERIESthe best of both worlds
MARATHON 18/5Dual temperature swim trainer with 5 person spa

Drawn by M. Mountain #8 AWG • Drawn by M. Mountain #8 AWG • 5/52/13 #8
ON
OFF
ON
OFF
ON
OFF
ON
2-POLE50A OR 100A
OFF
ON
OFF
LO
AD
HO
TB
LA
CK
WHITENEUTRAL
GREENGROUND
GREENGROUND
WHITELINENEUTRAL
REDLINEHOT
BLACKLINEHOT
BLACKHOT
REDHOT
WHITE
LOADGREEN
GROUND
LO
AD
HO
TR
ED
LOA
DH
OT
BLAC
K
LOA
DH
OT
RED
OFF
BL
AC
K
Ho
use B
eaker Box
G.F.C
.I Breaker B
ox
Fro
nt V
iew o
f G.F.C
.I (Sq
uare D
)
Sp
a System
Box
RE
DG
RN
WH
T
WH
ITE
(NE
UT
RA
L)
RE
D (H
OT
)
BO
TTO
M V
IEW
OF
G.F.C
.I.
WIRING SCHEMATIC220v
USE A 2-POLEBREAKER FOR 220V
ONLY
BREAKER MUST BERATED AT 50A OR 100A
DEPENDING ON SPA MODEL
BL
K (H
OT
)
WH
ITE
WH
ITE
(LO
AD
NE
UT
RA
L)BL
AC
K (H
OT
RE
D (H
OT
)G
RE
EN
(GR
OU
ND
)
40
DIAGRAM 1
U.S. Only
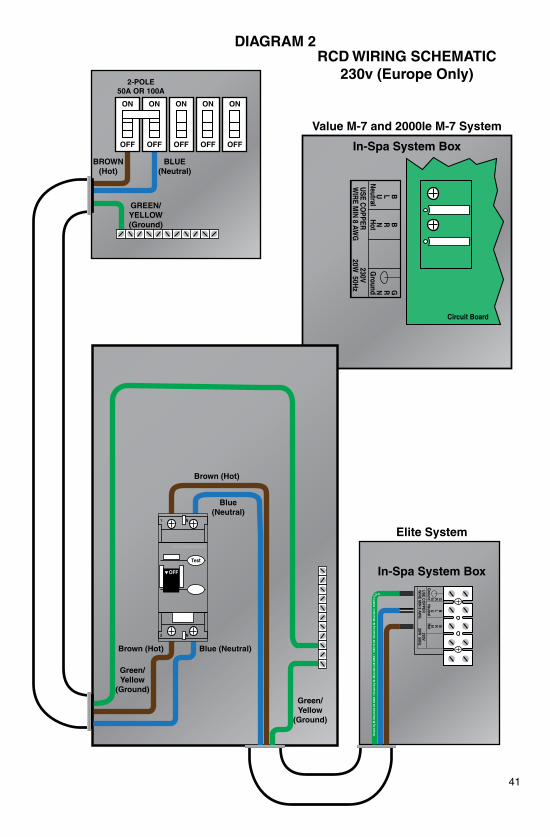
Dra
wn
by
M. M
ou
nta
in #
8 A
WG
• D
raw
n b
y M
. Mo
un
tain
#8
AW
G •
5/5
2/13
#8
• D
raw
n b
y M
. Mo
un
tain
• 5
/20/
13 U
.S.A.
ON
OFF
ON
OFF
ON
OFF
ON
2-POLE50A OR 100A
OFF
ON
OFF
Ground
Circuit Board
Neutral
Hot
230V20W
50Hz
USE C
OPPER
WIR
E MIN
8 AWG
GRN
BLU
BRN
In-Spa System Box
Elite System
Value M-7 and 2000le M-7 SystemG
roundN
eutralH
ot230V
20W 50H
zU
SE CO
PPERW
IRE M
IN 8 AW
G
GRN
BLU
BRN
In-Spa System BoxBROWN
(Hot)BLUE
(Neutral)
GREEN/YELLOW(Ground)
Blue(Neutral)
Blue (Neutral)Brown (Hot)
Brown (Hot)
OFF
Test
1 N
2 N
Green/Yellow
(Ground)Green/Yellow
(Ground)
RCD WIRING SCHEMATIC230v (Europe Only)
41
DIAGRAM 2
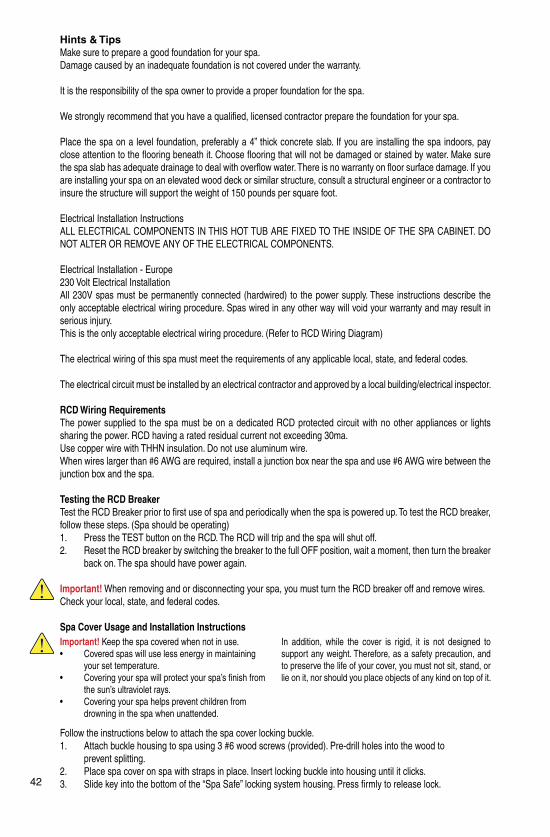
42
Hints & TipsMake sure to prepare a good foundation for your spa.Damage caused by an inadequate foundation is not covered under the warranty.
It is the responsibility of the spa owner to provide a proper foundation for the spa.
We strongly recommend that you have a qualified, licensed contractor prepare the foundation for your spa.
Place the spa on a level foundation, preferably a 4” thick concrete slab. If you are installing the spa indoors, pay close attention to the flooring beneath it. Choose flooring that will not be damaged or stained by water. Make sure the spa slab has adequate drainage to deal with overflow water. There is no warranty on floor surface damage. If you are installing your spa on an elevated wood deck or similar structure, consult a structural engineer or a contractor to insure the structure will support the weight of 150 pounds per square foot.
Electrical Installation InstructionsALL ELECTRICAL COMPONENTS IN THIS HOT TUB ARE FIXED TO THE INSIDE OF THE SPA CABINET. DO NOT ALTER OR REMOVE ANY OF THE ELECTRICAL COMPONENTS.
Electrical Installation - Europe230 Volt Electrical InstallationAll 230V spas must be permanently connected (hardwired) to the power supply. These instructions describe the only acceptable electrical wiring procedure. Spas wired in any other way will void your warranty and may result in serious injury.This is the only acceptable electrical wiring procedure. (Refer to RCD Wiring Diagram)
The electrical wiring of this spa must meet the requirements of any applicable local, state, and federal codes.
The electrical circuit must be installed by an electrical contractor and approved by a local building/electrical inspector.
RCD Wiring RequirementsThe power supplied to the spa must be on a dedicated RCD protected circuit with no other appliances or lights sharing the power. RCD having a rated residual current not exceeding 30ma.Use copper wire with THHN insulation. Do not use aluminum wire.When wires larger than #6 AWG are required, install a junction box near the spa and use #6 AWG wire between the junction box and the spa.
Testing the RCD BreakerTest the RCD Breaker prior to first use of spa and periodically when the spa is powered up. To test the RCD breaker, follow these steps. (Spa should be operating)1. Press the TEST button on the RCD. The RCD will trip and the spa will shut off.2. Reset the RCD breaker by switching the breaker to the full OFF position, wait a moment, then turn the breaker back on. The spa should have power again.
Important! When removing and or disconnecting your spa, you must turn the RCD breaker off and remove wires.Check your local, state, and federal codes.
Spa Cover Usage and Installation InstructionsImportant! Keep the spa covered when not in use.• Covered spas will use less energy in maintaining your set temperature.• Covering your spa will protect your spa’s finish from the sun’s ultraviolet rays.• Covering your spa helps prevent children from drowning in the spa when unattended.
In addition, while the cover is rigid, it is not designed to support any weight. Therefore, as a safety precaution, and to preserve the life of your cover, you must not sit, stand, or lie on it, nor should you place objects of any kind on top of it.
Follow the instructions below to attach the spa cover locking buckle.1. Attach buckle housing to spa using 3 #6 wood screws (provided). Pre-drill holes into the wood to prevent splitting.2. Place spa cover on spa with straps in place. Insert locking buckle into housing until it clicks.3. Slide key into the bottom of the “Spa Safe” locking system housing. Press firmly to release lock.
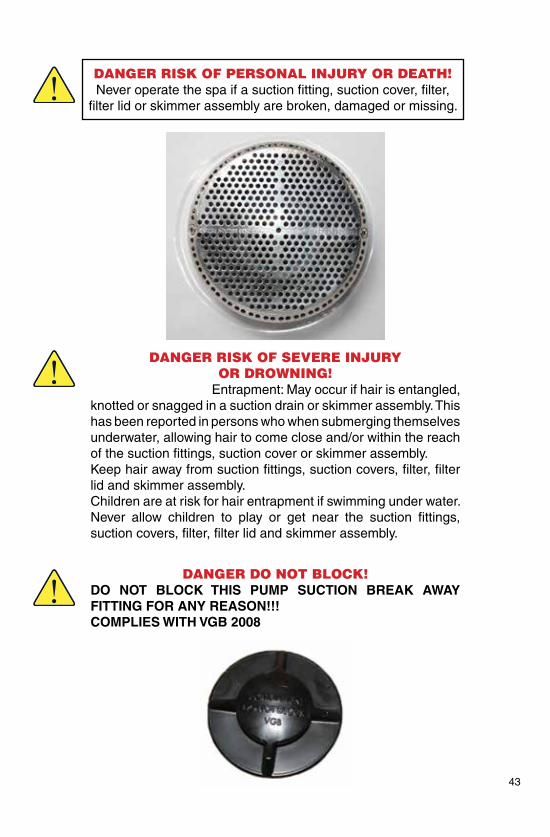
DANGER RISK OF PERSONAL INJURY OR DEATH!Never operate the spa if a suction fitting, suction cover, filter,
filter lid or skimmer assembly are broken, damaged or missing.
DANGER RISK OF SEVERE INJURYOR DROWNING!
Entrapment: May occur if hair is entangled, knotted or snagged in a suction drain or skimmer assembly. This has been reported in persons who when submerging themselves underwater, allowing hair to come close and/or within the reach of the suction fittings, suction cover or skimmer assembly.Keep hair away from suction fittings, suction covers, filter, filter lid and skimmer assembly.Children are at risk for hair entrapment if swimming under water.Never allow children to play or get near the suction fittings, suction covers, filter, filter lid and skimmer assembly.
DANGER DO NOT BLOCK!DO NOT BLOCK THIS PUMP SUCTION BREAK AWAY FITTING FOR ANY REASON!!!COMPLIES WITH VGB 2008
43

Thank Youfrom
Catalina Spas
We Appreciate Your Business
275 West Rider StreetPerris, California 92571
© Copyright 2013 Catalina Spas. All rights reserved. Printed in the U.S.A.