the ibox universal - hansgrohe.comhansgrohe.com/assets/global/hg_ibox_en-gb.pdf · 6 the ibox ®...
TRANSCRIPT
1
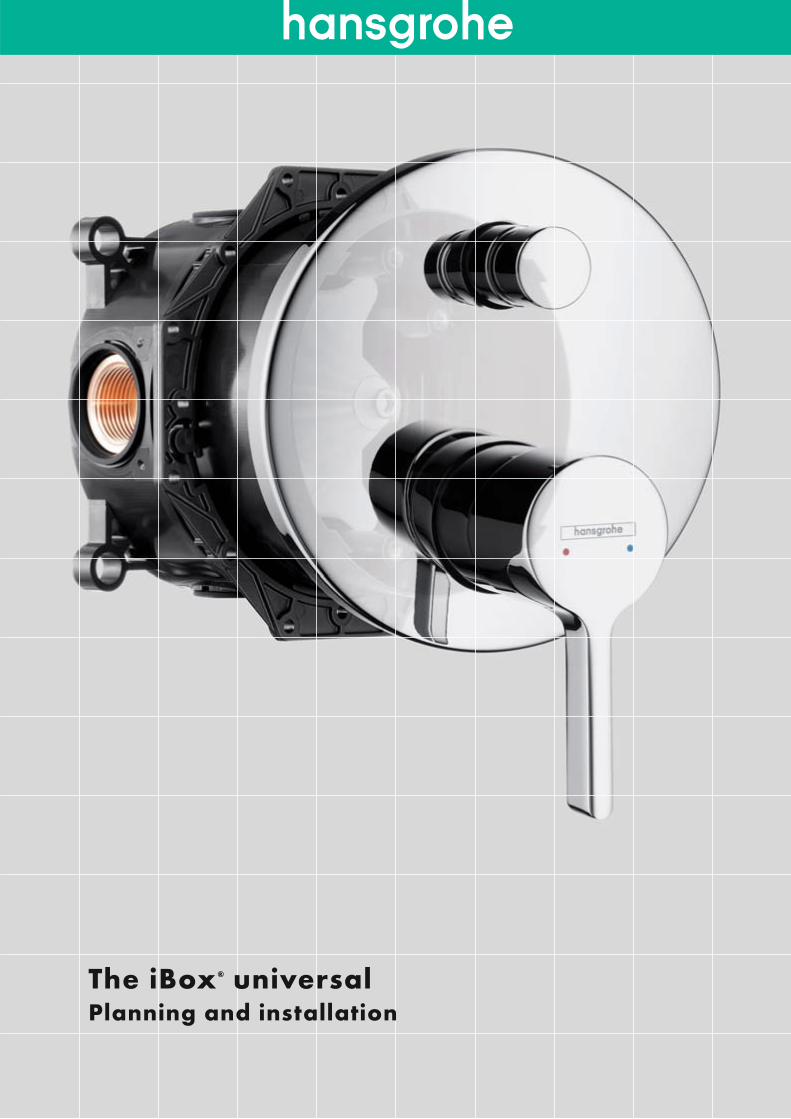
The iBox® universalPlanning and installation

The iBox® universalOne for all
IntroductioniBox® universalThe revolution in concealed installation continues 4The basis for all standard and thermostat solutions 6Proved a million times and improved three times over 8
Raindance® Rainfall® 10
Raindance® Shower panel® 12
imodul® 14
Installing the iBox universal 16Installing the standard fi nish set 17Piping and compatibility 18Installation methods 19Installation options 20Installation tips, planning guidelines, instructions 25Dimensioned drawings and technical information 26
Product overview Hansgrohe® faucet lines 28
Product overview Axor® Collections 30

4
The iBox® universalThe revolution in concealed installation continues
In a small bathroom your are limited in space and loose out on the showering pleasure. A concealed installation will provide you with more space, because fl ush mounting means a less intrusive fi nish, leaving more room to move around. With the iBox universal, Hansgrohe off ers a fl exible concealed installation system whichallows a basic unit built into the wall to be connected to various diff erent faucet fi nish sets. Introduced in 2001, the iBox universal is still the fi rst and only basic set for all standard and thermostat solutions. It can be connected up for several diff erentattachments, and is also amazingly fl exible–no wonder it has set the standard and taken the market by storm over the last six years! In order to keep it in the leadposition in future, Hansgrohe has worked closely with experienced installers to refi ne and improve the iBox universal, adapting it to changing needs. The following pages present details of the changes and show which aspects of this tried and tested technology have remained the same. One thing never changes, however: the part number stays the same.
Exposed installation Concealed installation

5
6
The iBox® universal The basis for all manual and thermostatic solutions
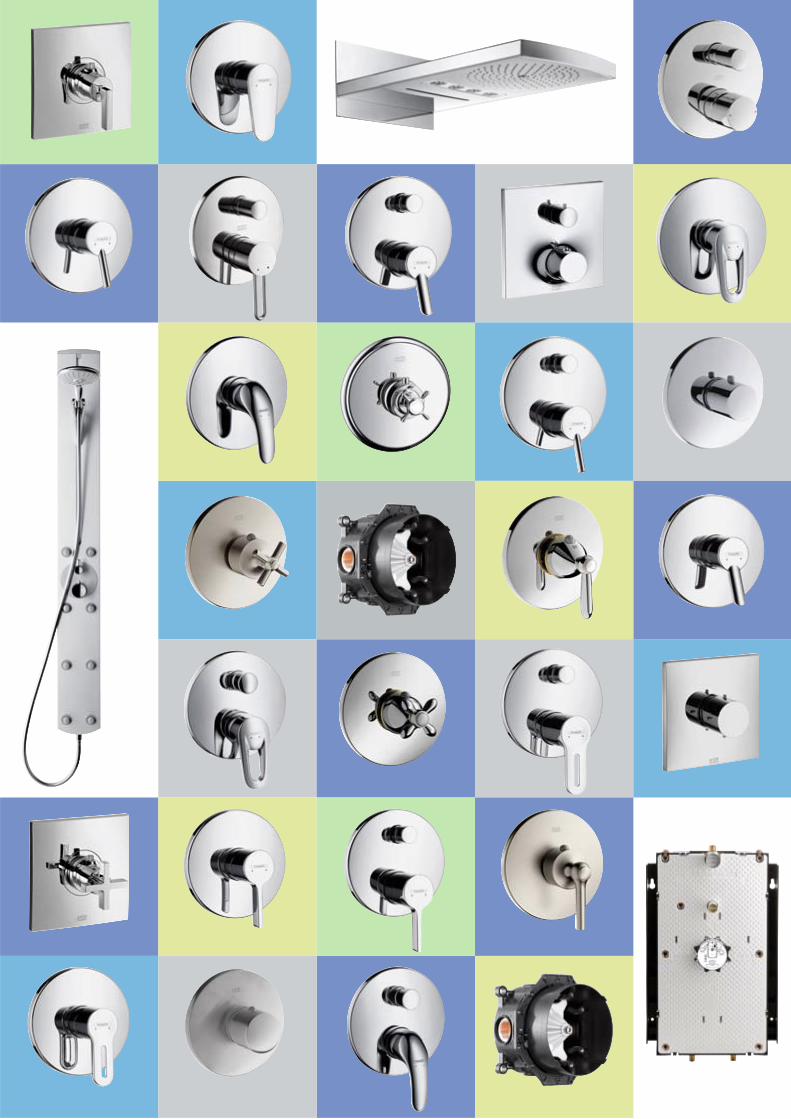
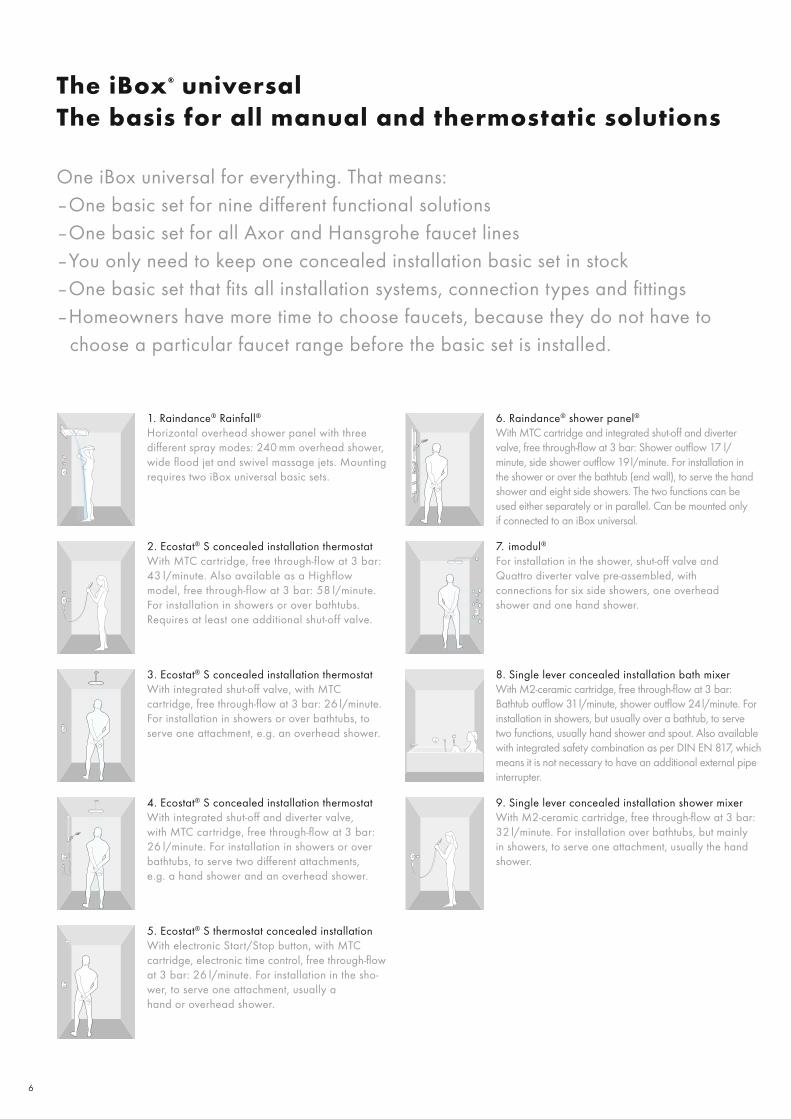
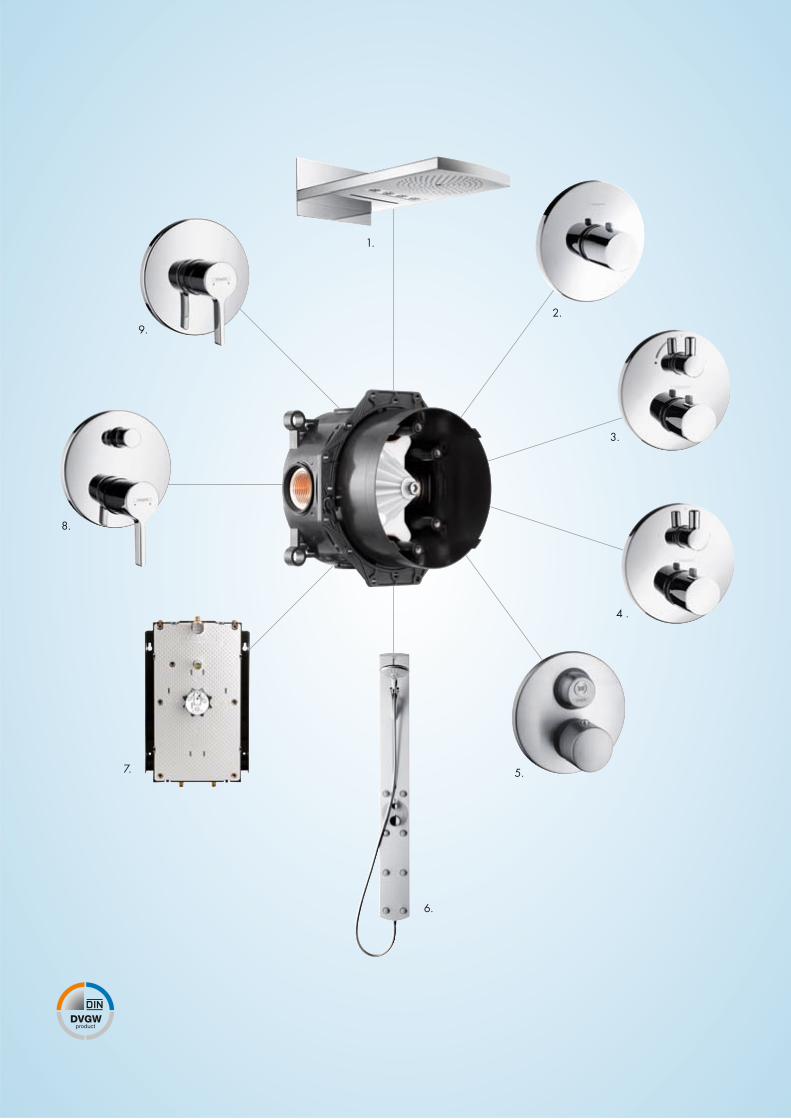
One iBox universal for everything. That means:–One basic set for nine diff erent functional solutions–One basic set for all Axor and Hansgrohe faucet lines–You only need to keep one concealed installation basic set in stock–One basic set that fi ts all installation systems, connection types and fi ttings–Homeowners have more time to choose faucets, because they do not have to choose a particular faucet range before the basic set is installed.
1. Raindance® Rainfall®
Horizontal overhead shower panel with three diff erent spray modes: 240 mm overhead shower, wide fl ood jet and swivel massage jets. Mounting requires two iBox universal basic sets.
2. Ecostat® S concealed installation thermostatWith MTC cartridge, free through-flow at 3 bar: 43 l/minute. Also available as a Highflow model, free through-flow at 3 bar: 58 l/minute. For installation in showers or over bathtubs. Requires at least one additional shut-off valve.
3. Ecostat® S concealed installation thermostatWith integrated shut-off valve, with MTC cartridge, free through-fl ow at 3 bar: 26 l/minute. For installation in showers or over bathtubs, to serve one attachment, e.g. an overhead shower.
4. Ecostat® S concealed installation thermostatWith integrated shut-off and diverter valve, with MTC cartridge, free through-fl ow at 3 bar: 26 l/minute. For installation in showers or over bathtubs, to serve two diff erent attachments, e.g. a hand shower and an overhead shower.
5. Ecostat® S thermostat concealed installationWith electronic Start/Stop button, with MTC cartridge, electronic time control, free through-fl ow at 3 bar: 26 l/minute. For installation in the sho-wer, to serve one attachment, usually a hand or overhead shower.
6. Raindance® shower panel®
With MTC cartridge and integrated shut-off and diverter valve, free through-fl ow at 3 bar: Shower outfl ow 17 l/minute, side shower outfl ow 19 l/minute. For installation in the shower or over the bathtub (end wall), to serve the hand shower and eight side showers. The two functions can be used either separately or in parallel. Can be mounted only if connected to an iBox universal.
7. imodul®
For installation in the shower, shut-off valve and Quattro diverter valve pre-assembled, with connections for six side showers, one overhead shower and one hand shower.
8. Single lever concealed installation bath mixerWith M2-ceramic cartridge, free through-fl ow at 3 bar: Bathtub outfl ow 31 l/minute, shower outfl ow 24 l/minute. For installation in showers, but usually over a bathtub, to serve two functions, usually hand shower and spout. Also available with integrated safety combination as per DIN EN 817, which means it is not necessary to have an additional external pipe interrupter.
9. Single lever concealed installation shower mixerWith M2-ceramic cartridge, free through-fl ow at 3 bar:32 l/minute. For installation over bathtubs, but mainly in showers, to serve one attachment, usually the hand shower.
7
1.
2.9.
8.
3.
4 .
5.7.
6.

8
min. 80
170
150
The iBox® universal Proved a million times and improved three times over
Can technology as trusted and reliable as the iBox universal really be improved? Hansgrohe, the leading innovator in concealed installation technology, answers with a three-fold „Yes“ and, with the modifi ed iBox universal, presents three new technical developments.
NEWSmaller collar diameterThe new, minimalist faucet design requires not only fi ligree operating handles but also a smaller collar. Therefore, when changing to the new faucet lines, Hansgrohe reduced the collar diameter of the concealed installation mixer by 20 mm, yet still keeping it fully compatible with the iBox universal. The diverters in the bath mixer were also reduced in size. The result: a consistent look and harmonious proportions.
Depth72 mm
Depth64 mm
Depth56 mm
Without ring, designed fordry wall installation
Single installation ring
NEWFlexible adjustment ringThe new iBox universal has a patented fl exible adjustment ring that can be precisely adapted by bayonet fi tting to fi t three diff erent depths. This makes it much more versatile, as you now have the freedom to mount it on walls of varying thickness. It also means that the iBox universal can be used for dry wall installations. For pre-fabricated housing, it can easily be pushed through the wall from the rear and then fi xed in place.
NEWReduced installation depthWhen the walls are thin, every millimetre counts. With a body that is now 2 mm fl atter – 80 mm instead of 82 mm – the iBox universal has become even more suitable for walls with limited installation depth.

9
105
25
min.58
22
80
Revolutionary technology,that has everyone excited
Built in rotational symmetryThe iBox universal‘s symmetrical structure makes all connections equal. The important thing is to make sure that the cold water is connected on the right and the hot water opposite it. When the iBox universal is used as a shower mixer, either the upper or lower outfl ow can be connected.
Multiple installation optionsCoordinated with all current installation systems and all types of connections and fi ttings, the iBox universal off ers truly universal installation possibilities, with its fl exible adjustment ring and the ability to be fi xed at two levels and DN20 connections.
Sealed all round Rubber seals on all four connections and the supporting collar which seals against splashing water protect the wall perfectly from moisture from any direction.
Soundproof The brass body of the iBox universal rests on seals, so that the sound of water-conducting parts cannot be transferred through the wall. Screwing the supporting collar to the iBox universal housing–and not to the function block–prevents sound being transferred through to the ceramic tiles.
Simplifi ed rinsing The fl ushing block supplied with the iBox universal, which can be mounted in diff erent positions, makes it easy to fl ush pipes through to where they fi nish at the wall, as recommended by DIN 1988.
Safe and economical The universal basic set contains just the connection block. The valuable function block is supplied later, together with the fi nish set, when it is installed. This makes expensive warehousing unnecessary and prevents problems like theft, dirt or frost occurring during the building phase.
Everything included Concealed single lever bath mixer with integrated safety combination for spout, with overfl ow and waste system (Exafi ll). Hansgrohe’s universal integrated safety combination means it is not necessary to use an external pipe interrupter, which reduces installation costs and maintenance expenses.
Basic unit extension Even if the iBox universal has been fi tted too deep into the wall, Hansgrohe has a solution at the ready. The basic unit extension is fi tted between the connector and the function block. The extension set ensures safety right up to the wall, keeping the walls free from dampness, even in this tricky situation.
Reduction kit Thanks to the reduction kit, even limited installation depths are not a problem. The reduction kit is fi tted between the tiles and the fi nish set, making it possible to fi t the iBox universal in despite the lack of depth.
10
1.
2.
3.
4.
+ +
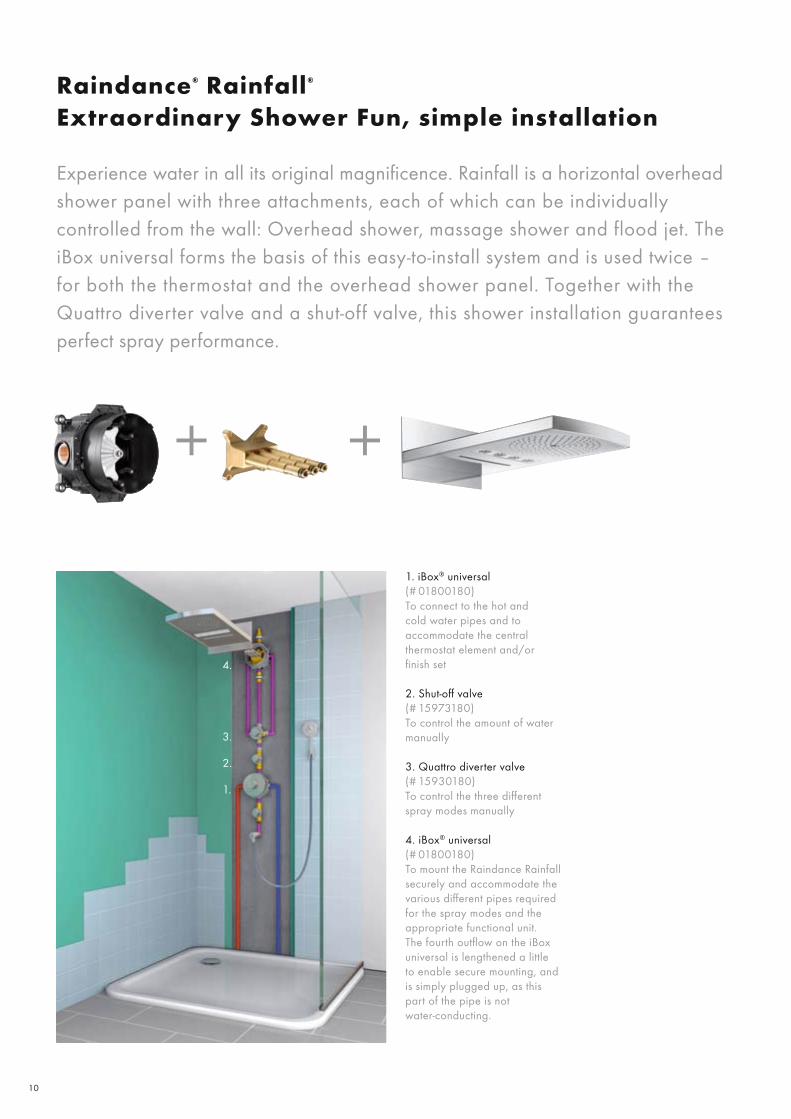
Raindance® Rainfall®
Extraordinary Shower Fun, simple installation
Experience water in all its original magnifi cence. Rainfall is a horizontal overhead shower panel with three attachments, each of which can be individually controlled from the wall: Overhead shower, massage shower and flood jet. The iBox universal forms the basis of this easy-to-install system and is used twice – for both the thermostat and the overhead shower panel. Together with the Quattro diverter valve and a shut-off valve, this shower installation guarantees perfect spray performance.
1. iBox® universal(# 01800180) To connect to the hot and cold water pipes and to accommodate the central thermostat element and/or fi nish set 2. Shut-off valve(# 15973180)To control the amount of water manually
3. Quattro diverter valve(# 15930180)To control the three diff erent spray modes manually
4. iBox® universal(# 01800180)To mount the Raindance Rainfall securely and accommodate the various diff erent pipes required for the spray modes and the appropriate functional unit. The fourth outfl ow on the iBox universal is lengthened a little to enable secure mounting, and is simply plugged up, as this part of the pipe is not water-conducting.

115

12
+
Raindance® Shower panel®
Ultra flat, ultra easy to install
The iBox universal makes it possible. As well as being the first-ever concealed installation shower panel, Raindance is also the world‘s flattest shower panel, with only 33 mm between it and the wall. You can imagine how easy it is to install: just set the iBox universal in place, mount the shower panel on top, and voilà–all done! Super easy to install, and super multi-mode Shower Fun. Thanks to the extra-large hand shower, the eight eff ective side showers and the diverse spray modes, anything is possible, from the a luxurious rain shower to apowerful whole body massage.

13
1414
imodul®imodul®
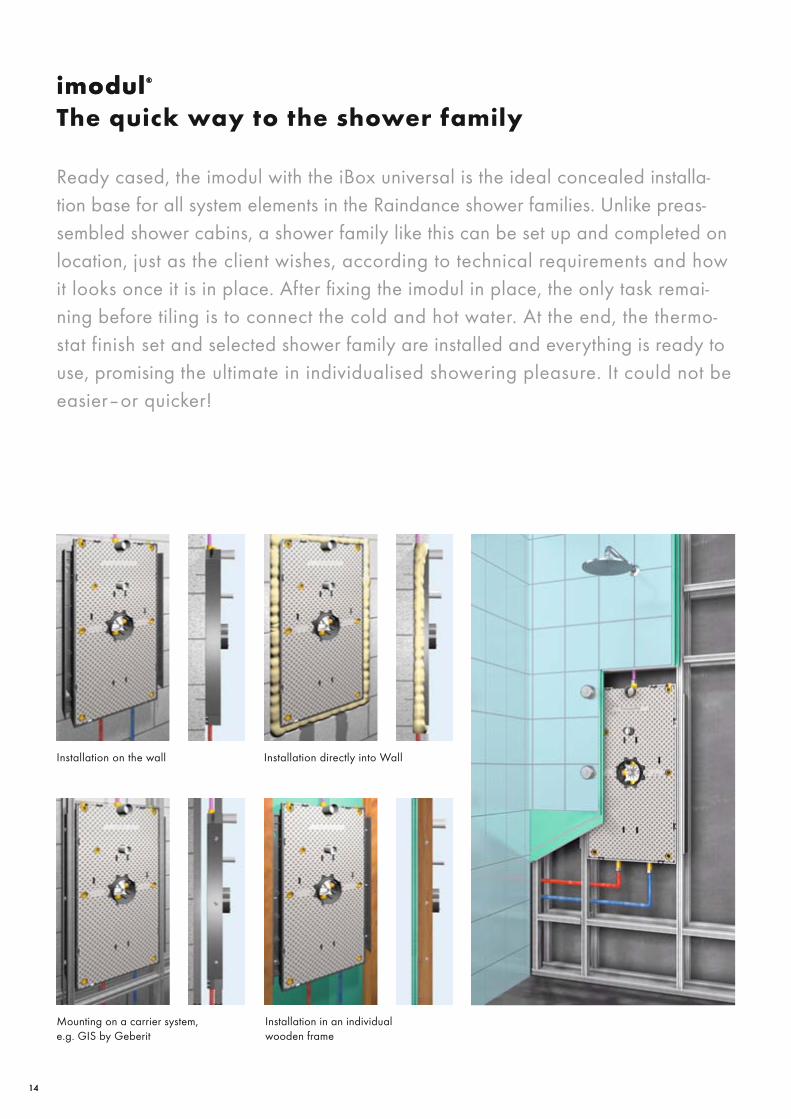
The quick way to the shower family
Ready cased, the imodul with the iBox universal is the ideal concealed installa-tion base for all system elements in the Raindance shower families. Unlike preas-sembled shower cabins, a shower family like this can be set up and completed on location, just as the client wishes, according to technical requirements and how it looks once it is in place. After fi xing the imodul in place, the only task remai-ning before tiling is to connect the cold and hot water. At the end, the thermo-stat finish set and selected shower family are installed and everything is ready to use, promising the ultimate in individualised showering pleasure. It could not be easier–or quicker!
Installation on the wall Installation directly into Wall
Mounting on a carrier system,e.g. GIS by Geberit
Installation in an individualwooden frame
15
16
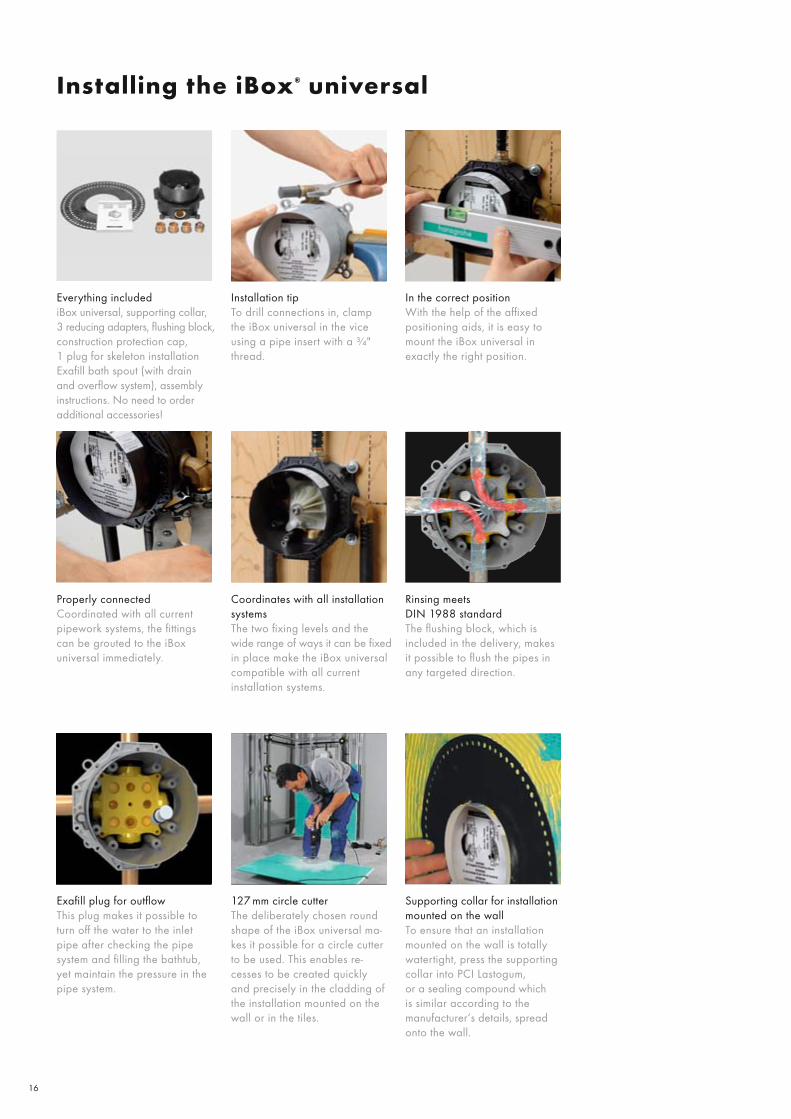
Installing the iBox® universal
Everything includediBox universal, supporting collar, 3 reducing adapters, fl ushing block, construction protection cap, 1 plug for skeleton installation Exafi ll bath spout (with drain and overfl ow system), assembly instructions. No need to order additional accessories!
Installation tipTo drill connections in, clamp the iBox universal in the vice using a pipe insert with a ¾" thread.
In the correct positionWith the help of the affi xed positioning aids, it is easy to mount the iBox universal in exactly the right position.
Properly connectedCoordinated with all current pipework systems, the fi ttings can be grouted to the iBox universal immediately.
Coordinates with all installation systemsThe two fi xing levels and the wide range of ways it can be fi xed in place make the iBox universal compatible with all current installation systems.
Rinsing meetsDIN 1988 standardThe fl ushing block, which is included in the delivery, makes it possible to fl ush the pipes in any targeted direction.
Exafi ll plug for outfl ow This plug makes it possible to turn off the water to the inlet pipe after checking the pipe system and fi lling the bathtub, yet maintain the pressure in the pipe system.
127 mm circle cutterThe deliberately chosen round shape of the iBox universal ma-kes it possible for a circle cutter to be used. This enables re-cesses to be created quickly and precisely in the cladding of the installation mounted on the wall or in the tiles.
Supporting collar for installation mounted on the wallTo ensure that an installation mounted on the wall is totally watertight, press the supporting collar into PCI Lastogum, or a sealing compound which is similar according to the manufacturer‘s details, spread onto the wall.
17
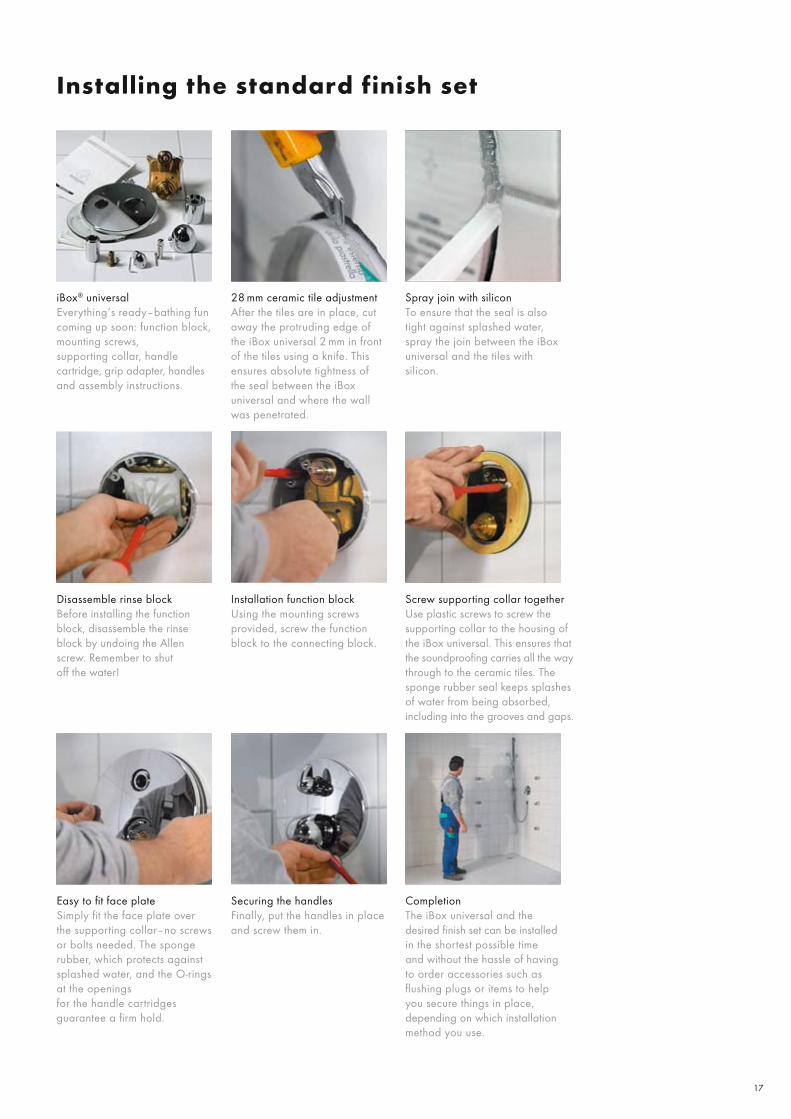
iBox® universalEverything‘s ready–bathing fun coming up soon: function block, mounting screws, supporting collar, handle cartridge, grip adapter, handles and assembly instructions.
28 mm ceramic tile adjustmentAfter the tiles are in place, cut away the protruding edge of the iBox universal 2 mm in front of the tiles using a knife. This ensures absolute tightness of the seal between the iBox universal and where the wall was penetrated.
Spray join with siliconTo ensure that the seal is also tight against splashed water, spray the join between the iBox universal and the tiles with silicon.
Disassemble rinse blockBefore installing the function block, disassemble the rinse block by undoing the Allen screw. Remember to shut off the water!
Installation function blockUsing the mounting screws provided, screw the function block to the connecting block.
Screw supporting collar togetherUse plastic screws to screw the supporting collar to the housing of the iBox universal. This ensures that the soundproofi ng carries all the way through to the ceramic tiles. The sponge rubber seal keeps splashes of water from being absorbed, including into the grooves and gaps.
Easy to fi t face plateSimply fi t the face plate over the supporting collar–no screws or bolts needed. The sponge rubber, which protects against splashed water, and the O-rings at the openings for the handle cartridges guarantee a fi rm hold.
Securing the handlesFinally, put the handles in place and screw them in.
CompletionThe iBox universal and the desired fi nish set can be installed in the shortest possible time and without the hassle of having to order accessories such as fl ushing plugs or items to help you secure things in place, depending on which installation method you use.
Installing the standard finish set

18
Piping and compatibility
The iBox universal is compatible with all current pipework systems. Here, the installation of a bathtub provides an opportunity to show pipework systems from different manufacturers. (These items are not available from Hansgrohe).
Bathtub installation withGeberit MeplaSupplies Hot and Cold potable water:2 pces Junction bracketwith AG No. 602.253.00.120x R¾ " Bathtub outfl ow /Shower outfl ow: 2 pces Junction with AG No.602.536.00.1 20xR¾ "1 pce Faucet connection forspout No.602.294.00.1 20xR¾ "1 pce Faucet connection forshower connection No.602.293.00.1 20 xR½ "
Bathtub installation withMapress stainless steelSupplies Hot and Cold potable water: 2 pces Junction bracket with male thread18-R½" Item No. 33834Bathtub outfl ow: 1 pce Junctionwith male thread 22-R¾ "Item No. 317011 pce 90° bend DN 20Item No. 301041 pce 45° bend with single-sidedinsert end DN 20Item No. 307041 pce Ceiling bracket with female thread22-Rp¾ " Item No. 30407Shower outfl ow: 1 pce Junctionwith male thread 18-R½ "Item No. 317041 pce Ceiling bracket with female thread18-Rp½ " Item No. 30405
Bathtub installation withGF Instafl exSupplies Hot and Cold potable water:2 pces Junction bracket 90° with male thread 16 ¾ "Item No. 760 854 839Bathtub outfl ow: 1 pce Junction with male thread 20 ¾ "Item No. 760 853 1381 pce Faucet connection with female thread 20 ¾ "Item No. 760 853 038Shower outfl ow: 1 pce Junction with male thread 16 ¾ "Item No. 760 853 1081 pce faucet connection with female thread 16 ½ "Item No. 760 853 013
Bathtub installation withViega Profi pressSupplies Hot and Cold potable water:2 pces 90° Bracket with male thread15 x ½ " model 2214.1Item No. 335 281Bathtub outfl ow: 1 pce Junction with male thread 18 ¾ "Model 2211 Item No. 283 2301 pce Wall disc 18 ¾ "Model 2225.5 Item No. 335 236Shower outfl ow: 1 pce Junctionwith male thread 15x ¾ "Model 2211 Item No. 287 7641 pce Wall disc 15 ½ "Model 2225.5 Item No. 107 345
Bathtub installation with Geberit GIS iBox® universal SetSupplies Hot and Cold potable water: 2 pces MeplaFix Bracket (PVDF) DN15 Item No. 632.272.00.5, or 2 pces MeplaFix Bracket (PVDF) reduced DN15/12 Item No. 31.272.00.5Bathtub outfl ow: 1 pce MeplaFixCoupling (PVDF) DN15Item No. 632.562.00.5
1 pce Mepla Faucet connection(Red brass) DN15x R¾ "Item No. 602.294.00.5Shower outfl ow: 1 pce MeplaFixCoupling (PVDF) DN15Item No. 632.562.00.51 pce Mepla Faucet connection(Red brass) DN15x R½ "Item No. 602.293.00.5
The GIS iBox universal set is optimally adjusted to make installation of the iBox universal effi cient and trouble-free. The GIS iBox universal set is a pre-assembled unit and comprises:– Mounting plates with pre-assembled attachment levers for fast
mounting onto GIS profi les by the circular screen principle, rotating 90 degrees at a time
– Pre-assembled iBox universal– 2 reducers to ½" male screw thread to connect the Mepla piping,
using MeplaFix, e.g. for hand shower and bathtub supply– 1 loose enclosed plug, in case only one attachment is to be connected

19
Installation methods
Installation on the wall Installation in front of the wall. Shown here with M 10 stock screws as variable spacers.
Mounting on a carrier system Installation on prefabricated house mounting plates or fi nished cells
Installation directly into the wall Installation with mounting rail set
20
Wanneneinlauf
Installation options
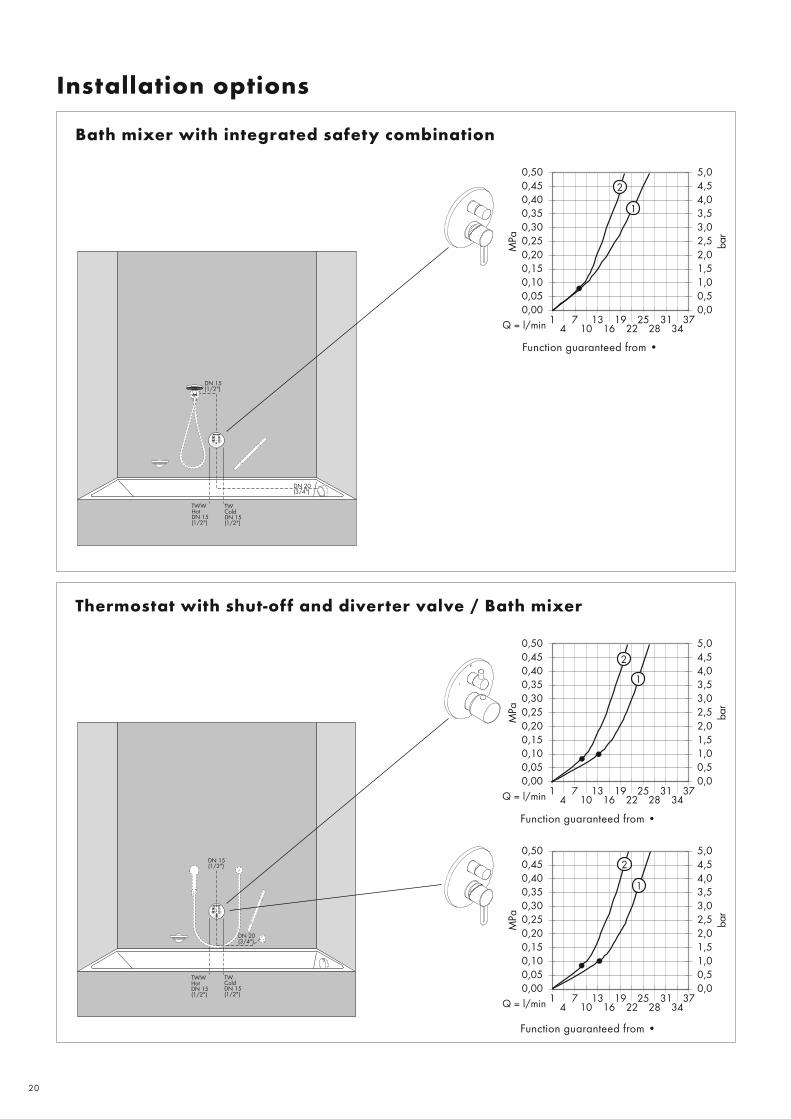
Bath mixer with integrated safety combination
Function guaranteed from •
Thermostat with shut-off and diverter valve / Bath mixer
Function guaranteed from •
Function guaranteed from •

21
���������
� �������������
� ������������
���������
� �������������
� ������������
Thermostat with shut-off valve / Shower mixer
DN 20 (3/4")
Function guaranteed from •
Function guaranteed from •
Thermostat with shut-off valve/shower mixer/Raindance® shower panel®
DN 20 (3/4")
2
1

22
� �������������
� ������������
���������
���������
Function guaranteed from •
Function guaranteed from •
Function guaranteed from •
Function guaranteed from •
Installation options
Shower thermostat with electronic Start/Stop button / Thermostat with shut-off valve / Shower mixer
DN 20 (3/4")
2
1
Thermostat with shut-off and diverter valve / Bath mixer
23
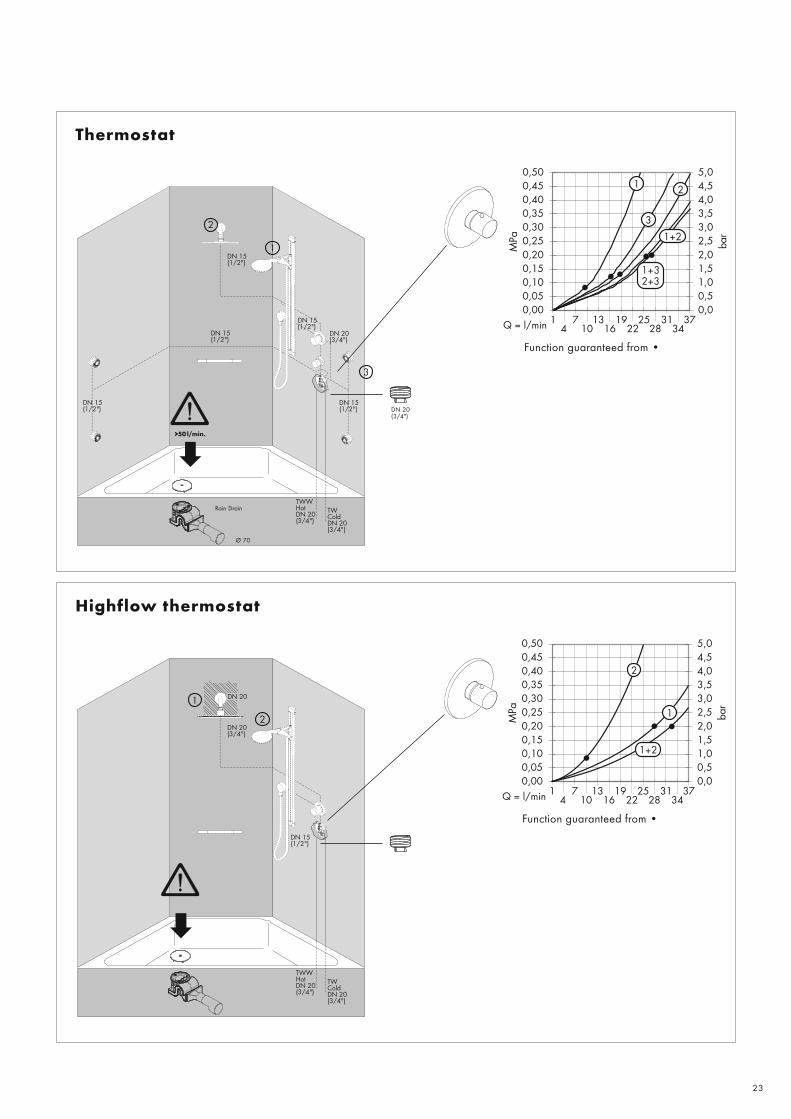
Function guaranteed from •
Function guaranteed from •
Rain Drain
Ø 70
2
1
3
DN 20 (3/4")
>50 l/min.
Thermostat
Highflow thermostat
2
1

24
DN20 (¾ ")
bar
Installation options
Highflow thermostat combined with Raindance® Rainfall®
Function guaranteed from •
1 Rain/Whirl2 Flow
Concealed valve
Ø 70
>50 l/min.
Quattro
Rain Drain
Highflow thermostat combined with Raindance® Rainmaker
1 Rain AIR2 Rain AIR XXL3 Whirl AIR1 + 3 Rain AIR + Whirl AIR2 + 3 Rain AIR XXL + Whirl AIR4 Hand shower5 Side showers
Concealed valve
Rain Drain
Trio Stop
Quattro
Ø 70
>50 l/min.
Function guaranteed from •

25
Installation tips, planning guidelines, instructions
Installation tip To drill connections in, clamp the iBox universal in the pipe insert using a vice.
Skeleton installationBuild in the basic unit in such a way that the hot water is connected on the left and the cold water is on the right.Installation depth 80 mm to 108 mmExtension set 25 mm Item No. 13595000Extension set 22 mmItem No. 13596, -000, -810, -880Item No. 13597, -000, -880Item No. 97407000The basic unit can be installed according to the needs of the site. The iBox universal is suitable for both bathtubs and showers. For single lever bath mixers, outflow 1 takes priority. For shower installations, the outflow that is not required must be sealed with a plug.
The iBox rotational symmetry basic unit can be used anywhere, either horizontally or vertically, except for installation of a bath faucet with safety combination, where only vertical mounting is possible.
RinsingRinse the whole installation in accordance with DIN 1988/EN 1717. The arrows on the rinsing block show which supply pipe is connected to which outfl ow pipe, e.g. cold water with outfl ow 1 and hot water with outfl ow 2. If only one outfl ow is required, the rinse block must be rotated 90° after the fi rst rinsing process.
iBox® universal in combination with anExafi ll spout with drain and overfl ow systemTurning off the water to the Exafi ll duringthe construction phase
Skeleton installation1. Install iBox universal (vertically only)2. Lay connections to Exafi ll and fi t metal plugs3. Rinse pipes and test for pressure and leaks
Placing bathtub1. Turn off water 2. Mount bathtub with Exafi ll and
connect to pipes3. Rinse pipe to Exafi ll with test spout
extensions and check whether it is watertight and check whether it is watertight
4. Turn off water at water meter on fl oor of building
5. Disassemble rinse block6. Insert plug (A) in outfl ow for Exafi ll7. Assemble rinse block 8. Turn on water
Outfl ow 2
Outfl ow 1
Hot Cold
These easy to understand, illustrated assembly instructions with many practical tips in paperback format can be ordered directly from Hansgrohe.# 84000928
26
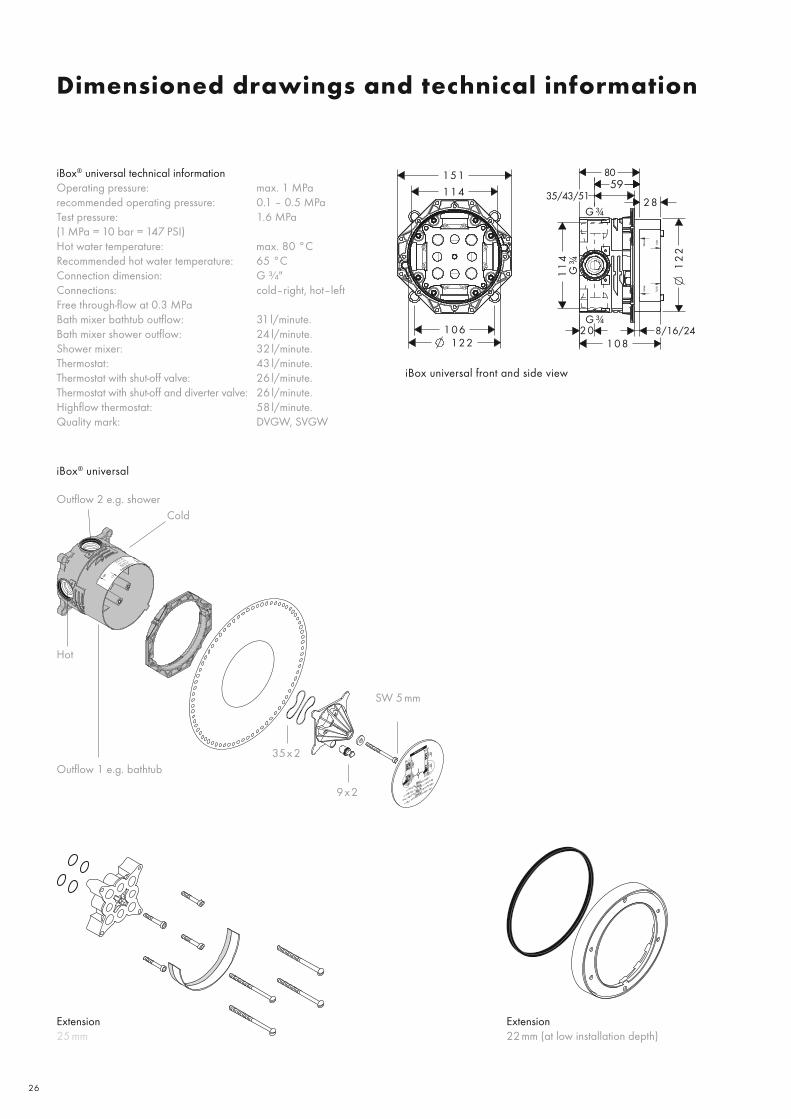
Dimensioned drawings and technical information
iBox® universal technical informationOperating pressure: max. 1 MParecommended operating pressure: 0.1 – 0.5 MPaTest pressure: 1.6 MPa(1 MPa = 10 bar = 147 PSI)Hot water temperature: max. 80 °CRecommended hot water temperature: 65 °CConnection dimension: G ¾"Connections: cold–right, hot–leftFree through-fl ow at 0.3 MPaBath mixer bathtub outfl ow: 31 l/minute.Bath mixer shower outfl ow: 24 l/minute.Shower mixer: 32 l/minute.Thermostat: 43 l/minute.Thermostat with shut-off valve: 26 l/minute.Thermostat with shut-off and diverter valve: 26 l/minute.Highfl ow thermostat: 58 l/minute.Quality mark: DVGW, SVGW
iBox universal front and side view
iBox® universal
Outfl ow 2 e.g. shower
Outfl ow 1 e.g. bathtub
Hot
Cold
Extension 25 mm
35x2
9x2
SW 5 mm
Extension 22 mm (at low installation depth)

27
Raindance® Shower panel®
Front and side viewRaindance® Rainfall®
View from below and side view
imodul®
Front and side view
Standing Area
Cement Floor
Room Height
28
Single lever basin mixer# 31612, -000
Talis® E2
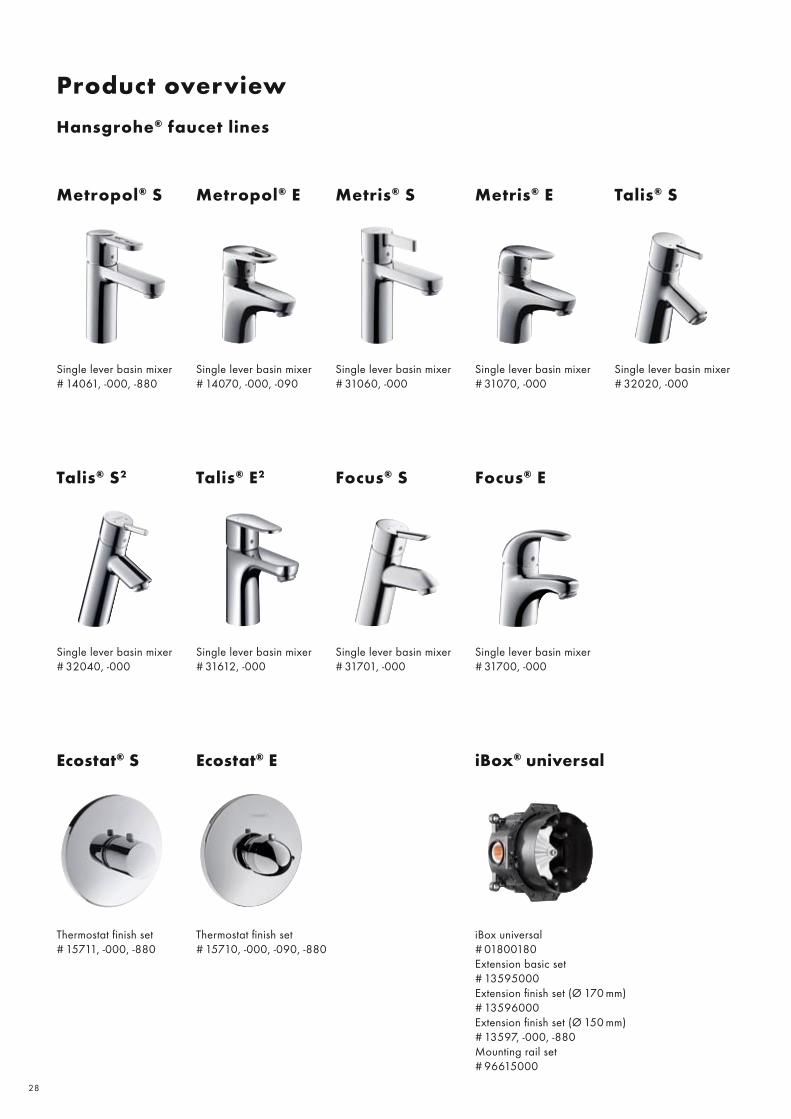
Single lever basin mixer# 31060, -000
Metris® S
Single lever basin mixer# 31070, -000
Metris® E Talis® S
Single lever basin mixer# 32020, -000
Talis® S2
Single lever basin mixer# 32040, -000
Single lever basin mixer# 31701, -000
Focus® S
Metropol® S
Single lever basin mixer# 14061, -000, -880
Metropol® E
Single lever basin mixer# 14070, -000, -090
Hansgrohe® faucet lines
Single lever basin mixer# 31700, -000
Focus® E
Thermostat fi nish set# 15710, -000, -090, -880
Ecostat® E
Thermostat fi nish set# 15711, -000, -880
Ecostat® S
Product overview
iBox universal# 01800180Extension basic set# 13595000Extension fi nish set (Ø 170 mm)# 13596000Extension fi nish set (Ø 150 mm)# 13597, -000, -880Mounting rail set# 96615000
iBox® universal
29
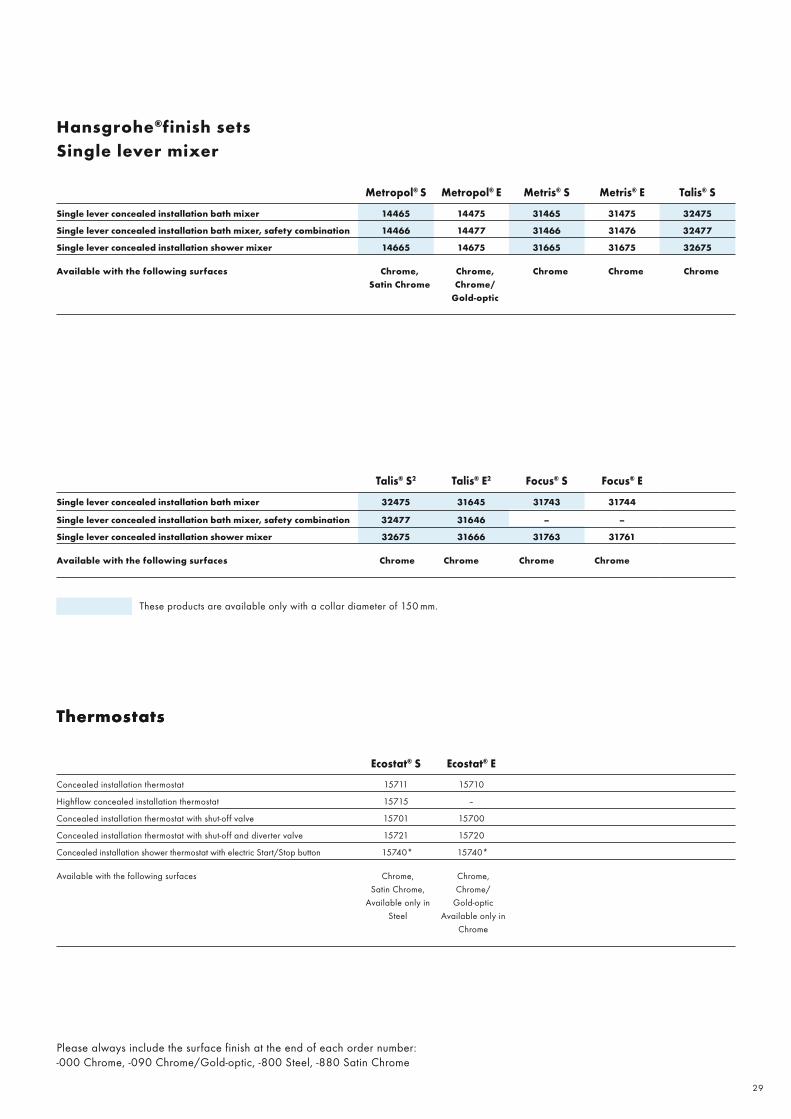
Hansgrohe®finish setsSingle lever mixer
Please always include the surface finish at the end of each order number: -000 Chrome, -090 Chrome/Gold-optic, -800 Steel, -880 Satin Chrome
Thermostats
These products are available only with a collar diameter of 150 mm.
Ecostat® S Ecostat® E
Concealed installation thermostat 15711 15710
Highflow concealed installation thermostat 15715 –
Concealed installation thermostat with shut-off valve 15701 15700
Concealed installation thermostat with shut-off and diverter valve 15721 15720
Concealed installation shower thermostat with electric Start/Stop button 15740* 15740*
Available with the following surfaces Chrome,Satin Chrome,
Available only in Steel
Chrome,Chrome/
Gold-opticAvailable only in
Chrome
Thermostats
Talis® S2 Talis® E2 Focus® S Focus® E
Single lever concealed installation bath mixer 32475 31645 31743 31744
Single lever concealed installation bath mixer, safety combination 32477 31646 – –
Single lever concealed installation shower mixer 32675 31666 31763 31761
Available with the following surfaces Chrome Chrome Chrome Chrome
Metropol® S Metropol® E Metris® S Metris® E Talis® S
Single lever concealed installation bath mixer 14465 14475 31465 31475 32475
Single lever concealed installation bath mixer, safety combination 14466 14477 31466 31476 32477
Single lever concealed installation shower mixer 14665 14675 31665 31675 32675
Available with the following surfaces Chrome,Satin Chrome
Chrome,Chrome/
Gold-optic
Chrome Chrome Chrome

30
Product overview
Axor® Collections
Twin handle basin mixer# 38040, -000
Single lever basin mixer# 10010, -000
Single lever basin mixer# 10070, -000
Single lever basin mixer# 38000, -000
Twin handle basin mixer# 37030, -000, -810
Single lever basin mixer# 18020, -000
Single lever basin mixer# 10111, -000
Single lever basin mixer# 17010, -000, -090, -120, -810
Twin handle basin mixer# 16502, -000, -820, -830
Single lever basin mixer# 39010, -000
Single lever basin mixer# 35002, -800
Axor® Uno2
Axor® Starck Classic
Axor® Starck X
Axor® Uno
Axor® Terrano
Axor® Massaud
Axor® Starck
Axor® Carlton Axor® Montreux
Axor® Citterio
Axor® Steel

Axor® finish sets
Please always include the surface number at the end of each order number: -000 Chrome, -090 Chrome/Gold-optic, -120 Chrome/Porcelain, -800 Stainless steel look, -810 Satinox, -820 Brushed Nickel, -830 Polished Nickel
Axor®
StarckAxor®
Starck ClassicAxor®
Starck XAxor®
CitterioAxor®
Massaud
Single lever concealed installation bath mixer 10416 10415 10445 39455 18455
Single lever concealed installation bath mixer, safety combination 10418 10417 10447 39457 18457
Single lever concealed installation shower mixer 10616 10615 10645 39655 18655
Concealed installation thermostat 10710 10710 10716 – 18740
Concealed installation thermostat, cross handle – – – 39715 –
Concealed installation thermostat, lever handle – – – 39710 –
Highflow concealed installation thermostat 10715 10715 10717 – 18741
Highflow concealed installation thermostat, cross handle – – – 39716 –
Highflow concealed installation thermostat , lever handle – – – 39711 –
Concealed installation thermostat with shut-off valve 10700 10700 10706 – 18745
Concealed installation thermostat with shut-off valve, cross handle – – – 39705 –
Concealed installation thermostat with shut-off valve, lever handle – – – 39700 –
Concealed installation thermostat with shut-off and diverter valve 10720 10720 10726 – 18750
Concealed installation thermostat with shut-off and diverter valve, cross handle – – – 39725 –
Concealed installation thermostat with shut-off and diverter valve, lever handle – – – 39720 –
Available in the following surfaces Chrome Chrome Chrome Chrome Chrome
Axor®
Uno2Axor®
UnoAxor®
SteelAxor®
TerranoAxor®
CarltonAxor®
Montreux
Single lever concealed installation bath mixer 38425 – 35425 37455 17415 –
Single lever concealed installation bath mixer, safety combination 38427 – 35427 37417 17417 –
Single lever concealed installation bath mixer, Zero handle – 38405 – – – –
Single lever concealed installation bath mixer, Zero handle, safety combination – 38407 – – – –
Single lever concealed installation bath mixer, U handle – 38415 – – – –
Single lever concealed installation bath mixer, U handle, safety combination – 38417 – – – –
Single lever concealed installation shower mixer 38625 – 35625 37655 17615 –
Single lever concealed installation shower mixer, Zero handle – 38605 – – – –
Single lever concealed installation shower mixer, U handle – 38615 – – – –
Concealed installation thermostat 38375 38375 35710 – – –
Concealed installation thermostat, cross handle – – – 37715 17715 16810
Concealed installation thermostat, lever handle – – – 37710 17710
Highflow concealed installation thermostat 38715 38715 35715 – – –
Highflow concealed installation thermostat, cross handle – – – 37716 17716 16815
Highflow concealed installation thermostat, lever handle – – – 37711 17712 –
Concealed installation thermostat with shut-off valve 38700 38700 35700 – – –
Concealed installation thermostat with shut-off valve, cross handle – – – 37705 17705 16800
Concealed installation thermostat with shut-off valve, lever handle – – – 37700 17700 –
Concealed installation thermostat with shut-off and diverter valve 38720 38720 35720 – – –
Concealed installation thermostat with shut-off and diverter valve, cross handle – – – 37725 17725 16820
Concealed installation thermostat with shut-off and diverter valve, lever handle – – – 37720 17720 –
Available in the following surfaces Chrome Chrome Steel Look Chrome,Satinox
Chrome,Chrome/
Gold-optic,Satinox,Chrome/Porcelain
Chrome,brushedNickel,
polishedNickel
31

The iBox universal revolutionised concealed installation, making it safer and easier. Now, working closely with experienced installers, Hansgrohe has re-worked and improved this popular product.
So what do these improvements mean for you? Which tried and tested elements have remained the same? And to what extent does the iBox universal make it easier to install Hansgrohe’s latest shower innovations?
This technical guide provides answers to all your questions about the iBox universal and concealed installation. It also demonstrates the many opportunities that the iBox universal off ers you and your customers when you combine it with Hansgrohe’s new shower systems.
Visit www.hansgrohe.com to download further technical product information.
SOE/
en-iB
ox® u
nive
rsal
, pla
nnin
g an
d in
stal
latio
n 2
007
· Su
bjec
t to
tech
nica
l alte
ratio
ns a
nd c
olou
r diff
eren
ces
due
to th
e pr
intin
g pr
oces
s. Fo
rm-N
o. 8
4 1
20
16
3 ·
06
/07/
3.5
· Pr
inte
d in
Ger
man
y · P
rinte
d on
100
% c
hlor
ine
free
blea
ched
pap
er ·
MRH
, Fre
ibur
g
Hansgrohe · P.O. Box 1145 · D-77757 Schiltach · Tel. +49 7836 51-0 Fax +49 7836 51-1300 · [email protected] · www.hansgrohe.com