the evolution of a crawlspace - lessons learned from a … evolution of a crawlspace – lessons...
TRANSCRIPT

The Evolution of a Crawlspace –Lessons Learned From a Big Energy Retrofit
Presented by:
Mike Barcik, Southface & Skye Dunning, BPS
RESNET 2014 Conference
1
About Southface
2

Crawlspaces and the old way of thinking…• Moisture problems could be solved by venting
• Hide stuff down there• Use vented crawlspace air for combustion
• More vents are better, right? 1:150 rule of thumb
• Hang batt insulation in cavities
3
Crawlspaces and the old way of thinking…• Moisture problems could be solved by venting
• Hide stuff down there• Use vented crawlspace air for combustion
• More vents are better, right? 1:150 rule of thumb
• Hang batt insulation in cavities
4
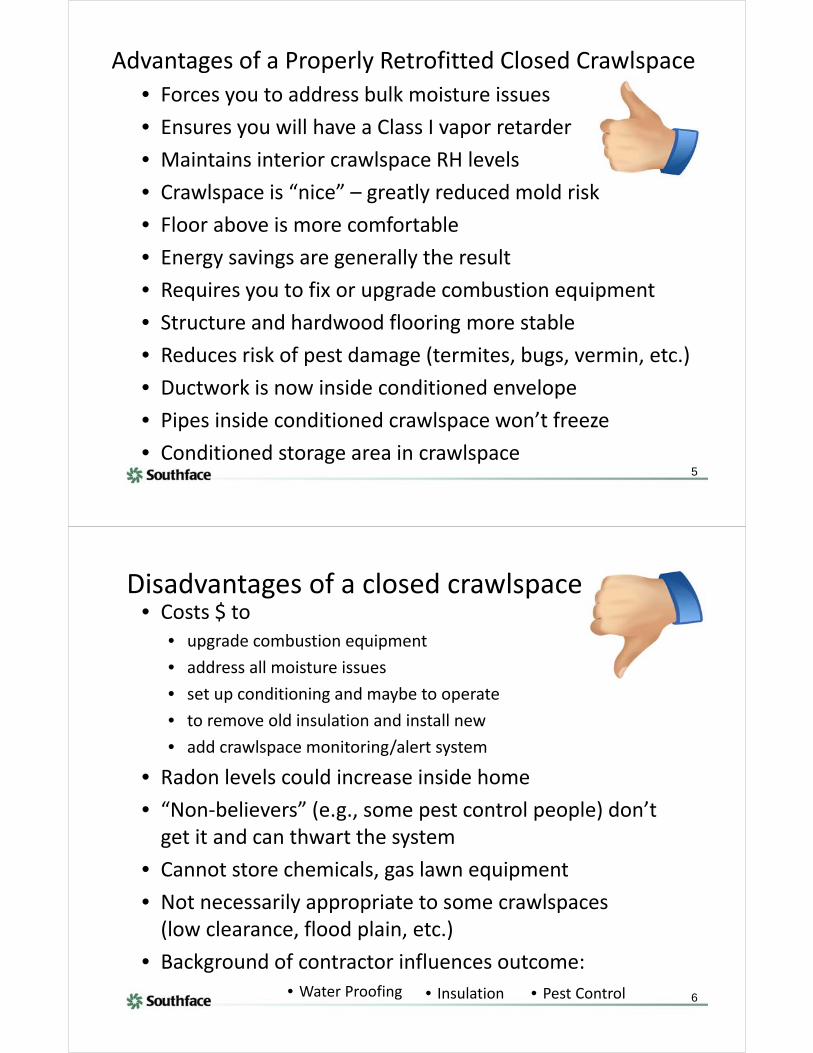
Advantages of a Properly Retrofitted Closed Crawlspace
• Forces you to address bulk moisture issues
• Ensures you will have a Class I vapor retarder
• Maintains interior crawlspace RH levels
• Crawlspace is “nice” – greatly reduced mold risk
• Floor above is more comfortable
• Energy savings are generally the result
• Requires you to fix or upgrade combustion equipment
• Structure and hardwood flooring more stable
• Reduces risk of pest damage (termites, bugs, vermin, etc.)
• Ductwork is now inside conditioned envelope
• Pipes inside conditioned crawlspace won’t freeze
• Conditioned storage area in crawlspace5
Disadvantages of a closed crawlspace• Costs $ to
• upgrade combustion equipment
• address all moisture issues
• set up conditioning and maybe to operate
• to remove old insulation and install new
• add crawlspace monitoring/alert system
• Radon levels could increase inside home
• “Non‐believers” (e.g., some pest control people) don’t get it and can thwart the system
• Cannot store chemicals, gas lawn equipment
• Not necessarily appropriate to some crawlspaces (low clearance, flood plain, etc.)
• Background of contractor influences outcome:
6• Water Proofing • Insulation • Pest Control
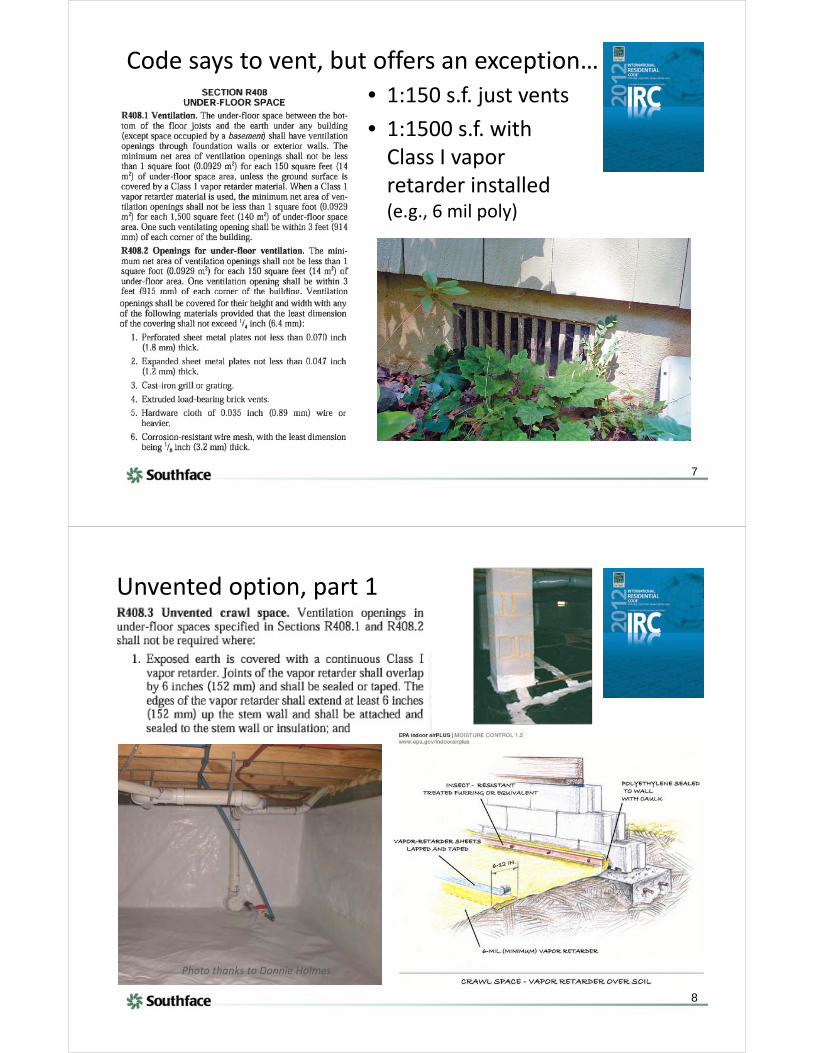
Code says to vent, but offers an exception…
• 1:150 s.f. just vents
• 1:1500 s.f. with Class I vapor retarder installed(e.g., 6 mil poly)
7
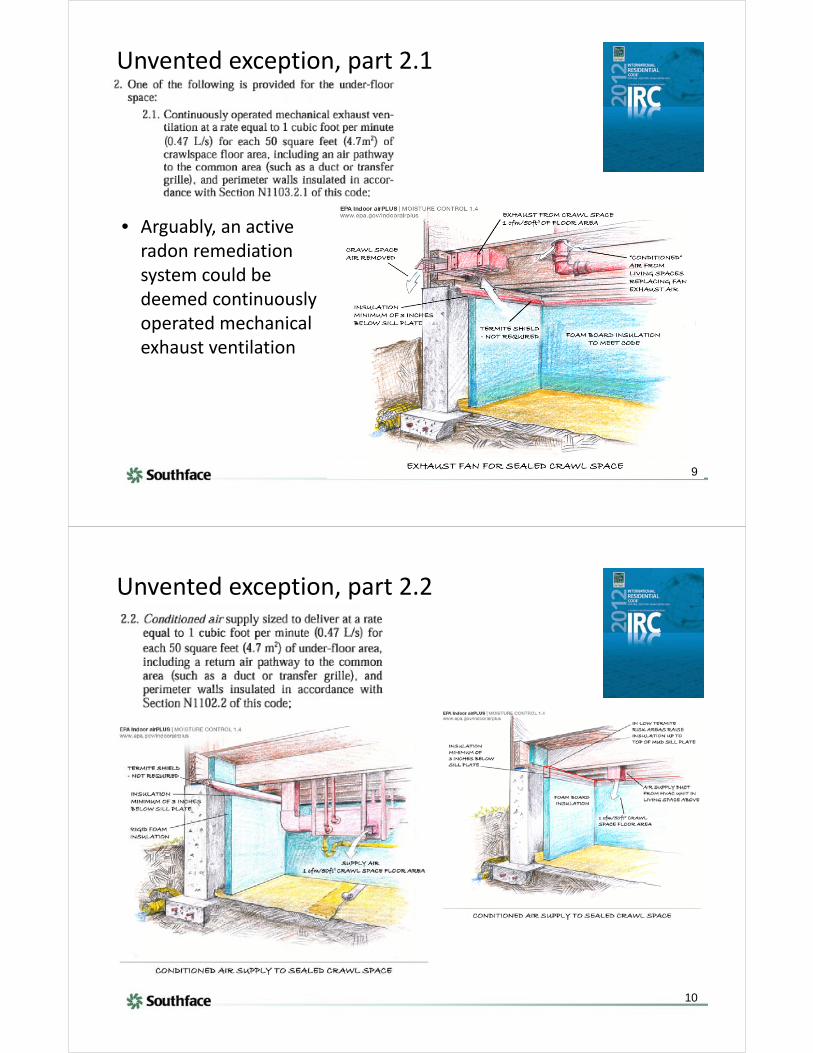
Unvented option, part 1
8
Photo thanks to Donnie Holmes
Unvented exception, part 2.1
9
• Arguably, an active radon remediation system could be deemed continuously operated mechanical exhaust ventilation
Unvented exception, part 2.2
10

Unvented exception, part 2.2(with a bit of an interpretation)
11
• Arguably, a crawlspace can be “conditioned” by installing a dehumidifier that is delivering the required cfm
• Especially in mixed or warmer climates, • drying the crawl air is more important • since the walls are insulated, the crawlspace tem‐perature should remain reasonable (above 60 o F)
• duct leakage contributes to “conditioning”• Our preferred approach since crawl gets what it needs (moisture control) based on sensor located in the crawlspace itself
Unvented exception, part 2.3
12
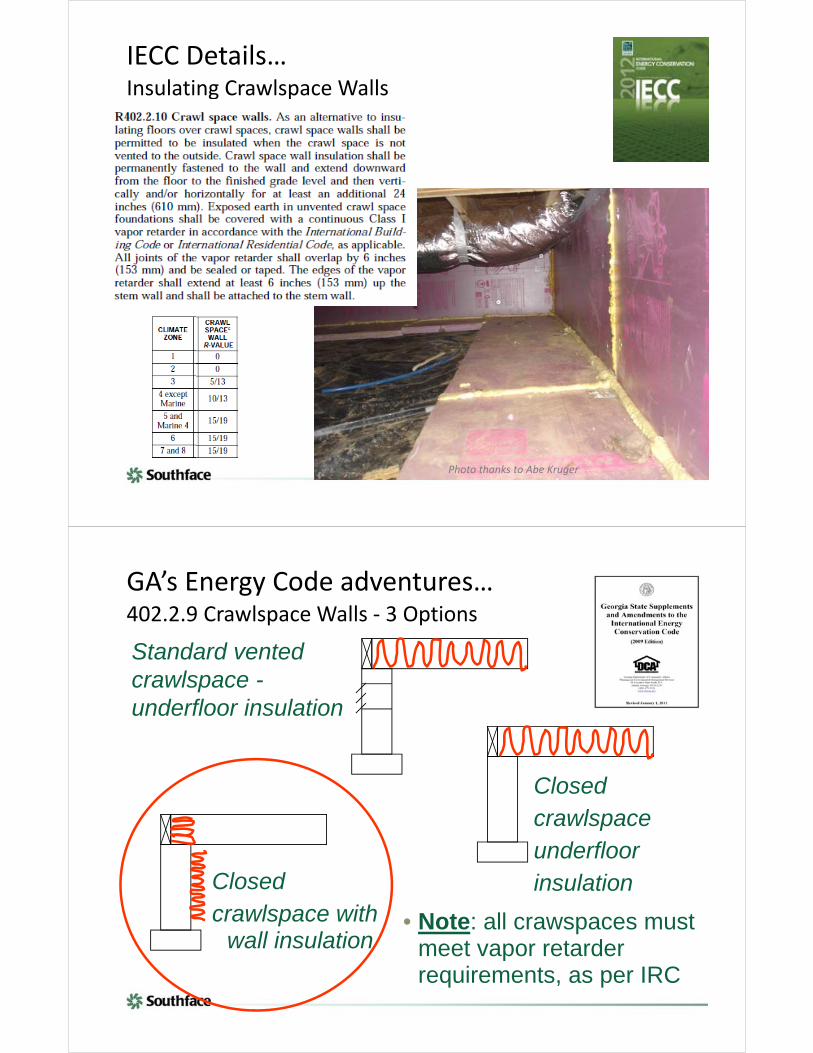
Insulating Crawlspace Walls
IECC Details…
Photo thanks to Abe Kruger
402.2.9 Crawlspace Walls ‐ 3 Options
Standard ventedcrawlspace -underfloor insulation
ClosedcrawlspaceunderfloorinsulationClosed
crawlspace with wall insulation
• Note: all crawspaces must meet vapor retarder requirements, as per IRC
GA’s Energy Code adventures…
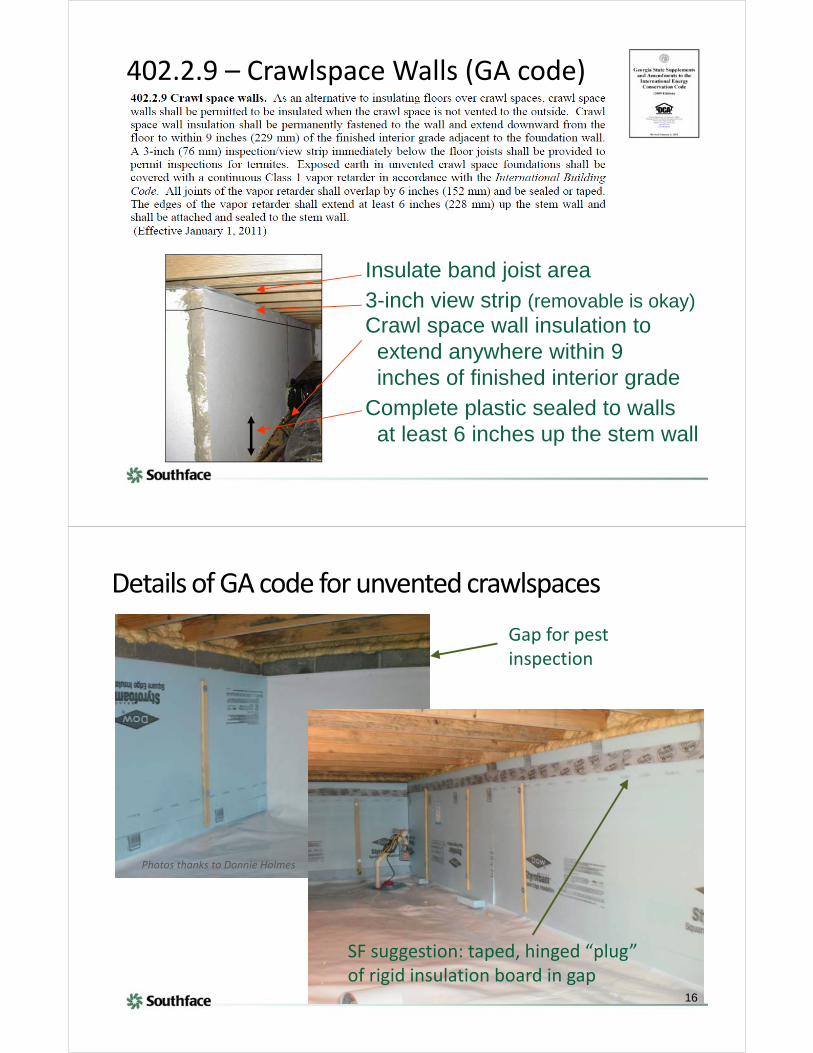
402.2.9 – Crawlspace Walls (GA code)
Crawl space wall insulation to extend anywhere within 9 inches of finished interior grade
Complete plastic sealed to walls at least 6 inches up the stem wall
Insulate band joist area3-inch view strip (removable is okay)
Details of GA code for unvented crawlspaces
SF suggestion: taped, hinged “plug” of rigid insulation board in gap
Gap for pest inspection
16
Photos thanks to Donnie Holmes
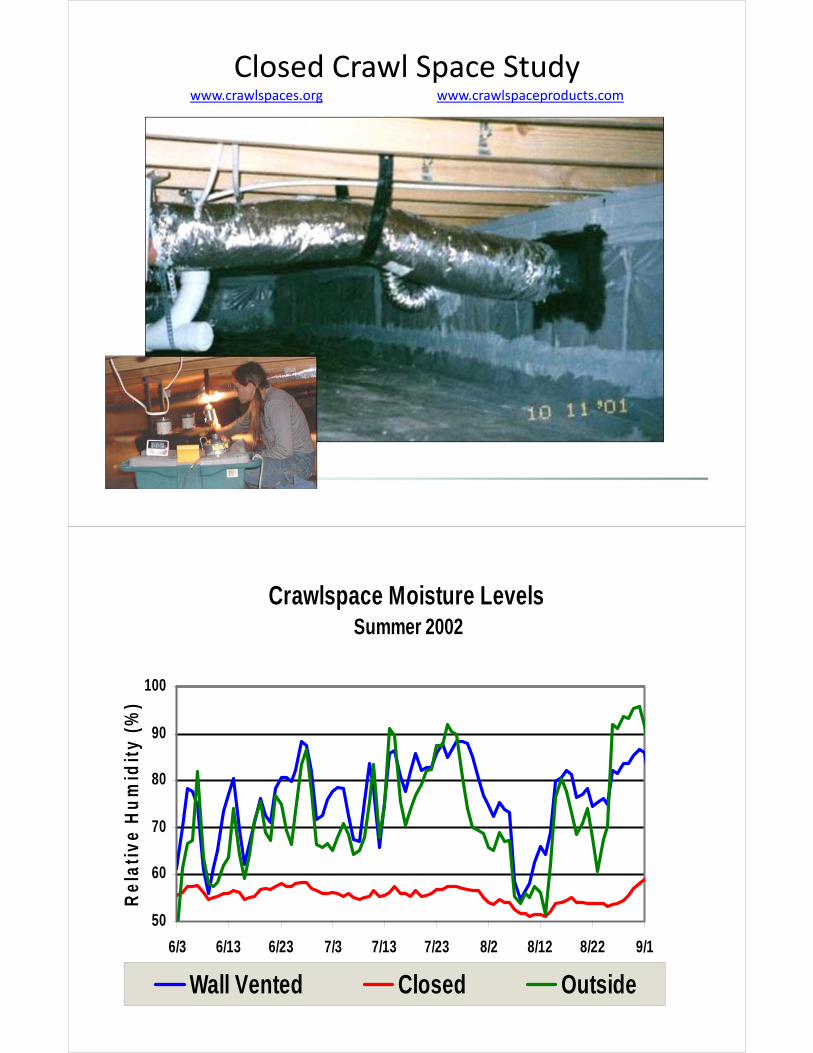
Closed Crawl Space Studywww.crawlspaces.org www.crawlspaceproducts.com
Crawlspace Moisture Levels Summer 2002
50
60
70
80
90
100
6/3 6/13 6/23 7/3 7/13 7/23 8/2 8/12 8/22 9/1
Da t e
Re
lati
ve
Hu
mid
ity
(%
)
Wall Vented Closed Outside
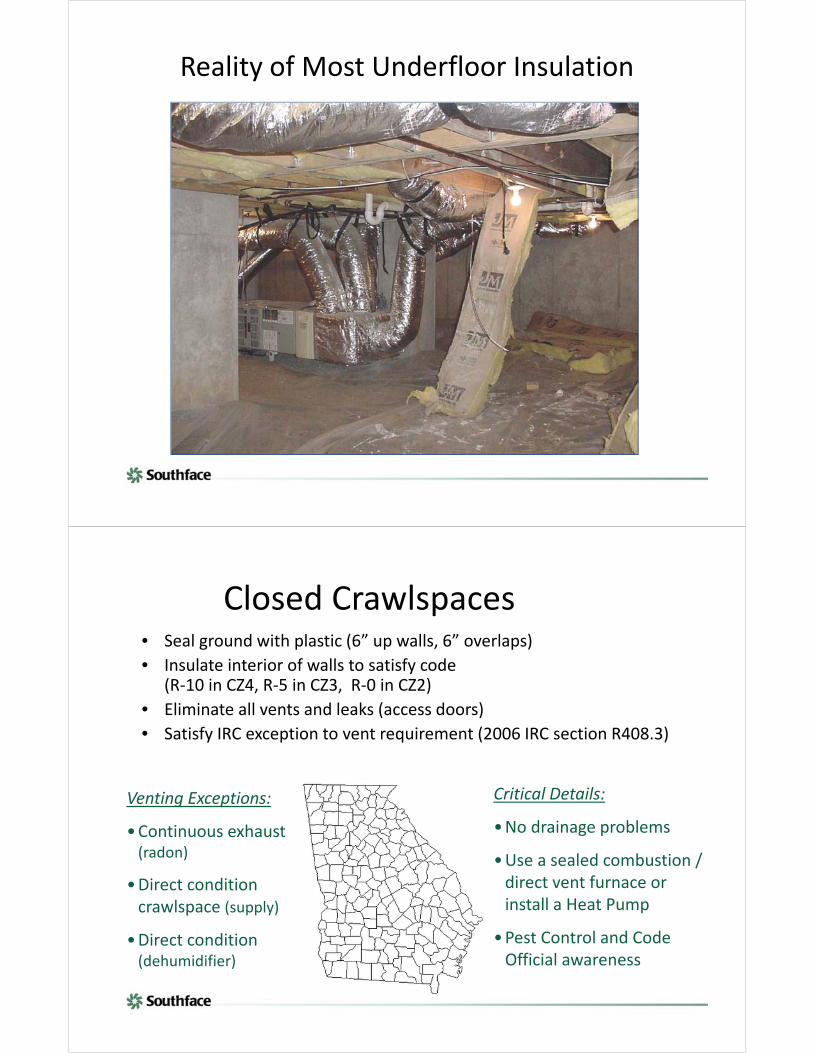
Reality of Most Underfloor Insulation
• Seal ground with plastic (6” up walls, 6” overlaps)
• Insulate interior of walls to satisfy code (R‐10 in CZ4, R‐5 in CZ3, R‐0 in CZ2)
• Eliminate all vents and leaks (access doors)
• Satisfy IRC exception to vent requirement (2006 IRC section R408.3)
Critical Details:
•No drainage problems
•Use a sealed combustion / direct vent furnace or install a Heat Pump
•Pest Control and Code Official awareness
Venting Exceptions:
•Continuous exhaust (radon)
•Direct condition crawlspace (supply)
•Direct condition (dehumidifier)
Closed Crawlspaces
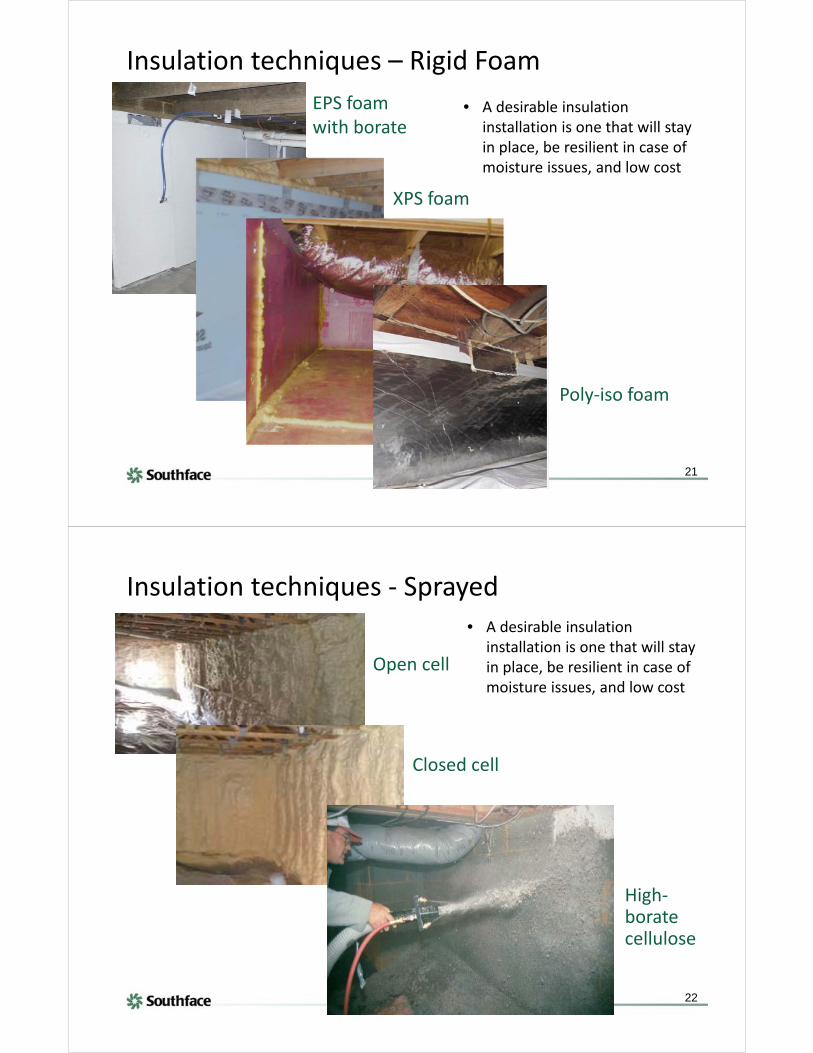
Insulation techniques – Rigid Foam
• A desirable insulation installation is one that will stay in place, be resilient in case of moisture issues, and low cost
21
EPS foam with borate
XPS foam
Poly‐iso foam
Insulation techniques ‐ Sprayed
22
• A desirable insulation installation is one that will stay in place, be resilient in case of moisture issues, and low cost
Open cell
Closed cell
High‐borate cellulose
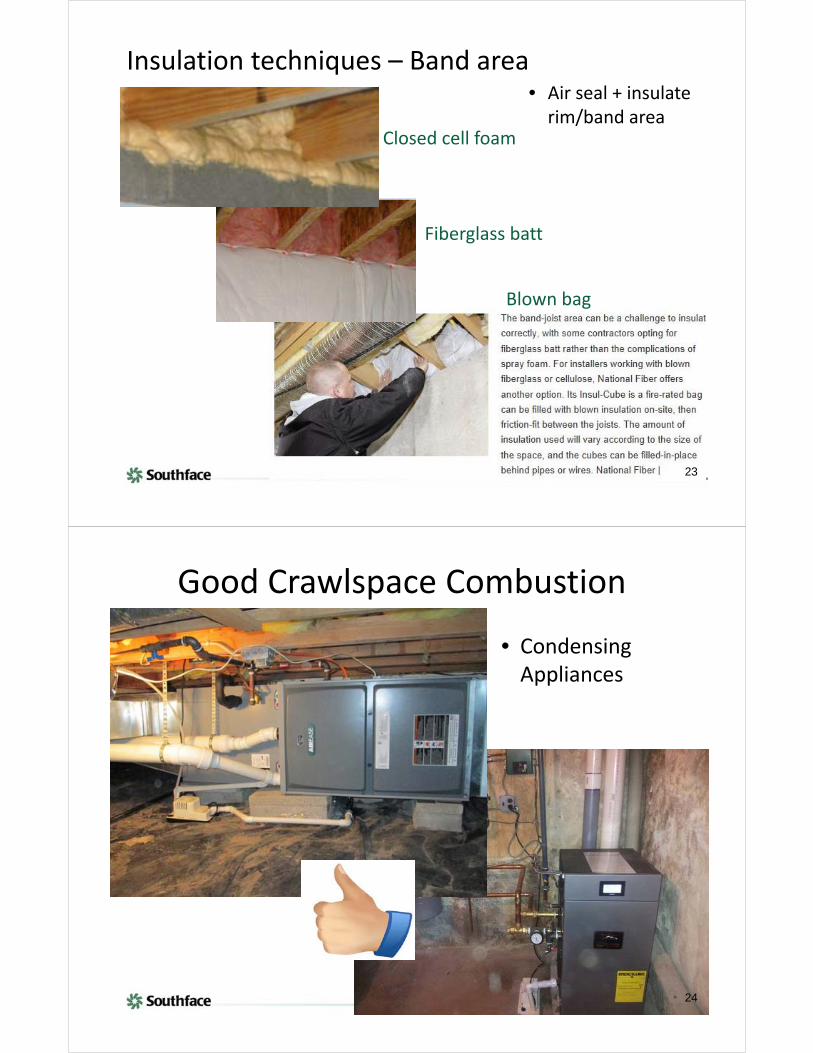
Insulation techniques – Band area• Air seal + insulate rim/band area
23
Fiberglass batt
Closed cell foam
Blown bag
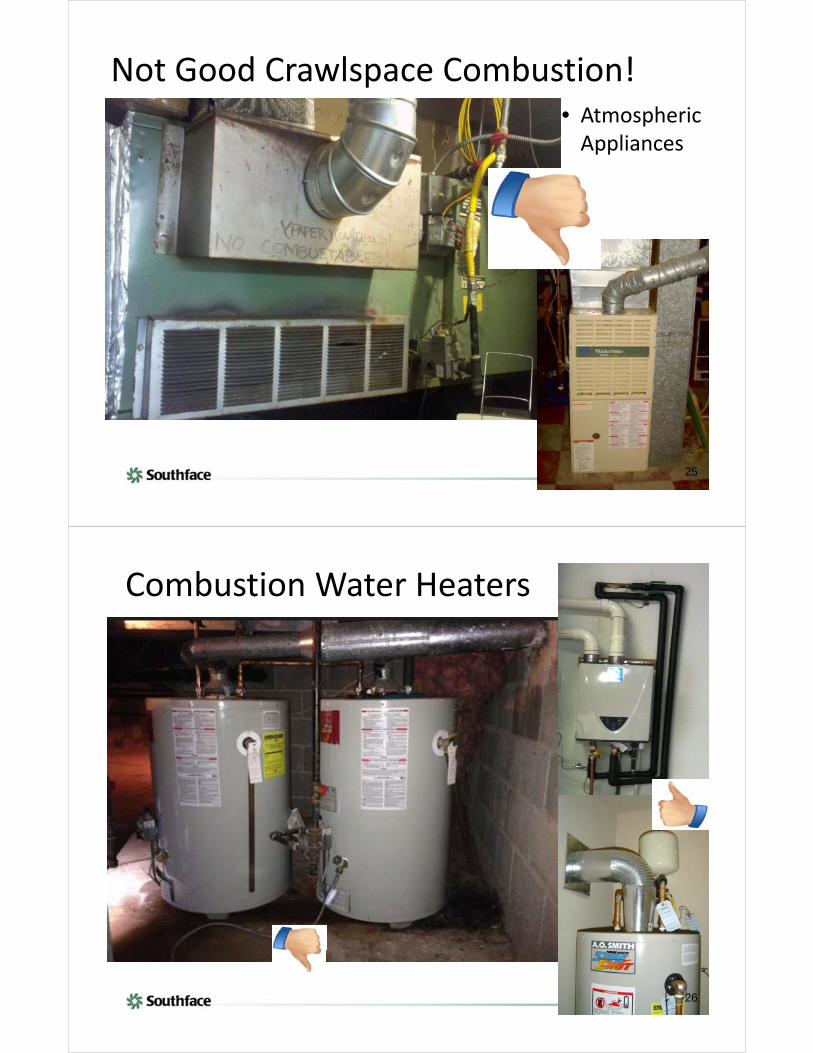
Good Crawlspace Combustion
• Condensing Appliances
24
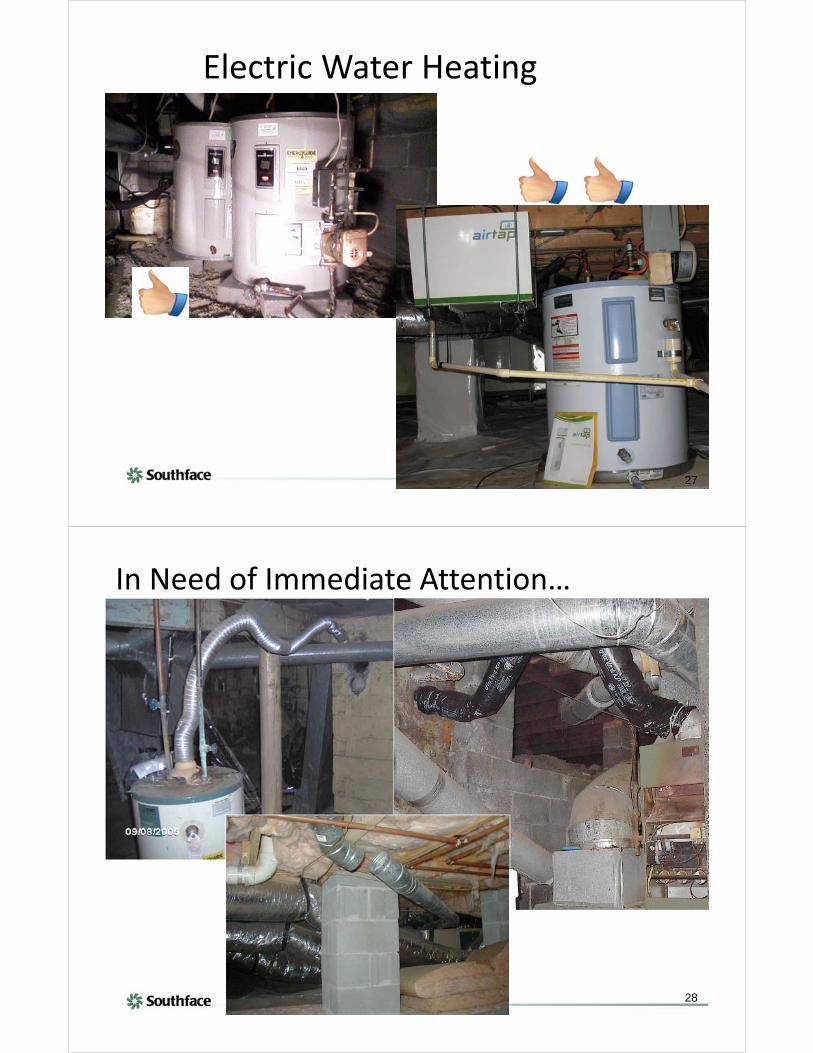
Not Good Crawlspace Combustion!
25
• Atmospheric Appliances
26
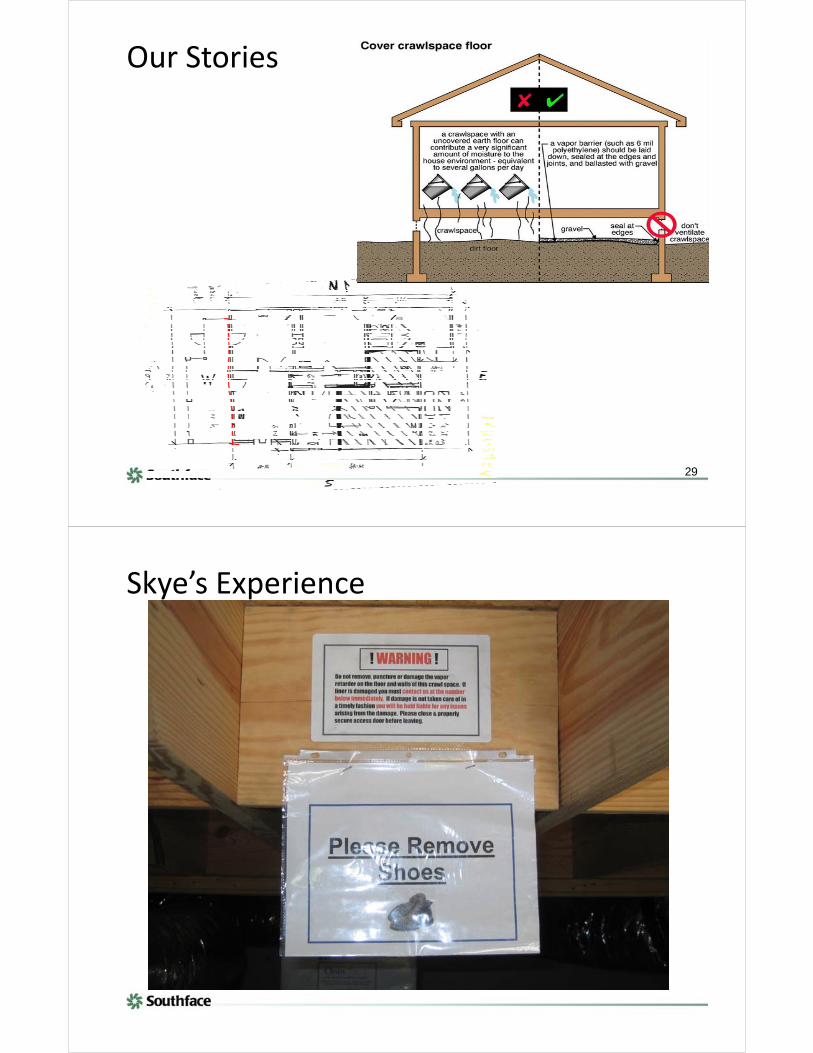
Combustion Water Heaters
Electric Water Heating
27
In Need of Immediate Attention…
28
29
Our Stories
Skye’s Experience

Skye’s Experience
Skye’s Experience

Skye’s Experience
Skye’s Experience
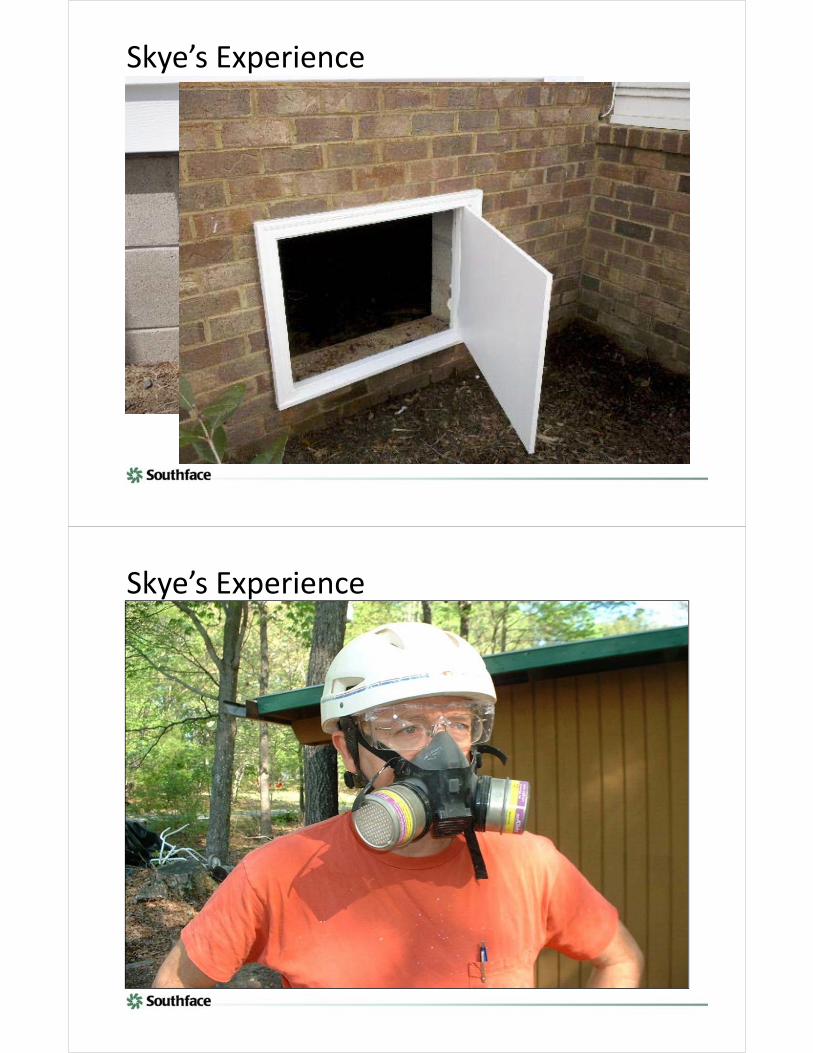
Skye’s Experience
Skye’s Experience

Acme Small Group Exercise ‐ Setup• Break into groups of ~6 people
• Introduce yourselves and determine the facilitator and modeler
• Read the scenario and constraints for your team & determine a solution
• Choose a presenter; at the end they will share your scenario and results with the larger group
37Barcik Family Vacation – “Don’t know why she won’t let us in her car”
Small Group Exercise ‐ Directions
38
1. Discuss your Scenario and its constraints for creating a closed crawlspace
2. Brainstorm on solutions to best proceed (use flip chart or paper)
3. Determine how you will insulate it and how to satisfy code unvented crawlspace (how will you “condition” it?)
4. Note the important details of your solution
5. Draw a section or isometric sketch
• Insulation method
• Moisture details
• Comment on the overall economics
6. Present your results to the larger group – consider a poster board
39
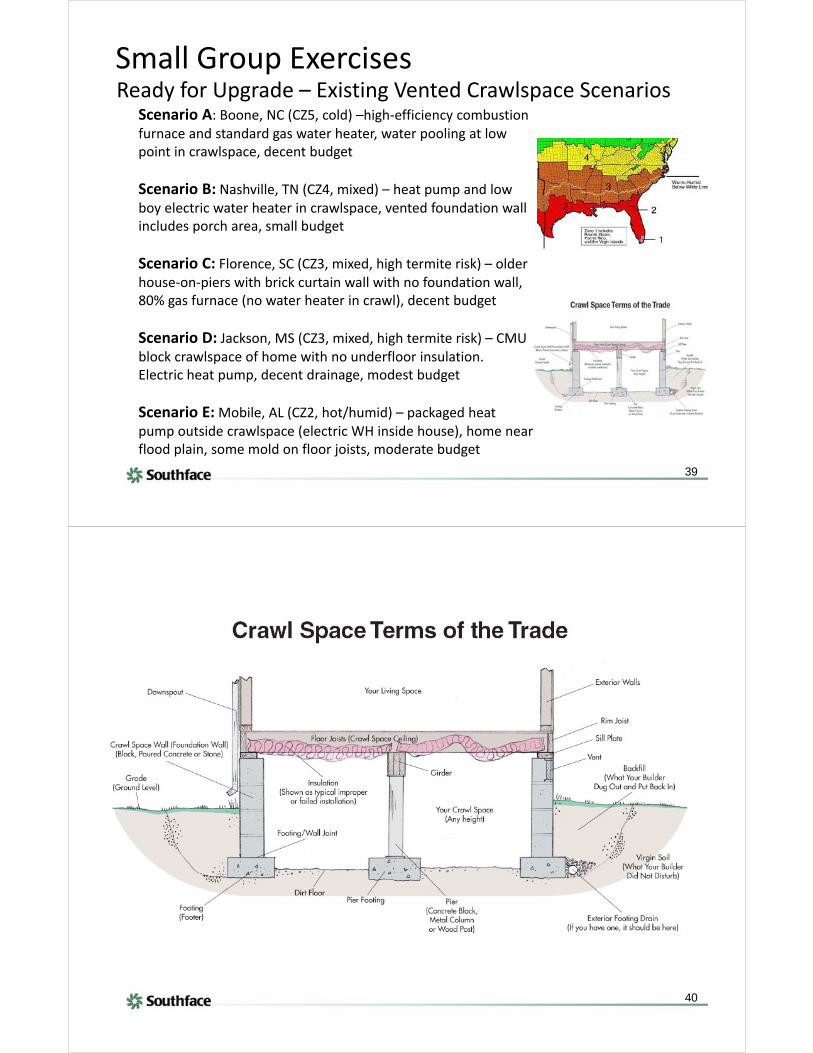
Scenario A: Boone, NC (CZ5, cold) –high‐efficiency combustion furnace and standard gas water heater, water pooling at low point in crawlspace, decent budget
Scenario B: Nashville, TN (CZ4, mixed) – heat pump and low boy electric water heater in crawlspace, vented foundation wall includes porch area, small budget
Scenario C: Florence, SC (CZ3, mixed, high termite risk) – older house‐on‐piers with brick curtain wall with no foundation wall, 80% gas furnace (no water heater in crawl), decent budget
Scenario D: Jackson, MS (CZ3, mixed, high termite risk) – CMU block crawlspace of home with no underfloor insulation. Electric heat pump, decent drainage, modest budget
Scenario E:Mobile, AL (CZ2, hot/humid) – packaged heat pump outside crawlspace (electric WH inside house), home near flood plain, some mold on floor joists, moderate budget
Small Group ExercisesReady for Upgrade – Existing Vented Crawlspace Scenarios
40

Wrap up and Q&A ‐ Thank You!
• Additional Questions?
• Closing Thoughts?
• Thank You!
Photo: Jonathan Hillyer, 2009
41

1
DRAFT ‐‐‐ The evolution of our crawlspace – tales of an IAQ & energy retrofit process by mike barcik
I’ve pretty much lived my entire life in older houses over vented crawlspaces – starting with my parents
brick ranch built in late 50’s, including college rental houses, the 1st house I bought, other rentals, and
currently our 1,500 s.f. Craftsman bungalow in Decatur, built circa 1920. Without exception, all have
had the air handler and ductwork located in the crawlspace, which is generally good from an air
conditioning standpoint since they are not located inside the hot attic, but generally bad from an indoor
air quality standpoint, since vented crawlspaces are moldy and that’s a big allergy issue for me.
In the early days of 2000, just after we moved into our home, the basic state of our crawlspace was fixed
vents, no real plastic ground cover, and R11 unfaced batts falling down in many places. Our foundation
was constructed as a pier and beam structure with the exterior perimeter bricked in (probably at a later
date) – typical vents had been added. The existing HVAC equipment was two 10 SEER, 2‐ton air
conditioners each with 80% AFUE furnaces. At some point in its life, our home had been turned into a
duplex and later back into a single family home.
My wife Tiffany and I put down 6‐mil (mesh reinforced) poly on the ground and I invested some effort in
air sealing the more obvious targets for holes – mainly under plumbing. These openings were largely
due to various retrofits that had occurred over the years, and many of those were huge – the hole under
one of the bathtubs was probably 18” square!

2
My surprise “helper”
Another project was rerouting our dryer vent down and out through the crawlspace which involved
working around various framing, wiring, and ductwork obstacles as well as coring a hole through the
brick wall for a termination device.
Initial duct leakage was ~15‐20% leakage to outside. I sealed ducts from the inside of our house by
removing the grills and reaching down inside with handfuls of mastic – one system’s panned return had
separated 1.5” leaving a gaping leak to the crawlspace. And, I sealed some of the more obvious duct
leakage points while inside the crawlspace at the air handler – but not really all that much as navigating
to and around the air handlers was, and is, a moderate challenge. I also added an additional small
return for a back bedroom and rerouted a bathroom supply that had been located directly behind a
toilet – likely an outcome of various remodels over the years.

3
Around 2003 we took advantage of a furnace failure to upgrade one of our two heaters with a 92% AFUE
condensing furnace– we received a utility rebate and also added a better, pleated 4” filter. As
mentioned, our small house had been subdivided into two dwelling units at one point in its life and so
had two separate mechanical systems, each serving ~750 s.f. The interesting result of this is that now
that it is a single family residence again, it allows us to have temperature zoning – the left (northern)
side is mostly bedrooms and the right (southern) is kitchen, dining, living room, etc.
We also had a very basic French drain installed on the high side of the house, plus routed the gutter
downspouts to better drain away from the foundation to lesson exterior moisture risk.

4
All these improvements were valuable but still our floorboards went through a semi –annual process of
expansion and contraction, primarily due to the change in moisture conditions in the vented crawl
below. In the winter, cold and very dry air was vented into the crawl and caused the floor boards above
to shrink. The opposite was true in the warmer, more humid months.
In 2010 we took advantage of the 30% federal tax incentives plus a $200 rebate from GEFA and replaced
the right side (southern) 80% furnace with a new 95% AFUE furnace with a variable speed blower and 4”
pleated filter. Since our two current furnaces were each installed with both intakes and exhaust PVC
pipes, the crawlspace now officially no longer needed to be vented in order to provide combustion air.
Working in a reasonably tight crawlspace is fairly labor intensive. In the fall‐winter of 2011‐12 we
outsourced much of the work to a contractor and finally completed the encapsulation of the crawl at a
total price of ~$5,000. I was eligible for and did receive a $700 rebate from GA Power for performing
this upgrade. Their improvement modeling software predicted a 13.9% improvement. Unfortunately,
this was not enough to hit the 20, 25, and 30% reduction thresholds required for the “bigger” rebates
which reach upwards of $2,000.
As part of the project, I elected to spend about $1,000 on mold remediation plus $450 on having both
duct systems cleaned. These, plus removing the old, dirty under‐floor batts did wonders for the air
quality of the crawlspace and consequently for our living space too.
The remaining money went towards the plastic skirting that was carefully sealed to the walls and piers
and connected to the ground vapor retarder as well as the wall insulation (rigid Thermax, ~R5 to R7).
The Georgia energy code requires a 3” uninsulated gap just below the bottom of the floor joists to
provide a means for visual inspection of termites. Because I did not want to compromise the
completeness of the wall insulation coverage, I had a 3” strip of insulation installed that was hinged with
a piece of tape. The foam board can easily be opened out for inspection and then folded back for
continuous insulation coverage.

5
Rim joists were sealed and insulated with batts and foam board. I also found more holes in the floor
that were now easily observed (they had formerly been covered by batts). These were fairly simple to
seal using a foam gun. Because my house features a 30’ front porch, it was necessary to frame, sheath,
and insulate a separation wall to isolate the vented porch crawlspace from the unvented main portion
under the house.
Above: Red line shows location of wall separating house foundation from porch foundation
6
We definitely encountered some mold in the older duct wrap that was severely compromised at several
locations. I have repaired a few pieces but still have others to get to. While it is a much more pleasant
place to be, working in the crawlspace still requires a physical effort that is hard to always find the
motivation for.
We discovered a disconnected duct that was broken at an elbow gore – the one that I had recently
rerouted from behind the toilet to a new location. It had been fairly thickly coated with mastic so it was
almost certainly broken by a subcontractor trying to maneuver around it. I considered “arthroscopic”
repair by using mastic to glue straps to the inside and securing and sealing it entirely from the inside but
in the end I just reconnected and insulated it from the crawlspace side.
We discovered two internal sources of bulk moisture – one from a partially buried former water pipe
that was easily fixed by adding a threaded plug at a fitting. The other was a sink water supply leak that
was dripping from a poor solder joint. I re‐soldered it and so far so good.
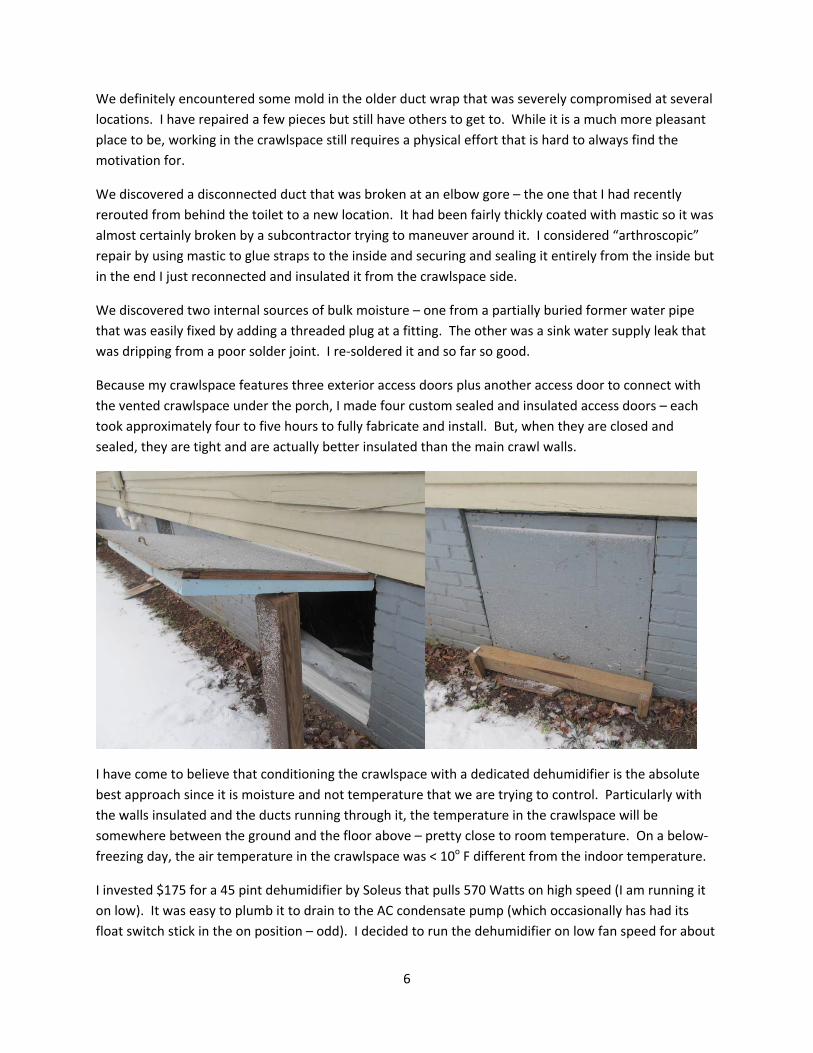
Because my crawlspace features three exterior access doors plus another access door to connect with
the vented crawlspace under the porch, I made four custom sealed and insulated access doors – each
took approximately four to five hours to fully fabricate and install. But, when they are closed and
sealed, they are tight and are actually better insulated than the main crawl walls.
I have come to believe that conditioning the crawlspace with a dedicated dehumidifier is the absolute
best approach since it is moisture and not temperature that we are trying to control. Particularly with
the walls insulated and the ducts running through it, the temperature in the crawlspace will be
somewhere between the ground and the floor above – pretty close to room temperature. On a below‐
freezing day, the air temperature in the crawlspace was < 10o F different from the indoor temperature.
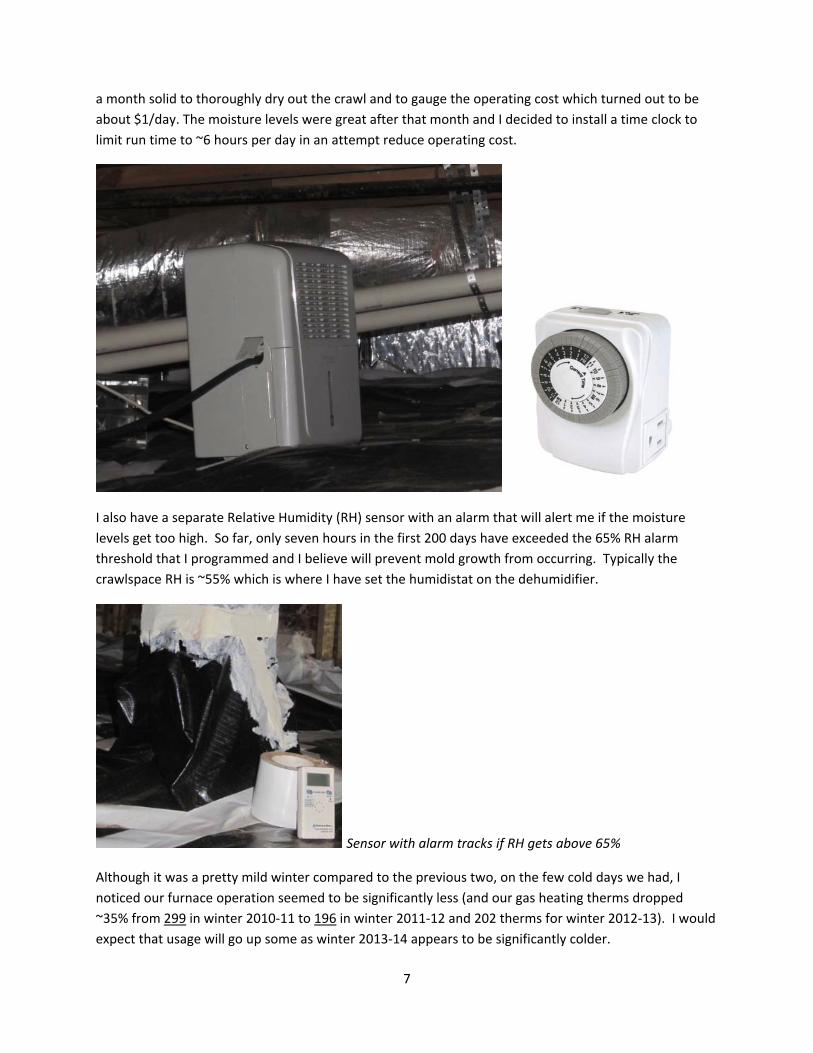
I invested $175 for a 45 pint dehumidifier by Soleus that pulls 570 Watts on high speed (I am running it
on low). It was easy to plumb it to drain to the AC condensate pump (which occasionally has had its
float switch stick in the on position – odd). I decided to run the dehumidifier on low fan speed for about
7
a month solid to thoroughly dry out the crawl and to gauge the operating cost which turned out to be
about $1/day. The moisture levels were great after that month and I decided to install a time clock to
limit run time to ~6 hours per day in an attempt reduce operating cost.
I also have a separate Relative Humidity (RH) sensor with an alarm that will alert me if the moisture
levels get too high. So far, only seven hours in the first 200 days have exceeded the 65% RH alarm
threshold that I programmed and I believe will prevent mold growth from occurring. Typically the
crawlspace RH is ~55% which is where I have set the humidistat on the dehumidifier.
Sensor with alarm tracks if RH gets above 65%
Although it was a pretty mild winter compared to the previous two, on the few cold days we had, I
noticed our furnace operation seemed to be significantly less (and our gas heating therms dropped
~35% from 299 in winter 2010‐11 to 196 in winter 2011‐12 and 202 therms for winter 2012‐13). I would
expect that usage will go up some as winter 2013‐14 appears to be significantly colder.
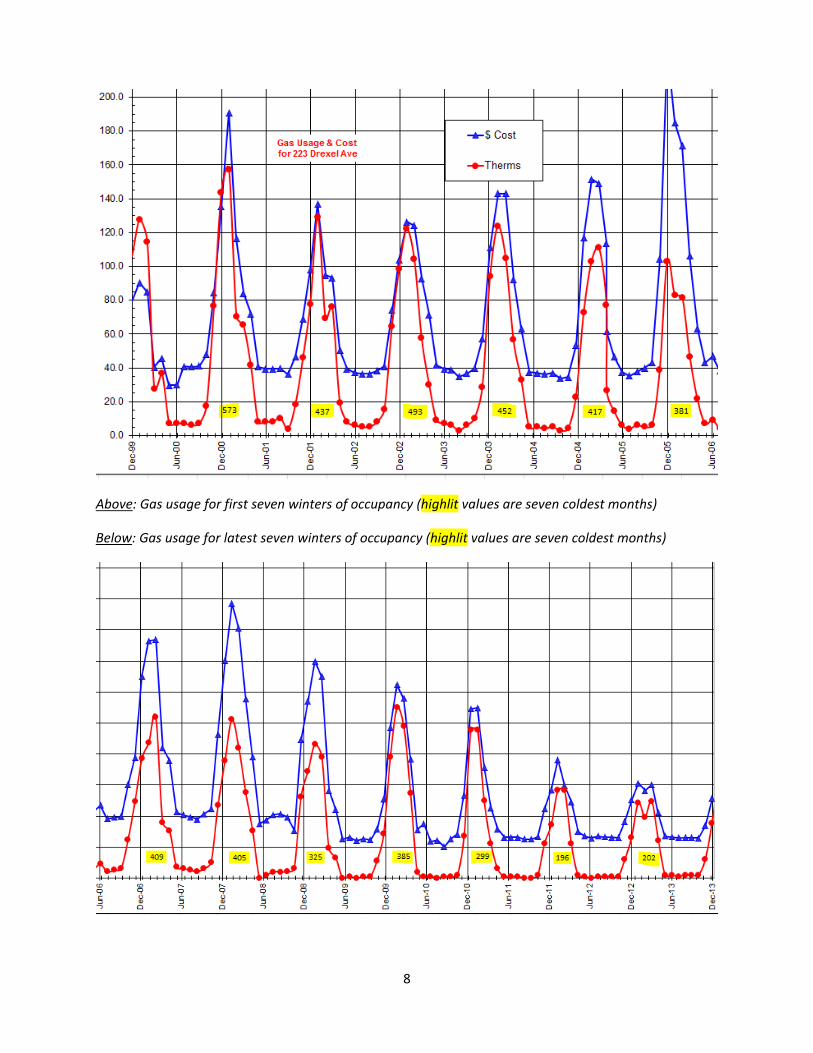
8
Above: Gas usage for first seven winters of occupancy (highlit values are seven coldest months)
Below: Gas usage for latest seven winters of occupancy (highlit values are seven coldest months)
9
The comfort of the floors and house is noticeably better and we now keep the indoor thermostat
setpoint around 68o whereas before we required 70o. And the air quality of the crawlspace is also
drastically improved – I can actually go in there without a filter mask!
I’ve run a HERS analysis using REM/Rate on our home and calculated the HERS Index* before and after
closing up our crawlspace. Before the encapsulation project, our Index was 94, afterwards it dropped to
a 70 which represents a 24% improvement. For comparison, when we purchased our home in
December of 1999, and before we made any of the numerous improvements, it had an Index of 150
(meaning it used 50% more energy than a 2006 code‐based home).
* [The HERS Index compares an as‐built home’s modeled energy consumption for heating, cooling, water
heating, lights and some appliances (H+C+W+LA) to a fictitious reference home that is built exactly to
meet the energy code (2006 IECC). An Index of 100 means the home uses exactly the same energy as if it
were built to code; an Index of 88 means the home uses 12% less energy than a code home while an
Index of 112 means the home uses 12% more.]
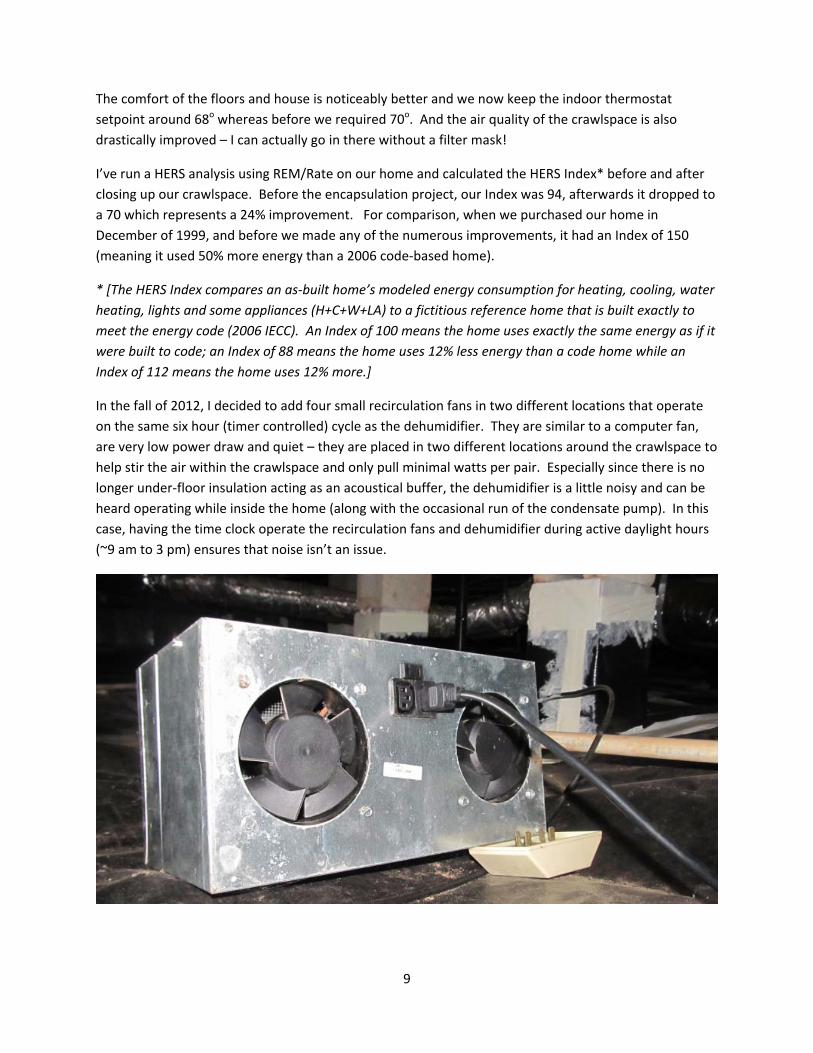
In the fall of 2012, I decided to add four small recirculation fans in two different locations that operate
on the same six hour (timer controlled) cycle as the dehumidifier. They are similar to a computer fan,
are very low power draw and quiet – they are placed in two different locations around the crawlspace to
help stir the air within the crawlspace and only pull minimal watts per pair. Especially since there is no
longer under‐floor insulation acting as an acoustical buffer, the dehumidifier is a little noisy and can be
heard operating while inside the home (along with the occasional run of the condensate pump). In this
case, having the time clock operate the recirculation fans and dehumidifier during active daylight hours
(~9 am to 3 pm) ensures that noise isn’t an issue.
10
In Jan 2013, I retested for radon levels inside the living area of the home. The previous test done in
January 2010 yielded fairly low levels (2.3 pico‐curies/L) back when the crawl was still vented.
Fortunately, the newest test results are still fairly low (2.8 pico‐curies/L); if they were confirmed to be
above action levels (4 pico‐curies/L), we would likely add a perforated pipe under the plastic that is then
vented up and to the outside above the roofline; we’d install a continuously operating inline radon fan if
necessary.
I’m somewhat regretting that I didn’t have the old duct wrap removed – there is mold in the fiberglass
that sometimes comes loose and gets airborne. I have rewrapped certain portions but a few sections
still are uninsulated and the majority of the existing duct wrap is pretty old. Fixing old metal ducts
(mainly sealing and re‐insulating) is certainly a lot of work but I’m definitely glad I’ve kept them due to
the exceptional airflow they provide.
The spring and early summer of 2013 was extraordinarily wet – we actually had more rain by the end of
June 2013 than we had all year in 2012. Many normally dry Atlanta homes featured wet basements and
crawlspaces and there was a definite spike in mold & moisture problems. Our standard cooling strategy
of not running the a/c and night flushing the house with the whole house fan probably went on too long
as we had some surface mildew growing on leather shoes inside a closet – problems we never
experienced in 13 previous years.
Because of the excessive rainfall, at some point I became concerned that up to six hours per day of
crawlspace dehumidifier runtime might not be enough – I checked my RH data logger and sure enough,
65% RH had been exceeded for a few hours so we likely pushed the edge of mold growth (~70% RH) in
the crawlspace. I switched the time switch to on which allowed the dehumidifier to run as much as it
needed (its setpoint is 55% RH) and left it alone for about a month before changing back to the time
clock mode – no other hours above 65%RH were logged and it has performed fine since the second half
of 2013 was a more typical year.
A house like ours is an eternal project but we are thrilled that our energy footprint, indoor air quality,
and wintertime comfort has improved so much.
Notes: I installed our gas dryer in April 2013 – since encapsulated, it was easier to work in crawlspace to
run the gas line. The dryer vent later turned out to be restricted by lint buildup after over a decade of
use – again fairly accessible to remove portions, clean out, then reassemble. Next big project – install
ERV in spring 2014.