the entire procedure is as follows ... · visitors: the entire procedure is as follows:-----1999 vw...
TRANSCRIPT

Visitors:
The entire procedure is as follows:
------------------------
1999 VW EuroVan Camper EVCAutomatic Transmission Fluid (ATF) ChangeDate of this text file: September 24, 2005Revised 4/25/11
If you own a VW EuroVan or EuroVan Camper (EVC) or a VW Rialta, Sunstar, or Vistayou will want to change your automatic transmission fluid (ATF) at least every40,000 miles, preferably more often if you haven't installed an external cooler.
The VW Service Schedule shows the following:
Service at 40,000 miles - ALL MODELSAutomatic Transmission: Check ATF (all models except EuroVan)Automatic Transmission: Change ATF (EuroVan only)
I change mine every 10,000 miles or 15,000 miles and find that the job only takesabout 45-minutes extra time when also doing the oil change and I've already got myEVC up on the lift. Some VW dealerships have quoted upwards of $800 for this job!Clearly, they do not have a clue... yet, they are the ones laughing all the way to thebank! If you supply the parts (shown below) and take your vehicle to a goodindependent VW mechanic, you should not have to pay more than about $60 or $100for the labor. Of course, I believe that you will be far better off if you simply do thejob yourself.
If you have never done the ATF change job before, give yourself extra time to figurethings out carefully. I would budget two hours for the first time owner doing the jobat home. No one will do the job as well as you can do it yourself, especially if youfollow the directions below carefully.
The next best option is to print this file out and give it to your independent VWmechanic. You can stand behind your mechanic, looking over his shoulder, to makesure he doesn't cut any corners. After all, it is you who will be taking a long walk ifyour transmission goes south. All of the pictures here and the information in thistext file pertain to my 1999 EVC. The procedure and photos ought to be fairly close(but not always identical) for other model years too.
Let's get started. Take a look at these first seven pictures and then follow along inthe text below:
1 of 31

Picture 1
Picture 2
2 of 31

Picture 3
Picture 4
3 of 31

Picture 5
Picture 6
4 of 31

Picture 7
The first seven pictures show the parts you should purchase beforehand. The ATF inpicture 2 is the expensive fluid available from any VW dealership at about $27 perliter bottle. You will need just shy of 4 liters to do this ATF change. I recommendpurchasing 5 liters, having an extra bottle "just in case." You can always save backthe extra fifth bottle for the next change.
The VW manual calls for 3.0 liters of "refill capacity," but my experience is that ittakes nearly 4 liters. The ATF in picture 2 is only available at the VW Dealerships.This next paragraph goes into an alternative ATF choice that is available.
Steve Schock, ([email protected]), at Europarts sells all the parts shown inpictures 1 through 7. Steve's ATF is apparently OEM, but in a different bottle. Youcan see Steve's ATF bottle and label in pictures 3 and 4. The price for this "other"fluid (Pentosin ATF1 or Febi-Bilstein) is roughly 40-percent less than the VWDealership price. I've looked at the fluid side-by-side and find them to be ever soslightly different in color when a few drops on a white background are compared.The odor (aroma?) between the two bottles was ever so slightly different as well.These minor differences may simply be variances between batches. I have no way ofknowing for sure. There are other replacement fluids available and some EVCowners swear by their brand. Personally, I will stick with the VW special sauce.
The Pentosin (and Febi-Bilstein) bottle does indicate that it meets VW TL 52162specification. I tend to stick with the VW Dealership ATF thinking that the extra $$is cheap insurance for what I do not know and cannot prove one way or another. Ifyour VW is still under factory or extended warranty, it may be wise to use the VWATF just to avoid any disputes in the event of a warranty claim. Steve can be calledat: 858 451-0020 or his web site is: http://www.europarts-sd.com. His e-mail
5 of 31

address is: [email protected]
The VW Service Schedule calls for an ATF change at every 40,000 miles interval.Many good VW mechanics and shops (including GoWesty!) recommend a 15,000miles interval. I do my changes every 10,000 to 15,000 miles. If you have not doneyour ATF change before and your mileage is getting high, I recommend that you dothe change as soon as possible and then do a second change in about 5,000 miles.The reasoning behind this second change is that you cannot get all of the ATF out ofthe transmission when you're draining. There is still one or perhaps two liters ofdirty fluid remaining when you are all done. (The VW manual shows that the EVCholds 5.3 liters ATF and the refill capacity is only 3.0 liters) That dirty fluid will mixwith the nearly four liters of new fluid right away. Again, nearly four liters is therefill amount, in my experience. So, doing a second change 5,000 miles after thefirst one might be considered a bit of an overkill, but that can be your call.Keep in mind too that ATF that has been overheated at any point in its history is nolonger as effective as new fluid. My theory is that the sooner you can get rid of asmuch of the old fluid as possible, the better off you will be.
Picture 8
This is probably the most important part to bring to the VW Independent shop!(Never have this kind of work done at a Dealership... you have NO control over theidiots and will never know what they did or didn't do. Though, some folks believethat "ignorance is bliss." And, many folks have a favorite dealership... okay, fine!)Give the cooler of beer to the mechanic after the job is through... but, let him see itbefore he starts! ;) If you find a *good* independent VW mechanic in whom you canplace your trust, great... be sure to leave him a good tip every time he works onyour vehicle. I usually will leave $25 or $50 for my guy.
I did my first ATF change under the watchful eye of a good, experienced VWindependent mechanic after I had researched the procedure thoroughly in theBentley manual and other sources. I have done all subsequent changes at homemyself.
6 of 31

Picture 9
Very important that any shop knows where to place the lift pads. There are squareindentations in the EVC's body... these are there as a sign for the lift operator tofollow. Make sure they don't screw this part up! If I am going to a new or differentshop for any reason, I place a bright orange sticky-dot on this square and I makesure the lift operator has been clued in. Keep in mind that the vehicle needs to belevel when you do the ATF fill at the very *end* of this procedure. It is okay to havethe front wheels up on a ramp or up on wood blocks for the *initial* draining. Onceyou are ready to do the *final* ATF fill, you will need to have the vehicle on levelground. The ideal situation is to have a lift that will bring your Eurovan up toshoulder level, but this is a luxury... it is not necessary.
7 of 31

Picture 10
Picture 11
8 of 31

Picture 12
Picture 13
Here is the filler cap and spout. The red cap may be reused about three or fourtimes, but the plastic part will break along its back crease eventually. It wasdesigned to be used once and replaced with a new one, although I don't feel it'sreally needed. In fact, most VW dealerships have no idea that the ATF needs to bechanged every 40,000 miles minimum (as per the shop manual fine print). Mostdealerships have never done this job and have no idea how to do it properly.Additionally, most will tell you that the automatic transmission is a "sealed unit"and is never to be opened or changed. This is utter nonsense. Do not listen to them!In fact, my blanket advice is to never go to a VW dealership for any reason, if you
9 of 31
can help it!
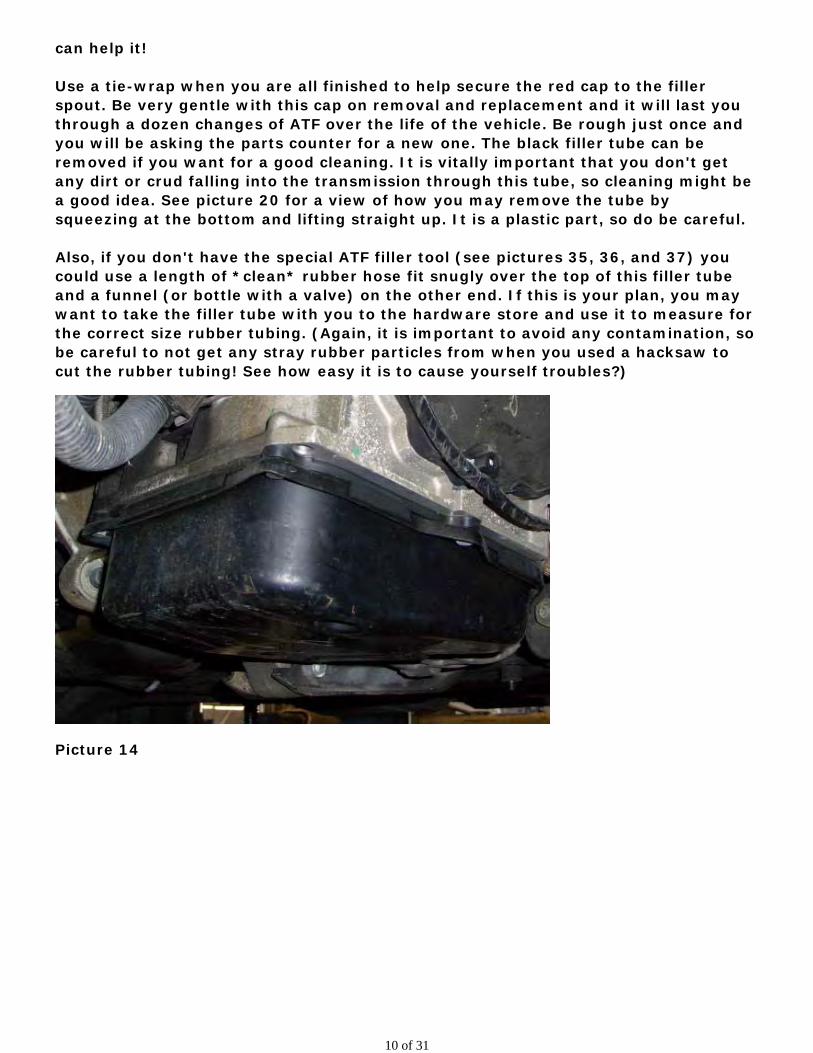
Use a tie-wrap when you are all finished to help secure the red cap to the fillerspout. Be very gentle with this cap on removal and replacement and it will last youthrough a dozen changes of ATF over the life of the vehicle. Be rough just once andyou will be asking the parts counter for a new one. The black filler tube can beremoved if you want for a good cleaning. It is vitally important that you don't getany dirt or crud falling into the transmission through this tube, so cleaning might bea good idea. See picture 20 for a view of how you may remove the tube bysqueezing at the bottom and lifting straight up. It is a plastic part, so do be careful.
Also, if you don't have the special ATF filler tool (see pictures 35, 36, and 37) youcould use a length of *clean* rubber hose fit snugly over the top of this filler tubeand a funnel (or bottle with a valve) on the other end. If this is your plan, you maywant to take the filler tube with you to the hardware store and use it to measure forthe correct size rubber tubing. (Again, it is important to avoid any contamination, sobe careful to not get any stray rubber particles from when you used a hacksaw tocut the rubber tubing! See how easy it is to cause yourself troubles?)
Picture 14
10 of 31

Picture 15
Picture 16
11 of 31

Here is the procedure for dropping the ATF pan. First, remove the drain plug (5 mmAllen Head) on the bottom of the ATF pan. Only a little fluid, if any, will drain at thispoint. Using the same tool, remove the green overflow tube inside the drain hole.This is plastic, so be careful not to ruin it. It's used to determine the proper fill levellater.
Before you begin loosening bolts, inspect the perimeter of the seal for any leaks. Ifyou loosen the back of the pan more than the front, you can tip the old ATF out theback slowly as not to cause a huge mess. Be careful of these bolts (5 bolts, all 10mm hex head) as they thread into soft aluminum. The torque for these is quitesmall, so be sure to consult the Bentley manual for the correct figure for yourvehicle. For any 098 or 01P transmission, this is 12 Newton-Meters. This is anotherreason not to trust this job to "just anyone." Also, with the pan hanging at an angle,you can put unnecessary stress on the last few threads of the bolt holes (again, softaluminum), so do be careful and considerate. Hold the heavy pan with your handand don't let it bounce against the bolts.
Picture 17
12 of 31

Picture 18
Here is what the inside of the ATF pan looks like. Notice the magnet has picked up ametallic film and has vibrated the metal into ridges. This just like a fiercelyexpensive version of that magnet and iron-fillings experiment we all did in secondgrade! Those ridges and lines will all wash off if you really scrub at them. The panshould be cleaned thoroughly. Do NOT use any shop cloths for this job. Notice toothe green drain tube. This does not need to be removed, but if you don't, do be verycareful draining the fluid and avoid unnecessary side loads on the tube. The greentube is the mechanism by which the ATF level is adjusted. Too much ATF and theexcess will drain into the top of the tube and out the bottom (if you have the panbolt removed). I will cover this procedure further down. (I have heard of one EVCowner who does remove the green tube from the bottom of the pan to facilitateeasier draining the ATF out the bottom drain hole rather than tipping the pan andletting it spill over the side. Personally, I've never removed my green tube andwould prefer to just leave it alone. Your mileage may vary. Give it a try if you want.)
13 of 31

Picture 19
Picture 20
14 of 31

Picture 21
Picture 22
These photos show the transmission interior with the ATF filter still in place. Noticethe ribbon cables and the intricate pathways, valves, and switches. Take a fewminutes and inspect every square inch in this area with a bright flashlight. If youtake some photos now, they may be quite helpful to you later if you begin to have
15 of 31

troubles with your transmission. Pay very close attention to the ribbons and look forsigns of trouble. I suspect that many transmissions have been replaced in totalwhen a new ribbon cable would have solved the real problem. Also know that VWreplaces "faulty" transmissions with rebuilt ones. You will NOT be getting a newtransmission. There is no telling how many miles are on this "new" (rebuilt)transmission that VW installs. If you ever wonder about your transmission, you cancheck its casting number on the side. If it ends in an "X," you have a rebuilttransmission on your vehicle. (Maybe you don't want to know!!?)
It is very important for you or your mechanic NOT to use a shop cloth on any ofthese interior parts. Lint or an errant thread from the cloth can get lodged in thevery small hydraulic passageways and cause you no end of grief later. I've been toldthat some of these intricate passageways are almost microscopically small in size,so it stands to reason that a small piece of lint or other crud can cause you a worldof hurt. If you're lucky, it will get caught in the filter... if not, it may get caught in apassageway and you'll never know why your transmission is acting up. On the sametheme, do NOT use any RTF (gasket sealer) on the pan gasket. Little chunks of driedRTF can cause major issues with your automatic transmission, so avoid all possiblecontamination sources. Little pieces of crud, doing the backstroke in your ATF is nota cool concept!
Some dealerships will try to sell you an ATF flush. Do not walk away from thoseidiots, RUN!! The last thing you ever want to do to your transmission is to stir up awhole bunch of muck, suck seventy-percent of it out, and dump in some new fluid,willy-nilly on top of a dirty filter. Always drop the pan, replace the filter and gasket,and allow as much of the old fluid to drain out as possible. Resist the urge to gowiping the interior of the transmission with a shop rag! (I guess I said thatalready!)
Notice too that the filter is just hanging there. It will pull off with about one- ortwo-pounds of force; it is only hanging by the friction of the ring gasket. There areno bolts holding the filter in place. Bolts are not necessary. The little bumps on thebottom of the filter rest on the bottom of the ATF pan, so there is no possibility thatthe filter will come off while driving. It is possible that your filter will come off andmight be resting in the bottom of your pan when you remove the five bolts. This isnot a huge problem and the filter only fell at the same moment that you dropped thepan. So, no panic! The new filter and new ring-gasket ought to fit snugly. The panwill hold the filter in place and there should be no chance of the filter not remainingin place for the duration. It really cannot go anywhere when the pan is on tight.
16 of 31

Picture 23
Picture 24
Once the filter has been pulled and discarded, this is the view underneath. Notice inpicture 23, the ring gasket is still up in there. It needs to be removed. Avoid using ascrewdriver (obviously) because the aluminum is soft. And, again, you don't wanterrant hunks of scrap aluminum floating around inside your transmission! Picture 24shows that the gasket has been removed.
17 of 31
Picture 25
Picture 26
18 of 31

Picture 27
Picture 28
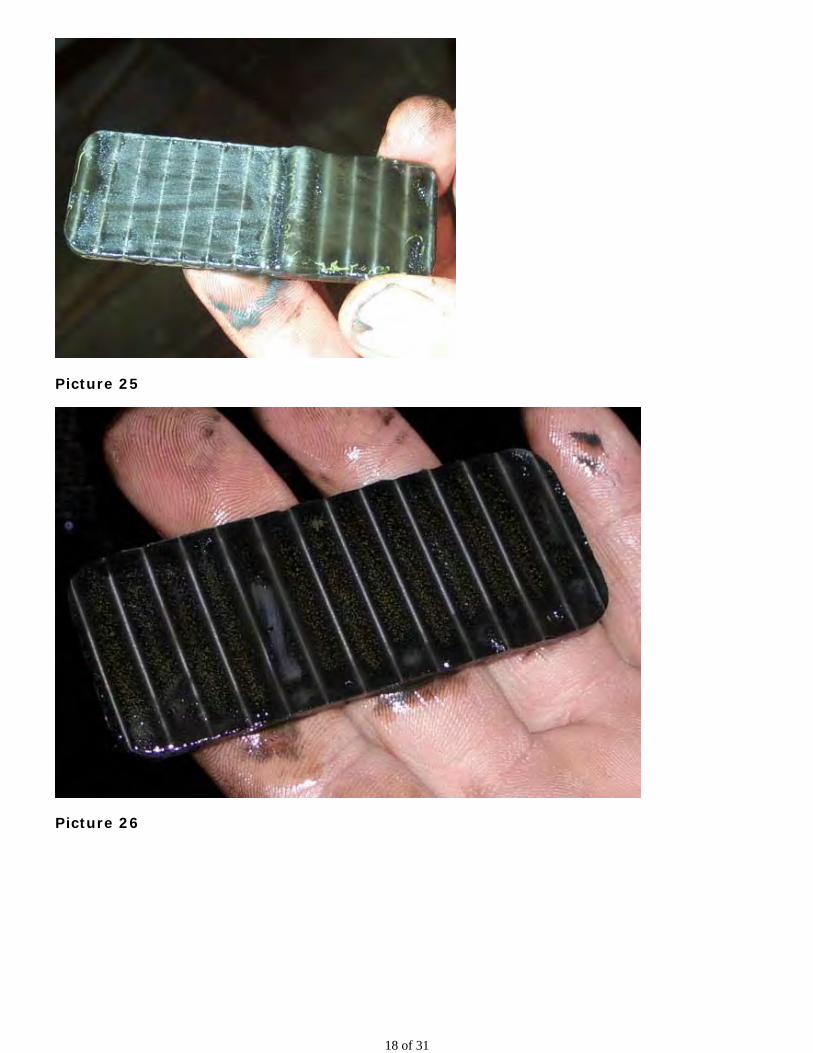
The magnet and pan need to be cleaned thoroughly. The magnet is only held in bythe magnetic field, but it's very strong and may require a screwdriver to force itaway from the pan. Again, avoid using shop cloths that have lint or loose threads.Some mechanics even forbid the use of paper towels for the same reason. Photo 25shows a magnet from another Eurovan. This is how much sludge built up after only
19 of 31

31,000 miles! Perhaps now you can have a new-found appreciation for 10,000 or15,000 intervals? Just think of what towing a heavy trailer up a hill will do! A goodparts cleaner machine is perfect for the job and do know that all those little lines doscrub out, so don't be afraid to get to work!
Pictures 28 and 29 have a good view of the green drain tube. Keep in mind that thegreen drain tube does NOT extend upward inside the filler neck tube (Photo 10).This is a common misconception. If you are curious, you can see the very tip (topquarter inch) of the green tube extending upward in picture 16. Picture 21 is thesame perspective and angle as picture 16 only without the pan blocking your view.The green tube extends upward right in front of the two "star head" bolts that yousee in picture 21. The filler neck tube is seen quite clearly in pictures 20 and 10, andis nowhere near the green tube location. When you install the green tube, it shouldonly be finger tight. It's plastic and could be damaged easily by over tightening. TheBentley calls for 2 NM (17 in/lb).
Picture 29
20 of 31

Picture 30
The magnet and pan are perfectly clean now, ready to be reinstalled. Notice that thenew gasket has been laid in place, shown in Picture 30. The gasket shouold beinstalled dry to get a good seal. Do not forget to install the 5 metal spacer sleevesindicated in Picture 30!
21 of 31

Picture 31
This photo shows the discarded ATF filter. Notice the thin layer of metallic "dust" allover it. This is after less than 10,000 miles. So, now maybe you can see why thegood shops recommend a 15,000 interval or less? Can you imagine what a mess thetransmission fluid would be in after 60,000 or 100,000 miles without frequentchanging? You can cut the old filter apart for inspection if you wish. Or... maybe youreally don't want to know what's in there! Also, in photo 31, notice the three bumpson the filter; they rest against the bottom of the pan. This is what keeps the filterfrom simply falling down while driving over bumps.
22 of 31

Picture 32
Picture 33
Here are some shots of the new filter. Notice that the filter media does not cover theintake hole completely... this is correct. Look closely in the hole, you'll see what Imean. And in photo 32, I have installed the ring gasket.
23 of 31

The next steps are to slide the ATF filter up into the transmission and to replace thepan. It is important to torque the pan to the correct limits, 12 NM (106 in/lbs), andin the correct order. Stripping the soft aluminum threads with an over zealouswrench would be a pretty big mistake. Don't do that to yourself!! Having ATF on thethreads of the bolts or saturated up in the threads of the aluminum transmissionblock will cause you to over-torque without even knowing it, so it is best to haveclean and dry bolts. Do NOT use anti-seize compound! That would be a horriblemistake.
Picture 34
Picture 35
24 of 31

Picture 36
Picture 37
25 of 31

Picture 38
Picture 39
26 of 31
Picture 40
Picture 41
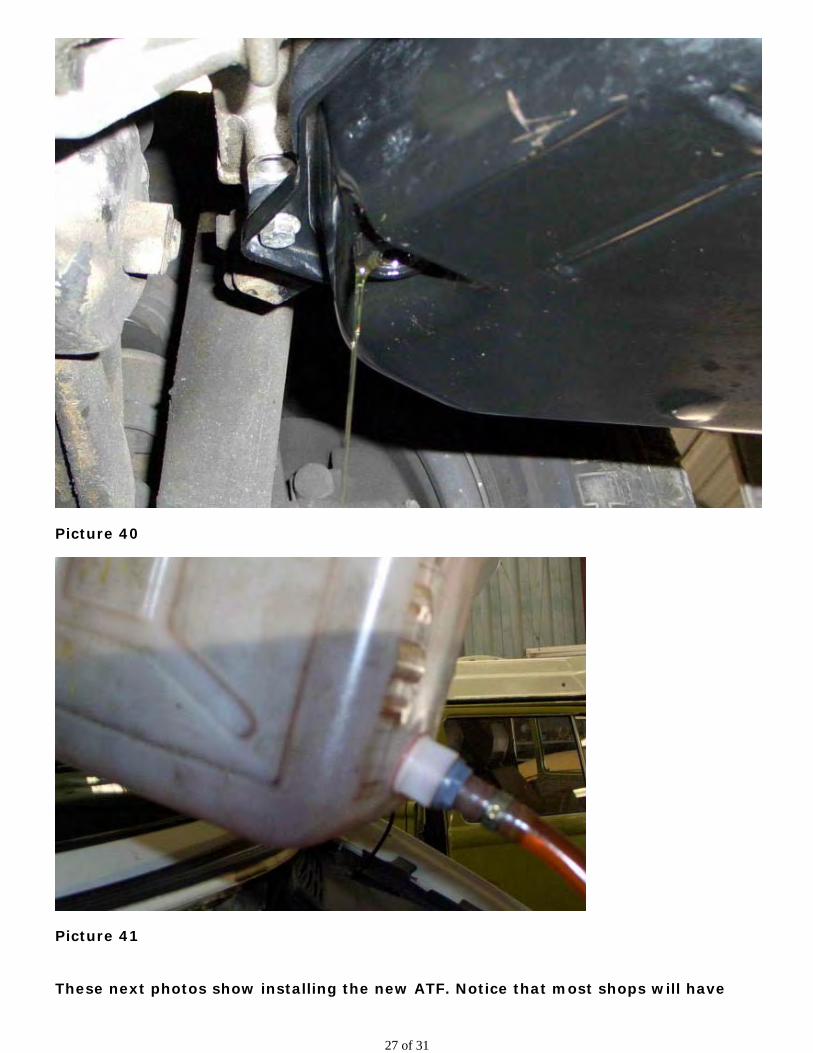
These next photos show installing the new ATF. Notice that most shops will have
27 of 31

some cheap, brand-X ATF they use for their "other customers" and all their supplybottles will be filled with this mystery garbage. I use my own clean supply bottle,picture 34. If you're not standing over the mechanic watching his every move, hemay leave a cup of their Brand-X crud in the bottom of their 20-year-old fill-bottleand then pour your expensive VW ATF on top. This would be a chemistryexperiment. Not wise! (Or, worse yet, the shop may just pocket your good bottles ofVW ATF and use their garbage ATF in your expensive transmission. How lovely! Thisis why you have to take an interest and keep these guys honest.
If the supply bottle is clean and empty, that is good, but what about the hose andvalve? What is left in there? (This is where having your own tools pays off. It is bestto do your own work or, at the very least, stand there and make sure that all stepsare being handled properly!) Rinse the bottle out thoroughly in the parts washer andblow dry with compressed air. I'll guarantee that the shop's bottle has not beencleaned in 20 years, so there is no telling what you will find in there. (The samegoes for their filler hose and valve.) Whatever it is, you don't want it suddenlyfloating around in your transmission! There is no sense in mixing any quantity ofdifferent brands of ATF. It is not necessary to mix, so just don't let them get sloppy.Also, the same rules apply regarding shop rags... don't use them! Make sure thesupply bottle and hose is absolutely spotlessly clean before pouring in your fourliters of supremely expensive VW special sauce. Again, having your own bottle,hose, and filler valve tool is the best insurance against all kinds of nonsense.
Photo 35 shows the special ATF tool with the sharp bend at its tip. Photo 36 showswhy that angle is so important. This is a difficult reach to get the fluid into the fillertube (as shown in photo 10). Photo 37 shows a good place on the EVC to hang thehand valve while making the adjustments to the ATF level. The ATF filler tool is ahandy thing and isn't very expensive. The on/off valve is right near the filler neck ofthe transmission (photo 10), so when it is time to stop filling, you can stop the flowrather quickly. If you don't wish to purchase your own tool, you can substitute arubber hose about four-feet long with a funnel at the top end. But again, watch outfor contamination issues and do realize that when it is time to stop the flow of ATF,there will be a long lag time while the funnel and hose keep emptying themselves ofyour fiercely expensive ATF.
The easiest procedure is to fill the ATF pan through the filler neck, photo 10, withfour liters. Now start the engine. You will want to cycle the transmission through allthe gears, including reverse. Be familiar with how your shifter button works! Somegears require the button *in* while other gears require the button to be *out*... andthings may be different and non-intuitive to you going in one direction versus theother. If you cannot get the shifter to go past one gear to the next, try doing theexact opposite with your shifter button. (This tip alone will save you massiveamounts of grief.)
Remember, it is vital that the Eurovan be level to the ground when you do the FINALfill. You need the ATF level to be exactly perfect.
The next procedure is important. The EuroVan requires the exact amount of ATF.And the quantity is temperature driven. Obviously, liquids expand and contract withtemperature variation. So the proper procedure is to hook up your VAG COM(computer diagnostics tool) to your OBD-2 connector (mine is under the steering
28 of 31

wheel) and to monitor the proper index for the ATF temperature. (You can also useyour Scangauge if you've programmed it to read Transmission Fluid Temperature -TFT.) The correct temperature to verify the level is 95-113F, so I use a target of 104,half way. While the engine is running, allow the fluid to get to this temperature,maybe ten minutes or fifteen minutes at idle. As the temperature approaches 90-95remove the drain plug to be sure you have excess fluid draining out the overflowtube. If not, quickly add more until it runs out the overflow tube. As soon as thetemperature gets to 104-105, replace the drain plug and torque to 15 NM (133in/lb) (Double-check your manual and model.). You may now shut off the engine. Ihave heard of at least one mechanic who warms the bottles of ATF in a hot waterbath before pouring the four liters into the supply bottle. This will minimize theamount of time leaving the engine idle, waiting for the temperature to rise.
Many mechanics bypass the use of the VAG COM and just wait until the electric fanskick in. DON'T DO IT!!! If you don't have an external cooler, the fluid will be up near180° by the time the fans run.
Make sure the temperature doesn't get too high while you're doing this or the fluidlevel will be too low!
The point of all this checking and re-checking is that the ATF level is critical forproper operation. And, each time you cycle through the gears, ATF will be filling theempty passageways, thus lowering the ATF level in the pan.
Some Eurovan owners elect to install the ATF dip stick. This optional part is nolonger available, so you'd need to find one from an older EV. I really don't see thepoint. Once the level has been checked it should not change on its own unless youhave a major leak somewhere.
Drink the beer. (Photo 8) Substitution of coffee, tea, or soft drink is quiteacceptable. The point is for you to celebrate! Take your Eurovan around the block(before the beer) and, I promise, you will convince yourself that the transmission isrunning smoother! After the beer, everything will seem to be running smoother! Docheck for leaks and make certain that all drips have been wiped clean. Replace thebelly pan. That pan is required for better cooling on the engine (and transmission)and for a quieter ride. (As a side note, I do not recommend the popular modificationto the belly pan where a slot is cut in it for easier access to the oil filter. Myphilosophy is that the belly pan should come down and the engine visually inspectedat every oil change. Don't get lazy on inspecting your engine!)
Unfortunately, there seems to be very little support data one way or the otherregarding the dependability of the Eurovan automatic transmissions. Many peoplelive in constant fear of their transmissions, expecting demise at any given moment.Temperature of the ATF is an important consideration. The warmer the ATF, thehigher the likelihood that your transmission will experience problems. Many folks(myself included) refuse to use the EVC as a towing vehicle because of the extraheat and stress it may put on the transmission. Some extended warranties areautomatically VOID if a trailer hitch is installed, regardless if it has been used ornot. (If you read the fine print in an extended warranty product, my guess is thatyou would never buy it in the first place. The contracts are written in such a mannerthat the warranty company could deny each and every claim if they want to. And,
29 of 31

sometimes they do deny claims based on ridiculous technicalities. I think thenumber of denied claims is directly related to whether the company is making itsprojected numbers for that month. Your mileage may vary with extended warrantycompanies.)
Picture 42
Some of the more "engineering minded" of the Eurovan owners have been tinkeringwith ideas for adding an ATF cooler. An ATF pan with cooling fins is a possibility, anexternal radiator is another. Picture 42 shows VW's solution for cooling the ATF.This is a shot of the ATF cooler. Temperature regulated engine coolant cyclesthrough this device as ATF is also routed in plumbing submerged in this much coolerfluid. How effective is this arrangement in hot weather, climbing a steep hill, pullinga heavy load, traveling slowly? Not very! The VAG COM connected to a laptopcomputer can be used to measure the actual temperature while the Eurovan ismoving. This is the most reliable indication of actual temperature of your ATF. Somefolks have speculated that an externally mounted thermometer can be affixed to theATF pan (with epoxy) and the digital leads routed to the cabin for temperaturemonitoring.
The VW automatic transmission fluid will provide 124,000 miles of service beforeoxidation occurs under normal operating temperatures of up to 212°F. Above normaloperating temperatures, the oxidation rate doubles (useful life of fluid is cut in half)with each 18°F increase in temperature.
The approximate life expectancy at various temperatures is as follows:
30 of 31

212°F 124,000 miles230°F 62,000 miles248°F 31,000 miles266°F 15,500 miles284°F 7,750 miles302°F 3,875 miles320°F 1,938 miles338°F 969 miles366°F 484 miles384°F 242 miles375°F 121 miles390°F 61 miles
I hope you found the information in this text file useful. If you have anysuggestions, ideas, corrections, or changes, please contact me. Please feel free touse the photos and this text for your own personal use... pass it along to friends asyou wish with credit due, but please do not post the pictures or the text without myknowledge and permission.
Thank you!
GarrettAustin, Texasgarrett.in.austin "AT" gmail.com (replace "AT" with @)1999 Eurovan Camper (EVC)
The information in this file was revised, and corrected where needed, on 4/25/11.Additional update/corrections 5/8/12
31 of 31