the danegrove calculation policy
TRANSCRIPT
1
The Danegrove Calculation Policy
Created by Nick Davis
Thank you to Leah Grogan for her help and support.
An introduction to our whole school core ideas The idea of writing a calculation policy for the school is based on trying to build a clear and consistent approach to Numeracy across the school for teachers, parents and children. In doing this, certain areas of Numeracy have stood out as being essential for building a solid platform of understanding.
A visual and concrete approach to early number
Firstly, that children’s early experiences with number are very visual. Using a wide variety of objects to help build mental images of number is very important. A hands-on approach to exploring concepts goes alongside this and is an essential prerequisite before more formal written methods. It is our role to provide these opportunities for exploration and to support it with the introduction and consolidation of Mathematical language that helps children to explain their ideas clearly.
Reasoning In all areas of Mathematics children are given the opportunities to ask questions and explore different methods and strategies in their approach to Maths. They are given time to explain what they are doing

2
and given the chance to listen to different opinions. It is not just important to know how to do something, or to give an answer, but to be able to explain why you have chosen a method and how to do it.
Identifying key areas to ensure teaching and
learning is thoroughly explored Key areas of Numeracy such as: Number bonds to 10 and 20, place value, times tables and the four operations are identified, taught in depth and revisited each year to ensure a deeper understanding. Key Mathematical language is identified and used regularly to support this process. A consistent approach when using column methods in all four operations is used throughout the school. Placing any exchanged digit in the next box available in the top left-hand corner is used by all teachers. This consistency is aimed at supporting less confident mathematicians.
Bar modelling Bar models are used throughout the school from Year 1 onwards and are an important part of helping to support children with their problem solving.
Teaching in blocks
Numeracy is taught in large blocks of work following the starting sequence of: place value, addition, subtraction, multiplication and division. This is followed, where appropriate, by fractions, decimals and percentages. The focus of Maths is 75% Number and the other units of work are fitted within the remaining time or through starters.

3
Variety Maths is taught with a variety of approaches: games, early morning work, arithmetic and mental maths,
reasoning, investigations and formal written methods.
The Calculation Policy starts with the Foundation
Stage booklet ‘An introduction to Number.’ The early exploration
and experiences with number are covered there.
Addition
Step 1 number bonds to 10
When you add two whole numbers together you get a bigger number (unless you are adding zero).
Learning Number bonds to 10 – a very visual and hands on experience is needed. This needs to be repeated over and over again so that it is thorough. The use of objects helps to create visual images for the children to help counteract the abstract nature of number. The guiding language support of adults is critical in enabling children to make sense of what they are doing and be able to explain it.

4
Equipment: Egg boxes, Numicon, Unifix, beans, counters, ten frames, number lines, etc. Games: Bean game 1 and 2, Pairs, Ten Down, Shut the Box, 1-12 cross them out (adapted to adding and subtracting only), The 12 pointed star, Subtraction Squares, Tug-of-War. (Check on The school website on the Maths pages for all the games.) Number bonds- to know that any number is made up of smaller numbers. For example, adding 5 and 1, 4 and 2, 3 and 3 and 0 and 6 can make the number 6. This is a very important stage in children’s development of an understanding of number – a chance to explore and reason about number.
What number is this? (6) How do we know? (I can see 5 and 1 and I know 5 + 1 makes 6) How else might you know that this is 6? (I can see 3 and 3 and that makes 6), There are 10 spaces altogether and 4 are empty and 10-4 =6) etc. This is a good chance to make the connection that adding can be done in any order. 2 + 4 = 6 and 4 + 2 = 6 (It helps if you have 2 different colours to illustrate each number and then you can flip it round.)

5
The context of exploring a number within a tens frame is very important so that a link is made, about how we group numbers into sets of 10, as soon as possible and how all numbers relate to this grouping in sets of ten. If you are using Unifix to show that 2 + 4 = 6 this is also a good time to make the connection that 6 - 2 = 4
With regular visual support through equipment - this link between addition and subtraction can be clearly made. 4 + 2 = 6 and 2 + 4 = 6 and 6 – 2 = 4 and 6 – 4 = 2.
The format above is very helpful in showing this using counters/cubes to visualise the written numbers. Children need lots of experiences exploring all the number bonds to ten first, before moving on to larger numbers.

6
Step 2
Missing number boxes Children need to have had a lot of time and experiences with adding numbers before looking at missing number box calculations. How children are taught to read the number sentences is crucial. = means ‘is the same as’. 3 + 4 = Three add four is the same which number? 4 + = 9 4 and what is the same as 9? What would you have to add to 4 to make 9? = 5 + 3 What number is the same as 5 add 3? Extension work to step 1 (For those with a very good grasp of number already) Make the link between- 3 + 4 = 7 30 + 40 = 70. (Three sets of ten and four sets of ten make seven sets of ten.) 4 + 6 = 10

7
40 + 60 = 100 (Four sets of ten and six sets of ten make ten sets of ten.) Look at all the number pairs that are multiples of 10 going up to 100. (You might need to practise counting in tens from any given multiple of ten.) This is similar to the number bonds to 10 -e.g. Pairs that make 60 and pairs that make 6. 0 + 60 0 + 6 60 + 0 6 + 0 10 + 50 1 + 5 50 + 10 5 + 1 20 + 40 2 + 4 40 + 20 4 + 2 30 + 30 3 + 3 Point out the similarities and highlight the pattern. Base Ten will also help with this. 3 + 4 = three ones and four ones together make 7 ones. 30 + 40 = three sets of ten plus four sets of ten make seven sets of ten.
Step 2
An understanding of Place Value

8
A good understanding of place value is needed before going onto the number bonds to 20 (which is often not given enough attention and time.) children need to explore place value. Point to consider: the numbers from 11 to 19 are difficult for children to hear. 19 sounds like 90, 17 like 70 and 14 like 40- hence why some children write 14 as 41 because they hear the 4 in 14 first. We need to ask the question – What is the difference between 7 and 12? (Introduction of the word digit if it has not been introduced already) What is 14? What is 17? What is a digit? Why are there 2 digits? What does each digit represent? Etc. A) Grouping-We explore this through collecting games – see ‘Towers of Victory’ and ‘The Money game’ where children are collecting an object and then exchanging it once they have completed a set of 10. These games need to be played several times each. The Estimation game’- see the Maths page- this is an excellent game for estimation, grouping into sets of 10, counting, linking a visual number of objects to a number on a number line and comparing the size of different numbers to each other.

9
Making two-digit numbers Egg boxes can also be used here to help children understand that ten objects together make one set of ten. If children are given a pile of cubes to make sets of ten with- e.g. 15 cubes- and a place value mat with tens and units marked at the top they could fill up the egg box to make a set of ten and write down a 1 in the tens column (1 set of ten) and the remaining 5 cubes which cannot make a set of ten remain in the units column. A 5 is then written down in the units column. They then end up with a 1 and a 5, which makes 15. Fifteen is 15- one set of ten and 5 ones.
Within this section children should be given the opportunity to explore what happens when you add a single digit number to 10 -again looking at patterns
10 + 2 = 12 10 + 5 = 15 10 + 4 = 14 10 + 7 = 17
Why does the number 10 end up being an easy number to add a single digit to? Would the same pattern emerge if you added a single digit number to 20?

10
Step 3
Number bonds to 20
Exploring all the pairs of numbers that make 11, 12, 13, etc. up to 20. This needs plenty of time because it is often overlooked/under taught. 11 = 11+ 0, 10 + 1, 9 + 2, 8 + 3 etc.
Step 4
Single digit addition strategies knowing how to halve and double numbers up to 30 (at least). Numicon helps to start off doubling –very visual. Double 5 is key for 6, 7, 8 and 9. E.g. For double 6 use partitioning 6 = 5+1 Therefore double 6 is:
Double 6 = 5 + 5 =10 1 + 1 =2
10 + 2 =12

11
Double 7 is: 7 = 5 + 2
Double 7 = 5 + 5 =10 2 + 2 = 4
10 + 4 =14 Tip: If you organise the children into pairs facing each other and you ask them what is double 8? (5 + 5 =10 and 3 +3 = 6 and 10 + 6=16). The children hold up a hand each and join the fingers together with each other to make 5 + 5 to equal 10. Then they hold up the other hand and join 3 fingers together to make 3 + 3 = 6 and then they say 5 + 5 =10 and 3 +3 = 6 so double 8 is 16. With doubles from 11-19 it is a similar method of partitioning.
Double 11 is: 10 +10 = 20
1+1 =2 20 + 2 =22

12
Double 16 is 10 +10 =20 6 + 6 = 12
20 + 12 = 32 Once this has been mastered it then follows on to teach near doubles.
How to use knowledge of doubles to work out near doubles
Adding 6 and 7 7 is close to 6 (6 + 1), therefore if we know double 6 we can use this to add 6 and 7
7= 6 + 1 6 + 6 = 12
12 + 1 = 13
8 + 7 7,1
7 + 7 = 14 14 + 1 = 15
It would look like this in children’s books
7 + 6 6, 1
6 + 6 = 12 12 + 1 = 13

13
7 + 8 7, 1
7 + 7 =14 14 + 1 = 15
Being able to add 2 single digit numbers together by partitioning
8 + 5
We need to try and make 10 with the biggest number, which is 8. How do we do this?
We split the smaller number into 2 and 3 Why?
If we add the 8 + 2 =10 And then 10 + 3 =13
6 + 9
Start with the bigger number 9
Then split the smaller number into two parts, one of which can be added to 9 to make 10.
6 splits into 1 and 5 9+ 1 =10
10 + 5 =15
(Children need to know all of the above before they attempt column addition to avoid use of fingers as an only strategy.)

14
Step 5
Using base 10
Base ten is an excellent resource for exploring place value, grouping into sets of 10, exchanging digits and visually seeing what is going on in the four operations. For all four operations, our aim is not just for children to be able to do them but
to be able to explain what they are doing and why.
Children can explore making a number like 14 by getting one set of ten and four ones/units and 25 by getting two sets of ten and five units/ones. This is creating a picture of a number.
If you ask children to create a picture of a number (Can you make 43 for me?) it will give you a good idea of their understanding of place value.

15
For example: Can you make 53?
How many tens are there in 53? How many ones are there in 53? What happens if I add another set of ten? Etc.
The next step is to create a picture and ask what it is. What are the numbers above? How do you know?

16
Step 6 Base 10 addition not crossing tens
(12+11, 13+14, 12+12 etc) Using a horizontal layout
Once children understand the value of a two-digit number we can think about adding them
together. Start by laying the first number out using Base 10 and then laying the second number out next to it using Base 10 (Just to see the two numbers) before combining them together to get one larger total. This seems a useful step before introducing column addition because prior to this all the addition has been with two numbers added horizontally. (Use numbers that do not need any exchanging)
Step 7 Base 10 - introduction to column addition not
crossing tens- headed columns very useful. The children use Base 10 alongside writing the sum on a whiteboard so that everything they do on their

17
written work is mirrored with the base 10 equipment. The importance of this is that the abstract nature of the operation is made more visible by using the Base 10. The children can see what is going on and physically experience their workings out with their hands manipulating the objects. Children explain out loud to a partner what they are doing.
Step 8 Base 10 column addition with exchange
There are video clips on the Maths pages. Use of near doubles, doubles and partitioning single digit
numbers for addition are now very useful here. Sums on paper need to be done alongside using Base 10.
Children need plenty of opportunities to work with a partner to explain out loud what they are doing. The correct language is key here (using words like exchange). It is very important that children are able to clearly explain the methods they are using so that other people listening have a good understanding of what they have done.

18
Column Addition
Step 1) Check correct layout
Step 2) Add the ones together 8 + 5 = 13. Place the 3 in
the units column below the 5. Exchange the 10 ones for 1
set of ten and write a small one in the top left hand
It can be helpful
sometimes at the
beginning to label
each column
t = tens u = units

19
corner of the box to the right of the answer box with a 3
in it.
Step 3) Add the tens – 4 tens and 3 tens and the 1 ten
below make 8 tens altogether and you write an 8 in the
tens box below the 3.
248 + 375
Step 1) Check the correct layout Step 2) Add the units 8+5 =13. Put the 3 in the ones column below the 5. Exchange the 10 ones for 1 set of ten and write a 1 in the tens column below the 7 and in the top left hand corner. Step 3) Add the 4 tens and the 7 tens and the 1 ten below to make 12 tens. Write a 2 in the tens column below the 7 and exchange the group of 10 tens for 1 group of a hundred. Write a 1 in the hundreds column below the 3 in the top left hand corner. Step 4) Add the hundreds- 2 hundreds + 3 hundreds add 1 hundred = 6 hundred. Write a 6 in the hundreds box below the 3.

20
Estimating an answer first before doing it.
Big tip
Getting children to estimate their answer by rounding
each number up and down and adding it up quickly.
This helps them to roughly know what the answer will
be and spot a possible mistake.

21
Useful addition vocabulary:
Add, plus, more than, total, sum of, and, together make,
count on, double
Try asking some questions with these words
What is the total of 6 and 3?
What number is 4 more than 19?
What is 17 plus 8?
What is the sum of 6 and 3 and 8?
What is double 17?
(To know and understand these words really helps in
Maths tests).
Partitioning
(The importance of understanding place value is really
evident here) This might be a point where the more
confident Mathematicians explore partitioning below and
the less confident Mathematicians keep practising the
column method.
24 + 13
20 4 10 3 Step 1) Split numbers into tens and units
20 + 10 = 30 Step 2) Add the tens together
4 + 3 = 7 Step 3) Add the units together
30 + 7 = 37 Step 4) Add the two answers together
Three more examples:

22
5 6 + 35 48 + 46
50 6 30 5 40 8 40 6
50 + 30 = 80 40 + 40 = 80
6 + 5 = 11 8 + 6 = 14
80 + 11 = 91 80 + 14 = 94
10 1 147 + 129 100 40 7 100 20 9 100 + 100 = 200 40 + 20 = 60 7 + 9 = 14 100 + 40 +10 +4 = 154 This works well until the numbers start getting too big to
partition easily and at this stage we move back to column
addition.
Subtraction
When you take a smaller number away from a larger number you end up with a smaller number (If you
take zero away from a number that number stays the same.)
Subtraction is the inverse of addition and needs to be taught alongside or closely following addition.
Subtraction facts to 10

23
Single digit numbers
Once children have explored their number bonds to
ten in addition they need to look at knowing their subtraction facts. This format with the three circles is very useful because it links with addition and visually
supports the more difficult concept of subtraction. Objects like Unifix cubes can be moved to show how
the number gets smaller. Once this is understood it can be shown that, unlike addition, subtraction cannot be done in any order.
Subtraction is the inverse of addition also needs to be shown now and as a way of checking
that answers are correct. Children need lots of practice taking single
digit numbers away from the number ten and below.
Extension work: More able Mathematicians can be
extended here, by showing them the link between:
7 - 4 = 3
70 - 40 = 30
(Seven sets of ten minus four sets of ten make three sets
of ten.)

24
Missing boxes and subtraction
Once children are confident subtracting numbers below
10 it is time to introduce missing number boxes
7 – 5 =
7 take away five is the same as?
= 7 – 5
What number is the same as 7 take away 5?
8 - = 4
8 take away which number is the same as 4?
If children are familiar with reading the number
sentences correctly (meaning they understand what they
say) and have access to equipment if they are not sure
these type of questions can be more accessible to
everyone.
Counting back
Lots of practice counting backwards out loud in ones
from any number is needed and a number line/hundred
square can be a helpful resource.

25
Play a
game
Write some numbers down each on a separate card and
place them in order from largest to smallest. One person
closes their eyes while the other swaps two cards around.
Once done, the first person opens their eyes and tries to
spot the change and correct it.
9, 8, 7, 5, 6, 4, 3
Single digit subtraction strategies
Halving
Using Numicon or Unifix cubes explore halving (and the
link to doubling that has already been explored during
the addition work that came before this)
Partitioning
12 – 4
Step 1) Split 4 into 2 and 2 (With the smaller number
being split, you are looking at the two digit number and
trying to make it into the nearest multiple of ten)
Step 2) Take 2 away from 12 (12 – 2 =10)
Step 3) Take 2 away from 10 (10 – 2 = 8)
11 – 5
Step 1) Split 5 into 1 and 4
Step 2) 11 – 1 = 10
Step 3) 10 – 4 = 6
26
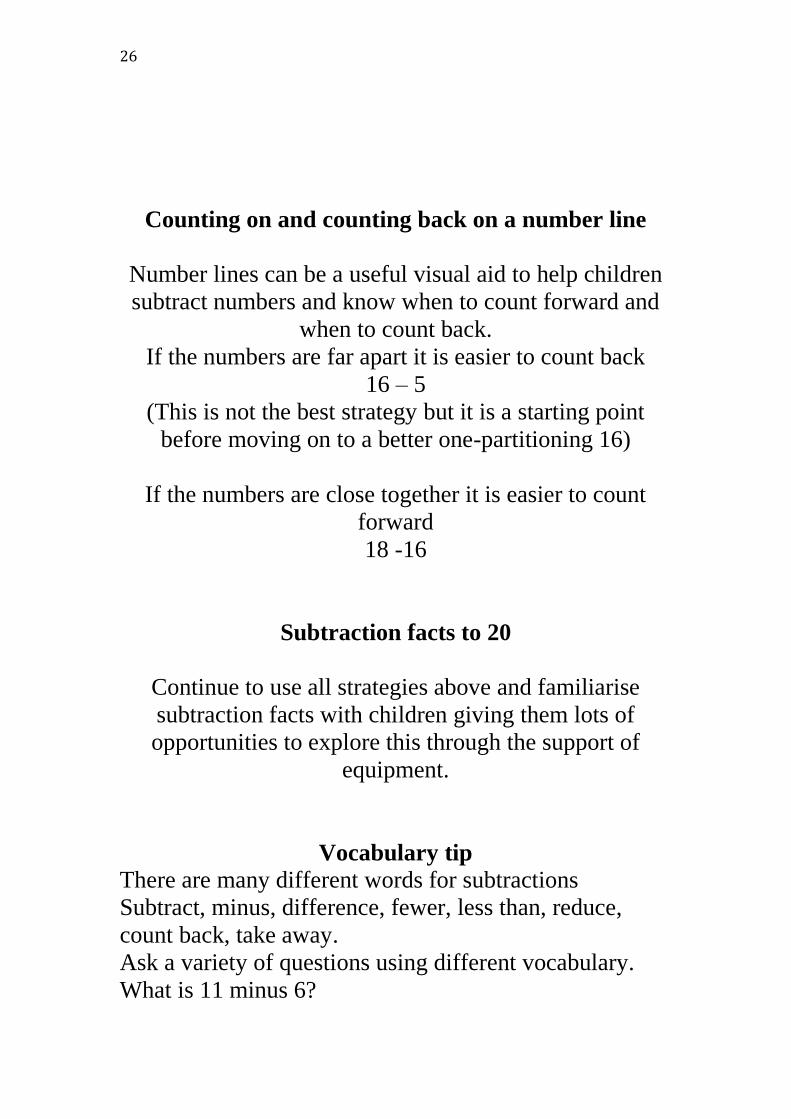
Counting on and counting back on a number line
Number lines can be a useful visual aid to help children
subtract numbers and know when to count forward and
when to count back.
If the numbers are far apart it is easier to count back
16 – 5
(This is not the best strategy but it is a starting point
before moving on to a better one-partitioning 16)
If the numbers are close together it is easier to count
forward
18 -16
Subtraction facts to 20
Continue to use all strategies above and familiarise
subtraction facts with children giving them lots of
opportunities to explore this through the support of
equipment.
Vocabulary tip
There are many different words for subtractions
Subtract, minus, difference, fewer, less than, reduce,
count back, take away.
Ask a variety of questions using different vocabulary.
What is 11 minus 6?

27
Which number is 8 less than 20?
What is the difference between 37 and 45?
Count back 4 from 15?
Which number is 4 fewer than 32?
Column subtraction with base 10 and no exchange
Very similar process to addition except only the largest
number is created with base 10. The smaller number is
then physically removed from the larger one. Children
work in pairs to explain what they are doing and use the
Base 10 alongside a whiteboard to record each step they
are doing.
25 – 11
25 is made up of two sets of 10 and 5 ones.
Then, 11 is then taken away starting with the 1 first in
the ones column and then 1 ten.
Use headed paper with tens and units/ones on it so that
children know where to place each part of the number at
the start. Children working with a partner (to explain
each part of the process) are given plenty of
opportunities to do this.
Column subtraction with base 10 with exchange
As above the largest number is created with base 10.
23 -16

28
Start with the units/one column, making sure the correct
vocabulary is used by the children when explaining the
operation out loud (exchange) to a partner.
Vertical subtraction
Step1) Start with the units 4
– 3 = 1
Step 2) Move on to the tens
column
It is 50 – 10 but we can do it
as 5 tens -1 ten = 4 tens
Giving an answer of 41
Step1) Start with the units- you
cannot take 8 ones from 2 ones.
Step 2) Move to the tens
column and exchange 1 set of
ten for 10 ones. Move it across
into the ones column by writing
a small 1 to the left of the 2.
Cross out the 6 and write 5 in
the tens column.
Step 3) Now there are 12 ones
which you can take 4 away

29
from. 12-8=4
Step 4) In the tens column Say that in 5 tens-20 tens = 3
tens.
Write a 3 in the tens column below the 2.
The answer is 34
Step 1) Careful with layout and putting the digits in the
right columns.
Step 2) 5 – 8 cannot be done.
Step 3) Exchange 1 set of ten into 10 ones. Cross out the
4 and write a small 3 in the tens column. Place the 1 into
the ones column by putting a small 1 in the top left hand
corner to the right of the 5. This makes 15 ones. 15- 8
=7. Write 7 below in the ones column.
Step 4) You cannot take 6 tens away from 4 tens.
Exchange 1 group of a hundred from the hundreds
column (cross out the 1 there and write a zero) and move
it into the tens column. This makes 13 groups of ten.
Step 5) 13 tens take away 6 tens= 7 tens. Write a 7
below in the tens column.
Step 6) There are no hundreds left and so the answer is
77.

30
Step 1) check the layout is correct
Step 2) I cannot take 9 away from 6
Step 3) Exchange 1 set of ten into 10 ones and place a
small 1 in the ones column where the 6 is but in the top
left hand corner. Cross the 1 in the tens column out and
write a small 0 in the top left hand corner.
Step 4) 16 – 9 = 7 Put a 7 in the ones column below the 9
Step 5) I cannot take 4 hundreds away from 0
Exchange 1 hundred from the hundreds column (crossing
out the 3 and writing a small 2 in the top right hand
corner) and place it in the tens column (by writing a
small 1 to the right of the small 0.
Step 6) 10 tens – 4 tens = 6 tens. Write a 6 in the ten
column below the 4.
Step 7) 2 hundred -1 hundred = 1 hundred.
Step 8) write a 1 in the hundreds column below the 1
The answer is 167

31
Halving larger numbers
Numbers like 24, 46 68, 82, 124, 148, etc. are fairly easy
halve.
24 68
20 and 4 60 and 8
Half of 20 =10 Half of 60 =30
Half of 4 = 2 Half of 8 = 4
10 + 2 =12 30 + 4 = 34
Children find numbers like 34, 56, 74, 98, 116, 154 a
little harder and this needs to be taught a little more
carefully.
34 (Splitting 34 into 30 and 4 is the difficult bit-it is
easier to split 30 into 20 and 10)
34 76
20 10 4 60 10 6
Half of 20 =10 Half of 60 =30
Half of 10 =5 Half of 10 = 5
Half of 4 =2 Half of 6 = 3
10 + 5 + 2 =17 30 + 5 + 3 = 38
Partitioning

32
Partitioning the Smaller number only
34 – 13 Step 1) Partition the smaller number only
10 3
34 – 10 = 24 Step 2) take 10 away from 34
24 – 3 = 21 Step 3) take 3 away from 24 = 21
Three more examples
78 – 25 63 – 37
20 5 30 7
78 – 20 = 58 63 – 30 = 33
58 – 5 = 53 33 – 7 = 26
253 – 164 100 60 4 253 - 100 =153 153 – 64 (64=53 and 11) 153-53 =100 100 -11 = 89 Giving the opportunity to discuss how to partition
a given number. How a number is partitioned or used is up for discussion. In the example above 153 -64, it could be just as effective to subtract 60 from 153 or 50 and then 10. In the example above, the choice of how to partition 64 relates to trying to get 153 down to 100.

33
Multiplication
1) Multiplication when introduced for a first time is linked to repeated addition
+ + 2 + 2 + 2 + + + 2 + 2 + 2 + 2 That writing the same number being added together can be written in a different way.
3 x 2
Right from the beginning this is read as 3 groups of 2 or 3 lots of 2. The word times can also be mentioned but groups of is a clearer explanation of what is happening and makes far more sense to a child. It needs to be done using apparatus- preferably Numicon. Introduce the word array.
+ + 2 + 2 + 2 = (is the same as) 3 x 2 (3 groups of 2)
2+2+2+2 = 4 x 2

34
2 plus 2 plus 2 plus 2 plus is the same as 4 groups of 2
2) Identifying and using arrays
What is this a picture?
2 + 2 + 2 + 2 + 2 = 10 or 5 x 2 = 10
2 plus 2 plus 2 plus 2 plus 2 or 5 groups of 2
3) Teaching times tables in order
(Order given later on)
Start with the 2 times table –this will include: adding 2, counting in 2’s and introducing the word multiples. Use Numicon and Numicon tens number line. Encourage children to read 4 x 2 as 4 groups of 2 or 4 lots of 2. Get children to use and place Numicon pieces on the Tens number line if they are not sure of an answer. Children need lots of experience of using equipment to help them make sense of, understand and explain what they are doing when learning a table.

35
3 x 2 7 x 2 4 x 2 5 x 2
10 x 2 7 x 2 0 x 2 12 x 2
Counting in 2’s, chanting together forwards and backwards is also useful. 2, 4, 6, 8, etc. 24, 22, 20, 18, etc. Begin from any starting point. 6, 8, 10,12 etc. 18, 16, 14 etc. Spot the missing number 2, 4, 6, 8, 10, 14, 16, 18? Look at how to lay out the multiples to help children spot patterns and spark discussions. The way to lay out each table is not reduced to just one way. It depends on which way is the most effective in seeing patterns. 2 4 6 8 10 12 14 16 18 20 22 24 Look at different strategies to help children learn their tables. e.g. Doubling

36
1 x 2 = 2 3 x 2 = 6 5 x 2 = 10 2 x 2 = 4 6 x 2 =12 10 x 2 = 20 4 x 2 = 8 12 x 2 = 24 8 x 2 =16 The importance of knowing 5 x 2 and 10 x 2 If I do not know 9 x 2, I can do 10 x 2 = 20 and then take away 2. If I do not know 6 x 2, then I can do 5 x 2 = 10 and then add 2
4) Making children’s knowledge secure Once a table is known the next step is to introduce missing number boxes. This will show true understanding or not. x 2 = 6 5 x = 10 Important emphasis is needed here on how to read the number sentence. How many groups of 2 are the same as 6? 5 groups of what are the same as 10? 14 = 7 x

37
14 is the same as 7 groups of what? 12 = x 2 12 is the same as how many lots of 2? (How many lots of 2 make 12?) x = 20 How many groups of an unknown number would be the same as 20? 8 = x 8 is the same as which 2 groups? (Visual supports would help this concept) Lots of practice of missing number boxes is needed for a deeper understanding. Verbalising a question beforehand is very helpful.
The next table is the 10’s (Again use Numicon and Numicon tens number line to help) Recap 10 + 10 + 10 = 3 x 10

38
10 plus 10 plus 10 is the same as 3 groups of 10 Look at multiples 10 20 30 40 50 60 70 80 90 100 110 120 What do you notice? It is important to practice counting out loud, writing the numbers out and knowing missing number boxes. 10 20 40 50 60 80 90 110
The more confident children become the more missing numbers are added. Continue to count forwards and backwards, sometimes missing out numbers and starting from any given point. Lots of practice (on paper) of tables in any given order with Numicon shapes and Numicon Number lines to visually support those who need it.

39
3 x 10 = 4 x 10 = 2 x 10 = 6 x 10 = Similar to the 2 times tables, there needs to be lots of opportunities to discuss different strategies to help remember tricky ones. knowing 5 times and 10 times of a number to know near facts. 5 x 10 =50 then 4 x 10 = 50-10 5 x 10 =50 then 6 x 10 =50 +10 Doubles 1 x 10 = 10 3 x 10 = 30 5 x 10 = 50 2 x 10 = 20 6 x 10 = 60 10 x 10 = 100 4 x 10 = 40 12 x 10 = 120 8 x 10 = 80 Then, on to missing box questions and the importance of reading out the number sentences using the correct language. 40 = x 7 x = 70

40
etc. Introduction to multiplication being done in any order 2 x 10 = 10 x 2 (Remember not to use Numicon to show this – it needs to be counters.)
o o o o o o o o o o o o o o o o o o o o
Continue through all the tables with the same strategies. Order 2 10, 5 3, 4 6, 8 7, 9 11, 12 Try different layouts to help children spot patterns. 3 6 9 12 15 18 21 24 27 30 33 36 Not too much here- odd, even, odd, even- but this way…

41
3 6 9 12 15 18 21 24 27 30 33 36 If you add the digits in each column they add up to the same number- 3, 6 or 9 Below are possibly the best layouts for each table but worth giving the children the chance to explore their own ways of laying out multiples to aid spotting patterns and helping them to remember. The 4’s 4 8 12 16 20 24 28 32 36 40 44 48 The 6’s 6 12 18 or 6 12 18 24 30 24 30 36 36 42 48 54 60 42 48 54 66 72 60 66 The 8’s 8 16 24 32 40 48 56 64 72 80 88 96 The 9’s 9 18 27 or 9 36 45 54 18

42
63 72 81 27 90 99 108 36 45 54 63 72 81 90 99 108 117 During this period of learning their tables children need to experience a wide variety of vocabulary related to multiplication: times, multiply, lots of, groups of, product, double, multiples.
Multiplying bigger numbers
Partitioning Partitioning of larger numbers into smaller groupings is a useful, visual way for children to see what is going on with the numbers and is an important stage before
column multiplication.

43
Example 1
13 x 4
10 3 Step 1 split 13 into 10 and 3
10 x 4 = 40 Step 2 10 x 4 = 40
3 x 4 = 12 Step 3 3 x 4 = 12
40 + 12 = 52 Step 4 add the two answers together
In the example above a lot of prior knowledge is used
10 x 4 = 40 and 3 x 4 = 12 therefore 13 x 4 = 40 + 12 =
52
Example 2
15 x 6
10 6 Step 1 split 16 into 10 and 6
10 x 6 = 60 Step 2 10 x 6 = 60
5 x 6 = 30 Step 3 5 x 6 =30
60 + 30 = 90 Step 4 add the two answers
together
Example 3
27 x 5
20 7 Step 1 split 27 into 20 and 7
20 x 5 = 100 Step 2 multiply 20 by 5 = 100
(or 10 x 5 and 10 x 5)
7 x 5 = 35 Step 3 multiply the 7 by 5 = 35
100 + 35 = 135 Step 4 add 100 + 35 =135

44
Example 4
352 x 6
300 50 2 Step 1 split 352 into 300, 50, and 2
300 x 6 = 1800 Step 2 multiply 300 x 6 = 1800
50 x 6 = 300 Step 3 multiply 50 x 6 = 300
2 x 6 = 12 Step 4 multiply 2 x 6 = 12
1800 + 300 + 12 = 2112 Step 5 Add the 3 numbers
This method has its limitations when the numbers
become too big. Recommended to stop after 3 digit x 1
digit.
Column method with Base 10 or place value
counters
It is important for children to be given the experience of learning and exploring the column method using Base 10/place value counters alongside recording their methods on paper/whiteboards. This is most effectively experienced working in pairs so that the methods are explained out loud to a partner. The
sum is being written alongside the equipment being used to physically show what is happening during the
operation. There are examples of short film clips on the Maths page to support this. The process of
learning to speak coherently takes time and practice.
Things to listen out for: Can a child explain a method clearly?

45
Are they using the right vocabulary? Is what they are saying matching up with what is recorded on paper/whiteboard and the physical
process of moving the Base 10 counters? How would you improve the explanation?
What aspects of the explanation were particularly clear?
Column Multiplication
Step 1) Place the numbers in the correct columns
Step 2) Multiply 5 x 7 = 35
Write 5 in the square below
Step 3) Place 3 (which is three 10’s- 30) in next blank
box to the left (the one that will be used next - the tens
column).
Step 4) 5 x 2 tens = 10 tens (5 groups of 20 =100) and
then add the 3 (3 groups of 10) = 13 (13 groups of 10 are
130)
The 1 is placed in the next column (because it
is 100) and the 3 in the tens column (which is 30). The
answer is 135.

46
Step 1) Place the digits in the correct columns.
Step 2) Start in the units column: 7 x 4 = 28
Write 8 in the ones column below. Place the 2 in the
next column to the left that is empty (the 2 is a 20 and
needs to go in the tens column).
Step 3) 7 x 5 tens = 350. (This is 7 lots of 5 tens (50) =
350) Remember to add the 2 (20) to make 37 tens
(350+20=370). Write the 7 below (in the tens column-
70) and place the 3 in the next box to the left (which is
the 100’s column because it is 300).
Step 4) 7 x 2 hundreds = 14 hundred (7 x 200 =1400)
remember to add the 3 (300) to make 17 (1700 in total).
This can be written straight in because there are no more
digits to multiply by 7. The 1 =1000 so it goes in the
thousands column and the 7 is 700 so it goes in the
hundreds column. The answer is 1778.

47
Important
Tip
Keep placing a digit being exchanged into the next box
to the left. The reason why becomes clear when we
move on to the next step.
A digit that is transferred to the next square to the left
(see in the next example with the 4 and 2) is always used
in the very next step. When it comes to adding the two
rows at the end the 4 and 2 are ignored.
This applies to all 4 operations-consistency is the key to
helping less able Mathematicians develop their
confidence.
Step 1) Check the layout of
each number so that the digits
are in the correct columns.
Step 2) Start with the unit
column on the left - the 6
6 x 1 = 6
Step 3) 6 x 7 = 42 (6 x 70 =
420) write down the 2 in the
tens column and transfer the 4
(400) into the hundreds
column.
Step 4) 6 x 2 = 12 (6 x 200 = 1200) and then add the 4
(1200+ 400=1600) The first row reads = 1626.
Step 5) Place a zero in the units column because although
we are going to times the next row by 3 it is really 30.
Step 6) 3 x 1 = 3 (30 x1=30) Place the 3 in the tens
column.

48
Step 7) 3 x 7 = 21 (30 x 70 =2100)– place the one in the
hundreds column and exchange the 2 into the thousands
column.
Step 8) 3 x 2 = 6 (30 x200 =6000) and add the 2 (2000) =
8000 making the second row reads 8130.
Step 9) Now add the two numbers together and ignore
any numbers exchanged in any rows above the row you
are on.
(They have already been used.) The answer is 9756.
Two further examples of column multiplication layout.

49
Pattern work in multiplication
3 x 4 = 12 3 x 40 = ?
What do we know?
The difference between the two calculations is that one of the numbers has become 10 times bigger and therefore the answer will become 10 times bigger. Now explore what will happen if 40 becomes 10 times bigger. 3 x 400=? (3 groups of 400 are the same as?) or 3x 4000 =? (3 groups of 4000 are the same as?) 6 x 8 =48 6 x 80 = ? 6 x 800 = ? 6 x 8000 = ? What there needs to follow on from this is lots of practice of similar calculations, discussion on how to read them using the correct vocabulary and visual support with resources when necessary.

50
When children are familiar with these calculations written in this way we then introduce missing number box problems to check their understanding. 5 x 6 = 30 5 x ? = 300 3000 = 5 x ? 3 x 8 = 24 3 x ? = 240 3 x 800 = ?
Division There are two different ways of teaching division- sharing and grouping. Sharing is when a number is divided into equal groups/parts. 12 ÷ 3 is read as 12 shared into 3 equal groups. Grouping is finding out how many of a given number there are in a larger number. Putting the number into groups of the same size as the smallest number does this.

51
12÷ 3 is read as how many 3’s are there in 12? Sharing 20÷ 5 = sharing 20 into 5 equal groups Grouping 20÷ 5 = How many 5’s are there in 20?
Important note:
Different division word problems require different division strategies. Problem 1: We have 12 cakes and we want to share them among three friends, how many cakes does everyone get? This is a sharing problem Problem 2: We want to make boxes of cakes for our friends. Each box will have 4 cakes. We have 12 cakes in total. How many boxes can we make? This is a grouping problem.
Sharing
The first experience children have of division is normally sharing.

52
Sharing a number into groups of the same size through
objects.
8 ÷ 2 means taking 8 objects and sharing them into two
groups equally. (one for you and one for me, etc.)
O O O O
O O O O
4 4
8 ÷ 2 = 4 (There are 4 in each group)
12 ÷ 3 = 4 12 counters shared equally into 3 groups = 4
O O O O O O
O O O O O O
4 4 4
(There are 4 in each group)
20 ÷ 4 twenty counters divided into 4 groups = 5
O O O O O O O O
O O O O O O O O O O O O
5 5 5 5
(There are 5 in each group. Each group is the same size.)

53
Important note:
Please bear in mind the following when children are practising a sharing problem. 12 ÷ 3= ? Children often forget their starting number once they have counted it out and then share the objects into groups without counting them in a focused way. They just share them out and therefore the link to the written form of the concept is not made clear. At this stage children need lots of experience with sharing physical objects out and expressing what they are doing in words and then in symbols. Children need lots of experience of sharing numbers into groups and it is when the numbers start to become too big (probably between 20 and 30) that it is time to introduce grouping.
Grouping
Step 1 Making a link
Need to make a link to multiplication (Division needs to be taught following on from multiplication.) They

54
are very closely related not just as an inverse of each other but in the language that we use with both operations. The correct language use is key. 8 ÷ 2 is read as how many 2’s are there in 8?
12 ÷ 3 is read as how many 3’s are there in 12?
The link with multiplication becomes apparent when
answering the question.
8÷2 – How many 2’s are in 8? 4 groups of 2 make 8
12÷3 -How many 3’s are there in 12? 4 groups of 3 make
12.
Step 2 The correct language to connect the two
operations.
Children then use Numicon shapes and a Numicon tens
number line to answer division questions.
15 ÷ 3 – placing Numicon 3’s on the number line until
the number 15 is arrived at.
25 ÷ 5 = 5 (How many 5’s are there in 25?) is quickly
linked to 5 x 5 = 25 (5 groups of 5 equal 25)
Children need to do division (grouping) with the table that they are learning.

55
If learning the 2 times table then also learn 6 ÷ 2 = 10 ÷ 2 =
4 ÷ 2 = 12 ÷ 2 =
2 ÷ 2 = 18 ÷2 =
Step 3 Visual supports - Arrays
Identifying an array- What can you tell me about the image below?
It is 4 x 5 = 20 (4 groups of 5 make 20) Or 20÷ 5 =4 (there are four 5’s in 20)
It cannot be 5 x 4 because there are not 5 groups of 4 in
the array.
This needs to be done verbally (to understand the correct
language alongside visual representations.)
This is 12 ÷ 4 (There are 3 groups of 4 in 12)
3 x 4 = 12 (3 groups of 4 make 12)
It cannot be 4 x 3 because there are not 4 groups of 3.

56
This array below is different
o o o o o
o o o o o
o o o o o
o o o o o
Because there are no defined number shapes (Numicon),
it can be seen as 5 x 4 = 20 ( If you turn it round), 4 x 5
= 20, 20 ÷ 4 = 5 and 20 ÷ 5 = 4. All 4 calculations are
visibly present.
Step 4 The establishment of multiplication as a strategy for solving division problems. 81 ÷ 9 = How many 9’s in 81? 9 x 9
Step 5
Before moving on to short division it is worth
checking if children can find out how many there are
of a given number in a larger number where there is
a remainder.
How many 3’s are there in 20?
Children can find it difficult to count to a given number
that is not a multiple of the starting number. A number
line can help. Children need to be shown where to stop at

57
the multiple that is one before the larger number and then
count the remainders. They might also need to see how
to check by counting past the larger number and then
returning to the previous multiple.
19 ÷ 3
3, 6, 9, 12, 15, 18, 21… 21 is too far therefore it is 18
with 1 left over. The answer is 6 remainder 1.
A number line can be helpful to show this by making a
series of jumps towards the target number.
Step 6
Short division using Base 10
This is often referred to as the bus stop method and it
can be a tricky and abstract concept. Therefore, it needs
to be introduced carefully using Maths equipment
alongside the written method so that children can see and
experience what is actually going on. Short division with
Base 10 and then place value counters are probably the
most effective aids. There are short film clips on the
Maths pages of the school website to support these ideas.
The main concept to remember is that this process is
grouping rather than sharing. We are putting each digit in
a number being divided into groups. 482 ÷ 4 First the 4
in the hundreds column to be grouped into 4 hundreds,

58
then the 8 in the tens column into groups of 4 tens and
then the units into groups of 4 ones (which is not
possible and therefore becomes a remainder). Short
division on paper (the children’s books) should not be
experienced until the children have had lots of practice
with the equipment first.
Step 7
Short division
Example 1 42 ÷ 3
Step 1) First the correct layout 3
4 2
Step 2) The question is not how
many 3’s in 4? It is -can we make
a group of 3 tens from the group of
4 tens? Yes-1 group of 3 tens with 1 group of ten
remainder.
Step 3) Write a one in the tens column above the 4.
Step 4) Exchange the remaining group of ten for ten 1’s
and place it in the 1’s column to the right by writing a 1
in the top left hand corner of the next box to the right.
Step 5) How many groups of 3 can we make in 12? 4.
Step 5) Place the 4 in the ones column above.
The answer is 14.
Example 2 72 ÷ 3

59
Step 1) First lay out the calculation correctly. 3 7 2
Step 2) How many groups of 3 tens can we make from
the group of 7 tens? - two groups of 3 tens and 1 group
of ten remaining.
Step 3) Write 2 above the 7 and exchange the 1 set of ten
into ten 1’s and write a 1 in the top left hand corner of
the next box on the right (the ones column – making 12
ones).
Step 4) How many groups of 3 can you make with 12? 4
Step 5) Write 4 in the ones column above the 2.
The answer is 24.
Example 3 96 ÷ 4
Step 1) Firstly the correct layout
Step 2) How many groups of 4 ten’s can we make from
the 9 tens? 2 groups of 4 tens and 1 group of ten
remaining.
Step 3) Write 2 above the 9 and exchange the remaining
one set of 10 into 10 ones and place in the ones column

60
by writing a 1 in the top left corner of the next box to the
right (this makes 16 ones).
Step 4) How many groups of 4 ones can I make from 16
ones? 4
Step 5) Write a 4 above the 6 in the ones column.
The answer is 24.
Example 4 275 ÷ 5
Step 1) The correct layout
Step 2) How many groups of 5 hundreds can you make
from 2 hundreds? None
Step 2) Put a 0 above the 2 in the hundreds column and
then exchange the 2 hundred by moving the 2 into the
top left hand corner of the next box to the right (the tens
column- this makes it 27 tens -270).
Step 3) How many groups of 5 tens can you make from
27 tens?
5 groups of ten and 2 groups of ten remain. Write the 5
above the 7 in the tens column.
Step 4) Exchange the remaining 2 tens (for 20 ones) and
place in the next box to the right and in the top left hand
corner write a 2. This then becomes 25 ones.
Step 5) How many groups of 5 ones can you make from
25 ones? 5
Step 6) Write the 5 in the ones column above the 5.
The answer is 55.

61
Answers can be checked by doing the inverse operation
of multiplication.
What happens with remainders (part 1)
Example 1: 82 ÷ 5 =
Step 1) Layout the same way 5 8 2
Step 2) How many groups of 5 tens can I make from 8
tens? 1 group of 5 tens and 3 groups of ten remain.
Step 3) Write 1 above the 8 in the tens column and
exchange by placing the remaining 3 tens in the top left
hand corner of the next box to the right-making it 32
ones.
Step 4) How many groups of 5 ones can I make with 32
ones? 6 r 2
Step 5) Write 6 above the 2 and r 2 after. Answer 16 r 2.
Example 2: 63 ÷ 2 =

62
Step 1) Layout as usual 2 6 3
Step 2) How many groups of 2 tens can I make in 6 tens?
3. Write 3 above the 6.
Step 3) How many groups of 2 ones are there in 3 ones?
1 r 1. Write 1 r 1 above the 3.
The answer is 31 r 1
Example 3: 81 ÷ 4 =
Step 1) Check the correct layout
Step 2) How many groups of 4 tens are there in 8 tens?
2. Write 2 above the 8.
Stage 3) How many groups of 4 ones are there in 1? 0
Write 0 above 1 and then r 1. The answer is 20 r 1.
Checking an answer with multiplication
20
X 4
80
+ 1 (the remainder)
81

63
What happens with remainders? Part 2 – the adding
of a decimal point.
Example 1 82 ÷ 5
Step 1) Layout 5 8 2
Step 2) How many groups of 5 tens can I make with
8 groups of ten? 1 group of 5 tens and three remaining.
Write 1 above the 8 in the tens column.
Step 3) Carry the 3 tens into into the ones column
(making 32 ones).
Step 4) How many groups of 5 ones can I make
from 32? = 6 groups with 2 remaining. Write down 6
above the 2 (in the ones column) and then put a decimal
point after the 6 and the 2.
16.
582.

64
Step 5) Put the remainder 2 to the right of 82 in the
tenths column and bring down a zero (2 =20 tenths)
Step 6) How many groups of 5 tenths can I make
with 20 tenths? = 4
1 6 . 4
5 8 .32 2 0
Example 2 61÷ 2
Step 1) Layout 2 | 6 1
Step 2) How many groups of 2 tens can I make from 6
tens? 3 -Write 3 above the 6 in the tens column.
Step 3) How many groups of 2 ones can I make from 1?
0. Write 0 above the 1 (in the ones column and put a
decimal point after the 0 and the 1.
3 0.
2 6 1.
Step 4) Carry the 1 across the decimal point into the
tenths column and add a zero. (Because 1 is exchanged
for 10 tenths).
How many groups of 2 tenths can you make from 10
tenths? = 5. Put 5 after decimal point.
3 0. 5
2 6 1. 1
Answer is 30.5

65
Example 3 273 ÷ 4
Step 1) Layout 4 | 2 7 3
Step 2) How many groups of 4 hundred can I make from
2 hundred? None - Write 0 above the 2 and then
exchange the 2 and carry the 2 across into the tens
column to make 27 (200 = 20 tens added to the 7 tens
already there =27 tens).
Step 3) How many groups of 4 tens can be made from 27
tens? 6 groups with 3 remaining. Now exchange the 3
tens across to the units column to make 33. Write 6
above the 7 in the tens column.
Step 4) How many groups of 4 can be created from
33? 8 groups remainder 1.
6 8.
4 2 7 3. 0
Step 5) Put in a decimal point after the 8 and the 3.
Exchange the 1 below into the next box on the right –the
tenths column (to become 10 tenths) and add a 0 to show
this.

66
Step 6) How many groups of 4 tenths can I make with 10
tenths? 2 remainder 2. Write 2 in the tenths column
above the zero.
Step 7) Exchange the 2 into the next column (hundredths
column to become 20 hundredths) and add a 0 to show
this.
Step 8) How many groups of 4 hundredths can I make
from 20 hundredths? 5
Step 9) The answer is 68.25 and you need to cross
out the 0 at the beginning.
Example 4 936 ÷ 12
Step 1) Lay out correctly
Step 2) How many groups of 12 hundreds can you make
from 9 hundreds? None – write a zero above the 9 in the
hundreds column.
Step 3) Exchange the 9 hundreds into the tens column to
make 90 tens. 9 is written in the top left hand corner and
so with 3 the tens already there makes a total of 93 tens.
How many groups of 12 tens can I make from 93 tens? 7
groups of 12 with 9 remaining. Write 7 above the 3 in the
tens column.
Step 4) The 9 remainder is exchanged into the next box
on the right and written in the top left hand corner
making a total of 96 ones.

67
Step 5) How many groups of 12 can we make from 96?
8. Write 8 above the 6 in the ones column. The answer is
78
Checking our answers with multiplication using
decimals.
When thinking about multiplying 30.5 x 2 we need to use
our knowledge of place value and help children to make
connections. If we make 30.5 ten times bigger it becomes
305. We can then do column multiplication and then
adjust the answer by making it ten times smaller. (We
can of course do 30.5 x 2.)
Step 1) The layout – remove the decimal point
30.5 305
x 2 x 2
Step 2) Multiply 305 by 2 = 610
Step 3) We put the decimal point back. The rule being:
Count the number of digits to the right of the decimal
point at the beginning = 1. (30.5 there is one = .5). With

68
610 count from the right one and put back the decimal
point 61.0 = 61.
If there are two digits to the left of the decimal point then
replace the decimal point two places from the right at the
end. See example below.
273÷ 4 = 68.25
Step 1) We need to make 68.25 a hundred times bigger to
6825 removing the decimal point.
Step 2) Do column multiplication to get the answer =
27300.
Step 3) Make the answer a hundred times smaller.
Starting from the right of 27400 count in 2 places and put
in the decimal point.
Step 4) If the number you end up with is the number you
started with you are correct. If they are different you are
6 8 2 5
x 4
2 37 13 10 0

69
wrong and need to check it again to see if you can spot
your mistake.
Long Division
Example 1 432 ÷ 12
Step 1) Layout of division
1 2 | 4 3 2
Step 2) How many groups of 12 hundred can I make in 4
hundred? 0 Write 0 above the 4 in the hundreds column.
Step 2) How many groups of 12 tens are there in 43 tens?
3
Step 3) Write 3 in the tens column above the 3 (3 x 12
tens = 36 tens).
Step 3) The 36 (tens) needs to be recorded in our
calculation by placing the 3 in the hundreds column
below the 4 and the 6 in the tens column below the 3
Step 4) Then subtract the 36 tens from the 43 tens to
leave a remainder of 7 tens which is written in the tens
column below the 6.

70
Step 5) Bring down the 2 in the ones column alongside
the 7 (tens) to make 72.
Step 6) How many 12’s in 72? = 6. Put the 6 in the ones
column above the 2.
The answer is 36.
Will 36 x 12 give me 432 (Check the answer with
multiplication)
Tip: To help children answer questions involving a
larger number being divided by a two digit number it can
be useful to list the multiples down the side of the page
before beginning.
For example: 936 ÷ 13
List the multiples: 13, 26, 39, 52, 65, 78, 91, 104,
117,130- generally do first 10 multiples (better done in a
vertical column to the side- and it can be helpful when
listing a multiple like this to add 10 each time and then 3
as a strategy for adding 13

71
Example 2 720 ÷ 15
Step 1) Layout of sum
Step 2) How many groups of 15 hundreds are there in 7
hundreds? 0. Write 0 above the 7 in the hundreds
column. Exchange the 7 hundreds into 70 tens.
Step 3) How many groups of 15 tens are there in 72 tens?
4.
Step 4) Write 4 in the tens column above the 2.
Step 5) The 4 groups of 15 tens = 600 and is recorded by
writing a 6 in the hundreds column below the 7 and a 0
in the tens column below the 2.
Step 6) When 60 tens (600) is taken away from 72 tens
(700) there are 12 tens left. Dropping the zero from the
units column down makes this 12 tens into 120.
Step 7) How many groups of 15 in 120 = 8. Write 8 in
the ones column.

72
Example 3 465 ÷ 13
Vocabulary for division
Share, groups of Divide 24 by 6?
Factors How many lots of 6 are
there in 42?
divide lots of What is 16 shared by 4?
half quarter What are the factors of 24?
third etc.