the centre for computing history
TRANSCRIPT


Copyright Acorn Computers Limited 1991Published by Acorn Computers Technical Publications DepartmentNeither the whole nor any part of the information contained in, nor the product described in, this manual may be adapted or reproduced in any material form except with the prior written approval of Acorn Computers Limited.
The product described in this manual and products for use with it are subject to continuous development and improvement. All information of a technical nature and particulars of the product and its use (including the information and particulars in this manual) are given by Acorn Computers Limited in good faith. However, Acorn Computers Limited cannot accept any liability for any loss or damage arising from the use of any information or particulars in this manual.
If you have any comments on this manual, please complete the form at the back of the manual, and send it to the address given there.
Acorn supplies its products through an international dealer network. These outlets are trained in the use and support of Acorn products and are available to help resolve any queries you may have.
Within this publication, the term 'BBC' is used as an abbreviation for 'British Broadcasting Corporation'.
ACORN, ARCHIMEDES and ECONET are trademarks of Acorn Computers Limited MS-DOS and Windows are trademarks of Microsoft CorporationDR-DOS is a trademark of Digital ResearchIBM is trademark of International Business MachinesIntel is a trademark of Intel CorporationLotus 1-2-3 and Symphony are registered trademarks of Lotus Development Corporation dBase IV is a trademark of Ashton-TateWordstar is a registered trademark of Micropro International Corporation.
Published by Acorn Computers LimitedPart number 0493,114Issue 1, July 1991

Contents
About this Guide vIntroduction vThe PC Emulator package vUpgrading your current PC Emulator viUpgrading your current version of DOS vi
Installing the PC Emulator 1Installing the emulator on a hard disc 3
Configuring the PC Emulator 9The configuration dialogue box 9Creating a second hard disc drive 13
Running the PC Emulator 15Running PCEm 15Running PCEmS 16PC Emulator icon bar menu options 17
Accessing DOS directories using MultiFS 19Introduction 19Configuring MultiFS 19Starting MultiFS 20Viewing the DOS filing system 20Icon bar menu options 20Translating file attributes between DOS and RISC OS 22MultiFS command line interface 22Running MultiFS and PC Emulator together 23
Acorn DOS utilities 25The mouse driver 25Transferring files between DOS and RISC OS 25
A brief introduction to DOS 27Appendix A: The PC Emulator 31
Compatibility 31The emulated PC — a technical description 31Unsupported features 32Application configuration options 33Possible problem areas 33The serial interface 34

Appendix B: Upgrading 37Upgrading from your existing PC emulator 37
Appendix C: Programming details 39Access to RISC OS 39The SVC Opcode 39The RISC OS PC Device 40
Appendix D: Further reading 41

About this Guide
IntroductionThe PC Emulator allows standard DOS applications to be run on a RISC OS computer. It does this by emulating the hardware of an IBM PC compatible computer and then running a standard copy of DOS on this emulated hardware.
This Guide is not a DOS tutorial. It only describes how to install and run the PC Emulator and explains those DOS utilities that are specific to the PC Emulator. There are many good books available for DOS, and some suggested titles appear at the end of this Guide.
The PC Emulator packageThe PC Emulator package contains four discs:• the large PC emulator disc (called MDA/CGA/EGA Multitasking)• the small PC emulator disc (called CGA Single tasking)• the two DR-DOS 5.0 discs (Startup/Install and Utilities).The large PC Emulator disc (MDA/CGA/EGA Multitasking) contains all the files needed for the PC Emulator !PCEm. These are:• !PCEm – the PC emulator application• !MultiFS – the desktop filer application that lets you view DOS format discs in a window• !System – which contains modules needed by the emulator• !Fonts – which contains fonts used when emulating a monochrome display adaptor• !Merge – an application that should be used to update your existing !System and !Fonts.The small PC Emulator disc (CGA Single tasking) contains all the files needed for the PC Emulator, !PCEmS. These are:• !PCEmS – the small PC emulator application• !MultiFS – the desktop filer application that lets you view DOS format discs in a window• !System – which contains modules needed by the emulator• !Merge – an application that should be used to update your existing !System and !Fonts.The DR-DOS Startup/Install disc contains DR-DOS Release 5.0, together with an Installation program for you to tailor DR-DOS to suit your particular system the first time you load it.
The DR-DOS Utilities disc contains standard DOS utilities and other DOS utilities specifically for use with the PC Emulator.
The DR-DOS discs are in DOS format and can only be read with the emulator or MultiFS.
Memory requirementsIf your computer has 2MB or more of RAM memory, then use the large emulator PCEm.If your computer has 1MB of RAM memory, then use the small emulator PCEmS.

The emulator does not operate in a computer with less than I MB of memory.You should choose which of these versions you are going to use. The instructions in this guide refer to both PCEm and PCEmS, and the differences between them are described.
The PC Emulator PCEmPCEm is a RISC OS application that runs in a window on the RISC OS desktop simultaneously with other RISC OS applications. It also has a 'Single Task' mode of operation in which the emulator takes over the whole screen. In 'Single Task' mode, the emulator runs a little faster and the computer appears to be an IBM PC clone running DOS. PCEm will run its normal screen modes in 2MB of memory. However the EGA+ mode requires more than 2MB.
The PC Emulator PCEmSPCEmS is a reduced version of the emulator for use with computers that have only 1MB of memory. PCEmS only operates in full screen (Single Task) mode; it does not operate in a window. Additionally, it only emulates the Colour Graphics Adaptor (CGA) display.
Viewing DR-DOS filesAlso supplied is MultiFS, an application that lets you view your DOS format discs in a RISC OS window. MultiFS allows DOS files to be moved, copied and deleted using normal RISC OS desktop operations.
Upgrading your current PC EmulatorIf you are running one of the earlier versions of the PC emulator first turn to Appendix B: Upgrading on page 37 to find out how to upgrade to this version.
Upgrading your current version of DOSIf you are using an earlier version of DOS and want to upgrade it, first follow the instructions on page 37.
Installing the PC EmulatorThis chapter describes how to install the PC Emulator on your computer. Installation is necessary to tailor the emulator to suit your requirements and the configuration of your system. You can run the PC Emulator from floppy discs, or, if your computer has one, from a hard disc. This chapter tells you how to install the emulator either way.
Before you start this chapter you must decide which version of the emulator you are going to use. Which one you use will depend to some extent on the memory size of your computer. PCEm needs at least 2MB of memory, while PCEmS can operate with 1MB.
If you plan to run the emulator from floppy discs, you should make backups of the master discs supplied, and use these backups as your working discs. The DR-DOS installation program tells you how to make backups of the DOS discs. See the RISC OS User Guide for instructions on backing up the PC Emulator master floppy discs (Disc 1 and Disc 2), which are RISC OS format discs.
If you will be running the emulator from floppy discs, you will therefore need four blank discs before you start installing the PC Emulator. The PC Emulator floppy discs are RISC OS format, but the DR-DOS discs are DOS format. The two formats are different, and cannot be used for the same purpose.
The DR-DOS installation program will format your backup discs for you during the installation process itself. At other times, use the DOS FORMAT command; see your DOS documentation for instructions on how to use it.
Floppy Disc InstallationIf you intend to run the emulator from your floppy disc drive, follow these instructions:
Loading the emulator1 Insert PC Emulator Disc 1 or Disc 2 (depending on which version of the emulator you wish to
install) into the floppy drive and click on the floppy icon. This displays the root directory.
2 Double-click on the PCEm (or PCEmS) application to load it onto the icon bar.If the small image PCEmS is to be loaded onto a 1MB machine then it will have to be configured to run with the Erase RISC OS? option set. This removes anything you have previously loaded into RISC OS, so make sure you save anything you want to keep before you run PCEmS. To set this option, click Menu over the PC icon bar icon, and choose Configuration. Click in the box next to Erase RISC OS?, then on OK in the Save as: dialogue box, to save the configuration change. Confirm the change by clicking on Yes.
3 Click on the PC icon on the icon bar.If the Erase RISC OS? option is set a warning box will appear to remind you that the desktop will be cleared. If you wish to continue, click on the OK box.

After a while the following message appears:Acorn PC Emulator, (C) Acorn 1991Insert DOS boot disk and press any key
4 Replace the Emulator disc with the DOS Startup/Install disc and press the space bar. DR-DOS boots itself up and displays the installation start-up page.
You will need two blank floppy discs (or else discs containing data which you don't mind losing) on which your working copies of DOS will be created. If do not have these discs, obtain them now, and then follow the set-up instructions below.
Installing DR-DOS on a floppy discThe DR-DOS installation program consists of a number of screens to read and follow. If at any time during the installation you make a mistake, you can press Esc to go back to the previous screen, or F10 to stop the installation.
This installation procedure assumes that you are setting up DR-DOS for the first time. If you wish to alter your set-up, refer to the DR-DOS documentation.
1 At the DR-DOS Welcome screen, press Return when you have read the screen.2 If you have a hard disc, but wish to run DOS from a floppy, use the down arrow key to select the
floppy disc A:, then press Return. If you just have a floppy disc press Return.
3 Make sure that you have your blank discs ready; press Return again to accept a balanced configuration between functionality and memory.
4 The country and keyboard settings are correctly defined by default. Press Return to accept United Kingdom as the country and US English as the default keyboard.The enhanced keyboard option is selected by default, so press Return to accept.
You can at this stage set up other parameters. Refer to the DR-DOS documentation for further details. However, if your are installing for the first time you should accept the default set-up by using the up arrow key to highlight the skip configuration and go directly to installation option, then press Return.
5 Press Return to continue with the installation.6 At the prompt follow the set-up instructions displayed on the screen to create working copies
from your original Startup/Install and Utilities discs. You may have to swap discs several times. The program will automatically format the backup discs (if necessary) before writing to them; this may take a little time, during which nothing very much will appear to be happening.
7 Once the system is installed, insert your new copy Startup/Install disc and reboot the PC Emulator by holding down Ctrl and Alt and pressing and releasing Delete.
You now have a complete DOS system installed on floppy discs.
To run the emulator, load the PCEm (or PCEmS) application onto the icon bar and click on the PC icon. lithe Erase RISC OS? option is set a warning box will appear to remind you that the desktop will be cleared. If you wish to continue click on the OK box.
At the Insert DOS boot disk and press any key prompt, put the working copy of the Startup/Install disc you have just made into the drive and press the space bar. When DOS has been loaded, the DOS command line prompt will be displayed, and you can use your computer as a DOS machine.
Installing the emulator on a hard discThis section explains how to install the PC Emulator on a computer with a hard disc. There are three main stages in this procedure:
1 Copying the emulator applications onto the hard disc, and updating your System and Fonts directories.
2 Creating a DOS partition on your hard disc.3 Installing DR-DOS on your DOS hard disc.
Copying the Emulator onto a hard discCopy the emulator files to a new directory on your hard disc as follows:1 Put the emulator floppy disc (Disc I or Disc 2, depending on which version of the emulator
you wish to use) in the disc drive and click on the floppy disc icon to display the contents.
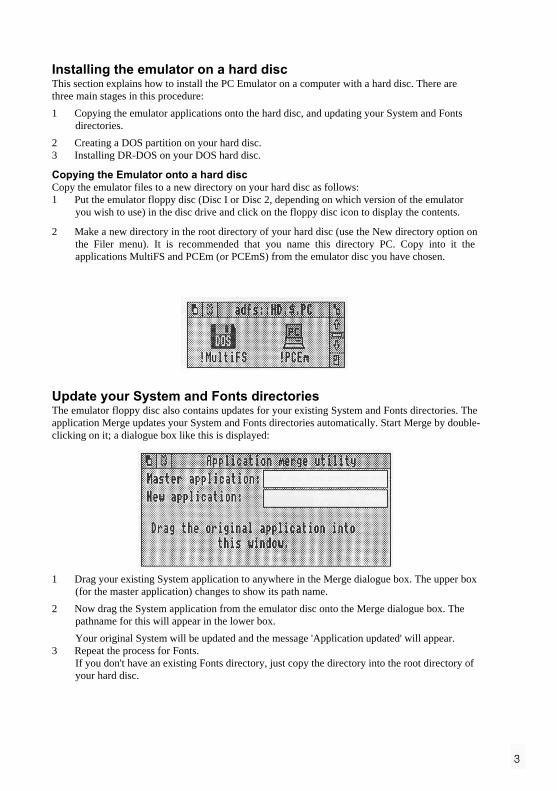
2 Make a new directory in the root directory of your hard disc (use the New directory option on the Filer menu). It is recommended that you name this directory PC. Copy into it the applications MultiFS and PCEm (or PCEmS) from the emulator disc you have chosen.
Update your System and Fonts directoriesThe emulator floppy disc also contains updates for your existing System and Fonts directories. The application Merge updates your System and Fonts directories automatically. Start Merge by double-clicking on it; a dialogue box like this is displayed:
1 Drag your existing System application to anywhere in the Merge dialogue box. The upper box (for the master application) changes to show its path name.
2 Now drag the System application from the emulator disc onto the Merge dialogue box. The pathname for this will appear in the lower box.
Your original System will be updated and the message 'Application updated' will appear.3 Repeat the process for Fonts.
If you don't have an existing Fonts directory, just copy the directory into the root directory of your hard disc.

If there are problems, you should read the error message and take the appropriate action. The only common error message you may see is 'disc full', which is unlikely to occur if you are merging onto a hard disc.
When you have finished, quit the application by clicking on the Close icon.4 Quit any other applications you may have running and save any data you wish to keep, then
hold down Ctrl and Reset the computer to clear the old Fonts directory from the system and ensure the new one is used.
5 Remove the emulator floppy disc from the disc drive.
Creating a DOS-formatted hard discThe emulator does not have its own hard disc; instead it uses a special RISC OS file as a simulated hard disc. In this section, when we refer to the PC hard disc, we are really referring to this file. However, in DOS terms, this file looks and behaves like a proper DOS hard disc drive.
There are four stages in creating a DOS hard disc:
1 Create the RISC OS file that the emulator can use as a PC hard disc.
2 Partition the simulated DOS hard disc and create a bootable DOS partition on it.
3 Format the simulated disc.
4 Copy the DOS utilities onto the hard disc.
The DR-DOS Setup program guides you through all these stages.If you already have a DOS hard disc file created with a previous version of the emulator it can still be used. See the appendix entitled Appendix B: Upgrading on page 37.
If you want to create a second DOS hard disc drive file, turn to see the section entitled Creating a second hard disc drive on page 13.
Create the RISC OS file that the emulator uses as a PC hard disc1 Load the PCEm (or PCEmS) application and choose the Configuration option from the icon
bar menu.
2 Click Select over the number next to Hard disc drive files; this changes the number to 1. (Clicking Adjust decreases the number). The default file name adfs::4.$.PC.Drive_C is displayed. This creates a file named Drive_C in the PC directory. If you have stored your emulator files in a different directory or wish to create a differently named file, erase this and type in a suitable RISC OS name.
3 Type in the size (in Megabytes) for the PC partition. A minimum size of 2MB is recommended.

4 Create the hard disc partition by clicking on the word Create. This creates an unformatted PC hard disc partition, which you will format in the next section.
5 Save the configuration by scrolling to the bottom of the dialogue box and then clicking on OK in the Save as box.
Installing DR-DOS on a hard disc1 Load the PCEm (or PCEmS) application onto the icon bar.
If the small image PCEmS is to be loaded onto a 1MB machine then it will have to be configured to run with the Erase RISC OS? option set. This removes anything you have previously loaded into RISC OS, so make sure you save anything you want to keep before you run PCEmS. To set this option, click Menu over the PC icon bar icon, and choose Configuration. Click in the box next to Erase RISC OS?, then on OK in the Save as: dialogue box, to save the configuration change. Confirm the change by clicking on Yes.
2 Click on the PC icon. The emulator will run, and you will be prompted to insert the DOS Startup/Install disc.
DR-DOS boots itself up and displays the installation start-up page.DR-DOS installation consists of a number of screens to read and follow. If at any time during the installation you make a mistake, you can press Esc to go back to the previous screen or F10 to stop the installation.
This installation procedure assumes that you are setting up DR-DOS on the hard disc for the first time. If you wish to alter your set-up, refer to the DR-DOS documentation.
3 At the DR-DOS Welcome screen, press Return when you have read the screen.4 The next screen asks you if you wish to format the hard disc you have just created. Press the
down arrow to select YES, and press Return.

5 The following message will be displayed:
1st hard disk sector zero has no boot sector id Initialize disk [Y/N]?
Type Y to start the partitioning process.
6 Type 1 to create a DOS partition.
7 Type 1 to create a primary partition.
8 When the message
Use cylinder X-XX for DOS (X.XMB) (Y/N)
is displayed, type Y to start partitioning.
9 Enter a disc label (a name for the disc), if you want to, then press Return.
10 Press Esc to leave the FDISK utility.
11 When you see the message
The operating system needs to be reloaded Insert a system disc into A: and strike a key
put your DR-DOS Startup disc into the floppy drive and press any key.
12 When you are back at the Welcome screen, press Return.
13 To select the hard disc partition C: as the location to install DOS, press Return again.
14 Press Return again to accept a balanced configuration between functionality and memory.
15 The country and keyboard settings are correctly defined by default. Press Return to accept United Kingdom as the country and US English as the default keyboard.
16 The enhanced keyboard option is also selected by default, so press Return to accept.
17 Make sure that the selected settings are correct. At this stage you can go back and correct them if necessary. If they are correct, press Return to continue.
18 Press Return in response to the question Replace all DOS files on the destination drive.
19 You can at this stage set up further parameters. Refer to the DR-DOS documentation for further details. However, if you are installing DR-DOS for the first time, it is advisable to accept the default set-up for now by using the up arrow key to highlight the skip configuration and go directly to installation option, then press Return.
20 Unless you want to review or change any choices at this stage, press Return to continue with the installation. Screen messages will inform you of the progress of the installation, and you will be prompted to swap discs.
21 At the prompt follow the set-up instructions displayed on the screen to copy the original Startup/Install and Utilities discs to the hard disc.
22 Once the system is installed, remove the floppy disc from the drive and reboot the PC Emulator by holding down Ctrl and Alt and pressing and releasing Delete.
You now have a complete DOS system installed on your hard disc. From now on, you do not need the floppy discs, except as backups in case your hard disc is corrupted at any time.

To run the emulator, load the PCEm (or PCEmS) application onto the icon bar and click on the PC icon. If the Erase RISC OS? option is set, a warning box will appear to remind you that the desktop will be cleared, and anything loaded under RISC OS lost. If you wish to continue, click on the OKbox.
You can now use drive C (the hard disc) in the same way as drives A or B.


Configuring the PC Emulator
You should now have installed the emulator.
If your computer has a hard disc you should have created a partitioned and formatted hard disc file for DOS. Finally you should have copied the contents of the DOS floppy disc onto the hard disc file.
This chapter explains how to configure the emulator further to suit your requirements.
The configuration dialogue boxThe configuration dialogue box is displayed by choosing the Configuration option from the icon bar menu. This option allows you to change details about the actual PC that is emulated. The configuration menu can only be accessed when the emulator is loaded but not running. Changing the configuration whilst the emulator is running is like trying to remove a graphics card from a PC while it is switched on!
If you change any of the options, the changes do not take effect until you have saved them by clicking on OK in the Save as box. The configuration options are saved, in plain text, in a file called !Choices in the emulator application directory. The PC Emulator choices window is scrollable as the bottom part of the window is hidden. Click under the vertical scroll bar to see the hidden part of the window.

PC RAM sizeThis option specifies the amount of RAM that the emulated PC can use, up to a maximum of 640KB. The default setting is All, which means that the PC Emulator will emulate a PC with as much memory as possible, up to 640KB.
If there is insufficient memory available when the PC Emulator is loaded, a warning message is displayed and the emulator icon is removed from the icon bar.
Erase RISC OS? (PCEmS version only)Clicking on this option maximises the memory available to DOS by deleting unwanted RISC OS modules from memory when the PC Emulator is started.
When you use the PC emulator you can usually leave the PC environment and return to the RISC OS desktop by clicking the middle mouse button. You can then go back to the PC environment by clicking on the emulator icon. The Erase RISC OS option removes this function.
The list of modules that are deleted from memory by this option can be found in the file !PCEmS.GenBoot.!Modules. Do not change this file unless you know what you are doing.
Floppy disc drivesClick Select on the number (next to the title) to add disc drives (click Adjust to remove them). If you have a 5 1/4" drive attached make sure you click on the appropriate 5 1/4" button.
You should not configure more floppy drives than there are real physical floppy disc drives. If you want your PC hard disc drive to be called C:, reduce the number of configured floppy drives to one or two.
Hard disc drive filesClick Select on the number (next to the title) to add hard disc drives (click Adjust to remove them).
There can be up to four hard disc drive files. FDISK, though, will only work when the maximum number of discs configured is two.
If you try to specify a hard disc file that does not exist, a warning is displayed when you start the emulator.
If a file representing a PC hard disc exists, but the emulator has not been configured for it, rather than type the filename into the dialogue box you can drag the file itself into the disc drive filename field in the dialogue box.
To set up a new hard disc drive, see the section entitled Creating a second hard disc drive on page 13.

Display adaptors (PCEm version only)Although there are several different types of display adaptors available, most users should simply choose EGA. If you have a multi-frequency or VGA-compatible monitor you can choose EGA monitor ECD, in all other cases choose CD. You should also choose the least amount of EGA memory needed to run your program; most run with 128K. However some applications need 256K to run properly.
Display adaptors in detail
It is possible to use two display adaptors:
• Adaptor 1 can be either a CGA, EGA or EGA+ display.
• Adaptor 2 is an MDA display.
Normally only one adaptor will be configured. Click Select on the adaptor names to select the adaptor required. To disable an adaptor, click Adjust on the highlighted option.

The chosen display should be the simplest that is suitable, as this will use the least RISC OS memory. MDA uses the least memory, followed by CGA, EGA and EGA+. Only CGA is available when running PCEmS. A number of programs that run under VGA will run successfully under EGA+ (for example, Microsoft Windows 3.0).
EGA Monitor types
With the EGA display you can specify the monitor type it is connected to. The choice is either CD (Colour Display) or ECD (Enhanced Colour Display). CD should be chosen if you have a medium-resolution monitor. If you have a multi-frequency or VGA-compatible monitor you can choose ECD.
EGA memory
With the EGA display you can specify the amount of memory to be used in the emulation of the adaptor. You should specify the least amount of memory that will allow the PC program to run. Most programs will run with 128K of memory. Increasing the memory used by the graphics adaptor will increase the RISC OS memory needed to run the emulator.
MDA font size
This option allows you to change the default font size that the MDA display uses. The default size is 13x13 points. If you change this to a smaller size the PC screen size will be correspondingly smaller too. You can also change font size in the MDA window menu; see the section entitled Running PCEm on page 15.
Startup textThis option allows you to define an action for the computer to perform after it has booted up correctly. The startup text can be any valid DOS command.
For example, to display the directory you would type in DIR|M. Always use M to end a command (instead of pressing Return).
Saving the configurationOnce you have decided which options to use, click on the Save as OK box. This saves your configuration in a file called !Choices in the PCEm applications directory.
Although !Choices is the standard file in which to save your configuration, you can save the configuration in any file. Type a new filename into the Save as box and then drag the icon to a directory. The file has a special PC icon.
To use this configuration file, make sure that RISC OS has 'seen' the PC emulator application, then double-click on the configuration file icon. This starts the emulator with the parameters stored in the configuration file.

Creating a second hard disc driveTo create an additional hard disc, load the emulator, but before you start DOS, choose Configuration from the icon bar menu, and increase the number of hard disc drive files by one. Check the path name and the desired size of the new hard disc drive file.
Click on the adjacent Create button. There will be a delay while the drive is created. Save the new configuration by clicking on the Save as OK button.Start the PC Emulator, and follow the instructions below to partition and format the new hard disc drive:
Warning: Follow this section carefully, to avoid the risk of formatting your existing drive.
1 Type
FDISK
2 You will be asked to enter your desired option from a list of choices. Type
4
to choose Select alternate fixed disk. This will select the new hard disc drive.
3 You will be asked if you want to initialize (format) the new drive. Type
Y
to confirm that you do.
4 At the next prompt, type
1
to create a DOS partition on the disc, and
1
again to make a primary DOS partition.
5 You will then be asked if you want to use all the cylinders (space on the new hard disc) for the DOS partition. Type
Y
to confirm that you do. The disc partition will then be formatted. When this is complete, you will be prompted for a disc label — a name for the new hard disc — and you can type one in if you do.
Press Esc to exit from FDISK.


Running the PC Emulator
Before you run either PCEm or PCEmS, you should first install the program as described in the chapter Installing the PC Emulator. This sets up the emulators to suit your particular system configuration, and makes working copies of them on either floppy or hard disc (if you have one). You should run the emulators from these working copies.
Running PCEmTo run the PC Emulator:1 Double-click on the PCEm icon in the directory display. This loads the emulator onto the icon
bar.
2 Click on the PCEm icon on the icon bar. This displays the PC screen in a window.3 If you do not have a PC hard disc you should insert the DOS system disc and press any key.
When the PC has finished starting up (booting) you will see an A> prompt, representing the floppy disc drive.
If you have a correctly set-up PC hard disc it will boot DOS automatically as long as the floppy disc drive is empty. When the PC has finished booting you will see a C> prompt, representing the hard disc drive. If you have more than two floppy drives your hard disc will not have the C> prompt.
The window menu optionsDisplay the emulator menu options by clicking Menu over the PC emulator window. The emulator window menu is only available if you are using PCEm.
Save screen
This option, which is not available from MDA, allows you to save a screenful of data to a RISC OS sprite file. Sprite files cannot be converted to text files.
Save text
This option allows you to save an MDA screen as a text file, and a CGA, EGA or EGA+ screen as a text file, if you are in a text mode.
Connect mouse
This option allows the PC window to use the mouse. You may also have to run AMOUSE.COM; see the section entitled The mouse driver on page 25 for details. When the mouse is 'connected' it will drive the PC mouse pointer. Click Menu to reconnect the mouse to the RISC OS mouse pointer.

Display (MDA display only)
This defines the display font size. A bigger font size will result in a bigger PC screen. The default font size can also be set from the Configuration dialogue box.
Quitting PCEmTo exit PCEm, choose the Quit option from the PC icon bar menu.
Warning: Any PC applications which are running will be immediately stopped and any associated data will be lost. Therefore this option should normally only be used when the PC Emulator is at the DOS prompt.
Running PCEmSTo run the reduced memory version of the PC Emulator:1 Double-click on the PCEmS icon in the directory display. This loads the emulator onto the
icon bar.
2 Click on the PCEmS icon on the icon bar. This displays the PC screen.This will cause all RISC OS tasks to be suspended and the emulator to run in single task mode. You can return to RISC OS, without losing your PC data, by clicking the middle mouse button (if the configuration option Erase RISC OS? has not been chosen). Click on the emulator icon to redisplay the PC screen.
3 If you do not have a PC hard disc you should insert your copy of the DOS Startup disc and press any key. When the PC has finished booting you will see an A> prompt, which represents the floppy disc drive.
If you have a correctly set-up PC hard disc it will boot DOS automatically as long as the floppy disc drive is empty. When the PC has finished booting you will see a C> prompt, representing the hard disc drive.
Quitting PCEmIf you have not set the Configuration option Erase RISC OS?, you can switch to the RISC OS desktop by clicking the Menu button on the mouse. Click on the PC icon bar icon to get back to DOS.
Exit PCEmS altogether by choosing the Quit option from the icon bar menu.
If you have set the Configuration option Erase RISC OS?, you must hold down Ctrl and press the Reset button to exit PCEmS.
Warning: When you quit the PC Emulator, any PC applications which are running will be immediately stopped and any associated data will be lost. Therefore you should normally only quit the PC Emulator when the DOS prompt is displayed.

PC Emulator icon bar menu optionsThe following options appear on the PC emulator icon bar menu. Click Menu over the emulator icon to display them. If you are using the reduced version of the emulator, the Freeze and Single task options are not available to you.
InfoThis gives the version number of the PC Emulator application.
Single task (PCEm version only)Clicking on this option causes the PC Emulator to use the whole screen, instead of operating in a RISC OS window. To return to window mode, click Menu.
No other RISC OS tasks run while the PC Emulator is in Single task mode. However, the RISC OS desktop will be restored as it was when you return to windowed mode. The RISC OS tasks that were running will now start again.
When running in Single task mode, the emulator will run slightly faster. Screen updates in particular will be faster and mouse movement smoother.
Freeze (PCEm version only)Clicking on this option causes the emulation to freeze. This option can be used to pause the PC Emulator while doing work in other RISC OS windows. Click on this option again to restart the emulator.
The emulator will automatically freeze when the emulator window is closed (by clicking on the close icon). Unfreeze and open the emulator window by clicking on the emulator icon.
ConfigurationClicking on this option displays a dialogue box that allows the details of the emulated PC to be specified. This dialogue box is described in detail in see the section entitled The configuration dialogue box on page 9.
A suitable configuration must be set up before DOS is run. You cannot reconfigure the emulator while it is running. You must first quit the emulator by choosing Quit from the icon bar menu and then reloading it. The Configuration option will then be available on the icon bar menu.
QuitClicking on this option causes the emulator to quit.

Warning: Any PC applications which are running will be immediately stopped and any associated data will be lost. Therefore this option should normally only be used when the PC Emulator is at the DOS prompt.
Accessing DOS directories using MuItiFS
IntroductionMultiFS gives you DOS disc icons on your icon bar. These display the contents of PC format floppy discs and emulated hard discs in standard RISC OS desktop directory displays.
You can also perform all the standard functions (such as move, copy and delete) in exactly the same way as you would with RISC OS.
MultiFS can be used to transfer files between DOS and RISC OS floppy formats. You can copy RISC OS files onto DOS discs and DOS files onto RISC OS discs. RISC OS files stored on DOS discs can be loaded and run as normal.
Configuring MuItiFSIf you have a hard disc with DOS partitions and your hard disc partition file(s) is(are) not adfs::4.$.PC.Drive_C (_D, etc) then you will need to alter the !Run file within !MultiFS.
To edit the !Run file:
1 Hold down the Shift key while double-clicking over the !MultiFS application. This displays the files contained inside the application.
2 Start the standard RISC OS application !Edit.
3 Drag the !Run file onto the Edit icon on the icon bar.
4 Find the following lines:
*If "<PCe$Drive_C" = "" THEN *Set PCe$Drive_C ADFS::4.$.PC.Drive_C
*If "<PCe$Drive_D" = "" THEN *Set PCe$Drive_D ADFS::4.$.PC.Drive_D
*If "<PCe$Drive_E" = "" THEN *Set PCe$Drive_E ADFS::A.$.PC.Drive_E
*If "<PCe$Drive_F" = "" THEN *Set PCe$Drive_F ADFS::A.$.PC.Drive_F
5 Edit the text ADFS::4.$.PC.Drive_C to the correct path name for the file you have configured for DOS drive C.
6 If you are emulating additional DOS drives then subsequent lines will also need to be modified.
7 If MultiFS has already been run, then the PCe$Drive_X variables will have been set. Therefore before re-running MultiFS, type the * command
Unset PCe$Drive_*
or reboot your machine.
The drives specified by <PCe$Drive_D>, <PCe$Drive_E>, and <PCe$Drive_F> will not be accessed if previous drives do not exist (ie C, D, or E).The !Run file also contains a series of DOSMAP commands. These map RISC OS file types to DOS extension types.

Starting MultiFSDouble-click on the !MultiFS icon. The DOS disc drive icons appear on the icon bar. You won't see the hard drive icon unless you have configured a DOS hard disc drive partition using the PC Emulator.
Viewing the DOS filing systemClick on the disc icons to open the directory window for that disc.
The window menu options available for DOS files and directories are exactly the same as those for RISC OS files and directories. Files can be copied and moved between RISC OS and DOS directories in the normal way. However you cannot start a DOS application by double-clicking on its icon.
Icon bar menu options
From the MultiFS icon bar menu you can select:
InfoThis gives information about MultiFS, including the version number.
Name translationADFS file names are limited to 10 characters without an extension, and DOS names are limited to 8 characters with a 3 letter extension. When copying from ADFS to DOS names are truncated to 8 characters. The RISC OS filetype of an object is preserved (this works with MS-DOS 3.21 and 3.30, and DR DOS 5.0).
There are three ways in which MultiFS can map DOS names to ADFS:
• Truncated: The DOS file separator is replaced with a `P, and if the name, including the separator, is more than 10 characters it will be truncated. For example, README.DOC is translated to README/DOC, whilst AUTOEXEC.BAT is thus translated to AUTOEXEC/B•
• Full: As above, but without truncation. However RISC OS will generate an error if an attempt is made to copy a file with a long file name from DOS to RISC OS.
The error 'not a heap block' is generated if you menu over a long file name (more than 10 characters)
• Hierarchical: This converts the DOS extension into a pseudo directory. AUTOEXEC.BAT will thus appear as AUTOEXEC in the directory BAT/
If you are performing DOS to DOS file transfers then use Full name translation. If you are transferring files from DOS to RISC OS, use Truncated name translation. Use Hierarchical when you need to access a DOS file with a long name; for instance, if you wish to use Edit to modify AUTOEXEC.BAT.
Name disc
Name disc lets you give your disc any name up to 10 letters long. Disc names (or volumes) cannot be created which contain spaces (even though some versions of DOS allow this). MultiFS will ignore any text after the first space it finds. A name must be longer than one character.
DismountDismount allows you to close all displayed directories
FormatYou can format floppy discs in various formats:
• MS-DOS 720K
• MS-DOS 720K system
• MS-DOS 360K
• MS-DOS 360K system
DOS discs formatted using MultiFS automatically have a volume label. This is of the form "HHMMYYMODD" where:
HH = 00 .. 23 (hours)
MM = 00 .. 59 (minutes)
YY = 00 .. 99 (year in current century)
MO = 01 .. 12 (month)
DD = 01 .. 31 (day)

This provides a unique disc identity for every formatted floppy disc that is similar to that used by the ADFS filer.
Copy systemThis is used to make a bootable DOS floppy disc. It takes a copy of the boot block, copyrighted system files, and any user files from a DOS system disc placed in the floppy drive. These files are kept within the MultiFS application as BootBlock and System. The boot block is written onto a disc when it is formatted normally, whilst both the boot block, system files, and user files are written back when a disc is formatted with the system option.
VerifyVerify will verify that a floppy disc does not contain media faults.
FreeFree returns the free space on the disc.
QuitChoose Quit to remove the MultiFS icon(s) from the icon bar.
Translating file attributes between DOS and RISC OSSince there is not a complete mapping between RISC OS file attributes and those provided by DOS, attributes are set as follows:
From RISC OS to DOS:
• The RISC OS Locked, Public read, and Public write bits are ignored.
• The DOS Archive bit will be set.
• If the RISC OS Write bit is not set then the DOS Read only bit will be set.
From DOS to RISC OS:
• The Archive bit is ignored
• The RISC OS Public read, and Public write bits are unset
• If the DOS Read only bit is set then the RISC OS Write bit will be unset and the Locked bit set
MultiFS command line interfaceThe following commands are available from the command line (entries marked t also appear on the Filer menu).
DeskTop_MultiFSFiler Starts the MultiFS RISC OS Desktop filer
MultiFS Selects MultiFS as the current filing system
DOSMap Provides MS-DOS .ext to RISC OS filetype mapping
Format Format a DOS disc $
Free Displays free and used byte counts $
NameDisc Set the DOS volume directory entry $
NameDisk Set the DOS volume directory entry

Dismount Forget this disc (close all Filer windows) tVerify Verify a formatted DOS disc tMap Provide FAT information about the floppy
Using * commands from the command lineFree, Map, Dismount, Verify: Specify the drive with either a drive number (:0 for the first floppy drive, :4 for the first hard disc) or a drive letter (:A, :C, :D, etc). These commands will not accept a drive name.
Cat: The drive can be specified by drive number, drive letter, or drive name. However the case of the drive name must be an exact match.
DOSMap: The DOS extension must be given in upper case.
Running MultiFS and PC Emulator togetherTwo applications attempting to write to the hard disc at the same time may cause corruption. Therefore it is not generally possible to access the hard disc from MultiFS while the emulator is running.
If the hard disc partition is locked (read only), then both the emulator and MultiFS will be able to read the partition, but not write to it.


Acorn DOS utilities
The mouse driverAMOUSE.COM is a Microsoft compatible mouse device driver and is supplied as one of the DOS utilities on the DOS system disc.
Load the mouse driver by typing AMOUSE at the DOS prompt. This should be done before starting a program that requires a mouse with a Microsoft compatible mouse driver. Alternatively, add the line AMOUSE.COM to the AUTOEXEC.BAT file. This will load the mouse driver every time you boot the emulator.
If you are working with the emulator in a window and running a program which uses the mouse, you should connect the mouse by using the Connect mouse option on the emulator window menu.
Some DOS programs (such as Microsoft Windows 3.0) use the mouse hardware directly and not via the mouse driver. These programs still work correctly as the hardware of a Microsoft bus mouse is also emulated. Therefore AMOUSE.COM need not be run.
Transferring files between DOS and RISC OSThe GETFILE and PUTFILE utilities, also supplied on the DOS system disc, are used to transfer files between the DOS and RISC OS filing systems. They are used from within the PC Emulator at the DOS prompt. Normally it is easier to use the MultiFS application for file transfers but these utilities may be useful in DOS batch files and are included for compatibility with previous versions of the PC Emulator.
The utility GETFILE allows the transfer of files from RISC OS to DOS and has the following syntax:
GETFILE <RISC OS source filename> <DOS destination filename>
For example:
GETFILE ADFS::FD.$.LETTERS.BANK A:\LETTERS\BANK.DOC
The utility PUTFILE allows the transfer of files from MS-DOS to RISC OS and has the following syntax:
PUTFILE <DOS source filename> <RISC OS destination filename>
For example:
PUTFILE A:\SHEETS\ACCOUNTS.SHT ADFS::FD.$.SHEETS.ACCOUNTS
Using GETFILE and PUTFILE on single floppy drive systemsTo transfer files between a RISC OS disc and DOS disc with only a single floppy drive, either a RISC OS RAM disc or a DOS RAM disc must be used. If you have sufficient RISC OS memory then use a RISC OS RAM disc as the procedure is much easier. If you are short of RISC OS memory but have sufficient DOS memory then use a DOS RAM disc.

Using a DOS RAM disc to transfer files.
1 Start up the PC Emulator and DOS.
2 Make sure that the DOS Startup/Install disc is unprotected.
3 From the A> prompt type:
ECHO DEVICE=VDISK.SYS >> \CONFIG.SYS
4 Re-boot the PC Emulator by holding down the Ctrl and Alt keys and pressing and releasing the Delete key.
5 The screen will clear and you will get a message saying that a RAM disc has been created on drive C.
With the RAM disc created you can now start to copy files between ADFS and DOS. First copy the GETFILE or PUTFILE programs into the RAM disc using:
A>C:C>COPY A:PUTFILE.EXE C:C>COPY A:GETFILE.EXE C:
If you are transferring files from ADFS, you can now put the ADFS disc into the drive and type, for example:
C>GETFILE ADFS::FD.$.MYFILE MYFILE.DOC
If you are putting files onto an ADFS disc, first copy the files from your DOS disc into the RAM disc and then use PUTFILE to transfer them to the ADFS disc.
Using a RISC OS RAM disc to transfer files
1 Create a RAM disc as described in your RISC OS User Guide.
2 If you are transferring a file from ADFS to DOS put the ADFS disc into the drive, and copy the file from the floppy disc into the RAM filing system (click on the RAM filing system icon on the icon bar to open up a directory display for it).
3 Start up the PC Emulator and DOS.
4 Insert the DOS floppy disc into the drive. This disc must also hold GETFILE.EXE and PUTFILE.EXE.
5 At the DOS prompt type in:
GETFILE RAM:$.MYFILE MYFILE.DOC
(replacing MYFILE with the name of the file to be transferred).
6 If you are transferring a file from DOS to ADFS start up the PC Emulator and DOS.
7 At the DOS prompt type in:
PUTFILE MYFILE.DOC RAM:$.MYFILE
(replacing MYFILE with the name of the file to be transferred).
8 If you are in single task mode or using PCEmS, return to RISC OS by clicking Menu.
9 Insert the ADFS destination disc. Open a directory display for the RAM disc by clicking on its icon on the icon bar. Copy the file from the RAM disc to the floppy disc.

A brief introduction to DOS
Below is a list of some of the most commonly-used commands with a brief description. These commands are common to both MS-DOS and DR DOS. See the list of suggested DOS books for more information about DOS.
CD (or CHDIR)CD (or CHDIR) is used to change the current directory. For example:
A>CD A:\LETTERS
changes the current directory of drive A to the directory LETTERS in the root directory of drive A. The following example:
A>CD B:\BILLS\GAS
changes the current directory of drive B to the directory GAS in the directory BILLS on drive B.
To return to the root directory, type
CD \
To go up a level, type
CD..
CHKDSKCHKDSK is used to check that a disc is correctly set up. It displays the total amount of space on the disc, the amount of unused space remaining and the number of files stored. In addition to this, CHKDSK displays the amount of memory the emulator makes available as PC memory and the amount of that which is free for applications. For example:
A>CHKDSK /V
lists all files and their paths.
A>CHKDSK /F
allows you to fix any problems that have been identified.
CLSCLS is used to clear the screen.
COPYCOPY is used to copy files or directories between drives on the system. For example:
A>COPY B:TEST.COM
copies TEST.COM from drive B to the current directory of drive A, while:
A>COPY B:\LETTERS B:\BILLS
copies the contents of the directory LETTERS on drive B to the directory BILLS on drive B.

DISKCOPYDISKCOPY copies the contents of the floppy disc in the source drive to a formatted or unformatted floppy disc in the target drive. For example:
A>DISKCOPY A: B:
copies the contents of the disc in A to the disc in B. In the case of a system with a single floppy drive, A: and B: are the same physical drive and you are prompted to change discs as necessary.
DATEDATE returns the system date and prompts for a new date to be entered. Note that the default date format is American, ie MM/DD/YY. If you do not want to change the date, just press return.
DIRDIR is used to catalogue the current directory. DIR on its own lists the files one per line. The following example:
A>DIR B: /W
lists the files on drive B. The /W denotes that they are displayed five per line.
ERASE (or DEL)ERASE allows you to delete files from a disc (an alternative form is DEL). For example:
A>ERASE *.COM
erases all files with the .COM extension, while:
A>ERASE B:\TEST
erases all files in the TEST directory on drive B.
A>ERASE *.*
erases all files in the current directory.
FORMATFORMAT is used to prepare new blank floppy discs to store data and programs on. For example:
A>FORMAT B:
formats the disc in drive B. You will be prompted to insert the new disc before formatting starts.
A>FORMAT A: /S
formats the disc in drive A and copies the system files onto the disc, so making it bootable.
MKDIR (or MD)MKDIR (or MD) is used to create new directories on the disc. For example:
A>MKDIR BILLS
creates a directory called BILLS from the current directory, while:
A>MD B:\TEST

creates a directory called TEST from the root on drive B.
RENAME (or REN)RENAME allows you to change the name of a file. For example:
A> REN BILLS OLDBILLS
renames the file BILLS to one called OLDBILLS.
RMDIR (or RD)RMDIR deletes a directory from the disc. The directory must be empty before it can be deleted. For example:
A>RMDIR LETTERS
deletes the directory called LETTERS on the current drive (A).
TIMETIME returns the system time and prompts for a new time to be entered. If you do not need to change the time, just press Return.
TYPETYPE allows you to display the contents of a text file on the screen. For example:
A>TYPE B:MYFILE.DOC
displays the contents of MYFILE.DOC on drive B.
XCOPY
XCOPY copies complete directories, subdirectories and files. For example:
A> XCOPY ARCHIVE B:
copies the file ARCHIVE to the B drive.
A> XCOPY APPS B: /S
copies the directory APPS and any lower level subdirectories and files onto the B drive. It does not copy empty directories.


Appendix A: The PC Emulator
CompatibilityThe compatibility of the emulator is very good. Many well known DOS titles have been tested and operate correctly. These include:
• Lotus 1-2-3
• dBASE IV
• Symphony
• Wordstar
• Microsoft C 5.1.
However, it is not possible to run all of these on a single-floppy drive or 1MB A3000, as some require EGA+ (and hence 2MB), while others have been designed to be run from a hard disc and will not fit on a 720K floppy disc. Check with your Acorn supplier as to the suitability of your system for particular DOS titles.
Since the emulator emulates the hardware and BIOS of the PC then it is possible to run other operating systems on the emulator. The following operating systems have been tested with the PC Emulator:
• MS-DOS 3.21
• DR DOS 3.41• DR DOS 5.00.
The emulated PC — a technical descriptionFor some DOS applications (particularly during installation), it is necessary to know the exact
nature of the PC and what attached devices the PC Emulator emulates.
The emulated PC is basically an IBM PC XT, but in more detail the emulated PC contains the
following components:
• Intel 80188 processor chip
• Intel 8087 maths coprocessor chip
• Intel 8259 interrupt controller chip
• Intel 8253 timer chip
• Intel 8237 DMA chip
• Intel 8255 10 chip
• Sound connected via 8255 chip
• Enhanced 101 key US layout keyboard connected via 8255 chip
• Serial interface (Intel 8250 chip)
• Parallel interface (output only)
• 3.5 inch 720K floppy disc (BIOS level only)
• External 5.25 inch 360K floppy disc (BIOS level only)

• Hard disc (BIOS level only)
• Real time clock (BIOS level only)
• MDA (not PCEmS)
• CGA
• EGA (not PCEmS)
• EGA+ (not PCEmS)
• Two button Microsoft bus mouse
• RAM (maximum 640K)
• ROM BIOS.
EGA+ is a partial implementation of VGA hardware. It does not support the 256 colour mode of VGA and does not provide VGA BIOS support. If you wish to run Microsoft Windows 3.0, configure it for use with VGA and use the emulator's EGA+ mode.
Some PC devices are only emulated at the BIOS level. This means that the hardware of the device is not emulated, only the BIOS interface to the device. DOS programs that attempt to access the hard disc 10 ports will fail because they are not emulated, but DOS programs that access the hard disc via the BIOS will work correctly. Other devices are emulated at the hardware level, for example, the graphics adaptors. Programs that access the graphics adaptor hardware directly will work correctly.
Unsupported features• Programs written for 80286, 80386 and later processors, and programs and commands
requiring memory greater than 640K are not supported.
• EGA screen blanking not supported.
• EGA smooth scrolling not supported.
• EGA Print screen (screen dump) is not supported.
• EGA does not support plane chaining. The consequence is that in 64K mode there may be fewer pages available than expected.
• Some limitations in sound emulation.
• DMA chip is not fully implemented.
• Blinking text is not supported.
• Long start-up texts in the configuration file may fail. Use the start-up text to run a .BAT file.
• 3.5" discs formatted under DOS 3.21 will, by default, be formatted to 360KB rather than 720KB. To overcome this, add the following line to your CONFIG.SYS file:
DRIVPARM = /D:0 /F:2
If you have a second drive then also add
DRIVPARM = /D:1 /F:2
• High density (1.44MB) discs are not supported.
• In very high bandwidth RISC OS screen modes (such as mode 21) the emulator may not read the floppy disc correctly. This is because the emulator does not blank the screen in these modes, leaving insufficient bandwidth for the floppy driver. The problem does not arise when in single task mode, or with the small emulator (PCEmS).

Application configuration optionsIf the PC application you are using allows any configuration options on how to address the screen, typically called Direct and BIOS, then choose BIOS. ProComm is one such application.
If the application offers a choice in performing scrolling, then do not select hardware scrolling.
Possible problem areasCGA Emulation in single tasking modeSome monitors (and televisions via the TV modulator) will not operate correctly when run with a CGA display in single tasking mode (this is the only option with PCEmS). This is due to the field rate being 60Hz.
To cure this problem you should:
1 Load Edit onto the icon bar.
2 Open the application directory by holding down the Shift key and double-clicking over the PCEm (or PCEmS) icon in the directory window.
3 Drag the file !Run onto the Edit icon. This display the contents of the file.
4 Comment out the line in the !Run file that reads:
RMEnsure ModesCGA 1.00 RMLoad <Obey$Dir>.ModesCGA
to comment out the line, type in the bar character ( | ) at the start of the line so that the line now reads:
| RMEnsure ModesCGA 1.00 RMLoad <Obey$Dir>.ModesCGA
5 Press F12 to access the command line. Type in:
RMKill ModesCGA
6 Press Return twice to display the desktop.
If you don't understand this procedure, contact your dealer.
This procedure removes the special 200 line screen mode and the CGA display will now use the standard 256 line screen mode; this results in a slightly smaller screen area.
Screen coloursWhen working in windowed mode, particularly in a 16-colour RISC OS mode (for example, mode 12), the DOS colours will often not be mapped correctly. This is because the 16 colours used by RISC OS are not the same colours used by DOS. This is less apparent in a 256-colour RISC OS mode (such as mode 15). The colours will be mapped correctly in single tasking mode.
EGA CompatibilityThe EGA graphics adaptor is a very complex device and it is possible to configure it in many ways other than the standard BIOS supported screen modes. It is possible some PC programs (games) using such non-standard register configurations, may not behave well.

Parallel portThe parallel port supports output only.
Copy protection
The restrictions on the parallel port mean that software titles which employ copy-protection via this port may not run.
Similarly, other titles using certain methods of floppy disc protection will not work under the PC Emulator.
Using the PC Emulator with external 5 1/4" 80 track drivesTo use external 5 1/4" 80 track drives with the emulator, edit the Choices configuration file by changing the line:
Floppy 5.25
to:
Floppy 5.25 DoubleStep
DR-DOS 5.0 commandsThe following limitations on using some DR-DOS 5.0 commands on some system configurations should be noted:
• Backup: this command does not work well on single floppy drive machines, involving many disc swaps. Diskcopy or Xcopy should be used instead. The options A, S, M, D, T, F and L do not work at all on a single-drive system. The related command Restore is also subject to the same limitation.
• CHCP only works in EGA, and therefore only on PCEm, and not PCEmS.
• Copy: copying from A: to B: on a single-drive computer, as with Backup, involves many disc swaps, hence is not very usable.
• Filelink: this command does not work in the current version of the emulator.
• Graftabl: this command does not work in the current version of the emulator.
• Join is not very usable on a single floppy disc drive system.
• Keyb: the option , c odepage does not work in the current version of the emulator.
• Mode : The RATE and DELAY commands have not been implemented in the emulator, and it is not possible to seta row length of 43 on systems which cannot support EGA ECD.
• Nlsfunc only works in EGA, and hence on a PCEm and not a PCEmS.
• Sid: the options QW/QR return a disc error when trying to read from disc B: on a single-floppy system.
The serial interfaceThe serial chip in early A305, A310, and A440 machines contained a number of faults which affected hardware handshaking. If you have such a machine and are having problems with the serial port, please contact your dealer.
Talking to a serial printerUse an IBM AT to serial printer cable.

Talking to a modemWith a modem the signals are wired straight through; therefore an IBM AT to modem cable will usually work. This should be wired as follows:
Talking to another PCThe following cable will allow communication between two Archimedes, two IBM ATs, or between an Archimedes and an AT:
Baud ratesWith handshaking enabled the emulator will transfer data at 9600 baud. Without handshaking, the maximum data rate is 600 baud.


Appendix B: Upgrading
Upgrading from your existing PC emulatorFloppy disc usersIf you have a floppy disc only machine, use the !Merge application supplied on the emulator disc to merge the new System and Fonts applications with your current versions. Then use the new PC Emulator disc in place of your old one. Your data and applications will continue to work. Turn to page 4 for more information about !Merge.
Hard disc usersThe following instructions tell you how to upgrade your PC Emulator:
1 Make a note of the pathname of the RISC OS file used by the emulator as a PC hard disc.
2 Delete the old PC emulator and its associated files from your hard disc. Do not delete your existing hard disc file.
3 Copy the new MultiFS and PCEm (or PCEmS) applications into your PC directory. You do not need to create a DOS hard disc file, as you already have one.
4 Type the pathname of your existing DOS hard disc file into the Hard disc drive file box in the Configuration menu. Alternatively, set the Hard disc drive files option to greater than zero (so that the default pathname is displayed) and then drag the hard disc file icon onto the appropriate Hard disc drive files box. This changes the pathname to that of your disc drive file.
5 Save the new configuration and start the new emulator. The emulator will now boot using your existing PC hard disc partition.
If you are also going to upgrade your version of DOS, do this by following the installation instructions for floppy disc and hard disc installation given in the chapter Installing the PC Emulator.


Appendix C: Programming details
Access to RISC OSDOS programs can gain access to RISC OS by using a special (new SVC) 8086 opcode. This is an opcode that is unused on a real 8086 but the PC Emulator traps and uses it to communicate with RISC OS. The utility programs GETFILE.EXE and PUTFILE.EXE use this SVC opcode to transfer files between the RISC OS and MS-DOS filing systems. There is also a PC 10 mapped device that allows RISC OS events to be seen by the PC and can cause the PC program to be interrupted if required.
The SVC OpcodeThe new pseudo 8086 SVC opcode has the following format:
FF FF nn nn
It is four bytes long, the first two bytes being hexadecimal FFFF the third and fourth bytes being a 16 bit number that indicates to the emulator what service is required. For example the SVC opcode to translate an 8086 address to an ARM address could be assembled in Microsoft MASM using.
dw –1,257
Only a few of the possible SVC numbers are actually used. Not all of the numbers that are used are described below as many are used for internal purposes. Only those SVC numbers described below should be used by a DOS application.
SVC 257Translate 8086 address to ARM address:
Entry:ES:BX 8086 address
Exit:
DX:AX 32 bit ARM addressCY = 1 if errorCY = 0 if okay
SVC 258General purpose SWI:
Entry;DX:AX = 'safe' (DH='s', AL='e')
ES:BX = pointer to parameter block

Parameter block (must be dword, ie 4 byte, aligned)
dword 0 SWI numberdword 1 R0dword 15 R14dword 16 R15 (flags only, does not contain the PC)
Exit:
lithe carry (CY) flag is clear then the parameter block is valid. In this case if the V flag in the returned R15 is clear the SWI was executed successfully and the parameter block will be updated with the values in the registers returned by the SWI. If the V flag was set, then the SWI failed.
If the carry flag is set then the parameter block is malformed. The top bit (bit 31) of the SWI number will be set, and the remainder of the SWI number will contain an error code:
0 — general failure
1 — invalid signature
2 — command block not in user RAM
3 — alignment error
4 — SWI number is out of range
5 — SWI number is protected
The RISC OS PC DeviceThis is a PC JO mapped device at PC ports 0x700 and 0x701. It allows RISC OS events to be seen by the PC emulator.
An ARM Event 13 will generate a PC IRQ3. These will be queued (up to at least 4 entries). The RISC OS PC device allows the 8086 to examine the event registers.
Port 700HRead bit 0 set if interrupt requested
bit 1 set if overrun (event buffer overflowed)
Write bits 0 to 1 select byte within word (00 = LSB of word)bits 2 to 5 atched register contents (r0 to r15) (only registers 0 to 2 can be read)bit 6 must be zero (reserved)bit 7 clears interrupt status, enables subsequent events
Port 701HRead only ARM register content at the time of Event 13 being queued. The byte that is read is
determined by writing to port 700H (see above).

Appendix D: Further reading
ABC's of MS-DOS by A R Miller, published by Sybex.
IBM PC: An introduction to the operating system, BASIC programming and application by L J Goldstein, published by Prentice-Hall.
IBM PC-DOS handbook by R A King, published by Sybex.
Understanding MS-DOS by K O'Day, published by Sams.
Mastering DOS: The complete tutorial and up to date user's guide by Judd Robbins, published by Sybex.


Reader's Comment FormPC Emulator V 1.6 / DR-DOS
We would greatly appreciate your comments about this Manual, which will be taken into account for the next issue:
Did you find the information you wanted?
Do you like the way the information is presented?
General comments:
If there is not enough room for your comments, please continue overleaf
How would you classify your experience with computers?
Cut out (or photocopy) and post to:Dept RC, Technical PublicationsAcorn Computers Limited645 Newmarket RoadCambridge CB5 8PBEngland
Your name and address:
This information will only be used to get in touch with you in case we wish to explore yourcomments further


