the c# language copyrighted materialcatalogimages.wiley.com/images/db/pdf/0782141765.excerpt.pdf ·...
TRANSCRIPT

The C# Language
• Basics of .NET
• Installing a C# development environment
• The C# runtime environment
• C# programming basics
• C# features
Chapter 1
4176ch01.qxd 10/13/04 3:13 PM Page 3
COPYRIG
HTED M
ATERIAL
4
I n its short history, the Microsoft .NET technology has quickly become a popular program-ming platform for developing applications for Microsoft Windows workstations and servers.
Although most of the media attention has focused around the web application capabilities of.NET, there are many other features that are useful to Windows programmers.
One of those features is the new C# programming language, developed specifically for.NET. C# is becoming a widely used programming platform for programmers wanting tocreate both network-aware and stand-alone applications for Windows systems. The languageprovides many resources to help create robust Windows-based applications. Many program-mers are migrating to the C# language to take advantage of these resources.
Before learning the basics of network programming in C#, it is important that you under-stand the C# programming environment, the fundamentals of .NET, and how to create anddistribute C# applications. This chapter shows how to create a C# development environmenton your system and how to ensure that C# applications you create will run on other Windowsworkstations and servers. Finally, I’ll present a brief introduction to the C# language, alongwith some C# programming topics relevant to network programming. All together, the con-cepts presented in this chapter will help you get ready for C# network programming.
Basics of .NETThe .NET group of programming languages differs from previous versions of Windows programming languages in the way programs are created and run on the Windows systems.If you are not familiar with how C# programs operate, this section briefly describes the basicsyou should know to be able to deploy applications based on the .NET technologies.
Common Language Runtime (CLR)The core of the Microsoft .NET technology is the Common Language Runtime (CLR) envi-ronment. This environment enables programmers to create programs using a multitude ofprogramming languages and run them on any platform that supports the CLR. The idea ofthe CLR is to provide a middle layer of Application Program Interfaces (APIs) that operatebetween the low-level Windows Win32 API functions and the application program code. Byproviding a common middle layer, Microsoft has given a larger number of application lan-guages access to core Windows technologies (such as network support).
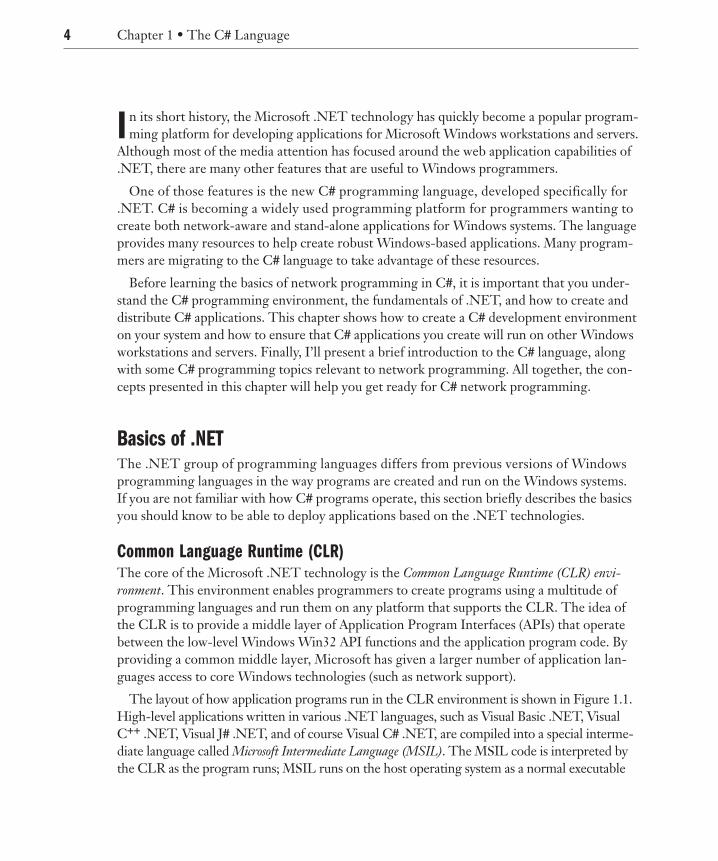
The layout of how application programs run in the CLR environment is shown in Figure 1.1.High-level applications written in various .NET languages, such as Visual Basic .NET, VisualC++ .NET, Visual J# .NET, and of course Visual C# .NET, are compiled into a special interme-diate language called Microsoft Intermediate Language (MSIL). The MSIL code is interpreted bythe CLR as the program runs; MSIL runs on the host operating system as a normal executable
Chapter 1 • The C# Language
4176ch01.qxd 10/13/04 3:13 PM Page 4
5
program. Of course, legacy programs that do not use the CLR can still directly access the low-level Windows Win32 APIs as before.
This CLR model also pertains to other operating systems. Because the CLR is ported toother operating systems, .NET programs will be able to run without recompiling them onthe new host systems. Currently, Microsoft supports the Shared Source Common LanguageInterface (CLI) project (nicknamed Rotor), which ports the CLR environment to theFreeBSD operating system. It is expected that the Rotor project will branch out to otheroperating systems as well. At the time of this writing you can get more information aboutRotor at the following website:
http://msdn.microsoft.com/downloads/default.asp?URL=/downloads/sample.asp?url=/msdn-files/027/001/901/msdncompositedoc.xml
For programs to run in the CLR, they must be compiled into the special MSIL format.The .NET C# compiler is used to convert C# language programs to MSIL code that runs in the CLR environment. The next section describes the MSIL code.
MSIL CodeWhen you compile a C# program, it produces an executable file. However, this executablefile is different from the ones you may be used to seeing produced from other Windowscompilers. Instead of a low-level assembly program that can run directly in Windows, thisexecutable file contains two parts:
● A stub assembly language program to start the CLR compiler
● The MSIL code of the compiled application
The stub program starts the CLR just-in-time (JIT) compiler, which compiles the MSILprogram code to native Win32 code that can be run on the system. Unlike native Windows
J++
Microsoft Windows Operating System
Microsoft Win32 API
Common Language Runtime JIT compiler Native compilers
C++Visual BasicMicrosoft Intermediate Language
C++.NET C#.NETJ#.NET Visual Basic.NET
F I G U R E 1 . 1 :The Common Language Runtime(CLR) environment
Basics of .NET
4176ch01.qxd 10/13/04 3:13 PM Page 5

6
applications, which interact directly with the low-level Win32 API system, .NET applicationsrely on the .NET Framework CLR to run. Running a .NET application on a system thatdoes not have the .NET Framework installed will produce an error message like the one inFigure 1.2. The .NET Framework is crucial to any .NET application, whether it is runningon a Windows workstation or server. Without it the MSIL code cannot run. Any Windowsworkstation or server expected to run .NET programs must have the .NET Frameworkinstalled.
Microsoft is committed to ensuring the .NET Framework will be installed on all futureversions of the Windows OS. However, older versions of Windows must have the .NETFramework manually installed. The following section includes instructions for installing the .NET Framework for a developer environment to allow you to create, compile, and run.NET applications.
Installing a C# Development EnvironmentBefore you can begin programming in C#, you must have a C# development environment—asystem for creating, compiling, and debugging C# programs. Unfortunately, one of the moststringent requirements for .NET application development is the designation of OS platformto use for development. Currently, .NET requires one of the following systems for full C#program development:
● Windows NT 4 Workstation or Server (with Service Pack 6a)
● Windows 2000 Professional or Server (with Service Pack 2)
● Windows XP Home Edition or Professional
Programmers without access to any of these systems will not be able to develop C# programs—but there is a solution to this, as will be explained later in the C# Runtime Environment section.
F I G U R E 1 . 2 :Trying to run a .NETapplication withoutthe .NET Framework
Chapter 1 • The C# Language
4176ch01.qxd 10/13/04 3:13 PM Page 6

7
C# Development OptionsMicrosoft offers three development environments for C# developers. Each environment hasits own set of pros and cons. This section describes these C# development environments andhow they differ.
● Visual Studio .NET
● Visual C# .NET
● .NET Framework software development kit (SDK)
NOTE All of the example programs in this book can be compiled in any of the .NET developmentenvironments. To simplify things, this book’s examples are shown using the .NET Frame-work command-line compiler. This ensures that anyone can use the examples, no matterwhich development environment you are using.
Visual Studio .NETThe Visual Studio .NET package is the flagship development product for Microsoft .NET.This Integrated Development Environment (IDE) offers many features to assist your Win-dows application programming tasks. Microsoft describes the Visual Studio package as “arapid application development (RAD) tool, enabling programmers to quickly code and debug.NET applications.” It includes a complete graphical environment for creating Windowsforms, typing code, and debugging programs. In addition to containing a fancy developmentenvironment, Visual Studio also supports all the .NET programming languages—VisualBasic .NET, Visual C++ .NET, Visual J# .NET, and Visual C# .NET. If you are looking atdeveloping with all of the .NET languages, the Visual Studio package is well worth the extraexpense.
In Visual Studio .NET, applications can be created in a graphical environment using anyof the four programming languages. The IDE provides separate windows for developingcode and for visually laying out Window controls for the application, including text boxes,list boxes, buttons, and scrollbars. Visual Studio .NET offers an easy way to create, test, anddebug .NET applications, whether they are stand-alone Windows applications or ASP.NETweb pages.
There are several package levels for Visual Studio .NET, depending on your developmentrequirements (and budget). Each package level includes progressively more developmentfunctionality, and also comes with a progressively higher price tag.
Installing a C# Development Environment
4176ch01.qxd 10/13/04 3:13 PM Page 7
8
Visual C# .NETIf you are interested only in programming using the C# language, you do not have to buy thefull Visual Studio .NET package. Instead, Microsoft offers the Visual C# .NET package, whichhas the same functionality of Visual Studio .NET but supports only the C# language. This is amuch less expensive method of development for C# programmers. Similar to Visual Studio, theVisual C# package also comes in various package levels, from a bare-bones student version to afull-featured professional developer version. Before you choose this version, however, be awarethat it does not include some of the advanced features, such as automatic database support, thatare in Visual Studio .NET.
Both the Visual Studio and C# development options require that you purchase a commer-cial software development package from Microsoft. Both are excellent software developmentpackages that can save you hours of time in creating Windows and debugging applications.However, many first-time and hobbyist programmers might find the cost of these IDE pack-ages too great.
.NET Framework SDKIf you are looking for an inexpensive way to get started with C# programming, the .NETFramework SDK is the way to go. The SDK is available free from Microsoft and containscommand-line tools for compiling and debugging .NET programs, including C#. Thispackage allows you to get the feel for developing C# applications without investing in anexpensive IDE development environment. You can obtain the .NET Framework SDKpackage by downloading the complete package via Microsoft’s .NET Framework website,or by ordering a minimal-cost CD directly from Microsoft. (See the upcoming section forwebsite information.)
If you are completely new to C#, you may want to start by downloading the .NET Frame-work SDK and giving it a try. It is often said that the best way to learn a programming languageis to hand-code all your programs and suffer the consequences—I think this is especially true ofnetwork programming. As you progress in your C# programming skills, you can migrate to theVisual C# .NET package for creating Windows forms and debugging complex applications. Toget you started, the following section describes how to download and install the .NET Frame-work SDK.
Downloading the .NET Framework SDKAt the time of this writing, the current version of the .NET Framework SDK is release 1. As mentioned, it can be downloaded free or you can purchase a CD from Microsoft. If you
Chapter 1 • The C# Language
4176ch01.qxd 10/13/04 3:13 PM Page 8

9
choose to download the package from Microsoft, there are two methods that can be used.Because the SDK is so large (131MB), you can either download it in one piece, or as tensmaller (13.1MB) packages that can be assembled after the download. Both methods requirethe same amount of data to be downloaded, but people with slower connections may want theconvenience of downloading the individual pieces one at a time.
The .NET Framework website URL is currently www.microsoft.com/netframework/. Asis common on the Web, this location may change by the time you read this. If so, just go tothe Microsoft home page (www.microsoft.com) and look for the .NET stuff.
The .NET Framework site contains lots of information about the SDK, including a linkto the separate software download page. The download page shows the various options fordownloading the software. The single-file download is a file named setup.exe, which canbe downloaded to your workstation or server for installation. If you select the multipartdownload option, you must download all of the split SDK files, along with the separatesetup.bat file, to a temporary directory. After all of the files are downloaded, you must runthe setup.bat file. This file creates the master setup.exe file from all of the SDK split files.
In either download scenario, the resulting file will be a setup.exe file. You must run thisfile to install the .NET Framework SDK package. The following section describes this process.
Installing the .NET Framework SDKOnce the setup.exe file is obtained, either by single download, multipart download, or CD,you can install the .NET Framework SDK. You start the installation by running the setup.exefile from a DOS command prompt, or by double-clicking it in Windows Explorer.
When the installation starts, a dialog box asks if you want to install the .NET FrameworkSDK. Click the Yes button to start the installation.
The .NET installation process first extracts the working installation files into a temporarydirectory, pointed to by the TEMP environment variable. This allows you to place the tem-porary working files on a drive other than the system drive (usually C:\) if you are tight ondisk space. After the working files are extracted, the installation updates the Windows installerpackage on the workstation and then launches Windows installer with the .NET Frameworkinstallation.
After the opening screen and a license agreement screen, you are asked which componentsof the SDK package you want installed. This is shown in Figure 1.3.
Installing a C# Development Environment
4176ch01.qxd 10/13/04 3:13 PM Page 9

10
If you are tight on disk space, you can prevent the SDK samples from being loaded on theworkstation by deselecting the SDK Samples checkbox. After the Install Options screen, the program asks where to install the SDK components. This only applies to some of thecomponents, as the DLLs and executable files used by the .NET Framework must beinstalled on the system drive (usually C:\). After you select the installation destination, theinstallation begins. When it’s completed, you should be ready to compile and run C# programs.
TIP It’’s a good idea to check out the Microsoft .NET Framework home page occasionally tosee if new service packs are released, and then to install them as directed.
The C# Runtime EnvironmentThe .NET Framework provides not only a development environment, but also a CLR envi-ronment for Windows workstations and servers that only run .NET programs. The .NETFramework contains lots of DLL files used to supply libraries to support .NET applicationprograms. These libraries must be loaded on any workstation or server you want your .NETprogram to run on. However, you do not need to load the .NET Framework SDK on everymachine that runs your program. As alluded to previously, Microsoft has a solution to thisaggravation.
F I G U R E 1 . 3 :.NET FrameworkInstall Options screen
Chapter 1 • The C# Language
4176ch01.qxd 10/13/04 3:13 PM Page 10
11
Microsoft has indicated that all future Windows operating systems will include the .NETFramework runtime (CLR) environment, starting with the Windows .NET Server release.This will ensure that .NET applications will run on the new OSes without your having tomanually install any .NET Framework libraries. Unfortunately, this is not the case with olderversions of Windows (98, Me, NT, 2000, and XP). The solution for these systems is manuallyinstalling a runtime version of the .NET Framework libraries.
The .NET Framework runtime version is a much smaller distribution than the SDK package.It includes only the files necessary to run .NET applications on the Windows workstation orserver. The following section describes how to download and install the .NET Frameworkruntime files on older Windows platforms.
Downloading and Installing the C# Runtime PackageThe C# runtime package is part of the .NET Framework Redistributable package. TheRedistributable package contains runtime environments for all .NET languages. Similar tothe SDK package, the Redistributable package can be obtained from the .NET Frameworkhome page at www.microsoft.com/netframework/. Because this is a much smaller distribu-tion, there is no multipart download option. The entire package must be downloaded as asingle piece (about 20MB).
The download file, dotnetredist.exe, is actually a compressed file that must be uncom-pressed into a working directory. When you run the program, it will ask for a working direc-tory to use. You can choose any location that has enough space (about 22MB). The extractedfile is named dotnetfx.exe.
There is not much to installing the .NET Framework Redistributable package. After startingthe dotnetfx.exe file, you’re asked to confirm the installation, and then the files are installed.You don’t have any choice as to locations for the Redistributable package files; they all go intodefault locations on the system drive.
Developing with the C# RuntimeCurrently, the .NET Framework Redistributable package includes the C# compiler program,csc.exe. This allows developers who do not have workstations or servers running WindowsNT 4, 2000, or XP to compile C# programs without installing the .NET Framework SDK.Any machine that supports the .NET Framework runtime can be used to compile C# applica-tions using the csc.exe program. This includes Windows 98 and Me workstations. Thoughthe compiler is included, none of the documentation or debugging programs are, so this ispretty much a bare-bones development environment.
The C# Runtime Environment
4176ch01.qxd 10/13/04 3:13 PM Page 11

12
If you want to compile C# programs from the Redistributable package, you must add thelocation of the csc.exe program to the PATH environment variable of your system. Thisdiffers depending on the system you are using.
● For Windows 98 and Me systems, you can add the PATH statement in the autoexec.batfile located in the C:\ directory. There may already be an autoexec.bat file present, andit may already have a PATH statement in it. If so, you can append the csc.exe path to theexisting PATH statement.
● For release 1 of the .NET Framework Redistributable package, csc.exe is located in theC:\Windows\Microsoft.Net\Framework\v1.0.3705 directory. (Remember that on Win-dows 98 and Me, the Windows system directory is called Windows; on Windows NT and2000 systems, it is Winnt.)
After rebooting the system you should be able to access the csc.exe compiler programfrom the command-line prompt, as in the following example:
C:\>cscMicrosoft (R) Visual C# .NET Compiler version 7.00.9466for Microsoft (R) .NET Framework version 1.0.3705Copyright (C) Microsoft Corporation 2001. All rights reserved.
fatal error CS2008: No inputs specified
C:\>
You are now ready to start programming using the C# language.
C# Programming BasicsThough it’s considered a bare-bones development environment, the .NET Framework SDKcontains quite a few tools that allow you to create, compile, and debug C# programs. Thissection describes some of the tools that are at your disposal.
Creating C# ProgramsIf you are using one of the Microsoft Visual products to develop your programs (Visual Studio.NET or Visual C# .NET), you have a complete program editing environment, including helpfiles, graphical wizards, and command completion wizards. If you are using the .NET Frame-work SDK package, you are on your own for producing and compiling your C# code. Althoughthis SDK’s features pale in comparison to the fancy Visual packages, it is nonetheless just asvalid a way to produce C# applications.
The first step to working with C# programs in the .NET Framework development envi-ronment is to associate the C# source code filename extension with a text editor. This will
Chapter 1 • The C# Language
4176ch01.qxd 10/13/04 3:13 PM Page 12
13
make editing programs much easier; you can just double-click a program from within theWindows Explorer program to begin editing. The type of editor you select is important.Choose one that allows you to save your source code files in text mode rather than aMicrosoft Word .doc file or other word processing document, because the C# compiler must be able to interpret each line of code. If you do select a word processing package to edit your C# programs, make sure that you save all of the files in text format.
After you select an editor, associate the .CS file type to the editor application within theWindows Explorer: right-click a C# program, select the Open With option, and select theappropriate application from the list.
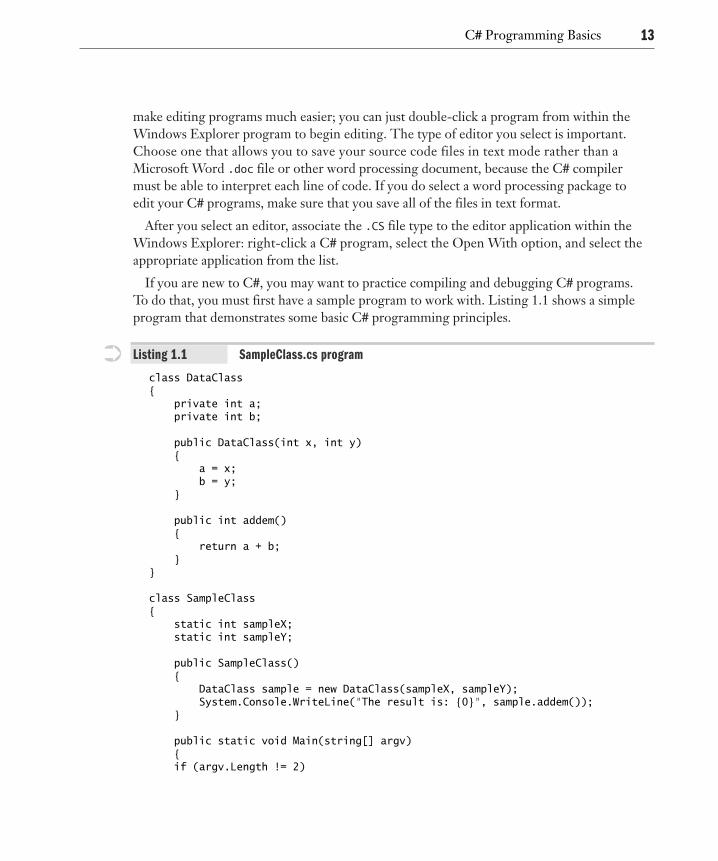
If you are new to C#, you may want to practice compiling and debugging C# programs. To do that, you must first have a sample program to work with. Listing 1.1 shows a simpleprogram that demonstrates some basic C# programming principles.
➲ Listing 1.1 SampleClass.cs program
class DataClass{
private int a;private int b;
public DataClass(int x, int y){
a = x;b = y;
}
public int addem(){
return a + b;}
}
class SampleClass{
static int sampleX;static int sampleY;
public SampleClass(){
DataClass sample = new DataClass(sampleX, sampleY);System.Console.WriteLine(“The result is: {0}”, sample.addem());
}
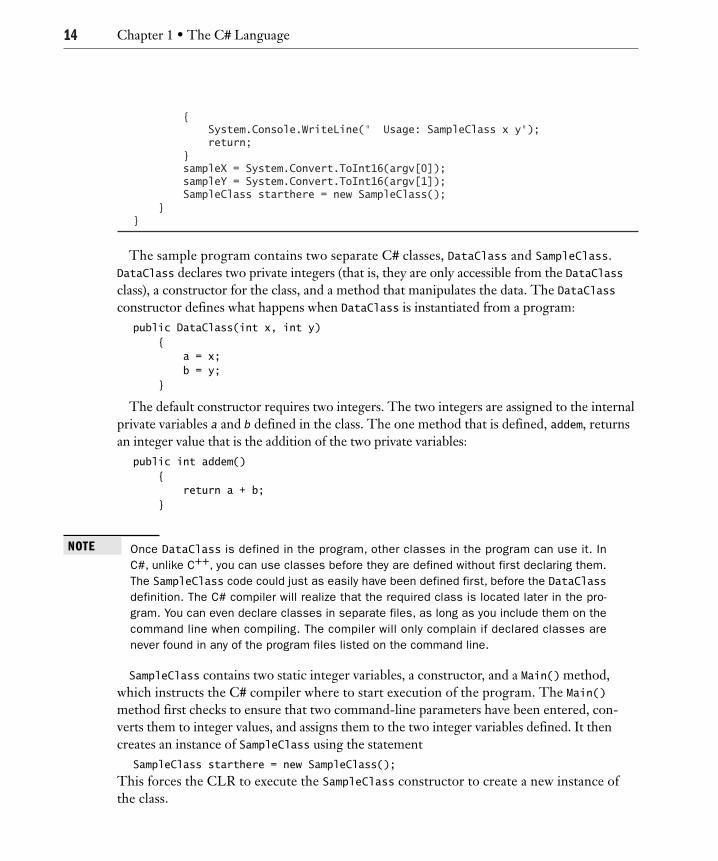
public static void Main(string[] argv){if (argv.Length != 2)
C# Programming Basics
4176ch01.qxd 10/13/04 3:13 PM Page 13
14
{System.Console.WriteLine(“ Usage: SampleClass x y”);return;
}sampleX = System.Convert.ToInt16(argv[0]);sampleY = System.Convert.ToInt16(argv[1]);SampleClass starthere = new SampleClass();
}}
The sample program contains two separate C# classes, DataClass and SampleClass. DataClass declares two private integers (that is, they are only accessible from the DataClassclass), a constructor for the class, and a method that manipulates the data. The DataClassconstructor defines what happens when DataClass is instantiated from a program:
public DataClass(int x, int y){
a = x;b = y;
}
The default constructor requires two integers. The two integers are assigned to the internalprivate variables a and b defined in the class. The one method that is defined, addem, returnsan integer value that is the addition of the two private variables:
public int addem(){
return a + b;}
NOTE Once DataClass is defined in the program, other classes in the program can use it. InC#, unlike C++, you can use classes before they are defined without first declaring them.The SampleClass code could just as easily have been defined first, before the DataClassdefinition. The C# compiler will realize that the required class is located later in the pro-gram. You can even declare classes in separate files, as long as you include them on thecommand line when compiling. The compiler will only complain if declared classes arenever found in any of the program files listed on the command line.
SampleClass contains two static integer variables, a constructor, and a Main() method,which instructs the C# compiler where to start execution of the program. The Main()method first checks to ensure that two command-line parameters have been entered, con-verts them to integer values, and assigns them to the two integer variables defined. It then creates an instance of SampleClass using the statement
SampleClass starthere = new SampleClass();
This forces the CLR to execute the SampleClass constructor to create a new instance ofthe class.
Chapter 1 • The C# Language
4176ch01.qxd 10/13/04 3:13 PM Page 14
15
The SampleClass constructor code creates an instance of DataClass, passing the two inte-gers to the DataClass class constructor. The addem() method is called from the instantiatedSampleClass variable and returns the result of the addition method. The following line is usedto display the result of the addem() method to the console screen:
System.Console.WriteLine(“The result is: {0}”, sample.addem());
The symbol {0} is used as a placement value to represent a variable listed after the text string,in this case replaced with the return value of the sample.addem() method. You can add addi-tional variables by continuing the placement numbers ({1}, {2}, and so on). Each additionalvariable is added to the variable list separated by commas.
After typing the program code, you must save the file using a .CS extension, which identifiesthe file as a C# code file. Once you save the file, you are ready to compile it.
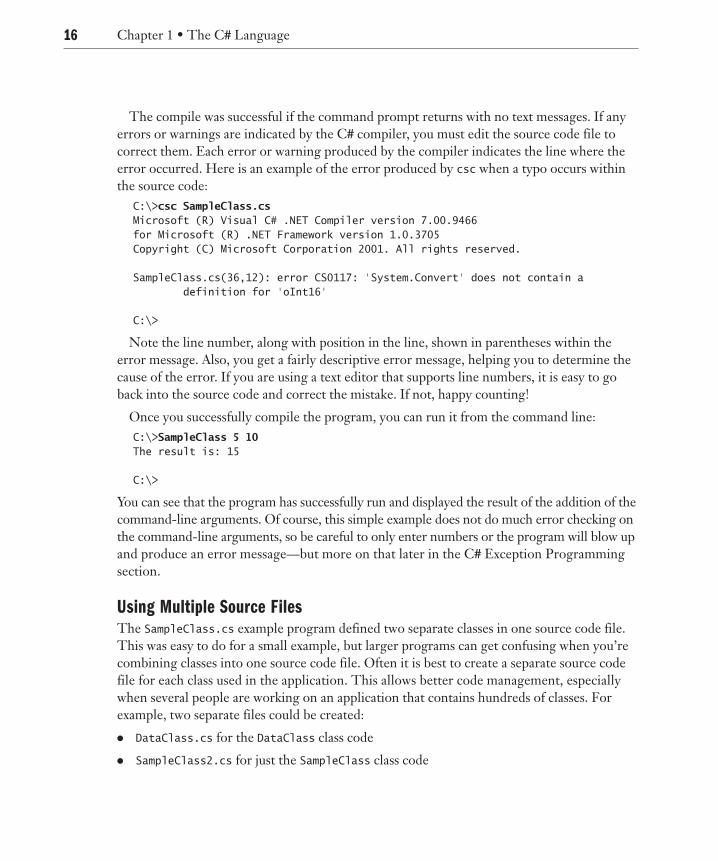
Compiling and Running C# ProgramsThe .NET Framework SDK and Redistributable packages both contain the C# compiler,csc.exe. Any C# program, no matter how complex, can be compiled using just this compiler.Many different switches can be used on the command line to control the behavior of the com-piler function. Some of the most common are listed in Table 1.1.
TABLE 1.1: csc Command Line Switches
Switch Function
/out:filename Defines the executable filename of the program
/main:classname Defines the class that contains the Main() method
/target:target Defines the type of program. The target can be exe for console-basedapps, winexe for Windows graphical apps, library for Windows DLL files,or module for assembly modules
/debug:type Creates debugging information for the executable file. The type can befull (the default), which enables attaching the debugger to a runningprocess, or it can be pdbonly, which only creates a .pdb database file for debugging within a debugging tool
/resource:<res> Embeds the resource specified in the executable file
After you determine what command-line options (if any) you need, compiling the C# program using the csc command-line compiler is simple:
C:\>csc SampleClass.csMicrosoft (R) Visual C# .NET Compiler version 7.00.9466for Microsoft (R) .NET Framework version 1.0.3705Copyright (C) Microsoft Corporation 2001. All rights reserved.
C:\>
C# Programming Basics
4176ch01.qxd 10/13/04 3:13 PM Page 15
16
The compile was successful if the command prompt returns with no text messages. If anyerrors or warnings are indicated by the C# compiler, you must edit the source code file tocorrect them. Each error or warning produced by the compiler indicates the line where theerror occurred. Here is an example of the error produced by csc when a typo occurs withinthe source code:
C:\>csc SampleClass.csMicrosoft (R) Visual C# .NET Compiler version 7.00.9466for Microsoft (R) .NET Framework version 1.0.3705Copyright (C) Microsoft Corporation 2001. All rights reserved.
SampleClass.cs(36,12): error CS0117: ‘System.Convert’ does not contain adefinition for ‘oInt16’
C:\>
Note the line number, along with position in the line, shown in parentheses within theerror message. Also, you get a fairly descriptive error message, helping you to determine thecause of the error. If you are using a text editor that supports line numbers, it is easy to goback into the source code and correct the mistake. If not, happy counting!
Once you successfully compile the program, you can run it from the command line:C:\>SampleClass 5 10The result is: 15
C:\>
You can see that the program has successfully run and displayed the result of the addition of thecommand-line arguments. Of course, this simple example does not do much error checking onthe command-line arguments, so be careful to only enter numbers or the program will blow upand produce an error message—but more on that later in the C# Exception Programmingsection.
Using Multiple Source FilesThe SampleClass.cs example program defined two separate classes in one source code file.This was easy to do for a small example, but larger programs can get confusing when you’recombining classes into one source code file. Often it is best to create a separate source codefile for each class used in the application. This allows better code management, especiallywhen several people are working on an application that contains hundreds of classes. Forexample, two separate files could be created:
● DataClass.cs for the DataClass class code
● SampleClass2.cs for just the SampleClass class code
Chapter 1 • The C# Language
4176ch01.qxd 10/13/04 3:13 PM Page 16

17
There are a few things to be careful of when you separate classes out into discrete sourcecode files. First, you must ensure that the C# compiler can find them at compile time. Theeasiest way to do this is to include all related source code files on the command line, as follows:
C:\>csc SampleClass2.cs DataClass.cs
Be careful when you do this, however, because the source code file listed first will be the default.exe filename. If you want to change the .exe filename, you can use the /out: command lineswitch:
C:\>csc /out:SampleClass2.exe DataClass.cs SampleClass2.cs
Another issue is the importance of telling the compiler where the program executionstarts. If only one class has a Main() section defined, this will work fine. However, some-times different classes can use methods from other classes, but both classes may contain aMain() method. This would confuse the compiler, as it would not know from which Main()method to start to run the program.
A command-line switch for the csc.exe program solves this problem. The /main:switchdefines the class that contains the Main() method you want to use:
C:\>csc /main:SampleClass SampleClass2.cs DataClass.cs
Notice that you must specify the class that the Main() method is in, not the source codefilename.
Debugging C# ProgramsThe .NET Framework SDK offers two excellent ways to debug C# programs:
● dbgclr is a GUI debugging program
● cordbg is a command-line text debugging program
The graphical dbgclr program and the text mode cordbg program have similar featuresbut present different interfaces. Both allow you to step through the C# program and watchvariables and outputs as execution proceeds. To do this, though, you must compile the exe-cutable program using the /debug option on the csc compiler:
C:\>csc /debug SampleClass.cs
This command performs two actions: an attribute is set in the executable file that informs theCLR JIT compiler that code tracking must be done, and a programmer database (PDB) fileis created that contains code tracking information for the debugger. The added attribute iscalled the JITTracking flag. It informs the CLR JIT compiler that the code must be disas-sembled from the generated native code back to MSIL instructions and ultimately mapped
C# Programming Basics
4176ch01.qxd 10/13/04 3:13 PM Page 17

18
back to the original source code. All of this information is contained in the PDB file for theexecutable file.
Using the dbgclr ProgramThe dbgclr program provides a Windows environment that can be used to watch and trace a running C# program to look for coding errors. The dbgclr program is located under theMicrosoft.Net directory you specified when installing the SDK. The default location is asfollows:
C:\Progam Files\Microsoft.Net\FrameworkSDK\GuiDebug\dbgclr.exe
When dbgclr is run, you must specify the source code and executable file location for theapplication. To do this, follow these steps:
1. From the Menu Bar, click Debug ➢ Program to Debug.
2. Next to the Program text box, click the ellipsis (...) button and select the SampleClass.exeprogram you want to debug. (Remember that the executable program must have been com-piled with the /debug switch.) The Working Directory text box will automatically displaythe directory location of the executable file. Also, in the Arguments text box, type in anyrequired arguments for the program; for the SampleClass program, type in any two num-bers. Click OK when you are finished.
3. Click File ➢ Open ➢ File. Select the SampleClass.cs source code file for the application,and click Open.
At this point, the dbgclr program will display four separate windows:
● The source code file
● The Solution Explorer
● The application output
● The command window
You should see the SampleClass.cs file in the source code window, and the Solution Explorershould list this file in the Miscellaneous Files section. To start debugging, from the menu bar,click Debug ➢ Step Into. This starts the program and allows you to single step though the code(see Figure 1.4).
Chapter 1 • The C# Language
4176ch01.qxd 10/13/04 3:13 PM Page 18

19
When the debugging process starts, a new window appears showing various variables usedwithin the application code. Note in Figure 1.4 that the command-line argument values youentered are displayed under the Locals tab, along with the Length value (which should be 2).This allows you to easily watch variable values throughout the execution of the program. Thisis handy if you are getting a corrupt variable value within the program and want to investigate.
The Step Into function starts executing the program line by line, starting at the Main()section. The current code line is highlighted in yellow. By pressing F11, you can single stepthrough the entire program. You can also click buttons on the toolbar to step over code, aswell as step out of (or back up from) a code segment. This gives you great control in watchingthe program execute.
Using the cordbg ProgramThe cordbg command-line tool has similar functionality to that of dbgclr, without the graphi-cal windows. It, too, allows you to single step through a program and monitor variable valuesas you go along, but with allowing text input and providing a text output. Listing 1.2 shows asample debug session using cordbg.
F I G U R E 1 . 4 :Using dbgclr to single-step through an application
C# Programming Basics
4176ch01.qxd 10/13/04 3:13 PM Page 19

20
➲ Listing 1.2 Sample output from cordbg
C:\>cordbgMicrosoft (R) Common Language Runtime Test Debugger Shell Version 1.0.3705.0Copyright (C) Microsoft Corporation 1998-2001. All rights reserved.
(cordbg) run SampleClass.exe 5 10Process 356/0x164 created.Warning couldn’t load symbols forc:\winnt\microsoft.net\framework\v1.0.3705\mscorlib.dll[thread 0xff] Thread created.
031: if (argv.Length != 2)(cordbg) sh026: System.Console.WriteLine(“The result is: {0}”, sample.addem());027: }028:029: public static void Main(string[] argv)030: {031:* if (argv.Length != 2)032: {033: System.Console.WriteLine(“ Usage: SampleClass x y”);034: return;035: }036: sampleX = System.Convert.ToInt16(argv[0]);(cordbg) pro
PID=0x164 (356) Name=C:\SampleClass.exeID=1 AppDomainName=SampleClass.exe
(cordbg) p argvargv=(0x00e718b8) array with dims=[2]argv[0] = (0x00e718d0) “5”argv[1] = (0x00e718e4) “10”
(cordbg) s
036: sampleX = System.Convert.ToInt16(argv[0]);(cordbg) so
037: sampleY = System.Convert.ToInt16(argv[1]);(cordbg) so
038: SampleClass starthere = new SampleClass();(cordbg) s
023: public SampleClass()(cordbg) s
[0007] nop
Chapter 1 • The C# Language
4176ch01.qxd 10/13/04 3:13 PM Page 20

21
(cordbg) s
[001c] mov ecx,0B65210h(cordbg) s
006: public DataClass(int x, int y)(cordbg) s
[0007] nop(cordbg) s
[0014] mov dword ptr [esi+4],edi(cordbg) s
009: b = y;(cordbg) s
010: }(cordbg) s
025: DataClass sample = new DataClass(sampleX, sampleY);(cordbg)
Note that when the cordbg program is started, you can use the run command with the file-name of the executable program, along with any pertinent command-line parameters for theexecutable program. Alternatively, you can run the cordbg command with the executableprogram and arguments on the command line.
The cordbg program uses text commands to step through the program and display perti-nent information. Table 1.2 describes some of the text commands that can be used.
TABLE 1.2: cordbg text commands
Command Function
s Step into one line of source code
si Step into one line of source code
so Step over the next line of code
ss Step into the next native or IL instruction
p arg Print the current value of the variable arg
pro Show the system process information for the running program
reg Display the CPU registers for the current thread
run prog Run the progam prog in the debugger
break Set or display a breakpoint in the code
sh Show the current line of code, along with five lines before and after
C# Programming Basics
4176ch01.qxd 10/13/04 3:13 PM Page 21

22
As demonstrated, you can do everything in cordbg that you can in dbgclr. In fact, manyadvanced developers prefer to use cordbg because it can be faster than waiting for the graphi-cal dbgclr program to do its thing.
Watching the C# program execute is one way to debug your application. The next sectiondescribes a tool for observing the actual MSIL code generated by the csc compiler and run bythe CLR.
Debugging MSIL CodeIf you really want to get under the hood of your program, you must look at the MSILcode—the actual code that is compiled by the CLR JIT compiler to create the native system code for the host. The .NET Framework SDK gives you a tool that helps you do this: the Microsoft Intermediate Language Disassembler (IL DASM). You must run the ildasm.exe program from the command line, along with the name of the CLR exe-cutable program to monitor to see the code:
C:\>ildasm SampleClass.exe
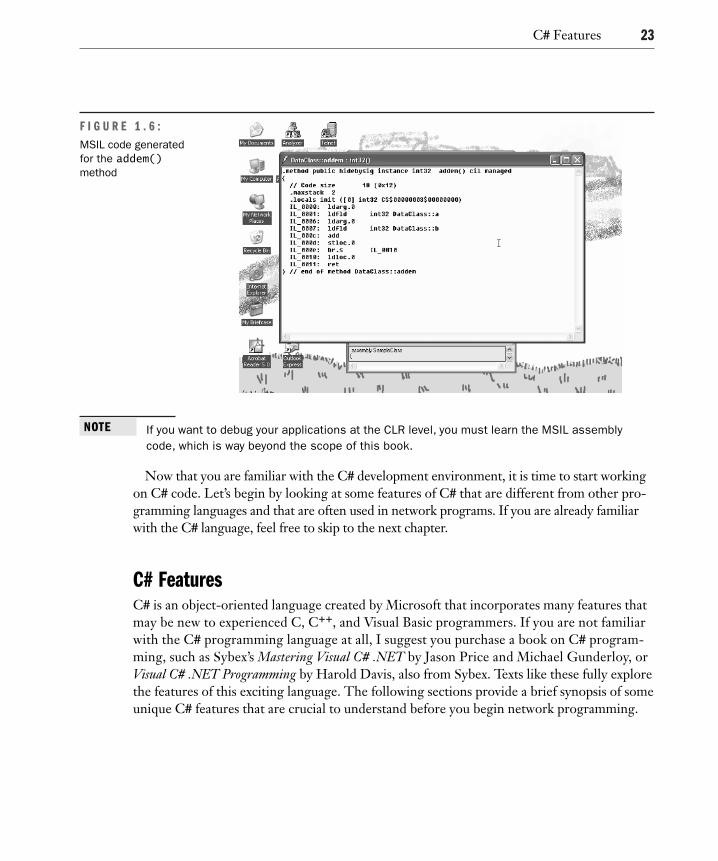
Figure 1.5 shows the IL DASM window with the classes and variables that are contained inthe program. IL DASM gives you a hierarchical view of the code, separating the classes and thevariables and methods within classes. To see the actual MSIL code, double-click an individualsection. Figure 1.6 shows the result from clicking the addem() method. Even without knowingmuch about MSIL, you can see that this section of code retrieves two values from memory andadds them.
F I G U R E 1 . 5 :The IL DASM window
Chapter 1 • The C# Language
4176ch01.qxd 10/13/04 3:13 PM Page 22
23
NOTE If you want to debug your applications at the CLR level, you must learn the MSIL assemblycode, which is way beyond the scope of this book.
Now that you are familiar with the C# development environment, it is time to start workingon C# code. Let’s begin by looking at some features of C# that are different from other pro-gramming languages and that are often used in network programs. If you are already familiarwith the C# language, feel free to skip to the next chapter.
C# FeaturesC# is an object-oriented language created by Microsoft that incorporates many features thatmay be new to experienced C, C++, and Visual Basic programmers. If you are not familiarwith the C# programming language at all, I suggest you purchase a book on C# program-ming, such as Sybex’s Mastering Visual C# .NET by Jason Price and Michael Gunderloy, orVisual C# .NET Programming by Harold Davis, also from Sybex. Texts like these fully explorethe features of this exciting language. The following sections provide a brief synopsis of someunique C# features that are crucial to understand before you begin network programming.
F I G U R E 1 . 6 :MSIL code generatedfor the addem()method
C# Features
4176ch01.qxd 10/13/04 3:13 PM Page 23

24
C# NamespacesWith all of the classes provided in the .NET Framework, it’s easy to get confused about whichclasses perform which functions and the methods that should be used from particular classes.To help simplify things, Microsoft uses namespaces in classifying .NET Framework classes.
What Are Namespaces?As shown in the SampleClass program, each C# application consists of one or more classes.Each class defines an object that can contain data and methods to manipulate the data. Atleast one class in each application must contain a program interface method called Main().The Main() method lets the C# compiler know where to begin execution of the program.Other classes can be defined within the program (such as the DataClass), or can even beshared with other programs.
Sharing classes among programs is the goal of object-oriented programming. One of theissues involved in class sharing is the importance of unique and meaningful class names. Ifyou are working alone and on simple projects, it is unlikely that you will run into the problemof calling two (or more) classes by the same name. However, on a large development teamthat needs to create hundreds of classes, having a class naming structure in place is critical tosuccess.
C# namespaces are used to identify a higher-level hierarchy of class names, allowing you to group similar classes together within a single namespace. The namespace is defined in thesource code file before the class definition, using the namespace directive:
namespace Test1;
class testProgram{
}
namespace Test2;class testProgram{
}
For programs that do not declare a namespace (such as the SampleClass program) thedefined classes become part of a global namespace. These classes are globally available to any application in the CLR.
Each namespace uniquely identifies the programs within it. Notice that both of the samplenamespaces just shown contain a class called testProgram; most likely they perform separatefunctions. If your program needs to use one or both of the testProgram classes, you mustspecify which class you mean to use by referencing the namespace.
Chapter 1 • The C# Language
4176ch01.qxd 10/13/04 3:13 PM Page 24

25
The .NET Framework contains many classes separated into namespaces, which help classify the various classes into groups of common functions. You must know how toproperly declare the classes you use so that there is no confusion by the compiler when your program is compiled. Let’s examine the specific namespaces used in the .NETFramework.
.NET Framework NamespacesThe .NET Framework uses namespaces to help categorize library classes used in the CLR.This helps programmers determine the location of various classes and how to define them intheir programs.
Many .NET Framework namespaces make up the core CLR classes. Table 1.3 lists some ofthe common namespaces you will encounter in your C# network applications.
TABLE 1.3: .NET Framework Class Namespaces
Namespace Description of Classes
Microsoft.Win32 Handles events raised by the OS and Registry handling classes
System Base .NET classes that define commonly used data types and dataconversions
System.Collections Defines lists, queues, bit arrays, and string collections
System.Data Defines the ADO.NET database structure
System.Data.OleDb Encapsulates the OLE DB .NET database structure
System.Drawing Provides access to basic graphics functionality
System.IO Allows reading and writing on data streams and files
System.Management Provides access to the Windows Management Instrumentation(WMI) infrastructure
System.Net Provides access to the Windows network functions
System.Net.Sockets Provides access to the Windows sockets (Winsock) interface
System.Runtime.Remoting Provides access to the Windows distributed computing platform
System.Security Provides access to the CLR security permissions system
System.Text Represents ACSII, Unicode, UTF-7, and UTF-8 character encodings
System.Threading Enables multi-threading programming
System.Timers Allows you to raise an event on a specified interval
System.Web Enables browser and web server functionality
System.Web.Mail Enables sending mail messages
System.Windows.Forms Creates Windows-based application using the standard Windowsgraphical interface
System.XML Provides support for processing XML documents
C# Features
4176ch01.qxd 10/13/04 3:13 PM Page 25
26
Using Namespaces in ProgramsAs explained, each namespace provides support for a specific group of classes. Once youhave located the namespaces that contain the classes you need for your program, you mustdefine them in your program to access the classes. There are two methods of identifying.NET Framework classes in your programs.
The first method was demonstrated in the SampleClass program:System.Console.WriteLine(“The result is {0}”, sample.addem());
This command uses the WriteLine() method of the Console class, found in the Systemnamespace. Notice the hierarchy used in referencing the method. First the namespace isdeclared, followed by the class name, and finally the method name. You can reference all ofthe .NET Framework classes in your program using this method, but you might quickly gettired of typing.
An easier way is to declare the namespace with the C# using directive at the beginning ofthe program. Any classes contained within a namespace declared with using do not have tobe referenced by their namespace name:
using System;
Console.WriteLine(“The result is {0}”, sample.addem());
The C# compiler searches all declared namespaces for the Console class and automaticallyreferences the proper namespace.
WARNING Be careful using this method of declaring namespaces, because you can run into situa-tions where two declared namespaces have classes with the same name (such as theTimer class). In that case, you must supply the full namespace name when referencingthe class. If you don’t, the C# compiler will complain that it cannot determine which classyou are trying to reference.
After the namespaces have been declared and you use the namespace classes in your pro-gram, you must ensure that the C# compiler can find the proper class libraries when youcompile your program. The next section explains how this is done.
Compiling Programs with NamespacesThe .NET Framework implements the CLR class library as a set of DLL files. Each DLLfile contains a specific subset of classes from one or more namespaces. Not only must theDLLs be available when you run your .NET program, they must also be referenced on thecommand line when you compile the program.
Chapter 1 • The C# Language
4176ch01.qxd 10/13/04 3:13 PM Page 26
27
You must reference each DLL that is necessary to support all of the namespaces declaredin your program. To reference a DLL, you use the /resource command-line switch for thecsc compiler:
C:\> csc /r:System.dll SampleClass.cs
(The /resource switch can be abbreviated /r.) Here, the classes for the System namespaceare contained in the System.dll file, so you need to reference the System.dll file on thecommand line for the SampleClass.cs program to compile properly. You may be wonderingwhy you didn’t have to do this when you compiled the program earlier. There is a trickinvolved.
The csc.exe compiler program uses a configuration file that sets a few standard command-line parameters, including default DLL files to reference. The configuration file is calledcsc.rsp and is located in the same directory as the csc.exe program file.
You can examine the csc.rsp file with any text editor, such as Microsoft Notepad. Listing 1.3 shows the default csc.rsp file that was installed with my version of the .NET Framework.
➲ Listing 1.3 Default csc.rsp file
# This file contains command-line options that the C## command line compiler (CSC) will process as part# of every compilation, unless the “/noconfig” option# is specified.
# Reference the common Framework libraries/r:Accessibility.dll/r:Microsoft.Vsa.dll/r:System.Configuration.Install.dll/r:System.Data.dll/r:System.Design.dll/r:System.DirectoryServices.dll/r:System.dll/r:System.Drawing.Design.dll/r:System.Drawing.dll/r:System.EnterpriseServices.dll/r:System.Management.dll/r:System.Messaging.dll/r:System.Runtime.Remoting.dll/r:System.Runtime.Serialization.Formatters.Soap.dll/r:System.Security.dll/r:System.ServiceProcess.dll/r:System.Web.dll/r:System.Web.RegularExpressions.dll/r:System.Web.Services.dll/r:System.Windows.Forms.Dll/r:System.XML.dll
C# Features
4176ch01.qxd 10/13/04 3:13 PM Page 27
28
Notice that the majority of the prevalent namespace DLLs are referenced in the csc.rsp file.This is a handy feature that keeps you from having to reference lots of files on the commandline if you are using classes from several namespaces. As shown in the comment text from thecsc.rsp file, you can also override the csc.rsp values by using the /noconfig command-lineswitch:
C:\>csc /noconfig /r:System.dll SampleClass.cs
This command will compile the SampleClass program with just the reference to the System.dll file.
NOTE Adding references to additional DLL files does not increase the size of the resulting exe-cutable file. The references are only for the purpose of telling the compiler where to findthe namespace definitions, not for compiling in the DLL code. The library class code isstill run from the DLL. That is why the .NET Framework must be installed on the targetworkstation or server.
Using Strings in C# ProgramsOne of the most difficult parts of C programming is dealing with strings. Many programsecurity holes develop from string buffer overflows, in which programmers have used characterarrays for strings, and hackers place more characters than memory bytes allocated for thestring. To alleviate some of the problems of dealing with strings in C# programs, Microsofthas incorporated two string handling classes into the C# language. Because many networkprotocols are concerned with sending and receiving text strings, it’s a good idea to get a handleon using strings properly in C# network programs. This section will help you do that by dis-cussing the use of .NET string classes in the C# language.
The String ClassThe basic part of string support in C# is the String class. The String class allows you toassign a series of characters to a variable and handle the variable in your program as a singleunit. The String class also contains several methods that can be used to perform operationson string objects, such as determining the length of the string and comparing two strings.
The String constructor is overloaded, providing several ways to create a string variable.Table 1.4 describes the string constructors.
Chapter 1 • The C# Language
4176ch01.qxd 10/13/04 3:13 PM Page 28

29
TABLE 1.4: String Constructors
Constructor Description
string(char[]) Creates a string from a specified character array
string(char, int) Creates a string from a specified character repeated intnumber of times
string(char[], int1, int2) Creates a string from a specified character array, starting atposition int1 with a length of int2 bytes
In one of the few quirks of C#, you can define strings using either a capital S or a lowercases in the String declaration. The following are a few examples of declaring string variables:
string test = “This is a test string”;string test2 = test;string anotherTest = new string(‘a’, 10);
The first technique just listed is the most common way to create new strings. After thestring is created, several other methods are available for manipulating and operating on the string. Table 1.5 shows some of the more popular methods.
TABLE 1.5: String Methods
Method Description
Clone Returns a reference to the string
Compare Compares two specified strings
CompareTo Compares a string with another object
Concat Concatenates two strings
Copy Creates a new string with the value of an existing string
CopyTo Copies a specified number of characters from one string, starting at a specified location, to another string
EndsWith Determines if a string ends with a specified string
Equals Determines if two strings have the same value
IndexOf Returns the first occurrence of a specified string within the string
Insert Inserts a specified string at a specified location of the string
Intern Retrieves the system reference for the string
Join Concatenates a specified string between each element of the string array
Continued on next page
C# Features
4176ch01.qxd 10/13/04 3:13 PM Page 29

30
TABLE 1.5 CONTINUED: String Methods
Method Description
LastIndexOf Returns the index location of the last occurrence of the specified string in the string
PadLeft Right-aligns the characters of the string and sets the left-most characters to spaces
PadRight Left-aligns the characters of the string and sets the right-most characters to spaces
Remove Deletes a specified number of characters from the string
Replace Replaces all occurrences of a specified character or string with another specifiedcharacter or string
Split Identifies substrings in the string based on a specified separation character
StartsWith Determines if a string starts with a specified string
ToCharArray Copies the characters in the string to a character array
ToLower Returns a copy of the string, setting all characters to lowercase
ToString Converts the value of the object to a string
ToUpper Returns a copy of the string, setting all characters to uppercase
Trim Removes all occurrences of a set of specified characters from the beginning andend of a string
TrimEnd Removes all occurrences of a set of specified characters from the end of a string
TrimStart Removes all occurrences of a set of specified characters from the beginning of a string
With all of these string methods at your disposal, it is easy to work with strings in C# pro-grams. Much of the hard work of manipulating and comparing strings has been done for you.Listing 1.4 shows a sample string program to illustrate some of these features.
➲ Listing 1.4 Sample string program StringTest.cs
using System;
class StringTest{
public static void Main (){
string test1 = “This is a test string”;string test2, test3;
test2 = test1.Insert(15, “application “);test3 = test1.ToUpper();
Console.WriteLine(“test1: ‘{0}’”, test1);Console.WriteLine(“test2: ‘{0}’”, test2);Console.WriteLine(“test3: ‘{0}’”, test3);
if (test1 == test3)Console.WriteLine(“test1 is equal to test3”);
Chapter 1 • The C# Language
4176ch01.qxd 10/13/04 3:13 PM Page 30

31
elseConsole.WriteLine(“test1 is not equal to test3”);
test2 = test1.Replace(“test”, “sample”);Console.WriteLine(“the new test2: ‘{0}’”, test2);
}}
The output from this program should look like this:C:\>StringTesttest1: ‘This is a test string’test2: ‘This is a test application string’test3: ‘THIS IS A TEST STRING’test1 is not equal to test3the new test2: ‘This is a sample string’
C:\>
C# creates a set amount of memory for each new string created. Because of this, strings areimmutable, that is, they cannot be changed. That said, you may see C# code like the following:
string newString = new string(“test”);string newString += “ing”;
The resulting value for the variable newString is testing.
If strings are immutable, how can you modify an existing string? The answer is, you don’t;C# just does some trickery. Instead of modifying the existing string, C# creates a brand newstring with the new value. The memory area reserved for the old string is now unused andwill be cleaned up on the next garbage collection cycle ( CLR’s automatic recovery of lostmemory). If you do a lot of string manipulation in your programs, these operations can createadditional memory overhead. To compensate for this, Microsoft has created another type ofstring class just for modifying string objects.
The StringBuilder ClassAs its name suggests, the StringBuilder class allows you to create and modify strings withoutthe overhead of recreating new strings each time. It generates a mutable sequence of charactersthat can change size dynamically as the string is modified, allocating more memory as required.
The amount of memory used by the string is called the capacity. The default capacity of aStringBuilder string is currently set to 16 bytes (StringBuilder documentation indicates thatthis value may change in the future). If you create a string larger than 16 bytes, StringBuilderwill automatically attempt to allocate more memory. When you want to control exactly howmuch memory StringBuilder can use, you can manually increase or decrease the string capacityusing StringBuilder methods, as well as various StringBuilder constructors when the instanceis initially created.
C# Features
4176ch01.qxd 10/13/04 3:13 PM Page 31

32
Six constructors can be used to create a StringBuilder instance, as shown in Table 1.6.
TABLE 1.6: The StringBuilder Class Constructors
Constructor Description
StringBuilder() Initializes a new default instance with a size of 16
StringBuilder(int) Initializes a new instance with a capacity of int
StringBuilder(string) Initializes a new instance with a default value of string
StringBuilder(int1, int2) Initializes a new instance with a default capacity ofint1 and a maximum capacity of int2
StringBuilder(string, int) Initializes a new instance with a default value ofstring and a capacity of int
StringBuilder(string, int1, int2, int3) Initializes a new instance with a default valuestarting at position int1 of string, int2characters long, with a capacity of int3
Once the StringBuilder instance is created, you have access to several properties, meth-ods, and operations for modifying and checking properties of the string. One of the mostuseful properties is Length, which allows you to dynamically change the capacity of thestring. Listing 1.5 shows an example of changing the capacity of the StringBuilder stringusing the Length property.
➲ Listing 1.5 The SampleBuilder.cs program
using System;using System.Text;
class SampleBuilder{
public static void Main (){
StringBuilder sb = new StringBuilder(“test string”);int length = 0;
length = sb.Length;Console.WriteLine(“The result is: ‘{0}’”, sb);Console.WriteLine(“The length is: {0}”, length);
sb.Length = 4;length = sb.Length;Console.WriteLine(“The result is: ‘{0}’”, sb);Console.WriteLine(“The length is: {0}”, length);
Chapter 1 • The C# Language
4176ch01.qxd 10/13/04 3:13 PM Page 32
33
sb.Length = 20;length = sb.Length;Console.WriteLine(“The result is: ‘{0}’”, sb);Console.WriteLine(“The length is: {0}”, length);
}}
The output from the StringSample program should look like this:C:\>SampleBuilderThe result is: ‘test string’The length is: 11The result is: ‘test’The length is: 4The result is: ‘test ‘The length is: 20
C:\>
The original string is 11 bytes long, but after setting the string length to 4, the resultingstring is only the first 4 bytes of the original string. After setting the string length to 20,the string becomes 20 bytes long, but the data originally located after the fourth byte hasbeen lost, with spaces used to pad the extra bytes.
After the final string is built using a StringBuilder object, you may need to convert it to a string object to send it to a network stream. This is a simple process using the ToString()method:
string outbound = sb.ToString();
Now the string outbound can be used as a normal string object. Just remember that it isnow an immutable string, and as such should not be modified (or be aware that you may suffer additional overhead if it is).
Streams, mentioned in the preceding paragraph, are another feature of C# that you shouldknow intimately for network programming. The next section describes C# streams andtheir uses.
C# StreamsData handling is one of the most important jobs of programs. There are many methods forstoring and retrieving data in the C# world—files, memory, input/output devices, interprocesscommunication pipes, and networks. There are also many ways of reading data to and writingit from objects. Most objects allow data to be read or written on a byte-by-byte basis. Thismethod transfers one byte of data into or out of the data object at a time. Certainly this works,but it is not the most efficient manner of handling data.
C# Features
4176ch01.qxd 10/13/04 3:13 PM Page 33

34
The C# language supplies an interface to assist programmers in moving large chunks ofdata to and from data objects. The data stream allows multiple bytes of data to be transferredsimultaneously to a data object so that programs can work on blocks of data instead of havingto build data elements one byte at a time.
Streams can support three fundamental operations:
● Transferring data from a stream to a memory buffer (reading)
● Transferring data from a memory buffer to a stream (writing)
● Searching the stream for a specific byte pattern (seeking)
Not all streams support all of these functions. Obviously, a CD-ROM device cannot supportstreams that write data, and network connections do not support streams that seek data patterns.
The .NET System.IO namespace contains various stream classes that can be used to combine the bytes from a data source into manageable blocks that are easier to manipulate.
The FileStream class is a good example of using a stream to simplify reading and writingdata. This class provides a stream interface to easily read and write data to a disk file. Let’slook at an example.
If you were writing a program that logged messages to a log file, you most likely would belogging (writing out) one text line of information at a time. You would write the code toplace each string in the file byte-by-byte, and ensure that the proper carriage return wasadded to each text line as it was written. Then, when you wanted to read the log file with aprogram, you would have to create the code to read the file byte-by-byte. As the file wasread, you would have to know that each log file entry ended with the carriage return and that a new entry would start. Each byte read would have to be examined to determine if it was acarriage return.
Instead of this tedious process, you can take advantage of the FileStream class, along withthe StreamWriter class, to easily write and read lines of text in a log file. Listing 1.6 shows asample program that uses streams to simplify file access.
➲ Listing 1.6 Sample log writing program TestLog.cs
using System;using System.IO;
class TestLog{
public static void Main (){
string logFile = “LOGFILE.TXT”;
FileStream fs = new FileStream(logFile,
Chapter 1 • The C# Language
4176ch01.qxd 10/13/04 3:13 PM Page 34

35
FileMode.OpenOrCreate, FileAccess.ReadWrite);
StreamWriter sw = new StreamWriter(fs);StreamReader sr = new StreamReader(fs);
sw.WriteLine(“First log entry”);sw.WriteLine(“Second log entry”);
while(sr.Peek() > -1){
Console.WriteLine(sr.ReadLine());}
sw.Close();sr.Close();fs.Close();
}}
Take note of the following things in this example:
● The FileStream object can be used for both reading data from and writing data to thestream.
● Both the StreamReader and StreamWriter objects reference the same FileStream, butthey perform different functions.
● Each stream object has its own pointer in the stream. After the StreamWriter objectinserts two new lines in its stream, the StreamReader object reads the first object in itsstream, which is the first line in the file.
● Each stream opened must be explicitly closed, including the base FileStream object.Many novice programmers forget to close the base stream and inadvertently leave ithanging.
The most common stream technique is to create two separate streams for reading andwriting:
StreamWriter sw = new StreamWriter(fs);StreamReader sr = new StreamReader(fs);
This enables you to have complete control over data access to and from the stream using separate streams.
One thing this program doesn’t do is error checking on the file open attempt. If the pro-gram is not able to open the log file, it will produce an ugly error message to the user. Thenext section shows how you can gracefully handle error conditions within C# programs.
C# Features
4176ch01.qxd 10/13/04 3:13 PM Page 35

36
C# Exception ProgrammingOne of the biggest problems for programmers is dealing with abnormal conditions in a pro-gram. Inexperienced programmers often forget to compensate for error conditions such asdividing by zero. This results in ugly and annoying error messages and programs blowing up in customers’ faces. To ensure that your code is user-friendly, try to compensate for mosttypes of error conditions. Such error conditions, or other unexpected behavior occurringwhen a program executes, are called exceptions. Listing 1.7 shows an example.
➲ Listing 1.7 The BadError.cs program
using System;
class BadError{
public static void Main (){
int var1 = 1000, var2 = 0, var3;
var3 = var1 / var2;Console.WriteLine(“The result is: {0}”, var3);
}}
As you can see, this program is doomed from the start. The arithmetic function in line 9 is destined for disaster because of a divide-by-zero error. Compile and run this example andwatch what happens:
C:\>csc BadError.csMicrosoft (R) Visual C# .NET Compiler version 7.00.9466for Microsoft (R) .NET Framework version 1.0.3705Copyright (C) Microsoft Corporation 2001. All rights reserved.
C:\>BadError
Unhandled Exception: System.DivideByZeroException: Attempted to divide by zero.at BadError.Main()
C:\>
The csc compiler had no problem compiling this code. It was oblivious to the impendingerror. When the program runs, a pop-up window indicates that an error occurred and asksyou if you want to debug the application. This is exactly the kind of thing you do not wantyour customers to see. After clicking the OK button, the text error message is produced onthe console, indicating the error that was encountered. The program halts at the line of codethat produced the error, and no other lines are executed.
Chapter 1 • The C# Language
4176ch01.qxd 10/13/04 3:13 PM Page 36

37
C# helps programmers code for exceptions by providing a way to watch and capture excep-tions as they occur. By catching exceptions, programmers can efficiently provide for readableerror messages and the continuation of the program, or they can stop the program gracefullyif necessary. In C#, the try-catch block accomplishes this.
The try-catch block tries to execute one or more statements. If any of the statements generates an exception, the catch block of code is executed instead of the program stopping.Depending on what you include in the catch block, the program can either be terminatedgracefully, or allowed to continue as if nothing were wrong. Here is the format of a try-catchblock:
try{
// one or more lines of code}catch (){
// one or more lines of code to execute if an error}finally{
// one or more lines of code to execute at all times}
The statements in the try block are executed as normal within the course of the program.If an error condition occurs within the try block, program execution moves to the catch block.After the code in the catch block is executed, control passes back to the main program state-ments that follow the try-catch block, as if no error had occurred (unless of course the codein the catch block stops or redirects the program execution).
Optionally, you can add a finally block, which will be executed after the try or the catchblocks are finished. Sometimes the finally block is used for clean-up functions that must runwhether the functions succeed or fail; most often, however, finally is not used.
NOTE Notice the parentheses in the catch statement. This is a filter, allowing you to define whattypes of exceptions you want to attempt to catch. You can define a specific exception towatch for, depending on the type of actions being done in the try block; or you can definethe generic Exception class, which will catch any exception that occurs. You can evendefine more than one catch block. Catch blocks are evaluated in order, so specific excep-tions must be listed before general ones.
Listing 1.8 shows an example of a simple try-catch block.
C# Features
4176ch01.qxd 10/13/04 3:13 PM Page 37

38
➲ Listing 1.8 The CatchError.cs program
using System;
class CatchError{
public static void Main (){
int var1 = 1000, var2 = 0, var3;
try{
var3 = var1 / var2;}catch (ArithmeticException e){
Console.WriteLine(“Exception: {0}”,e.ToString());
var3 = -1;}catch (Exception e){
Console.WriteLine(“Exception: {0}”,e.ToString());
var3 = -2;}Console.WriteLine(“The result is: {0}”, var3);
}}
In CatchError, the original program is modified by adding a try-catch block. There aretwo catch statements: one to watch specifically for ArithmeticExceptions, and one to watchfor any general Exception. Notice that the specific ArithmeticException was listed first,otherwise the general Exception block would handle all of the exceptions before the moredetailed exception appeared. Also note that the catch blocks set a value for the result variablethat can then be checked later on in the program. The result of this program is as follows:
C:\>csc CatchError.csMicrosoft (R) Visual C# .NET Compiler version 7.00.9466for Microsoft (R) .NET Framework version 1.0.3705Copyright (C) Microsoft Corporation 2001. All rights reserved.
C:\>CatchErrorException: System.DivideByZeroException: Attempted to divide by zero.
at CatchError.Main()The result is: -1
C:\>
Chapter 1 • The C# Language
4176ch01.qxd 10/13/04 3:13 PM Page 38

39
The try-catch block gracefully catches the arithmetic exception, displays the error as instructed in the catch block, and sets the variable to a special value that can later be checked in the program logic.
NOTE Network functions are frequently used within try-catch blocks. In network programming,it is often impossible to determine whether an action will succeed. For example, packetssent out on the network may not get to their intended destination because of a downrouter or destination host. Instead of the program blowing up because of an unexpectednetwork issue, the problem can be reported to the user.
SummaryThe Microsoft .NET technology supplies an excellent programming environment for net-work programmers. The C# programming language allows programmers to easily prototypeapplications in a short amount of time and lets them design robust network applications thattake advantage of the Windows networking features.
Creating a C# development environment is easy with the two comprehensive MicrosoftVisual .NET products or the new .NET Framework SDK package. All three environmentsinclude compilers and debuggers for creating C# application programs.
The C# language also offers many features that smooth the way for programmers writingnetwork applications. For instance, using the StringBuilder class instead of creating andmodifying string objects may save your application some performance time. Also, puttingstreams to work in network programming can simplify handling of data into and out of thenetwork transport. Using exceptions in your programs can make your applications look moreprofessional and save your customers lots of grief.
This chapter discussed the basics of the C# language, and you’ll find more basics in Chapter 3.There we’ll get into the specific C# classes used for network programming. With the additionof network programming helper classes, C# makes network programming a snap. First, though,Chapter 2 presents a helpful review of IP programming fundamentals.
Summary
4176ch01.qxd 10/13/04 3:13 PM Page 39

4176ch01.qxd 10/13/04 3:13 PM Page 40