the best of bernina
TRANSCRIPT

© 2014 BERNINA of America Visit bernina.com: Projects ● Webinars ● Promotions
Expand your creative options using the decorative stitches of your machine. Make unique combinations to create embellishments for any project! These BERNINA Stitch Recipes originally appeared as articles in various issues of Through the Needle magazine. Although the articles may reference retired machine models and specific stitch numbers, most of the stitches shown are available on current machines. There is a graphic stitch index in the back of most BERNINA machine manuals to help you find the same or similar stitches when creating your own stitch recipes. References to websites within this document are out of date and cannot be guaranteed operational.
The Best
of BERNINA

This is a fun, creative way to use the HalfPattern Function. Essentially, this functionallows you to “re-arrange” the order inwhich the stitch is sewn!• Select Stitch #414 (satin stitched scallop).• Engage Needle Stop Down.• Engage the Half Pattern function.• Begin sewing; the machine will automati-cally stop sewing after sewing half of thestitch pattern.• Pivot 90° as shown.• Continue to sew and pivot to create a diag-onal row of stitching.
This all-over embellishment stitch is perfect for adding color
and subtle texture to flat, smooth fabrics such as wool flannel.
• Select Stitch #44 - Running Stitch, Stitch Length - 4mm and
Stitch Width - 6mm. These settings are simply suggestions;
play and experiment to find a look you like.
• Stitch back and forth across the fabric; engage the Needle
Stop Down function for easy pivoting at the ends of the rows.
• Reduce the top tension as necessary for the decorative
threads used.
Sew multiple passes of this stitch using different colors of
thread for an interesting look.
6
This design works well on wide wale corduroy. The wales of thecorduroy are used as stitching guidelines.• Insert a 2.5mm or 3.0mm double needle.• Thread the machine using a combination of threads in contrastingcolors or perhaps in shades of the same color. Use both the hori-zontal and vertical spool pins.• Select a preprogrammed smocking stitch (shown is #710 of theartista 180)• Use the programmed stitch settings for Stitch Length.• Adjust stitch width by engaging the Double Needle Limitationfunction. Touch the function until it reads “3”.• Reduce needle tension if needed. Sew a test to determine theproper adjustment.• A light-weight tear-away stabilizer may be necessary in addition
to the interfacing.Since there are no “official” rules for embellishing; don’t worry if the “Zigs” don’t match up with the Zags” in a neighboring row. Just sew! Stagger the rows as you stitch.
DOUBLE DIAMONDS
TRAILING ARROWS
RUNNING AWAY
BROKEN SCALLOPS
For more stitch recipes,
go to www.berninausa.com
>Sewing Studio>Sew A Stitch
This is a fun exercise - take a single stitch pattern and combine it in memory with different func-
tions and settings! This is great for defining the lines of a plaid fabric.
• Select Stitch #401 on the artista sewing machine (satin stitch triangle).
• Adjust the tension on this stitch to approximately 3 or slightly less than 3.
• Touch the external “mem” button; touch “mem 1” to open a new memory bank.
• Enter Stitch #401 into the memory 6 times.
• Touch the Pattern Begin function to go back to the beginning of
the memory.• Touch “edit”.• Make the following needle position adjustments to each of the six
patterns.- Pattern 1 - Far right needle position
- Pattern 2 - 2 dots to the right of center needle position
- Pattern 3 - 2 dots to the left of center needle position
- Pattern 4 - Far left needle position
- Pattern 5 - 2 dots to the left of center needle position
- Pattern 6 - 2 dots to the right of center needle position
• Touch “edit” to close the window.
• Touch “store” to save the combination.
• Sew rows of this manipulated pattern along the lines of a plaid
fabric.

Cook up a new recipe for embellishment using the decorative stitchesof your BERNINA® sewing machine. Try new combinations, differentdirections, overlapping patterns, and unusual thread choices to getbeautiful embroidery looks using decorative stitches.
Sew many stitches, sew little time...
Spring Flowers
14
Through the Needle
1. Open an empty Memory bank2. Program the following:• Stitch #351• Mirror Image Stitch #351 • Stitch #655
3. Stitch the memory combination first4. Add Stitch #436 as a “scallop” frame on each side, using mirror image as needed
5. Add Stitch #307 to the outside edge of Stitch #436, using mirror image as needed.
THREAD SELECTIONS• Pink variegated – Oliver Twist• Green metallic – YLI Reflections• Pink flowers – Rayon
Cook up a new recipe for embellishment using the decorativestitches of your BERNINA® sewing machine. Try new combi-nations, different directions, overlapping patterns, andunusual thread choices to get beautiful embroidery looksusing decorative stitches.
Sew many stitches, sew little time...
Want to learn more?Check out the artista 200 link on our website: www.berninausa.com for more stitch recipes!
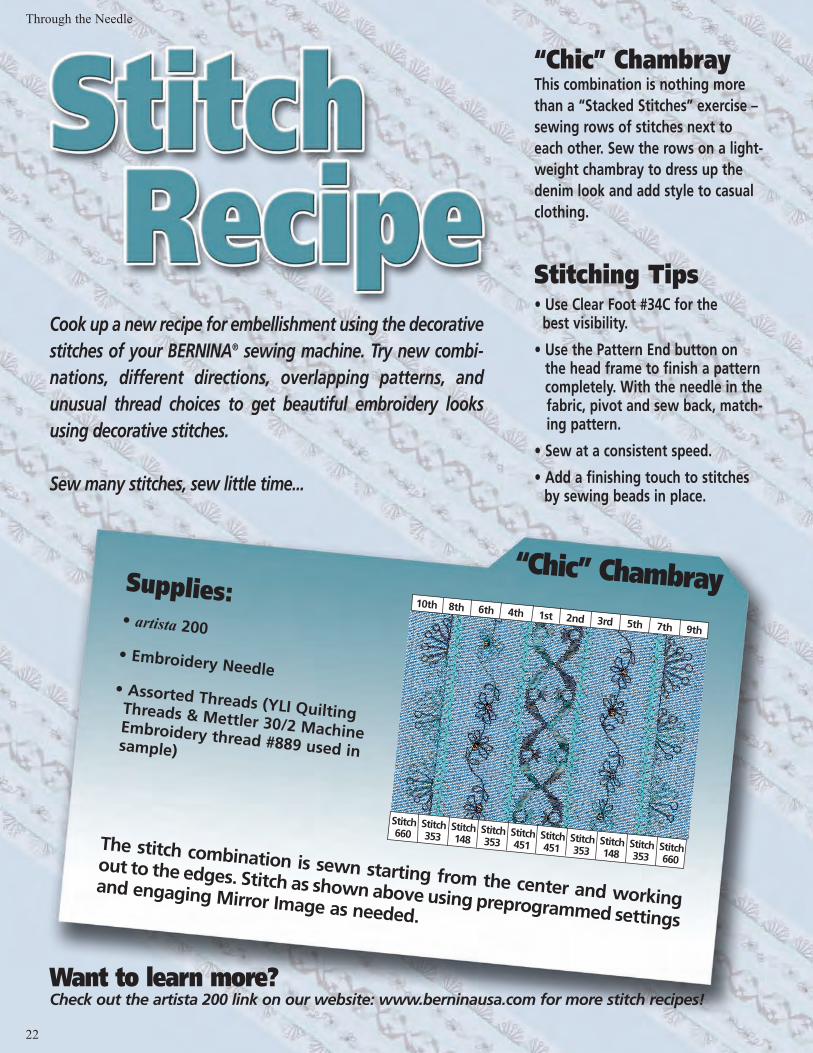
“Chic” Chambray
22
Through the Needle
The stitch combination is sewn starting from the center and working
out to the edges. Stitch as shown above using preprogrammed settings
and engaging Mirror Image as needed.
“Chic” ChambrayThis combination is nothing morethan a “Stacked Stitches” exercise –sewing rows of stitches next toeach other. Sew the rows on a light-weight chambray to dress up thedenim look and add style to casualclothing.
Stitching Tips• Use Clear Foot #34C for the
best visibility.
• Use the Pattern End button on the head frame to finish a pattern completely. With the needle in the fabric, pivot and sew back, match-ing pattern.
• Sew at a consistent speed.
• Add a finishing touch to stitches by sewing beads in place.
Supplies:• artista 200
• Embroidery Needle• Assorted Threads (YLI Quilting Threads & Mettler 30/2 Machine Embroidery thread #889 used in sample)
Stitch660
Stitch353
Stitch148
Stitch353
Stitch451
Stitch451
Stitch353
Stitch148
Stitch353
Stitch660
10th 8th 6th 4th 1st 2nd 3rd 5th 7th 9th
Want to learn more?Check out the artista 200 link on our website: www.berninausa.com for more stitch recipes!
26
Through the Needle
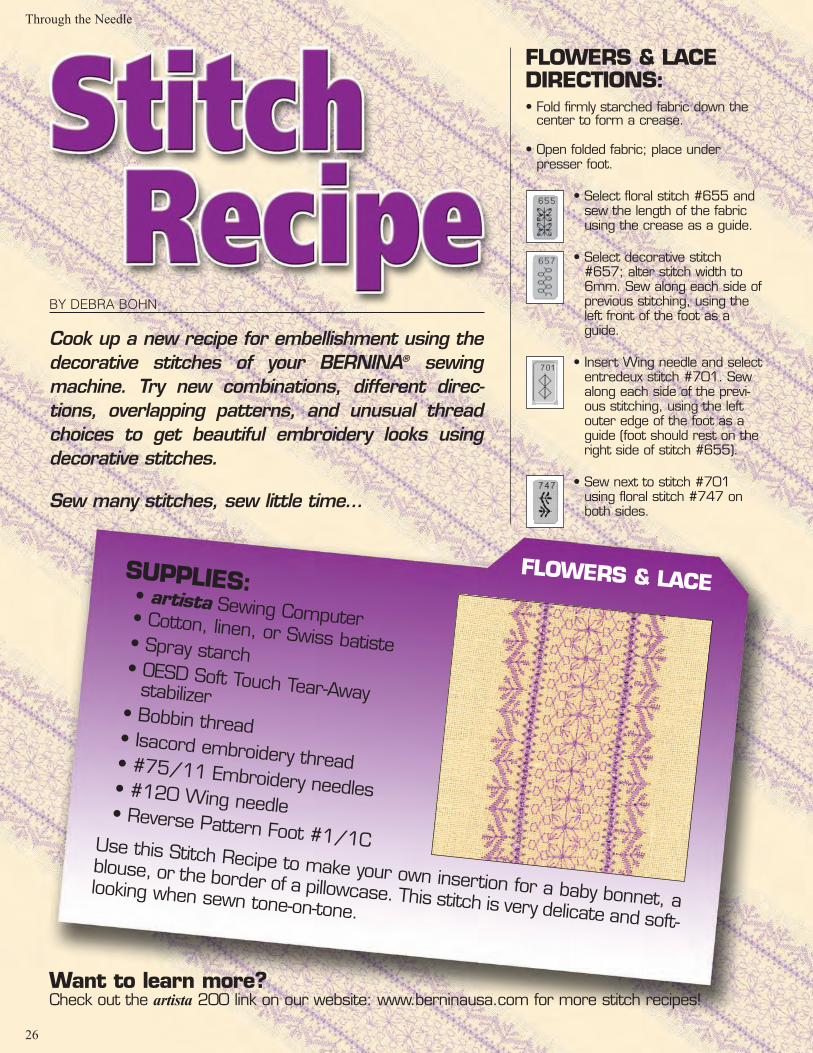
Use this Stitch Recipe to make your own insertion for a baby bonnet, a
blouse, or the border of a pillowcase. This stitch is very delicate and soft-
looking when sewn tone-on-tone.
SUPPLIES:• artista Sewing Computer• Cotton, linen, or Swiss batiste• Spray starch
• OESD Soft Touch Tear-Away stabilizer• Bobbin thread• Isacord embroidery thread• #75/11 Embroidery needles• #120 Wing needle• Reverse Pattern Foot #1/1C
Cook up a new recipe for embellishment using thedecorative stitches of your BERNINA® sewingmachine. Try new combinations, different direc-tions, overlapping patterns, and unusual threadchoices to get beautiful embroidery looks usingdecorative stitches.
Sew many stitches, sew little time...
FLOWERS & LACEDIRECTIONS:• Fold firmly starched fabric down the
center to form a crease.
• Open folded fabric; place under presser foot.
• Select floral stitch #655 and sew the length of the fabric using the crease as a guide.
• Select decorative stitch #657; alter stitch width to 6mm. Sew along each side of previous stitching, using the left front of the foot as a guide.
• Insert Wing needle and select entredeux stitch #701. Sew along each side of the previ-ous stitching, using the left outer edge of the foot as a guide (foot should rest on the right side of stitch #655).
• Sew next to stitch #701 using floral stitch #747 on both sides.
BY DEBRA BOHN
FLOWERS & LACE
WANT TO LEARN MORE?
For more Stitch Recipes, including variations
on the Scalloped Floral Edgingfor the virtuosa 153
and artista 165, visit the Sewing Studio at:
www.berninausa.com
26
Through the Needle
BY JILL DANKLEFSON
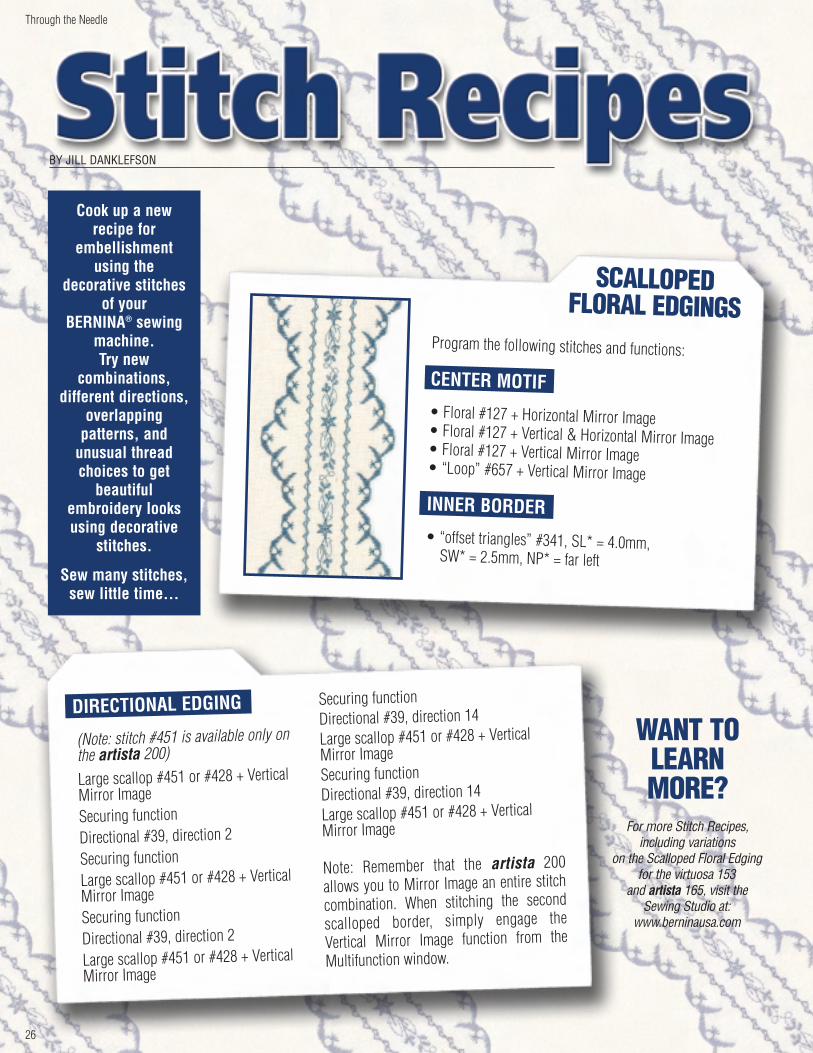
SCALLOPED FLORAL EDGINGS
Cook up a new recipe for
embellishment using the
decorative stitches of your
BERNINA® sewingmachine. Try new
combinations, different directions,
overlapping patterns, and
unusual thread choices to get
beautiful embroidery looks using decorative
stitches.
Sew many stitches, sew little time...
Program the following stitches and functions:
CENTER MOTIF• Floral #127 + Horizontal Mirror Image• Floral #127 + Vertical & Horizontal Mirror Image• Floral #127 + Vertical Mirror Image• “Loop” #657 + Vertical Mirror Image
INNER BORDER• “offset triangles” #341, SL* = 4.0mm,
SW* = 2.5mm, NP* = far left
DIRECTIONAL EDGING
(Note: stitch #451 is available only on the artista 200)
Large scallop #451 or #428 + Vertical Mirror ImageSecuring functionDirectional #39, direction 2
Securing functionLarge scallop #451 or #428 + Vertical Mirror ImageSecuring functionDirectional #39, direction 2
Large scallop #451 or #428 + Vertical Mirror Image
Securing functionDirectional #39, direction 14Large scallop #451 or #428 + Vertical Mirror ImageSecuring functionDirectional #39, direction 14Large scallop #451 or #428 + Vertical Mirror Image
Note: Remember that the artista 200
allows you to Mirror Image an entire stitch
combination. When stitching the second
scalloped border, simply engage the
Vertical Mirror Image function from the
Multifunction window.

WANT TO LEARN MORE?
For more Stitch Recipes, including variations
on the Scalloped Floral Edgingfor the virtuosa 153
and artista 165, visit the Sewing Studio at:
www.berninausa.com
WALLPAPER STITCHES
WALLPAPER STITCHES
Cook up a new recipe for
embellishment using the
decorative stitches of your
BERNINA® sewingmachine. Try new
combinations, different directions,
overlapping patterns, and
unusual thread choices to get
beautiful embroidery looks using decorative
stitches.
Sew many stitches, sew little time...
T h r o u g h t h e N e e d l e
22
5mm BERNINA® Sewing Machines
Line 1: Blanket stitch, Mirrored
Line 2: Open flower stitch
Line 3: Blanket stitch
SPACE AS DESIRED
Line 4: Feather stitch
Line 5: Triple straight stitch
Line 6: Small floral stitch
Line 7: Triple straight stitch
Line 8: Feather stitch
REPEAT as desired.
artista 185 & 200Line 1: Stitch 150, default settingsLine 2: Stitch 332, feather stitch, SW=4.6, SL=2.6,
Mirror Image HorizontalLine 3: Stitch 332, feather stitch, SW=4.6, SL=2.6Line 4: Stitch 332, feather stitch, SW=4.6, SL=2.6,
Mirror Image HorizontalSPACE AS DESIRED
Line 5: Stitch 657, default settingsStitch 6, triple straight stitch, over the center of 657
Line 6: Stitch 826
Line 7: Stitch 657, default settingsStitch 6, triple straight stitch, over the center of 657
REPEAT as desired.

WANT TO LEARN MORE?
For more Stitch Recipes, visit the Sewing Studio at:
www.berninausa.com
artista Embroidery Software Version
Sewing MachineVersion
Cook up a new recipe for
embellishment using the
decorative stitches of your
BERNINA® sewingmachine. Try new
combinations, different directions,
overlapping patterns, and
unusual thread choices to get
beautiful embroidery looks using decorative
stitches.
Sew many stitches, sew little time...
Notes: Engage Motor Speed function before stitching; set at 3/4
speed. Substitute similarly shaped stitches if these are not
available on your machine.
CENTER MOTIF• artista stitch #728• artista stitch #728 + Mirror Image. Engage the Pattern
Begin function before stitching the second row; align
stitch “baselines” so that satin stitch areas meet to form
diamonds along the center line
INNER BORDER• artista stitch #150• artista stitch #150 + Mirror Image. Engage Pattern
Begin to align rows of stitching
OUTER BORDER• artista stitch #746• artista stitch #746 + Mirror Image; engage Pattern
Begin to align rows
(Refer to software manual for specific directions on creating pattern run outlines.)
CENTER MOTIF• heirloom menu, stitch #728• heirloom menu, stitch #728 + Mirror Image
INNER BORDER• np004a menu, stitch #A200150• np004a menu, stitch #A200150 + Mirror Image
OUTER BORDER• Home Dec menu, stitch #a408• Home Dec menu, stitch # a408+ Mirror Image
T h r o u g h t h e N e e d l e
24
Tear Drop TasselTear Drop Tassel

WANT TO LEARN MORE?For more Stitch Recipes, visit the Sewing Studio at: www.berninausa.com
Cook up a new recipe for embellishment
using the decorative stitches of your BERNINA®
sewing machine. Try new combinations,
different directions, overlapping patterns, and unusual thread
choices to get beautiful embroidery looks using
decorative stitches.
Sew many stitches, sew little time...
Begin by planning your row spacing. The rows in the sample are approximately 1/2”apart, with 9mm wide stitches. If your stitches are 5mm wide, you may want to placeyour rows closer together.
Choose thread according to the desired final appearance: for a matte finish use cottonthreads such as the red 30 wt. cotton and subtly variegated blue Oliver Twist shown inthe sample; for a shiny finish use 30 wt rayon or polyester embroidery threads.
Needle – Use a size 90/14 machine embroidery needle.
Create the following stitch combination using the MEMORY feature of your machine:Stitch 906 (star) Default setting (Note: Numbers listed areStitch 417 (satin chevron) Default setting artista stitch numbers,Stitch 906 (star) Mirror Image look for similar stitchesStitch 417 (satin chevron) Mirror Image on your machine.)
Save this combination. Using blue thread, stitch every other line, staggering thestarting point of each row to create more visual interest.
To create the red stripes, select Stitch 414 (satin wave). If your machine has a PatternExtend feature, lengthen the pattern to your personal liking. Stitch every other row(between the blue stripes), again staggering the starting point of each row.
Stars & Stripes
Show your patriotic spirit with afun and simple stitch recipe!
I S S U E 8
25

BY JILL DANKLEFSEN
Bouquet Of Buttons
I S S U E 1 3
23
Create fun stitch combinations,then accent the stitching with
additional “findings” such as beadsand/or buttons. Button “findings”come in many different styles and
types; the recipes shown hereinclude buttons from Just Another
Button Company.
Use Button Sew-on Foot #18 toattach the buttons. Note: Thesebuttons do not have traditionalspacing between the holes, so test the stitch width using the
handwheel, then adjust the width as needed.
For more information on the buttons shown in
this article, go to www.justanotherbutton
company.com
The stitch numbers referenced in this article are listed below with the appropriate current model of BERNINA®
machines. If using another model, look for the same or similar stitch patterns on your machine.
*CPS = Customized Pattern Selection and refers to softwarethat allows the user to exchange the preprogrammed stitchesof the machine with additional choices.
Basic Blossomsartista machines – Stitch 129 [Preprogrammed on 200, CPS* for other artista machines]
virtuosa machines (150, 153, 155, 160) Found in CPS*
aurora 440 – Stitch 83
Diamond Starsartista machines – Stitch 639 [Preprogrammed on 200, CPS* for other artista machines]
virtuosa machines (150, 153, 155, 160) Found in CPS*
aurora 440 – Stitch 138, aurora 430 – Stitch 109
A Button Gardenartista machines – Stitch 122 [Preprogrammed on 200, CPS* for other artista machines]
virtuosa machines (150, 153, 155, 160) Found in CPS*
aurora 440 – Stitch 79, aurora 430 – Stitch 39
activa 240 – Stitch 34, activa 230 PE – Stitch 37
artista machines – Stitch 427 [Preprogrammed on 200, CPS* for other artista machines]
virtuosa machines (150, 153, 155, 160) Found in CPS*
aurora 440 – Stitch 113, aurora 430 – Stitch 87
activa 240 – Stitch 63, activa 230 PE – Stitch 53
artista machines – Stitch 633 [Preprogrammed on 200, CPS* for other artista machines]
virtuosa machines (150, 153, 155, 160) Found in CPS*
aurora 440 – Stitch 135, aurora 430 – Stitch 106
artista machines – Stitch 732 [Preprogrammed on 200, CPS* for other artista machines]
virtuosa machines (150, 153, 155, 160) Found in CPS*
aurora 440 – Stitch 171, aurora 430 – Stitch 141
activa 240 – Stitch 93

Create simple frame shapes to showcase a row of colorful buttons.The recipe shown here has two rows of stitching that form a line oflinked diamonds.
Supplies:• Embroidery thread• OESD lightweight tear-away stabilizer• “Star” buttons
• Coordinating thread to attach buttons• Clear Foot #34/34C• Button Sew-On Foot #18Instructions:1. Engage Needle Stop down; attach Clear Foot #34/34C.2. Sew one row of stitching; engage the Single Pattern or Pattern End
function to perfectly finish the first row of stitching.3. The needle is already in the fabric so simply pivot 180˚ and sew back
to the beginning point, forming a row of diamonds.4. Position and attach buttons as shown.
Diamond Stars
Floral buttons and a simple leaf stitch make a beautiful row of basic
blossoms.
Supplies:
• Green embroidery thread
• OESD lightweight tear-away stabilizer
• “Blossom” buttons
• Coordinating thread to attach buttons
• Open Embroidery Foot #20/20C
• Button Sew-On Foot #18
Instructions:
1. Select a stitch such as the floral/leaf pattern shown here.
2. Using Open Embroidery Foot #20/20C, stitch a row of continuous
pattern as desired.
3. After stitching is complete, attach buttons in appropriate places to
complete the design using coordinating thread and Button Sew-On
Foot #18.
Basic Blossoms
T H R O U G H T H E N E E D L E
24
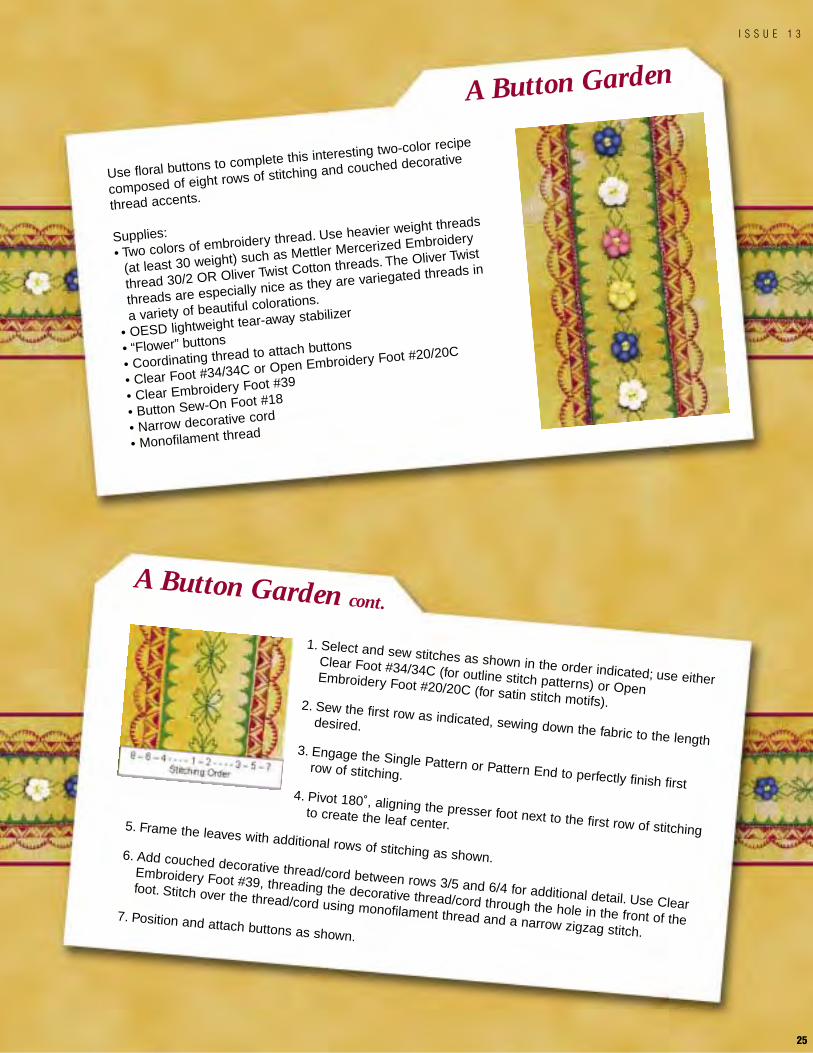
Use floral buttons to complete this interesting two-color recipe
composed of eight rows of stitching and couched decorative
thread accents.
Supplies:
• Two colors of embroidery thread. Use heavier weight threads
(at least 30 weight) such as Mettler Mercerized Embroidery
thread 30/2 OR Oliver Twist Cotton threads. The Oliver Twist
threads are especially nice as they are variegated threads in
a variety of beautiful colorations.
• OESD lightweight tear-away stabilizer
• “Flower” buttons
• Coordinating thread to attach buttons
• Clear Foot #34/34C or Open Embroidery Foot #20/20C
• Clear Embroidery Foot #39
• Button Sew-On Foot #18
• Narrow decorative cord
• Monofilament thread
1. Select and sew stitches as shown in the order indicated; use eitherClear Foot #34/34C (for outline stitch patterns) or OpenEmbroidery Foot #20/20C (for satin stitch motifs).2. Sew the first row as indicated, sewing down the fabric to the length
desired.
3. Engage the Single Pattern or Pattern End to perfectly finish firstrow of stitching.
4. Pivot 180˚, aligning the presser foot next to the first row of stitchingto create the leaf center.5. Frame the leaves with additional rows of stitching as shown.6. Add couched decorative thread/cord between rows 3/5 and 6/4 for additional detail. Use Clear
Embroidery Foot #39, threading the decorative thread/cord through the hole in the front of the
foot. Stitch over the thread/cord using monofilament thread and a narrow zigzag stitch.7. Position and attach buttons as shown.
A Button Garden
A Button Garden cont.
I S S U E 1 3
25
BY JILL DANKLEFSEN
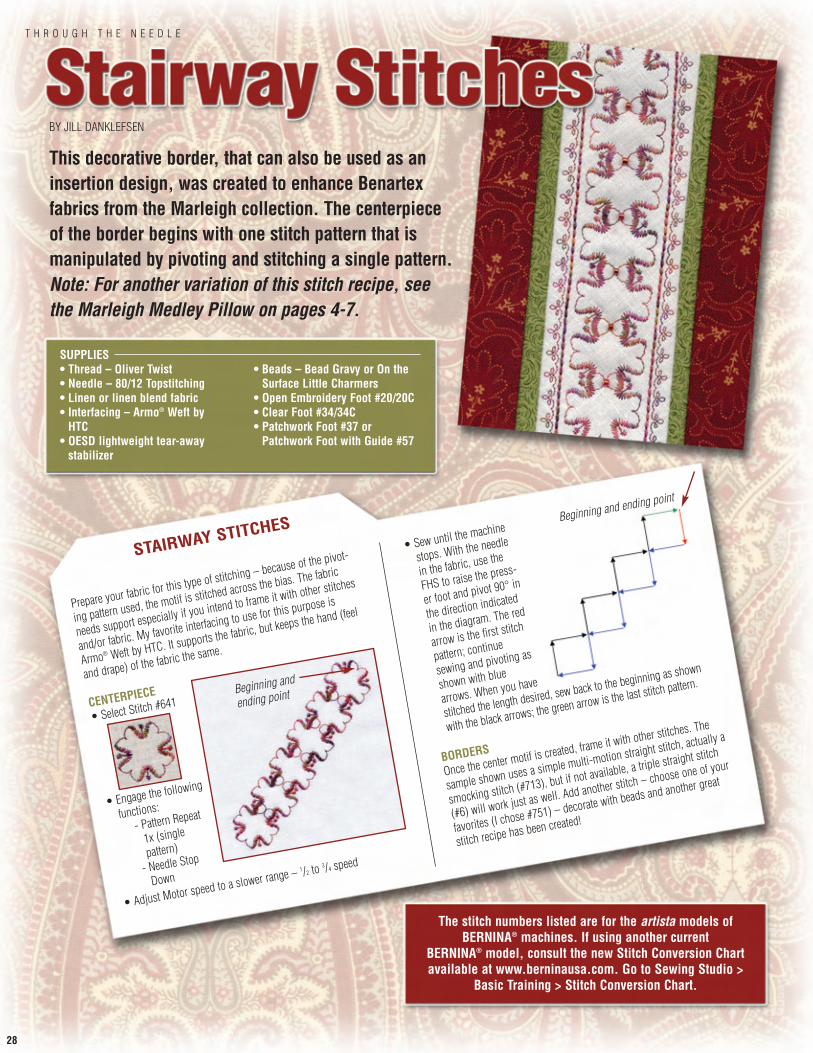
STAIRWAY STITCHES
28
T H R O U G H T H E N E E D L E
This decorative border, that can also be used as aninsertion design, was created to enhance Benartexfabrics from the Marleigh collection. The centerpieceof the border begins with one stitch pattern that ismanipulated by pivoting and stitching a single pattern.Note: For another variation of this stitch recipe, seethe Marleigh Medley Pillow on pages 4-7.
The stitch numbers listed are for the artista models of BERNINA® machines. If using another current
BERNINA® model, consult the new Stitch Conversion Chart available at www.berninausa.com. Go to Sewing Studio >
Basic Training > Stitch Conversion Chart.
Prepare your fabric for this type of stitching – because of the pivot-
ing pattern used, the motif is stitched across the bias. The fabric
needs support especially if you intend to frame it with other stitches
and/or fabric. My favorite interfacing to use for this purpose is
Armo® Weft by HTC. It supports the fabric, but keeps the hand (feel
and drape) of the fabric the same.
CENTERPIECE
• Select Stitch #641
• Engage the following
functions:- Pattern Repeat
1x (single
pattern)
- Needle Stop
Down
• Adjust Motor speed to a slower range – 1/2 to 3/4 speed
• Sew until the machine
stops. With the needle
in the fabric, use the
FHS to raise the press-
er foot and pivot 90° in
the direction indicated
in the diagram. The red
arrow is the first stitch
pattern; continue
sewing and pivoting as
shown with blue
arrows. When you have
stitched the length desired, sew back to the beginning as shown
with the black arrows; the green arrow is the last stitch pattern.
BORDERS
Once the center motif is created, frame it with other stitches. The
sample shown uses a simple multi-motion straight stitch, actually a
smocking stitch (#713), but if not available, a triple straight stitch
(#6) will work just as well. Add another stitch – choose one of your
favorites (I chose #751) – decorate with beads and another great
stitch recipe has been created!
SUPPLIES• Thread – Oliver Twist • Needle – 80/12 Topstitching• Linen or linen blend fabric• Interfacing – Armo® Weft by
HTC• OESD lightweight tear-away
stabilizer
• Beads – Bead Gravy or On theSurface Little Charmers
• Open Embroidery Foot #20/20C• Clear Foot #34/34C• Patchwork Foot #37 or
Patchwork Foot with Guide #57
Beginning and ending point
Beginning and
ending point
32
By JILL DANKLEFSEN
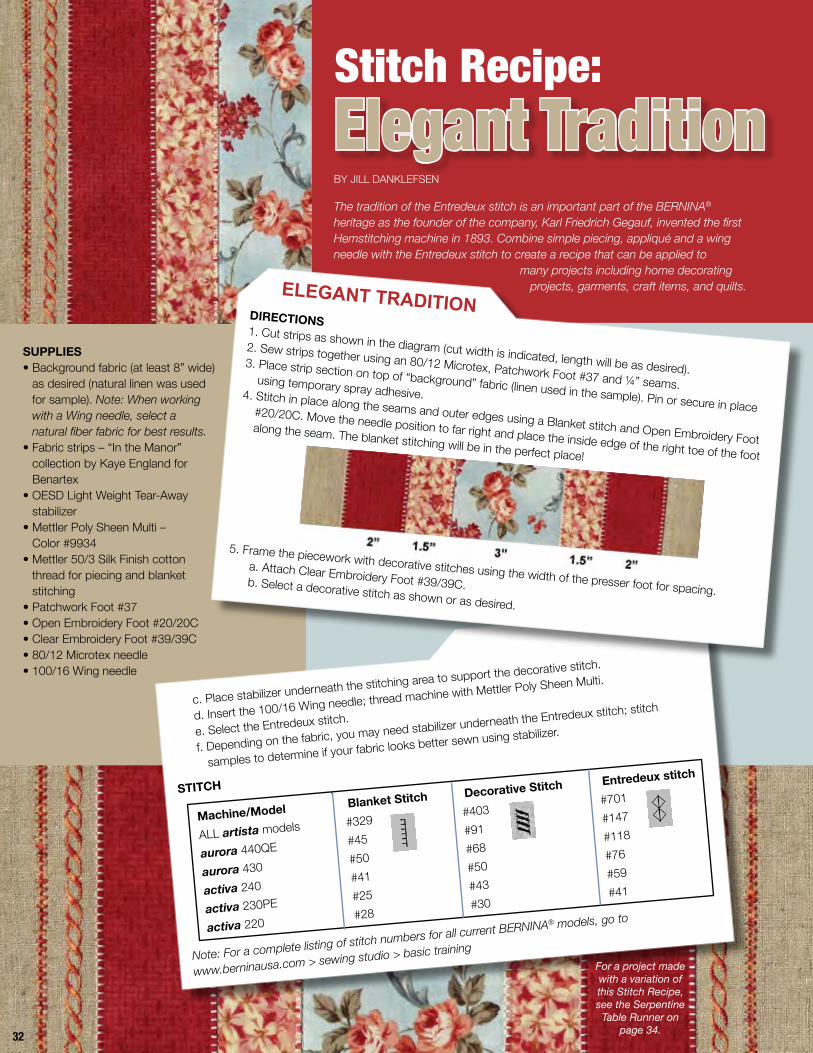
The tradition of the Entredeux stitch is an important part of the BERNINA® heritage as the founder of the company, Karl Friedrich Gegauf, invented the first Hemstitching machine in 1893. Combine simple piecing, appliqué and a wing needle with the Entredeux stitch to create a recipe that can be applied to many projects including home decorating projects, garments, craft items, and quilts.
SuPPLieS • Background fabric (at least 8” wide)
as desired (natural linen was used for sample). Note: When working with a Wing needle, select a natural fiber fabric for best results.
• Fabric strips – “In the Manor” collection by Kaye England for Benartex
• OESD Light Weight Tear-Away stabilizer
• Mettler Poly Sheen Multi – Color #9934
• Mettler 50/3 Silk Finish cotton thread for piecing and blanket stitching
• Patchwork Foot #37• Open Embroidery Foot #20/20C• Clear Embroidery Foot #39/39C• 80/12 Microtex needle• 100/16 Wing needle
c. Place stabilizer underneath the stitching area to support the decorative stitch.
d. Insert the 100/16 Wing needle; thread machine with Mettler Poly Sheen Multi.
e. Select the Entredeux stitch.
f. Depending on the fabric, you may need stabilizer underneath the Entredeux stitch; stitch
samples to determine if your fabric looks better sewn using stabilizer.
diReCtionS1. Cut strips as shown in the diagram (cut width is indicated, length will be as desired).
2. Sew strips together using an 80/12 Microtex, Patchwork Foot #37 and ¼” seams.
3. Place strip section on top of “background” fabric (linen used in the sample). Pin or secure in place
using temporary spray adhesive.4. Stitch in place along the seams and outer edges using a Blanket stitch and Open Embroidery Foot
#20/20C. Move the needle position to far right and place the inside edge of the right toe of the foot
along the seam. The blanket stitching will be in the perfect place!
5. Frame the piecework with decorative stitches using the width of the presser foot for spacing.
a. Attach Clear Embroidery Foot #39/39C. b. Select a decorative stitch as shown or as desired.
ELEGANT TRADITION
StitCh
Machine/Model Blanket Stitch decorative Stitch entredeux stitch
ALL artista models #329 #403
#701
aurora 440QE #45 #91
#147
aurora 430 #50
#68 #118
activa 240 #41
#50 #76
activa 230PE #25 #43
#59
activa 220 #28
#30 #41
Note: For a complete listing of stitch numbers for all current BERNINA® models, go to
www.berninausa.com > sewing studio > basic training
For a project made with a variation of this Stitch Recipe, see the Serpentine Table Runner on
page 34.
29
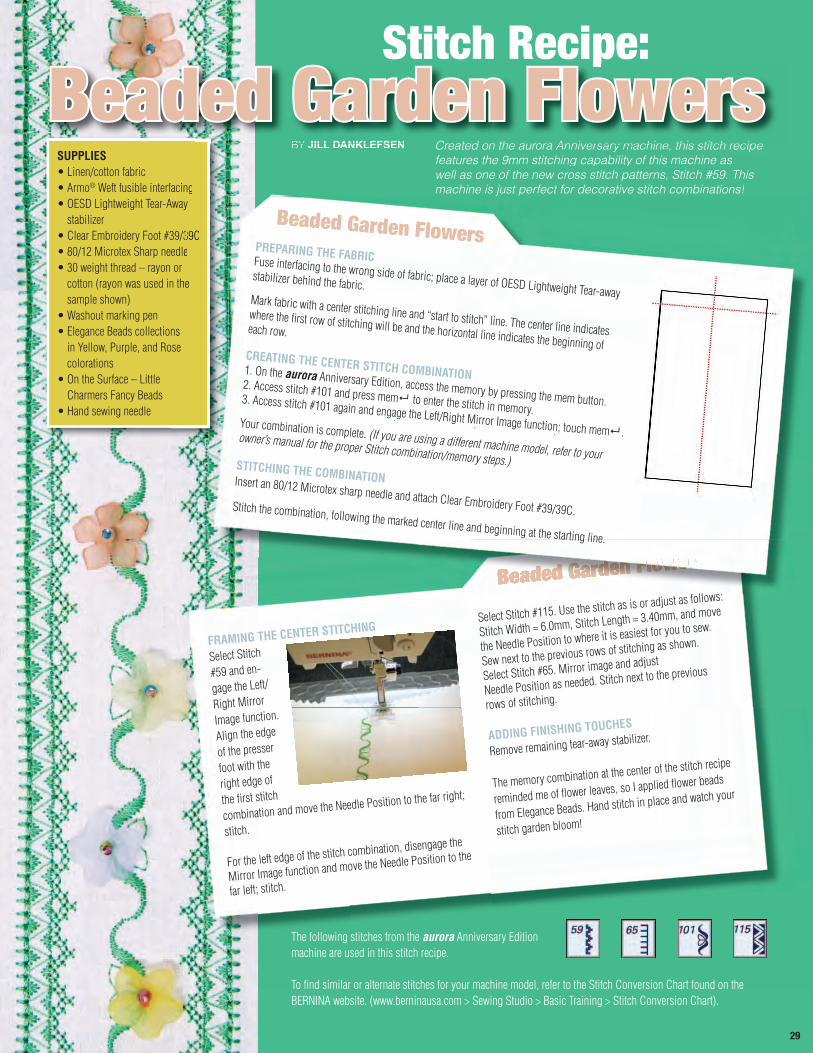
BY JILL DANKLEFSEN Created on the aurora Anniversary machine, this stitch recipefeatures the 9mm stitching capability of this machine aswell as one of the new cross stitch patterns, Stitch #59. Thismachine is just perfect for decorative stitch combinations!
SUPPLIES• Linen/cotton fabric• Armo® Weft fusible interfacing• OESD Lightweight Tear-Away
stabilizer• Clear Embroidery Foot #39/39C• 80/12 Microtex Sharp needle• 30 weight thread – rayon or
cotton (rayon was used in thesample shown)
• Washout marking pen• Elegance Beads collections
in Yellow, Purple, and Rosecolorations
• On the Surface – LittleCharmers Fancy Beads
• Hand sewing needle
BY JILL DANKLEFSEN Created on the aurora Anniversary machine,features the 9mm stitching capability of this machine aswell as one of the new cross stitch patterns, Stitch #59. Thismachine is just perfect for decorative stitch combinations!g
39Ce
he
se
FRAMING THE CENTER STITCHING
Select Stitch
#59 and en-
gage the Left/
Right Mirror
Image function.
Align the edge
of the presser
foot with the
right edge of
the fi rst stitch
combination and move the Needle Position to the far right;
stitch.
For the left edge of the stitch combination, disengage the
Mirror Image function and move the Needle Position to the
far left; stitch.
Select Stitch #115. Use the stitch as is or adjust as follows:
Stitch Width = 6.0mm, Stitch Length = 3.40mm, and move
the Needle Position to where it is easiest for you to sew.
Sew next to the previous rows of stitching as shown.
Select Stitch #65. Mirror image and adjust
Needle Position as needed. Stitch next to the previous
rows of stitching.
ADDING FINISHING TOUCHES
Remove remaining tear-away stabilizer.
The memory combination at the center of the stitch recipe
reminded me of fl ower leaves, so I applied fl ower beads
from Elegance Beads. Hand stitch in place and watch your
stitch garden bloom!
PREPARING THE FABRICFuse interfacing to the wrong side of fabric; place a layer of OESD Lightweight Tear-awaystabilizer behind the fabric.Mark fabric with a center stitching line and “start to stitch” line. The center line indicateswhere the fi rst row of stitching will be and the horizontal line indicates the beginning ofeach row.
CREATING THE CENTER STITCH COMBINATION1. On the aurora Anniversary Edition, access the memory by pressing the mem button.2. Access stitch #101 and press mem to enter the stitch in memory.3. Access stitch #101 again and engage the Left/Right Mirror Image function; touch mem .Your combination is complete. (If you are using a different machine model, refer to yourowner’s manual for the proper Stitch combination/memory steps.)STITCHING THE COMBINATIONInsert an 80/12 Microtex sharp needle and attach Clear Embroidery Foot #39/39C.Stitch the combination, following the marked center line and beginning at the starting line.
Beaded Garden Flowers
A i hi thi tit h iBY JILL DANKLEFSEN C t d th A i
Beaded Garden Flowers
The following stitches from the aurora Anniversary Editionmachine are used in this stitch recipe.
To fi nd similar or alternate stitches for your machine model, refer to the Stitch Conversion Chart found on theBERNINA website. (www.berninausa.com > Sewing Studio > Basic Training > Stitch Conversion Chart).
22
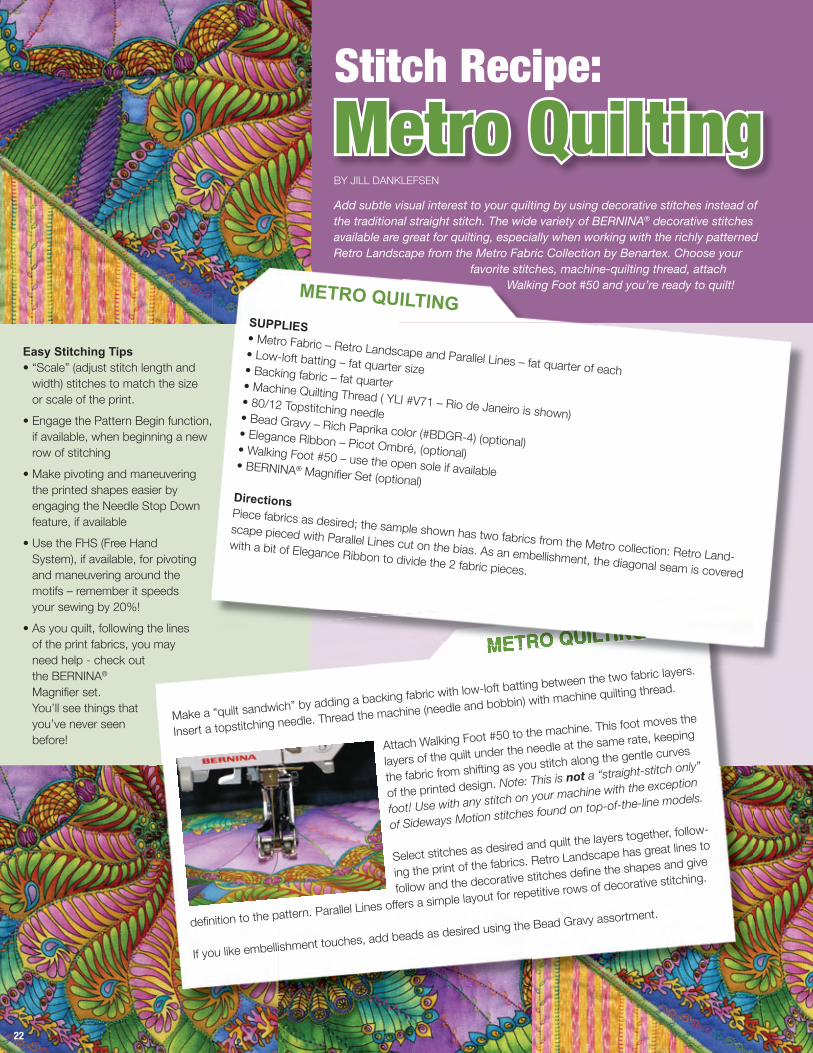
METRO QUILTING
BY JILL DANKLEFSEN
Add subtle visual interest to your quilting by using decorative stitches instead of the traditional straight stitch. The wide variety of BERNINA® decorative stitches available are great for quilting, especially when working with the richly patterned Retro Landscape from the Metro Fabric Collection by Benartex. Choose your favorite stitches, machine-quilting thread, attach Walking Foot #50 and you’re ready to quilt!
Easy Stitching Tips • “Scale” (adjust stitch length and
width) stitches to match the size or scale of the print.
• Engage the Pattern Begin function, if available, when beginning a new row of stitching
• Make pivoting and maneuvering the printed shapes easier by engaging the Needle Stop Down feature, if available
• Use the FHS (Free Hand System), if available, for pivoting and maneuvering around the motifs – remember it speeds your sewing by 20%!
• As you quilt, following the lines of the print fabrics, you may need help - check out the BERNINA® Magnifi er set. You’ll see things that you’ve never seen before!
Make a “quilt sandwich” by adding a backing fabric with low-loft batting between the two fabric layers.
Insert a topstitching needle. Thread the machine (needle and bobbin) with machine quilting thread.
Attach Walking Foot #50 to the machine. This foot moves the
layers of the quilt under the needle at the same rate, keeping
the fabric from shifting as you stitch along the gentle curves
of the printed design. Note: This is not a “straight-stitch only”
foot! Use with any stitch on your machine with the exception
of Sideways Motion stitches found on top-of-the-line models.
Select stitches as desired and quilt the layers together, follow-
ing the print of the fabrics. Retro Landscape has great lines to
follow and the decorative stitches defi ne the shapes and give
defi nition to the pattern. Parallel Lines offers a simple layout for repetitive rows of decorative stitching.
If you like embellishment touches, add beads as desired using the Bead Gravy assortment.
SUPPLIES• Metro Fabric – Retro Landscape and Parallel Lines – fat quarter of each• Low-loft batting – fat quarter size• Backing fabric – fat quarter• Machine Quilting Thread ( YLI #V71 – Rio de Janeiro is shown)
• 80/12 Topstitching needle• Bead Gravy – Rich Paprika color (#BDGR-4) (optional)• Elegance Ribbon – Picot Ombré, (optional)• Walking Foot #50 – use the open sole if available• BERNINA® Magnifi er Set (optional)
DirectionsPiece fabrics as desired; the sample shown has two fabrics from the Metro collection: Retro Land-
scape pieced with Parallel Lines cut on the bias. As an embellishment, the diagonal seam is covered
with a bit of Elegance Ribbon to divide the 2 fabric pieces.
METRO QUILTING