thank you for purchasing the p-touch 530/550! -...
TRANSCRIPT


Thank you for purchasing the P-touch 530/550!
With your new P-touch, you can create labels and stamps for any need. Select from the manyframes, character sizes and styles to design beautiful custom labels and stamps. In a addition,the variety of tape and ink colors available allow you to print personalized labels, useful forcolor-coding.
You no longer have to worry about urgent tasks that require professional printing. In theoffice, the factory, the lab or the home, the quality and performance of the P-touch 530/550makes it an extremely practical machine.
Finally, as you may want to refer to this User’s Guide occasionally, we suggest that you keepit in a handy place.
FCC NOTICE
This equipment has been tested and found to comply with the limits foe a Class B digitaldevice, pursuant to 15 of the FCC Rules. These limits are designed to provide reasonableprotection against harmful interference in a residential installation. This equipmentgenerates, uses, and can radiate radio frequency energy and, if not installed and used inaccordance with the instructions, may cause harmful interference to radio communications.However, there is no guarantee that interference will not occur in a particular installation.If this equipment does cause harmful interference to radio or television reception, whichcan be determined by turning the equipment off and on, the user is encouraged to try tocorrect the interference by one or more of the following measures:
Reorient or relocate the receiving antenna.
Increase the separation between the equipment and receiver.
Connect the equipment into an outlet on a circuit different from that to which the receiveris connected.
Consult the dealer or an experienced radio/TV technician for help.
The enclosed interface cable should be used in order to ensure compliance with the limitsfor a Class B digital device.
Changes or modifications not expressly approved by Brother Industries, Ltd. Could voidthe user’s authority to operate the equipment.
This product is covered by one or more of the following patents.
USP4839742 USP4983058 EP315369 GB2223740
USP4922063 USP5009530 EP322918
USP4927278 USP5069557 EP322919
USP4966476 USP5120147
USP4976558

i
ABOUT THIS MANUAL.................................................................................. 1
QUICK REFERENCE GUIDE
BEFORE YOU START
MACHINE DIAGRAM...................................................................................8 GENERAL PRECAUTIONS .......................................................................10 BATTERIS.................................................................................................11 OPTIONAL AC ADAPTOR.........................................................................12 TAPE CASSETTE .....................................................................................13 ATTACHING LABELS................................................................................16 PRINT HEAD AND ROLLERS....................................................................19
LEARNING THE ROPES
INTRODUCTION .......................................................................................22 NAME TAG EXAMPLE ..............................................................................23 EQUIPMENT LABEL EXAMPLE ................................................................30 ADDRESS LABEL EXAMPLE ....................................................................36 STORAGE SHELF LABEL EXAMPLE ........................................................45
FOR YOUR INFORMATION
INTRODUCTION .......................................................................................54 FINDING YOUR WAY................................................................................55 On/Off KEY ...............................................................................................56 CURSOR KEYS ........................................................................................57 Code/Alt/Shift KEYS AND Caps MODE ......................................................59 Space KEY................................................................................................62 RETURN KEY ...........................................................................................63 New Block FUNCTION...............................................................................66 Cancel KEY...............................................................................................68 BS (BACKSPACE) KEY.............................................................................71 Line Out FUNCTION..................................................................................72 Clear FUNCTION.......................................................................................73 Symbol FUNCTION ...................................................................................75 Accent FUNCTION ....................................................................................78

ii
Barcode FUNCTION ..................................................................................80 Zoom KEY.................................................................................................85 Contrast KEY.............................................................................................86 Label length FUNCTION ............................................................................87 Auto Formats Key ......................................................................................88 Area KEY AND ALL FUNCTION.................................................................97 Font KEY................................................................................................. 100 Size AND Width KEYS............................................................................. 102 Style KEY................................................................................................ 104 Undl/Frm (UNDERLINE/FRAME) KEY...................................................... 107 Color KEY ............................................................................................... 109 Format KEY............................................................................................. 110 GLOBAL FRAME FUNCTION .................................................................. 112 FRAME COLOR FUNCTION.................................................................... 113 STYLE COLOR FUNCTION..................................................................... 114 LENGTH FUNCTION............................................................................... 116 FEED (TAPE FEED) FUNCTION.............................................................. 117 H.ALI (HORIZONTAL ALIGNMENT) FUNCTION ...................................... 118 VERT (VERTICAL PRINTING) FUNCTION............................................... 119 MIRROR (MIRROR PRINTING) FUNCTION............................................. 120 UNIT FUNCTION..................................................................................... 121 Print KEY AND Tape Cut KEY.................................................................. 122 COLOR PRINT FUNCTION ..................................................................... 123 Stamp FUNCTION................................................................................... 125 Special Print FUNCTION.......................................................................... 128 Seq. Numbering FUNCTION .................................................................... 130 Store, Recall AND M.Del KEYS................................................................ 134
ERROR MESSAGE LIST ............................................................................ 139
TROUBLESHOOTING ................................................................................ 146
MACHINE SPECIFICATIONS...................................................................... 147
FEATURES ................................................................................................. 148
INDEX ......................................................................................................... 149
ACCESSORIES........................................................................................... 152

1
Although the P-touch 530/550 is easy to use, we suggest that you read this manual carefully
before starting. This manual consists of a reference guide and three chapter:
QUICK REFERENCE GUIDE This guide provides quick and simple instructions on set-
ting up and using the machine.
BEFORE YOU START This chapter provides basic information concerning the tape
cassettes, power supplies, and labels.
LEARNING THE ROPES The easy-to-follow practice sessions in this chapter are de-
signed to help you become familiar with the machine’s
operations.
FOR YOUR INFORMATION This handy reference chapter contains detailed explanations
of all the machine’s features.
The Quick Reference Guide contains all the information you need to immediately begin
using this machine for making simple labels. Please read the brief Before You Start chapter
for more details on the setup and care of the machine.
If this is your first time using a P-touch or if you would like to brush up on some techniques,
we suggest you work through the exercises in Learning the Ropes. If you have detailed ques-
tions about specific features, the For Your Information chapter will provide you with the
answers.
We hope you enjoy using your P-touch 530/550.

2

3

4

5

6


8

9

10
* Use only Brother TZ tapes with this machine. Do not use tapes that do not have the
mark.
* Do not pull on the tape being fed from the P-touch. Doing so may damage the tape
cassette.
* Avoid using the machine in extremely dusty place. Keep in out of both direct sunlight and
rain.
* When printing a label, a horizontal line appears on your label, this may be an indication that dust is on the print head. To clean the print head, gently rub a cotton swab over the print head to remove dust. (See page 19.)
* Be sure tape is properly fed through tape guidelines before installing a tape into the ma- chine. (See page 15.)
* Do not expose the machine to high temperatures or high humidity. Never leave it on the dashboard or in the back of your car.
* Do not leave any rubber or vinyl on the machine foe an extended period of time. Doing so may cause staining.
* Do not put any foreign objects onto or into the machine.
* To avoid injuries, do not touch the cutter’s edge.
* When inserting new batteries, be sure to do so within five minutes of removing the old ones, otherwise all text files will be lost (unless the machine is plugged into an AC outlet with the AC adapter).
* Use only the AC adapter (model AD-60) designed exclusively for this machine. Use of any other adapter will void the warranty.
* When the machine is not being used for a long period of time and it is not necessary to keep the text files stored in the memory, disconnect the AC adapter, and remove the batteries to prevent them from leaking and damaging the machine.
* If the adapter is removed from the AC outlet before unplugging in from the machine, the text files in the memory will not be deleted if the batteries are correctly installed.
* Use only AA alkaline batteries in this machine.

11

12

13

14

15

16

17

18
+ White garments made from 100% cotton with a plain (smooth) surface are best formaking iron-on transfers.You can also make transfers to garments made from 100% linen or cotton/polyesterblends as long as they have a plain (smooth) surface.The iron-on will not adhere properly to any cloth with a rough surface, such as pile ordenim, or with a waterproof surface. Hart- sensitive materials, such as nylon, acetateor other similar fibers, are unsuitable as they may be damaged when they are pressedwith an iron at a high temperature.Press the iron straight down onto the cloth. Do not move the iron while pressing,otherwise the label may move out of place.After the backing tape has been removed, the transferred iron-on may appear glossy.In addition, some white spots may have appeared on the label if it was touched whilethe backing tape was peeled off. These can be removed by ironing over the iron-ontransfer with a piece of cloth placed between it and the iron.The iron-on transfer will have a white background on colored cloth.Since the transferred iron-on cannot be removed once it is applied, make all transferswith care.
Washing
Garments with iron-on transfers can be washed over 20 times if the iron-on has been trans-ferred correctly. Normal biological and non-biological household detergents may be used.The iron-on may become discolored if the garment is placed in bleach for an extendedlength of time.Be careful that hard objects such as buckles or buttons do not come into contact with theiron-on in the wash.Do not dry clean garments which have had iron-on transfers applied.
Drying
Garments with iron-on transfers may be dried either inside or outside out.Do not tumble dry. The transfers will come off and may stick to other items of clothing.
Ironing
Iron garments with transfers using normal temperature settings.Be sure to place a piece of cloth between the iron and label when you iron over it toprevent the label from sticking to the iron.

19
Occasionally, specks of dust or dirt become attached to the machine’s print head and rollers.This is particularly likely when you are using the unit outdoors or in a very dusty environment.If a section of the print head is covered with dust, a blank horizontal streak mayappear through the text in the printed label.
Therefore, as with a tape recorder, the machine’s head may need to be cleaned from time totime.
TO CLEAN THE PRINT HEAD
Ê Turn off the machine.
Ë Open the tape compartment cover, then remove the tape cassette if one is installed. The print head and rollers are located in the tape compartment.
Ì Print head: Use a dry cotton swab to gently wipe the print head with an up-and - down motion.
Rollers: Use a dry cotton swab to wipe each roller with an up-and-down motion while rotating them with your finger.
Í Try printing again.If dust still remains:
Î Repeat step Ì using a cotton swab dipped in isopropyl (rubbing) alcohol.
If none of the above works, contact your service representative.

20


22
In Learning the Ropes, you will find a series of label-making examples. As the example labelsbecome increasingly more complex, you will learn how to use the more advanced featuresof the machine. The first exercise consists of creating a simple one-line name tag. The second,an equipment instruction label, takes advantage of several additional machine capabilities.The third is a four-line address label. Finally, the storage shelf label shows you how to usethe unit’s more expert functions.
If you are a first-time user, we suggest that you work through these exercises to becomeacquainted with the various features of this machine. Since they do not require much time,they can be done in four separate practice sessions or all at once.
The Learning the Ropes examples is constructed as shown below:
+ Although the P-touch 530 display is shown in the examples, the operation does not
change for the P-touch 550.
To best use this training section, simply follow the flow of the practice sessions. Read thebackground explanations, then follow the instructions, checking that your results match theillustrations provided. If you would like more detailed information about a particular point,simply check in the For Your Information chapter.
Now, let’s see how easy it is to make beautiful labels with the P-touch 530/550!

23
After you have inserted the batteries and the enclosed tape cassette as explained in the BeforeYou Start chapter, we can practice using some of the basic functions of your P-touch 530/550.We must first begin by turning on the power to the machine.
The WYSIWYG (what-you-see-is-what-you-get) mode allows you to see exactly how thelabel would appear if it were printed. The flashing bracket that appears on the display iscalled the “cursor”. Its is like a pointer which shows your current position and lets you selectcharacters in your text.
Some format settings are indicated by the rectangles which appear at the top and bottom ofthe display. The default settings (the settings when the machines is turned on for the very firsttime) have been pre-programmed into the machine and represent the most common settingsfor labels. However, you can design your own label to have any format that you wish.Detailed explanations of the formats can be found on page 97 to 120 of For Your Information.
Your P-touch 530/550 is also equipped with an Auto Formats function, which allows you tomake labels more quickly and easily then if you formatted the text yourself. With this function,simply, select from the many preset label templates that are available and enter the textto create labels which are already formatted with certain fonts, styles and other layout settings.For more details on this function, refer to the Auto Formats KEY section on pages 88 to 96.
24
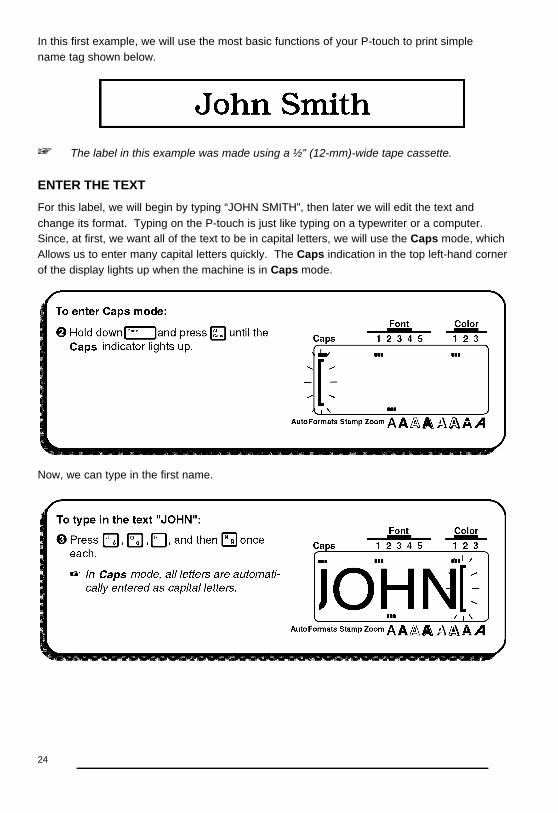
In this first example, we will use the most basic functions of your P-touch to print simplename tag shown below.
+ The label in this example was made using a ½” (12-mm)-wide tape cassette.
ENTER THE TEXT
For this label, we will begin by typing “JOHN SMITH”, then later we will edit the text andchange its format. Typing on the P-touch is just like typing on a typewriter or a computer.Since, at first, we want all of the text to be in capital letters, we will use the Caps mode, whichAllows us to enter many capital letters quickly. The Caps indication in the top left-hand cornerof the display lights up when the machine is in Caps mode.
Now, we can type in the first name.

25

26

27

28

29
PRINT THE TEXT
Since our text is finished, we can print it. If we used the default settings pre-programmed intothe P-touch for the Special Print function, we could print one whole copy of the label, whichwould automatically be cut after printing is finished.

30
Now that we know how to enter, edit and print text, we can practice creating a multi-linelabel. In this example, we will also learn how to use the Special Print and the Format keyfunctions to print three copies of the copier label shown below.
+ The label in this example was made using a ½” (12-mm)-wide tape cassette.
CLEARING THE DISPLAY
Before entering our new text, we must first erase the text that is shown in the display from theprevious time that the machine was used. When we clear the display, all of the text formats(font, size, width, style, underline/framing and color) and the Format key functions return totheir default settings.

31

32

33

34
PRINT THE TEXT
Suppose we wish to print three copies this label. To do this, we would use the COPIESparameter of the Special Print function. For more details on the Special Print function para-meters, refer to pages 128 and 129.

35

36
In this example, we will recall our name tag text file, change it into a multi-line address label,then print using the color printing functions. We will also use some of the other text formatkeys to emphasize part of the text.
+ The label in this example can be printed on 3/4”(18-mm)-, 1”(24-mm)- or 1-1/2”
(36mm)-wide tape.
RECALLING TEXT
Since we saved the name tag text in the memory, we can recall it to edit it. If we had notsaved the text, it would be lost and we would have to type it in again. When we recall testfrom the memory, any text that was shown in the display is deleted.

37
ENTERING THE TEXTNow, we can type in the address and telephone number for our label.

38
Since the text is displayed in the WYSIWYG mode, it starts to become small and difficult toread when too many lines are entered. Therefore, we will use the zoom function so that wecan see the text more clearly.

39

40
The text format settings could also have been chosen before the text was entered. In this way,the selected settings would remain until they are changed again.Next, we can use the Format key to add a frame all around our address label text.

41

42
PRINTING THE TEXT
Now, let’s assume we wish to print a copy of this label in color. Therefore, we must decidewhich ink colors will be used for COLOR1, COLOR2 and COLOR3. For this example, let’sfill in the name with red (COLOR2) and print the frame in blue (COLOR3). We will print therest of the text, which has default setting (COLOR1), in black. For more details on colorprinting, refer to pages 123 to 124.

43

44

45
In this final example, we will practice using the New Block function as will as more specializedfeatures, such as the Barcode and Seq. Numbering (sequential numbering) functions, in orderto make the following two labels which could be used to describe objects stored on a shelf.
+ The label in this example can be printed on ¾”(18-mm)-, 1”(24-mm)- or 1-1/2”(36-mm)-wide tape.
Each time the number of lines changes, a new block of text must be created. Therefore, thetext for our label must be entered in three separate blocks as shown below. With the WYSIWYGmode, making complex multi-block labels is easier since you can see exactly how the labelwould appear if it were printed.

46
CLEARING THE DISPLAY
Again, we must first erase the text that is shown in the display from the previous time that themachine was used.
ENTERING THE TEXT
Now, we can begin entering the storage shelf label text. Since we know that we want to usea different font for the first block, we can select the new font before entering the text.

47
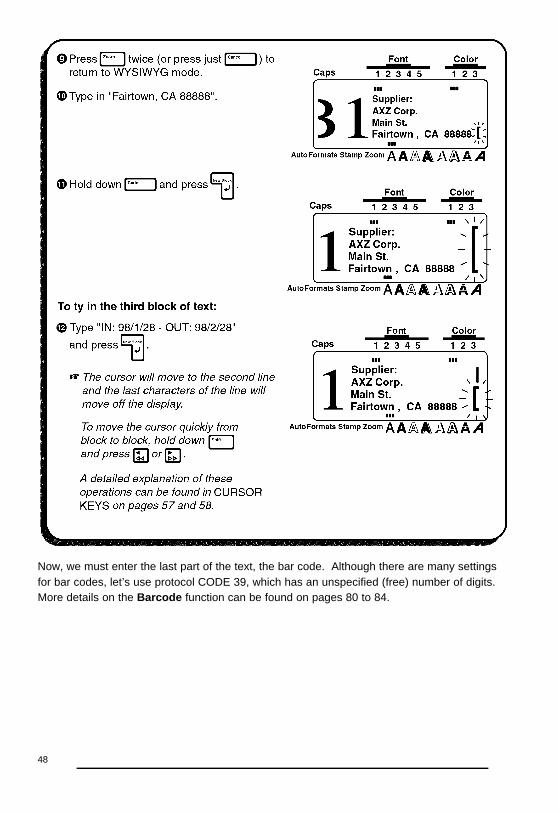
Since we now want to change from a one-line to a four-line block, we will use the NewBlock function. A detailed explanation of multi-block labeling can be found in New BlockFUNCTION on pages 66 and 67.
48
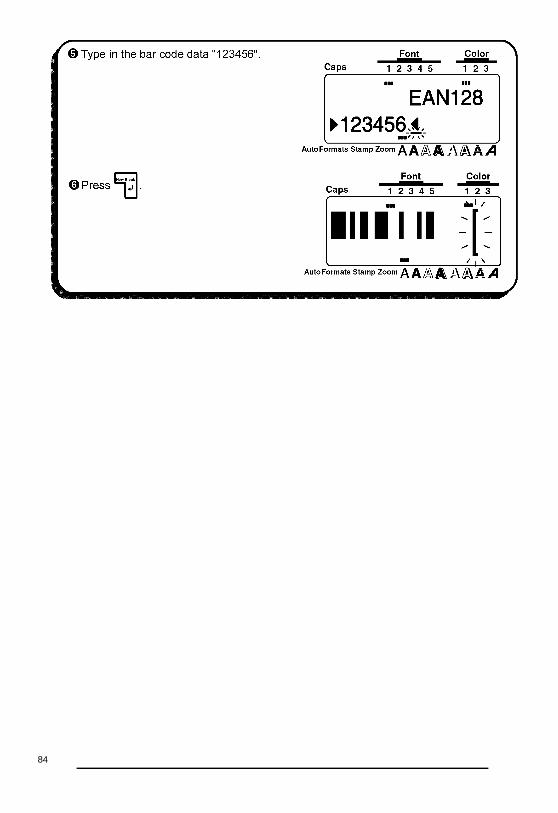
Now, we must enter the last part of the text, the bar code. Although there are many settingsfor bar codes, let’s use protocol CODE 39, which has an unspecified (free) number of digits.More details on the Barcode function can be found on pages 80 to 84.

49
PRINTING THE TEXT
Finally, let’s assume that we want to put labels on two different shelves (B1 and B2) whilekeeping the same bar code. To do this, we can use the Seq. Numbering (sequential num-bering) function to print two copies of our label while automatically increasing the shelf numberafter each label is printed. More details can be found in Seq. Numbering FUNCTION onpages 130 to 133.

50

51
With these four examples, we have covered most of the basic features of your P-touch 530/550 so that you can begin creating your own customized labels. If you have questions aboutany of the functions, refer to the appropriate explanation in the For Your Information chapter.

52


54
In this chapter, you will find detailed explanations for all of the machine’s features. Eachtopic is given its own section, making this reference chapter easy to use.
Operational examples of most features can also be found in the Learning the Ropes practicesessions. If you are a first-time P-touch user, we suggest that you work through those exer-cises before starting to make labels on your own.
This For Your Information chapter provides supplementary information. When you have aquestion about a particular key or function, locate that topic in the FINDING YOUR WAYcontents list and turn to the page indicated.
+ Although the P-touch 530 display is shown in the examples, the operation does not
change for the P-touch 550.

55
This For Your Information chapter gives detailed explanations of all of this machine’s fea-tures. The following list shows which topics are covered and on which page an explanationof their operation can be found.
PAGE
On/Off key 56
INPUTTING AND EDITING
Cursor key 57
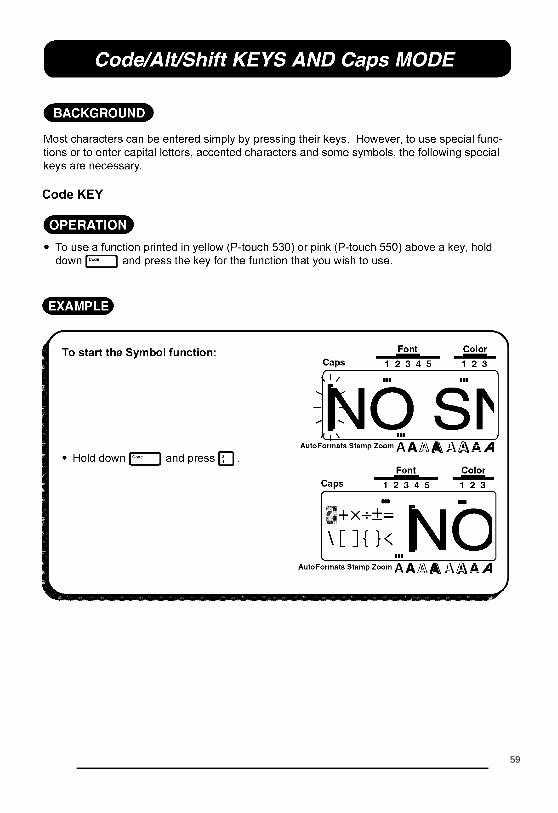
Code/Alt/Shift keys
and Caps mode 59
Space key 62
(return) key
New Block function 66
Cancel key 68
BS (backspace) key 71
Line Out function 72
Clear function 73
Symbol function 75
Accent function 78
Barcode function 80
DISPLAYING
Zoom key 85
Contrast function 86
Label Length function 87
FORMATTING
Auto Format key 88
Area key and All function 97
Text Formats:
Font key 100
Size and Width keys 102
Style key 104
Undl/Frm (underline/frame) key 107
Color key 109
PAGE
Format key 110
Label Formats:
GROBAL FRAME function 112
FRAME COLOR function 113
STYLE COLOR function 114
LENGTH function 116
FEED (tape feed) function 117
H.ALI (horizontal
alignment) function 118
VERT (vertical printing) function 119
MIRROR (mirror printing)
function 120
UNIT function 121
PRINTING
Print key and Feed &
(tape cut) key
COLOR PRINT function 123
Stamp function 125
Special Print function 128
Seq. Numbering
(sequential numbering) function 130
MEMORY FUNCTIONS
Store, Recall and M.Del keys 134

56
batteries have been installed or the machine has been plugged in using the optional AC adaptor, the previous session’s information is displayed when the machine is turned on. This feature allows you to stop work on a label, turn off the machine, and return to it later without having to re-enter the text.
+ When changing the batteries, be sure to insert the new ones within five minutes of
removing the old batteries, otherwise the text shown in the display and any text filesstored in the memory will be lost (unless the machine is plugged into an AC outlet withthe AC adaptor.
If the adaptor is removed from the AC outlet before unplugging it from the machine,the text files in the memory will not be deleted if batteries are correctly installed.
The machine will automatically turn off if no key is pressed within 5 minutes. The machine’s Internal memory stores the current session’s information and displays it when you turn on the machine again.

57

58
59

60

61

62

63

64

65

66

67

68

69

70

71

72

73

74

75

76

77

78

79

80

81
The following symbols can only be entered when using protocols EAN 128 or CODE 128.
VALUE CHARACTER VALUE CHARACTER VALUE CHARACTER
3 # 69 ENQ 87 ETB4 $ 70 ACK 88 CAN11 + 71 BEL 89 EM28 < 72 BS 90 SUB29 = 73 HT 91 ESC30 > 74 LF 91 {32 @ 75 VT 92 FS59 [ 76 FF 92 |60 \ 77 CR 93 GS61 ] 78 SO 93 }62 ~ 79 SI 94 RS63 _ 80 DLE 94 ~64 NUL 81 DC1 95 US64 ` 82 DC2 95 DEL65 SOH 83 DC3 96 FNC366 STX 84 DC4 97 FNC267 ETX 85 NAK 100 FNC468 EOT 86 SYN 102 FNC1

82

83
84

85

86

87

88

89

90
Preset Label Templates Entries
A. VCR VHS (3/4” (18mm))
1. SYMBOL? 4. DURATION2. TITLE? 5. REC. MODE?3. SNB-TITLE? 6. DATE?
B. VCR 8mm-1 (3/8” (9mm))
1. SYMBOL? 4. DATA?2. TITLE? 5. REC. MODE?3. SUB-TITLE?
C. VCR 8mm-2 (1.2” (12mm))
1. SYMBOL? 4. DURATION?2. TITLE? 5. REC. MODE?3. SUB-TITLE? 6. DATE?
D. VCR VHSC-1 (1/2” (12mm)) 1. TITLE? 2. SUB-TITLE?
E. VCR VHSC-2 (3/4” (18mm))
1. SYMBOL? 4. DURATION?2. TITLE? 5. REC. MODE?3. SUB-TITLE? 6. DATE?
F. AUDIO-1 (1/4” (6mm))1. SYMBOL? 3. SUB-TITLE?2. TITLE?
G. AUDIO-2 (3/8” (9mm), 1/2” (12mm))1. SYMBOL? 3. SUB-TITLE?2. TITLE?
H. AUDIO-3 (3/8” (9mm), 1/2” (12mm)) 1. SYMBOL? 2. TITLE?
I. NAME PLATE (3/4” (18mm), 11/2” (36mm)) 1. NAME? 2. COMPANY?
J. ADDRESS (3/4” (18mm),1” (24mm), 11/2” (36mm))1. NAME? 3. ADDRESS2?2. ADDRESS1? 4. ADD.3/TEL?
K. EQUIPMENT (3/4” (18mm), 1” (24mm), 11/2” (36mm))1. TITLE? 3. NUMBER?2. NAME?
L. EQUIPMENT (1/2” (12mm))1. TITLE? 3. NAME?2. SUB-TITLE? 4. NUMBER?
M.SLIDE (1/2” (12mm))1. TITLE? 3. SUB-TITLE?2. DATE?
N. PRICE (3/4” (18mm), 1” (24mm),11/2” (36mm)) 1. NAME? 2. PRICE?
O. SALE PRICE (3/4” (18mm), 1” (24mm), 11/2” (36mm))1. NAME? 3. NEW PRICE?2. OLD PRICE?
P. FILE LONG (3/4” (18mm), 1” (24mm), 11/2” (36mm)) 1. TITLE?
Q. FILE LONGV (3/4” (18mm), 1” (24mm), 11/2” (36mm)) 1. TITLE?
R. FILE SHORT (3/8” (9mm), 1/2” (12mm), 3/4” (18mm),
1” (24mm), 11/2” (36mm)) 1. TITLE?
S. FLOPPY 3.5” (3/4” (18mm), 1” (24mm), 11/2”(36mm))1. TITLE? 3. NAME?2. SUB-TITLE?
T. FLOPPY 5” (3/4” (18mm), 1” (24mm), 11/2”(36mm))1. TITLE? 3. NAME?2. SUB-TITLE?

91

92

93

94

95

96
97

98

99

100

101
102
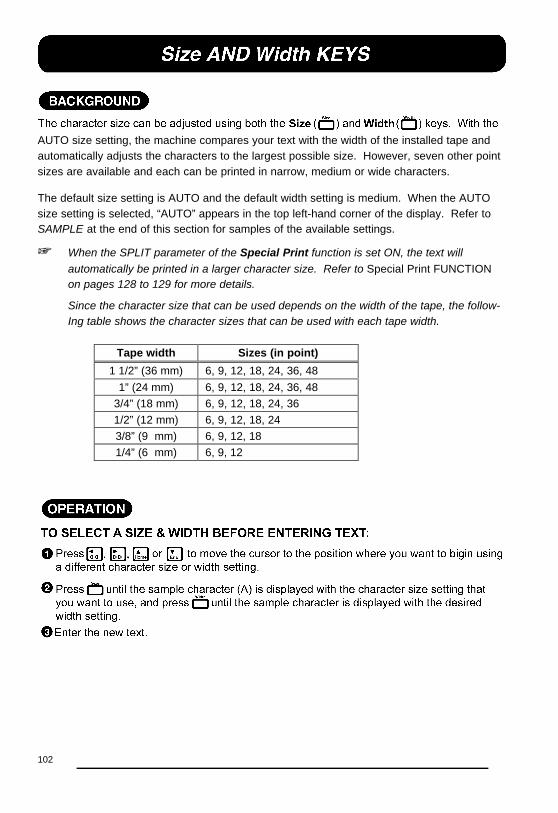
AUTO size setting, the machine compares your text with the width of the installed tape andautomatically adjusts the characters to the largest possible size. However, seven other pointsizes are available and each can be printed in narrow, medium or wide characters.
The default size setting is AUTO and the default width setting is medium. When the AUTOsize setting is selected, “AUTO” appears in the top left-hand corner of the display. Refer toSAMPLE at the end of this section for samples of the available settings.
+ When the SPLIT parameter of the Special Print function is set ON, the text will
automatically be printed in a larger character size. Refer to Special Print FUNCTIONon pages 128 to 129 for more details.
Since the character size that can be used depends on the width of the tape, the follow-Ing table shows the character sizes that can be used with each tape width.
Tape width Sizes (in point)
1 1/2” (36 mm) 6, 9, 12, 18, 24, 36, 48
1” (24 mm) 6, 9, 12, 18, 24, 36, 48
3/4” (18 mm) 6, 9, 12, 18, 24, 36
1/2” (12 mm) 6, 9, 12, 18, 24
3/8” (9 mm) 6, 9, 12, 18
1/4” (6 mm) 6, 9, 12

103

104

105
106

107

108

109

110

111

112

113

114

115

116

117
The FEED function allows you to select the size of the margins on the left and right side ofyour test.The default setting is FULL; however, three other settings are also available.FULL (1” (25 mm))NONE (1/6” (4 mm))NERROW (1/3” (8 mm))MEDIUM (1/2” (12 mm))
+ The FEED function can only be applied to the entire text; it cannot be applied to just
part of the text.Since reducing the tape feed may decrease bar code readability, the FULL tape feedsetting is recommended when the text contains bar codesIf an instant-lettering (rub-on transfer) or an iron-on transfer tape cassette is installed,the text will be printed with the FULL setting (1” (25 mm)-margins), even if a differentsetting was selected.

118
You can choose to align the text in one of four ways.The default setting is LEFT; however, three other settings are also available.
LEFTCENTERRIGHTJUSTIFY
+ The H.ALI (horizontal alignment) function can only be applied to the entire text; itcannot be applied to just part of the text.
If the label length for text containing multiple blocks has been set with the LENGTHfunction and its horizontal alignment has been set to JUSTIFY, the spaces betweenthe blocks are adjusted so that the text spreads out evenly along the label.

119

120

121

122

123

124

125

126

127

128
The Special Print function allows you to set the number of copies of the label that will beprinted, set whether the machine will automatically cut off each label, and turn the splitprinting function on and off.
Parameters Settings
COPIES (number of label copies 1 to 99that will be printed)
A.CUT (automatically cuts off each ON, OFFlabel after printing)
SPLIT (splits the label lengthwise ON, OFFand prints it as two labels)
+ When the SPLIT parameter is set to ON, the COPIES parameter is ignored and only
one copy of the label will be printed.The settings selected for these three parameters are ignored during color printing.

129

130

131

132

133

134

135

136

137

138

139

140

141

142

143

144

145

146

147
HARDWAREInput device: KEYBOARD – 63 keys
LCD: 112 x 32 dots
23 indicators
Print type: 23 indicators
5 widths available
1/4” (6 mm)
3/8” (9 mm)
1/2” (12 mm)
3/4” (18 mm)
1” (24 mm)
11/2” (36 mm)
Power supply 8 AA alkaline batteries
(optional AC adapter model AD-60)
Auto power off if no key pressed within 5 minutes
Print head: 128 dot / 180 dpi
Dimensions: 8 45/64” x 9 31/32” x 3 27/64” (221 x 253 x 87 mm)
Weight 2 lbs. 10 ozs. (1.2kg)
SOFTWARECharacter size: 6 sizes (6, 9, 12, 18, 36 and 48 point) + AUTO
All are available in NARROW, MEDIUM and MODE
Character fonts: 8 built - in typefaces (P-touch 550)
5 built - in typefaces (P-touch 530)
Buffer size: Single line - 1 m
Multi - line
Multi - block
Memory size: 3,400 characters (P-touch 550)
1,000 characters (P-touch 530)
Number of characters: 398 characters
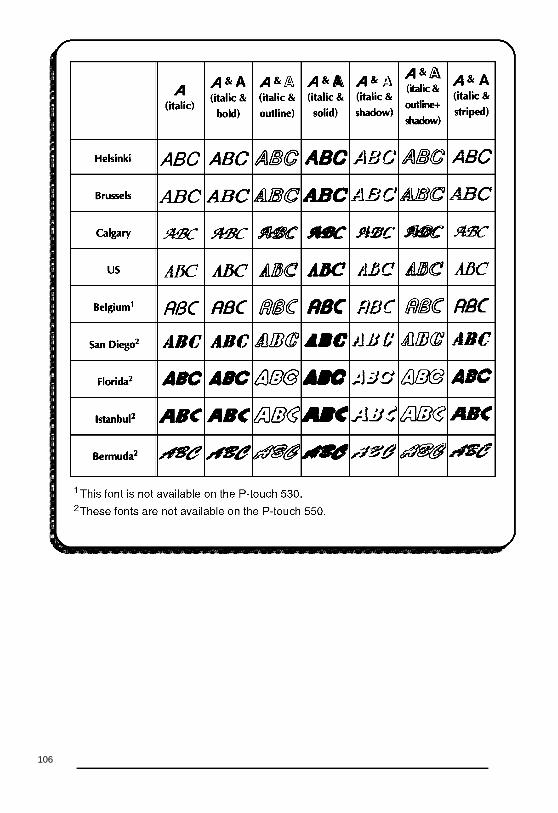
Print styles: Normal, Bold, Outline, Solid, Shadow, and Outline + Shadow,
Striped (each can be combined with Italic)

148
The P-touch 530/550 features the following:
• WYSIWYG display
• Color printing
• Stamp creating
• Pre-formatted label templates
• Multi-line printing (up to 7 lines)
• Multi-block printing (up to 5 blocks)
• 7 sizes & 14 styles
• Text and label framing
• Text underling
• Vertical printing
• Mirror printing
• Horizontal alignment adjustment
• Adjustable tape feed
• Label length setting
• Repeat printing
• Split printing
• Numbering function
• Bar code generation
• Zooming in and out

149
AA. CUT parameter.............................128AC adapter ........................................10,12Accent function .................................78All function.........................................27,97Alt key................................................60Area key ............................................39,97Auto Formats key..............................88Automatic backup .............................56Automatic power off ..........................56BBackspace key ..................................28,71Backup ..............................................56Barcode function ...............................49,80 Numbering....................................131 Parameters ..................................80Batteries ............................................10,11,56Blank display .....................................146Blocks................................................47,66Bold character style ..........................104CCancel key.........................................68Caps mode........................................24,61Cassettes ..........................................10,13-15Center alignment...............................118Character Size ..............................................102 Style .............................................104 Width ............................................102CHECK DIG. Parameter...................80Cleaning Machine’s surface........................10 Print head and rollers ..................19Clear function....................................30,77CODABAR symbols..........................82CODE 39 symbols ............................82Code key ...........................................59CODE 128 symbols ..........................81Color key ...........................................109COLOR PRINT function ...................42,123Color printing Frame...........................................113
Ink and tape cassette ..................14-15 Shading........................................113 Style .............................................114Colored characters ...........................114Colored frame/shading .....................113Combination character styles...........104Continuing.........................................63Contrast function ..............................86COPIES parameter...........................128Creating Bar codes.....................................80 Stamps.........................................125Cursor ...............................................23Cursor keys.......................................57DDefault settings Font..............................................100 Framing........................................107 Label formats...............................110 Size ..............................................102 Style .............................................104 Text color .....................................109 Text formats.................................97-98 Underlining...................................107 Width............................................102Deleting All characters...............................73 Characters ...................................71 Stored text files............................135 Text lines .....................................72Displaying Final layout ..................................85 Label length .................................87EEAN 128 symbols .............................81END key............................................58Error messages ................................139-145FFailure to print...................................146Features............................................9Feed & Tape Cut key........................117FEED (tape feed) function................117
150
Font key.............................................100Format key ........................................32,40,110Frame ................................................107,112 Color.............................................113FRAME COLOR function..................41,113GGLOBAL FRAME function ................33,41,112HH.ALI (horizontal alignment function)......33,118HOME key.........................................58IIndicator Auto Formats ...............................88 Caps .............................................24,31,61 Color.............................................109 Font ..............................................100 Stamp...........................................125 Style .............................................104 Zoom ............................................85Indicators...........................................23Ink cassettes .....................................13-15Instant lettering tape .........................17Iron-on transfers................................17Italic character style ..........................104JJustifying text ....................................118KKeyboard...........................................8LLabel backing....................................16Label format functions ......................110-121Label length Displaying.....................................87 Selecting ......................................116Label Length function .......................87Label templates.................................90-96LCD display.......................................8Left alignment....................................118LENGTH function..............................116Line Out function...............................72Lines..................................................31,63 Deleting ........................................71
MMalformed characters.......................146Memory Deleting........................................135 Recalling ......................................135 Storing..........................................134MIRROR (mirror printing) function ......120NNew Block function ...........................47,66Normal character style .....................104Numbering ........................................130 Bar codes.....................................131 Symbols .......................................130OOn/Off key.........................................56Outline character style......................104PPower key .........................................56Power off...........................................56Precautions.......................................10Print head..........................................19Print key ............................................29,122Printing Failure ..........................................146 Malformed characters .................146PROTOCOL parameter....................80QQuitting..............................................68RRecall function ..................................36,135Removing label backing ...................16Resetting the machine......................146Return key.........................................31,63Right alignment.................................118Rollers...............................................19Rub-on transfers...............................17SSelecting Character size .............................102 Character styles...........................104

151
Character width............................102 Fill-in colors..................................114 Fonts ............................................100 Frame color..................................113 Frames .........................................107,112 Horizontal alignment....................118 Italics ............................................104 Label formats ...............................110-121 Label length .................................116 Mirror printing...............................120 Numbering field............................130 Shading color ...............................113 Shading ........................................107,112 Tape feed width ...........................117 Text colors ...................................109 Text formats .................................97-109 Underlines....................................107 Vertical printing ............................119Seq. Numbering (sequential numbering)function..............................................50Shading .............................................107,112 Color.............................................113Shadow character style ....................104,130Shift key.............................................61Size key.............................................102Solid character style .........................104Space key..........................................25,62Special Print function ........................35,128SPLIT parameter...............................128Stamp function ..................................125Store function....................................28,134Striped character style ......................104Striped tape.......................................146STYLE COLOR function...................41,114Style key............................................104Symbol function ................................38,75Symbols.............................................77 Bar codes .....................................81-82 Numbering....................................130TTape cassettes..................................10,13-15Text Deleting ........................................71 Recalling ......................................135 Storing..........................................134Text format keys ...............................27,100-109
Troubleshooting ................................146
Typing Accented characters....................78 Capital letters...............................24,61UUNDER#S parameter.......................80Underlining........................................107 Color ............................................113Undl/Frm key.....................................107UNIT function....................................121VVERT (vertical printing) function ......119WWidth key ..........................................102WIDTH parameter ............................80WYSIWYG mode..............................23,85ZZoom key ..........................................38,85

152
• SuppliesObtain tape cassettes, AC adapters, and tape cutters from you nearest authorized dealer.Brother cannot be held responsible for trouble caused by the use of unauthorized supplies.Use only Brother TZ tapes with this machine. Do not use tapes that do not have the mark.
Stock No. Description QTY/PACKAGE PRICE1-1/2” (36 mm) laminated tapes
TZ-161 Black Characters on Clear Tape 1 $27.99TZ-261 Black Characters on White Tape 1 $27.99TZ-661 Black Characters on Yellow Tape 1 $27.99
1” (24 mm) laminated tapesTZ-151 Black Characters on Clear Adhesive 1 $23.99TZ-251 Black Characters on White Adhesive 1 $23.99TZ-451 Black Characters on Red Adhesive 1 $23.99TZ-651 Black Characters on Yellow Adhesive 1 $23.99TZ-252 Red Characters on White Adhesive 1 $23.99TZ-354 Gold Characters on Black Adhesive 1 $26.99TZ-355 White Characters on Black Adhesive 1 $26.99
3/4“ (18 mm) laminated tapesTZ-141 Black Characters on Clear Adhesive 1 $20.99TZ-241 Black Characters on White Adhesive 1 $20.99TZ-242 Red Characters on White Adhesive 1 $20.99TZ-243 Blue Characters on White Adhesive 1 $20.99TZ-344 Gold Characters on Black Adhesive 1 $24.99TZ-345 White Characters on Black Adhesive 1 $23.99TZ-441 Black Characters on Red Adhesive 1 $20.99TZ-541 Black Characters on Blue Adhesive 1 $20.99TZ-545 White Characters on Blue Adhesive 1 $23.99TZ-641 Black Characters on Yellow Adhesive 1 $20.99TZ-741 Black Characters on Green Adhesive 1 $20.99TZ-B41 Black Characters on Orange Fluorescent Adhesive 1 $24.99TZ-M41 Black Characters on Clear (matte) Adhesive 1 $23.99
TZ-WB41 Black Characters on Bugs Bunny Adhesive 1 $23.99TZ-WT41 Black Characters on Taz Adhesive 1 $23.99TZ-WS41 Black Characters on Tweety & Sylvester Adhesive 1 $23.99
1/2“ (12 mm) laminated tapesTZ-131 Black Characters on Clear Adhesive 1 $16.99TZ-231 Black Characters on White Adhesive 1 $17.99TZ-232 Red Characters on White Adhesive 1 $17.99TZ-335 White Characters on Black Adhesive 1 $20.99
3/8” (9 mm) laminated tapesTZ-121 Black Characters on Clear Adhesive 1 $14.99TZ-221 Black Characters on White Adhesive 1 $16.99TZ-325 White Characters on Black Adhesive 1 $18.99TZ-421 Black Characters on Red Adhesive 1 $16.99

153
Stock No. Description QTY/PACKAGE PRICE1/4” (6 mm) laminated tapes
TZ-111 Black Characters on Clear Adhesive 1 $12.99TZ-211 Black Characters on White Adhesive 1 $14.99TZ-315 White Characters on Black Adhesive 1 $17.99
Special tapes
Stock No. Description QTY/PACKAGE PRICETZ-SE4 Black Characters on 3/4” (18 mm) Security Adhesive 1 $29.99TZ-FA3 Blue Characters on 1/2” (12 mm) Fabric Adhesive 1 $24.99
Multi-color printing cassettes
Stock No. Description QTY/PACKAGE PRICETZ-T240 White Tape 1 $19.99TZ-R041 Black ink ribbon 1 $12.99TZ-R042 Red ink ribbon 1 $12.99TZ-R043 Blue ink ribbon 1 $12.99
Stamp kit
Stock No. Description QTY/PACKAGE PRICESK-LB Stamp Making kit for Large Black 1 $39.99SK-MB Stamp Making kit for Medium Black 1 $37.99SH-LB Additional Stamper for Large Black 1 $27.99SH-MB Additional Stamper for Medium Black 1 $24.99
Options
Stock No. Description QTY/PACKAGE PRICEAD-60 AC Adapter for PT-330/350 1 $24.99

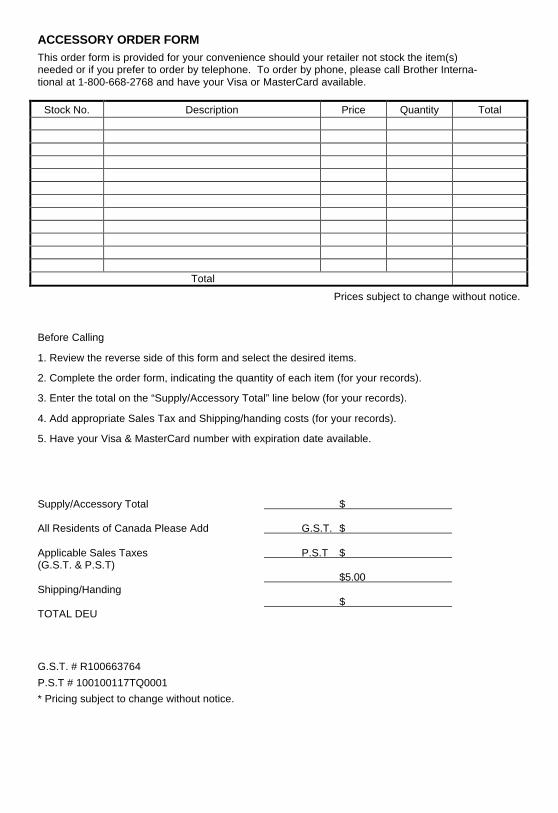
ACCESSORY ORDER FORMThis order form is provided for your convenience should your retailer not stock the item(s)needed or if you prefer to order by telephone. To order by phone, please call Brother Interna-tional at 1-800-668-2768 and have your Visa or MasterCard available.
Stock No. Description Price Quantity Total
Total
Prices subject to change without notice.
Before Calling
1. Review the reverse side of this form and select the desired items.
2. Complete the order form, indicating the quantity of each item (for your records).
3. Enter the total on the “Supply/Accessory Total” line below (for your records).
4. Add appropriate Sales Tax and Shipping/handing costs (for your records).
5. Have your Visa & MasterCard number with expiration date available.
Supply/Accessory Total $
All Residents of Canada Please Add G.S.T. $
Applicable Sales Taxes P.S.T $ (G.S.T. & P.S.T)
$5.00 Shipping/Handing
$ TOTAL DEU
G.S.T. # R100663764
P.S.T # 100100117TQ0001
* Pricing subject to change without notice.

158

GUÍA DEL USUARIO
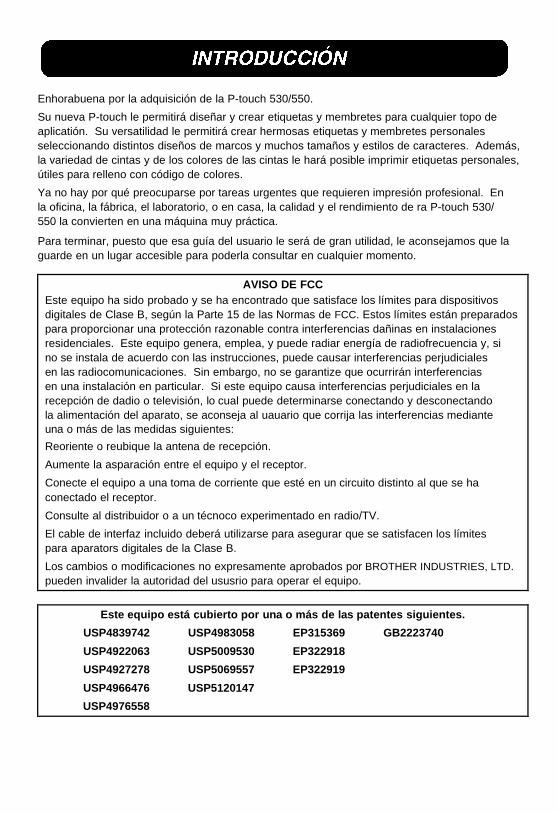
Enhorabuena por la adquisición de la P-touch 530/550.
Su nueva P-touch le permitirá diseñar y crear etiquetas y membretes para cualquier topo deaplicatión. Su versatilidad le permitirá crear hermosas etiquetas y membretes personalesseleccionando distintos diseños de marcos y muchos tamaños y estilos de caracteres. Además,la variedad de cintas y de los colores de las cintas le hará posible imprimir etiquetas personales,útiles para relleno con código de colores.
Ya no hay por qué preocuparse por tareas urgentes que requieren impresión profesional. Enla oficina, la fábrica, el laboratorio, o en casa, la calidad y el rendimiento de ra P-touch 530/550 la convierten en una máquina muy práctica.
Para terminar, puesto que esa guía del usuario le será de gran utilidad, le aconsejamos que laguarde en un lugar accesible para poderla consultar en cualquier momento.
AVISO DE FCCEste equipo ha sido probado y se ha encontrado que satisface los límites para dispositivosdigitales de Clase B, según la Parte 15 de las Normas de FCC. Estos límites están preparadospara proporcionar una protección razonable contra interferencias dañinas en instalacionesresidenciales. Este equipo genera, emplea, y puede radiar energía de radiofrecuencia y, sino se instala de acuerdo con las instrucciones, puede causar interferencias perjudicialesen las radiocomunicaciones. Sin embargo, no se garantize que ocurrirán interferenciasen una instalación en particular. Si este equipo causa interferencias perjudiciales en larecepción de dadio o televisión, lo cual puede determinarse conectando y desconectandola alimentación del aparato, se aconseja al uauario que corrija las interferencias medianteuna o más de las medidas siguientes:
Reoriente o reubique la antena de recepción.
Aumente la asparación entre el equipo y el receptor.
Conecte el equipo a una toma de corriente que esté en un circuito distinto al que se haconectado el receptor.
Consulte al distribuidor o a un técnoco experimentado en radio/TV.
El cable de interfaz incluido deberá utilizarse para asegurar que se satisfacen los límitespara aparators digitales de la Clase B.
Los cambios o modificaciones no expresamente aprobados por BROTHER INDUSTRIES, LTD.pueden invalider la autoridad del ususrio para operar el equipo.
Este equipo está cubierto por una o más de las patentes siguientes.
USP4839742 USP4983058 EP315369 GB2223740
USP4922063 USP5009530 EP322918
USP4927278 USP5069557 EP322919
USP4966476 USP5120147
USP4976558

i
PRECAUCIONES GENERALES .......................................................................................... 1PILAS ................................................................................................................................... 2ADAPTADOR DE CA OPCIONAL ........................................................................................ 2CASSETTES DE CINTA....................................................................................................... 3CABEZAL DE IMPRESIÓN Y RODILLOS ............................................................................ 6TECLAS DEL CURSOR ....................................................................................................... 7TECLAS Code/Alt/Shift Y MODO Caps ................................................................................ 8TECLA Cancel......................................................................................................................10TECLA BS (RETROCESO) ..................................................................................................10FUNCIÓN Line Out...............................................................................................................11FUNCIÓN Clear....................................................................................................................11FUNCIÓN Symbol ................................................................................................................12FUNCIÓN Barcode ...............................................................................................................13TECLA Zoom........................................................................................................................16FUNCIÓN Contrast...............................................................................................................16FUNCIÓN Label Length........................................................................................................17TECLA Auto Formats............................................................................................................18TECLA Font..........................................................................................................................20TECLA Size Y Width.............................................................................................................21TECLA Style .........................................................................................................................22TECLA Undl/Frm (SUBRAYADO/ENCUADRE)....................................................................24TECLA Color ........................................................................................................................25FUNCIÓN DE ENCUADRE COMPLETO..............................................................................26FUNCIÓN DE COLOR DEL ENCUADRE.............................................................................27FUNCIÓN DE COLOR DEL ESTILO ....................................................................................28FUNCIÓN DE LONGITUD....................................................................................................29FUNCIÓN DE AVANCE DE LA CINTA (FEED) ....................................................................30FUNCIÓN DE ALINEACIÓN HORIZONTAL (H.ALI).............................................................31FUNCIÓN DE IMPRESIÓN VERTICAL (VERT) ...................................................................32FUNCIÓN DE IMPRESIÓN DE ESPEJO (MIRROR)............................................................33FUNCIÓN DE UNIDAD.........................................................................................................34FUNCIÓN DE IMPRESIÓN EN COLOR...............................................................................35FUNCIÓN DE MEMBRETE (Stamp).....................................................................................37FUNCIÓN DE IMPRESIÓN ESPECIAL (Special Print).........................................................39FUNCIÓN DE NUMERACIÓN SECUENCIAL (Seq. Numbering) .........................................41TECLAS Store, Recall Y M.Del.............................................................................................43

ii
1
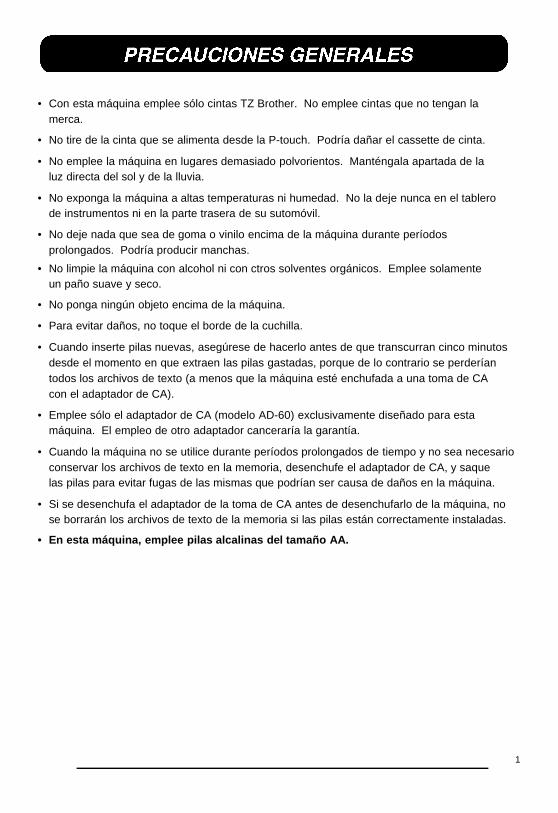
• Con esta máquina emplee sólo cintas TZ Brother. No emplee cintas que no tengan lamerca.
• No tire de la cinta que se alimenta desde la P-touch. Podría dañar el cassette de cinta.
• No emplee la máquina en lugares demasiado polvorientos. Manténgala apartada de laluz directa del sol y de la lluvia.
• No exponga la máquina a altas temperaturas ni humedad. No la deje nunca en el tablerode instrumentos ni en la parte trasera de su sutomóvil.
• No deje nada que sea de goma o vinilo encima de la máquina durante períodosprolongados. Podría producir manchas.
• No limpie la máquina con alcohol ni con ctros solventes orgánicos. Emplee solamenteun paño suave y seco.
• No ponga ningún objeto encima de la máquina.
• Para evitar daños, no toque el borde de la cuchilla.
• Cuando inserte pilas nuevas, asegúrese de hacerlo antes de que transcurran cinco minutosdesde el momento en que extraen las pilas gastadas, porque de lo contrario se perderíantodos los archivos de texto (a menos que la máquina esté enchufada a una toma de CAcon el adaptador de CA).
• Emplee sólo el adaptador de CA (modelo AD-60) exclusivamente diseñado para estamáquina. El empleo de otro adaptador canceraría la garantía.
• Cuando la máquina no se utilice durante períodos prolongados de tiempo y no sea necesarioconservar los archivos de texto en la memoria, desenchufe el adaptador de CA, y saquelas pilas para evitar fugas de las mismas que podrían ser causa de daños en la máquina.
• Si se desenchufa el adaptador de la toma de CA antes de desenchufarlo de la máquina, nose borrarán los archivos de texto de la memoria si las pilas están correctamente instaladas.
• En esta máquina, emplee pilas alcalinas del tamaño AA.

2
Esta máquina ligera y portátil puede utilizarse en cualquier lugar instalando ocho (8) pilasAlcalinas AA. Cuando cambie las pilas, reemplace siempre las ocho pilas al mismo tiempo.
+ Asegúrese de insertar las pilas nuevas antes de que transscurran cinco minutos desde
que se extraen las pilas gastadas, porque de lo contrario el texto que se visualiza en lapantalla y los archivos de texto almacenados en la memoria se perderían (a menosque la máquina esté enchufada a una toma de CA con el adaptador de CA).
Si no se emplean pilas alcalinas, no podrán imprimirse tipos de caracteres grandes niCódigos de barras.
El adaptador de CA (modelo AD-60) le permite emplear esta máquina siempre que dispongade una toma de corriente eléctrica.
+ Emplee sólo el adaptador de CA diseñado exclusivamente para esta máquina.
Si se desenchufa el adaptador de la toma de CA antes de desenchufarlo de la máquina,no se borrarán los archivos de texto de la memoria si las pilas están correctamenteinstaladas.
Se recomienda emplear el adaptador de CA para imprimir tipos de caracteres grandesy códigos de barras con cintas de 18 mm (3/4”) o de 24 mm (1”) porque grandesoperaciones pueden gaster las pilas con rapidez.

3
Un cassette de TZ se suministra con la unidad. Sin embargo, puesto que para esta máquinahay disponibles una amplia gama de cassettes de cinta TZ, tintas y cassettes de cinta paraimpresión en color de distintos colores y tamaños, es posible crear etiquetas con distincióncodificadas por colores y estilizadas. Además, hemos diseñado esta máquina para permitirlecambiar rápida y fácilmente los cassettes de cinta.
PARA CAMBIAR UN CASSETTE DE CINTA TZ:

4
PARA CAMBIAR LOS CASSETTES DE TINTA Y DE CINTA PARA IMPRESIÓNEN COLOR:

5
Avance de la cinta por el cassette

6
De vez en cuando, motas de polvo o suciedad se adhieren al cabezal de impresión y a losrodillos de la máquina. Suele suceder cuando se emplea la unidad en exteriores o en lugarescon mucho polvo. Si alguna parte del cabezal de impresión está cubierta de polvo, esposible que aparezca una franja horizontal blanca por el texto de la etiqueta impresa.
Por lo tanto, al igual que con las grabadoras de cintas, el cabezal de la máquina deberálimpiarse de vez en cuando.
PARA LIMPIAR EL CABEZAL DE IMPRESIÓN:
� Desconecte la alimentación de la máquina.
� Abra la cubierta del compartmiento de la cinta, y extraiga el cassette de cinta, si está
dentro. El cabezal impresión y los rodillos están situados dentro del compartimientode la cinta.
� Cabezal de impresión: Emplee un palillo con punta de algodón seco para frotar con
cuidado el cabezal de impresión con movimiento hacia arriba y abajo.
Rodillos: Emplee un palillo con punta de algodón seco para frotar cada rodillo conMovimiento hacia arriba abajo mientras los gira con el dedo.
� Pruebe de nuevo la impresión.
Si todavía queda polvo:
� Repita el paso � empleando un palillo con cabeza de algodón humedecido en alcohol
isopropílico (limpieza).
Si no funciona nada de lo de arriba, póngase en contacto con el representante de servicio.

7

8

9

10

11

12

13
La función de códigos barras Barcode, que permite añadir códigos de barras a las etiquetasimpresas, es una las caracteríisticas más avanzadas de la máquina.
+ En esta sección explicaremos cómo introducir un código de barras en el texto. No
tiene el propósito de ser una introducción amplia al concepto de los códigos de battas.Para encontrar información más detallada al respecto, consulte uno de los muchoslibros de referencia disponibles en el mercado.
Puesto que esta máquina no está específicamente diseñnda para hacer etiquetas decódigos de barras, es posible que algunos lectores de códigos de barras no puedamleer las etiquetas.
Imprima los códigos de barras con tinta negra sobre fondo blanco.
Cuatro parámetros distintos le permiten crear códigos de barras personalizados.
Parámetro AjustesPROTOCOL CODE 39 1-2/5, EAN13, EAN8, UPC-A, UPC-E,
CODABAR, EAN128*, CODE128*, ISBN5*,ISBN2** Sólo disponible en la P-touch 550
WIDTH (anchura del código de barras) LARGE (grande), SMALL (pequeño)
UNDER#S ON, OFF
(números impresos debajo del código debarras)
CHECK DIG. (dígito de comprobación) OFF, ON
Los ajustes iniciales son CODE39 PROTOCOL, LARGE WIDTH, UNDER#S ajustado a ON,y CHECH DIG ajustado a OFF.
+ Recomendamos imprimir los códigos de barras empleando la función FEED ajustada
a FULL y el parámetro WIDTH de códigos de barras ajustado a LARGE (grande). Delo contrario, es posible que los códigos de barras sean difíciles de leer.
PARA CERAR UN CÓDIGO DE BARRAS:

14
Selección de los ajustes de parámetros de código de barras
Los caracteres especiales siguientes sólo pueden introducirse cuando se emplea los tipos EAN 128 o Code 128.
VALOR CARÁCTER VALOR CARÁCTER VALOR CARÁCTER
3 # 71 DEL 89 EM
4 $ 72 BS 90 SUB
11 + 73 HT 91 ESC
28 < 74 LF 91 {
29 = 75 VT 92 FS
30 > 76 FF 92 |
32 @ 77 CR 93 GS
59 [ 78 SO 93 }
60 \ 79 SI 94 RS
61 ] 80 DLE 94 ~

15
VALOR CARÁCTER VALOR CARÁCTER VALOR CARÁCTER
63 _ 81 DC1 95 US
63 NUL 82 DC2 95 DEL
65 SOH 83 DC3 96 FNC3
66 STX 84 DC4 97 FNC2
67 ETX 85 NAK 100 FNC4
68 EOT 86 SYN 102 FNC1
69 ENQ 87 ETB
70 ACK 88 CAN
Los símbolos siguientes sólo pueden introducirse cuando se emplea los protocolos CODE 39o CODABAR.
SYMBOL CARÁCTER
1 +
2 $

16

17
Esta función se emplea para visualizar la longitud de la etiqueta en pulgadas o en centímetros,dependiendo del ajuste de la función UNIT. Para más información sobre el cambio de unidadesque se emplean para visualizar la longitud, consulte a FUNCIÓN UNIDAD de la página.
18

19
Plantilla de etiquetas preajustadasVCR VHS (3/4” (18 mm))
VCR 8mm-1 (3/8” (9 mm))
VCR 8mm-2 (1/2” (12 mm))
VCR VHSC-1 (1/2” (12 mm))
VCR VHSC-2 (3/4” (18 mm))
AUDIO-1 (1/4” (6 mm))
AUDIO-2 (3/8” (9 mm), 1/2” (12 mm))
AUDIO-3 (3/8” (9 mm), 1/2” (12 mm))
NAME PLATE (3/4” (18 mm), 1 1/2” (36 mm))
ADDRESS (3/4” (18 mm), 1 1/2” (36 mm))
EQUIPMENT (3/4” (18 mm), 1” (24 mm), 1 1/2” (36 mm))
EQUIPMENT (1/2” (12 mm))
SLIDE (1/2” (12 mm))
PRICE (3/4” (18 mm), 1” (24 mm), 1 1/2” (36 mm))
SALE PRICE (3/4” (18 mm), 1” (24 mm), 1 1/2” (36 mm))
FILE LONG (3/4” (18 mm), 1” (24 mm), 1 1/2” (36 mm))
FILE LONGV (3/4” (18 mm), 1” (24 mm), 1 1/2” (36 mm))
FILE SHORT (3/8” (9 mm), 1/2” (12 mm), 3/4” (18 mm), 1” (24 mm), 1 1/2” (36 mm))
FLOPPY 3.5∂ (3/4” (18 mm), 1” (24 mm), 1 1/2” (36 mm))
FLOPPY 5∂ (3/4” (18 mm), 1” (24 mm), 1 1/2” (36 mm))

20
Los ajustes de tipos de caracteres siguientes están disponibles en la P-touch 530:Tipo 1 (Helsinki), Tipo 2 (Brussels), Tipo 3 (Calgary), Tipo 4 (US), Tipo 5 (Belgium)
Los ajustes de tipos de caracteres siguientes están disponibles en la P-touch 550:Tipo 1 (Helsinki), Tipo 2 (Brussels), Tipo 3 (Calgary), Tipo 4 (US),Tipo 5 (San Diego),Tipo 6 (Florida), Tipo 7 (Istanbul), y Tipo 8 (Bermuda)
El ajuste del tipo de caracteres seleccionado para la posición actual del cursor se muestra enlos indicadores Font encima del visualizador. El ajuste inicial del tipo de caracteres es el Tipo1 (Helsinki). Consulte el apartado de MUESTRAS, al final de esta sección, para ver muestrasde los ajustes disponibles.
PARA SELECCIONAR UN TIPO DE CARACTERES ANTES DE INTRODUCIR ELTEXTO:

21
El ajuste del tamaño de ajuste inicial es AUTO y el ajuste inicial para la anchura es media.Caundo se selecciona el ajuste del tamaño AUTO, “AUTO” aparece en la esquina superiorizquierda del visualizador. Consulte el apartado de MUESTRAS, al final de esta sección, paraver muestras de los ajustes disponibles.
+ Cuando el parámetro SPLIT de la función Special Print se ajusta a ON, el texto se
imprimirá automáticamente en un tamaño de caracters grandes. Consulte la FUNCIÓNDE IMPRESIÓN ESPECIAL (Special Print) de las páginas 39 a 40 para encontrar másdetalles.
Puesto que el tamaño de caracteres que puede utilizarse depende de la anchura de lacinta, la tabla indica los tamaño de caracteres que pueden utilizarse con cada anchurade cinta.
Anchuras de cinta Tamaños (en puntos)
1 1/2” (36 mm) 6,9,12,18,24,36,48
1” (24 mm) 6,9,12,18,24,36,48
3/4” (18 mm) 6,9,12,18,24,36
1/2” (12 mm) 6,9,12,18,24
3/8” ( 9 mm) 6,9,12,18
1/4” ( 6 mm) 6,9,12
PARA SELECCIONAR UN TAMAÑO Y UNA ANCHURA ANTES DE INTRODUICREL TEXTO:

22

23

24
25

26

27
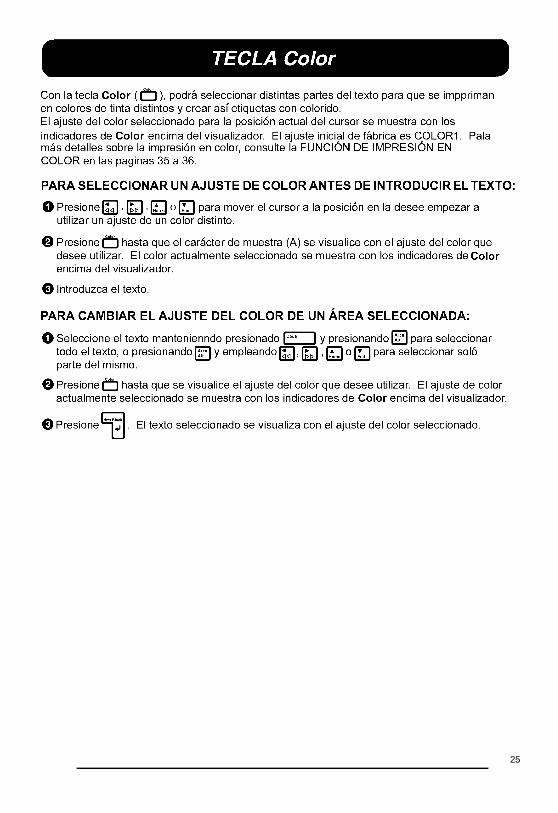
Podrá seleccionar cuál de lostres colores de tinra se deberá emplear para imprimir cualquiersubrayado, encuadre, tachado, o sombreado del texto durante la impresión en color. Paramás detalles sobre la impresión en color, consulte la FUNCIÓN DE IMPRESIÓN EN COLORen las páginas 35 a 36.
El ajuste inicial de fábrica es COLOR 1.
+ Antes de imprimir con la función de IMPRESIÓN EN COLOR, asegúrese de haberajustado la función de COLOR DEL ENCUADRE.
En color seleccionado con la función de COLOR DEL ENCUADRE se aplicará a todosLos subrayados, encuadres, tachados o sombreados del texto; no puede aplicarse sóloa una parte del texto. Si no añadido un subrayado, encuadre, tachado o sombreadoal texto, el ajuste seleccionado para esta función se ignorará durante la impresión encolor.
PARA CAMBIAR EL COLOR DEL SUBRAYADO, ENCUADRE, TACHADO YSOMBREADO:

28
Cuando emplee la función de IMPRESIÓN EN COLOR para imprimir texto formateado encualquier estilo que no sea A (normal) o A (negrilla), podrá seleccionar un color de rellenopara las partes de caracteres que normalmente se dejan en blanco como se muestra en elapartado de MUESTRAS. Para más detalles sobre la impresión en color, consulte la FUN-CIÓN DE IMPRESIÓN EN COLOR en las páginas 35 a 36.
El ajuste inicial de fábrica es OFF.
+ Antes de imprimir con la función de IMPRESIÓN EN COLOR, asegúrese de haber
ajustado la función de COLOR DEL ESTILO.La función de COLOR DEL ESTILO sólo puede aplicarse a todo de texto; no puedeaplicarse sólo a una parte del texto. Si sólon se utilizan los ajustes de A (normal) Y A(negrilla) en le texto, el ajuste seleccionado para esta función se ignorará durante laimpresión en color.
PARA CAMBIAR EL COLOR DE RELLENO DE CARACTERES:

29
La longitud de la etiqueta puede ajustarse de dos formas distintas. Con el ajuste de longitudAUTO, la máquina compara el texto introducido con el tamaño de la cinta instalada y ajustaautomáticamente la longitud de la etiqueta para adaptarla al texto. Sin embargo, si usteddesea ajustar la longitud de la etiqueta, podrá ajustarla entre 3,8 cm (1,5”) y 28,7 cm (11,3”).
El ajuste inicial de fábrica es AUTO.
+ La función de LONGITUD sólo puede aplicarse a todo el texto; no puede aplicarse
sólo a una parte del texto.
Si el texto no se acopla dentro de la longitud ajustada, aparecerá el mensaje de error“TOO LONG”.
PARA CAMBIAR LA LONGITUD DE LA ETIQUETA:

30
La función de AVANCE DE LA CINTA le permite seleccionar el tamaño de los márgenesizquierdo y derecho de su texto.
El ajuste inicial de fábrica es FULL; aunque tembién tendrá disponibles otros ajustes.FULL (25 mm (1”))
NONE (4 mm (1/6”))
NARROW (8 mm (1/3”))
MEDIUM (12 mm (1/2”))
+ La función de AVANCE DE LA CINTA sólo pude aplicarse a todo el texto; no puedeaplicarse sólo a parte del texto.
Puesto que la reducción del avance de la cinta puede reducir la legibilidad de loscódigos de barras, se recomienda el ajuste FULL de avance de a cinta cuando el textocontenga códigos de barras.
Si hay instalado un cassette de cinta de letras instantáneas (transferencia por frotación)o de transferencia por calor, el texto se imprimirá con el sjuste FULL (márgenes de 25mm (1”)), aunque se haya seleccionado un ajuste distinto.
PARA CAMBIAR LA ANCHURA DE AVANCE DE LA CINTA:

Podrá seleccionar la a alineación del texto de cuatro formas.
El ajuste inicial de fábrica es LEFT; aunque tendrá también disponibles otros ajustes.
LEFT
CENTER
RIGHT
JUSTIFY
+ La función H.ALI. (alineación horizontal) sólo puede aplicarse a todo el texto; no puedeaplicarse sólo a parte del texto.
Si la longitud de la etiqueta para un texto que contiene bloques múltiples se ha ajustadocon la función LENGTH y su alineación horizontal se ha ajustado a JUSTIFY, losespacios entre los bloques se ajustan de modo que el texto queda uniforme en toda laetiqueta.
PARA CAMBIAR LA ALINEACIÓN HORIZONTAL DEL TESTO:

32
El texto introducido podrá imprimirse verticalmente a lo lardo de la etiqueta.
El ajuste inicial de fábrica es OFF.
+ La función VERT (impresión vertical) sólo puede aplicarse a todo de texto; no puede
aplicarse sólo a parte del texto.
Cualquier etiqueta que usted cree podrá imprimise empleeando esta función.
PARA CAMBIAR EL AJUSTE DE IMPRESIÓN VERTICAL:

33
Con esta función, podrá imprimir el texto de modo que los caracteres puedan leerse desde ellado del adhesivo de la cinta. Si se adhieren etiquetas con impresión de espejo, usando cintatransparente, a un vidrio, como pueda ser en un escaparate, o en otro material transparente,podrán leerse correctamente desde el lado opuesto.
El ajuste inicial de fábrica es OFF.
+ Cuando la función MIRROR se ajusta a ON, imprima el texto transparente.
La función de impresión de espejo (MIRROR) sólo puede splicarse a todo el texto; nopuede aplicarse sólo a parte del texto.
Cualquier etiqueta creada puede imprimirse empleando esta función.
PARA CAMBIAR EL AJUSTE DE LA IMPRESIÓN DE ESPEJO:

34
Las mediciones se muestran en el visualizador en centímetros (cm) o en pulgadas (inch). Conesta función, usted podrá seleccionar las unidades utilizadas para visualizar las mediciones.
El ajuste inicial de fábrica es el de pulgadas (inch).
+ Esta ajuste sólo puede aplicarse a todas las mediciones; no puede aplicarse sólo aparte de ellas.
PARA CAMBIAR LA UNIDAD DE LAS MEDICIONES:
35

36

37
La función de membrete Stamp le permite crear con rapidez y facilidad sus propios membretespersonalizados. Seleccione esta función para centrar automáticamente el texto y ajustar lalongitud de la cinta y los márgenes a un formato perfecto para los soportes de películas demembrete entintados. Puesto que el soporte del membrete es reutilizable, haga nuevosmembretes reemplazando la película del membrete en el soporte de películas.
+ Conserve el soporte de películas de membrete fuera del alcance de los niños.
Evite que los ojos o la boca entren en contacto con la tinta. Si le entra tinta en los ojoso en la boca, lávese inmediatamente los ojos o la boca con agua fresca durante variosminutos y vaya al médico.
Mantenga la tinta apartada de la piel, ropas y papeles importantes. Empleeinmediatamente jajón para lavaese la piel que haya entrado en contacto con la tinta.
Incluso lavándose, es posible que no desaparezca toda la tinta.
PARA HACER UN MEMBRETE:

38

39
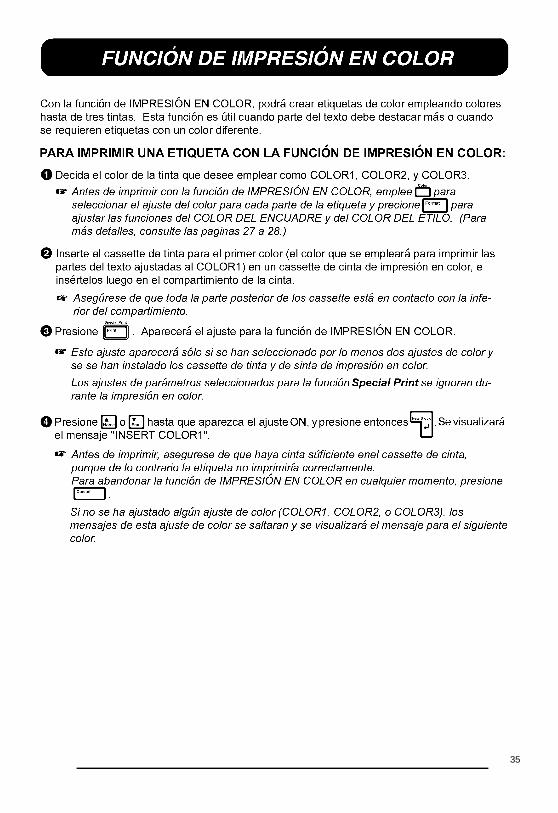
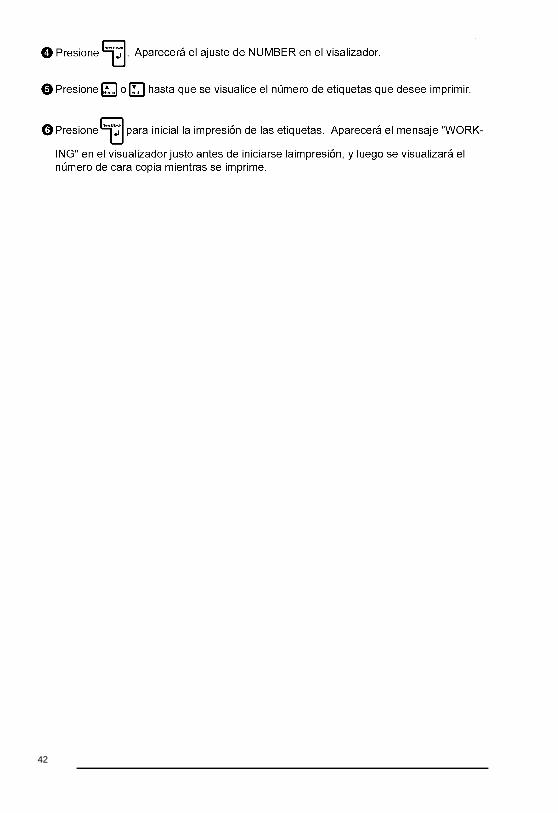
La dunción Special Print la permite ajustar el número de copias de la etiqueta que se impri-mirán, ajustar si la máquina corta automáticamente cada etiqueta, y activar y desactivar lafunción de impresión dividida.
Parámetros Ajustes
COPIES (número de copias de la 1 a 99Etiqueta que se imprimirán)
A. CUT (corte automático de cada ON, OFFetiqueta después de la impresión)
SPLIT (división de la etiqueta OFF, ONlongitudinalmente e impresióncomo dos etiquetas)
Los ajustes de fábrica son COPIES ajustado a 1, A. CUT ajustado a ON, y SPLIT ajustado aOFF.
+ Cuando el parámetro SPLIT se ajusta a ON, se ignora el parámetro COPIES y sólo se
imprime una copia de la etiqueta.
Los ajustes seleccionados para estos parámetros se ignoran durante la impresión
en color.
PARA CAMBIAR EL AJUSTE DE UN PARÁMETRO DE LA FUNCIÓN DEIMPRESIÓN ESPECIAL:

40
Si el parámetro SPLIT está ajustado a ON, las etiquetas como las mostradas arriba se imp-rimirán. Para colocaras juntas de forma que no se dividan los caracteres, corte el espacio enblanco de la parte inferior de la etiqueta superior, y la parte superior de la etiqueta inferior.
+ Cuando el parámetro SPLIT eatá activado, solamente se imprimirá una copia completa
de la etiqueta, independientemente del ajuste del parámetro de copias.

41
La función de numeración secuencial (Seq. Numbering) puede utilizarse para imprimir variascopias del mismo texto mientras se incrementan ciertos caracteres (letras o números) despuésde imprimirse cada etiqueta. Este tipo de incremento antomátoco es muy útil para imprimiretiquetas con numeración secuencial, para producir etiquetas de control u otras etiquetasque requieren códigos con incremento ascendente.
+ El texto sólo puede contener un campo numérico.
Si incluye un carácter que no es alfanumérico, como por ejemplo un símbolo en elcampo de numeración, sólo se incrementarán las letras y números del campo numéricocuando se impriman las etiquetas, o sólo se imprimirá una etiqueta si se incluye uncarácter que no es alfanumérico en el campo.
PARA IMPRIMIR ETIQUETAS CON CARACTERES EN EL CAMPO DENUMERACIÓN:
+ Para el campo de numeración pueden seleccionarse hasta cinco caracteres como
máximo. Si se seleccionan más de cinco caracteres, aparecerá el mensaje de error“WRONG SELECT” en el visualiza dor.
Un campo de numeración debe situarse por entero dentro de una línea de texto de unMismo bloque. Si tata de incluir texto de dos líneas distintas o de dos bloques distintosEn el campo de numeración, aparecerá el mensaje de error “INVAL. CHARS!” en elvisualizador.
El campo de numeración no puede contener caracteres con ajustes de formatos distin-tos. Si trata de seleccionar caracteres con ajustes de formatos distintos, aparecerá elmensaje de erroe “WRONG SELECT” en el visualizador.
42

43
Cuando se almacena cada archivo, se le da un número para poderlo abrir posteriormentecon facilidad. En la memoria pueden almacenarse hasta 100 archivos de texto o hasta nnos3.000 caracteres enla P-touch 550 (o 1.000 caracteres en la P-touch 530).
Puesto que se llama una copia del archivo de texto almacenado cuando se emplea la funciónde llamada (Recall), puede editarse o imprimirse el texto sin cambiar el archivo original.Cuando un archivo deja de ser necesario, podrá emplear la función M.Del para borrarlo.
PARA ALMACENAR UN ARCHIVO DE TEXTO EN LA MEMORIA:

44

45