text goes here agenda welcome to hardie 101 basic training best practices version 6.2 – october...
TRANSCRIPT

Text goes hereAgenda
Welcome to Hardie 101
Basic TrainingBest Practices Version 6.2 – October 2012
By: Gary GriffithsSenior Installation Specialist
James Hardie Installation Team

Installation Best Practices 6.2
Products & Installation

Text goes hereAgendaHardieSoffit
Please Follow Along in the Best Practices:
Pages 57 – 63 in the Canada HZ5 Best Practices Version 6.2
Pages 70 – 82 in the US HZ5 Best Practices Guide Version 7.0
Pages 74 – 85 in the US HZ10 Best Practices Guide Version 7.0

Text goes hereAgendaHardieSoffit
HardieSoffit Product Description
Text goes hereAgendaHardieSoffit
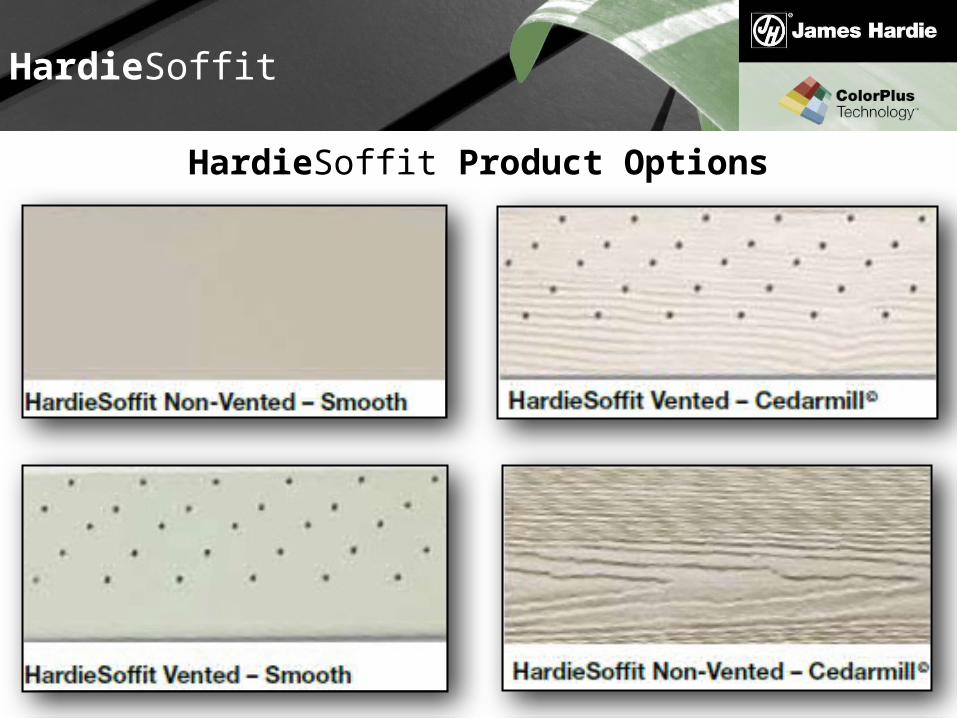
HardieSoffit Product Options
Text goes hereAgendaHardieSoffit
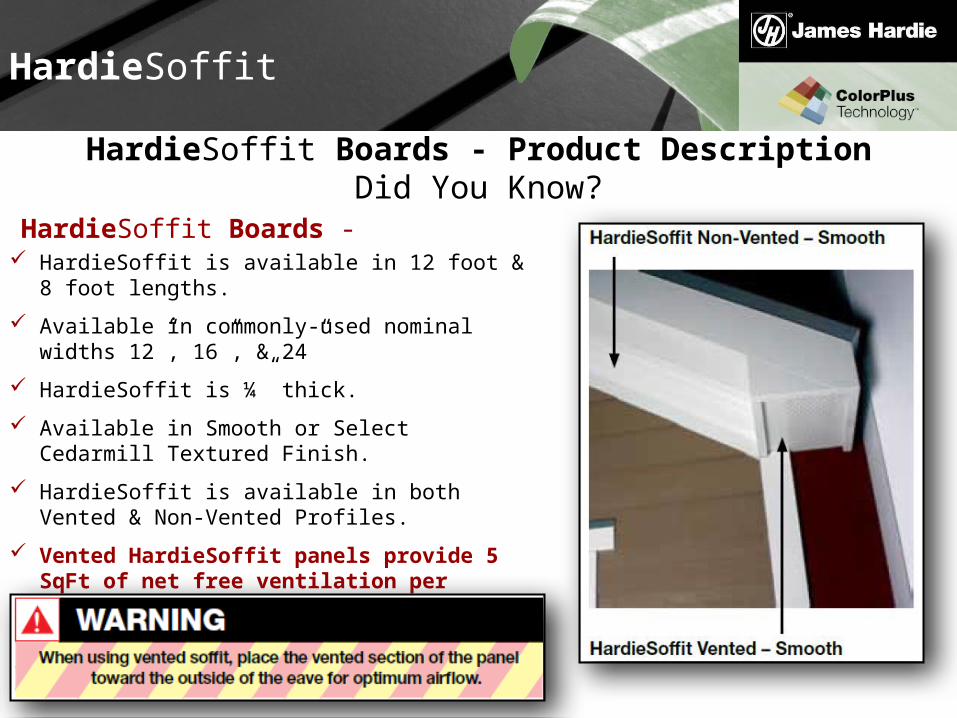
HardieSoffit Boards - Product DescriptionDid You Know?
HardieSoffit Boards - HardieSoffit is available in 12 foot & 8 foot lengths.
Available in commonly-used nominal widths 12”, 16”, & 24”
HardieSoffit is ¼” thick.
Available in Smooth or Select Cedarmill Textured Finish.
HardieSoffit is available in both Vented & Non-Vented Profiles.
Vented HardieSoffit panels provide 5 SqFt of net free ventilation per lineal foot of soffit.

Text goes hereAgendaHardieSoffit
HardieSoffit Boards – Installation RequirementsDid You Know?
HardieSoffit Boards – Standard Soffit HardieSoffit panels must be attached to solid
framing (typically 2x4 supports spaced no more than 24” oc)
HardieSoffit runs lengthwise in the eaves, with the panel width (12”, 16” or 24”) running from the building out.
Eave framing must include a Subfascia, rafter/truss blocking, and/or a ledger board on the wall to provide solid nailing along the long dimension of the soffit.
ALL Panel Edges MUST be Supported.
Text goes hereAgendaHardieSoffit
HardieSoffit Boards – Installation RequirementsDid You Know?
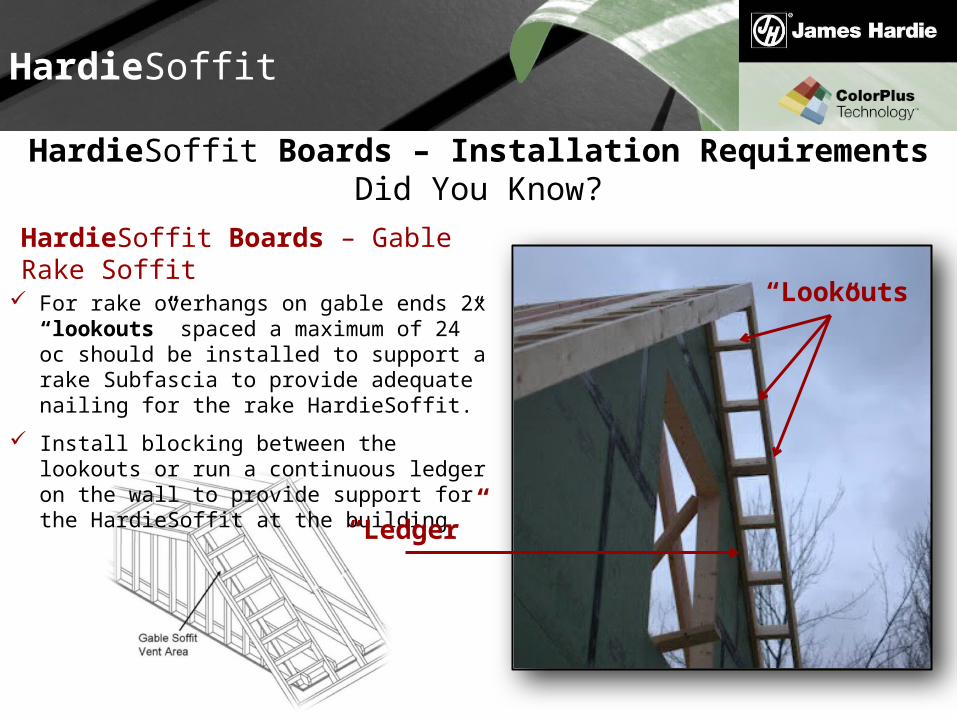
HardieSoffit Boards – Gable Rake Soffit For rake overhangs on gable ends 2x “lookouts”
spaced a maximum of 24” oc should be installed to support a rake Subfascia to provide adequate nailing for the rake HardieSoffit.
Install blocking between the lookouts or run a continuous ledger on the wall to provide support for the HardieSoffit at the building.
“Lookouts”
“Ledger”

Text goes hereAgendaHardieSoffit
HardieSoffit Boards – Installation RequirementsDid You Know?
HardieSoffit Boards – 4 Approved Joint Treatments There are Four (4) Approved Joint Treatment methods for joining the lengths of HardieSoffit panels
together.
1. HardieSoffit Panel Joints may be lightly butted together in moderate contact.
2. HardieSoffit Panel Joints may be covered with batten strips.
3. HardieSoffit Panel Joints may be joined with a PVC or Metal H molding or Trim.
4. HardieSoffit Panel Joints may be gapped 1/8” and caulked (Primed Product ONLY)
1 42 3

Text goes hereAgenda
Installation of HardieSoffit Panels
HardieSoffit
Preparation for HardieSoffit Panels: Required Framing
When Installing the Soffit:
1) Straighten the rafter tails by pulling and snapping a chalk line across the ends of the tails and then trimming them as necessary. (Figure 1.1)
2) Install a solid wood sub-fascia on the ends of the rafter tails or install blocking between the rafter tails as needed. (Figure 1.2)
Fig 1.1
Fig 1.2
3) In order to close in the soffit area, add nailers at every rafter or truss to provide support.
“Nailer”

Text goes hereAgenda
Installation of HardieSoffit Panels
HardieSoffit
Preparation for HardieSoffit Panels: Positioning & Fastening
When Installing the HardieSoffit Panels:
1) If the eaves are longer than 12’, measure and trim the first HardieSoffit panel making sure that the end falls in the middle of a nailer.
2) Using the sub-fascia as a guide along the edge, carefully position the panel and secure with 4d common galvanized nails spaced no greater than 8”oc at all panel edges and on all intermediate framing members.
3) Continue with additional pieces until the run is complete. Remembering to keep the vent strip to the outside of the eave.

Text goes hereAgenda
Installation of HardieSoffit Panels
HardieSoffit
Preparation for HardieSoffit Panels: 45o Hip Roof Framing
Hip roof soffits continue level around the corners of the house. The soffit panels should join at the corner with two 45o angle cuts.
To Create these Corners:
1) First measure from the corner to the perpendicular framing member closest to, but not over 12’ feet.
2) Using that measurement and pulling from the factory cut end of the soffit panel, mark the outside edge of the soffit panel for the long point of the 45o cut.
3) After cutting the 45o angle, position the panel on the soffit framing and check the fit on both ends before fastening.
4) Begin nailing at the 45o cut end and work toward the factory end.
1
2

Text goes hereAgenda
Installation of HardieSoffit Panels
HardieSoffit
Installed HardieSoffit Panels: 45o Hip Roof Mitered Examples
Correctly Installed HardieSoffit
- Shown with optional Batten Strip
Incorrectly Installed HardieSoffit
Venting MUST be installed to the Fascia NOT the wall.
- Shown with optional H Channel

Text goes hereAgenda
Installation of HardieSoffit Panels
HardieSoffit
Soffit to Wall Treatment Options for HardieSoffit Panels:
In addition to the frieze board treatments described above, there are several other options for finishing the juncture where the siding meets the soffit.
CAULK THE SIDING/SOFFIT JOINT:A fast and economical method of finishing the siding/soffit juncture is simply to run a bead of quality permanently flexible caulk along the top edge of the siding where it meets the soffit. Make sure the last piece of siding installed is ripped straight so it looks aesthetically pleasing.
OVER THE TOP OF THE SIDING WITH “J” CHANNEL:Once the Soffit is in place, install a vinyl “J” channel upside down with the base of the “J” against the soffit. Then rip the final course of siding so that it fits inside the channel.
INSTALL AN EXTERIOR CROWN MOLDING OR CORNICE TRIM:Crown molding or trim is another way of finishing and sealing the soffit/siding juncture, install and finish the crown molding or trim according to the manufacturer’s specifications.

Text goes hereAgenda
Installation of HardieSoffit Panels
HardieSoffit
HardieSoffit Panels: Installation of additional Insect Screen (where required)
When Installing Additional Insect Screen in the Soffit:
1) Cut insect screen so it covers the vented portion of the HardieSoffit.
2) Ensure the insect screen laps by 1 – 2 inches over the non-vented portion of the HardieSoffit Panel.
3) Secure the insect screen to the backside of the vented portion of the HardieSoffit using a bead of construction adhesive.
1-2 inches

Text goes hereAgenda
Installation of HardieSoffit Panels
HardieSoffit
HardieSoffit Panels: Required Fasteners & Fastener SpacingWhen Fastening HardieSoffit:
1) Ensure all Panel Edges break on solid wood framing.
2) Fastener Spacing is 8” oc into solid framing members spaced no further apart then 24” oc maximum.
3) Keep Fasteners 2” from corners and 3/8” in from HardieSoffit Panel Edges.
4) Stainless Steel Fasteners are always recommended when installing all James Hardie Products.
8” Inches

Text goes hereAgenda
HardieSoffitInstallation Requirements
Please Reference the Installation Requirements found on:
Pages 76 – 82 in the US HZ5 Best Practices Guide Version 7.0
&
Pages 80 – 85 in the US HZ10 Best Practices Guide Version 7.0
&
Pages 61 – 63 in the Canada HZ5 Best Practices Version 6.2

Installation Best Practices 6.2
Begin theHardieSoffit Installation Requirements
Knowledge Test

Text goes hereAgendaKNOWLEDGE TEST RESULTS
HardieSoffit Installation Requirements:
1. Vented HardieSoffit panels provide how many net free square inches of ventilation per foot?
a) 2.0b) 3.0c) 5.0d) 12.0
2. When installing vented HardieSoffit panels you should install venting to the outside of the eave?
a) Trueb) False
3. HardieSoffit panels may be installed over steel or wood framing min. 2x4 members spaced a maximum of how many inches apart?
a) 6”b) 12”c) 24”d) 36”
4. Which of the following methods can be used to properly treat soffit joints?
a) Moderate Contactb) 1/8” gap and caulk (prime products only)c) Batten Stripsd) H-Moldinge) All of the Above
5. A full headed nail must be used to install HardieSoffit panels?
a) Trueb) False
6. The Addition of insect screen over the already vented section of the HardieSoffit will reduce the net airflow?
a) Trueb) False

Text goes hereAgenda
12 Critical Details to a Quality Installation Page 13 in your
Best Practices Guide.
All 12 items are Critical to the Long Term Quality, Durability and Installation Compliance.
Most Important Page in your Best Practices Guide
General Installation Requirements