testlink user manual
TRANSCRIPT
User Manual
TestLink version 1.9
Version: 1.18
Status: Updated for TL 1.9
© 2004 - 2010 TestLink Community
Permission is granted to copy, distribute and/or modify this document under the terms of the GNU Free Documentation License, Version 1.2 published by the Free Software Foundation; with no Invariant Sections, no Front-Cover Texts, and no Back-Cover Texts. The license is available in "GNU Free Documentation License" homepage.
Revision History
# Description Date Author
0.x Documents for TL 1.5 and update for TL 1.6 2005 M. HavlátA. MorsingF. Mancardi
1.0 Converted to OO2 format; 2005/03/12 M. Havlát
1.1 Minor update; FIX 372, 352 2006/02/14 M. Havlát
1.2 Updated as draft for TL 1.7 2006/11/17 M. Havlát
1.3 Removed TL 1.6 termsAdded initial information about Custom Fields
2007/03/01 F. Mancardi
1.4 Added content and updated Francisco's “jumpstart_manual” and tl_file_format.General style clean-up and update.
2007/09/06 M. Havlát
1.5 General update and restructuring; added Test Suite chapter; requirements report
2007/12/17 M. Havlát
1.6 Overall language review 2008/01/24 W. Pollans
1.7 Minor update; Added section Import Test Cases from Excel via XML (prepared by Prem)
2008/02/02 M. Havlat
1.8 Update to TL 1.8 draft 2008/04/16 M. Havlat
1.9 Update some new features 2008/07/212008/08/18
M. Havlát
1.10 Update for 1.8 RC3 01/15/09 M. Havlát
1.11 Update for 1.8 RC5 02/15/09 M. Havlát
1.12 Update for 1.8.0; Import/Export 03/15/09 M. Havlát
1.13 Update according to issues 04/01/09 M. Havlát
1.14 Update according to issues (TL 1.8.2) 04/30/09 M. Havlát
1.15 Updated chapter “Custom fields: Estimated and Actual execution time” by qviiAdded page numbers
05/06/09 M. Havlát
1.16 Minor updates according to User feedback 23/06/0909/12/09
M. Havlát
1.17 Update for 1.9; Platforms; Inventory 08/01/10 M. Havlat
1.18 Removed Import/Export as this information is duplicated in external document
04/03/10 M. Havlat
- 2 -

Table of Contents
1 General information 5 1.1 Overall structure 5 1.2 Basic Terminology 5 1.3 Example of TestLink simple work-flow 6 1.4 Short-cuts 7
2 Test Projects 9 2.1 Creating new Test Projects 9 2.2 Edit and delete Test Projects 9 2.3 Inventory 10
3 Test Specification 12 3.1 Test Suites 12 3.2 Test Cases 13 3.3 Keywords 16 3.4 Generate Test Specification document 17
4 Requirement based testing 18 4.1 Availability 18 4.2 Requirements Specification Document 18 4.3 Requirements 19
5 Test Plans 21 5.1 Create and delete Test Plan 21 5.2 Builds 21 5.3 Test Set - adding Test Cases to Test Plan 22 5.4 Removing Test Cases from Test Set 23 5.5 Test execution assignment 24 5.6 Platforms 29 5.7 Prioritize testing 33 5.8 Milestones 34
6 Test Execution 36 6.1 General 36 6.2 Navigation and settings 36 6.3 Test execution 37
7 Test Reports and Metrics 40 7.1 General Test Plan Metrics 40 7.2 Query Metrics 41 7.3 Blocked, Failed, and Not Run Test Case Reports 44 7.4 Test Report 44 7.5 Charts 44 7.6 Total Bugs For Each Test Case 45 7.7 Requirements based report 45 7.8 How to add a new report 45
8 Administration 46 8.1 User account settings 46 8.2 Role Permissions 46 8.3 Test Plan assignment to users 47 8.4 Custom Fields 47
9 Import and Export data 54
- 3 -

1 General information
TestLink is web based Test Management system. This manual should serve as source for users to understand processes, terms and organization of work with TestLink. See the Installation manual for more information about system requirements, installation steps and configuration. The latest documentation is available on www.teamst.org or testlink.sourceforge.net.
Please use our forum if you have questions that the manual doesn't answer.
TestLink code is often faster than documentation and some contribution missed appropriate description. Some enhancement are not described for this reason here. Thank you for notify us via tracker.
1.1 Overall structure
There are three cornerstones: Test Project, Test Plan and User. All other data are relations or attributes of this base. First, we will define terms that are used throughout the documentation and testing world.
1.2 Basic Terminology
Test Case describes a testing task via steps (actions, scenario) and expected results. Test Cases are the fundamental piece of TestLink.
- 4 -
Illustration 1: Test Project is the basic component in TestLink
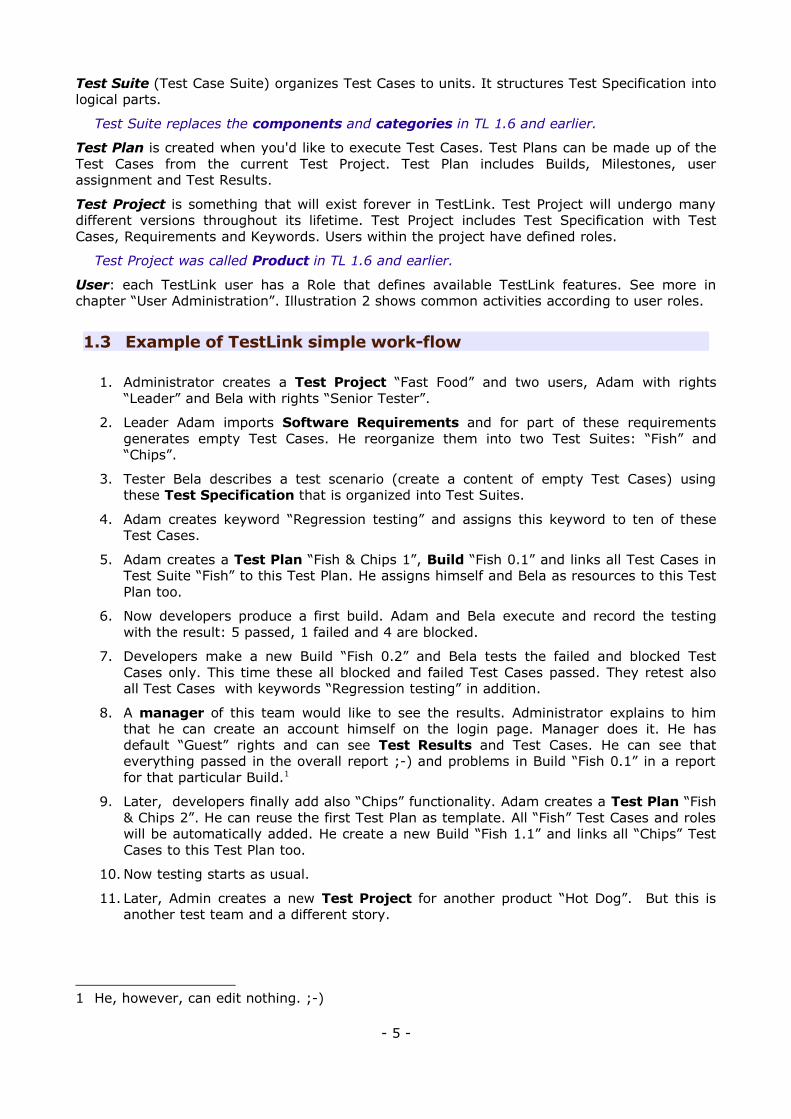
Test Suite (Test Case Suite) organizes Test Cases to units. It structures Test Specification into logical parts.
Test Suite replaces the components and categories in TL 1.6 and earlier.
Test Plan is created when you'd like to execute Test Cases. Test Plans can be made up of the Test Cases from the current Test Project. Test Plan includes Builds, Milestones, user assignment and Test Results.
Test Project is something that will exist forever in TestLink. Test Project will undergo many different versions throughout its lifetime. Test Project includes Test Specification with Test Cases, Requirements and Keywords. Users within the project have defined roles.
Test Project was called Product in TL 1.6 and earlier.
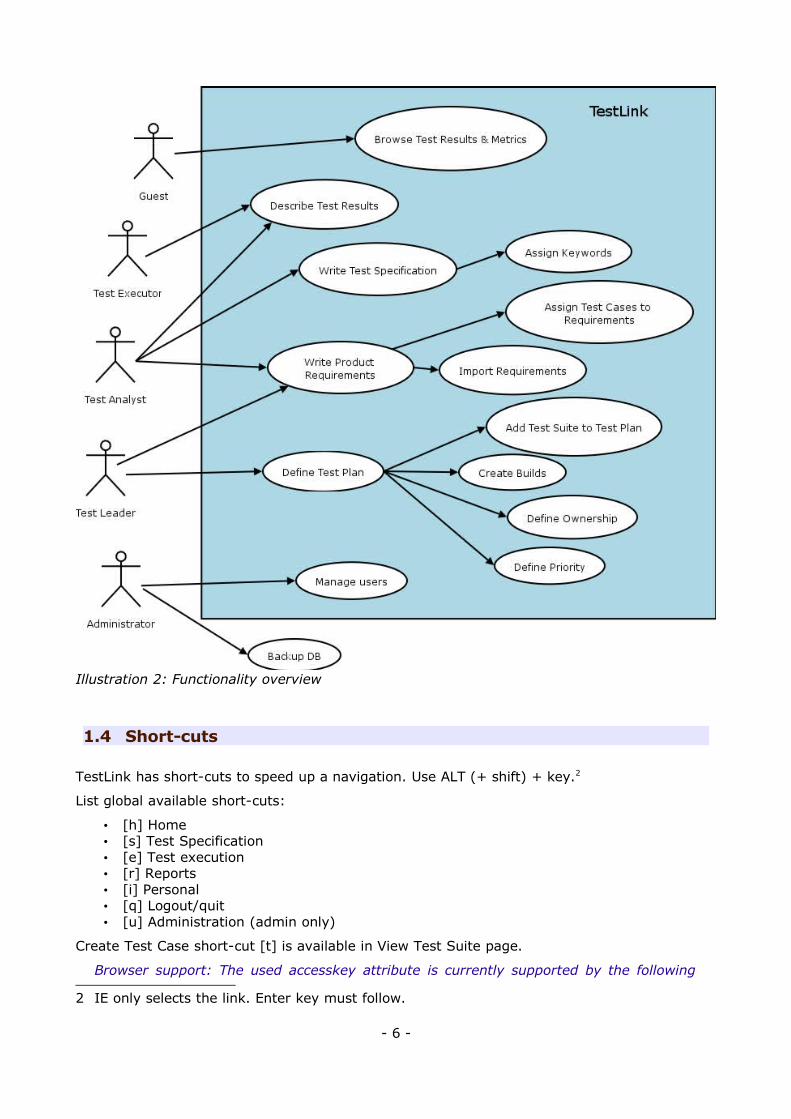
User: each TestLink user has a Role that defines available TestLink features. See more in chapter “User Administration”. Illustration 2 shows common activities according to user roles.
1.3 Example of TestLink simple work-flow
1. Administrator creates a Test Project “Fast Food” and two users, Adam with rights “Leader” and Bela with rights “Senior Tester”.
2. Leader Adam imports Software Requirements and for part of these requirements generates empty Test Cases. He reorganize them into two Test Suites: “Fish” and “Chips”.
3. Tester Bela describes a test scenario (create a content of empty Test Cases) using these Test Specification that is organized into Test Suites.
4. Adam creates keyword “Regression testing” and assigns this keyword to ten of these Test Cases.
5. Adam creates a Test Plan “Fish & Chips 1”, Build “Fish 0.1” and links all Test Cases in Test Suite “Fish” to this Test Plan. He assigns himself and Bela as resources to this Test Plan too.
6. Now developers produce a first build. Adam and Bela execute and record the testing with the result: 5 passed, 1 failed and 4 are blocked.
7. Developers make a new Build “Fish 0.2” and Bela tests the failed and blocked Test Cases only. This time these all blocked and failed Test Cases passed. They retest also all Test Cases with keywords “Regression testing” in addition.
8. A manager of this team would like to see the results. Administrator explains to him that he can create an account himself on the login page. Manager does it. He has default “Guest” rights and can see Test Results and Test Cases. He can see that everything passed in the overall report ;-) and problems in Build “Fish 0.1” in a report for that particular Build.1
9. Later, developers finally add also “Chips” functionality. Adam creates a Test Plan “Fish & Chips 2”. He can reuse the first Test Plan as template. All “Fish” Test Cases and roles will be automatically added. He create a new Build “Fish 1.1” and links all “Chips” Test Cases to this Test Plan too.
10. Now testing starts as usual.
11. Later, Admin creates a new Test Project for another product “Hot Dog”. But this is another test team and a different story.
1 He, however, can edit nothing. ;-)
- 5 -
1.4 Short-cuts
TestLink has short-cuts to speed up a navigation. Use ALT (+ shift) + key.2
List global available short-cuts:
• [h] Home • [s] Test Specification• [e] Test execution• [r] Reports• [i] Personal • [q] Logout/quit • [u] Administration (admin only)
Create Test Case short-cut [t] is available in View Test Suite page.
Browser support: The used accesskey attribute is currently supported by the following
2 IE only selects the link. Enter key must follow.
- 6 -
Illustration 2: Functionality overview
web browsers:
• Firefox
• Internet Explorer 4+ (Windows) 5+ (Mac)
• Mozilla (Windows + Linux)
• Netscape 6.1+ (Windows)
• Opera 7+ (Windows + Linux)
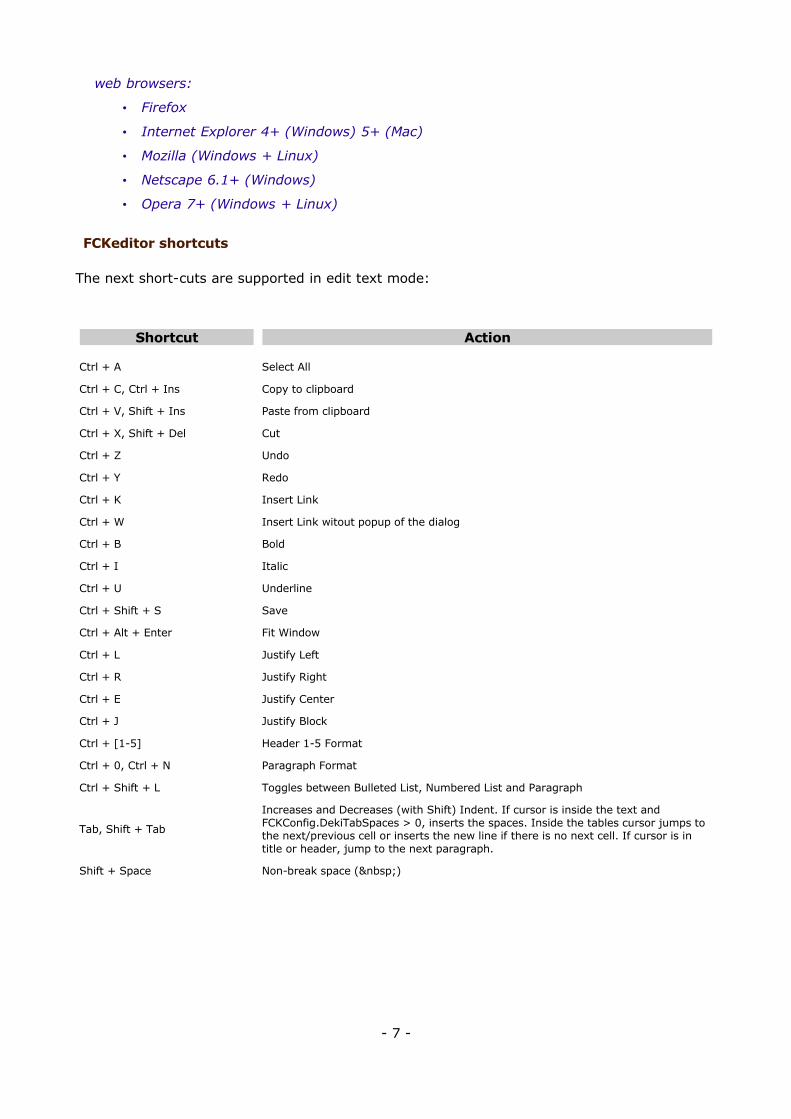
FCKeditor shortcuts
The next short-cuts are supported in edit text mode:
Shortcut Action
Ctrl + A Select All
Ctrl + C, Ctrl + Ins Copy to clipboard
Ctrl + V, Shift + Ins Paste from clipboard
Ctrl + X, Shift + Del Cut
Ctrl + Z Undo
Ctrl + Y Redo
Ctrl + K Insert Link
Ctrl + W Insert Link witout popup of the dialog
Ctrl + B Bold
Ctrl + I Italic
Ctrl + U Underline
Ctrl + Shift + S Save
Ctrl + Alt + Enter Fit Window
Ctrl + L Justify Left
Ctrl + R Justify Right
Ctrl + E Justify Center
Ctrl + J Justify Block
Ctrl + [1-5] Header 1-5 Format
Ctrl + 0, Ctrl + N Paragraph Format
Ctrl + Shift + L Toggles between Bulleted List, Numbered List and Paragraph
Tab, Shift + Tab
Increases and Decreases (with Shift) Indent. If cursor is inside the text and FCKConfig.DekiTabSpaces > 0, inserts the spaces. Inside the tables cursor jumps to the next/previous cell or inserts the new line if there is no next cell. If cursor is in title or header, jump to the next paragraph.
Shift + Space Non-break space ( )
- 7 -
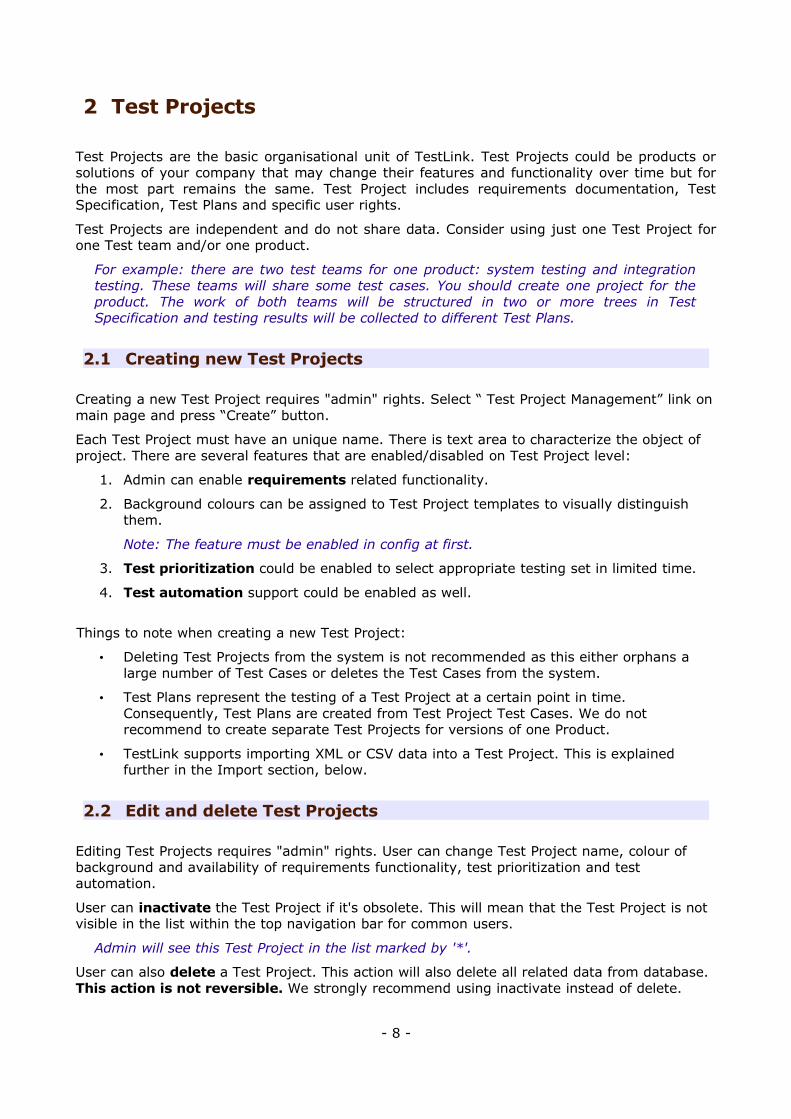
2 Test Projects
Test Projects are the basic organisational unit of TestLink. Test Projects could be products or solutions of your company that may change their features and functionality over time but for the most part remains the same. Test Project includes requirements documentation, Test Specification, Test Plans and specific user rights.
Test Projects are independent and do not share data. Consider using just one Test Project for one Test team and/or one product.
For example: there are two test teams for one product: system testing and integration testing. These teams will share some test cases. You should create one project for the product. The work of both teams will be structured in two or more trees in Test Specification and testing results will be collected to different Test Plans.
2.1 Creating new Test Projects
Creating a new Test Project requires "admin" rights. Select “ Test Project Management” link on main page and press “Create” button.
Each Test Project must have an unique name. There is text area to characterize the object of project. There are several features that are enabled/disabled on Test Project level:
1. Admin can enable requirements related functionality.
2. Background colours can be assigned to Test Project templates to visually distinguish them.
Note: The feature must be enabled in config at first.
3. Test prioritization could be enabled to select appropriate testing set in limited time.
4. Test automation support could be enabled as well.
Things to note when creating a new Test Project:
• Deleting Test Projects from the system is not recommended as this either orphans a large number of Test Cases or deletes the Test Cases from the system.
• Test Plans represent the testing of a Test Project at a certain point in time. Consequently, Test Plans are created from Test Project Test Cases. We do not recommend to create separate Test Projects for versions of one Product.
• TestLink supports importing XML or CSV data into a Test Project. This is explained further in the Import section, below.
2.2 Edit and delete Test Projects
Editing Test Projects requires "admin" rights. User can change Test Project name, colour of background and availability of requirements functionality, test prioritization and test automation.
User can inactivate the Test Project if it's obsolete. This will mean that the Test Project is not visible in the list within the top navigation bar for common users.
Admin will see this Test Project in the list marked by '*'.
User can also delete a Test Project. This action will also delete all related data from database. This action is not reversible. We strongly recommend using inactivate instead of delete.
- 8 -

2.3 Inventory
Users can list their hardware in table per project. The feature should be enable on “Edit Project” page. Leaders can edit this page by default and testers can browse it only.3 Inventory link is available on Main Project page in “Test Project” menu.
Inventory page offers three actions: create, update and delete.
Table shows all devices and allows sorting on any field.
Select “Create” button to define a device. The next parameters are supported:
• Host name (unique mandatory value)
• IP address
• Purpose (simple text with maximally 2000 characters)
• Hardware (simple text with maximally 2000 characters)
• Notes (simple text with maximally 2000 characters)
• Owner (optional) could be anybody who has at least view ability
3 Admin can modify roles rights to extend these rights.
- 9 -
Illustration 5: Inventory table with sorting
Illustration 4: Actions on Inventory table
Illustration 3: Navigation to Inventory
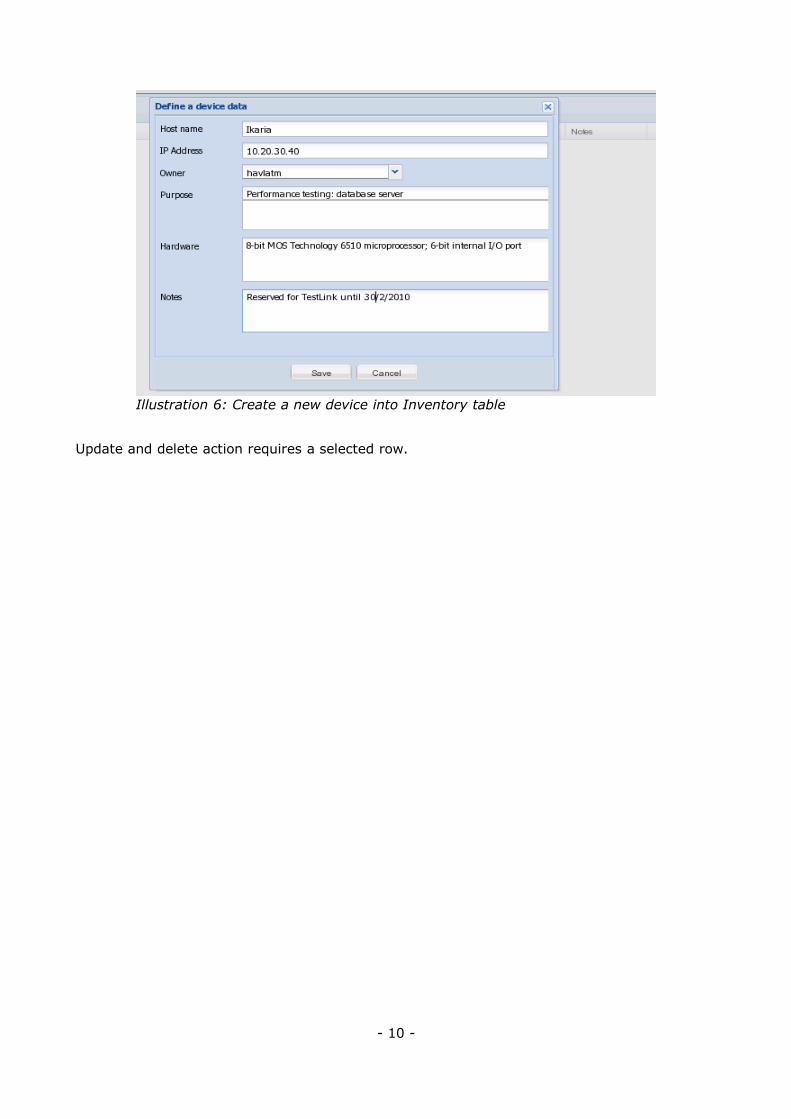
Update and delete action requires a selected row.
- 10 -
Illustration 6: Create a new device into Inventory table

3 Test Specification
TestLink breaks down the Test Specification structure into Test Suites and Test Cases. These levels are persisted throughout the application. One Test Project has just one Test Specification.
Future consideration: we plan to implement the next abilities: Test patterns, review process and status of Test case, variable Test case structure (for example step by step design).
3.1 Test Suites
Users organize Test Cases into Test (Case) Suites. Each Test Suite consists of a title, formatted description Test Cases and possibly other Test Suites. TestLink uses tree structure for Test Suites. The common practise is that the description holds information valid for most of included data.
For example, the following could be specified: scope of included tests, default configuration, preconditions, links to related documentation, list of tools, infrastructure overview, etc.
Creating one or more Test Suites is one of the first steps when creating your Test Project. Users (with edit right) can create, delete, copy, move, export and import both nested Test Suites and Test Cases. Title and description can be modified too.
You can reorder both Test cases and child Test Suites via Drag & Drop items on the navigation tree.4
Practice: Consider structure of your test specification. You could divide tests by functional/non functional testing, particular features, components. You can change the structure later of course – move test suites without lost of any information.
Practice: Later versions of your product could have some features obsolete. You can create a special Test suite 'Obsolete' or 'Your product 0.1' and move test cases there. Deleting of test case causes that earlier test results will be deleted too.
Attachments with external documents or pictures could be added into particular Test Suites.
4 It requires EXT-JS component (default).
- 11 -
Illustration 7: Test Specification is structured by Test Suites

Note: The functionality must be allowed via TestLink configuration.
More information about import and export are in appendix.
FAQ: Could I copy/move Test suites between projects? You cannot directly in this version. We designed Test projects fully independent each from other. Use import/export as workaround.
3.2 Test Cases
Test Case is a set of inputs, execution preconditions, and expected results (outcomes) developed for a particular objective, such as to exercise a particular program path or to verify compliance with a specific requirement.
Test Cases have the following parts:
• Identifier of a Test Case is assigned automatically by TestLink, and can not be changed by users. This ID composes from Test Project prefix and a counter related to the Test Project in which the Test Case is created.5
• Title: could include either short description or abbreviation (e.g. TL-USER-LOGIN)
• Summary: should be really short; just for overview, introduction and references.
• Steps: describe test scenario (input actions); can also include precondition and clean-up information here.
FAQ: Our test steps are pretty detailed are use a lot of formatting coming from Word. Use "Paste from msword" feature of FCKeditor. It cleans garbage. (Configure toolbar if not available.)
• Expected results: describe checkpoints and expected behaviour of a tested product or system.
• Attachments: could be added if configuration allows it.
• Importance: Test designer could set importance of the test [HIGH, MEDIUM and LOW]. The value is used to compute priority in Test Plan.6
• Execution type: Test designer could set automation support of the test [MANUAL/AUTOMATED].6
• Custom fields: Administrator could define own parameters to enhance Test Case description or categorization. See 8.4 for more.
Large custom fields (more than 250 characters) are not possible. But information could be added into parent Test Suite and referred via custom fields. For example you can describe Configuration 'standard', 'performance', 'standard_2' and refer via CF to this labels.
Note: The development is planned to make a TC structure more flexible in future.
Test Case - Active Attribute
If several versions of a Test Case exist, it would be useful to have a new attribute, Active/Inactive, to use in this way:
• Every Test Case version is created ACTIVE • An Inactive Test Case Version will not be available in "Add Test Cases to Test Plan".
This can be useful for Test Designers. They can edit or change the Test Case Version and only when he/she decides it is completed, change Status to ACTIVE so it will be available to be used in a Test Plan.
• Once a Test Case Version has been linked to a Test Plan, and has results, it can't be
5 TestLink 1.7 and earlier versions have had this ID as a global counter independent of the Test Project. TestLink 1.8 still uses this unique ID for API calls.
6 The feature must be enabled on Test project management.
- 12 -

turned INACTIVE.
Spell checker
You can use web browser ability. Firefox has add-on for example “British English Dictionary” or amount dictionaries for other languages.
FCKeditor supports own solution. See their Developers Guide for more.
As you can note, the number near Test Project name (in this example: toaster_xl5) is 2, but the Test Project has 3 Test Cases. Test Case TC1 is not counted, because is inactive.
Removing Test Cases
Test Cases and Test Suites may be removed from a Test Plan by users with “lead” permissions. This operation may be useful when first creating a Test Plan since there are no results. However, removing Test Cases will cause the loss of all results associated with them. Therefore, extreme caution is recommended when using this functionality.
- 13 -
Illustration 8: What you see in Test Case specification
Illustration 9: What you see when trying to add Test Cases to a Test Plan
Requirements relation
Test Cases could be related to software/system requirements as n to n. The “requirements” functionality must be enabled for a Test Project. User can assign Test Cases and Requirements via the “Assign Requirements” link in the main screen.
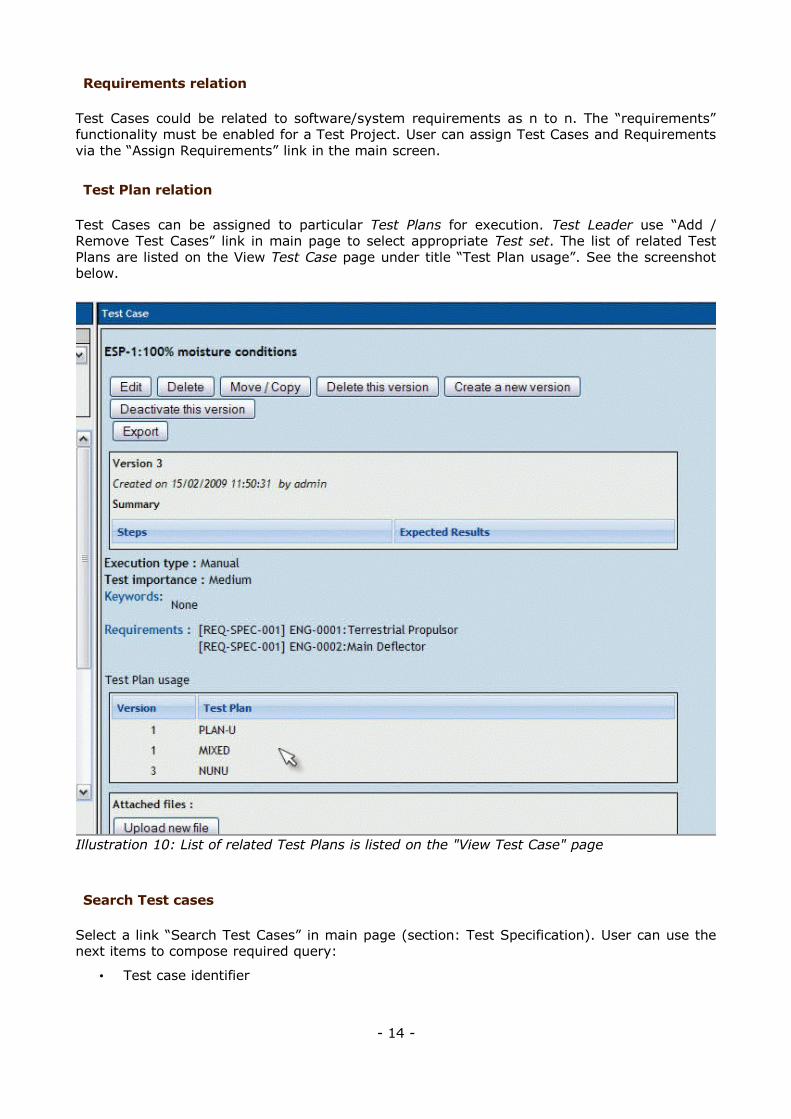
Test Plan relation
Test Cases can be assigned to particular Test Plans for execution. Test Leader use “Add / Remove Test Cases” link in main page to select appropriate Test set. The list of related Test Plans are listed on the View Test Case page under title “Test Plan usage”. See the screenshot below.
Search Test cases
Select a link “Search Test Cases” in main page (section: Test Specification). User can use the next items to compose required query:
• Test case identifier
- 14 -
Illustration 10: List of related Test Plans is listed on the "View Test Case" page
• Version of Test case
• Keyword in title
• Keyword in Summary, Steps and/or Expected results (Warning: this search simply parse texts including HTML tags. For example keyword “hello word” doesn't find a text “<p>hello <b> word</b></p>”).
• Assigned keyword.
• Assigned requirement ID.
The resulted list of includes for each Test case: related parental Test Suite(s) and a link to a Test case page.
3.3 Keywords
Keywords were created to give users another level of depth when categorizing Test Cases. Keywords are ideal for filtering. Keywords serve as a means of grouping Test Cases with some attribute within a Test Specification. For example, you can use it to define:
• Regression set (or Sanity for ability to filter mandatory tests)
• Reviewed Test Cases (to indicate formal status)
• Solaris (set of Test Cases valid for one platform)
• Change request 12345 (related to new features in specific release)
• Your_product 3.2.1 (related to certain version of product)
Note: You could use also Custom Fields if you need more sophisticated using.
Create a Keyword
At this time keywords can only be created by users with the mgt_modify_key rights. These rights are currently held by role Leader. Once a keyword or grouping of keywords has been created users may assign them to Test Cases.
Each project has own set of keywords.
Assigning Keywords
Keywords may be assigned to Test Cases either from the assign keyword screen (in batch) or via the Test Case management (individually).
Filter by Keyword
Users have the ability to filter by Keywords in:
• Navigation tree of Test specification.
• Search Test Cases in Test Specification.
• Add Test Cases in a Testing Set (Test Plan).
• “Execute test” page.
Some reports also give results with respect to keywords.
- 15 -

3.4 Generate Test Specification document
Users can generate the current Test Specification as a document. Use a link from the main page. There is structural options and possibility to select a required Test Suite or get all content.
User can choose document format (HTML, OpenOffice text document or msword document), TOC, Test suite data, Test Case summary, steps + expected results, and list of related keywords and/or requirements.
- 16 -
Illustration 11: Options for generated Test Specification
4 Requirement based testing
To prove that a system is built as specified, testers use requirement based testing. For every requirement, they design one or more Test Cases. At the end of the test execution a test manager reports on the tests that are executed and the requirements that are covered. Based on this information the client and the various stakeholders decide whether a system can be transferred to the next test phase or can go live. Test managers use a combination of risk and requirement-based testing to ensure that a system is built as specified from the customer and stakeholders perspective. As a result, this complete testing delivers the following advantages:
• Linking risks and requirements will reveal vague or missing requirements. This is especially interesting for risks with a high priority.
• Testing can be focused on the most important parts of an information system first: covering the risks with the highest priority.
• Communicating in the same language as the client and the stakeholders. This makes it easier to report on the status of the Test Project. Then a better founded decision can be made whether to invest more in testing or take the risk.
• The risks and their priority make negotiating on the Test Project in times of pressure easier. What risks have to be covered within this Test Project and which ones can be postponed. Risk and requirement-based testing results in a better controlled Test Project. The communication with the client and the stakeholders is improved. The test manager begins testing with risks with the highest priority. The process is streamlined and the end result is higher quality.
4.1 Availability
The functionality is available at the Test Project level. I.e. Administrator should enable it for a specified Test Project (Edit Test Project link in Main window). Otherwise links are not shown.
There are two user levels for this feature. Most roles can view requirements, but not modify them. Refer to User section for more details.
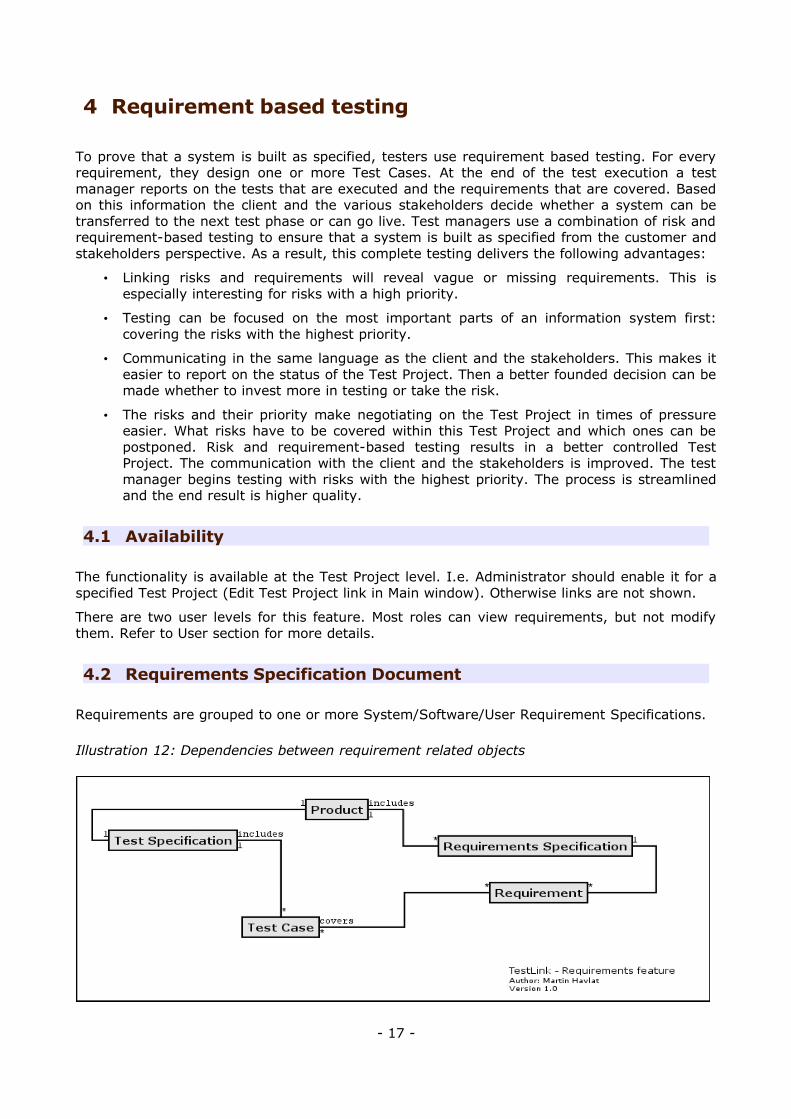
4.2 Requirements Specification Document
Requirements are grouped to one or more System/Software/User Requirement Specifications.
- 17 -
Illustration 12: Dependencies between requirement related objects

Create a document with Requirements:
1. Click Requirements Specification in Main window. The list of Requirement Specifications is shown.
2. Press Create button to create a document.
3. Adjust Title, Scope and eventually Count of Test Cases. The last parameter is used for statistics. Use only if you have a valid Requirement document but not all requirements are available at the moment in TestLink. Default value '0' means that the current count of requirements in a specification is used.
4. Press Create button to add data to database. You can see the title of your new created document in the table of list of Requirement Specifications.
5. Click the title of document for next work. The Requirement Specification window is shown.
Each Requirement Specification has own statistics and report related to included data.
All Specifications can be printed using the "Print" button in the "Requirement Specification" window. Administrator can define company, copyright and confident text via configuration files.
Warning: TestLink 1.8 brings support of n-depth tree structure for requirements (should be enabled by configuration). However some related features (for example import/export, document generation) aren't compliant with this settings yet. These features behaves like only direct child requirements exists and all inner sub folders are ignored.
4.3 Requirements
Each requirement has Title, Scope (html format) and Status. Title must be unique and has max. 100 characters. Scope parameter is text in HTML format. Status can have the values VALID or NOT_TESTABLE. A NOT_TESTABLE requirement is not counted in metrics.
Requirements could be created/modified or deleted manually via TestLink interface or imported as CSV file.
- 18 -
Illustration 13: Manage a Requirements Specification

Import requirements
TestLink supports two types of CSV. The first 'simple' is composed from title and scope in each row. The second 'Export from Doors' tries to detect the header and choose the correct fields. Import compares titles and tries to resolve conflicts. There are three ways to do this: update, create requirements with same title and skip adding the conflicted ones.
Requirements to Test Case relation
Test Cases are related with software/system requirements as * to *. I.e. you can assign one or more Test Cases to one Requirement and one or more requirements could be covered by one Test Case. User can assign Requirements to Test Cases via the Assign Requirements link in the Main window.
The coverage of the Test Specification could be viewed via pressing the Analyse button in the Requirement Specification window.
Requirement based Report
Navigate to Reports and Metrics menu. There is a Requirements based Report link. Requirements in the current Requirement Specification and Test Plan are analysed for this report. The latest results of Test Cases (available in Test Plan) are processed for each requirement. The result with the highest priority is applied for the requirement. Priorities, from the highest to lowest, are: Failed, Blocked, Not Run and Passed.
Example of requirement coverage
A requirement is covered by three Test Cases. Two of them are included in the current Test Suite. One passed and one was not tested for the Build 1. Now Requirement has overall result of Not Run. Second Test Case was tested with Build 2 and passed. So Requirement passed too.
- 19 -
5 Test Plans
“A record of the test planning process detailing the degree of tester involvement, the test environment, the Test Case design techniques and test measurement techniques to be used, and the rationale for their choice.”
Test Plans are the basis for test execution activity. A Test Plan contains name, description, collection of chosen Test Cases, Builds, Test Results, milestones, tester assignment and priority definition. Each Test Plan is related to the current Test Project.
5.1 Create and delete Test Plan
Test Plans may be created from the “Test Plan management” page by users with lead privileges for the current Test Project. Press “Create” button and enter data.
Test Plan definition consists from title, description (html format) and status “Active” check-box. Description should include the next information with respect to company processes:
• Summary/Scope
• Features to be tested
• Features to not be tested
• Test criteria (to pass tested product)
• Test environment, Infrastructure
• Test tools
• Risks
• References (Product plan or Change request, Quality document(s), etc.)
Test Plans are made up of Test Cases imported from a Test Specification at a specific point of time. Test Plans may be created from other Test Plans. This allows users to create Test Plans from Test Cases that exist at a desired point in time. This may be necessary when creating a Test Plan for a patch. In order for a user to see a Test Plan they must have the proper rights. Rights may be assigned (by leads) in the define User/Project Rights section. This is an important thing to remember when users tell you they can't see the project they are working on.
Test Plans may be deleted by users with lead privileges. Deleting Test Plans permanently deletes both the Test Plan and all of its corresponding data, including Test Cases (not in Test Specification), results, etc. This should be reserved only for special cases. Alternatively, Test Plans may be deactivated on the same page, which suppresses display on selection menus in the “main” and “Execute” pages.
5.2 Builds
An user with lead privileges could follow the link “Build management” in the main page.
Builds are a specific release of software. Each project in a company is most likely made up of many different Builds. In TestLink, execution is made up of both Builds and Test Cases. If there are no Builds created for a project the execution screen will not allow you to execute. The metrics screen will also be completely blank.
- 20 -

Each Build is identified via title. It includes description (html format) and two states:
• Active / Inactive – defines whether the Build is available for TestLink functionality. Inactive Build is not listed in either execution or reports pages.
• Opened / Closed – defines if Test Results can be modified for the Build.
Builds can be edited (via link under a Build title) and deleted (by click on the appropriate “bin” icon) in the table of existing Builds.
5.3 Test Set - adding Test Cases to Test Plan
Test Plan content is defined by adding a Testing set (of Test Cases) from Test Specification. Use a link “Add / Remove Test Cases” on the Home page. Test Specification data can be filtered by keywords (adjusted in the navigation pane). Once data has been linked into a Test Plan it will be marked with check-mark.
- 21 -
Illustration 15: Test Case navigation: Select an appropriate Test Suite
Illustration 14: Build management
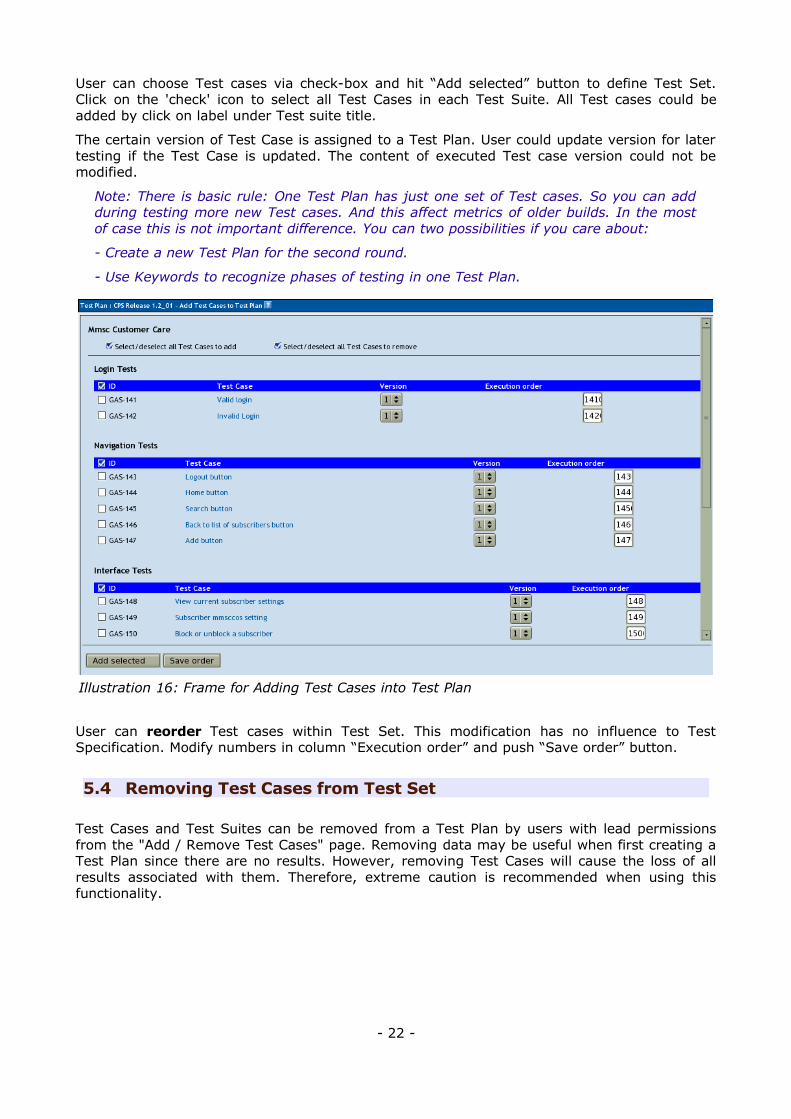
User can choose Test cases via check-box and hit “Add selected” button to define Test Set. Click on the 'check' icon to select all Test Cases in each Test Suite. All Test cases could be added by click on label under Test suite title.
The certain version of Test Case is assigned to a Test Plan. User could update version for later testing if the Test Case is updated. The content of executed Test case version could not be modified.
Note: There is basic rule: One Test Plan has just one set of Test cases. So you can add during testing more new Test cases. And this affect metrics of older builds. In the most of case this is not important difference. You can two possibilities if you care about:
- Create a new Test Plan for the second round.
- Use Keywords to recognize phases of testing in one Test Plan.
User can reorder Test cases within Test Set. This modification has no influence to Test Specification. Modify numbers in column “Execution order” and push “Save order” button.
5.4 Removing Test Cases from Test Set
Test Cases and Test Suites can be removed from a Test Plan by users with lead permissions from the "Add / Remove Test Cases" page. Removing data may be useful when first creating a Test Plan since there are no results. However, removing Test Cases will cause the loss of all results associated with them. Therefore, extreme caution is recommended when using this functionality.
- 22 -
Illustration 16: Frame for Adding Test Cases into Test Plan

5.5 Test execution assignment
You can assign Test Case for execution to different users. Test execution assignment affects both the execution and reports. In the execution screen users have the ability to sort the executable Test Cases to see the ones they have been assigned. In the reports there is a table that shows the remaining Test Cases by tester. If there are no Test Case tester assigned it defaults to none. A Tester can also see the metrics of his/her own executed tests in main page if these metrics are enabled (see Installation manual).
Navigate from the home page:
Using tree menu on left frame, you can choose a whole test suite, that will be displayed on detail on right frame.
- 23 -
Illustration 17: Frame for modifying content of test cases within Test Plan

In this example, clicking on Transportation will produce:
To assign a test case to an user, following steps must be followed:
1. select test case, using check box on the left of test case ID.
- 24 -

2. choose user, using combo box place on column with label 'Assign to'.
3. Use 'Save' button to write selection on database
To simplify this task when you need to assign a whole test suite to an user, bulk user assignment feature has been developed.
User can notify assigned testers – select check-box “Send mail notification to tester”.
Bulk user assignment
Bulk user assignment is not really different, that normal assignment. Using clickable images you can toggle state of multiple check boxes with one click. In the image displayed above, you can see following help, when you put cursor over image present on the left of test suite name.
Clicking on this image will result on all test cases present on “Transportation” test suite and it's children test suites, be selected as displayed on following image:
- 25 -

Next step is to choose user, this will be done using bulk assignment section under test suite name. Then using 'Do' button, combo boxes of all checked check boxes will be setted to 'admin'.
- 26 -

Last step, to save this work is click on 'Save' button
After screen refresh, you will see:
- 27 -

Bulk assignment, can be also done just on test cases belonging to a test suite without affecting children test suites.As an example if you want to change assignment, only on test cases children of “HyperSpace” test suite , instead of using image on the left of test suite name:
5.6 Platforms
Platform describes a “unit” that test cases could be executed on. For example a platform can be a web browser, OS, spaceship, hardware device or configuration. A test plan can have associated platforms which are chosen when a test case is executed.
A Test project might have several platforms that needs testing. For example a website needs to be tested in different browsers, or a software needs to run on different operating systems or hardware devices. TestLink calls this concept Platforms. Platforms are a way of connecting Test
- 28 -
Illustration 18: Click on suite check-box picture to select all include Test Cases
cases in a Test plan to a specific software platform, device or configuration.
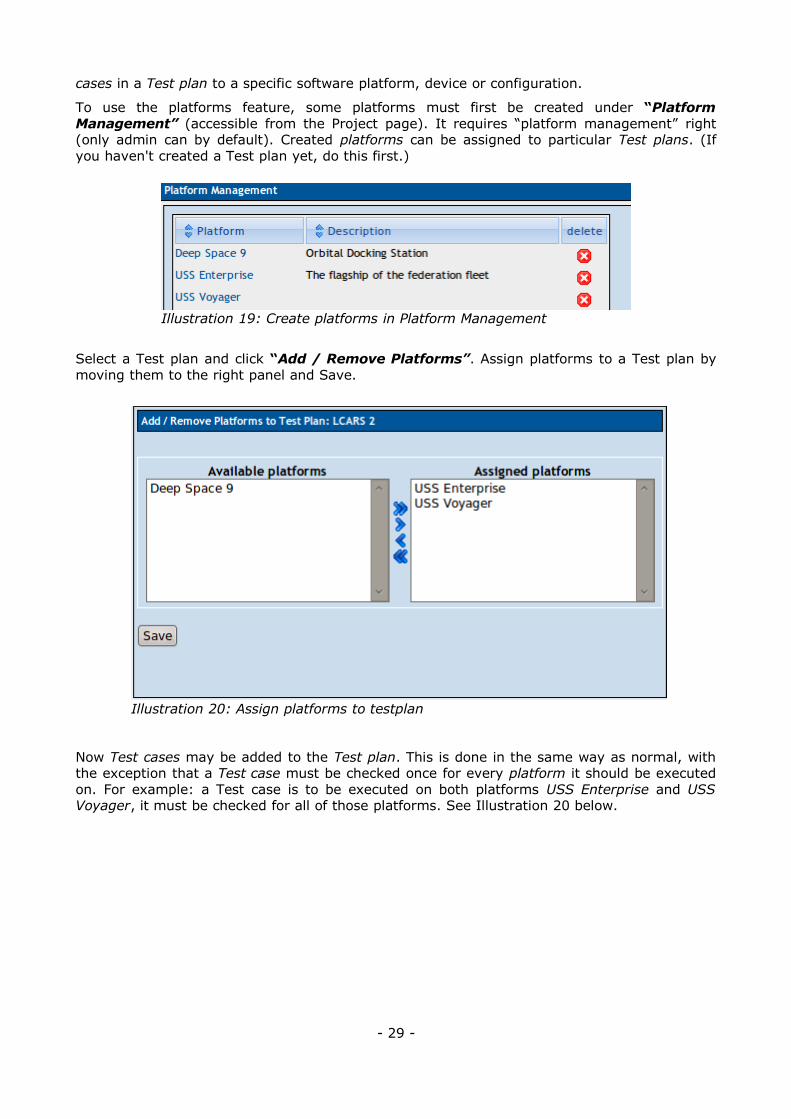
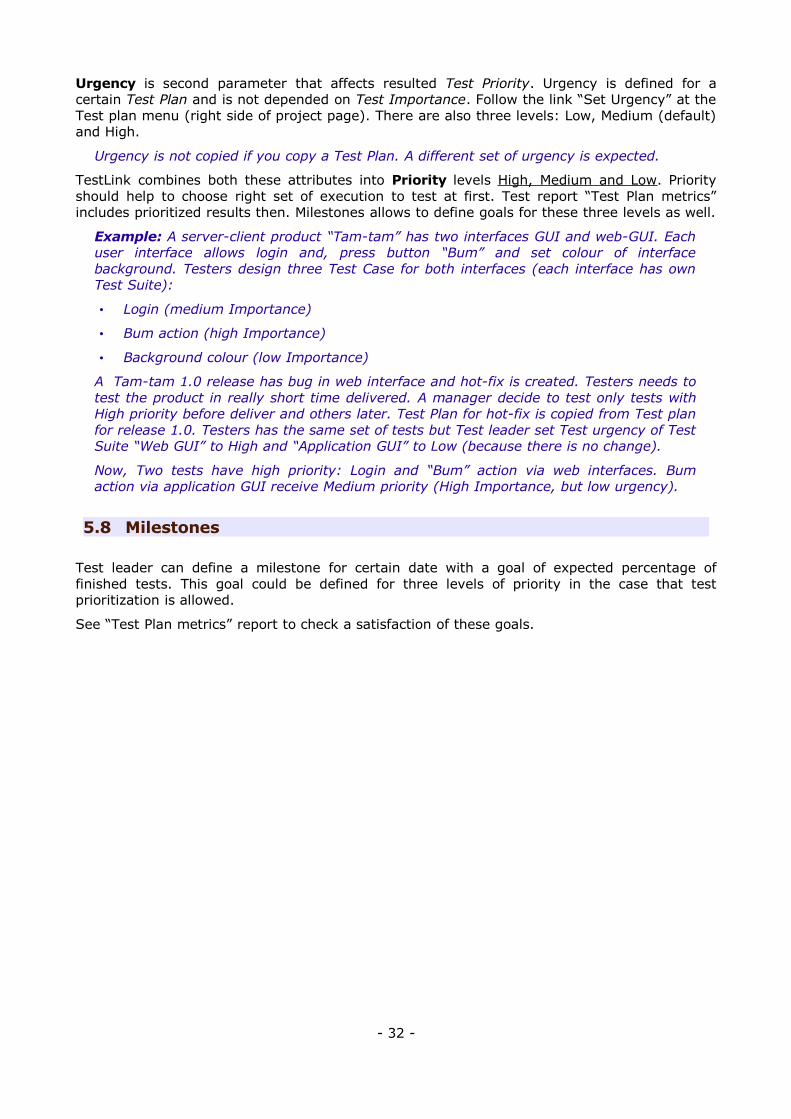
To use the platforms feature, some platforms must first be created under “Platform Management” (accessible from the Project page). It requires “platform management” right (only admin can by default). Created platforms can be assigned to particular Test plans. (If you haven't created a Test plan yet, do this first.)
Select a Test plan and click “Add / Remove Platforms”. Assign platforms to a Test plan by moving them to the right panel and Save.
Now Test cases may be added to the Test plan. This is done in the same way as normal, with the exception that a Test case must be checked once for every platform it should be executed on. For example: a Test case is to be executed on both platforms USS Enterprise and USS Voyager, it must be checked for all of those platforms. See Illustration 20 below.
- 29 -
Illustration 20: Assign platforms to testplan
Illustration 19: Create platforms in Platform Management

Next step is to assign users to execute the test cases. You are free to associate users as you wish. One possibility is to have a user to execute one test case on all platforms. Another way is to let a user execute all test cases on one platform, or a mix of the two.
- 30 -
Illustration 21: Add test case to test plan
Illustration 22: Assign users

When multiple platforms are used the execution step of TestLink gets one additional filter option. Make sure the platform selection is set to the platform you are going to execute test cases on. As seen in Illustration 19 the tree below only shows the test cases for the currently selected platform.
After execution the results uses the platform metrics in the reports. Notice: a test case that is linked to three platforms will count as three different test cases in reports. The reason to this is that it have to be executed once per platform for full test coverage and this is reflected in the results.
5.7 Prioritize testing
Test priority is optional feature. Generally, some features are new or heavy development was done. It should receive more attention. On the other side some features was nearly untouched in development phase and only test with the highest importance make sense to execute.
Configuration: This feature must be allowed on Test Project level by administrator (“Test project management” link on main page).
Parameter Test priority is defined as combination Test Case Importance and Suite urgency in a Test Plan. Test priority is usable as filter settings for test execution and also reported in metrics.
TestLink gives users the ability to assign Importance to Test Cases. There are three levels: Low, Medium (default) and High. This value is adjustable during a test design in Test Specification.
- 31 -
Illustration 23: Filter on platform in execution navigator
Urgency is second parameter that affects resulted Test Priority. Urgency is defined for a certain Test Plan and is not depended on Test Importance. Follow the link “Set Urgency” at the Test plan menu (right side of project page). There are also three levels: Low, Medium (default) and High.
Urgency is not copied if you copy a Test Plan. A different set of urgency is expected.
TestLink combines both these attributes into Priority levels High, Medium and Low. Priority should help to choose right set of execution to test at first. Test report “Test Plan metrics” includes prioritized results then. Milestones allows to define goals for these three levels as well.
Example: A server-client product “Tam-tam” has two interfaces GUI and web-GUI. Each user interface allows login and, press button “Bum” and set colour of interface background. Testers design three Test Case for both interfaces (each interface has own Test Suite):
• Login (medium Importance)
• Bum action (high Importance)
• Background colour (low Importance)
A Tam-tam 1.0 release has bug in web interface and hot-fix is created. Testers needs to test the product in really short time delivered. A manager decide to test only tests with High priority before deliver and others later. Test Plan for hot-fix is copied from Test plan for release 1.0. Testers has the same set of tests but Test leader set Test urgency of Test Suite “Web GUI” to High and “Application GUI” to Low (because there is no change).
Now, Two tests have high priority: Login and “Bum” action via web interfaces. Bum action via application GUI receive Medium priority (High Importance, but low urgency).
5.8 Milestones
Test leader can define a milestone for certain date with a goal of expected percentage of finished tests. This goal could be defined for three levels of priority in the case that test prioritization is allowed.
See “Test Plan metrics” report to check a satisfaction of these goals.
- 32 -

- 33 -
Illustration 24: Test leader can define one or more milestones for a Test Plan

6 Test Execution
6.1 General
Test execution is available after:
1. A Test Specification is written.
2. A Test Plan is created.
3. Test Cases are added into Test Plan.
4. At least one Build is created.
5. Testers have appropriate rights for execution to work with the this Test Plan.
Select the “Execute” link in top menu or “Execute Tests” link in the Main page to navigate to the “Test Execution” window. The left pane allows navigation in Test Cases via a tree menu, and set-up settings and filters. The execution window shows relevant information and allow to add test results.
6.2 Navigation and settings
The navigation pane consists of a 'Filter & Settings' box and a tree menu with Test Case Suite.
Define a tested Build
Users should specify one from all active Builds to add results. The latest build is set by default. Build label specified exact package of product under test for tracking purpose. Each Test Case may be run more times per a Build. However it's common practise that just one testing round is executed against a Build for a test case.
Builds can be created by Test Leader using the Create New Build page.
- 34 -
Search a Test Case
Users can specify exact the Test Case identifier to faster navigation.
Filtering Test Cases
This table allows the user to filter Test Cases for smart navigation before they are executed. You must hit the “Apply filter” button to propagate a new filter settings.
• Tester: Users can filter Test Cases by their tester. There is also check-box to see both the chosen tester and unassigned Test Cases.
• Keyword: Users can filter Test Cases by keyword. See 3.3 Keywords.
• Result: Users can filter Test Cases by results. Results are what happened to that Test Case during a particular Build. Test Cases can pass, fail, be blocked, or not be run.
• Test priority: Users can prioritize Test Cases.
Tree menu
The tree menu in navigation pane shows the chosen list of Test Cases in the Test Plan. It allows to open appropriate Test Case(s) for test execution in the right frame. Test Suites in the menu are enhanced by short test status overview behind a title (count of test cases, passed, failed, blocked and not-executed counter) coloured by results.
The tree menu could be coloured for some types of used menu component only. By default the tree will be sorted by the results for the defined Build that is chosen from the drop-down box.
Example TC coloured according to the Build:
User selects Build 2 from the drop-down box and doesn't check the "most current" check box. All Test Cases will be shown with their status from Build 2. So, if Test Case 1 passed in Build 2 it will be coloured green.
A second possibility is that the menu is coloured according to the latest Test Result.
Example TC coloured according to the latest result
User selects Build 2 from the drop-down box and this time checks the "most current" check box. All Test Cases will be shown with most current status. So, if Test Case 1 passed in Build 3, even though the user has also selected Build 2, it will be coloured green.
6.3 Test execution
Test Status
Execution is the process of assigning a result (pass, fail, blocked) to a Test Case for a specific Build. A 'Blocked' Test Case is not possible to test for some reason (e.g. a problem in configuration disallows to run a tested functionality).
Insert Test Results
Test Results screen is shown via click on an appropriate Test Suite or Test Case in navigation pane. The title shows the current Build and owner. The coloured bar indicate status of the Test Case. Yellow box includes test scenario of the Test Case.
- 35 -

The indication that the Test Case was updated or deleted in test Specification is not supported after 1.5 version.
Updated Test Cases: TL 1.0.4 version has indication by flag, that is missing from 1.6 version. If users have the proper rights they can go to the “Update modified test case”
- 36 -
Illustration 25: Frame with several results of one Test Case
Illustration 26: User can select to print only the last result
Illustration 27: The last result could be printed only

page through the link on main page. It is not necessary for users to update Test Cases if there has been a change (newer version or deleted).
- 37 -
7 Test Reports and Metrics
Test Reports and Metrics are accessed by clicking the “Results” or “Test reports and Metrics” links on the main page. Reports and Metrics are based on the selected Test Plan (from combo box menu). The page that is displayed to the user includes:
The right pane will be populated with instructions on how to use the controls and how each report is produced.
The left pane is used for navigating to each report and operating controls which effect how reports behave and are displayed. The button “Print” initializes printing of the right pane (no navigation will be printed).
All test reports (except charts) can be generated in 1 of 3 format :
1. Normal - report is displayed in a web page (html)
2. OpenOffice Writer – calls OO Writer to show a report
3. OpenOffice Calc - calls OO Calc to show a table based report
4. MS Excel –calls microsoft Excel to show a table based report
5. MS Word - calls microsoft word to show a report
6. HTML Email – send report to user's email address
There are currently 11 separate reports to choose from, their purpose and function are explained below. Currently, there are no reports which compile results across multiple Test Plans.
7.1 General Test Plan Metrics
This page shows you only the most current status of a Test Plan by test suite, owner, milestone, priority and keyword. In addition there are also basic metrics for all enabled builds.
The most “current status” is determined by the most recent Build Test Cases were executed on. For instance, if a Test Case was executed over multiple Builds, only the latest result is taken into account. “Last Test Result” is a concept used in many reports, and is determined as follows :
1) The order in which Builds are added to a Test Plan determines which Build is most recent. The results from the most recent Build will take precedence over older Builds. For example, if you mark a test as “fail” in Build 1, and mark it as “pass” in Build 2, it's latest result will be “pass”.
2) If a Test Case is executed multiple times on the same Build, the most recent execution will take precedence. For example, if Build 3 is released to your team and tester 1 marks it as “pass” at 2PM, and tester 2 marks it as “fail” at 3PM – it will appear as “fail”.
3) Test Cases listed as “not run” against a Build are not taken into account. For example, if you mark a case as “pass” in Build 1, and don't execute it in Build 2, it's last result will be considered as “pass”.
The following tables are displayed :
- 38 -
Results by top level Test Suites
Lists the results of each top level suite. Total cases with status are listed: passed, failed, blocked, not run, and percent completed. A “completed” Test Case is one that has been marked pass, fail, or block. Results for top level suites include all children suites.
Results by Build
Lists the execution results for every Build. For each Build, the total Test Cases, total pass, % pass, total fail, % fail, blocked, % blocked, not run, and %not run are displayed. If a Test Case has been executed twice on the same Build, the most recent execution will be taken into account.
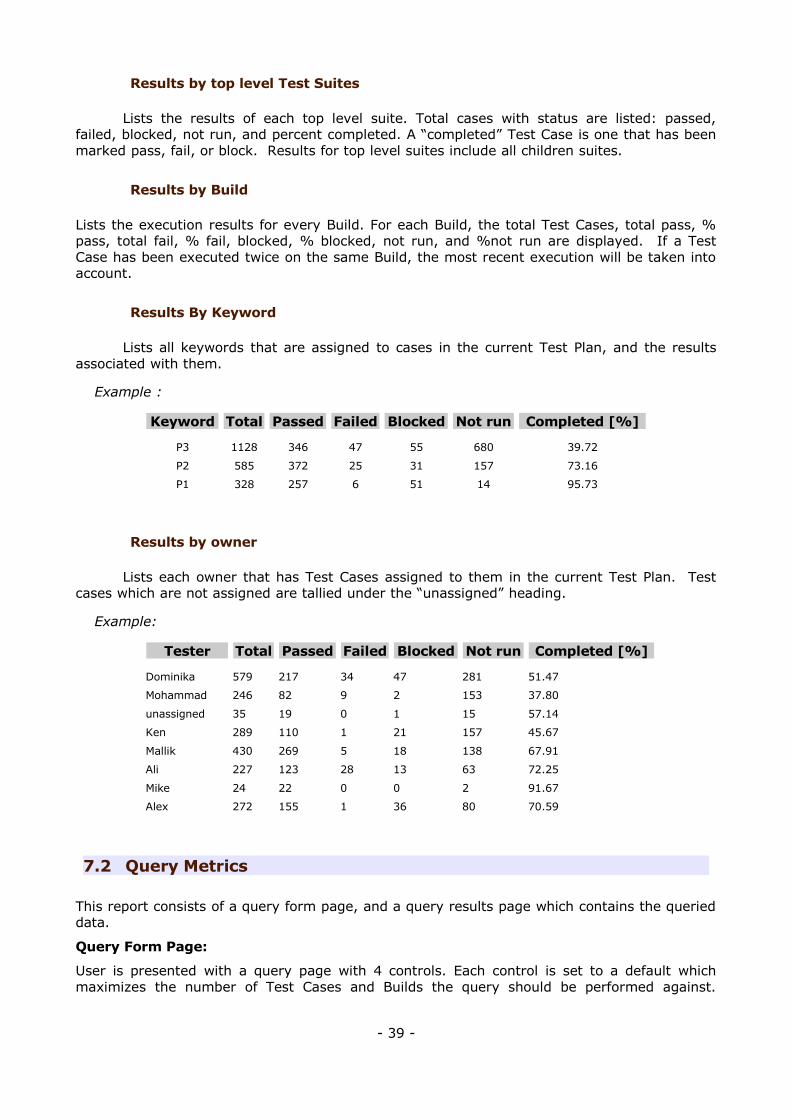
Results By Keyword
Lists all keywords that are assigned to cases in the current Test Plan, and the results associated with them.
Example :
Keyword Total Passed Failed Blocked Not run Completed [%]
P3 1128 346 47 55 680 39.72
P2 585 372 25 31 157 73.16
P1 328 257 6 51 14 95.73
Results by owner
Lists each owner that has Test Cases assigned to them in the current Test Plan. Test cases which are not assigned are tallied under the “unassigned” heading.
Example:
Tester Total Passed Failed Blocked Not run Completed [%]
Dominika 579 217 34 47 281 51.47
Mohammad 246 82 9 2 153 37.80
unassigned 35 19 0 1 15 57.14
Ken 289 110 1 21 157 45.67
Mallik 430 269 5 18 138 67.91
Ali 227 123 28 13 63 72.25
Mike 24 22 0 0 2 91.67
Alex 272 155 1 36 80 70.59
7.2 Query Metrics
This report consists of a query form page, and a query results page which contains the queried data.
Query Form Page:
User is presented with a query page with 4 controls. Each control is set to a default which maximizes the number of Test Cases and Builds the query should be performed against.
- 39 -
Altering the controls allows the user to filter the results and generate specific reports for specific owner, keyword, suite, and Build combinations.
keyword – 0->1 keywords can be selected. By default – no keyword is selected. If a keyword is not selected, then all Test Cases will be considered regardless of keyword assignments. Keywords are assigned in the Test Specification or Keyword Management pages. Keywords assigned to Test Cases span all Test Plans, and span across all versions of a Test Case. If you are interested in the results for a specific keyword you would alter this control.
owner – 0->1 owners can be selected. By default – no owner is selected. If an owner is not selected, then all Test Cases will be considered regardless of owner assignment. Currently there is no functionality to search for “unassigned” Test Cases. Ownership is assigned through the “Assign Test Case execution” page, and is done on a per Test Plan basis. If you are interested in the work done by a specific tester you would alter this control.
top level suite - 0-> n top level suites can be selected. By default – all suites are selected. Only suites that are selected will be queried for result metrics. If you are only interested in the results for a specific suite you would alter this control.
Builds – 1->n Builds can be selected. By default – all Builds are selected. Only executions performed on Builds you select will be taken into account when producing metrics. For example – if you wanted to see how many Test Cases were executed on the last 3 Builds – you would alter this control.
Keyword, owner, and top level suite selections will dictate the number of Test Cases from your Test Plan that are used to compute per suite and per Test Plan metrics. For example, if you select owner=“Greg”, Keyword=”Priority 1”, and all available test suites – only Priority 1 Test Cases assigned to Greg will be considered. The “# of Test Cases” totals you will see on the report will be influenced by these 3 controls.
Build selections will influence whether a case is considered “pass”, “fail”, “blocked”, or “not run”. Please refer to “Last Test Result” rules as they appear above.
Press the “submit” button to proceed with the query and display the output page.
- 40 -

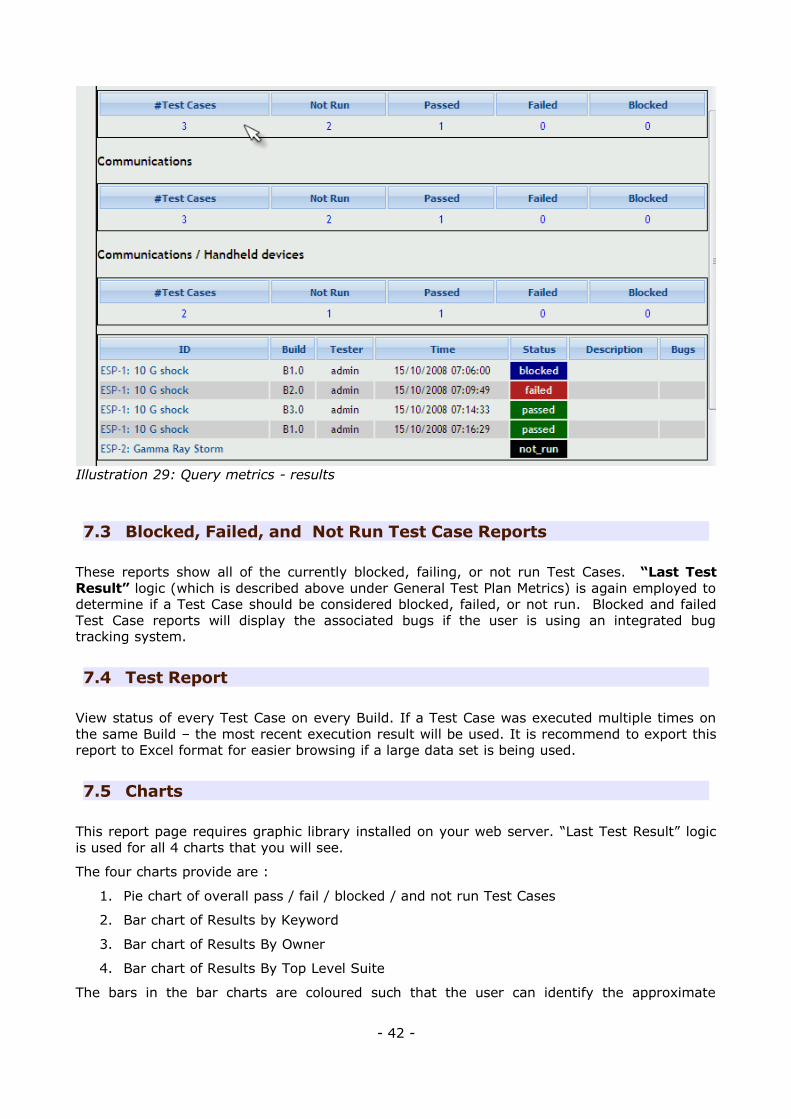
Query Report Page:
The report page will display:
1. the query parameters used to create the report
2. totals for the entire Test Plan
3. a per suite breakdown of totals (sum / pass / fail / blocked / not run) and all executions performed on that suite. If a Test Case has been executed more than once on multiple Builds – all executions will be displayed that were recorded against the selected Builds. However, the summary for that suite will only include the “Last Test Result” for the selected Builds.
- 41 -
Illustration 28: Query metrics - Input parameters
7.3 Blocked, Failed, and Not Run Test Case Reports
These reports show all of the currently blocked, failing, or not run Test Cases. “Last Test Result” logic (which is described above under General Test Plan Metrics) is again employed to determine if a Test Case should be considered blocked, failed, or not run. Blocked and failed Test Case reports will display the associated bugs if the user is using an integrated bug tracking system.
7.4 Test Report
View status of every Test Case on every Build. If a Test Case was executed multiple times on the same Build – the most recent execution result will be used. It is recommend to export this report to Excel format for easier browsing if a large data set is being used.
7.5 Charts
This report page requires graphic library installed on your web server. “Last Test Result” logic is used for all 4 charts that you will see.
The four charts provide are :
1. Pie chart of overall pass / fail / blocked / and not run Test Cases
2. Bar chart of Results by Keyword
3. Bar chart of Results By Owner
4. Bar chart of Results By Top Level Suite
The bars in the bar charts are coloured such that the user can identify the approximate
- 42 -
Illustration 29: Query metrics - results
number of pass, fail, blocked, and not run cases.
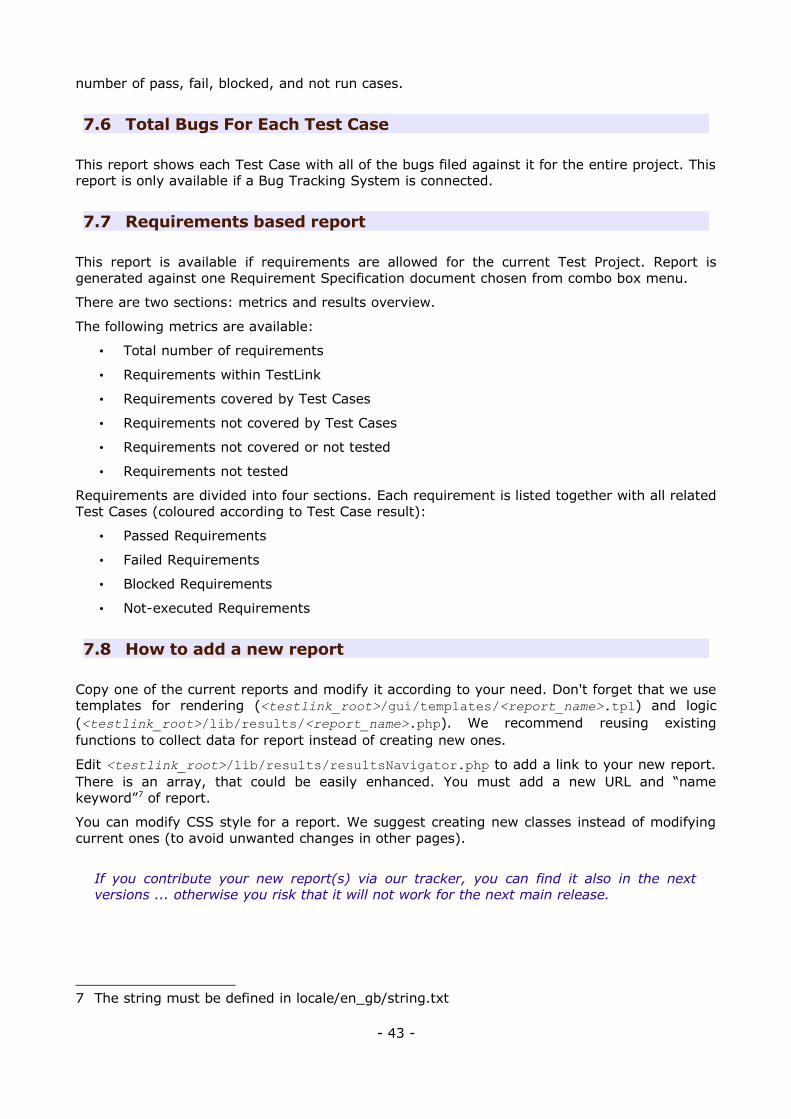
7.6 Total Bugs For Each Test Case
This report shows each Test Case with all of the bugs filed against it for the entire project. This report is only available if a Bug Tracking System is connected.
7.7 Requirements based report
This report is available if requirements are allowed for the current Test Project. Report is generated against one Requirement Specification document chosen from combo box menu.
There are two sections: metrics and results overview.
The following metrics are available:
• Total number of requirements
• Requirements within TestLink
• Requirements covered by Test Cases
• Requirements not covered by Test Cases
• Requirements not covered or not tested
• Requirements not tested
Requirements are divided into four sections. Each requirement is listed together with all related Test Cases (coloured according to Test Case result):
• Passed Requirements
• Failed Requirements
• Blocked Requirements
• Not-executed Requirements
7.8 How to add a new report
Copy one of the current reports and modify it according to your need. Don't forget that we use templates for rendering (<testlink_root>/gui/templates/<report_name>.tpl) and logic (<testlink_root>/lib/results/<report_name>.php). We recommend reusing existing functions to collect data for report instead of creating new ones.
Edit <testlink_root>/lib/results/resultsNavigator.php to add a link to your new report. There is an array, that could be easily enhanced. You must add a new URL and “name keyword”7 of report.
You can modify CSS style for a report. We suggest creating new classes instead of modifying current ones (to avoid unwanted changes in other pages).
If you contribute your new report(s) via our tracker, you can find it also in the next versions ... otherwise you risk that it will not work for the next main release.
7 The string must be defined in locale/en_gb/string.txt
- 43 -
8 Administration
8.1 User account settings
Every guest can create own account on login page.
The auto-create feature can be disabled by configuration. There is also configurable default role parameter ('guest' by default).
Every user on the system will be able to edit their own information via the Account settings window ('Personal' link in menu bar). He can modify own Name, email address, password and generate API key (if enabled).
TestLink allows users with administrator rights to create, edit, and delete users within the system. However, TestLink does not allow administrators to view or edit user's passwords. If users forget their passwords there is link on the login screen, that will mail the user their password based upon their user name and the email address they entered.
8.2 Role Permissions
User can see the current role in top line of TestLink window. Each users has 'generic role' that applies on all projects. Administrator can assign specific project role for a particular project. Users can have modified role for particular Test Plan as well.
For example Jack could be guest by default (can see all test cases and reports) and Test leader on project 'XYZ' to lead this project testing.
TestLink is built with 6 different default permission levels built in. These permission levels are as follows:
• Guest: A guest only has permission to view Test Cases, reports and metrics. He cannot modify anything.
• Test Executor: A tester has permissions to see and run tests allocated to them.
• Test Designer: A user can fully work (view and modify) with Test Specification and Requirements.
• Test Analyst: A tester can view, create, edit, and delete Test Cases as well as execute them. Testers lack the permissions to manage Test Plans, manage Test Projects, create milestones, or assign rights. (initially Senior tester).
• Test Leader: A lead has all of the same permissions as a Tester but also gains the ability to manage Test Plans, assign rights, create milestones, and manage keywords.
• Administrator: An admin has all possible permissions (leader plus the ability to manage Test Projects and users).
Changing of these rights is handled by the user administration link which is accessible by administrators. Admin can add a new custom roles and modify existing ones via GUI.
See Developer's Guide to understand more.
If you view the table you will see rows for each of the permissions levels (guest ,tester, senior tester, leader, admin). The second column holds all of the different rights levels which will be defined below. These levels have been determined as standard for use but they can be edited to define new roles (for experienced administrator). The user table contains a foreign key that points to the appropriate permission level in the rights table.
- 44 -

Note: Test Plan related features needs also assign a Test Plan to be available. See Test Plan Assignment.
Case study – restrict access by default
Situation
In our organization we would like to restrict access to projects unless it is specifically granted. We currently have about 150 users with just over 90 different project. Many of the users are not QA, but are business analysts, and in some cases end users doing UAT. From what I can tell, all rights are inherited based on how the user was set-up.
But we don't want a Business Analyst who is working on only one project have access to all 90.
Solution
Set these users with the global role <No rights> and granted an appropriate role on a Test project or Test plan base. In custom_config.inc.php you can also set the default role id to <No rights>:
$tlCfg->default_roleid = TL_ROLES_NO_RIGHTS;
You can also would like to rename a role “No rights” to something more polite.
8.3 Test Plan assignment to users
Users can execute only assigned Test Plans. In order to gain Test Plan permissions a user with lead or admin status must give them rights through the “Define user/project rights” link under “Test Plan Management”.
All users in the system will by default not have permissions to view newly created Test Plans (except for the Test Plan creators who can give themselves permissions at creation). Zero Test Plan permissions means that users will not see any Test Plans in the Test Plan drop-down box on main screen.
However he can browse reports.
8.4 Custom Fields
Users can extend the most important objects (Test cases, suites, plans) in TestLink with customized fields. After you have created a Custom Field, you need to assign it to the Test Project in which do you want to use it. So each project have own set of additional fields.
Common practice: Test case CF could be: review notes or status, estimated or real execution time, platform (OS, HW, ...), test script name or owner, etc.
Navigate to “Custom field management” link on main page. This page is the base point for managing custom fields pool. It lists the custom fields defined in the system. Custom field definitions are system wide, i.e., you can not define two custom fields with same field ID.
The "Create" button take you to a page where you can define the details of a custom field. These include it's name, type, value and availability/display information. On the edit page, the following information is defined to control the custom field:
• name • type - possible values are listed below. • Value constraints (Possible values, default value, regular expression, minimum length,
maximum length). • Availability/Display control (where the field will show up and must be filled in
- 45 -
All fields are compared in length to be greater than or equal to the minimum length, and less than or equal to the maximum length, unless these values are 0. If the values are 0, the check is skipped. All fields are also compared against the regular expression. If the value matches the expression, then the value is stored. For example, the expression "/^-?([0-9])*$/" can be used to constrain an integer.
There is data format verification for types numeric, float and email. On submit (when created a Test case or while executing) CF of this type are controlled. Empty value OK, but if value NoT empty but do not conform a regular expression (NOT USER DEFINED but coded ) submit will be blocked with message on screen.
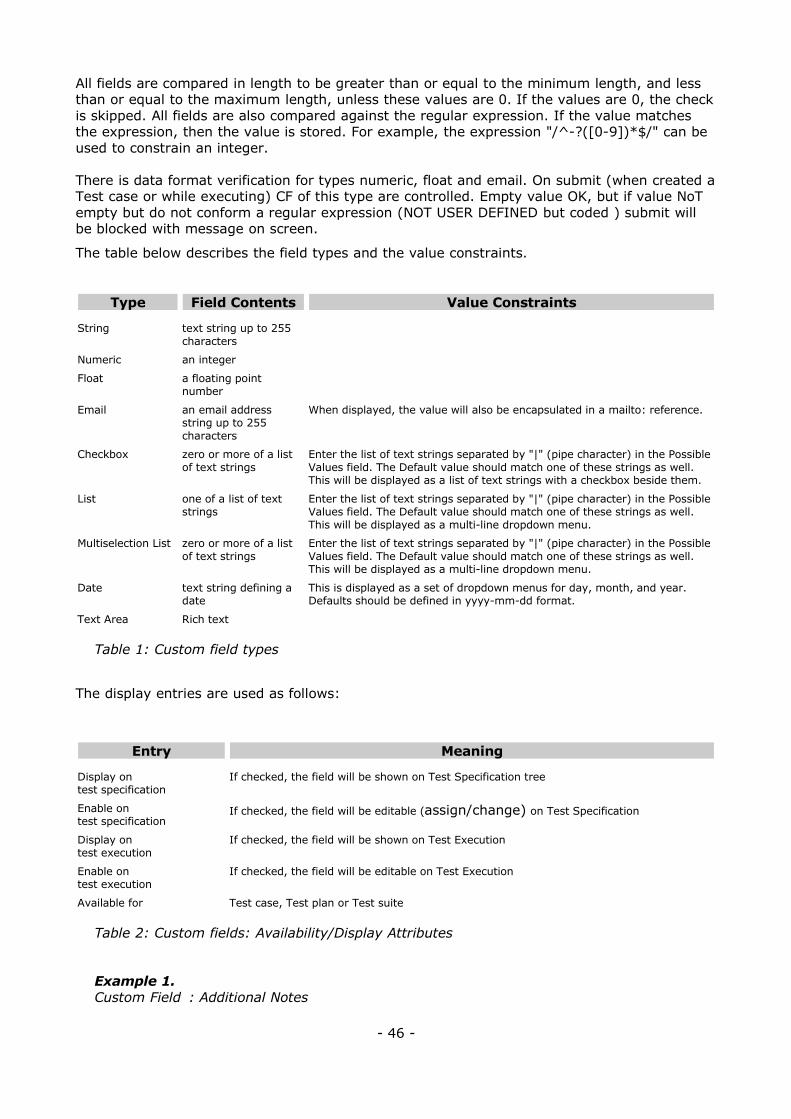
The table below describes the field types and the value constraints.
Type Field Contents Value Constraints
String text string up to 255 characters
Numeric an integer
Float a floating point number
Email an email address string up to 255 characters
When displayed, the value will also be encapsulated in a mailto: reference.
Checkbox zero or more of a list of text strings
Enter the list of text strings separated by "|" (pipe character) in the Possible Values field. The Default value should match one of these strings as well. This will be displayed as a list of text strings with a checkbox beside them.
List one of a list of text strings
Enter the list of text strings separated by "|" (pipe character) in the Possible Values field. The Default value should match one of these strings as well. This will be displayed as a multi-line dropdown menu.
Multiselection List zero or more of a list of text strings
Enter the list of text strings separated by "|" (pipe character) in the Possible Values field. The Default value should match one of these strings as well. This will be displayed as a multi-line dropdown menu.
Date text string defining a date
This is displayed as a set of dropdown menus for day, month, and year. Defaults should be defined in yyyy-mm-dd format.
Text Area Rich text
Table 1: Custom field types
The display entries are used as follows:
Entry Meaning
Display on test specification
If checked, the field will be shown on Test Specification tree
Enable on test specification
If checked, the field will be editable (assign/change) on Test Specification
Display on test execution
If checked, the field will be shown on Test Execution
Enable on test execution
If checked, the field will be editable on Test Execution
Available for Test case, Test plan or Test suite
Table 2: Custom fields: Availability/Display Attributes
Example 1. Custom Field : Additional Notes
- 46 -
Type : string
applicable to test suites, to be edited ONLY during Test Case specification, but useful to be seen during test execution.
show on design = YES enable on design = YES show on execution = YES enable on execution = NO
Example 2.Custom Field : Operating System Type : list
applicable to Test Cases, to be edited ONLY during Test Case EXECUTION, unused during Test Case DESIGN.
show on design = NO enable on design = NO show on execution = YES enable on execution = NO
Custom field feature has been implemented using a mix functionality from Mantis (http://www.mantisbt.org/) and dotproject (http://www.dotproject.net/) models.
Custom fields: Estimated and Actual execution time
“Estimated Execution Time” and “Actual Execution Time” custom fields can be added to any project and TestLink will automatically summarize those fields during the reporting process.
Step 1 – Create the custom fields
NOTE: The user must have permissions (i.e. “Custom Field Management” must be enabled for the user's role) to define and assign custom fields.
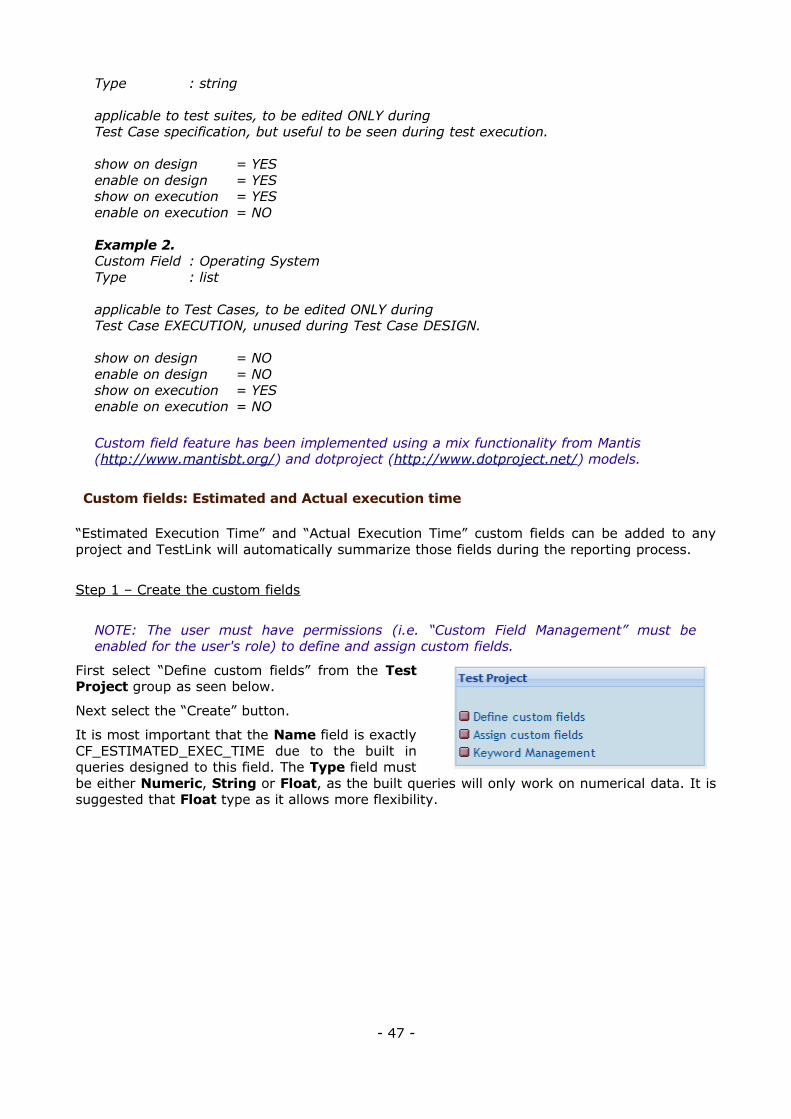
First select “Define custom fields” from the Test Project group as seen below.
Next select the “Create” button.
It is most important that the Name field is exactly CF_ESTIMATED_EXEC_TIME due to the built in queries designed to this field. The Type field must be either Numeric, String or Float, as the built queries will only work on numerical data. It is suggested that Float type as it allows more flexibility.
- 47 -

Once completed, click “Add” to create the new custom field to the system.
Next repeat the process for CF_EXEC_TIME as seen below.
- 48 -

The new custom fields will be available for assignment to ANY project in TestLink. Make sure the Test Project is set to the project that you want before assigning the custom fields.
Step 2 – Assign custom fields
Select “Assign custom fields” from the Test Project group as seen below.
Select each of the custom fields and click “Assign”.
Now each of the custom fields have been assigned to the current project.
When you create a new test case (or edit a previous entered test case), above the Keywords section you will notice the custom fields.
- 49 -

Add the estimated time and click “Create” (or “Save” on an edit).
Localizations: Use “ . “ (dot) as decimal separator or sum will be wrong.
Step 3 – Add the test cases to the Test Plan
See chapter 5.3 for details.
Step 4 – Summation of the Estimations
Select “Test reports and Metrics” from the Test Execution group as seen below.
Select “Test Report” from the menu, then check the “Metrics” option
Finally select the Test Suite or Test Case that you wish to create the report.
At the bottom of the report will be a summary of the estimated execution time for all of the test cases.
- 50 -
NOTE: The time entered into the custom fields doesn't have to be in units of minutes, hours can also be used. The $TLS_estimated_time_hours and $TLS_estimated_time_min strings are predefined strings can be selected based on your preference.
- 51 -

9 Import and Export data
TestLink supports several ways to share data. Data Format is described in extra document <testlink>/docs/tl-file-format.pdf. In addition you can consider to use TestLink API to deliver data from script or external tool.
There is amount of file examples in directory <testlink>/docs/file_examples/.
- 52 -