temptron 616 - tactac.com.pk/administrator/brochure_manual/0309002608_manual.pdf · temptron 616...
TRANSCRIPT


Temptron 616 User's Manual
Page 2 of 21
TEMPTRON 616
OPERATION MANUAL
The Temptron 616 is a stand alone climate controller that can control one heater, 7 groups of fans, minimum ventilation system,1 cooling system, 1 lighting system, 1 inlet motor, 1 curtain motor and 1 relay to be used for an alarm output. The Temptron 616 has a built in automatic temperature reduction table and automatic weight increase table for ventilation The first fan group is working as minimum ventilation. It is optional to connect the Temptron 616 to a PC for central management with the help of the WinChick software package.
INSTALLATION ____________________________________________ 3
OPERATION _______________________________________________ 3
READING SET POINT ________________________________________ 4
CHANGE OF SET POINT______________________________________ 4
Lock Code _________________________________________________ 5
SET POINTS _______________________________________________ 5
Heating system ______________________________________________ 5
Fan Set points _________________________________________________6
Inlet/curtain Position____________________________________________7
Minimum ventilation Setup _____________________________________ 7
Cooling System ______________________________________________10
Alarm ____________________________________________________10
Light and feed index __________________________________________11
24-hour data________________________________________________13
Temperature Reduction Table____________________________________14
Weight increase table__________________________________________15
Hidden functions. ____________________________________________17
Flap Calibration _____________________________________________19
TROUBLE-SHOOTING _______________________________________20
Diagram___________________________________________________21

Temptron 616 User's Manual
Page 3 of 21
INSTALLATION
Open the front panel Sensors
1. Connect the Temperature Sensors to the analog input inputs 1 and 2. The sensors can be placed up to 100 meter from the main unit with an ordinary two-wire cable. The sensor has no polarity. 2. Feed back flap 1 (Inlet); Connect a dry contact from flap 1 to the digital 1 input. 3. Feed back flap 1 (Curtain); Connect a dry contact from flap 2 to the digital 2 input. 4. Feed output; Connect a dry contact from the feed contactor to the digital 7 input. 5. Water counter; Connect a dry contact from the water clock to the digital 8 input. 6. Humidity sensor; Use a three wire cable. Connect the brown wire to the +V input, Blue wire to GND and the yellow wire to analog input 7. 7. Static pressure sensor; Use a three wire cable. Connect the brown wire to the +V input, Blue wire to GND and the yellow wire to analog input 8.
Relays
Connect the relay outputs to the various systems. All outputs are dry contacts, maximum 2 Amp/220V NO/NC. Relay 1 = Alarm (bottom left side of relay box)
Relay 9 = Fan group 1 (bottom right side of relay box)
Relay 2 = Heating system Relay 10 = Fan group 2 Relay 3 = Cooling system Relay 11 = Fan group 3 Relay 4 = Lighting system Relay 12 = Fan group 4 Relay 5 = Open inlet Relay 13 = Fan group 5 Relay 6 = Close inlet Relay 14 = Fan group 6 Relay 7 = Open cool curtain Relay 15 = Fan group 7 Relay 8 = Close cool curtain Relay 16 = Fed line
Connect a 220V cable to the unit.
Close the panel with the two screws.
OPERATION The Temptron 616 will display the average temperature of the connected temperature Sensors. It is possible to display each sensor separately.
Turn on power. 1. Each time power is connected to the unit Agro Lo will appear on the display. The Temptron 616 is calibrating its connected sensors. 2. After 20 Seconds the average temperature will appear on the left display.

Temptron 616 User's Manual
Page 4 of 21
Temperature, humidity and pressure sensors
To view each sensor reading separately, press once on: Number 1-5 = Displays the chosen temperature sensor reading. Number 7 = Displays the humidity sensor reading. Number 8 = Static pressure sensor reading. To display sensor 1, press on button 1 . The temperature of Sensor 1 will be displayed. To display Sensor 2, press on button 2 . The temperature of sensor 2 will be displayed.
READING SET POINT It is possible to read all the information on the Temptron 616 display. The right display indicates the function number. The left display shows the set point for each function. Each set point has a code number (see menu on the front panel). It is possible to go into the code in two ways: 1. By pressing on the DATA button the code number display on the right side of the panel will increase. The preset information will appear on the data display on the left side of the panel. 2. By pressing on the 0 button, two lines will appear on the code display and FUNC on the data display.
Example:
If you would like to see code no.8; a) Push on the 0 button. b) Push on 0 and than on 8 button. On the code display will appear 08 and on the data display the information. If a code number is higher than 10, push on 0 and than enter the code number. It is possible to continue from code 12 by pushing on the DATA button to the next code.
CHANGE OF SET POINT
It is possible to change each set point. 1. Go into the desired code as explained above. 2. Push on PROG button. The code display will start to flash. 3. Use the keyboard to enter the desired data. The new data will appear on the data display. 4. Check the display to see if the information is correct. If yes, push on the Enter button. The code display will stop flashing to indicate that the new information has been stored into the unit s memory.

Temptron 616 User's Manual
Page 5 of 21
Lock Code It is possible to enter a 4-digit code, which will lock the Temptron 616 to prevent unauthorized personnel form making changes in the unit. It is possible to see all the information in the unit, but not possible to make any changes. The unit is factory set in an unlocked manner, without a code. If a code is needed see the hidden function section for an explanation of how to program the code. Once a code has been programmed, in order to unlock the unit to change values, enter the programmed 4 digit code while the display is showing the average temperature. There is no need to press PROG for this.
Once the code has been entered, after a ten minute period from the last value change, the unit will relock. If no code is desired enter 0000 for the lock code.
SET POINTS Functions
01. Time (not shown on front panel menu) This is a reading of the current time setting. It is possible here to adjust the time reading.
02. Required Temperature
The required temperature is the requested temperature in the house. All set points (except the cool temperature set point) are set as a differential from the requested room temperature. The required temperature will be reduced daily according to the temperature reduction table. See function 55-64.
Heating system 03 Heat
Heat set point is the temperature differential below the Required temperature that the heating system will turn on. Example: Heat set point = 1.0 If the room temperature should drop 1.0° below the Required temperature (code 02) setting then the heating system will start to run.

Temptron 616 User's Manual
Page 6 of 21
Fan Set points
04. Fan 1
Fan group 1 is used as the minimum ventilation fan group.
Fan 1 set point is the temperature differential above the required temperature at which time fan 1 will run nonstop. Fan group 1 is working as minimum ventilation as long as the measured temperature is less than the required temperature plus fan 1 set point. Fan 1 group will work in the minimum ventilation mode as set up in functions 18 -26. and according to the weight increase graph as setup in functions 65-74. Each time fan group 1 comes into operation, during minimum ventilation cycle, the inlet will open to the set opening (in percentage) as setup in function 11. The fan group will start to run after 10 seconds. This waiting time is needed to prevent a build up of high negative pressure in the house.
05. Fan 2
Fan 2 set point is the temperature differential above
the requested room temperature that fan 2 will turn on. When fan group 2 comes into operation the inlet/curtain will open to its preset opening as set in function 12.
06. Fan 3
Fan 3 set point is the temperature differential above
the requested room temperature that fan group 3 will turn on. When fan group 3 comes into operation the inlet/curtain will open to its preset opening as set in function 13.
07. Fan 4
Fan 4 set point is the temperature differential above
the requested room temperature that fan group 4 will turn on. When fan group 4 comes into operation the inlet/curtain will open to its preset opening as set in function 14.
08. Fan 5
Fan 5 set point is the temperature differential above
the requested room temperature that fan group 4 will turn on. When fan group 5 comes into operation the inlet/curtain will open to its preset opening as set in function 15.
09. Fan 6
Fan 6 set point is the temperature differential above
the requested room temperature that fan group 6 will turn on. When fan group 6 comes into operation the inlet/curtain will open to its preset opening as set in function 16.
10. Fan 7
Fan 7 set point is the temperature differential above
the requested room temperature that fan group 7 will turn on. When fan group 7 comes into operation the inlet/curtain will open to its preset opening as set in function 17.
Temptron 616 User's Manual
Page 7 of 21
Inlet/curtain Position
11. Flap Position 1 %
Enter here the in percentage that the inlet / curtain will open each time the corresponding fan group comes into operation. Fan group 1 = Position 1
12. Flap Position 2 %
Enter here the in percentage that the inlet / curtain will open each time the corresponding fan group comes into operation. Fan group 2 = Position 2
13. Flap Position 3 %
Enter here the in percentage that the inlet / curtain will open each time the corresponding fan group comes into operation. Fan group 3 = Position 3
14. Flap Position 4 %
Enter here the in percentage that the inlet / curtain will open each time the corresponding fan group comes into operation. Fan group 4 = Position 4
15. Flap Position 5 %
Enter here the in percentage that the inlet / curtain will open each time the corresponding fan group comes into operation. Fan group 5 = Position 5
16. Flap Position 6 %
Enter here the in percentage that the inlet / curtain will open each time the corresponding fan group comes into operation. Fan group 6 = Position 6
17. Flap Position 7 %
Enter here the in percentage that the inlet / curtain will open each time the corresponding fan group comes into operation. Fan group 7 = Position 7
Minimum ventilation Setup
18. Fan Minimum Duty
A value set in percent. This is the minimum amount of time the fan1 group will run out of the Fan cycle time (see next function) during minimum ventilation.
19. Fan Cycle Time
This is a time period set in minutes and seconds. This is the time frame that the minimum ventilation cycle will use.
Temptron 616 User's Manual
Page 8 of 21
20. Maximum Air Per Hour.
Enter here the total amount of cubic air per hour that minimum ventilation fan group 1 can supply. Take the total amount and divide it by 1000. Example: If fan group 1 can supply 20,000 cubic meters of air per minute then enter the value 20.
21. Minimum Air Per Kg
Enter here the minimum amount of cubic air per kg wanted in the house.
22. Number Of Birds
Enter here the total number of birds in the house. Example: 20,000 birds will appear as 20.00
23. Current Weight.
This is the current weight of one bird as calculated in the automatic weight increase table (function 65-74). This weight can be changed if needed.
24. Fan Duty Cycle
This is the calculated duty cycle (percent) of the Fan Cycle Time according to the minimum ventilation mode as explained later. If this number is larger than the minimum duty cycle time then the fan 1 group will run this amount out of the fan cycle time. If the minimum duty cycle time is larger then the calculated duty cycle time the fans will run according to the minimum.
25. Cycle Timer
This is a display in seconds of the minimum ventilation timer. The timer shows the time left of the Fan Cycle Time (function 19).
26. Tunnel On Group.
Enter here a fan group number that when reached will cause the unit to close the inlet and open the tunnel curtain.
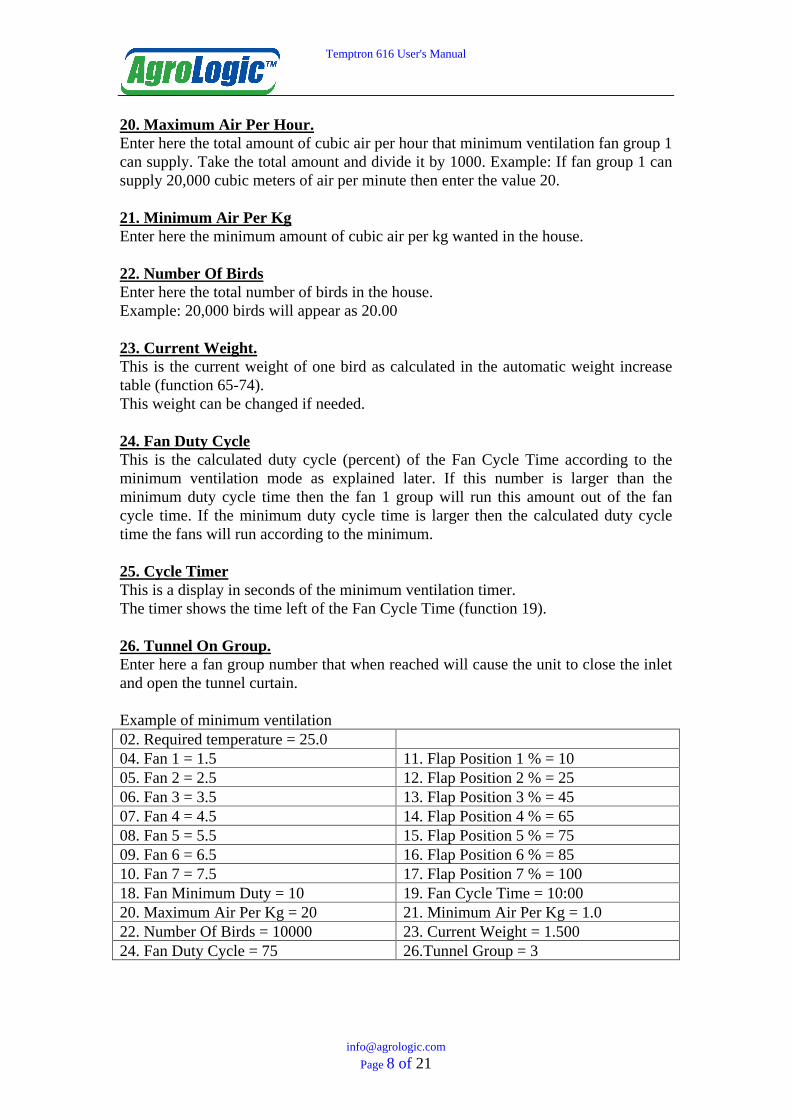
Example of minimum ventilation 02. Required temperature = 25.0 04. Fan 1 = 1.5 11. Flap Position 1 % = 10 05. Fan 2 = 2.5 12. Flap Position 2 % = 25 06. Fan 3 = 3.5 13. Flap Position 3 % = 45 07. Fan 4 = 4.5 14. Flap Position 4 % = 65 08. Fan 5 = 5.5 15. Flap Position 5 % = 75 09. Fan 6 = 6.5 16. Flap Position 6 % = 85 10. Fan 7 = 7.5 17. Flap Position 7 % = 100 18. Fan Minimum Duty = 10 19. Fan Cycle Time = 10:00 20. Maximum Air Per Kg = 20 21. Minimum Air Per Kg = 1.0 22. Number Of Birds = 10000 23. Current Weight = 1.500 24. Fan Duty Cycle = 75 26.Tunnel Group = 3

Temptron 616 User's Manual
Page 9 of 21
Using the values in the previous table, the ventilation will run as follows. Fan group1 will be used to supply the minimum ventilation. As long as the house temperature is less then 26.5 degrees (function 02 plus function 04) the unit will run in the minimum ventilation mode. The fans will run 75 percent (function 24) out of 10:00 minutes (function 19). In other words the fans will run in a cycle of 7:30 minutes on, 2:30 minutes off. How the calculation is made is explained as follows. The unit multiplies the total number of birds (function 22) by the current weight (function 23) to get the total weight in Kg for the house = 15,000kg. This number is then multiplied by the minimum amount of cubic air per kg (function 21) = 15,000 cube per hour. This gives us the total amount of cubic air per hour needed to supply a minimum amount of air to the birds. Next we take into account the maximum amount of air that fan group 1 can supply while per hour = 20,000 cube per hour. We can now calculate the amount of time (function 24) that the fan 1 group needs to run out of the fan cycle time (function 19) = 75 percent or 7 and a half minutes on 2 and a half minutes off.
As the weight increases (function 23) the fan duty cycle will increase. Once the duty cycle reaches 100 percent fan 1 will run nonstop
If more than one group of fans is to be used there will be a 5 second delay between the start of each fan group. The same delay time will be used when the fan groups go off. During the minimum ventilation cycle the fan group 1 will be running in a cycle mode. Before the fan group comes into operation the inlet will open to the set position as programmed in function 11. Once the inlet has opened the fan group will come into operation (after the 5 second delay). This cycle mode will continue to run as long as the temperature is less then the required house temperature (function 02) plus the set point for fan group 1 (function 04) = 26.5 degrees. Once the temperature in the house rises to 26.5 degrees, the fan group 1 will run nonstop (if the duty cycle is less then 100%). If the temperature in the house reaches the set point of fan group 2 (function 05), then the inlet will open to the preset opening as set in function 12. Once the inlet has opened fan group 2 will come into operation. This mode will continue as explained, fans running and the inlet opening according to preset positions. Once the set point of the fan group that was programmed as the Tunnel group (function 26) is reached the unit will open the cooling curtain to the set position according to the programmed flap position. The inlet will be closed According to the example this will happen when the set point for fan group 3 is reached. The fans will continue to operate during this transition. The unit will continue to bring into operation the fan groups according to the temperature increase. Note: It is necessary to program the set points of the fan groups in a order
starting from fan group 1 through to fan group 7 .
Be sure that the programmed inlet/curtain opening for each group increases in size in order to prevent a high (negative) static pressure in the house.

Temptron 616 User's Manual
Page 10 of 21
Cooling System
27. Cool Temp.ABS
Enter here the temperature that when reached in the house the cooling system will start to run in its cycle mode as setup in functions 28 and 29. This temperature is set as an absolute temperature.
28.Cool On Time mm:ss
This is the on time for the cooling system, set in minutes and seconds, which the cooling system will run.
29. Cool Off Time mm:ss
This is the off time for the cooling system, set in minutes and seconds, which the cooling system will be off.
30.Cool Humidity Set Point
Enter here the maximum humidity in percentage. If the humidity in the house reaches this level then the cooling system will turn off. Note: If no humidity sensor is connected to the V911 unit then the value 100 must be used.
31. Cool Timer Display
This is a display in seconds of the time cycles for the cooling system.
Alarm
32. Alarm Low set
Enter the number of degrees below the required house temperature that if reached the unit will activate the alarm relay. Example: Required temperature 25.0 Alarm Low: 5.0 If the house temperature drops to 20.0 then the alarm relay will be activated. 33. Alarm High set
Enter the number of degrees above the required house temperature that if reached the unit will activate the alarm relay. Example: Required temperature 25.0 Alarm High: 5.0 If the house temperature rises to 30.0 then the alarm relay will be activated.

Temptron 616 User's Manual
Page 11 of 21
34. Alarm Type
Shown here is the current alarm in digital form The unit has 8 alarms 1. Cold 2. Hot 3. Memory- represents a problem with the unit s memory. 4. Sensors- all temperature malfunctioning. 5. Sensor- one sensor is malfunctioning. 6. Inlet- the unit has detected a problem with the inlet motor feedback. 7. Curtain- the unit has detected a problem with the curtain motor feedback.
8. Light dimmer
35. Alarm Disable
It is possible to disable alarms 5-8. To disable an alarm enter the corresponding number. Example: In order to disable alarm number 5 (bad sensor) enter the value 5. Note:
If an alarm is disabled then the alarm relay will not be activated when there is a problem.
Light and feed index
36. Light/Feed Index
It is possible to program up to 8 on off programs for the light and feed systems over a 24-hour period. If your Temptron 616 is equipped with a built in light dimmer it is possible to create dust dawn programs up to 8 times over a 24 hour period. See hidden function number 85 for built in dimmer setup.
Enter here the number of the program (from 1-8) that is to be programmed. Always start with the number 1 program. Enter 1 and then continue to program the on and off times in functions37-40. Be sure to clear all unused indexes by entering zero (0) as the values in the used indexes. 37. Light On Time
Enter here the light on time for the chosen index program. Use a real time mode.
38. Light Off Time
Enter here the light off time for the chosen index program. Use a real time mode. Example: Index (function 36) = 1 Light On Time (function 37) = 0600 Light Off Time (function 38) = 2000 In this example the lights will go on at 06:00 and off at 20:00. If more than one lighting program is needed, continue to program the indexes. Index (function 36) = 1 Light On Time (function 37) = 0600 Light Off Time (function 38) = 2000 Index (function 36) = 2 Light On Time (function 37) = 2200

Temptron 616 User's Manual
Page 12 of 21
Light Off Time (function 38) = 0100 In this example the lights will go on at 06:00 and off at 20:00 (index 1) At 22:00 the lights will come back on and then go off at 01:00.
In order to erase all indexed programs, enter in the Index (function 36) the value 0 (zero). After the value 0 is entered the index number will return automatically to 1.
39. Feed On Time
It is possible to program up to 8 on off programs for the feeding system over a 24-hour period.. Use the Index function as explained above to program up to 8 different on off programs for the feeding system Enter here the feed on time for the chosen index program. Use a real time mode.
38. Feed Off Time
Enter here the feed off time for the chosen index program. Use a real time mode. Example: Index (function 36) = 1 Feed On Time (function 39) = 0700 Feed Off Time (function 40) = 2100 In this example the feeding system will go on at 07:00 and off at 21:00. If more than one feeding program is needed, continue to program the indexes. Index (function 36) = 1 Feed On Time (function 39) = 0700 Feed Off Time (function 40) = 2100 Index (function 36) = 2 Feed On Time (function 39) = 0200 Feed Off Time (function 40) = 0500 In this example the feeding system will go on at 07:00 and off at 21:00 (index 1) At 02:00 the feeding system will come back on and then go off at 05:00.
Note:
In order to erase all indexed programs, enter in the Light Index (function 36) the value 0 (zero). After the value 0 is entered the index number will return automatically to 1.
41.Max Light
If your Temptron is equipped with a built in light dimmer then you can program the maximum light intensity and the time it takes to reach this intensity. Enter in this function the maximum light intensity, in percentage from 0 to 100 that is desired for the house.
42.Light Delay
Enter here in minutes and seconds the amount of time it take the lights to go from 0 to the set maximum intensity and back down to 0 intensity. Example: Index (function 36) = 1 Light On Time (function 37) = 06.00

Temptron 616 User's Manual
Page 13 of 21
Light Off Time (function 38) = 20.00
Max Light (function 41) = 75 Light Delay (function 42) =00.50 In this example the lights will go on at 06:00. Over the next 50 seconds the lights will increase in intensity. At the end of the 50 second time frame the lights will have reached an intensity of 75 %. At 20.00, over a 50 second period the lights will decrease in intensity. At the end of the 50 second time frame the lights will be off.
24-hour data
43. Min Temperature
A display of the minimum temperature recorded over the last 24 hours. This will be updated according to the reset time (function 71).
44. Minimum Temperature Time
A display of the time that the minimum temperature occurred in the house.
45. Maximum Temperature
A display of the maximum temperature recorded over the last 24 hours. This will be updated according to the reset time (function 71).
46. Maximum Temperature Time
A display of the time that the maximum temperature occurred in the house.
47. Minimum Humidity
A display of the minimum humidity recorded over the last 24 hours. This will be updated according to the reset time (function 71).
48. Minimum Humidity Time
A display of the time that the minimum humidity occurred in the house.
49. Maximum Humidity
A display of the maximum humidity recorded over the last 24 hours. This will be updated according to the reset time (function 71).
50. Maximum Humidity Time
A display of the time that the maximum humidity occurred in the house.
51.Water Clock
If a water measuring clock has been connected to the Temptron 616 then in this function will be displayed the amount of water consumed over a 24 hour period. This 24 hour time period is from Reset time to Reset time (function 76).
52.Feed Clock
If a dry contact has been connected to the Temptron 616 from the feed auger contactor. then in this function the amount of feed consumed over a 24 hour

Temptron 616 User's Manual
Page 14 of 21
period will be displayed. The 24 hour time period is from Reset time to Reset time.
53.Feed Mult
Feed multiply is the total amount for feed in kilograms that is duped from the feed auger over a one minute time period. If a dry contact has been connected to the Temptron 616 from the feed auger contactor and a Feed multiply is entered then the Temptron 616 will convert the feed augers motor running time into kilogram and display this amount in function 52. Example:
Over a one minute time period 25 kilogram comes out of the feed auger. The Temptron 616 will calculate feed consumption using this value. If the feed auger runs for 10 minutes then the Temptron will assume that 250 kilogram of feed was consumed. Since different types of feed will cause a change in the amount of feed, this is only an approximant calculation of consumed feed..
54. Average 24- Hour Temperature
A display of the average temperature over the last 24 hours. This is updated at reset time.
Temperature Reduction Table
It is possible to enter a automatic temperature reduction table for the required house temperature.
55.Day 1 Temp
Day 1 temperature is the starting temperature for the first day grow day. It is the temperature that will appear as required temperature (function 02) when 1 is entered here. The room temp will be reduced according to the following table. Important: When Day is equal to 1 it is not possible to change Required Temperature (function 02).
56- 64 Temperature Graph 1
It is possible to set a temperature graph to reduce automatically the room temperature each day during the raising period. It is possible to set up to 9 Groups. Length of each Group can be up to 9 days. Each Group can be reduced up to 9.9 C. Example: Day 1 temperature 31 C (function 55). Growth day 1 (function 75) Room temperature will be 31 C. Group 1 - 7 days reducing of 2.1 C.

Temptron 616 User's Manual
Page 15 of 21
Each day the room temperature will be reduced by 0.3 C. At day 7 - the room temperature will be 29 C. Group 2-3 days reducing of 1.5 C. Each day the room temperature will be reduced by 0.5 C. At day 10 the room temperature will be 27.5 C. and so on. Example:
To Enter temperature reduction of 2 C in 7 days, press on 7 and than on 2 than on 0 and than on enter. On the display will appear : 7 2.0 G1 Press on data key, next group will appear. To enter temperature reduction of 1.5 C in 3 days, press on 3 than on 1 than on 5 then on enter. On the display will appear: 3 1.5 G2.
It is important to enter data in all 9 groups. If a group is not in use than put one day and 0 C. as a reduction temperature
65. Day 1 Weight
It is possible to enter an automatic weight increase table to be used by the minimum ventilation system. Enter here the weight of one bird at one day old. Each time day one is entered at Grow day (function 75) the current weight (function 23) will be updated to this weight Important: When Day is equal to 1 it is not possible to change current weight (function 23).
Weight increase table 66-74. Weight Graph
The weight increase graph (table) works as follows: The table has 9 groups. Each group contains two settings. The first setting represents the number of days that the weight increase will take place over. The maximum number of days is 9. The second setting is the actual weight increase over the set number of days. The maximum weight increase is 990 grams
2526272829303132
G1 G2
Temp

Temptron 616 User's Manual
Page 16 of 21
Example 1
Enter the first table of the weight increase graph. To enter a weight increase of 80 grams over 7 days, press on number 7, number 0 and number 8. Next press on enter. On the display will appear: 7 08 G1
Example 2
Press on the data button to go to the next table in the weight increase graph. To enter a weight increase of 200 grams over the next 9 days, press on number 9, number 2 and number 0. Next press on enter. On the display will appear: 9 20 G2.
It is important to enter data in all 9 groups. If a group is not in use, than put one day and 0 as weight increase.
75. Grow Day
This is the current grow day of the flock. At the beginning of the flock enter here The room temperature (function 02) will automatically receive the value as entered in Grow day1 temp. The Current weight function will automatically receive the value as entered in Day 1 Weight.
76. Reset Time
The Temptron 616 collects all its information on a 24 hours basis. It is possible to set the reset time. The grow day also changes after this time is passed. All information, temperature, humidity, water count and feed consumption will reset at this time.

Temptron 616 User's Manual
Page 17 of 21
77. Flap 1 Position%
A display of the current position of the inlet in percent.
78. Flap 2 Position%
A display of the current position of the curtain in percent.
Hidden functions. Hidden functions are functions that are normally set up once and are not used on a daily basis. There are 8 hidden functions. In order to reach the hidden function (79-85) you must first unlock them. To unlock the hidden functions follow these steps. A. Enter the time function (01). B. Push on PROG
C. Enter 3331 and press enter. The hidden functions are now unlocked To relock the hidden functions manually enter function 01 and enter 3330 and enter. If no information is enter for a period of 10 minutes the unit will automatically lock the hidden functions.
Hidden functions: 79.Flap 1 current state. 80.Flap 2 current state.
The flaps have 14 different states. State 0= The flap is not moving. State 1= The flap is opening. State 2= The flap is closing. State 3= The flap is at zero percent and there is no feedback. State 4= The flap is a 100 percent and there is no feedback. State 5-9= The flap is in a state other than opening or closing. State 10= The is in a error state. This state indicates that at some point during operation the flap lost its calibration. In this state the Temptron will activate the alarm relay and the alarm type will be either 6 (inlet) or 7 (curtain). State 11=. No flap was detected during the calibration process (function 4441/4442). State 12= the unit has closed the flap open relay but no flap is connected. The relay will remain closed for 10 seconds. No alarm will be activated. State 13= the unit has closed the flap open relay but no flap is connected. The relay will remain closed for 10 seconds. No alarm will be activated.
81. Lock code.
Enter here the 4-digit code for locking/unlocking the unit. If the value 0000 is entered then the lock code is disabled.
82. NAVR
Number of sensors for average. Enter here up to 4 sensors that are to be used for calculating the average temperature.

Temptron 616 User's Manual
Page 18 of 21
83.Net Name
It is possible to connect the Temptron 616 to a PC computer with the help of the "ChickPro" software package. It is possible to manage up 99 Temptron 607 units. Each unit needs a net name.
84.Digital Input reading:
This is a display of the current digital input in use. This readout is a binary number. Digital input 1=1 (inlet input) 2=2 (curtain input) 7=64 (water counter input) 8=128 (feed input)
85.Op Mode:
Here we program the unit for the built in light dimmer. If the unit is not equipped with a built in dimmer, enter here 0.
If the unit is equipped with a built in dimmer, enter here 1.
Add 2 to Op Mode in order to keep fan 1 on after fan 2 and up are working. For example: Op Mode = 3 (2 + 1), the internal dimmer is being used and fan 1 will remain running together with fan 2. This feature was added in program version 1602 and up.
86. Minimum ventilation off
Enter here a fan group number. When this fan group comes into operation all fan groups below this group will turn off. Example: Minimum ventilation off = 3 When fan group 3 comes into operation fan groups 1 and 2 will shut off.
87. Version Number
This is the version number of the unit.

Temptron 616 User's Manual
Page 19 of 21
Flap Calibration Flap 1 Calibration (inlet)
It will be necessary to calibrate the inlets / curtains before the start of each flock. A. Go to the time function (code 01)
B. Push on PROG
C. Enter 4441 and press "Enter". This will start the calibration process. The flap will first close to 0 percent and then open to 100 percent. The flap will then go to its required position.
Flap 2 Calibration (curtain)
It will be necessary to calibrate the inlets / curtains before the start of each flock. A. Go to the time function (code 01)
B. Push on PROG
C. Enter 4442 and press "Enter". This will start the calibration process. The flap will first close to 0 percent and then open to 100 percent. The flap will then go to its required position. If no flap feedback is detected during the calibration process, the unit will assume that no flap is attached. Each time the unit gives a command for a flap to open or close it will close the corresponding relay and leave it closed for 10 seconds. This will be an indication that the flap must be moved manually. There will be no alarm in this case.

Temptron 616 User's Manual
Page 20 of 21
TROUBLE-SHOOTING
1. If a temperature sensor or its cable is disconnected, the sensor reading will show Open.
2. If a temperature sensor or its cable is shorted, the sensor reading will show Short.
3. If all sensors are disconnected, the unit will show open as average and activate the alarm.
If one sensor is disconnected, the system will automatically work on the remaining sensor.
