tempalarm dialer pro · tempalarm dialer pro model fa-900e thank you for purchasing our tempalarm...
TRANSCRIPT

1
TempAlarm Dialer Pro
Model FA-900E
Thank you for purchasing our TempAlarm Dialer Pro. This instruction manual
covers installation for model FA-900E.
GENERAL DESCRIPTION AND FEATURES
The FA-900E is a remote monitoring device that can automatically call up to three
phone numbers when the temperature inside any space gets out of range, if the
power fails or if the back-up battery requires replacing. The FA-900E uses a series
of menu options that are accessible by pressing the buttons on your Touch-Tone
phone. All menu prompts and alarm messages are in English. In addition to calling
you if an emergency condition exists at your monitored location, the FA-900E also
offers the following features:
• “Quick Status Check” allows you to remotely check the current temperature,
power status and battery status from any phone in the world – all within a 15
second phone call.
• Remotely turn up the heat in your vacation home or cabin by switching
between a thermostat set at a lower temperature to one set at a higher
temperature. This feature does require some integration with your existing
heating system.
• Monitor for the presence of water leaks and floods by adding our WaterSiren
water sensor. It provides additional peace of mind from leaking pipes and
fixtures, burst washing machine hoses, leaking water heaters or overflowing
sumps. The WaterSiren triggers the FA-900E to call your three programmed
numbers and warn you of a water emergency.
• A normally open or closed auxiliary alarm contact allows you to monitor for
any type of alarm sensor that can either close or open a dry contact.
APPLICATIONS
• Second home owners who need to monitor two different homes.
• Cabin and vacation property owners can monitor their home and pre-heat it by
phone.
• Monitor a refrigerator or freezer from getting too warm.
• Computer Rooms can be monitored if air conditioning fails.
• Elderly residents or pets can be rescued from homes that get too hot.
• Monitor greenhouses, health care drugs, vaccines and supplies.
• Monitor equipment, boilers and any machinery that has the ability to close an
alarm contact.

2
If, after reading this manual, you need additional help installing or using your FA-
900E, contact our technical support department at 800-880-6000, Monday through
Friday, 8am to 5pm, Central Time.
For easy future reference during technical support and service, it is recommended
that you write your purchase date and the serial number of the unit in the spaces
below. The serial number can be found on the bottom instruction label on the FA-
900E unit itself. You will also need a 4-digit security code. This is used to prevent
unauthorized remote access to your FA-900E. The factory default security code is
9999. You may keep this or change it to your unique code. Your security code
must contain four numeric digits.
Purchase Date: ______________________
Serial Number: ______________________
Security Code: _______________________
Technical Support: Monday-Friday, 8am to 5pm, Central Time
Phone: 800-880-6000
Email: [email protected]
Web: www.controlproductsonline.com
Every effort has been made to ensure the information in this user manual is complete,
accurate and up-to-date. Emerson Control Products Inc. assumes no responsibility for results
of errors in this manual nor can it guarantee that changes in equipment made by other
manufacturers and referred to in this manual will not affect the operation or intended use of
the FA-900E.
Copyright © 2017 by Emerson
Document 42420126A
FreezeAlarm and WaterSiren are trademarks of Emerson Control Products Inc.
Touch Tone® is a registered trademark of AT&T
This manual may not be reproduced, modified
or distributed without permission from Emerson Control Products Inc.

3
TABLE OF CONTENTS:
1.0 Initial Set-Up
1.1 Operating Environment ............................................................................... 4
1.2 Knowing your way around your FA-900E .................................................. 4
1.3 What you need before you start ................................................................... 6
1.4 Use of a DSL, VOIP or Other Digital Phone Service .................................. 6
1.5 Dip Switches and their function .................................................................. 7
1.6 Connecting cords, sensor and battery .......................................................... 8
1.7 Connecting additional alarm devices to the auxiliary alarm input ............... 8
1.8 Using the Remote Switch Feature (T1, T2 & COM connections) .............. 9
2.0 Programming
2.1 Quick Program ............................................................................................ 9
2.2 Explanation of Program Menu Options ..................................................... 10
2.3 Programming your FA-900E Locally ........................................................ 14
2.4 Programming your FA-900E Remotely ..................................................... 15
2.5 Testing your FA-900E ............................................................................... 16
3.0 Operation of your FA-900E
3.1 Standby Mode ............................................................................................ 17
3.2 Calling into your FA-900E ........................................................................ 17
3.3 Use of an Answering Machine or Voice Mail at the Monitored Location. 19
3.4 What happens during an alarm .................................................................. 19
3.5 How to Cancel the “Alarm Call-Out” and reset your FA-900E ................ 21
3.6 Replacing the Back-Up Battery ................................................................. 23
3.7 Disconnecting the FA-900E for seasonal storage ...................................... 23
4.0 Other Installation Notes
4.1 Answering machines at the Call-To locations ........................................... 24
4.2 Extending the temperature sensor .............................................................. 24
4.3 Extending the phone cord .......................................................................... 24
4.4 Back-Up Battery Options .......................................................................... 24
5.0 Commonly Asked Questions ............................................................................ 25
6.0 Trouble Shooting ............................................................................................. 26
7.0 Warranty and Repair Information
7.1 Contacting Us ............................................................................................ 27
7.2 Limited Warranty ...................................................................................... 27
7.3 Repair and Service ..................................................................................... 28
8.0 Certification Statements .................................................................................. 29
9.0 Appendices
A. Program Menu, Call-In Menu and Call-Out Menu Flow Charts ............... 31
B. Remote Switch Wiring Diagrams & Installation Notes ............................. 34

4
1.0 INITIAL SET-UP BEFORE YOU PROCEED - Read the Following
Warranty Statement: Please read the entire warranty statement on page 27.
Minimum Installation:
• You should program at least one (1) phone number to call if there is a
temperature, power or battery emergency. The unit will operate without a
phone number programmed and you will be able to remotely access the unit to
check current status, but without any call-to phone number programmed, you
will not receive alarm calls.
• You must use a back-up battery. A 9V Lithium Battery (not included) is
highly recommended although an alkaline battery will work fine. Other
battery options are discussed in section 4.4 on page 24.
• IT IS CRITICAL THAT YOU TEST YOUR FA-900E to make sure the
unit calls out during an alarm condition.
1.1 Operating Environment
The FA-900E should operate in a dry, clean area that is near an AC power outlet
and a phone wall-jack. It is designed to operate in temperatures from 20° to 140°F
(-7° to 60°C). You should not install in areas where there is strong electrostatic,
electromagnetic or radioactive fields. Do not install in an area with high humidity,
chemical fumes or corrosive vapors. Never install or connect during a lightning
storm!
1.2 Knowing your way around your FA-900E
Back of the FA-900E
Front of the FA-900E
FA900E

5
Phone Jack
Plug in the supplied phone cord here and to your
wall jack. (or through a surge suppressor that has
the ability to protect the phone line).
Dip Switches
There are six dip switches that are used to select
various features and functions of your FA-900E.
Note: UP position of the switch is towards the
top of the case and DOWN is towards the
bottom.
Sensor Input Jack
Connection for the temperature sensor. This
jack is slightly smaller than a normal phone jack.
This is to prevent accidental input of the phone
line into this jack which could cause harm to the
FA-900E.
9 Volt Battery Connection This is where you will plug in your 9V battery.
Auxiliary Alarm Inputs
This allows you to monitor any additional alarm
device or contact closure or contact opening.
This is where to connect our WaterSiren.
Remote Switch Connections Connections for the Remote Switch Relay.
Plug In Power Cord Connection for the power cord. (Included)
Manual Remote Switch,
T1/T2
Used to manually switch between the T1 and T2
settings for the Remote Switch.
Standby/On Switch Toggle switch for either STANDBY mode or
ON for normal operation mode.
Power Indicator Light
On if the plug-in transformer is plugged in and
there is power to the unit. Off if the unit is
operating on battery power only.
Alarm Indicator Light
Will FLASH if the unit is in the STANDBY
mode. Off during normal operation with no
alarms present. On with no flashing if the unit is
in ALARM mode.
T1 and T2 Indicator Lights
These indicate the position that the remote
switch is in. They can be ignored unless you are
using the T1/T2 Remote Switch to either turn up
or down the temperature in your monitored
location or to turn on or off some other device
by phone.
Program Phone Jack
Plug in a phone here to either locally program
your FA-900E or to locally check status or
cancel alarm call-outs. For normal operation,
do not leave a phone plugged into this jack.

6
1.3 What you need before you start
Before proceeding, make sure you have the following ready:
1. 9V battery for back-up power.
2. A high quality surge suppressor that protects the power line as well as the
phone connections. (Recommended, but not required)
3. Three phone numbers that the FA-900E will automatically call during a
temperature, power or battery emergency. You may program only one
number or the same phone number in more than one of the 3 spots. These
numbers are referred to as “call-to” phone numbers throughout this manual.
4. Access to a single line phone jack. An existing single phone line in a home
or business will work. The FA-900E will not interfere with the use of your
phone line in any way. It will operate with all standard phone systems that
accept either pulse or tone dialing. Certain business phone systems and
PBX or digital phone systems may work, but testing is required. Please see
section 1.4 Use of a DSL, VOIP or other Phone Services below for further
details. The FA-900E cannot be used on a party line or a pay phone line.
5. You will need a standard phone to program your FA-900E using the front
Programming Phone jack. A cordless phone should work, but if you
encounter problems, locate a wired phone or program it remotely by dialing
into it using a cell phone or a phone from another location. You only need
this phone to program locally. After programming is completed, unplug this
phone from the FA-900E. It is not needed for the FA-900E to operate.
6. If you wish to use one phone jack for both the FA-900E and a regular
phone, you will also need to purchase a dual phone jack line splitter. This
will turn a single phone jack on your wall into two separate phone jacks to
plug in both the FA-900E and a regular single line phone. These are
available from any hardware or department store.
1.4 Use of a DSL, VOIP or other Digital Phone Services
If you have a DSL phone line or a phone line through your cable company, you
should install the appropriate filters on the phone line as required by your phone
service provider. Please note that the FA-900E is designed to work with and is
certified by the FCC to operate on a standard phone line provided by your local
phone company. A DSL, digital cable phone service or VOIP system may work just
fine, as long as the service has the capability to provide dial tone service to the FA-
900E. If you have questions or problems using one of these types of phone
services, contact your phone service provider.
Important: During power failures, many alternative phone services such as
digital cable provided phone service or VOIP systems DO NOT WORK. These
phone services require that power be on in the premises for the phones to operate.
The FA-900E will NOT be able to call out if the power is out when utilizing these
phone services. If you have a standard POTS phone line, power is supplied to this
line by the phone company and is usually not affected if power is out at the
monitored location.

7
1.5 Dip Switches and Their Functions
1. DO NOT plug in any components or battery until directed to do so in
the manual.
2. Make sure the toggle switch on the front of the FA-900E is on the
STANDBY position for programming.
3. Select the dip switch options per the Dip Switch Menu found below.
4. Use only the following table for proper explanation of each dip switch
setting. UP means the switch should be pointing towards the top of the case
and DOWN towards the bottom of the case. All the switches should come
from the factory in the DOWN position.
Dip Switch Menu # Description Settings
1
Pulse or Tone Dial Out. Select for Pulse Dialing only
if you do not have Touch-Tone™ dialing capability at
the monitored location.
UP =
pulse dialing
DOWN =
tone dialing
2
Power Alarm Monitoring – you can turn this feature off
or on with this switch. If you do not wish to receive an
alarm call for a power failure, put switch in the UP
position.
UP =
Power alarm
monitoring is
OFF
DOWN =
Power alarm
monitoring is
ON
3
Call Out Frequency. When the FA-900E goes into
alarm mode and begins calling out, it will call the three
programmed phone numbers. If no one has canceled
the alarm call-out, it will begin the sequence again in
either 15 minutes or in 2 hours according to the setting
selected.
UP =
2 hour call out
frequency
DOWN =
15 minute
call out
frequency
4
Call Out Ring Count. If the FA-900E received no
answer when calling a phone number, this switch
determines how many times the phone should ring
before the FA-900E hangs up the call and moves on to
the next programmed number. This saves on long
distance charges. Select 3 rings and, if the FA-900E is
calling an answering machine set to answer on 4 or
more rings, it will hang up before the answering
machine answers, saving on long distance charge. This
may not work in all areas as some phone companies
may still charge for an attempted long distance call
which does not go through.
UP =
3 rings
DOWN =
10 rings
5
45 Minute Temperature Alarm Delay. This feature
provides a 45 minute delay before going into
temperature alarm. This is used frequently to monitor
walk-in refrigerators or freezers for a rise in
temperature. The 45 minute temperature alarm delay
can be enabled so it won’t alarm while the refrigerator
or freezer is being loaded.
UP =
45 minute
delay
DOWN =
Call
immediately
6
Fahrenheit/Celsius Selection. The FA-900E can report
temperatures in either degrees Fahrenheit or Celsius.
Select °F or °C.
UP = °C DOWN = °F

8
NOTE: This phone will only be used to
program your FA-900E locally or for
locally checking the current status. It is
important to UNPLUG this phone from the
front after you are done programming or
making any changes.
1.6 Connecting Cords, Sensor and Battery
1. Connect the temperature sensor on the back of the unit marked Sensor.
2. Connect the power cord to the Power connection on the back of the unit.
Plug the other end into an AC power outlet or into your surge suppressor
power strip (purchased separately).
3. Plug in a 9V battery to the battery connection.
4. Using the supplied phone cord, connect one end to the OUT TO
WALLJACK connection on the back and the other end into your phone jack
on the wall.
If you are using a surge suppressor that also protects the phone line, there should be an “IN”
and “OUT” labeling or diagram for proper connection of the phone lines. See the diagram
below for details on the phone line connections and follow the instructions that came with
your surge suppressor.
5. Plug in your standard, single line phone to the “PROGRAM PHONE” jack
on the front of your FA-900E. See Figure below.
1.7 Connecting Additional Alarm Devices to the Auxiliary Alarm Input
This is most often used to connect our WaterSiren or any other auxiliary alarms.
Any sensor or alarm device that opens or closes a dry (non-voltage) contact can be
connected to the auxiliary alarm input. Connection of more than one alarm device
to the auxiliary alarm input is possible by connecting them in parallel as noted
below. The auxiliary alarm input cannot accept any device that sends voltage
through the contact wire.
FA-900E

9
During programming, you can set the Auxiliary Alarm Input to monitor for either a
contact closure (default position) or for a contact opening. When the Auxiliary
Alarm Input is either closed or opened (depending upon the setup), it will trigger the
FA-900E to begin calling your preprogrammed phone numbers and play a special
message you can record for whatever alarm device is connected to the auxiliary
alarm input. For instance, if you have our WaterSiren connected, you can record an
alarm message warning you of a water emergency at your monitored location
instead of the factory default “Auxiliary Alarm” message.
1.8 Using the Remote Switch Feature (T1, T2 and COM connections)
The Remote Switch allows you to remotely turn on or off another device by phone
or remotely switch between two different thermostats to pre-heat or cool your
monitored location. This installation is detailed in Appendix B.
2.0 PROGRAMMING You can program your FA-900E using a regular home phone or you can remotely
access and program it using a cell phone or a phone at another location. This
feature allows you to remotely change programming selections at a later time from
any phone in the world. Most first time users program it locally by using a single
line home phone. A cordless phone may work, but a standard single line home
phone with a wired handset will work best. An explanation of each menu option
with helpful hints on programming is provided after the quick programming guide.
2.1 Quick Program
If you feel comfortable with the various menu options and want to get your FA-
900E up and running quickly, follow the steps below. This provides a quick method
to program up to 3 call-to phone numbers in just a few minutes. You should
program at least 1 call-to phone number for proper operation. Check the factory
defaults if you need to change any other settings as they are not discussed in this
Quick Program section. When the manual tells you to press a number, it is referring
to a number on your program phone’s Touch-Tone® keypad. If you need an
explanation of each menu option, please go to the next section on the following
page.

10
1. Make sure the dip switches on the back are set for your application.
2. Make sure it is connected properly and has a 9V battery installed.
3. Make sure the toggle switch on the front is set to STANDBY position.
The front ALARM light will blink while in STANDBY mode.
4. Plug a program phone into the PROGRAM PHONE jack on the front.
5. Pick up the phone handset and the Main Menu will begin to play.
6. Press 3 to access the Program Menu.
7. Press 1 to review or program phone numbers.
8. Press 1 to review or program phone number 1.
9. Press 0 to enter a new phone number or to change an existing number.
10. Enter the phone number followed by the pound “#” key.
11. Press 2 to identify this as a regular phone number and not a pager.
12. Press 9 to return to the Phone Number Menu.
13. Repeat this process for phone numbers 2 and 3.
14. After entering phone numbers, press 9 to return to the Program Menu.
15. Hang up or change any of the other settings as needed.
16. After programming is completed, UNPLUG YOUR PROGRAM PHONE
from the front PROGRAM JACK!
17. FLIP TOGGLE SWITCH ON THE FRONT TO “ON” POSITION!
If this is the first time you have programmed this FA-900E, the factory default
settings for the other menu options are as follows:
Security Code ................................................................................................ 9999
Low Temperature Alarm Setpoint ................................ 45° Fahrenheit or Celsius
High Temperature Alarm Setpoint ............................. 100° Fahrenheit or Celsius
Number of rings before the unit answers ................................................... 5 rings
Number of minutes the power should be out before alarming .......................... 60
Greeting Message: ..“Hello, this is your automated monitoring control system”
Alarm Message: …..“Hello, this is your automated monitoring control system.”
Auxiliary Alarm Message ............ “The auxiliary alarm input is in alarm mode”
Auxiliary Alarm Input Setting ....................................................... Normally Open
IMPORTANT WARNING! After Programming, you must return the
front toggle switch to the ON position or it will not call you if an alarm
condition occurs and you will be unable to call the FA-900E remotely!
CRITICAL! TEST YOUR FA-900E to make sure it calls your call-to
phone numbers during an alarm. See the Test Procedure on page 16.
2.2 Explanation of Program Menu Options
The programming options are explained in detail below. Review before proceeding.
MENU OPTION 1: Review or Program Phone Numbers Program your call-to phone numbers here. You can also review or change any
existing phone numbers. The FA-900E can dial up to 3 phone numbers with each
phone number consisting of up to 60 digits. You can include pauses and the star (*)
11
key as part of your phone number to accommodate calling cards, different phone
features and pager systems. Any or all of these numbers can be to a mobile phone
or any other phone number. These phone numbers are referred to throughout the
rest of this manual as “call-to phone numbers”.
One or more of the phone numbers may be a pager phone number. If so, you will
have the opportunity during the program sequence to identify which numbers are
pager numbers and which are regular phone numbers. In addition, you will also
have the opportunity to program a pager display message.
To program a star (*) in your phone number, press the * key on your keypad as part
of the phone number. To enter a two second pause in a call-to phone number, press
the * key twice. This will count as two digits of your total 60 allowed for that
number. You can combine * keys in a phone number to add both a two second
pause and a dialed * key by having three * keys in your phone number sequence.
Three * keys equal a 2 second pause followed by a dialed * key. Four * keys equal
a four second pause in the dialing sequence.
IMPORTANT NOTES ABOUT ENTERING YOUR
CALL-TO PHONE NUMBERS
• LONG DISTANCE: Enter the phone number exactly like you would dial a
voice call. Use a 1 and/or area code if needed. If dialing internationally, make
sure you have the correct country codes and follow proper international
dialing rules. Check with your phone company for assistance determining the
correct number.
• AREA CODES: Area codes rules for dialing within an area code can
changing frequently. Make sure you change your call-to phone numbers if
area codes or calling rules change in your area.
Review or Program Pager Display Information: If one or more of the phone
numbers you program are to a numeric pager, you can program a numeric message
that will be displayed on the pager when it calls. This can be any numeric message
up to 15 characters in length.
MENU OPTION 2: Review or Program the Temperature Alarm Setpoints
This menu option lets you set the high and low temperatures at which you want the
FA-900E to dial out for a temperature alarm.
The factory setting for the low temperature alarm is 45° whether you have the unit
set to read temperatures in Fahrenheit or Celsius. The high temperature alarm
setpoint is 100°F or °C. You can select a temperature alarm setpoint anywhere from
-66 to 301°F (-54 to 149°C). The FA-900E can read temperatures to you in either
°F or °C based on dip switch number six.
NOTE FOR A NEGATIVE TEMPERATURE ALARM SETPOINT: To enter a
negative temperature alarm setpoint, you will need to precede the desired negative
temperature with a *. For example, if you want a temperature alarm setpoint of

12
negative 15°, press * 1 5 # on your phone keypad when requested. This will be
played back to you by the FA-900E as “negative fifteen degrees”.
MENU OPTION 3: Review or Program the Security Code The security code is used for two functions by the FA-900E.
1. Password Protection to prevent unauthorized persons from accessing your
FA-900E remotely. The factory set security code is 9999. It is highly
recommended you change this and write the security code down on the front
of this manual and in a safe place at all your call-to locations. Security
codes must have four numeric digits.
2. Location Identifier. The security code also provides a location code to the
person answering an alarm call from the FA-900E. The FA-900E will note
that there is a specific alarm condition “at location ####”. This allows a
service or monitoring company to quickly identify which location is calling
so they can dispatch service personnel to your monitored location most
efficiently. This is also an easy way to hear what your security code is if
you have forgotten the code.
If you have forgotten your security code, there is no way to remotely change the
code. You will need to go to the monitored location, plug a phone into the front of
the unit, go to menu option 3 in the programming menu and review or change the
security code at that time. If you are receiving alarm calls from your FA-900E, the
unit will tell you the security code during the alarm message.
MENU OPTION 4: Review or Program the Number of Rings Before the Unit
Answers
This is also referred to as the “incoming ring count”. When you call your FA-900E
from a remote location, it will be waiting to hear a specified number of rings before
it picks up. You can select the number of rings you wish the FA-900E to hear
before it will pick up. Through this menu option, you can select to have it answer
after a specific number of rings have been counted. The factory default incoming
ring count is set at five rings. You can set the ring count from 1 to 30 rings.
This feature is provided for several reasons:
1. If you have an answering machine or voice mail at the monitored location,
you generally want people calling that location to be able to leave a message.
If the FA-900E answers before your message system answers it will override
the answering machine or voice mail. You can program it to answer on a
number of rings that is greater than that of your message system and still
have people leave messages for you. To gain access to your FA-900E
instead of the message system, follow the procedures outlined on page 19.
2. When you are visiting your monitored location, you may receive frequent
phone calls from outside callers. With a smaller incoming ring count
selected, there is the possibility the FA-900E could answer if several callers
called in sequence within a three and a half minute period of time. If you
normally receive a lot of calls at the monitored location, you may wish to set

13
the incoming ring count to a higher number. This is helpful for businesses
who receive a lot of calls or for vacation rental companies that are monitoring
multiple locations and don’t want their guests to even know there is a FA-
900E in their rental property.
MENU OPTION 5: Review or Program the Number of Minutes the Power
Should be Out Before Calling with a Power Alarm
The FA-900E can call you if the power to the unit has failed. This menu option
allows you to select the number of minutes that the power should be out before it
calls you. You can select any number of minutes from 1 to 120. The power will
have to be out continuously for the number of minutes selected before calling you.
For example, if you have the power out timer set at 60 minutes and the power goes
out for 40 minutes and then comes back on for a brief moment and then goes off
again, the timer resets to zero. It will keep track of the number of minutes the
power is out and tell you during an alarm call how long the power has been out and
if the power is currently on or off. The factory default for the power out timer is 60
minutes. The power monitoring feature can be turned off so that you never receive
calls about power failures. This is done by flipping dip switch #2 to the “UP”
position on the back of the unit.
MENU OPTION 6: To Review or Record Messages
You can record several messages on the FA-900E. Each message can be
approximately 15 seconds long. The following explains how the messages work.
Greeting Message: This is played whenever you call into your FA-900E from a
remote location. This message is helpful if you plan on having relatives or
neighbors call to check on the property. If there is no answering machine or voice
mail, you may record a message that indicates this machine does not accept
messages and request the caller to try back later. If you do not record a separate
Greeting Message, the factory default message is: Hello, this is your automated
monitoring system.
Main Alarm Message: This is played when the FA-900E calls out with an alarm. It
will precede the factory alarm messages so it can contain personal information
about your name, address, etc. It is useful to record an alarm message that will help
people at your call-to locations better identify that the call is from your FA-900E. If
calling to a monitored service or contractor, they may also like a custom message
that provides address information. The factory default message is: Hello, this is
your automated monitoring system. This is then followed by our factory message
telling you specifically what alarm conditions are or have recently occurred.
If you record your own custom message, the factory recorded messages indicating
the specific alarms that are occurring will still play after your custom message has
played.

14
Auxiliary Alarm Message: This is played if the device that is attached to the
Auxiliary Alarm Input is in alarm mode (either the contact has closed or opened).
This message will only play during alarm call-out to your programmed call-to
phone numbers. This message overrides the factory default message of “The
Auxiliary Alarm Input is in alarm mode”.
Reinstating the Factory Default Messages
If you record a custom Greeting, Alarm or Auxiliary Alarm Message but decide you
would rather have the factory default message instead, you can reinstate the factory
default alarm or greeting message.
1. Select the menu option 6 to record messages
2. Press 1: To Review or Program the (Alarm/Greeting/Auxiliary) Message
3. Press 0 so you can change the Alarm or Greeting Message
4. The FA-900E will begin playing the menu prompt shown below. While this
message is playing, press the pound (#) key. The menu prompt will stop
and the FA-900E will now play the factory default greeting or alarm
message.
“Begin Recording after the tone. When you have finished recording, press
the pound (#) key”
Recording over old messages
To record over an old message, follow the instructions to program a new message
and simply record a new message. The old message will automatically be erased.
MENU OPTION 7: To Review or Modify Auxiliary Alarm Setting
The auxiliary alarm input is used to plug in additional alarm devices such as our
WaterSiren (WS-04E). This device is designed to “close” an alarm contact when it
goes into alarm. Some other alarm devices are designed to “open” an alarm contact
when they go into alarm. This menu option allows you to change whether the
Auxiliary Alarm Input should monitor for a “closed” or “open” contact. The table
below shows you what to select based on what your alarm device will do when it
goes into alarm.
If your alarm will “close” when an
alarm condition occurs such as our
WaterSiren
Select the Auxiliary Alarm input to
be “Normally Open”
If your alarm will “open” when an alarm
condition occurs
Select the Auxiliary Alarm input to
be “Normally Closed”
2.3 Programming Your FA-900E Locally
At the location where the FA-900E is located
1. Make sure the toggle switch on the front is on the STANDBY position for
programming. The ALARM light on the front will begin flashing.
2. Make sure you have a regular, single line phone plugged into the front where
it says PROGRAM PHONE. This will be referred to as your Programming

15
Phone. NOTE: After programming is completed, unplug the Programming
Phone from the PROGRAM PHONE jack on the front of the FA-900E. A
phone left plugged into the front cannot operate as a regular phone. If you
want to share a phone with your FA-900E in the same wall jack, you will
need a phone jack line splitter.
3. Pick up the handset on your Programming Phone. The FA-900E will begin
talking to you with the Main Menu.
Main Menu:
You are now in the main menu.
For current status, press 1.
For remote switch status, press 2.
To enter the Program Menu, press 3.
Current Status: Provides the current status of the various sensors.
The current temperature is XX degrees, the power is on (or off), the batter
is at X.XX volts and the auxiliary alarm input is currently (in/not in) alarm
mode.
Remote Switch Status: This is where you can easily change the position of
the remote switch status. This can be used to switch between one
thermostat set at a lower temperature to another thermostat set at a higher
temperature, allowing you to warm up a space before you arrive. It can
also be used to turn on or off a remote device by phone. Use of this feature
is detailed in Appendix B on page 34.
Program Menu: It is recommended you listen to all the menu options once
before programming to become familiar with the program menu. At the
end of the menu, it will pause and then start playing from the beginning
again.
4. IMPORTANT: After programming is completed, flip the front
ON/STANDBY switch to the ON position for normal operation of your FA-
900E.
2.4 Programming Your FA-900E Remotely
By calling into your FA-900E from a remote phone or cell phone
1. Make sure all the connections have been made according to section 1.6 on
page 8. You will not need to plug a phone into the “PROGRAM PHONE”
jack on the front of the FA-900E to program remotely.
2. Make sure the toggle switch on the front of the FA-900E is in the ON
position.
3. From an outside phone or a mobile/cell phone, call the phone number of your
monitored location. The FA-900E will answer after five rings. If you have
an answering machine or voice mail at the monitored location, you may need
to place two or more calls to the monitored location to bypass the answering
machine or voice mail. For more details, see the section 3.3 on page 19.

16
4. When the FA-900E answers, you will hear the following:
Hello, this is your automated monitoring system (or a custom greeting
message if recorded earlier). The current temperature is XX degrees, the
power is on (or off), and the battery is at X.XX volts.
If no alarm conditions are present at the current time, you will then hear:
There are no alarm conditions occurring at this time. To access the main
menu, enter your 4-digit security code followed by the pound (#) key.
If alarm conditions do exist when you call into your FA-900E, it will play
any alarm conditions present at that time instead of the above message. You
can still continue to remotely program the unit even if alarm conditions are
present.
5. Enter your 4-digit security code followed by # on your phone key pad. If the
security code is correct, the main menu will play. If the security code is
incorrect, you will be given one more chance and then the FA-900E will say
Incorrect Security Code, good-bye and then hang up.
6. From the Main Menu, select menu option 3 to enter the Program Menu.
From the program menu, you can review or program your call-to phone
numbers, security code, temperature alarm setpoints, and other options.
There are six programming options in the Programming Menu. Each Menu
Option is discussed in detail in section 2.2.
7. IMPORTANT: Flip the front ON/STANDBY switch to the ON position for
normal operation of your FA-900E.
IMPORTANT WARNING! After Programming, you must return the
front toggle switch to the ON position or it will not call you if an alarm
condition occurs and you will be unable to call into your FA-900E
remotely!
CRITICAL! TEST YOUR FA-900E to make sure it calls your call-to
phone numbers during an alarm.
2.5 Testing Your FA-900E It is CRITICAL that you test your FA-900E to ensure you have programmed all the
phone numbers correctly and to make sure it is working properly with your phone
line. Before you start the test, make sure the front toggle switch is in the ON
position.
To test an alarm call-out based on a cold temperature, wrap the end of the
temperature sensor in a plastic bag and insert into a cup of ice or put the sensor in a
freezer. IT IS VERY IMPORTANT THAT THE TEMPERAUTRE SENSOR
DOES NOT GET WET. The sensor is not designed for wet environments or for
submersion into any liquids. Note that if you have the 45 minute temperature alarm
delay “on”, it will take 45 minutes or more before the alarm call-out begins. The
temperature alarm delay feature can be changed based on the position of dip switch
#5.

17
You can also test the alarm call-out simply by unplugging the temperature sensor.
With the sensor unplugged the unit automatically thinks there is a temperature alarm
and it will begin calling the three programmed phone numbers.
NOTE: When you first power up your FA-900E with either the battery or the plug-
in transformer, the unit waits for five minutes before checking any sensors.
After you have verified the programmed call-to phone numbers have been called
successfully, you must still cancel the alarm call-out. Make sure the temperature
sensor is out of the ice and at room temperature again or plugged back into the
SENSOR location on the back. To cancel the alarm and reset the FA-900E, flip the
front toggle switch to the STANDBY position and then back to the ON position.
The red alarm light on the front should go out. Your FA-900E is now ready for
operation.
3.0 OPERATION OF YOUR FA-900E 3.1 Standby Mode On the front of your FA-900E is a toggle switch with STANDBY or ON positions.
The STANDBY position is primarily used for programming purposes only. The
ON position is where it should be once programming is completed. In STANDBY
mode, you can access the main and programming menus, but you cannot remotely
dial into your FA-900E and more importantly, it cannot call you if an alarm
condition occurs.
Some users may want to temporarily flip the switch to the STANDBY mode if they
are visiting the monitored location and don’t want the possibility of an incoming
call being picked up by the FA-900E. We don’t recommend the STANDBY mode
for this scenario and instead suggest you change your incoming ring count selection
to a higher number so virtually all incoming callers will either go to your answering
machine/voice mail or you have sufficient rings to allow you to get to the call
before the FA-900E answers.
3.2 Calling into your FA-900E
One of the best features of the FA-900E is the ability to remotely check the current
temperature, power, auxiliary alarm and battery status at your monitored location.
You can also change the remote switch status for turning up and down heat or
turning on or off another device remotely. Plus, you can change any of the program
menu settings including the call-to phone numbers if desired. If you have an
answering machine or voice mail at the monitored location, make sure you read
section 3.3 on page 19 before proceeding. The following is the procedure for
remotely accessing your FA-900E to check current conditions or change program
menu options.

18
To Check Current Conditions at your Monitored Location:
1. Call the phone number of your monitored location where the FA-900E is
located.
2. When the FA-900E answers, you will hear the following:
Hello, this is your Automated Monitoring System (Or you will hear your
custom greeting message that was recorded earlier) The current temperature
is # # degrees, the power is on (or off) and the battery is at #.# # volts.
There are no alarm conditions occurring at this time. To access the main
menu, enter your 4-digit security code followed by the pound “#” key.
3. You can either hang up or go into the main menu by entering your 4-digit
security code.
Remotely Changing the Remote Switch Status: The Remote Switch Status is a feature that is most often used to switch between one
thermostat set at a low temperature to one set at a high temperature, thereby
allowing you to remotely turn up or down the temperature in your home or cabin.
The remote switch can also be used to turn on or off another device. Details on how
to hook up devices to the T1/T2/COM connections on the back of the FA-900E are
detailed beginning on Page 34.
To change the Remote Switch Status:
1. Access the MAIN MENU as described above. You will hear the following:
You are now in the main menu.
For current status, press 1.
For remote switch status, press 2.
To enter programming menu, press 3.
2. Select Menu Option 2 and you will hear:
The position of the remote switch is currently T1 (or T2). To change, press 0
or to return to the main menu, press 9.
3. Toggle between the T1/T2 switch as desired.
NOTE: The Remote Switch Status can only be changed by authorized personnel
who have correctly entered a security code. The switch can also be changed while
at the monitored location by pressing and holding in the Remote Switch button on
the back. This will toggle between the T1 and T2 relay positions.
To Remotely Change Program Menu Settings Including Call-To Phone Numbers:
1. Call the phone number of your monitored location where the FA-900E is
located
2. When the FA-900E answers, you will hear the factory greeting message or
your custom greeting message recorded earlier. This will be followed by the
current temperature, power status and battery voltage at your monitored
location.
3. Enter your 4-digit security code followed by # to access the main menu.
4. Press 2 to access the Program Menu.

19
5. Press the number of the menu option you wish to change and follow the
prompts.
3.3 Use of an Answering Machine or Voice Mail at the Monitored Location
If you have an answering machine or voice mail at the monitored location where
your FA-900E is located, there is an easy way to still use your answering machine
or voice mail and access the FA-900E to check current status or to cancel the alarm
call-out.
The FA-900E will answer after it hears a specified number of rings. This number of
rings is the “incoming ring count” selection programmed during the programming
section. It can count incoming rings over multiple calls that are made within three
and a half minutes of the first call. This allows most incoming calls to go to the
user’s answering machine or voice mail service prior to the FA-900E answering.
The FA-900E will answer based on your “incoming ring count” selection
programmed. The factory default incoming ring count is five rings.
How This Works (an example):
1. During Programming, you set your FA-900E to answer on 5 rings. You set
up your answering machine or voice mail to answer on 4 rings or less.
2. When your monitored location receives an incoming call, it will go to the
answering system first because that is set to answer on four or fewer rings
while your FA-900E is set to answer on five rings.
3. If you wish to call your FA-900E, place two calls to your monitored location.
a. On the first call, let the phone ring two or three times and then hang up
before your answering system answers. The FA-900E will remember
those first two or three rings in memory for the next three and a half
minutes.
b. On your second call, let the phone ring another two or three times. Your
FA-900E will answer first because it remembered the first two or three
rings and with the second set of rings, it accumulated a total of five rings
and now answers before your answering machine or voice mail. If you
have your FA-900E set to answer on a high number of rings, you may
need to place more calls to get the FA-900E to eventually answer.
Note: After three and a half minutes, the incoming ring counter will reset to zero. If
you receive many incoming calls to your monitored location (like at a business),
you would want to set your incoming ring counter to a high number.
3.4 What Happens During An Alarm:
The FA-900E will call your programmed call-to phone numbers if an alarm
condition has occurred. It will continue to call you every 15 minutes (or every two
hours depending upon dip switch #3’s position) even if the alarm condition has been
corrected, but the alarm call-out has not yet been canceled. Note that canceling the

20
alarm call-out does not disable the FA-900E. It will continue to monitor all
conditions including those in alarm.
Alarm Call-Out Sequence:
The FA-900E will continue to call all programmed call-to phone numbers until
someone acknowledges the alarm and cancels the alarm call-out.
The FA-900E will call the first call-to phone number and play its alarm message to
a person, answering machine or voice mail. If it gets a busy signal, no answer or a
person who doesn’t know how to cancel the alarm call-out, it will immediately start
calling the second number. If the alarm call-out isn’t canceled by the second call-to
person, it will immediately move to the third number. If no one at that call-to
number cancels the alarm call-out, the unit will wait either 15 minutes or 2 hours
and then start the sequence all over again.
The only way to stop the FA-900E from calling the call-to phone numbers is to have
a person at one of the call-to numbers cancel the alarm call-out as described later in
this manual or go to the monitored location and switch the toggle switch to
STANDBY and then back to ON. This resets the FA-900E.
The FA-900E is persistent and always wants you to know that an alarm has
occurred, even if the alarm condition has corrected itself. For example: The power
goes out long enough so that the FA-900E notes a power alarm and begins calling
your call-to phone numbers. If none of the people at the call-to numbers are home
to answer the call, and the power is eventually restored, the FA-900E will continue
to call the call-to phone numbers until the alarm call-out has been canceled.
Multiple Alarms It is possible to receive multiple alarm calls from your FA-900E even if you believe
you have canceled one of the alarms.
Here are some examples:
Example 1: If you receive a power out alarm and cancel that alarm call-out, your
FA-900E will still be running on back-up battery power until the power is restored.
It is conceivable, that the battery could drop below 7.0 volts and begin calling out
again, but this time with a battery alarm. You would need to cancel this alarm call
separately from the earlier power out alarm. If power continues to be out, you could
also receive a separate temperature alarm later because your heating system will
most likely not be working. This alarm call-out would have to be canceled
separately as well.
Example 2: Assume you have received a power out alarm and have canceled the
alarm call-out. A short time later, you receive another power out alarm. What has
happened is that your power was restored after you canceled the first alarm call-out
and the power out alarm was automatically reset. A short time later, the power went

21
out again (not infrequent in remote areas). This caused the FA-900E to initiate
another power out alarm and begin calling your call-to phone numbers again.
Example 3: This same multiple alarm call-out can happen with a temperature alarm
as well, especially if the temperature outside your monitored location is close to the
temperature alarm setpoint you have programmed on your FA-900E. If your
heating system fails or power is out, the temperature in your monitored location
begins to drop. In the evening, when it is colder outside, it may drop below your
temperature alarm setpoint inside the home and then call you with a temperature
alarm. Then, during the day, the temperature may return above the temperature
alarm setpoint because the sun is out. This would cause the FA-900E to potentially
reset during the day and call you again at night.
3.5 How to Cancel the “Alarm Call-Out” and reset your FA-900E
Two things need to happen to reset the FA-900E. The alarm call-out must be
canceled and the alarm condition needs to be corrected. Once both of these things
have happened, the FA-900E will automatically reset.
You can cancel the alarm call-out in one of three methods.
1. If you answer a call from the FA-900E, it will give you an opportunity to
enter the 4-digit security code which will cancel the alarm call-out.
2. If the FA-900E has left alarm messages on your answering machine or voice
mail, you can remotely call into the FA-900E and cancel the alarm call-out
by following the prompts.
3. Go to the monitored location and if the FA-900E is still dialing out to the
call-to phone numbers, you can simply switch the front toggle switch to
STANDBY mode and then back to the ON position. This is a physical reset
that can only be done at the monitored location. You will see the red
ALARM light go off when you reset it in this fashion. Doing this does not
erase any programmed phone numbers, security codes or other settings.
Those settings will be retained indefinitely even if the power cord is
unplugged and the battery is removed.
Canceling the Alarm Call-Out during a call from the FA-900E
When the FA-900E calls you, you will initially hear either the factory recorded
alarm message or your custom alarm message that you recorded during the
programming section. The alarm messages will play twice, but you can enter your
security code to cancel the alarm call out at any time during the message playback.
Hello, this is your Automated Monitoring System. (Or your pre-recorded
custom alarm message) There is an alarm condition at your remote monitored
location. The following alarms currently exist or have occurred recently at
location XXXX.
This will be followed by one or more alarm conditions. A 4-digit location code will
also be played. This is the same number as your security code.
22
There is a temperature alarm. The power at location # # # # has been out for #
# # minutes and is currently on (or off). There is a battery alarm at location #
# # #. The auxiliary alarm input is in alarm mode (or your pre-recorded
custom auxiliary alarm message). Please check conditions at your monitored
location immediately.
This entire message will repeat again and be followed by:
To cancel the alarm call-out, enter your 4-digit security code followed by the
pound “#” key.
You will be given two chances to enter the correct security code. If incorrect two
times, it will say, Incorrect Security Code, good-bye and then it will hang up. If you
enter the correct security code, it will respond with:
The alarm call-out is now canceled. To return to the main menu, press 1.
Otherwise, hang up.
Calling into your FA-900E to Cancel the Alarm Call-Out
If you received calls from your FA-900E and know there is an alarm at your
monitored location, you can call into it from any phone in the world and remotely
cancel the alarm call-out without having to wait for another call.
Follow this procedure:
1. Call your monitored location’s phone number where the FA-900E is located.
2. When the FA-900E answers, you will hear the following:
Hello, this is your Automated Monitoring System. (Or your pre-recorded
custom alarm message) The current temperature is # # degrees, the power
is on (or off), and the battery is at #.# # volts. There is an alarm condition
at your remote monitored location. The following alarms currently exist or
have occurred recently at location # # # #.
This will be followed by one or more alarm conditions. A 4-digit location
code will also be played. This is the same number as your security code.
There is a temperature alarm at location # # # #. The power at location #
# # # has been out for # # # minutes and is currently on (or off). There is a
battery alarm at location # # # #. The auxiliary alarm input is in alarm
mode (or your pre-recorded custom auxiliary alarm message). Please
check conditions at your monitored location immediately.
This entire message will repeat again and be followed by:
To cancel the alarm call-out, enter your 4-digit security code followed by
the pound “#” key.
You will be given two chances to enter the correct security code. If incorrect
two times, it will say, Incorrect Security Code, good-bye and then it will
hang up. If you enter the correct security code, it will respond with:

23
The alarm call-out is now canceled. You are now in the main menu. From
here, you can either access main menu or hang up.
If the Alarm Call-Out Has Been Canceled By Someone Else
Since the FA-900E can call multiple phone numbers, there is a chance that a person
at one of the other call-to locations may have canceled the alarm call-out prior to
your call. If that occurs, you will still hear the current status and all the alarm
conditions when you call into it, but you will not be given a chance to cancel the
alarm call-out. Instead, it will ask for your 4-digit security code to access the main
menu. You can either enter your security code to check current conditions again or
hang up and determine the steps needed to correct the alarm conditions.
It is possible for one of your other call-to people to cancel the alarm call-out and the
alarm condition improves at your monitored location. If that occurs, you will not
hear any alarm conditions, instead, you will be given a current status and then an
opportunity to enter the main menu.
3.6 Replacing the Back-Up Battery
We highly recommend replacing it with a new 9V lithium battery. Follow this
procedure to change the back-up battery.
1. Switch the front toggle switch to the STANDBY position.
2. Remove the old battery and insert the new battery.
3. Switch the front toggle switch back to the ON position.
A fresh 9V lithium battery will provide approximately 10 to 15 hours of power if it
is calling out every 15 minutes to all three phone numbers. If it is calling to fewer
numbers, calling out every 2 hours or the alarm call-out was cancelled during one of
the first calls, the battery life should be longer. Too many variables exist to provide
accurate battery life for every condition. There are other battery and power supply
options in section 4.4 on Page 24.
3.7 Disconnecting the FA-900E for Seasonal Storage
Your FA-900E can provide year round protection, but if desired, it can be safely
stored for seasonal use. To store it, disconnect all cables and wires and take out the
battery. If you leave a battery in it, the battery will be dead the next time you are
ready to use it. Storing electrical devices with batteries in place is not
recommended. Store your FA-900E in a dry place with no excessive temperatures.
The FA-900E will indefinitely retain all programmed call-to phone numbers and
other programmed settings, even if the power cord is disconnected and the battery
has been removed. It is recommended you check all settings when reconnecting to
double check call-out phone numbers and verify all settings are still correct. It is
critical that you TEST your FA-900E once each year.
24
4.0 OTHER INSTALLATION NOTES 4.1 Answering Machines at the Call-To Locations
If you have an answering machine or voice mail at any of the call-to locations, the
FA-900E will generally leave a portion of its alarm message on the answering
machine or voice mail. You may want to test this as some answering systems do
not pick up the message. Answering machines and voice mail will not affect or stop
the call-out sequence in any way.
4.2 Extending the Temperature Sensor Length
The temperature sensor may be extended using standard, four conductor phone
extension wire up to 100 feet (30.5m) from the FA-900E unit. Emerson Control
Products offers a 90 foot (27.4m) sensor replacement. Order part number TS-10-
FA90. Extending the sensor more than 100 feet will increase the temperature that it
senses by about 1°F/C for every 100 feet added. The connection at the end of the
temperature sensor that normally plugs into the FA-900E is a male RJ9 connection.
This is a smaller connection than a regular phone line. You can either make or
purchase an RJ9 extension wire or simply splice in additional four conductor phone
wire in between the sensor and RJ9 connection ends. Note that if you are extending
sensors outdoors and/or underground, consideration should be given to using
shielded wire inside metal conduit. Both shield and conduit should be connected to
a ground. This helps prevent stray voltage from interfering with the sensor’s signal.
4.3 Extending the Phone Cord Length
You may use a longer phone extension cable to place the FA-900E unit at a further
distance from an available phone jack. It has been tested to operate on a phone line
indoors at a distance of 1,000 feet (304m). Make sure you use four conductor
phone wire. This is available at most hardware and discount department stores. If
you are extending this to the outdoors, consideration should be given to using
shielded wire inside metal conduit. Both shield and conduit should be connected to
a ground.
4.4 Back-Up Battery Options
The FA-900E has a connection for a 9V battery which supplies power to the unit if
the AC power is disconnected or out. A fully charged 9V lithium battery will
provide 10 to 15 hours of operation. During this time you will likely receive a
“Battery Alarm” call meaning the battery has gone below 7 volts. Once the battery
drops to about 6 volts, the FA-900E can no longer operate.
For a longer battery option, Emerson Control Products offers a battery holder that
holds 6 “D” cell batteries in series along with a convenient 9V battery snap. This
produces the required 9 volts of DC power and provides about 7 to 10 days of
power from fully charged batteries. The FA-900E can also accept up to 12 volts of DC power through the battery
connection. This means you could connect a 12VDC battery to the battery
terminals and have a much longer battery life than even the “D” cell battery option.

25
Emerson Control Products has not tested this option nor have we determined the
operational life when running off this battery option.
5.0 COMMONLY ASKED QUESTIONS 1. I have pulse dialing on my phone line. Can I use the FA-900E?
Yes. There is a pulse/tone dip switch on the back of your FA-900E. Put
this switch in the UP position to dial out in pulse dialing mode. If you are
programming the FA-900E locally using a phone plugged into the front of
the FA-900E, your phone must be set to tone because the FA-900E’s menu
structure requires touch tones to operate. Once you have completed the
programming functions, you can reset your phone back to pulse mode.
2. I have to dial 9 before I can make a phone call. Can I do this?
Generally, the FA-900E should be able to dial 9 or any other sequence of
numbers during a phone call. If you need to dial a number to get an
outside line or a dial tone, it is recommended you program in a 9 followed
by a pause. This will allow the phone system time to get the dial tone
before the FA-900E begins playing the rest of the digits of your call-to
phone number.
3. Do I need a dedicated phone line for my FA-900E?
No. The FA-900E uses any existing phone line. The only time it uses the
line is if it needs to call out or if you are calling into the FA-900E. If you
have a commercial phone system at the monitored location, it may work,
but it needs to be tested. An easy way to know if your phone system will
work is to take a regular, single line phone and plug it into the phone jack.
If you get a dial tone when you pick up the handset, your FA-900E should
work as well. Unfortunately, there are hundreds of different phone systems
and phone companies in the United States and Canada and we cannot
guarantee that it will work with all of them.
4. I have high speed internet access and phone service through my cable or
phone company. Can I still use a FA-900E on that phone line?
In most cases, you can use these types of phone lines, but you should utilize
appropriate phone filters as specified by your DSL or Cable Phone Service
Provider. Be advised that these phone lines are not regulated the same
way a regular phone line is and may interpret the Touch-Tones® differently
than that of a regular POTS phone line. More important is that DSL and
cable provided phone service from your phone company may require that
the power is on in the monitored premises. A regular phone line gets its
power from the phone company and will often operate even if the regular
power is out in the premises. This means that if you have one of these
phone services, your FA-900E WILL NOT CALL OUT IF THE POWER IS
OUT!
5. If I unplug the FA-900E or take out the battery, will I have to re-program all
my phone numbers and settings?
No. The FA-900E uses a special memory that retains all of your
programmed call-to phone numbers and settings indefinitely.
26
6. How do I reset my FA-900E?
The FA-900E automatically resets itself when the alarm call-out has been
canceled and the alarm conditions have been corrected.
7. My temperature sensor is damaged.
We offer replacement temperature sensors. The part number is TS-10-FA.
Order from our customer service department.
6.0 TROUBLESHOOTING 1. I did a test and my FA-900E is not calling out to the programmed phone
numbers.
Double check that all phone numbers are entered correctly. Did you
include a “1” or area codes if necessary? Check the phone line
connection. Is the phone cord plugged into the FA-900E and wall jack
correctly? Do you have a single line phone line? If doing a test, did you
get the FA-900E to go into alarm? Is the red alarm light on? If not, re-do
the test based on the procedure outlined in the manual. Try adding a
pause in front of the phone number. A pause is two stars “*” in front of
the phone number.
2. The FA-900E is not responding when I press the keys on my touch-tone
phone. Check to make sure your phone is set to the tone mode so key presses are
in touch-tone mode. Try pressing the keys for different lengths of time –
either longer presses or very short presses. Press slowly with ½ second
breaks between key presses. If this still does not work, try another phone
or dial in remotely to program. If the tones are not being accepted when
you dial into the FA-900E, try a different phone or even a cell phone.
3. The FA-900E is not answering. Either the phone lines are down or the power is out and the battery has
died preventing the FA-900E from answering the phone.
4. I cannot cancel the alarm call-out. The FA-900E keeps calling me. Are you entering the correct security code? Do you hear the message that
the alarm call-out has been canceled? If not, your security code may be
incorrect. Are you hearing the exact same alarm message each time, even
after you have canceled the alarm call-out? If not, then the FA-900E is
calling with different alarms each time. See the Multiple Alarms section
on page 20.
5. I am receiving false temperature or power alarms. The FA-900E’s temperature sensor is accurate to within 3°F of the actual
temperature. Your sensor may be too close to a cold window or other
colder spot at the monitored location. You may also have the temperature
on your thermostat set too close to the temperature alarm setpoint on your
FA-900E. Either change the thermostat setting or your temperature alarm
setpoint so there is a 5 degree difference in temperature. False power

27
alarms are most likely the result of the power going off and then back on
before you’ve had the chance to cancel the alarm call-out.
6. I am receiving false Auxiliary alarms. In some environments, the auxiliary alarm input can be sensitive to high
voltage power lines, radiation, or microwave transmissions and
accidentally trip the auxiliary alarm – even if you don’t have anything
plugged into it. If this happens, move the unit to a new location with less
interference or shield the unit and its temperature sensor so as to avoid or
minimize the interference.
7. All the lights are off on my FA-900E. If the power is out or the power cord is unplugged, the lights on the FA-
900E will not be illuminated. This is designed to save battery power
during a power failure. This could also signal that something serious has
happened to your FA-900E. Check power connections and if you still have
no lights, call Customer Service.
8. I am getting a temperature reading of 302°F (150°C) or a temperature reading
of -50°F (-XX°C). If you are receiving a very high temperature sensor reading, your
temperature sensor is either unplugged, not plugged in correctly or it has
been damaged. Replacement sensors are available. Sensor part number is
TS-10-FA. 9. The alarm light is blinking.
This means your FA-900E is in the STANDBY mode. In this mode, it
cannot answer incoming calls and it cannot dial out during an alarm.
7.0 WARRANTY AND REPAIR INFORMATION 7.1 Contacting Us
For more information, contact one of our Customer Service Representatives at:
Phone: 800-880-6000
Email: [email protected]
Internet: www.controlproductsonline.com
Replacement Parts & Accessories:
Temperature Sensor (3.5 feet, 1.1m) Part Number: TS-10-FA
Optional 25’, 50’ and 90’ sensors are available as well.
FA-900E Transformer (500ma) Part Number: 70000151-996
D cell battery holder Part Number: BATTHOLD6D
7.2 Limited Warranty Warrantor: Dealer, Distributor, Retailer, Manufacturer
Warranty and Remedy:
We believe the FA-900E is a superior product. Although we take extreme pride in producing
and testing a product that will function properly, we cannot guarantee that there will never be
a defective unit or that a unit will function on all the thousands of phone lines and
communication equipment in existence. For this reason, it must be clear that the Warrantors
are not insuring your premises or guaranteeing that there will not be damage to your person

28
or property if you use this Product. If you are not comfortable with our Limited Warranty, or
completely satisfied with the Product, we encourage you to return the unused Product for a
full refund within 30 days of purchase. Thank you for your understanding.
One Year Limited Warranty – Emerson Control Products Inc. warrants its product to be free
from defects in material and workmanship under normal use for one year, and is not
responsible for consequential damages or installation costs of any nature. In the event that
the Product does not conform to this Warranty at any time during the period of one year from
original purchase date, Warrantor will repair the defect and return it to you at no charge.
IMPORTANT: The Warranty is limited to replacement of the Product ONLY. Secondly,
because every phone line differs, we strongly encourage you to fully test this Product in its
actual application. This should include a full test, involving the Product actually dialing to its
designated locations and someone verifying the proper response.
This Warranty shall terminate and be of no further effect at the time the Products is 1)
damaged by extraneous causes such as fire, water, power surge, electrical spike, lightening,
etc., or not maintained as reasonable and necessary; 2) modified; 3) improperly installed; 4)
repaired by someone other than the Warrantor; 5) used in a manner or purpose for which the
Product was not intended.
WARRANTORS’ OBLIGATION UNDER THIS WARRANTY IS LIMITED TO
REPAIR OR REPLACEMENT OF THE PRODUCT ONLY. THIS WARRANTY DOES
NOT COVER PAYMENT OR PROVIDE FOR THE REIMBURSEMENT OF
PAYMENT FOR INCIDENTAL OR CONSEQUENTIAL DAMAGES.
It must be clear that the Warrantors are not insuring your premises or guaranteeing that there
will not be damage to your person or property if you use this Product. The Warrantors shall
not be liable under any circumstances for damage to your person or property or some other
person or that person’s property by reason of the sale or use of this Product, or its failure to
operate in the manner in which it is designed. The Warrantors’ liability, if any, shall be
limited to the original cost of the Product only. Use of this product is at your own risk.
7.3 Repair and Service In the event that the Product does not conform to this Warranty, the Product should be
shipped or delivered freight prepaid to Warrantor with evidence of original purchase. If in
any way you’re not comfortable with this product or its Limited Warranty, we encourage you
to return it, unused within 30 days of original purchase date with evidence of the purchase
date.
The FA-900E should only be repaired by Emerson Control Products or an authorized service
representative. Do not attempt to repair or fix your FA-900E or have it serviced by anyone
other than an authorized service representative or you will void your warranty.
To return a product to Emerson Control Products:
All products being returned to Emerson Control Products, Inc. must have a valid Returned
Goods Authorization Number (RGA #) from Emerson Control Products, regardless of why
the product is being returned. Warranty returns will be honored only with an RGA #. Ship
warranty return products prepaid to Emerson Control Products, 1724 Lake Drive West,
Chanhassen, MN 55317. Emerson Control Products will, at its option, either repair or
replace the product free of charge and return the repaired unit or replacement unit at the lower
cost shipping prepaid. Products returned for credit are subject to a 25% restocking charge.

29
Returns resulting from errors by the seller are not subject to this charge. All returns must
include evidence of original purchase, showing purchase date. The RGA # should be clearly
marked on the outside of the package containing the product.
To request an RGA #, call Emerson Control Products at 800-880-6000 and ask for Customer
Service. Failure to have an RGA # may result in lost product or significant delays in
handling your return. Products without an RGA # clearly marked on the outside of the
package are not the responsibility of Emerson Control Products, Inc.
8.0 FCC & UL CERTIFICATION STATEMENTS FCC – PART 68: This equipment complies with Part 68 of the FCC rules and the
requirements adopted by the ACTA. On the back of your FA-900E is a label that contains,
among other information, a product identifier in the format US:AAAEQ##TXXXX. If
requested, this number must be provided to the phone company.
A plug and jack used to connect this equipment to the premises wiring and phone network
must comply with the applicable FCC Part 68 rules and requirements adopted by the ACTA.
A compliant phone cord and modular plug is provided with this product. It is designed to be
connected to a compatible modular jack that is also compliant. See installation instructions
for details.
The REN is used to determine the number of devices that may be connected to a phone line.
Excessive REN’s on a phone line may result in the devices not ringing in response to an
incoming call. In most but not all areas, the sum of REN’s should not exceed five (5.0). To
be certain of the number of devices that may be connected to a line, as determined by the
total REN’s, contact your local phone company. The REN for this product is identified as
part of the FCC product identifier shown on the label on the back of your FA-900E. The
REN for other devices will be identified on a label on the product in the FCC product
identifier or listed separately. If there is a product identifier number, it will be in a format as
US:AAAEQ##TXXXX. The ## is the REN number shown without a decimal point (e.g., 03
is a REN of 0.3).
If this FA-900E causes harm to the phone network, the phone company will notify you in
advance that temporary discontinuance of service may be required. But if advance notice
isn’t practical, the phone company will notify the customer as soon as possible. Also, you
will be advised of your right to file a complaint with the FCC if you believe it is necessary.
The phone company may make changes in its facilities, equipment, operations or procedures
that could affect the operation of the equipment. If this happens, the phone company will
provide advance notice in order for you to make necessary modifications to maintain
uninterrupted service.
If trouble is experienced with your FA-900E, for repair or warranty information, please
contact Customer Service at 800-880-6000. If the equipment is causing harm to the phone
network, the phone company may request that you disconnect the equipment until the
problem is resolved.
Connection to party line service is subject to state tariffs. Contact the state public utility
commission, public service commission or corporation commission for information.
30
If your home has specially wired alarm equipment connected to the phone line ensure the
installation of your FA-900E does not disable your alarm equipment. If you have questions
about what will disable alarm equipment, consult your phone company or a qualified
installer.
FCC – PART 15: This equipment has been tested and found to comply with the limits for a
Class B digital device, pursuant to Part 15 of the FCC rules. These limits are designed to
provide reasonable protection against harmful interference in a residential installation. This
equipment generates, uses and can radiate radio frequency energy and, if not installed and
used in accordance with the instructions, may cause harmful interference to radio
communications. However, there is no guarantee that interference will not occur in a
particular installation. If this equipment does cause harmful interference to radio or
television reception, which can be determined by turning the equipment off and on, the user
is encouraged to try to correct the interference by one or more of the following measures:
• Reorient or relocate the receiving antenna
• Increase the separation between the equipment and the receiver
• Connect the equipment into an outlet on a circuit different from that which the
receiver is connected.
• Consult the dealer or an experienced radio/television technician for help.
Canada’s Industry Standard:
Notice: The Canadian Industry Standard label identifies certified equipment. This
certification means the equipment meets certain telecommunications network protective
operational and safety requirements. The Department does not guarantee the equipment will
operate to the user’s satisfaction.
Before installing this equipment, users should ensure that it is permissible to be connected to
the facilities of the local telecommunications company. The equipment must also be installed
using an acceptable method of connection. In some cases, where the company’s inside
wiring is associated with a single line, individual service may be extended by means of a
certified connector assembly (phone extension cord). The customer should be aware that
compliance with the above conditions may not prevent degradation of service in some
situations.
Repairs to certified equipment should be made by an authorized Canadian maintenance
facility designated by the supplier. Any repairs or alterations made by the user to this
equipment, or equipment malfunctions, may give the telecommunications company cause to
request the user to disconnect the equipment.
Users should ensure for their own protection that the electrical ground connections of the
power utility phone lines and internal metallic water pipe system, if present, are connected
together. This precaution may be particularly important in rural areas.
CAUTION: Users should not attempt to make such connections themselves, but should
contact the appropriate electric inspection authority, or electrician, as appropriate.
UL & CUL Listing:
The plug in transformer included with your FA-900E is UL/CUL listed as a Class 2
Transformer. This is UL/CUL listed with Ningbo Chen Yow Electron Co., Ltd..

31
Appendix A
"Record your message
after the tone, when you
are done press the pound
key."
"You are now in the main menu.
For current status press 1.
For remote switch status, press 2.
To enter programming menu, press 3."
"The current temperature is xx
degrees, the power is on/off, the
battery is at x.xx volts and the
auxiliary input is currently not in/in
alarm mode.
"To review or program first telephone number, press 1.
To review or program second telephone number, press 2.
To review or program third telephone number, press, 3.
To review or program pager display information, press 4
To return to the main menu, press 9."
"(First / Second / Third) telephone number is currently
xxxx / empty / pager, to change, press zero or press 9 to
return to the main telephone number menu."
Using the keys on
your touch-tone
phone, enter the
phone number
followed by the
pound key.
"To review or program the low
temperature alarm setpoint
press 1. To review or program
the high temperature alarm
setpoint, press 2. To return to
the main menu, press 9."
"The (high / low) temperature alarm setpoint is now xxx
degrees. To change, press zero or press 9 to return to
the temperature setpoint menu."
"Enter the (high / low)
temperature alarm setpoint
followed by the pound key.
"The security code is
currently xxxx. To change,
press zero, or press 9 to
return to the main menu."
"Enter the security
code followed by the
pound key."
"The FreezeAlarm is
currently set to answer on
xx rings. To change, press
0, or press 9 to return to
the main menu."
"Enter the
number of rings
followed by the
pound key."
To review or record Greeting Message,
press 1. To review or record Main
Alarm Message, press 2. To review or
record Auxiliary Alarm Message, press
3. To return to the main menu, press 9
"The position of the remote switch is
currently (T1 / T2). To change, the
position to (T2 / T1), press zero, or to
return to the main menu press 9."
"To review or program phone numbers, press 1.
To review or program the temperature alarm set-point, press 2.
To review or program the security code, press 3.
To review or program the number of rings before the unit
answers, press 4.
To review or program the number of minutes the power should
be out before calling with a power alarm, press 5.
To review or record messages, press 6.
To review or modify the auxiliary alarm setting, press 7
To return to the main menu, press 9."
1
3
1
9
1, 2 or 3
2 - T
em
pe
ratu
re A
larm
Se
tpo
int
91 or 2
0
9
3 - S
ecu
rity C
od
e
9
0
#
#
4 - R
ing
Co
un
t Se
lectio
n
9
9
2
9
0
9
6 - M
essa
ge
s
0#
The FreezeAlarm is currently set to
alarm if the power is out for xx
minutes. To change, press 0, or
press 9 to return to the main menu.
Enter the number of minutes the power
should be out before calling with a power
alarm, followed by the pound key.
9
5 - P
ow
er A
larm
Tim
er
0
#
1, 2, 3
9
0
#
Main Menu - FA-D2
The auxiliary alarm input is currently set as a
normally open/closed contact. To change,
press 0 or press 9 to return to the main menu.
Pressing zero will play back
the same menu, but with
the selection changed.
0
7 - A
ux A
larm
Se
tting
9
To review or program pager display
information, press 2, or press 9 to
return to phone number menu.
4
Pager display information is
currently XXXX/empty. To
change, press 0, to return to
main pager display menu,
press 9
29
Using the keypad on your touch
tone phone, enter the number
to be displayed on the pager
during an alarm call out
followed by the pound key.
When zero is
pressed, return
them back to this
menu and play
changed status of
remote switch.
The (Greeting/Main
Alarm/Auxiliary Alarm) Message
is currently: play message. To
record a new message, press 0
or to return to the message
menu, press 9.
09
9
0
If this is a pager number,
press 1, if not, press 2.
# 1 or 2
PAGER INFO:
If a number is
identified as a
pager number,
when playing
back the
number, play
the word
"PAGER" after
the number.
Main Menu FA-900E
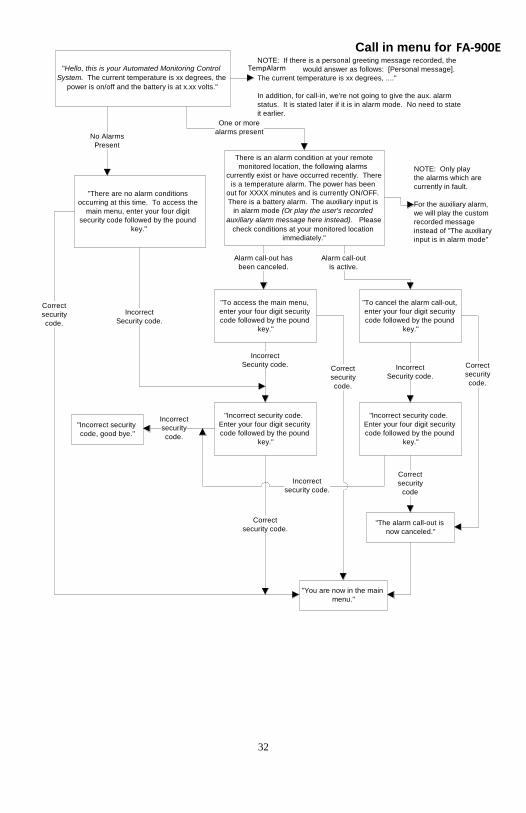
32
"Hello, this is your Automated Monitoring Control
System. The current temperature is xx degrees, the
power is on/off and the battery is at x.xx volts."
"There are no alarm conditions
occurring at this time. To access the
main menu, enter your four digit
security code followed by the pound
key."
There is an alarm condition at your remote
monitored location, the following alarms
currently exist or have occurred recently. There
is a temperature alarm. The power has been
out for XXXX minutes and is currently ON/OFF.
There is a battery alarm. The auxiliary input is
in alarm mode (Or play the user's recorded
auxiliary alarm message here instead). Please
check conditions at your monitored location
immediately."
"To access the main menu,
enter your four digit security
code followed by the pound
key."
No Alarms
Present
NOTE: If there is a personal greeting message recorded, the
Freeze Alarm would answer as follows: [Personal message].
The current temperature is xx degrees, ...."
In addition, for call-in, we're not going to give the aux. alarm
status. It is stated later if it is in alarm mode. No need to state
it earlier.
"To cancel the alarm call-out,
enter your four digit security
code followed by the pound
key."
"Incorrect security code.
Enter your four digit security
code followed by the pound
key."
"Incorrect security code.
Enter your four digit security
code followed by the pound
key."
"Incorrect security
code, good bye."
"The alarm call-out is
now canceled."
"You are now in the main
menu."
One or more
alarms present
Incorrect
Security code.
Incorrect
Security code. Incorrect
Security code.
Alarm call-out has
been canceled.
Alarm call-out
is active.
Correct
security
code.
Correct
security
code.
Incorrect
security
code.
Incorrect
security code.
Correct
security code.
Correct
security
code.
Correct
security
code
Call in menu for FA-D2
NOTE: Only play
the alarms which are
currently in fault.
For the auxiliary alarm,
we will play the custom
recorded message
instead of "The auxiliary
input is in alarm mode"
FA-900E
TempAlarm

33
"Hello, this is your Automated Monitoring
System. There is an alarm condition at your
remote monitored location, the following alarms
currently exist or have occurred recently at
location ####."
NOTE: If there is a
personal alarm message
recorded, the
Freeze Alarm would
answer as follows:
"[Personal alarm message].
There is an alarm condition
at your remote ...."
"To cancel the alarm call-out,
enter your four digit security
code, followed by the pound
key."
"Incorrect security code.
Enter your four digit security
code followed by the pound
key."
"Incorrect security
code, good bye."
"The alarm callout is now
canceled. To return to
the main menu, press 1,
otherwise hang up."
"You are now in the main
menu. . . ."
Incorrect
security
code.
Repeat the above alarm message(s).
Correct
Security CodeIncorrect
Security Code
1
Correct
Security
Code
Call out menu FA-D2
There is a temperature alarm. The power has
been out for XXXX minutes and is currently
ON/OFF. There is a battery alarm. The
auxiliary input is in alarm mode (Or play the
user's recorded auxiliary alarm message here
instead). Please check conditions at your
monitored location immediately."
Call out menu FA-900E
TempAlarm would

34
F
A-9
00
E

35
The following diagrams are NOT installation schematics. These diagrams are intended to show you some possible ways to utilize the FA-900E remote switch feature. Installation must be performed by trained personnel and in accordance with local codes, ordinances, regulations and instructions. If you do not feel comfortable doing this installation yourself, contact your local heating or electrical contractor. WARNING! Improper installation could result in hazardous conditions and damage to the FA-900E unit, your property or person. Emerson Control Products is not liable or responsible for consequential damages to your person or property or installation costs of any nature. Please see the warranty statement that is provided in this instruction manual for full warranty and coverage limitations and exclusions.
FA
-900
E
FA
-900
E

36