tektronix phasershare networking manual
TRANSCRIPT
8/13/2019 Tektronix PhaserShare Networking Manual
http://slidepdf.com/reader/full/tektronix-phasershare-networking-manual 1/184
P H A S E R S H A R E ® N E T W O R K I N GM a n u a l
ww w.tek.com/ Color_Prin ters/

8/13/2019 Tektronix PhaserShare Networking Manual
http://slidepdf.com/reader/full/tektronix-phasershare-networking-manual 2/184

8/13/2019 Tektronix PhaserShare Networking Manual
http://slidepdf.com/reader/full/tektronix-phasershare-networking-manual 3/184
PhaserShare ® Networking Manual
V3 April 1999071-0180-01

8/13/2019 Tektronix PhaserShare Networking Manual
http://slidepdf.com/reader/full/tektronix-phasershare-networking-manual 4/184
Copyright ©
Tektronix, Inc.Unpublished rights reserved under the copyright laws of the United States. Contents of this publication may not be reproduced inany form without permission of Tektronix, Inc.
Tektronix
®
, Phaser
®
, PhaserShare
®
, the TekColor logo, ColorStix
®
, ColorCoat
®
, and Made For Each Other
®
are registeredtrademarks of Tektronix, Inc. Finepoint™, PhaserLink™, PhaserPrint™, the TekColor name, and PhaserSym™ are trademarks ofTektronix, Inc.
Adobe
®
and PostScript
®
are trademarks of Adobe Systems Incorporated which may be registered in certain jurisdictions.Apple
®
, AppleTalk
®
, LocalTalk
®
, EtherTalk
®
, TokenTalk
®
, and Macintosh
®
are registered trademarks of Apple Computer, Inc.
SGI™ is a trademark of Silicon Graphics, Inc.
SPARC
®
is a registered trademark of SPARC International, Incorporated. SPARCstation™ is a trademark of SPARC International,Inc., licensed exclusively to Sun Microsystems, Inc.
Tektronix Phaser 840, Phaser 740, Phaser 780, and Phaser 360 printers are certied as NetWare print serverdevices, on both 3.12 and 4.1
x
NetWare systems. Bindery mode is also certied to comply on both 3.12 and 4.1
x
NetWare systems. NetWare NDS is certied on 4.1
x
NetWare systems.
Novell® and NetWare® are registered trademarks of Novell, Inc.
UNIX
®
is a registered trademark in the United States and other countries, licensed exclusively through X/OpenCompany, Ltd.
Times™, Helvetica™ and Palatino™ are trademarks of Linotype-Hell AG and/or its subsidiaries.
Other marks are trademarks or registered trademarks of the companies with which they are associated.
PANTONE
®
*
Colors generated by Phaser Color Printers are four- and/or three-color process simulations andmay not match PANTONE-identied solid color standards. Use current PANTONE Color Reference Manuals
for accurate colors.
PANTONE Color simulations are only obtainable on these products when driven by qualied Pantone-licensed softwarepackages. Contact Pantone, Inc. for a current list of qualied licensees.
*
Pantone, Inc.’s check-standard trademark for color reproduction and color reproduction materials.© Pantone, Inc., 1988.
8/13/2019 Tektronix PhaserShare Networking Manual
http://slidepdf.com/reader/full/tektronix-phasershare-networking-manual 5/184
PhaserShare Networking Manual
iii
1 Network Printing with Tektronix Color Printers
Key components for networking Tektronix color printers 1Network installation overview 6The printer’s Configuration Page 6How to tell which protocols are enabled 8The printer’s networking software 8Support for DOS systems 10Tektronix PhaserPrint for UNIX software 10
2 PhaserShare Series B Network Interfaces
PhaserShare Series B Ethernet interface 11PhaserShare Series B Token Ring card 14PhaserShare Series B LocalTalk card 22
3 EtherTalk, LocalTalk, and TokenTalk Configuration
Before you begin 25Configuration overview 25Finding the printer’s name in the Chooser 26Changing the printer’s name (optional) 27Changing the printer’s EtherTalk/TokenTalk zone (optional) 29Troubleshooting 30
4 Novell NetWare Configuration
The printer’s NetWare interface 31
Before beginning the configuration procedure 32Configuration software for NetWare 33NetWare configuration for Windows environments 33Troubleshooting Windows configurations 36Setting IPX frame types from the front panel 40
5 PhaserShare Administrator Software for NetWare Networks
Introduction to the PhaserShare Administrator 43NetWare configuration with the PhaserShare Administrator 44Installation 44Using the PhaserShare Administrator 46PhaserShare Administrator on-line help 50
6 TCP/IP Configuration Overview
Before you begin 52Extracting files from unix.tar 52Printing the Configuration Page 52TCP/IP configuration overview 53
Contents

8/13/2019 Tektronix PhaserShare Networking Manual
http://slidepdf.com/reader/full/tektronix-phasershare-networking-manual 6/184
iv
PhaserShare Networking Manual
7 TCP/IP Printer Configuration (All Platforms)
Setting the printer’s IP addressing parameters 55General information on setting IP parameters (front panel) 57Setting IP parameters: Phaser 840 printer front panel 57Setting IP parameters: Phaser 740 printer front panel 58Setting IP parameters: Phaser 780 printer front panel 60Setting IP parameters: Phaser 360 printer front panel 63Setting IP parameters: RARP or BOOTP 65Setting IP parameters: DHCP 66Supported BOOTP/DHCP fields 68Enabling and disabling RARP and BOOTP/DHCP (front panel) 69Setting IP parameters: PhaserLink Printer Management Software 73Controlling host access 76
Receiving printer status 79
8 TCP/IP Host Configuration (UNIX)
Configuring a host 83Troubleshooting 94
9 TCP/IP Configuration (OS/2 Warp/LAN Server)
Setting the printer’s IP addressing parameters 95Creating an LPR queue in OS/2 Warp Connect (direct LPR connection to the printer) 96OS/2 client-to-server setup 97Warp Server 4.0/Warp Connect 98
10 Windows NT
Setting the printer’s IP address 99Adding the Windows NT 4.0 driver on a Windows NT 4.0 server or workstation 99Adding the Windows NT 4.0 driver on aWindows NT 3.51 server 104Adding a Windows NT 3.x driver 109Windows NT network communication 112Windows NT network troubleshooting 113
11 Windows 95 and Windows 98: PhaserPort Software
TCP/IP configuration for the PC 117Setting the printer’s IP address 117PhaserPort software installation 118Adding a port for a new printer 119Adding a port to an existing printer 119Changing a port’s IP address 120

8/13/2019 Tektronix PhaserShare Networking Manual
http://slidepdf.com/reader/full/tektronix-phasershare-networking-manual 7/184
PhaserShare Networking Manual
v
12 PhaserLink Printer Management Software
System requirements 121Multiple language support 121Accessing printer information from a browser 122Printer information pages 122Printer status display 124PhaserLink Printer Management Software help files 125Setting printer parameters: PhaserLink Printer Management Software pages 126Information Forwarding 126
13 Printer Management
Job accounting 127PhaserLink PDF Direct Printing 128
Phaser 840 Intelligent Ready 129PhaserLink Status Notification (Email Notification) 130Usage Profile reports (Phaser 840, 740 and 780 printers only) 131Printing Usage Profile reports from the front panel 132Printing verbose Usage Profile reports from the front panel 133Printing Usage Profile reports from PhaserLink Printer Management Software 134Sending Usage Profile reports via email from the front panel 134Sending Usage Profile reports via email: PhaserLink Printer Management Software 136Controlling Usage Profile email reporting 137Email to Tektronix 138Reading Usage Profile reports 139Report fields 140Logs 145
14 Getting Help
If you need help from Tektronix 153Using the automated fax systems 155Receiving email update notices 156
15 Disabling Protocols
Disabling protocols: front panel 158If the front panel is locked 165Disabling protocols: PhaserShare Administrator 166Disabling protocols: PhaserLink Printer Management Software 166

8/13/2019 Tektronix PhaserShare Networking Manual
http://slidepdf.com/reader/full/tektronix-phasershare-networking-manual 8/184
vi
PhaserShare Networking Manual
16 Resetting the Printer
Resetting the printer: PhaserLink Printer Management Software 167Resetting your printer using the Apple Printer Utility 168
17 FTP Interface
Index

8/13/2019 Tektronix PhaserShare Networking Manual
http://slidepdf.com/reader/full/tektronix-phasershare-networking-manual 9/184
PhaserShare Networking Manual
1
Chapter 1
Network Printing withTektronix Color Printers
This manual provides information for system administrators and others who need toinstall Tektronix Phaser 840, Phaser 740, Phaser 780, and Phaser 360 printersequipped with PhaserShare Series B network interfaces.
Before using this manual, unpack and set up your printer. Install theappropriate drivers on any PC and Macintosh computers on your network.Instructions for unpacking, set-up, and installation are contained in yourprinter’s user documentation.
After your printer is set up, use this manual in conjunction with your printer’sPhaserShare Administrator or PhaserLink Printer Management Software tocongure the printer on the network.
This manual covers the following hardware and software versions:
PhaserShare Series B interfaces
PhaserShare Administrator version 3.9
Key components for networking Tektronix color printers
The following items are key components for networking your Tektronix printer:
PhaserShare Series B network interface. This brings ease-of-use, superbshareability and broad compatibility to Tektronix Phaser color printers. Formore information, see “PhaserShare Series B network interface” on page 2 .
PhaserShare Administrator software. PhaserShare Administratorsoftware makes it easy to install, congure, and manage Phaser printers ona NetWare network. For more information, see Chapter 5, “P haserShareAdministrator Software for NetWare Networks”.
PhaserLink Printer Management Software. PhaserLink PrinterManagement Software is internal printer software that provides printerstatus and supports printer management through a World Wide Web
browser. For more information, see Chapter 12, “P haserLink PrinterManagement Software”.
PhaserPrint for UNIX software. PhaserPrint for UNIX software provides adriver with push-button control of printer features and fast raster leprinting capability from UNIX workstations. For more information, see“Tektronix PhaserPrint for UNIX software” on page 10.

8/13/2019 Tektronix PhaserShare Networking Manual
http://slidepdf.com/reader/full/tektronix-phasershare-networking-manual 10/184
2
PhaserShare Networking Manual
1
Network Printing with Tektronix Color Printers
PhaserShare Series B network interface
The Phaser 840, 740, 780, and 360 printers support the PhaserShare Series B networkinterface. These printers are equipped with a built-in PhaserShare Series B networkinterface with a 10BaseT Ethernet connector. This printer can be equipped withthese optional PhaserShare Series B network cards:
PhaserShare Series B Fast Ethernet card.
This card is equipped with acombined 10BaseT and 100BaseTx connector and a 10Base2 (BNC)connector. The combined 10BaseT/100BaseTx connector can be connectedto either a 10BaseT or 100BaseTx network, and it will automatically adjustto the correct data rate using a process called auto-negotiation
. If noconnection is made to the 10BaseT/100BaseTx connector, the card isprepared to communicate using the 10Base2 connector.
PhaserShare Series B Token Ring card.
This card is equipped with STP(Shielded Twisted Pair) and UTP (Unshielded Twisted Pair) connectors.Only one connector at a time can be used.
PhaserShare Series B LocalTalk card (AppleTalk).
PhaserShare network cards can be purchased initially with the printer as options oradded later as upgrade kits. A printer can have only one card at a time installed.When a PhaserShare Series B Fast Ethernet or Token Ring card is installed, thestandard 10BaseT connector on the printer’s rear panel is disabled. The card andthe printer’s standard parallel port can be simultaneously active. All networkprotocols can be simultaneously active.
PhaserShare cards
PhaserShare cards work with the following printers: Phaser 380, 350, 340, 560, 550,540, and 600. PhaserShare cards enable you to use your printer with Ethernet, TokenRing, LocalTalk, or serial connections. PhaserShare cards can be purchased initiallywith the printer as options or added later as upgrade kits.
A printer can have only one PhaserShare card installed at a time. When aPhaserShare card is installed, all ports on the card and the printer’s standard parallelport can be simultaneously active. Also, all network protocols can besimultaneously active.
For information on networking printers with PhaserShare cards, refer to thePhaserShare Networking System Administrator Manual
, part number 070-9789-00.

8/13/2019 Tektronix PhaserShare Networking Manual
http://slidepdf.com/reader/full/tektronix-phasershare-networking-manual 11/184
PhaserShare Networking Manual
3
Network Printing with Tektronix Color Printers
1
Recognizing PhaserShare Series B interfaces and earlier PhaserShare cards
On your network, you may have some Tektronix printers equipped withPhaserShare Series B interfaces and other Tektronix printers equipped with earlierPhaserShare cards. Printers equipped with earlier PhaserShare cards are supporteddifferently in printer management software such as the PhaserShare Administrator
and PhaserLink Printer Management Software. There are several ways to determineif the printer is equipped with a PhaserShare Series B interface or an earlierPhaserShare card:
Printer model. PhaserShare Series B cards work with Phaser 840, 740, 780,and 360 printers. PhaserShare cards work with the following printers:Phaser 380, 350, 340, 560, 550, 540, and 600.
Card rear panel. The cards are labeled on the rear panel.
The printer’s Conguration Page. For Series B interfaces, Series B
appears following the Network Information
area on the printer’sConguration Page. If an earlier PhaserShare card is installed, the printer’sConguration Page reports the type of card installed in the PhaserShare
eld.
The printer’s Startup Page. For Series B interfaces, Series B
appears in theEthernet
, Token Ring
, or LocalTalk elds on the printer’s Startup Page. Ifa PhaserShare card is installed, the printer’s Startup Page reports theavailable connections in the Ports eld.
PhaserLink Printer Management Software.
If the Adobe PostScript eldreads Adobe PostScript Level 3 Version
, the interface is Series B. If theeld reads Adobe PostScript Level 2 Version
, the printer supportsPhaserShare network cards (not Series B). The Adobe PostScript eld is onthe View Printer Information page or on the View and Congure GeneralSettings page, depending on the printer type. Links to these pages can beaccessed by clicking the Conguration link. For more information onPhaserLink Printer Management Software, see Chapter 12, “P haserLinkPrinter Management Software”.
PhaserShare Administrator.
In the PhaserShare Administrator, Series Binterfaces are identied in the Ethernet or Token Ring tabs, where Series Bis displayed in the Interface Information
area. For more information onthe PhaserShare Administrator, see Chapter 5, “PhaserShare AdministratorSoftware for NetWare Networks”.
8/13/2019 Tektronix PhaserShare Networking Manual
http://slidepdf.com/reader/full/tektronix-phasershare-networking-manual 12/184
4
PhaserShare Networking Manual
1
Network Printing with Tektronix Color Printers
Environments supported
Tektronix Phaser printers are compatible with mixed PC, Macintosh, and UNIXenvironments. The printer automatically switches between the printer’s ports andnetwork protocols to service all computers on the network.
Phaser printers are compatible with nearly all PC client/server environments. Theprinter’s Ethernet and Token Ring network interfaces are compatible with thefollowing:
NetWare servers via the IPX (Internet Packet Exchange) protocol
Windows NT servers over TCP/IP or EtherTalk protocols
LANServer 4.0 servers via TCP/IP
UNIX workstation via TCP/IP
Macintosh computers via AppleTalk (LocalTalk, EtherTalk and TokenTalk).
Windows 98
Windows 95
Supported PC platforms
Any PC in the server environments listed in the previous topic, “Environmentssupported,” can print over the network to a Phaser printer, including the following:
Windows 98
Windows 95
Windows 3.1
Windows NT
Windows for Workgroups
OS/2 Warp
DOS

8/13/2019 Tektronix PhaserShare Networking Manual
http://slidepdf.com/reader/full/tektronix-phasershare-networking-manual 13/184
PhaserShare Networking Manual 5
Network Printing with Tektronix Color Printers 1
Phaser printers are compatible with Banyan Vines and Microsoft LAN Managerservers; however, third-party interfaces are required. Contact Tektronix TechnicalSupport for more information (see Chapter 14, “ Getting Help”).
WorkstationsUNIXMacintosh
Windows 95(peer - to - peer)
ServerNovell NetWare (IPX)
Windows NT (EtherTalkor TCP/IP)
LAN Server 4.0 (TCIP/IP)UNIX (TCP/IP)
ClientsWindows 95Windows 3.1Windows NTWindows for WorkgroupsOS/2 WarpDOS
Phaser Color PrinterWith PhaserShareEthernet or Token Ringinterface
9538-04c

8/13/2019 Tektronix PhaserShare Networking Manual
http://slidepdf.com/reader/full/tektronix-phasershare-networking-manual 14/184
6 PhaserShare Networking Manual
1 Network Printing with Tektronix Color Printers
Network installation overview
The printer’s Conguration PageYour printer can generate a Conguration Page that lists the following information:
General printer information, including TekColor settings
Communication and network parameters for all ports
SCSI disk settings (if the printer has a SCSI port)
The information supplied on the Conguration Page is helpful when you areinstalling and conguring the printer on a network. There are two ways to print theConguration Page:
Use the printer’s front panel. You can easily print the Conguration Pagefrom the printer’s front panel. Use this method if your printer is not yetcongured on the network. Refer to:
“Printing a Conguration Page: Phaser 840 front panel” on page 7.
“Printing a Conguration Page: Phaser 740 and 360 front panels” onpage 7.
“Printing a Conguration Page: Phaser 780 front panel” on page 7.
Use PhaserLink Printer Management Software. With a TCP/IPconnection and a World Wide Web browser, you can use PhaserLinkPrinter Management Software; see “ Printing a Conguration Page:PhaserLink Printer Management Software” on page 7.
Step 1 Unpack and set upthe printer.
This step must be done before attempting to congure the printer on a network.Printer setup includes installing ink or toner, loading paper trays, and turning onthe printer. See your printer’s user documentation for information about printersetup.
Step 2 Install the networkcard in the printer. This step is necessary if the printer is to be equipped with an optional networkcard. It is not necessary when using the printer’s built-in Ethernet connector.This step is done at the factory when a network card is purchased initially withyour printer.
When a network card is purchased later as an upgrade kit, follow theinstallation instructions included with the card.
Information on physically connecting the printer to networks is provided in thismanual:
For Ethernet, see “PhaserShare Series B Ethernet interface” on page 11.
For Token Ring, see “PhaserShare Series B Token Ring card” on page 1 4.
For LocalTalk, see “PhaserShare Series B LocalTalk card” on page 22 .
Step 3 Networkconguration.
For LocalTalk, EtherTalk, or TokenTalk , see Chapter 3, “EtherTalk, LocalTalk,and TokenTalk Conguration” .
For NetWare , see Chapter 4, “Novell NetWare Conguration” .For TCP/IP , see:
Chapter 6, “TCP/IP Conguration Overview” .
Chapter 7, “TCP/IP Printer Conguration (All Platforms)” .
Chapter 8, “TCP/IP Host Conguration (UNIX)” .
Chapter 9, “TCP/IP Conguration (OS/2 Warp/LAN Server)”
Chapter 11, “Windows 95 and Windows 98: PhaserPort Software ”.
For Windows NT , see Chapter 10, “Windows NT” .

8/13/2019 Tektronix PhaserShare Networking Manual
http://slidepdf.com/reader/full/tektronix-phasershare-networking-manual 15/184
PhaserShare Networking Manual 7
Network Printing with Tektronix Color Printers 1
Printing a Conguration Page: Phaser 840 front panel1. When the front panel displays READY TO PRINT , press the down-arrow
button until Menu is highlighted. Press Select .
2. Press the down-arrow button until Printer Configuration ishighlighted. Press Select .
3. Press the down-arrow button until Print Configuration Page ishighlighted. Press Select .
Printing a Conguration Page: Phaser 740 and 360 front panels1. While Ready is displayed, press Menu ; the printer displays the rst item
in the menu:
2. Press Menu to access the Help Pages; the following message appears:
3. Press <---- or ----> until the following message appears:
4. Press Print .
Printing a Conguration Page: Phaser 780 front panel1. While Ready is displayed, press Select ; the Printer menu is
displayed:
2. Press Menu ; the Help Pages menu is displayed:
3. Press Print .
Printing a Conguration Page: PhaserLink Printer Management Software1. From the printer’s home page, click Conguration ; this displays the View
and Congure Settings page.
2. On the View and Congure Settings page, select Conguration Pagefrom the pull-down list. Click Print .
For more information on PhaserLink Printer Management Software, see Chapter 12,“PhaserLink Printer Management Software”.
Help Pages<---- ----> Menu
Menu Map<---- ----> Print
Configuration Page <---- ----> Print
Printer MenuHelp Pages Menu
Help PagesConfiguration Page Print
8/13/2019 Tektronix PhaserShare Networking Manual
http://slidepdf.com/reader/full/tektronix-phasershare-networking-manual 16/184
8 PhaserShare Networking Manual
1 Network Printing with Tektronix Color Printers
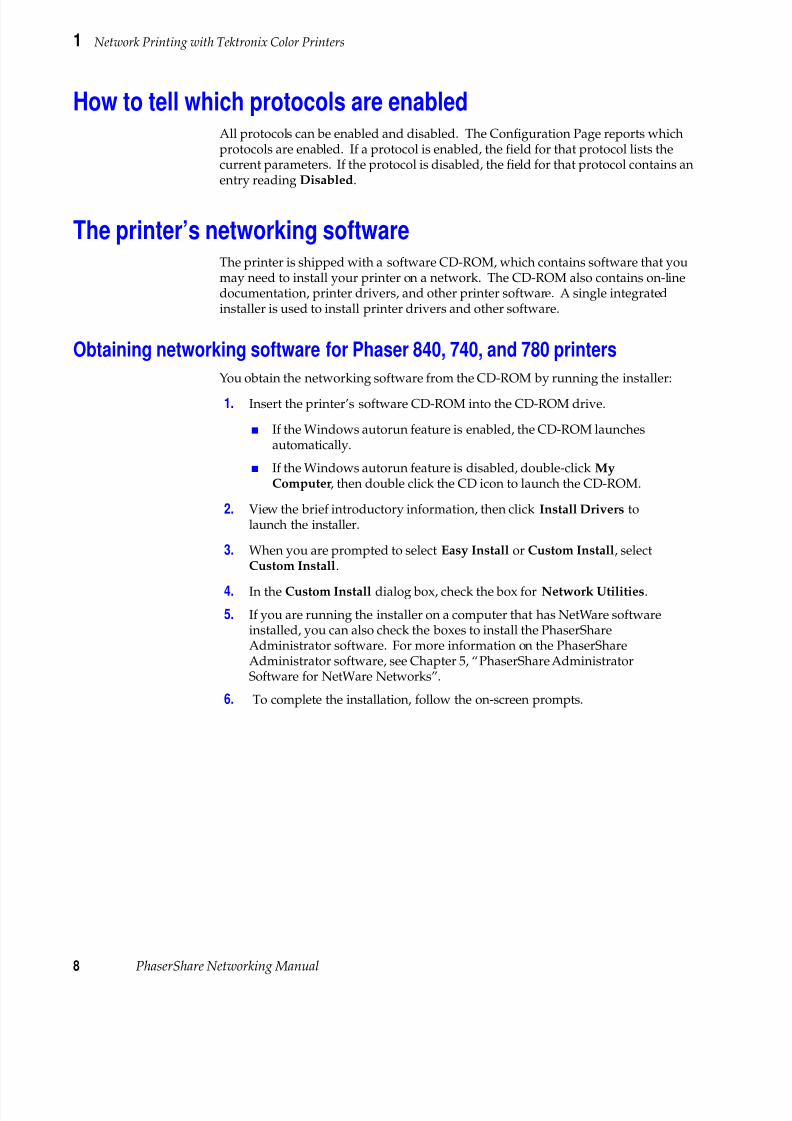
How to tell which protocols are enabledAll protocols can be enabled and disabled. The Conguration Page reports whichprotocols are enabled. If a protocol is enabled, the field for that protocol lists thecurrent parameters. If the protocol is disabled, the field for that protocol contains anentry reading Disabled .
The printer’s networking softwareThe printer is shipped with a software CD-ROM, which contains software that youmay need to install your printer on a network. The CD-ROM also contains on-linedocumentation, printer drivers, and other printer software. A single integratedinstaller is used to install printer drivers and other software.
Obtaining networking software for Phaser 840, 740, and 780 printersYou obtain the networking software from the CD-ROM by running the installer:
1. Insert the printer’s software CD-ROM into the CD-ROM drive.
If the Windows autorun feature is enabled, the CD-ROM launchesautomatically.
If the Windows autorun feature is disabled, double-click MyComputer , then double click the CD icon to launch the CD-ROM.
2. View the brief introductory information, then click Install Drivers tolaunch the installer.
3. When you are prompted to select Easy Install or Custom Install , selectCustom Install .
4. In the Custom Install dialog box, check the box for Network Utilities .5. If you are running the installer on a computer that has NetWare software
installed, you can also check the boxes to install the PhaserShareAdministrator software. For more information on the PhaserShareAdministrator software, see Chapter 5, “ PhaserShare AdministratorSoftware for NetWare Networks”.
6. To complete the installation, follow the on-screen prompts.

8/13/2019 Tektronix PhaserShare Networking Manual
http://slidepdf.com/reader/full/tektronix-phasershare-networking-manual 17/184
PhaserShare Networking Manual 9
Network Printing with Tektronix Color Printers 1
Obtaining networking software for Phaser 360 printersYou obtain the networking software from the CD-ROM by running the installer:
1. Locate and run the installer on the printer’s CD-ROM. On a PC, the le isSETUP.EXE; on a Macintosh, it is Phaser 360 Installer.
2. When you are prompted to select Easy Install or Custom Install ,select Custom Install .
3. In the Custom Install dialog box, check the box for Network Utilities .
4. If you are running the installer on a computer that has NetWare softwareinstalled, you can also check the boxes to install the PhaserShareAdministrator software. For more information on the PhaserShareAdministrator software, see Chapter 5, “ PhaserShare AdministratorSoftware for NetWare Networks”.
5. To complete the installation, follow the on-screen prompts.
Network administration softwareThe following table lists the network administration software according toenvironment (network protocol, platform, and printer).
Network administration software
Environment Software
NetWare; Windows 95,Windows NT, andWindows 3.1
Network queue conguration: PhaserShare Administrator (Novell PCONSOLEand NWAdmin can also be used.)
Printer conguration: PhaserShare Administrator (Over TCP/IP, PhaserLinkPrinter Management Software can also be used; Novell’s PCONSOLE andNWAdmin cannot congure the PhaserShare network interface.)
Printer status monitoring: Windows Print Monitor (over TCP/IP, PhaserLink
Printer Management Software can also be used; PhaserLink Printer ManagementSoftware provides status on additional Tektronix printer features.)
TCP/IP; Windows 95 andWindows 3.1
Printer conguration: PhaserLink Printer Management Software
Printer status monitoring: PhaserLink Printer Management Software
TCP/IP; Windows NT Printer conguration: PhaserLink Printer Management Software (PhaserLinkPrinter Management Software does not set up queues on the print server.)
Printer status monitoring: PhaserLink Printer Management Software
AppleTalk; Macintosh 7.xand 8.x
Printer conguration: PhaserLink Printer Management Software (MacTCP orOpen Transport required)
Printer status monitoring: PhaserLink Printer Management Software (MacTCPor Open Transport required)
TCP/IP; UNIX Printer conguration: PhaserLink Printer Management Software (If using
PhaserPrint for UNIX for printing, use PhaserPrint to set up print queues.)Printer status monitoring: PhaserLink Printer Management Software

8/13/2019 Tektronix PhaserShare Networking Manual
http://slidepdf.com/reader/full/tektronix-phasershare-networking-manual 18/184
10 PhaserShare Networking Manual
1 Network Printing with Tektronix Color Printers
Support for DOS systemsFor information on installing Tektronix printers in DOS environments, see theprinter’s CD-ROM. They contain PostScript utility les that can be sent to theprinter for network conguration in DOS environments. They also contain a DOSapplication, NWSET, for printer conguration on NetWare networks.
For information on how to use the DOS conguration les, see the README les onthe printer’s CD-ROM. PC users will nd the README le for the PostScript utilityles in the UTILS directory; the README le for NWSET is in the NETWARE directory. (Macintosh users will nd the ReadMe le for the PostScript utility les inthe Network Utilities folder).
Tektronix PhaserPrint for UNIX softwareFor UNIX environments, Tektronix offers PhaserPrint software. PhaserPrint forUNIX provides fast raster screen copy printing to Tektronix color printers.PhaserPrint for UNIX also provides a graphical user interface for push-buttoncontrol of Tektronix printer features.
PhaserPrint for UNIX is available for these workstations:
Sun: SunOS 4.1.4, Solaris 2.3 and 2.4
SGI: IRIX 5.2, 5.3, 6.2, 6.3, and 6.4
HP 9000 700/800: HP-UX 9.0.5 and 10.2
IBM RS/6000: AIX 3.2 and 4.2
DECstation: ULTRIX 4.0 and 4.4
DEC Alpha AXP: OSF/1 3.0, 3.2, and Digital UNIX 4.0
PhaserPrint for UNIX works with the workstation’s native spooling system to printPostScript les and raster les in these formats: Sun Raster Format (SRF), xwd , SGIRGB, HP Starbase, TIFF, PBM, GIF, PCX, and BMP.
Your printer’s CD-ROM contains a demonstration copy of PhaserPrint for UNIX andan on-line instruction guide in the unix/unixdemo directory. You can also obtain ademonstration copy at this Tektronix site:
ftp.tek.com/cpid/UNIX/phaserprint2.1/demo

8/13/2019 Tektronix PhaserShare Networking Manual
http://slidepdf.com/reader/full/tektronix-phasershare-networking-manual 19/184
PhaserShare Networking Manual 11
Chapter
2 PhaserShare Series BNetwork Interfaces
PhaserShare Series B network cards work with the Phaser 840, 740, 780, and 360printers. Printers that work with PhaserShare Series B network cards have a built-inPhaserShare Series B Ethernet interface on the rear panel. Earlier printers(Phaser 380, 350, 340, 560, 550, 540, and 600) may be equipped with earlierPhaserShare network cards; these printers have no built-in network connections onthe rear panel. If you are not sure which network interface your printer has, see“Recognizing PhaserShare Series B interfaces and earlier PhaserShare cards” onpage 3.
This chapter provides information on connecting PhaserShare Series B interfaces tothe network; for information on installing PhaserShare Series B network cards, seethe instruction sheet that is shipped with each card.
PhaserShare Series B Ethernet interfaceEthernet is a communication standard that supports very high speed datatransmission. Ethernet offers signicant speed improvement compared to serial,parallel, and LocalTalk connections. Speed improvement varies greatly dependingon network trafc, computer hardware, and other factors.
The PhaserShare Series B Ethernet interface conforms to the IEEE 802.3 and EthernetII standards. With the printer’s built-in Ethernet interface, you can connect theprinter directly to an Ethernet network using twisted pair (10BaseT) cables. With thePhaserShare Series B Ethernet card, you can connect the printer directly to anEthernet network using twisted pair (10BaseT or 100BaseTx) or thin coax (10Base2)cables. Connecting the printer using thick coax (10Base5) requires an adapter;contact your dealer to obtain adapters, cables, and terminators.
When a PhaserShare Series B Ethernet card is installed, the built-in Ethernetconnector is disabled; use the connectors on the card.
When a PhaserShare Series B card is purchased initially with the printer, it isinstalled at the factory. When a PhaserShare Series B card is purchased later as anupgrade kit, follow the instructions that are shipped with the card.
C A U T I O NTo avoid damaging the network interface, turn off the printer before making anyEthernet connections.

8/13/2019 Tektronix PhaserShare Networking Manual
http://slidepdf.com/reader/full/tektronix-phasershare-networking-manual 20/184
12 PhaserShare Networking Manual
2 PhaserShare Series B Network Interfaces
Ethernet connections and indicators
The printer’s built-in Ethernet connector
The printer’s built-in Ethernet connector has the following connections andindicators:
1. LINK indicator (Phaser 360 only); on indicates a working connection to ahub, off indicates no connection to a hub.
2. RCV indicator (green); blinks while the network interface is receiving.
3. XMT indicator (yellow); blinks while the network interface is transmitting.
4. Twisted pair (10BaseT) connector.
PhaserShare Series B Ethernet card
The PhaserShare Series B Ethernet card has the following connections andindicators:
1. TX indicator (yellow); blinks while the network interface is transmitting.
2. RX Link indicator (green); blinks while the network interface is receiving.
3. Speed indicator (yellow); on indicates 100 Mbps, off indicates 10 Mbps.
4. Twisted pair connection indicator; on indicates a working connection to ahub, off indicates no connection to a hub. If the 10Base2 connector ( 6) isused, this indicator is off .
5. Twisted pair (10BaseT or 100BaseTx) connector.
6. Thin coax (10Base2) connector.
0180-01
Ethernet
RCV XMT
LNK
12
4
3
9789-05
1 3 5 6
2 4
100Mbs
10/100Base-TX 10Base2TPLINK
TX
RX
PhaserShare TM
Series BEthernet Card

8/13/2019 Tektronix PhaserShare Networking Manual
http://slidepdf.com/reader/full/tektronix-phasershare-networking-manual 21/184
PhaserShare Networking Manual 13
PhaserShare Series B Network Interfaces 2
Ethernet cables and termination
N O T ETo fully comply with EMI specications, the use of shielded or screened cables maybe required. “Shielded” describes IBM-dened cables used with the DB-9connector. “Screened” describes cables that are electrically similar to Category 4UTP, but with an added shield or screen.
10BaseT or 100BaseTx (Twisted Pair)
100BaseTx requires Category 5 (100-Ohm UTP) cabling.
The Ethernet standard does not allow a direct 10BaseT connection between a singlecomputer and a single printer. Use 10Base2 (Thin Ethernet) to connect a singlecomputer to a single printer.
C A U T I O NDo not use “silver satin” telephone extension cables for 10BaseT networks, either as
drop cords or as patch cables in the wiring closet. (Silver satin cables are at,usually silver or gray, with 28-gauge stranded or tinsel conductors.) Do not useshielded twisted pair cable intended for IBM Token Ring networks or voice-grade(level 1 or 2) unshielded twisted pair cable for wiring runs. These cables do notmeet the requirements for 10BaseT and will lead to unreliable operation.
10Base2 (Thin Ethernet)
Depending on the type of Ethernet cables you use and your network conguration,you may need to use terminators at certain points in the installation. Refer to themanufacturer’s documentation for your Ethernet adapters and cables for details.
10Base5 (Thick Ethernet)Connecting the printer using thick coax (10Base5) requires an adapter; contact yourdealer to obtain adapters, cables, and terminators.

8/13/2019 Tektronix PhaserShare Networking Manual
http://slidepdf.com/reader/full/tektronix-phasershare-networking-manual 22/184
14 PhaserShare Networking Manual
2 PhaserShare Series B Network Interfaces
PhaserShare Series B Token Ring cardThe PhaserShare Series B Token Ring port conforms to the IEEE 802.5 standard.With the PhaserShare Series B Token Ring card, you can connect the printer directlyto a Token Ring network using shielded twisted pair (STP; IBM Type 1) orunshielded twisted pair (UTP; IBM Type 3) cables. Contact your dealer to obtain
adapters and cables.
N O T ETo fully comply with EMI specications, the use of shielded or screened cables maybe required. “Shielded” describes IBM-dened cables used with the DB-9connector. “Screened” describes cables that are electrically similar to Category 4UTP, but with an added shield or screen.
When a PhaserShare Series B card is purchased initially with the printer, it isinstalled at the factory. When a PhaserShare Series B card is purchased later as anupgrade kit, follow the installation instructions that are shipped with the card.
When a PhaserShare Series B Token Ring card is installed in the printer, the printer’s built-in Ethernet connector is disabled.
C A U T I O NTo avoid damaging the network interface, turn off the printer before making anyToken Ring connections.
Token Ring connections and indicatorsThe PhaserShare Series B Token Ring card has the following connections andindicators on the rear panel:
1. Shielded Twisted Pair (STP; IBM Type 1) connector (DB-9).
2. Unshielded Twisted Pair (UTP; IBM Type 3) connector (RJ-45).
3. Ring speed indicator (yellow); on indicates 16 Mbps, off indicates 4 Mbps.
4. TX indicator (yellow); blinks while the interface is transmitting.
5. Connection indicator (green); on indicates that the card is asserting its ringinsertion control signal.
6. RX indicator (green); blinks while the interface is receiving.
N O T E
The STP port on the PhaserShare Token Ring card supports cable lengths up to150 meters (492 feet) from the interface to the MAU (Medium Access Unit),including lobe and patch cables.
9789-06
PhaserShare TM
Series BToken Ring Card
TX
RXINS
16Mbs
STP UTP
1 2 3 4
5 6

8/13/2019 Tektronix PhaserShare Networking Manual
http://slidepdf.com/reader/full/tektronix-phasershare-networking-manual 23/184
PhaserShare Networking Manual 15
PhaserShare Series B Network Interfaces 2
Ring speed jumperThe Token Ring card is equipped with a single three-pin jumper to set the ring speed.There are two settings: 4 Mbps and 16 Mbps.
N O T EIf you received your printer with the Token Ring card already installed, you must turnoff the printer and remove the card before you change the jumper setting.
The following illustration shows a top view of the card and the location of the jumper.
1. Rear panel
2. Jumper
9789-03
16 Mbps 4 Mbps
2
1

8/13/2019 Tektronix PhaserShare Networking Manual
http://slidepdf.com/reader/full/tektronix-phasershare-networking-manual 24/184
16 PhaserShare Networking Manual
2 PhaserShare Series B Network Interfaces
Token Ring congurationYou can set the Token Ring Frame Routing from the printer’s front panel. When youhave the Frame Routing set, you may want to set other Token Ring parameters. See“How to congure Token Ring parameters:” on page 19 . See the table “Token Ringparameters” on page 18 for a list of all settable Token Ring parameters.
Setting the Frame Routing from the Phaser 740 and 360 front panels
When the Token Ring card is installed in the printer, you can set the Frame Routingfrom the printer’s front panel. The choices are Transparent (no source routing) orSource Route (use source routing).
N O T EIf you are attempting to perform any front panel procedure and you don’t see theexpected menu choices, the front panel may be locked. For information on how tounlock it, see “If the front panel is locked” on page 165.
1. Press Menu ; the front panel displays Help Pages .
2. Press ----> or <---- until the front panel displays Network Settings .3. Access the Frame Routing menu:
a. Press Menu until the front panel displays Token Ring .
b. Press Menu ; the front panel displays the rst of two Frame Routingchoices.
4. Select the desired Frame Routing: Transparent or Source Route :
a. Press ----> until the Frame Routing choice you want is displayed.
b. Press OK to enter your choice into the printer; the front panel brieydisplays Selected , then returns to the Token Ring display.
5. Return the printer to normal operation:
a. Press Exit until the front panel displays Network Settings .
b. Press Exit again.
If you have changed any parameters that require a printer reset totake effect, you will be prompted to reset the printer. If you pressReset , the printer resets. If you press Resume , the front paneldisplays Network Settings . Press Exit ; the printer returns tonormal operation, but the changes you have made will not takeeffect until the next time the printer is reset.
If you have not changed any parameters that require a printer resetto take effect, the front panel displays Ready .

8/13/2019 Tektronix PhaserShare Networking Manual
http://slidepdf.com/reader/full/tektronix-phasershare-networking-manual 25/184
PhaserShare Networking Manual 17
PhaserShare Series B Network Interfaces 2
Setting Frame Routing from the Phaser 780 printer front panel
When the Token Ring card is installed in the printer, you can set the Frame Routingfrom the printer’s front panel. The choices are Transparent (no source routing) orSource Route (use source routing).
1. While Ready is displayed, press Select ; the Printer menu is displayed:
2. Press the left or right arrow buttons until the front panel displays NetworkSettings .
3. Press Menu to enter the Network Settings menu; the front paneldisplays:
4. Press Menu again; the front panel displays the rst of two Frame Routingchoices.
5. Select the desired Frame Routing: Transparent or Source Route :
a. Press the right arrow button until the Frame Routing choice you wantis displayed.
b. Press Select to enter your choice into the printer; the front panel briey displays Selected , then displays the selected Frame Routingchoice again.
6. Return the printer to normal operation:
a. Press Exit (the far right button) until the front panel displays:
b. Press Exit again.
If you have changed any parameters that require a printer reset to takeeffect, you will be prompted to reset the printer. If you press Confirm ,the printer resets. To return to normal operation without resetting theprinter, press Exit (the far right button) ; Printer Menu appears onthe top line of the display. Press Exit again; the printer returns tonormal operation, but the changes you have made will not take effectuntil the next time the printer is reset.
If you have not changed any parameters that require a printer reset,press Exit again; the front panel displays Ready .
Printer MenuHelp Pages Menu
Printer MenuNetwork Settings Menu
Network SettingsToken Ring Menu
Network Settings Token Ring Menu

8/13/2019 Tektronix PhaserShare Networking Manual
http://slidepdf.com/reader/full/tektronix-phasershare-networking-manual 26/184
18 PhaserShare Networking Manual
2 PhaserShare Series B Network Interfaces
Token Ring parameters
Parameter Description Choices
Network Address Token Ring Address (by default, this is abit-swapped version of the printer’s Printer ID,
and it is a unique address on the network). Youcan supply a Locally Administered Address.
Any valid Token Ring address between40. xx.xx.xx.xx.xx and 7F. xx.xx.xx.xx.xx .
Speed This read-only parameter reports the ring speedset by the jumper on the card.
4 Mbps or 16 Mbps.
Early TokenRelease
The printer releases the token at the end of thelast byte transmitted (not applicable at 4 Mbps).
Enabled (default) or Disabled
Adapter Status This read-only parameter reports the Token Ringcard status.
The report is in two parts, separated by acomma:
Adapter status , Details
Adapter status reports the condition of the TokenRing card. Details reports additional information.
Adapter status:
Adapter Initializing. Card is starting up.
Adaptor Open. Card is connected to thenetwork.
Adapter Closed. Card is not connected to thenetwork.
Adapter Fault. Card is defective.
Details:
Ring OK. Ready for network communication.
Fault. Internal error; the card is defective.
Cable Disconnected. Cable is not connected tothe card.
Ring Error. Network problem.
Removed by network management. Thenetwork administrator has disabled theconnection.
Route CacheSize
The number of entries in the source route table. 10 to 300.
Route CacheTimeout
The time in seconds that an entry remains in thesource route table before being updated.
5 to 65535.
Broadcast For broadcasting to all network nodes.Changes the default frame type for source routebroadcasts. Broadcast is ignored if FrameRouting is set to Transparent .
NOTE: Some protocols (for example, IP andARP) always use all routes, so they are notaffected by this parameter.
Single Route. The printer uses single-routebroadcasts for most source-route broadcasts.
All Routes. The printer uses all-routesbroadcasts for all broadcasts.
Unknown Route Used when the printer is searching for a route toa specic network node. Changes the defaultframe type for source route broadcasts.Unknown Route is ignored if Frame Routing isset to Transparent .
NOTE: Some protocols (for example, IP andARP) always use all routes, so they are notaffected by this parameter.
Single Route. The printer uses single-routebroadcasts for most source-route broadcasts.
All Routes. The printer uses all-routesbroadcasts for all broadcasts.

8/13/2019 Tektronix PhaserShare Networking Manual
http://slidepdf.com/reader/full/tektronix-phasershare-networking-manual 27/184
PhaserShare Networking Manual 19
PhaserShare Series B Network Interfaces 2
How to congure Token Ring parameters:
On UNIX systems, you can use the script cong-TokenRing, provided withthe printer’s network utilities software. See the next topic, “U sing thecong-TokenRing script”.
On PCs, you can edit the PostScript utility le TOKNCFG.PS and send it to
the printer. See the README le in the UTILS directory on the printer’sCD-ROM for details.
On a Macintosh, you can edit the PostScript utility le Congure Token Ring and send it to the printer. See the ReadMe le in the Network Utilities folderon the printer’s CD-ROM for details.
Windows users on NetWare networks can use the PhaserShareAdministrator. See “ Using the PhaserShare Administrator to congureToken Ring” on page 20.
With a TCP/IP connection and a World Wide Web browser, you can usePhaserLink Printer Management Software. See “Using PhaserLink PrinterManagement Software to congure Token Ring” on page 21.
Whichever method you use, you must reset the printer to make the changes takeeffect. For more information, see Chapter 16, “R esetting the Printer”.
Using the cong-TokenRing script
The UNIX shell script cong-TokenRing is provided with the printer’s networkutilities software. The script creates a PostScript le containing the Token Ringparameters. Set the Token Ring parameters by sending the PostScript le to theprinter.
Before performing this procedure, you must install the script on your host computer.If you have not already installed the le, see “E xtracting les from unix.tar” onpage 52. Your host spooling system must also be congured; see Chapter 8, “TCP/IPHost Conguration (UNIX)”.
1. Connect the printer to the network. ARP (Address Resolution Protocol)requires that the printer be connected on the same physical networksegment as the host. You will be using the arp command later in thisprocedure.
2. Log in.
3. Run the script cong-TokenRing:
a. Change ( cd ) to the bin subdirectory in the directory where you placedyour printer’s network utilities.
b. Type the name of the script, redirecting the output to a le. Type:
4. When prompted by the script, enter the Token Ring parameters.
5. When the script is nished, log in as root .
cong-TokenRing > lename

8/13/2019 Tektronix PhaserShare Networking Manual
http://slidepdf.com/reader/full/tektronix-phasershare-networking-manual 28/184
20 PhaserShare Networking Manual
2 PhaserShare Series B Network Interfaces
6. Make an entry into the host’s ARP (Address Resolution Protocol) tabledening the printer’s Printer Name/Token Ring address pair. In general,this requires a command corresponding to one of the following syntaxexamples:
7. Turn on the printer.
8. Use the host spooling system (for example, lpr or lp ) to send the le youcreated in Step 3b to the printer; this stores the Token Ring information inthe printer’s internal memory, where it is retained over a reset or powercycle.
9. You must reset the printer before the changes take effect. For moreinformation, see Chapter 16, “ Resetting the Printer”.
Using the PhaserShare Administrator to congure Token Ring1. In the PhaserShare Administrator Main window, select the desired printer
from the Printer List .
2. Click Congure Printer ; this displays the Congure Printer dialog box.
3. In the Congure Printer dialog box, click the Token Ring tab.
4. In the Token Ring tab, set the Token Ring parameters as desired.
5. Click OK .
6. You are prompted to reset the printer. You must reset the printer before the
changes take effect. For more information, see Chapter 16, “ Resetting thePrinter” .
For more information on the PhaserShare Administrator, see Chapter 5,“PhaserShare Administrator Software for NetWare Networks”.
arp -s printer-name Token-Ring-address (for BSD systems) or
arp -s ether printer-nam e Token-Ring-address (for System V)See the documentation for your host system for specics of this command.

8/13/2019 Tektronix PhaserShare Networking Manual
http://slidepdf.com/reader/full/tektronix-phasershare-networking-manual 29/184
PhaserShare Networking Manual 21
PhaserShare Series B Network Interfaces 2
Using PhaserLink Printer Management Software to congure Token Ring
For information on connecting to your printer via PhaserLink Printer ManagementSoftware, see “ Accessing printer information from a browser” on page 122. F orgeneral information on PhaserLink Printer Management Software, see Chapter 12,“PhaserLink Printer Management Software”.
1. From the printer’s home page, click Conguration ; this displays the Viewand Congure Settings page.
2. From the View and Congure Settings page, click View and CongureInterface Settings ; this displays the View and Congure InterfaceSettings page.
3. From the View and Congure Interface Settings page, click View andCongure PhaserShare Settings (Token Ring card) ; this displays the Viewand Congure PhaserShare Settings page for Token Ring.
4. Enter your settings into the elds for Token Ring Address , Speed , andBridging . If you make an error, click Restore Initial Form Values and startagain.
5. When you are nished entering the settings, enter the Validation Passwordand click Do/Apply . If you are not sure of the password, contact yoursystem administrator.
6. You must reset the printer before the changes take effect. For moreinformation, see Chapter 16, “ Resetting the Printer”.

8/13/2019 Tektronix PhaserShare Networking Manual
http://slidepdf.com/reader/full/tektronix-phasershare-networking-manual 30/184
22 PhaserShare Networking Manual
2 PhaserShare Series B Network Interfaces
PhaserShare Series B LocalTalk cardWith the PhaserShare Series B LocalTalk card, you can connect the printer to aLocalTalk network. Both the LocalTalk connection on the card and the Ethernetconnector on the printer’s rear panel are simultaneously active.
When a PhaserShare Series B card is purchased initially with the printer, it isinstalled at the factory. When a PhaserShare Series B card is purchased later as anupgrade kit, follow the installation instructions that are shipped with the card.
LocalTalk connection
N O T ELocalTalk is sometimes referred to as AppleTalk. LocalTalk refers to the physicalconnection; AppleTalk is the protocol.
You can make LocalTalk connections between the printer and a single computer or aLocalTalk network. If your LocalTalk installation is complex, or if you needassistance, contact your network system administrator.
C A U T I O NConnect your printer to a LocalTalk network before you turn on the printer.
The PhaserShare Series B LocalTalk card has the following connections andindicators on the rear panel:
1. TX indicator (yellow); blinks while the interface is transmitting.
2. RX indicator (green); blinks while the interface is receiving.
3. LocalTalk connector; 8-pin, circular DIN.
N O T EBoth indicators ashing together indicates a fatal software error. Turn the printer off,then on again; if the problem persists, replace the card.
9789-07
TX
RXLocalTalk®
PhaserShare TM
Series BLocalTalk Card
1 3
2

8/13/2019 Tektronix PhaserShare Networking Manual
http://slidepdf.com/reader/full/tektronix-phasershare-networking-manual 31/184
PhaserShare Networking Manual 23
PhaserShare Series B Network Interfaces 2
LocalTalk connectors and cables
LocalTalk connectors and cables are available through your local reseller. Thisillustration shows two commonly used types of LocalTalk connectors:
1. Self-terminating connector
2. Connector that requires an external terminator, depending on yournetwork conguration
N O T EDepending on the type of LocalTalk cables you use and your network conguration,you might need to use terminators at certain points in the installation. Refer to thedocumentation for your LocalTalk connectors and cables for details.
Connecting to a single computer
You can use LocalTalk connectors and cables to connect the printer directly to yourcomputer, without connecting it to any other network. To avoid damaging thenetwork interface, turn off the printer before making any LocalTalk connections.
1. Connect the short cable of a LocalTalk connector to the PhaserShareLocalTalk port.
2. Connect the short cable of another LocalTalk connector to your computer’sLocalTalk port.
3. Connect a LocalTalk cable from the LocalTalk connector that you have justattached to your computer to the printer’s LocalTalk connector.
Depending on the type of LocalTalk connectors you use and your networkconguration, you might need to use external terminators. Refer to thedocumentation for your LocalTalk connectors and cables for details.
0180-021 2
9789-083
21
TX
RXLocalTalk®
PhaserShare TM SeriesB LocalTalkCard

8/13/2019 Tektronix PhaserShare Networking Manual
http://slidepdf.com/reader/full/tektronix-phasershare-networking-manual 32/184
24 PhaserShare Networking Manual
2 PhaserShare Series B Network Interfaces

8/13/2019 Tektronix PhaserShare Networking Manual
http://slidepdf.com/reader/full/tektronix-phasershare-networking-manual 33/184
PhaserShare Networking Manual 25
Chapter
3 EtherTalk, LocalTalk, andTokenTalk Configuration
Before you beginBefore you begin the conguration, complete the following steps:
Your printer should be set up, connected to the network, and turned on.See your printer’s user documentation for information about setting upand turning on the printer. For information about connecting the printer tothe network, see Chapter 2, “ PhaserShare Series B Network Interfaces”.
Install the Tektronix driver for your printer on every Macintosh and PCthat will send print jobs to the printer. For details on driver installation, seeyour printer’s user documentation.
Conguration overviewN O T E
The printer’s AppleTalk connection works with Macintosh system software, 7.0, 7.1,7.5, 7.6, 8.0, 8.1, and 8.2.
The conguration procedure for LocalTalk, EtherTalk, and TokenTalk consists of twosimple steps:
1. Print the Conguration Page. It reports the printer’s default name, whichyou need for EtherTalk and TokenTalk congurations. For information onprinting a Conguration Page, see “The printer’s Conguration Page” onpage 6.
2. Verify that the printer is in the Chooser . See “Finding the printer’s name inthe Chooser” on page 26.
If the printer is not in the Chooser , see “Troubleshooting” on page 30.
If the printer is in the Chooser , you may want to change the printer’sname or zone. See “ Changing the printer’s name (optional)” onpage 27 and “Changing the printer’s EtherTalk/TokenTalk zone(optional)” on page 29.
N O T EThe default language for the LocalTalk, EtherTalk, and TokenTalk ports isPostScript. Refer to your printer’s user documentation for information aboutchanging the printer’s default language.

8/13/2019 Tektronix PhaserShare Networking Manual
http://slidepdf.com/reader/full/tektronix-phasershare-networking-manual 34/184
26 PhaserShare Networking Manual
3 EtherTalk, LocalTalk, and TokenTalk Configuration
Finding the printer’s name in the Chooser1. From the Apple menu, select Chooser .
2. In the upper-left corner of the Chooser , nd the driver icon. (If the drivericon does not appear in the Chooser , install the printer driver.) Click the
driver icon.3. If a list of zones appears in the lower-left portion of the Chooser , select the
proper zone.
4. A list of printers appears in the right portion of the Chooser ; nd yourprinter’s name in the list. The printer’s default name is listed on theConguration Page (see “The printer’s Conguration Page” on page 6). If
the name does not appear, check the cable connection between your printerand the network.
N O T EThe printer’s default zone is listed on the Conguration Page in the EtherTalkor TokenTalk eld. For more information on the Conguration Page, see “Theprinter’s Conguration Page” on page 6 .
N O T EIt is possible for the Printer Name eld on the Conguration Page to be blank.When the printer is powered up, it uses a default name and then checks to seethat no other printer on the network has the same name. If enough printerswith the same default name are present it can take several minutes for theprinter to establish a unique name. If the name eld is blank, wait a short timeand reprint the Conguration Page.

8/13/2019 Tektronix PhaserShare Networking Manual
http://slidepdf.com/reader/full/tektronix-phasershare-networking-manual 35/184
PhaserShare Networking Manual 27
EtherTalk, LocalTalk, and TokenTalk Configuration 3
Changing the printer’s name (optional)There are three ways to change the printer’s name:
Use the Apple Printer Utility ; see “ Changing the printer’s name: ApplePrinter Utility” on page 28.
With a TCP/IP connection and a World Wide Web browser, you can usePhaserLink Printer Management Software; see “ Changing the printer’sname: PhaserLink Printer Management Software” on page 28.
With a PC running Windows on a NetWare network, you can use thePhaserShare Administrator; see “ Changing the printer’sEtherTalk/TokenTalk zone (optional)” on page 29.
The name selected here prints on the Startup Page and Conguration Page; the namealso appears in the Chooser on a Macintosh. The name can be up to 31 characterslong. It may contain any printable characters; however, the characters @ : = * aredeleted from the name used on AppleTalk. A change is persistent across printerpower cycles.
Notes regarding printer namesIf you have more than one printer in the same zone and you choose a namefor one printer that is already assigned to another, the second printerregisters itself on the network with the number 1 appended to the name.For example, if you attempt to assign a printer the name TekPhaser andanother printer in the zone already has the same name, the printer you arenaming appears on the network as TekPhaser-1.
The added number is recalculated each time the printer is turned on. If youhave more than one printer with the same name on the network, theprinters’ names on the network depend on the order in which the printersare turned on. To avoid this confusion, it is recommended that you assigneach printer on the network a unique name.
The added number appears in the Chooser , on the printer’s front panel,and on the Startup Page. On the Conguration Page, the name, without thecharacters @ : = *, and with the added number, appears in the EtherTalk ,LocalTalk , and TokenTalk areas. The Printer Name under GeneralInformation is the name as it was set, not as it appears in the Chooser .

8/13/2019 Tektronix PhaserShare Networking Manual
http://slidepdf.com/reader/full/tektronix-phasershare-networking-manual 36/184
28 PhaserShare Networking Manual
3 EtherTalk, LocalTalk, and TokenTalk Configuration
Changing the printer’s name: Apple Printer Utility 1. Locate the Apple Printer Utility , included with your printer’s network
utilities software.
2. Double-click the Apple Printer Utility icon; the Printer Selectorwindow is displayed.
3. Select the zone (if applicable) and the printer. Click Open Printer ; adialog box is displayed containing Printer Information and PrinterPreferences .
4. Click the triangle to the left of Printer Preferences . Click the triangle tothe left of Name ; this displays a dialog box containing a eld for theprinter’s name. Enter the new name in the eld.
5. Click Send .
6. To reselect the printer with its new name, open the Chooser .
Changing the printer’s name: PhaserLink Printer Management Software1. From the printer’s home page, click Conguration ; this displays theView and Congure Settings page.
2. On the View and Congure Settings page, click View and CongureInterface Settings .
3. On the View and Congure Interface Settings page, click View andCongure EtherTalk Settings , View and Congure LocalTalkSettings , or View and Congure TokenTalk Settings .
4. In the Printer Name eld, enter the desired printer name.
For more information on PhaserLink Printer Management Software, see Chapter12, “PhaserLink Printer Management Software”.

8/13/2019 Tektronix PhaserShare Networking Manual
http://slidepdf.com/reader/full/tektronix-phasershare-networking-manual 37/184
PhaserShare Networking Manual 29
EtherTalk, LocalTalk, and TokenTalk Configuration 3
Changing the printer’s EtherTalk/TokenTalk zone (optional)There are two ways to change the printer’s zone:
With a TCP/IP connection and a World Wide Web browser, you can usePhaserLink Printer Management Software; see “ Changing the printer’s
zone: PhaserLink Printer Management Software” on page 29.You can also change the printer’s zone using PostScript utility les; see theREADME les on the printer’s CD-ROM. The Macintosh README le isin the Network Utilities folder; the PC README le is in the UTILS directory.
Changing the printer’s zone: PhaserLink Printer Management Software1. From the printer’s home page, click Conguration ; this displays the View
and Congure Settings page.
2. On the View and Congure Settings page, click View and Congure
Interface Settings page.3. On the View and Congure Interface Settings page, click: View and
Congure EtherTalk Settings , or View and Congure TokenTalkSettings .
4. In the Zone eld, enter the desired zone.
For more information on PhaserLink Printer Management Software, see Chapter 12,“PhaserLink Printer Management Software”.

8/13/2019 Tektronix PhaserShare Networking Manual
http://slidepdf.com/reader/full/tektronix-phasershare-networking-manual 38/184
30 PhaserShare Networking Manual
3 EtherTalk, LocalTalk, and TokenTalk Configuration
TroubleshootingIf the printer is not in the Chooser , use the following troubleshooting procedure.
1. Check that the Conguration Page shows a printer name, a node number,and a zone.
If there is no node number, verify that the printer is properly cabled tothe network. Test the cable segment by plugging in a new cablesegment or using the cable segment of a printer that is in the Chooser .
If your network uses zones, and there is no zone name on theConguration Page, or if the Conguration Page shows the wrongzone, see “ Changing the printer’s EtherTalk/TokenTalk zone(optional)” on page 29.
2. If the Conguration Page shows the correct printer name, node number,and zone, and the printer is still not visible in the Chooser , check thefollowing items:
If there is a Novell NetWare server on the network, verify that theNetWare server has been congured for Phase 2 routing andaddressing.
If there is a Windows NT server on the network, verify that the printerhas not been captured by a Windows NT machine.
If the printer continually reboots when connected to the network, it ispossible that a router is broadcasting a zone of *, which is an invalidzone.
If using QuickDraw GX, the GX drivers must be installed. If you don'tuse QuickDraw GX, disable the QuickDraw GX, QuickDraw Helper,and ColorSync extensions.
N O T EThe printer cannot create a zone; it must already exist.

8/13/2019 Tektronix PhaserShare Networking Manual
http://slidepdf.com/reader/full/tektronix-phasershare-networking-manual 39/184
PhaserShare Networking Manual 31
Chapter
4 Novell NetWareConfiguration
The printer’s NetWare interfaceThe printer’s NetWare interface supports the Print Server (PSERVER) operatingmode. Under the NetWare networking model, print jobs are stored in queues(directories) on a le server. A print server takes print jobs from the queues andsends them to printers. In your Tektronix printer, the print server resides within theinternal interface of the printer, so the print server and the printer are one. Theprinter logs in to a le server using a login connection to service specied queues.
Bindery mode and NDS (NetWare Directory Services) supportedThe printer’s NetWare interface supports Bindery and NDS connection modesseparately or simultaneously.
Supported NetWare versionsThe printer’s NetWare interface has been tested with NetWare versions 3.12, 4.1, and4.11. It should work with any NetWare server that uses NetWare’s QMS (QueueManagement System) to manage and service print queues. These servers include80286-, 80386-, and 80486-based servers running other versions of NetWare (for
example, versions 2.15, 2.2, 3.0, 3.11, 4.0), DOS and OS/2-based systems, VMSservers, and servers running UnixWare. The PhaserShare NetWare interface is notcompatible with systems running NetWare Lite.
Supported NetWare protocolsThe printer ’s NetWare interface supports the following NetWare protocols:
NCP (NetWare Core Protocol)
IPX (Internet Packet Exchange)
SPX (Sequential Packet Exchange)
SAP (Service Advertising Protocol)
RIP (Router Information Protocol)
NEST (Novell Embedded Systems Technology)
SNMP (Simple Network Management Protocol)
8/13/2019 Tektronix PhaserShare Networking Manual
http://slidepdf.com/reader/full/tektronix-phasershare-networking-manual 40/184
32 PhaserShare Networking Manual
4 Novell NetWare Configuration
Other featuresThe printer’s NetWare interface supports up to 32 queues and eight le servers inany combination when in bindery mode. No additional VAPs (Value AddedProcedures), NLMs (Network Loadable Modules), or TSRs (Terminate Stay Residentprograms) are required to install your Tektronix printer on the network.
N O T EThe printer’s NetWare interface supports packet signature and IPX checksumautomatically, that is, the print server automatically signs packets and/or calculateschecksums upon request from the le server.
PasswordsIf a password is used in Bindery mode, it must be set on the printer with thePhaserShare Administrator (or PhaserLink Printer Management Software) and onthe le server with PCONSOLE.
If a password is used in NDS mode, it must be set on the printer with thePhaserShare Administrator (or PhaserLink Printer Management Software) and onthe le server with the NWAdmin utility or PCONSOLE.
Notify listsUse the PhaserShare Administrator to set up notify lists on NetWare 3.x servers.On NetWare 4.1, use the NWAdmin utility to set up the notify list for a printer.
Before beginning the conguration procedureBefore you begin the NetWare conguration, complete the following steps:
Set up the printer and connect it to the network. See your printer’s userdocumentation for information about setting up and turning on the printer.For information about connecting the printer to the network, see Chapter 2,“PhaserShare Series B Network Interfaces”.
Install the Tektronix driver for your printer should be installed on everycomputer that will be sending print jobs to the printer. For details ondriver installation, see the printer’s user documentation.
To speed the setup process and avoid conicts, familiarize yourself withthe components of your network. You should know which version(s) of
NetWare are installed, which versions of client software are used, and thenetwork topology (frame types, routers, hubs, and cabling).

8/13/2019 Tektronix PhaserShare Networking Manual
http://slidepdf.com/reader/full/tektronix-phasershare-networking-manual 41/184
PhaserShare Networking Manual 33
Novell NetWare Configuration 4
Conguration software for NetWareWindows software
PhaserShare Administrator (Tektronix). Use this application to congurethe printer and the network when using NetWare 3.x and 4.x.
NWAdmin (Novell). Use this utility to manage existing queues onnetworks running NetWare 4.x in NDS mode.
DOS software
NWSET (Tektronix). Use this application to congure the printer withNetWare 3.x and 4.x. For more information on NWSET, see the README le in the NETWARE directory of the printer’s or CD-ROM.
NWCONFIG.PS (Tektronix utility le). In DOS environments and othernon-Windows environments, you can use this to congure the printer forNetWare 4.x networks. The PostScript code contained in the leNWCONFIG.PS is also available in a Macintosh le called Congure
NetWare . For more information on NWCONFIG.PS, see the README le inthe UTILS directory of the printer’s or CD-ROM. For more information onCongure NetWare, see the ReadMe le in the Network Utilities directory ofthe printer’s or CD-ROM.
PCONSOLE (Novell). Use this utility to manage existing queues withNetWare 3.x and 4.x (both Bindery and NDS modes).
NetWare conguration for Windows environmentsThis is a quick conguration procedure using the Tektronix PhaserShareAdministrator. For information on installing the PhaserShare Administrator, see
Chapter 5, “PhaserShare Administrator Software for NetWare Networks”. Fordetailed information on the PhaserShare Administrator, functions, see thePhaserShare Administrator on-line help.
Printing the Conguration PageYour printer’s Conguration Page reports information that you need for NetWareconguration. For information on printing a Conguration Page, see “The printer’sConguration Page” on page 6.
N O T EOn the printer’s Conguration Page, all zeros in one or more of the IPX Networks
elds indicates that the printer does not recognize the network connection; thisprobably indicates a faulty cable connection, an incorrect frame type, or Reply toGet Nearest Server has not been set to on . It must be set to on for at least one leserver or router on the same segment as the printer.

8/13/2019 Tektronix PhaserShare Networking Manual
http://slidepdf.com/reader/full/tektronix-phasershare-networking-manual 42/184
34 PhaserShare Networking Manual
4 Novell NetWare Configuration
Using the PhaserShare Administrator Quick Conguration Wizard
Log on to the le server
NetWare 3.x. Log on to the default NetWare le server as SUPERVISOR orSUPERVISOR equivalent. Many of the operations performed using the PhaserShareAdministrator require SUPERVISOR privileges (for example, creating queues).
NetWare 4.x. In Bindery mode, log on to the default NetWare le server asSUPERVISOR, SUPERVISOR equivalent, or ADMIN /B. Many of the operationsperformed using the PhaserShare Administrator require SUPERVISOR privileges(for example, creating queues).
NetWare 4.x, NDS (NetWare Directory Services) mode. Log on to the defaultNetWare le server as ADMIN or ADMIN equivalent. Many of the operationsperformed using the PhaserShare Administrator require ADMIN privileges (forexample, creating queues).
N O T EWhile not required, it is recommended that you log in only to the le servers to becongured with this printer.
Start the PhaserShare Administrator
To start the PhaserShare Administrator, double-click the PhaserShare Administratoricon. Refer to your Windows documentation for complete information on how tostart applications. For information on installing the PhaserShare Administrator, see“Installation” on page 44.
When you start the PhaserShare Administrator, the Main window is displayed.
8/13/2019 Tektronix PhaserShare Networking Manual
http://slidepdf.com/reader/full/tektronix-phasershare-networking-manual 43/184
PhaserShare Networking Manual 35
Novell NetWare Configuration 4
Select a print server
In the Main window Printer List , click the print server name/printer name.
N O T EIf the printer does not show up in the list of available printers, there could be anetwork hardware problem, an incorrect frame type, or incorrect search options
settings (see “ Printer does not appear in the Main window printer list” on page 36 ).
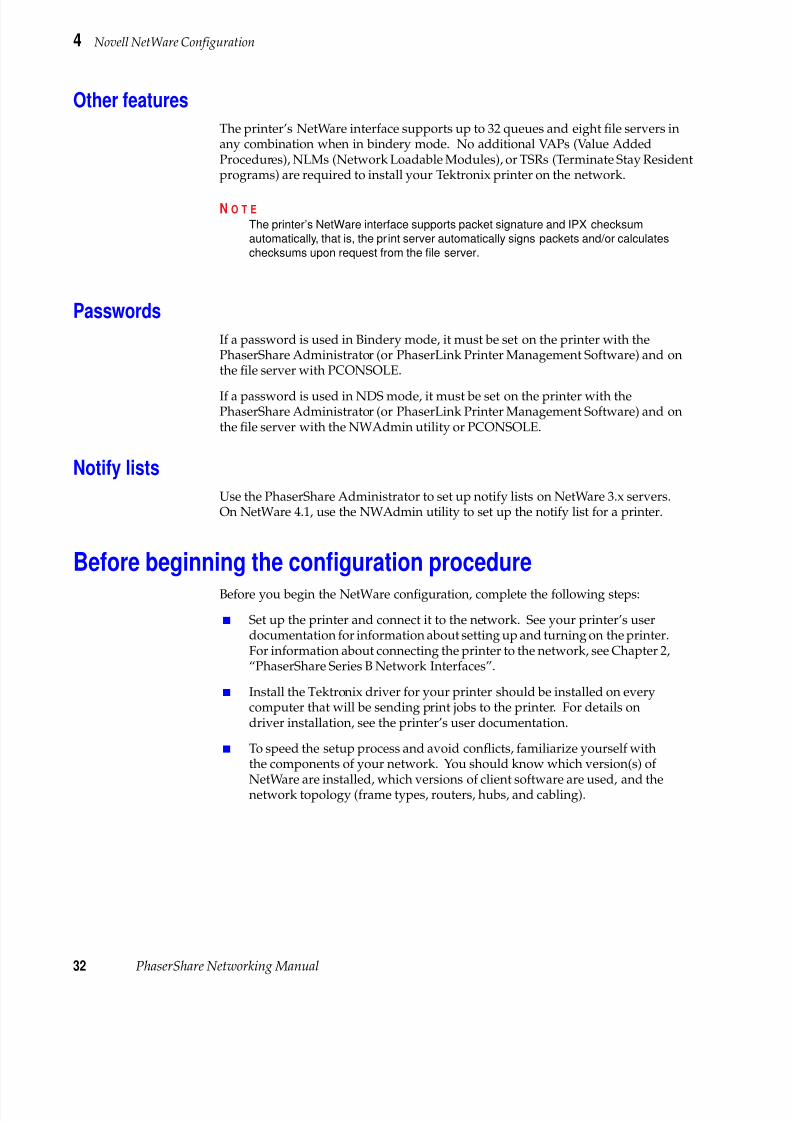
Launch the Quick Conguration Wizard
Click Quick Conguration to launch the Quick Conguration Wizard.
Congure the printer and set up queues1. If desired, change the Print Server Name or Printer Name .
2. Select connection mode(s) by checking the box(es) for Bindery Services ,NDS Services , or both (the Phaser 740, 780, and 360 printers support both).
3. Click Next . The dialogs that follow allow you to congure Binderyconnections, NDS connections, or both. Supply the following informationfor these connections:
a. Click File Servers to display the File Servers Browse dialog box.
b. Select the server you want. Click OK . You are returned to the FileServer Selection dialog box.
c. Select either the conguration le server or the preferred le serverfrom the drop-down list. Click Next .
Information needed for Bindery connections
Select either the conguration le server or the preferred le server fromthe drop-down list; click Next .
If the le server you want is not on the list, proceed with these steps:
Create and select a new queue, or select an existing queue; click Finish .

8/13/2019 Tektronix PhaserShare Networking Manual
http://slidepdf.com/reader/full/tektronix-phasershare-networking-manual 44/184
36 PhaserShare Networking Manual
4 Novell NetWare Configuration
Information needed for NDS connections
Specify the current Directory Services Tree ; (the tree where the printserver will reside).
Specify the current Directory Services Context . (the location in thedirectory services tree where the print server will reside).
Create and select a new queue, or select an existing queue; click Finish .
Verify information and nish the conguration
After you have entered the conguration information, the Quick CongurationWizard displays the Congured Printer Information dialog box, which reports theinformation you have entered.
1. Verify that the information is correct.
If the information is correct, click Apply Changes .
If the information is not correct, click Back to return to previous dialog
boxes and correct the information. Click Next to return to theCongured Printer Information dialog box. Click Apply Changes .
To exit the wizard and return to the Main window without making anychanges, click Cancel .
2. After you click Apply Changes , the printer resets; the changes take effectwhen the reset is complete.
3. After the reset, you are prompted to print a test page. It is recommendedthat you print a test page to verify a successful installation.
Troubleshooting Windows congurations
Printer does not appear in the Main window printer list1. Make sure that the printer is turned on and properly connected to the
network. Try a different network drop or port.
2. Make sure that NetWare is enabled on the printer. This is reported on theprinter’s Conguration Page in the NetWare eld. For information onenabling and disabling protocols, see Chapter 15, “ Disabling Protocols”.
3. If your network uses a router, congure the router to not suppress NetWareSAP (Service Advertising Protocol) packets or packets of the frame type theprinter is using.
If you are using bindery emulation, make sure that NDS is disabled. Fromthe PhaserShare Administrator Print Server tab, uncheck the DirectoryServices checkbox.

8/13/2019 Tektronix PhaserShare Networking Manual
http://slidepdf.com/reader/full/tektronix-phasershare-networking-manual 45/184
PhaserShare Networking Manual 37
Novell NetWare Configuration 4
Testing from the PhaserShare Administrator
The following steps provide a simple test of the Administrator:
1. Click Search Options .
2. In the Search Options dialog box, click the following radio buttons:
a. Sort by: Print Server Name
b. Select by: All Tektronix Printers
3. Click OK .
Look at the list of printers. If the Printer Name is listed as <Information NotAvailable> , the Administrator is unable to communicate with the printer usingSNMP over IPX; this indicates that either the printer selected is an unsupportedprinter or the network conguration is incorrect. If the printer is not listed, check theprinter’s Conguration Page for network errors.
N O T E
The PhaserShare Administrator displays an SNMP error when the client computerrunning the PhaserShare Administrator is not attached to a le server with the sameframe type as the printer is using. The same error is displayed if a version of thePhaserShare Administrator below 3.6 is used to congure a Phaser 740, 780, orPhaser 360 printer. The Printer Not Responding dialog box is displayed with themessage: This printer is not responding to SNMP queries. Please check theprinter and try again . Click OK and correct the problem.
Testing the le server-to-printer connection1. First use the CAPTURE command to redirect an LPT port output to a
network queue. For example:
2. Use any text editor to create a two-line ASCII le with the followingcontents:
3. Use the COPY command to send the le to the printer. For example, if thele is called SHOWPAGE , and the printer is assigned to LPT1, type:
If the le server-to-printer connection is functional, the printer ejects a blank page.
CAPTURE NB NFF NT Q=PHASER L=1where:
NB species NO BANNERNFF species NO FORM FEEDNT species NO TABSQ=PHASER species PHASER as the queue nameL=1 species port LPT1
%!showpage
COPY SHOWPAGE LPT1:

8/13/2019 Tektronix PhaserShare Networking Manual
http://slidepdf.com/reader/full/tektronix-phasershare-networking-manual 46/184
38 PhaserShare Networking Manual
4 Novell NetWare Configuration
Cannot submit job to a queue
Use the NWAdmin to verify that the user is a queue user.
1. Log in as ADMIN and launch the NWAdmin utility. Browse the directoryservices tree to the location of the print queue object for this printer.Double-click the print queue object to view its properties.
2. The identication view is displayed by default. If it is not displayed, selectit. Make sure that all of the Operator Flags at the bottom left corner of thewindow are checked.
3. Click Users ; this view displays a list of queue users and queue user groups.Verify that the list of users, groups, and group memberships are correct.For more details, consult the NetWare Administrator documentation.
4. Click Assignment; this view displays the print servers and printersassigned to service this print queue. Assign the appropriate objects to thisprint queue.
N O T EFor the print server to attach and service the print queue, the print server objectname in the tree must match the print server name in the printer.
Job appears in queue, but printer does not service it1. Verify that the printer has been set up to service the queue.
a. Log in as ADMIN and launch the NWAdmin utility. Browse thedirectory services tree to the location of the print queue object for thisprinter. Double-click the print queue object to view its properties.
b. Click Assignment ; this view displays the print servers and printersassigned to service this print queue.
c. The Authorized print servers window and the Printers servicing printqueues window should list the names of the objects linked to this printqueue. If a print server object is not linked to this print queue, create ormodify a print server object and assign it to this print queue. If aprinter object is not linked to this print queue, create or modify aprinter object and assign it to this print queue. See the NetWare userdocumentation for more details.
2. Check that the printer was able to log in to the le server:
a. At the le server’s console, type:
b. From the Available Options menu, select Connection Information .
If the printer has logged in, its print server name is displayed in the list. Ifthe print server name is not on the list, continue with Steps 3 through 5.
load monitor

8/13/2019 Tektronix PhaserShare Networking Manual
http://slidepdf.com/reader/full/tektronix-phasershare-networking-manual 47/184
PhaserShare Networking Manual 39
Novell NetWare Configuration 4
3. Verify that there was an available connection slot for the printer. Since theprinter consumes a login connection, the le server may need an availableconnection for the printer to log in.
4. Verify that the password the printer saved (if one was set) is the same as theone on the le server. Mismatched passwords can result if PCONSOLE ,rather than the PhaserShare Administrator, is used to set the password.Use the PhaserShare Administrator to enter a new password to ensure thatthey are the same. In the Print Server tab, click Set Password ; this displaysthe Set Password dialog box. Enter the password in both elds andclick OK .
5. Verify that the printer’s print server name matches the one in the NDS tree.The Conguration Page reports the printer’s print server name. Forinformation on printing a Conguration Page, see “T he printer’sConguration Page” on page 6.
6. Verify that the frame type the printer is using is supported by the leserver. See “Printer does not appear in the Main window printer list” onpage 36.
7. Verify that at least one le server or router on the same segment as theprinter has Reply to Get Nearest Server set to on .
Job is serviced, but does not print
Check the PhaserShare Administrator Printer Info dialog box for reportederror conditions.
Download the PostScript Error Handler to the printer. For information onusing the Tektronix PostScript Error Handler, see your printer’s userdocumentation.
Use the correct Tektronix driver for your networked printer.
Verify that the Print Server protocol is enabled; use the printer’s front panelor check the Administrator’s Print Server tab.
Banners, form feeds, and tabs may interfere with the print job.Try disabling these from the driver/network setup.

8/13/2019 Tektronix PhaserShare Networking Manual
http://slidepdf.com/reader/full/tektronix-phasershare-networking-manual 48/184
40 PhaserShare Networking Manual
4 Novell NetWare Configuration
Setting IPX frame types from the front panel
Setting IPX frame types: Phaser 8401. When the front panel displays READY TO PRINT , press the down-arrow
button until Menu is highlighted. Press Select .
2. Press the down-arrow button until Printer Configuration ishighlighted. Press Select .
3. Press the down-arrow button until Network Settings is highlighted.Press Select .
4. Press the down-arrow button until NetWare is highlighted. Press Select .
5. Press the down-arrow button until IPX Frame Type is highlighted. PressSelect .
6. Press the down-arrow button until the desired frame type is highlighted.Press Select until On is displayed. If desired, you can set more than oneframe type.
7. To return the printer to normal operation, press the down-arrow buttonuntil Exit is highlighted. Press Select .
Setting IPX frame types: Phaser 740 and Phaser 360 printer
N O T EIf you are attempting to perform any front panel procedure and you don’t see theexpected menu choices, the front panel may be locked. For information on how tounlock it, see “If the front panel is locked” on page 165.
1. Enter the Network Settings menu:
a. Press Menu ; the front panel displays Help Pages .
b. Press ----> or <---- until the front panel displays NetworkSettings .
c. Press Menu ; the front panel displays TCP/IP .
2. Access the menu of frame types:
a. Press ----> until the front panel displays NetWare .
b. Press Menu ; the front panel displays Enable Interface .
c. Press ----> ; the front panel displays IPX Frame Type .
d. Press Menu ; the front panel displays the rst in a menu of frame types.
8/13/2019 Tektronix PhaserShare Networking Manual
http://slidepdf.com/reader/full/tektronix-phasershare-networking-manual 49/184
PhaserShare Networking Manual 41
Novell NetWare Configuration 4
3. Enable or disable the frame type:
a. Press ----> until the frame type you want is displayed.
b. Press Menu to display the current status of the frame type:Enabled or Disabled.
c. Press ----> until the frame type is either Enabled or Disabled ,as desired.
d. Press OK to enter your choice into the printer. The front panel briey displays Selected , then returns to the display of the frametype name.
4. You can set more than one frame type; to set other frame types, repeatStep 3.
5. Return the printer to normal operation:
a. Press Exit (the far left button) until the front panel displays NetworkSettings .
b. Press Exit again.If you have changed any parameters that require a printer resetto take effect, you are prompted to reset the printer. If you pressReset , the printer resets. If you press Resume , the front paneldisplays Network Settings . Press Exit (the far left button) ;the printer returns to normal operation, but the changes youhave made do take effect until the next time the printer is reset.
If you have not changed any parameters that require a printerreset to take effect, the front panel displays Ready .
Setting IPX frame types: Phaser 780 printer1. Enter the Network Settings menu:
a. While Ready is displayed, press Select ; the Printer menu isdisplayed:
b. Press the left or right arrow buttons until the front panel displaysNetwork Settings.
c. Press Menu to enter the Network Settings menu; NetworkSettings
appears on the top line of the display.
Printer Menu Help Pages Menu
Printer Menu Network Settings Menu

8/13/2019 Tektronix PhaserShare Networking Manual
http://slidepdf.com/reader/full/tektronix-phasershare-networking-manual 50/184
42 PhaserShare Networking Manual
4 Novell NetWare Configuration
2. Access the menu of frame types:
a. Press the right arrow button until the front panel displays NetWare .
b. Press Menu ; the front panel displays Interface .
c. Press the right arrow button until the front panel displays IPX Frame
Type .d. Press Menu ; the front panel displays the rst in a menu of frame types.
3. Enable or disable the frame type:
a. Press the right arrow button until the frame type you want isdisplayed.
b. Press Menu to display the current status of the frame type: On or Off.
c. Press the right arrow button until the frame type is either On or Off , asdesired.
d. Press Select to enter your choice into the printer. The front panel
briey displays Selected , then returns to the display of the frametype name.
e. Press Exit (the far right button) to return to the menu of frame types.
4. You can set more than one frame type; to set other frame types, repeatStep 3.
5. Return the printer to normal operation:
a. Press Exit (the far right button) until Network Settings appears onthe top line of the display.
b. Press Exit again.
If you have changed any parameters that require a printer reset to takeeffect, you will be prompted to reset the printer. If you press Confirm ,the printer resets. To return to normal operation without resetting theprinter, press Exit (the far right button) ; Printer Menu appears onthe top line of the display. Press Exit again; the printer returns tonormal operation, but the changes you have made will not take effectuntil the next time the printer is reset.
If you have not changed any parameters that require a printer reset,press Exit again; the front panel displays Ready .

8/13/2019 Tektronix PhaserShare Networking Manual
http://slidepdf.com/reader/full/tektronix-phasershare-networking-manual 51/184
PhaserShare Networking Manual 43
Chapter
5 PhaserShare Administrator Software for NetWare Networks
PhaserShare Administrator software makes your Tektronix color printer easier to usein a NetWare environment. It provides network administrators with printermanagement capabilities, job accounting information, and congurationinformation.
This chapter provides instructions for installing the PhaserShare Administrator. Thischapter also provides basic information on how to use the PhaserShareAdministrator. Chapter 4, “ Novell NetWare Conguration”, p rovides quickconguration instructions. More detailed information on using the PhaserShareAdministrator is available through the PhaserShare Administrator’s on-line help.
Introduction to the PhaserShare AdministratorThe PhaserShare Administrator is a powerful tool for network and systemadministrators designed to simplify administration and make Tektronix printerseasy to share. The PhaserShare Administrator’s key features are listed here:
Printer conguration reporting. You can control printer settings andnetwork settings. You can remotely set the print server name, IPX frametypes, and many more NetWare parameters, bringing printer control toyour desktop.
Printer management. The PhaserShare Administrator is a valuable printermanagement tool for network administrators. With real time printermessages and access to a remote printer control panel, administrators canresolve many printing problems without leaving their desks. By using theNotify List to send printer alerts, the network administrator is the rst toknow if a printing problem exists.
Network conguration. The PhaserShare Administrator supports automaticdriver distribution and queue management. Once you install a Tektronixprinter driver on a network server, the driver is automatically available toall network users.
Job accounting. Job accounting allows you to track printer usage byindividual user and job on NetWare networks.

8/13/2019 Tektronix PhaserShare Networking Manual
http://slidepdf.com/reader/full/tektronix-phasershare-networking-manual 52/184
44 PhaserShare Networking Manual
5 PhaserShare Administrator Software for NetWare Networks
NetWare conguration with the PhaserShare AdministratorThe PhaserShare Administrator allows you to congure and administer yourTektronix printer and the queues it services, while providing functionality notavailable with PCONSOLE . The PhaserShare Administrator allows you to controlparameters that can be set from PCONSOLE . It also allows you to control the
following printer-specic parameters not supported by PCONSOLE :Printer connection type
Frame type
Queue scan interval
Conguration le server
Error notication
Resetting the printer (Phaser 740 and 360 printers)
Print server name
Printer login password
Banner printing on a per-queue basis
The PhaserShare Administrator is compatible with NetWare 3.x and 4.x.
Installation
System requirementsA Tektronix color printer equipped with an Ethernet card or a Token Ringcard.
Microsoft Windows 3.1, 3.11 (or later), Windows for Workgroups 3.11,Windows NT 4.0, or Windows 95 installed on workstations with standardmemory. The workstation must be at least an 80286 PC.
Novell NetWare 2.x, 3.x, and 4.x networks with shells 3.26 or above andIPX version 3.10 or above.
Supervisor or equivalent permission on all NetWare 3. x le servers to becongured.
and/or
Administrator or equivalent permission on all NetWare 4.x networks to becongured.
N O T ETo determine your network IPX version, use the NetWare NVER command.The IPX version is not shown when using the IPXODI ? command.

8/13/2019 Tektronix PhaserShare Networking Manual
http://slidepdf.com/reader/full/tektronix-phasershare-networking-manual 53/184
PhaserShare Networking Manual 45
PhaserShare Administrator Software for NetWare Networks 5
Installation methodsThe installer supports the following installation methods:
Standard install. This is the recommended installation method; it copiesthe necessary les to your workstation’s hard disk. All program featuresare installed automatically using standard settings.
Network install. This method allows you to specify a drive and directoryon a NetWare le server in which to place the les needed for theinstallation. You can then install the software from that directory todesignated workstations using the standard install.
Installation procedure
Installation for Phaser 840, 740, and 780 printers1. Put the printer’s software CD-ROM into the CD-ROM drive.
If the Windows autorun feature is enabled, the CD-ROM launchesautomatically.
If the Windows autorun feature is disabled, double-click MyComputer , then double click the CD icon to launch the CD-ROM.
2. View the brief introductory information, then click Install Drivers tolaunch the installer.
3. When you are prompted to select Easy Install or Custom Install , selectCustom Install .
4. During custom installation, a dialog box is displayed enabling you toinstall the PhaserShare Administrator. Follow the on-screen prompts tocomplete the installation.
Installation for Phaser 360 printers1. Locate and run the le SETUP.EXE on the printer’s CD-ROM or on printer
software diskette 1.
2. When you are prompted to select Easy Install or Custom Install , selectCustom Install .
3. During the custom installation, a dialog box is displayed enabling you toinstall the PhaserShare Administrator. Follow the on-screen prompts tocomplete the installation.
N O T EThe drive you specify should be a NetWare shared drive. You must have writeaccess to the directory you specify.

8/13/2019 Tektronix PhaserShare Networking Manual
http://slidepdf.com/reader/full/tektronix-phasershare-networking-manual 54/184

8/13/2019 Tektronix PhaserShare Networking Manual
http://slidepdf.com/reader/full/tektronix-phasershare-networking-manual 55/184
PhaserShare Networking Manual 47
PhaserShare Administrator Software for NetWare Networks 5
4. In the Printer List, locate the desired printer.
The Printer List displays only Tektronix printers from the NetWare leservers that were attached when you launched the PhaserShareAdministrator.
If the list is long, you may need to use the scroll bar to scroll through
the list and nd the printer you want.The list is constructed according to the search options that are currentlyactive. You can control the list to display only certain types of printers
based on search options that you specify. To display the SearchOptions dialog box, click Search Options . For more information oncontrolling the list with search options, see “Specifying search options:the Search Options dialog box” on page 48.
5. When you see the printer that you want in the list, click it to select it.
6. Click the button you need to perform the type of work you need to do:
For a quick, rst-time installation, click Quick Conguration . SeeChapter 4, “Novell NetWare Conguration” f or more information.
To display job accounting information or congure settings for theselected printer, click Congure Printer .
To congure NetWare le servers, queues, and the notify list for theselected printer, click Congure Network :
With NetWare 3.x servers. The Congure Network button displaysthe Congure Network dialog box, which is used to manage
queues, the notify list, and le server connections for the selectedprinter.
With NetWare 4.x servers. The Congure Network button opensthe NWAdmin utility, if it is installed; if NWAdmin is not installed,this button is grayed-out.
To read detailed conguration information about the selected printer,click Printer Info .
7. To quit the PhaserShare Administrator, click Exit in the Main window.
N O T EThe list is updated each time you click OK in the Search Options dialog box.

8/13/2019 Tektronix PhaserShare Networking Manual
http://slidepdf.com/reader/full/tektronix-phasershare-networking-manual 56/184
48 PhaserShare Networking Manual
5 PhaserShare Administrator Software for NetWare Networks
Specifying search options: the Search Options dialog box1. In the Main window, click Search Options ; this displays the Search
Options dialog box.
If you are logged on to an NDS le server, these buttons are grayed-out:
File ServerFS/Queue
File Server by Print Server
FS/Queue by Print Server

8/13/2019 Tektronix PhaserShare Networking Manual
http://slidepdf.com/reader/full/tektronix-phasershare-networking-manual 57/184
PhaserShare Networking Manual 49
PhaserShare Administrator Software for NetWare Networks 5
2. Choose a Select by option to limit the number of printers in the list, orchoose a Sort by option to present all the printers in a particular order.Choose only one select or sort option. To select or sort the printers in thelist, follow the procedures given here:
To select the printers in the list . In the Select by area, click the buttonfor the selection option that you want to use. The selection optiondetermines which printers appear on the list in the Main window.
To sort the printers in the list. In the Sort by area, click the button forthe sort option you want to use. The sort option determines the orderin which the printers are displayed on the list in the Main window.
3. If you want your chosen selection or sort option to apply each time you runthe PhaserShare Administrator, check the Use setting at startup checkbox.If you leave the box unchecked, the next time the Administrator is started,the settings are All Tektronix Printers and Print Server Name . When theAdministrator is rst installed, the setting for Select by is Printer Name* .
4. To rearrange the list, click OK . To return to the Main window withoutrearranging the list, click Cancel .
When you select a Sort by option, the Select by option changes to All TektronixPrinters . When you choose a Select by option, the Sort by option changes to PrintServer Name .
Information Not Available in the Printer List
When using the Sort by options, some selections in the Search Options dialog boxdisplay the message Information Not Available in the printer list in the Main window. This indicates that the printer is not equipped with a PhaserShare card or isnot using the PhaserShare Series B interface. The PhaserShare Administrator cannot
congure these printers; use the Advanced Conguration Tool supplied with yourprinter’s network utilities software.
The eld at the bottom of the Select by area allows you to enterspecic information after you have chosen a selection option. Thiseld functions either as a ll-in eld or a pull-down menu, dependingon what selection option you have chosen. For example, if you choosePrinter Name , type a printer name in the eld. If you choose FileServer , the eld becomes a pull-down menu displaying the le serversyour workstation is attached to. Select a le server from the pull-downmenu.
N O T EWhen typing the printer name or printer model, you may end any entry with a “wild
card.” Wild cards are an asterisk (*) to specify any group of characters and aquestion mark (?) to specify any single character.

8/13/2019 Tektronix PhaserShare Networking Manual
http://slidepdf.com/reader/full/tektronix-phasershare-networking-manual 58/184
50 PhaserShare Networking Manual
5 PhaserShare Administrator Software for NetWare Networks
Printer Not Responding dialog box
If you click a printer name and the PhaserShare Administrator displays the PrinterNot Responding dialog box, quit and restart the PhaserShare Administrator. If youstill get the same dialog box when you select the printer, there are several possiblecauses:
There is a problem with the printer, its network connection, or the PC’snetwork setup.
The frame type of the computer running the PhaserShare Administratordoes not match the frame type of the printer it is attached to.
You are attempting to congure a printer equipped with a PhaserShareSeries B interface using a version of the PhaserShare Administrator belowversion 3.6.
You also get the Printer Not Responding dialog box if you click a printerthat reports Information Not Available in the Printer List (see theprevious topic, “ Information Not Available in the Printer List”).
PhaserShare Administrator on-line helpThe PhaserShare Administrator provides Windows Help les containing detaileddescriptions of all program functions and dialog boxes.

8/13/2019 Tektronix PhaserShare Networking Manual
http://slidepdf.com/reader/full/tektronix-phasershare-networking-manual 59/184
PhaserShare Networking Manual 51
Chapter
6 TCP/IP ConfigurationOverview
This chapter provides an overview of TCP/IP conguration. For detailed printerconguration instructions, refer to Chapter 7, “ TCP/IP Printer Conguration (AllPlatforms)” ; for host conguration instructions, refer to the chapter for yourenvironment:
Chapter 8, “TCP/IP Host Conguration (UNIX)”
Chapter 9, “TCP/IP Conguration (OS/2 Warp/LAN Server)”
Chapter 10, “Windows NT”
Chapter 11, “Windows 95 and Windows 98: PhaserPort Software”
PhaserShare Series B Ethernet and Token Ring interfaces support the followingcapabilities:
Print jobs. The interface can accept print jobs sent via AppSocket, ftp ,telnet , lpr , or lp with lpr extensions.
Printer status. The interface can report printer status through thefollowing protocols:
lpq/lpc (lpc for UNIX BSD systems only).
Syslog (UNIX systems only). This protocol functions like a remoteprinter front panel for reporting printer status.
SNMP (Simple Network Management Protocol; UNIX systems only).The printer’s interface responds to status queries from host-residentSNMP utilities.
AppSocket. This protocol allows a direct, socket-level connection tothe printer.
HTTP (HyperText Transport Protocol). This protocol allowscommunication with the printer via PhaserLink Printer ManagementSoftware.

8/13/2019 Tektronix PhaserShare Networking Manual
http://slidepdf.com/reader/full/tektronix-phasershare-networking-manual 60/184
52 PhaserShare Networking Manual
6 TCP/IP Configuration Overview
Before you beginDo not turn on the printer yet. Your printer should be set up andconnected to the network. See your printer’s user documentation forinformation about setting up the printer. For information about connectingthe printer to the network, see Chapter 2, “ PhaserShare Series B Network
Interfaces”.Install the les from the your printer’s CD-ROM on to the hard disk of theworkstation you will be using for the TCP/IP conguration. For moreinformation, see the next topic, “ Extracting les from unix.tar”.
Extracting les from unix.tar The le unix.tar contains all shell scripts and other les needed for networkconguration in UNIX environments. The le is in UNIX tar format. The le isincluded with your printer’s networking software.
Listing the contents of unix.tar Type this command:
Where directory-name is the mount point or the directory that contains the le. Forexample:
Extracting the les1. Change ( cd ) to the directory on your workstation where you want the les
to reside.
2. Type this command:
Where directory-name is the mount point or the directory that contains the le. Forexample:
Printing the Conguration PageYour printer’s Conguration Page reports important information that you will needfor TCP/IP conguration. For information on printing a Conguration Page, see“The printer’s Conguration Page” on page 6.
tar tvf / directory-name /unix.tar
tar tvf /mnt/unix.tar
tar xvf / directory-name /unix.tar
tar xvf /mnt/unix.tar

8/13/2019 Tektronix PhaserShare Networking Manual
http://slidepdf.com/reader/full/tektronix-phasershare-networking-manual 61/184
PhaserShare Networking Manual 53
TCP/IP Configuration Overview 6
TCP/IP conguration overview
9789-09
Print the Configuration Page
Configure host• Host table• Print queue
Configure printerWhere should the printer’s IPaddressing information be stored?
PrinterOR
Use Tektronix-supplied UNIXshell scripts to generatePostScript configuration files.Send PostScript configurationfiles to the printer.
Use printer’s front panelOR
•
Server
Host file: RARP, BOOTP, or DHCP
Reset printer
Set host access and control characterfiltering
Set printer status reporting (optional; UNIX only)
Reset printer
•

8/13/2019 Tektronix PhaserShare Networking Manual
http://slidepdf.com/reader/full/tektronix-phasershare-networking-manual 62/184
54 PhaserShare Networking Manual
6 TCP/IP Configuration Overview

8/13/2019 Tektronix PhaserShare Networking Manual
http://slidepdf.com/reader/full/tektronix-phasershare-networking-manual 63/184
PhaserShare Networking Manual 55
Chapter
7 TCP/IP PrinterConfiguration(All Platforms)There are two steps to printer conguration:
1. Set the printer’s IP address and other addressing information. The Phaser840, 740 and 780 printers support the use of IP host name as well as IPaddresses.
2. Set the printer’s other TCP/IP parameters (optional):
Set host access and control character ltering for each port.
Receiving printer status (Syslog, SNMP, or email notication)
Setting the printer’s IP addressing parametersObtain the information listed in the following table. It might be helpful to writedown this information so that you can refer to it later when you are performing theconguration.
Information for TCP/IP conguration
Information Comments
Internet (IP) address for the printer The format is x.x.x.x , where x represents a decimal number from 0 - 255.
Network mask If you are unsure, leave this blank; the printer chooses an appropriate mask.
Broadcast address If you are unsure, leave this blank; the printer computes an appropriatebroadcast address.
This is the address the printer uses to send broadcast packets. Regardlessof how this parameter is set, the printer accepts broadcast packets from anyof the commonly used broadcast address conventions.
Gateway IP address This is the address of the router. You need this address if you want tocommunicate with the printer from anywhere other than the local networksegment.

8/13/2019 Tektronix PhaserShare Networking Manual
http://slidepdf.com/reader/full/tektronix-phasershare-networking-manual 64/184

8/13/2019 Tektronix PhaserShare Networking Manual
http://slidepdf.com/reader/full/tektronix-phasershare-networking-manual 65/184
PhaserShare Networking Manual 57
TCP/IP Printer Configuration (All Platforms) 7
General information on setting IP parameters (front panel)You can set IP address, network mask, gateway address, and broadcast address fromthe front panel. See the following topics for procedures for each of the followingprinters:
“Setting IP parameters: Phaser 840 printer front panel” on page 57.“Setting IP parameters: Phaser 740 printer front panel” on page 58.
“Setting IP parameters: Phaser 780 printer front panel” on page 60
“Setting IP parameters: Phaser 360 printer front panel” on page 63.
Printer defaults for network mask and broadcast address
When you set the IP address from the front panel, the printer supplies default valuesfor network mask and broadcast address. These default values are calculatedaccording the rst octet of the IP address you set. The following table provides someexamples.
When you are setting the IP addressing parameters from the front panel, you canaccept these default values or change them. However, if you return to the frontpanel later to change the IP address, the network mask and broadcast address arereset to these default values, and you will have to set them as well if you want valuesdifferent than these defaults.
N O T EIf you are attempting to perform any front panel procedure and you don’t see theexpected menu choices, the front panel may be locked. For information on how tounlock it, see “If the front panel is locked” on page 165.
Setting IP parameters: Phaser 840 printer front panel1. When the front panel displays READY TO PRINT , press the down arrow
button until Menu is highlighted. Press Select .
2. Press the down arrow button until Printer Configuration ishighlighted. Press Select .
3. Press the down arrow button until Network Settings is highlighted.Press Select .
4. Press the down arrow button until TCP/IP is highlighted. Press Select .
1st octet ofIP address
ExampleIP address
Printer’s defaultnetwork mask
Printer’s defaultbroadcast address
1 - 127 118.101.14.101 255.0.0.0 118.255.255.255
128 - 191 134.101.14.101 255.255.0.0 134.101.255.255
192 - 223 192.101.14.101 255.255.255.0 192.101.14.255

8/13/2019 Tektronix PhaserShare Networking Manual
http://slidepdf.com/reader/full/tektronix-phasershare-networking-manual 66/184
58 PhaserShare Networking Manual
7 TCP/IP Printer Configuration (All Platforms)
5. Set the IP address:
a. Press the down arrow button until IP Address is highlighted. PressSelect .
b. Press the left or right arrow buttons to highlight the 3-digit part of theaddress that you want to set. Press the up or down arrow keys tochange the numbers.
c. When the address is set, press Select .
6. Set the network mask:
a. Press the down arrow button until NW Mask is highlighted. PressSelect .
b. Press the left or right arrow buttons to highlight the 3-digit part of theaddress that you want to set. Press the up or down arrow keys tochange the numbers.
c. When the address is set, press Select .
7. Set the default router/gateway address:
a. Press the down arrow button until Default Router/Gateway Address is highlighted. Press Select .
b. Press the left or right arrow buttons to highlight the 3-digit part of theaddress that you want to set. Press the up or down arrow keys tochange the numbers.
c. When the address is set, press Select .
8. To return the printer to normal operation, press the down arrow buttonuntil Exit is highlighted. Press Select .
Setting IP parameters: Phaser 740 printer front panelN O T E
When you set the IP addressing parameters from the front panel, the selections forDHCP/BOOTP and RARP are automatically set to Disabled .
1. Press Menu ; the front panel displays Help Pages .
2. Press ----> or <---- until the front panel displays Network Settings .
3. Press Menu until the front panel displays TCP/IP .
4. To set the IP address:a. Press Menu again; the front panel displays Interface .
b. Press ----> to display TCP/IP Address .

8/13/2019 Tektronix PhaserShare Networking Manual
http://slidepdf.com/reader/full/tektronix-phasershare-networking-manual 67/184
PhaserShare Networking Manual 59
TCP/IP Printer Configuration (All Platforms) 7
c. Press Select to display the IP address. For example:
d. Press + to set the left-most digit of the address.
e. Press ----> to advance to the next digit. Press + to set this digit.
f. Use ----> and + as described in Step e to set the remaining digits.
g. When the address is correctly set, press Set to enter your settings intothe printer; the front panel displays:
h. Press Confirm ; the front panel briey displays Selected , thenreturns to TCP/IP Address . The IP address is now set in the printer.
5. To set the network mask:
a. Press ----> until Network Mask is displayed.
b. Press Select ; the front panel displays the network mask.
c. Use + and ----> as described in Steps 4d through 4f to set the
network mask.d. When the network mask is set, use Set and Confirm as described in
Steps 4g and 4h to enter the network mask into the printer.
6. To set the gateway address:
a. Press ----> until Gateway Address is displayed.
b. Press Select ; the front panel displays the gateway address.
c. Use + and ----> as described in Steps 4d through 4f to set thegateway address.
d. When the gateway address is set, use Set and Confirm as describedin Steps 4g and 4h to enter the gateway address into the printer.
192.2.194.101 + ----> Set
N O T ESetting the IP address to 000.000.000.000 causes the printer to use DynamicAddress Resolution to set its IP address (see “ Setting IP parameters: RARP orBOOTP” on page 65 ).
Confirm Selection Confirm
N O T EWhen you press Conrm to set the IP address, the printer resets the network maskand broadcast address to the printer’s defaults; see “ Printer defaults for networkmask and broadcast address” on page 57 .

8/13/2019 Tektronix PhaserShare Networking Manual
http://slidepdf.com/reader/full/tektronix-phasershare-networking-manual 68/184
60 PhaserShare Networking Manual
7 TCP/IP Printer Configuration (All Platforms)
7. The printer calculates the broadcast address based on the IP address andthe network mask. However, the broadcast address can be viewed and setusing the following procedure:
a. Press ----> until Broadcast Address is displayed.
b. Press Select ; the front panel displays the broadcast address.
c. Use + and ----> as described in Steps 4d through 4f to set the broadcast address.
d. When the broadcast address is set, use Set and Confirm as describedin Steps 4g and 4h to enter the broadcast address into the printer.
8. Return the printer to normal operation.
a. Press Exit (the far left button) until the front panel displays NetworkSettings .
b. Press Exit again.
If you have changed any parameters that require a printer reset totake effect, you will be prompted to reset the printer. If you pressReset , the printer resets. If you press Resume , the front paneldisplays Network Settings . Press Exit (the far left button) ; theprinter returns to normal operation, but the changes you have madewill not take effect until the next time the printer is reset.
If you have not changed any parameters that require a printer resetto take effect, the front panel displays Ready .
Setting IP parameters: Phaser 780 printer front panel
NO
T EWhen you set the IP addressing parameters from the front panel, the front panelselections for DHCP/BOOTP and RARP are automatically set to Disabled.
1. While Ready is displayed, press Select ; the Printer menu is displayed:
2. Press the left or right arrow buttons until the front panel displays NetworkSettings .
3. Press Menu to enter the Network Settings menu; Network Settings appears on the top line of the display .
4. If TCP/IP is not already displayed, press the right arrow button until thefront panel displays TCP/IP .
Printer MenuHelp Pages Menu
Printer MenuNetwork Settings Menu

8/13/2019 Tektronix PhaserShare Networking Manual
http://slidepdf.com/reader/full/tektronix-phasershare-networking-manual 69/184

8/13/2019 Tektronix PhaserShare Networking Manual
http://slidepdf.com/reader/full/tektronix-phasershare-networking-manual 70/184
62 PhaserShare Networking Manual
7 TCP/IP Printer Configuration (All Platforms)
7. To set the gateway address:
a. Press the right arrow button until Gateway Address is displayed.
b. Press Menu ; the front panel displays the gateway address.
c. Use the up arrow and right arrow buttons as described in Steps 5d
through 5f to set the gateway address.d. When the gateway address is set, use Set and Confirm as described
in Steps 5g and 5h to enter the gateway address into the printer.
e. Press Exit (the far right button); the front panel displays:
8. The printer calculates the broadcast address based on the IP address andthe network mask. However, the broadcast address can be viewed and setusing the following procedure:
a. Press the right arrow button until Broadcast Address is displayed.
b. Press Menu ; the front panel displays the broadcast address.
c. Use the up arrow and right arrow buttons as described in Steps 5d through 5f to set the broadcast address.
d. When the broadcast address is set, use Select and Confirm asdescribed in Steps 5g and 5h to enter the broadcast address into theprinter.
e. Press Exit (the far right button); the front panel displays:
9. Return the printer to normal operation:
a. Press Exit (the far right button) until Network Settings appears onthe top line of the display.
b. Press Exit again.
If you have changed any parameters that require a printer reset to takeeffect, you will be prompted to reset the printer. If you press Confirm ,the printer resets. To return to normal operation without resetting theprinter, press Exit (the far right button) ; Printer Menu appears onthe top line of the display. Press Exit again; the printer returns tonormal operation, but the changes you have made will not take effectuntil the next time the printer is reset.
If you have not changed any parameters that require a printer reset,press Exit again; the front panel displays Ready .
TCP/IP Gateway Address Menu
TCP/IP Broadcast Address Menu

8/13/2019 Tektronix PhaserShare Networking Manual
http://slidepdf.com/reader/full/tektronix-phasershare-networking-manual 71/184
PhaserShare Networking Manual 63
TCP/IP Printer Configuration (All Platforms) 7
Setting IP parameters: Phaser 360 printer front panelN O T E
When you set the IP addressing parameters from the front panel, the front panelselections for DHCP/BOOTP and RARP are automatically set to Disabled.
1. Press the Menu ; the front panel displays Help Pages .
2. Press ----> or <---- until the front panel displays Network Settings .
3. Press Menu until the front panel displays TCP/IP .
4. To set the IP address:
a. Press Menu again; the front panel displays Enable Interface .
b. Press ----> until the front panel displays TCP/IP Address .
c. To display the IP address, press Menu . For example:
d. To set the left-most digit of the address, press Increment .
e. To advance to the next digit, press Shift . To set this digit, pressIncrement .
f. To set the remaining digits, press Shift and Increment as describedin Step e.
g. When the address is correctly set, enter your settings into the printer bypressing Select ; the front panel displays:
h. Press Confirm ; the front panel briey displays Selected , thendisplays the IP address again. The IP address is now set in the printer.
i. To return to the menu of IP addressing parameters, press Exit .
N O T EWhen you are in the menu, if the front panel is not used for 5 minutes, theprinter returns to Ready .
000.000.000.000 Increment Shift Select
N O T ESetting the IP address to 000.000.000.000 causes the printer to use DynamicAddress Resolution to set its IP address (see “ Setting IP parameters: RARP orBOOTP” on page 65 ).
Confirm Selection Confirm
N O T E
When you press Conrm to set the IP address, the printer resets the network maskand broadcast address to the printer’s defaults; see “ Printer defaults for networkmask and broadcast address” on page 57 .

8/13/2019 Tektronix PhaserShare Networking Manual
http://slidepdf.com/reader/full/tektronix-phasershare-networking-manual 72/184
64 PhaserShare Networking Manual
7 TCP/IP Printer Configuration (All Platforms)
5. To set the network mask:
a. Press ----> until Network Mask is displayed.
b. Press Menu ; the front panel displays the network mask.
c. To set the network mask, press Increment and Shift as described in
Step 4d through 4f.d. When the network mask is set, enter it into the printer by pressing
Select and Confirm as described in Steps 4g and 4h .
e. To return to the menu of IP addressing parameters, press Exit .
6. To set the gateway address:
a. Press ----> until Gateway Address is displayed.
b. Press Menu ; the front panel displays the gateway address.
c. To set the gateway address, press Increment and Shift as describedin 4d through 4f.
d. When the gateway address is set, enter the it into the printer bypressing Select and Confirm as described in Steps 4g and 4h .
7. The printer calculates the broadcast address based on the IP address andthe network mask as described under “ Printer defaults for network maskand broadcast address” on page 57. In most cases, this calculated value iscorrect and there is no need to set the broadcast address. However, the
broadcast address can be viewed and set using the following procedure:
a. Press ----> until Broadcast Address is displayed.
b. Press Menu ; the front panel displays the broadcast address.
c. To set the broadcast address, press Increment and Shift asdescribed in 4d through 4f.
d. When the broadcast address is set, enter it into the printer by pressingSelect and Confirm as described in Steps 4g and 4h .
8. Return the printer to normal operation:
a. Press Exit until the front panel displays Network Settings .
b. Press Exit again.
If you have changed any parameters that require a printer reset totake effect, you will be prompted to reset the printer. If you pressReset , the printer resets. If you press Resume , the front paneldisplays Network Settings . Press Exit ; the printer returns tonormal operation, but the changes you have made will not takeeffect until the next time the printer is reset.
If you have not changed any parameters that require a printer resetto take effect, the front panel displays Ready .

8/13/2019 Tektronix PhaserShare Networking Manual
http://slidepdf.com/reader/full/tektronix-phasershare-networking-manual 73/184
PhaserShare Networking Manual 65
TCP/IP Printer Configuration (All Platforms) 7
Setting IP parameters: RARP or BOOTPWith this method, conguration information is sent to the printer over the Ethernetor Token Ring connection via RARP or BOOTP, depending on which protocol yourhost supports. This is called Dynamic Address Resolution.
The advantage of server-based conguration is that it provides centralizedadministration. You can congure a number of printers from a central location. Thedisadvantage is that if the server is down, the printer does not appear on thenetwork after a reset or power cycle, because the printer gets its boot informationfrom a boot server and does not retain it in non-volatile memory.
Store the printer’s conguration information on a boot server, in a conguration lesuch as an ethers or bootptab le. On power-up, the printer issues RARP and BOOTPrequests and receives the conguration information from the server in the RARP orBOOTP response.
The RARP response contains only IP address information. After the printer has itsaddress information, you can set other TCP/IP parameters by either of two methods:
With a TCP/IP connection and a World Wide Web browser, you can usePhaserLink Printer Management Software; see “ Setting IP parameters:PhaserLink Printer Management Software” on page 73.
Send PostScript les to the printer using your host spooler. UNIX shellscripts for creating the PostScript les are provided with your printer’snetwork utilities software. See “Setting IP parameters: PostScript utility le(UNIX only)” on page 71. For PC environments, the PostScript leIPCONFIG.PS is in the UTILS directory on your printer’s CD-ROM.
N O T EThe printer’s BOOTP and RARP implementations do not support booting across arouter. The BOOTP or RARP server (host) and client (printer) must be connected tothe same Token Ring or Ethernet segment, or to segments interconnected only byrepeaters and/or bridges. However, with certain hosts (such as OS/2) on TokenRing networks, the server and the client must be on the same Token Ring.Furthermore, the printer’s BOOTP and RARP implementations do not supportbooting between Token Ring and Ethernet segments.

8/13/2019 Tektronix PhaserShare Networking Manual
http://slidepdf.com/reader/full/tektronix-phasershare-networking-manual 74/184
66 PhaserShare Networking Manual
7 TCP/IP Printer Configuration (All Platforms)
Setting IP parameters: DHCPDHCP (Dynamic Host Conguration Protocol) is a system in which DHCP serverscan allocate IP addresses dynamically. Under DHCP, the server gives the printer(called a DHCP client) its IP address when the printer is reset.
Installing the DHCP server1. In Control Panel:Network , select Add Software .
2. Select TCP/IP components .
3. In the second window that is displayed, select DHCP server .
Setting up a DHCP server1. Access your DHCP management utility:
Windows NT 4.x. Click Start ; select Programs , then Administrative
Tools (Common) . Select DHCP Manager .Windows 3.5x. Go to the Network Administration group and selectDHCP Manager .
2. Congure DHCP with a scope; a scope is a range of IP addresses availableto be allocated to DHCP clients. For example, the scope could be the IPaddresses 192.2.194.101 through 192.2.194.254.
a. Click Start , Programs , Administrative Tools , DHCP Manager .
b. Double-click Local Machine .
c. Click Scope , Create .d. Enter the IP information to dene the scope.
a. Open the Network Administration group.
b. Double-click DHCP Manager .
c. Double-click Local Machine .
d. Click Scope , Create .
e. Enter the IP information to dene the scope.
3. Dene the lease. A lease is a pre-determined time that the printer holds theIP address. When the lease time expires, the printer queries the DHCPserver again to renew its lease of the IP address. It is recommended thatyou set the lease to Unlimited .
4. Dene a name for the scope. You are prompted to activate the newlycreated scope. Answer Yes.
Dening a scope in Windows NT 4.x
Dening a scope in Windows NT 3.5.x

8/13/2019 Tektronix PhaserShare Networking Manual
http://slidepdf.com/reader/full/tektronix-phasershare-networking-manual 75/184
PhaserShare Networking Manual 67
TCP/IP Printer Configuration (All Platforms) 7
5. Restart the DHCP server:
a. In Control Panel:Services , scroll down to DHCP Server .
b. Click Stop ; then click Start .
c. Click Close .
6. Turn on the printer. The printer receives its IP address from the server.Print a Conguration Page to obtain the IP address (see “T he printer’sConguration Page” on page 6).
7. Using Add Printer Wizard (Windows NT 4.0) or Print Manager (WindowsNT 3.5x), verify that a Windows NT printer port refers to the printer’s IPaddress or DNS name. See Chapter 10, “ Windows NT” fo r moreinformation.
8. Congure the printer’s DHCP client software.
DHCP transactions
On power up or reset, the printer sends a DHCP discover packet, indicatingits Ethernet address and requesting an IP address.
The DHCP server responds to the discover packet with a DHCP offer packet,which contains an IP address from within the assigned scope and theassigned lease.
The printer examines the DHCP offer packet and decides whether toaccept the lease. The printer sends a request packet, accepting the IP addressand the lease.
The DHCP server sends an acknowledgment packet to the printer, completingthe transaction.
N O T EThere can be multiple DHCP servers on the same network, each dening itsown scopes and leases. The printer selects the rst lease offered.

8/13/2019 Tektronix PhaserShare Networking Manual
http://slidepdf.com/reader/full/tektronix-phasershare-networking-manual 76/184
68 PhaserShare Networking Manual
7 TCP/IP Printer Configuration (All Platforms)
Supported BOOTP/DHCP eldsThe printer recognizes the BOOTP/DHCP elds listed in the following table.
Field Description Values
gw Gateway address list List of IP addresses separated by spaces.
ha Hardware address Hexadecimal; the ha tag must be preceded by theht tag.
ht Hardware type (seeAssigned Numbers RFC)
Unsigned decimal, octal, or hexadecimal integer,or one of the following symbolic names:
For UNIX Ethernet:ethernet or ether for 10-Mbit Ethernet(DIX encapsulation);ieee802 for IEEE 802 Ethernet(SNAP encapsulation).For UNIX Token Ring:token ring For OS/2 Ethernet or Token Ring:ether
ip IP address A single IP address.
lg Log host address(es) A list of IP addresses separated by spaces.
sm Subnet mask A single IP address.
dn IP domain name A single domain name.
ds DNS server IP addresslist
Printer recognizes up to two IP addresses,separated by spaces.

8/13/2019 Tektronix PhaserShare Networking Manual
http://slidepdf.com/reader/full/tektronix-phasershare-networking-manual 77/184
PhaserShare Networking Manual 69
TCP/IP Printer Configuration (All Platforms) 7
Enabling and disabling RARP and BOOTP/DHCP (front panel)RARP, BOOTP, and DHCP can be enabled and disabled from the front panel. Thedefault is enabled. When you set the IP addressing parameters from the front panel,the front panel selections for DHCP/BOOTP and RARP are automatically set toDisabled. To disable these protocols manually, follow the procedure for your printer:
“Phaser 740 and 360 printers” (the next topic).
“Phaser 780 printer” on page 70.
Phaser 740 and 360 printers1. Press Menu ; the front panel displays Help Pages .
2. Press ----> or <---- until the front panel displays Network Settings .
3. Press Menu until the front panel displays TCP/IP .
4. Press Menu again; the front panel displays Interface .
5. To disable DHCP/BOOTP:
a. Press ----> until the front panel displays DHCP/BOOTP .
b. Press Menu again to display the current status of the protocol:Interface:Enabled or Interface:Disabled . The current statusis marked with an asterisk ( * ) in the upper-right corner of the display.
c. Press ----> until the front panel displays Interface:Disabled .
d. Press OK to disable the protocol; the front panel briey displaysSelected , then it displays Interface .
e. Press Exit (the far left button) to return to the Interface display.
6. To disable RARP:
a. Press ----> until the front panel displays RARP.
b. Press Menu again to display the current status of the protocol:Interface:Enabled or Interface:Disabled . The current statusis marked with an asterisk ( * ) in the upper-right corner of the display.
c. Press ----> until the front panel displays Interface:Disabled .
d. Press OK to disable the protocol; the front panel briey displaysSelected , then it displays Interface .
e. Press Exit (the far left button) to return to the Interface display.

8/13/2019 Tektronix PhaserShare Networking Manual
http://slidepdf.com/reader/full/tektronix-phasershare-networking-manual 78/184
70 PhaserShare Networking Manual
7 TCP/IP Printer Configuration (All Platforms)
7. Return the printer to normal operation.
a. Press Exit (the far left button) until the front panel displays NetworkSettings .
b. Press Exit again.
If you have changed any parameters that require a printer reset totake effect, you will be prompted to reset the printer. If you pressReset , the printer resets. If you press Resume , the front paneldisplays Network Settings . Press Exit (the far left button); theprinter returns to normal operation, but the changes you have madewill not take effect until the next time the printer is reset.
If you have not changed any parameters that require a printer resetto take effect, the front panel displays Ready .
Phaser 780 printer1. Press Select ; the front panel displays Help Pages .
2. Press the right arrow or left arrow buttons until the front panel displaysNetwork Settings .
3. Press Menu to enter the Network Settings menu.
4. Press the right arrow button until TCP/IP is displayed.
5. Press Menu again; the front panel displays Interface .
6. To disable DHCP/BOOTP:
a. Press the right arrow button until the front panel displaysDHCP/BOOTP .
b. Press Menu again to display the current status of the protocol: On orOff . The current status is marked with an asterisk ( * ) in theupper-right corner of the display.
c. Press the right arrow button until the front panel displays Off .
d. Press Select to disable the protocol; the front panel briey displaysSelected , then it displays Off again.
e. Press Exit (the far right button) to return to the TCP/IP menu.
7. To return the printer to normal operation, go to Step 8, to disable RARP,follow these steps:
a. Press the right arrow button until the front panel displays RARP.
b. Press Menu again to display the current status of the protocol: On orOff . The current status is marked with an asterisk ( * ) in theupper-right corner of the display.
c. Press the right arrow button until the front panel displays Off .
d. Press Select to disable the protocol; the front panel briey displaysSelected , then it displays Off again.

8/13/2019 Tektronix PhaserShare Networking Manual
http://slidepdf.com/reader/full/tektronix-phasershare-networking-manual 79/184
PhaserShare Networking Manual 71
TCP/IP Printer Configuration (All Platforms) 7
8. Return the printer to normal operation:
a. Press Exit (the far right button) until Network Settings appears on thetop line of the display.
b. Press Exit again.
If you have changed any parameters that require a printer reset to takeeffect, you will be prompted to reset the printer. If you press Confirm ,the printer resets. To return to normal operation without resetting theprinter, press Exit (the far right button); Printer Menu appears on thetop line of the display. Press Exit again; the printer returns to normaloperation, but the changes you have made will not take effect until thenext time the printer is reset.
If you have not changed any parameters that require a printer reset,press Exit (the far right button) again; the front panel displaysReady .
After the printer has its address information, you can set other TCP/IP parameters by either of two methods:
With a TCP/IP connection and a World Wide Web browser, you can usePhaserLink Printer Management Software; see “ Setting IP parameters:PhaserLink Printer Management Software” on page 73.
Send PostScript les to the printer using your host spooler. UNIX shellscripts for creating the PostScript les are provided with your printer’snetwork utilities software. For PC environments, the PostScript les forsetting other TCP/IP parameters are included with your printer’s networkutilities software.
Setting IP parameters: PostScript utility le (UNIX only)Use the cong-IP script to create a PostScript le that sets the printer’s IP addressingparameters. The cong-IP script is provided with your printer’s network utilitiessoftware. Keep the following points in mind when running the cong-IP script:
The output of the script is PostScript code, which you must send to theprinter. When you run the script, redirect the output to a le. Then sendthe le to the printer.
The script prompts you to provide certain information. For informationabout these prompts, see the tables “ IP parameters” on page 72.
The advantage of this method is that each printer has a permanent setup stored in itsnon-volatile memory and is not dependent on a boot server for boot information.
The disadvantage is that you must congure each printer individually.Before performing this procedure, install the les from your printer’s networkutilities software on to your host computer. If you have not already installed theles, see “Extracting les from unix.tar” on page 52.
In the printer-based conguration procedure, you use a script provided on theprinter’s CD-ROM to set the IP parameters listed in the following table.The procedure follows the table.

8/13/2019 Tektronix PhaserShare Networking Manual
http://slidepdf.com/reader/full/tektronix-phasershare-networking-manual 80/184
72 PhaserShare Networking Manual
7 TCP/IP Printer Configuration (All Platforms)
1. Connect the printer to the network. ARP (Address Resolution Protocol)requires that the printer be connected on the same physical networksegment as the host.
2. Run the script cong-IP:
a. Change ( cd ) to the bin subdirectory in the directory where you placedyour printer’s network utilities.
b. Type the name of the script, redirecting the output to a le. Type:
3. When prompted by the script, enter the information.
IP parameters
Parameter Description
Use RARP Yes/no. S pecies whether the printer should get its IPaddress from a RARP response at power-up. Thedefault is yes . Answer no for a printer-based
conguration; this prevents RARP packets fromappearing on the network when the printer is turned onor reset.
Use BOOTP/DHCP Yes/no. Species whether the printer should get its IPaddress from a BOOTP or DHCP response at power-up.The default is yes . Answer no for a printer-basedconguration; this prevents BOOTP or DHCP packetsfrom appearing on the network when the printer isturned on or reset.
IP address The printer’s address on the network. The format isx.x.x.x , where x represents a decimal number from0 - 255. The value entered must be a valid IP addressand not 0.0.0.0, 255.0.0.0, any address starting with127, or any address ending with 255.
Network mask Needed in networks that use sub-netting. If you are notusing sub-netting, leave this blank; the printer willchoose an appropriate mask. The format is x.x.x.x,where x represents a decimal number from0 - 255.
Broadcast address The address the printer uses to send broadcast packets.The format is x.x.x.x, where x represents a decimalnumber from 0 - 255. If you are unsure, leave this blank;the printer will choose an appropriate address.
Default gateway (router) The address the printer uses to communicate withdevices not on the same network segment. The formatis x.x.x.x, where x represents a decimal number from0 - 255.
cong-IP > filename
N O T EThe script accepts IP addresses that have empty elds (for example,123..40.10). The script does not detect this error. Double-check the IPaddresses you enter.

8/13/2019 Tektronix PhaserShare Networking Manual
http://slidepdf.com/reader/full/tektronix-phasershare-networking-manual 81/184

8/13/2019 Tektronix PhaserShare Networking Manual
http://slidepdf.com/reader/full/tektronix-phasershare-networking-manual 82/184
74 PhaserShare Networking Manual
7 TCP/IP Printer Configuration (All Platforms)
5. When you are nished entering the settings, enter the Validation Password(if one has been set) and click Do/Apply .
6. The printer responds by displaying a dialog box that allows you to resetthe printer. The new parameters will not take effect until the printer isreset.
Setting IP parameters: arp table entry ( address gleaning )This method sets the printer’s IP address until the next printer reset. Once you haveused this method to set the printer’s IP address, you can use PhaserLink PrinterManagement Software (see “Setting IP parameters: PhaserLink Printer ManagementSoftware” on page 73) or a PostScript utility le (see “S etting IP parameters:PostScript utility le (UNIX only)” on page 71) t o set the address permanently.
You can enter the printer’s Ethernet address and IP address in your host’s arp table,then send a ping command to the printer, and the printer will take it’s IP addressfrom the ping packet.
1. Make an entry into the host’s ARP (Address Resolution Protocol) tabledening the printer’s IP/hardware address pair. In general, this requires acommand corresponding to one of the following syntax examples:
2. Execute the ping command from the host:
Domain Name Services (DNS)The Phaser 840, 740, and 780 printers support Domain Name Services (DNS)through an embedded DNS stub resolver. The DNS resolver protocol communicateswith one or more DNS servers to request the IP address for a given host name or thehost name for a given IP address.
To use an IP host name for the printer, the system administrator must have alreadycongured one or more DNS servers and a local DNS domain name space data base.
arp -s printer-name hardware-address (for BSD systems) orarp -s ether printer-name hardware-address (for System V)
See the documentation for your host system for specics of thiscommand.
N O T EThe hardware address in the arp command example is the printer’s EthernetAddress for PhaserShare Ethernet cards or the Token Ring Address for
PhaserShare Token Ring cards.
ping printer-IP-address

8/13/2019 Tektronix PhaserShare Networking Manual
http://slidepdf.com/reader/full/tektronix-phasershare-networking-manual 83/184
PhaserShare Networking Manual 75
TCP/IP Printer Configuration (All Platforms) 7
To set up the printer for DNS, you must supply an IP domain name and up to twoDNS name server IP addresses. There are three ways to set up the printer for DNS:
BOOTP. See “ Setting IP parameters: RARP or BOOTP” on page 65 an d“Supported BOOTP/DHCP elds” on page 68.
DHCP. See “ Setting IP parameters: DHCP” on page 66 a nd “S upported
BOOTP/DHCP elds” on page 68.On any system that supports TCP/IP, you can use PhaserLink PrinterManagement Software. See the next topic, “Setting up the printer for DNSusing PhaserLink Printer Management Software”."
Setting up the printer for DNS using PhaserLink Printer Management Software
After setting the printer’s IP address by one of the methods described previously inthis chapter, you can set up the printer for DNS using PhaserLink software, if youhave a World Wide Web browser. For more information on PhaserLink software, seeChapter 12, “PhaserLink Printer Management Software”.
1. From the printer’s home page, click Conguration ; this displays the Viewand Congure Settings page.
2. From the View and Congure Settings page, click View and CongureInterface Settings ; this displays the View and Congure InterfaceSettings page.
3. From the View and Congure Interface Settings page, click View andCongure TCP/IP Settings ; this displays the View and Congure TCP/IPSettings page.
4. Set the Domain Name Service Resolver Enabled eld Yes .
5. Enter the following information:
Primary Name Server IP Address (required)
Second Name Server IP Address (optional)
IP Domain Name (required)
Additional Search Domain Name(s) (optional)
6. When you are nished entering the settings, enter the Validation Password and click Do/Apply .
7. The printer responds by displaying a dialog box that allows you to reset theprinter. The new parameters will not take effect until the printer is reset.

8/13/2019 Tektronix PhaserShare Networking Manual
http://slidepdf.com/reader/full/tektronix-phasershare-networking-manual 84/184
76 PhaserShare Networking Manual
7 TCP/IP Printer Configuration (All Platforms)
Controlling host access
LPR (BSD systems)You can control which hosts can access the printer through LPR. The printer’s
factory default is that all hosts have access to the printer.There are two ways to set host access:
With a TCP/IP connection and a World Wide Web browser, you can usePhaserLink Printer Management Software. See the next topic, “Controllinghost access using PhaserLink Printer Management Software” fo r moreinformation.
Send the appropriate PostScript le to the printer. See “ Controlling hostaccess using a PostScript utility le” on page 77.
Controlling host access using PhaserLink Printer Management Software
With a TCP/IP connection and a World Wide Web browser, you can use PhaserLinkPrinter Management Software to set host access. For more information onPhaserLink software, see Chapter 12, “ PhaserLink Printer Management Software”.
1. Click Conguration ; this displays the View and Congure Settings page.
2. On the View and Congure Settings page, click View and CongureInterface Settings ; this displays the View and Congure InterfaceSettings page.
3. On the View and Congure Interface Settings page, click View andCongure LPR Settings ; this displays the View and Congure LPRSettings page.
4. In the Host Access List eld, enter the IP addresse(s) or DNS name(s) of thehost(s) that will have access to the printer. You can enter addresses ornames for multiple hosts by separating them with spaces, up to a total of256 characters. If you do not enter any addresses, all hosts will have accessto the printer.
5. Enter the validation password (if one has been assigned), and clickDo/Apply .

8/13/2019 Tektronix PhaserShare Networking Manual
http://slidepdf.com/reader/full/tektronix-phasershare-networking-manual 85/184
PhaserShare Networking Manual 77
TCP/IP Printer Configuration (All Platforms) 7
Controlling host access using a PostScript utility le
To create a PostScript le to set host access, use the script cong-LPR provided withthe printer’s network utilities software.
1. Make sure that the printer is connected to the network.
2. Run the script cong-LPR:a. Change ( cd ) to the bin subdirectory in the directory where you
placed your printer’s network utilities.
b. Type the name of the script, redirecting the output to a le:
3. When prompted, enter the IP addresse(s) of the host(s) that will have accessto the printer. You can enter addresses for multiple hosts by separatingthem with spaces, up to a total of 256 characters. If you do not enter anyaddresses, all hosts will have access to the printer.
4. Send the le named in Step 2b to the printer; type:
AppSocket (TCP Sockets)You can control which hosts can access the printer through AppSocket. The printer’sfactory default is that all hosts have access to the printer.
There are two ways to set host access:
With a TCP/IP connection and a World Wide Web browser, you can usePhaserLink Printer Management Software. See the next topic, “ControllingHost Access using PhaserLink Printer Management Software”.
Send the appropriate PostScript le to the printer. See “ Controlling hostaccess using a PostScript utility le” on page 78.
cong-LPR > filename
N O T E
The script accepts IP addresses that have empty elds (for example, 123..40.10).The script does not detect this error. Double-check the IP addresses you enter.
lpr -P queue-name filename

8/13/2019 Tektronix PhaserShare Networking Manual
http://slidepdf.com/reader/full/tektronix-phasershare-networking-manual 86/184
78 PhaserShare Networking Manual
7 TCP/IP Printer Configuration (All Platforms)
Controlling Host Access using PhaserLink Printer Management Software
With a TCP/IP connection and a World Wide Web browser, you can use PhaserLinkPrinter Management Software to set host access. For more information onPhaserLink software, see Chapter 12, “ PhaserLink Printer Management Software”.
1. Click Conguration ; this displays the View and Congure Settings page.
2. On the View and Congure Settings page, click View and CongureInterface Settings ; this displays the View and Congure InterfaceSettings page.
3. On the View and Congure Interface Settings page, click View andCongure AppSocket Settings ; this displays the View and CongureAppSocket Settings page.
4. In the Host Access List eld, enter the IP addresse(s) or DNS name(s) of thehost(s) that will have access to the printer. You can enter addresses ornames for multiple hosts by separating them with spaces, up to a total of256 characters. If you do not enter any addresses, all hosts will have accessto the printer.
5. Enter the validation password (if one has been assigned), and clickDo/Apply .
Controlling host access using a PostScript utility le
To create a PostScript le to set host access, use the script cong-sockets provided withthe printer’s network utilities software.
1. Connect the printer to the network.
2. Run the script cong-sockets:
a. Change ( cd ) to the bin subdirectory in the directory where you placedyour printer’s network utilities.
b. Type the name of the script, redirecting the output to a le:
3. When prompted, enter the IP addresse(s) of the host(s) that will haveaccess to the printer. You can enter addresses for multiple hosts byseparating them with spaces, up to a total of 256 characters. If you do notenter any addresses, all hosts will have access to the printer.
4. Send the le named in Step 2b to the printer using lp or lpr .
cong-sockets > lename
N O T EThe script accepts IP addresses that have empty elds (for example,123..40.10). The script does not detect this error. Double-check the IP
addresses you enter.

8/13/2019 Tektronix PhaserShare Networking Manual
http://slidepdf.com/reader/full/tektronix-phasershare-networking-manual 87/184
PhaserShare Networking Manual 79
TCP/IP Printer Configuration (All Platforms) 7
Receiving printer status
Email notication through PhaserLink Printer Management SoftwarePhaserLink Printer Management Software provides email notication, allowing the
printer to automatically send email to the system administrator and others when theprinter needs attention (for example, paper jams or out of ink). This emailnotication capability is supplied by an SMTP client embedded in the printer’srmware. For more information, see “P haserLink Status Notication (EmailNotication)” on page 130.
Syslog (UNIX systems only)The Syslog facility provides a dynamic path for printer status information thatallows administrators to collect information from the printer. You can set a prioritythreshold indicating which messages from the printer will be sent to the listed loghost.
The threshold is a number listed in the following table. The priorities listed in thetable conform to BSD and SunOS conventions.
N O T EIf you are using BOOTP to set the printer’s network address, the printer sendssyslog messages to the hosts listed in the BOOTP log hosts eld. If you are notusing BOOTP or have not specied a log host in the BOOTP conguration, youmust set the syslog host address as described in the next two topics.
There are two ways to set Syslog priorities:
With a TCP/IP connection and a World Wide Web browser, you can usePhaserLink Printer Management Software. See the next topic, “S ettingSyslog priorities using PhaserLink Printer Management Software” for moreinformation.
Send the appropriate PostScript le to the printer. See “S etting Syslogpriorities using a PostScript utility le” on page 80.
Priority Number Description
Emergency 0 Printer is no longer available
Alert 1 Printer needs immediate attention
Critical 2 Critical error message
Error 3 Error message
Warning 4 Warning message
Notice (printer’s default) 5 Normal but signicant message
Information 6 Informational message
Debugging 7 Debugging message

8/13/2019 Tektronix PhaserShare Networking Manual
http://slidepdf.com/reader/full/tektronix-phasershare-networking-manual 88/184
80 PhaserShare Networking Manual
7 TCP/IP Printer Configuration (All Platforms)
Setting Syslog priorities using PhaserLink Printer Management Software
With a TCP/IP connection and a World Wide Web browser, you can use PhaserLinkPrinter Management Software to set host access. For more information onPhaserLink software, see Chapter 12, “ PhaserLink Printer Management Software”.
1. Click Conguration ; this displays the View and Congure Settings page.
2. On the View and Congure Settings page, click View and CongureInterface Settings ; this displays the View and Congure InterfaceSettings page.
3. On the View and Congure Interface Settings page, click View andCongure Syslog Settings ; this displays the View and Congure SyslogSettings page.
4. On the View and Congure Syslog Settings page, enter the log host’s IPaddress or DNS name and the priority level of the threshold you want toset.
5. Enter the validation password (if one has been assigned), and click
Do/Apply .
Setting Syslog priorities using a PostScript utility le
To create a PostScript le to set Syslog priorities, use the script cong-syslog providedon the printer’s CD-ROM.
1. Connect the printer to the network.
2. Run the script cong-syslog:
a. Change ( cd ) to the bin subdirectory in the directory where you placedyour printer’s network utilities.
b. Run the script, redirecting the output to a le. Type:
3. When prompted, enter the log host’s IP address and the priority level of thethreshold you want to set.
4. Send the le named in Step 2b to the printer using lp or lpr .
cong-syslog > filename
N O T EThe script accepts IP addresses that have empty elds (for example,123..40.10). The script does not detect this error. Double-check the IPaddresses you enter.

8/13/2019 Tektronix PhaserShare Networking Manual
http://slidepdf.com/reader/full/tektronix-phasershare-networking-manual 89/184
PhaserShare Networking Manual 81
TCP/IP Printer Configuration (All Platforms) 7
SNMP (UNIX systems only)SNMP (Simple Network Management Protocol) allows you to use an SNMPmonitoring station to query the printer remotely for its status. You can provide thefollowing information for the printer to send to your SNMP utility:
Printer's name.
Name of contact person for printer problems.
Printer's location.
Phaser 740, 780, and 360 printers. Trap host's IP or IPX address. Membersof this list receive asynchronous SNMP traps (error and status messages)from the printer.
Phaser 380, 350, 340, 560, 550, 540, and 600 printers. Trap host's IP addressand community name. Members of this list receive asynchronous SNMPtraps (error and status messages) from the printer.
There are two ways to set SNMP parameters:
With a TCP/IP connection and a World Wide Web browser, you can usePhaserLink Printer Management Software. See “Setting SNMP parametersusing PhaserLink Printer Management Software” on page 81.
Send the appropriate PostScript le to the printer. See “S etting SNMPparameters using a PostScript utility le” on page 82.
Setting SNMP parameters using PhaserLink Printer Management SoftwareWith a TCP/IP connection and a World Wide Web browser, you can use PhaserLinkPrinter Management Software to set host access. For more information onPhaserLink software, see Chapter 12, “ PhaserLink Printer Management Software”.
1. Click Conguration ; this displays the View and Congure Settings page.
2. On the View and Congure Settings page, click View and CongureInterface Settings ; this displays the View and Congure InterfaceSettings page.
3. On the View and Congure Interface Settings page, click View andCongure SNMP Settings ; this displays the View and Congure SNMP
Settings page.4. On the View and Congure SNMP Settings page, enter the information
for the SNMP utility.
5. Enter the validation password (if one has been assigned), and clickDo/Apply .
N O T E
Phaser 350, 360, 550, and 560 printers support RFC 1759, The Printer MIB.Phaser 740, 780, and 360 printers support SNMP traps within RFC 1759.

8/13/2019 Tektronix PhaserShare Networking Manual
http://slidepdf.com/reader/full/tektronix-phasershare-networking-manual 90/184
82 PhaserShare Networking Manual
7 TCP/IP Printer Configuration (All Platforms)
Setting SNMP parameters using a PostScript utility le
To create a PostScript le to control these parameters, use the script cong-SNMP provided with the printer’s network utilities software.
1. Connect the printer to the network.
2. Run the script cong-SNMP:a. Change ( cd ) to the bin subdirectory in the directory where you placed
your printer’s network utilities.
b. Run the script, redirecting the output to a le. Type:
3. When prompted, provide the information for the SNMP utility.
4. Send the le named in Step 2b to the printer using lp or lpr .
cong-SNMP > filename

8/13/2019 Tektronix PhaserShare Networking Manual
http://slidepdf.com/reader/full/tektronix-phasershare-networking-manual 91/184
PhaserShare Networking Manual 83
Chapter
8 TCP/IP HostConfiguration (UNIX)
Conguring a host
Adding the printer to the host tableAdd the printer’s name to the host table and assign an IP address to the printer’sname. Depending on your host system, you may do this one of three ways:
Use NIS (Name Information Server, formerly Yellow Pages).
Use DNS (Domain Name Server).
Edit a le (for example, /etc/hosts). For an example, see “E xampleinstallation for a typical BSD UNIX system” on page 85.
Assigning a print queue to the printerFor BSD systems, edit the /etc/printcap le and add a spool directory (forexample, to /usr/spool/lpd).
For System V hosts, congure the queue as a remote BSD print queue(support for TCP/IP LPR is required). Specific instructions for thefollowing System V hosts are provided in this manual:
“Sun Solaris” on page 87.
“SGI IRIX 5.3 and 6.x” on page 89.
“IBM AIX 3.x and 4.x” on page 90.
“Hewlett-Packard HP-UX 9.x and 10.x” on page 92.
N O T ESome UNIX hosts report an error when you congure a print queue that is notcurrently on the network; ignore this message.

8/13/2019 Tektronix PhaserShare Networking Manual
http://slidepdf.com/reader/full/tektronix-phasershare-networking-manual 92/184
84 PhaserShare Networking Manual
8 TCP/IP Host Configuration (UNIX)
Assigning print queues with PhaserPrint for UNIX
For UNIX environments, Tektronix offers PhaserPrint for UNIX software, whichprovides fast raster printing and a graphical user interface with push-button controlof printer features. For more information on PhaserPrint software, see “T ektronixPhaserPrint for UNIX software” on page 10.
If you want to print using PhaserPrint for UNIX software, you must use PhaserPrintsoftware to congure your host. Refer to the PhaserPrint for UNIX user manual orthe instructions provided with the PhaserPrint for UNIX CD-ROM for congurationinformation. PostScript and PDF versions of the manual are available from theTektronix ftp site:
ftp.tek.com/cpid/UNIX/phaserprint2.1/demo/MANUALS
Required remote printer queue names
The printer’s internal LPR queue uses the BSD protocol; its known queues are listedin the following table. These are the only remote queue names that the printerrecognizes. If you use another name, the printer automatically defaults to AUTO.
Using PostScript utility les to control printer features from queues
As you set up a spool queue for the printer, you can use the PostScript utility lesprovided with your printer’s software to control printer features (for example,
selecting upper or lower paper trays, or selecting print quality modes). See yourprinter’s user documentation for more information on these utility les.
UNIX model les
The printer’s CD-ROM contains UNIX model les. These les allow you to accessprinter features from the UNIX command line by using the -o printing option. Onthe printer’s CD-ROM, the le model.tar contains the installer for the model les andmodel les for Sun Solaris, Hewlett-Packard, and IBM AIX workstations.
Queue name Language
PS PostScript
PCL PCL (Printer Control Language)
AUTO Automatic Language Selection (the printer automatically sensesthe language of the print job and processes it accordingly)

8/13/2019 Tektronix PhaserShare Networking Manual
http://slidepdf.com/reader/full/tektronix-phasershare-networking-manual 93/184
PhaserShare Networking Manual 85
TCP/IP Host Configuration (UNIX) 8
Example installation for a typical BSD UNIX systemThe following procedure is an example spooler conguration that will work formany BSD systems, including SunOS 4.x and 5.x (Solaris 1.x and 2.x) and DigitalUNIX.
Modify the /etc/hosts le to identify the printer to the workstation and modify the /etc/printcap le to describe the printer to the workstation:
1. Log on to your system as root.
2. Make a backup copy of the /etc/hosts le.
3. Edit /etc/hosts and add a line that denes the printer's IP address and itsname. The IP address you enter here for the printer must be the sameaddress you specied as the printer's IP address when it was congured.The name is the name by which your workstation identies the printer.
(You will enter this same remote name in your /etc/printcap le in the nextstep.)
4. Make a backup copy of the /etc/printcap le.
5. Edit /etc/printcap and add an entry for your printer. Refer to the followingexample and the table “Descriptions of printcap parameters” on page 86 tocreate your entry.
N O T EYou need superuser privileges to edit this le.
Example:
134.62.33.138 Phaser740
In this example, 134.62.33.138 is the printer’s IP address andPhaser740 is the printer’s remote name.
Sample printcap le
# Printer: Tektronix Phaser740# Print queue name: colorprinter# Remote machine name: Phaser740# Remote printer queue name: PS# Spool directory: /usr/spool/lpd/colorprinter colorprinter:\ :lp=:\ :rm=Phaser740:\ :rp=PS:\ :mx#0:\ :lf=/usr/spool/lpd/ERRORLOG:\
:sd=/usr/spool/lpd/colorprinter:#

8/13/2019 Tektronix PhaserShare Networking Manual
http://slidepdf.com/reader/full/tektronix-phasershare-networking-manual 94/184

8/13/2019 Tektronix PhaserShare Networking Manual
http://slidepdf.com/reader/full/tektronix-phasershare-networking-manual 95/184
PhaserShare Networking Manual 87
TCP/IP Host Configuration (UNIX) 8
Conguration procedures for common System V UNIX hosts
Sun Solaris
For Solaris version 2.6 and later, go to “Adding an LPD queue in Solaris” on page 88. For Solaris 2.5x and older, use the sol_apps.tar provided with your printer’snetworking software to avoid a Solaris communication problem. The sol_apps.tar leis also available from the Tektronix ftp site:
ftp.tek.com/cpid/UNIX/sun/sol_apps.tar
This le redirects the print jobs to the printer's AppSocket port (port 9100) instead ofthe LPD port (port 515).
N O T EIf you do not want to redirect the print jobs to the printer's AppSocket port, see“Adding an LPD queue in Solaris” on page 8 8.
1. Untar the sol_apps.tar le by typing this command:
2. Edit the le /etc/hosts to create an entry for the printer.
3. Execute the following commands:
The print queue is now enabled.
tar -xvf phaser.sun5
The following les are extracted into the indicated directories:
asprint.sun5 to /usr/bintektcp.sun5 to /usr/spool/lp/model
N O T EThe network name and the queue name for your printer must be identical forthe model le to work.
lpadmin -p queuename -v /dev/null -i /usr/spool/lp/model/tektcp.sun5 -I postscriptenable queuenameaccept queuename
where queuename is the name entered for the printer in the /etc/hosts le.

8/13/2019 Tektronix PhaserShare Networking Manual
http://slidepdf.com/reader/full/tektronix-phasershare-networking-manual 96/184
88 PhaserShare Networking Manual
8 TCP/IP Host Configuration (UNIX)
Adding an LPD queue in Solaris
Add the printer to the host table. This is done by either editing the local host table /etc/hosts (if not running yp or NIS ), or updating the NIS data base on the NIS (yp )server.
Here is an example of how to add a PostScript queue named phaser printing to a
printer named tektronix while in the Bourne shell. /bin/sh
lpsystem -t bsd tektronix
lpadmin -p phaser -s tektronix!PS -I postscript
The queue name can be anything you want. The printer name should be the samename used in the host table.
The !PS names the remote queue name. There are four valid remote printer names:PS, HPGL, PCL, and AUTO.
Use the following commands to enable the new queue:
lpshut /usr/lib/lpsched
enable phaser
accept phaser
If Solaris 2.2/2.3 print jobs get stuck in the queue1. Change directory (cd) to this location:
2. To remove any jobs, type:
3. Change directory (cd) to this location:
4. To remove any jobs, type:
5. Type:
6. To restart lpsched, type:
7. Remove any jobs that have not printed from the Print Tool .
/usr/spool/lp/temp/ workstation-name
rm
/usr/spool/lp/requests/ workstation-name
rm
kill - pid
where pid is the process ID number /usr/lib/lpsched.
/usr/lib/lpsched

8/13/2019 Tektronix PhaserShare Networking Manual
http://slidepdf.com/reader/full/tektronix-phasershare-networking-manual 97/184
PhaserShare Networking Manual 89
TCP/IP Host Configuration (UNIX) 8
SGI IRIX 5.3 and 6.x
Modify the /etc/hosts le to identify the printer to the workstation:
N O T EYou need superuser privileges to edit this le.
1. Log onto your system as root.
2. Make a backup copy of the / etc/hosts le.
3. Edit /etc/hosts and add a line that denes the printer's IP address and itsname. The IP address you enter here for the printer must be the sameaddress you specied as the printer's IP address when it was congured.The name is the name by which your workstation identies the printer.
IRIX 5.3 and IRIX 6.x with Impressario Client
The following procedure describes how to use the SGI Printer Manager program tocongure a workstation running IRIX 5.3 and IRIX 6.x with Impressario Client tosupport a color PostScript printer.
1. From the Toolchest , click System/Printer Manager , or type printers at thecommand line.
2. Click Printer and select Add from the pull-down menu.
3. Fill in the elds; refer to the following table.
4. Click OK .
Field name Description
New Printer Name Name of the print queue (this can be anything).
Connection Type Select Network .
Remote Host Name The name that you entered in your /etc/hosts leas the remote machine name.
Remote Printer Name Queue name that the printer recognizes:
PS for PostScript
PCL for text
HPGL for HP7475A
AUTO for automatic selection.

8/13/2019 Tektronix PhaserShare Networking Manual
http://slidepdf.com/reader/full/tektronix-phasershare-networking-manual 98/184
90 PhaserShare Networking Manual
8 TCP/IP Host Configuration (UNIX)
IRIX 6.x with Impressario Server
The following procedure describes how to use the SGI Printer Manager program tocongure a workstation running IRIX 6.x with Impressario Server to support a colorPostScript printer.
1. From the Toolchest , click System/Printer Manager , or type printers at the
command line.2. Click Printer and select Add from the pull-down menu.
3. Fill in the elds; refer to the following table.
4. Click OK .
IBM AIX 3.x and 4.x
Modify the /etc/hosts le to identify the printer to the workstation:
1. Log onto your system as root.
2. Make a backup copy of the /etc/hosts le.
3. Edit /etc/hosts and add a line that denes the printer’s IP address and itsname. The IP address you enter here for the printer must be the sameaddress you specied as the printer's IP address when it was congured.The name is the name by which your workstation identies the printer.
Field name Description
New Printer Name Name of the print queue (this can be anything).
Printer Connected To Select Local Host .
Location Code Optional; may contain information describing thelocation of the printer.
Location Description Optional; may contain information describing the
location of the printer.Printer Type Select one of the Generic Color PostScript
entries.
Printer is Attached to Select Network .
Printer's Name (or IP Address) The name that you entered in your /etc/hosts leas the remote machine name.
Printer is Attached to Network With Network card Installed in printer.
N O T EYou need superuser privileges to edit this le.

8/13/2019 Tektronix PhaserShare Networking Manual
http://slidepdf.com/reader/full/tektronix-phasershare-networking-manual 99/184
PhaserShare Networking Manual 91
TCP/IP Host Configuration (UNIX) 8
AIX 3.x
The following procedure describes how to use the AIX System Managementprogram (SMIT) to congure a workstation running AIX 3.x to support a colorPostScript printer.
1. Log in as root on your workstation.
2. From the command line, type smit .
3. Select Devices .
4. Select Printer/Plotter .
5. Select Manage Remote Printer Subsystem .
6. Select Client Services .
7. Select Remote Printer Queues .
8. Select Add a Remote Queue .
9. Fill in the elds; refer to the following table.
10. To process the information, press Enter . Make sure that SMIT nishes withan OK in the upper left hand corner. To return to the rst Printer/PlotterDevices menu, press F3.
AIX 4.x
The following procedure describes how to use the AIX System Managementprogram (SMIT) to congure a workstation running AIX 4.x to support a colorPostScript printer.
1. Log in as root on your workstation.
2. From the command line, type: smit .
3. Select Print Spooling .
4. Select Add a Print Queue .
Field name Description
NAME of queue to add Name of the print queue (this can be anything).
DESTINATION HOST for remote jobs
The name that you entered in your /etc/hosts leas the remote machine name.
Name of QUEUE on remoteprinter
The queue name that the printer recognizes:
PS for PostScript
PCL for text
HPGL for HP7475A
AUTO for automatic selection.
NAME of device to add Any name.

8/13/2019 Tektronix PhaserShare Networking Manual
http://slidepdf.com/reader/full/tektronix-phasershare-networking-manual 100/184
92 PhaserShare Networking Manual
8 TCP/IP Host Configuration (UNIX)
5. Fill in the elds; refer to the following table.
6. To process the information, press Enter . Make sure that SMIT nishes withan OK in the upper left hand corner. To return to the rst Printer/PlotterDevices menu, press F3.
Hewlett-Packard HP-UX 9.x and 10.x1. Log in as root on your workstation.
2. Make a backup copy of the /etc/hosts le.
3. Edit /etc/hosts and add a line that denes the printer's IP address and itsremote machine name.
4. Use the HP System Administrator Manager program (SAM) to congurean HP workstation. From the command line, type: sam .
Field name Description
Attachment Type Select remote.
Type of Remote Printing Select Local ltering before sending toprint server.
Remote Printer Type Select Other , then generic .
Name of NEW print queues to add Use the down-arrow key to move down toPostScript , then enter the print queue nameon the right side. This can be anything.
HOSTNAME of remote server The name that you entered in your /etc/hosts le as the remote machine name.
Name of QUEUE on remote server Queue name that the printer recognizes:
PS for PostScript
PCL for text
HPGL for HP7475A
AUTO for automatic selection.
TYPE of print spooler on remoteserver
Press F4 and select BSD .
Send PASS-THROUGH FLAG toqueue on remote server?
Select F4 and select no .
N O T EYou need superuser privileges to edit this le.
The IP address you enter here for the printer must be the same address youspecied as the Tektronix printer IP address when you congured theprinter. For example:
134.62.33.138 tekphaser
In this example, 134.62.33.138 is the printer's IP address andtekphaser is the printer's remote system name.

8/13/2019 Tektronix PhaserShare Networking Manual
http://slidepdf.com/reader/full/tektronix-phasershare-networking-manual 101/184
PhaserShare Networking Manual 93
TCP/IP Host Configuration (UNIX) 8
5. Perform the appropriate step for your HP-UX version:
Version 9.x. Highlight Printers and Plotters from the menu. PressReturn or click Open .
Version 10.x. Double-click the Printers and Plotters icon.
6. Perform the appropriate step for your HP-UX version:Version 9.x. Highlight Printers/Plotters from the menu. Press Return or click Open .
Version 10.x. Again, double-click the Printers and Plotters icon.
7. From the Actions menu, select Add Remote Printer/Plotter .
8. Fill in the elds. See the following table for example entriesand descriptions. Access SAM's help utility for additional informationabout these elds.
9. To save your changes, click OK at the bottom of the window.
10. When you are asked about sending a test le to the printer, type no . (It isrecommended that you do not let SAM send a test le because it may not
be compatible with your printer.)
11. Exit SAM:
a. From the File menu, select Exit .b. Click Exit SAM .
Field name Example entry Description
Printer Name phaser360PS The name you use to access the printer.You can use any name you want.
Remote System name tekphaser The name that you entered in your /etc/hosts le as the remotemachine name.
Remote Printer name PS Queue name that the printer recognizes:
PS for PostScript
PCL for text
HPGL for HP7475A
AUTO for automatic selection.
Remote cancel model rcmodel -
Remote status model rsmodel -Printer class ( version 9.x ) - Optional
Remote printer is on aBSD system?
- Check the box for a BSD system.

8/13/2019 Tektronix PhaserShare Networking Manual
http://slidepdf.com/reader/full/tektronix-phasershare-networking-manual 102/184
94 PhaserShare Networking Manual
8 TCP/IP Host Configuration (UNIX)
Troubleshooting
Testing the network connectionExecute the ping command from the host. For example, type:
ping printer-name
If the ping test to the printer-name fails, try issuing the ping command again,specifying the printer’s IP address explicitly; type:
ping printer-IP-address
If the ping test succeeds using the printer’s IP address, but fails using the printer’sname, check the NIS database, DNS, or /etc/hosts le to make sure that you are usingthe correct name for the printer. If the ping test fails using the printer’s IP address,check the cabling and any gateways to make sure that the printer has a workingconnection.
Make sure that the printer’s IP address and network mask are consistent with the IPaddress and network mask of your local subnet.

8/13/2019 Tektronix PhaserShare Networking Manual
http://slidepdf.com/reader/full/tektronix-phasershare-networking-manual 103/184

8/13/2019 Tektronix PhaserShare Networking Manual
http://slidepdf.com/reader/full/tektronix-phasershare-networking-manual 104/184
96 PhaserShare Networking Manual
9 TCP/IP Configuration (OS/2 Warp/LAN Server)
Creating an LPR queue in OS/2 Warp Connect (direct LPRconnection to the printer)
OS/2 Warp Connect allows you to print directly to Tektronix printers via LPR (noserver).
N O T EIt is important that LPRPORTD.EXE and LPD.EXE be running in the background.You can set these to run automatically from the Autostart tab of the TCP/IPConguration dialog box.
1. Create a Printer Object . To do this, use the right mouse button to drag thePrinter template from the Templates folder to the desktop; this displaysthe Create a Printer dialog box.
2. In the Create Printer dialog box, enter the name of the printer.
3. If the driver is already installed, select the appropriate driver; if the driver
is not installed, you must install it:a. Click Install new printer driver ; this displays the Install new printer
driver dialog box.
b. In the Printer Driver Selection section, select Other OS/2 printerdriver, then specify the path to the driver. For example:
c. Click Refresh , then select the new driver from the list. Click Installand follow the on-screen prompts.
4. Click the right mouse button on an available Pipe port ( 0 through 7) andselect Settings from the menu; the Settings dialog box is displayed. Ifports are not selectable or are unavailable, follow these steps:
a. Select Install Ports from Settings and enter C:\TCPIP\DLL whereappropriate. You will only have to do this if no printers were speciedwhen TCP/IP was installed.
b. This is where the ports that were not available can be selected: Lpt1-3 ,Com 1-4 , and Pipe 0-7 .
c. Once ports are installed, select a Pipe , such as Pipe 1 , then double-clickthis port.
d:\os2drv

8/13/2019 Tektronix PhaserShare Networking Manual
http://slidepdf.com/reader/full/tektronix-phasershare-networking-manual 105/184
PhaserShare Networking Manual 97
TCP/IP Configuration (OS/2 Warp/LAN Server) 9
5. In the Print Destination section, make the following entries:
LPD server. The printer’s IP address.
LPD printer. The printer’s name. The printer’s name should be eitherPS or AUTO in uppercase letters. It is recommended that you leaveeverything else blank.
To return to the Create Printer dialog box, click OK; then click Create .
6. Set the printer as your default printer:
a. Click the right mouse button on the printer object.
b. Click Set default , then select the new printer object.
OS/2 client-to-server setup1. Create a network printer object:use the right mouse button to drag the
Network Printer template from the Templates folder; the Access anothernetwork printer dialog box is displayed.
2. In the Access another network printer dialog box, make the followingselections from the list boxes:
Network. Network protocol.
Server. Name of the server for the queue.
Resource. Name of the queue.
3. Click the right mouse button on the network printer icon and selectSettings from the menu; this displays the Settings dialog box.
4. In the Settings dialog box, select the Printer driver tab. If the driver isalready installed, select the appropriate driver; if the driver is not installed,you must install it:
a. Click the right mouse button on any driver and select Install from themenu.
b. In the Printer Driver Selection section, select Other OS/2 printerdriver , then specify the path to the driver.
c. Click Refresh , then select the new driver from the list. Click Install .
Click OK ; this creates a network printer object.

8/13/2019 Tektronix PhaserShare Networking Manual
http://slidepdf.com/reader/full/tektronix-phasershare-networking-manual 106/184
98 PhaserShare Networking Manual
9 TCP/IP Configuration (OS/2 Warp/LAN Server)
Warp Server 4.0/Warp ConnectWarp Server is replacing OS/2 LanServer and also allows printing to Tektronixprinters via LPR.
1. Use the procedure under “ Creating an LPR queue in OS/2 Warp
Connect (direct LPR connection to the printer)” on page 96.2. Make the new printer available to network clients; see your OS/2
server documentation for details.

8/13/2019 Tektronix PhaserShare Networking Manual
http://slidepdf.com/reader/full/tektronix-phasershare-networking-manual 107/184
PhaserShare Networking Manual 99
Chapter
10 Windows NT
The procedures in this chapter are valid for Windows NT version 3.x and 4.x. Forinformation about driver installation for later versions of Windows NT, contactTektronix technical support or visit the Tektronix web site:
www.tek.com/Color_Printers/support
Setting the printer’s IP addressThere are three ways to set the printer’s IP address:
Use the printer’s front panel. For more information, see “G eneralinformation on setting IP parameters (front panel)” on page 57.
Use DHCP. For more information, see “ Setting IP parameters: DHCP” onpage 66.
Download a PostScript utility le. For more information, see theREADME le on the printer’s CD-ROM. The README le is in the UTILS directory.
Adding the Windows NT 4.0 driver on a Windows NT 4.0 serveror workstationThe Windows NT 4.0 PostScript driver is a PPD-based driver. Follow theseinstructions to add or update the Tektronix Phaser PPD for use withWindows NT 4.0. Adding this support gives your printer access to Tektronix pagesizes, tray selection, TekColor color corrections, and resident fonts.
This update procedure provides printer page-size information for Windows NTapplications. These instructions assume a basic familiarity with Windows NToperation and terminology. For additional information about Windows NT, refer toyour Microsoft Windows NT documentation.
N O T EYou may need the Windows NT 4.0 CD-ROM or your printer’s software CD-ROM tocomplete this procedure.

8/13/2019 Tektronix PhaserShare Networking Manual
http://slidepdf.com/reader/full/tektronix-phasershare-networking-manual 108/184
100 PhaserShare Networking Manual
10 Windows NT
Add the printer1. Log in as Administrator or a user with administrator privileges.
2. Click Start , Settings , and Printers .
3. In the Printers dialog box, double-click Add Printer .
If you intend to do your printer management from this computer, clickMy Computer . The rest of this procedure applies when you click MyComputer .
If you intend to do your printer management from another computer,click Network Print Server . In this case, you need only enter theprinter’s name in the Printer eld and click OK . The rest of thisprocedure does not apply.
4. Click Next .
5. If the printer is connected directly to the computer, select the port theprinter is connected to:
a. LPTx is for a parallel-printer connection.
b. COM is for a serial-connected printer.
6. If the printer is connected to a network, click Add Port . Tektronix printerssupport two types of network ports, LPR and AppleTalk. The next topiccovers LPR ports; for information on AppleTalk ports, see “C reating anAppleTalk port” on page 101.

8/13/2019 Tektronix PhaserShare Networking Manual
http://slidepdf.com/reader/full/tektronix-phasershare-networking-manual 109/184
PhaserShare Networking Manual 101
Windows NT 10
Creating an LPR port1. To connect via TCP/IP, double-click LPR Port in the Printer Ports dialog
box. If LPR Port is not listed in this box, the Microsoft TCP/IP PrintingService must be installed on the NT machine:
a. Click Start , Settings , Control Panel , and Network .
b. Click Services , then click Add .
c. Select Microsoft TCP/IP Printing , then click OK and install thisservice. The original Windows NT distribution CD-ROM is neededduring installation.
2. In the Add LPR compatible printer dialog box, enter the printer's IPaddress or DNS name in the box labeled Name or address of serverproviding lpd . In the box marked Name of printer or print queue on thatserver , enter PS or AUTO in uppercase. Click OK .
3. When returned to the Printer Ports box, click Close .
4. At the Add Printer Wizard dialog box, click the box next to this new port; acheck mark is added. Click Next .
Creating an AppleTalk port1. In the Printer Port dialog box, double-click AppleTalk Printing Devices .
2. In the Available AppleTalk Printing Devices dialog box, select the zonewhere the printer resides. If no zone name appears, double-click the zoneicon.
3. Windows NT searches for all AppleTalk devices in that zone and displays alist; double click your printer.
4. Windows NT prompts you to capture the printer; click No . (Capturing theprinter causes it to disappear from the Chooser .)
5. After adding the printer port, click the box next to the new port to select it;click Next .
N O T EThe TCP/IP protocol must also be installed on the server. Click the Protocol tab toverify if it is installed. See your Windows NT documentation for details. RebootWindows NT after installing TCP/IP.

8/13/2019 Tektronix PhaserShare Networking Manual
http://slidepdf.com/reader/full/tektronix-phasershare-networking-manual 110/184
102 PhaserShare Networking Manual
10 Windows NT
Install the driver1. In the Add Printer Wizard dialog box, click Have Disk to add a new
Tektronix driver.
2. Type the path name to the driver les. This can be A:\ if the les are on adiskette. If these les were downloaded from an on-line service, type the
path name where they were saved. Click OK .3. Select the printer model and click Next .
4. If prompted that a driver is already installed for this printer, select Replaceexisting driver . Click Next .
Name the printer and set up sharing1. Type the printer's name; this can be any name you want. If the
Windows-based applications are to use this printer as the default printer,click the appropriate box. Click Next .

8/13/2019 Tektronix PhaserShare Networking Manual
http://slidepdf.com/reader/full/tektronix-phasershare-networking-manual 111/184
PhaserShare Networking Manual 103
Windows NT 10
2. If this printer is to be shared on the network, click Shared and click allapplicable platforms that may be printing to this printer. If desired, enter aShare Name for the printer. If the printer is a local printer only, click Notshared . Click Next .
Windows NT creates the printer1. If you want Windows NT to print a test page after installing the printer
driver, click Yes (recommended). If you do not want the Windows NT testpage, click No . When nished, click Finish .
2. At this point, Windows NT is ready to create the printer. You may need theoriginal Windows NT distribution CD-ROM or your printer’s softwareCD-ROM to complete this step. Once the CD-ROM is installed, type the
drive letter or path name to the les requested. On the Windows NTCD-ROM, the les are usually in the I386 directory for Intel-basedWindows NT servers. Click OK .
3. If you chose to have a test page printed in Step 1, check to see if it printed.If the test page printed, click OK .

8/13/2019 Tektronix PhaserShare Networking Manual
http://slidepdf.com/reader/full/tektronix-phasershare-networking-manual 112/184
104 PhaserShare Networking Manual
10 Windows NT
Adding the Windows NT 4.0 driver on aWindows NT 3.51 server
N O T EFor proper installation, use the latest Windows NT 3.51 drivers andWindows NT 4.0 drivers, available from the Tektronix web site:
www.tek.com/Color_Printers/support/software.html
The following procedure describes how to set up the Windows NT 3.51 server toautomatically load a Windows NT 4.0 driver on a Windows NT 4.0 client.
N O T EYou must have Administrator access on the Windows NT 3.51 server.
Add the printer1. From a Windows NT 4.0 client, click the right-mouse button on Network
Neighborhood . Select Find Computer .
2. Type the name of the Windows NT 3.51 server. Press Enter .
3. Double-click the Windows NT 3.51 server icon.
4. Double-click the Windows NT 3.51 server's Printers folder.
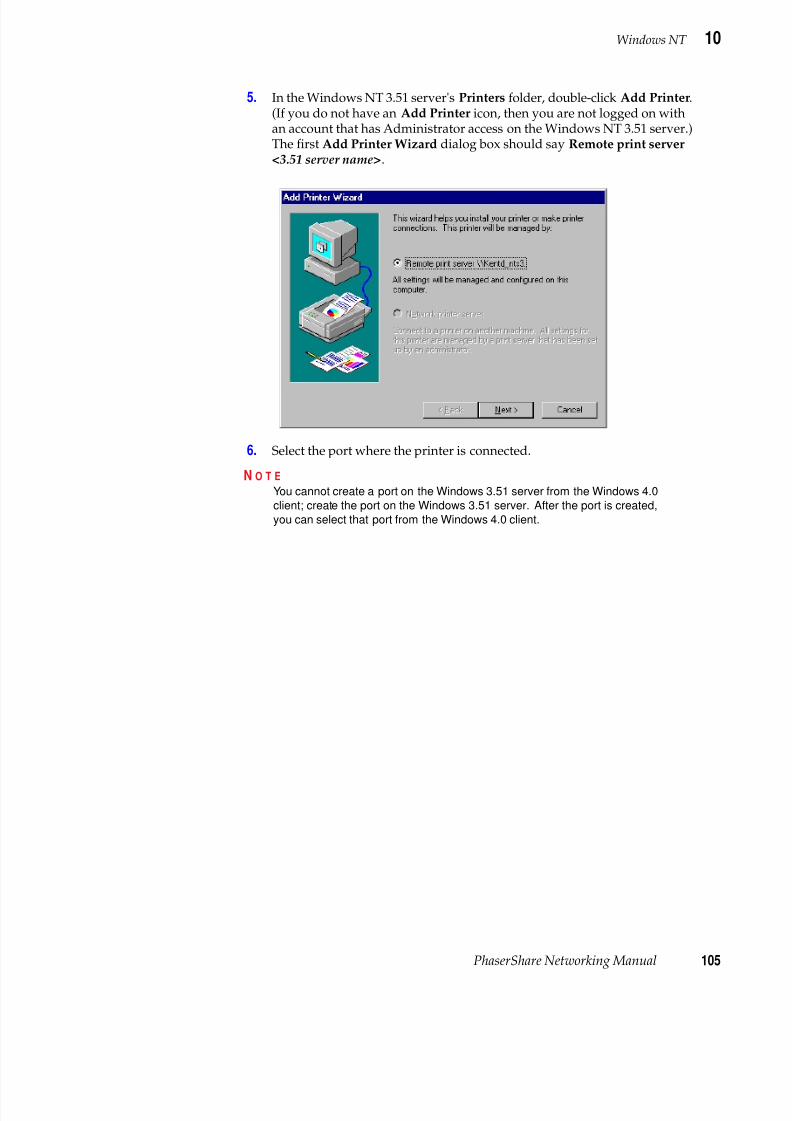
8/13/2019 Tektronix PhaserShare Networking Manual
http://slidepdf.com/reader/full/tektronix-phasershare-networking-manual 113/184
PhaserShare Networking Manual 105
Windows NT 10
5. In the Windows NT 3.51 server's Printers folder, double-click Add Printer .(If you do not have an Add Printer icon, then you are not logged on withan account that has Administrator access on the Windows NT 3.51 server.)The rst Add Printer Wizard dialog box should say Remote print server<3.51 server name> .
6. Select the port where the printer is connected.
N O T EYou cannot create a port on the Windows 3.51 server from the Windows 4.0client; create the port on the Windows 3.51 server. After the port is created,you can select that port from the Windows 4.0 client.

8/13/2019 Tektronix PhaserShare Networking Manual
http://slidepdf.com/reader/full/tektronix-phasershare-networking-manual 114/184
106 PhaserShare Networking Manual
10 Windows NT
Install the driver1. In the Add Printer Wizard dialog box, click Have Disk to add a new
Tektronix driver.
2. Type the path name to the driver les. This can be A:\ if the les are on adiskette. If these les were downloaded from an on-line service, type the
path name where they were saved. Click OK .
3. Select the printer model and click Next .

8/13/2019 Tektronix PhaserShare Networking Manual
http://slidepdf.com/reader/full/tektronix-phasershare-networking-manual 115/184
PhaserShare Networking Manual 107
Windows NT 10
Enter the printer’s name and set up sharing1. Type the printer's name; this can be any name you want. Click Next .
2. If this printer is to be shared on the network, click Shared and highlight allapplicable platforms that may be connecting to this server(Windows NT 4.0 x86 should be one). If desired, enter a Share Name forthe printer.

8/13/2019 Tektronix PhaserShare Networking Manual
http://slidepdf.com/reader/full/tektronix-phasershare-networking-manual 116/184
108 PhaserShare Networking Manual
10 Windows NT
Windows NT creates the printer1. If you want Windows NT to print a test page after installing the printer
driver, click Yes (recommended). If you do not want the Windows NT testpage, click No . When nished, click Finish .
2. When prompted for the Windows NT 3.51 CD-ROM, insert it into your
computer’s CD-ROM drive and click OK .
3. Type the path name to the driver.
The printer should now exist on the Windows NT 3.51 server and haveWindows NT 4.0 drivers available. Now any Windows 4.0 client can use that sharedprinter, and the driver is installed automatically.
N O T EFor proper installation, you must use the latest Windows NT 3.51 drivers andWindows NT 4.0 drivers, which are available from the Tektronix web site:
www.tek.com/Color_Printers/support/software.html

8/13/2019 Tektronix PhaserShare Networking Manual
http://slidepdf.com/reader/full/tektronix-phasershare-networking-manual 117/184
PhaserShare Networking Manual 109
Windows NT 10
Adding a Windows NT 3.x driverThis update procedure provides printer page size information for Windows NTapplications. However, TekColor color corrections and other PostScript Level 2features are not supported by the Windows NT driver. Refer to your printer’s userdocumentation for instructions on other ways of selecting color corrections. Refer to
your Microsoft Windows NT documentation for details on features in theWindows NT driver.
These instructions assume a basic familiarity with Windows NT operation andterminology. For additional information about Windows NT, refer to your MicrosoftWindows NT documentation.
1. Start your system with Windows NT .
2. From the Main window, double-click the Print Manager icon.
3. Install the Tektronix printer. From the Printer menu, select Create Printer ;the Create Printer dialog box appears.
4. Under Driver , scroll to the end of the list and select Other ; the InstallDriver dialog box appears.
5. When prompted, do one of the following.
If you are using the printer’s CD-ROM: Type the CD-ROM drivelocation. Click OK ; the Select Driver dialog box appears.
If you are using the printer’s software for Windows diskette:Type the diskette drive location. Click OK ; the Select Driver dialog
box appears.
6. Under Printer Driver , choose your printer from the list, then click OK .
7. Under Print to , scroll to the end of the list and select Other ; the Printer port dialog box appears. Tektronix printers support two types of network portsin Windows NT: LPR and AppleTalk. The next topic covers LPR ports; forinformation on creating an AppleTalk port, see “ Creating an AppleTalkport” on page 111.
N O T E
If you are using older drivers, you get a series of Noncritical Errors statingthat Windows NT is unable to open the PSCRIPT.DLL le and thePSCRIPT.DRV les. Click Ignore or update your driver.

8/13/2019 Tektronix PhaserShare Networking Manual
http://slidepdf.com/reader/full/tektronix-phasershare-networking-manual 118/184
110 PhaserShare Networking Manual
10 Windows NT
Creating an LPR port1. In the Printer Port dialog box, click the LPR port. If the LPR port is not
listed in the Printer Port dialog box, the Microsoft TCP/IP Printing Serviceneeds to be added to the Windows NT machine:
a. In the Control Panel , double-click Network ; the Network Settings
dialog box appears.b. In Network Settings , click Add Software ; the Add Network Software
dialog box appears.
c. In the Add Network Software dialog box, click the drop-down menufor Network Software . In the list, select TCP/IP Protocol and RelatedComponents , then click Continue ; the TCP/IP Installation dialog boxappears.
d. In the TCP/IP Installation dialog box, select TCP/IP Network PrintingSupport . (Consult your Windows NT documentation for informationon other TCP/IP options.)
e. Click Continue to install this service. The original Windows NTdistribution diskettes are needed during installation. To apply thesechanges, restart Windows NT.
2. In the Add LPR compatible printer dialog box, enter your printer’s IPaddress in the eld named Name or address of server providing lpd .In the eld named Name of printer or print queue on that server , enter PS or AUTO in UPPERCASE letters.

8/13/2019 Tektronix PhaserShare Networking Manual
http://slidepdf.com/reader/full/tektronix-phasershare-networking-manual 119/184
PhaserShare Networking Manual 111
Windows NT 10
Creating an AppleTalk port1. In the Printer Port dialog box, double-click the AppleTalk Printing
Devices port. If the AppleTalk Printing Devices port is not listed in thePrinter Port dialog box, the Microsoft Services for Macintosh needs to beadded to the Windows NT machine:
a. In Control Panel , double-click Network ; the Network Settings dialog box appears.
b. In the Network Settings dialog box, click Add Software ; the AddNetwork Software dialog box appears.
c. In the Add Network Software dialog box, click the drop down menufor Network Software . In the list, select Services for Macintosh , thenclick OK to install the service. The original Windows NT distributiondiskettes are needed during installation. To apply these changes,restart Windows NT.
2. In the Available AppleTalk Printing Devices dialog box, select the zonewhere the printer resides. If no zone name appears, double-click the zoneicon.
3. Windows NT searches for all AppleTalk devices in that zone and displays alist; double click your printer.
4. Windows NT prompts you to capture the printer; click No . (Capturing theprinter causes it to disappear from the Chooser .)
Set up sharing
If this printer is to be shared on the network, perform the following steps:
1. In the Create Printer dialog box, check the option Share this printer on the
network .2. Enter any name you want for the Share Name .

8/13/2019 Tektronix PhaserShare Networking Manual
http://slidepdf.com/reader/full/tektronix-phasershare-networking-manual 120/184
112 PhaserShare Networking Manual
10 Windows NT
Windows NT network communication
TCP/IP connection
Basic concepts of TCP/IP printingIn Windows NT, printing via TCP/IP is accomplished using the LPR (Line PrinterRequest) protocol. Because LPR was developed for UNIX systems, comparingWindows NT and UNIX implementations may be helpful.
The LPR protocol is a host-to-host protocol, rather than a host-to-printer protocol.When printing via LPR, the computer sending the print job assumes that it issending the job to another computer, or print server, which sends the job to theprinter. In UNIX terminology, the print server is called a remote host. The printserver can have several printers connected to it. The way to differentiate betweendifferent printers when spooling to the print server is to print to a specic remotequeue.
The following table summarizes these concepts of TCP/IP printing and theterminology used in UNIX and Windows NT environments.
Your Tektronix printer emulates a print server. Tektronix printers are accessed bygiving an NT host a remote host name that will point to the printer. This is true onlyif the print job is spooled directly to the printer via its internal network interface, andnot through an external third-party print server. If the print job is spooled throughan external third-party print server, the remote host name is the TCP/IP address ofthe print server and the remote queue name is the name of the queue for that printserver.
Concept Description UNIX term NT term
Print server An IP address or a DNS namethat is mapped to this address.This is how your computer knowswhere to send the print job.
Remote host Name oraddress ofhost providingLPD
Print queue For Tektronix printers, this is PS (PostScript) or AUTO(AutoSelect).
Remote printerqueue name
Name ofprinter on thatmachine

8/13/2019 Tektronix PhaserShare Networking Manual
http://slidepdf.com/reader/full/tektronix-phasershare-networking-manual 121/184
PhaserShare Networking Manual 113
Windows NT 10
Windows NT network troubleshooting
Error messages in Print ManagerWhen there is a problem printing from Windows NT, often print jobs stay in Print
Manager with ambiguous messages like Printer Error or Permissiondenied . If the printer is connected via TCP/IP, there is probably a problem with theway LPR was set up.
Begin troubleshooting by opening the Event Viewer in the Administrative Tools program group. When it opens, click Log , scroll down, and select Application .Look at any of the error messages that say LPR Print Monitor . Double-clickingthe error message tells you more information about the error. The following topicsdeal with specic errors reported in the Event Viewer .
Printer PS on host IP-address is rejecting your request
At the MS-DOS command prompt in Windows NT, type the ping command in thefollowing format:
ping IP-address
For example:
ping 134.62.36.134
If the printer does not reply or the request times out, either the printer doesnot have an IP address, or the NT host cannot nd the printer.
If the printer does not have an address, assign one as described in“Setting the printer’s IP addressing parameters” on page 55.
If the printer has an IP Address, your printer could have a faultynetwork connection or a defective network card.
If the printer does respond, disconnect the printer from the network andsend the ping command again.
If you get a response this time, there is a duplicate IP address on thenetwork. Make sure that all devices on the network have a unique IPaddress.
If you do not get a response this time, the printer's IP address is valid, but LPR may be disabled on the printer. Print a Conguration Pageand look under LPR. For instructions on how to print a CongurationPage, see “The printer’s Conguration Page” on page 6. F or
instructions on enabling or disabling protocols, see Chapter 15,“Disabling Protocols”.

8/13/2019 Tektronix PhaserShare Networking Manual
http://slidepdf.com/reader/full/tektronix-phasershare-networking-manual 122/184
114 PhaserShare Networking Manual
10 Windows NT
Printer printer-name on host IP-address is rejecting your request
The remote queue name is not correctly set. Refer to Step 2 in the appropriateprocedure:
Windows NT 4.0 driver on Windows NT 4.0 server. See “Creating an LPRport” on page 101.
Windows NT 3.x driver. See “ Creating an LPR port” on page 110.
Printer PS on host IP-address is unreachable
or
The LPR print monitor failed to open a temporary le while spooling output forport IP-address :PS
With this problem, you can print all PostScript jobs when logged into the NT Serveras administrator, but users cannot print. Users cannot print because they lack thepermissions to spool to the system le areas.
This problem is frequently encountered after applying Service Pack 2, 3, or 4 to aWindows NT 3.51 print server installed on an Windows NT File System (NTFS)partition. Windows for Workgroups, Windows 95, and other clients will no longer beable to print to shared LPR printers (print queues on Windows NT which are usingLPR to reach their destination).
Service Pack updates change the permissions of the SPOOL and PRINTERS sub-directories to be read-only (write-protected). Also, an administrator could easilydo this (for security reasons) without a Service Pack Update.
To x this problem in Windows NT 4.0:
1. Log in as administrator.
2. Double-click My Computer .
3. Open the folder C:\Winnt\system32 .
4. Set permissions on the spool folder:
a. Click the right mouse button on the spool folder.
b. In the pull-down menu, click the left mouse button on Sharing ; thisdisplays the Printer Properties dialog box.
c. Click Security .
d. Click Permissions ; this displays the Directory Permissions dialog box.
e. In the Directory Permissions dialog box, click Everyone . From the Type ofAccess pull-down list, select Full Control .
f. To close the Directory Permissions dialog box, click OK .
g. To close the Printer Properties dialog box, click OK .
8/13/2019 Tektronix PhaserShare Networking Manual
http://slidepdf.com/reader/full/tektronix-phasershare-networking-manual 123/184
PhaserShare Networking Manual 115
Windows NT 10
5. Set permissions on the Printers folder:
a. In the C:\Winnt\system32 folder, open the spool folder.
b. Click the right mouse button on the Printers folder.
c. In the pull-down menu, click the left mouse button on Sharing ; thisdisplays the spoolProperties dialog box.
d. Click Security .
e. Click Permissions ; this displays the Directory Permissions dialog box.
f. In the Directory Permissions dialog box, click Everyone . From the Type ofAccess pull-down list, select Full Control .
g. To close the Directory Permissions dialog box, click OK .
h. To close the spoolProperties dialog box, click OK .
To x this problem in Windows NT 3.1:
1. Log in as administrator.
2. In the Main group, double-click File Manager .3. Open the folder C:\WINNT35\system32 .
4. Set permissions on the spool folder:
a. Click the spool folder.
b. From the Security menu, select Permissions ; this displays theDirectory Permissions dialog box.
c. In the Directory Permissions dialog box, click Everyone. From theType of Access pull-down list select Full Control .
d. To return to File Manager , click OK .
5. Set permissions on the Printers folder:
a. In the C:\WINNT35\system32 folder, open the spool folder.
b. Click the Printers folder.
c. From the Security menu, select Permissions ; this displays theDirectory Permissions dialog box.
d. In the Directory Permissions dialog box, click Everyone . From theType of Access pull-down list, select Full Control .
e. To return to File Manager , click OK .

8/13/2019 Tektronix PhaserShare Networking Manual
http://slidepdf.com/reader/full/tektronix-phasershare-networking-manual 124/184
116 PhaserShare Networking Manual
10 Windows NT
Printing from the command line via lprTo send a Postscript le to the printer using lpr, type the following lpr command inat the MS-DOS command prompt in Windows NT:
lpr -S IP-address -P PS lename
For example:lpr -S 134.62.36.161 -P PS FONTS.PS
If you get the following message, your printer is spooling to the wrong IPaddress, LPR is disabled on the printing device, or LPR on the printingdevice is denying access:
Error: print server did not accept request.Job aborted.
If you get the following message, the printer has TCP/IP disabled or yourprinter is spooling to an invalid IP address:
Error: print server unreachable or specified
printer does not exist.Print a Conguration Page and make sure that TCP/IP is still enabled. Forinstructions on how to print a Conguration Page, see “T he printer’sConguration Page” on page 6. For instructions on enabling or disablingprotocols, see Chapter 15, “ Disabling Protocols”. Check to see if yourprinter is spooling to a correct IP address.
N O T EWhen using the lpr command at a DOS command prompt when the Name of theprint queue is not PS, this message is displayed: Error: print server didnot accept request. Job aborted.
Checking the IP address of the Windows NT serverIf you have tried the techniques described in this troubleshooting topic andcommunication is still not happening, check the IP address of the Windows NTserver. If it is in a different class (possibly even a different network number in thesame class), it can prevent communication from taking place.

8/13/2019 Tektronix PhaserShare Networking Manual
http://slidepdf.com/reader/full/tektronix-phasershare-networking-manual 125/184

8/13/2019 Tektronix PhaserShare Networking Manual
http://slidepdf.com/reader/full/tektronix-phasershare-networking-manual 126/184
118 PhaserShare Networking Manual
11 Windows 95 and Windows 98: PhaserPort Software
PhaserPort software installation
Using the installerYou can install PhaserPort software using the installer on your printer’s software
CD-ROM. A single integrated installer is used to install printer drivers, PhaserPort,and other software.
1. Put the printer’s software CD-ROM into the CD-ROM drive.
If the Windows autorun feature is enabled, the CD-ROM launchesautomatically.
If the Windows autorun feature is disabled, double-click MyComputer , then double-click the CD icon to launch the CD-ROM.
2. View the brief introductory information, then click Install Drivers tolaunch the installer.
3. When you are prompted to select Easy Install or Custom Install , selectCustom Install .
4. During custom installation, a dialog is displayed enabling you to select theoptions you want to install. Check the box for PhaserPort. To install thedrivers and PPD les for your printer, check the box for Drivers/PPDs (thisis recommended for rst-time installations). Follow the on-screen promptsto complete the installation. For details, see “ Create your rst port andinstall the printer” on page 118.
Create your rst port and install the printer1. After the PhaserPort software is installed, the Add PhaserPort dialog is
displayed. Create your rst port:a. In the Description eld, enter a name for the port (this can be the
printer name/model, location, or any other descriptive name of yourchoice), such as Phaser 740 .
b. In the Name/Address eld, enter the IP address or DNS name of theprinter (for example, 192.1.1.2).
c. Click OK .
2. You are asked if you want to install the PhaserShare Administratorsoftware. Install the PhaserShare Administrator software if you also wantto print using NetWare.
If you don’t know the printer ’s IP address or DNS name, click Browse to display a list of printers on the network. Double-click the printeryou want; PhaserPort automatically enters the information into theAdd PhaserPort dialog. To search the network again, click Refresh ; tonarrow down the search by using subnets, click Advanced .

8/13/2019 Tektronix PhaserShare Networking Manual
http://slidepdf.com/reader/full/tektronix-phasershare-networking-manual 127/184
PhaserShare Networking Manual 119
Windows 95 and Windows 98: PhaserPort Software 11
3. If you chose to install drivers and PPD les earlier in the installation, theinstaller launches the Tektronix Add Printer Wizard.
4. Follow the on-screen instructions for the Tektronix Add Printer Wizard.
When you are prompted to choose Network Printer or Local Printer, chooseLocal printer. When you are prompted to choose a port, choose the portyou created in Step 1a.
5. When prompted, nish the setup by registering your printer and restartingyour computer.
The following topics provide instructions for using PhaserPort after the initialinstallation:
The next topic: “ Adding a port for a new printer”
“Adding a port to an existing printer” on page 119
“Changing a port’s IP address” on page 120
Adding a port for a new printerUse this procedure to install a new printer and add a port for it.
1. Start the Microsoft Add Printer Wizard:
a. From the Start menu, select Settings , then click Printers .
b. From the Printers window, open Add Printer .
2. Use the Add Printer Wizard to install the printer. When prompted, makethe following choices:
When prompted to specify how the printer is attached, choose LocalPrinter .
Choose LPT1 as the connection port.
3. When you are nished with Add Printer Wizard, follow the directions inthe next topic, “ Adding a port to an existing printer” on page 119.
Adding a port to an existing printerUse this procedure to add a port after you have installed the printer.
1. Select your printer:
a. From the Start menu, select Settings , then click Printers .
b In the Printers window, right-mouse click on your printer.
2. From the pop-up menu, choose Properties .
3. When the properties dialog for the printer is displayed, click Details .
If you did not choose to install drivers and PPD les earlier in theinstallation, go to Step 5.
If you are prompted to send a test page to the printer, choose No .

8/13/2019 Tektronix PhaserShare Networking Manual
http://slidepdf.com/reader/full/tektronix-phasershare-networking-manual 128/184

8/13/2019 Tektronix PhaserShare Networking Manual
http://slidepdf.com/reader/full/tektronix-phasershare-networking-manual 129/184
PhaserShare Networking Manual 121
Chapter
12 PhaserLink Printer Management Software
PhaserLink Printer Management Software is a printer administration and supporttool using World Wide Web technology. With PhaserLink Printer ManagementSoftware, you can access printer status and manage your printer over the networkusing a web browser. PhaserLink Printer Management Software gives you thefollowing capabilities:
You can receive printer status and manage your printer over the networkusing a standard web browser.
You can dene a link to your local web server’s support page.You can access on-line manuals and technical support information by using
built-in links to the Tektronix web site.
PhaserLink Printer Management Software provides an easy-to-use, consistentinterface that you can use to perform most of the conguration tasks describedthroughout this manual.
System requirementsPhaserLink Printer Management Software provides printer status and printer
management, independent of network servers and operating systems.PhaserLink Printer Management Software requires only a World Wide Web browserand a TCP/IP connection between the printer and the network. (TCP/IP and HTTPmust be enabled in the printer.)
Multiple language supportPhaserLink Printer Management Software is displayed in the language selected fromthe printer’s front panel. See your printer’s user documentation for information onselecting a language.

8/13/2019 Tektronix PhaserShare Networking Manual
http://slidepdf.com/reader/full/tektronix-phasershare-networking-manual 130/184
122 PhaserShare Networking Manual
12 PhaserLink Printer Management Software
Accessing printer information from a browserBefore you can view your printer’s information pages, you must connect the printerto the network using a TCP/IP connection and set the printer’s IP address.
Once the TCP/IP connection has been established and the printer’s IP address is set,
you can visit the printer’s home page from your web browser by entering theprinter’s URL (Uniform Resource Locator), just as you would to visit any web site.The printer’s default URL is listed here:
http:// printer’s-IP-address /
where printer’s-IP-address is the IP address you set for the printer during TCP/IPconguration.
N O T ESome platforms and browsers allow you to set a name/IP address pair in the UNIXhost table (or equivalent network name-server database on a non-UNIX host); theprinter’s name can be used in place of the IP address in the URL. For example:
http://Phaser360-Marketing/
Printer information pagesYour printer’s Current Status page is your starting place for viewing your printer’sinformation. From the Current Status page, you can access other pages internal tothe printer, and you can link to a number of external web sites as well.
PhaserLink Printer Management Software pages have three components:
Header. The header is at the top of the page. It is the same for all printerpages. The header shows the Tektronix logo, a picture of the printer, andthe printer’s model number.Main section. The top of the main section reports the page name and theprinter name. The rest of the middle section is different for each printer.
Navigation links. Five navigation links take you to other printer pages.The following table describes the links and the pages they lead to.

8/13/2019 Tektronix PhaserShare Networking Manual
http://slidepdf.com/reader/full/tektronix-phasershare-networking-manual 131/184
PhaserShare Networking Manual 123
PhaserLink Printer Management Software 12
PhaserLink Printer Management Software navigation links
Link/Page Description
Status For Phaser 840, 740, 780, 360, 350, 380, 560, 600 printers. Contains live printer status, which isupdated according to the value specied in the Status Refresh Display eld. If an option is notinstalled, no parameters are displayed for that option.
For Phaser 340 and Phaser 550 printers. Contains read-only printer status at the time the pagewas requested. Status messages are not automatically updated while the page is displayed. If anoption is not installed, no parameters are displayed for that option.
Conguration Allows you to congure and manage your printer over the web.
Also allows you to print the printer’s internal help pages (for example: Startup Page, CongurationPage, sampler pages, demo pages).
Help Allows you to print the printer’s internal help pages (for example: Startup Page, CongurationPage, sampler pages, demo pages).
Allows you to download a PostScript error handler le to the printer for help in diagnosing printingproblems.
Contains a link to the Tektronix Color Printer web server for on-line help and technical suppor t.
Allows you to dene a link from the printer’s web pages to your local web server. You can use thislink to supply your own site-specic on-line help information.
Reference Contains links to the Tektronix Color Printer web server for printer manuals and other customerpublications, printer updates, product information, and new printer registration.
Smart Ideas Phaser 840, 740, 780, 360, 380, and 560 printers. Provides an on-line connection to examplesand templates of things you can do with your Tektronix color printer.
Gallery Phaser 340, 350, and 550 printers. Provides an on-line connection to examples and templatesof things you can do with your Tektronix color printer.
List Printers(Phaser 840and 780printers only)
Displays a list of all Tektronix printers on the same IP network as the printer you are connected to.Click on any printer in the list to view that printer’s PhaserLink Status page.
NOTES: The link Copyright Tektronix, Inc. connects you to a page of copyright information on the Tektronix webserver.
In the Help and Reference pages, when you click a link that connects you to the Tektronix web server, the printersends status information back to the Tektronix server. Transmitting this information ensures the quickest connectionto relevant product and update information. Tektronix may store this information to serve you better in the future.See “Information Forwarding” on page 126 for more information.

8/13/2019 Tektronix PhaserShare Networking Manual
http://slidepdf.com/reader/full/tektronix-phasershare-networking-manual 132/184
124 PhaserShare Networking Manual
12 PhaserLink Printer Management Software
Printer status displayTo display the printer’s live status, click the link Start Status Update on the printer’sCurrent Status Page; the Live Status page is displayed.
The page has two parts:
The status summary reports information about the printer’s status andconguration.
The status icon graphically indicates the printer’s status. The followingtable summarizes all of the status icons.
Printer status icons
Icon Description
Ready/Standby The printer is ready to accept data.
Busy If the light in the lower-right corner of the icon is yellow, the printeris printing or processing data.
Jam Paper is jammed in the printer. Check the printer to resolve theproblem.
Error The triangle in the lower-right of the icon is red, indicating that thereis an error at the printer, such as ink or toner empty. Check the
printer and try to resolve the problem.
Warning The triangle in the lower-right of the icon is yellow, indicating thatthere is a non-critical problem at the printer, such as a paper-low orink-low condition.
Paper This could be caused by any of three conditions:
The printer is out of paper.
The printing application has requested a paper size not currentlyloaded in the printer.
The printing application has requested that paper be fedmanually.

8/13/2019 Tektronix PhaserShare Networking Manual
http://slidepdf.com/reader/full/tektronix-phasershare-networking-manual 133/184
PhaserShare Networking Manual 125
PhaserLink Printer Management Software 12
PhaserLink Printer Management Software help lesMost PhaserLink pages allow you to view and set printer parameters through elds.HTML les containing descriptions of the elds are supplied on the printer’sCD-ROM in the PHLINK directory, where the le PLHOME.HTM is the home pagefor the help les. These les can be viewed using any browser that supports
HTML 3.0.If you copy these PhaserLink software help les to your local web server, then denethat server as your local link, PhaserLink users can access the help les from theprinter’s PhaserLink software Help page.
To congure PhaserLink Printer Management Software Help1. Copy the PhaserLink HTML help les from the printer’s CD-ROM to your
local web server. Note the URL for the PhaserLink Help home page,PLHOME.HTM .
2. Access the printer’s Status page by entering the printer’s URL into your
browser. See “Accessing printer information from a browser” on page 122for more information.
3. Click Congure ; this displays the View and Congure Settings page.
4. Click Dene Local HTTP Link ; this displays the Dene Local HTTP Link page.
5. Enter the URL that you have set up for the PhaserLink Help home page(don’t forget the prex http:// ). If you have congured PhaserLink torequire a password, enter it into the Password eld. Then click Do/Apply .
To access PhaserLink Printer Management Software Help
After you have dened the PhaserLink Help home page as your local link,as described in the previous procedure, users can access PhaserLink Help this way:
1. Click Help ; this displays the Help page.
2. On the Help page, click local HTTP link ; this displays the home page forPhaserLink software help.
N O T EPhaserLink passwords are not encrypted.

8/13/2019 Tektronix PhaserShare Networking Manual
http://slidepdf.com/reader/full/tektronix-phasershare-networking-manual 134/184

8/13/2019 Tektronix PhaserShare Networking Manual
http://slidepdf.com/reader/full/tektronix-phasershare-networking-manual 135/184
PhaserShare Networking Manual 127
Chapter
13 Printer Management
Job accountingThe printer can store information about jobs printed. The information, in the form ofa log le, is stored either in the printer’s memory or on a hard disk, if one isconnected to the printer. If the log le is stored in the printer’s memory, it is lostwhen the printer is reset; therefore, it is recommended that a hard disk be used withthis job accounting feature.
The log le is a list of job accounting records stored by the printer. Each recordcontains elds such as user name, job name, pages printed, job times, and tonerused. Not all elds are supported by all printers. For details, refer to thePhaserShare Administrator or PhaserLink Printer Management Software on-linehelp.
The actual job accounting values reported vary depending on the protocol and printcommand used when each job was printed. For example, using NPRINT overNetWare provides the printer with the most information about the job being printed.When using Windows and NetWare, the job name is often LST: or LST:BANNER.Other jobs from other ports may provide even less information about the job.
Job accounting is available through the PhaserShare Administrator and PhaserLinkPrinter Management Software. See the next topic, “J ob accounting: PhaserShare
Administrator” and “Job accounting: PhaserLink Printer Management Software” onpage 128.
Job accounting: PhaserShare Administrator1. Display the Job Display tab:
a. In the Main window, click Congure Printer ; this displays theCongure Printer dialog box.
b. In the Congure Printer dialog box, click Job Display ; this displays the Job Display tab.
2. When the Job Display tab is rst displayed, the job summary list is emptyand the Total Number of Jobs eld reports the number of jobs stored bythe printer. To get job information, click Get Jobs .
For complete information on PhaserShare Administrator job accounting, includingclearing job information, exporting job information to a le, and job accounting leformats, see the PhaserShare Administrator on-line help.

8/13/2019 Tektronix PhaserShare Networking Manual
http://slidepdf.com/reader/full/tektronix-phasershare-networking-manual 136/184
128 PhaserShare Networking Manual
13 Printer Management
Job accounting: PhaserLink Printer Management Software1. On any PhaserLink page, click Conguration . This displays the View and
Congure Settings page.
2. From the View and Congure Settings page, click Download JobAccounting Log . This displays the Job Accounting page.
3. On the Job Accounting page, enter the proper password and clickDo/Apply to access the Job Accounting Links page. See the PhaserLinkPrinter Management Software help les for more information aboutPhaserLink software passwords.
N O T EPhaserLink passwords are not encrypted.
The Job Accounting Links page has links to the following pages, which you use towork with job accounting records.
Browse Job Accounting Records. Displays the 10 oldest job accountingrecords; the numbers at the bottom of the page are links to other pagescontaining the remaining records (10 to a page).
Download All Job Accounting Records. Downloads the job accountinglog le from the printer to your host computer, but preserves the jobsummary list stored by the printer. This page displays job accountingrecords in plain text format. Since this data is accessed through aHyperText link and not through an HTML form, it can be saved directly todisk without interference from the browser.
Clear All Job Accounting Records. Clears the job summary list stored bythe printer, clears all job accounting records in the printer, and displays apage that conrms the operation, or reports an error if the operation could
not be performed.For complete information on PhaserLink Printer Management Software jobaccounting, including clearing job information, downloading job information to ale, and job accounting le formats, see the PhaserLink software help les.
PhaserLink PDF Direct PrintingPhaserLink PDF Direct Printing provides drag-and-drop printing of PDF andPostScript les from your web browser in Windows 95 and Windows 98environments. Just drag any hyperlink for a PDF or PostScript le from the browserto the PDF Direct Printing icon on the desktop to print the le on your Tektronixprinter. There is no need to open the le.
To install PhaserLink PDF Direct Printing, use the installer on your printer ’sCD-ROM. Choose Custom Installation and check the box for PhaserLink PDFDirect Printing . Detailed instructions are provided in the README le and in theon-line help.

8/13/2019 Tektronix PhaserShare Networking Manual
http://slidepdf.com/reader/full/tektronix-phasershare-networking-manual 137/184
PhaserShare Networking Manual 129
Printer Management 13
Phaser 840 Intelligent ReadyIntelligent Ready is an automated system that monitors the Phaser 840 printer’susage and warms up the printer when you are most likely to need it. You can turnIntelligent Ready on or off from the printer’s front panel. Using PhaserLink PrinterManagement Software, you can control when the printer automatically warm s up.
Enabling and disabling Intelligent Ready from the front panel1. In the front panel, scroll to Menu ; press Select .
2. Scroll to Printer Configuration ; press Select .
3. Scroll to Default Printer Settings ; press Select .
4. Scroll to Advanced Printer Settings ; press Select .
5. Scroll to Intelligent Ready . Press Select to turn this option on oroff.
6. Scroll to Exit ; press Select to return to the Ready to Print message.
Setting up Intelligent Ready using PhaserLink Printer Management Software1. On any PhaserLink page, click Conguration . This displays the View and
Congure Settings page.
2. From the View and Congure Settings page, click View and CongureIntelligent Ready Settings . This displays the View and CongureIntelligent Ready Settings page.
3. Select a Warmup Mode :
Intelligent . In this mode, the printer monitors usage patterns andwarms up automatically when you are most likely to need it.
Scheduled . This mode allows you to specify a warmup time for eachday of the week. If you select this mode, use the Sunday throughSaturday elds to select warmup times.
Job Activated. In this mode, the printer warms up when it receives aprint job.
4. If a validation password has been assigned, enter the password to make thechange to take effect.
5. Click Do/Apply .
N O T E
PhaserLink passwords are not encrypted.

8/13/2019 Tektronix PhaserShare Networking Manual
http://slidepdf.com/reader/full/tektronix-phasershare-networking-manual 138/184
130 PhaserShare Networking Manual
13 Printer Management
PhaserLink Status Notication (Email Notication)PhaserLink Status Notication allows the printer to automatically send email to thesystem administrator and others under the following conditions:
When printer errors, warnings, and alerts occur.
When the printer requires attention (for example, when service isrequired).
When a reply to a PhaserLink Remote Internet Printing message is desired.See the PhaserLink Remote Internet Printing User Manual for moreinformation on PhaserLink Remote Internet printing.
This status notication capability is supplied by an SMTP (Simple Mail TransportProtocol) client embedded in the printer’s rmware.
Three designated users can receive messages: SysAdmin, Service, and Key User.Printer messages reporting errors, alerts, and warnings can be individually assignedto any of these users. PhaserLink Printer Management Software provides three
pages for controlling email printing:View and Congure PhaserLink Status Notication (Email Notication). Used to congure status notication parameters such as your emailserver’s IP address; addresses for SysAdmin, Service, and Key Usermessage recipients; and preset subject line and message texts.
View and Congure Email Message Settings. Controls which types ofprinter conditions generate messages to SysAdmin, Service, and Key User.
View and Congure Email Custom Settings. Provides complete control ofnotication for every supported printer condition.
For complete information on status notication, including descriptions of all eldson all three pages, see the PhaserLink software help les.
To display the View and Congure PhaserLink Status Notication (EmailNotication) Settings page1. On any PhaserLink page, click Conguration . This displays the View and
Congure Settings page.
2. From the View and Congure Settings page, click View and CongureInterface Settings . This displays the View and Congure InterfaceSettings page.
3. On the View and Congure Interface Settings page, click View andCongure PhaserLink Status Notication (Email Notication) Settings .This displays the View and Congure PhaserLink Status Notication(Email Notication) Settings page.

8/13/2019 Tektronix PhaserShare Networking Manual
http://slidepdf.com/reader/full/tektronix-phasershare-networking-manual 139/184
PhaserShare Networking Manual 131
Printer Management 13
Usage Prole reports (Phaser 840, 740 and 780 printers only)The printer can generate reports detailing printer usage. These Usage Prole reportsinclude information on many aspects of printer usage, including such items as ink ortoner used, number of pages printed, and media types used. You can get thesereports four ways:
Print reports from the printer’s front panel. You can print out reportsfrom the printer’s front panel. See the next topic, “ Printing Usage Prolereports from the front panel”.
Print reports from PhaserLink Printer Management Software. You canprint out reports from the View and Congure Settings page. See“Printing Usage Prole reports from PhaserLink Printer ManagementSoftware” on page 134.
Send reports via email from the front panel. You can send reports byemail from the front panel. See “ Sending Usage Prole reports via emailfrom the front panel” on page 134.
Send reports via email automatically. Using the PhaserLink PrinterManagement Software status notication (email notication) feature, theprinter can send reports by email automatically. You can control theconditions under which reports are sent out, and you can control whoreceives reports. See “ Controlling Usage Prole email reporting” onpage 137.
Usage prole reports track over 160 individual printer parameters. With UsageProle reports, you can gain valuable information such as:
Unique printer information, such as printer name, date installed, totalpages printed, options installed, and network ID.
Consumables usage data (for example, toner or ink). By trackingconsumables usage, you can order supplies in advance, so your printer willalways be well-stocked with supplies.
Media and tray information, such as how often prints are made on papercompared to transparencies, and how often each tray is used.
Job characteristics, such as size and timing of jobs.

8/13/2019 Tektronix PhaserShare Networking Manual
http://slidepdf.com/reader/full/tektronix-phasershare-networking-manual 140/184
132 PhaserShare Networking Manual
13 Printer Management
Printing Usage Prole reports from the front panelThe standard Usage Prole report contains only those elds with non-zero values.In most cases, this is the easiest format to use. However, it is also possible to print averbose report that contains all elds, including those with zero values (see“Printing verbose Usage Prole reports from the front panel” on page 133).
Phaser 840 printer1. When the front panel displays READY TO PRINT , press the down arrow
button until Menu is highlighted. Press Select .
2. Press the down arrow button until Consumable Usage is highlighted.Press Select .
3. Press the down arrow button until Print Usage Profile ishighlighted. Press Select .
Phaser 740 printer1. While Ready is displayed, press Menu ; the printer displays the rst item
in the menu:
2. Press Menu to access the Help Pages; the following message appears:
3. Press <---- or ----> until the following message appears:
4. Press Menu .
5. Press Print Report .
6. To return the printer to normal operation, press Exit (the far left button)until the front panel displays Ready .
Phaser 780 printer1. While Ready is displayed, press Select ; the Printer menu is displayed:
2. Press Menu ; the Help Pages menu is displayed:
Help Pages<---- ----> Menu
Consumables Page<---- ----> Print
Usage Profile<---- ----> Menu
Printer MenuHelp Pages Menu
Help PagesConfiguration Page Print

8/13/2019 Tektronix PhaserShare Networking Manual
http://slidepdf.com/reader/full/tektronix-phasershare-networking-manual 141/184
PhaserShare Networking Manual 133
Printer Management 13
3. Press the right or left arrow buttons until the front panel displays UsageProfile :
4. Press Menu to access the Usage Profile menu.
5. Press Print .
6. To return the printer to normal operation, press Exit (the far right button)until the front panel displays Ready .
Printing verbose Usage Prole reports from the front panelThe verbose Usage Prole report contains all elds, including those with zerovalues. This format can be used as a guide for interpreting email reports withoutlabels.
Phaser 840 printer1. When the front panel displays READY TO PRINT , press the down arrow
button until Menu is highlighted. Press Select .
2. Press the down arrow button until Troubleshooting is highlighted.Press Select .
3. Press the left arrow button and the Select button at the same time.
4. Press the down arrow button until Test Prints is highlighted. PressSelect .
Phaser 740 printer1. While Ready is displayed, press Menu ; the printer displays the rst item
in the menu:
2. Press Menu to access the Help Pages; the following message appears:
3. Press <---- or ----> until the following message appears:
4. Press Menu .
5. Press and hold Print Report ; while holding Print Report , quicklypress Exit (the far left button). Release both buttons.
6. To return the printer to normal operation, press Exit (the far left button)until the front panel displays Ready .
Help PagesUsage Profile Menu
Help Pages<---- ----> Menu
Consumables Page<---- ----> Print
Usage Profile
<---- ----> Menu

8/13/2019 Tektronix PhaserShare Networking Manual
http://slidepdf.com/reader/full/tektronix-phasershare-networking-manual 142/184
134 PhaserShare Networking Manual
13 Printer Management
Phaser 780 printer1. While Ready is displayed, press Select ; the Printer menu is displayed:
2. Press Menu ; the Help Pages menu is displayed:
3. Press the left or right arrow buttons until the front panel displays UsageProfile :
4. Press Menu to access the Usage Profile menu.
5. Press and hold the up arrow button; while holding the up arrow button,quickly press Print . Release both buttons.
6. To return the printer to normal operation, press Exit (the far right button)until the front panel displays Ready .
Printing Usage Prole reports from PhaserLink PrinterManagement Software
1. From the printer’s home page, click Conguration ; this displays the Viewand Congure Settings page.
2. On the View and Congure Settings page, select Usage Prole from thePrint pull-down list. Click Print .
Sending Usage Prole reports via email from the front panelN O T E
To send Usage Prole reports via email, status notication (email notication) mustbe properly set up for your printer. For more information, see “PhaserLink StatusNotication (Email Notication)” on page 130 .
Phaser 840 printer
1. When the front panel displays READY TO PRINT , press the down arrow button until Menu is highlighted. Press Select .
2. Press the down arrow button until Consumable Usage is highlighted.Press Select .
3. Press the down arrow button until Email Report or Email JobReport is highlighted. Press Select .
Printer MenuHelp Pages Menu
Help PagesConfiguration Page Print
Help PagesUsage Profile Menu
8/13/2019 Tektronix PhaserShare Networking Manual
http://slidepdf.com/reader/full/tektronix-phasershare-networking-manual 143/184
PhaserShare Networking Manual 135
Printer Management 13
Phaser 740 printer1. Press Menu ; the front panel displays Help Pages .
2. Press ----> or <---- until the front panel displays Network Settings .
3. Enter the Network Settings menu by pressing Menu .
4. Press ----> until the front panel displays TCP/IP .
5. Press ----> or <---- until the front panel displays Usage Profile .
6. Press Menu ; the front panel displays the rst of two Usage Prole choices.
To email a full report, press ----> or <---- until the front paneldisplays Email Report . Then press OK . The recipients of this reportare specied in the PhaserLink email notication pages. A full reportis sent to the users specied in the Regular Intervals eld of the Viewand Congure Email Custom Settings page. A report is also sent toTektronix if the Email to Tektronix eld in the View and CongureEmail Notication Settings page is set to On .
To email a job report, press ----> or <---- until the front paneldisplays Email Job Report . Then press OK . The recipients of thisreport are specied in the PhaserLink status notication (emailnotication) pages. A job report is sent to the users specied in theEach Job eld of the View and Congure Email Custom Settings page.
7. To return the printer to normal operation, press Exit (the far left button)until the front panel displays Ready .
Phaser 780 printer1. While Ready is displayed, press Select ; the Printer menu is
displayed:
2. Press Menu ; the Help Pages menu is displayed:
3. Press the left or right arrow buttons until the front panel displays UsageProfile :
Printer MenuHelp Pages Menu
Help PagesConfiguration Page Print
Help PagesUsage Profile Menu

8/13/2019 Tektronix PhaserShare Networking Manual
http://slidepdf.com/reader/full/tektronix-phasershare-networking-manual 144/184
136 PhaserShare Networking Manual
13 Printer Management
4. Press Menu to access the Usage Profile menu.
To email a full report, press the left or right arrow buttons until thefront panel displays Email Report . Then press OK . The recipientsof this report are specied in the PhaserLink email notication pages.A full report is sent to the users specied in the Regular Intervals eldof the View and Congure Status Notication Custom Settings page.A report is also sent to Tektronix if the Email to Tektronix eld in theView and Congure Status Notication Settings page is set to On .
To email a job report, press the left or right arrow buttons until thefront panel displays Email Job Report . Then press OK . Therecipients of this report are specied in the PhaserLink emailnotication pages. A job report is sent to the users specied in theEach Job eld of the View and Congure Status Notication CustomSettings page.
5. To return the printer to normal operation, press Exit (the far right button)until the front panel displays Ready .
Sending Usage Prole reports via email: PhaserLink PrinterManagement Software
N O T ETo send Usage Prole repor ts via email, Status Notication (Email Notication)must be properly set up for your printer. For more information, see “PhaserLinkStatus Notication (Email Notication)” on page 130.
1. From the printer’s home page, click Conguration ; this displays the Viewand Congure Settings page.
2. On the View and Congure Settings page, select Usage Prole FullReport or Usage Prole Job Report from the Email pull-down list.Click Email .
The recipients of this report are specied in the PhaserLink email notication pages.
A job report is sent to the users specied in the Each Job eld of the Viewand Congure Status Notication Custom (Email Custom) Settings page.
A full report is sent to the users specied in the Regular Intervals eld ofthe View and Congure Status Notication Custom (Email Custom)Settings page. A full report is also sent to Tektronix if the Email toTektronix eld in the View and Congure Status Notication (EmailNotication) Settings page is set to On .

8/13/2019 Tektronix PhaserShare Networking Manual
http://slidepdf.com/reader/full/tektronix-phasershare-networking-manual 145/184
PhaserShare Networking Manual 137
Printer Management 13
Controlling Usage Prole email reporting
Specifying when reports are to be sent and specifying the report format1. On any PhaserLink page, click Conguration . This displays the View and
Congure Settings page.2. From the View and Congure Settings page, click View and Congure
Interface Settings . This displays the View and Congure InterfaceSettings page.
3. On the View and Congure Interface Settings page, click View andCongure Status Notication (Email Notication) Settings . This displaysthe View and Congure Status Notication (Email Notication) Settings page.
4. On the View and Congure Status Notication (Email Notication)Settings page, you can specify when full reports are to be sent, and you canspecify the report format:
Time interval. Enter a value in hours in the Usage Prole TimeInterval eld. Reports are automatically sent at the specied timeinterval (for example, every 48 hours).
Page interval. Enter a value in pages in the Usage Prole PageInterval eld. Reports are automatically sent at the specied pageinterval (for example, every 1000 pages).
Report format. The Usage Prole Verbose Email eld controls theformat of email reports. Select Without Labels to get a report thatcontains mostly numbers, without eld labels; select With Labels tosend reports that have the elds labeled, similar to the printed reports
The time interval and page interval settings apply as long as the Regular Intervals check box on the View and Congure Email Custom Settings page is checked.
Also on the View and Congure Email Custom Settings page, you can specify thatreports are to be sent under other conditions:
When jams or errors occur (full report sent).
For each job (job report sent).
To display the View and Congure Email Custom Settings page, click View andCongure Email Custom Settings in the View and Congure Email MessageSettings page.
For more information on customizing Usage Prole reporting and other statusnotication (email notication) features, see “PhaserLink Status Notication (EmailNotication)” on page 130.

8/13/2019 Tektronix PhaserShare Networking Manual
http://slidepdf.com/reader/full/tektronix-phasershare-networking-manual 146/184
138 PhaserShare Networking Manual
13 Printer Management
Specifying who receives reportsUsage prole reporting is part of email notication. You specify who receivesreports by using the View and Congure Status Notication Message (EmailMessage) Settings page, just as you do for other email notication features. UsageProle appears on the View and Congure Status Notication Message (Email
Message) Settings page as one of the email notication condition classes. You canspecify that reports are to be sent to Admin , Key User , and Service users, just as youdo for other email notication features.
You can further customize who receives reports and under what conditions thereports are send by using the check boxes on the View and Congure StatusNotication Custom (Email Custom) Settings page.
For more information on customizing Usage Prole reporting and other statusnotication (email notication) features, see “PhaserLink Status Notication (EmailNotication)” on page 130.
Email to TektronixIn addition to controlling which users at your site receive reports by email, you canallow reports to be sent to Tektronix at specic intervals or under certain errorconditions. A program is currently under development at Tektronix to use thisinformation to serve you better.
N O T EWhen you allow Usage Prole reports to be sent to Tektronix, the data collected istreated condentially, and no information is sent about the content of prints, onlyabout how the printer is used.
To enable email to Tektronix1. On any PhaserLink page, click Conguration . This displays the View and
Congure Settings page.
2. From the View and Congure Settings page, click View and CongureInterface Settings . This displays the View and Congure InterfaceSettings page.
3. On the View and Congure Interface Settings page, click View andCongure Status Notication (Email Notication) Settings . This displaysthe View and Congure Status Notication (Email Notication) Settings page.
4. On the View and Congure Status Notication (Email Notication)Settings page, set the Email to Tektronix eld to On or Off . Make surethat the Status Notication (Email Notication) Enabled eld is set to Yes .

8/13/2019 Tektronix PhaserShare Networking Manual
http://slidepdf.com/reader/full/tektronix-phasershare-networking-manual 147/184

8/13/2019 Tektronix PhaserShare Networking Manual
http://slidepdf.com/reader/full/tektronix-phasershare-networking-manual 148/184
140 PhaserShare Networking Manual
13 Printer Management
Report eldsThe next two tables describe the report elds.
Usage prole job report
Field Description
Printer Name The printer’s name as it appears on the Conguration Page.
Job ID Job identication number assigned by the printer starting from the lastpower-up.
If known for a given job, these identications are also provided:Protocol, Filename, Job Name, User Name, and Host Name; if notknown, -- is reported.
Finished at Date and time when the job was nished.
Duration (min) How many minutes the job took to print; rounded to the nearest minute.
Media Class Type of media used for the job (for example: Paper, Transparency).
Media Size Size of media used for the job (for example: Letter, Legal).
Unique Pages The number of pages printed, not including multiple copies of pages.Copies The number of copies specied for the job.
Total pages The number of unique pages times the number of copies.
Coverage The amount of toner or ink placed on the page(s), expressed as apercentage of a fully-covered page. Values are given for Black, Yellow,Magenta, and Cyan, rounded to the nearest 0.1%.
Consumable The amount of toner or ink used, expressed as a percentage of a fulltoner cartridge or ink stick. Values are given for Black, Yellow, Magenta,and Cyan, rounded to 6 places.
Pixel The number of pixels of each color used. Values are given for Black,Yellow, Magenta, and Cyan, rounded to the nearest K (1024).
Usage prole full report - some elds not supported by all printers
Fieldnumber Field name Description
1 Date of Report The date and time that the report was generated.
2 Time Stamp The date and time that the printer was rst turned on.
3 Network IDs Serial Number, Ethernet Address, IP Address, CheckCode.
4 Printer Name The printer’s name as it appears on the Conguration
Page.5 Printer Type The printer type as it appears on the Conguration
Page.
6 Printer Class Laser or Phase Change.
7 Adobe Firmware PostScript version number.
8 Engine Firmware Print engine rmware version number.
9 PS Firmware PS region rmware number.

8/13/2019 Tektronix PhaserShare Networking Manual
http://slidepdf.com/reader/full/tektronix-phasershare-networking-manual 149/184
PhaserShare Networking Manual 141
Printer Management 13
10 Net Firmware Net region rmware number.
11 OS Firmware OS region rmware number.
12 RAM (MBs) The number of megabytes of printer RAM.
13 Installed Trays The number of trays installed, including themulti-purpose tray.
14 Accessories A list of all accessories installed in the printer: D uplexer,Scanner, IDE Disk, and SCSI Disk.
101 Repor t Intervals Page and time intervals specied in the PhaserLinkView and Congure Status Notication (EmailNotication) Settings page.
102 Images Number of sides printed (a single-sided print is 1 image;a duplex print is 2 images).
103 Planes For all images, the number of colors used (cyan,
magenta, yellow, black).111 Pixels imaged (1K) The total number of pixels printed for each color.
Values are given in K (1024) for Black, Yellow, Magenta,and Cyan, rounded to the nearest K.
112 Average Coverage(%)
The average coverage per page for all images.
113 Pixels Imaged-Paper(1K)
The number of pixels printed on paper for each color.Values are given in K (1024) for Black, Yellow, Magenta,and Cyan, rounded to the nearest K.
114 AverageCoverage-Paper (%)
The average coverage per page for all images on paper.
115 Pixels
Imaged-transparency(1K)
The number of pixels printed on transparencies for each
color. Values are given in K (1024) for Black, Yellow,Magenta, and Cyan, rounded to the nearest K.
116 AverageCoverage-transparency (%)
The average coverage per page for all images ontransparencies.
121 Days printed The number of calendar days that the printer was turnedon. If the printer was turned on for any amount of timeduring a day, that day is counted.
122 Pages / Day A distribution of the number of pages printed for eachday the printer was on, showing how much activity theprinter had.
A set of number pairs in the format page-count range :number of days . For example, 2-4:3 indicates that therewere 3 days in which 2, 3, or 4 pages were printed.
123 Unique Pages / Job A distr ibution of the sizes of jobs.
A set of number pairs in the format unique-page-countrange : number of jobs . For example, 2-4:3 indicatesthat there were 3 jobs that consisted of 2, 3, or 4 uniquepages (sides).
Usage prole full report - some elds not supported by all printers (cont'd.)
Fieldnumber Field name Description

8/13/2019 Tektronix PhaserShare Networking Manual
http://slidepdf.com/reader/full/tektronix-phasershare-networking-manual 150/184
142 PhaserShare Networking Manual
13 Printer Management
124 Copies / Job A distribution of how many copies were printed for each job.
A set of number pairs in the format copy-count range :number of jobs . For example, 2-4:3 indicates that therewere 3 jobs that consisted of 2, 3, or 4 copies.
125 Minutes / Job A distribution of how long each job took to print.
A set of number pairs in the format minutes-range :number of jobs . For example, 2-4:3 indicates that therewere 3 jobs that took 2, 3, or 4 minutes to print.
131 Job Source A set of value pairs in the format job-source : number of jobs . For example, EtherTalk:3 indicates that therewere 3 jobs printed over EtherTalk.
132 Job Language A set of value pairs in the format job-language : numberof jobs . For example, PostScript:3 indicates that therewere 3 PostScript jobs printed.
133 Jobs Collated A set of value pairs in the format No : number of jobs ,Yes : number of jobs . For example, No:5,Yes:3indicates that 5 non-collated jobs were printed and 3collated jobs were printed.
134 Cancelled jobs The number of jobs that were cancelled.
141 Duplex Prints(pages)
A set of value pairs in the format Simplex : number ofpages ,Duplex : number of pages . For example,Simplex:5,Duplex3 indicates that 5 single-sided pageswere printed and 3 double-sided pages were printed.
142 Output Order (pages) A set of value pairs in the format Face Down : numberof pages ,Face Up : number of pages . For example,Face Down:5,Face Up:3 indicates that 5 pages wereprinted face down and 3 pages were printed face up.
143 Color Prints (pages) A distribution of color vs. monochrome pages.
144 Print Quality (pages) A distribution of images for all print qualities.
145 Color Correction(pages)
A distribution of images for all color correction modes.
151 Multi-Purpose TrayMedia
A distribution of images for all possible media size andtype combinations from the Multi-Purpose tray as muchas the user has identied it.
152 Cassette Media A distribution of images for all possible media size andtype combinations from the cassettes.
160 Maintenance KitRemaining (%)
The percentage of life remaining for the maintenancekit.
161 Maintenance KitRemaining (pages)(Phaser 840)
Toner Status(Phaser 740, 780)
The remaining life of the maintenance kit expressed asthe number of pages that can still be printed.
For each toner supply, the status will be shown as OK,Low , Replace , or Not Installed just as on theConsumables Page.
Usage prole full report - some elds not supported by all printers (cont'd.)
Fieldnumber Field name Description

8/13/2019 Tektronix PhaserShare Networking Manual
http://slidepdf.com/reader/full/tektronix-phasershare-networking-manual 151/184
PhaserShare Networking Manual 143
Printer Management 13
162 Fuser Remaining (%) The percentage of life remaining in the fuser unit.
163 Imaging Unit
Remaining (%)
The percentage of life remaining in the imaging unit.
164 Transfer KitRemaining (%)
The percentage of life remaining in the transfer kit unit.
165 Fuser RollRemaining (%)
The percentage of life remaining in the fuser roll unit.
166 Main Charge GridRemaining
The percentage of life remaining for the main chargegrid.
171 Doors Open For each access door, the number of times it has beenopened.
172 ConsumablesReplaced
A distribution of the conditions at which eachconsumable has been replaced, whether it was low orout or neither (i.e. at the user’s discretion), or some
other condition detected by the printer.173 Paper Out For each tray, the number of times it has been emptied.
174 Button Presses The number of times any of the front panel buttons hasbeen pressed.
175 Feature A distribution of how many times the user has accessedfront panel menu settings or printed internal help pages.
181 Power On Count The number of times the power has been switched on.
182 Total On Time (hrs) Total time the printer has been on, in hours.
183 Latest On Time (hrs) Time the printer has been on since just the last time itwas switched on.
184 EStar Time (hrs) Total time the printer has been in Energy Star mode, inhours.
185 EStar TimeDistribution (mins)
A distribution of the time the printer has spent in EnergyStar mode. For example: 15-29:5 indicates that therewere 5 periods of Energy Star lasting between 15 and29 minutes.
186 Warmup Time (hrs) Total time the printer has been in the warmup state, inhours.
187 Ofine Time (hrs) Total time the printer has been unavailable for printing,in hours.
188 JetStack StandbyTime (hrs)
Total time the printer has been in JetStack Standbymode, in hours.
189 JetStack StandbyTime Distribution(mins)
A distribution of the time the printer has spent inJetStack Standby mode. For example: 15-29:5indicates that there were 5 periods of JetStack Standbylasting between 15 and 29 hours.
191 Temperature (C) A distribution of hourly temperature readings.For example: <=10:2 indicates that the enginetemperature was less than or equal to 10 degreesCelsius for 2 hours.
Usage prole full report - some elds not supported by all printers (cont'd.)
Fieldnumber Field name Description

8/13/2019 Tektronix PhaserShare Networking Manual
http://slidepdf.com/reader/full/tektronix-phasershare-networking-manual 152/184
144 PhaserShare Networking Manual
13 Printer Management
192 Humidity (%) A distribution of hourly humidity readings. For example:16-35:43 indicates that the engine temperature wasbetween 16 and 35 percent for 43 hours.
201 System Reset Count Number of times the system has been reset by someinternal condition.
202 System Reset Log Log of the last 5 system reset addresses. (Zeroindicates no event.)
203 System Reset Page# Corresponding page numbers at which the last 5system resets occurred.
204 Engine Error Log Log of the last 10 engine error codes—see “Logs” onpage 145 . (Zero indicates no event.)
205 Engine Error Page# Corresponding page numbers at which the last 10engine errors occurred.
206 PostScript Error Log Log of the last 5 PostScript error codes—see “Logs” on
page 145 . (Zero indicates no event.)207 PostScript Error
Page#Corresponding page numbers at which the last 5PostScript errors occurred.
211 Jam A (Upper Tray;Phaser 840, 740)
Jam AB (Phaser 780)
A distribution of jams for all media size and typecombinations through the upper tray.
A distribution of jams for all media size and typecombinations.
212 Jam B (Middle/LowerTrays)
A distribution of jams for all media size and typecombinations through the middle and lower trays.
213 Jam C (Exit Cover;Phaser 840)
Jam C (Fuser;Phaser 740)
Jam CD(Phaser 780)
A distribution of jams for all possible media size andtype combinations, as much as the user or the tray hasidentied it.
A distribution of jams for all possible media size andtype combinations, as much as the user or the tray hasidentied it.
A distribution of jams for all possible media size andtype combinations.
214 Jam D (Front Cover;Phaser 840)
Jam D (Flip;(Phaser 740, 780)
A distribution of jams for all possible media size andtype combinations, as much as the user or the tray hasidentied it.
A distribution of jams for all possible media size andtype combinations, as much as the user or the tray hasidentied it.
215 Jam E (Exit;(Phaser 840, 740)
Jam E (Phaser 780)
A distribution of jams for all possible media size andtype combinations, as much as the user or the tray hasidentied it.
A distribution of jams for all possible media size andtype combinations.
216 Jam F (Duplex) A distribution of jams for all possible media size andtype combinations, as much as the user or the tray hasidentied it.
Usage prole full report - some elds not supported by all printers (cont'd.)
Fieldnumber Field name Description

8/13/2019 Tektronix PhaserShare Networking Manual
http://slidepdf.com/reader/full/tektronix-phasershare-networking-manual 153/184
PhaserShare Networking Manual 145
Printer Management 13
LogsSeveral lines in the report are logs rather than counters, for example, the PostScriptError Log. Each time a PostScript error occurs (and the user has enabled the ErrorHandler), the PostScript error is recorded as a numerical code along with the pagenumber on which the error occurred.
On each successive error, the log is shifted to the left, with the oldest one beingremoved from the left end, and the new one being added to the right end. Note thata value of 0 (zero) in the log indicates no error. There are actually two lines for eachlog, one for the code and one for the page number. (In the case of last jam, there arethree lines—paper code, location code, and page number.)
N O T EFor information on solutions to engine errors, see the Advanced Features andTroubleshooting Manual on the web or on your printer’s CD-ROM.
217 Jam Manual Feed(Phaser 840)
Jam Multi-PurposeTray(Phaser 740, 780)
A distribution of jams for all possible media size andtype combinations through Manual Feed, as much asthe user has identied it.
A distribution of jams for all possible media size andtype combinations through the Multi-purpose tray asmuch as the user has identied it.
221 Last Jam Location Log of the last 5 jam locations—see “Logs” onpage 145 . (Zero indicates no event.)
222 Last Jam Media Log of the last 5 jam media—see “Logs” on page 145 .(Zero indicates no event.)
223 Last Jam Page # Corresponding page numbers at which the last ve jamsoccurred.
224 Print Head CleanDate Log
Log of the dates and times of the last ve print headcleanings.
225 Print Head CleanPage #
Corresponding page numbers at which the last ve printhead cleanings occurred.
Engine Error Log (Phaser 840 printer)
Code Description
xx ,xxx .4x Device faultxx ,xxx .6x Software error
22, xxx .xx Media jam
Usage prole full report - some elds not supported by all printers (cont'd.)
Fieldnumber Field name Description

8/13/2019 Tektronix PhaserShare Networking Manual
http://slidepdf.com/reader/full/tektronix-phasershare-networking-manual 154/184

8/13/2019 Tektronix PhaserShare Networking Manual
http://slidepdf.com/reader/full/tektronix-phasershare-networking-manual 155/184
PhaserShare Networking Manual 147
Printer Management 13
84 Engine parity error
85 Fuser warmup time out
86 Fuser lamp error
87 ROS motor failure
88 Process motor failure
89 Paper handling motor failure
90 CRUM communications error
91 CRUM verify error
92 CRUM used bit set
93 CRUM ID doesn’t match engine ID
94 CRUM count error
95 CRUM imitation error 1
96 CRUM imitation error 2
97 Duplexer communication error
98 Bias transfer roller error
99 Abnormally high pixel coverage
100 Abnormally high patch density
101 Abnormally low patch density
102 Environment sensor error
103 Home sensor error
104 NVRAM checksum error
105 Pixel count density control error
106 Auto-density control error
Postscript Error Log (Phaser 840, 740 and 780 printers)
Code Description
1 unregistered
2 invalidaccess
3 typecheck
4 invalidrestore 5 dictfull
6 handleerror
7 invalidexit
8 ioerror
9 limitcheck
Engine Error Log (Phaser 740 and 780 printers) (cont'd.)

8/13/2019 Tektronix PhaserShare Networking Manual
http://slidepdf.com/reader/full/tektronix-phasershare-networking-manual 156/184

8/13/2019 Tektronix PhaserShare Networking Manual
http://slidepdf.com/reader/full/tektronix-phasershare-networking-manual 157/184
PhaserShare Networking Manual 149
Printer Management 13
Last jam logsPossible values for Last Jam Location are dened by the particular jams for thefollowing printers:
“Last Jam Log - Phaser 840 printer” on page 149.
“Last Jam Log - Phaser 740 printer” on page 150.“Last Jam Log - Phaser 780 printer” on page 151.
Last Jam Log - Phaser 840 printer
Code Description
1 Jam A (Upper Tray)
1 = Paper Letter2 = Paper A43 = Transparency Letter4 = Transparency A4
2 Jam B (Middle/Lower Trays)1 = Paper Letter2 = Paper A4
3 Jam C (Exit Cover)
1 = Paper Letter2 = Paper A43 = Transparency Letter4 = Transparency A45 = Other (Envelopes)
4 Jam D (Front Cover)
1 = Paper Letter2 = Paper A4
3 = Transparency Letter4 = Transparency A45 = Other (Envelopes)
5 Jam E (Exit Tray)
1 = Paper Letter2 = Paper A43 = Transparency Letter4 = Transparency A45 = Other (Envelopes)
6 Jam Manual Feed
Same as 3, Jam C (Fuser)

8/13/2019 Tektronix PhaserShare Networking Manual
http://slidepdf.com/reader/full/tektronix-phasershare-networking-manual 158/184
150 PhaserShare Networking Manual
13 Printer Management
Last Jam Log - Phaser 740 printer
Code Description
1 Jam A (Upper Tray)
1 = Upper-Paper-Letter2 = Upper-Paper-A43 = Upper-Paper-Legal4 = Upper-Transparency-Letter5 = Upper-Transparency-A46 = Upper-Transparency-Legal
2 Jam B (Middle/Lower Trays)
1 = Middle-Paper-Letter2 = Middle-Paper-A43 = Middle-Paper-Legal4 = Middle-Transparency-Letter5 = Middle-Transparency-A46 = Middle-Transparency-Legal7 = Lower-Paper-Letter8 = Lower-Paper-A49 = Lower-Paper-Legal10 = Lower-Transparency-Letter11 = Lower-Transparency-A412 = Lower-Transparency-Legal
3 Jam C (Fuser)
1 = Paper-Letter2 = Paper-A43 = Paper-Legal4 = Transparency-Letter5 = Transparency-A46 = Coated-Letter7 = Coated-A48 = Coated-Legal9 = Card-Letter
10 = Card-A411 = Card-Legal12 = Env-#1013 = Label-Letter14 = Label-A415 = Fabric Transfer-Letter16 = Fabric Transfer-A417 = 2nd Side-Letter18 = 2nd Side-A419 = 2nd Side-Legal
4 Jam D (Flip) - same as 3, Jam C (Fuser)
5 Jam E (Exit) - same as 3, Jam C (Fuser)
6 Jam F (Duplex) - same as 3, Jam C (Fuser)
7 Jam Multi-Purpose Tray - same as 3, Jam C (Fuser)

8/13/2019 Tektronix PhaserShare Networking Manual
http://slidepdf.com/reader/full/tektronix-phasershare-networking-manual 159/184
PhaserShare Networking Manual 151
Printer Management 13
Last Jam Log - Phaser 780 printer
Code Description
1 Jam AB
1 = Paper-Letter2 = Paper-Legal3 = Paper-Tabloid4 = Paper-Tabloid extra5 = Paper-Tabloid plus6 = Paper-SRA37 = Paper-A38 = Paper-A49 = Paper-A510 = Paper-B411 = Paper-B512 = Transparency-Letter13 = Transparency-A414 = Transparency-Tabloid extra15 = Coated-Letter16 = Coated-Legal
17 = Coated-Tabloid18 = Coated-Tabloid extra19 = Coated-Tabloid plus20 = Coated-SRA321 = Coated-A322 = Coated-A423 = Coated-A524 = Coated-B425 = Coated-B526 = Card-Letter27 = Card-Legal28 = Card-Tabloid29 = Card-Tabloid extra30 = Card-Tabloid plus31 = Card-SRA3
32 = Card-A333 = Card-A434 = Card-A535 = Card-B436 = Card-B537 = Card-Postcard38 = Label-Letter39 = Label-A440 = Fabric Transfer-Letter41 = Fabric Transfer-A442 = Fabric Transfer-Tabloid extra43 = Envelope-Env #1044 = Envelope-Env C445 = Envelope-Env C546 = Envelope-Env C647 = Envelope-Env dl48 = Envelope-Env chou349 = Envelope-Env kaku2
2 Jam CD - same as 1, Jam AB
3 Jam E - same as 1, Jam AB

8/13/2019 Tektronix PhaserShare Networking Manual
http://slidepdf.com/reader/full/tektronix-phasershare-networking-manual 160/184
152 PhaserShare Networking Manual
13 Printer Management

8/13/2019 Tektronix PhaserShare Networking Manual
http://slidepdf.com/reader/full/tektronix-phasershare-networking-manual 161/184
PhaserShare Networking Manual 153
Chapter
14 Getting Help
If you need help from TektronixVisit Tektronix’ color printer web site for the most up-to-date information about yourprinter. View updated user documentation, download utility les, get answers tofrequently asked questions, nd a list of Tektronix dealers in your area, or contactcustomer support.
Tektronix Color Printerweb site
www.tek.com/Color_Printers/
Documentation www.tek.com/Color_Printers/userdoc/introduction.html
Technical support www.tek.com/Color_Printers/support/colcare.html
Color use tips for novicesand experts
www.colorize.com
PhaserLink PrinterManagement software
www.tek.com/Color_Printers/products/phaserlink.html
TekSMART™ KnowledgeBase
www2.tek.com/merlin/tko
Anonymous FTP server ftp.tek.com/Color_Printers/
email update notices www.tek.com/Color_Printers/support/subscribe.html

8/13/2019 Tektronix PhaserShare Networking Manual
http://slidepdf.com/reader/full/tektronix-phasershare-networking-manual 162/184
154 PhaserShare Networking Manual
14 Getting Help
For more information or for getting help with troubleshooting or servicing yourprinter, contact your local Tektronix dealer or sales representative or the followingresources worldwide:
Customer Support Centers
Australia1-800-811-177
Austria0660 5804
Belgium02 720 9602
Brazil0800 16 0220
Canada1-800-835-6100
China10-6235-1230
Denmark(44) 533 444Eastern Europe andthe Middle East+44 1908 68187
Finland0203 206 30
France01 69 86 8137
Germany0180 525 3535
Hong Kong2585-6655
India (South Asia)(91) 80-227-5577
Italy02 45 287 000
Japan81 3 3448 4872
Korea2-528-5299Luxembourg400 847
Netherlands(040) 267 0440
New Zealand+61 2 9888 0100
Norway(22) 723 801
Singapore (ASEAN)1-800-356-5565
Spain902 239 272
Sweden(08) 299 071
Switzerland155 9493
Taiwan(02) 2757-1571Thailand2-645-4407
U.K.(01) 908 681 707
U.S.1-800-835-6100
All other locations: Contact local Tektronix dealers or Tektronix ofces.For a list of dealers in your area, visit www.tek.com/Color_Printers/contacts .

8/13/2019 Tektronix PhaserShare Networking Manual
http://slidepdf.com/reader/full/tektronix-phasershare-networking-manual 163/184
PhaserShare Networking Manual 155
Getting Help 14
Using the automated fax systemsAs an alternative to other resources, and to provide up-to-date information quickly,Tektronix has set up HAL (Highly Automated Library) and EuroHAL, twointeractive, automated fax systems. These automated fax systems provideMacintosh, PC, and workstation users with the latest technical hints and tips (like
color adjustments), solutions to common technical problems, and application notesfor software problems (such as CorelDRAW! and QuarkXPress).
If you have a fax machine and a touch-tone voice telephone, you can order a HALcatalog, listing all of the information offered by HAL. You may call HAL orEuroHAL from anywhere in the world. The fax systems are available 24 hours a day,seven days a week.
Use EuroHAL to order a catalog or individual documents in Europe
EuroHAL includes many documents, some in English and some in other Europeanlanguages. If a local version of the document you want is available, EuroHAL willsend it in your language. Otherwise, it will send English documents.
Country Numbers
Austria
00 44 1908 681839Belgium
Denmark
Finland
Holland
Italy
Norway
Switzerland
France 0800 90 81 86
Germany 0130 819 220
Spain 07 44 1908 681839
Sweden 009 44 1908 681839
UK 01908 681839
Other countries +44 1908 681839(where + is your country’sInternational Access Code)

8/13/2019 Tektronix PhaserShare Networking Manual
http://slidepdf.com/reader/full/tektronix-phasershare-networking-manual 164/184
156 PhaserShare Networking Manual
14 Getting Help
Receiving email update noticesUsing the World Wide Web, you can register to receive email notication of newprinter drivers, accessories and upgrades for your Tektronix Phaser color printer asthey become available. To subscribe to this free service, simply follow these steps:
1. Point your browser to the Tektronix web site:www.tek.com/Color_Printers/support/subscribe.html
2. Enter your email address and select your model of Phaser color printerfrom the pull-down list.
3. Click subscribe .

8/13/2019 Tektronix PhaserShare Networking Manual
http://slidepdf.com/reader/full/tektronix-phasershare-networking-manual 165/184
PhaserShare Networking Manual 157
Chapter
15 Disabling Protocols
After your network conguration is complete, you may want to disable protocolsthat you are not using to avoid unnecessary network trafc. There are four ways todisable protocols:
Use the printer’s front panel; see “ Disabling protocols: front panel” onpage 158.
Use the PhaserShare Administrator, if you are running NetWare; see“Disabling protocols: PhaserShare Administrator” on page 166.
With a TCP/IP connection and a World Wide Web browser, you can usePhaserLink Printer Management Software; see “ Disabling protocols:PhaserLink Printer Management Software” on page 166.
Send the appropriate PostScript utility le to the printer. See the README les on the printer’s CD-ROM. The PC README le is in the UTILS directory; the Macintosh README le is in the Network Utilities folder.
The procedures given here for disabling protocols only apply to EtherTalk andTokenTalk installations (using a PhaserShare Series B Ethernet or Token Ring card).The PhaserShare Series B LocalTalk card does not support the protocols discussedhere, so they cannot be enabled or disabled.
You can enable protocols by the same procedures; just select the command to enablea protocol rather than disable it.
8/13/2019 Tektronix PhaserShare Networking Manual
http://slidepdf.com/reader/full/tektronix-phasershare-networking-manual 166/184
158 PhaserShare Networking Manual
15 Disabling Protocols
Disabling protocols: front panelN O T E
If you are attempting to perform any front panel procedure and you don’t see theexpected menu choices on the front panel display, the front panel may be locked.For information on how to unlock it, see “If the front panel is locked” on page 165 .
Phaser 840 printer1. When the front panel displays READY TO PRINT , press the down-arrow
button until Menu is highlighted. Press Select .
2. Press the down-arrow button until Printer Configuration ishighlighted. Press Select .
3. Press the down-arrow button until Network Settings is highlighted.Press Select .
4. To disable EtherTalk (or TokenTalk): a. Press the down-arrow button until EtherTalk (or TokenTalk ) is
highlighted.
b. Press Select until Off is displayed.
To return the printer to normal operation, press the down-arrow button until Exit is highlighted. Press Select .
To disable other protocols, continue with Step 5.
5. To disable NetWare:
a. Press the down-arrow button until NetWare is highlighted. PressSelect .
b. Press the down-arrow button until NetWare is highlighted.
c. Press Select until Off is displayed.
To return the printer to normal operation, press the down-arrow button until Exit is highlighted. Press Select .
To disable other protocols, press the up-arrow button untilPrevious Menu is highlighted. Press Select . Continue withStep 6.

8/13/2019 Tektronix PhaserShare Networking Manual
http://slidepdf.com/reader/full/tektronix-phasershare-networking-manual 167/184
PhaserShare Networking Manual 159
Disabling Protocols 15
6. To disable TCP/IP:
a. Press the down-arrow button until TCP/IP is highlighted. PressSelect .
b. Press the down-arrow button until TCP/IP Interface ishighlighted.
c. Press Select until Off is displayed.
To return the printer to normal operation, press the down-arrow button until Exit is highlighted. Press Select .
To disable other protocols, press the up-arrow button untilPrevious Menu is highlighted. Press Select . Continue withStep 7.
7. To disable HTTP:
a. Press the down-arrow button until HTTP is highlighted.
b. Press Select until Off is displayed.
c. To return the printer to normal operation, press the down-arrow buttonuntil Exit is highlighted. Press Select .
Phaser 740 printer1. Press Menu ; the front panel displays Help Pages .
2. Enter the Network Settings menu by pressing ----> or <---- untilthe front panel displays Network Settings .
3. Press Menu ; the front panel displays TCP/IP .
4. Disabling TCP/IP:
a. Press Menu ; the front panel displays Interface .
b. Press Menu again to display the current status of the protocol:Interface:Enabled or Interface:Disabled . The current statusis marked with an asterisk ( * ) in the upper-right corner of the display.
c. Press ----> until the front panel displays Interface:Disabled .
d. Press OK to disable the protocol; the front panel briey displaysSelected , then it displays Interface .
e. Press Exit (the far left button) to return to the TCP/IP display.
N O T EWhen you are in the menu, if the front panel is not used for 5 minutes, theprinter returns to the Ready state.

8/13/2019 Tektronix PhaserShare Networking Manual
http://slidepdf.com/reader/full/tektronix-phasershare-networking-manual 168/184
160 PhaserShare Networking Manual
15 Disabling Protocols
5. Disabling EtherTalk: To return the printer to normal operation, goimmediately to Step 8; to continue and disable the EtherTalk protocol,follow these steps:
a. Press ----> ; the front panel displays EtherTalk .
b. Press Menu ; the front panel displays the current status of the protocol:EtherTalk:Enabled or EtherTalk:Disabled. The currentstatus is marked with an asterisk ( * ) in the upper-right corner of thedisplay.
c. Press ----> until the front panel displays EtherTalk:Disabled .
d. Press OK to disable the protocol; the front panel briey displaysSelected , then it displays EtherTalk .
6. Disabling NetWare: To return the printer to normal operation, goimmediately to Step 8; to continue and disable the NetWare protocol,follow these steps:
a. Press ----> ; the front panel displays NetWare .
b. Press Menu again; the front panel displays Interface .
c. Press Menu to display the current status of the protocol:Interface:Enabled or Interface:Disabled . The current statusis marked with an asterisk ( * ) in the upper-right corner of the display.
d. Press ----> until the front panel displays Interface:Disabled .
e. Press OK to disable the protocol; the front panel briey displaysSelected , then it displays Interface .
f. Press Exit (the far left button) to return to the NetWare display.
7. Disabling HTTP: To return the printer to normal operation, go immediatelyto Step 8; to continue and disable the HTTP protocol, follow these steps:
a. Press ----> ; the front panel displays HTTP .
b. Press Menu ; the front panel displays the current status of the protocol:HTTP:Enabled or HTTP:Disabled . The current status is markedwith an asterisk ( * ) in the upper-right corner of the display.
c. Press ----> until the front panel displays HTTP:Disabled .
d. Press OK to disable the protocol; the front panel briey displaysSelected , then it displays HTTP .

8/13/2019 Tektronix PhaserShare Networking Manual
http://slidepdf.com/reader/full/tektronix-phasershare-networking-manual 169/184
PhaserShare Networking Manual 161
Disabling Protocols 15
8. Return the printer to normal operation:
a. Pres s Exit (the far left button) until the front panel displays NetworkSettings .
b. Press Exit (the far left button) again.
If you have changed any parameters that require a printer reset totake effect, you will be prompted to reset the printer. If you pressReset , the printer resets. If you press Resume , the front paneldisplays Network Settings . Press Exit (the far left button); theprinter returns to normal operation, but the changes you have madewill not take effect until the next time the printer is reset.
If you have not changed any parameters that require a printer resetto take effect, the front panel displays Ready .
Phaser 780 printer1. Press Select ; the front panel displays Help Pages .
2. Press the left arrow or right arrow buttons until the front panel displaysNetwork Settings .
3. Press Menu to enter the Network Settings menu.
4. Disabling TCP/IP:
a. Press the right arrow button until the front panel displays TCP/IP .
b. Press Menu ; the front panel displays Interface .
c. Press Menu again to display the current status of the protocol: On orOff . The current status is marked with an asterisk ( * ) in theupper-right corner of the display.
d. Press the right arrow button until the front panel displays Off .e. Press Select to disable the protocol; the front panel briey displays
Selected , then it displays Off again.
f. Press the right arrow button twice to return to the NetworkSettings menu.
5. Disabling EtherTalk (or TokenTalk):To return the printer to normaloperation, go immediately to Step 8; to continue and disable the EtherTalkprotocol, follow these steps:
a. Press the right arrow button until the front panel displays EtherTalk or (TokenTalk ).
b. Press Menu to display the current status of the protocol: On or Off .The current status is marked with an asterisk ( * ) in the upper-rightcorner of the display.
c. Press the right arrow button until the front panel displays Off .
d. Press Select to disable the protocol; the front panel briey displaysSelected , then it displays Off again.
e. Press Exit (the far right button) once to return to the NetworkSettings menu.

8/13/2019 Tektronix PhaserShare Networking Manual
http://slidepdf.com/reader/full/tektronix-phasershare-networking-manual 170/184
162 PhaserShare Networking Manual
15 Disabling Protocols
6. Disabling NetWare: To return the printer to normal operation, goimmediately to Step 8; to continue and disable the NetWare protocol,follow these steps:
a. Press the right arrow button until the front panel displays NetWare .
b. Press Menu ; the front panel displays Interface .
c. Press Menu again to display the current status of the protocol: On orOff . The current status is marked with an asterisk ( * ) in theupper-right corner of the display.
d. Press the right arrow button until the front panel displays Off .
e. Press Select to disable the protocol; the front panel briey displaysSelected , then it displays Off again.
f. Press Exit (the far right button) twice to return to the NetworkSettings menu.
7. Disabling HTTP:To return the printer to normal operation, go immediately
to Step 8; to continue and disable the HTTP protocol, follow these steps:a. Press the right arrow button until the front panel displays HTTP .
b. Press Menu to display the current status of the protocol: On or Off .The current status is marked with an asterisk ( * ) in the upper-rightcorner of the display.
c. Press the right arrow button until the front panel displays Off .
d. Press Select to disable the protocol; the front panel briey displaysSelected , then it displays Off again.
e. Press Exit (the far right button) twice to return to the NetworkSettings menu.
8. Return the printer to normal operation, press Exit (the far right button)again:
If you have changed any parameters that require a printer reset to takeeffect, you will be prompted to reset the printer. If you press Reset ,the printer resets. If you press Resume , the front panel displaysNetwork Settings . Press Exit (the far right button); the printerreturns to normal operation, but the changes you have made will nottake effect until the next time the printer is reset.
If you have not changed any parameters that require a printer reset totake effect, the front panel displays Ready .

8/13/2019 Tektronix PhaserShare Networking Manual
http://slidepdf.com/reader/full/tektronix-phasershare-networking-manual 171/184
PhaserShare Networking Manual 163
Disabling Protocols 15
Phaser 360 printer1. Press Menu ; the front panel displays Help Pages .
2. Enter the Network Settings menu by pressing ----> or <---- untilthe front panel displays Network Settings .
3. Press Menu ; the front panel displays TCP/IP .4. Disabling TCP/IP:
a. Press Menu ; the front panel displays Enable Interface .
b. Press Menu again to display the current status of the protocol: Interface:On or Interface:Off . The current status is markedwith an asterisk ( * ) in the upper-right corner of the display.
c. Press ----> until the front panel displays Interface:Off .
d. Press OK to disable the protocol; the front panel briey displaysSelected , then it displays Enable Interface .
e. Press Exit to return to the TCP/IP display.
5. Disabling EtherTalk (or TokenTalk):To return the printer to normaloperation, go immediately to Step 8; to continue and disable EtherTalk (orTokenTalk), follow these steps:
a. Press ----> ; the front panel displays EtherTalk or (TokenTalk ).
b. Press Menu ; the front panel displays the current status of the protocol:Enabled or Disabled . The current status is marked with an asterisk(* ) in the upper-right corner of the display.
c. Press ----> until the front panel displays Disabled .
d. Press OK to disable the protocol; the front panel briey displaysSelected , then it displays EtherTalk or (TokenTalk ).
6. Disabling NetWare:To return the printer to normal operation, goimmediately to Step 8; to continue and disable the NetWare protocol,follow these steps:
a. Press ----> ; the front panel displays NetWare .
b. Press Menu again; the front panel displays Enable Interface .
c. Press Menu to display the current status of the protocol:Interface:On or Interface:Off . The current status is markedwith an asterisk ( * ) in the upper-right corner of the display.
d. Press ----> until the front panel displays Interface:Off .
e. Press OK to disable the protocol; the front panel briey displaysSelected , then it displays Enable Interface .
f. Press Exit to return to the NetWare display.

8/13/2019 Tektronix PhaserShare Networking Manual
http://slidepdf.com/reader/full/tektronix-phasershare-networking-manual 172/184

8/13/2019 Tektronix PhaserShare Networking Manual
http://slidepdf.com/reader/full/tektronix-phasershare-networking-manual 173/184
PhaserShare Networking Manual 165
Disabling Protocols 15
If the front panel is lockedIf you are attempting to perform any front panel procedures and you don’t see theexpected menu choices on the front panel display, the front panel may be locked.The following topics describe how to unlock the front panel.
Phaser 840 printer
The printer allows a system administrator to lock the front panel menu by usingPhaserLink software or by downloading a utility le. In this protected mode, theConfiguration menu does not display Default Printer Settings or
Network Settings . The following procedure displays these menu choices untilyou leave the Configuration menu; the next time you return to the menu, thechoices will not be displayed.
1. Display the Configuration menu:
a. When the front panel displays READY TO PRINT , press the downarrow button until Menu is highlighted, then press Select .
b. Press the down arrow button until Printer Configuration ishighlighted, then press Select .
2. With the Configuration menu displayed, press and hold the left arrow button; while holding down the left arrow button, press Select , then release both buttons.
Phaser 360 printer
The printer allows a system administrator to lock the front panel menu bydownloading a utility le. In this protected mode, you can print the pages in theHelp Pages menu, but cannot modify any settings in the rest of the menus. For moreinformation on locking the front panel menu with a utility le, refer to your printer’suser documentation.
Press Menu . The front panel displays the following message:
When the front panel is locked and you press Menu , the display shows only thepages in the Help Pages menu (without the heading):
To access the entire menu with the front panel locked, you must use a special keysequence to enter the menu.
Press and hold down Menu and press Exit . The front panel displays thefollowing message:
You now have access to all front panel menus.
Help Pages<---- ----> Menu
Configuration Page<---- ----> Print
Help Pages<---- ----> Menu

8/13/2019 Tektronix PhaserShare Networking Manual
http://slidepdf.com/reader/full/tektronix-phasershare-networking-manual 174/184
166 PhaserShare Networking Manual
15 Disabling Protocols
Disabling protocols: PhaserShare Administrator1. In the PhaserShare Administrator Main window, select the desired printer
from the Printer List .
2. Click Congure Printer ; this displays the Congure Printer dialog box.
3. In the Congure Printer dialog box, click the Ethernet (or Token Ring ) tab.
4. In the Ethernet (or Token Ring ) tab, click Protocol Settings . This displaysthe Protocol Settings dialog box.
5. In the Protocol Settings dialog box, click the tab for the protocol you wantto disable.
6. On the tab for the selected protocol, nd the eld for enabling or disablingthe protocol. On some printers, this eld is labeled Port Enabled ; on otherprinters, the port name is spelled out (for example, NetWare Enabled ). Todisable the protocol, select No .
7. Click OK .
For more information on the PhaserShare Administrator, see Chapter 5,“PhaserShare Administrator Software for NetWare Networks”.
Disabling protocols: PhaserLink Printer ManagementSoftware
1. From the printer’s home page, click Conguration ; this displays the Viewand Congure Settings page.
2. On the View and Congure Settings page, click the link to the View and
Congure Interface Settings page.3. On the View and Congure Interface Settings page, click the link for the
protocol you want to disable; this displays the page for that protocol.
4. On the page for the selected protocol, nd the eld for enabling ordisabling the protocol. On some printers, this eld is labeled Port Enabled ;on other printers, the port name is spelled out (for example, NetWareEnabled ). To disable the protocol, select No , then click Do/Apply .
For more information on PhaserLink Printer Management Software, see Chapter 12,“PhaserLink Printer Management Software”.
8/13/2019 Tektronix PhaserShare Networking Manual
http://slidepdf.com/reader/full/tektronix-phasershare-networking-manual 175/184
PhaserShare Networking Manual 167
Chapter
16 Resetting the Printer
Several of the network conguration procedures require you to reset the printer.There are several ways to reset the printer:
Turn the printer off, then back on again.
With a TCP/IP connection and a World Wide Web browser, you can usePhaserLink Printer Management Software; see “ Resetting the printer:PhaserLink Printer Management Software” on page 167.
PC and UNIX users can send the PostScript le RESET.PS from theprinter’s utilities software.
Macintosh users can reset the printer using the Apple Printer Utility. See“Resetting your printer using the Apple Printer Utility” on page 168.
Resetting the printer by any of these methods restores the printer to its power-onconditions ( not its factory default conditions). The power-on conditions include anycustom changes made to the printer that are stored in the printer’s non-volatilememory and are therefore persistent across printer power cycles. For example, theprinter’s name is a power-on condition that is not altered by resetting the printer.
Resetting the printer: PhaserLink Printer ManagementSoftware1. From the printer’s home page, click Conguration ; this displays the View
and Congure Settings page.
2. On the View and Congure Settings page, click Congure AuthorizationCodes .
3. On the Congure Authorization Codes page, enter the validationpassword (if one has been assigned), and click Do/Apply .
4. Wait 10 seconds, then click the browser’s Stop button.
5. Reload the page in the browser.
For more information on PhaserLink Printer Management Software, see Chapter 12,“PhaserLink Printer Management Software”.
N O T E
PhaserLink passwords are not encrypted.

8/13/2019 Tektronix PhaserShare Networking Manual
http://slidepdf.com/reader/full/tektronix-phasershare-networking-manual 176/184
168 PhaserShare Networking Manual
16 Resetting the Printer
Resetting your printer using the Apple Printer UtilityMacintosh users can reset the printer using the Apple Printer Utility .
1. Locate the Apple Printer Utility , which is included with your printer’snetwork utilities software.
2. Double-click the Apple Printer Utility icon; the Printer Selector window isdisplayed.
3. Select the zone (if applicable) and the printer. Click Open Printer ; a dialog box is displayed containing Printer Information and Printer Preferences .
4. From the Utilities menu, select Restart Printer .

8/13/2019 Tektronix PhaserShare Networking Manual
http://slidepdf.com/reader/full/tektronix-phasershare-networking-manual 177/184
PhaserShare Networking Manual 169
Chapter
17 FTP Interface
Your printer’s FTP interface is a standard FTP server. Using FTP, you can send a jobto the printer, where it is printed (not stored). No password is required. You cansave a PostScript le from an application and send the le to a remote printer over anetwork or the Internet using an FTP program.
The printer’s FTP directory is PRINTER:1, and any les sent there are automaticallypassed to the printer.
The printer’s FTP parameters can be changed using PhaserLink Printer Management
Software. For more information on PhaserLink software, see Chapter 12,“PhaserLink Printer Management Software”.
The following table lists the supported FTP commands.
Supported FTP commands
Request Description
ABOR Abort previous command.
HELP Give help information.
MODE Specify data transfer mode.
NOTE: With the PhaserShare FTP interface, the only transfermode is Stream .
NOOP Do nothing.
PASS Specify password.
PASV Get the server’s IP address and port number.
PORT Specify data connection port.
PUT Send a le to the printer.
PWD Print the current working directory.
QUIT Terminate session.
STAT Report current status.
NOTE: With the PhaserShare FTP interface, optional argumentsto this command are ignored.
STOR Store a le.
STRU Specify a data transfer structure.
NOTE: With the PhaserShare FTP interface, only File andRecord structures are allowed; the default is File .

8/13/2019 Tektronix PhaserShare Networking Manual
http://slidepdf.com/reader/full/tektronix-phasershare-networking-manual 178/184
170 PhaserShare Networking Manual
17 FTP Interface
SYST Specify operating system of server.
TYPE Specify data transfer type.
NOTE: With the PhaserShare FTP interface, only ASCIINon-printing and Image types are allowed; the default is ASCIINon-printing .
USER Specify user name.
Supported FTP commands (cont'd.)
Request Description

8/13/2019 Tektronix PhaserShare Networking Manual
http://slidepdf.com/reader/full/tektronix-phasershare-networking-manual 179/184
PhaserShare Networking Manual 171
IndexAAdapter Status 18Apple Printer Utility
to change printer's name 28
to reset the printer168
AppSocket 77ARP (Address Resolution Protocol)
with cong-IP script 72with cong-TokenRing script 19
automated fax systems (HAL/EuroHAL) 155auto-negotiation 2
BBOOTP 56Broadcast 18Broadcast address 55
Ccables
Ethernet 13LocalTalk 23Token Ring 14
Chooser 26cong-IP 72cong-LPR 77cong-SNMP 82cong-sockets 78cong-syslog 80
cong-TokenRing 19Conguration Pagehow to print 6reports what protocols are enabled 8
Congure NetWare 33control character ltering 76customer support 153
DDHCP 66disabling protocols 157
from the printer’s front panel
(Phaser 360) 163from the printer’s front panel(Phaser 740) 159
from the printer’s front panel(Phaser 780) 161
from the printer’s front panel(Phaser 840) 158
DNSprinter configuration 74UNIX host 83
DOS 10
EEarly Token Release 18email notication 130
email to Tektronix 138enabling protocols 157etc/hosts le 85etc/printcap le 85Ethernet
adapters 11cables 13terminators 13
EtherTalk 25troubleshooting 30
EuroHAL, automated fax system 155
FFrame Routing (Phaser 740 and 360) 16Frame Routing (Phaser 780) 17front panel
disabling protocols (Phaser 360) 163disabling protocols (Phaser 740) 159disabling protocols (Phaser 780) 161disabling protocols (Phaser 840) 158enable/disable RARP/BOOTP
(Phaser 740 and 360) 69enable/disable RARP/BOOTP
(Phaser 780) 70locking and unlocking 165printing Configuration Page (Phaser 740 and
360) 7printing Configuration Page (Phaser 780) 7printing Configuration Page (Phaser 840) 7printing Usage Profile reports (Phaser
740) 132printing Usage Profile reports
(Phaser 780) 132printing Usage Profile reports
(Phaser 840) 132printing verbose Usage Profile reports
(Phaser 740) 133printing verbose Usage Profile reports
(Phaser 780) 134printing verbose Usage Profile reports
(Phaser 840) 133

8/13/2019 Tektronix PhaserShare Networking Manual
http://slidepdf.com/reader/full/tektronix-phasershare-networking-manual 180/184
172 PhaserShare Networking Manual
sending Usage Profile reports via email(Phaser 740) 135
sending Usage Profile reports via email
(Phaser 780) 135sending Usage Profile reports via email(Phaser 840) 134
setting IPX frame type (Phaser 740 and360) 40
setting IPX frame type (Phaser 780) 41setting IPX frame type (Phaser 840) 40setting printer’s IP addressing parameters
(Phaser 360) 63setting printer’s IP parameters
(Phaser 740) 58setting printer’s IP parameters
(Phaser 780) 60setting printer’s IP parameters
(Phaser 840) 57setting Token Ring Frame Routing (Phaser 740
and 360) 16setting Token Ring Frame Routing
(Phaser 780) 17FTP 169
GGateway IP address 55
HHAL, automated fax system 155host access 76hosts le 85
Iinformation forwarding 126Information Not Available 49Intelligent Ready
enabling and disabling from the frontpanel 129
setup with PhaserLink software 129
IP addressing parameters 55DHCP 66general information on setting 57setting from Phaser 360 front panel 63setting from Phaser 740 front panel 58setting from Phaser 780 front panel 60setting from Phaser 840 front panel 57setting using a PostScript utility file
(UNIX) 71
setting using PhaserLink software 73setting using RARP or BOOTP 65
J job accounting 127PhaserLink Software 128PhaserShare Administrator 127
LLocalTalk 25
cables 23troubleshooting 30
LPR 76
MMain window 47model les 84
Nname, EtherTalk or TokenTalk 27NetWare 31
troubleshooting, Windows 36Network Address 18network administration software 9Network mask 55networking software 8NIS 83NWAdmin 33NWCONFIG.PS 33
OOS/2 Warp 95
PPCONSOLE 33PDF Direct Printing 128PhaserLink PDF Direct Printing 128PhaserLink Printer Management Software
format for printer pages 122general information 121information forwarding 126status display 124status icon 124system requirements 121URL, printer 122
PhaserLink status notication (emailnotication) 130

8/13/2019 Tektronix PhaserShare Networking Manual
http://slidepdf.com/reader/full/tektronix-phasershare-networking-manual 181/184
PhaserShare Networking Manual 173
PhaserPort software 117installation 118
PhaserPrint for UNIX software 10
PhaserShare Administrator 43installation methods 45installation procedure 45Quick Configuration Wizard 34system requirements 44
PhaserShare Series B Ethernet card 12PhaserShare Series B Ethernet interface 11PhaserShare Series B LocalTalk card 22PhaserShare Series B Token Ring card
configuration 16ping 94print queue (UNIX) 83
printcap le 85printer name, EtherTalk or TokenTalk 27Printer Not Responding dialog box 50PSERVER 31
Qqueue names (UNIX remote printer) 84queues
UNIX 83UNIX remote printer queue names 84Windows NT 3.x driver 110Windows NT 4.0 driver on a Windows NT 4.0
server or workstation101
RRARP 56remote printer queue names 84resetting the printer 167Route Cache Size 18Route Cache Timeout 18
SSearch Options button 47Search Options dialog box 48
Select by 49SNMP 81Sort by 49Speed 18status icon 124Status page 124Syslog 79
TTCP/IP
extracting files from unix.tar 52host access 76host configuration 83IP addressing parameters 55OS/2 Warp 95printer configuration 55printer status 79troubleshooting 94Windows 95 and Windows 98 117Windows NT concepts 112Windows NT procedures 99
technical support 153terminators
Ethernet 13LocalTalk 23Token Ring
cables 14configuration 16
TokenTalk 25troubleshooting 30
troubleshootingEtherTalk, LocalTalk, TokenTalk 30NetWare/Windows 36TCP/IP 94
UUNIX model les 84Unknown Route 18URL (Uniform Resource Locator)
for the printer 122Usage Prole reports 131
(verbose) printing from Phaser 740 frontpanel 133
(verbose) printing from Phaser 780 frontpanel 134
(verbose) printing from Phaser 840 frontpanel 133
email to Tektronix 138full report 139how to read 139
job report 139printing from Phaser 740 front panel 132printing from Phaser 780 front panel 132printing from Phaser 840 front panel 132printing from PhaserLink Printer Management
Software 134

8/13/2019 Tektronix PhaserShare Networking Manual
http://slidepdf.com/reader/full/tektronix-phasershare-networking-manual 182/184
174 PhaserShare Networking Manual
sending via email from PhaserLink PrinterManagement Software 136
sending via email from the Phaser 740 front
panel 135sending via email from the Phaser 780 frontpanel 135
sending via email from the Phaser 840 frontpanel 134
specifying when reports are to be sent 137specifying who receives reports 138
VView and Congure Information
Forwarding page 126
WWindows 95 and Windows 98 117Windows NT 99
network communication 112network troubleshooting 113Windows NT 3.x driver 109Windows NT 4.0 driver on a Windows NT 3.51
server 104Windows NT 4.0 driver on a Windows NT 4.0
server or workstation 99World Wide Web
printer pages 122

8/13/2019 Tektronix PhaserShare Networking Manual
http://slidepdf.com/reader/full/tektronix-phasershare-networking-manual 183/184

8/13/2019 Tektronix PhaserShare Networking Manual
http://slidepdf.com/reader/full/tektronix-phasershare-networking-manual 184/184