teec chhnniicaall lcchheemmiissttrryy ...old.eng.unideb.hu/kvt/images/angol/techchem/labmanual...or...
TRANSCRIPT

TTEECCHHNNIICCAALL CCHHEEMMIISSTTRRYY LLAABBOORRAATTOORRYY
LAB MANUAL
for mechanical engineer students
Made by: Dr. Ildikó Bodnár college professor
University of Debrecen, Faculty of Engineering, Department of Environmental Engineering
2018.

2
Preface
This lab manual can be used to prepare for the Technical Chemistry laboratory work of mechanical
engineer majors at the Faculty of Engineering, University of Debrecen. This manual helps beginners
to learn how to take informative and short chemical laboratory notes.
All chemical principles, equipment and techniques are generated in the laboratory. For engineers it is
important to have knowledge of chemistry to help them in different tasks of engineering: design and
development of new materials, technologies and for example to protect the environment. The
laboratory is the place where different engineering students get contact with the chemistry.
The main objective of this laboratory course is to introduce engineering students to simple laboratory
operations and some chemical measurement methods. We hope that this manual will also support
students to obtain the ‘know-how’ of planning and carrying out systematic chemical experiments in
addition to observing basic chemical phenomena and learning the most important principles.
September 2018, Debrecen
Instructors

3
Content
PREFACE ........................................................................................................................................................................... 2
CONTENT .......................................................................................................................................................................... 3
TECHNICAL CHEMISTRY LABORATORY PRACTICE ......................................................................................... 4
INTRODUCTION .............................................................................................................................................................. 6
LABORATORY PRACTICES WEEK 1 ....................................................................................................................... 10
1. GENERAL RULES OF LABORATORY WORK .................................................................................................... 10
1.1. LABORATORY WORK AND SAFETY TRAINING .................................................................................................... 10 1.2. LABORATORY EQUIPMENT ................................................................................................................................ 15
LABORATORY PRACTICES WEEK 2 ....................................................................................................................... 22
1. DETERMINATION OF BOD (BIOCHEMICAL OXYGEN DEMAND) VALUES FOR DIFFERENT WATER
SAMPLES BY OXITOP® IS 12 BOD MEASURING SYSTEM (STARTING OF MEASUREMENT) .................... 22
2. INVESTIGATION OF WATER SAMPLES BY MULTILINE P4 PORTABLE ELECTROANALYTICAL SET
............................................................................................................................................................................................ 32
LABORATORY PRACTICES WEEK 3 ....................................................................................................................... 54
1. DETERMINATION OF BOD (BIOCHEMICAL OXYGEN DEMAND) VALUES FOR DIFFERENT WATER
SAMPLES BY OXITOP® IS 12 BOD MEASURING SYSTEM (FINISHING AND EVALUATION OF
MEASUREMENT) ............................................................................................................................................................. 54
2. MASS AND VOLUME MEASUREMENTS
2.1. MASS MEASUREMENTS ....................................................................................................................................... 54
2.2. VOLUME MEASUREMENTS ................................................................................................................................ 58
LITERATURE .................................................................................................................................................................. 67

4
Technical Chemistry Laboratory Practice
Technical Chemistry Laboratory Practice
Year I/semester 2; Lab: 1 hour/week, blocked practices in 2+2x5 hours/semester
1st Group:
1. week: Practice’s Introduction Part
5th April 2018, Thursday 10 am – 12 noon (2 hours), Ground floor; 9. room
2. week: The first real Laboratory Practice of Technical Chemistry for the 1st Group of Mechanical
Engineering Students
12th April 2018, Thursday 10 am – 15 pm (5 hours), 218. lab
3. week: The second real Laboratory Practice of Technical Chemistry for the 1st Group of Mechanical
Engineering Students 19th April 2018, Thursday 10 am– 15 pm (5 hours), 218. lab
2nd Group:
1. week: Practice’s Introduction Part
5th April 2018, Thursday 10 am – 12 noon (2 hours), Ground floor; 9. room
2. week: The first real Laboratory Practice of Technical Chemistry for the 2nd Group of Mechanical
Engineering Students
26th April 2018, Thursday 10 am – 15 pm (5 hours), 218. lab
3. week: The second real Laboratory Practice of Technical Chemistry for the 2nd Group of Mechanical
Engineering Students 3th May 2018, Thursday 10 am– 15 pm (5 hours), 218. lab
Site: Laboratory E218. (2nd floor) (Faculty of Engineering, 2-4, Otemeto Street)
Instructors: Dr. Ildikó Bodnár, college professor
Department of Environmental Engineering, Room 312.
Phone: 77825, e-mail: [email protected]
Dr. Andrea Keczán-Üveges, associate professor
Department of Environmental Engineering, Room 313.
Phone: 77829, e-mail: [email protected]
Dr. Dénes Kocsis, assistant professor
Department of Environmental Engineering, Room 310.
Phone: 77781, e-mail: [email protected]

5
Schedule of Laboratory practices
Week 1
1. General rules of laboratory work and using of laboratory equipment
1.1. Laboratory work and safety training (Lab Manual pages: 10-14.)
1.2. Introduction to laboratory equipment (Lab Manual pages: 15-21.)
Week 2
1. Determination of BOD (Biochemical Oxygen Demand) values for different water samples by
OxiTop® IS 12 BOD measuring system (Starting of measurement). (Lab Manual pages: 22-31.,
Appendix pages 3-10.)
2. Investigation of water samples by MultiLine P4 portable electroanalytical set (Lab Manual
pages: 32-53., Appendix pages 11-26.)
Week 3
1. Determination of BOD (Biochemical Oxygen Demand) values for different water samples by
OxiTop® IS 12 BOD measuring system (Finishing and evaluation of measurement). (Lab
Manual page: 54., Appendix pages 3-10.)
2. Mass and volume measurement
2.1. Introduction into the mass measurements with the overview of the metric and SI units and
introduction into the concepts of precision and accuracy (Lab Manual pages: 54-57., Appendix
pages 27-30.) 2.2. Introduction into the volume measurements with determination of hydrochloric acid solution’s
precise concentration by acid-base titration (Lab Manual pages: 58-66., Appendix pages 31-38.)

6
INTRODUCTION
The objective of the laboratory work is to introduce first-year engineer students of different
background to chemical laboratory work, the use of basic laboratory equipment, simple laboratory
operations and measurements.
The Lab Manual and Appendices (with measurements report templates) are available to the
students at the webpage of Department of Environmental Engineering:
(http://old.eng.unideb.hu/kvt/)
Please, print the actual measurement reports and bring them with yourself for the laboratory
practice!
The weekly syllabus covers the particular topics and gives a full description of the experiments.
Each week the laboratory session begins or closes with a short test (no more than 20 minutes) based
exclusively on the preparatory material of that week and the previous week and the results of the
experiments carried out the previous week. There are two short tests (2. and 3. week) during the
semester.
Lab grading is based on a five-level scale: 1 (fail), 2 (pass), 3 (average), 4 (good), 5 (excellent)
calculated from as an average of the tests’ results (the average of two short test) and measurement
reports (the average of four measurement reports). The minimum requirement for the short tests is
50%.
The lab grade is prerequisite of the signature and the exam, too!
Students with ‘fail’ lab course grade due to inadequate laboratory work have to retake the course the
next year. Students with ‘fail’ course grade due to low test results can re-take a comprehensive test
exam in the exam period.
Participation at practice is compulsory, so it is not allowed to miss any laboratory practices!
The attendance on practice will be recorded by the practice leader. If a student misses, medical
certification is needed to be submitted within a week. It is not possible to miss short tests at the
beginning of the laboratory practice.
In the laboratory, you receive laboratory equipment for use. At the begining and the end of the lab
practice students have to check the equipment. The students are responsible for the protection of the
equipment.
During the lab practice students have to present some essential own tools for the safety lab
work, as: lab coat, chemical spoon, tweezers, alcohol marker pen, calculator (not mobile
phone)!
Please get lab coat for the 2nd and 3th weeks, because it must be worn at all times in the laboratory
(you can buy it in a work-clothes shops or whether in second-hand shops or can borrow it from
somebody for this two occasions).

7
The International System of Units (Systeme Internationale d'Unites);
interconversion of SI and metric units
Metric units, which are often not identical to the latest international standards, are widely used among
chemists and physicists around the world to record the results of their measurements.
The basic metric units of length, mass, and volume are meter, gram and liter. When smaller or
larger units are needed a system based on the powers of ten is used to form prefixes.
The SI system of units is a modern and internationally accepted version of the metric system. In the SI
system, the relationship between the different fundamental units is rigorously consistent. The main
advantage of the SI system is that its exclusive use during calculations guarantees that any intermediate
or final results for both fundamental and derived quantities will also be obtained in SI units without the
need for conversion factors.
The following Table gives the metric and SI units of the most important physical quantities:
Physical property SI unit Metric unit Conversion
Length meter (m) meter (m)
Volume cubic meter (m3) liter (l) 1 l=10–3 m3=1 dm3
Mass kilogram (kg) gram (g) 1 kg=103 g
Pressure pascal (Pa) atmosphere (atm) 1 Pa=1 N/m2
1 atm=101325 Pa
torr (mmHg) 1 torr = 1.333102 Pa
bar 1 bar =105 Pa
Temperature kelvin (K) Celsius degree (oC) K = 273.15 + oC
Energy joule (J) calorie (cal) 1 cal=4.184 J
Significant Figures
In science it is fundamentally important to indicate the accuracy of measured or calculated data. The
primary way of indication is to control the number of significant figures of a quantity. To do this, it is
convenient to give all numbers in the common scientific notation using a factor between 1 and 10
multiplied by the appropriate power of 10. The number of digits in the first factor is the number of
significant figures.
For example: 40200 = 4.02 104: the number of significant figures is three
The number of significant figures in any given quantity can be determined as follows:
(a) If there is no decimal point in the number, a count of the digits from the first non-zero digit on the
right to the last non-zero digit on the left gives the number of significant figures.
(b) If the number contains a decimal point, a count of the digits from the first non-zero digit on the left
to the very last digit (regardless of its value) on the right gives the number of significant figures.

8
Examples:
Significant figures Significant figures
5270 3 0.320 3
5027 4 0.32 2
0.0129 3 10.01 4
There are simple rules for giving significant figures in values calculated by mathematical operations.
For multiplication or division the number of significant figures in the result is the same as the number in
the least precise measurement used in the calculation. For addition or subtraction the result has the same
number of decimal places as the least precise measurement in the calculation.
Accuracy and precision
Scientific measurements almost always have some error. This error may result from the limitation of
the instruments used or the limitations of human senses. It is exceptionally rare to find that an
experimentally measured value is exactly the same as theoretical predictions.
The term accuracy is used to refer to the closeness of single measurement to the true value. The smaller
the difference between the experimental and theoretical value the more accurate the results and the
measuring device are. Some devices are more accurate than others. For example, 10 cm3 of a liquid can
be both measured by a single-volume pipette or a measuring cylinder. Pipettes are more accurate in
this comparison.
However, the true value is only known if some kind of standard can be used for comparison. For most
measurements, the true or theoretically predicted value is not known. This is why before the first use of
any measuring device calibration must be done. This calibration is always in comparison with some
kind of standard and makes sure that the new device is accurate enough. After careful calibration, the
device can be trusted in further measurements.
Errors in measurements are almost always unavoidable. The best option for scientists to decrease the
error of results is to do the same measurement several times (called parallel measurements) and
calculate the average. The average is always more reliable than the result of a single measurement. For
really reliable measurements, the parallel results are close to each other.
Precision is used to refer to the closeness of the set of values obtained from identical measurements of a
quantity on the same instrument. Precision is often given numerically as mean deviation.

9
To obtain mean deviation, first the mean value has to be calculated ( x ), the absolute values of the
individual deviations must be summed ( i ix - x = 0), and finally divided by the number of identical
measurements (
=n
i0).
For example:
During the calibration of a 5 cm3 pipette, the following results were obtained: 5.041 cm3, 5.033 cm3,
5.019 cm3, 5,021 cm3, and 5.025 cm3. What is the value of the mean deviation ( )?
measured values deviation: ix - x 0
x1 5.041 0.013
x2 5.033 0.005
x3 5.019 0.009
x4 5.021 0.007
x5 5.025 0.003
mean: x = 5.028 mean deviation: = 0.007
The calibrated volume of the pipette is given as: 5.028 ± 0.007 cm3 or 5.028(7) cm3 .

10
Laboratory practices
Week 1
1. General rules of laboratory work
Objectives This chapter gives an overview of general and safety rules of working in a chemical laboratory and also
demontrates the most important laboratory equipment.
1.1. Laboratory work and safety training
This part of the chapter provides abundant information on how to work in a chemical laboratory in a
safe and scientifically sound manner. During the first lab session, the instructors will re-emphasize all
the important points. However, simply knowing the rules is not enough to guarantee laboratory safety.
It is the experimenters’ duty and responsibility to work always in a way that does not endanger either
themselves or others working in the same laboratory.
List of rules:
1. Arrive always on time for the laboratory practice (extra time can’t be given for finalizing the
short tests or performing the tasks for the students being late). Repeated failure to arrive on time will
result in expulsion from the lab.
2. Approved lab coats or apron (made of cotton wool preferably) along with appropriate clothing
(e.g. closed toe shoes with socks and long pants) must be worn at all times in the laboratory.
Clothing must cover the entirety of the legs, arms and shoulders to protect against chemical spills.
Clothing must not be loose or flowing to avoid contact with hazardous chemicals or mechanical
equipment. Shoes must cover the entire feet. Shoes with open toes or other exposed skin (e.g.
sandals) are prohibited in the laboratory.
3. In certain cases goggles must be worn during chemical manipulations. Safety goggles must
offer front, top, bottom, and side protection. Failure to wear approved eye protection will result in
ONE warning; after that, you will be expelled from the laboratory for the remainder of that lab.
4. In certain cases (e.g. work with bromine or white phosphorous) rubber gloves must be worn
during chemical manipulations.
5. Because contact lenses may absorb certain solvents, it should be avoided to use them in
laboratory. Contact lenses also represent a special hazard in the event of a chemical splash to the
eyes. Contact lenses tend to concentrate hazardous chemical materials against the cornea and prevent
tears from washing the hazardous chemical away.
6. Long hair must be confined (cured back and off the shoulders in such a manner as to prevent it
from coming in contact with hazardous chemicals, fire or mechanical equipment, and to prevent
contamination of the work environment) during your stay in the laboratory.

11
7. No eating, drinking, or chewing is allowed in the laboratory. Deliberately tasting or smelling
chemicals is also strictly forbidden.
8. The use of media devices is prohibited in the laboratory. This includes cell phones, MP3
players, PDA's, tablets and notebooks of all types. You must be focused on your work without
distractions.
9. No visitors may be present in the laboratory without special arrangements or permission. All
official visitors are subject to the same rules as students in the laboratory including wearing eye
protection.
10. Students are not allowed to work in the laboratory alone. The laboratory instructor or a
teaching assistant must be present at all times.
11. No unauthorized experiments will be performed. Use only small portions of chemicals to
perform the tests (1-2 cm3 of solutions and size of a lentil grain for the solids if not stated otherwise).
12. Horseplay, practical jokes, and/or rowdiness are not allowed in the laboratory.
13. Following instruction on the first day of laboratory all students are required to know the
locations and proper use of safety showers, eye wash fountains, fire extinguishers, fire blankets,
and first aid kits in the laboratory. Any nonfunctioning safety equipment must be reported
immediately to your teaching assistant.
14. Be prepared (you must come to the lab well prepared and knowing the basis of the chemical and
safety procedures associated with the experiments to be performed).
15. Maintain an orderly arrangement of the apparatus, glassware, and materials in your work
area. Work only with clean and unhurt equipment.
16. Wash your hands often during the work with chemicals. Hand washing must be conducted
before taking a break and at the end of each laboratory session.
17. Experiments must not be left unattended. Open flame devices must never be left unattended,
e.g. hot plate, Bunsen burner, etc.
18. Aisles must not be obstructed in any way. No equipment, chairs, supplies are permitted in exit
passageways or aisles (coats and bags must be stored in the lockers).
19. Doors to the laboratories will be (and must) kept closed during lab class time, but exit doors
must not be blocked, bolted, or obstructed in any way to block access. Each person must know the
location of the closest exit door and in case of an emergency (emergency signal) she/he has to leave
the lab through this door. Even in the case of emergency the experiment in progress must be
stopped/stored safely.
20. Be aware of your surroundings and your lab-mates. If you see an unsafe practice, do not
hesitate to report the instructor about it!
20. Never use mouth to fill a pipette. Pipette bulbs are available in the laboratory (one per each
cabinet).

12
21. Never direct the open end of test tube toward yourself or anyone else.
22. Never pour water into concentrated acid. Handle and dispense concentrated acids (e.g., HCl,
HNO3, H2SO4) and bases (e.g., NaOH, KOH, NH3) with extreme caution and only in the fume hood as
directed by the lab instructor. Use the fume hoods also when toxic or irritating vapors are involved
(CO, SO2, NH3, H2S, etc.). Know how to smell properly the vapors evolved in the reaction.
23. In the event that your skin (hands, arms, face, etc.) comes into contact with laboratory
chemicals, wash the affected area quickly and thoroughly with soap and water. Use the eye
wash fountain to flush chemicals from the eyes and face. GET HELP IMMEDIATELY!
Do not rub the affected area with your hands before washing, especially the face or eyes.
24. Chemical spillage over a large part of the body requires immediate action. Flood the
affected area for couple of minutes with tap water. Remove contaminated clothing if necessary. Use
a mild detergent and water only. Get medical attention if needed.
25. Acid and base spills must be neutralized (sodium bicarbonate solution for acids; 1% acetic acid
for bases) followed by washing the affected surface (but the eyes) with plenty of water. Organic
chemical spills and mercury spills must be reported immediately to your laboratory instructor, who
will be responsible for directing the clean-up procedure.
26. Your laboratory instructor must be notified at once of any accident or injury even if it
appears to be minor.
27. Pay attention and follow all chemical waste disposal procedures and use designated waste
containers as directed by the lab instructor. See the lab instructor with any questions regarding
chemical disposal.
28. Clean up any chemical spill. Before leaving the laboratory, make sure your work area is clean
and dry. Ensure that all gas, water valves and electrical equipment are completely turned off. Collect
the equipments belonging to your cabinet before leaving. Close the cabinet with the lock and
return the key to intsructor(s) (unless you are using your own lock as in this case the key form the
lock remains with you while the key form the cabinet must be returned to the instructor).
29. To avoid contamination, keep lids on reagent bottles, never return unused chemicals to the
original container (this is why you should know the quantity that is desired to take for the reaction),
and always double-check the names of any chemicals before using (similar names may correspond to
chemically different substances (e.g. potassium chloride (KCl) v. potassium chlorate (KClO3)) with
very different chemical reactivity).
30. Your instructor is available for any assistance you may need. Never hesitate to ask questions
especially if there is any question concerning proper operating procedure. Be sure that you
understand every instruction before proceeding.
Sign it the proper reports based on the teacher’ instructions
I, the undersigned, have read these laboratory safety rules and agree to observe
them during my laboratory course.

13
Fire Safety in Laboratories
Labs, especially those using solvents in any quantity, have a very high potential for flash fires, explosion,
rapid spread of fire, and high toxicity of products of combustion (heat, smoke, and flame).
Classes of Fire:
Class A: Ordinary combustibles or fibrous material, such as wood, paper, cloth, rubber, and
some plastics.
Class B: Flammable or combustible liquids such as gasoline, kerosene, paint, paint thinners
and propane.
Class C: Energized electrical equipment, such as appliances, switches, panel boxes and
power tools.
Class D: Certain combustible metals, such as magnesium, titanium, potassium, and sodium.
Fire prevention is a vital aspect of laboratory safety:
1. Recognize hazards
2. Evaluate the space before lab tests or chemical reactions have begun. This includes
housekeeping and storage practices.
3. Protect yourself through the proper use of PPE (personal protective equipment) and
emergency equipment.
Housekeeping is an essential component of fire safety in labs:
1. Lab area must be kept clean as work allows.
2. Unused combustible items, such as unused boxes and paper should be cleared from the lab
workspace.
3. Stored items should not block access to the fire extinguishers or other safety equipment
(eyewashes, safety showers), or block access to exits.
Emergency Equipment in the Lab:
Know where the emergency safety equipment in located in the lab space: the nearest fire
extinguisher, fire alarm box, exit(s), telephone, emergency shower/eyewash, and first aid kit, etc.
1. There should be access to a fire extinguisher.
2. Know where the closest fire alarm pull station is located.
3. There should be a safety shower and eyewash located within 10 seconds of the area you are
working, so keep that in mind when planning work.
Emergency Egress
1. Aisles need to remain clear so that there is a clear path of egress to emergency exits.
2. Do not wedge or block doors in the event of a fire.
3. Make sure you are familiar with your building’s evacuation plan and know where exits are
located and learn all of the escape routes from your lab area.
4. Know what to do. You tend to do under stress what you have practiced or pre-planned.
Fire Extinguishers
1. All lab personnel, including faculty staff and students, should be adequately trained in the use
of fire extinguishers and know where the closest fire extinguishers are located.
2. There should be at least one ABC extinguisher either inside the lab, or in close proximity.
3. Extinguishers should not be blocked access or covered up.

14
Fire procedures
Notify:
1. Other occupants of the immediate space (yell)
2. Other occupants of the facility (use the fire alarm)
3. Emergency responders (the alarm will do that for you, but a phone call makes certain)
4. In the event that any student, fire or imminent danger to detect or become aware of these,
report it immediately:
a. The head of the practice,
b. Concierge service to the nearest location,
c. Via phone: 105 (Central Fire Station Number)
Evacuate from a Fire:
1. Pull the fire alarm.
2. Leave immediately if the fire alarm sounds. Don’t ever assume it is just a fire drill.
3. Ensure you take any personal belongings.
4. Close all doors and windows on the way out.
5. Make sure everyone in your lab has been accounted for. Your lab area may want to designate
an assembly area outside to meet in the event of an evacuation.
6. Do not reenter the building unless authorized to do so.
Isolate:
1. Lower hood sash, close lab door(s), close corridor doors.
IF SAFE TO DO SO, attempt to extinguish.
Sign it the proper reports based on the teacher’ instructions
I, the undersigned, have read these laboratory fire safety rules and agree to observe
them during my laboratory course.
15
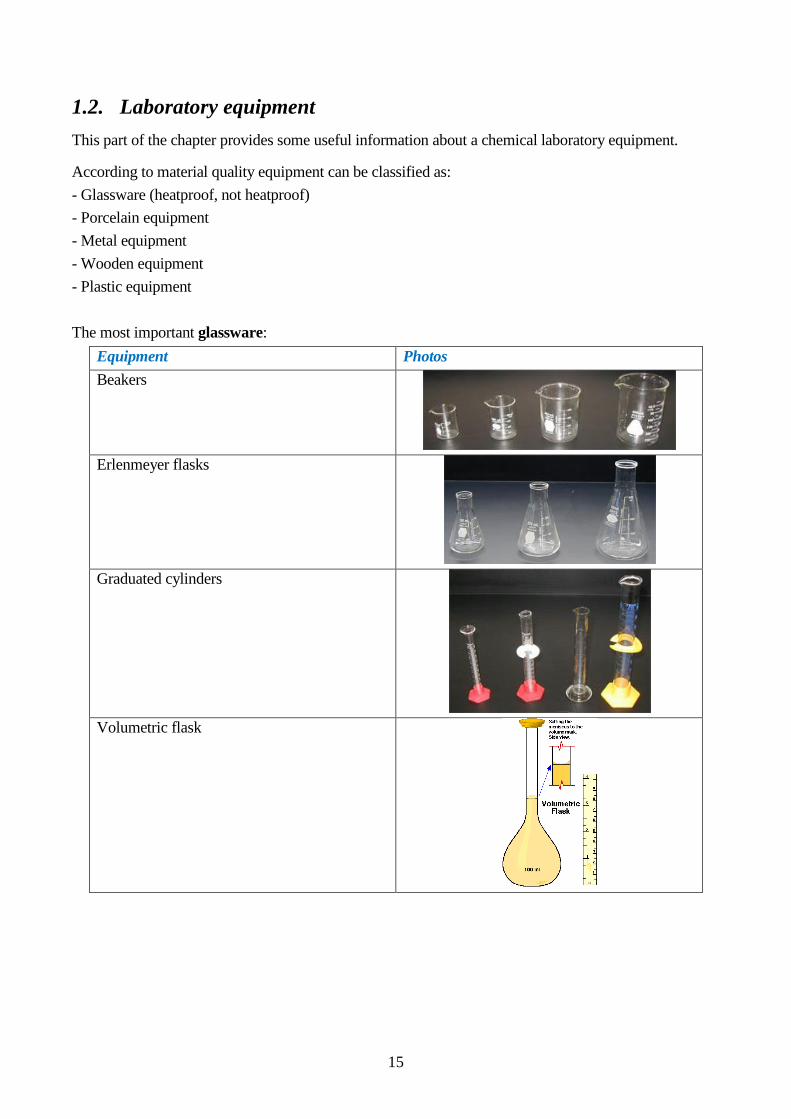
1.2. Laboratory equipment
This part of the chapter provides some useful information about a chemical laboratory equipment.
According to material quality equipment can be classified as:
- Glassware (heatproof, not heatproof)
- Porcelain equipment
- Metal equipment
- Wooden equipment
- Plastic equipment
The most important glassware:
Equipment Photos
Beakers
Erlenmeyer flasks
Graduated cylinders
Volumetric flask

16
Buret/burette
Pipet/pipette
Dropper (a), syringe (b), pipette bulb (c)
Test tubes
Watch glass

17
Funnel
Reagent bottle
The most important porcelain equipment:
Equipment Photos
Evaporating dish
Mortar and pestle
Crucible and cover
Pipe stem(clay) triangle

18
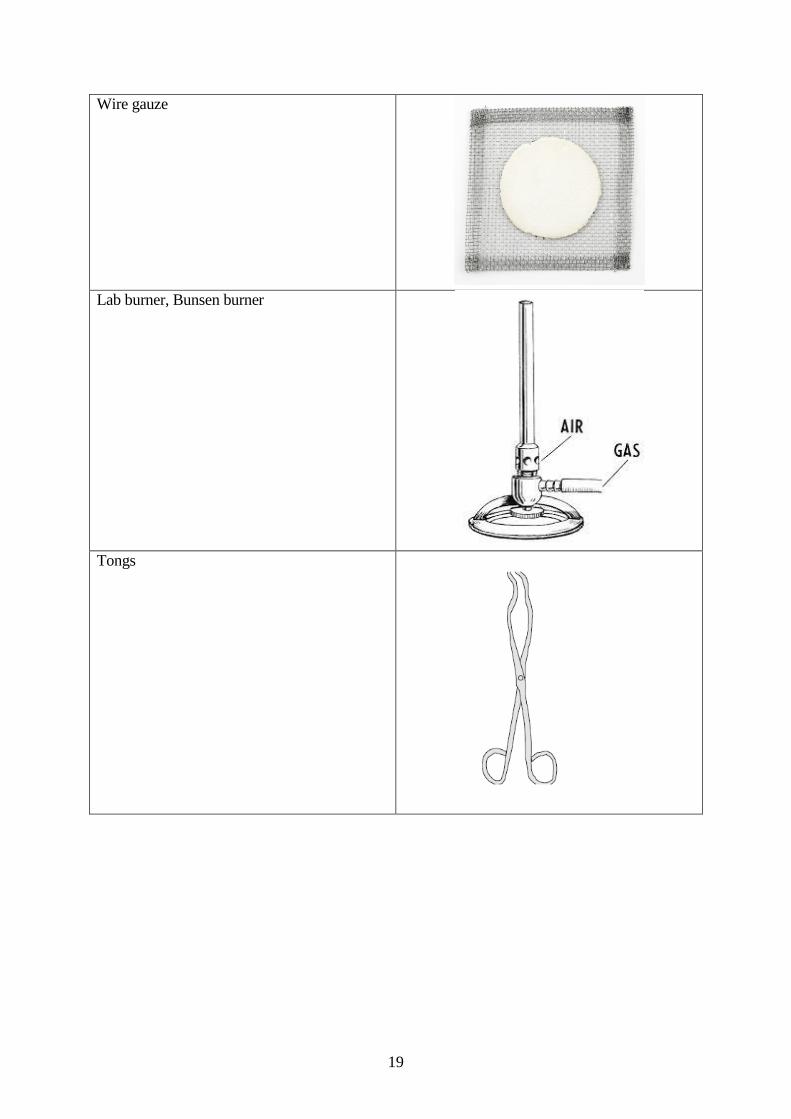
The most important metal equipment:
Equipment Photos
Lab Stand/Ring stand
Iron ring
Utility clamp
Forceps, tweezers
Spatula
19
Wire gauze
Lab burner, Bunsen burner
Tongs

20
The most important plastic and wooden equipment:
Equipment Photos
Safety goggles
Wash bottle
Well plate
Test-tube rack
Brush
Griffin ballon/Pipet(te) bulb

21
Other equipment:
Equipment Photos
Electronic analytical balance/scale
Electronic precision balance/scale
Water purification system
(to get pure/deionized water and ultrapure
water for laboratory use)

22
Laboratory practices
Week 2
Measurement tasks:
1. Determination of BOD (Biochemical Oxygen Demand) values for different water samples by
OxiTop® IS 12 BOD measuring system (Starting the 5 days test!)
2. Investigation of water samples by MultiLine P4 portable set.
1.
Determination of BOD
(Biochemical Oxygen Demand) values
for different water samples by
OxiTop® IS 12 BOD measuring system
1. Objectives
Determination of BOD (Biochemical Oxygen Demand) values for tap water (as a controll sample)
and different waste water samples by OxiTop® IS 12 BOD measuring system.
2. Theoretical bases:
Biochemical Oxygen Demand (BOD) is an important parameter in water resource management, to
measure the quality of water and treatment results in wastewater. In addition, BOD analysis potential
is used in the planning and design of wastewater treatment facilities. In routine use BOD
determination is used to check the wastewater in the inflow and discharge of wastewater treatment
plants.
Depending on the measurement site and type of wastewater the BOD value can lie between a few
mg/L and several thousand mg/L. Several methods are aviable for carrying out the measurement.

23
In „BOD self-cheks” with respirometer, the reduction on oxygen causes a definite pressure
difference that can be measured by piezoresistive electronic pressure sensor.
With several useful function, the OxiTop measuring system minimizes the measuring work and is
especially suited to the courses of the respirometric BOD measurement.
This practical method is very easy to perform. The method requires the samples to be kept at 20 oC
(68 oF) for 5 days in a temperature controlled incubator. The measured value is BOD5 in mg/L.
The complete degradation of organic substances requires about 20 days, but the largest portion of
organic substances can be degraded by 5 days, too. BOD20 value can be calculated from BOD5
values:
BOD20= 1,25 x BOD5
Definition of BOD:
Standard method for indirect measurement of the amount of organic pollution (that can be oxidized
biologically) in a sample of water. BOD test procedure is based on the activities of bacteria and other
aerobic microorganisms (microbes), which feed on organic matter in presence of oxygen. The result
of a BOD test indicates the amount of water-dissolved oxygen (expressed as parts per million or
milligrams per liter of water) consumed by microbes incubated in darkness for five days at an
ambient temperature of 20±1°C. Higher the BOD, higher the amount of pollution in the test sample.
Normally municipal wastewater does not contain toxic or impeding substances. There are enough
nutrient salts and suitable microorganisms. Under these conditions the BOD5 determination with
OxiTop measuring system is possible in the undiluted sample.
A BOD determination is only possible with an adapted biology that must not be damaged, inhibited
or destroyed by the sample!
Measuring principles:
In the same way as we human beings require oxygen, many microorganisms also require oxygen to
obtain energy. This biochemical oxygen demand can be determined by measuring this phenomenon.
Bacteria inhale oxygen and exhale carbon dioxide:
Organic substance + O2 CO2 + H2O
If the microorganisms consume oxygen in the aqueous phase, oxygen from the gas phase is added as
the partial pressure of the gases present constantly adapt. The partial oxygen pressure is of
significance to the respirometric measurement. The partial oxygen pressure in the aqueous phase is
the same as the partial oxygen pressure in the gas phase. In order to accelerate the exchange and to
prevent oxygen deficiency in the measurement sample, the material under test is thoroughly mixed
during the entire duration of the measurement.
Sampling
If analysis begins within 2 hours of sample collection, the sample does not noeed to be colled.
Otherwise, the sample must be cooled to <4°C immediately after it has been taken. The time to
analysis must not exceed 6 hours. If this is not possible, the duration and temperature of storage must
be noted. The sample must not be stored for more than 24 hours.
The duration of bulk sampling is restricted to 24 hours. During the sampling of the bulk sample, the
sample must be cooled to <4°C. A bulk sample is stored in the same way as a random sample.
bacteria
24
A sample is taken using a clean dry vessel and poured into a clean and dry vessel. The sampling
vessel is not prerinsed with the sample solution. The sampling volume is at least one liter, it depends
on the measuring volume.
If possible, the sample should not be frozen. Deep-frozen samples result in lower measured values.
The reason for this is again due to the fact that a biological process is being analysed:
Ice has a larger volume than water (this is the reason that icebergs float!). As a result, the cell walls
of deep-frozen cells can burst and, thus, damage the microorganisms. This inevitably causes the
BOD value fall.
Mixing and homogenizing
The sample in the BOD bottle must have a composition that is identical to the original sample. The
sample must be homogenized. The reason for this is obvious if you imagine a sample that has benn
allowed to settle. Obviously, measuring the sediment would lead to BOD that was too high whereas
measuring the supernatant liqiud would lead to a BOD that was too low.
The question remains is what kind of homogenization should be used. The use of a blending machine
is only recommended if the particles of solid matter are very coarse. The blending process destroys
the flakes and the microorganisms could be damaged.
Mechanical stirring or magnetic stirrer with a stirring rod (bar) is gentler.
BOD samples are not filtered as a rule! By filtering the sample, undissolved components that
naturally also have a BOD are removed. The measurement would lead to lower results.
The sample should have a neutral pH value of between 6.6 and 7.2. The pH value can be adjusted
by means of sulfuric acid or sodium hydroxide.
Microorganisms always adapt to their specific habitant. In order to survive, they require an
environment that is suited to their species. Indispensable for this is an adapted pH range within the
sample. In the purification of bilogical wastewater, this corresponds to a pH range of between 6.6
and 7.2.
If sample contains inhibiting and/or toxic substances such as phenols, heavy metals or cyanide
compounds in high concentrations, samples must be specially monitores and processed. The oxygen
degradation curves in inhibited and/or toxic polluted samples are greatly delayed. In some cases,
almost no oxygen degradation can be seen int he first few days whereas, in other cases, degradation
is reduced throughout the entire testing period.
Thermostatting
The sample that is used must be brought to the required temperature ±1°C before being poured into
the graduated measuring flask. Any sample that ever had a temperature of >50°C at any time must
be seeded with a sufficient number of bacteria. The temperature during a BOD measurement should
be held constant ±1°C through the entire measurement period. The OxiTop has a built-in AutoTemp
function. It is sufficient to thermostat the sample to 15-21°C before taking the measurement sample.
This point will be addressed separately at a later stage.

25
Required instruments and accessories:
OxiTop measuring system: it is based on pressure
measurements in a closed system: microorganisms in
the sample consume the oxygen and form CO2; the
CO2 is absorbed by NaOH, creating a vacuum that can
be measured as a mg/L BOD value.
Measurement range: 0-40 digit corresponding to 0-
40/80/200/400/800/2000/4000 mg/L BOD.
OxiTop heads (green and yellow) have an AutoTemp
function: if the sample temperature is too cold, the
start of measurement is automatically delayed by at
least 1 hour until a constant temperature has been
reached. Apart from the automatic storage of 5
measured values (1 value per day), further measured
values can be read at all times during or after the
period of 5 days, which permits the tracking of check
values or measurements over longer periods.
Head contains 1 piezoelecctric pressure sensor; 2
operating keys: M for showing the current value, S for
showing the stored value; 2-placed LED, displaying
00 to 50 „scale divisions”; 2 batteries with a typical
working life of 1 year. Conversion of mbar to digits is
stored in the instrument, i.e. evaluation of the
measured values remains unchanged.
Inductive stirring system:
Stirrers IS 12 have been specially developed for BOD
measurement with the OxiTop system. Software-
controlled speed regulation prevent the magnetic
stirrer bar from getting cought or wobblong.
Incubator themostatic box (temperature: 20±1°C):
To incubate samples at a constant, desired temperature
during the reaction period, a termostat cabinet is
necessary. It is fitted with internal power socket and 4
shelves are also available in it, thus enabling
simultaneous temperature control of up to 48 standard
BOD samples.

26
Brown sample bottles (nominal volume 510 ml):
Brown glass prevents any possible growth of algae. In
order to close the gratuated measuring flask so that it
is leakproof, it is sufficient to tightly screw on the
OxiTop measuring head.
Graduated overflow measuring beakers/flasks: the
sample volume used regulates the amount of oxygen
available for a complete BOD. The expected range of
measurement of the sample determines the volume to
be used. The two volumes that are most often required
are 164 mL and 432 mL. The volumes used are
selected so that the factors for calculating the BOD5
are even-numbered.
Nitrification inhibitor, NTH 600 solution
(allylthiourea): The so-called nitrificants (typically
nitrosomonas and nitrobacter bacteria) also consume
oxygen in the conversation of ammonium to nitrite
and nitrate. This consumption is not included in the
BOD5 value. Consequently, an inhibitor is added to
the measurement solution to prevent the conversation
of ammonium to nitrate.
Stirring rods (bars) and stirring bar remover: the
magnetic stirrer rods that are supplied are designed
specially for the bottles so that they provide optimum
mixing of the sample.
Rubber sleeve and Sodium hydroxide tablets: Tablets
are used to absorb carbon dioxide. 2 tablets NaOH are
required for each measurements. You have to put
tablets into rubber sleeve and after that put the rubber
sleeve into the neck of sample bottle. As a result of the
reaction with carbon dioxide in which water is formed
and due to the hygroscopic properties of NaOH, the
tablets become damp or are dissolved during the
measurement.

27
3. Experiment Outline
1. Estimate the measuring range of sample to be analysed.
Measuring range
(mg/L)
Sample volume (mL) Factor Nitrification inhibitor
solution (drops)
0-40 432,0 1 9
0-80 365,0 2 7
0-200 250,0 5 5
0-400 164,0 10 3
0-800 97,0 20 2
0-2000 43,5 20 1
0-4000 22,7 100 1
2. Take suitable signs on the sample bottles.
Group Number/
Sample ID
Measuring range Paralel measurements: 3 times
Sample 1
Tap water
0-40 mg/L 1/1. 1/2. 1/3.
Sample 2
Waste water-1
0-400 mg/L 2/1. 2/2. 2/3.
Sample 3
Waste water-2
0-800 mg/L 3/1. 3/2. 3/3.
3. Rinse the overflow measuring flask with the measured sample using gloves. Empty thoroughly.
4. Add the nitrification inhibitor solution (NTH 600) to the sample bottle (See the 1. point table).
5. Fill the overflow measuring flask with the homogenized sample.
6. Transfer/pour the selected volume of sample to the sample bottle.
7. Insert a magnetic stirrer bar into the bottle.
8. Insert the rubber sleeve in the neck of the bottle.
9. Place 2 sodium hydroxide (NaOH) tablets in the rubber sleeve with tweezers. (Caution! The
tablets must never come into the sample!)
10. Screw OxiTop head directly on sample bottle.
11. Start measurement: Press S and M simultaneously (2 seconds) untill the display shows 00.
_ _ 00 Display: Stored values are deleted
12. Keep the measuring bottles for 5 days at 20°C (e.g. in a termostatic cabinet). After the measuring
temperature has been reached (after 1 hour at the earliest, after 3 hour at the latest; AutoTemp
function), the OxiTop automatically starts the measurement of oxygen consumption. During the 5
days the sample is countinously stirred.
Place IS 12 Inductive Stirring System into the termostatic cabinet.
Connect line adaptor to main socket.
Connect line adaptor to instrument.
After a short waiting time the Inductive Rotary field is automatically built up and the stirring
rods start running.
2 sec

28
Place prepared sample bottles onto IS 12 stirring system.
The OxiTop automatically stores one value every 24 hours for 5 days. To have the current value
shown press the M key.
M Display current measured value:
Press M until measured value is displayed (1 second)
39 e.g.
13. Readout of the stored values after the 5 days have passed.
S Recall stored value:
Press S until measured value is displayed (1 second).
Scroll to next day by repressing the S key while the measured
value is displayed (5 sec). Fast scrolling by repeatedly pressing
the S key.
Convert the displayed measured value (digits) into BOD value with the given factors
(Digits x Factor = BOD5 in mg/L).
(You must be multiplied the digits with given factor to get BOD5 values!)

29
Use the following table to data recording:
Samples Digit factor 1st day 2nd day 3th day 4th day 5th day BOD5
(mg/L)
I/1. *
** I/2.
I/3.
II/1.
II/2.
II/3.
III/1.
III/2.
III/3.
* Reading value
** Converted values (Digits x Factor)
4. Measuring Table:
Note the measured and converted values in the following Table.
Group number:
Sample
ID Measuring
range
(mg/L)
Sample
volume
(mL)
Nitrification
inhibitor
solution
(drops)
Factor BOD5
values at
the 5th
day in
digits
BOD5
values
(mg/L)
Digits x
Factor
Average
BOD5
value
(mg/L)
1/1. 0-40 432* 9 1
1/2. 0-40 432* 9 1
1/3. 0-40 432* 9 1
2/1. 0-400 164* 3 10
2/2. 0-400 164* 3 10
2/3. 0-400 164* 3 10
3/1. 0-800 97** 2 20
3/2. 0-800 97** 2 20
3/3. 0-800 97** 2 20
Temperature of measurement:
Starting time: * Use overflow measuring flask
**Use measuring cylinder

30
5. Disturbances and system messages:
Measured value remains below measuring range
The display shows zero or too low a value.
The measuring equipment is not water-tight.
Check rubber sleeve, screw top and bottle.
Insufficient sample preteatment or preservation.
The temperature of the sample had not sufficiently been adjusted (<15°C).
Measuring range exceed.
The measuring range chosen is to small. With very high values (>2000 mg/L) we recommend to
predilute the sample.
Nitrification inhibitor (allylthiourea) is missing or lacking.
Errors due to procedure have not been mentioned.
System messages:
IF: Memory empty (IF = measured value of day 1 is missing).
LO: Change batteries (approx. every 3 years)! --
-: Value remains below measuring range (< 0 digits). ---: Value exceeds measuring range (> 50 digits).
6. Evaluation:
Show the BOD values in the following paper:
5. Cleaning:
Screw OxiTop head from the sample bottles.
Remove the rubber sleeves with a tweezer and put them in a beaker.
With the stirring bar remover remove the stirring bars from the sample bottles and place them
in another beaker. (Attention! Do not pour the sample in the sink with the stirring bars!)

31
Pour the samples without stirring bars in the sink and wash out the bottles. Do not use
disinfectants! (Disinfectants will kill the required microoganisms!) Remove gross
contaminations mechanically, e.g. with brush.
Rinse the bottles with clear water or with water of the next samples. (After using detergents
rinse thoroughly! Detergent residues may disturb the BOD5 determination!)
Cleaning of the OxiTop Single Measuring System:
Do not use alcohol or acetone!
Clean with a soft cloth and aqueous soap solution.

32
2.
Investigation of water samples by
MultiLine P4 portable electroanalytical set
1. Objectives
Investigation of different water samples by MultiLine P4 electroanalytical portable set.
2. Theoretical bases:
Introduction
Electrochemisty, electrochemical analysis
Electrochemistry plays a very important role both in technology (for example chemical sources of
electic energy) and chemical analytics (for example potentiometric or conductivity measurements,
both providing a quantitative measure for the concentration of charged solute particles).
Reduction and oxidation are two central chemical terms that describe the ability of chemical agents
to accept (reduction) or donate electrons (oxidation). Standard electrode or redox potentials are very
important in chemistry because they provide a quantitative measure of reducing and oxidizing power
and they also provide a convenient way to predict the direction of redox reactions. The larger negative
value the electrode potential is, the stronger the reducing agent is, or, vice versa, a large positive
electrode potential indicates a powerful oxidizing agent (assuming that concentrations are not very
different).
Standard electrode potentials can be used to decide if any two substances will react in a redox process.
The general rule is as follows: the oxidized form (ox1) of the redox system with the more positive
electrode potential (1) is capable of oxidizing the reduced form (red2) of the redox system with the more
negative electrode potential (2):
ox1 + red2 ox2 + red1
The redox reaction proceeds until an equilibrium is established because the concentration effects make
the actual electrode potentials of the systems equal.
An electrochemical cell used, for example, for electrolysis, consists of the source of an electric voltage,
as well as of two chemical electodes immersed typically in an aqueous solution of an electrolyte. The
electric circuit consists of negative charges, the electrons, which migrate through all metal parts of this
cell, and the ions both positive (cations) and negative (anions) migrating through the aqueous solution
towards the respective electrodes. At the electrodes, the ions either release an electron or accept an
electron, leading to a respective chemical reaction.
The cells can be grouped for galvanic (voltaic) cells and electolytic cells. A galvanic cell induces a
spontaneous redox reaction to create a flow of electrical charges, or electricity. Non-rechargeable
batteries are examples of galvanic cells. Electrons flow from the anode (negative since electrons are
built up here) to the cathode (positive since it is gaining electrons). An electrolytic cell is one kind of
battery that requires an outside electrical source to drive the non-spontaneous redox reaction.

33
Rechargeable batteries act as electrolytic cells when they are being recharged. Must supply electrons
to the cathode to drive the reduction, so cathode is negative. Must remove electrons from the anode
to drive the oxidation, so anode is positive.
Both cells contain two electrodes (the anode and the cathode), a volt meter (measures the electric
current, in galvanic cells, this shows how much current is produced; in electrolytic cells, this shows
how much current is charging the system), an electrolyte (conducting medium, which has contact
with electrodes and it usually in aqueous solution of ionic compounds) and the salt bridge.
To illustrate the concept of electrochemical cells, we consider the Danielle-element as an example
of galvanic cell or chemical battery. The galvanic chain connects a zinc-electrode and a copper
electrode via a salt bridge. The cell is sketched in following figure.
source: glossary.periodni.com
Zn(s) | Zn2+ (aq) || Cu2+ (aq)| Cu(s)
oxidation- (half-cell) (salt bridge) (half-cell)-reduction
Oxidation: Zn(s) → Zn2+ (aq) + 2e- (anode)
Reduction: 2e- + Cu2+ (aq) → Cu(s) (cathode)
An electrochemical cell consists of two half-cells. Each half-cell consists of an electrode and an
electrolyte. The two half-cells may use the same electrolyte, or they may use different electrolytes.
The salt bridge allows the ions to flow from one half cell to another but prevents the flow of
solutions. It joins the two halves of the electrochemical cell and filled with a salt solution or gel
(potassium chloride, KCl). The salt bridge keeps the solution separate and completes the circuit.
An electrolytic cell is a cell which requires an outside electrical source to initiate the redox reaction.
The process of how electric energy drives the non-spontaneous reaction is called electrolysis.
Whereas the galvanic cell used a redox reaction to make electrons flow, the electrolytic cell uses
electron movement (in the source of electricity) to cause the redox reaction. In an electrolytic cell,
electrons are forced to flow in the opposite direction. Electrolytic cell for the example above:

34
Oxidation: Cu(s) → Cu2+ (aq) + 2e- (anode)
Reduction: Zn2+ (aq) + 2e- → Zn(s) (cathode)
MultiLine P4 set gives opportunities for multi-parameters measurements. It contains different
electrodes to measure given parameter of analysed samples (solution) in field or in the laboratory.
The measuring signal is not processed in the instrument, it is generated directly in the sensor and
transmitted to the meter with additional information.
This instrument contains the following electrodes:
Type of electrode Electroda ID Measured parameters, dimensions
pH Combined Electrode
with Integrated Temperature
Probe
SenTix 41 pH value (pH), -
temperature, °C
Oxidation-reduction
potential (ORP), mV
Standard Conductivity Cell TetraCon 325 conductivity (), S/cm
temperature, °C
salinity (SAL), g/L
Dissolved Oxygen Probe CellOx 325 dissolved oxygen
(DO, O2) concentration,
mg/L
temperature, °C
dissolved oxygen
(DO, O2) saturation, %
2.1. pH value
Basic principles
The definition of pH is the theoretical definition that designates the pH value as the negative decimal
logarithm of the hydrogen ion activity:
pH = - log aH+
At the same time, this activity corresponds to an effective concentration.
The water molecule (H2O) has the property of dissociating into two ionic components in aqueous
solution.
H2O H+ + OH-
The H+ ion is termed hydrogen ion or proton, the OH- ion hydroxide ion.
The pH value desribes the activity of Hydrogen ions in aqueous solutions on a scale of 0 to 14. Based
on this scale, liquids are characterized as being acidic, alkaline or neutral: a solution which is neither
acidic or alkaline is neutral. This corresponds to a value of 7 on the scale.
Acidity indicates a higher activity of hydrogen ions and a pH value lower than 7.
Alkaline solutions are characterized by a lower hydrogen ion activity or higher hydroxide ion
activity, respectively and a pH value above 7.
The graph below uses examples to illustrate the pH scale. pH values below 0 and above 14 actually
occur in practice, but are often difficult to measure. pH scale is logarithmic. A difference of one pH
unit represents a tenfold, or ten times increase or reduction of hydrogen ion activity.

35
The measurement of pH can be carried out with a pH electrode: two electrodes submersed in a
solution develop a measurable potential difference. Prerequisite is that one electrode (the reference
electrode) always develops a constant potential Eref and that the potential of the second electrode
Emeas (measuring electrode) is a function of the pH value. The measurable voltage, i.e. the potential
difference, can be calculated using the Nernst law:
where:
R= general gas constant (8.3145 J/(K*mol))
F= Faraday constant (96485 C/mol)
U0= normal voltage (mV)
T= temperature (K)
This clearly shows that the measured voltage has a linear dependency on the pH value. The slope of
the corresponding straight line curve is temperature-dependent. In the practical measurement, the
voltage difference U is converted into the pH value by means of calibration data.
The actual pH measurement is a voltage measurement between two electrodes. In modern
combination electrodes, both electrodes are embedded within one another.
In this way, practical requirements can be better fulfilled than with separate measuring and reference
electrodes.
What causes this voltage? Each pH electrode is an ion-sensitive electrode. Through the replacement
of ions in the glass membrane by H+-ions, the voltage between the measuring and reference electrode
changes. The voltage represents the difference of the potentials of the two electrodes. Only the
potential difference can be measured. Individual potentials cannot be determined. The activity of the
H+-ions determines the potential at the measuring electrode and, thus, the voltage. The sensitive
range of the membrane is designated as the leach layer or extraction layer. Ideally, the leach layer is
completely homogenous. In reality, inhomogenities are present. These lead to an additional potential
difference and form components of the so-called asymmetry or offset voltage. The size of the
asymmetry is a measure of the quality of the electrode that is described in more detail below. The
adjustment time of the potential also plays a considerable role in the evaluation of the quality of a pH
electrode. Amongst other factors, it depends on the thickness of the leach layer. With increasing age,
the leach layer expands and causes the electrode to become slower.
The pH value can only be measured if the measuring system has been calibrated. In addition, the
data of the calibration enable evaluation of the achievable quality of the measurement. For this
reason, it has considerable significance in analytical quality assurance. The method of calibration is
decisive for the reproducibility of the pH measurement.

36
Buffer solutions with a known pH value are used for calibration. Buffer solutions retain their stable
pH value over longer periods of time and are relatively insensitive to dilutions, e.g. through drops of
water that adhere to the electrode. Consequently, the pH value, the precision, the buffer value and the
dilution influence are characteristic of the individual buffer solutions.
Ready-made standard buffer solutions correspond in composition to the primary or secondary
reference material but are usually subject to a conservation procedure. The accuracy of these
solutions lies at ± 0.02 pH units.
Calibration should be performed with technical buffer solutions pH 4 and pH 7.
The electrodes should be stored in a 3 molar (mol/L) potassium chloride solution. Never use
distilled water under any circumstances. A liquid is required so that the electrode does not dry out. If
a 3 molar potassium chloride solution is used, no concentration drop is present between the reference
electrolyte and storage solution.
1.2. ORP
Basic principles
Reduction and oxidation are two central chemical terms that describe the ability of chemical agents
to accept (reduction) or donate electrons (oxidation). In aqueous solutions, the Oxidation-Reduction
Potential (ORP) voltage can be measured using a standard hydrogen electrode as reference. The
reducing or oxidizing properties of a solution first are a matter of
the reactants. By using an ORP electrode this change in potentials would be recorded as a positive or
negative voltage.
ORP measurements monitor chemical reactions such as checking the denitrification of wastewater
and disinfectant effect of detergents or the strength of plating baths. Measurement of ORP voltage is
carried out using ORP combination electrodes. Similar to pH electrodes, these consist of a measuring
electrode and a reference electrode.
A metal electrode (normally a precious metal like gold, silver or platinum) is used in ORP
combination electrodes in place of a glass membrane for carrying out the measuring function. The
tendency for the chemical agents to accept or donate electrons determines the potential of the metal
and thus the electrical potential of the combination electrode. ORP combination electrodes in use
today contain a silver/silver chloride reference electrode, the indicated potential refers to this
potential. Conversion to the standard hydrogen electrode system (UH) and that of the silver/silver
chloride reference electrode is easily possible.

37
2.3. Measurement of electrical conductivity (EC)
Basic principles
The specific electrical conductivity and the electrical conductance are a measure of the ability of a
solution, a metal or a gas - in brief all materials - to conduct an electrical current. In solutions, the
current is carried by cations and anions whereas in metals it is carried by electrons. If a substance has
a high electrical conductance G, the electrical or ohmic resistance R is low. The electrical
conductance G is the reciprocal of the resistance:
G = 1 / R
The unit of R is the Ohm and the unit of G is the Siemens. At this point, it would be useful
to consider the measuring technique. To measure the electrical conductance, a voltage is applied to
the electrode pairs and the current that flows is measured. During this process, the cations migrate to
the negative electrode, the anions to the positive electrode and the solution acts as an electrical
conductor. A conductor is defined by its length and crosssection. The smaller the electrode gap/and
the larger the electrode area A, the larger the measurable current at the same electrolyte
concentration and same voltage.
The electrical conductance G is given by the equation:
where A is the electrode area, l the electrode gap, γ the specific conductivity and ρ the specific
resistance. γ and ρ are material constants with the units S/m and Ωm. This equation also illustrates
the relation between the specific conductivity γ and the conductance G.
As well as γ , σ and κ are also customary symbols used for specific conductivity. The quotient of the
length and area is the cell constant K (resulting in the unit m-1).

38
If the cell constant is known, the specific conductivity can be correspondingly determined from the
measured conductance and depicts the result of a conductivity measurement.
Conductivity measurement cells
Basically, conductivity measuring cells consist of electrode pairs to which a voltage is applied. The
current that flows is measured and the conductivity is calculated from it. This is a very rough
approximation. The voltage applied is an alternating voltage to reduce polarization effects.
Polarization of a conductivity measuring cell includes the effects that occur at the junction between
the metal and liquid when a current flows and apparently causes the conductivity of the solution to
change. If a voltage is applied to an electrode, a capacitor layer (double layer) is created because the
electrode attracts inversely charged ions.
With increasing depth of the electrode in the solution, the effective voltage continues to drop further.
Polarization effects can be reduced or prevented by applying an alternating voltage and by
optimizing the electrode areas. In an alternating field, unequal charge distribution as shown in the
diagram above cannot form so easily because the ions are alternately attracted by the two electrodes.
Cations and anions oscillate about their location at the cycle of the applied frequency. This effect can
be compared to a tug-of-war between two equally strong teams.
The higher the applied frequency, the lower the polarization effects that can be expected. Because
the measuring frequency at high conductivity is restricted by instrument engineering, a suitable
electrode material must be used, e.g. usually graphite or platinum-plated platinum. The selection
depends on the required measuring range of the conductivity measurement.
The "classical" conductivity measuring cell consists of an electrode pair. The cell constant is
determined using a calibration solution with known conductivity, usually a 0.01 mol/L KCl
solution.
Selected values are listed in the following table as an example of typical conductivity:

39
Even the purest water has a conductivity! This has its origin in the intrinsic dissociation of water
that, according to the solubility product, forms oxonium and hydronium ions.
2.3. Measurement of dissolved oxygen content
Basic principles
Oxygen is not only a constituent of air but also exists in a dissolved state in liquids. A state of
equilibrium is reached when the partial pressure of oxygen, i.e. the part of the total pressure that is
due to oxygen, is equal in air and in liquid. The liquid is then saturated with oxygen.
For the sake of physical and chemical correctness, it should be added that partial pressure in a liquid
actually refers to the fugacity. In the pressure range relevant to the measurements at hand, it is
acceptable to equate the two values and this allows us to restrict the following considerations to the
partial pressure. In dry, atmospheric air, the partial pressure of oxygen is 20.95% of the air pressure.
This value is reduced over a water surface because water vapor has its own vapor pressure and a
corresponding partial pressure.

40
The following condition is met when the air is saturated:
where pO2 (T) is the partial pressure of oxygen, pair is the air pressure and pw (T) is the water vapor
pressure. (T) represents temperature-dependent values.
Usually, however, the level of the concentration of oxygen βO2 (T) is required. The concentration is
proportionally dependent on the partial pressure of oxygen and, of course, on the type of liquid, as
indicated by the Bunsen absorption coefficient aO2 (T).
where: MO2 is the molar mass of oxygen and VM is the molar volume. Knowledge of the temperature
is absolutely imperative when measuring the oxygen concentration. If the result is required as a % of
saturation, the current air pressure is also required.
The equations show that water can dissolve more oxygen at higher air pressures than at lower air
pressures. Water vapor pressure increases as temperature rises, i.e. the partial pressure of oxygen
decreases. To illustrate this effect, values can be compared at 20°C and 40°C at an air pressure of
1013 hPa. While 9.09 mg/L oxygen dissolve in water at 20°C, only 6.41 mg/L dissolve at 40°C.
The amount by which the volume of a liquid changes with a corresponding change in temperature is
dependent on the type of liquid. In water, the effect is minor and negligible. Not so the effect of
dissolved substances. They can either reduce or increase the solubility of oxygen. A salt content
(sodium chloride) of one percent in water lowers the saturation concentration from 9.09 mg/L to 8.54
mg/L at 20°C. Organic substances, on the other hand, generally increase the solubility of oxygen in
water. The maximum saturation concentration increases with the proportion of the organic substance.
Pure ethanol, for example, dissolves 40 mg/L of oxygen.
Oxygen sensors
The basic principle underlying the electrochemical determination of oxygen concentration is the use
of membrane-covered electrochemical sensors. The main components of the sensors are the oxygen-

41
permeable membrane, the working electrode, the counterelectrode, the electrolyte solution and a
possible reference electrode.
A voltage is applied between the gold cathode and the anode that consists of either lead or silver, and
causes the oxygen to react electrochemically. The higher the oxygen concentration, the higher the
resulting electric current. The current in the sensor is measured and, after calibration, converted into
the concentration of dissolved oxygen.
If the anode is made of silver, the meter applies the required voltage (polarographic sensor). If it is
made of lead, the sensor is self-polarizing, i.e. the voltage is generated in the sensor by the electrodes
themselves, comparable to the process in a battery (galvanic sensor). The meter merely evaluates the
current. The following electrode reactions take place during the electrochemical determination of
oxygen: Oxygen is reduced at the cathode:
During this process, “the cathode provides electrons” and the oxygen that diffuses through the
membrane reacts with water to form hydroxide ions.
The metal of the electrode is oxidized at the anode, a process which releases the electrons required
for the cathode reaction.

42
As for pH measurements, calibration must also be carried out for dissolved oxygen measurements at
regular intervals. This is because the measuring process consumes the electrolyte solution in the
sensor head, as shown by the electrode reactions presented above.
The ions of the electrolyte solution bind the released metal ions, thereby changing the composition of
the solution. The recommended calibration interval depends on the oxygen sensor used and ranges
from two weeks for pocket instruments to 2–3 months for stationary oxygen sensors.
2.2. The MultiLine P4 electroanalytical set:
The following pictures represent the structure and contents of MultiLine P4 set.
SET equipment: 1: Meter MultiLine P4, carrying strap with 2 carrying clips; Armouring
2: Quiver LF/Oxi with quiver clip
3: Quiver pH
4: Stand
5: Plastic beaker 50 mL
6: Storing solution for pH electrodes
7: pH buffer solution STP 4, 50 mL
8: pH buffer solution STP 7, 50 mL
9: Calibration and control standard for conductivity cells, 50 mL
10: Electrolyte solution ELY/G for D. O. probes, 50 mL
11: Cleaning solution RL/G for D. O. probes, 50 mL
12: Exchange membrane heads WP 90/3 for D. O. probes (3 pieces)
13: Grinding foil SF 300 for D. O. probes
14: Conductivity cell (TetraCon 325-3, TetraCon 325).
15: pH combined electrode (SenTix 41-3, SenTix 41).
16: D. O. probe (CellOx 325-3, CellOx 325).

43
17: Instruction manual + Short instruction
18: Professional case
19: Line adaptor
Display:
where:
1: Measured parameters:
pH = pH value + redox voltage (ORP) (in mV)
O2 = Dissolved oxygen concentration (mg/L) or saturation (%)
= conductivity (S/cm or mS/cm)
Sal = salinity (g/L)
2: Calibration data: Slope of the D. O. probe.
3: User guidance and measured values: pH, voltage, D. O. concentration, D. O. saturation, Conductivity, Salinity,
Slope of the pH electrode, Asymmetry, Slope of the D. O. probe
4: Dimensions:
mV: Voltage/Asymmetry
mV/pH: Slope of the electrode
%: D. O. saturation
mg/L: D. O. concentration
S/cm, mS/cm: Conductivity
5: Calibration data: Probe evaluation
6: Status:
Sal: Salinity correction active
TP: Temperature measurement active
1/cm: Cell constant
°C: Temperature
7: Measured values and set parameters: Temperature, Salinity, Cell constant, Time, Date, Numerator, Number to
identify, measured value, Baud rate.
8: Status: RCL: Function "Read-out of memory" active
9: Status:
AR: Drift control active
AR statikus: Stable measured value is displayed AR villog: Stable value is being determined
10: Status: Arng: Automatic selection of measuring range active
11: Calibration procedures:
AutoCal TEC: for pH measurements
OxiCal: for D. O. measurements
Cal: for conductivity measurements
12: Status: STORE: Function "Manual storing" active
13: Status:
LoBat: Rechargeable batteries discharged Tref 25: Reference temperature 25°C for conductivity
14: Status:
Time: time

44
Day, month: day and month
Year: year
Baud: Transmission speed
No.: Number of storage location Ident: Number to identify measured value
Keypad:
1: Measuring mode: pH value / voltage, D. O. concentration/ D. O. saturation, conductivity / salinity (scroll mode)
2: Calibration of the currently set measuring parameter
3: On/Off switch
4: On/Off switch for drift control (AR)
5: ENTER: Confirmation of inputs, Start of measurements with drift control, Output of measured values
6: Setting of numerical values, "Scrolling" of a list, Selection of settings
7: Displays or transmits stored measured values
8: Stores measured value
Rear panel:
1: Conductivity cell, TetraCon® 325 or D. O. probe CellOx 325
2: pH combined electrode
3: Line adaptor
4: Serial interface
5: Temperature probe (integrated in pH-electrode)

45
Applied electrodes and their instruction manuals:
Type of electrode Electroda ID Measured parameters, dimensions
pH Combined Electrode
with Integrated Temperature
Probe
SenTix 41 pH value (pH), -
temperature, °C
Oxidation-reduction
potential (ORP), mV
Standard Conductivity Cell TetraCon 325 conductivity (), S/cm
temperature, °C
salinity (SAL), g/L
Dissolved Oxygen Probe CellOx 325 dissolved oxygen
(DO, O2) concentration,
mg/L
temperature, °C
dissolved oxygen
(DO, O2) saturation, %
I. pH combined electrode with integrated temperature probe (SenTix 41).
1: Watertight plug of the pH combined electrode
2: 1 pin banana plug for temperature probe
3: Membrane of the pH electrode
4: Diaphragm of the reference electrode
5: Temperature probe
6: Wetting cap with potassium chloride solution (3 mol/l)
Storage: Always keep the membrane in a moist condition. Storage with wetting cap, filled with
potassium chloride solution (c = 3 mol). Never use deionized water for storage. Storage
position: Horizontal or upright with membrane at the bottom.
Putting the pH combined electrode into operation:
1. Connect electrode to MultiLine P4 meter.
2. Remove wetting cap. (If the membrane has dried out, soak the pH electrode in a neutral buffer
solution or, preferably, potassium chloride solution (c = 3 mol/l) for 24 hours. Some of the
potassium chloride solution may leak out of the wetting cap during transport or storage, leaving a
crust of potassium chloride solution after drying. This layer of salt is harmless and can be rinsed
off with water.)
3. Rinse pH electrode with deionized water and dry it with paper towel carefully!

46
4. Switch meter on and wait until the display test is finished. After a total discharge set date and
time if necessary.
Set one after the other:
Date (day) 1 ... 31
Date (month) 1 ... 12
(year) 1997 ... 2100
Time (hour) 0 ... 23
Time (minute) 0 ... 59
5. Calibrate the electrode with two-point calibration according to the following instructions.
(Admissible standard solutions: WTW technical buffer solutions pH 2.00, 4.01, 7.00 or 10.00 (at 25
°C). Highest accuracy when the temperature of standard solutions and sample solution is the same.)
Use calibrating mode with „CAL” key. CAL1 sign is shown on display.
Immerse pH electrode into the first WTW technical buffer solution (pH 4.01).
Start measurement with „RUN/ENTER” key.
AR flashes. Wait until the display shows: CAL2.
Rinse pH electrode with deionized water, dry it with paper towel and immerse into the second
technical buffer solution (pH 7.00).
Continue calibration procedure with „RUN/ENTER” key.
AR flashes. Wait until AR extinguishes. You can read out the Slope of the electrode (S).
Admissible range: -50.0 mV/pH ... -62.0 mV/pH.
Please, note the S value in your measuring table.
When error message E3 occurs see chapter "Troubleshooting".
6. pH measurement: Set measuring mode with M key. Select measuring function "pH value" with
following keys:
Rinse pH electrode with deionized water, dry it with paper towel and immerse the sample
solution.
Please, note the measured pH value and the measured temperature in your measuring
table.
7. ORP measurement: Select measuring function "mV" with following keys:

47
Please, note the measured ORP value for the same sample in your measuring table.
8. Repeat the measurement of pH and ORP with another samples (two samples) and note the
measured values. Avarage the measured values for given sample and note the mean values in your
measuring table.
9. After measurement rinse the pH combined electrode with deionized water, dry it with paper towel.
Insert the guard wetting cap on the electrode carefully and put it back into the suit/case!
Troubleshooting
General system messages
pH system messages

48
II. Standard conductivity cell (TetraCon 325).
1: 8-pin plug IP67
2: Voltage electrode
3: Current electrode (ring)
4: Temperature probe
Application range with MultiLine P4: 1 μS/cm ... 500 mS/cm and -5 ... +80 °C (100 °C)
Fundamentally, the conductivity measuring cell does not age. The cell life is considerably shortened
or the cell damaged by excessive temperatures or special measuring solutions (e.g. strong acid and
lye solutions, organic solvents). We give no warranty for defects and mechanical damage caused by
the measuring medium.
Cleaning solution: deionized water
Putting conductivity cell into operation:
1. Connect conductivity cell (TetraCon 325) to MultiLine P4 meter.
2. Switch meter on and wait until the display test is finished. The cell is immediately ready for
measurement ().
3. Calibrate the electrode with calibration and control standard solution:
Press "CAL" key to recall calibration mode.
Rinse conductivity cell with deionized water, dry it with paper towel.
Immerse measuring cell into calibration and control standard solution 0.01 mol/L KCI.
Start calibration procedure with „RUN/ENTER” key.
AR flashes. Wait until AR extinguishes. You can read out the determined cell
constant.
Please, note the cell constant value in 1/cm dimension in your measuring table.
When error message E3 occurs see chapter "Troubleshooting".
4. Electrical conductivity (EC) measurement: Set measuring mode with M key. Select measuring
function "Conductivity" () in S/cm or mS/cm with following keys:

49
Rinse the cell with deionized water, dry it with paper towel and immerse the sample solution.
Please, note the measured conductivity in S/cm or mS/cm and the measured
temperature in your measuring table.
5. Salinity measurement: Select measuring function Salinity (Sal) in g/L with following keys:
Please, note the measured Salinity in g/L in your measuring table.
6. Repeat the measurement of EC and salinity with another samples (two samples) and note the
measured values. Avarage the measured values for given sample and note the mean values in your
measuring table.
7. After measurement rinse the cell with deionized water, dry it with paper towel. Put the cell back
into the case!
Troubleshooting

50
III. Dissolved Oxygen Probe (CellOx 325).
1: Membrane head WP 90
2: Temperature probe
3: Shaft
4: Closing head
5: Working electrode (gold cathode)
6: Counter electrode (lead anode)
7: Isolator
Storage:
Store the probe in the calibration beaker! Sponge in the beaker must bemoist (not wet!).
Storage position: optional
Air Calibration Beaker for precision calibration of WTW D. O. probes:
Maintenance Air Calibration Beaker (OxiCal-SL):
1. Remove cap!
2. Moisten sponge!
3. Close cap!

51
Putting the D.O. probe into operation:
1. Connect D. O. probe CellOx 325 electrode to MultiLine P4 meter.
2. Switch meter on and wait until the display test is finished. The probe is immediately ready for
measurement (O2).
3. Do not remove the air calibration beaker from the electrode!
4. Calibrate the electrode with air calibration beaker:
Press "CAL" key to recall calibration mode.
Start calibration procedure with „RUN/ENTER” key.
AR flashes. Wait until AR extinguishes.
You can read out the Slope of the electrode (S). Admissible range: 0.6 ... 1.25
Please, note the S value in your measuring table.
When error message E3 occurs see chapter "Troubleshooting".
6. DO concentration measurement: Set measuring mode with M key. Select measuring function
dissolved oxygen (DO) concentration in mg/L with following keys:
Remove the air calibration beaker from the electrode carefully! Do not remove the
membrane head! It contains corrosive electrolyte solution! Use plastic gloves!
Rinse D.O. probe (without calibration baker) with deionized water, dry it with paper towel
and immerse the sample solution.
Please, note the measured dissolved oxygen (DO) concentration in mg/L and the
measured temperature in your measuring table.
7. DO saturation measurement: Select measuring function oxygen (DO) saturation in % with
following keys:
Please, note the measured oxygen (DO) saturation in % in your measuring table.
8. Repeat the measurement of DO concentration and saturation with another samples (two samples)
and note the measured values. Avarage the measured values for given sample and note the mean
values in your measuring table.
9. After measurement rinse the D.O probe with deionized water, dry it with paper towel. Insert the
calibration baker on the electrode carefully and put it back into the case!

52
Troubleshooting
3. Experiment Outline
Perform the following measurements for given water samples and note the measured values to the
measuring table. Adhere to the operating instructions carefully!
Measured parameters:
1. pH, -
2. ORP, mV
3. conductivity, S/cm or mS/cm
4. salinity, g/L
5. dissolved oxygen concentration, mg/L
6. oxygen saturation, %

53
4. Measuring Table
Measured
parameter
pH
(-)
ORP
(mV)
Conductivity
(S/cm v.
mS/cm)
Salintity
(g/L)
Dissolved
oxygen
concentration
(mg/L)
Oxygen
saturation
(%)
Samples ID /other
measured
parameters
Temperature:
Temperature:
Temperature:
Temperature:
Temperature:
Temperature:
Tap
wat
er
1/1.
1/2.
1/3.
Mean
Was
te w
ater
2/1.
2/2.
2/3.
Mean
Slopes mV/pH 1/cm -
5. Disscussion:
Conclusions formulation, experience

54
Laboratory practices
Week 3
Measurement tasks:
1. Determination of BOD (Biochemical Oxygen Demand) values for different water samples by
OxiTop® IS 12 BOD measuring system (Finishing and evaluation the 5 days test!)
2. Mass and volume measurements.
1.
Determination of BOD
(Biochemical Oxygen Demand) values
for different water samples by
OxiTop® IS 12 BOD measuring system
1. Objectives
Finishing and evaluation of BOD (Biochemical Oxygen Demand) measurement for tap water (as a
controll sample) and different waste water samples by OxiTop® IS 12 BOD measuring system.
2. Experiment Outline:
Finish and evaluate of BOD (Biochemical Oxygen Demand) measurement for tap water (as a
controll sample) and different waste water samples based on the Week 1 program and instructions
(See page 29.).
Clean the used equipment carefully!
2.
MASS AND VOLUME MEASUREMENTS
2.1.
MASS MEASUREMENTS
1. Objectives
Introduction into the mass measurements with the overview of the metric and SI units and introduction
into the concepts of precision and accuracy.

55
2. Theoretical bases:
The measurement of the mass of analytical samples
The SI unit of the mass is the kilogram (kg). We often use even gram (g), 1 kg=103 g.
1 g =103 mg =106 g
During the laboratory work we use different type of
balances/scales with various sensitivity based on the quantity
of measuring material and the required measurement accuracy.
These highly precise instruments can measure down to ten
thousandths or even hundred thousandths of a gram. In this
part the analytical (0.1 mg) of precision mass measurement
will be detailed.
Modern analytical balances use a complex system of
electronic sensors to accurately mass a substance. The
analytical balance is so sensitive that it often has a draft shield
to prevent air currents from interfering with the measurement.
When weighing, a weigh boat or small containers are used to hold the substance being weighed and
protect the weighing pan. Before weighing a substance, analytical balances are tarred to subtract the
weigh boat or small containers and re-zero the scale. Tarring refers to setting the scale back to read
zero and allows for a substance to be accurately weighed. Aside from weighing chemical substances,
analytical balances are used several area of life.
The purpose of the mass measurements can be following:
a.) determination of unknown weigh accurately,
b.) measuring specified amount from prepared material (ranging).
Nowadays we use digital analytical balances. During the determination of unknown weight after the
switching on the balance we wait for the 00 value apperance. We put the measuring object on the pan
of the balance and close the balance-door. The display shows the weight of the object to be measured
0.1 mg accuracy, after reaching the equilibrium the measured value can be recorded.
During ranging we use the back-testing method where properly prepared material in a measuring
containers is placed in the weighing pan. Close the draft shield. After reaching equilibrium pressing
the appropriate button to TARE. The display shows the zero (read 0.0000 g) and during the
measurement it will be the initial state.
From the measuring container we lift the approximate quantity with a chemical spoon or a spatula
and we correct this activity (even as we take a spoon or backscattered from it) till display shows the
the required value. We transfer the contents of chemical spoon to the chemical titration or volumetric
flask, using distilled water to dissolved the measured material in water. We use this procedure when
we prepared different solutions with accurately measuring.
With analytical accuracy we can measure the mass in weigh boat or a small baker (less than 1 gram
weights), too. In this case we put the clean and dry container on the balance and we tare it. Putting
off the container the balance we place the measuring substance into it, and putting back on the
weighing pan we read the measured value on the display.

56
When the desired weight is not achieved, the deficit can be replaced. From the weight boat we
transfer the material into a graduated flask and solve into deionized water.
After weighing, be sure to clean off any debris that may have spilled onto the pan using a
brush.
3. Experiment Outline
Select one of the standard objects provided by the instructors and weigh it using a standard laboratory
balance. If you use a simple pan-balance, record which certified weights you used and also the
order in which you put them in the measuring pan.
If you use a digital balance, make sure you use the balance correctly and figure out how tarring
works on the balance.
Weigh the same standard object using an analytical balance. If you use a simple pan-balance, record
which certified weights you used during the measurement (in later laboratory work, recording only the
mass is sufficient). Make sure you can use the balance routinely!
4. Measuring data
4.1. Weighing a standard object on a digital laboratory balance
Name of the object:
...............................................................
The mass of the object
(g)
1.
2.
3.
Mean value
4.2. Review Exercises and Problems
1. List the most often used SI and metric units of the following physical quantities!
Quantity SI unit Metric unit Conversion factor
mass (m)
volume (V)
length (l)
density ()

57
2. Which unit is larger?
1 kg ....... 100 g 1 dm3 ....... 1 l
1 cm3 ....... 10 ml 1 J ....... 1 cal
1 mg ....... 1 g 1 Pa ....... 1 bar
1 nm ....... 1 mm 1 g/cm3 ...... 1 kg/m3
3. A certified 2-g weight is weighed three times in order to calibrate three different standard laboratory
balances.
The results:
Measurement Balance 1 (g) Balance 2 (g) Balance 3 (g)
1 2.04 2.16 2.14
2 2.00 2.14 1.87
3 1.98 2.08 1.92
a/ Calculate the difference between the average mass and the real mass for each set of data.
b/ Compare the different balances based on their accuracy.
c/ What is the mean deviation ( )?
d/ Compare the precision of different balances.

58
2.2.
VOLUME MEASUREMENTS
1. Objectives
Introduction into the volume measurements with determination of hydrochloric acid solution’s precise
concentration by acid-base titration.
2. Theoretical bases:
Volume measurement
The SI unit of the volume is the cubic meters (m3). A liter (L) of non-SI unit volume, but its use is
permitted. 1 L= 1 dm3; 1 dm3 = 10-3 m3
We use the cubic centimeter, 1 cm3 = 10-6 m3; 1 cm3=1 mL
In a laboratory the volume of liquid can be measured with different measuring devices, as measuring
cylinder, volumetric/graduated flask, pipette or burette. They can be made of either glass or plastic.
Certified volume measuring devices are calibrated for inflow or outflow.
During measuring volumes of liquids the volume must be
taken at the meniscus level of the liquid. Meniscus is the
curvature of the liquid in the container. Reading of scale of
applied device the eye is positioned at the same level of the
meniscus to avoid parallax error. Always read volume from
the bottom of the meniscus.
Volume measuring devices
Equipment Photo Description
Measuring cylinder
The measuring cylinder is used an estimate
of volume measurement. It is calibrated for
outflow. This means that if we pour glass
wetting liquid in the measuring cylinder
and the horizontal lower portion of
meniscus overlaps with a signal, then the
volume of the spilled liquid will be the
same to the signal corresponding the given
volume. Readable volume: 0.1 mL.

59
Volumetric/
graduated flask
It is usually a polished glass-stoppered
flask. It has a narrow neck with a long
circular signal. The usual temperature of
calibration is 20°C and this is marked on
the volumetric flask. It is calibrated for
inflow. This means that for example in a
100 cm3 (ml) flask marked the 20°C we
can get in exactly 100 cm3 liquid when the
temperature of the liquids (and of course
the flask) are 20°C. Volumetric flask is
used to prepare given concentrated
solutions. At that time we transfer (using a
funnel or special weigh boat or small
containers) measured amount of given
material into the volumetric flask and pour
some deionized water on it to solve the
substance. We shake the solution
occasionally and fill the flask with
deionized water till the mark of the neck.
The flask was filled with exactly when the
horizontal part of the meniscus coincides
to the signal. After plugging the flask it is
necessery mixing the solution well.
Pipette/Pipet
Pipettes are used for measuring specified
fluid’s volume. The usual temperature of
calibration is 20°C and this is marked on
the pipet. It is calibrated for outflow.
This means that for example when
temperature is 20°C from a 10 cm3 (ml)
pipet running off liquid is exactly 10 cm3.
Pipettes are designated as class „A” or „B”
according to their accuracy. A class is
more accurate than B. Volumetric pipettes
are normally used for the accurate transfer
of 1.0, 2.0, 5.0, 10.0 and 25.0 mL of liquid.
Mohr pipette is graduated from a point
near the tip to the nominal capacity of the
pipette.
Most volumetric pipettes are calibrated To-
Deliver (marked TC) with a certain amount
of liquid remaning in the tip should not be
blown-up. Pipets of the „blown up” variety
will usually have a ground glass ring at the
top. Measuring pipettes will be graduated
in appropriate units.
20°C
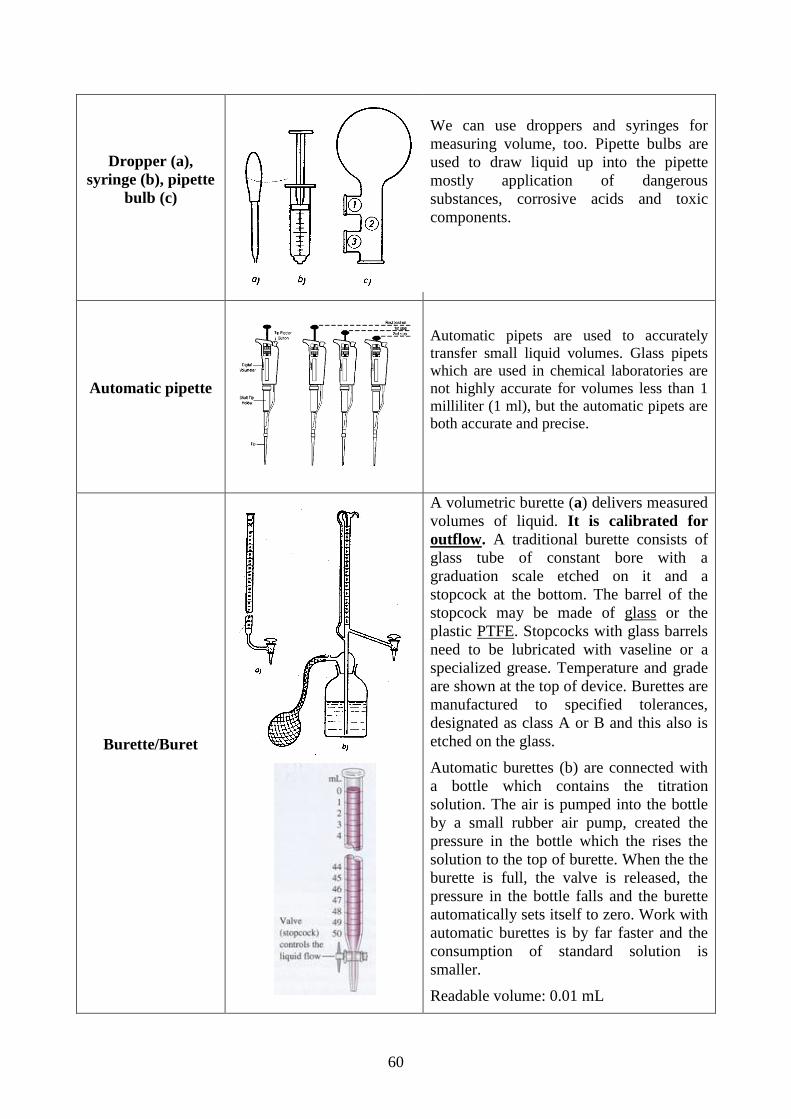
60
Dropper (a),
syringe (b), pipette
bulb (c)
We can use droppers and syringes for
measuring volume, too. Pipette bulbs are
used to draw liquid up into the pipette
mostly application of dangerous
substances, corrosive acids and toxic
components.
Automatic pipette
Automatic pipets are used to accurately
transfer small liquid volumes. Glass pipets
which are used in chemical laboratories are
not highly accurate for volumes less than 1
milliliter (1 ml), but the automatic pipets are
both accurate and precise.
Burette/Buret
A volumetric burette (a) delivers measured
volumes of liquid. It is calibrated for
outflow. A traditional burette consists of
glass tube of constant bore with a
graduation scale etched on it and a
stopcock at the bottom. The barrel of the
stopcock may be made of glass or the
plastic PTFE. Stopcocks with glass barrels
need to be lubricated with vaseline or a
specialized grease. Temperature and grade
are shown at the top of device. Burettes are
manufactured to specified tolerances,
designated as class A or B and this also is
etched on the glass.
Automatic burettes (b) are connected with
a bottle which contains the titration
solution. The air is pumped into the bottle
by a small rubber air pump, created the
pressure in the bottle which the rises the
solution to the top of burette. When the the
burette is full, the valve is released, the
pressure in the bottle falls and the burette
automatically sets itself to zero. Work with
automatic burettes is by far faster and the
consumption of standard solution is
smaller.
Readable volume: 0.01 mL

61
Concentrations of solutions
A solution is a homogeneous mixture of two things - a solute and the solvent that it's dissolved in.
Concentration is a measure of how much solute is dissolved within the solvent. There are a number
of ways to express the relative amounts of solute and solvent in a solution. We use the following
concentration forms to express the concentration of solution:
Percent composition by mass
(the parts of solute per 100
parts of solution).
%(m/m) %
Molarity M moles/L or mmoles/mL
Molality m moles/1 kg solvent
Normality N equivalence/L or meq/mL
Principles of titration
Classical analytical methods are classified to
gravimetry and titrimetry (volumetric titration).
A titration is a process used to determine the
volume of a solution (called a titrant or titrator)
needed to react (endpoint of a reaction) with a
given amount of another substance (analyte). At
the equivalence point the reactants are done
reacting. The endpoint indicates once the
equivalence point has been reached.
A buret is used to deliver the reactant to the
titration flask and an indicator (by a color
change) or a suitable device (pH meter,
conductivity cell) is used to detect the endpoint
of the reaction.
Procedure:
During the procedure of titration buret should be filled with titrant solution with checking for air
bubbles and leaks, before proceding with the titration. Prepare the solution to be analyzed by placing
it in a clean Erlenmeyer flask. Use the buret to transfer an amount of titrant to within a couple of mL
of your expected endpoint. You will see the indicator change color when the titrant hits the solution
in the flask, but the color change disappears upon stirring. Approach the endpoint more slowly and
watch the color of your Erlenmeyer flask carefully. If you have reached the endpoint, you can record
the volume reading and add another partial drop. Sometimes it is easier to tell when you have gone
past the endpoint. If the flask looks like this, you have gone too far! When you have reached the
endpoint, read the final volume in the buret and record it in your measuring table. Subtract the initial
volume to determine the amount of titrant delivered. Use this, the concentration of the titrant, and the
stoichiometry of the titration reaction to calculate the number of moles of reactant in your analyte
solution.

62
Based on the chemical rections there are many types of titrations with different procedures.
The most common types of qualitative titration are:
acid-base titrations
complexometric titration,
precipitation titration and
redox titrations
In aqueous solutions, a compound that produces H+ ions upon dissolution is termed an acid. A
compound that produces OH– ions when dissolved in water is called a base. The reaction of an acid
and base is a neutralization reaction, the products of which are a salt and water. In an aqueous
solution, virtually all of the OH– ions present will react with all of the H+ ions that are present:
H+ (aq) + OH– (aq) → H2O (l)
Because this reaction is essentially quantitative, it is possible to determine the concentration of an
acid or base in an aqueous solution with high accuracy.
Acid-base titrations depend on the neutralization between an
acid and a base when mixed in solution. In addition to the
sample, an appropriate acid-base indicator is added to the
titration flask, reflecting the pH range of the equivalence point.
The acid-base indicator indicates the endpoint of the titration
by changing color. The endpoint and the equivalence point are
not exactly the same because the equivalence point is
determined by the stoichiometry of the reaction while the
endpoint is just the color change from the indicator. Thus, a
careful selection of the indicator will reduce the indicator
error. When more precise results are required a pH meter or a
conductance meter are used.
MacidVacid = MbaseVbase where:
Macid: molarity of acid
Vacid: volume of acid
Mbase: molarity of base
Vbase: volume of base
Molarity = moles/liter =mol/L
The acid-base indicators are substances which change color with pH. They are usually weak acids
or bases. The undissociated form of the indicator is a different color than the iogenic form of the
indicator. A variety of indicators change color at various pH levels.

63
Metyl orange: Methyl orange is an indicator of acids
(red) and bases (yellow). The transitional
color is orange.
pH range: 3.1-4.4
Phenolphthalein
Phenolphthalein is an indicator of acids
(colorless) and bases (pink).
pH range: 8.0-10.0
3. Measurement task:
In this experiment, you will titrate hydrochloric acid solution, HCl, with a basic potassium hydrogen
carbonate, KHCO3 in acid-base titration:
HCl + KHCO3 = KCl + H2O + CO2
When a KHCO3 solution (in an Erlenmeyer flask) is titrated with a HCl solution (adding from the
buret), the pH of the basic solution is initially high. The applied acid-base indicator (metyl orange)
adding to the KHCO3 solution shows yellow color. As acid is added, the change in pH is quite
gradual until close to the equivalence point, when equimolar amounts of acid and base have been
mixed. Near the equivalence point, the pH increases very rapidly, and the change in pH then
becomes more gradual again, before leveling off with the addition of excess acid.
The volume of HCl titrant used at the equivalence point will be used to determine the molarity of the
HCl.

64
4. Experiment Outline
The instructors introduce the most important volume measuring devices, demonstrate their correct use.
Determination of hydrochloric acid solution’s precise concentration by acid-base
titration
Objectives
Determination of hydrochloric acid (HCl) solution precise concentration (~0.1 mol/L HCl solution),
with a basic potassium hydrogen carbonate (KHCO3) in acid-base titration.
The equation of the applied reaction:
HCl + KHCO3 = KCl + H2O + CO2
The process of determining the precise concentration:
1. Make sure all equipment has been previously cleaned, rinsed with deionized water, and
allowed to dry.
2. Weigh on an electronic analytical balance ~0.1 g KHCO3 into an Erlenmeyer flask and
dissolve it in about 50 mL of deionized water. Record the exact amount of KHCO3 used in
your measuring table.
3. Add 3 drops of metyl orange indicator solution to the solution. The KHCO3 solution’s color
is yellow.
4. Fill the burette with HCl solution and set the zero point. The tip of the burette should be in
the neck of the Erlenmeyer flask without touching any sides.
5. Titrate the yellow KHCO3 solution with the dosing HCl until just before the endpoint of the
acid-base rection (when the solution turns into orange)
6. Finish the titration (this will take VERY little HCl so go slow!)
7. Record the volume of HCl used to the measuring table.
8. Repeat the expariment in two more times.
9. Calculate the concentration of HCl solution with all experiments in the following way:
Data:
MKHCO3= 100.12 g/mol
mKHCO3= 0.1050 g
VHCl=9.40 cm3
a. Calculate the number of moles of KHCO3:
100.12 g KHCO3 1 mol KHCO3
0.1050 g KHCO3 x mol KHCO3
x = (0.1050/100.12) . 1 = 1.048 . 10-3 mol KHCO3
b. Based on the equation of the applied reaction:
KHCO3 + HCl = KCl + CO2 + H2O
1 mol 1 mol
1 mol KHCO3 reacts with 1 mol HCl.

65
c. Calculate the number of moles of requisite HCl:
Use the chemical equation for the reactant between your titrant and your solution to find the moles of
solute in your flask.
If 1 mol KHCO3 reacts 1 mol HCl
Than 1.048 . 10-3 mol KHCO3 reacts 1.048 . 10-3 mol HCl
d. Calculate the precise concentration of HCl solution:
Now that you know the amount of solute in your solution, it's easy to find your concentration
in terms of molarity.
9.40 cm3 HCl solution contains 1.048 . 10-3 mol HCl
1000 cm3 (= 1 dm3) solution contains x mol HCl
x = (1000/9.40) . 1.048 . 10-3 = 0.1116 mol HCl
The precise concentration of HCl solution is: 0.1116 mol/dm3.
5. Measuring data
a.) Measured volume of HCl solution:
1. 2. 3.
mKHCO3 (g)
VHCl (cm3)
cHCl (mol/dm3)
Average cHCl (mol/dm3)
b.) Calculatation of the precise concentration of HCl solution:
M KHCO3 = 100.12 g/mol
The equation of the applied reaction:
Calculation:
1.

66
2.
3.
Result:
The precise concentration of HCl solution is: …………………….mol/dm3.

67
LITERATURE
http://www.inorg.unideb.hu: General Chemistry Laboratory Practice and Seminar, General
Laboratory Safety Rules and Procedures
Dr. Wolfgang Schärtl: Basic Physical Chemistry: A Complete Introduction on Bachelor of
Science Level, 1st edition, bookboon.com, 2014. ISBN 978-87-403-0669-9
http://chemwiki.ucdavis.edu/Core/Analytical_Chemistry/Electrochemistry/Voltaic_Cells/Elec
trochemical_Cell_Conventions
JoVE Science Education Database. General Laboratory Techniques. Measuring Mass in the
Laboratory. JoVE, Cambridge, MA, doi: 10.3791/5037 (2016). http://www.jove.com/science-
education/5037/measuring-mass-in-the-laboratory
Julian L. Roberts, Jr.; J. Leland Hollenberg; James M. Pastma: General Chemistry in the
Laboratory (W.H. Freeman and Company, New York, 1991)
JO A. Beran; James E. Brady: Laboratory Manual for General Chemistry (John Wiley &
Sons, New York, Chichester, Brisbane, Toronto, Singapore, 1985)
WTW Lab and Field Instrumentation catalog, www.WTW.com