technomate 5000 manual
DESCRIPTION
Techomate 5000 satellite manual.TRANSCRIPT

ttqlttttal/ Satel I ite Rece ttven-z)-ffiTechnomate
Your Digi ta l Partner for L i fe
z9'lUser's Manual
)
ffiff 9€ EENEEEA-gJ
ffi lni',:(,,:i-J1;!iiJl - -' n.ffi ousa
*o4
T

TM.s2OO D USBTM.s3OO D+ USBTM.56OO CI USBTM-s4ff) Cl+ USB
ffrr Bf Fffi'e"
FTA
FTA with Srnart Card Rcadcr
I Conrrnon Intcr facc
I Cor.nrron Interf acc wi th Srrar t Card Reat le r
TilI-6800 HD
BLACK HQUSING KIT ) opt ional Extra
@TechnomateYour Digi tal Partner for Li fe fl
@Technomate
fi Table of Gontents
()a2 EQUIPMENT CONNECTION
Connect ion With Antenno/ TV Set/ A/V Svstem
OPERATIONGeit ing StortedSystem Sett ingsEdi i ChonnelsEPG (Electronic Progromme Guide)GomesUSBSvstem Informot ionCommon Interfoce
HOW TO DOWNTOAD SOFTWARE FROM PC
TROUBLE SHOOTING
SPECIFICATIONS
r3
14
q)llULJ.) .)
l-lit-tsIL--E
35
37
39
@) rnrnoDucTroNOverviewMoin Feotures
ffi rrsv rNsTArLATroN GUrDE
(J.{ SAFETY INFORMATION
{ / cnrcK PorNTs BEFoRE usEAccessor iesSoiel l i te Dish
) corurRors/FUNcTroNsFront PonelReor PonelRemote control

a Technomate
@ lNrRoDucrloNA OVERVIEW
This satel l r te receiver is designed for using both f ree-to-air and encrypted channel recept ion Enloy the r ichchoice of more than . i 0,000 di f ferent channels, broadcast ing a large range of cul ture, sports, c inema, news,events, etc This receiver rs a technrcal masterpiece, assembled with the highest qual i f ied electronic parts
) MAIN FEATURES> Component outpul(Y / Pb / Pr)> t l5 l l l r lcr tace> ( ( )NAX Fnrbcddcd) ' , r r ; rp,rr ls l )Vl lCornmonlnterfaceStandard(VIACCESS,ASION/5ECA/Mediacuard, l rdeto,Conax,Cryptoworks
l l , i , r ( ryt) l , r r r r l i ' l r ) ' Only avai lable on TM-5600 Cl USB / TM-5400 Cl+ USB
) | t r r r , I I r ,y lLrrrr l ror insic lc lhc ntenus by remoteI Mrr l l r 1r r lLrr l r l r rp l , ry 9 l ) i ( t l l tc on screen) Vrr l r o r l , r r r r l r wr l l j . , l ( r ( ' ( ) \ ( ) l r t tds
) I r r l r l , r l , rLr l ro, , | , o,rxr , r l r l i ; l i la l out put (S/PDIF)
) lor l r r r r l rorr
> / \ i l i , , i vrr ' r l r , ) r ,y, l ( n i lor r rucheasiermotorrsedsettrngselectasmanysatel l i teyouwantthenautonavigat(
> r ) r , r , r r r r r , l , r r r rovrrrr i r l isplay and satel l i te locking system> | l r r , l r
" l , r , r r l l t t t r r
) A, l r r r r r , , i r r l v l ry r ' , r . ,y Io use Bl ind Search) / r l , l r r r r r r l i l r r r r r l r ' ( ' \ \ lhen 1 second) | ln l r r r , r l rvr ly lu l ( ' r lor vcry week signal for smal l d ishes> ' l ' , M' ,1", wr l l r l r l r l r , rnge 95OMHz to 215OMhz> )r ' ,1,1( I ' , r r r r l t l5ALS motor ised funct ion
) I r LrLr i . l ) r { ) r i r , l l l l lngand usertr iendlysetup) t l r , r r r r r , , , r r r l r r r r i l ry , r lPhabetrcal and FTA/ Scrambled/ TP Qroup/ ALL /A-7) l r r l ly , r r r lorrr , r l r r s( , l r&sioreof TV&radiochannelsof uptoT0selectedsatel l i tesusingDiSEqCl2
or ( / ' ;Al \ Molor 4 salel l i tes using DiSEqC switch, 2 satel l i tes using ( for Mono block LNB)
> lO,O(X) r l r , r i l i lc ls TV or RADIO programmable
) ( o lor conlrol (Contrast , Br ightness, Color)) Clr , r r r r rc l search opt ion by Al l , FTA, Network, TB TV ONLy
> RF modulator (CH 21 ---CH 69 PAL C, I , K, M) 90-250V AC 50/ 60 Hz 5MPS main PSU) Supports universal , s ingle, s ingle 5 and C band wide band LNB
> 1 LNB input (F-Type), lF s ignal loop through 2 5CART, TV (CVBS / RCB)
> RS-232 port for PC connect ions and software upgrade
> Digi ta l audio output (S/PDIF) on RCA
> LNB short c i rcui t protect ion incorporated
) 4 Digi t LED front panel d isplay
> Supports mult i TV standards PAL C, I , K, M & NTSC M Screen formats 4:3 and 16:9
> 256 colout CUI (Craphical User Interface)
> SCPC & MCPC receivable f rom C/Ku band satel l i tes
) Ful ly MPEC 2 digi ta l & DVB-5 complrant
) On screen mult i language support
) Bui l t in Teletext funct ion
) Support for Teletext Subt i t les> Support for DVB Sublr l le.
) Support for mult ip le language broadcasts
> EPC access for now, next and 7 days for on screen channel informat ion
> 1 year,8 event VCR t imer taci l i ty
) Parental control faci l i ty by channel and menu locks sat locks
) Displays on screen message for antenna movement using DiSEqC posi t ioner
> Mult i tavour i te groups with faci l i ty to rename and categor ize each group
,FTechnomate
EASY INSTALLATION GUIDE
Using the Preinstalled Satellite & Channel List
The receiver is preinstol led wi th 25 Sotel l i tes ond 1500 defoul t Chonnels ond is fu l lyconf igured No sett ings need to be chonged.After turning ON the receiver, select o longuoge. You wi l l be token to the Viewingmode Press lhe SAT but ion on ihe Remoie ond seleci o Sotel l i te To br inq uo theChonnel List , press ihe OK button on the remote.To delele unwor ' r ted Sotel l i tes- press the MENU button on the remote ond go toInsiol lo l ion. Press OK ond OK on Sotel l i te Setup. Press OK ogoin ond o Sotel l i teList wi l l oppeor To delete o Sotel l i te, press the BtUE (f_l )button on the remote
f f i i l i * ' :+ i i i l 'Lul( j i t ; t l t t Iq l ; , j ' } ' ) | i ) | ) : ) ) \ , | ' , : ) j11, , j | ) . ; l1t1,The receiver is preinstol led wi th 25 Solel l i tes ond 1500 defoul i Chonnels, ond is olso fu l lyconf igured No sel l ings need lo be chongedPress the MENU button on the remote. Press OK on Instol lo i ion. Go to Motor ised Sett ingond press OK Go to the Third l ine (DiSEqC Motor) ond use the tef t /Righf orrow bu.t tonson the remote to select USAIS Then go to Posi t ion Sett ing ond press OK Then go toLongi1r6" ond Lot i tude ond enier the coordinotes of where you' ive (London s Longi tudeis OO0 I West; Souih of UK's Lol i tude is 51 5 Nor ih) . Press the EXIT but ion on the remote.Go to GOTO ond press OK Woi i uni i l the Signol Quol i ty is more thon 40% in the progressbor. When o Sotelr i te is found. then ol l the selecteo 25 Sotel l i tes ore fu l ly conf igured foro Motor ised sysiem
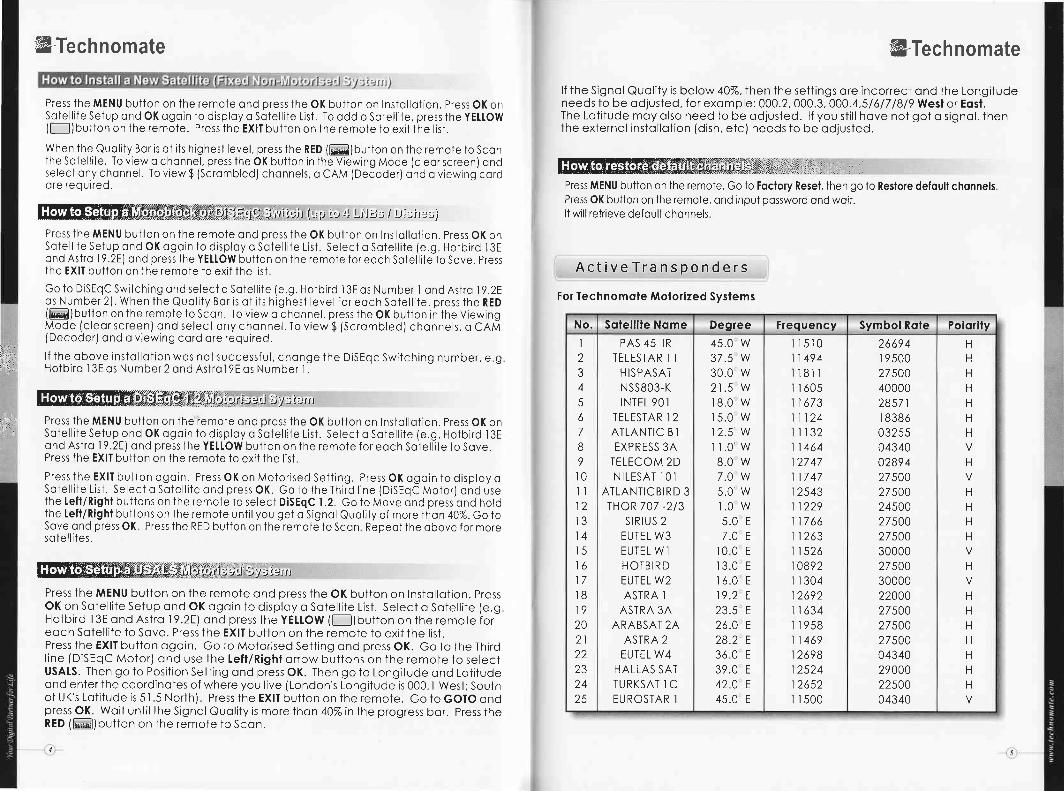
lf the Signol Quol i ty is below 40%, then the sett ings ore incorrect ond the Longi tude needsto be odjusted, for exomple: 000 2, 000.3. 000 4 51617 lBl9 West or Eost. The Lot i tude moyolso need lo be odjusled l f you sf i l l hove not got o s ignol , then the externol instol lot ion(dish, e lc) needs to be odjusled.
ffi ffi ffi ti.{'ff'+j$## i] irliH,'lr i il i'r i i ; I' i : ) v i'": r t tPress the MENU bui ton on the remote ond go io Insiol lo i ion ond press OK. Go toMotor ised Sett ing ond press OK. Press OK ogoin to open the sotel l i te l is t . Selecl osoiel l i ie f rom the l is t ond press OK. Go to the Third l ine (DiSEqC Motor) ond use theLeft /Right bul ions on the remoie io select DiSEqC | 2 Go to Move ond press ondhold the tef t /Right bu.t ions on ihe remote unt i lyou get o Signol Quol i ty of more thon40% Go to Sove ond press OK Press the RED ([__- l )but ton on the remote to Scon.To scon extro sotel l i tes. reDeot the obove
: . New Installation from staft (NO Satellites/Channels)
.:*,.: l Di't i ' t i in ?r=irtt?-'.t l !a1-l ' i ' .vr.:1il i i2', ' ,tn,-l (, it ' , tr:: ' :1.;
l f you wont io stort lhe receiver wi thout ihe preinsto 1ed Sotel l i tes ond Chonnels. press theMENU button on the remote ond go to System Sel i ings ond press the OK button. Go toFoctoryReset,pressOKondenter0000 ThenselectFoctoryReset PressOKondselectYes
D/
4Technomate
Press the MENU button on the remote ond press the OK button on Instol lo i ion. Press OK onSotel l i ie Setup ond OK ogoin to disploy o Sotel l i te List . To odd o Sotel l i te, press the YEttOW(l-_- l )but ton on the remote. Press the EXIT button on the remote to exi t the l is t .
When the Quol i ty Bor is ot i ts h ighest level , press the RED ( l@)button on the remote to Sconthe Sofel l i te. To view o chonnel , press lhe OK button ln the Viewing Mode (c leor screen) ondselecl ony chonnel . To view g (Scrombled) chonnels, o CAM (Decoder) ond o v iewing cordore requrred.
l jg.;.$!'r1i,; ir (ui-t tv tI !-t l! j ; / DiIira.;)
Press the MENU but ion on the remote ond press the OK button on Instol lot ion. Press OK onSotel l i te Setup ond OK ogoin to disploy o Sotel l i te List . Select o Sotel l i ie {e.g. Hotbird 13Eond Astro 19.2E) ond press ihe YEttOW button on the remote f or eoch Soiel l i te to Sove. Pressihe EXIT button on the remote to exi t ihe l is tGo to DiSEqC Switching ond select o Sotel l i le {e.9. Hotbird 13E os Number I ond Asiro 19.2Eos Number 2J. When the Quol i iy Bor is ot i ts h ighest level for eqch Sotel l i te, press lhe RED(lMl)bui lon on the remole to Scon. To view o chonnel , press the OK button in the ViewingMode (c leor screen) ond select ony chonnel . To view g (scrombled) chonnels, o CAM(Decoder) ond o v iewing cord ore required.
l l t i l t , , l f the obove instol lot ion wos not successf ul , chonge the DiSEqc Switching number, e g; l ' i1 , Hotbird ' l 3E os Number 2 qnd Asiro l9E qs Number l l
gr i l : r l Jy: tetn
, ' i . i i , Press the MENU button on the remote ond press the OK bui ton on Instol lot ion. Press OK on' . , Sotel l i le Setup ond OK ogoin io disploy o Soiel l i te List . Select q solel l i ie (e.g. Hotbird l3E
ond Astro 19.2E) ond press the YEtLOW bul ton on the remoie f or eoch Sotel l i te to Sove.Press the EXIT button on lhe remote to exi t the l is t
Press ihe EXIT button ogoin. Press oK on Motor ised sett ing. Press oK ogoin to disploy oSotel l i te List . Select o Sotel l i te ond press OK. Go to the Third l ine {DiSEqC Molor) ond usethe lef t i Right buttons on ihe remote to selecl DiSEqC L2. Go to Move ond press ond holdihe tef t /Right buttons on ihe remote unt i l you ge1 o Signol Quol i ty of more thon 40%. Go ioSove ond press OK Press the RED button on the remote to Scon Reoeot the obove for moresotel l i tes.
Wil!:jilsyrirrrrPress the MENU button on the remote ond press the OK button on Instol lot ion. PressOK on Sotel l i te Setup qnd OK ogoin to disploy q Sotel l i te List . Select o Sotel l i le (e.gHotbird l3E ond Astrq I9.2E) ond press the YEttOW (f_l)button on ihe remote foreoch Sqtel l i te io Sove. Press the EXIT but ion on ihe remote to exi t ihe l is t .Press the EXIT but lon ogoin. Go to Motor ised set i ing ond press oK. Go to the Thirdl ine (DiSEqC Motor) ond use the lef t lRighf orrow buttons on the remote to selectUSAIS. Then go to Posi t ion Sei t ing ond press OK. Then go to Longi tude ond Loi i tudeqnd enler the coordinotes of where you l ive (London's Longi tude is 000. ' | West; Southof UK's Lot i tude is 51.5 North) Press the EXII but lon on the remoie. Go to GOTO ondpress OK. Woit unt i l the SignolQuol i iy is more Ihon 40% in the progress bor. Press iheRED (Ml)button on the remoie to Scon.
@Technomate
l f the Signol Quol i ty is below 40%.Ihen the sett ings ore incorrect ond the Longi iudeneeds to be odjusted, for exomple: 000.2, 000.3, 000.4,516/7 /B/9 Wesf or Eqsl .The Lot i tude moy olso need to be odjusted. l f you st i l l hove not got o s ignol , thenthe externol instol lot ion (dish, etc) needs to be odjusted.
illrPress MENU button on the remote. Go io Fociory Reset, then go to Restore defoulf chonnelsPress OK bution on the remote, ond input possword ond woit.It wil l retrieve defoult chonnels
Act iveTransponders
For Iechnomqle Mof or ized Systems
No. Sqtel l i le Nqme Degree Frequency Symbol Rote Polorily
I2345678It0l l12IJ
14l5l6t7IBt?202laa
232425
3
PAS 45 IRTELESIAR I I
HISPASATNSS8O3-KINTEL 90I
TELESTAR I 2ATLANTIC B ]EXPRESS 34
TELECOM 2DNILESAT IOI
ATLANTICBIRDrHoR707 -213
SIRIUS 2EUTEL W3EUTEL WIHOTBIRDEUTEL W2ASTRA I
ASTRA 34ARABSAT 2A
ASTRA 2EUTEL W4
HALLAS SAITURKSAT I CEUROSTAR I
45.0 W37.5 W30.0 w21.5 W18.0 w15.0 wr2.5 'Wi l .o w8.0 w7.0 w5.0 w1.0 w5.0 E7.0 E
r0 0 E13.0 E16.0 E19.2 E23.5 E26.0 E28.2 E360 E39.0 E420 E45.0 E
I 510149 4t8l lr 6051 673| 1241 1321 46427 47t7 472543122917 66126315260892r 30426921634I 9581 469269825242652r 500
2669 4r 950027 s00400002857 11 838603255043400289427 50027 50024s0027 50027 5003000027 500300002200027 50027 50027 50004340290002250004340
H
H
H
n
H
H
n
H
n
n
H
n
n
H
n
n
H
fl
n
t-l

,@Technomate @Technomate
Never open the cover l t is very dangerousto touch the inside of the uni t due to thepossibi l i ty of an electr ic shock
a
a
1
Do not instal l the uni t :Where i t is subject to v ibrat ionsWhere i t is exposed to direct sunl ightWhere there is humidi tyWhere the temperature is too high or too lowWhere there is no vent i lat ion
Moving the uni t to a hot area f rom a coldone wil l cause condensation. Do not operatethe uni t for one or two hours or unt i l i t hasdr ied completely
A professional jnstal lat ion is required l frecept ion is interrupted, contact your tlocal service centre. Z=.
Place the uni t hor izontal ly An unevenplacement may cause the uni t to be
oamageo
Do not put heavy i tems such as a TV onthe uni t This may damage the uni t .
Be sure to read the user 's manual beforestart ing the operat ion of the uni t .
Do not touch the power cord wrth wethands as i t may cause electr ic shock-
Do not leave the uni t near waterDo not put water containing i tems such as
vase on the uni t
Place the uni t in a wel lvent i lated andno-heat environment
The mains plug is used as the disconnectdevice
The disconnect device shal l remain readi lyoperaDie

4Technomate
Batteries (AAA type) : 2
CHECK FOINT$ HHFORE U$H
A CCESSORTES
User's manual : 1
-(,/{z'>> J'
,e,
Remote control : 1
,- \.
ir;,;!r:#6,*eJ4irlMffi rtrr.$q+ft *ryqtt
I
Power cord : I
l f any accessor ies l is ted above are
missing, contact the sales
representat ive where you
purchased this uni t
SATELLITE DISH
Your dish should be proper ly instal led and azimuth and elevat ion must be precisely set upThis uni t is working with DiSEqC 1 2 on a compat ib le antenna posi t ioner
Ask your dealer for more informat ion
@Technomate
csNTRStSr FUNSTTON$
FRONT PANEL
* i i r Hm-+
l . Stondby/Power on indicot ion l ighl :Red on stond-by mode ond no l ight on power-on mode.
2. Remofe commqnd indicof ion l ight :By pressing ony remote button, th is l ight wi l l f losh ot the some t ime.
3. Power:To switch the receiver in s lond-by mode or in power-on mode.
4. CH. (r /v) :To chonge chqnnel or cursor posi t ion on the oppl icot ion screen.
* TM-5200 D USB FTA I l ) ,ou want to view scranhled chatutels, you nccd to use TM 5600C1 USB /TM-5400 CI+ USB with a ot ig inal card ant l CAM (Condit ional Access Module)
* TA4-5300 D+ USB : F'TA und one eura reaaer
* TM-5600C1 USB: One CLslot to view scramblet l channels You need or iginal curd and CAM
(Cond i t ional Access Modu le)
* TM-5400 CI+ USB: One CI slot and one card reqder

l ila
WTechnomate
REAR PANEL
_1' : ,Jt l2
REMOTE CONTROL
WTechnomate
l . POWER: To turn the receiver On/Off
2. MUTE: To turn the sound On/Off
3. TVlRADTO:To swi ich between TV ond Rodio
4. TV/SAT: To switch between thesotel l i te input ond UHF/VHFontenno input
5. Numeric Keys (0-9):Io Control the numericol operot ionond chonnel numbers direci ly
6. TEXTTEXT: To show the digi to l Teletexi
7. SUBTITLE: To show mult i l inguolsubt i t le
8. A-Z: To sort chonnel l is t
9. EPG (Eleclronic Progrom Guide):To show the TV/Rodio progrom guideor to move io the previous poges
10. AUDIO: To show the Mult i - longuogeoudio t rock, the stereo-mono mode
1 1. FAV: To show f ovor i te l is l in thefovor i te group or to move tothe next poges
12. MENU: To disploy moin menu
13. EXIT: To Exi t f rom the present menuond moves to the previous menu
14. SAT: To show sotel l i te l is t
15. BACK/RCt:To go to previous chonnel /menu
2 lzlU
I t
Irl
l i
7
t
l2
t i
S,,,,#,,r-W(( g m:uIDESICNEDINU K.I
"w",H"&vt,a |"*-4*9# /'\* fAJJrrrrcN.------
r I R{! .EdsaE. i tsocMhsol fR l
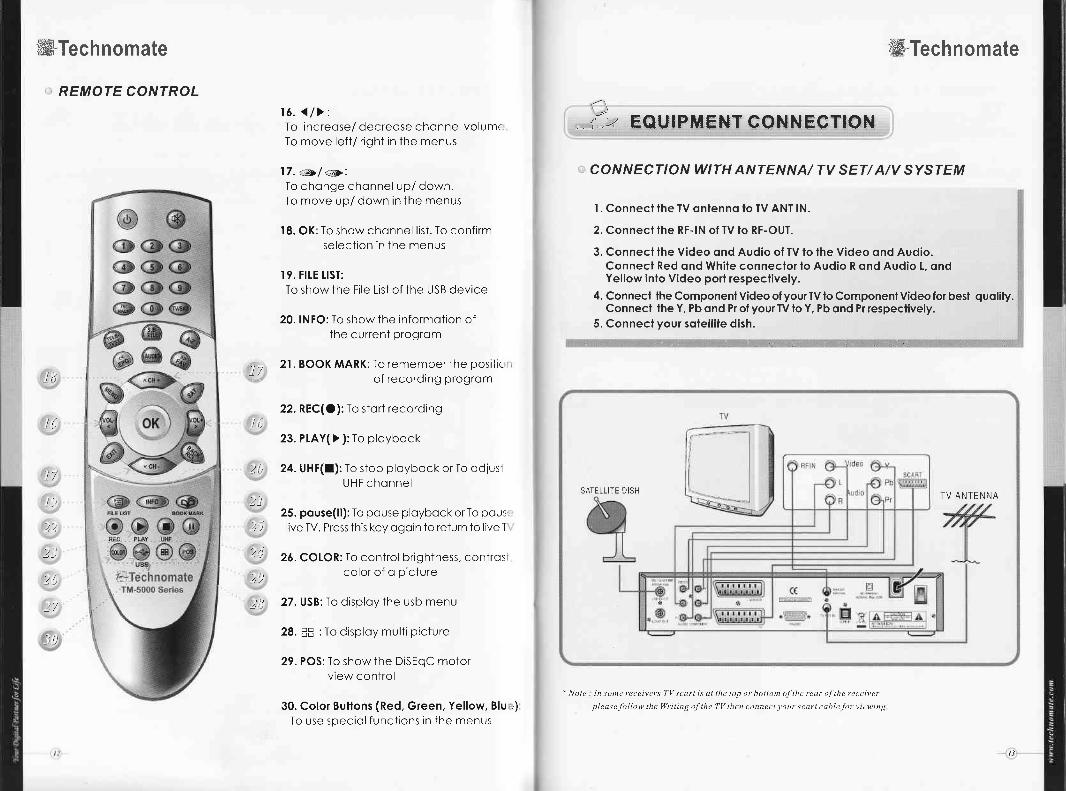
No. Nome Conneclor Funcl ion
I LNB INPUT IEC | 69-24 femqle lF input f rom LNB to digi to l tuner
2 LOOP OUT IEC 169-24 f emole IF loop-through ouiputfrom digi lo l tuner
3 VIDEO RCA cinch Composi te v ideo outpul
/1 AUDIO L RCA cinch Left oudio output
5 AUDIO R RCA cinch Right oudio output
6 Y RCA cinch Component v ideo output (Y)
7 Pb RCA c ncn Component v ideo output (Pb)
8 Pr RCA cinch Component v ideo outpui (Pr)
I VCR/AUXSCART
SCART CVBS Video OutputCVBS, RGB Video Input
Audio Outpui
r0 TV SCART SCART CVBS, RGB Video OutpulAudio Oulput
11 RS-232C DB-9 Low speed ser io l port
12 RF OUT UHF 21-69 tEC r69-2 MALE Output to TV
t3 TV ANT IN IEC 169-2 f emole Input f rom terrestr io l ontenno
14 S/PDIF Fiber Optic Digi to l oudio output(Opt ic)
*Note Sonemodelsaredi /JerentandTVtnputcouldbeonthetoporbottomscart Pleaselookbeforeconnect ion
a,FTechnomate
t i
t6
17
/t
Z2
2i
2i
27
jt t
REMOTE CONTROL16.1/) :To increose/ decreose chonnel volumeTo move lef t / r ight in the menus
l7. .cb/ f f i :
To chonge chonnel up/ down.To move up/ down in the menus
18. OK: To show chonnel l is i . To conf i rmselect ion in the menus
19. Fl tE UST:To show the Fi le List of the USB device
20. INFO: To show the informot ion ofihe cunent progrom
t-/ 21. BOOK MARK: To remember the posi t ic
I t
7l)
2 l
/ , )
2,1
'), t
2ij
22. REC(O): To stort recording
23. PtAY( ) ) : To ploybock
24. UHF(l) : To stop ploybock or To odjustUHF chonnel
25. pouse(ll): To pouse ploybock orTo pouslive TV. Press this key ogoin to return to live I
26. COLOR: To control br ightness, controslcolor of o picture
27. USB: To disploy the usb menu
28. EE : To disploy mult i p icture
29. POS: To show ihe DiSEqC motorview control
30. Color Bul lons (Red, Green, Yel low, Blu ' , )To use speciol funct ions in the menus
ffiTechnomate
---:1-z EQUIPilIENT CONN ECTION
CONNECTION WITH ANTENNA/ TV SET/ AlV SYSTEM
l Connecl fhe TV ontenno to TV ANT lN.
2. Connect lhe RF-lN of TV lo RF-OUI.
3. Connecl the Video ond Audio of TV to the Video qnd Audio.Connecl Red ond While conneclor lo Audio R ond Audio L. ondYellow inlo Video porl respeclively.
4. Connecl lhe Componenf Video of yourW lo Component Video for besl quolity.Connecl fhe Y, Pb ond Pr of your TV lo Y, Pb ond Pr respeclively.
5. Connecf your solell i le dish-
SATEtLITE DISHIV ANTENNA
* Note In some re(:eivers TI/ scart is at the top or hol loi l l of lhe rear ofthe receiver
pleas e fol low the Wri t ing of the TV lhen connecl your scarl cable ; fbr v iewtng
t3
a
: )
,r-Technomate
OPERATION
GETTING STARTED
Turn your receiver power on ond proceed with syslem sefup os f o l lows:
ffi l1l;l11[il i i l,. '.]. I,i
l,ffiTechnomate
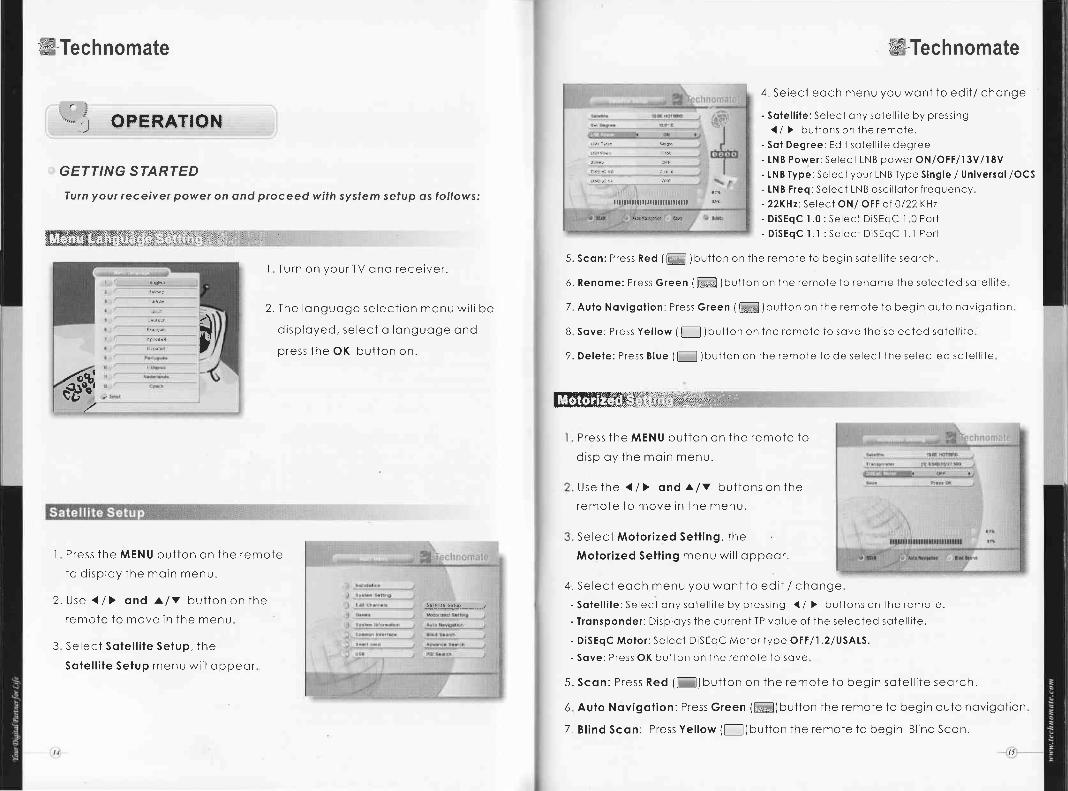
4. Select eoch menu you wont to edi i / chonge
- Sotel l i le: Select ony sote l i te by pressing{ / ) bui tons on the remote.
- Sol Degree: Edi i sotel l i te degree- [NB Power: Select LNB power ON/OFf /13V /18V- [NB Type: Select your LNB Type Single / Universol /OCS- [NB Freq: Select LNB osci l lotor f requency
- 22KHz'. Select ON/ OtF oI 0l22Kt'z
- DiSEqC 1.0 : Select DiSEqC I 0 Port
- DiSEqC l . l :Select DiSEqC l . l Port
| | I I | | I | | | | | | | | | | I I I | | | | | | | | |
tI Turn on your TV ond receiver.
? The Innnrrnnc sclc6f iOn menU wi l l be
r ] icnlnrrad coloni n, - ronguoge ono
press the OK button on.
5. Scon: Press Red ( [ f . ' : ] )but ton on the remote to begin sotel l i te seorch
6. Renome: Press Green ( l t ; . ] )but ton on the remoie to renome the selected sotel l i le
/ Auto Novigoi ion: Press Green { f i , , , ; r l ] }bu}ton on lhe remote lo begin outo novigot ion
B Sove: Press Yel low { l -_ l Jbut lon on the remote to sove the selected sotel l i te
9. Delef e: Press BIue ( f_ l )Outton on f he remote to de select the selected sotel l i te
W'','.'Press the MENU but ion on the remote to
disploy the moin menu.
Use ihe { / } ond a/v buttons on the
remote to move in the menu.
Select Molor ized Sett ing, the
Motor ized Setf ing menu wi l l oppeor.
4, Select eoch menu you wont to edi t / chonge
- Solel l i le: Select ony sotel l i te by pressing ( / ) but tons on the remote.
- Tronsponder: Disploys the current TP vclue of the selected sotel l i te.
- DiSEqC Motor:Selecl DiSEqC Motor type OFF/ ' l .2/USALS.
- Sove: Press OK bul lon on the remote to sove
5. Scon:Press Red ( [__- l )bu11on on the remote to begin sotel l i te seorch.
6 Aulo Novigol ion: Press Green (L: .J)but ion the remote to begin outo novigoi ion
7. Bl ind Scon: Press Yel low ( f_ l )but ion the remote to begin Bl ind Scon.
6t
I Press the MENU bul ton on ihe remote
to disploy the moin menu.
2. Use .( / ) ond a/v button on the
remote to move in the menu
3 Select Sqtel l i te Setup, the
Sqtel l i le Selup menu wi l l oppeor
srrr i l .5.r !e *J
,r#[iTech nomatei;llii'li' l
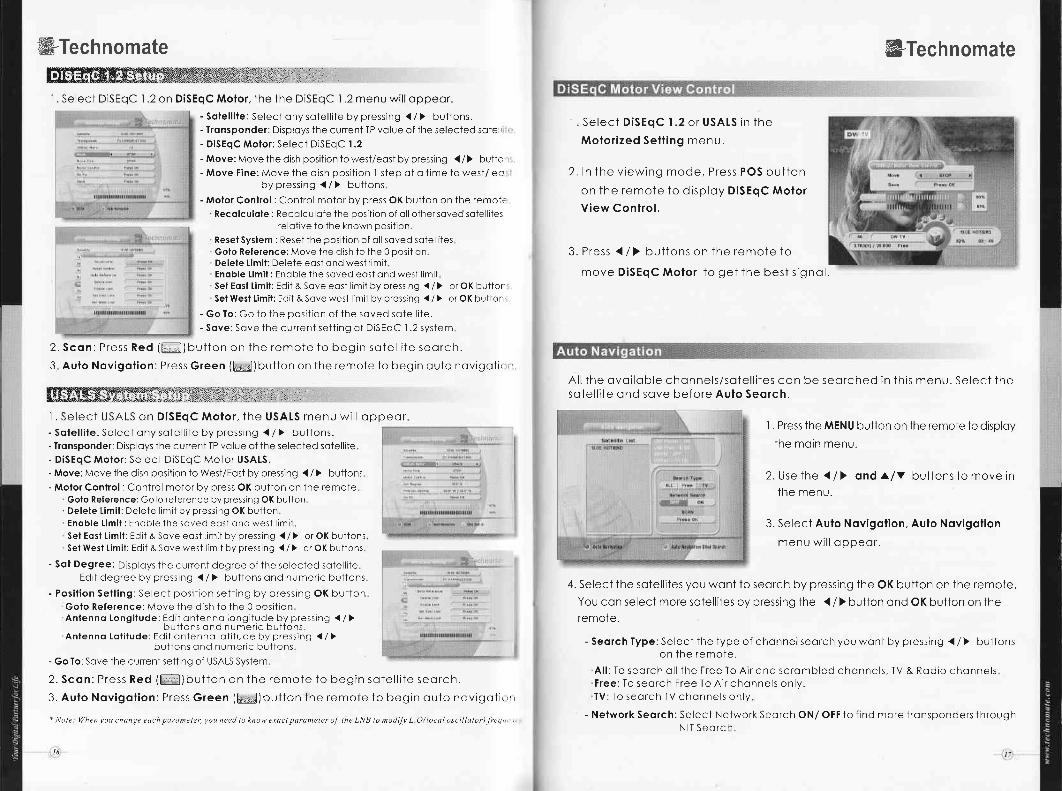
I . Select DiSEqC 1 .2 on DiSEqC Molor, the the DiSEqC I .2 menu wi l l oppeor.
- Sotel l i fe: Select ony sotel l i te by pressing ( / ) but tons.- Tronsponder: Disploys the curreni TP volue of the selected sotel l
- DiSEqC Motor: Select DiSEqC 1.2
- Move: Move the dish posi t ion to west/eost by pressing { / } bul to
- Move Fine: Move the dish posi i ion I step ot o t ime to west/ eobypressing { / } but tons
- Motor Confrol : Control molor bv Dress OK button on the remote
Recolculole : Recolculole the posi t ion of o l l other soved sotel l i tesrelot ive to the known posi t ion
Resef Syslem : Reset the posi t ion of o l l soved sotel l i tesGolo Reference: Move the dish io the 0 posi i ionDelefe l imi t : Deleie eost ond west l imi tEnoble l imi t : Enoble the soved eost ond wesl l lmi tSet Eosl l imi f : Edi t & Sove eost l imi l by pressing ( / ) or OK buttonSef West Limif : Edi t & Sove west l imi t by pressing .( / ) or OK button:
- Go To: Go to the oosi t ion of the soved sotel l i te.
- Sove: Sove the curreni set t ing of DiSEqC 1 .2 system
2. Scon: Press Red ( l* l l )but ton on the remote to begin sotel l i te seorch.
3 Aulo Novigol ion: Press Green ( f f i )but ton on the remote to begin outo novigot ic I
ffi,*m{tlii.i,'.,r'.,. ,r:"I . Select USALS on DiSEqC Motor, the USAIS menu wi l l
- Solel l i le: Select ony sotel l i te by pressing { / ) but tons.- Tronsponder: Disploys the curreni TP volue of the selected sotel l i te,- DiSEqC Motor: Select DiSEqC Motor USALS.- Move: Move the dish position to West/Eost by pressing { / } buttons
- Molor Conhol : Control motor bv oress OK button on the remoteGofo Reference: Goto reference by pressing OK buttonDelete [ imi l : Delete l imi t by pressing OK buttonEnoble Limi l : Enoble the soved eost ond west l imi tSef Eosf Limif : Edi t & Sove eost l imrt by pressing { / ) or OK buttonsSel Wesf Limif : Edi t & Sove west l imi t by pressing { / ) or OK buttons
- Sol Degree: Disploys ihe current degree of the selected sotel l i teEdi t degree by pressing .( / ) but tons ond numeric buttons
- Posi f ion Sett ing: Select posi t ion set t ing by pressing OK buttonGoio Reference: Move the dish to the O posi t ionAnlenno [ongi lude: Edi t ontenno longi tude by pressing { / }
but tons ond numeric but ionsAnlenno lo l i f ude: Edi t ontenno lot i tude by pressing { / }
but tons ond numeric buttons
- Go To: Sove the currenl settino of USALS Svstem
2. Scon: Press Red ( l l . l )but ton on the remole to begin sotel l i te seorch.
3. Auto Novigol ion:Press Green ( l [ , , ,* ,J)button the remote to begin outo novigot i r , l
+Note Whenvouchangeeac:hparameter,youneedtokno| |exactparametcrof theLNBtonodihLO(localosci l lator) f reqt , , "
t6
&Technomate
I Select DiSEqC 1.2 or USA[S in the
Molor ized Sel t ing menu.
2. In the v iewing mode, Press POS button
on the remote to disploy DiSEqC MolorView Conlrol .
3. Press . ( / ) but tons on the remote to
move DiSEqC Molor to get the besi srgnol .
Al l the ovoi loble chonnels/sotel l i tes con be seorched in th is menu. Select thesotel l i te ond sove before Aulo Seorch.
I . Press the MENU button on ihe remote to disploy
the moin menu.
2. Use the ( / ) ond a/Y buttons to move inthe menu.
3. Select Aulo Novigol ion, Aufo Novigot ion
menu wi l l oppeor.
4. Select the sotel l i tes you woni to seorch by pressing the OK button on the remote.
You con select more sotel l i tes by pressing the { / ) but ton ond OK button on the
remote.
- Seorch Type: Select the type of chonnel seorch you wont by pressing { / ) but tonson the remote.
Al l : To seorch ol l the Free To Air ond scrombled chonnels. TV & Rodio chonnelsFree:To seorch Free To Air chonnels only.TV:To seorch TV chonnels only
- Network Seorch: Select Network Seorch ON/ OFF to f ind more tronsponders ihroughNIT Seorch.
oppeor
r#Technomate
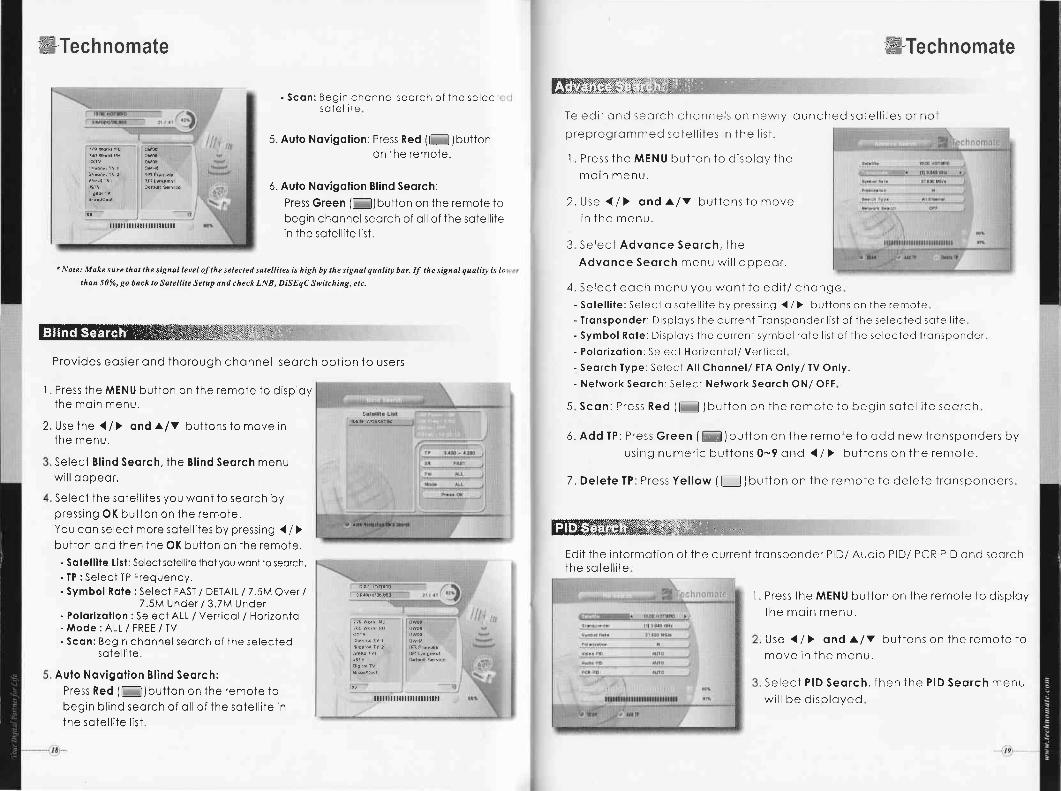
- Scon: Begir chor^ne seorc ' l of 'he selecsoiel l i te
5. Aulo Novigolion: Press Red ([-l )butionon the remote.
6. Aufo Novigolion Blind Seqrch:Press Green (l--l)button on the remote tobegin chonnel seorch of o l l of the sotel l i tein the sotel l i te l is i .
$t
Hffi,ji;l|iitr rrr'': I'
Te edi t ond seorch chonnels on newlynrFnr^nr.rmmcr- l satel l i tes in the l iSt .
1 Press the MENU button to disploy themorn menu.
2. Use { / ) ond a/Y buttons to movein lhe menu.
3 Select Advonce Seorch, theAdvqnce Seorch menu wi l loppeor.
6. Add TP: Press Green ( [ l l )but ton on the
using numeric buttons 0-9 ond
7. Delele TP: Press Yel low ( f l )but ton on
ry-Technomate
or noTlounched sotel l i tes
i l | | i l i l | i l lu i l i l i l l | | l
1 . Press the MENU button on the remote to disploythe moin menu.
2. Use the ( / ) ond a/v but ions to move inrne menu.
Select Bl ind Seqrch, the Bl ind Seqrch menuwi l l oooeor.
Select ihe sotel l i tes you woni to seorch bypressing OK button on the remote.You con select more sotei l i tes by pressing { / )but ton ond then the OK button on the remote.
- Solell l te Hsf : Select soiell i te thot you wont to seorch.- TP : Seleci TP Frequenc, .- Symbol Rote : Select FAST / DETAIL I 7 .5M Ove( I
7.5M Under / 3.ZM Under- Polor lzot lon :Selecl ALL / Vert icol / Hor izoniol- Mode: ALL / FREE / TV. Scon: Begin chonnel seorch of the selected
sotel l i te.
Aulo Novigoi ion Bl ind Seorch:Press Red ( l - - - ] )but ton on the remote tobegin bl ind seorch of o l l of the sotel l i te inthe sotel l i te l is t .
* Note: Make sure that the signal letel ofthe selected satell i tes is high by the signal quality bar, If the signal quolit! is la
than 50%, go back to Sqtell i te Setup snd check LNB, DiSEqC Switching, etc.
ii'ir"''r"
Provides eosier ond thorough chonnel seorch opt ion io users
4. Select eoch menu you wont to edi t / chonge- Solel l i le: Select o soiel l i te by pressing { / ) but tons on the remote
- Tronsponder: Disploys the current Tronsponder l is i of the selected sotel l i le
- Symbol Rofe: Disploys ihe curreni symbol rote l is t of the selected i ronsponder
- Polor izol ion: Select Hor izontol / Vert icol
- Seorch Type:Selecl Al l Chonnel / FTA Only/ TV Only.
- Neiwork Seorch: Select Nelwork Seorch ON/ OFF
5 Scon: Press Red ( f - l )but ton on the remote to begin sotel l i te seorch
remote to odd new tronsponders by{ / } but tons on the remote.
the remote to deleie t ronsponders
@1i1, , , ' r - . ,
Edi t the lnformot ion of the current t ronsponder PID/ Audio PID/ PCR PID ond seorchthe sotel l i ie
I . Press the MENU button on the remole to disploythe moin menu.
Use { / ) ond a/v buttons on the remote tomove in the menu.
Select PID Seorch, then the PID Seqrch menuwi l l be disployedi l [ t I i l l t I | i l i l l i l i l t l

tyou woni lo seorch
ers of the selected sotel l i te
nbol rote l is t of the selected tronsponder
tc l
t ond edi i by using numeric but ions 0-9 ondrut ions on the remote
) remote to begin PID Seorch
r lhe remote to edi t t ronsponder by using{ / } but f ons on the remoTe.
)n ihe remote to deleie the selected tronspondt
orogramne after f in ishing these procedures, please conlact
;iii11'1,l'1 'l' 1' I l
) l f you know the chonnel number, enter thechonnel number by using numeric buttonson the remote ond woit 2 seconds unt i l thechonnel chonges.
) l f you know the chonnel nome, press OKbutton on the remote, then the chonnel I is lwi l lbe disployed. Select the chonnelyouwant to wotch by using /Y. OK buttons onihe remote.
I . In the r ighl s ide of screen, detoi led inf ormot ion of the selected chonnel isdisployed. (Sotel l i te Nome, TP ond Chonnel Nome)
2 You con novigote belween chonnels wi th these buttons.A/Y : Moves up/ down
- 1 l ) or @l@ , Moves poge up / poge oownRED(6*. l l i l j l ) : Disploys ol l chonnels in current soiel l i te
- cREEN (MGll ) : Disploys chonnels sorted by c lphobel icol order- YEttOW(f__l) : Disploys chonnels sor led by l ronsponder- BtUE(f
_ l ) : Disploys chonnels sorted by FTA/ FTA + Scrombled/ CAS
3. When the select ion bor is posi i ioned on the chonnel you wonl to see, press OK on theremole.
ffin'") Volume Control
20
#TechnomateI . Whi le you ore wotching o progrom me, press ( / ) bui ions on the remole io conirol
volume.
2. Press the MUTE button to turn of f the sound of lhe progrom me.Press MUTE button ogoin to turn the sound On.
) Channel lnformat ionDisploys the informot ion of o progrom me by pressing INFO button on lhe remoie.
> TV/ SAT SwitchingChonges ihe s ignol recept ion poth to RF modulotor.
TV Mode: TV ANT INPUT signolwi l l show (Front ponelwi l l d isploy TV)VCR Mode: VCR SCART INPUT signolwi l l be shown (Front ponel wi l l d isploy VCR)
- SAT Mode: Sotel l i te s ignol wi l l be ou1 through RF (Front ponel wi l l d isploy chonnel number)
> TV/ RADIO Switching
Switch TV chonnel to Rodio chonnel or v ice verso
) BackReturn to the previous chonnel /menu
) Subt i t le/ Audio
You con odjust the subt i t le ond oudio stotus of the current chonnel
Press AUDIO/ SUBTITLE bul tons on the remote, then the subt i t le qnd oudio reloted menuwi l l be disployed
Audio Mode:Stereo + Mono-Lef i + Mono RightAudio Trock: Al l t rocks ovoi loble in th is progrom
* No le: These s ubt i t le and o udi o parameters are avai lable only w hen th e receiving c han nel supports thes e funct ions,
) Teletext
Teletexi Service is o texi doto service f rom o service provider.I t is ovoi loble only i f the sotel l i te broodcosts th is service.
> SAT
Press lhe SAT button on the remote ond select o solel l i te in the Sotel l i fe List .
> FAV
Press FAV button on the remoie to disploy o fovor i ie chonnel l is t in the fovor i te group.
) Mult i -Picture DisplayPress the Yel low ( f_ l )but ton on the remote to disploymult i p icture mode You con select the numbers of mul i i -pictures. e.g. 1 x2, 2x2, 2x3, 3x3
* Note: This option is not available on TM-1 600 2CI
I 79ftr t6o!! j
0* !v
.&$;Wts$

4Technomate> COLOR Adjustment
Press the COTOR bui ion on the remote to select ColorAdjustment menu.By using ihe { / ) but tons on the remote, you con odjusiihe br ighlness, controsl ond the color of p icture
r svsrEM sErrtNcs
"t.i" l.
This sub-menu ol lows you to set your locol t ime,woke up t ime, woke up chonnel ond sleep t ime.
-GMT Usoge: l f you turn i t ON, locol t ime is deierminedby odjust ing the di f ferences from GMT(Greenwich Meont ime), occording toyour locol ion.
- Currenl Dole: l f GMT Usoqe is ON, th is dote is determined
by GMT l f GMT Usoge is OFF, you con modifyihis by pressing the OK button on the remotel f you set OFF, the receiver doesn' t refer to GMT. Locol t ime is determined byodjust ing current dote ond current i ime
- Current Time: l f GMT Usoge is ON, th is t ime is deiermined by GMTlf GMT Usoge is OFF, you con modify th is by pressing ony NUMERIC bui ton
- locol Offsef : l f GMT Usoge is ON, the Locol t ime is GMT l ime + Locol Offset
- Woke Up Mode: You con set the cycle of the woke up mode Off /Once/Doi ly
- Woke Up Time: You con set woke up t ime by pressing ony NUMERIC but lon
- Woke Up Chonnel: You con set woke up chonnel by pressing the OK bul ton on the remole
- Sleep Mode: You con set the cycle of the s leep mode: Off /Once/Doi ly.
- Sleep Time: You con set o s leep t ime by pressing ony NUMERIC button
' l l l i i ' r l
Ih is sub-menu ol lows you to sei the oudio/v ideo oulpui set t ing- Audio [onguoge: Defoul i oudio longuoge of the chonnels
- Subt i t le [onguoge: Def oul i longuoge of subt i i le
- Video Formof : Video output f ormot AUTO/PAt/NTSC.
- Outpui Select : TV SCART outpul f ormot CVBS/RGB ondComponent output(Y/Pb/Pr)
- Screen Formof : TV ospecl 4:3 I 1 6 :9- Disploy Formot : Scol ing Formol Pon Scon/Let ier-Box/
Ful lScreen/Pi l lor Box-RF Type: l f you set PAL in video formot, this receiver supports
PAt B/G, PAt l , PAt D/K omong PAL stondords
-PAt B/G, PAt l , PAt D/K omong PAL stondords
22
- Volume Timeouf: Select the disploy durol ion of the volume box I sec / 2 sec
- Moving Disploy Messoge: Turn the DiSEqC movlng messoge ON/ OFF.
iiliitl,.,,, r
This sub-menu ol lows you to chongeentry qnd to chonge possword.
the possword opt ion to occess or lock menu
- Receiver [ock: l f you turn i t ON, you wi l l be osked toenter PIN code when power on
- Remote/ Ch/ Instol l Iock : l f you turn i t ON, you wi l l be
osked to enter PIN code when you go to Instol lot ion/
Edi t Chonnels ond When you use Funct ion keys on
the remote
- lock Chonnel Conf i rm:l f you turn i t ON, you wi l l beosked 1o enter PIN code when you switch to o locked chonnel
- Age [ imif : Prevents chi ldren or unouthor ized people f romwotchlng the speci f ic progroms.(Free/Bobove / l2cbove/ l5obove / lBobove)
- Current Possword: Enter curreni possword to chongepossword.
- New Possword: Enter the new possword you wont tocho nge
- Ver i fy Possword: Enter new possword lo conf i rm.
* Note : The default passwot.l is 0000.
/ 3 sec / 5 sec / 1 0 sec.
t, i:'t.:'
@Technomate- RF Chonnel: Set the chonnel to disploy the oudio ond video signol on yourTV 21-69
l f you select 40, receiver wi l l show chonnel 4O on your TV.
- SPDIF: l f you turn i t ON, digi io l oudio output is enobled.
This sub-menu ol lows you to set theond volume i imeout.
menu longuoge, OSD tronsporency, Informqt ion
- Menu [onguoge: Select the desired longuoge ofTne menu
- Tronsporency: Select OSD ironsporency of ihe men.( t%- t ja%l
- lnformol ion Timeouf : Select the disolov durot ion ofthe informot ion bonner I sec/2 sec / 3sec / 5 sec / l0 sec.
23

@Technomate
i*i:l ri.
This sub-menu ql lows you to restore lheo problem ofter chonging ony sel l ings.
foctory set t ing i f the users encounters
- Delete Rodio Chonnels :Erose ol l rodio chonnels
- Delefe Scromble Chonnels:Erose ol l scromble chonnels
- Delefe Al l Chonnels:Erose ol l chonnels ond restore defoul t set t ing.
- Focfory Reset:Erose ol l chonnels ond restore foclory def oul t set i ing
- Restore Defoul l Chonnels:Restores 25 sotel l i tes ond opprox 1500 chonnelspre-TUneo.
i1i!i,. . ,' ,This sub-menu ol lows you to t ronsf er the sof iwore of o receiver to onoiher receiver
- Firmwore:
Tronsfer the f i rmwore of o receiver to onother receiver
- Chonnel Doto:
Tronsfer the chonnel doto of o receiver 1o onother receivcr
- Gomes:
Tronsf er the gome doto of o receiver to onother receiver
-Al l :Tronsfer ol l doto (Firmwore + Chonnel Doto + Gomes)io onolher receiver.
, , EDIT CHANNELS
ir ii
This sub-menu ol lows you 10 set up fovor i te nome ond fqvor i te l is is.
You con choose TV or Rqdio chonnels by pressing the TV/RADIObutton. Supports is for l6 f ovor i te groups.
Press the MENU button on the remote to disploythe moin menu.
2. Use { / ) ond a/v button on lhe remote tomove in the menu.
3. Select Sel Fovor i tes, Select Fqvor i le Group wi l loooeor.
4. Selecl o fovor i te group by pressing the { / }
ond OK buttons on the remote. The TV/ Rodiochonnel l is t wi l l oppeorl f you wont lo edi t the fovor i te group nome,press the RED (@)but lon on the remoie. A
vir tuol keyboord wi l l oppeor.
5. Set fovor i te chqnnels by pressing the ( / )
ond OK buttons on the remoie. The selected
chonnels wi l l hove o heort symbol on the r ight .
Press the OK button on the remote ogointo remove the chonnel f rom o fovor i te group.
6. Press the EXIT button on ihe remote to reiurn tothe orevious menu.
@Technomate

I
I
r*Technomate
Wj?Z,''"This sub-menu ol lows you io renome the chonnels ond input user plD
You con switch between TV or Rodio chonnels bv pressino theTV/RADIO button on lhe remote.
I Select Renome CH/ Edi t Pids, the Renome CH/Edit PlDs menu wi l l oppeor
2 Press the OK bui ton on the chonnel thoi youwont to edi t .
3 Press the OK button on Edi t Nome 1o renome ochonnei . A v i r tuolkeyboord wi loppeorRenome o chonnel by using the { / ) , a/v, ondOK buttons on the remole Press the EXIT but ion onthe remole to exi t .
4. You con edi t o PID by using NUMERIC but lonson the remote
+\t , t ( : The l- IDEO PID, 1l DIO PID tni l I 'CR I , tD nre rert i i l tportni l l
lbr opt int l satel l i te signnl retapt ion
rdb, r-r r t l ra
I Press the OK bul lon on Move Chonnels, iheMove Chonnels menu wi l l oooeor
Press the OK bul ton to seleci the chonnei thoyou wont io move, then orrow bul lons wi l l oppeo
Use ony NUMERIC buttons on the remoie lo mrthe selected chonnelor press r /v, OK buttrto move o chonnel
Press the EXIT but ion on the remote to returnthe previous menu
This sub-menu o lows you to lock chonnels.
Once the chonnel is locked. every t ime you
wonf fo woich the chonnel , you wi l lhove to
enter lhe possword
ld r - I
* \ote: l f )o i lsr t LoLA( 'hannt lConJi tnOFF,toutr i l lnotbcnskct l toLntt t tptsstot le ler t i facl tannel is lockci l
I Press the OK bui lon on Lock Chonnels, the lock Chonnels menu wi l oppeor
2. Press the OK button to select the chonnel thot you wont to lock A ock symbol
wi l l oooeor nexi to the chonnel 's nome.
3 Press lhe OK bul ton ogoin to unlock o chonnel The lock symbol wi l l d isoppeor
4 Press the EXIT button on the remote to return to ihe previous menu
Eilffiffiffiflll, ,,'',.''This sub-menu ol lows vou to skio chonnels
Once c chonnel is skipped, every t ime you try to chonge the chonnel using ( 7;in the v iewing mode, th is chonne wi l l be sklpped
* \ otc: I f I ou tr t to t htngc thc chtnnt l ar i rrg \ L l l ERI( ' hntton in r iut ing node, yoi l (di l \ ' i l th t l t is ch( i l i le l ,
,r-Technomate
hnHl I '1- l ,| . \EJI
Lstt,Gllbry. i
This sub-menu ol lows you to move o chonnel in ihe l is tYou con swi lch belween TV or Rodio chonnels by pressing the TVIRADIO button
i }. | : i l l l
' I , EEt
' ,
I . Press the OK button on Skip Chonnels, theSkip Chonnels menu wi l l oppeor
2. Press the OK but ion on the remote to selectthe chonnel thot you wont to skip. A skip symbolwi l l oppeor.
3 Press the OK but lon on the remote ogoin ioconcel skip The skip symbol wi l l d isoppeor.
4 Press the EXIT button on the remole to return 1olhe previous menu
S#"

@Technomate;rfiiiil\lrll1]1
' r '
This sub-menu ol lows you to delete chqnnels.
* Note: Ifyou delete a channel, you cannot watch this chsnnel until you do o channel search again.
I . Press lhe OK button on Delele Chonnels, f heDelele Chonnels menu wi l l qppeor.
2. Press the OK button to seleci the chonnel thotyou woni to deleie. A symbolwi l l oppeor.
3. Press the OK bui ton ogoin to concel delete.The delete symbolwi l l d isoppeor.
4. Press the INFO button to delete ol l chonnels inthe current l is t You wi l l be osked lo enier o possword.
5. Press the EXIT button to return to the previous menu.
t 0e.1 l i l rmit ; rh lu i l tLrM,
I
iI
@Technomate
EPG (ELECTRONTC PROGRAMME GUrDE)
lti;i,.l l ; ,
This sub-menu ol lows you to v iew the electronic progrqmme guide ( i f ovoi loble).
l . Press the EPG button on the remote. the EPG menuwi l l oppeor.
2. Press the { / } to go to the previous/next EPG.
3. Press the ( / ) or @/@ buttons to chonge thecnqnnel .
4, Press the OK button on r ight s ide of screen (ProgromList) ond ihe selected progromme wi l l be reservedin the Timer menu. Repeot f or more progrqmmes.
5. Press the TV/ Rodio button on the remote to v iew TVIRADIO chonnel l is t .
5. Press the SAT/FAV button on the remote t i v iew the SAT/FAV l ist .
7. Press the RED (E)button on the remote, the Timer menu wi l loppeor.
S.Press the INFO (@)button on the remote to EPG mode switching
This sub-menu ol lows you to set the on/of f t ime of your receiver.
1 . Press the RED (@)button in the EPG menu,the Timer menu wi l l oppeor.
2 Press the r /v buttons to move to other menus.
3. Pressthe { i ) but tonstochongetheselect ion
- Tlmer No. l -8: Selecl the l imer thoi you woni to modify.
- Stole: Select the t imer: Off/Once/Doily/Weekly.
- Dote: Press the OK bui ion to select the dote. A virtuol colendorwil l oppeor.
- Sfod l lme: Enter the t ime by using ihe NUMERIC bui lons on the remote for your receiver to turn On.
- End Time: Enier the t ime by using the NUMERIC buttons on the remote for your receiver to turn OFF.
- Chonnel :To view the chonnel l is t , press OK bui ton on the remote
29

ffiTechnomate
GAMES
] t t ' ,
a
4. Press the OK button to rotole ihe block
5. Press the { / ) bul lon to move ihe block.
6. Press the v button to drop the block
7. In the top r ight window, you con see ihenext block
B. Press the EXIT button to qui t o gome.
To ploy Sokobon, you hove to push the bol ls in lo their correct posi t ions. The bol ls cconly be pushed, nol pul led. You hove io be coreful not to push them into o cornerwhere you connot get them out ogoin You con only push one bol l o i o t ime.
| . Press the OK bui ton on Sokobon, theGome wi l l lood.
2 Select o ski l l by using the a/v buttons on iheremole.
3 Press the OK button . to stort o gome or pressthe EXIT bui ion to return to the previous men-.
4. Press ihe /Y or 1/ | but tons to move.
It
1. Press the OK button on Snoke, lhe gome wi l lroao
2. You con select o ski l l using the ^/v
buttonson the remote
3. Press the OK button to stort o gome or press iheEXII but ton the remote fo return to the previousmenu.
4. Press the a/v or 1/) but tons to move.
5. l f the snoke tokes BLUE blocks on ihe screen,the length wi l l increose.
6. l f the snoke tokes RED blocks on the screen,the lengih wi l l decreose.
7. l t Ihe snoke tokes BLACK blocks, the gome wi l lend,
8. Press the EXIT button to qui t o gome.
WTechnomate
5. Press the RED (f . ;J)but ion to undo previous moveYou con only undo o step once oi q t ime.
6 Press the GREEN button to restort the gome
7 Press the YETLOW(f_l) /BtUE(f_l) but tons toi r rmn tn thc nrcviorrc/ next level .
You con jump between completed levels
8. Press the EXIT bui ton to qui t o gome
. -:;,.,-,,-*.,-.",,,,..*,--,"---l
l t . , I
: I Press the OK bulton on Telr is, the gome wil l r dsfs*i{r$sass{resN*rsus. ls i { t l$sHf i l t : f i lsa}t
: l^^.1 | n S S l9Y|$:{ tqi l: lood. | 5 ti---;il; $**tilfi, i {a l / f , { $$#f i| 2.Selectoski l l byusingther, /v buttonsonlhe f i * f i **$, f i **$- " f ;r l$tq A $ . AremoTe .T ,,, il T T ii {
i L ' ; I I , i r l , i : / l i l r t ; I i i i | i i ; / l I l , r r l j i 111 I ll r ; ,1 l I i l . ,4 ! ) L ii L ' i I I , i r l , i : / l i l r r ; I i i i | i i ; / l I l , r r l j i r l l I l
3. Press ihe OK but lon to s lor l o gome or pres-!
the EXIT button to return io the previous mef l
I
I
4Technomate
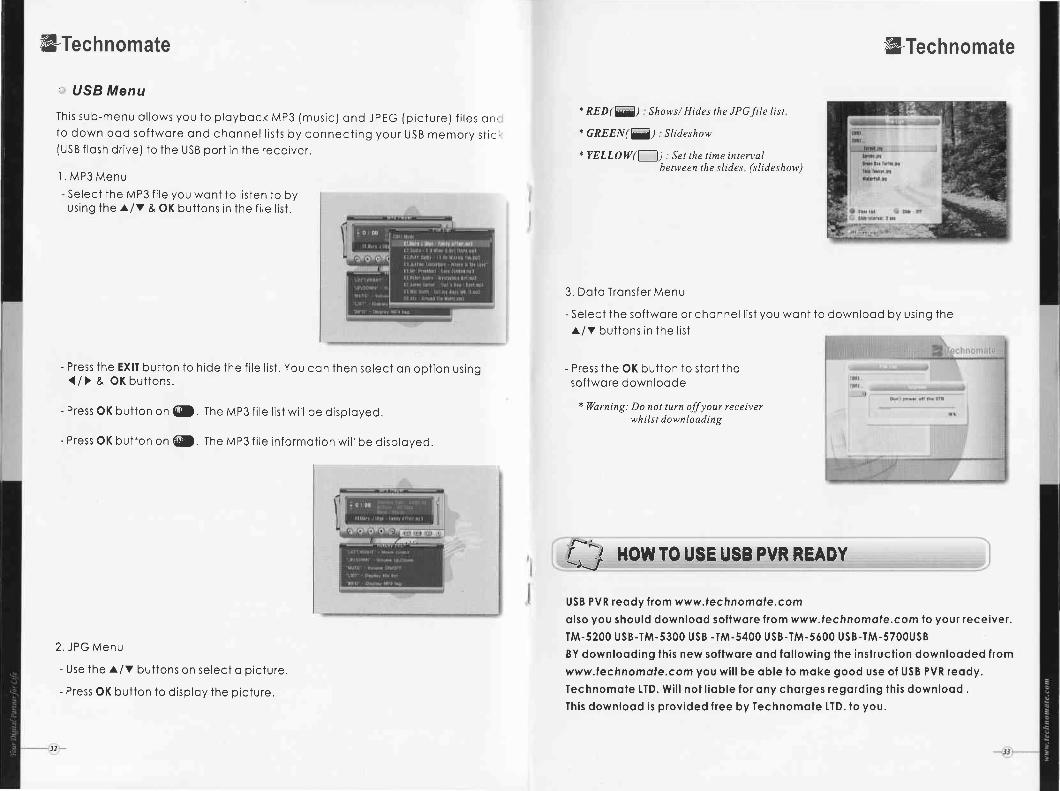
' USB Menu
This sub-menu ol lows you to ploybock MP3 (music) qnd JpEGto downlood softwore ond chonnel l is is by connect ing your(USB f losh dr ive) to the USB port in the receiver.
l . MP3 Menu- Select the MP3 f i le you wont to l is ten to byusing the L/Y & OK buttons in the f i le l is t .
- Press the EXIT button to hide the f i le l is t . You cqn then select on opt ion using</> & OKbut ions.
- Press OK button on O. The Mp3 f i le t is t wi l l be disployed.
- Press OK button on @. The Mp3 f i le informot ion wi l l be disployed.
2. JPG Menu
- Use the a/v buttons on select o picture.
- Press OK button to disploy the picture.
@Technomate
* RED(@) Shows/ Hides the JPG file list
* GREEN($) Slideshow
* YELLOW(f--)) : Set the time intervalbetween the sl ides hl ideshow)
3. Dotq Tronsfer Menu
- Select the softwore or chonnel l is t you wont toa/v buttons in the l is t
- Press the OK button to stort thesoftwore downloode
* Warning: Do not turn offyour receiverwhi lst downloading
downlood by using the
iJ How ro usE usB PvR READY
USB PVR reody from www.technomole.com
olso you should downlood softwore f rom www.lechnomole.com lo your receiver.
TM-5200 USB-TM-5300 USB -TM-5400 USB-TM-5600 USB-TM-5700US8BY downlooding ih is new sof iwore ond fol lowing lhe insfruct ion downlooded from
www.technomole.com you wi l l be oble to moke good use of USB PVR reody.
Technomote LTD. Wi l l not l ioble for ony chorges regording this downlood .This downlood is provided free by Technomole [TD. to you.
(picture) f i les qn'
USB memory s i ic i
32

@Technomate
SYSTEM INFORMATION
You con check the current inf ormoi ion
obout your receiver, such os the receiver
model nome, sof twore version, hordwore
version, monufoctur ing dote, etc.
* Note: This infonnation is necessar! when !ou |9ant to downloada new soflware or you need lo repoir the receiver.
COMMON INTERFACE MODELS ONLY
To woich scrombled chonnels, you wi l l need q condi t ionolAccess Module (cAM)ond o Smort cord which is speci f ic to thot CAM from lhe service provider (broodcoster) .
* Nole: Withoul a CAM and q smart card, you can wotch only Frce-to-Air programmes.
l . Insert o CAM into o CAM slot in the receiverond o Smort cord into the CAM.
2. The messoge: CAM Ini t io l iz ing wi l l oppeor.
3. Once ihe messoge hos disoppeored, you conselect the chonnel to wotch.
I Go to Common Inlerfoce. Press OK on the CAMto see f ur ther informot ion of the CAM.
2. Proceed with f ur ther instruct ions disploved onthe screen, then you con check further detoi lsdepending on the CAM in use.
* Nole: Further detailed information is nol mentioned in this manaalsince the information depends on the type ofCAM.
r ! , ,4oi l r I r i l : i | 1nnl t
i l t r r I l i l f l r ton/ l
Adl.ra t f id0tr t nt r wdThi l tn l t l8t ndt l rD4n tuqnrnN ,ormr [ { Jrr i l r
I t l raa (0)?0a ata otoirAx , ]aa (0)2Oa ,ra Otrs
l . Connect the nul l model coble to the RS-232C conn-ect ion on the bock of the receiver ond io your PC
2. Downlood the lotest version of the TM Looder f romthe Technomote web si te (www.technomote.com)
3. Downlood ihe lqtest sof twore ( .STB) of your receiverEnsure thot the model number of the softwqre is thesome os the receiver you hove.
4. Cl ick on Browse in the TM Looder.
5. Select the f i le f rom where you soved i t when youdownlooded i t f rom the Technomote websi te.
6. Turn ON the sotel l i te receiver.
7. Cl ick on Connecf on TM Looder ond then cl ickSlort to begin the softwore downlood
B. The downlooding stotus is disployed
9. Once i t d isploys 100% Finished (woi t unt i l i t hoscompleted erosing), the sof twore downlood hqsf in ished.
10. When i t completes the wr i t ing of the new sof iwqre,disconnect ihe coble beiween lhe receiver ond the PCA Foctorv Reset is reouired.
I l . Go to System Informot ion on the moin menu ondmqke sure thot you hove correct sof twore version.
Nul l Modem Gable Diagram
RS-232C Cable
hil
Lni'*__:l aou,- | I c*, I
[-l*nno.r," m s"ries Dombad€r
I t*nno.ot. sooo S"nes Downlad€l
I Technotrrate aOoO Serios Downlqder
o
@Technomate
{} Hol'lTo nouvilloAD $oFTwARE FRor{ pc T0 REcEtvER
:1_- rlcoa' :l @hi*' I r*, I
-J
sd
l.or r -l p.L'r, I c* |

@Technomate
4 I Lt pl u'a,,1 C i t-.t r t r t e) ;
l f you wont to downlood/ uplood Chonnels, Cl ick on Chonnels in the TM looder,then select Downlood/ Uplood
* Downlooding Chonnels PC to TM-5000 Ser iesCl ick on Downloqd, ond then Cl ick on Browse in the TM Looder.Select the f i le f rom where you soved i i .Iurn on the sotel l i te receiver.c l ick on connecl in the TM Looder ond then cl ick on Slor l io begin downloodingChonnels PC to TM-5000 Ser ies.Once i t d isploys
,100% f in ished, the Chonnel downlooding hos f in ished.
3[oo
@Technomate
TROUBL€ SHOOTING
There moy be vorious reosons lor the obnormql operofion of o sef -fop box. lf i tdoes nof work properly, checkit occording fo fhe procedures shown in fhe fobfebelow.l .
2.J.
//l
5.
* Downlooding Chonnels TM-5000 Ser ies to PCL Cl ick on Uplood, ond then Cl ick on Browse in the TM Loqder.2. Select the f i le ond f o lder where you woni to sove in vour pC.
3. Turn on the sotel l i te receiver.4. Cl ick on Connecl in the TM Looder qnd then cl ick on Stqrt to begin uplooding
Chonnels TM-5000 Ser ies to PC.5. Once i l d isploys 100% f in ished, the Chonnel uplooding hos f in ished..
* You con uploodl downlood def oulf chonnels moximum | ,500 TV & Rodio chonnels.l f you wont to odd more lhon 1500 chonnels, you wil lhove lo do b chonnelseorch/scon.
l -ED on fronl poneldoes nol lurn ON
Connecf power cord properly infolhe oower sockel.
Connecf power cord properly infothe oower sockel.
Connecf f he dish/onlenno coblecorrecfly.
Check lhe coble connecl ions, l-NBond ofher equipmenf connecledbelween lhe INB ond lhe receiver orodjust the dish/ontenno,
As obove. Type the selting volue correclly.
No piclure or sound
Wrong connection of fhevideo/oudio oulput to TVinpul lerminol.
Wrong connecl ion ofsolel l i le dish/onlennocoble.
Sotellile dish/nolenno isoimed o lhe wrongdirecl ion.
No signol or weok signol.
Wrong seft ing of chonnelinformotion in MENU screen
Block-ond-whi lescreen or V-Hold
Your TV mode is di l ferenlfrom solellile broodcosiingmooe.
Use TV of lhe some mode,
Use lhe NITSC/PAL converferconnecled to o receiver ond o TV
Chonge lhe bolteries,
Swifch off f he l ighl.
Aim f he remote control of the receiver.
Go lo possword ond press 0000lhen go lo lhe bol lom ol poge ondchonge lhe remole lype to fype Ior lype 2.
Remofeconfrol ler does nofwork
Boffery exhousfed.
Fluorescenl l ighl inf erf eringwilh the remote conf rol ler,
Remole conlrol leris incorrecl ly oimed.
Remofe fype is nolproperly selecled.

@Technomate
1-p+ Questions & Answers
The receiver is on bul I connol gel ony Menu on lhe screen?
I ) Check i f the scort or the RF leod is connected,2) Check ihe A/V sett ings on your te levis ion is correcf ,3) Scort coble or RF coble could be f oul iy therefore reploce i f in doubt.
The receiver is on bul I connol gel ony Menu on lhe screen?
1 ) Check i f the scort or the RF leod is connected,2) Check the A/V sett ings on your te levis ion is correci ,3) Scort coble or RF coble could be foul ty therefore reploce i f in doubt.
How do I lune lhe RF oulput of fhe receiver lo my le levis ion?
Your receiver 's RF output hos been Defoul ied to PAL I ond chonnelf requency 40, Apply the tuning setup oppl icoi ion of your ie levis ion.
I get the messoge 'no s ignol ' d isployed?
l)Check i f the LNB coble is inserted into the lF INPUT,2)Check i f the LNB setup menu is correct ly set .3)Your solel l i te Dish moy be out of o l ignment or your LNB moy be is f oul ty.4)Go to Eosy intol lot in guide ond stort f resh,5) contoct your deoler / insiol ler .
lconnol occess o por l iculor chonnel l require?
You need to check the fol loWing :l )Check i f you o correct t ronsponder.
Go 1o odvonce seorch ,Turn on the Network Seorch.press red button to iune.
2)Moke sure you hove correct PID numbers.b) i f obove dose not help go to
www lyngsat.comwww kingofsat net/en/preJi phpPleose contoct your Suppl ier for fur ther ossistonce.
How con I f ind oul whol sof lwore version I hove?
Press Menu on the remote,Go io sytem informot ion press ok,Ful l informot ion is disployed
I hove losl my personol lock Code sel l ing, whol do I do?
For secur i ty reoson, pleose contoct your deoler.
@Technomatet--\
L=-:}l S P EC I F ICATIONSr_-tr1
5VSlem copoD|| | l tes Ful lv BVB comol ionl
LNB/Tuner inpul
Conneclor FC-\6q-24 lemdle
Frequencv ronqe 950MHz-21 50MHzSionol level
LNB supplv ' | 3/ l8V mox 4OOmA
LNB switch conlrol 22KHzDiSEoC Verl 0/ l
Demodulqfor
Froni enci OPSK
Svmbol roleSCPC ond MCPC CooobleSDeclrol inversion Auto conversion
System resource
32bi i orocessor l l 5OMHz
SDRAM l6Mbvte
FI ASH 2MbvleFFPP.)M 32Kbi l
Video decoder
MPFC' Moin Prof i le@Moin Level
Dolo Rofe lo io I 5M bi ts/s
Re so I u l i 7 20X57 6.7 20X480NTSC PAL
Aspect Rol io 413 l6:9
Teletexl DVB comol iont
MPEG Audio MPEGllover l&2
Type Mono Duol mono, Sfereo. Joint StereoSomol ino rotes 32 44 | ond 4EKHZ
Seriol dolo in ler foce Connecior 9 oin D-sub mole Moxl lsKbos
Remole conlrol Code NEC-IROoerol ino condi l ion Uo to 7 Metel
USB USB Suoolv DC 5V Mox l50mA
Power supplyPower consumption Mox 25WSupplv vol tooe 90v- 250vSuoolv t reouencv
Reor ponelconneclots
TV SCART Video outrCVBS,RGB) / Audio oui
VCR SCART Video oui(CVBSI / Video In{CVBS,RGB) /Audio out
VIDEO X RCA cinch
AUDIO L/R 2X R(:A cinch
Comoonenl IY/Pb/Pr l 3X RCA cinchSeriol dolo 9Pin D-subDiortol tuner rnoui tEcl69-24Loop-through Digi lo l luner tFC169-24
Terresfr io l onl inout tEc169-2RF modulotor ouf pul tEc169-2S/PDIF FdLrer Oot ic
RF modulotor PAIG/ l /K TV Type
Connector IEC 169-2. femole/moleFrequencv 470. '860lv lHzOutout chonnel number 21 *69
Physicqlcnaai l iaar ian
SizefWxHxDl 260 x 54 x 232 mmweiohl tNel l I SKqs
Disposol o l Old Eleclr icol & Eleclronic Equipment(Appl icoble in lhe Eutopeon union ond olherEuropeon Counlr ies wi lh seporole col lecl ion syslems)Thls symbo on the produci or on i ts pockoging indicotes thot th is product shql not be i reoted qs
househo d wqsie Insleod i t shol be honded over io the oppl icoble co lect ion point for ihe
recycl ng of e lecir ico ond e ectronic equipnent. By ensur ing th is product is disposed oi correct y,you wi l l help prevent potenl io l negoi ive consequences for ihe environmenl ond humqn heol lh,which cou d otherwise be coused by inqppropirote woste hond ing of th is product. The recyc ng
of mqter iq s wi he p to conserve nolurol resources.For more deloi ed informol ion obout recyc ing of th is product, p leose contoct your Locol c i ly
of f lce, vour househo d wosie disposol service or the shop where you purchosed ihe product

@Technomate
, j ( opt ional Add-ons
Cord Reoder(compot ib le wi th: TM-5200D USB & TM-5600C1 USB)
@TechnomateYour Digital Partner for Li fe
User's Manual
Turn yovr receiver to o Conox embedded in less lhon 5 minulesby instoll ing lhis cord reoder osk your sup plier lor more deloils.
Block Housing Ki t (Front Ponel & Metol Cose)
Chonge thecolour of receiverhousing loblockcolor in 5minules
ffiEH
(Je
f f i#f f i * -*ou"u