technology enhanced classroom instructor guide greenspun hall 2009
Upload: office-of-information-technology-university-of-nevada-las-vegas
Post on 14-Mar-2016
220 views
DESCRIPTION
An intsructor's guide to using technology in Technology Enhanced Classrooms (TECs) in Greenspun Hall, which houses UNLV's Greenspun College of Urban Affairs. The manual details how to use the microphone, PC, projector and room controls to enhance the audio visual experience. Prepared by the Office of Information Technology at UNLV.TRANSCRIPT
Technology enhanced classroom (Tec)cresTron conTrol sysTem | greensPUn hall
Instructor GuIde

contentsSupport & More 3
Equipment & Software Overview 4
How To Guides 6
Equipment Use 10
Help 18
Contacts 19

on manaGInG your fIles:
3
tIpsBring your files on a flash drive (also called a usB or jump drive).
When done using a tec, save newly created files on your flash drive.
the computer is secured with a product called deepfreeze, which erases all newly saved files put on the computer between restarts.
lEavinG THE rOOMplease shut off the projector and lock the room door when you leave. swipe your marlok card until the light turns red. please ensure the door is properly closed by pulling on the door handle.
SUppOrTto get immediate help, call classroom support at 895-0771, monday to friday 8:00 a.m. to 10:00 p.m. you can request a technician, software installation, or schedule training.
TEC lOCaTiOnSfor a current list of tec locations, visit: oit.unlv.edu/labs-classrooms/tecs
TEll US WHaT YOU THinK!We need to hear from you in order to improve teaching spaces. click the TEC Survey icon on the computer desktop screen in this room and share your opinion. our management staff analyze the results and set goals based upon your input.

The equipment
available in Tecs
may vary slightly
from room to room,
but all Tecs have
the following as
standard equipment
eqUiPmenTlectern Houses most of the equipment in the tec, excluding the multimedia projector.
Control panel (p. 10 & 11)allows you to choose which device is displayed by the multimedia projector and to adjust the volume and settings of the selected multimedia source device. you may also control projection screens, built-in microphones and more.
Document Camera (p. 14)displays documents, such as printouts or photos, overhead transparencies and small 3-dimensional objects through the multimedia projector.
DvD/vHS playerplays dVd discs and VHs tapes through the multimedia projector. It also plays audio cds and may play mp3s on cd-rW/r media.
Gooseneck Microphoneprovides speech sound reinforcement. may be muted through the control panel.
laptop/auxiliary Device Support (p. 8)cables are provided to enable you to present multimedia through the audio/visual system from your own equipment (laptops, iphones, ipods). cables for composite video and audio are supplied. you may need to provide your own adaptor to fit some devices. laptop users may need to bring the adapters necessary to connect to a standard analog VGa cable.
Multimedia projector displays computer, laptop, document camera and dVd/VHs content on a screen.
pC (Computer)provides Internet service, access to selected software, and more.
presentation remote (p. 17)allows navigation through powerpoint presentations. doubles as a laser pointer and mouse.
Telephoneuse it to contact:classroom support (ext. 50771) facilities Help desk (ext. 54357) public safety (911)
4

The following
software is
installed on all
general purpose
Tec computers
sofTwareMultimediaitunes Quicktime playerrealplayerWinampWindows media player
Otherdeepfreeze Java 2 runtime environmentpower archiverWebcampus plug-insWindows Xp professional
applicationsadobe acrobat readeradobe creative suite 4adobe photoshop elementsdVd player softwarespss for Windowssymantec antiVirus
internet ToolsfirefoxGoogle earth Internet explorersecure file transfer clientsecure shell clientWs_ftp 95 le
Microsoft Office 2003 & 2007microsoft accessmicrosoft excelmicrosoft powerpointmicrosoft Wordmicrosoft publisher
Some TECs may include additional specialized software. if you need software that is not provided, please contact Classroom Support.
5
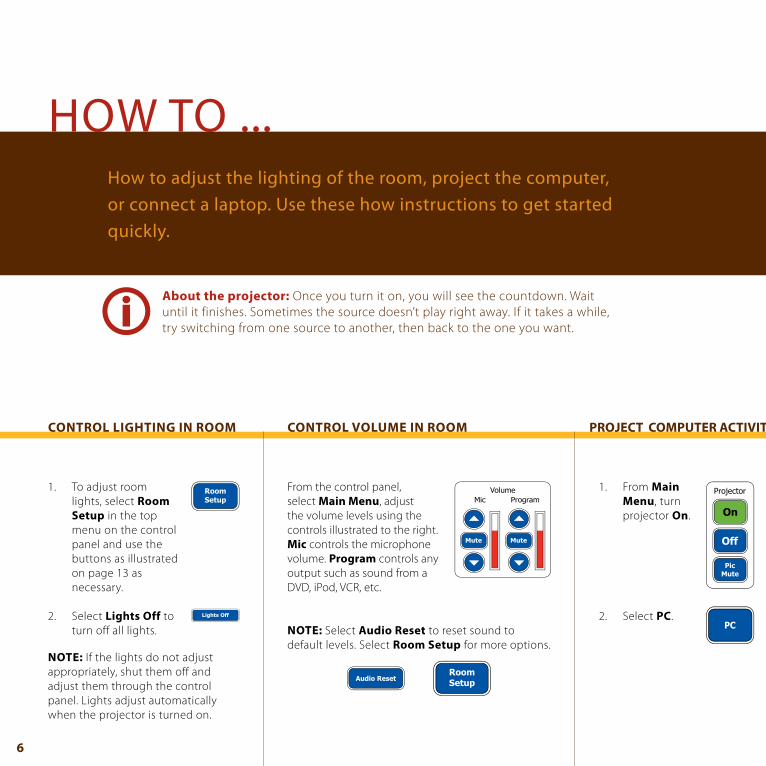
how To ...how to adjust the lighting of the room, project the computer, or connect a laptop. Use these how instructions to get started quickly.
about the projector: once you turn it on, you will see the countdown. Wait until it finishes. sometimes the source doesn’t play right away. If it takes a while, try switching from one source to another, then back to the one you want.
COnTrOl vOlUME in rOOMCOnTrOl liGHTinG in rOOM prOjECT COMpUTEr aCTiviTY
6
from the control panel, select Main Menu, adjust the volume levels using the controls illustrated to the right. Mic controls the microphone volume. program controls any output such as sound from a dVd, ipod, Vcr, etc.
nOTE: select audio reset to reset sound to default levels. select room Setup for more options.
1. to adjust room lights, select room Setup in the top menu on the control panel and use the buttons as illustrated on page 13 as necessary.
2. select lights Off to turn off all lights.
nOTE: If the lights do not adjust appropriately, shut them off and adjust them through the control panel. lights adjust automatically when the projector is turned on.
1. from Main Menu, turn projector On.
2. select pC.
prOjECT COMpUTEr aCTiviTY SHOW a DvD
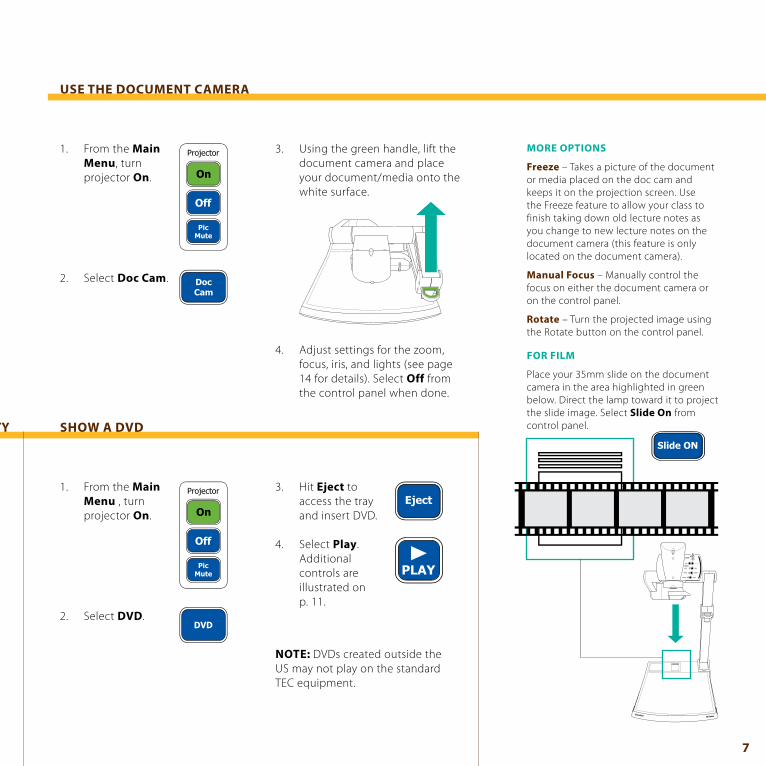
USE THE DOCUMEnT CaMEra
7
MOrE OpTiOnS
Freeze – takes a picture of the document or media placed on the doc cam and keeps it on the projection screen. use the freeze feature to allow your class to finish taking down old lecture notes as you change to new lecture notes on the document camera (this feature is only located on the document camera).
Manual Focus – manually control the focus on either the document camera or on the control panel.
rotate – turn the projected image using the rotate button on the control panel.
1. from the Main Menu, turn projector On.
2. select Doc Cam.
3. using the green handle, lift the document camera and place your document/media onto the white surface.
4. adjust settings for the zoom, focus, iris, and lights (see page 14 for details). select Off from the control panel when done.
1. from the Main Menu , turn projector On.
2. select DvD.
3. Hit Eject to access the tray and insert dVd.
4. select play. additional controls are illustrated on p. 11.
nOTE: dVds created outside the us may not play on the standard tec equipment.
FOr FilM
place your 35mm slide on the document camera in the area highlighted in green below. direct the lamp toward it to project the slide image. select Slide On from control panel.

COnnECT a lapTOp COnnECT OTHEr DEviCES
8
1. from the control panel, select Main Menu in the top menu.
determine whether or not you have a VGa or dVI-d connection on your laptop. most pcs are VGa. many macs are dVI.
2. plug in VGa or dVI connector into your laptop VGa port or video port adapter.
3. plug in the audio cable into the headphone port of your laptop.
4. turn on laptop. • on a pc, select Display
External image. • on a mac, select Display
Mirrors.
5. under ‘projected source’ in the control panel, select laptop vGa or laptop Dvi.
nOTE: If the image on your laptop does not match what is on the projected screen, call classroom support. on a pc, If your image does not display, you may need to press a combination of the function key and F4, F6 or F8 on your laptop keyboard. this procedure varies depending on the brand of your pc hardware.
vGa connector
Dvi - D
continuedhow To ...
ipOD
1. connect the audio mini plug to the headphone port on your device. you will need to provide an adaptor if using a first generation iphone. other adaptors may be necessary.
2. select ipod audio, on the main menu.
Video
right-side audio
left-side audio
laSErDiSCS or viDEO CaMEraS
1. plug in the yellow taped cord and the audio cords. If you only need one audio cord, plug in either the white or red cord.
2. select aux under ‘projected source.’

USE THE MiCrOpHOnE
9
1. make sure the green light is on, at the base of the microphone.
2. on the control panel, select Main Menu in the top menu.
3. under the volume section, make sure the mute button for the microphone is turned off (blue means off, red means on). adjust the volume using the up or down arrows.
4. to turn the mic off, push Mute.
nOTE: to see the controls for the dVd, Vcr, or doc cam while using the full screen preview mode, select Show Transport.
1. select preview from the top menu.
2. under ‘preview source,’ select which device you want to privately work on, then go ahead and work on it.
3. When you’re ready for the class to see the screen you’re working on, select Send to projector.
4. for full screen mode, touch the small preview window on the top right of the control panel.
prEp MaTErialS WHilE STUDEnTS WaTCH SOMETHinG ElSE On a prOjECTOr
Video
right-side audio
left-side audio

On turns on the multimedia projector. there will be at least a 60 second delay as the multimedia projector warms up.
Off turns off the multimedia projector.
pic Mute mutes all video from the multimedia projector, replacing it with a black screen.
prOjECTOr
Mic adjusts the volume for the gooseneck and wireless microphones.
Mic Mute silences all audio from the gooseneck microphone.
program adjusts the volume for all other sources.
program Mute silences all audio from other sources.
vOlUME
pC displays the pc using the multimedia projector.
laptop vGa displays a laptop with VGa connection through the multimedia projector.
laptop Dvi displays a laptop with dVI connection through the multimedia projector.
Doc Cam displays the document camera through the multimedia projector.
prOjECTED SOUrCE
DvD displays the dVd player through the multimedia projector.
vCr displays the Vcr through the multimedia projector.
aux displays a connected auxiliary source through the multimedia projector, like a camcorder or laserdisc.
10
eqUiPmenT Use
the control panel is the brain of the tec. use it to control the dVd player, microphone, multimedia projector, room lighting, and more.
crestron control systemMain Menu

Menus see following pages for descriptions on room setup. preview is described on pg 9.
11
preview Screendisplays content presented on projection screen
ipod audio selects a connected ipod or iphone as a source for audio (first generation iphone requires an adaptor and other devices may as well).
connect the audio mini plug to your headphone port on your iphone or ipod. remove your case if it’s in the way.

12
On turns on the multimedia projector. there will be at least a 60 second delay as the multimedia projector warms up.
Off turns off the multimedia projector.
pic Mute mutes all video from the multimedia projector, replacing it with a black screen.
prOjECTOr
advanced this is for technicians only.
room Setup
eqUiPmenT Use
this tab on the control panel allows you to adjust the room set up. some rooms have more options on this screen than others.
crestron control system

13
lights On/Off turns default settings for room lights on or off.
lecture turns on uplights which is optimal for lectures that do not use audio/visuals.
av Mode turns on downlights so that students can take notes during audio/visual presentations.
Whiteboard On/Off turns on or off the whiteboard lights. does not affect other lights.
Screen use the up or down arrows to lower or raise projector screen. press Stop to halt the screen.
Shadeuse the up or down arrows to lower or raise window shades. press Stop to halt the shades.
liGHTSSCrEEn & SHaDE
audio reset resets audio to default levels.
If for some reason the control panel does not work, you can adjust room lighting by using the controls located on the wall behind the lectern.
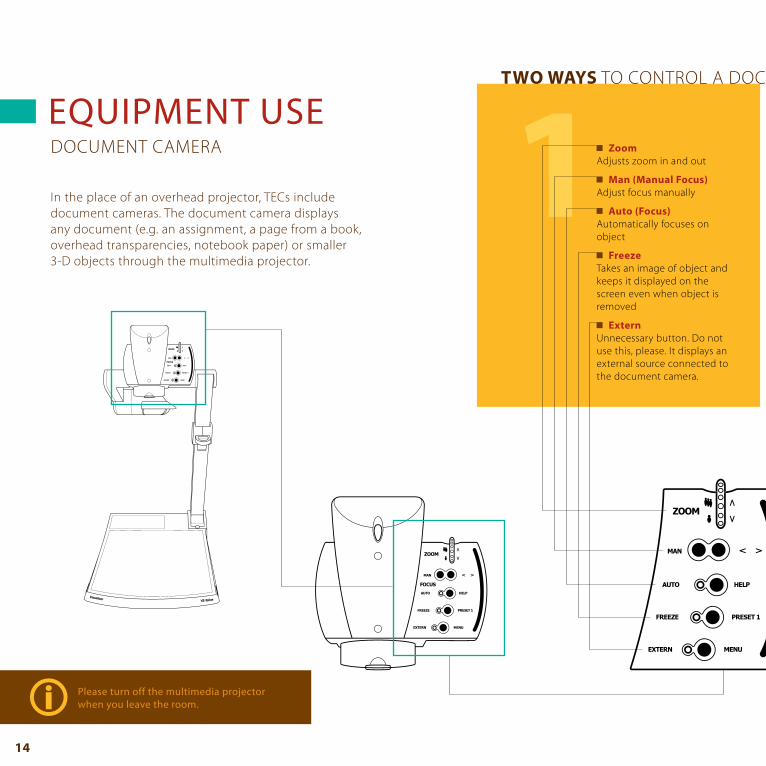
document camera
eqUiPmenT Use
In the place of an overhead projector, tecs include document cameras. the document camera displays any document (e.g. an assignment, a page from a book, overhead transparencies, notebook paper) or smaller 3-d objects through the multimedia projector.
TWO WaYS to control a document camera (doc cam)
Please turn off the multimedia projector when you leave the room.
14
Zoom adjusts zoom in and out
Man (Manual Focus) adjust focus manually
auto (Focus) automatically focuses on object
Freeze takes an image of object and keeps it displayed on the screen even when object is removed
Externunnecessary button. do not use this, please. It displays an external source connected to the document camera.

TWO WaYS to control a document camera (doc cam)
15
On & Offturns doc cam on or off. please shut off when done.
rotate turns displayed image
Save presetsaves customized presets. use when regularly switching between very different types of items
recall presetapplies saved customized presets
light1 Onturns document camera lamp on
Slide Onturns the slide
transparency light on and adjusts lens. you can use this to display 35 mm slides
lights OFFturns doc cam lamp off
Focus + sharpens focus of object
Focus - Blurs focus of object
auto (Focus)automatically focuses on object
Zoom + Zooms closer to object
Zoom - Zooms away from object
iris + Brightens the image according to the object
iris - darkens the image according to the object
auto (iris)automatically adjusts lighting on object
mIcropHone & remote
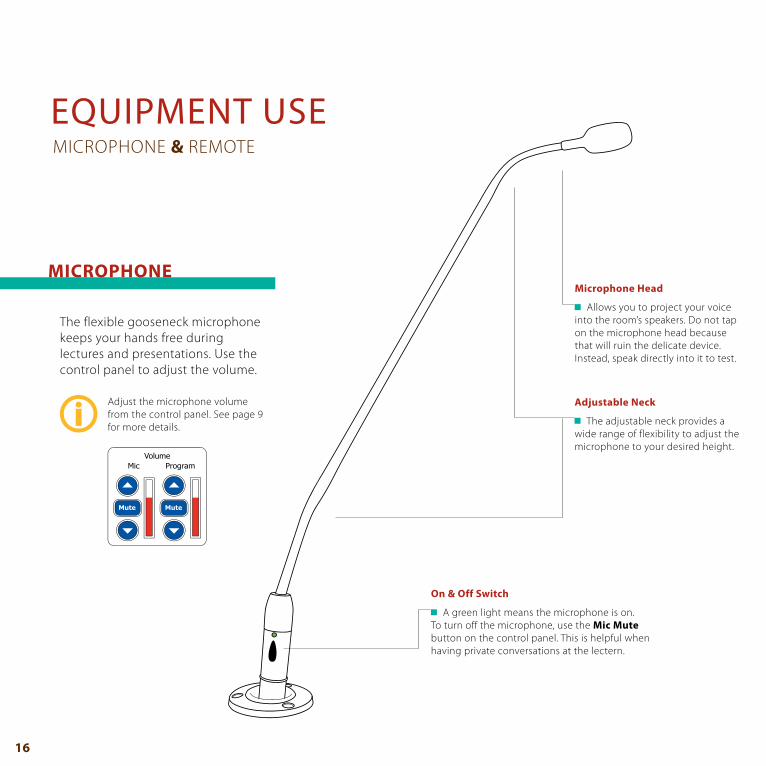
eqUiPmenT Use
the flexible gooseneck microphone keeps your hands free during lectures and presentations. use the control panel to adjust the volume.
MiCrOpHOnE
16
On & Off Switch
a green light means the microphone is on. to turn off the microphone, use the Mic Mute button on the control panel. this is helpful when having private conversations at the lectern.
adjustable neck
the adjustable neck provides a wide range of flexibility to adjust the microphone to your desired height.
Microphone Head
allows you to project your voice into the room’s speakers. do not tap on the microphone head because that will ruin the delicate device. Instead, speak directly into it to test.
adjust the microphone volume from the control panel. see page 9 for more details.

the presentation remote is a mouse, laser pointer, and wireless remote all-in-one. It’s a great accessory for navigating through powerpoint presentations. all tec computers come with presentation remotes installed.
remember to leave the remote at lectern for the next instructor. use the velcro to attach it to the right side of the lcd monitor.
rEMOTE
17
Use as Mouse
place thumb on the grey button at the center of the remote and push it the direction you would like the mouse cursor to move.
the silver button below mimics mouse buttons. push button to the left to ‘left click’ and to the right to ‘right click’.
Use as laser pointer
turn laser on by pressing and holding both the clear button at the bottom and the small blue button near the top for several seconds. When the clear button at the bottom flashes red, then let go of both buttons.
point the remote at the screen and use the blue button to activate the laser.
For powerpoint presentations
start the slide show and move the scroll wheel up and down to move back and forth between slides. this wheel is on the side of the remote.

Trainingtraining is offered to any instructor or student using a tec. to schedule a training session, please contact classroom support at 895-0771. or, check out our videos online.
Classroom Supportcontact 895-0771, monday to friday from 8:00 am to 10:00 pm, for your tec needs, such as: • software installation• Help using equipment• trainingoit.unlv.edu/labs-classrooms/technology-enhanced-classrooms-tecs
Software installto request new software for a tec computer, please contact classroom support at 895-0771 with the software’s title and the classroom in which you would like to have the software installed.
to view the software Installation policy, go to: oit.unlv.edu/about-oit/software-installation-computing-facilities
Help
18

manaGers
Darrell luteyassistant directorInstructional technology services [email protected]
a.j. robinsoncomputing facilities development [email protected]
rohan palmerIt technician [email protected]
contacts
19
TEll US WHaT YOU THinK!click the TEC Survey icon on the computer desktop screen in this room and share your opinion.

Fall 2009offIce of InformatIon tecHnoloGy