technical manual pace 203 - dot medical osypka medical 2013© technical manual pace 203 external...
TRANSCRIPT
5I-17-013X-B-18 Osypka Medical 2013©
Technical Manual
PACE 203 External Dual Chamber Pacemaker
M a n u f a c t u r e r
Osypka Medical GmbH
Albert-Einstein-Strasse 3 D-12489 Berlin, Germany
Phone: +49 (30) 6392 8300 Fax: +49 (30) 6392 8301 E-Mail: [email protected]

Osypka Medical PACE 203 – Technical Manual
5I-17-013X-B-18 Page 2 of 62
Table of Contents 1 Technical Description 6
1.1 Overview 6
1.2 Classifications 6
1.3 Applicable Standards 6
1.4 Electronic Block Diagram 7
1.5 Mechanics 8
2 Function Check 9
3 Safety Check 10
3.1 Micro/Macro Shock Protection Tests 11
3.1.1 Measurement of Enclosure Leakage Current 12
3.1.2 Measurement of Patient Leakage Current 12
3.1.3 Insulation Test 14
3.2 Measurement of Patient Auxiliary Current 14
3.3 Runaway Protection Test 15
4 Special Service Modes 16
4.1 Service Mode 16
4.1.1 Activation of Service Mode 16
4.1.2 Deactivation of Service Mode 16
4.1.3 Service Menu 16
5 Feature and Compatibility Menu 17
5.1 Activation of the Feature and Compatibility Menu 17
5.2 Deactivation of the Feature and Compatibility Menu 17
5.3 Hardware & Software Compatibility Issues 17
5.3.1 Firmware 1.29 or higher 18
5.3.2 Firmware 1.25 + 1.26 + 1.27 + 1.28 19
5.3.3 Firmware 1.24 19
5.3.4 Firmware 1.23 20
5.3.5 Firmware 1.22 20
5.3.6 Firmware 1.21.1 21
5.3.7 Firmware 1.21 + 1.20 21
5.4 LCD Board Generations 22
6 Pulse Generator Timing 23
6.1 General 23
6.1.1 Terms 23
6.1.2 Symbols 24
6.2 Mode Characteristics 24
6.3 Asynchronous modes (V00 or A00) 25
6.4 Inhibited Single-chamber Modes (VVI or AAI) 25
6.5 Asynchronous Dual-chamber Mode (D00) 26
6.6 Dual-chamber Mode without Atrial Stimulation (VDD) 26
6.7 Dual-Chamber Universal Mode (DDD) 27
6.8 The Implicitly Adjustable DAI Mode 28
6.9 The Implicitly Adjustable DVI Mode 28
6.10 Atrial Trigger Modes (AAT, DDD+AT) 29
7 EMC Guidance and Manufacturer’s Declaration 30

Osypka Medical PACE 203 – Technical Manual
5I-17-013X-B-18 Page 3 of 62
7.1 Electromagnetic Emission/Radiation 30
7.2 Electromagnetic Immunity 31
7.3 Electromagnetic Immunity for External Cardiac Pacemakers 32
7.4 Recommended Safety Distances to Portable and Mobile RF Equipment 33
8 Appendices 34
8.1 Error Codes 34
8.2 Stimulation Amplitude According to ISO Definition 37
8.3 Waveform of Stimulation Pulse 38
8.4 Sensitivity for sin² Test Impulses 39
8.5 Spare Part List 40
8.6 Circuit Diagrams and Assembly Drawings 42
8.7 Function and Safety Check with SigmaPaceTM
1000 52
8.7.1 Visual Inspection 52
8.7.2 Test Equipment & Test Set Up 53
8.7.3 Supply Current & Power Management 53
8.7.4 Patient Auxiliary Current 55
8.7.5 Runaway Protection 55
8.7.6 Pulse Amplitude 56
8.7.7 Pulse Duration 56
8.7.8 Rate 56
8.7.9 Sensitivity 57
8.7.10 Noise Detection 57
8.7.11 A-V Delay 58
8.7.12 Refractory Period 58
8.7.13 Electrode Supervisory 59
8.7.14 Cross Current 59
8.7.15 CTRL OUT Signal (optional) 59
8.7.16 Test Protocol 60
Osypka Medical PACE 203 – Technical Manual
5I-17-013X-B-18 Page 4 of 62
Table of Tables Table 1: Medical Device Classifications .............................................................................................................6
Table 2: Applicable Standards ............................................................................................................................6
Table 3 Leakage currents ................................................................................................................................ 11
Table 4 Insulation to be tested ........................................................................................................................ 12
Table 5 Runaway protection values ................................................................................................................ 15
Table 6 Hardware Compatibility Matrix for Firmware 1.29 or higher. .............................................................. 18
Table 7 Hardware Compatibility Matrix for Firmware 1.25, 1.26, 1.27 and 1.28. ............................................ 19
Table 8 Hardware Compatibility Matrix for Firmware 1.24. ............................................................................. 19
Table 9 Hardware Compatibility Matrix for Firmware 1.23. ............................................................................. 20
Table 10 Hardware Compatibility Matrix for Firmware 1.22. ........................................................................... 20
Table 11 Hardware Compatibility Matrix for Firmware 1.21.1. ........................................................................ 21
Table 12 Hardware Compatibility Matrix for Firmware 1.21 and 1.20. ............................................................ 21
Table 13 Mode characteristics ......................................................................................................................... 24
Table 14: Guidance and manufacturer’s declaration – electromagnetic emission .......................................... 30
Table 15: Guidance and manufacturer’s declaration – electromagnetic immunity I........................................ 31
Table 16 Guidance and manufacturer's declaration – electromagnetic immunity II ........................................ 32
Table 17 Safety distances between portable and mobile RF communication equipment ............................... 33
Table 18 PACE 203 Exception Error numbers ................................................................................................ 35
Table 19 PACE 203 Other Error numbers ....................................................................................................... 36
Table 20 Peak amplitude vs. ISO 5841-1 amplitudes ..................................................................................... 37
Table 21: List of Spare Parts ........................................................................................................................... 41

Osypka Medical PACE 203 – Technical Manual
5I-17-013X-B-18 Page 5 of 62
Table of Figures Figure 1: Block Diagram PACE 203 ...................................................................................................................7
Figure 2: LCD electronics board with SED1540 controller .............................................................................. 22
Figure 3: LCD electronics board with ST7522 controller and SED1565 controller (5V) ................................. 22
Figure 4: LCD electronics board with ST7522 controller and SED1565 controller (3.3V) .............................. 22
Figure 5 V00 Timing Cycle .............................................................................................................................. 25
Figure 6 A00 Timing Cycle .............................................................................................................................. 25
Figure 7 VVI Timing Cycle with Inhibition by V-Sense .................................................................................... 25
Figure 8 AAI Timing Cycle with Inhibition by A-Sense .................................................................................... 25
Figure 9 D00 Timing Cycle .............................................................................................................................. 26
Figure 10 VDD Timing Cycle with V-Sense in AVD ........................................................................................ 26
Figure 11 DDD Timing Cycle with V-Sense in AVD ........................................................................................ 27
Figure 12 DDD Timing Cycle with A-Sense in AEI .......................................................................................... 27
Figure 13 DAI Timing Cycle with A-Sense in AEI ............................................................................................ 28
Figure 14 DVI Timing Cycle with Inhibition by V-Sense in AEI ....................................................................... 28
Figure 15 DDD Timing Cycle with A-Pace Triggered by A-Sense in AEI ........................................................ 29
Figure 16: Text messages for error numbers .................................................................................................. 34
Figure 17 Atrial output pulse (at manufacturer's default settings) ................................................................... 38
Figure 18 Ventricular output pulse (at manufacturer's default settings) .......................................................... 38
Figure 19: Circuit Diagram of Power Management & Encoder ....................................................................... 42
Figure 20: Circuit Diagram of MCU & Peripherals ........................................................................................... 43
Figure 21 Circuit Diagram of Stimulation Amplifier .......................................................................................... 44
Figure 22 Circuit Diagram of ECG Amplifier .................................................................................................... 45
Figure 23 Assembly Plan of Power Board top ................................................................................................. 46
Figure 24 Assembly Plan of Power Board bottom ........................................................................................... 47
Figure 25 Assembly Plan of Main Board top ................................................................................................... 48
Figure 26 Assembly Plan of Main Board bottom ............................................................................................. 49
Figure 27 Assembly Plan of Upper Case ........................................................................................................ 50
Figure 28 Assembly Plan of Lower Case ........................................................................................................ 51

Osypka Medical PACE 203 – Technical Manual
5I-17-013X-B-18 Page 6 of 62
1 Technical Description
1.1 Overview The Osypka Medical PACE 203 is a dual-chamber chamber external pacemaker (also referred to as a pulse generator).
This technical manual refers to the PACE 203 either as PACE 203 or PACE 203H. The distinction between PACE 203 and PACE 203H is just a branding issue, not a technical difference.
PACE 203 is classified as CF electrical medical equipment1 with an internal power source.
1.2 Classifications
Region Class Reference
Europe IIb Medical Product Council Directive 93/42/EEC of 14 June 1993 (‘Medical Device Directive’), Annex IX
USA Class III Device 21 CFR 862-892 [807.87(c)]
Japan Specially Controlled Medical Device
The Pharmaceutical Affairs Law (Law No. 145 dated August 10, 1960) Article 2, Paragraph 5
Class III Medical Devices PFSB (Yakushoku) Notification No. 0720022, July 20, 2004 and PFSB (Yakushoku) Notification No. 0510 (8), May 10, 2013
Table 1: Medical Device Classifications
1.3 Applicable Standards
IEC 60601-1:2012 Medical electrical equipment – Part 1: General requirements for basic safety and essential performance, Edition 3.1
IEC 60601-1-2:2007 Medical electrical equipment – Part 1: General requirements for basic safety and essential performance – Collateral Standard: Electromagnetic compatibility – Requirements and tests, 2nd Edition
IEC 60601-1-6:2010 Medical electrical equipment - Part 1-6: General requirements for basic safety and essential performance – Collateral standard: Usability
IEC 60601-2-31:2011 Medical electrical equipment – Part 2-31: Particular requirements for the basic safety and essential performance of external cardiac pacemakers with internal power source, Edition 2.1
ISO 14971:2012 Medical devices - Application of risk management to medical devices
Table 2: Applicable Standards
1 ISO 60601-1
Osypka Medical PACE 203 – Technical Manual
5I-17-013X-B-18 Page 7 of 62
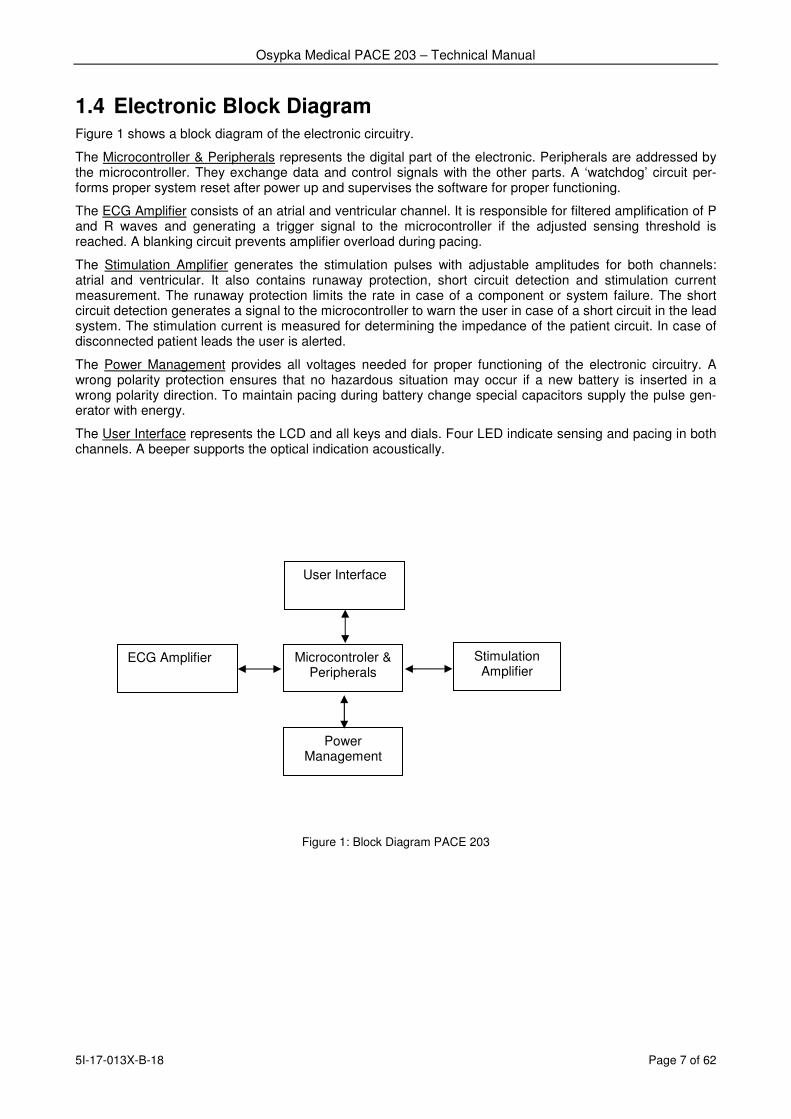
1.4 Electronic Block Diagram Figure 1 shows a block diagram of the electronic circuitry.
The Microcontroller & Peripherals represents the digital part of the electronic. Peripherals are addressed by the microcontroller. They exchange data and control signals with the other parts. A ‘watchdog’ circuit per-forms proper system reset after power up and supervises the software for proper functioning.
The ECG Amplifier consists of an atrial and ventricular channel. It is responsible for filtered amplification of P and R waves and generating a trigger signal to the microcontroller if the adjusted sensing threshold is reached. A blanking circuit prevents amplifier overload during pacing.
The Stimulation Amplifier generates the stimulation pulses with adjustable amplitudes for both channels: atrial and ventricular. It also contains runaway protection, short circuit detection and stimulation current measurement. The runaway protection limits the rate in case of a component or system failure. The short circuit detection generates a signal to the microcontroller to warn the user in case of a short circuit in the lead system. The stimulation current is measured for determining the impedance of the patient circuit. In case of disconnected patient leads the user is alerted.
The Power Management provides all voltages needed for proper functioning of the electronic circuitry. A wrong polarity protection ensures that no hazardous situation may occur if a new battery is inserted in a wrong polarity direction. To maintain pacing during battery change special capacitors supply the pulse gen-erator with energy.
The User Interface represents the LCD and all keys and dials. Four LED indicate sensing and pacing in both channels. A beeper supports the optical indication acoustically.
Figure 1: Block Diagram PACE 203
Microcontroler & Peripherals
Stimulation Amplifier
ECG Amplifier
Power Management
User Interface

Osypka Medical PACE 203 – Technical Manual
5I-17-013X-B-18 Page 8 of 62
1.5 Mechanics The pacemaker body is divided unto an upper case, a lower case, a battery cover and a lock. The electronic assembly comprising of two printed circuit boards and the LCD module is embedded in the body. . Upper and lower body cases are made of ABS plastic. Two rubber gaskets ensure protection against liquid ingress. A first gasket separates the upper and the lower part. A second gasket is applied between the battery cover and the lower case.
The user interface incorporates
1) Six dial knobs sitting on encoder shafts:
a. High knobs are employed for adjustment of Stimulation rate (‘RATE’), and atrial and ventricular output amplitudes (‘A-STIM’, ‘V-STIM’);
b. Flat knobs are used for adjustment of AV-delay (‘A-V DLY’) and atrial and ventricular sensitivity thresholds (‘A-SENSE’, ‘V-SENSE’);
2) 9 keys integrated into the key foil; foil material: Polyethylene (PE);
3) LCD display.
Open the battery compartment by first moving the battery release button cover located on the back of the device to the side and then push the release button. The battery release button cover is intended to avoid accidental opening of the battery compartment and release of the battery.
Inside the battery compartment two springs connect battery terminals and electronic circuitry. A screw spring attached to the release button pulls the button back to its default position.
On the top of the PACE 203 there are four protected lead connection terminals (V-, V+, A-, A+) located. They are suitable for plugs with a diameter of 0.9 mm to 2.0 mm. The terminals are made of PA-plastic.
On the rear side of the enclosure there is a metal hanger. The metal hanger attached to the rear side of the PACE 203 can be deployed in three snap-in positions to either hang the device or have it stand or lay on a table top..
The CTRL-Out-socket located at the bottom of the PACE 203 is covered by a rubber cap.

Osypka Medical PACE 203 – Technical Manual
5I-17-013X-B-18 Page 9 of 62
2 Function Check The function check shall be made with pacemaker test equipment. There are different models available on market. The chosen model's instructions for use must be followed. As an example for a function check pro-cedure with a pacemaker analyzer see Section 1.1.
The following measurements and inspections must be carried out:
• Measuring the stimulation parameters (amplitude, pulse width) in the atrial and ventricular channels
• Measuring the rate
• Measuring the sensitivity in the atrial and ventricular channels
• Inspecting the battery surveillance and measuring the power maintenance time
• Inspecting the lead surveillance
Additionally the following measurements and inspections may be made:
• Measuring the refractory period in the atrial and ventricular channels
• Measuring the A-V delay
• Inspecting the atrial overdrive stimulation
• Inspecting the emergency setting
• Inspecting the interference behavior
Osypka Medical PACE 203 – Technical Manual
5I-17-013X-B-18 Page 10 of 62
3 Safety Check This safety check is based on the international standards referred to in the section 1.3 on page 6.
The following measurement equipment and auxiliary means are required:
• Safety tester according to IEC 60601-1
• Digital multimeter
• Oscilloscope
• High voltage tester
• Metal foil, to get an intimate contact with the insulating enclosure of the PACE 203
• A metal surface of 20 cm × 25 cm
• Diverse leads with 2 mm and 4 mm plugs, measuring probes, two 100 kΩ resistors
From a safety point of view, an external pulse generator belongs to the internally powered equipment class and has a CF degree of protection against electric shock.
The external pulse generator PACE 203 is characterized as follows: an enclosure made of insulating materi-al; two applied parts (atrial and ventricular channel), each applied part with the two patient connections DIFF (black terminal) and INDIFF (red terminal).
The following chapters describe all safety tests contained in the above-mentioned standards, which are ap-plicable to external pulse generators with internal power supply. As a safety check of the PACE 203 at least measuring the patient auxiliary currents must be carried out. As an example for a safety check procedure with a pacemaker analyzer see section 8.7 on page 52.
Osypka Medical PACE 203 – Technical Manual
5I-17-013X-B-18 Page 11 of 62
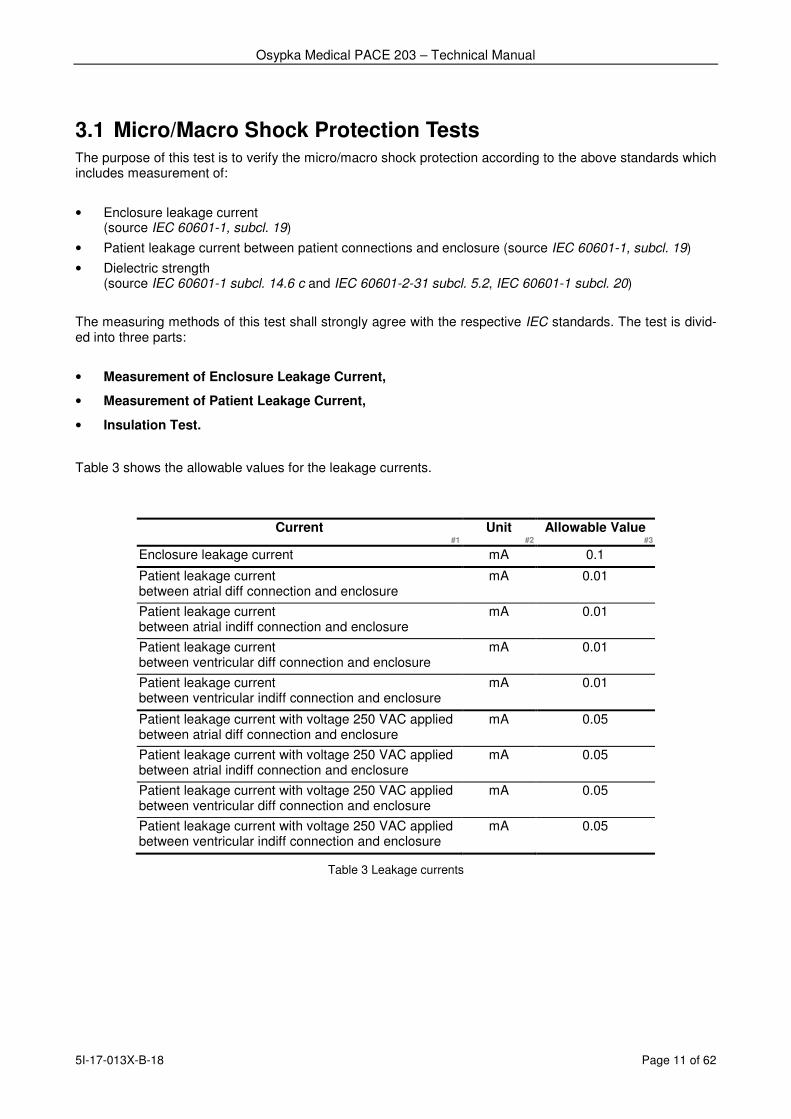
3.1 Micro/Macro Shock Protection Tests The purpose of this test is to verify the micro/macro shock protection according to the above standards which includes measurement of:
• Enclosure leakage current (source IEC 60601-1, subcl. 19)
• Patient leakage current between patient connections and enclosure (source IEC 60601-1, subcl. 19)
• Dielectric strength (source IEC 60601-1 subcl. 14.6 c and IEC 60601-2-31 subcl. 5.2, IEC 60601-1 subcl. 20)
The measuring methods of this test shall strongly agree with the respective IEC standards. The test is divid-ed into three parts:
• Measurement of Enclosure Leakage Current,
• Measurement of Patient Leakage Current,
• Insulation Test.
Table 3 shows the allowable values for the leakage currents.
Current Unit Allowable Value #1 #2 #3
Enclosure leakage current mA 0.1
Patient leakage current between atrial diff connection and enclosure
mA 0.01
Patient leakage current between atrial indiff connection and enclosure
mA 0.01
Patient leakage current between ventricular diff connection and enclosure
mA 0.01
Patient leakage current between ventricular indiff connection and enclosure
mA 0.01
Patient leakage current with voltage 250 VAC applied between atrial diff connection and enclosure
mA 0.05
Patient leakage current with voltage 250 VAC applied between atrial indiff connection and enclosure
mA 0.05
Patient leakage current with voltage 250 VAC applied between ventricular diff connection and enclosure
mA 0.05
Patient leakage current with voltage 250 VAC applied between ventricular indiff connection and enclosure
mA 0.05
Table 3 Leakage currents

Osypka Medical PACE 203 – Technical Manual
5I-17-013X-B-18 Page 12 of 62
Table 4 shows the insulation to be tested.
Insulation to be tested Case B-d (Basic Insulation)
Between enclosure and atrial diff patient connection
Between enclosure and atrial indiff patient connection
Between enclosure and ventricular diff patient connection
Between enclosure and ventricular indiff patient connection
Between signal output connections and atrial diff patient connection
Between signal output connections and atrial indiff patient connection
Between signal output connections and ventricular diff patient connection
Between signal output connections and ventricular indiff patient connec-tion
Table 4 Insulation to be tested
3.1.1 Measurement of Enclosure Leakage Current
The enclosure leakage current shall be measured between different parts of the enclosure according to IEC 60601-1, subcl. 19.1 c and 19.4 g 3. A proper measuring device is also given in accordance with the IEC 60601-1 standard and is shown there in figure 18. The subcl. 2.1.6 of IEC 60601-1 defines as an enclosure also all accessible metal parts, knobs and the like, so for measurement of enclosure leakage current both the socket (CTRL OUT) for connection of a serial interface cable and the pacers hanger shall be taken into ac-count. The exterior surface of the pacer made of insulating material shall be covered with a metal foil (ac-cording to IEC 60601-1, subcl. 19.4 g 5) of max. 10 x 20 cm. The metal foil shall be pressed towards the insulating material of the enclosure (using foam/rubber of the same dimension as the metal foil).
Taking the above considerations into account the enclosure leakage current shall be measured between:
1. the socket (CTRL OUT) for connection of a serial interface cable and the metal foil pressed against the insulating part of enclosure
2. the pacers hanger and the metal foil pressed against the insulating part of enclosure
The measured values shall not exceed the values given in Table 3.
3.1.2 Measurement of Patient Leakage Current
The test shall be carried out with the safety tester. Its instructions for use shall be exactly followed.
Normal Condition For the normal condition the standard ICE 60601-1, subcl. 19.4 h 6 shall be taken into account where figure 23 shows the proper measuring device. The exterior surface of the pacer made of insulating material shall be covered with a metal foil (according to IEC 60601-1, subcl. 19.4 g 5) of max. 10 x 20 cm. The metal foil shall be pressed towards the insulating material of the enclosure (using foam/rubber of the same dimension as the metal foil). According to the standard IEC 60601-1, subcl. 19.1 e /Appendix K the patient leakage current shall be measured between each patient connection and the enclosure covered with the metal foil. The pacer shall be set to DDD mode with standard parameters.
In particular the patient leakage current shall be measured between the parts and the values shall not ex-ceed the values given in Table 3.

Osypka Medical PACE 203 – Technical Manual
5I-17-013X-B-18 Page 13 of 62
Single Fault Condition According to the standard IEC 60601-1, subcl. 19.1 e /Appendix K and the ICE 60601-1, subcl. 19.4 h 7 (measuring device see figure 24) the patient leakage current shall be measured between each patient connection and the enclosure covered with the metal foil for single fault condition ap-plying 250 V (in accordance with IEC 60601-1, subcl. 19.1 b) to each patient connection. The enclosure made of insulating material shall be placed in any position of normal use upon a flat metal surface connected to earth with dimensions at least equal to the plan-projection of the enclosure (see ICE 60601-1, subcl. 19.4 h 7). The pacer shall be set to DDD mode with standard parameters. All other constraints described in case of normal condition for measuring the patient leakage current are also valid for single fault condition.
In particular the patient leakage current shall be measured for single fault condition in following cases:
1. with voltage 250 VAC between atrial diff connection and enclosure
2. with voltage 250 VAC between atrial indiff connection and enclosure
3. with voltage 250 VAC between ventricular diff connection and enclosure
4. with voltage 250 VAC between ventricular indiff connection and enclosure
The measured values shall not exceed the values given in Table 3.

Osypka Medical PACE 203 – Technical Manual
5I-17-013X-B-18 Page 14 of 62
3.1.3 Insulation Test
The test shall be carried out with the high voltage tester. Its instructions for use shall be exactly followed.
The insulation test shall occur according to IEC 60601-1, subcl. 20.2 B-d. Values of test voltages are speci-fied in IEC 60601-1, subcl. 20.3, table V. In case of the pacer P203H a basic insulation shall be tested. The exterior surface of the pacer made of insulating material shall be covered with a metal foil (according to IEC 60601-1, subcl. 19.4 g 5) of max. 10 x 20 cm. The metal foil shall be pressed towards the insulating material of the enclosure (using foam/rubber of the same dimension as the metal foil). Care shall be taken that the metal foil is positioned in a manner that flashover does not occur at the edges of insulation linings. If possi-ble, the metal foil should be moved so as to test all parts of the surface. During the insulation test the pacer
shall be switched off. The insulation test shall be done for a reference voltage of V 150V 50 ≤≤ refU (this
case is valid for activated EL-backlight). The test voltage shall be equal to 1000 V. The test shall be carried out in accordance with IEC 60601-1, subcl. 20.4. Initially, not more than 500 V shall be applied, then the test voltage shall be gradually raised over a period of 10 s to 1000 V, which shall be maintained for 1 min. after which it shall be gradually lowered over a period of 10 s to less than 500 V. The insulation test shall occur between the parts shown in Table 4.
3.2 Measurement of Patient Auxiliary Current The purpose of this test is to verify the tissue protection, which includes measurement of:
• atrial and ventricular patient auxiliary currents (source IEC 60601-2-31, subcl. 19.3 a)
The Patient Auxiliary Current shall be measured according to the standard IEC 60601-2-31, subcl. 19.3 a. The test conditions are described in the standard IEC 60601-2-31, subcl. 19.4 j 4. For measurement of pa-tient auxiliary current the equipment shall be connected as shown in figure 27 of the general standard to a d.c. measuring device with an input resistance of 100 kΩ. The equipment shall be connected to the measur-ing device for a minimum of 5 min. before making the patient auxiliary measurement. The patient auxiliary current will be measured just before the pacing pulse. In this case the measured voltage shall not exceed 100 mV. According to the IEC 60601-1, subcl. 19.1 f and g /Appendix K, the measurement of patient auxiliary current shall be done between:
1. atrial diff connection and atrial indiff connection
(DDD mode)
2. ventricular diff connection and ventricular indiff connection
(DDD mode)
3. atrial diff connection and ventricular indiff connection
(DDD mode)
4. ventricular diff connection and atrial indiff connection
(DDD mode)
5. atrial diff and atrial indiff, ventricular diff and ventricular indiff connected together
(AAI mode)
6. atrial indiff and atrial diff, ventricular diff and ventricular indiff connected together
(AAI mode)
7. ventricular diff and ventricular indiff, atrial diff and atrial indiff connected together
(VVI mode)
8. ventricular indiff and ventricular diff, atrial diff and atrial indiff connected together
(VVI mode)

Osypka Medical PACE 203 – Technical Manual
5I-17-013X-B-18 Page 15 of 62
3.3 Runaway Protection Test The purpose of this test is to verify that the runaway protection limits the pulse rate in the event of a single fault condition (source IEC 60601-2-31, subcl. 51.104 a). To carry out this test, first the service mode of the PACE 203 must be entered. See section 4.1.1 on page 16 for how to activate the service mode. Note that 10 minutes after the last user operation the device automatically terminates the service mode and returns to normal operation. While being in the service mode the check for abnormal settings is disabled and it is pos-sible to dial an abnormal high pacing rate in order to perform the runaway protection test.
For the runaway protection test the rate of the stimulation pulse must be measured by an oscilloscope or other suitable equipment. Then with the corresponding dial the pulse rate shall be increased over 220 ppm until the measured rate goes back to the half value (2:1 block). If this happens, the runaway protection cor-rectly works at the rate just adjusted. The test has to be done in AAI and VVI mode and the observed rate values must be as shown in Table 5.
Channel Unit Value Tolerance #1 #2 #3 #4
Atrial channel runaway protection ppm 238 ±3
Ventricular channel runaway protection ppm 238 ±3
Table 5 Runaway protection values
Osypka Medical PACE 203 – Technical Manual
5I-17-013X-B-18 Page 16 of 62
4 Special Service Modes
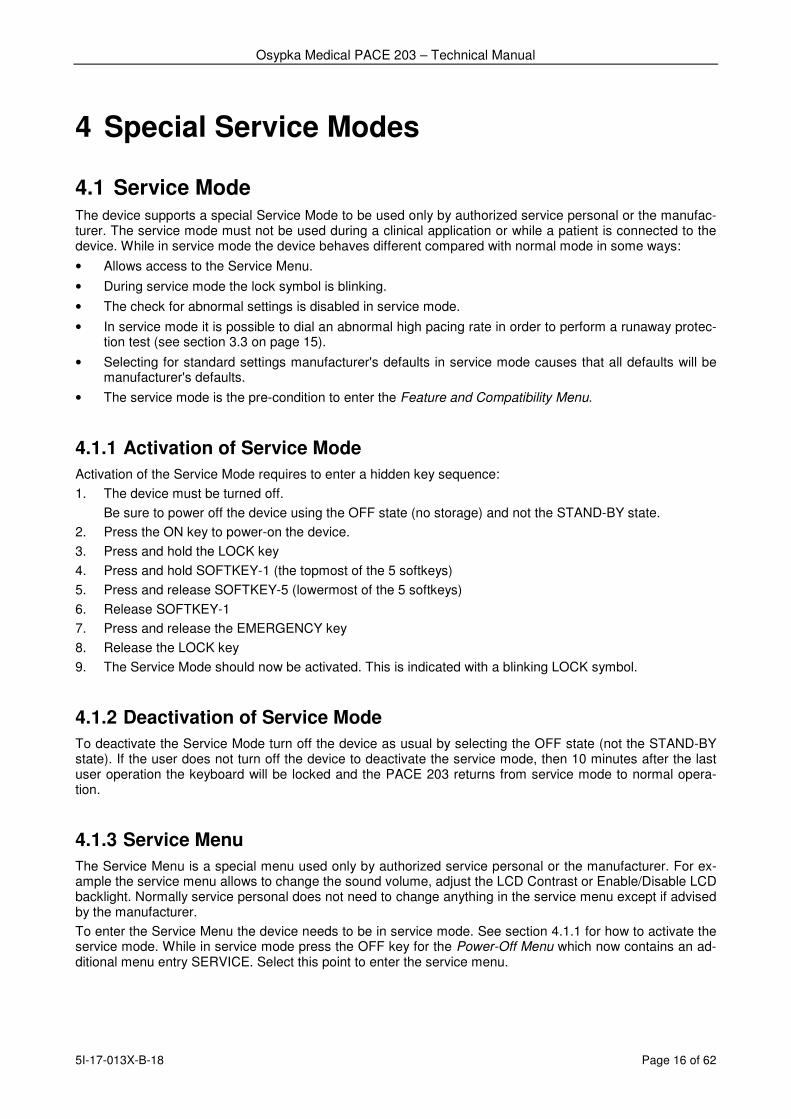
4.1 Service Mode The device supports a special Service Mode to be used only by authorized service personal or the manufac-turer. The service mode must not be used during a clinical application or while a patient is connected to the device. While in service mode the device behaves different compared with normal mode in some ways:
• Allows access to the Service Menu.
• During service mode the lock symbol is blinking.
• The check for abnormal settings is disabled in service mode.
• In service mode it is possible to dial an abnormal high pacing rate in order to perform a runaway protec-tion test (see section 3.3 on page 15).
• Selecting for standard settings manufacturer's defaults in service mode causes that all defaults will be manufacturer's defaults.
• The service mode is the pre-condition to enter the Feature and Compatibility Menu.
4.1.1 Activation of Service Mode
Activation of the Service Mode requires to enter a hidden key sequence:
1. The device must be turned off.
Be sure to power off the device using the OFF state (no storage) and not the STAND-BY state.
2. Press the ON key to power-on the device.
3. Press and hold the LOCK key
4. Press and hold SOFTKEY-1 (the topmost of the 5 softkeys)
5. Press and release SOFTKEY-5 (lowermost of the 5 softkeys)
6. Release SOFTKEY-1
7. Press and release the EMERGENCY key
8. Release the LOCK key
9. The Service Mode should now be activated. This is indicated with a blinking LOCK symbol.
4.1.2 Deactivation of Service Mode
To deactivate the Service Mode turn off the device as usual by selecting the OFF state (not the STAND-BY state). If the user does not turn off the device to deactivate the service mode, then 10 minutes after the last user operation the keyboard will be locked and the PACE 203 returns from service mode to normal opera-tion.
4.1.3 Service Menu
The Service Menu is a special menu used only by authorized service personal or the manufacturer. For ex-ample the service menu allows to change the sound volume, adjust the LCD Contrast or Enable/Disable LCD backlight. Normally service personal does not need to change anything in the service menu except if advised by the manufacturer.
To enter the Service Menu the device needs to be in service mode. See section 4.1.1 for how to activate the service mode. While in service mode press the OFF key for the Power-Off Menu which now contains an ad-ditional menu entry SERVICE. Select this point to enter the service menu.

Osypka Medical PACE 203 – Technical Manual
5I-17-013X-B-18 Page 17 of 62
5 Feature and Compatibility Menu The Feature and Compatibility Menu is a special menu used only by authorized service personal or the man-
ufacturer. The goal of this menu is to en/disable certain optional device features2 (since firmware 1.24) and to solve some compatibility issues between different hardware and software revisions (since firmware 1.25).
5.1 Activation of the Feature and Compatibility Menu As a pre-condition the activation of the Feature and Compatibility Menu requires the Service Mode to be enabled. See section 4.1.1 on page 16 for how to activate the Service Mode.
After the Service Mode has been activated another hidden key sequence must be entered to enable the
Feature and Compatibility Menu:3
1. Be sure that the Service Mode is entered. (The LOCK symbol should be blinking)
2. Press and release OFF key to open the Power-Off menu
3. Press and hold SOFTKEY-2 (second uppermost of the 5 softkeys)
4. Press and hold SOFTKEY-1 (uppermost of the 5 softkeys)
5. Press and release SOFTKEY-3 (middle one of the 5 softkeys)
6. Release SOFTKEY-1 (uppermost of the 5 softkeys)
7. Press and release PAUSE key
8. Release SOFTKEY-2 (second uppermost of the 5 softkeys)
9. The Feature and Compatibility Menu should now be enabled.
After the Feature and Compatibility Menu has been enabled this menu can be reached as follows: Press the OFF key for the Power-Off Menu which now contains an addiotional menu entry FEATURES. Select this point to enter the Feature and Compatibility Menu.
5.2 Deactivation of the Feature and Compatibility Menu To deactivate the Feature and Compatibility Menu turn-off the device as usual by selecting the OFF state (not the STAND-BY state). Unlike for deactivation of the Service Mode (section 4.1.2, page 16) the for the Feature and Compatibility Menu does not have auto-deactivation after some minutes.
5.3 Hardware & Software Compatibility Issues Since its market release the device´s hardware and software components have undergone several revisions. For technical reasons hardware and software components generally can operate only in specific combina-tions of revisions. These combination need to be considered when during device repair a defective hardware component needs to be exchanged with spare parts.
In the interest of the customer, to minimize economical impact of spare part changes the manufacturer has created means to solve some compatiblity dependency issues. For technical reasons it is impossible to be able to resolve all compatibility dependencies.
Solving Hardware and Software Compatibility issues for spare parts is supported since firmware revision
1.25 which itself requires a pacer main-board4 labelled with 5I-23-511X-X-00, ...-01 or ...-02. With correct adjustments in the compatibility menu one can reach compatibility of all combinations between the hardware
2 for example an adjustable VRP (Ventricular Refractory Period)
3 This means that to enable the Feature and Compatibility Menu the user needs two different key sequences: The first to enable the
Service Mode (as a pre-condition) and the second to enable the Feature and Compatibility Menu.
4 Actually all pacer main-boards with a Flash-programmable MCU are supported. Older main-boards with an one-time-programmable external program memory (PROM chip) are not supported by Firmware 1.25.

Osypka Medical PACE 203 – Technical Manual
5I-17-013X-B-18 Page 18 of 62
and revisions shown in Table 7. But note that some features (like Stimulation Pulse Surveillance) may be unavailable for some combinations.
If the device to be repaired contains a pacer main-board labelled with 5I-23-511X-X-00, ...-01 or ...-02 and when it matches one of the hardware and software combinations shown in Table 8 to Table 12, then one should update to firmware 1.25 or above, because this allows solving of Hardware and Software Compatibil-ity issues for spare parts.
Pacer main-boards labelled with 5I-23-506X-X-00, ...-01, ...-02 or ...-03 contain a deprecated one-time-
programmable external program memory (PROM chip)5. In this case consider changing the main-board to be able to run firmware 1.25 or above.
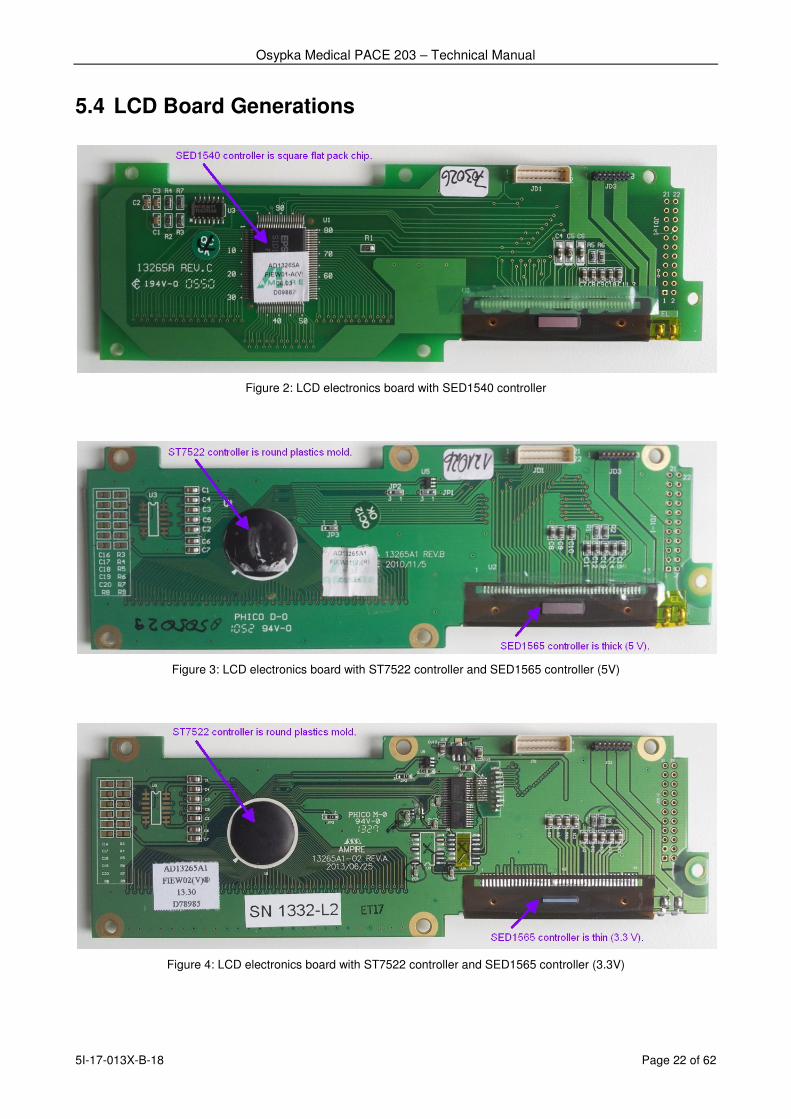
The photos in section 5.4 on page 22 can be used to better distinguish the different LCD board generations being referred in the below compatibility tables.
5.3.1 Firmware 1.29 or higher
Component Article Number of PCB or other Designator
Article Number of Component Group
Comment / Setting in Feature and Compatibility Menu
Main-Board: 5I-23-511X-X-00 (labelled on PCB)
5I-27-506Z-X-04 “Main Board = ~00 or ~01”, “Stimulation Pulse Surveillance = No”.
5I-23-511X-X-01 (labelled on PCB)
5I-27-506Z-X-04 “Main Board = ~00 or ~01”, “Stimulation Pulse Surveillance = No”.
5I-23-511X-X-02 (labelled on PCB)
5I-27-506Z-X-05 “Main Board = ~02 or higher”, “Stimulation Pulse Surveillance = Yes”.
Power-Board: 5I-23-512X-X-00 (with 5 capacitors)
5I-27-507Z-X-02 “PMC available = No”
5I-23-512X-X-01 (with 5 capacitors)
5I-27-512Z-X-01 “PMC available = Yes” for serial numbers above SN#08xxxxxx otherwise “No”
5I-23-512X-X-02 (with 5 capacitors)
5I-27-512Z-X-02 “PMC available = Yes”
LCD: SED1540 controller is square flat pack chip.
5I-25-080Z-X-01 “Display Controller = SED1540 (old)”
ST7522 controller is round plastics mold and SED1565 controller is thick (5 V).
5I-25-080Z-X-02 5I-25-080Z-X-03
“Display Controller = ST7522 (5 V)”
ST7522 controller is round plastics mold and SED1565 controller is thin (3.3 V).
5I-25-080Z-X-04 5I-25-080Z-X-05
“Display Controller = ST7522 (3.3 V)”
Firmware: 1.29 or higher (displayed at startup)
6I-25-005Z-A-29 (or higher end-index)
You need at least firmware 1.29 to use a LCD with 3.3V operation (since Aug. 2013).
Table 6 Hardware Compatibility Matrix for Firmware 1.29 or higher. All combinations of all componends listed in the table are supported by Firmware 1.29 or higher,
but the given adjustments in the “Feature and Compatibility Menu” must be made.
5 Later main-boards do not need a PROM chip because they use reprogrammable internal program memory of the micro-controller.
Osypka Medical PACE 203 – Technical Manual
5I-17-013X-B-18 Page 19 of 62
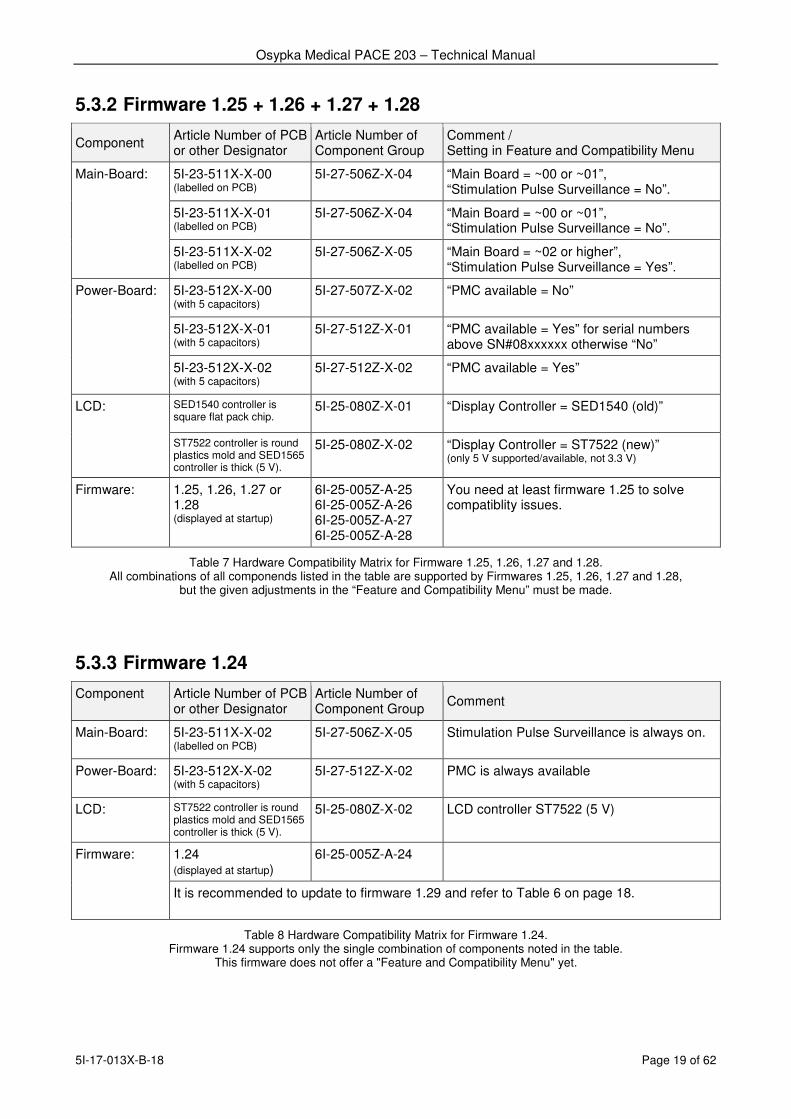
5.3.2 Firmware 1.25 + 1.26 + 1.27 + 1.28
Component Article Number of PCB or other Designator
Article Number of Component Group
Comment / Setting in Feature and Compatibility Menu
Main-Board: 5I-23-511X-X-00 (labelled on PCB)
5I-27-506Z-X-04 “Main Board = ~00 or ~01”, “Stimulation Pulse Surveillance = No”.
5I-23-511X-X-01 (labelled on PCB)
5I-27-506Z-X-04 “Main Board = ~00 or ~01”, “Stimulation Pulse Surveillance = No”.
5I-23-511X-X-02 (labelled on PCB)
5I-27-506Z-X-05 “Main Board = ~02 or higher”, “Stimulation Pulse Surveillance = Yes”.
Power-Board: 5I-23-512X-X-00 (with 5 capacitors)
5I-27-507Z-X-02 “PMC available = No”
5I-23-512X-X-01 (with 5 capacitors)
5I-27-512Z-X-01 “PMC available = Yes” for serial numbers above SN#08xxxxxx otherwise “No”
5I-23-512X-X-02 (with 5 capacitors)
5I-27-512Z-X-02 “PMC available = Yes”
LCD: SED1540 controller is square flat pack chip.
5I-25-080Z-X-01 “Display Controller = SED1540 (old)”
ST7522 controller is round plastics mold and SED1565 controller is thick (5 V).
5I-25-080Z-X-02 “Display Controller = ST7522 (new)” (only 5 V supported/available, not 3.3 V)
Firmware: 1.25, 1.26, 1.27 or 1.28 (displayed at startup)
6I-25-005Z-A-25 6I-25-005Z-A-26 6I-25-005Z-A-27 6I-25-005Z-A-28
You need at least firmware 1.25 to solve compatiblity issues.
Table 7 Hardware Compatibility Matrix for Firmware 1.25, 1.26, 1.27 and 1.28. All combinations of all componends listed in the table are supported by Firmwares 1.25, 1.26, 1.27 and 1.28,
but the given adjustments in the “Feature and Compatibility Menu” must be made.
5.3.3 Firmware 1.24
Component
Article Number of PCB or other Designator
Article Number of Component Group
Comment
Main-Board: 5I-23-511X-X-02 (labelled on PCB)
5I-27-506Z-X-05 Stimulation Pulse Surveillance is always on.
Power-Board: 5I-23-512X-X-02 (with 5 capacitors)
5I-27-512Z-X-02 PMC is always available
LCD: ST7522 controller is round plastics mold and SED1565 controller is thick (5 V).
5I-25-080Z-X-02 LCD controller ST7522 (5 V)
Firmware: 1.24 (displayed at startup)
6I-25-005Z-A-24
It is recommended to update to firmware 1.29 and refer to Table 6 on page 18.
Table 8 Hardware Compatibility Matrix for Firmware 1.24. Firmware 1.24 supports only the single combination of components noted in the table.
This firmware does not offer a "Feature and Compatibility Menu" yet.
Osypka Medical PACE 203 – Technical Manual
5I-17-013X-B-18 Page 20 of 62
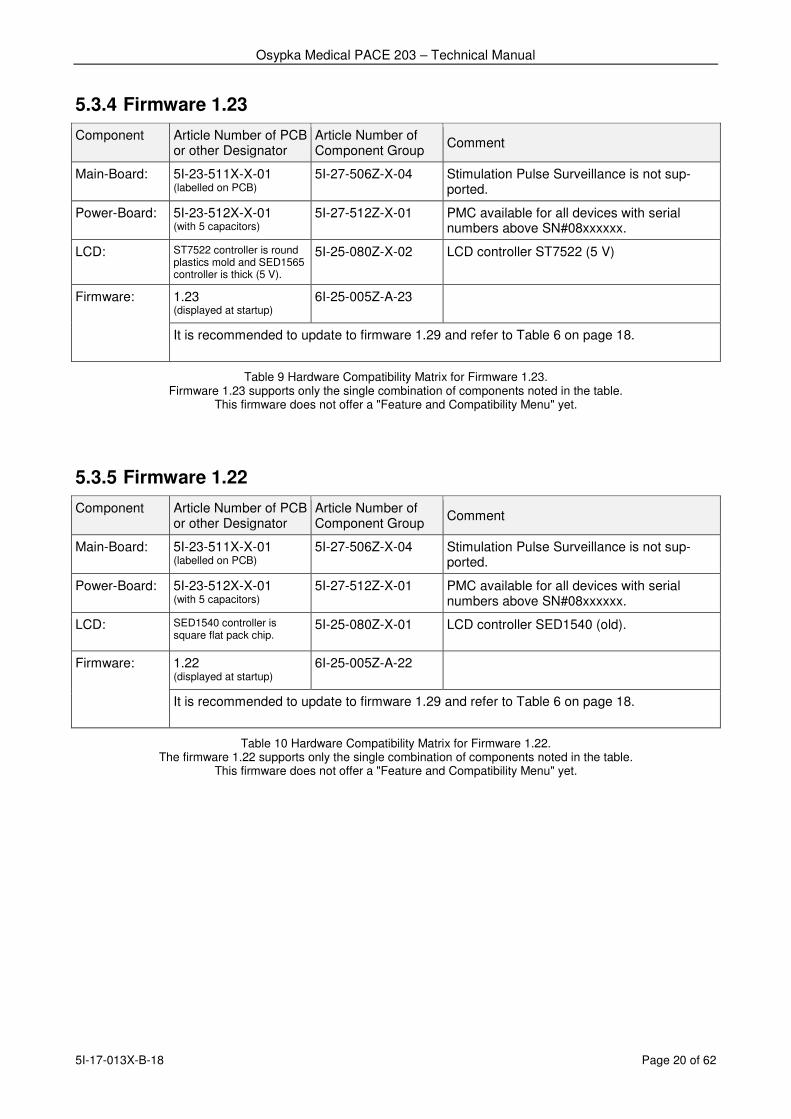
5.3.4 Firmware 1.23
Component
Article Number of PCB or other Designator
Article Number of Component Group
Comment
Main-Board: 5I-23-511X-X-01 (labelled on PCB)
5I-27-506Z-X-04 Stimulation Pulse Surveillance is not sup-ported.
Power-Board: 5I-23-512X-X-01 (with 5 capacitors)
5I-27-512Z-X-01 PMC available for all devices with serial numbers above SN#08xxxxxx.
LCD: ST7522 controller is round plastics mold and SED1565 controller is thick (5 V).
5I-25-080Z-X-02 LCD controller ST7522 (5 V)
Firmware: 1.23 (displayed at startup)
6I-25-005Z-A-23
It is recommended to update to firmware 1.29 and refer to Table 6 on page 18.
Table 9 Hardware Compatibility Matrix for Firmware 1.23. Firmware 1.23 supports only the single combination of components noted in the table.
This firmware does not offer a "Feature and Compatibility Menu" yet.
5.3.5 Firmware 1.22
Component
Article Number of PCB or other Designator
Article Number of Component Group
Comment
Main-Board: 5I-23-511X-X-01 (labelled on PCB)
5I-27-506Z-X-04 Stimulation Pulse Surveillance is not sup-ported.
Power-Board: 5I-23-512X-X-01 (with 5 capacitors)
5I-27-512Z-X-01 PMC available for all devices with serial numbers above SN#08xxxxxx.
LCD: SED1540 controller is square flat pack chip.
5I-25-080Z-X-01 LCD controller SED1540 (old).
Firmware: 1.22 (displayed at startup)
6I-25-005Z-A-22
It is recommended to update to firmware 1.29 and refer to Table 6 on page 18.
Table 10 Hardware Compatibility Matrix for Firmware 1.22. The firmware 1.22 supports only the single combination of components noted in the table.
This firmware does not offer a "Feature and Compatibility Menu" yet.
Osypka Medical PACE 203 – Technical Manual
5I-17-013X-B-18 Page 21 of 62
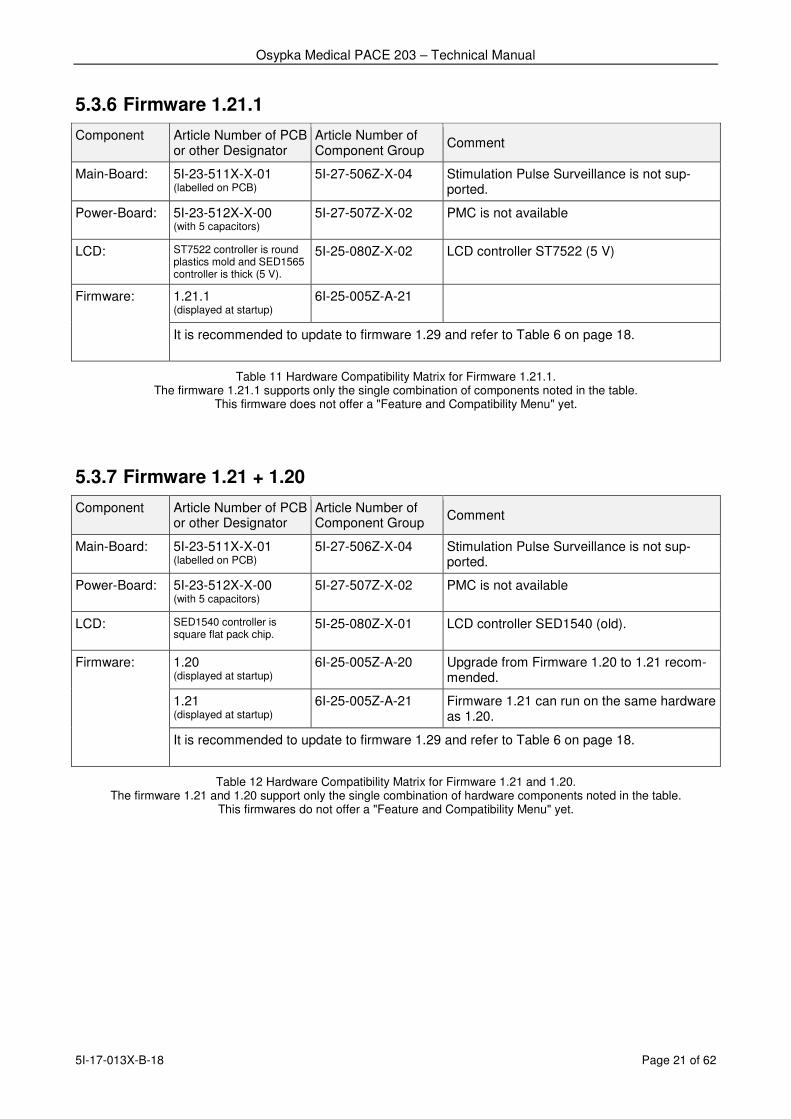
5.3.6 Firmware 1.21.1
Component
Article Number of PCB or other Designator
Article Number of Component Group
Comment
Main-Board: 5I-23-511X-X-01 (labelled on PCB)
5I-27-506Z-X-04 Stimulation Pulse Surveillance is not sup-ported.
Power-Board: 5I-23-512X-X-00 (with 5 capacitors)
5I-27-507Z-X-02 PMC is not available
LCD: ST7522 controller is round plastics mold and SED1565 controller is thick (5 V).
5I-25-080Z-X-02 LCD controller ST7522 (5 V)
Firmware: 1.21.1 (displayed at startup)
6I-25-005Z-A-21
It is recommended to update to firmware 1.29 and refer to Table 6 on page 18.
Table 11 Hardware Compatibility Matrix for Firmware 1.21.1. The firmware 1.21.1 supports only the single combination of components noted in the table.
This firmware does not offer a "Feature and Compatibility Menu" yet.
5.3.7 Firmware 1.21 + 1.20
Component
Article Number of PCB or other Designator
Article Number of Component Group
Comment
Main-Board: 5I-23-511X-X-01 (labelled on PCB)
5I-27-506Z-X-04 Stimulation Pulse Surveillance is not sup-ported.
Power-Board: 5I-23-512X-X-00 (with 5 capacitors)
5I-27-507Z-X-02 PMC is not available
LCD: SED1540 controller is square flat pack chip.
5I-25-080Z-X-01 LCD controller SED1540 (old).
Firmware: 1.20 (displayed at startup)
6I-25-005Z-A-20 Upgrade from Firmware 1.20 to 1.21 recom-mended.
1.21 (displayed at startup)
6I-25-005Z-A-21 Firmware 1.21 can run on the same hardware as 1.20.
It is recommended to update to firmware 1.29 and refer to Table 6 on page 18.
Table 12 Hardware Compatibility Matrix for Firmware 1.21 and 1.20. The firmware 1.21 and 1.20 support only the single combination of hardware components noted in the table.
This firmwares do not offer a "Feature and Compatibility Menu" yet.
Osypka Medical PACE 203 – Technical Manual
5I-17-013X-B-18 Page 22 of 62
5.4 LCD Board Generations
Figure 2: LCD electronics board with SED1540 controller
Figure 3: LCD electronics board with ST7522 controller and SED1565 controller (5V)
Figure 4: LCD electronics board with ST7522 controller and SED1565 controller (3.3V)

Osypka Medical PACE 203 – Technical Manual
5I-17-013X-B-18 Page 23 of 62
6 Pulse Generator Timing
6.1 General
6.1.1 Terms
Used terminology in next sections agrees with definitions given in section Definitions. The following terms will be used in formulas and parameter specifications.
tLRI LRI
tURI URI
tARP ARP
tPVARP PVARP
tPVARPa Absolute PVARP
tPVARPr Relative PVARP
tVRP VRP
tAVI AVI
tAVD AVD
tAEI AEI
tEI Escape Interval (EI)
tABP ABP
tVBP VBP
tDCHP Discharge Period
tDCHD Discharge Delay after Pulse
tD Pulse Duration
tP Pulse Interval ( tP = 1/fP , tP [ms]=60000 /fP [ppm])
fP Pulse Rate ( fP = 1/tP )
fLR Basic Rate, Lower Rate ( fLR = 1/tLRI )
AISO Pulse Amplitude (Voltage) per ISO 5841-1, Section B.2.2
A Pulse Amplitude (Peak Voltage)
ROUT Pulse Generator Output Resistance
RL Pulse Generator Load Resistance

Osypka Medical PACE 203 – Technical Manual
5I-17-013X-B-18 Page 24 of 62
6.1.2 Symbols
Legend of Symbols:
Running Interval
Cancelled Interval
Prolonged Interval
Relative Refractory Period
Stimulation Pulse
V-Sense or R-Sense (test signal suitable for atrial and ventricular sensing evaluation as specified in ISO 5841-1, Section B.1.4)
Interference or cross talk
6.2 Mode Characteristics Table 13 shows the characteristic of each implemented mode.
Mode6 A-Pace
A-Sense
Events V-Pace
V-Sense
Spec. PVC React.
PV Delay
Safety Window
Wenck. Cond.
Atrial Trigger
Emerg. Mode
A00 N/A N/A V007/A00
AAI N/A V00/A00
V00 N/A N/A V00
VVI N/A N/A V00
D00 N/A N/A V00
DDD V00
VDD N/A V00
DVI (no!) N/A N/A V00
DAI V00
VAI V00
Table 13 Mode characteristics
PVC is only detectable in dual chamber modes with ventricular sensing. Wenckebach behavior requires the capability of atrial sensing (tracking) and ventricular pacing by atrial control. Safety window pacing is only possible in such modes that combine atrial pacing and ventricular sensing. Precisely there must be a previ-ous atrial pace combined with the current ability of ventricular sensing.
6 Does not include all modes derived from 16 sense/pace combinations.
7 V00 only if a valid lead can be detected, else A00.

Osypka Medical PACE 203 – Technical Manual
5I-17-013X-B-18 Page 25 of 62
6.3 Asynchronous modes (V00 or A00) Regardless of intrinsic of intrinsic rhythm, ventricular or atrial stimulation impulses will be emitted with the set basic rate. Figure 5 and Figure 6 show the timing.
Figure 5 V00 Timing Cycle
Figure 6 A00 Timing Cycle
6.4 Inhibited Single-chamber Modes (VVI or AAI) In the absence of intrinsic activity, ventricular or atrial stimulation impulses will be given with the set basic rate. The recognition of an R-wave in VVI-mode or a P-wave in AAI mode in the pacemaker’s sensing phase inhibits the emission of the next stimulation impulse, resets the timing of the pacemaker to the beginning of the beat-to-beat interval and starts the refractory period. Figure 7 and Figure 8 show the timing.
Figure 7 VVI Timing Cycle with Inhibition by V-Sense
Figure 8 AAI Timing Cycle with Inhibition by A-Sense
Lower Rate Interval tLRI
V
Lower Rate Interval tLRI
A
Lower Rate Interval
Refractory Period
tLRI
tVRP
V
Escape Interval tEI
Lower Rate Interval
Refractory Period
tLRI
A
Escape Interval tEI
t ARP
Osypka Medical PACE 203 – Technical Manual
5I-17-013X-B-18 Page 26 of 62
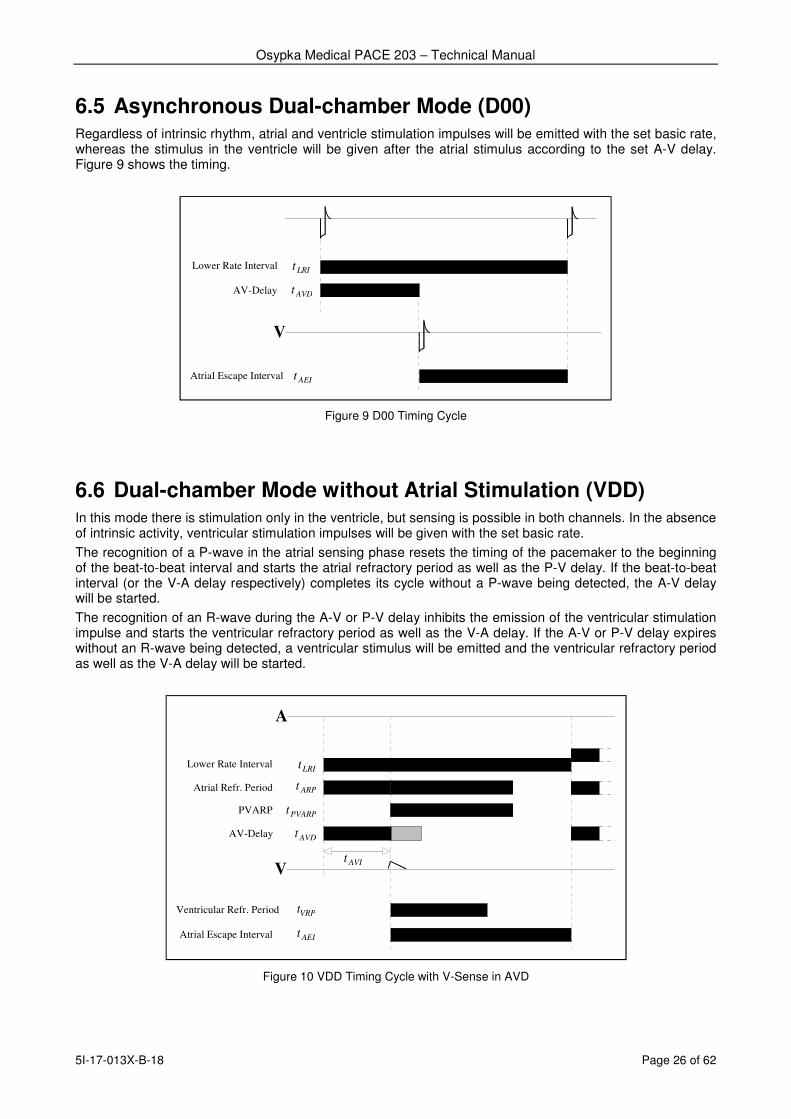
6.5 Asynchronous Dual-chamber Mode (D00) Regardless of intrinsic rhythm, atrial and ventricle stimulation impulses will be emitted with the set basic rate, whereas the stimulus in the ventricle will be given after the atrial stimulus according to the set A-V delay. Figure 9 shows the timing.
Figure 9 D00 Timing Cycle
6.6 Dual-chamber Mode without Atrial Stimulation (VDD) In this mode there is stimulation only in the ventricle, but sensing is possible in both channels. In the absence of intrinsic activity, ventricular stimulation impulses will be given with the set basic rate.
The recognition of a P-wave in the atrial sensing phase resets the timing of the pacemaker to the beginning of the beat-to-beat interval and starts the atrial refractory period as well as the P-V delay. If the beat-to-beat interval (or the V-A delay respectively) completes its cycle without a P-wave being detected, the A-V delay will be started.
The recognition of an R-wave during the A-V or P-V delay inhibits the emission of the ventricular stimulation impulse and starts the ventricular refractory period as well as the V-A delay. If the A-V or P-V delay expires without an R-wave being detected, a ventricular stimulus will be emitted and the ventricular refractory period as well as the V-A delay will be started.
Figure 10 VDD Timing Cycle with V-Sense in AVD
Lower Rate Interval tLRI
AV-Delay t AVD
Atrial Escape Interval t AEI
V
Lower Rate Interval
Atrial Refr. Period
tLRI
t ARP
A
AV-Delay t AVD
Atrial Escape Interval t AEI
Ventricular Refr. Period tVRP
V
PVARP tPVARP
t AVI

Osypka Medical PACE 203 – Technical Manual
5I-17-013X-B-18 Page 27 of 62
6.7 Dual-Chamber Universal Mode (DDD) In this mode, stimulation and sensing are possible in both channels. In the absence of intrinsic activity, the atrium and ventricle will be stimulated with the set basic rate, whereas the stimulus in the ventricle is delayed according to the set A-V delay after the atrial-stimulus is given.
The sensing of a P-wave in the atrial sensing phase of the pacemaker inhibits the emission of the atrial stim-ulation impulse, resets the timing of the pacemaker to the beginning of the beat-to-beat interval and starts the atrial refractory period as well as the P-V delay. If the beat-to-beat interval (i.e. the V-A delay) expires without a P-wave being detected, an atrial stimulus will be given and the atrial refractory period as well as the A-V delay will be started.
The sensing of an R-wave during the A-V or P-V delay inhibits the emission of the ventricular stimulation impulse and starts the ventricular refractory period as well as the V-A period. If the A-V or P-V delay expires without an R-wave being detected, a ventricular stimulus will be given and the ventricular refractory period as well as the V-A delay will be started. Figure 11 and Figure 12 show two different situations, which can occur in DDD.
Figure 11 DDD Timing Cycle with V-Sense in AVD
Figure 12 DDD Timing Cycle with A-Sense in AEI
Lower Rate Interval
Atrial Refr. Period
tLRI
t ARP
A
AV-Delay t AVD
Atrial Escape Interval t AEI
Ventricular Refr. Period tVRP
V
PVARP tPVARP
tAVI
Lower Rate Interval
Atrial Refr. Period
tLRI
t ARP
A
AV Delay t AVD
Atrial Escape Interval t AEI
Ventricular Refr. Period tVRP
PVARP tPVARP
V
PV Delay tPVD

Osypka Medical PACE 203 – Technical Manual
5I-17-013X-B-18 Page 28 of 62
6.8 The Implicitly Adjustable DAI Mode The mode DAI is similar to the DDD mode except that sensing is only possible in the atrial channel. This mode is implicitly adjustable, in that the DDD mode is selected and the sensitivity in the ventricular channel is set to infinite ("–.–"). In this way the sensing of this channel is turned off. A timing of this mode is shown in Figure 13.
Figure 13 DAI Timing Cycle with A-Sense in AEI
6.9 The Implicitly Adjustable DVI Mode The mode DVI is similar to the DDD mode except that sensing is only possible in the ventricular channel. This mode is implicitly adjustable, in that the DDD mode is selected and the sensitivity in the atrial channel is set to infinite ("–.–"). In this way the sensing of this channel is turned off. A timing is shown in Figure 14.
Figure 14 DVI Timing Cycle with Inhibition by V-Sense in AEI
Lower Rate Interval
Atrial Refr. Period
tLRI
t ARP
A
AV Delay t AVD
Atrial Escape Interval t AEI
PVARP tPVARP
V
PV Delay tPVD
Lower Rate Interval tLRI
A
AV-Delay t AVD
Atrial Escape Interval
Ventricular Refr. Period tVRP
V
t AEI

Osypka Medical PACE 203 – Technical Manual
5I-17-013X-B-18 Page 29 of 62
6.10 Atrial Trigger Modes (AAT, DDD+AT) If Atrial Trigger option is activated, an atrial stimulus will be emitted as soon as an atrial activity has been sensed in the sensing phase. Figure 15 shows an atrial trigger in DDD.
Figure 15 DDD Timing Cycle with A-Pace Triggered by A-Sense in AEI
Lower Rate Interval
Atrial Refr. Period
tLRI
t ARP
A
AV Delay t AVD
Atrial Escape Interval t AEI
Ventricular Refr. Period tVRP
PVARP tPVARP
V
PV Delay tPVD
Osypka Medical PACE 203 – Technical Manual
5I-17-013X-B-18 Page 30 of 62
7 EMC Guidance and Manufacturer’s Declara-tion
The PACE 203 needs like every medical electrical device special precautions regarding electromagnetic compatibility (EMC). This section is intended to give the user guidance and information about all aspects to ensure that the PACE 203 operates as intended in an electromagnetic environment. Guidance here given must be followed for putting PACE 203 into service.
The user must be aware that the use of leads and patient cables other than those specified in the instruction for use may result in increased electromagnetic emissions or decreased electromagnetic immunity.
The PACE 203 should not be used adjacent to or stacked with other equipment. If adjacent or stacked use is necessary, the PACE 203 should be observed to verify normal operation in the configuration in which it will be used.
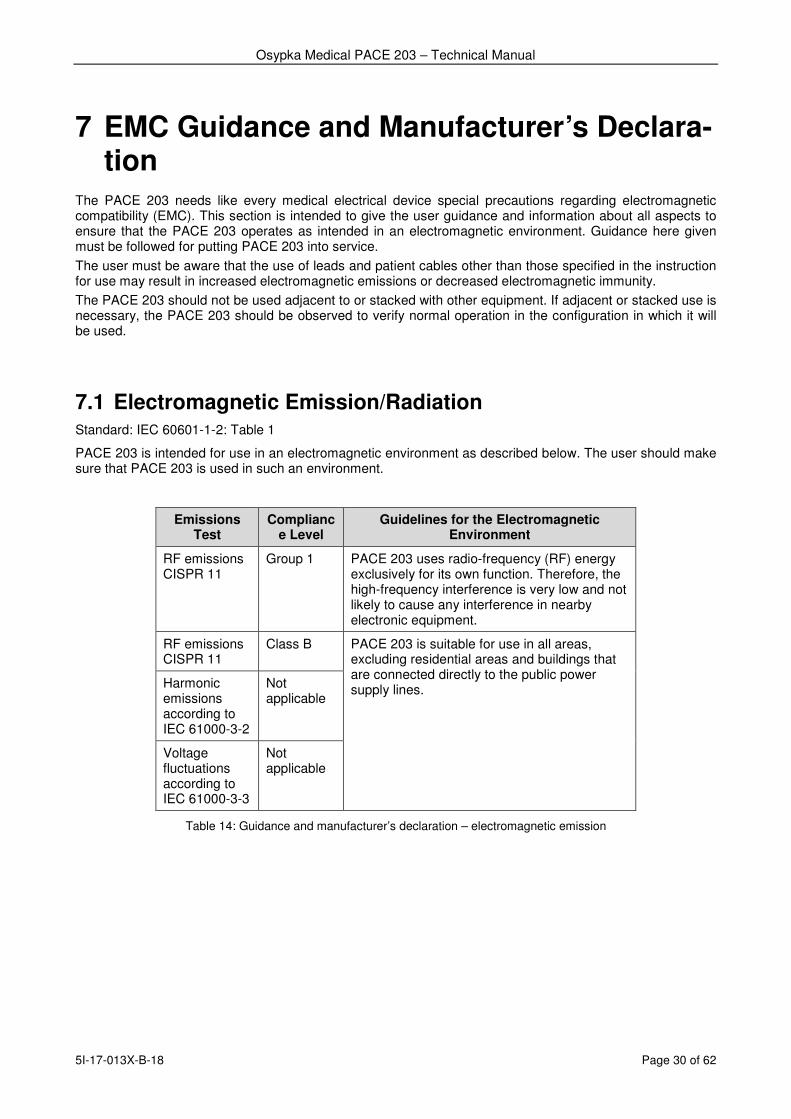
7.1 Electromagnetic Emission/Radiation Standard: IEC 60601-1-2: Table 1
PACE 203 is intended for use in an electromagnetic environment as described below. The user should make sure that PACE 203 is used in such an environment.
Emissions Test
Compliance Level
Guidelines for the Electromagnetic Environment
RF emissions CISPR 11
Group 1 PACE 203 uses radio-frequency (RF) energy exclusively for its own function. Therefore, the high-frequency interference is very low and not likely to cause any interference in nearby electronic equipment.
RF emissions CISPR 11
Class B PACE 203 is suitable for use in all areas, excluding residential areas and buildings that are connected directly to the public power supply lines.
Harmonic emissions according to IEC 61000-3-2
Not applicable
Voltage fluctuations according to IEC 61000-3-3
Not applicable
Table 14: Guidance and manufacturer’s declaration – electromagnetic emission

Osypka Medical PACE 203 – Technical Manual
5I-17-013X-B-18 Page 31 of 62
7.2 Electromagnetic Immunity Standard: IEC 60601-1-2: Table 2
PACE 203 is intended for use in an electromagnetic environment as described below. The user should make sure that PACE 203 is used in such an environment.
Testing the Immunity to Interference
Test Level according to
IEC 60601
Compliance Level
Guidelines for the Electro-magnetic Environment
Electrostatic discharge (ESD) IEC 61000-4-2
± 6 kV contact discharge
± 6 kV contact discharge
Floors should be made of wood, concrete or ceramic tiles. If floors consist of a synthetic material, the relative humidity should be at least 30 %.
± 8 kV air discharge
± 8kV air discharge
Fast transient electrical interference / bursts according to IEC 61000-4-4
± 2 kV for power supply lines
± 2 kV for power supply lines
Quality of power supply lines should be that of typical commercial or hospital environment. ± 1 kV for
input / output lines
Not applicable (lines have a length of less than 3 m)
Surge voltages (surges) according to IEC 61000-4-5
± 1 kV differential mode
± 1 kV differential mode
Quality of power supply lines should correspond to levels typical of commercial or hospital environments. ± 2 kV
common mode ± 2 kV common mode
Voltage drops, brief interruptions and fluctuations on power supply lines according to IEC 61000-4-11
<5 % UT (>95 % dip in UT) for 0.5 cycle
40 % UT (60 % drop in UT) for 5 cycles
70 % UT (30 % drop in UT) for 25 cycles
<5 % UT (>95 % drop in UT) for 5 seconds
Not applicable Not applicable (PACE 203 has an uninterruptible power supply)
Magnetic field at the supply frequency (50/60 Hz) according to IEC 61000-4-8
3 A/m 3 A/m The magnetic field strength should correspond to levels typical to commercial or hospital environments.
NOTE UT is the AC voltage prior to application of the test level
Table 15: Guidance and manufacturer’s declaration – electromagnetic immunity I

Osypka Medical PACE 203 – Technical Manual
5I-17-013X-B-18 Page 32 of 62
7.3 Electromagnetic Immunity for External Cardiac Pacemak-ers
Standard: IEC 60601-1-2: Table 3
PACE 203 is intended for use in an electromagnetic environment as described below. The user should make sure that PACE 203 is used in such an environment.
Testing the Immunity to Interference
Test Level according to
IEC 60601
Compliance Level
Guidelines for the Electromagnetic Environment
Portable and mobile radio-frequency (RF) communication equipment are not used closer to any part of PACE 203, including cables and leads, than the recommended safety distance.
Recommended safety distance:
Conducted RF interferences according to IEC 61000-4-6
10 Vrms 150 kHz to 80 MHz outside of ISM bands
a
10 Vrms 150 kHz to 80 MHz outside of ISM bands
a
Pd ]35.0[=
10 Vrms 150 kHz to 80 MHz inside of ISM bands
a
10 Vrms 150 kHz to 80 MHz inside of ISM bands
a
Pd ]2.1[=
Radiated RF interference accfording to IEC 61000-4-3
10 V/m 80 MHz to 2.5 GHz
10 V/m 80 MHz to 2.5 GHz
[ ] Pd 2.1=
for 80 MHz to 800 MHz
[ ] Pd 3.2=
800 MHz to 2.5 GHz
P is the maximum rated power of the transmitter in watts (W) according to the information of the transmitter manufacturer and d is the recommended safety distance in meters (m).
b
Field strength of stationary RF transmitters must be determined site
c and must be be less than the compliance level at all
frequenciesd.
Interference may occur in the vicinity of devices marked with the following symbol:
Note 1: At 80 MHz and 800 MHz, the higher frequency range applies.
Note 2: These guidelines do not necessarily apply in all situations. The propagation of electromagnetic waves is influenced by absorption and reflection from structures, objects and humans.
a The ISM bands (for ndustrial, scientific and medical applications) between 150 kHz and 80 MHz are 6.765 MHz to 6,795 MHz; 13.553 MHz to 13.567 MHz; 26.957 MHz to 27.283 MHz; and 40.66 MHz to 40.70 MHz.
b The compliance level in the ISM frequency bands between 150 kHz and 80 MHz and in the frequency range 80 MHz to 2.5 GHz is intended to reduce the likelihood that mobile/portable communications devices cause interference if they are unintentionally brought into patient areas. For this reason greater safety distance is recommended separation distance in these frequency ranges (factor 12 instead of 0.35).
c The field strengths of staionary transmitters, such as base stations for mobile phones and land mobile radios, amateur radio stations and radio broadcast and TV broadcasta cannot be predicted with accuracy. To assess the electromagnetic environment by fixed RF transmitters, a study of the location should be considered. If the measured field strength exceeds the HF compliance level at the location where PACE 203 is used, PACE 203 must be observed to ensure correct functioning. Additional measures may be necessary, such as reorienting or relocating PACE 203.
d In the frequency range 150 kHz to 80 MHz the field strengths should be less than 10 V/m.
Table 16 Guidance and manufacturer's declaration – electromagnetic immunity II
Osypka Medical PACE 203 – Technical Manual
5I-17-013X-B-18 Page 33 of 62
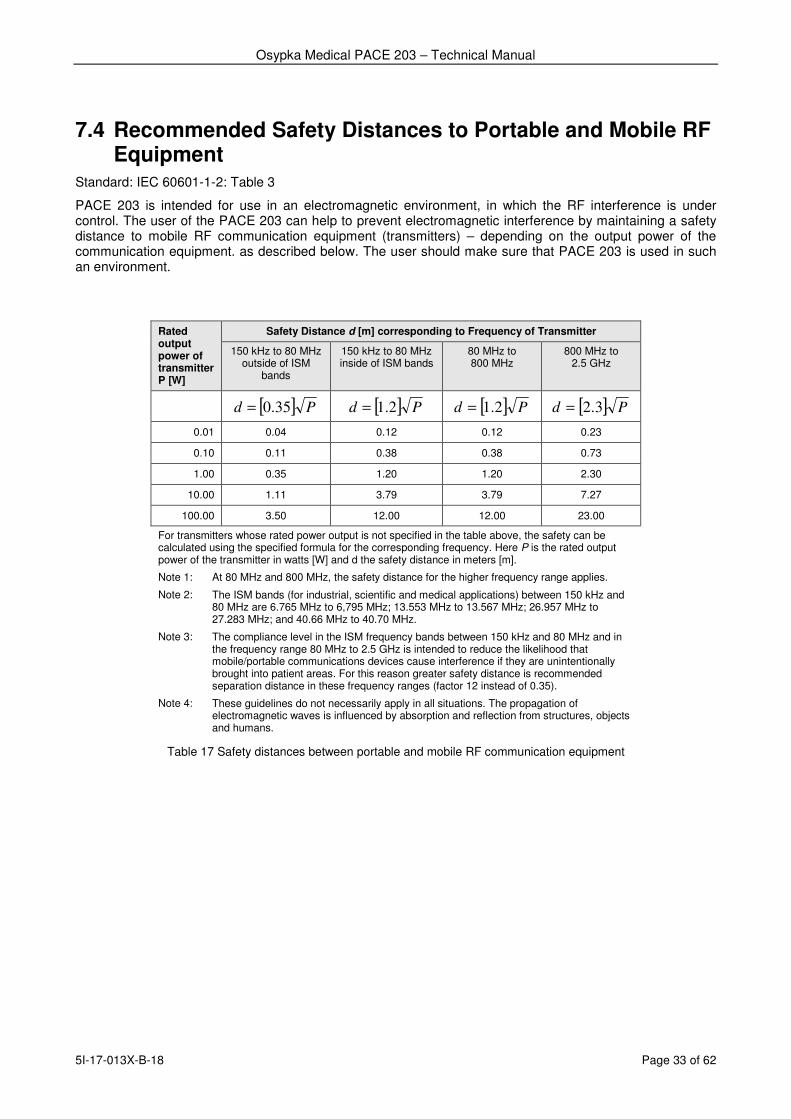
7.4 Recommended Safety Distances to Portable and Mobile RF Equipment
Standard: IEC 60601-1-2: Table 3
PACE 203 is intended for use in an electromagnetic environment, in which the RF interference is under control. The user of the PACE 203 can help to prevent electromagnetic interference by maintaining a safety distance to mobile RF communication equipment (transmitters) – depending on the output power of the communication equipment. as described below. The user should make sure that PACE 203 is used in such an environment.
Rated output power of transmitter P [W]
Safety Distance d [m] corresponding to Frequency of Transmitter
150 kHz to 80 MHz outside of ISM
bands
150 kHz to 80 MHz inside of ISM bands
80 MHz to 800 MHz
800 MHz to 2.5 GHz
[ ] Pd 35.0= [ ] Pd 2.1= [ ] Pd 2.1= [ ] Pd 3.2=
0.01 0.04 0.12 0.12 0.23
0.10 0.11 0.38 0.38 0.73
1.00 0.35 1.20 1.20 2.30
10.00 1.11 3.79 3.79 7.27
100.00 3.50 12.00 12.00 23.00
For transmitters whose rated power output is not specified in the table above, the safety can be calculated using the specified formula for the corresponding frequency. Here P is the rated output power of the transmitter in watts [W] and d the safety distance in meters [m].
Note 1: At 80 MHz and 800 MHz, the safety distance for the higher frequency range applies.
Note 2: The ISM bands (for industrial, scientific and medical applications) between 150 kHz and 80 MHz are 6.765 MHz to 6,795 MHz; 13.553 MHz to 13.567 MHz; 26.957 MHz to 27.283 MHz; and 40.66 MHz to 40.70 MHz.
Note 3: The compliance level in the ISM frequency bands between 150 kHz and 80 MHz and in the frequency range 80 MHz to 2.5 GHz is intended to reduce the likelihood that mobile/portable communications devices cause interference if they are unintentionally brought into patient areas. For this reason greater safety distance is recommended separation distance in these frequency ranges (factor 12 instead of 0.35).
Note 4: These guidelines do not necessarily apply in all situations. The propagation of electromagnetic waves is influenced by absorption and reflection from structures, objects and humans.
Table 17 Safety distances between portable and mobile RF communication equipment
Osypka Medical PACE 203 – Technical Manual
5I-17-013X-B-18 Page 34 of 62
8 Appendices
8.1 Error Codes The PACE 203 differentiates between conflicts, application related errors and device related errors, and warning messages. While the instruction for use describe most errors, warnings and conflicts, the description and possible cause of all errors is disclosed in this technical manual.
In particular PACE 203 distinguishes between:
• Exception errors and
• Other errors.
In the event of an exception error the micro-controller unit (MCU) halts and, as a consequence, PACE 203 is not operable. Upon such an exception error the PACE 203 will reset and restart the MCU automatically. After successful restart the MCU reads the previously stored error code and displays this error code promi-nently in a message in the lower portion of display. The display of the error code (if possible) is accompa-nied by an acoustic beep pattern corresponding to the error code.
In the event of other errors, the MCU and in turn the PACE 203 remains operational. Again, the error code will be displayed in the lower display. Only one high beep tone is generated upon occurrence of such an error. The user is periodically reminded acoustically until the error message is confirmed by the user via the LOCK key.
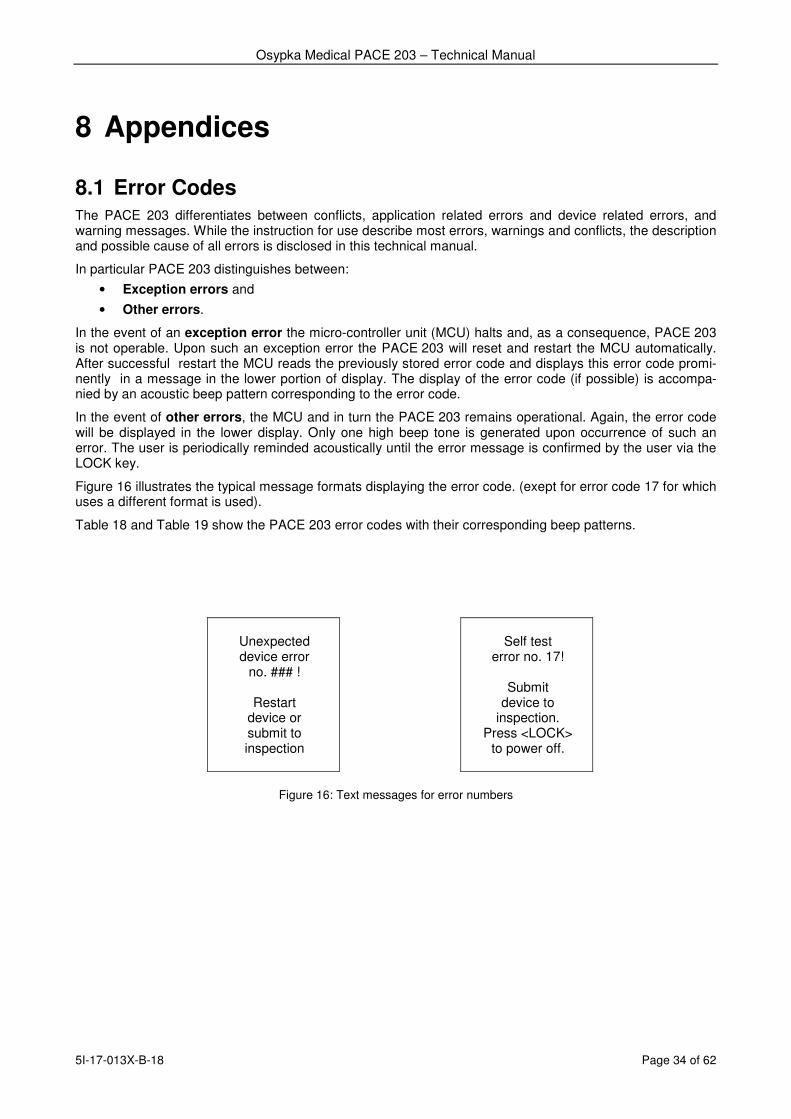
Figure 16 illustrates the typical message formats displaying the error code. (exept for error code 17 for which uses a different format is used).
Table 18 and Table 19 show the PACE 203 error codes with their corresponding beep patterns.
Unexpected device error
no. ### !
Restart device or submit to inspection
Self test
error no. 17!
Submit device to
inspection. Press <LOCK>
to power off.
Figure 16: Text messages for error numbers

Osypka Medical PACE 203 – Technical Manual
5I-17-013X-B-18 Page 35 of 62
Table 18 PACE 203 Exception Error numbers
Exception Errors
Error number Beep Pattern
Comments Low beeps High beeps
1 - 1 Pacer timers: Overflow of PTM list EXIT_OUTOFMEM_PTM
2 - 2 Events: Overflow of EVT list EXIT_OUTOFMEM_EVT
3 - 3 High-speed timers: Overflow of HST array EXIT_OUTOFMEM_HST
4 - 4 General purpose timers: Overflow of GPT list EXIT_OUTOFMEM_GPT
5 - 5 Menu: Not enough memory for menu EXIT_OUTOFMEM_MENU
6 - 6 RAM error EXIT_HW_RAM
7 - 7 ROM error EXIT_HW_ROM
51 1 1 Unexpected MCU exception EXIT_CPU_UND
52 1 2 Unexpected MCU exception EXIT_CPU_INTO
53 1 3 Unexpected MCU exception EXIT_CPU_BRK
54 1 4 Unexpected MCU exception EXIT_CPU_ADRMATCH
55 1 5 Unexpected MCU exception EXIT_CPU_STEP
56 1 6 Unexpected MCU exception EXIT_CPU_WDOVF
57 1 7 Unexpected MCU exception EXIT_CPU_DBC
58 1 8 External Watchdog overflow EXIT_CPU_NMI

Osypka Medical PACE 203 – Technical Manual
5I-17-013X-B-18 Page 36 of 62
Table 19 PACE 203 Other Error numbers
Other Errors
Error number High beeps Comments
10 1 Inconsistency of time bases ERR_TIMEBASE
11 1 Bad analog/reference voltage ERR_ANA_REF_VOLTAGE
12 1 ADC corrupt ERR_ADC
13 1 Power off failed ERR_FAIL_PWROFF
14 1 Atrial sense during atrial blanking ERR_BLNKATR
15 1 Ventricular sense during ventricular blanking ERR_BLNKVEN
16 1 Power On stimulation self test failed ERR_PWRON_STIMERR
17 1 Configurable hardware feature (see section 5.3 on page 17) not readable or has not been defined. ERR_HWFEATURE_LOST

Osypka Medical PACE 203 – Technical Manual
5I-17-013X-B-18 Page 37 of 62
8.2 Stimulation Amplitude According to ISO Definition The amplitude of the stimulation pulse indicated on the PACE 203 display is equal to the peak pulse ampli-tude. This was chosen for an easy measurement of the pulse amplitude, but it differs from the test procedure in ISO 5841-1, Subclause B.2.2 where the pulse amplitude is calculated from the time integral over voltage divided by the pulse duration. The pulse duration shall be measured between the points on the pulse wave-form where the amplitude is equal to one-third of the peak pulse amplitude.
With the following equation the ISO 5841-1 amplitude can be calculated from the peak pulse amplitude:
)1
(
CR
D
eAA
L
CR
D
PEAKISO
L
−
−=
There is
D: pulse duration,
RL: load resistance and
C: capacitor in load circuit: 10 µF in PACE 203 with S/N ≥ 1024001 at resistive load).
Table 20 shows calculated values for standard load RL = 500 Ω and standard pulse durations D = 0.75 ms (ventricle), D = 1.00 ms (atrium).
Table 20 Peak amplitude vs. ISO 5841-1 amplitudes
APEAK [V] AISO [V]
1 0.93
2 1.86
3 2.79
4 3.71
5 4.64
6 5.57
7 6.50
8 7.43
10 9.29
12 11.14
14 13.00
16 14.86
18 16.72

Osypka Medical PACE 203 – Technical Manual
5I-17-013X-B-18 Page 38 of 62
8.3 Waveform of Stimulation Pulse Figure 17 and Figure 18 show the waveforms of an atrial respectively ventricular pacer output pulse (at man-ufacturer's default settings).
These waveforms are applicable only for pacer main-boards with an article number 5I-23-511X-X-02 (or higher) labeled on the PCB. This should be the case for all devices with a serial number higher or equal than 1035001 on the back side of the housing. For older devices please refer to a previous version of this docu-ment.
Figure 17 Atrial output pulse (at manufacturer's default settings)
Figure 18 Ventricular output pulse (at manufacturer's default settings)

Osypka Medical PACE 203 – Technical Manual
5I-17-013X-B-18 Page 39 of 62
8.4 Sensitivity for sin² Test Impulses The sensitivity S (in mV) of the PACE 203 is adjusted by the manufacturer applying the triangle 2ms/13ms test impulse as specified in ISO 5841-1, Subclause B.1.4 (SISO).
With the following equations the corresponding sensitivities for sin² test impulses can be calculated:
15 ms pulse duration: ISOms
SS *77.015/sin 2 =
25 ms pulse duration: ISOms
SS *83.025/sin 2 =
40 ms pulse duration: ISOms
SS *19.140/sin 2 =
The formulas have to be interpreted as in the following example:
If the sensitivity of the PACE 203 is set to 1 mV (displayed value) and a 15 ms-sin² test impulse is used, it is as if the sensitivity has been set to 0.77 mV. With other words: A 15 ms-sin² impulse with an amplitude of 0.77 mV will just be recognized by the PACE 203, when its sensitivity parameter is set to "1 mV".
The formulas can also be reversed like in the following example:
When a 15 ms-sin² impulse with an amplitude of 1 mV shall just trigger the PACE 203, its sensitivity must be set to 1.3 mV (= 1/0.77 mV).

Osypka Medical PACE 203 – Technical Manual
5I-17-013X-B-18 Page 40 of 62
8.5 Spare Part List
Pos. Quantity Name Part Number
1. 1 PACE203H Upper Housing Subassembly incl. Key Foil, Screen Glass with MAINS Window*
5I-25-079Z-A
2. 1 PACE203H Upper Housing Subassembly incl. Key Foil, Screen Glass w/o MAINS Window*
5I-25-079Z-E
3. 1 PACE203H Lower Housing Subassembly incl. Battery Cover, Electrode Terminals, CTRL-Out Socket, Housing Feet*
5I-25-076Z-A
4. 1 PACE203H Battery Cover* 5I-25-087Z-A
5. 1 PACE203H Hanger 5I-28-093Z-A
6. 2 PACE203H Terminal Cap red 5I-25-096Z-A
7. 2 PACE203H Terminal Cap black 5I-25-096Z-B
8. 3 PACE203H Screw Cover 5I-28-101Z-A
9. 2 PACE203H Housing Foot 5I-28-100Z-A
10. 1 PACE203H Knob flat light blue (Rate) 5I-28-090Z-B
11. 1 PACE203H Knob flat dark blue (A-Stim) 5I-28-090Z-C
12. 1 PACE203H Knob flat white (V-Stim) 5I-28-090Z-A
13. 1 PACE203H Knob high light blue (A-V Delay) 5I-28-089Z-B
14. 1 PACE203H Knob high dark blue (A-Sense) 5I-28-089Z-C
15. 1 PACE203H Knob high white (V-Sense) 5I-28-089Z-A
16. 4 PACE203H Energy Storing Capacitor EECAOEL105 pre-assembled (4pcs. are needed for 1 device) *
5I-25-103Z-A
17. 5 PACE203H Energy Storing Capacitor EECAOEL105 w/o diode (5pcs. are needed for 1 device) *
9E-28-8403-B
18. 1 PACE203H Battery Terminal Spring* 5I-28-092Z-B
19. 4 O-Ring 4,0,1, 00N 70Shore A black 9A-28-0017-A
20. 6 PACE203H Encoder* 9E-28-8426-A
21. 6 PACE203H Encoder Gasket* 5I-28-099Z-A

Osypka Medical PACE 203 – Technical Manual
5I-17-013X-B-18 Page 41 of 62
Pos. Quantity Name Part Number
22. 1 PACE203H Back Foil incl. Battery Button Cover 5I-25-104Z-A
23. 1 Silicone Paste (Bayer-Silicone) Tube for Lubrication for Encoders
9Q-28-8007-A
24. 1 Loctite® 454 Tube to fix the Knobs 9Q-28-0024-A
25. 1 Loctite® 406 incl. Primer 770 to fix the Housing Feet 9Q-28-8013-A
26. 1 PACE203H CTRL-OUT socket pre-assembled* 5I-25-095Z-A
27. 1 PACE203H CTRL-OUT Cap 5I-28-059Z-A
28. 1 Buzzer Piezo Digisound* 9E-28-8215-B
29. 10 Screw M3x4 9A-28-8055-A
30. 10 Washer M3* 9A-28-8007-A
31. 6 Thread Bolt M3x7 w/ Thread 6mm (to ass. Power Board) * 9A-28-8105-A
32. 5 Thread Bolt M3x7 w/ Thread 4mm (to ass. LCD to housing) * 9A-28-8109-A
33. 1 Thread Bolt M3x7 w/ Thread 4mm, plastic (to ass. LCD to housing) *
9A-28-8109-B
34. 1 Pin 2M6x16 A2 Stainless Steel* 9A-28-8106-A
35. 2 LED for Sense green ø 5mm* 9E-28-8316-B
36. 2 LED for Stim. yellow ø 5mm* 9E-28-8488-B
37. 2 LED for Sense green 2x4mm* 9E-28-8802-B
38. 2 LED for Stim. yellow 2x4mm* 9E-28-9128-B
39. 1 PACE203H Carrying Case 5I-25-101Z-C
40. 1 PACE203H Protection Bag 5I-28-108Z-A
Table 21: List of Spare Parts
Note:
* Parts available only for authorized/trained customers

Osypka Medical PACE 203 – Technical Manual
5I-17-013X-B-18 Page 42 of 62
8.6 Circuit Diagrams and Assembly Drawings
Figure 19: Circuit Diagram of Power Management & Encoder

Osypka Medical PACE 203 – Technical Manual
5I-17-013X-B-18 Page 43 of 62
Figure 20: Circuit Diagram of MCU & Peripherals
Osypka Medical PACE 203 – Technical Manual
5I-17-013X-B-18 Page 44 of 62
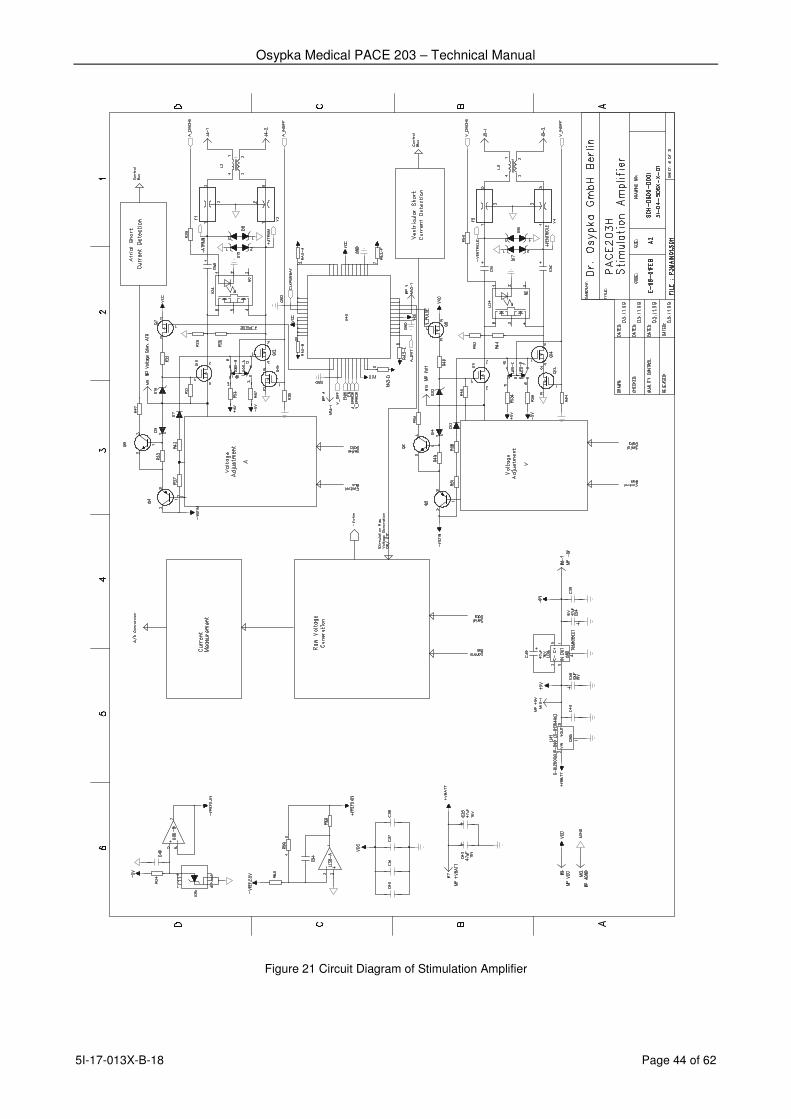
Figure 21 Circuit Diagram of Stimulation Amplifier
Osypka Medical PACE 203 – Technical Manual
5I-17-013X-B-18 Page 45 of 62
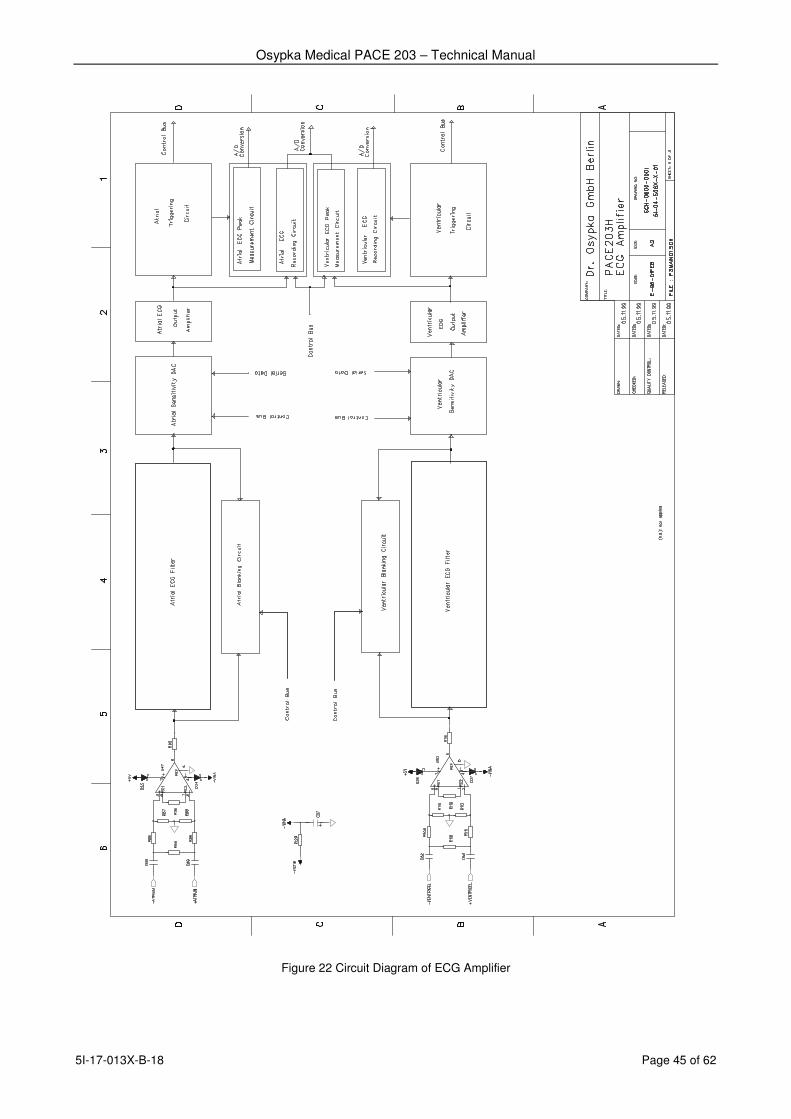
Figure 22 Circuit Diagram of ECG Amplifier

Osypka Medical PACE 203 – Technical Manual
5I-17-013X-B-18 Page 46 of 62
Figure 23 Assembly Plan of Power Board top

Osypka Medical PACE 203 – Technical Manual
5I-17-013X-B-18 Page 47 of 62
Figure 24 Assembly Plan of Power Board bottom

Osypka Medical PACE 203 – Technical Manual
5I-17-013X-B-18 Page 48 of 62
Figure 25 Assembly Plan of Main Board top

Osypka Medical PACE 203 – Technical Manual
5I-17-013X-B-18 Page 49 of 62
Figure 26 Assembly Plan of Main Board bottom

Osypka Medical PACE 203 – Technical Manual
5I-17-013X-B-18 Page 50 of 62
Figure 27 Assembly Plan of Upper Case

Osypka Medical PACE 203 – Technical Manual
5I-17-013X-B-18 Page 51 of 62
Figure 28 Assembly Plan of Lower Case
Osypka Medical PACE 203 – Technical Manual
5I-17-013X-B-18 Page 52 of 62
8.7 Function and Safety Check with SigmaPaceTM 1000
The SigmaPaceTM
by Fluke Biomedical is an External Pacemaker Analyzer for pacemaker testing.
8.7.1 Visual Inspection
1) Ensure that the body of the pacemaker is not damaged. Record the results (Pass or Fail).
2) Ensure that the LCD is not damaged and no particle is visible. Record the results (Pass or Fail).
3) Ensure that no label is damaged. Record the results (Pass or Fail).
4) Ensure that parameter switches (rotary and push buttons) are not damaged. Ensure knobs have the right color. Record the results (Pass or Fail).
5) Ensure that CTRL-OUT terminal (right / bottom corner) has a cover cap and is not damaged. Record the results (Pass or Fail).
6) Test BLACK and RED receptacles for function by turning of the profile caps. Record the results (Pass or Fail).
7) Check battery compartment for easy opening and closing. Record the results (Pass or Fail).
8) Check battery button cover for tight fit but easy turning. Record the results (Pass or Fail).
9) Turn on the pacemaker. After pressing the ON button, verify that all 4 LED’s are emitting shortly. Record the results (Pass / Fail / Not applicable).
Note: Test is not applicable for devices with firmware 1.11 or lower
10) Verify that the display backlight is on. Record the results (Pass or Fail).
11) Record firmware version in the form sheet.
12) Test the rotary dial function. To do this unlock the controls (using the LOCK/UNLOCK button if locked). Go to DDD pacing mode. Turn each of the 6 rotary dials clockwise and anti-clockwise and watch the corresponding value on the LCD display. Verify that the turning causes a corresponding increment or decrement of the numeric value. Record the results (Pass or Fail).
13) The inspection is finished.
Turn off the pacemaker.
Remove the test battery.

Osypka Medical PACE 203 – Technical Manual
5I-17-013X-B-18 Page 53 of 62
8.7.2 Test Equipment & Test Set Up
Provide the following test equipment:
• Pacemaker Analyzer SigmaPace 10008
• 9VDC Load Test Cable
• 4 Test leads
• Stopwatch
• Test battery
• Power supply with DC voltage regulator
• Voltmeter
• Resistance decade box
• Test cables
• Balloon Pump Interface BPI 202 (optional)
1) To perform tests and checks the examiner must be familiar with the content of the pacemaker’s instructions for use.
2) Place a new battery in the battery compartment of the pacemaker. The internal energy storage device must be full charged before the test starts.
Note: After inserting a new battery, the Pacemaker needs 30 minutes to recharge the energy storage device.
3) Turn on the SigmaPace™
1000
Press and release the ENTER/POWER ON KEY.
Press F2 INV for invasive (transvenous) external pacemaker testing.
Press F4 to select the test load of 500 Ohms.
Press F1 NEXT
8.7.3 Supply Current & Power Management
Test of Battery Change Time.
1) Pacemaker: Power OFF.
Plug the supplied 9VDC Load Test Cable into the matching connector on the left side of the SigmaPace 1000. Connect the 9VDC Load Test Cable to Pacemaker battery terminals.
Use F4 to navigate through the available test selections.
Press F2 to select DC LOAD.
Press F1 NEXT.
Pacemaker: Select VVI Standard, display ON, backlight OFF.
Fill in the actual VVI-Mode current measurement value in the test protocol.
2) Pacemaker: Turn "ON", select DDD Standard, display ON, backlight OFF.
Fill in the actual DDD-Mode current measurement value in the test protocol.
Press ESC 2x.
8 External Pacemaker Analyser SigmaPace 1000, DNI Nevada Inc., USA

Osypka Medical PACE 203 – Technical Manual
5I-17-013X-B-18 Page 54 of 62
3) Turn "ON" the stopwatch. Simultaneous remove the supplied 9V DC Load Test Cable from the matching connector on the left side of the SigmaPace 1000 and start the stopwatch time measure-ment.
Wait until the pacemaker switches OFF itself and stop the stopwatch time measurement simultane-ous.
Fill in the actual Battery Change Time in the test protocol9.
Remove the supplied 9VDC Load Test Cable from the pacemaker.
Note: If during testing the pacemaker does not detect a key response within a few seconds, the device will revert to the "Lock" condition. In order to continue with the testing, one must press repeatedly the "LOCK/UNLOCK" key button (or one must set the pacemaker into Service Mode, see Section 4.1 on page 16).
The following steps should be performed to test the low battery indication circuitry of the pulse generator.
1) Connect a voltmeter to the Power Supply output terminals. Turn "ON" the Voltage Meter and set it to “V=” (DC/Direct Current).
Turn "ON" the Power Supply. Set the Power Supply output to a nominal voltage of 9.00 (±0.1) Volts by rotation the "VOLTAGE ADJUSTMENT" dial.
Connect test cables between the Power Supply outputs and the battery terminals of the PACEMAK-ER.
2) Turn "ON" the Pacemaker. Verify that the "Battery Symbol" (located on the upper right hand corner of the display) is displaying "Full" battery condition. Record the results (Pass or Fail).
3) Slowly rotate the "VOLTAGE ADJUSTMENT" dial of the Power Supply counterclockwise and set the Power Supply output to a nominal voltage of 7.0 Volts. Allow a minimum of ten (10) seconds for sta-bilization.
Verify on the pulse generator the following:
a) The "Battery Symbol" displays the last segment blinking;
b) An acoustic warning signal is heard when the time-to-change-battery level is reached for the first time; and
c) The message "Change battery!" appears on the lower half of the display. If the lower display is switched off press "LOCK/UNLOCK" once.
Record the results (Pass or Fail).
d) Press "LOCK/UNLOCK" button as often as necessary to let the display message disappear.
Note: The display message will appear every 10 minutes again.
4) Slowly rotate the "VOLTAGE ADJUSTMENT" dial of the Power Supply counterclockwise and set the Power Supply output to a nominal voltage of 5.0 Volts. Allow a minimum of ten (10) seconds for sta-bilization. Verify on the pulse generator the following:
a) The "Battery Symbol" displays no filling and blinks;
b) An acoustic warning signal is heard continuously when an immediate battery change is required; and
c) The messages "Hurry up!" and "Change battery!" appear on the lower half of the display. If the lower display is switched off press "LOCK/UNLOCK" once.
Record results (Pass or Fail).
5) Pacemaker: Turn power "OFF". Remove all the connections from the pacemaker, install the battery and close the battery compartment door.
9 Although a value greater than 30 sec is specified in the Technical Data the measured value in the yearly safety check-up shall be
greater than 90 to 120 seconds because the energy storage devices are subject to an aging process. The measured value shall be compared with the value determined one year ago to recognize the trend of changing.

Osypka Medical PACE 203 – Technical Manual
5I-17-013X-B-18 Page 55 of 62
8.7.4 Patient Auxiliary Current
Connect atrial and ventricular channel test leads between SigmaPace 1000 and pacemaker.
• Patient Auxiliary Current, Static, Atrial Channel Use F4 to navigate through the available test selections. Press F1 to select DC LEAK test Press F1 OFF to select Static test Pacemaker: Turn power OFF Press F1 to select the ATRIAL channel Press F1 HOLD to freeze the pacer measurement Fill in the actual pacer measurement data to the test protocol Press ESC to return to the previous menu
• Patient Auxiliary Current, Static, Ventricular Channel Press F1 OFF to select Static test Press F2 to select the VENT channel Press F1 HOLD to freeze the pacer measurement Fill in the actual pacer measurement data to the test protocol Press ESC to return to the previous menu
• Patient Auxiliary Current, Dynamic, Atrial Channel Pacemaker: Turn power ON, select AAI-Mode Press F2 ON to select Dynamic test Press F1 to select the ATRIAL channel Press F1 NEXT Press F1 HOLD to freeze the pacer measurement Fill in the actual pacer measurement data to the test protocol Press ESC to return to the previous menu
• Patient Auxiliary Current, Dynamic, Ventricular Channel Pacemaker: Select VVI-Mode Press F2 ON to select Dynamic test Press F2 to select the VENT channel Press F1 NEXT Press F1 HOLD to freeze the actual pacer measurement Fill in the actual pacer measurement data to the test protocol Press ESC 2x to return to the previous menu Pacemaker: Turn power OFF
8.7.5 Runaway Protection
• Runaway Protection Atrial Channel Pacemaker: Turn on in Service Mode (see Section 4.1.1) and set AAI Standard Use F4 to navigate through the available test selections. Press F1 to select Pulse Output test Press F1 to select Channel Atr Only Pacemaker: Increase the rate until only half of the rate is displayed. Read the pacemaker rate and fill in the test protocol. Press ESC to return to the previous menu
• Runaway Protection Ventricular Channel Pacemaker: Set VVI Standard Press F2 to select Channel Vent Only Pacemaker: Increase the rate until the half of the adjusted rate is displayed. Read the pacemaker rate and fill in the test protocol. Press ESC to return to the previous menu

Osypka Medical PACE 203 – Technical Manual
5I-17-013X-B-18 Page 56 of 62
8.7.6 Pulse Amplitude10
• Pulse Amplitude Atrial Channel Disconnect VENT Pacemaker: AAI Standard, A-Ampl. variable Press F1 to select Channel Atr Only Pacemaker: Set the atrial amplitude according to the test protocol. Verify that the A-Stim LED is blinking Fill in the actual pacer measurement value in the test protocol. Repeat the steps until the values are complete. Press ESC to return to the previous menu
• Pulse Amplitude Ventricular Channel Connect VENT, Disconnect ATRIUM Pacemaker: VVI Standard, V-Ampl. variable Press F2 to select Channel Vent Only Pacemaker: Set the ventricular amplitude according to the test protocol. Verify that the V-Stim LED is blinking Fill in the actual pacer measurement value in the test protocol. Repeat the steps until the values are complete. Press ESC to return to the previous menu
8.7.7 Pulse Duration
• Pulse Duration Atrial Channel Connect ATRIUM, Disconnect VENT Pacemaker: AAI Standard, atrial duration variable Press F1 to select Channel Atr Only Pacemaker: Set the nominal atrial duration. Fill in the actual pacemaker measurement value in the test protocol. Repeat the steps until the values are complete. Press ESC to return to the previous menu
• Pulse Duration Ventricular Channel Connect VENT, Disconnect ATRIUM Pacemaker: VVI Standard, ventricular duration variable Press F2 to select Channel Vent Only Pacemaker: Set the nominal atrial duration. Fill in the actual pacemaker measurement value in the test protocol. Repeat the steps until the values are complete. Press ESC to return to the previous menu.
8.7.8 Rate
• Pulse Rate Connect ATRIUM and VENT Pacemaker: AAI Standard, pulse rate variable Press F1 to select Channel Atr Only Pacemaker: Set the nominal pulse rate. Fill in the actual pacemaker measurement value in the test protocol. Repeat the steps until the values are complete. Press ESC to return to the previous menu
10 The pulse amplitude indicated in the pacemaker’s display is equal to the peak pulse amplitude. The SigmaPace 1000 measures the
amplitude according to the ISO definition (see Section 8.1). Therefore, the test protocol distinguishes between amplitude setting value (peak) and nominal value (ISO definition).
Osypka Medical PACE 203 – Technical Manual
5I-17-013X-B-18 Page 57 of 62
• High Rate Atrial Channel Pacemaker: AAI Standard, pulse rate variable Press F1 to select Channel Atr Only Pacemaker: Set the nominal atrial pulse high-rate. Press START Press F1 HOLD to freeze the actual pacemaker measurement. Fill in the actual pacer measurement value in the test protocol. Press ESC 2x to return to the previous menu.
8.7.9 Sensitivity11
• Sensitivity Atrial Channel Pacemaker: AAI Standard, atrial sensitivity variable Use F4 to navigate through the available test selections. Press F2 to select SENSE AMP Press F1 to select ATR Channel. Press F1 NEXT Press F3 to select ISO WAVE 2/13ms WIDTH Press F1 NEXT Pacemaker: Set the nominal atrial sensitivity. Press F3 POL to select the nominal polarity. Press F4 AMP to increase or decrease the nominal amplitude until the pacemaker senses the signal continuously. Verify that the A-Sense LED is blinking Fill in the actual sense amplitude value in the test protocol. Repeat the steps until the values are complete. Press ESC 2x to return to the previous menu.
• Sensitivity Ventricular Channel PACEMAKER: Set VVI Standard, ventricular sensitivity variable Press F2 to select VENT Channel. Press F1 NEXT Press F3 to select ISO WAVE 2/13ms WIDTH Press F1 NEXT PACEMAKER: Set the nominal ventricular sensitivity. Press F3 POL to select the nominal polarity. Press F4 AMP to increase or decrease the nominal amplitude until the pacemaker senses the signal continuously. Verify that the V-Sense LED is blinking Fill in the actual sense amplitude value in the test protocol. Repeat the steps until the values are complete. Press ESC 3x to return to the previous menu.
8.7.10 Noise Detection
• Noise Detection Atrial Channel Pacemaker: Set AAI Standard Use F4 to navigate through the available test selections. Press F3 to select NOISE LINE Press F3 to select 50Hz LINE Press F1 NEXT Pacemaker: An interference symbol will be shown in the upper display in the atrial sense section. Press F3 to select ECG ON Pacemaker: An interference symbol will be shown in the upper display in the atrial sense section. Fill in the results in the test protocol. Press ESC to return to the previous menu. Press F3 to select 60Hz LINE Press F1 NEXT
11 Sensitivity with ±20% tolerances because of manual determination with SigmaPace
TM 1000
Osypka Medical PACE 203 – Technical Manual
5I-17-013X-B-18 Page 58 of 62
Pacemaker: An interference symbol will be shown in the upper display in the atrial sense section. Press F3 to select ECG ON Pacemaker: An interference symbol will be shown in the upper display in the atrial sense section. Fill in the results in the test protocol. Press ESC to return to the previous menu.
• Noise Detection Ventricular Channel Pacemaker: VVI Standard Press F2 to select V CHAN Press F3 to select 50Hz LINE Press F1 NEXT Pacemaker: An interference symbol will be shown in the upper display in the ventricular sense sec-tion. Press F3 to select ECG ON Pacemaker: An interference symbol will be shown in the upper display in the ventricular sense sec-tion. Fill in the results in the test protocol. Press ESC to return to the previous menu. Press F3 to select 60Hz LINE Press F1 NEXT Pacemaker: An interference symbol will be shown in the upper display in the ventricular sense sec-tion. Press F3 to select ECG ON Pacemaker: An interference symbol will be shown in the upper display in the ventricular sense sec-tion. Fill in the results in the test protocol. Press ESC 2x to return to the previous menu.
8.7.11 A-V Delay
• A-V Delay Pacemaker: Set DDD Standard, A-V Delay variable Pacemaker must still be in Service Mode (see Section 4.1.1) Use F4 to navigate through the available test selections. Press F1 to select PULSE OUTPUT Press F3 to select DUAL A+V Pacemaker: Set the nominal A-V delay time. Fill in the actual pacer measurement value in the test protocol. Repeat the steps until the values are complete. Press ESC 2x to return to the previous menu.
8.7.12 Refractory Period
• Refractory Period Atrial Channel Pacemaker: Set AAI Standard, 10mV atrial sensitivity. Use F4 to navigate through the available test selections. Press F1 to select REFRCT DEMAND Press F1 ATR Channel. Press F3 to select ISO WAVE 2/13ms WIDTH Press F1 NEXT Press F1 START Wait until the pacemaker measurement is complete.
Add 13 ms to SRP value12. Fill in the actual PRP and the corrected SRP measurement value in the test protocol. Press ESC 2x to return to the previous menu.
• Refractory Period Ventricular Channel Pacemaker: VVI Standard,10mV ventricular sensitivity.
12 Test signal duration

Osypka Medical PACE 203 – Technical Manual
5I-17-013X-B-18 Page 59 of 62
Press F2 VENT Channel. Press F3 to select ISO WAVE 2/13ms WIDTH Press F1 NEXT Press F1 START Wait until the pacemaker measurement is complete.
Add 13 ms to SRP value13. Fill in the actual PRP and the corrected SRP measurement value in the test protocol. Press ESC 2x to return to the previous menu. Hold ESC for 2sec. to turn off the SigmaPace 1000
8.7.13 Electrode Supervisory
• Electrode Supervisory Output Short Disconnect atrial and ventricular channel test leads between the SigmaPace 1000 and pacemaker Pacemaker: Set DDD-Standard Short circuit atrial BLACK and RED receptacles. Error message “atrial output short“ must appear. Press UNLOCK to confirm message Short circuit ventricular BLACK and RED receptacles. Error message “vent. output short“ must ap-pear. Press UNLOCK to confirm message Fill in the results in the test protocol.
• Electrode Supervisory Valid / Disconnection Pacemaker: Set DDD-Standard, Connect test leads between the resistor decade box and pacemaker atrial channel.
Set resistor decade to 2 KΩ, no error message shall appear.
Set resistor decade to 8 KΩ error message „disconn“ and interference symbol must appear. Connect test leads between the resistor decade box and pacemaker ventricular channel.
Set resistor decade to 2 KΩ no error message shall appear.
Set resistor decade to 8 KΩ error message „disconn“ and interference symbol must appear. Fill in the results in the test protocol.
8.7.14 Cross Current
• Cross Current Check Pacemaker: Set DDD-Standard, Connect A-DIFF directly with V-IND. No error message “output short“ must appear. Repeat the check with A-IND und V-DIFF. Fill in the results in the test protocol.
8.7.15 CTRL OUT Signal (optional14)
• CTRL OUT Signal (Optional) Pacemaker: Set VVI Standard Connect a Balloon Pump Interface BPI 202 to the CTRL OUT socket. LED signal “out” at BPI 202 must blink with the stimulation rate. Fill in the result in the test protocol.
13 Test signal duration
14 This test must be performed if a Balloon Pump Interface BPI 202 is used in the hospital.

Osypka Medical PACE 203 – Technical Manual
5I-17-013X-B-18 Page 60 of 62
8.7.16 Test Protocol
Order number:
Serial number:
Equipment number:
Examiner:
Date:
TEST DESCRIPTION Visual Inspection Nominal Actual
Case Condition Pass
LCD (Liquid Crystal Display) Condition Pass
Labels Condition Pass
Verify Parameter Switches Pass
Verify Boot/Cover CTRL-OUT Pass
Verify BLACK and RED Receptacles Pass
Battery Compartment Condition Pass
Battery Button Cover Condition Pass
Verify LED Emitting (not applicable for devices with firmware 1.11 or lower) Pass
Verify Display Backlight Pass
Record Firmware Version 1.00 – 1.XX
Verify Dial Turning, Button Pressing and Beep Pass
Supply Current & Power Management Nominal Actual
Verify VVI-Mode Current (VVI Std.,Display On, Backlight Off):
applicable for devices with SN 0706001 or high-er
applicable for devices with SN 0704020 or lower
2.4 mA ± 1.0 mA
mA
3.5 mA ± 1.0 mA mA
Verify DDD-Mode Current (DDD Std.,Display On, Backlight Off):
applicable for devices with SN 0706001 or high-er
applicable for devices with SN 0704020 or lower
2.6 mA ± 1.0 mA
mA
4.0 mA ± 1.0 mA mA
Verify Battery Change Time (DDD Std.,Display On, Backlight Off) > 30 sec sec
Verify Battery Supervisory Battery Symbol Condition Pass
Change Battery @ 7.0 V Power Supply Pass
Hurry Up! Change Battery @ 5.0 V Power Supply Pass
Patient Auxiliary Current Nominal Actual
Patient Auxiliary Current ,Static, Atrial Channel < 1 µA µA
Patient Auxiliary Current ,Static, Ventricular Channel < 1 µA µA
Patient Auxiliary Current , Dynamic, Atrial Channel < 1 µA µA
Patient Auxiliary Current , Dynamic, Ventricular Channel < 1 µA µA
Runaway Protection Nominal Actual
Runaway Protection Atrial Channel 238 ppm ± 3 ppm ppm
Runaway Protection Ventricular Channel 238 ppm ± 3 ppm ppm

Osypka Medical PACE 203 – Technical Manual
5I-17-013X-B-18 Page 61 of 62
TEST DESCRIPTION Pulse Amplitude
Pulse Amplitude Atrial Channel @ 500 Ω Load, 1.00 ms Pulse Duration:
0.1… 18 V ± 10 % ± 0.05 V whatever is great-er
SETTING Corresponding ISO 5841-1 S/N <1024001
Corresponding ISO 5841-1 S/N ≥1024001
Actual AAI ISO
SETTING Corresponding ISO 5841-1 S/N <1024001
Corresponding ISO 5841-1 S/N ≥1024001
Actual AAI ISO
1.0 V 0.733 – 0.896V 0.816 – 0.997V V 10.0 V 7.330 – 8.959V 8.157 – 9.970V V
2.0 V 1.466 – 1.792V 1.631 – 1.994V V 12.0 V 8.796 – 10.751V 9.789 – 11.964V V
4.0 V 2.932 – 3.584V 3.263 – 3.988V V 14.0 V 10.262 – 12.543V 11.420 – 13.958V V
8.0 V 5.864 – 7.167V 6,526 – 7,976V V 18.0 V 13.194 – 16.126V 14.683 – 17.946V V
Pulse Amplitude Ventricular Channel @ 500 Ω Load, 0.75 ms Pulse Duration:
0.1… 18 V ± 10 % ± 0.05 V whatever is great-er
SETTING Nominal ISO S/N <1024001
Nominal ISO S/N ≥1024001
Actual VVI ISO
SETTING Nominal ISO S/N <1024001
Nominal ISO S/N ≥1024001
Actual VVI ISO
1.0 V 0.778 – 0.950V 0.836 – 1.021V V 10.0 V 7775. – 9.503V 8.358 – 10.215V V
2.0 V 1.555 – 1.901V 1.672 – 2.043V V 12.0 V 9.331 – 11.404V 10.029 – 12.258V V
4.0 V 3.110 – 3.801V 3.343 – 4.086V V 14.0 V 10.886 – 13.305V 11.701 – 14.301V V
8.0 V 6.220 – 7.603V 6.686 – 8.172V V 18.0 V 13.996 – 17.106V 15.044 – 18.387V V
Pulse Duration 0.05 ms … 1.5 ms ± 10 % ± 0.01 ms whatever is greater
Nominal Actual AAI Actual VVI Nominal Actual AAI Actual VVI
0.25 ms ms ms 1.00 ms ms ms
0.50ms ms ms 1.25 ms ms ms
0.75 ms ms ms 1.50 ms ms ms
Pulse Rate 30 ppm … 220 ppm ± 2 %
Nominal Actual Nominal Actual Nominal Actual
30 ppm ppm 90 ppm ppm 180 ppm ppm
60 ppm ppm 120 ppm ppm 220 ppm ppm
High Rate Atrial Channel 70 … 1000 ppm ± 5 % 1000 ppm ppm
Sensitivity
Sensitivity ATRIAL 0.2 … 20 mV ± 20 % ± 0.1 mV whatever is greater
VENT. 1.0 … 20 mV ± 20 % ± 0.1 mV whatever is greater
Nominal Actual AAI POSITIVE
Actual AAI NEGATIVE
Actual VVI POSITIVE
Actual VVI NEGATIVE
3.00 mV mV mV mV mV
4.00 mV mV mV mV mV
5.00 mV mV mV mV mV
10.00 mV mV mV mV mV
20.00 mV mV mV mV mV
Noise Detection Nominal Actual AAI Actual VVI
Interference Symbol at 50Hz ECG OFF Pass
at 50Hz ECG ON Pass
at 60Hz ECG OFF Pass
at 60Hz ECG ON Pass

Osypka Medical PACE 203 – Technical Manual
5I-17-013X-B-18 Page 62 of 62
TEST DESCRIPTION
A-V Delay 5 ms … 400 ms ± 5 % ± 2 ms whatever is greater
Nominal Actual Nominal Actual Nominal Actual
5 ms ms 100 ms ms 300 ms ms
50ms ms 200 ms ms 400 ms ms
Refractory Period Nominal Actual
Refractory Period Atrial Channel after Atr Pacing (AAI Std.) 250 ms ± 5 % ms
Refractory Period Atrial Channel after Atr Sensing (AAI Std.) 15 250 ms ± 5 % ms
Refractory Period Ventricular Channel after Ventr. Pacing (VVI Std.) 250 ms ± 5 % ms
Refractory Period Ventricular Channel after Ventr. Sensing (VVI Std.)16 250 ms ± 5 % ms
Electrode Supervisory Nominal Actual
Electrode Supervisory Atrial Output Short (DDD Std.) Pass
Electrode Supervisory Ventricular Output Short (DDD Std.) Pass
Electrode Supervisory Atrial Valid @ 2kΩ (DDD Std.) Pass
Electrode Supervisory Atrial Disconn @ 8kΩ (DDD Std.) Pass
Electrode Supervisory Ventricular Valid @ 2kΩ (DDD Std.) Pass
Electrode Supervisory Ventricular Disconn @ 8kΩ (DDD Std.) Pass
Cross Current Check - No error message “output short“ must appear. Pass
CTRL OUT Signal (Optional) Pass
Summary of Pacemaker Function and Safety Check Pass
Comments:
Signature:
Date:
15 add 13 ms to the measured ventricular refractory period (see section 8.7.12)
16 add 13 ms to the measured ventricular refractory period (see section 8.7.12)