techhnical general installation - flexelec · tracing piping equipment: elbows, flanges, valves and...
TRANSCRIPT
TECHHNICAL GUIDE
■ BASIC RULES
Your temperature maintenance system will give trouble-free operationprovided it is fitted in accordance with good engineering practice. Youshould fit and connect up the cables and flexible heating elements asindicated below. Read the instructions carefully: it will be more costly tohave to carry our repair work afterwards than to “waste” time reading theseinstructions to the end and installing your system in keeping with therecommendations given. (BS 6351 Part3)It is prohibited to use the system in any way that does not respect theprecautions for use.Before beginning to fit the heating element, make sure that thermalinsulation is fitted immediately afterwards: our products could bedamaged by tools or solder, etc. falling on them if too much time elapsesbetween these two operations.
Assembly and commissioning are subject to standards (BS 6351 Part3),safety instructions and accident prevention rules in force in each country. It is prohibited to modify the devices in any way.Clean and wipe the outside of the part to be heated.Also check that no sharp parts such as welds, welding flash, metal parts,etc. could damage the heating element.The whole of the heating element must be in contact with the part to beheated.In no circumstances should the heating element cross over or overlapitself.Cover the whole of the heating element and the part to be heated withthermal insulation of recommended thickness. Stick the warning label on the thermal insulation .The heating element should be energised only when fitting operations arefinished.Connect up to a suitable, properly protected electric power supply.The electrical protection systems (fuses, circuit-breakers, etc.) must beprovided on the site as per the applicable standards in force.
■ SPECIAL INSTRUCTIONS
Ensure that the flexible heating element chosen is fully appropriate forthe requirements of the installation. For this purpose, consult the FLEXELEC technical documents.Check whether the project requires straight or spiral heat tracing and ifextra lengths need to be provided for valves, flanges, pumps, etc.
Heat loss calculations for flanges, valves, piping supports or otherelements may turn out to be complex because of difficulty in measuringthe exact heat transfer surfaces. Many accessories such as flanges andvalves are manufactured according to standards, while others, such asfilters or pumps differ from one manufacturer or application to another. To determine heat losses, follow the recommendations below:
When fitting heating elements, do not:
• allow them to come into contact with sharp edges,
• apply excessive pulling force to them,
• allow them to be crushed in any way.
The cables must be terminated as soon as possible afterfitting to preventdamp entering by non-sealed ends.
• Inspect the heating elements and accessories as soon as you receivethem to check that they have not been damaged during transit. It isrecommended to carry out measurement of insulation resistance atthis stage.
• For constant power cables, check that sufficient length has beenprovided to allow for the incorporated cold tails.
• Allow an extra 0.5 m of self-regulating heating cable to connect to another cable or for a branch joint.
• Always begin heat tracing at the power supply end.
■ FITTING THERMOSTATS AND JUNCTION BOXES
To protect against freezing, air thermostats are generally used. Thesemust be fitted in the area most exposed to freezing and can be fixed tothe piping or any other support. If they are fitted to piping the heatingcable can be connected directly into the thermostat. Self-regulatingheating cables can be connected directly to a junction box (a thermostatis not strictly necessary , but strongly recommended). Supports exist forfixing the junction box or thermostat onto the piping.
Bulb and capillary or temperature probe thermostats are normally usedfor production lines to control the surface temperature and must be fittedimmediately adjacent to the power point. Supports exist for fixing thethermostat onto the piping.
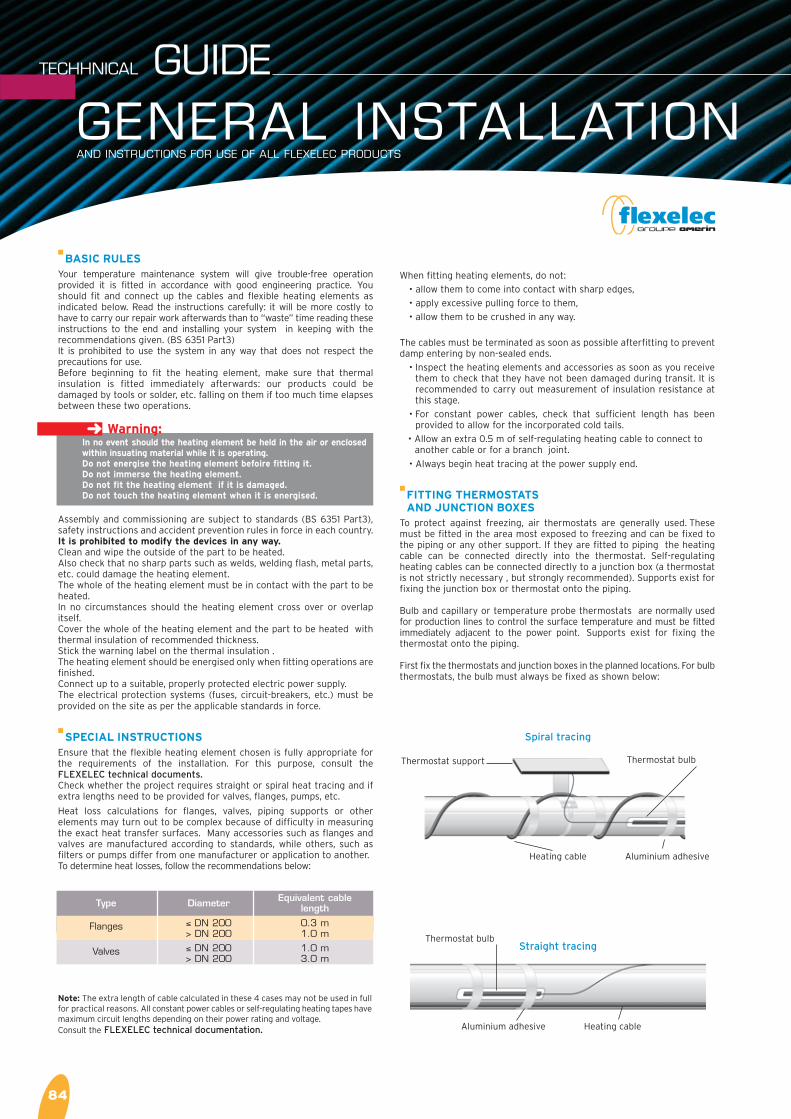
First fix the thermostats and junction boxes in the planned locations. For bulbthermostats, the bulb must always be fixed as shown below:
In no event should the heating element be held in the air or enclosedwithin insuating material while it is operating. Do not energise the heating element befoire fitting it. Do not immerse the heating element. Do not fit the heating element if it is damaged. Do not touch the heating element when it is energised.
➜ Warning:
Type Diameter Equivalent cablelength
Flanges ≤ DN 200 0.3 m> DN 200 1.0 m
Valves ≤ DN 200 1.0 m> DN 200 3.0 m
Note: The extra length of cable calculated in these 4 cases may not be used in fullfor practical reasons. All constant power cables or self-regulating heating tapes havemaximum circuit lengths depending on their power rating and voltage. Consult the FLEXELEC technical documentation.
Spiral tracing
Heating cable Aluminium adhesive
Straight tracing
Heating cableAluminium adhesive
GENERAL INSTALLATIONAND INSTRUCTIONS FOR USE OF ALL FLEXELEC PRODUCTS
84
Thermostat support
Thermostat bulb
Thermostat bulb

■ TRACING PIPING EQUIPMENT: ELBOWS, FLANGES, VALVES AND PIPING SUPPORTS
Notes: - Inverting the screw pitch either side of the equipment makes it easier to remove.- Ensure that the heating cable is properly in contact with the equipment.- Smooth over any sharp edges as necessary (with an aluminium tape, for example).
■ FITTING HEATING CABLES
(the term “cables” also refers to other flexible heating elements).The first rule is never to cross heating cables or lay one on top ofanother.
It is not essential to completely cover the heating element with aluminiumadhesive, but this is recommended for the following reasons:
• The heating cable will not be trapped in the thermal insulation.
• Thermal efficiency will be improved through better contact betweenthe heating cable and the piping.
• This eliminates the risk of hot spots on the heating cable.
• This type of fitting is strongly recommended on flanges, valves, taps,etc.
Metres of cable per metre of piping
Spiral tracing
Aluminium adhesive
1 metre maximum
Pitch
Straight tracing
1 heating cable 2 heating cables 3 heating cables
6 o’clock
Type Straight tracing Spiral tracing
Ap
pro
xim
ate
win
din
g p
itch
(cm
)
Ext
ern
al d
iam
eter
of
pip
ing
(m
m)
INSTRUCTIONS
Elbows
Flanges
Small diametervalves
Large diametervalves
Trace on the outsideof the elbow
Regular pitch,adjacent turns mustnot touch on theinside
85
Heating cable Aluminium adhesive
4 o’clock8 o’clock8 o’clock 4 o’clock6 o’clock

TECHHNICAL GUIDE
86
■ TRACING A BRANCH JOINT
Branch joints or nozzles are often of a smaller diameter than the main pipe. Return tracing must therefore be avoided on long nozzles as these wouldincrease the installed power to the point of multiplying it by two (straight tracing) and causing local overheating.
Short nozzles: 1.5 m maximum.
Long nozzles: greater than 1.5 m.
For long nozzles, break the circuit and fit a junction box to allow the heating circuit to branch off.
■ FITTING A HEATING CABLE TO PIPING WITH A STEAMTRACER
Check that the cable sheath will withstand the temperature of thesteam.
Never use spiral tracing, which would cause the cable to come intocontact with the steam tracer.
Use single or double straight tracing.
■ TRACING TWO PIPES SIDE BY SIDE
Never spiral the heating cable over the piping.
Use double straight tracing.
Straight tracing Spiral tracing
Heating cables
■ PIPING SUPPORTS
Screwed collars
Welded flat iron bars
Welded columns
Type Straight tracing Spiral tracing
Double tracing
Steam tracer
Heating cable
Straight tracing
GENERAL INSTALLATIONAND INSTRUCTIONS FOR USE OF ALL FLEXELEC PRODUCTS

■ MAINTENANCE
Visual inspection
Visually inspect the piping with tracers to check that neither theinsulation nor the cable have been damaged.
Tracer inspection
The following inspection procedures must be carried out at leastonce a year (before winter) for installations protecting against freezingor twice a year for production installations.
Thermal insulation
• The heating cables must always be protected by thermal insulation.
• During inspection operations, be very careful not to damage theheating cables.
• The thermal insulation must always have the same temperature limit asthe heating cables.
• The heating cables must never be trapped within the thermalinsulation.
• The thermal insulation must be appropriate for the environmentalconditions prevailing.
• Apply labels warning that electrical heat tracing is in use on theoutside of the thermal insulation at intervals which make it possiblefor them to be seen clearly, wherever the person working on thepiping may be. Do not forget to place them on both sides of thethermal insulation.
87
■ INSPECTION
Before fitting the thermal insulation, perform the following inspections:
• Throughout the cable installation process.
• As soon as possible once the installation is finished and before connecting up to the electric power supply.
The following inspections must be made:
• The heating cables and temperatureprobes (if any) are in close contact withthe piping; there is no air gap betweenthese devices and the piping.
• No cable loops are hanging in mid air.
• No heating cable is trapped under pipingsupports, thermostat supports or junctionboxes, etc.
• No heating cable is crossed over or laidon top of another, or twisted about itself.
• All the heating cables are fixed to thepiping with appropriate fixing materials.
• Self-regulating heating cables
Check the insulation resistance using a2500 V DC (500V DC min) megohmmeter.
Whatever the length of the cable, theminimum insulation resistance must be 10megohms.
Between conductors and piping if thecable is not braided.
Between conductors and braid if any.
For cables with braid and sheath,perform 2 tests:
• Test 1: between conductor and braid,
• Test 2: between braid and metalpiping
As before, record and store the testresults.
The following procedure is designed to checkthat the various heating cables are operatingproperly.
• Constant power cables
Check the resistance and continuity ofthe circuits using a multimeter.
Check the insulation resistancebetween the conductors and the earthusing a 2500 V DC (500V DC min)megohmmeter.
Whatever the length of the cable, theminimum insulation resistance must be10 megohms.
The results of the above tests must berecorded and stored.
Installation inspection Circuit continuity and insulation resistance inspection
Before any inspection work, switch off the electric power supply.
• Remove the lid from junction boxes and thermostats.
• Disconnect the heating cable from the electric power supply.
• Check, as described above, the insulation resistance rating and,for constant power cables, the resistance rating.Make a note of these figures and store them.
• Compare these figures with those from the previous inspection. If they are the same, reconnect the heating cable and replacethe junction box lids.
• With the thermostat still electrically insulated, carry out theinspection as above. Check that the power cables are properlyconnected to the right terminal block. Using a multimeter, checkthat the thermostat cuts off power to the heating cables bylowering and raising the temperature setpoint to minimum andthen to maximum.
• If the thermostat operates, do not forget to put the setpointback to the initial temperature.
• Replace the thermostat lid.
• Visually inspect the installation in order to detect any damageto piping or insulation.
• Connect the electric power supply back up.
INSTRUCTIONS
1
2
3
1
2
3
4