teamworks travel and expense tte receipt store handbook
TRANSCRIPT

TeamWorks Travel and Expense With Concur Technologies
TTE Receipt Store Handbook

Page 2 of 12 Revision Date: 05/15/13
Table of Contents Receipt Store Overview .................................................................................................................. 3 Section 1: Before You Begin: Verify Email Addresses ........................................................................ 4 Section 2: Email Receipts into Receipt Store .................................................................................... 6 Section 3: Upload Receipt Images into Receipt Store ........................................................................ 7 Section 4: Drag and Drop Receipts from Receipt Store to an Expense Report ................................... 10 Section 5: Delete a Receipt Image from Receipt Store .................................................................... 12

Page 3 of 12 Revision Date: 05/15/13
Receipt Store Overview
The Receipt Store feature allows you to store receipt images in a repository and then associate them with specific expense entries quickly and easily. It also allows managers and processors to easily reconcile the expense report receipts at the expense item level.
The ability to drag or upload receipt images in Receipt Store is turned on by default. However, you must verify your email address to activate the option to email receipt images to Concur.
Users can email their receipt image files to the Receipt Store image repository. The image is stored and is available only to the user, who can log in to Expense and use options to attach these images to their expense report line item expense entries (only).
Advantages of the Receipt Store feature include a new way to move images to the expense report and line item expense entry receipt matching. The design allows several image attachment opportunities in the user interface to support flexibility and ensure the user is reminded, even during Submit, that receipts are required for their entries. This reduces the number of submitted reports lacking required receipts and speeds approval where 1:1 receipt-to-entry is easily verified by the manager and processor
Once verified, the user can begin emailing their receipt images in JPEG, PNG, TIFF, HTML, and PDF (only) formats directly to Receipt Store. When doing this, note the following guidelines:
• Each email attachment is treated as a single image file - a single image file with two receipt images within it is still treated as a single receipt image. An image embedded in the body of the email is treated as a single image file The system does not support a combination of attached image files along with an image embedded in the body of the same email - in this scenario the embedded images are ignored
Images can then be retrieved within the Expense application by selecting Receipt Store and attaching them to line item expense entries when creating the expense report.

Page 4 of 12 Revision Date: 05/15/13
Section 1: Before You Begin: Verify Email Addresses How to… Additional Information
1. In the My Concur window click the Profile tab
2. Click Email Addresses on the left hand menu
The Profile window opens
The Email Addresses window opens
3. Click on the Verify link for the email address you
wish to use to send receipt images into TTE
A notice pops up instructing you to check the email address for an email with your verification code.
The TTE system can only verify an email address ONCE. Do not use an Expense Delegate’s email address or they will not be able to email into Receipt Store!
4. Check your email for the Concur Email
Verification from Concur

Page 5 of 12 Revision Date: 05/15/13
Section 1: Setup: Verify Email Addresses (continued)
How to… Additional Information
5. Copy the verification code shown in blue on the email into the box that now appears in the Email Address section of your TTE Profile.
6. Click OK
If you have not received the email, click Resend to generate another email with a new code. This will invalidate the previous code emailed to you.

Page 6 of 12 Revision Date: 05/15/13
Section 1: Setup: Verify Email Addresses (continued) How to… Additional Information
7. The email address will now show as verified.
8. If you set up Receipt Store prior to the recent
update, your email address may not show as in the profile. Simply add it
Section 2: Email Receipts into Receipt Store
With a verified email address, you can email receipt images into Receipt Store to make them available to attach to specific line item expenses.
How to… Additional Information
1. Send receipts from the verified email to [email protected] or to [email protected] .
The receipts will automatically appear in Receipt Store once the email is processed. Process times vary depending on the size of the receipt image.
You can attach images to emails or include them in the body of the email.
Receipts sent from non-verified email addresses will not appear in Receipt Store.

Page 7 of 12 Revision Date: 05/15/13
Section 3: Upload Receipt Images into Receipt Store You can upload receipt images from a local drive into Receipt Store
How to… Additional Information
1. Click on the Expense tab
2. Click on View Receipt Store
The Receipt Store opens
9. Click on Upload
10. Click on Browse
The Receipt Upload dialogue box opens

Page 8 of 12 Revision Date: 05/15/13
Section 3: Upload Receipt Images into Receipt Store (continued) How to… Additional Information
11. Locate and select the receipt image to be uploaded to Receipt Store
12. Click on Open
The Receipt Upload dialogue box opens again
12. Click on Upload The document uploads.

Page 9 of 12 Revision Date: 05/15/13
Section 3: Upload Receipt Images into Receipt Store (continued) How to… Additional Information
3. Click on Close The receipt will appear at the end of the Receipt
Store Images list.
The receipt image is ready to be attached to an expense item.
Page 10 of 12 Revision Date: 05/15/13
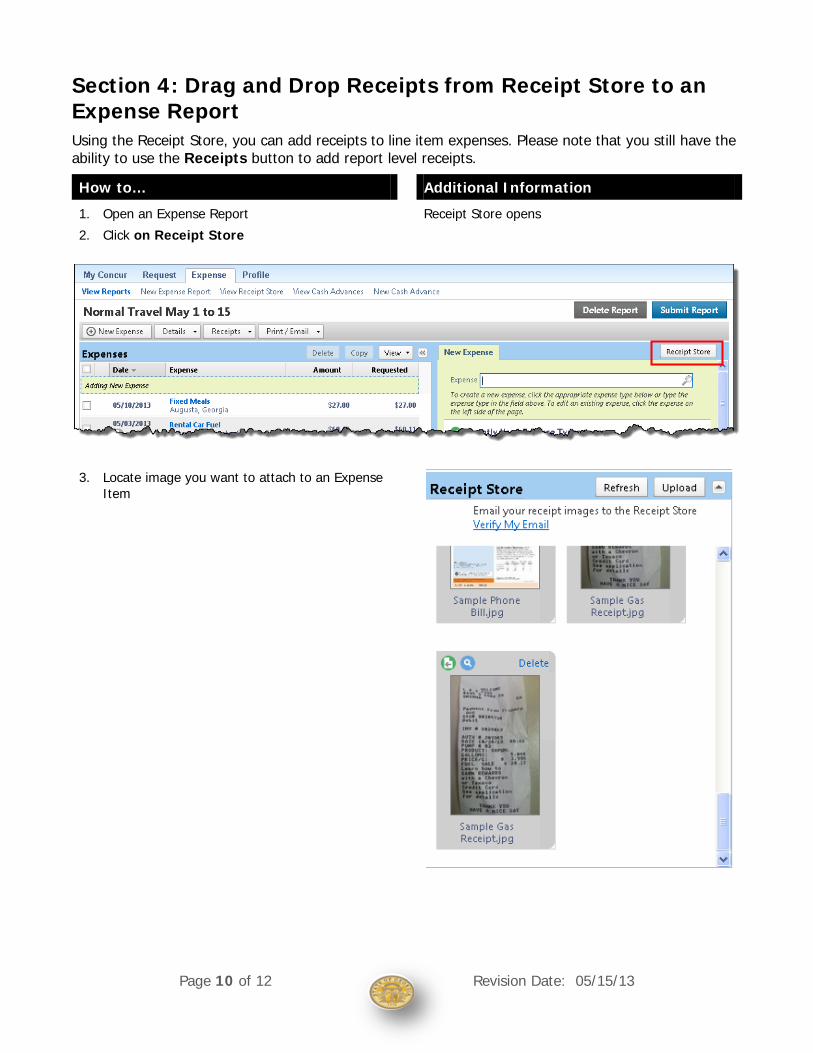
Section 4: Drag and Drop Receipts from Receipt Store to an Expense Report Using the Receipt Store, you can add receipts to line item expenses. Please note that you still have the ability to use the Receipts button to add report level receipts.
How to… Additional Information
1. Open an Expense Report
2. Click on Receipt Store
Receipt Store opens
3. Locate image you want to attach to an Expense
Item

Page 11 of 12 Revision Date: 05/15/13
Section 4: : Drag and Drop Receipts from Receipt Store to an Expense Report (continued) How to… Additional Information
4. Drag the receipt image to the expense item you
want to attach the receipt to.
5. The Receipt Attached icon appears and the
receipt is attached.
6. You may drag multiple receipt images to the
same expense item

Page 12 of 12 Revision Date: 05/15/13
Section 4: : Drag and Drop Receipts from Receipt Store to an Expense Report (continued) How to… Additional Information
7. Click Yes on the Please Confirm dialogue box to
append the image to the existing receipts for that expense item.
Section 5: Delete a Receipt Image from Receipt Store How to… Additional Information
1. Click on the Expense tab
2. Click on View Receipt Store
3. Click on Delete on the image you wish to remove from Receipt Store.
4. Click Yes in the Deletion Confirmation box that appears
The image will be removed from Receipt Store