teamcenter manager for solidworks user guide · 1 introduction when first installed, the...
TRANSCRIPT

Teamcenter Integration for SolidWorks®
Administration Guide
Version 9.2.0
TranscenData A Business of International TechneGroup Incorporated
DuPont Circle Milford OH, 45150
i
ITI PROVIDES THIS PROGRAM AS IS AND WITH ALL FAULTS. ITI SPECIFICALLY
DISCLAIMS ANY IMPLIED WARRANTY OF MERCHANTABILITY OR FITNESS FOR A
PARTICULAR USE. ITI DOES NOT WARRANT THAT THE OPERATION OF THE
PROGRAM WILL BE UNINTERRUPTED OR ERROR FREE.
i-Man® is a registered trademark of UGS Corp.
Siemens and the Siemens logo are registered trademarks of Siemens AG. UGS, Teamcenter and
UGS Teamcenter are trademarks or registered trademarks of UGS or its subsidiaries. This
software and related documentation are proprietary to UGS Corp. ©2012 UGS Corp. All rights
reserved.
SolidWorks® is a registered trademark of SolidWorks Corporation.
Copyright© 2013 International TechneGroup Incorporated, 5303 DuPont Circle, Milford, Ohio
45150, U.S.A. All Rights Reserved.
This program contains software licensed from UGS Corp. ©2012 UGS Corp. All Rights
Reserved

ii
Contents
Introduction ................................................................................................................................... 1
Technical Support ......................................................................................................................... 1
Configuration ................................................................................................................................ 1
Swim.properties .......................................................................................................................... 2 General preferences ................................................................................................................ 3 Open preferences .................................................................................................................... 3 Save preferences ..................................................................................................................... 5
Update preferences.................................................................................................................. 8 Create preferences ................................................................................................................... 8
swim.xml ..................................................................................................................................... 8
Attribute Mapping ................................................................................................................... 8 cad_name .......................................................................................................................... 10 pdm_name ......................................................................................................................... 10 default ............................................................................................................................... 12
missing_attribute_action ................................................................................................... 13 direction ............................................................................................................................ 13
constraint ........................................................................................................................... 13 truncate .............................................................................................................................. 14 Loading the Attribute Mappings into Teamcenter ............................................................ 15
User Defined Columns .......................................................................................................... 15 Column Map ..................................................................................................................... 15
column tag ..................................................................................................................... 16 display_name ................................................................................................................ 16
cad_name ...................................................................................................................... 16 pdm_name ..................................................................................................................... 16
BOM Map ............................................................................................................................. 16 BOM View Type............................................................................................................... 17 BOM Properties ................................................................................................................ 17
Auxiliary Files ...................................................................................................................... 19 General Auxiliary Files ..................................................................................................... 19
auxiliary_file ..................................................................................................... 20
cadtopdm_control ................................................................................................ 20
create_text_file ................................................................................................ 21
ets_request ............................................................................................................ 22
file_name ................................................................................................................. 23
os_command............................................................................................................... 24
preview_command................................................................................................... 25
generate_command ................................................................................................ 26
pdm_location .......................................................................................................... 26
Substitution Keywords .................................................................................................. 27 JT Files .......................................................................................................................... 28
Template Map ....................................................................................................................... 29 Using Templates from a Directory ................................................................................... 29
iii
Using Templates from Teamcenter ................................................................................... 30 Dataset Map .......................................................................................................................... 30
Allowed Item Types .......................................................................................................... 31 Submit to Workflow ......................................................................................................... 31
Example Map File ................................................................................................................. 32 swim.cfg .................................................................................................................................... 37 Teamcenter Preferences ............................................................................................................ 38
Utility Functions .......................................................................................................................... 39
Exporting SolidWorks Models from Teamcenter with swimexport ......................................... 39
Usage..................................................................................................................................... 39 Description ............................................................................................................................ 40 Configurations....................................................................................................................... 44
Toolbox Parts ........................................................................................................................ 44 Multiple Model Versions ...................................................................................................... 44 Instruction Files .................................................................................................................... 44
Examples ............................................................................................................................... 45 Importing SolidWorks Models into Teamcenter with swimimport .......................................... 46
Usage..................................................................................................................................... 46 Description ............................................................................................................................ 46 Item IDs, Names, Types, and Revisions ............................................................................... 48
Attributes............................................................................................................................... 48 BOMs .................................................................................................................................... 48
Configurations and Design Tables ........................................................................................ 49 Toolbox Parts ........................................................................................................................ 49
Auxiliary Files ...................................................................................................................... 49 Instruction Files .................................................................................................................... 50
Examples ............................................................................................................................... 52 Importing SolidWorks Models into Teamcenter with bulk import .......................................... 52
Usage..................................................................................................................................... 52
Configuration ........................................................................................................................ 53 Limitations ............................................................................................................................ 54
Renaming SolidWorks Models in Teamcenter with swimrename ........................................... 54 Usage..................................................................................................................................... 54
Description ............................................................................................................................ 55 Examples ............................................................................................................................... 57
Best Practice Recommendations ................................................................................................ 58
Properties display in Save Dialog and Teamcenter New Dialog .............................................. 58 Configurations........................................................................................................................... 59
Integration preferences related to configurations ................................................................. 59 SolidWorks External References .............................................................................................. 59
SolidWorks Toolbox ................................................................................................................. 60 SolidWorks SpeedPak ............................................................................................................... 60 SolidWorks Virtual Components .............................................................................................. 60 Multisite .................................................................................................................................... 61
Upgrading the Teamcenter database for multi-site ............................................................... 61
iv
Usage................................................................................................................................. 61 Description ........................................................................................................................ 61
Configuring Teamcenter Multi-Site to Export SolidWorks Models..................................... 62 Configuring Teamcenter Multi-Site for Transferring Ownership of SolidWorks Models ... 63
Configuring the Teamcenter Integration for SolidWorks for Performance .............................. 63 Restricted access to data ........................................................................................................... 64
Opening a model with access restrictions ............................................................................. 65 Saving a model with access restrictions................................................................................ 67
Troubleshooting .......................................................................................................................... 69
General guidelines .................................................................................................................... 69 Logging ................................................................................................................................. 69 Reporting problems ............................................................................................................... 69
Integration launch ..................................................................................................................... 69 Runtime problems ..................................................................................................................... 72
1
Introduction When first installed, the Teamcenter® Integration for SolidWorks® is configured to satisfy most
customers’ requirements. As users become more experienced with the product, the Teamcenter
Administrator may want to change certain settings to align with customer-specific requirements
and processes. The Configuration section of this document explains how to change the
configuration, and why you may want to do so.
The integration provides a set of utility programs to perform administrative-level functions on
SolidWorks data. Those functions, and their usage, are described in the Utility Functions section
of this document.
Finally, there is a small set of known issues that customers may encounter when working with
the product. These are covered in the Troubleshooting and Best Practices sections.
Technical Support
For technical support, please contact the Global Technical Access Center (GTAC). You can
reach GTAC via the World Wide Web at http://support.ugs.com/ or by telephone:
United States and Canada (800) 955-0000
In other countries please see http://support.ugs.com/html/by_phone/ for additional telephone
numbers, or call (714) 952-5444.
Configuration
The integration’s CAD data management behavior is controlled by settings in four different
locations:
swim.properties
o This properties file may be controlled at the site level, and also made available to
users or groups of users for overriding of selected preferences. It is a text file
containing a list of keywords and values. Each keyword is documented within the
file, and each has a default value. Together they form a set of preferences which are
read when SolidWorks is launched with the integration loaded. If the value for a
particular keyword is not modified, then the default value remains in effect. Some
preferences in the swim.properties file are best controlled at the site level, while
others may be user-specific. The Teamcenter Administrator at each site must decide
which settings users are allowed to override.
swim.xml
o A set of maps to control integration behavior at the site level. This file is not designed
for modification by anyone but the Teamcenter Administrator.
swim.cfg
o This file exists only on the integration client workstations. It is not designed for site-
level administration, although customers may choose to install the integration in a
network-accessible location, and allow users to launch using desktop shortcuts. In

2
that case, it may effectively become a site-level configuration file. It is a text file
with various settings to control the interaction between the integration client, the
operating system, and the SolidWorks session, as well as the configuration of certain
elements of the Graphical User Interface (GUI). Only a small subset of the included
properties is intended for modification by customers.
Teamcenter preferences
o There are several Teamcenter preferences that can have an effect on integration
behavior. These may be managed as user, group, role or site preferences, although by
default most are site preferences. The most commonly encountered scenarios are
explained in this guide, but the Teamcenter documentation provides the most
complete description of these preferences.
By default, all three of the above files are located in the integration’s client installation directory
(often called SWIM_DIR in various documentation). Both swim.properties and swim.xml may be
read from other locations as well. Swim.cfg is only read from the client’s installation directory.
Swim.properties
The swim.properties file, located in the installation directory, contains the preferences that can be
configured for a site or for an individual user. All of these preferences are optional.
Preference files may be named either swim.properties or .swimrc and may be placed in any of
these locations:
In the working directory where the Teamcenter Integration for SolidWorks is started.
In the user’s home directory.
In the Teamcenter Integration for SolidWorks installation directory.
When the Integration starts, it reads all swim.properties and .swimrc files in these locations. If
several files specify the same preference, the preferences from the working directory take
precedence over those from the user’s home directory, and preferences from the user’s home
directory take precedence over those from the installation directory. Preferences that are likely
to have the same definition for all users should be specified in the installation directory, while a
user’s personal customizations may be specified in the home directory or working directory
preferences file.
It is recommended that the Teamcenter administrator maintain the installed swim.properties file
as a read-only master copy, and make all changes in a separate file, which is included in
swim.properties using the preferences.file setting, as in this example:
preferences.file = .\\swim_site.properties
This technique allows you to override each preference’s default value, while preserving the
original unchanged value for documentation. It also helps to quickly identify those preferences
whose values have been changed by the site.
Special syntax is available for “locking” settings so that users cannot override them, and for
resolving values through environment variables (especially useful for settings that point to

3
directory or file locations). This syntax is explained at the top of the swim.properties file, and so
it is not repeated here.
Any of the published configuration settings may be overridden in the swim.properties file, but
some are more frequently changed than others. The following is a summary of the more
commonly modified settings.
General preferences
table.columns.std: With the default value, the integration displays the most
commonly needed attributes of the CAD models. It is
possible to display additional or alternative attributes, either
by selecting from a predefined set (documented in
swim.properties) or by configuring display of custom
columns. The attributes included in table.columns.std
apply to all integration dialogs, unless overridden by
similar dialog-specific preferences, such as
table.columns.checkin and table.columns.update.
log.file The integration automatically writes a log file to the
session’s startup directory, the location of which may be
influenced by several factors including the configuration of
desktop shortcuts. Assuming that all users have write
access to a consistent location on their client workstations,
it is recommended to set log.file to a consistent value for all
users, such as c:\\temp\\txdlog.txt.
log.suppress The default setting for this option is 3, which includes the
most important information needed for troubleshooting. In
rare cases it may be necessary to increase the level of
logging detail. This may be done by setting log.suppress
to any value greater than 10000.
summary.table.rows.std This preference controls the attributes which are displayed
in the Summary panel on the Open, Open
Dependencies, and Update dialogs. The swim.properties
file documents a predefined list of keywords that may be
used to add or change the set of displayed attributes. In
addition, any Teamcenter attribute (out of the box or
custom) may be added to the set by first configuring the
attribute as a mapped column (see the section on Column
Mapping, later in this document) and then adding the
column map’s display_name value to
summary.table.rows.std.
Open preferences
4
filters.checkout.choices Filters are check boxes that appear on the integration’s
Open Dependencies dialog. They give the SolidWorks
designer control over how much CAD data is downloaded
from Teamcenter to his client. A subset of the available
filters is displayed by default. Filter options can be added
or subtracted by modifying this preference.
filters.checkout.default Once the available filters are configured, it is advisable to
set them to the appropriate default true or false values, so
that the initial collection of models displayed in the Open
Dependencies dialog represents the most commonly
desired set of dependencies. Users can change and apply
filter options in the Open Dependencies dialog, but each
change requires the integration to recalculate the
dependency tree, and this can take significant time for very
large structures. Filter options that are included in the
filters.checkout.default preference are set to true by default;
filters not mentioned in this preference default to false.
checkout.exportdirectory If this preference is not set, then the initial value of Work
Folder in the Open Dependencies dialog is determined by
the SolidWorks session’s current working directory. If the
user changes his SolidWorks directory, the next export
from Teamcenter will be routed to a different location on
his client. The result is little or no consistency in the
location of managed Teamcenter files. For this reason, it is
recommended to set checkout.exportdirectory to a fixed
location. The syntax documented in the swim.properties
file may be used to read an environment variable as part of
the path, for example:
checkout.exportdirectory=${USERPROFILE}\\sw.
iman.bomrevisionruledefault When this preference remains unset, the default revision
rule that is applied to the operation is determined by the
user’s Default Revision Rule setting, in the Rich Client’s
Options | Product Structure dialog. Customers may
want to configure a different revision rule as the default for
SolidWorks users, and this can be done by setting
iman.bomrevisionruledefault to the name of any revision
rule defined in Teamcenter. It is important to configure a
default revision rule that is appropriate for most users, most
of the time, because this rule will always be used to
configure the selected top-level model during Open. The
user will have an opportunity to select a different rule after
the Open Dependencies dialog is displayed, but applying

5
the alternative rule requires additional processing on the
client and server, which takes additional time.
Save preferences
checkin.after This setting controls the default value of the Action on
Save control on the save dialog. Some customers may
wish to change this default so that users do not have to
remember to do it themselves, during each save operation.
checkin.owner.integration.ignore This preference controls whether models can be saved to
existing Teamcenter Item Revisions. Such item revisions
may be mastered by another integration. Ownership of an
Item Revision is determined by the presence of an
integration-specific dataset. For the SolidWorks
integration those datasets are SW* (SWAsm, SWPrt,
SWDrw …). The default setting of false prevents saving
models to existing Item Revisions that do not already
contain a SolidWorks integration dataset. A value of true
allows saving models to any Item Revision. It is
recommended to maintain the default setting of “false”,
unless there is a good reason to change it.
eai.jtenabled When the SolidWorks translator is installed, the integration
can call the translator to create JT files during save to
Teamcenter, and then automatically upload the resulting JT
files into the Teamcenter Bill of Materials. The translation
is controlled by a check box on the save dialog, labeled
Save JT Files. Because client-side JT translation can have
a significant impact on save performance, Administrators
may wish to disable this function by default, and this is
done by simply changing the preference value from true to
false.
iman.addonlynewtoselected By default, all new items are put into a Teamcenter folder.
If the user selects a folder in the save dialog, then the items
are put into that folder. If he does not explicitly select a
folder (this is done by selecting the top-level Teamcenter
folder in the folder selection dialog, as shown below)
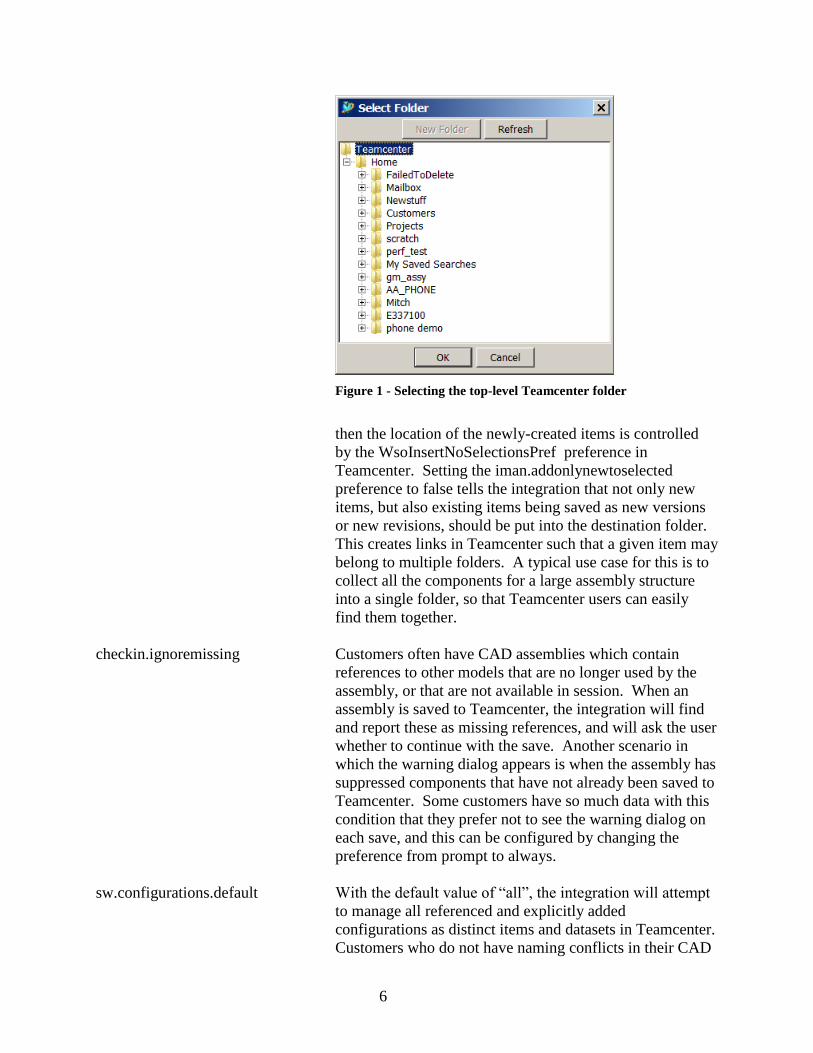
6
Figure 1 - Selecting the top-level Teamcenter folder
then the location of the newly-created items is controlled
by the WsoInsertNoSelectionsPref preference in
Teamcenter. Setting the iman.addonlynewtoselected
preference to false tells the integration that not only new
items, but also existing items being saved as new versions
or new revisions, should be put into the destination folder.
This creates links in Teamcenter such that a given item may
belong to multiple folders. A typical use case for this is to
collect all the components for a large assembly structure
into a single folder, so that Teamcenter users can easily
find them together.
checkin.ignoremissing Customers often have CAD assemblies which contain
references to other models that are no longer used by the
assembly, or that are not available in session. When an
assembly is saved to Teamcenter, the integration will find
and report these as missing references, and will ask the user
whether to continue with the save. Another scenario in
which the warning dialog appears is when the assembly has
suppressed components that have not already been saved to
Teamcenter. Some customers have so much data with this
condition that they prefer not to see the warning dialog on
each save, and this can be configured by changing the
preference from prompt to always.
sw.configurations.default With the default value of “all”, the integration will attempt
to manage all referenced and explicitly added
configurations as distinct items and datasets in Teamcenter.
Customers who do not have naming conflicts in their CAD
7
data can accept the default setting, but many customers
who are migrating SolidWorks from other PDM systems,
or from disk, where naming conflicts exist and are
tolerated, may wish to change this setting to “none”. When
set to “none”, the integration will ignore configurations
within documents, and will save only the documents to
item IDs and datasets in Teamcenter. Configurations are
still available within the SolidWorks session, because they
are embedded within the .sldasm and .sldprt CAD files
managed by Teamcenter. The most significant
consequence of choosing to hide configurations in this way
is that they are not visible within Teamcenter and therefore
cannot appear as assembly components within the
Teamcenter Bill of Materials.
sw.configurations.hide Similar to sw.configurations.default, this setting will
prevent Teamcenter from saving configurations as items.
However, it is not a global setting but instead is a list of
specific configuration names (wildcards may be used)
which should be hidden. Customers who use a consistent
naming convention for non-product or prototype
configurations should use this setting to hide those
configurations from Teamcenter.
sw.configurations.keep The opposite of sw.configurations.hide, this setting will
permit configurations to be saved only if their names match
a specified pattern (which may be a regular expression).
Those not matching the pattern will not be saved as items
in Teamcenter.
sw.configurations.masters SolidWorks itself creates a master configuration, named
“Default”, for each document, unless configured otherwise.
This setting should contain the names of all master
configurations used by the site. For example, a site running
in the French locale may have configured SolidWorks to
create master configurations as “Défaut”. Such a site
should set sw.configurations.masters = Défaut.
sw.configurations.master.document.same Instead of using a consistent name, or set of names,
for master configurations, some customers have named
their master configuration the same as the document which
contains it. In such cases, the default setting for this
preference should be retained. If configurations named the
same as the document are not intended to represent the
master configuration, then this setting should be changed to
“false”, and during save to Teamcenter the users will be
8
required to rename either the document or the same-named
configuration.
Update preferences
update.autoclose This preference applies only to the Update Directory
function. The RMB Update Model function dialog always
closes automatically after the operation is finished.
Update.autoclose is set to “true” by default, so that the
Update Directory dialog automatically closes after the
update completes. Some customers may want to change
this setting to “false”, so that the dialog remains open for
further use.
Create preferences
create.enable.manual.itemid This preference controls whether users are allowed to
assign item IDs of their own choosing while creating a new
Teamcenter item from within SolidWorks. Changing this
preference to “false” will force users to assign item IDs
from Teamcenter, typically to satisfy naming rule
requirements.
swim.xml
The swim.xml file, located in the installation directory, tells the Integration how to map
SolidWorks properties to Teamcenter attributes, which BOMs to create when a model is saved to
Teamcenter, whether auxiliary files should be saved with models, which user-defined columns
to display, and which Teamcenter dataset and named reference types to use for SolidWorks
models. It is an XML file whose format is defined by swim.dtd, also located in the installation
directory. You may choose to modify swim.xml, or you can create another map file as long as
the map file conforms to the swim.dtd definition. If you choose to create another map file, set
the map.file user preference, in swim.properties, to define the path to it, and place a copy of
swim.dtd in the same directory as the new map file. The swim.dtd file should not be modified.
Attribute Mapping
When a model is exported from Teamcenter and opened in SolidWorks, attributes assigned to the
item, item revision, dataset, or forms may be copied to parameters in the SolidWorks model.
When a model is saved from SolidWorks to Teamcenter, its parameter values may be copied
back to these objects. The attribute map specifies which attributes should be copied for a
particular type of SolidWorks model. Some attributes appear in the properties panel of the Save
dialog and can be modified. These attributes have create descriptors in Teamcenter. Additional
attributes can be added to the properties panel by setting their create descriptors. Learn more by
reviewing Properties display in Save Dialog and Teamcenter New Dialog, elsewhere in this
document.
9
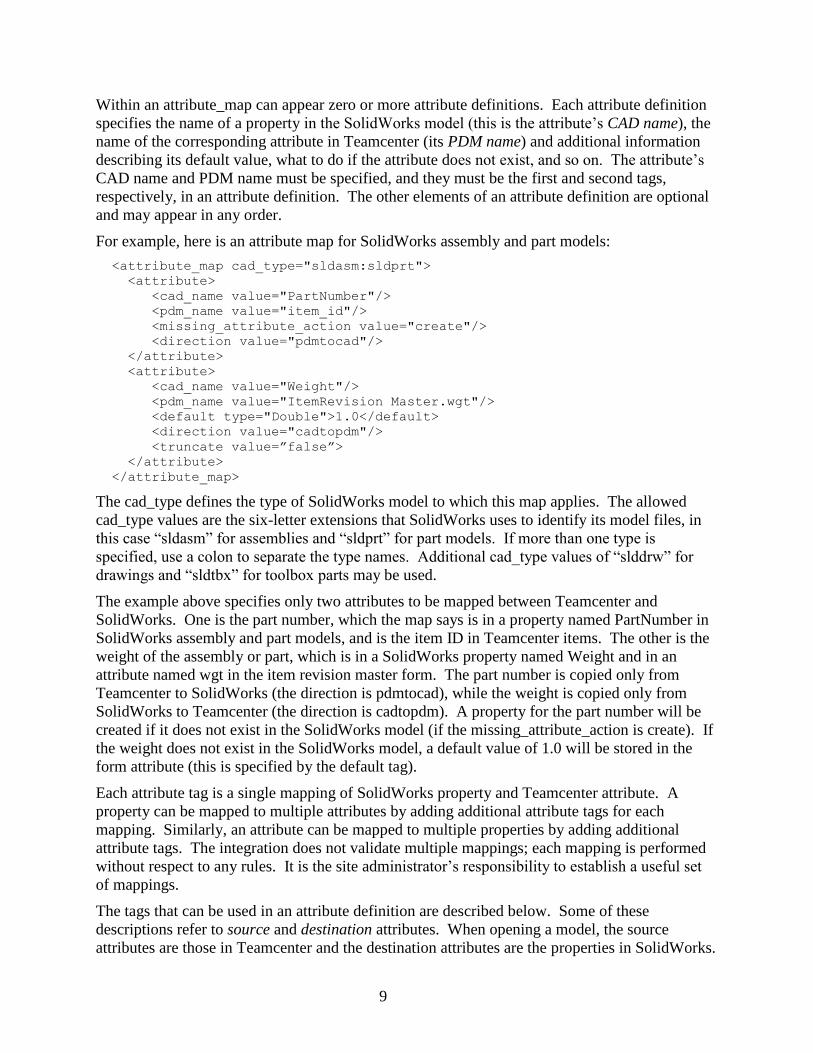
Within an attribute_map can appear zero or more attribute definitions. Each attribute definition
specifies the name of a property in the SolidWorks model (this is the attribute’s CAD name), the
name of the corresponding attribute in Teamcenter (its PDM name) and additional information
describing its default value, what to do if the attribute does not exist, and so on. The attribute’s
CAD name and PDM name must be specified, and they must be the first and second tags,
respectively, in an attribute definition. The other elements of an attribute definition are optional
and may appear in any order.
For example, here is an attribute map for SolidWorks assembly and part models:
<attribute_map cad_type="sldasm:sldprt">
<attribute>
<cad_name value="PartNumber"/>
<pdm_name value="item_id"/>
<missing_attribute_action value="create"/>
<direction value="pdmtocad"/>
</attribute>
<attribute>
<cad_name value="Weight"/>
<pdm_name value="ItemRevision Master.wgt"/>
<default type="Double">1.0</default>
<direction value="cadtopdm"/>
<truncate value=”false”>
</attribute>
</attribute_map>
The cad_type defines the type of SolidWorks model to which this map applies. The allowed
cad_type values are the six-letter extensions that SolidWorks uses to identify its model files, in
this case “sldasm” for assemblies and “sldprt” for part models. If more than one type is
specified, use a colon to separate the type names. Additional cad_type values of “slddrw” for
drawings and “sldtbx” for toolbox parts may be used.
The example above specifies only two attributes to be mapped between Teamcenter and
SolidWorks. One is the part number, which the map says is in a property named PartNumber in
SolidWorks assembly and part models, and is the item ID in Teamcenter items. The other is the
weight of the assembly or part, which is in a SolidWorks property named Weight and in an
attribute named wgt in the item revision master form. The part number is copied only from
Teamcenter to SolidWorks (the direction is pdmtocad), while the weight is copied only from
SolidWorks to Teamcenter (the direction is cadtopdm). A property for the part number will be
created if it does not exist in the SolidWorks model (if the missing_attribute_action is create). If
the weight does not exist in the SolidWorks model, a default value of 1.0 will be stored in the
form attribute (this is specified by the default tag).
Each attribute tag is a single mapping of SolidWorks property and Teamcenter attribute. A
property can be mapped to multiple attributes by adding additional attribute tags for each
mapping. Similarly, an attribute can be mapped to multiple properties by adding additional
attribute tags. The integration does not validate multiple mappings; each mapping is performed
without respect to any rules. It is the site administrator’s responsibility to establish a useful set
of mappings.
The tags that can be used in an attribute definition are described below. Some of these
descriptions refer to source and destination attributes. When opening a model, the source
attributes are those in Teamcenter and the destination attributes are the properties in SolidWorks.
10
When saving a model, the source attributes are the properties in SolidWorks and the destination
attributes are those in Teamcenter.
cad_name
<cad_name value="name"/>
The cad_name tag specifies the attribute’s name in the SolidWorks model, which should be the
name of a custom property in the SolidWorks document. The cad_name tag is required and it
must be the first tag in an attribute definition. It has no default.
The following attribute function may be used instead of a property name, but only when
direction is "cadtopdm".
is_configuration() The attribute value is true if the SolidWorks model is a
configuration. The value is false if the model is a document.
pdm_name
<pdm_name value="keyword"|"class[:type].name"/>
The pdm_name tag specifies the attribute’s name in Teamcenter. This name can be a keyword
for certain special attributes, or it can be a more general expression that gives the attribute’s
name and the class and type of object where the attribute can be found.
When only a single keyword is given for the value of the pdm_name, it may be one of the
following:
dataset_desc The attribute is the dataset description.
item_desc The attribute is the item description.
item_name The attribute is the item name.
item_id The attribute is the item ID.
item_revision_id The attribute is the item revision level.
item_revision_desc The attribute is the revision description.
item_type The attribute is the item type. Since an item’s type cannot change
after the item has been created, this is ignored when copying
attribute values to an existing item.
To specify attributes other than the special ones listed above, use the notation class.name for the
pdm_name value, where class indicates where the attribute will be found, such as on an item,
and name is the name of the attribute. The classes of Teamcenter objects currently supported
are:
Dataset The attribute is a dataset property.
Item The attribute is an item property.
Item Master The attribute is one of the form properties in the item master. Note
that there is a single space in this class name.
Item.Form The attribute is a property in a form attached to an item. The form
must be based on a POM class derived from the Form class. If
11
more than one form is attached to an item, the first one that matches
the class and type (see below) is used. Forms that are stored as files
are not supported.
ItemRevision The attribute is an item revision property.
ItemRevision Master The attribute is one of the form properties in the item revision
master. Note that there is a single space in this class name.
ItemRevision.Form The attribute is a property in a form attached to an item revision.
The form must be based on a POM class derived from the Form
class. If more than one form is attached to an item revision, the
first one that matches the class and type (see below) is used. Forms
that are stored as files are not supported.
For example, to specify the project_id attribute in the item revision master form, the name would
be
<pdm_name value="ItemRevision Master.project_id"/>
An optional type can be specified using the notation class:type.name. An attribute object_desc
that will be used only for items of type Part would be named
<pdm_name value="Item:Part.object_desc"/>
Types may also be included in the compound notation used to specify a general form attribute.
For example, suppose items of type Part can have a form of type PartData. An attribute data1 in
a PartData form would be named
<pdm_name value="Item:Part.Form:PartData.data1"/>
When using the class.name or class:type.name notation, name must be the attribute’s real
property name, not its display name. You can find the real name of an attribute with the
Teamcenter BMIDE application. Under POM_application_object, look for ItemMaster and
ItemVersionMaster to see the attributes of the Item Master and ItemRevision Master classes;
under POM_application_object | WorkspaceObject are the definitions of the Item, ItemRevision,
and Dataset classes.
When a keyword or class.name specification exists for the attribute
you want to map, and when the attribute mapping applies to all
Teamcenter Item types, then you may use the abbreviated syntax. If
you want the attribute mapping to apply to only one, or a subset, of
the available Teamcenter Item types, then you must use the fully
qualified compound notation.
The pdm_name tag is required and it must be the second tag in an attribute definition, following
the cad_name tag. It has no default.
The Teamcenter attributes must be present in the swim_policy.xml or custom_policy.xml. If not
present in either policy file, then the site administrator should add the attribute to the
custom_policy.xml (modification of the swim_policy.xml file is not supported). In the
custom_policy.xml, the attributes should be added under the proper object type as shown below
for an Item.

12
<ObjectType name="Item">
<Property name="object_desc"/>
<Property name="Property2"/>
:
:
<Property name="Propertyn"/>
</ObjectType>
Errors or performance degradation can occur if the attributes
referenced as pdm_name are not included in the policy file.
Specifically, “assertion” failures mayl appear in the txdlog file if
an attribute is missing from the policy file.
A Teamcenter attribute may be mapped to SolidWorks only if
SolidWorks supports an equivalent property type. The following
Teamcenter types should not be mapped to SolidWorks: Boolean
Array, Character Array, Integer Array, Double Array, and Date
Array. When saving SolidWorks data to Teamcenter, such
attributes may be populated in the save dialog, provided the
necessary create descriptors have been attached in the BMIDE.
default
<default type="Date"|"Double"|"Integer"|"String"|"Boolean">data</default>
The default tag specifies a default value to assign to the destination attribute when the source
property is missing. The value that is assigned to the destination attribute is data. Its type may
be "Date", "Double", "Integer", "String", or "Boolean" (note that double quotes are required
around the type as shown, but should not enclose data). Teamcenter types are defined in the
template, and so type can only specify the SolidWorks type in the cadtopdm direction. When the
type is "Date", the data must be in a valid date format. When the type is "Boolean", data must be
either true or false.
The default tag is optional. If the source property is missing and no default is defined, the
attribute mapping is skipped.
Teamcenter dates and SolidWorks dates are different. Teamcenter
dates include time of day. SolidWorks dates do not include time.
If the time is important, then the type for a date should be of type
“String” to ensure the date will include the time. If the time is not
important the default type should be “Date”. If the date is to be
modified within SolidWorks, it is best to use the “Date” type, as
the integration may not be able to convert the user value to a
Teamcenter date format.
When Date is the default type, it is acceptable if the value of the
date in the default tag is empty. Use an empty default to avoid
incorrect dates in Teamcenter.

13
missing_attribute_action <missing_attribute_action value="create"|"ignore"/>
The missing_attribute_action tag specifies what to do when the mapping direction is cadtopdm,
and the destination CAD property is missing. Its value may be one of the following strings
(these strings must be enclosed in double quotes as shown).
"create" The destination property is created if it does not exist. This is the
default.
"ignore" The attribute mapping is skipped if the destination property does
not exist.
The missing_attribute_action tag applies only to SolidWorks properties. It is ignored when the
destination is a Teamcenter attribute. Thus it is only meaningful when the direction value is
“pdmtocad” or “both”.
direction <direction value="both"|"cadtopdm"|"pdmtocad"/>
The direction tag indicates whether to copy the attribute only from Teamcenter to SolidWorks,
only from SolidWorks to Teamcenter, or in both directions. Its value may be one of the
following strings (these strings must be enclosed in double quotes as shown).
"both" The attribute is copied from Teamcenter to SolidWorks when the
model is opened, and it is copied from SolidWorks to Teamcenter
when the model is saved. This is the default. The integration does
not attempt to modify toolbox parts. If the sldtbx cad type is
included in a mapping definition where direction = “both”, the
attributes will not be mapped from Teamcenter into the toolbox
part.
"cadtopdm" The attribute is copied only from SolidWorks to Teamcenter when
the model is saved.
"pdmtocad" The attribute is copied only from Teamcenter to SolidWorks when
the model is opened. The integration does not attempt to modify
toolbox parts. If a sldtbx cad_type is included in a mapping
definition where direction = “pdmtocad”, the attributes will not be
mapped from Teamcenter into the toolbox part.
Note that two attribute definitions can be provided when different behavior is needed for each
direction in which the attribute is copied. One definition may specify the cadtopdm direction and
the other definition may specify the pdmtocad direction.
constraint <constraint value="any"|"master"|"non_master"| “use_default_cfg” |
"reserved"/>
The constraint tag restricts attribute copying to models with certain characteristics. Its value may
be one of the following strings (these strings must be enclosed in double quotes as shown).

14
"any" There is no restriction on copying the attribute. This is the default.
"master" The attribute should be copied only if the model “owns” its file,
which in the case of SolidWorks means the model is a document.
Use this constraint value to prevent the attribute from being copied
when the model is a SolidWorks configuration.
"non_master" The attribute should be copied only if the model does not “own” its
file. Use this constraint value to copy the attribute when the model
is a SolidWorks configuration, and to prevent the attribute from
being copied for SolidWorks documents. This constraint does not
apply to “default” configurations (where “default” is defined by
sw.configurations.masters preference)
"use_default_cfg" The attribute should always be copied to or from the configuration-
specific tab of the model’s properties. Use this constraint when you
want to ensure that all Teamcenter attributes are accessed from the
configuration-specific tab, whether the model is a document or a
configuration.
"reserved" The attribute should be copied only if the model is reserved by the
user. Use this constraint value to avoid modifying models that
cannot be checked in. This constraint applies only to the pdmtocad
direction. It is ignored when attributes are copied from SolidWorks
to Teamcenter.
The constraint tag may be used more than once. For example, to make sure an attribute is copied
only to models that are checked out for modification, and not copied to a SolidWorks
configuration, use two constraint tags:
<constraint value="reserved"/>
<constraint value="master"/>
truncate <truncate value="true"|"false"/>
The truncate tag specifies whether an attribute should be truncated when mapping from CAD to
PDM. Should a SolidWorks property be of greater length than the corresponding Teamcenter
attribute, the attribute can be truncated to the length of the Teamcenter attribute.
"true" Truncate the attribute prior to writing to Teamcenter.
"false" Default value. The attribute is not truncated before writing to
Teamcenter. If property is too long, an error will occur and the
save will be stopped.
If an error occurs, the user should correct the attribute length and
re-save all data again, not just the model that had the attribute
problem, as some of the data may not have been saved.
15
Loading the Attribute Mappings into Teamcenter
The attribute mappings defined by the attribute_map tag in the swim.xml must also be defined in
the Teamcenter database. Follow the procedure Loading the Attribute Mappings defined in
the Post-Installation Configuration section of the Installation Guide. When performing those
steps, use the swim.xml file that contains the attribute mappings.
User Defined Columns
User defined columns are used to display attributes in the Integration’s dialogs which are not
available as keyword column tags in the swim.properties file preferences. Such columns may be
associated to the Teamcenter Item, Item Revision, Dataset or Form classes, or to properties of the
SolidWorks models. They can be added to any table.columns.* preference in swim.properties.
For example, the following setting causes two user defined columns to be displayed for all
dialogs which are not overridden by a separate preference:
table.columns.std = itemid:itemtype:itemrev:itemname: UserDefinedCol1:UserDefinedCol1:datasettype:cadname
where UserDefinedCol1 and UserDefinedCol2 are defined in the Column Map.
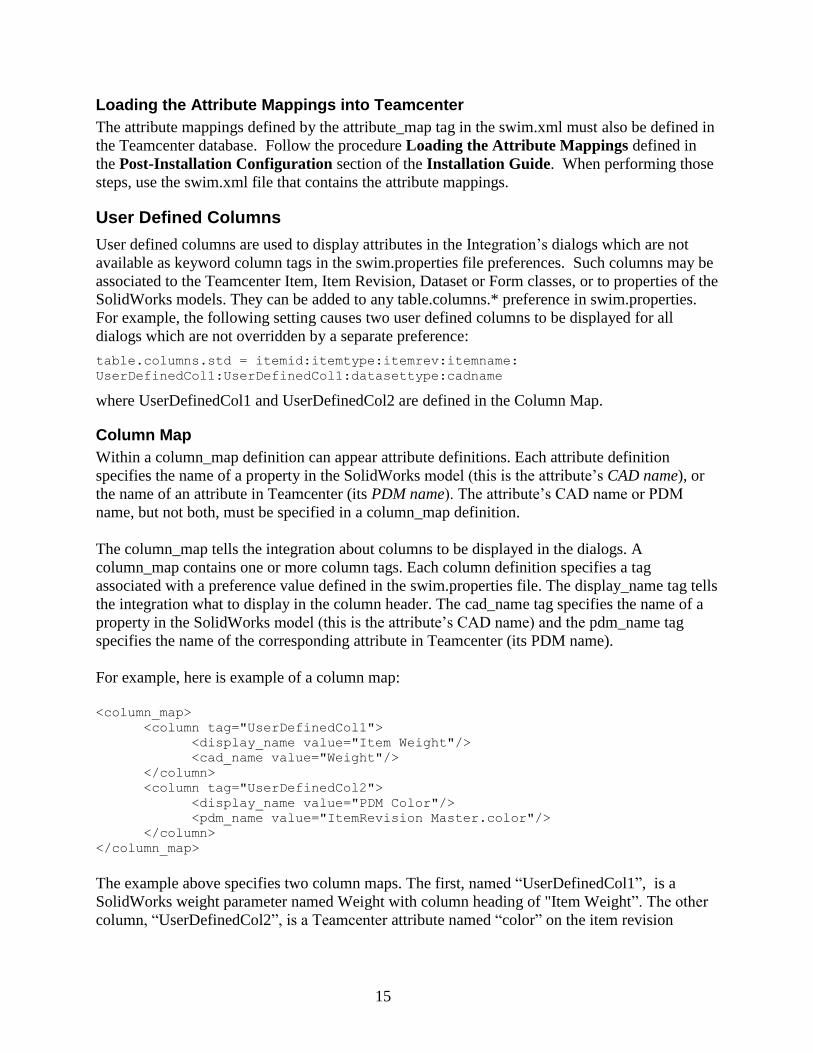
Column Map
Within a column_map definition can appear attribute definitions. Each attribute definition
specifies the name of a property in the SolidWorks model (this is the attribute’s CAD name), or
the name of an attribute in Teamcenter (its PDM name). The attribute’s CAD name or PDM
name, but not both, must be specified in a column_map definition.
The column_map tells the integration about columns to be displayed in the dialogs. A
column_map contains one or more column tags. Each column definition specifies a tag
associated with a preference value defined in the swim.properties file. The display_name tag tells
the integration what to display in the column header. The cad_name tag specifies the name of a
property in the SolidWorks model (this is the attribute’s CAD name) and the pdm_name tag
specifies the name of the corresponding attribute in Teamcenter (its PDM name).
For example, here is example of a column map:
<column_map>
<column tag="UserDefinedCol1">
<display_name value="Item Weight"/>
<cad_name value="Weight"/>
</column>
<column tag="UserDefinedCol2">
<display_name value="PDM Color"/>
<pdm_name value="ItemRevision Master.color"/>
</column>
</column_map>
The example above specifies two column maps. The first, named “UserDefinedCol1”, is a
SolidWorks weight parameter named Weight with column heading of "Item Weight”. The other
column, “UserDefinedCol2”, is a Teamcenter attribute named “color” on the item revision
16
master form with column heading of "PDM Color”. The tags that can be used in a column
definition are described below.
column tag <column tag="name">
The column tag specifies the name to be used in the preference value in the swim.properties file.
For example, if the name is “UserDefinedCol1” then the name in swim.properties must match
and must be unique for the column map. Below is an example:
table.columns.std = itemid:itemtype:itemrev:itemname:
UserDefinedCol1:datasettype:cadname
display_name <display_name value="Column Description"/>
The display_name tag specifies the column description.
cad_name <cad_name value="name"/>
The cad_name tag specifies the property’s name in the SolidWorks model, or it may be the name
of an attribute function. If the cad_name tag is defined then the pdm_name tag cannot also be
defined. If it is the name of a property, it must obey the usual rules for SolidWorks property
names.
pdm_name
<pdm_name value="keyword"|"class[:type].name"/>
The pdm_name tag specifies the attribute’s name in Teamcenter. If the pdm_name tag is defined
then the cad_name tag cannot also be defined. This name can be a keyword for certain special
attributes, or it can be a more general expression that gives the attribute’s name and the class and
type of object where the attribute can be found. Both the keyword and the general expression
syntax are the same as documented for the pdm_name tag in the attribute mapping section of this
document.
BOM Map
The bom_map tag defines the view type for the BOMs that the Integration must update each time
it saves a SolidWorks model in Teamcenter. It has the following format.
<bom_map>
<bom_line parent_type="parent" child_type="child" view_types="type"/> .
.
17
.
</bom_map>
BOM View Type
Each bom_line tag specifies the type of BOM view that must be created or updated whenever a
SolidWorks model is saved. Both parent and child must be SolidWorks model types defined by
entity tags in the type_map. The parent is the type of model for which the BOMs are being
created. The child is the type of model that will appear on the BOM line. The parent is a model
that depends on the child. The type is the type of BOM that should be given a BOM line for the
child when the parent model is saved to Teamcenter.
For example, the following bom_map defines three BOM lines, one for assembly-to-assembly
relationships, one for assembly-to-part relationships, and one for assembly-to-toolbox part
relationships. The first bom_line tag states that, when an assembly model (parent_type) depends
on another assembly model (child_type), the item revision containing the parent model should be
given a BOM of the view type. The second bom_line tag makes a similar statement about the
BOM to add to an assembly item revision that depends on a part model.
<bom_map>
<bom_line parent_type="sldasm" child_type="sldasm" view_types="view">
<bom_prop cadName="componentReference" pdmName="bl_sequence_no"
direction="pdmtocad"/>
</bom_line>
<bom_line parent_type="sldasm" child_type="sldprt" view_types="view">
<bom_prop cadName="componentReference" pdmName="bl_sequence_no"
direction="pdmtocad"/>
</bom_line>
<bom_line parent_type="sldasm" child_type="sldtbx" view_types="view">
<bom_prop cadName="componentReference" pdmName="bl_sequence_no"
direction="pdmtocad"/>
</bom_line>
</bom_map>
BOM Properties
A bom_line tag may optionally enclose several bom_prop tags, each of which specifies a
SolidWorks component property to be synchronized with an occurrence attribute on the BOM
line. The bom_prop tag contains a direction for the mapping. The component reference property
is the only supported SolidWorks property. This property can be shown in drawing annotations,
such as tables or balloon notes. Any Teamcenter BOM line property can be supported. The
bom_prop tag can be repeated to establish multiple mappings. One-to-many mapping can be
used in the cadtopdm direction, but not in the pdmtocad direction.
Every bom_prop tag has the following structure
<bom_prop cadName="ComponentReference" pdmName="bl_sequence_no"
direction="pdmtocad"/>
cadName The name of the SolidWorks property. “ComponentReference” is the only
supported value and it is only supported for SolidWorks 2010 and beyond.

18
pdmName The name (not display name) of the Teamcenter bomline attribute. For
example “bl_sequence_no” is the name of the attribute displayed as “Find
No.”. All bomline attributes are supported.
direction Allowed values are “both”, “pdmtocad”, and “cadtopdm”. If “both”, then
the property will be set in Teamcenter during save and in SolidWorks
during open. If “pdmtocad”, then the property will be set in SolidWorks
during open. If “cadtopdm”, then the property will be set in Teamcenter
during save.
When bom_prop tags are set in the swim.xml file, cadtopdm mappings occur on every save.
Pdmtocad mappings only occur when the assembly is opened from Teamcenter using the
Synchronize BOM Attributes checkbox on the Open dialog.
If using BOM packing in the Structure Editor, the packing will be
affected by pdmtocad mapping of bl_sequence_no. In some cases
portions of a bom could become packed or unpacked unexpectedly.
When mapping in the cadtopdm direction, the BOM attributes must
be writeable. If not writeable, the save operation will fail resulting
in corrupted data in Teamcenter. At a minimum, the BVR will be
missing. The integration assumes access to all attributes, as
verification of the attribute on every BVR would be a significant
performance impact.
String attributes being mapped in the cadtopdm direction will be
truncated if the value in cad is greater than the maximum length of
the attribute.
Drawing annotations which reference the component reference
property will not automatically update if Load referenced
documents is set to “None”. Load referenced documents is a
SolidWorks system option, which can be found on the Tools |
Options | System Options | External References dialog.
If any BOMLine properties are configured as source or destination in the bom_prop tag of
swim.xml, those properties should be present in the swim_policy.xml or custom_policy.xml. If
not present in either policy file, then the site administrator should add the property to the
custom_policy.xml (sites should not modify the swim_policy.xml). In the custom_policy.xml,
the properties should be added under ObjectType name=”BOMLine” as shown below.
<ObjectType name="BOMLine">
<Property name="Property1"/>
<Property name="Property2"/>
:
:
<Property name="Property"/>
</ObjectType>
19
Errors or performance degradation can occur if the BOMLine
properties referenced as pdmName are not included in the policy
file. Specifically, “assertion failure” errors may appear in the
txdlog file if an attribute is missing from the policy file
Auxiliary Files
When a model is saved to Teamcenter, additional local files may be saved with it. These files
may also be fetched from Teamcenter when the model is fetched. These additional files are
called auxiliary files. Examples of auxiliary files are JT files for the Teamcenter Rich Client
Viewer, GIF image files, and files of NC machining instructions. The auxiliary_file_map tag
tells the Integration about auxiliary files to save or fetch with SolidWorks models.
An auxiliary_file_map tag contains one or more auxiliary_file tags. It may also contain jt_file
tags, which are described in a later section on JT Files. The general purpose auxiliary_file tag
specifies a pattern for the name of a file, the dataset type and named reference type where the file
will be stored in Teamcenter, and optional commands for the operating system to execute. It
may also specify a checkbox to display in the Save dialog for users to choose whether auxiliary
files should be saved.
General Auxiliary Files
The auxiliary_file tag supports most kinds of auxiliary files. Each is associated with a particular
type of SolidWorks model. When a model of that type is saved to Teamcenter, the Integration
will also save any local files that match a specified file name pattern. When the model is fetched
from Teamcenter, these files can also be fetched.
For example, here is an auxiliary file map containing a single auxiliary_file tag for JT files.1 The
cad_type="sldprt" attribute means this auxiliary file definition is associated only with part
models:
<auxiliary_file_map>
<auxiliary_file cad_type="sldprt">
<pdm_location named_ref="JTPART" pdm_type="DirectModel"
relation_type="IMAN_Rendering"/>
<file_name pattern="{cad_name}.jt"/>
<os_command cmd="doit {cad_file}"/>
<cadtopdm_control label="Save JT Files"
user_preference_name="eai.jtenabled"
user_preference_default="true"/>
</auxiliary_file>
</auxiliary_file_map>
The pdm_location tag tells the Integration where to put the auxiliary file in Teamcenter. In the
example above, the file will be stored in a dataset of type "DirectModel" and the file’s named
reference will be "JTPART". The dataset is assumed to have the same name as the SolidWorks
model’s dataset. If the dataset does not exist, it will be created and attached to the model’s item
revision with an "IMAN_Rendering" relation.
1 The jt_file tag, described later, is an easier way to handle JT files.
20
The file_name tag tells the Integration how to find the auxiliary file in the local file system. In
the example above, the name of the auxiliary file is composed of the model’s lower-case name
with a .jt extension. It is not an error if an auxiliary file cannot be found.
An optional operating system command can be specified with the os_command tag. In the
example above, the Integration will tell the operating system to execute a command named doit,
which takes the path to the model’s file as its sole argument. Commands are executed after
SolidWorks writes models to the local file system, but before the models or auxiliary files are
saved to Teamcenter.
If an error occurs while attempting to execute the command, the
auxiliary file will not be checked-in to Teamcenter.
The cadtopdm_control tag defines an optional checkbox to display in the Save dialog’s
Auxiliary Files box. In this example, the checkbox label will be Save JT Files. This tag also
defines a user preference named eai.jtenabled that sets the default state of checkbox. In this case,
the checkbox is on by default.
The tags that can be used in a general auxiliary_file definition are described in more detail
below.
auxiliary_file
<auxiliary_file cad_type="type" [direction ="both"|"cadtopdm"|"pdmtocad"]>
optional elements </auxiliary_file>
The auxiliary_file tag is the general purpose definition of an auxiliary file. The cad_type defines
the type of SolidWorks model to which the auxiliary_file tag applies. The allowed values for
type are the six-letter extensions that SolidWorks uses to identify its model files. For example,
cad_type="sldprt" means the auxiliary file is associated only with part models.
More than one SolidWorks model type may be given for cad_type. Use a colon to separate each
six-letter value from the next. For example, to indicate that an auxiliary_file tag applies to parts,
assemblies, and drawings, the attribute should be cad_type="sldprt:sldasm:slddrw".
The direction attribute indicates whether to save the file to Teamcenter when the SolidWorks
model is saved, fetch it from Teamcenter when the model is fetched, or both. Its value may be
one of the following strings (these strings must be enclosed in double quotes as shown).
"both" The auxiliary file is saved to Teamcenter when the SolidWorks
model is saved, and it is fetched from Teamcenter when the model
is fetched.
"cadtopdm" The auxiliary file is saved to Teamcenter when the SolidWorks
model is saved, but is not fetched with the model. This is the
default.
"pdmtocad" The auxiliary file is fetched from Teamcenter with the SolidWorks
model, but it is not saved when the model is saved.
The optional elements that can be included in an auxiliary_file definition are described below.
cadtopdm_control

21
<cadtopdm_control label="label" [user_preference_name="name"] [user_preference_default="true"|"false"]/>
The cadtopdm_control tag creates a checkbox in the Save dialog that allows the user to choose
whether to save the auxiliary files specified by the auxiliary_file definition. The text labeling the
checkbox is label. If the same label is used for several auxiliary_file definitions, a single
checkbox can control all of them.
The user_preference_name attribute creates a user preference name that can be used in the
swim.properties file to set the initial state of the checkbox. When the user preference is not set,
the checkbox is initially checked or unchecked according to whether user_preference_default is
true or false.
If an auxiliary_file definition has no cadtopdm_control tag, the auxiliary files are always saved.
The direction attribute on the auxiliary_file definition must be
"cadtopdm" or "both" for the cadtopdm_control tag to have any
effect.
create_text_file
<create_text_file file_name="path" [separate_files="true"|"false"]
[header="path"] [body="path"] [footer="path"] [phase="in_cad"|"in_directory"|"in_pdm"]/>
The create_text_file tag specifies one or more text files to create. By default, the file(s) will be
created after SolidWorks has saved the models to the local file system, but before the models or
auxiliary files are checked-in to Teamcenter.
If an error occurs while attempting to write a text file, the file will
not be checked-in to Teamcenter.
The file to be created is specified by the file_name attribute, where path is the path to the file.
The path may include keywords described in the section on Substitution Keywords. If
separate_files is true, a separate text file will be created for each model saved to Teamcenter. If
separate_files is false, a single file will be created, which may contain information about all
models saved to Teamcenter.
Each text file is composed from three templates: the header, the body, and the footer. The
header and footer appear once in the output file, at its beginning and end, respectively. The body
appears between these two sections. If a single file is being created for all models, the body is
repeated for each model being saved to Teamcenter. The body appears only once in the output
file if a separate output file is created for each model.
Each template is optional, although at least one must be specified. The header attribute specifies
the path to a text file that will be used as the header template, the body attribute specifies the path
to a text file that will be used as the body template, and the footer attribute specifies the path to a
text file that will be used as the footer template. The paths to these files may include keywords
from the Substitution Keywords section, and the text within these files may also use these
keywords. If separate_files is true, keywords that imply a particular model, such as {cad_name}
and {cad_type}, can be used in any template and in any file path. If separate_files is false,
keywords that imply a particular model can be used only in the body template and in the path to

22
the body template file. The header and footer, and the file_name path, can use only keywords
that do not refer to a specific model when separate_files is false.
The use of these keywords in the paths to the template files makes it possible to use separate
body templates for parts, assemblies, and drawings, or to use separate templates for SolidWorks
configurations and documents. For example, suppose the C:\text_templates directory contains a
header template file named header.txt with the following contents:
“These models are being checked-in to Teamcenter…”
and two body template files named sldprt.txt and sldasm.txt, in which sldprt.txt contains:
“A part named {cad_name} is being checked-in to Teamcenter.”
and sldasm.txt contains:
“An assembly named {cad_name} is being checked-in to Teamcenter.”
A create_text_file tag that uses these templates to create a single text file summarizing the parts
and assemblies selected for check-in to Teamcenter might look like this:
<create_text_file file_name="summary.txt"
header="C:\text_templates\header.txt"
body="C:\text_templates\{cad_type}.txt"/>
When an assembly named Coupling and two parts, Pin and Shaft, are saved to Teamcenter, the
contents of summary.txt would be:
These models are being checked-in to Teamcenter…
A part named Pin is being checked-in to Teamcenter.
A part named Shaft is being checked-in to Teamcenter.
An assembly named Coupling is being checked-in to Teamcenter.
The {cad_type} pattern in the path to the body template would have been replaced with sldprt or
sldasm, depending on the model type, and the {cad_name} pattern in the body templates would
have been replaced by the model name.
You can also specify a phase in which the text file(s) will be created. Refer to the os_command
tag for more information concerning the phase attribute. By default, text files are created during
the in_directory phase.
ets_request
<ets_request translator="service" [provider="name"] [priority="0"|"1"|"2"|"3"]
[request_per_model="true"|"false"]>
<translator_option name="translator_option">value</translator_option>
</ets_request>
The ets_request tag submits translation requests to Teamcenter’s Dispatcher after all models
have been checked in to Teamcenter. The name of the translator that will handle the request,
also known as the service, is given by the required translator attribute. The default provider is
"SIEMENS", but other providers can be specified with the optional provider attribute. The
translation request can be given a priority of 1, 2 or 3, corresponding to high, medium or low
priority, using the priority attribute. If the priority is set to 0, no translation request is submitted.
23
By default, the ets_request tag submits a separate translation request for each SolidWorks model
of the specified type that is saved to Teamcenter. However, if the translator can handle more
than one model at a time, you can set the request_per_model attribute to "false", which will
cause one translation request to be submitted containing all models that have been saved to
Teamcenter. For example, if four parts are saved to Teamcenter and an auxiliary_file definition
with a cad_type of "sldprt" specifies an ets_request, four separate translation requests will be
submitted by default or if request_per_model is explicitly "true". If request_per_model is
"false", a single translation request will be submitted containing all four parts2.
If an auxiliary file definition uses ets_request, the Dispatcher will create the auxiliary file and
import it into Teamcenter, so there is no need to specify a file or a PDM location for it. For
example, an auxiliary file definition that submits a request for translating drawings to DXF files
might look like this:
<auxiliary_file cad_type="slddrw">
<cadtopdm_control label="Save DXF Files (ETS)"/>
<ets_request translator="swtodxf"/>
</auxiliary_file>
In this example, the cadtopdm_control tag adds a checkbox to the Save dialog, giving the user
control over whether the DXF file will be created.
If the translator accepts additional options, these can be specified with one or more
translator_option sub-tags. Refer to the documentation for your translator to determine whether
additional translator options are supported, and to find out the names and allowed values of these
options. The name attribute specifies the name of a translator option, and the string to be
assigned to that option is given by value. When request_per_model is "true", value may include
any of the keywords that are described later in the Substitution Keywords section. When
request_per_model is "false", only substitution keywords that do not refer to a specific model
should be used. Substitution keywords in value are replaced when the request is submitted to the
Dispatcher, not when the translation occurs.
The ets_request tag always submits Dispatcher requests during the in_pdm phase. An
auxiliary_file tag should not have more than one action per phase, so do not use other in_pdm
actions within the same auxiliary_file tag as your ets_request tag. See the section on the
os_command tag for more information on phases.
file_name
<file_name pattern="pattern" [version="all"|"latest"]/>
The file_name tag identifies the auxiliary file by defining a pattern that matches the file’s name.
The pattern may give an absolute path to the file, or the path may be relative to the directory
where the SolidWorks model file is saved. The * wildcard character is allowed in the simple file
name part of the pattern, but wildcards are not allowed in directory names. For example,
"myfile.*" and "images/*.gif" are acceptable patterns, but "image*/myfile.*" is not allowed
because a wildcard is used in a directory name.
2 The OOTB translators SWToJT and SWToDXF do not accept more than a single model per translation request;
therefore the request_per_model attribute only applies to alternative or custom translators.
24
The pattern may also include certain keywords that the Integration will replace with data from
the model. Keywords can be used anywhere in a pattern, both in the file name part and the
directory parts of a path. The recognized keywords are described later in the section on
Substitution Keywords.
The optional version attribute indicates whether all auxiliary files matching the pattern should be
saved to Teamcenter, or only the file with the latest modification time. The default is "all",
which saves all auxiliary files that match the pattern.
The file_name tag is optional. If it is not included in an auxiliary_file tag, the Integration will
not attempt to find and save an auxiliary file when it saves the corresponding SolidWorks model,
nor will it attempt to execute any operating system commands specified by the os_command tag.
os_command
<os_command [cmd="command"] [pre_cmd="command"] [post_cmd="command"] [phase="in_cad"|"in_directory"|"in_pdm"]
[ignore_status="true"|"false"]/>
The os_command tag specifies one, two, or three optional commands for the operating system to
execute. By default, these commands are executed after SolidWorks has saved the models to the
local file system, but before the models or auxiliary files are checked-in to Teamcenter.
If an error occurs while attempting to execute one of these
commands, the auxiliary files affected by that particular
auxiliary_file tag will not be checked-in to Teamcenter.
The string in cmd="command" is an operating system command that is executed for each
SolidWorks model saved to Teamcenter. The command string may include the same keywords
allowed in the file_name pattern, which are listed in the section on Substitution Keywords.
The strings in pre_cmd="command" and post_cmd="command" are also operating system
commands. The pre_cmd string is executed once, before any cmd strings from any auxiliary_file
tag are executed (“once” means just once during a Save, Save As, Save All Checkouts, or Save
All command, regardless of the number of models being saved). The post_cmd string is also
executed only once, after all cmd strings from all auxiliary_file tags have been executed. The
pre_cmd and post_cmd strings may also include some of the keywords described in the
Substitution Keywords section, but not every keyword is meaningful in these command strings.
Since pre_cmd and post_cmd are not associated with one specific model, keywords that refer to a
model’s name, directory, item ID, or other model-specific data, are not applicable in these
strings.
If you provide a pre_cmd, cmd, or post_cmd, the Integration requires the command to execute
successfully before it saves the auxiliary file to Teamcenter. If pre_cmd, cmd, or post_cmd fails,
the auxiliary file matched by the file_name pattern will not be saved. Also, if pre_cmd fails,
neither cmd nor post_cmd will be executed.
If an operating system command exits with a non-zero status, the Integration usually assumes the
command has failed. However, if ignore_status="true" is specified, the Integration ignores exit
status and assumes commands always succeed when executed.

25
You can also specify the phase in which these commands will execute. When the Integration
saves models from SolidWorks to Teamcenter, the models pass through three phases
corresponding to the values that can be assigned to the phase attribute:
in_cad The models are in the SolidWorks session and have not yet been
saved to the local file system.
in_directory The models have been saved from SolidWorks to the local file
system, but neither the models nor any auxiliary files have been
checked in to Teamcenter.
in_pdm All models and auxiliary files have been checked in to Teamcenter.
By default, the commands specified by an os_command tag are executed during the in_directory
phase, which is usually the phase in which you would want to run any translators that read a
SolidWorks file to create an auxiliary file. If you have any batch processes that must run after
models have been checked in to Teamcenter, you might want to use an os_command tag to
launch them during the in_pdm phase. As a point of interest, the ets_request tag submits
translation requests during the in_pdm phase.
You can think of the os_command, create_text_file, and ets_request tags as actions within an
auxiliary_file definition. Each auxiliary_file definition may have one such action per phase,
which means that as many as three os_command tags can appear in an auxiliary_file definition if
each one specifies a different phase. Alternatively, an auxiliary_file definition could have one
create_text_file tag for the in_directory phase, an os_command tag for the in_pdm phase, and so
on.
Every attribute in an os_command tag is optional.
preview_command
<preview_command [cmd="command"] [pre_cmd="command"] [post_cmd="command"] [phase="in_cad"|"in_directory"|"in_pdm"]
[ignore_status="true"|"false"]/>
The preview_command tag specifies one, two, or three optional commands for SolidWorks to
execute. By default, these commands are executed after SolidWorks has saved the models to the
local file system, but before the models or auxiliary files are checked into Teamcenter. The
preview_command tag is similar to the os_command tag except the keyword “built-in
file_name_tag” is added to invoke added functionality by the Integration. You may notice that by
default, the swim.xml file already has these tags:
<auxiliary_file_map>
<auxiliary_file cad_type="sldprt" direction="cadtopdm">
<!-- Uncomment the below if you want to give the user choice of
saving the preview files -->
<!-- cadtopdm_control label="Save PNG Files"/-->
<pdm_location named_ref="PNG" pdm_type="SWPrt"/>
<file_name pattern="{temp_dir}\{cad_name}p.PNG"/>
<preview_command cmd="built_in {temp_dir}\{cad_name}p.PNG"
ignore_status="true" phase="in_directory"/>
</auxiliary_file>
<auxiliary_file cad_type="sldasm" direction="cadtopdm">
<pdm_location named_ref="PNG" pdm_type="SWAsm"/>
<file_name pattern="{temp_dir}\{cad_name}a.PNG"/>

26
<preview_command cmd="built_in {temp_dir}\{cad_name}a.PNG"
ignore_status="true" phase="in_directory"/>
</auxiliary_file>
<auxiliary_file cad_type="slddrw" direction="cadtopdm">
<pdm_location named_ref="PNG" pdm_type="SWDrw"/>
<file_name pattern="{temp_dir}\{cad_name}d.PNG"/>
<preview_command cmd="built_in {temp_dir}\{cad_name}d.PNG"
ignore_status="true" phase="in_directory"/>
</auxiliary_file>
</auxiliary_file_map>
generate_command
<generate_command [cmd="command"] [pre_cmd="command"] [post_cmd="command"] [phase="in_cad"|"in_directory"|"in_pdm"]
cad_type=”SolidWorks Save as type”
[ignore_status="true"|"false"]/>
The generate_command tag specifies one, two, or three optional commands for SolidWorks to
execute. By default, these commands are executed after SolidWorks has saved the models to the
local file system, but before the models or auxiliary files are checked into to Teamcenter. The
generate_command tag is similar to the os_command tag except for the keyword “built_in
file_name_tag”, which is added to the cmd tag to invoke added functionality by the Integration,
and “cad_type”. Below is an example of using these tags to generate PDF files drawings:
<auxiliary_file_map>
<auxiliary_file cad_type="slddrw" direction="cadtopdm">
<pdm_location named_ref="PDF_Reference"
relation_type="IMAN_rendering" pdm_type="PDF"/>
<file_name pattern="{temp_dir}\{cad_name}d.PDF"/>
<generate_command cmd="built_in {temp_dir}\{cad_name}d.PDF"
cad_type="PDF" ignore_status="true" phase="in_directory"/>
</auxiliary_file>
</auxiliary_file_map>
PDF files cannot be generated for individual part or assembly
configurations. The PDF is generated for the active configuration.
PDF generation is intended for drawings.
The generate_command tag may be applied to any file type which can be exported from a
SolidWorks session, and which also has a defined named reference type in Teamcenter. To
determine the list of eligible file types for a given CAD type, review the list of file extensions
displayed by the File | Save As function in SolidWorks.
pdm_location
<pdm_location named_ref="ref" [pdm_type="dataset"] [relation_type="relation"]/>
The pdm_location tag specifies where an auxiliary file should be saved in Teamcenter.
Auxiliary files associated with a particular model are always saved in the same item revision as
the model, but they can be stored in the model’s dataset or in a dataset of their own.
27
The named_ref attribute must always be specified, where ref is the type of named reference to be
used for the auxiliary file. The pdm_type attribute is the type of dataset in which to store the
auxiliary file. The dataset is assumed to have the same name as the dataset holding the
SolidWorks model. If the pdm_type is not specified, the auxiliary file is stored in the model’s
dataset.
If a dataset must be created for the auxiliary file, it will be attached to the item revision using the
type of relation specified by relation_type. If not specified, the default relation type is
"IMAN_Rendering".
The named_ref attribute is required in a pdm_location definition. The pdm_type and
relation_type attributes are optional.
Substitution Keywords
Patterns of the form {keyword} can be used in the file_name pattern, and in the os_command and
create_text_file tags. The Integration replaces these patterns with appropriate values. For
example, if a model is named widget, the pattern "{cad_name}.gif" will become "widget.gif"
when widget is saved to Teamcenter.
The modifier upper or lower may be appended to any keyword. Use a comma to separate the
modifier from the keyword, without spaces. The {keyword,upper} pattern will be replaced with
a result that is all upper case. The {keyword,lower} pattern converts the result to lower case.
For example, the pattern "{cad_name,upper}.gif" would produce "WIDGET.gif" when the
model’s name is widget.
The escape modifier can also be appended to any keyword. This modifier causes every
backslash in the result to be replaced with two backslashes. For example, if the {cad_directory}
pattern produces the result "C:\work\latest", the pattern {cad_directory,escape} will produce
"C:\\work\\latest".
The recognized keywords are:
{cad_dataset_uid} The UID for the model’s Teamcenter dataset, or an empty string if
the dataset does not exist at the time this pattern is replaced. When
this pattern is used in an os_command string, for example, the
dataset might not exist during the in_cad and in_directory phases.
{cad_directory} The absolute path to the directory containing the model file3.
{cad_file} The absolute path to the model file.
{cad_name} The model’s name.
{cad_type} The SolidWorks six-letter model type, such as sldasm or sldprt.
{document_cad_name} The name of the model’s SolidWorks document. If the model is a
document, this is the same as {cad_name}.
{group} The user’s current Teamcenter group.
3 This keyword can be used only where a single model is implied, such as in the file_name pattern or in the
os_command cmd string. It is not recognized in the os_command pre_cmd or post_cmd strings because these
commands are not executed for each model.
28
{item_id} The Teamcenter item ID for the model.
{item_name} The Teamcenter item name for the model.
{item_revision_id} The Teamcenter item revision ID for the model.
{item_revision_uid} The UID for the model’s Teamcenter item revision, or an empty
string if the item revision does not exist at the time this pattern is
replaced. When this pattern is used in an os_command string, for
example, the item revision might not exist during the in_cad and
in_directory phases.
{item_uid} The UID for the model’s Teamcenter item, or an empty string if the
item does not exist at the time this pattern is replaced. When this
pattern is used in an os_command string, for example, the item
might not exist during the in_cad and in_directory phases.
{named_ref} The named reference for the auxiliary file.
{pdm_type} The Teamcenter dataset type for the auxiliary file. For example, if
the auxiliary file is saved in the same dataset as a SolidWorks
assembly model, the dataset type is SWAsm. For JT files, the
dataset type is DirectModel.
{swim_dir} The absolute path to the directory where the Teamcenter Integration
for SolidWorks is installed.
{user_id} The user’s Teamcenter user ID.
JT Files
The jt_file tag is simpler than the auxiliary_file tag for configuring the Integration to save JT
files.4 The jt_file element shown below in the auxiliary_file_map makes this happen:
<auxiliary_file_map>
<jt_file action="translate" cad_type="sldprt:sldtbx"
eai_dir="D:\apps\translators\swjt"/>
</auxiliary_file_map>
This tells the Integration to save a JT file with each SolidWorks part or Toolbox model saved to
Teamcenter (cad_type="sldprt:sldtbx"). For non-Toolbox parts, the JT file must have the same
name as the part and must be in the same directory as the model’s file. To apply this to both parts
and assemblies, use "sldprt:sldasm" for the cad_type value.
The file_name tag, described previously for general auxiliary files, may also be used within a
jt_file element if the JT file’s name will not have the same name as the part or will be located in
a different directory.
The presence of a jt_file tag in the auxiliary_file_map makes the
Save JT Files checkbox visible in the Save dialog. When this
checkbox is on, the jt_file tag is enabled and the Integration saves
JT files as directed by the action type. When this checkbox is off,
the jt_file tag is disabled as if action is "none" and save is "false".
4 Siemens’s SolidWorksToJT translator must be installed and licensed in order to generate JT files.

29
The default state of this checkbox can be set with the eai.jtenabled
user preference. This option and others are described in detail in
the swim.properties file, found in the directory where the
Teamcenter Integration for SolidWorks is installed.
Template Map
The template_map tag specifies template models, also known as seed models or start models,
that can be copied when a new model must be created. A template will usually be needed when
the Open command attempts to fetch a model from Teamcenter and the model’s dataset is empty.
When that happens, a template model of the required type will be copied and placed in the
destination directory, and the copy is given the name that the missing model should have had.
The template_map is only used when opening seed parts from
Teamcenter. It is not used by the SolidWorks File | New
command, or by the Teamcenter | Teamcenter New command.
A template_map contains zero or more template tags:
<template_map>
<template cad_type="type" location/> .
.
.
</template_map>
Each template tag specifies a location where a template can be found, either on the local file
system or in Teamcenter. Each template tag also has a cad_type attribute that specifies the type
of SolidWorks model to be created from the template. The allowed values for type are "sldasm",
"slddrw", and "sldprt".
If the template tag specifies a location in Teamcenter, more than one SolidWorks model type
may be given for cad_type. Use a colon to separate each three-letter value from the next. For
example, to indicate that an item in Teamcenter contains templates for parts, assemblies, and
drawings, the attribute should be cad_type="sldprt:sldasm:slddrw".
The cad_type attribute should specify only one type when the location is on the local file system.
The models used as templates should not depend on other models. When a model specified in
the template_map is copied to create a new model, that model alone is copied. No other models
are copied with it.
Note that, when a SolidWorks document is copied to create a new model, the document is copied
in its entirety. The resulting new document will have the same configurations, with the same
names, as in the original.
A SolidWorks configuration cannot be used as a template.
Using Templates from a Directory
A template model that is located in a directory is specified by the path to its file:
<template cad_type="type" path="path"/>
30
The file must exist, and path cannot contain any wildcards, but path may include keywords
described in the Substitution Keywords section for general auxiliary files, if the keywords do
not imply a specific model. For example, a SolidWorks part model could be included in the
template_map as follows.
<template cad_type="sldprt" path="C:\SW\data\templates\Part.sldprt"/>
Using Templates from Teamcenter
A template model located in Teamcenter is specified by its item ID, revision ID and model
name:
<template cad_type="type"
item_id="item" [item_revision_id="revision"] [model_name="name"]/>
The revision and model name are optional, and if not specified, all revisions and datasets in the
item are searched for templates of the appropriate type. Wildcards may also be used in item,
revision and name, as if conducting a simple search in the Open dialog. If more than one
revision of a model is found for a given type, the latest one is used. If several models with
different names are found for a given type, one is arbitrarily selected. For example, suppose an
item Seeds is created in Teamcenter to hold the templates for parts and assemblies. This item
can be referenced using a single template tag:
<template cad_type="sldprt:sldasm" item_id="Seeds"/>
If Seeds has a part named mm_part and an assembly named mm_asm, the document for mm_part
will be used to create parts and the document for mm_asm will be used to create assemblies. If
Seeds has two revisions, the documents from the later revision will be used. However, if Seeds
also has a part model named in_part, either mm_part or in_part will be arbitrarily selected as the
template to use when creating a new part. In a situation such as this, it may be helpful to also
specify the model_name attribute so only one of these models will be selected:
<template cad_type="sldprt:sldasm" item_id="Seeds" model_name="mm_*"/>
Dataset Map
Each type of SolidWorks CAD model maps to a unique dataset type and named reference in
Teamcenter. The type_map and dataset_map tag define these one-to-one mappings. The
type_map is not intended for customer modification and so it is not covered in this document.
A typical dataset map is shown below. None of these mappings are optional.
<dataset_map>
<dataset allowed_item_types="Item:Part:Document" allowed_workflows="Quick
Release:Design Review" named_ref="AsmFile" pdm_type="SWAsm"/>
<dataset allowed_item_types="Part:Item:Document" allowed_workflows="Quick
Release:Design Review" named_ref="PrtFile" pdm_type="SWPrt"/>
<dataset allowed_item_types="Item:Part:Document" allowed_workflows="Quick
Release:Design Review" named_ref="DrwFile" pdm_type="SWDrw"/>
<dataset allowed_item_types="Item:Part:Document" allowed_workflows="Quick
Release:Design Review" named_ref="TbxFile" pdm_type="SW2Tbx"/>
</dataset_map>
For each mapping between a SolidWorks CAD type and a Teamcenter dataset type, the
allowable named reference, item types, and workflows are defined by an entity tag. The
31
pdm_type identifies the dataset type, and named_ref identifies the named reference for the
SolidWorks model. These tags should not be changed by customers.
Allowed Item Types
The mandatory allowed_item_types attribute is a colon separated list that defines the list of item
types to appear in the drop-down list on the Save dialog. The first item type in the list is the
default item type for the specified CAD type5.
Customers must configure each dataset type’s
“allowed_item_types” to include the same item type for CAD types
which may be saved together to the same item ID, such as a
drawing and its 3D model. This allows a dataset such as a
SWDrw to be saved under the 3D model revision. Otherwise an
error will occur.
Assigning a singular and different value to the
“allowed_item_type” preference for each dataset type will prevent
more than one dataset type from being saved under the same item
revision.
Submit to Workflow
The integration can be configured to submit Item Revisions to a workflow process by adding
“workflow” to the table.columns.checkin preference in swim.properties.
The optional allowed_workflows tag is a colon separated list that defines the list of Teamcenter
workflows to appear in the workflow column drop-down list on the Save dialog. The first
workflow in the list is the default for the specified CAD type.
Customers must configure the same default workflow for CAD
types which can be saved together to the same item ID, such as a
drawing and its 3D model. Assigning different default workflows
to such CAD types can result in the same item revision being
submitted to multiple workflows simultaneously, which is not the
desired result.
The integration determines if an object is checked in, checked out, or released by evaluating the
status of the dataset. Workflows that apply status to the objects should set the status on the Item
Revision and the SolidWorks dataset. Failure to set the status on the dataset will enable the user
to continue to work on the object. Teamcenter does not provide a workflow that will
simultaneously release both the Item Revision and the Dataset. See the Teamcenter
documentation for more information on how to create and configure workflows.
5 Note that the ordering of the allowed_item_types list in the dataset map replaces the single iman.itemtypedefault
swim.properties preference that was used in earlier releases, providing more configuration flexibility.
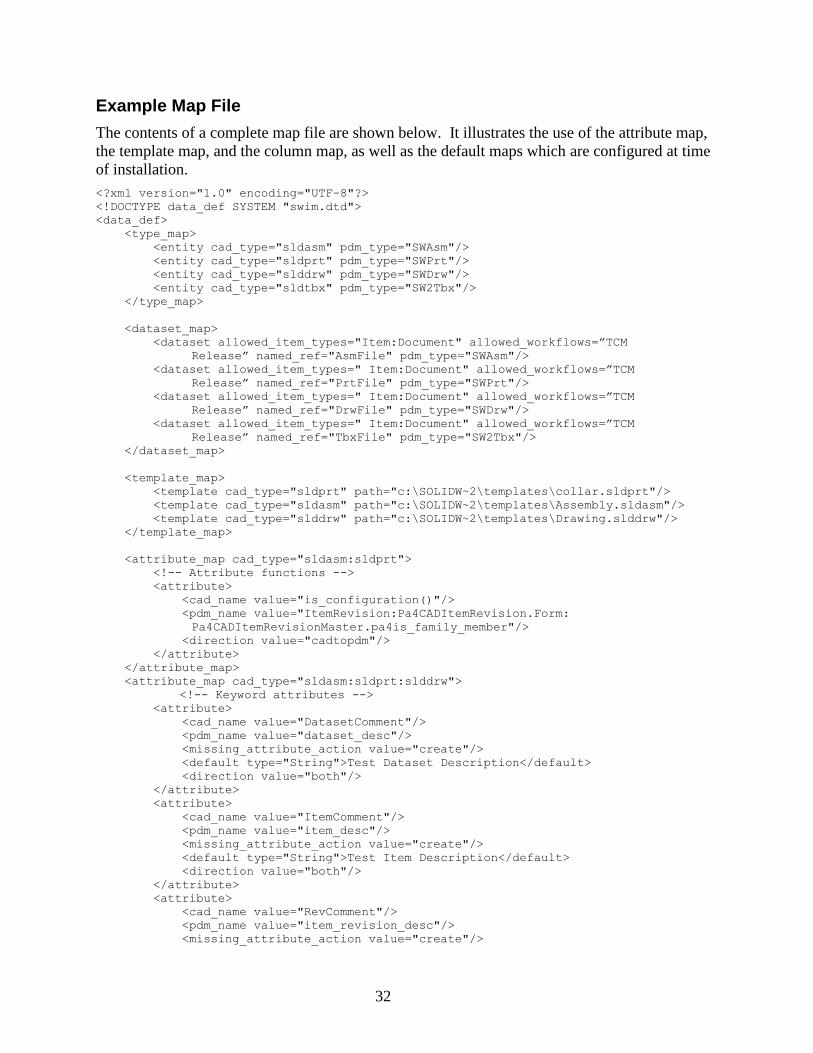
32
Example Map File
The contents of a complete map file are shown below. It illustrates the use of the attribute map,
the template map, and the column map, as well as the default maps which are configured at time
of installation.
<?xml version="1.0" encoding="UTF-8"?>
<!DOCTYPE data_def SYSTEM "swim.dtd">
<data_def>
<type_map>
<entity cad_type="sldasm" pdm_type="SWAsm"/>
<entity cad_type="sldprt" pdm_type="SWPrt"/>
<entity cad_type="slddrw" pdm_type="SWDrw"/>
<entity cad_type="sldtbx" pdm_type="SW2Tbx"/>
</type_map>
<dataset_map>
<dataset allowed_item_types="Item:Document" allowed_workflows=”TCM
Release” named_ref="AsmFile" pdm_type="SWAsm"/>
<dataset allowed_item_types=" Item:Document" allowed_workflows=”TCM
Release” named_ref="PrtFile" pdm_type="SWPrt"/>
<dataset allowed_item_types=" Item:Document" allowed_workflows=”TCM
Release” named_ref="DrwFile" pdm_type="SWDrw"/>
<dataset allowed_item_types=" Item:Document" allowed_workflows=”TCM
Release” named_ref="TbxFile" pdm_type="SW2Tbx"/>
</dataset_map>
<template_map>
<template cad_type="sldprt" path="c:\SOLIDW~2\templates\collar.sldprt"/>
<template cad_type="sldasm" path="c:\SOLIDW~2\templates\Assembly.sldasm"/>
<template cad_type="slddrw" path="c:\SOLIDW~2\templates\Drawing.slddrw"/>
</template_map>
<attribute_map cad_type="sldasm:sldprt">
<!-- Attribute functions -->
<attribute>
<cad_name value="is_configuration()"/>
<pdm_name value="ItemRevision:Pa4CADItemRevision.Form:
Pa4CADItemRevisionMaster.pa4is_family_member"/>
<direction value="cadtopdm"/>
</attribute>
</attribute_map>
<attribute_map cad_type="sldasm:sldprt:slddrw">
<!-- Keyword attributes -->
<attribute>
<cad_name value="DatasetComment"/>
<pdm_name value="dataset_desc"/>
<missing_attribute_action value="create"/>
<default type="String">Test Dataset Description</default>
<direction value="both"/>
</attribute>
<attribute>
<cad_name value="ItemComment"/>
<pdm_name value="item_desc"/>
<missing_attribute_action value="create"/>
<default type="String">Test Item Description</default>
<direction value="both"/>
</attribute>
<attribute>
<cad_name value="RevComment"/>
<pdm_name value="item_revision_desc"/>
<missing_attribute_action value="create"/>
33
<default type="String">Test Revision comment</default>
<direction value="both"/>
</attribute>
<attribute>
<cad_name value="Description"/>
<pdm_name value="item_name"/>
<direction value="cadtopdm"/>
<constraint value="use_default_cfg"/>
</attribute>
<attribute>
<cad_name value="Description"/>
<pdm_name value="ItemRevision.object_name"/>
<direction value="both"/>
</attribute>
<attribute>
<cad_name value="PartNumber"/>
<pdm_name value="item_id"/>
<missing_attribute_action value="create"/>
<direction value="pdmtocad"/>
<constraint value="use_default_cfg"/>
</attribute>
<attribute>
<cad_name value="Revision"/>
<pdm_name value="item_revision_id"/>
<missing_attribute_action value="create"/>
<direction value="pdmtocad"/>
<constraint value="use_default_cfg"/>
</attribute>
<attribute>
<cad_name value="ItemType"/>
<pdm_name value="item_type"/>
<missing_attribute_action value="create"/>
<direction value="pdmtocad"/>
<constraint value="use_default_cfg"/>
</attribute>
<!-- Attributes for miscellaneous Teamcenter classes -->
<attribute>
<cad_name value="UnitOfMeasure"/>
<pdm_name value="Item.uom_tag"/>
<missing_attribute_action value="create"/>
<direction value="pdmtocad"/>
</attribute>
<attribute>
<cad_name value="Status"/>
<pdm_name value="ItemRevision.release_status_list"/>
<missing_attribute_action value="create"/>
<direction value="pdmtocad"/>
</attribute>
<!-- Attributes for custom form -->
<attribute>
<cad_name value="Size"/>
<pdm_name value="ItemRevision:Pa4CADItemRevision.Form:
Pa4CustomForm.pa4S"/>
<prompt value="none"/>
<default type="String">Test size</default>
<missing_attribute_action value="create"/>
<direction value="both"/>
</attribute>
<attribute>
<cad_name value="DIAMETER"/>
<pdm_name value="ItemRevision:Pa4CADItemRevision.Form:
Pa4CustomForm.pa4D"/>
<prompt value="none"/>
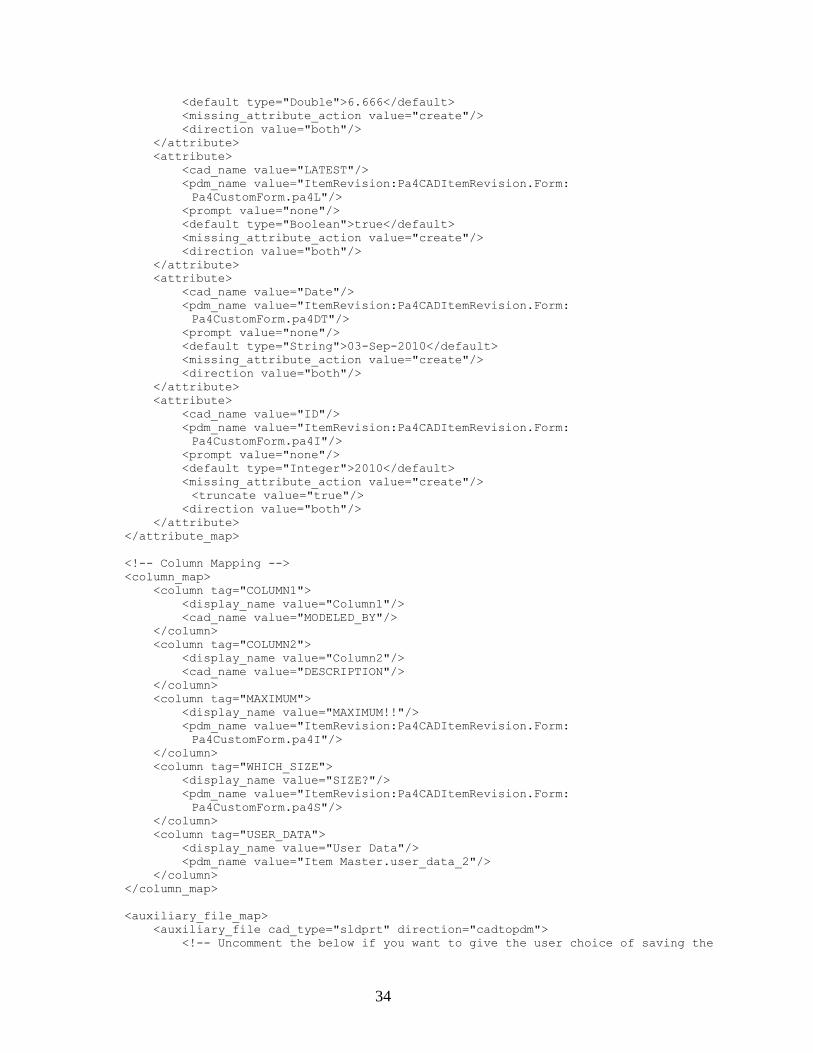
34
<default type="Double">6.666</default>
<missing_attribute_action value="create"/>
<direction value="both"/>
</attribute>
<attribute>
<cad_name value="LATEST"/>
<pdm_name value="ItemRevision:Pa4CADItemRevision.Form:
Pa4CustomForm.pa4L"/>
<prompt value="none"/>
<default type="Boolean">true</default>
<missing_attribute_action value="create"/>
<direction value="both"/>
</attribute>
<attribute>
<cad_name value="Date"/>
<pdm_name value="ItemRevision:Pa4CADItemRevision.Form:
Pa4CustomForm.pa4DT"/>
<prompt value="none"/>
<default type="String">03-Sep-2010</default>
<missing_attribute_action value="create"/>
<direction value="both"/>
</attribute>
<attribute>
<cad_name value="ID"/>
<pdm_name value="ItemRevision:Pa4CADItemRevision.Form:
Pa4CustomForm.pa4I"/>
<prompt value="none"/>
<default type="Integer">2010</default>
<missing_attribute_action value="create"/>
<truncate value="true"/>
<direction value="both"/>
</attribute>
</attribute_map>
<!-- Column Mapping -->
<column_map>
<column tag="COLUMN1">
<display_name value="Column1"/>
<cad_name value="MODELED_BY"/>
</column>
<column tag="COLUMN2">
<display_name value="Column2"/>
<cad_name value="DESCRIPTION"/>
</column>
<column tag="MAXIMUM">
<display_name value="MAXIMUM!!"/>
<pdm_name value="ItemRevision:Pa4CADItemRevision.Form:
Pa4CustomForm.pa4I"/>
</column>
<column tag="WHICH_SIZE">
<display_name value="SIZE?"/>
<pdm_name value="ItemRevision:Pa4CADItemRevision.Form:
Pa4CustomForm.pa4S"/>
</column>
<column tag="USER_DATA">
<display_name value="User Data"/>
<pdm_name value="Item Master.user_data_2"/>
</column>
</column_map>
<auxiliary_file_map>
<auxiliary_file cad_type="sldprt" direction="cadtopdm">
<!-- Uncomment the below if you want to give the user choice of saving the

35
preview files -->
<!-- cadtopdm_control label="Save Preview Files"/ -->
<pdm_location named_ref="PNG" pdm_type="SWPrt"/>
<file_name pattern="{temp_dir}\{cad_name}p.PNG"/>
<preview_command cmd="built_in {temp_dir}\{cad_name}p.PNG"
ignore_status="true" phase="in_directory"/>
</auxiliary_file>
<auxiliary_file cad_type="sldtbx" direction="cadtopdm">
<pdm_location named_ref="PNG" pdm_type="SW2Tbx"/>
<file_name pattern="{temp_dir}\{cad_name}t.PNG"/>
<preview_command cmd="built_in {temp_dir}\{cad_name}t.PNG"
ignore_status="true" phase="in_directory"/>
</auxiliary_file>
<auxiliary_file cad_type="sldasm" direction="cadtopdm">
<pdm_location named_ref="PNG" pdm_type="SWAsm"/>
<file_name pattern="{temp_dir}\{cad_name}a.PNG"/>
<preview_command cmd="built_in {temp_dir}\{cad_name}a.PNG"
ignore_status="true" phase="in_directory"/>
</auxiliary_file>
<auxiliary_file cad_type="slddrw" direction="cadtopdm">
<pdm_location named_ref="PNG" pdm_type="SWDrw"/>
<file_name pattern="{temp_dir}\{cad_name}d.PNG"/>
<preview_command cmd="built_in {temp_dir}\{cad_name}d.PNG"
ignore_status="true" phase="in_directory"/>
</auxiliary_file>
<jt_file action="translate" cad_type="sldprt:sldtbx"
eai_dir="D:\apps\translators\swjt"/>
<auxiliary_file cad_type="slddrw" direction="cadtopdm">
<cadtopdm_control label="Save PDF Files"/>
<pdm_location named_ref="PDF_Reference"
relation_type="IMAN_specification"
pdm_type="PDF"/>
<file_name pattern="{temp_dir}\{cad_name}d.PDF"/>
<generate_command cmd="built_in {temp_dir}\{cad_name}d.PDF"
cad_type="PDF"
ignore_status="true" phase="in_directory"/>
</auxiliary_file>
</auxiliary_file_map>
<bom_map>
<bom_line child_type="sldasm" parent_type="sldasm" view_types="view">
<!-- Uncomment the line below to set the componentReference -->
<bom_prop cadName="componentReference" pdmName="bl_sequence_no"
direction="pdmtocad"/>
</bom_line>
<bom_line child_type="sldprt" parent_type="sldasm" view_types="view">
<!-- Uncomment the line below to set the componentReference -->
<bom_prop cadName="componentReference" pdmName="bl_sequence_no"
direction="pdmtocad"/>
</bom_line>
<bom_line child_type="sldtbx" parent_type="sldasm" view_types="view">
<!-- Uncomment the line below to set the componentReference -->
<bom_prop cadName="componentReference" pdmName="bl_sequence_no"
direction="pdmtocad"/>
</bom_line>
</bom_map>
<transfer_ownership>
<set_preference session_name="PORTAL_SESSION_IMAN_ownership_export">TRUE
</set_preference>
<set_preference name="IMAN_run_ie_in_background"
session_name="PORTAL_SESSION_IMAN_run_ie_in_background">FALSE
</set_preference>
<set_preference name="IMAN_include_folder_contents"
36
session_name="PORTAL_SESSION_IMAN_include_folder_contents">FALSE
</set_preference>
<set_preference name="IMAN_item_latest_rev_export"
session_name="PORTAL_SESSION_IMAN_item_latest_rev_export">FALSE
</set_preference>
<set_preference name="IMAN_item_latest_working_rev_export"
session_name="PORTAL_SESSION_IMAN_item_latest_working_rev_export">
FALSE</set_preference>
<set_preference name="IMAN_item_latest_working_or_any_rs_export"
session_name="PORTAL_SESSION_IMAN_item_latest_working_or_any_rs_export">
FALSE</set_preference>
<set_preference name="IMAN_item_latest_released_rev_export"
session_name="PORTAL_SESSION_IMAN_item_latest_released_rev_export">
FALSE</set_preference>
<set_preference name="IMAN_item_selected_revs_export"
session_name="PORTAL_SESSION_IMAN_item_selected_revs_export">FALSE
</set_preference>
<set_preference name="IMAN_modified_only_export"
session_name="PORTAL_SESSION_IMAN_modified_only_export">FALSE
</set_preference>
<set_preference name="IMAN_protected_object_export"
session_name="PORTAL_SESSION_IMAN_protected_object_export">FALSE
</set_preference>
<set_preference name="IMAN_bom_level_export"
session_name="PORTAL_SESSION_IMAN_bom_level_export">0
</set_preference>
<set_preference name="IMAN_assy_xfer_top_only"
session_name="PORTAL_SESSION_IMAN_assy_xfer_top_only">FALSE
</set_preference>
<set_preference name="IMAN_assy_no_xfer_comp"
session_name="PORTAL_SESSION_IMAN_assy_no_xfer_comp">FALSE
</set_preference>
<set_preference name="IMAN_assy_no_export_comp"
session_name="PORTAL_SESSION_IMAN_assy_no_export_comp">FALSE
</set_preference>
<set_preference name="IMAN_assy_retrieve_distrib_comp"
session_name="PORTAL_SESSION_IMAN_assy_retrieve_distrib_comp">
FALSE</set_preference>
<set_preference name="IMAN_item_specific_status_export"
session_name="PORTAL_SESSION_IMAN_item_specific_status_export">
FALSE</set_preference>
<set_preference name="IMAN_ie_continue_on_error"
session_name="PORTAL_SESSION_IMAN_ie_continue_on_error">FALSE
</set_preference>
<set_preference name="IMAN_sync_auto_synchronize"
session_name="PORTAL_SESSION_IMAN_sync_auto_synchronize">FALSE
</set_preference>
<set_preference name="IMAN_sync_batch_synchronize"
session_name="PORTAL_SESSION_IMAN_sync_batch_synchronize">FALSE
</set_preference>
<set_preference name="IMAN_sync_notify"
session_name="PORTAL_SESSION_IMAN_sync_notify">FALSE</set_preference>
<set_preference name="IMAN_bomchange_export"
session_name="PORTAL_SESSION_IMAN_bomchange_export">FALSE
</set_preference>
<set_preference name="IMAN_supercedure_export"
session_name="PORTAL_SESSION_IMAN_supercedure_export">FALSE
</set_preference>
<set_preference name="IMAN_item_revs_export"
session_name="PORTAL_SESSION_IMAN_item_revs_export">TRUE
</set_preference>
<set_preference name="IMAN_dataset_vers_export"
session_name="PORTAL_SESSION_IMAN_dataset_vers_export">TRUE
37
</set_preference>
<set_preference name="IMAN_dataset_refs_export"
session_name="PORTAL_SESSION_IMAN_dataset_refs_export">TRUE
</set_preference>
<add_preference_list name="IMAN_relation_export"
session_name="PORTAL_SESSION_IMAN_relation_export">
<preference_list_value>IMAN_master_form</preference_list_value>
<preference_list_value>IMAN_Rendering</preference_list_value>
<preference_list_value>IMAN_requirement</preference_list_value>
<preference_list_value>IMAN_specification</preference_list_value>
<preference_list_value>IMAN_RES_audit</preference_list_value>
<preference_list_value>TXD_long_name_relation</preference_list_value>
</add_preference_list>
<remove_preference_list name="IMAN_relation_export"
session_name="PORTAL_SESSION_IMAN_relation_export">
<preference_list_value>IPEM_dependency</preference_list_value>
<preference_list_value>SWIM_dependency</preference_list_value>
<preference_list_value>SWIM_master_dependency</preference_list_value>
<preference_list_value>SWIM_suppressed_dependency</preference_list_value>
<preference_list_value>SW2_bom_exclusion</preference_list_value>
<preference_list_value>SW2_configuration</preference_list_value>
</remove_preference_list>
</transfer_ownership>
</data_def>
swim.cfg
Many customers will not find a reason to deal with this file at all. There are only three settings
that may require modification, under normal circumstances:
sw.toolbox.dirs The integration’s installation program asks the user
whether SolidWorks Toolbox should be configured, and if
so, updates this preference with the specified path(s) to the
Toolbox directories. If new Toolbox directories are added
after the initial installation, it may be easier to extend the
set of locations by editing this text file, instead of re-
running the installation process. It is a simple list of
directory paths, separated by the ‘;’ character.
sw.manager.node.text In the Integration’s default configuration, CAD models are
displayed in the Teamcenter task pane with a predefined set
of key properties and attributes. The default set of values,
or the order in which they appear, may be changed by
modifying this setting. You may use properties of the CAD
models, or Teamcenter attributes, or both together, to
display the specific model information that is most
meaningful for your CAD users. For example, in the
following figure the Teamcenter Item ID/Revision appear
first, followed by the SolidWorks Description, which is
mapped from the Teamcenter Item Name:
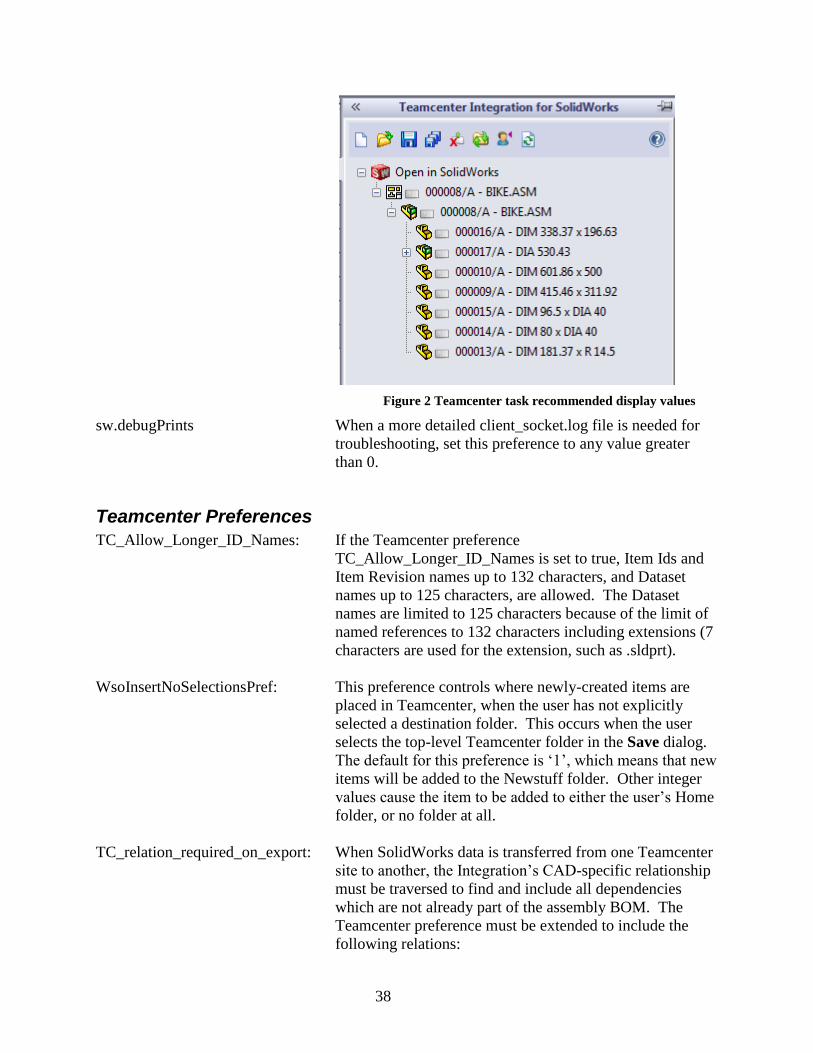
38
Figure 2 Teamcenter task recommended display values
sw.debugPrints When a more detailed client_socket.log file is needed for
troubleshooting, set this preference to any value greater
than 0.
Teamcenter Preferences
TC_Allow_Longer_ID_Names: If the Teamcenter preference
TC_Allow_Longer_ID_Names is set to true, Item Ids and
Item Revision names up to 132 characters, and Dataset
names up to 125 characters, are allowed. The Dataset
names are limited to 125 characters because of the limit of
named references to 132 characters including extensions (7
characters are used for the extension, such as .sldprt).
WsoInsertNoSelectionsPref: This preference controls where newly-created items are
placed in Teamcenter, when the user has not explicitly
selected a destination folder. This occurs when the user
selects the top-level Teamcenter folder in the Save dialog.
The default for this preference is ‘1’, which means that new
items will be added to the Newstuff folder. Other integer
values cause the item to be added to either the user’s Home
folder, or no folder at all.
TC_relation_required_on_export: When SolidWorks data is transferred from one Teamcenter
site to another, the Integration’s CAD-specific relationship
must be traversed to find and include all dependencies
which are not already part of the assembly BOM. The
Teamcenter preference must be extended to include the
following relations:
39
SWIM_dependency
SWIM_master_dependency
SWIM_suppressed_dependency
SW2_configuration
EPM_multiple_processes_targets: The integration can be configured to submit Item Revisions
to a workflow process by adding “workflow” to the
table.columns.checkin preference in swim.properties. The
integration does not prevent users from submitting objects
to multiple workflows. Sites which want to prevent this
should set the Teamcenter preference
EPM_multiple_process_targets to “OFF
Utility Functions
In addition to using the interactive Integration in your SolidWorks session, you can also use
several command line utilities to work with SolidWorks models in Teamcenter. These utilities
are found in the same directory where the Teamcenter Integration for SolidWorks is installed.
These are:
The swimexport utility for exporting SolidWorks models from Teamcenter.
The swimimport utility for saving SolidWorks models to Teamcenter.
The swimrename utility for renaming SolidWorks models in Teamcenter.
If the Integration’s installation directory is in your path, you can run any of these utilities by
opening a shell or command window for your operating system, and typing the utility’s name
with appropriate arguments on the command line. Arguments are shown in detail in the
following sections under Usage. Arguments enclosed in square brackets [] are optional, a
vertical bar | separates alternate values that can be used for an argument, and text shown in italics
is to be replaced by an appropriate value when you use the command. For example,
swimexport -u username -p password [-export true|false]
shows the swimexport utility’s –export argument is optional because it is enclosed in brackets,
and that its value can be one of the literal words true or false, while username and password
should be replaced by your Teamcenter user name and password.
Exporting SolidWorks Models from Teamcenter with swimexport
The swimexport utility exports SolidWorks models from Teamcenter. Datasets may also be
checked out, i.e. reserved, when exporting models. Models that are checked out by swimexport
may be checked back into Teamcenter with the swimimport utility.
Usage
swimexport [-login] [-u username -p password
[-g group]]
[-help]
[-project project_id]
40
[-export_dir path]
[-change_id id] [-comment string]
[-export true|false] [-export_related true|false]
[-checkout true|false] [-checkout_related true|false]
[-config rule] [-precise_is_imprecise]
[-precise_relation_is_imprecise true|false]
[-precise_configuration_is_imprecise true|false]
[-no_filters] [-filter name] [-levels limit]
[-item_id id] [-item_revision_id rev] [-model_name datasetname]
[-model_type type] [-dry_run] [-output instructionfile]
[-log logfile]
[-incomplete_operation_fatal | -incomplete_operation_ok]
[-serverhost host] [-servername servername]
[-marker markername]
file1 file2 ...
Description
The swimexport utility will export a SolidWorks model, and the models on which it depends,
from Teamcenter to a local directory. The model to export may be identified with the –item_id,
–item_revision_id, –model_name and –model_type options on the command line, or several
models may be specified in instruction files, given by arguments file1, file2, etc., following any
command line options. Instruction files are text files that list models to export, one model per
line.
Some options affect only explicitly specified models identified on the command line or in
instruction files. Other options affect implicitly specified models that are not identified on the
command line or in instruction files, but which are also exported because explicitly specified
models depend on them.
The default action is to export all explicitly specified models and the models on which they
depend, but this can be changed using the –export option for explicitly specified models and the
–export_related option for implicitly specified models. To reserve models, the –checkout option
reserves explicitly specified models and –checkout_related reserves implicitly specified models.
Models that have been reserved may be checked back into Teamcenter using the swimimport
utility.
The swimexport utility uses the same mapping file and user preferences used by the Teamcenter
Integration for SolidWorks.
One significant difference between the swimexport utility and the Teamcenter Integration for
SolidWorks is that swimexport does not copy attribute values from Teamcenter to properties in
the SolidWorks models.
The swimexport options are described below.
-change_id id
Specifies a change ID to assign to all datasets that are checked out
(optional).
41
-checkout true | false
True specifies that explicitly specified models should be reserved
(optional). The default is false, which means that these models will not be
reserved. Note that if –export is false, this option can be used to reserve a
dataset without exporting the model file in it. This option does not affect
implicitly specified models. To reserve implicitly specified models, use
the –checkout_related option.
-checkout_related true | false
True specifies that implicitly specified models should be reserved
(optional). The default is false, which means that these models will not be
reserved. Note that if –export_related is false, this option can be used to
reserve datasets without exporting the model files in them.
-comment string
Specifies a comment to assign to all datasets that are checked out
(optional).
-config rule
Specifies the name of a configuration rule (optional). The default is to use
the rule specified by the iman.bomrevisionruledefault user preference or
the default Teamcenter rule.
-dry_run The utility goes through most of the actions it would ordinarily execute,
but it does not export any files or reserve datasets (optional). When used
in conjunction with the –output option, an instruction file can be generated
for use in a subsequent run of this utility.
-export true | false
True specifies that explicitly specified models should be exported, which
is the default (optional). False means that these models will not be
exported. Note that –checkout may be true even if –export is false. This
option does not affect implicitly specified models. To export implicitly
specified models, use the –export_related option.
-export_dir path
Specifies the path to the export directory (optional). The default is to
export models to the default working directory as specified during product
installation. The default working directory can be overridden by
specifying checkout.exportdirectory preference in swim.properties.
-export_related true | false
True specifies that implicitly specified models should be exported, which
is the default (optional). False means that these models will not be
exported. Note that the –checkout_related option may be true even when
–export_related is false.
-filter name
Specifies a filter to use when collecting implicitly specified models
(optional). Each use of this option adds another filter to any filters

42
previously specified. Later filters can override the actions of previous
filters. The default filters are those specified by the
filters.checkout.default user preference, but note that the -no_filters option
can erase those prior filters. See the filters.checkout.choices user
preference for the names of filters that can be used with this option. User
preferences are described in the swim.properties file located in the
directory where the Teamcenter Integration for SolidWorks is installed.
-g groupname
Specifies the group name to use when connecting to Teamcenter
(optional). Ignored when -login is specified.
-help Prints usage information and exits.
-incomplete_operation_fatal
Causes the program to exit when an operation on a model cannot be
completed due to an error (optional). The default is
-incomplete_operation_ok.
-incomplete_operation_ok
Causes the program to continue when an operation on a model cannot be
completed due to an error (optional). This is the default.
-item_id id
Specifies the Teamcenter item ID of a model to export (optional). This
option may be used only once on the command line, but wildcards are
allowed.
-item_revision_id rev
Specifies the Teamcenter revision of a model to export (optional). This
option may be used only once on the command line, but wildcards are
allowed.
-levels limit
Specifies the number of levels to include in the hierarchy of dependencies
when collecting implicitly specified models (optional). If not specified, or
if limit is a negative number, the number of implicitly specified models is
unlimited. A positive number sets the maximum number of levels of
implicitly specified models that can be collected. This option has the
same purpose as the limit.levels user preference, described in the
swim.properties file located in the directory where the Teamcenter
Integration for SolidWorks is installed, although swimexport ignores
limit.levels. The limit can only be set using this command line argument.
-log logfile Defines the name of the log file that will be created (optional). If not
specified, the log file will be swimexport.txt in the current directory.
Logging cannot be disabled and warning messages cannot be suppressed,
but otherwise the logging preferences in swim.properties have their usual
effect.
43
-login Uses the Teamcenter login dialog. When this option is specified, the -u,
-p, -g, and -marker options are ignored.
-marker markername
The Teamcenter server marker name or URI. If not specified, the default
marker is that of the first server in the client_specific.properties file, found
in the Teamcenter Rich Client installation directory. If URI includes
"services/PLMGatewayService"; remove it. For example,
"http://serverrname:7001/tc/services/PLMGatewayService" should be
"http://servername:7001/tc/”. Ignored when –login is specified
-model_name datasetname
Specifies the name of a SolidWorks model, which may be either the name
of a SolidWorks document or the name of a SolidWorks configuration.
The model name is the same as the dataset name.
-model_type type
Specifies the dataset type or the six-letter SolidWorks model type. For
example, models stored in the files widget.prt and gadget.sldprt both have
type sldprt, and their datasets are of type SWPrt, so type for a SolidWorks
part model may be either sldprt or SWPrt.
-no_filters
Causes any previous list of filters to be erased, such that no filters will be
used when collecting implicitly specified models. However, a new list of
filters will be created if this option is followed by one or more -filter
options.
-output instructionfile
Defines the name of an instruction file to be written (optional). This file
lists each model exported or reserved from Teamcenter.
-p password Specifies the password to use when connecting to Teamcenter. Ignored
when -login is specified.
-precise_is_imprecise
Causes precise relations to be treated as if they are imprecise, which
means the rule given by the –config option will be used to select item
revisions (optional). This option is a shortcut for the two options:
-precise_relation_is_imprecise true
-precise_configuration_is_imprecise true
-precise_configuration_is_imprecise true | false
True causes a precise relation between a configuration and its SolidWorks
document to be treated as if it is imprecise, which means the rule given by
the –config option will be used to select the document’s item revision
(optional).
-precise_relation_is_imprecise true | false
True causes precise general relations to be treated as if they are imprecise,
which means the rule given by the –config option will be used to select
44
item revisions (optional). This option does not affect the treatment of
relations between configurations and their SolidWorks document.
-project project_id
Specifies the project to use when connection to Teamcenter (optional).
-u username Specifies the user name to use when connecting to Teamcenter. Ignored
when -login is specified.
Configurations
Every SolidWorks model in Teamcenter is represented by a dataset, even models that are
configurations. However, in the case of a configuration, the dataset does not contain the model’s
file. Instead, configurations depend on their document, and it is in the dataset for the document
that the SolidWorks model file is found.
If you “export” a configuration, swimexport will actually export the model file from the
document’s dataset. If you reserve a configuration, swimexport will also reserve the document.
Toolbox Parts
The swimexport utility does not export files for toolbox parts stored as sw2Tbx datasets. An
assembly exported by swimexport must be opened with a SolidWorks installation having access
to the toolbox. For more information on managing Toolbox parts, see the Best Practices section
in this document.
Multiple Model Versions
Only one version of any given SolidWorks model will be exported in one execution of the
swimexport utility. For example, if several revisions of a model are specified on the command
line or in instruction files, only the first one encountered will actually be exported.
Instruction Files
An instruction file is a text file that lists SolidWorks models. Each line in the file should identify
one model. Blank lines and comments are also allowed. The comment character is #. Any text
between the comment character and the end of the line will be ignored.
A model is identified by several keyword=value pairs. A value containing spaces must be
enclosed in double quotes, and keyword is one of the following:
checkout This is the same as the –checkout command line option, but it applies only
to the model specified on the line where this keyword appears. The value
may be either true or false. If this keyword is not specified, the value of
the –checkout command line option applies.
export This is the same as the –export command line option, but it applies only to
the model specified on the line where this keyword appears. The value
may be either true or false. If this keyword is not specified, the value of
the –export command line option applies.
item_id The value is the item ID.
45
item_revision_id
The value is the revision.
model_name The value is the name of the SolidWorks model, which may be either the
name of a SolidWorks document or the name of a SolidWorks
configuration.. The model name is the same as the dataset name.
model_type The value is the dataset type or the three-letter file extension that identifies
the SolidWorks model type. For example, models stored in the files
widget.prt and gadget.sldprt both have type sldprt, and their datasets are of
type SWPrt, so model type for a SolidWorks part model may be either
sldprt or SWPrt
If a value contains spaces, it must be enclosed in double quotes.
A simple instruction file is shown below.
# Sample swimexport instruction file
item_id=702283 item_revision_id=B model_name=Bolt_A model_type=sldprt
item_id=702284 item_revision_id=A export=false checkout=false
item_id=702285 item_revision_id=A
The first line is a comment. The second line identifies a particular model, the SolidWorks part
Bolt_A in revision B of item 702283. No checkout or export keyword is given on this line, so
the command line options –checkout and –export will be used to decide whether to export and/or
reserve this model. By default, swimexport will export the model without reserving it.
The third line specifies an item ID and revision, but the model name and type are not given. If
revision A of item 702284 has several SolidWorks datasets, this line affects all of them. For
example, if revision A contains both a part and a drawing, neither will be exported or checked
out because export and checkout are both false on this line.
The fourth line also identifies a model using only its item ID and revision. Since no export or
checkout keyword is included on this line, the model will be exported or reserved according to
the command line options –export and –checkout.
Examples
The following example shows a simple use of this export utility.
swimexport -u infodba -p infodba –item_id 702283 –item_revision_id=B
This command will export the SolidWorks model(s) in revision B of item 702283, plus all
models on which it depends. The model files will be placed in the current working directory.
None of these models will be reserved. If the models in 702283 should be reserved, the
command becomes:
swimexport -u infodba -p infodba –item_id 702283 –item_revision_id=B \
-checkout true –comment "Changes per 4283"
This reserves only the model in revision B of 702283, but the models on which it depends are
still exported. If the SolidWorks model in revision B should be reserved without being exported,
and the models on which it depends also should not be exported, the command would be:

46
swimexport -u infodba -p infodba –item_id 702283 –item_revision_id=B \
-checkout true –export false –export_related false \
–comment "Changes per 4283"
If 702283 is a configuration, the command above will also reserve the document regardless of
how –export_related is set.
Suppose an instruction file named exports.txt specifies the models to export. In this case, the
command would be:
swimexport -u infodba -p infodba exports.txt
To find out what will really be exported or reserved prior to executing the command above, use
the –dry_run option and ask swimexport to generate an instruction file:
swimexport -u infodba -p infodba –dry_run –output out.txt exports.txt
Importing SolidWorks Models into Teamcenter with swimimport
The swimimport utility imports SolidWorks models into Teamcenter. This non-interactive utility
saves models to Teamcenter after opening them in SolidWorks. During the import process,
items, item revisions, and datasets may be created, parameter values may be copied to attributes
in Teamcenter, and BOMs may be updated.
Usage
swimimport [-login] [-u username -p password [-g group]] [-help] [-dry_run] [-project project_id]
[-output instructionfile] [-log logfile]
[-folder folder] [-overwrite | -revise] [-all_configurations]
[-marker markername] file1 file2 ...
Description
The arguments file1, file2, ..., are SolidWorks models to import, directories containing
SolidWorks models, or instruction files. An instruction file is a text file in which each line is
either the path to a SolidWorks model file or a directory containing SolidWorks models. This
utility opens all of the models specified by these arguments in a SolidWorks session, obtains
information concerning parent-child relationships, parameter values, configurations, and so on,
and then imports the models into Teamcenter.
Each argument file1, file2, ..., must be an absolute path.
Models are imported in two steps. In the first step, Teamcenter objects (items, item revisions,
and datasets) are created as needed and the model files are imported into the datasets. In the
second step, parameter values are copied from SolidWorks to attributes of the Teamcenter
objects.
When importing a model into an existing dataset, you must either use the –overwrite option or
check out the dataset prior to running swimimport. Models will not be imported into datasets
that are reserved by another user. Also, if you reserve a dataset using check out with export, the
model can only be imported from the export directory that was specified at the time you reserved
the dataset, and the model will be deleted from that directory after it is imported.
47
The other arguments for swimimport are described below.
-all_configurations
Saves all configurations within a document as distinct items in Teamcenter
(optional). This option overrides the sw.configurations.default user
preference to save all configurations except those matching the
sw.configurations.masters user preference. If not given, the default is to
create items only for configurations that are explicitly identified in an
instruction file or implicitly allowed by the sw.configurations.default user
preference. User preferences are described in the swim.properties file
found in the Teamcenter Integration for SolidWorks installation directory.
-dry_run
The utility goes through most of the actions it would ordinarily execute,
but it does not import any files or other data to Teamcenter (optional).
When used in conjunction with the –output option, an instruction file can
be generated for use in a subsequent run of this utility.
-folder folder
Specifies the name of a Teamcenter folder, belonging to the user, into
which new items will be placed (optional).
-help Prints usage information and exits.
-log logfile The absolute path to the log file to be written (optional). If not specified,
the log file will be swimimport.txt in the directory where the Teamcenter
Integration for SolidWorks is installed. Logging cannot be disabled and
warning messages cannot be suppressed, but otherwise the logging
preferences in swim.properties have their usual effect.
-marker markername
The Teamcenter server marker name or URI. If not specified, the default
marker is that of the first server in the client_specific.properties file, found
in the Teamcenter Rich Client installation directory. If URI includes
"services/PLMGatewayService"; remove it. For example,
"http://serverrname:7001/tc/services/PLMGatewayService" should be
"http://servername:7001/tc/”.
-output instructionfile
The absolute path to an instruction file to be written (optional). This file
lists all of the models imported into Teamcenter.
-overwrite
Causes existing model files already in Teamcenter to be replaced if a new
file is imported (optional). The default is to skip models that already exist
in the latest revision.
-p password Specifies the password to use when connecting to Teamcenter. Ignored
when -login is specified.
-project project_id

48
Specifies the project to use when connection to Teamcenter (optional).
-revise Causes a new revision to be created for each model imported into
Teamcenter (optional). The default is to import into the latest revision,
skipping any model if the latest revision already contains a version of the
model.
-u username Specifies the user name to use when connecting to Teamcenter. Ignored
when -login is specified.
Item IDs, Names, Types, and Revisions
A model’s item ID, name, type, and revision can be specified in an instruction file or by mapping
parameters from the SolidWorks model to these attributes in Teamcenter. See the section on
Instruction Files below for more information on how to do this in an instruction file, or refer to
the section on Attribute Mapping for more information on setting up an attribute map. If the
model’s item ID, name, type, or revision is not specified, the following defaults apply.
The default item ID is assumed to be the same as the model name. The model name is
also used as the default item name. For example, if a part file widget.sldprt is imported
into Teamcenter, the item ID and item name will both be widget.
The default item type is determined by a combination of the model’s CAD type and the
first item type to appear in the allowed_item_types list in the dataset map within the
swim.xml file. See the section on the map file for more details.
The default revision is the latest revision of an item unless the -revise option is specified.
When several SolidWorks models have the same item ID, they will be imported into the same
item. For example, if widget.slddrw contains a drawing of widget.sldprt and no other item ID is
specified for either model, both will be stored in the item whose ID is widget.
Attributes
This utility will copy parameter values from SolidWorks models to attributes in Teamcenter.
The attribute values that are copied are specified by the Teamcenter Integration for SolidWorks
mapping file. The default mapping file is swim.xml in the Teamcenter Integration for
SolidWorks installation directory.
If a model was skipped during the file import step because its item revision already has a dataset
for the model, it will also be skipped during the step that copies attribute values. Specifying the
–overwrite, or -revise option will ensure no models are skipped.
BOMs
BOMs will be created or updated by this utility. The types of models that are added to the
BOMs, and the BOMs that are affected, are specified by the Teamcenter Integration for
SolidWorks mapping file. The default mapping file is swim.xml in the Teamcenter Integration
for SolidWorks installation directory.

49
BOMs are precise by default. This can be changed by setting the iman.precisebom preference,
described in the swim.properties file in the Teamcenter Integration for SolidWorks installation
directory.
If a model was skipped during the file import step because its item revision already has a dataset
for the model, it will also be skipped during the step that updates BOMs. Specifying the
-overwrite, or -revise option will ensure no models are skipped.
Configurations and Design Tables
By default, Teamcenter items, item revisions, and datasets are created only for SolidWorks
documents, but this behavior can be changed to save the individual configurations found within a
document, too. The sw.configurations.default option, described in the swim.properties file in the
Teamcenter Integration for SolidWorks installation directory, specifies whether configurations
should or should not be saved as separate entities in Teamcenter. Specific configurations may
also be saved if their names are entered in instruction files (described below).
This behavior can be changed with the –all_configurations option. When specified, swimimport
creates separate items for all configurations, except for those excluded by the
sw.configurations.masters, sw.configurations.master.document.same, and sw.configurations.hide
user preferences.
A dataset that represents a SolidWorks configuration is given the same name as the
configuration. The dataset for a SolidWorks document is given the same name as the document.
Configurations created by a SolidWorks design table are handled in the same way as other
configurations within a document. If the configurations are saved separately, by means of the
sw.configurations.default option in swim.properties or by adding their names to instruction files,
each design table member is treated as a model in its own right. An item, item revision, and
dataset will be created for it, although the SolidWorks file will be stored only in the dataset for
the document.
Toolbox Parts
The swimimport utility must be executed on a system with SolidWorks Toolbox installed and
configured, in order for the sw2Tbx datasets to be created for the Toolbox parts. Toolbox parts
cannot be imported directly, as top-level objects. They are only imported when used as
components within an assembly, and that assembly is imported.
Auxiliary Files
The swimimport utility will create and import auxiliary files when importing models if an
auxiliary file map exists. For more information on auxiliary files and the map file, refer to the
section on The Map File.
If you do not want to import models, but only auxiliary files, consider using the import_file
utility, which is included with Teamcenter. Note that the Teamcenter Integration for SolidWorks
can be configured, via the auxiliary file map, to provide the item ID, revision, dataset name,
dataset type, and named reference for each auxiliary file required when a model is saved to
Teamcenter. This information can be used later to import auxiliary files with import_file.

50
Instruction Files
An instruction file is a text file that lists SolidWorks files or directories containing SolidWorks
models. Each line in the file should contain the path to one file or directory. Blank lines and
comments are also allowed. The comment character is #. Any text between the comment
character and the end of the line will be ignored.
If the path to a file or directory contains spaces, it must be enclosed in double quotes. For
example, the following path does not have to be quoted:
D:\Models\widget.sldprt
but this path must be quoted:
"D:\Sw Models\widget.sldprt"
The path to a SolidWorks model may be followed by several optional arguments on the same
line. Each argument has the form keyword=value, where keyword is one of the following:
configuration The value is the name of a SolidWorks configuration. If this option is
specified, this line in the instruction file indicates the configuration is to be
treated as a separate model in Teamcenter, distinct from its document.
Without this option, this line in the instruction file refers to the document.
dataset_desc The value is the dataset description. This is ignored if the dataset already
exists.
document The value is the name of a SolidWorks document. This is the same as the
base name of the file, without any extension or path. For example, the
document name for the file widget.sldprt is widget. This option is
redundant if the file name is given. It cannot be used to rename the model.
item_desc The value is the item description. This is ignored if the item already
exists.
item_name The value is the item name. This is ignored if the item already exists.
item_id The value is the item ID.
item_revision_id
The value is the revision level.
item_type The value is the item type. This is ignored if the item already exists.
model_type The value is the six-letter extension that identifies the SolidWorks model
type. For example, the type of a model stored in the file widget.sldprt or
widget.prt is sldprt. This option is redundant if the file name is given. It
cannot be used to change the type of the model.
property[class[:type].name]
The property keyword is used to specify Teamcenter properties other than
the keyword properties listed above. The class[:type].name string
specifies the Teamcenter property. Refer pdm_name section under
Attribute Mapping for details on class[:type].name syntax. If the
property is an array, the value must be included in curly braces {} and
comma separated. If required properties have been specified in the
51
BMIDE then the property key word may be required to use swimimport.
If a value contains spaces, it must be enclosed in double quotes.
The SolidWorks file name does not have to be given if the document and model_type options are
included on the line. Although these two options are not sufficient to identify the file to load,
they can be used to refer to a model that is loaded implicitly or explicitly by a file specified
elsewhere in the arguments given to swimimport. For example, suppose three different revisions
of widget.sldprt are stored in directories c:\reva, c:\revb, and c:\revc, and a single instruction file
c:\widget.txt has been created to specify the item ID to use for the model:
document=widget model_type=sldprt item_id=184786
The swimimport utility can then be executed three times to load the revisions:
swimimport –u infodba –p infodba –revise c:\widget.txt c:\reva\widget.sldprt
swimimport –u infodba –p infodba –revise c:\widget.txt c:\revb\widget.sldprt
swimimport –u infodba –p infodba –revise c:\widget.txt c:\revc\widget.sldprt
In each case, the path to the model’s file is specified on the command line. The model identified
in the instruction file depends on the file that the utility loads.
Another simple instruction file is shown below.
# Sample swimimport instruction file
D:\jjs\models
D:\jjs\bolts\bolt.sldprt item_id=702283 item_desc="Bolt design table"
document=bolt configuration=BOLT_A model_type=sldprt item_id=702284
document=bolt configuration=BOLT_B model_type=sldprt item_id=702285
document=bolt configuration=BOLT_C model_type=sldprt item_id=702286
The first line is a comment. The second line specifies a directory D:\jjs\models. The
swimimport utility will load all SolidWorks models that it finds in that directory. The third line
specifies a SolidWorks part file bolt.sldprt. Two optional arguments appear on this line to
specify the model’s item ID and, if the item has to be created, a description to include with the
item.
In this example, suppose bolt.sldprt contains a design table. The user wants to specify the item
ID where each configuration is to be stored, which is what the last three lines accomplish. Since
the file name alone cannot identify the individual configurations, the last three lines use the
document, configuration and model_type keywords to identify these models.
The instruction file below shows the property keyword.
D:\Work_Dir\A2.sldasm property[Item:Ipm9_AllPropItem.ipm9_dateArray]="{15-
Oct-2012 08:55,12-Jan-2012 05:14,25-Mar-2012 06:20}" "property[ItemRevision
Master:Ipm9_AllPropItemRevisionMaster.user_data_1]"="data1" "property[Item
Master.user_data_2]"="data2"
property[ItemRevision:Ipm9_AllPropItemRevision.ipm9_cascadingLOV]="Detroit"
D:\Work_Dir\P3.sldasm property[Item:Ipm9_AllPropItem.ipm9_dateArray]="{15-
Oct-2012 12:32,12-Jan-2012 05:14,25-Mar-2012 06:20}" "property[ItemRevision
Master:Ipm9_AllPropItemRevisionMaster.user_data_1]"="data1" "property[Item
Master.user_data_2]"="data2"
property[ItemRevision:Ipm9_AllPropItemRevision.ipm9_cascadingLOV]="Boston"
D:\Work_Dir\P4.sldasm property[Item:Ipm9_AllPropItem.ipm9_dateArray]="{15-
Oct-2012 14:55,12-Jan-2012 05:14,25-Mar-2012 06:20}" "property[ItemRevision
Master:Ipm9_AllPropItemRevisionMaster.user_data_1]"="data1" "property[Item
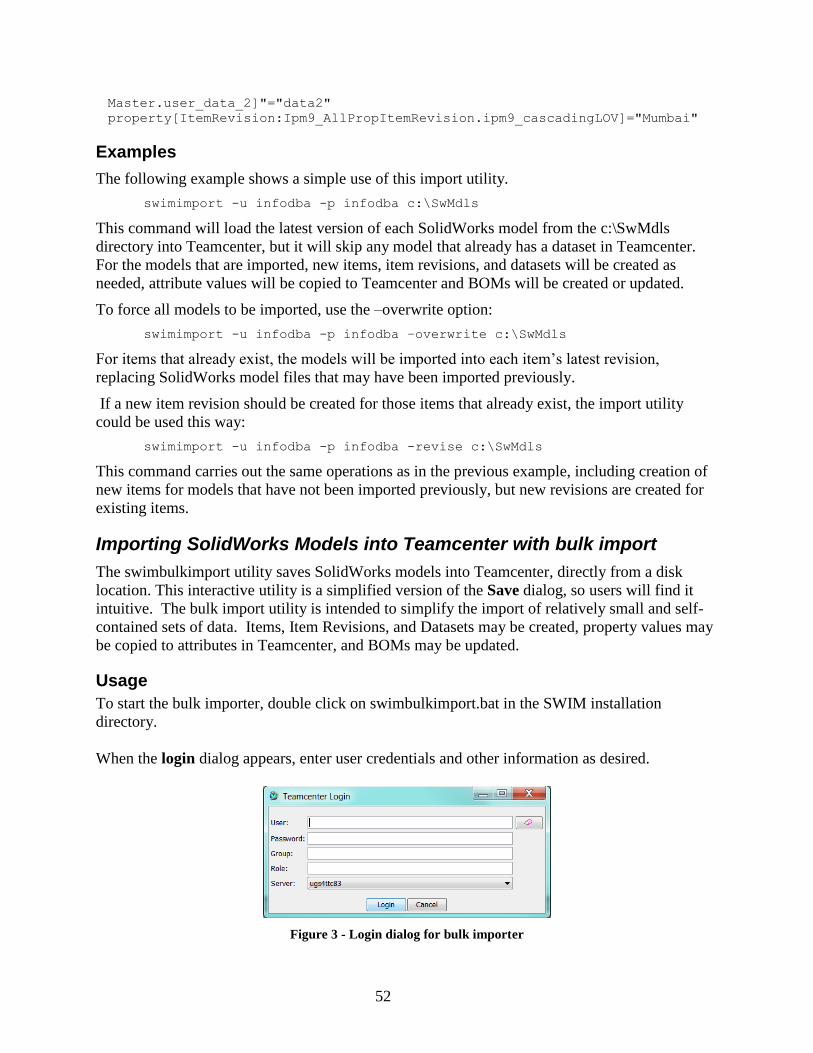
52
Master.user_data_2]"="data2"
property[ItemRevision:Ipm9_AllPropItemRevision.ipm9_cascadingLOV]="Mumbai"
Examples
The following example shows a simple use of this import utility.
swimimport -u infodba -p infodba c:\SwMdls
This command will load the latest version of each SolidWorks model from the c:\SwMdls
directory into Teamcenter, but it will skip any model that already has a dataset in Teamcenter.
For the models that are imported, new items, item revisions, and datasets will be created as
needed, attribute values will be copied to Teamcenter and BOMs will be created or updated.
To force all models to be imported, use the –overwrite option:
swimimport -u infodba -p infodba –overwrite c:\SwMdls
For items that already exist, the models will be imported into each item’s latest revision,
replacing SolidWorks model files that may have been imported previously.
If a new item revision should be created for those items that already exist, the import utility
could be used this way:
swimimport -u infodba -p infodba -revise c:\SwMdls
This command carries out the same operations as in the previous example, including creation of
new items for models that have not been imported previously, but new revisions are created for
existing items.
Importing SolidWorks Models into Teamcenter with bulk import
The swimbulkimport utility saves SolidWorks models into Teamcenter, directly from a disk
location. This interactive utility is a simplified version of the Save dialog, so users will find it
intuitive. The bulk import utility is intended to simplify the import of relatively small and self-
contained sets of data. Items, Item Revisions, and Datasets may be created, property values may
be copied to attributes in Teamcenter, and BOMs may be updated.
Usage
To start the bulk importer, double click on swimbulkimport.bat in the SWIM installation
directory.
When the login dialog appears, enter user credentials and other information as desired.
Figure 3 - Login dialog for bulk importer
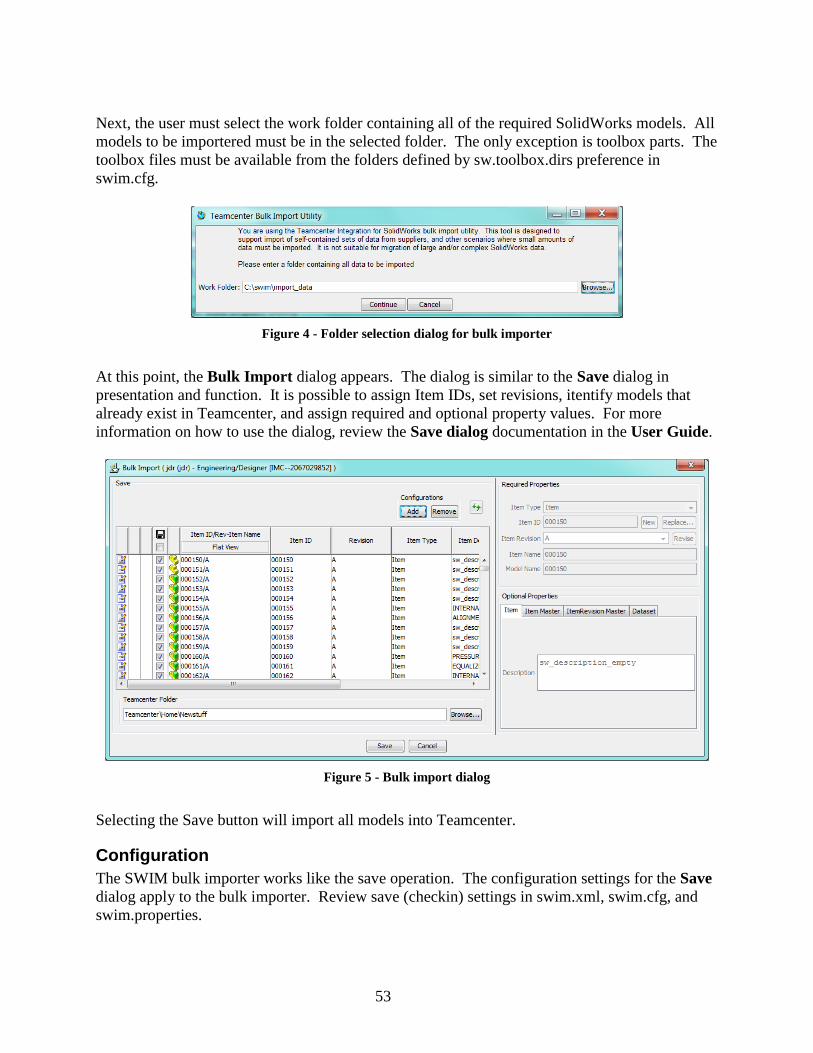
53
Next, the user must select the work folder containing all of the required SolidWorks models. All
models to be importered must be in the selected folder. The only exception is toolbox parts. The
toolbox files must be available from the folders defined by sw.toolbox.dirs preference in
swim.cfg.
Figure 4 - Folder selection dialog for bulk importer
At this point, the Bulk Import dialog appears. The dialog is similar to the Save dialog in
presentation and function. It is possible to assign Item IDs, set revisions, itentify models that
already exist in Teamcenter, and assign required and optional property values. For more
information on how to use the dialog, review the Save dialog documentation in the User Guide.
Figure 5 - Bulk import dialog
Selecting the Save button will import all models into Teamcenter.
Configuration
The SWIM bulk importer works like the save operation. The configuration settings for the Save
dialog apply to the bulk importer. Review save (checkin) settings in swim.xml, swim.cfg, and
swim.properties.
54
Limitations
The SWIM bulk importer does not use a session of SolidWorks. Instead it uses the SolidWorks
document manager API to rapidly interrogate and modify files. Consequently there are some
limitations with the bulk importer:
All files must be in the selected directory. The only exception is toolbox parts, which
must be in the directory specified by swim.cfg configuration sw.toolbox.dirs.
SolidWorks 2004 and earlier files cannot be imported – These old files cannot be read.
The old files are detected and user will be alerted to open and save models with newer
version of SolidWorks.
The import process modifies files in such a way that imported files cannot be reused by
another bulk import session. It is best to start with a fresh directory of files for each bulk
import.
The bulk importer does not store length units of measure in the Teamcenter BOM – The
SolidWorks document manager API does not support unit of measure access. As a result,
assembly visualization in the Teamcenter Structure Manager may be incorrect until the
assembly is saved interactively. SPR459029 has been raised with SolidWorks.
Assembly configurations which are renamed by the document manager API as part of the
import process must be opened and saved to disk, from SolidWorks, before they can be
imported again. The most common scenarios in which this limitation may be
encountered are:
o The user renames an assembly configuration (via the New or Replace buttons)
within the bulk import dialog, and then decides to cancel the operation. He must
open the renamed models in SolidWorks and save them back to disk, before
attempting to import them again.
o The user renames an assembly configuration as described in the last bullet, as part
of a complete import operation. He then exports the model from Teamcenter to a
disk location, without opening it in a SolidWorks session. He then attempts to
bulk-import the exported model under a new Item ID, as part of a clone operation.
The first step could also occur another application based on the document manager
modified the files. The bulk importer detects the renamed configurations and alerts the
user to open and save models interactively from within a SolidWorks session.
Renaming SolidWorks Models in Teamcenter with swimrename
The swimrename utility renames SolidWorks models and their datasets in Teamcenter. This non-
interactive utility will check out a model from Teamcenter, open it in SolidWorks, rename the
model and save it back to Teamcenter. It also checks out, updates and saves all of the
SolidWorks models that use the renamed model, and optionally changes the item ID and the
names of other objects to match the new name.
Usage
swimrename [-login] [-u username -p password [-g group]] [-help]
55
[-project project_id]
-item itemid [-rev revision] -type type
-old_name oldname -new_name newname -work_dir directory [-no_autorename]
[-autorename_item_id true|false]
[-autorename_item_name true|false]
[-autorename_other true|false]
[-autorename_other_exact_length true|false]
[-marker markername]
[-progress_file outputfile] [inputfile]
Description
Before running the swimrename utility, all models that will be renamed and all of the models
that use them must be checked-in to Teamcenter. The swimrename utility will stop with an error
if it finds that a model to be renamed, or a model that uses a renamed model, is already reserved.
A log file named swimrename.txt is always produced containing information about the actions
carried out during the renaming process. This log is located in the Teamcenter Integration for
SolidWorks installation directory.
The arguments for swimrename are described below.
-autorename_item_id true | false
Specifies whether the item ID should be changed to match the model name
(optional). If true, the item ID is changed to the new model name if the
old item ID matches the old model name, ignoring case. If false, the item
ID is not changed. Specifying -no_autorename also sets this option to
false. This option can follow -no_autorename on the command line to
override -no_autorename. If not specified, the default is given by the
iman.autorename.itemid user preference (see the swim.properties file in
the installation directory for a description of user preferences).
-autorename_item_name true | false
Specifies whether the item name should be changed to match the model
name (optional). If true, the item name and item revision name are
changed to the new model name if their old names match the old model
name, ignoring case. If false, the names are not changed. Specifying
-no_autorename also sets this option to false. This option can follow
-no_autorename on the command line to override -no_autorename. If not
specified, the default is given by the iman.autorename.itemname user
preference (see the swim.properties file in the installation directory for a
description of user preferences).
-autorename_other true | false
Specifies whether the names of other objects within the item or item
revisions should be changed to match the model name (optional).
Examples of “other” objects include forms, BOM views, and non-
SolidWorks datasets and their named references, i.e. any Teamcenter

56
object in an item or item revision that is not a SolidWorks dataset. When
true, these other objects are renamed to the new model name if their old
names match the old model name, ignoring case (the
-autorename_other_exact_length option determines how the names are
matched). When false, the names are not changed. Specifying
-no_autorename also sets this option to false. This option can follow
-no_autorename on the command line to override -no_autorename. If not
specified, the default is given by the iman.autorename.other user
preference (see the swim.properties file in the installation directory for a
description of user preferences).
-autorename_other_exact_length true | false
Specifies how to match names when deciding whether to rename other
objects in the item or item revisions (optional). When true, the name of a
Teamcenter object matches the SolidWorks model name if both names
match character-for-character, ignoring case, and are exactly the same
length (for named references, the file name without extension is tested).
When false, the names match if the object’s name starts with the model
name, ignoring case. For example, suppose the model’s name is
WIDGET. If -autorename_other_exact_length is true, an item master
form named WIDGET will match the model name, but not an item
revision master form named WIDGET/A. If
-autorename_other_exact_length is false, both forms match the model’s
name. This option only affects the “other” objects in the item and item
revisions when -autorename_other is true. Exact length is always used
when matching the model name to the item ID, item name, or item
revision name. If not specified, the default is given by the
iman.autorename.other.exactlength user preference (see the
swim.properties file in the installation directory for a description of user
preferences).
-g group The Teamcenter group (optional). Ignored when -login is specified.
-help Prints usage information and quits (optional).
-item itemid
The item ID of the model to be renamed.
-login Uses the Teamcenter login dialog. When this option is specified, the -u,
-p, -g, and -marker options are ignored.
-marker markername
The Teamcenter server marker name or URI. If not specified, the default
marker is that of the first server in the client_specific.properties file, found
in the Teamcenter Rich Client installation directory. If URI includes
"services/PLMGatewayService"; remove it. For example,
"http://serverrname:7001/tc/services/PLMGatewayService" should be
"http://servername:7001/tc/”. Ignored when –login is specified.
57
-new_name newname
The new name for the SolidWorks model. Do not include the file
extension.
-no_autorename
Turns off automatic renaming of the item, item revisions, and other
objects (optional). This is the same as setting -autorename_item_id,
-autorename_item_name, and -autorename_other to false.
-old_name oldname
The old name for the SolidWorks model. Do not include the file
extension.
-p password The Teamcenter password. Ignored when -login is specified.
-project project_id
Specifies the project to use when connection to Teamcenter (optional).
-progress_file outputfile
The absolute path to a text file that this program will create to record its
progress (optional). If an error occurs, the program can be restarted using
the file as the inputfile argument.
-rev revision
The item revision ID of the model to be renamed (optional). If not
specified, all revisions of the model will be renamed. Use of this option
should be avoided, except in unusual circumstances. In most cases, all
revisions of a model should be renamed. This is particularly true if the
model occurs in any imprecise BOMs.
-type type The six-letter SolidWorks file extension that identifies the type of the
model, such as sldasm. Alternatively, this may also be the dataset type,
such as SWAsm.
-u username The user’s Teamcenter login name. Ignored when -login is specified.
-work_dir directory
The absolute path to a temporary working directory. This directory will
be created if it does not exist. If the directory does exist, it must be empty.
You will usually want to use a directory that is not the same as the
directory where you start the swimrename utility.
Examples
Suppose an assembly named “cylinder” is stored in an item whose item ID is 0000753, and it is
decided to rename the model to match the item ID. The command to execute this change might
look something like this:
swimrename –u infodba –p infodba –item 0000753 \
–type sldprt –old_name cylinder –new_name 0000753 \
–work_dir d:\tmp –progress_file c:\restart1.txt
58
The –rev option is not specified, so all revisions of cylinder in item 0000753 are renamed to
0000753. This is recommended if there is a possibility that item 0000753 occurs in the
imprecise BOMs of other assemblies. A directory d:\tmp is used as a temporary space for
SolidWorks to work on these models, and a file c:\restart1.txt will be created in case the
command aborts before all of the models are renamed.
Suppose an assembly that uses cylinder is currently checked out by someone else. The
swimrename utility will stop with an error because it will not be able to check out that other
assembly, but this may occur after swimrename has already renamed and saved several revisions.
Since the –progress_file option is used in the example above, swimrename can be restarted once
the other assembly becomes available. The command to execute swimrename is the same as
before, but the output file created with the –progress_file option above is now given as an input
to swimrename:
swimrename –u infodba –p infodba –item 0000753 \
–type sldprt –old_name CYLINDER –new_name 0000753 \
–work_dir d:\tmp –progress_file c:\restart2.txt c:\restart1.txt
Note that this command also creates a new text file, c:\restart2.txt, which can be used to restart
swimrename again if another error occurs.
Suppose it is later decided to rename part 0000753 to 5000753 after a drawing named 0000753
has been added to the same item. The part and the drawing should both be renamed, but you
must run swimrename twice to do this. Either could be renamed first, but it may be desirable to
avoid changing the item ID until both models are renamed. The two runs of swimrename might
look like this:
swimrename –u infodba –p infodba –item 0000753 \
–type sldprt –old_name 0000753 –new_name 5000753 –no_autorename \
–work_dir d:\tmp –progress_file c:\restart.txt
swimrename –u infodba –p infodba –item 0000753 \
–type slddrw –old_name 0000753 –new_name 5000753 \
–work_dir d:\tmp –progress_file c:\restart.txt
Notice that -no_autorename is used in the first run, when renaming the part. This prevents the
item ID from changing and allows the second run to use almost the same arguments to rename
the drawing, except for changing the -type argument and dropping -no_autorename. At the end
of the second run, swimrename will change the item ID to 5000753.
Best Practice Recommendations
Properties display in Save Dialog and Teamcenter New Dialog
The Save and Teamcenter New dialogs have two panels of properties, Required Properties
and Optional Properties. By default, the Required Properties panel contains only the system
properties required by the SolidWorks integration. These system properties are Item Type, Item
ID, Item Revision and Item Name. On the other hand, the Optional Properties panel’s tabs are
populated with properties that have Teamcenter create descriptors. By default only a few
properties have create descriptors.
By the use of Teamcenter create descriptors, sites can change the contents of panels. Using
BMIDE to specify create descriptors on additional properties will add those properties to the
59
Optional Properties tabs. Setting a create descriptor to required in BMIDE will cause the
property to appear in the Required Properties panel. All of the required properties must have a
value before the model can be saved for the first time.
Additional Notes:
Create descriptors can differ between Item Types
A property with a required create descriptor will only appear in the Required Properties
panel.
Models already existing in Teamcenter without values for required properties can be
saved without the user setting the values – the required create descriptors are only
enforced upon first-time creation of an item.
Overuse of required create descriptors could cause users to defer saving work in
progress, and so they should be used selectively.
Configurations
Integration preferences related to configurations
Every SolidWorks part or assembly has one or more configurations. Not all configurations are
used the same way. The integration provides several preferences intended to help customers
manage and resolve various types of conflicts and inconsistencies in their SolidWorks data:
Set sw.configuration.default = all. The idea being that all active or referenced
configurations are intended to be managed.
Populate sw.configurations.hide with configuration names that should never be managed.
Establish site practices for designers to use unmanaged configuration names when they
create representations, this will prevent unwanted configurations from being saved into
Teamcenter. It can be difficult to remove data from Teamcenter, so it is best to establish
practices that avoid creating the data in the first place. Alternatively, consider using
sw.configurations.keep to control which configurations may be managed in Teamcenter.
The choice of which preference to use depends largely upon how easily identifiable the
SolidWorks data is, by naming convention.
Set sw.configurations.master.document.same = true, to handle configurations with the
same name with the document. Data such as this often comes from Toolbox (see
Toolbox documentation elsewhere in this document) or suppliers. In such cases the
document usually contains only the single configuration and no other “Master
Configurations”, thus managing the configuration with the document is desired.
SolidWorks External References
SolidWorks creates an external reference between documents when the parent document depends
on the feature definition of the child document. When the child document is modified, the parent
60
document is modified too. The integration detects external references when saving the data to
Teamcenter. However, if a user renames the child in SolidWorks or the integration Save dialog
the external reference will not be updated. The relationship will be broken. To “save-as” data
with external references, use the SolidWorks Pack and Go utility, then import the renamed data
into Teamcenter via interactive Save or Bulk Import. Another option is to disable external
references by selecting “Do not create references external to the model” from SolidWorks Tools,
Options, System Options External References dialog.
SolidWorks Toolbox
SolidWorks toolbox is a library of fasteners, nuts, bolts, screws, bearings, and more. The
toolbox is highly integrated into SolidWorks. SolidWorks enables the sizing of the components
at the time of instantiation into SolidWorks assemblies. The toolbox is a powerful tool, and its
files are best not managed by Teamcenter, but left to SolidWorks to manage. On the other hand,
Teamcenter requires Items to exist for the toolbox parts, for life cycle management within
Teamcenter.
To enable Teamcenter knowledge of the toolbox parts, the SolidWorks integration to Teamcenter
creates Items, Item revisions, and Datasets for toolbox configurations, but does not store the
files. A sw2Tbx dataset type is used to represent the toolbox parts. The associated items appear
in the BVR of parent assemblies. Toolbox parts are represented by the icon in the integration
dialogs.
SolidWorks SpeedPak
Speedpak creates a simplified configuration of an assembly to improve assembly performance.
Another benefit of SpeedPak is assembly sharing. The integration does not fully support
SpeedPak configurations. With this release, it is best if SpeedPak configurations are not
managed with Teamcenter. One means to avoid saving SpeedPak configurations is to set
sw.configuration.hide = *speedpak. When using this setting, if a SpeedPak configuration is
active at the time of save, all references to child components will be lost.
SolidWorks Virtual Components
Virtual components are internal to the SolidWorks assembly file instead of in separate
subassembly or part files. The integration hides virtual components from the user. The child
relationships of a virtual component are assumed by the parent assembly. JT files cannot be
generated for virtual components. When a virtual component is made external the integration
will manage the external copy. When an external component is made virtual the integration will
hide the internal copy. Once a component is managed by the integration the recommendation is
to not virtualize the component as changes to the virtual component will not be reflected in
Teamcenter.
61
Multisite
Upgrading the Teamcenter database for multi-site
Upgrading the database is only required for sites that have saved data with integration version
9.1.0 or earlier. Sites that have only deployed version 9.2.0 and later do not need to run the
utility. The upgrade adds SW2_configuration relations into the database. These relations are
required to enable complete multi-site transfer of a document and all related configurations.
Starting with integration version 9.2.0 of the integration, the SW2_configuration relations are
created by the integration operations.
Usage
swim_upgrade_database -u user -p password [-g group] -mode=SINGlE|FULL [-input_file=inputfilename]
[-statistics]
[-dryrun]
[-batch_size=number of records to process]
[-debug=filename]
[-log=filename]
[-help]
Description
The upgrade utility creates SW2_configuration GRM relations in the database where they do not
already exist. The SW2_configuration relations are most important to customers who transfer
SolidWorks data via Teamcenter multi-site. Failure to run the utility could result in duplicated
configuration items between sites.
The utility cannot create SW2_configuration GRM relations for all cases. For instance, if there
is more than one dataset as the secondary of a SWIM_master_dependency relation, the utility
will report the relation and not create a SW2_configuration relation. The skipped relation will be
reported and mode=SINGLE can be used to fix to add the relation.
The swim_upgrade_database utility must be run on the server and must be run by a database
administrator.
-batch_size=number of record to process
Optional argument that specifies the number of relations to process at a
time. The default is 5000. Too large a value could result in memory
failures.
-debug=filename
An optional argument to specify the filename and path to record debug
information.
-dryrun
When specified, the utility does not create the relations. All other utility
actions are performed. Run in dryrun mode to determine if there are going
to be problems.
-g=group Optional argument to specify the administrators group.
62
-help Prints usage information and quits (optional).
-input_file=inputfilename
This argument is required only if the user has specified –mode=SINGLE.
The input file consists of lines that contain the following fields, separated
by spaces. If a field itself contains a space, enclose it with quotes (The
error statements in the log file from FULL mode may be used as a
template for the property syntax and formatting):
Document_itemid document_revid document_dataset document_dataset_type config_itemid
config_revid config_dataset config_dataset_type
-log=filename
An optional argument to specify the filename and path where the utility
records relations that it failed to process.
-mode=SINGLE|FULL
A required argument. SINGLE is to process a list of relations, and FULL
is to process the entire database.
-p=password The Teamcenter password.
-statistics
An optional argument that outputs the count of each GRM relation the
utility queries. No other processing will occur when this option is
specified.
-u username The user’s Teamcenter login name.
Configuring Teamcenter Multi-Site to Export SolidWorks Models
If you are using Teamcenter Multi-Site to export items containing SolidWorks datasets, you must
include the following relation types in the references to be exported:
IMAN_master_form
IMAN_Rendering
IMAN_specification
TXD_long_name_relation
You should add these types to your TC_relation_required_on_export site preference. These
additional types should be included when exporting models with the other SolidWorks models
on which they depend:
SWIM_dependency
SWIM_mandatory_dependency
SWIM_master_dependency
SWIM_suppressed_dependency
SW2_configuration

63
When exporting items using the Tools | Export | Objects command in the Teamcenter Portal’s
Navigator application, or when importing items with the Tools | Import | Remote command,
remember to include the relation types above in the references shown in the Advanced tab of the
Export Preferences dialog or Import Remote Options dialog, respectively.
Configuring Teamcenter Multi-Site for Transferring Ownership of SolidWorks Models
If users are allowed to transfer ownership of SolidWorks models from remote sites to your site,
first configure Multi-Site to replicate items containing SolidWorks models, remembering when
exporting and importing items to include the relation types described in the previous section.
At the site that owns the items you want to transfer, make sure your site is included in the list of
sites defined by the IDSM_permitted_transfer_sites Teamcenter preference.
The site that owns the items must also grant the TRANSFER_OUT privilege for objects of the
POM_application_object class. For example, in the Teamcenter Rich Client’s Access Manager,
this privilege might be granted by modifying the default Import/Export ACL as shown in Figure
10.
Figure 6 ACL Granting TRANSFER_OUT Privilege
Before starting SolidWorks, you may want to add a column to the Teamcenter Integration for
SolidWorks dialogs so users can see the name of the site that owns each SolidWorks model. Do
this by adding the site keyword to the list of columns defined by the table.columns.std user
preference in the swim.properties file. This user preference and others are described in the
swim.properties file, which can be found in the installation directory.
If you chose to add the Transfer Ownership command during installation, the command will
appear in the shortcut menu when the user right-clicks on a model in the Teamcenter Integration
for SolidWorks dialogs. If this command does not appear in the shortcut menu, run the installer
again, choosing a Custom installation with only the Configure Client for Multi-Site option
selected. Refer to the User Guide’s section on Using the Shortcut Menu for more information
on the Transfer Ownership command.
Configuring the Teamcenter Integration for SolidWorks for Performance
You may want to consider the following configuration changes to improve the Integration’s
performance.
64
Set the iman.allrelations user preference to false in the swim.properties file, located in the
installation directory. If inaccessible dependencies can be ignored, Open operations may
be faster. However, you should also set checkin.ignoremissing to prompt or never to
prevent models from being saved when some of their dependencies in Teamcenter are
inaccessible. For example, you may want to add these lines to your swim.properties file:
iman.allrelations = false
checkin.ignoremissing = prompt
If using Teamcenter 9.1 and later, set the iman.metacache.enabled user preference to true
in the swim.properties file located in the installation directory. When set to true the
integration will automatically check if the cache is up to date at time of login. If not, the
cache will be updated. To enable the integration to use the Teamcenter metacache, you
may add the following line to your swim.properties file:
iman.metacache.enabled = true
In addition to the changes described above, best performance is usually obtained when using a
two-tier installation of the Teamcenter Rich Client. Performance with four-tier installations will
be slower than with a two-tier installation, when the clients and the server are on the same LAN.
If the clients and the server are separated by a WAN with significant network latency, then four-
tier is likely to be faster and more scalable than two-tier.
Restricted access to data
While opening CAD data from Teamcenter, and while saving CAD data to Teamcenter, the
integration identifies all models which are related to the top-level structured model (drawing,
assembly, and configuration). During Open and Save, Teamcenter relationships are expanded
and traversed. During Save, the CAD session is also interrogated to read its network of
dependency relations.
While expanding and traversing these relations, Teamcenter may encounter one or more
components which are inaccessible in one way or another. Common scenarios are:
The item, item revision, dataset, or some combination of these, has been assigned to a
project to which the CAD user does not have read access.
The item, item revision, dataset, or some combination thereof, has an ACL attached, or is
owned by a security-enabled group, that explicitly or implicitly denies read access to the
CAD user.
Any of the above objects was imported into the local database via MultiSite import, and
has since been deleted, leaving a stubbed reference in the local Teamcenter database.
Teamcenter allows deletion of replica data even though it is referenced by higher-level
objects in the local database. When that replica data is deleted, the reference remains.
The user is saving an assembly which has suppressed components, and those suppressed
components have never existed in Teamcenter. This can occur when the components
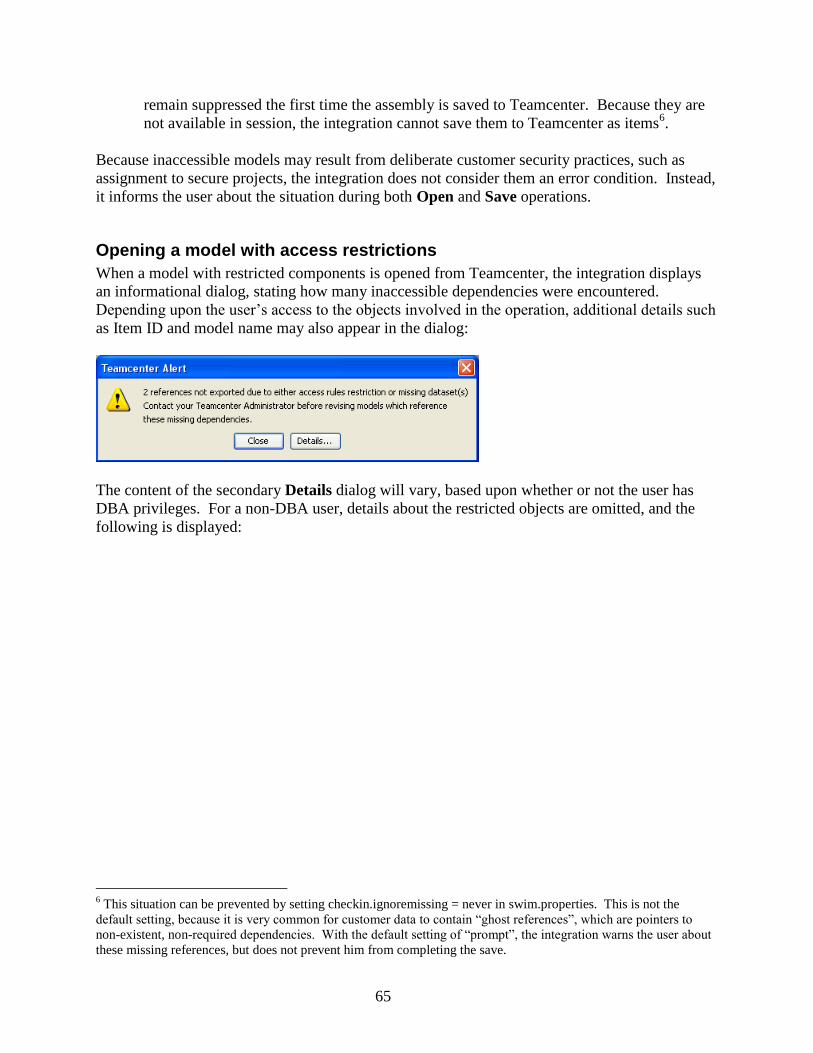
65
remain suppressed the first time the assembly is saved to Teamcenter. Because they are
not available in session, the integration cannot save them to Teamcenter as items6.
Because inaccessible models may result from deliberate customer security practices, such as
assignment to secure projects, the integration does not consider them an error condition. Instead,
it informs the user about the situation during both Open and Save operations.
Opening a model with access restrictions
When a model with restricted components is opened from Teamcenter, the integration displays
an informational dialog, stating how many inaccessible dependencies were encountered.
Depending upon the user’s access to the objects involved in the operation, additional details such
as Item ID and model name may also appear in the dialog:
The content of the secondary Details dialog will vary, based upon whether or not the user has
DBA privileges. For a non-DBA user, details about the restricted objects are omitted, and the
following is displayed:
6 This situation can be prevented by setting checkin.ignoremissing = never in swim.properties. This is not the
default setting, because it is very common for customer data to contain “ghost references”, which are pointers to
non-existent, non-required dependencies. With the default setting of “prompt”, the integration warns the user about
these missing references, but does not prevent him from completing the save.
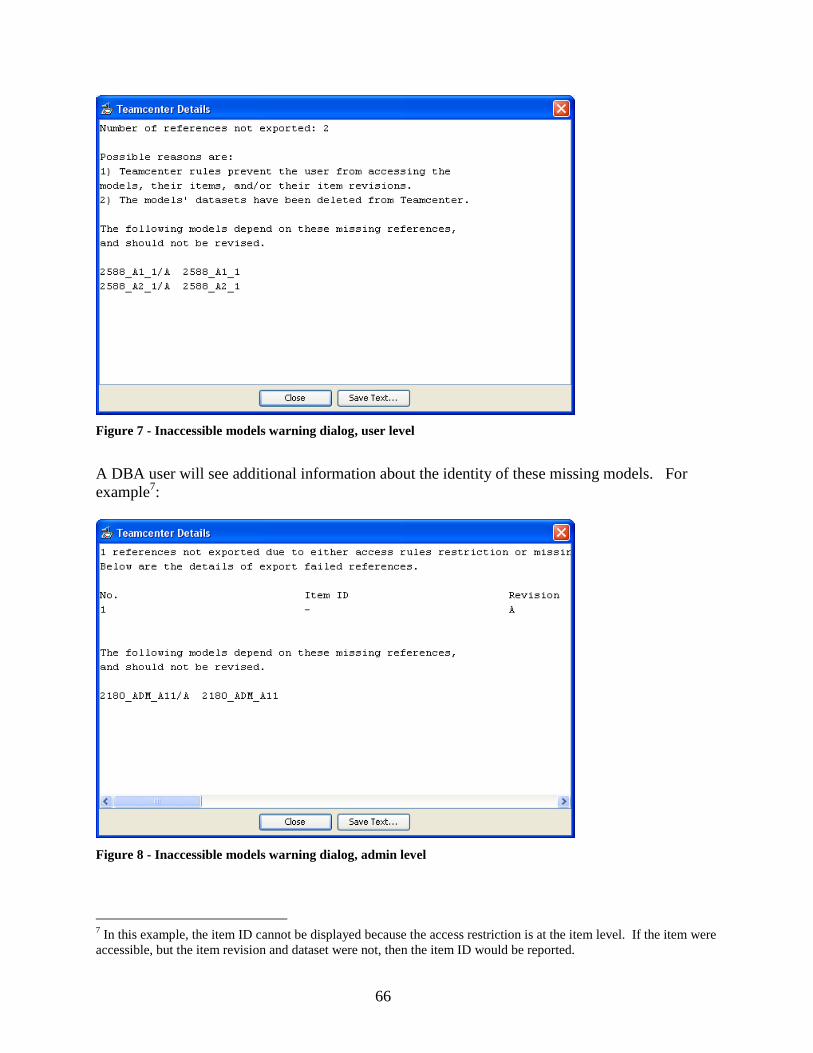
66
Figure 7 - Inaccessible models warning dialog, user level
A DBA user will see additional information about the identity of these missing models. For
example7:
Figure 8 - Inaccessible models warning dialog, admin level
7 In this example, the item ID cannot be displayed because the access restriction is at the item level. If the item were
accessible, but the item revision and dataset were not, then the item ID would be reported.

67
Saving a model with access restrictions
The integration does not display any special warnings when the assembly or drawing is checked
out and saved as a new dataset version. There is no risk of lost references in this case; the
integration simply ignores relationships to the inaccessible objects and does not alter them. The
following dialog will appear, but this is a general informational dialog that appears in several
other contexts. It is not specific to restricted object scenarios:
When the model is being saved as a new revision, however, the integration displays a warning
dialog:
The Details button will display a secondary dialog that identifies the model(s) which have
dependencies on the inaccessible objects, and should therefore not be revised unless the user, or
the Teamcenter Administrator, has judged it safe to do so:
Figure 9 - Revising a model with inaccessible dependencies
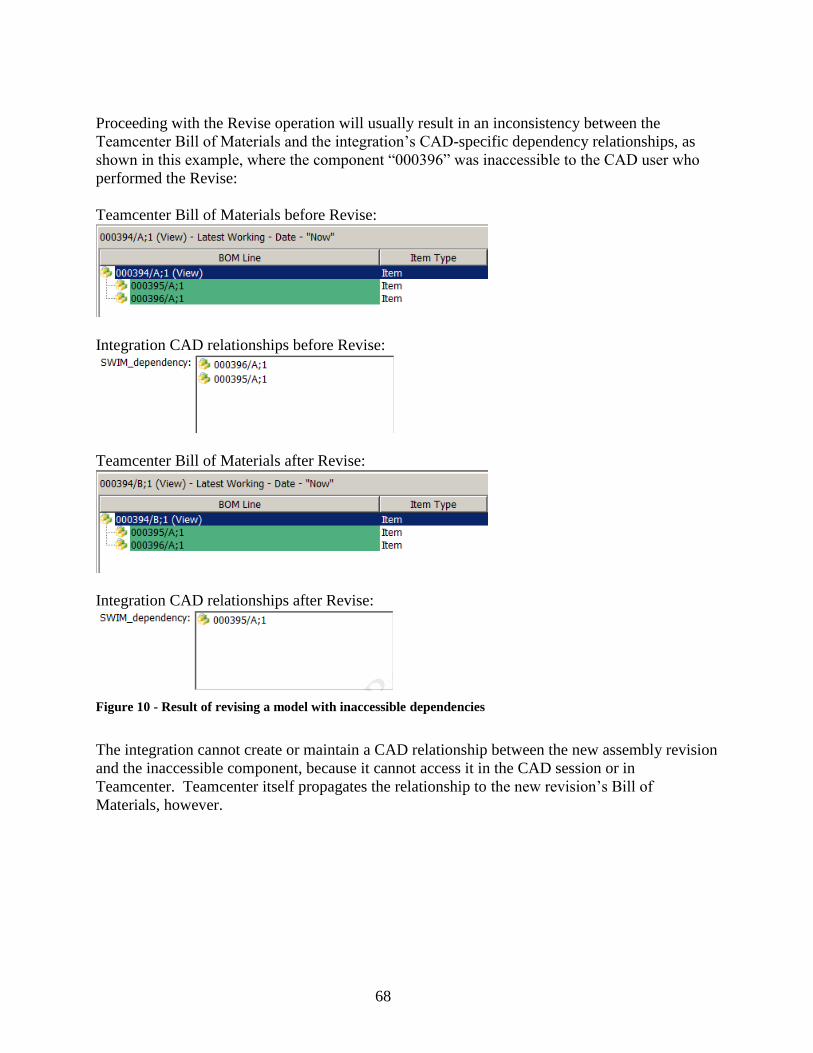
68
Proceeding with the Revise operation will usually result in an inconsistency between the
Teamcenter Bill of Materials and the integration’s CAD-specific dependency relationships, as
shown in this example, where the component “000396” was inaccessible to the CAD user who
performed the Revise:
Teamcenter Bill of Materials before Revise:
Integration CAD relationships before Revise:
Teamcenter Bill of Materials after Revise:
Integration CAD relationships after Revise:
Figure 10 - Result of revising a model with inaccessible dependencies
The integration cannot create or maintain a CAD relationship between the new assembly revision
and the inaccessible component, because it cannot access it in the CAD session or in
Teamcenter. Teamcenter itself propagates the relationship to the new revision’s Bill of
Materials, however.
69
Troubleshooting
General guidelines
Logging
Sometimes problems must be sent to Siemens GTAC for analysis. We will need a
txdlog.txt file to better understand the issue. To generate this file, add the following lines
to the beginning of the swim.properties file, on the client:
log.enable = true
log.file = c:\\temp\\txdlog.txt
log.suppress = 10000
The SolidWorks session must be restarted after making this change, in order for the
logging options to take effect.
Each integration session will also produce a client_socket.log file. This file is written to
the integration’s installation directory on each client.
Reporting problems
When submitting a case to GTAC, include enough detail to enable the assigned analyst to
reproduce the problem. This always requires a full description of the test case and data
involved, and all available log files. The minimum set required are the txdlog.txt file and
client_socket.log file mentioned above, but when Teamcenter server errors are involved,
GTAC will also need the tcserver syslog file.
It is very important to provide all necessary information with the initial submission to
GTAC. Incomplete or ambiguous information will lead to unnecessary delay in resolving
your problem.
Integration launch
If you have trouble starting SolidWorks, or if SolidWorks starts, but no Teamcenter Integration
for SolidWorks sidebar tab appears:
Make sure the minimum required build of SolidWorks is installed. See the Installation
Guide section on “Prerequisites for the Teamcenter Integration for SolidWorks” for more
information.
If the Teamcenter Integration for SolidWorks sidebar tab does not appear in SolidWorks,
make sure the SwSwimAddin is enabled. In SolidWorks, select Tools | Add-Ins to open
the Add-Ins dialog. Make sure the dialog shows the SwSwimAddin in this list, and put a
check next to its name. If the dialog does not show the SwSwimAddin, it may be
necessary to repeat the client installation or you can double click on %SWIM_DIR%/bin/
RegisterSwimAddin.bat, to re-register the integration with SolidWorks.
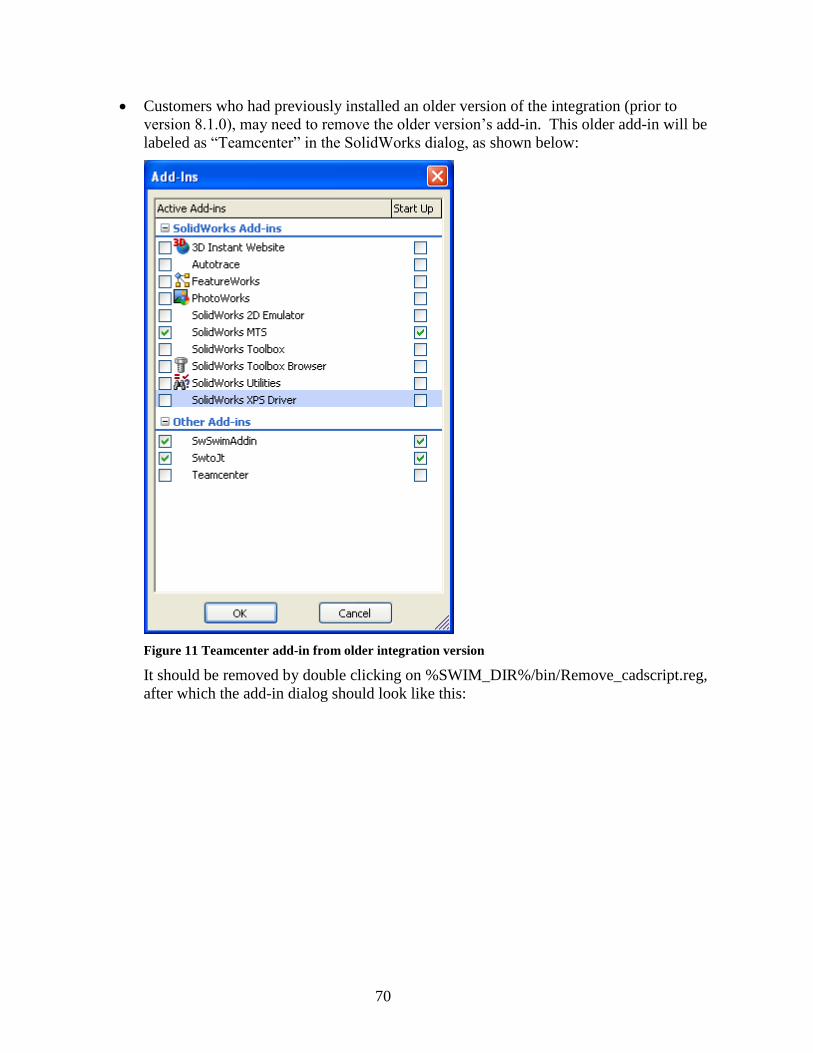
70
Customers who had previously installed an older version of the integration (prior to
version 8.1.0), may need to remove the older version’s add-in. This older add-in will be
labeled as “Teamcenter” in the SolidWorks dialog, as shown below:
Figure 11 Teamcenter add-in from older integration version
It should be removed by double clicking on %SWIM_DIR%/bin/Remove_cadscript.reg,
after which the add-in dialog should look like this:
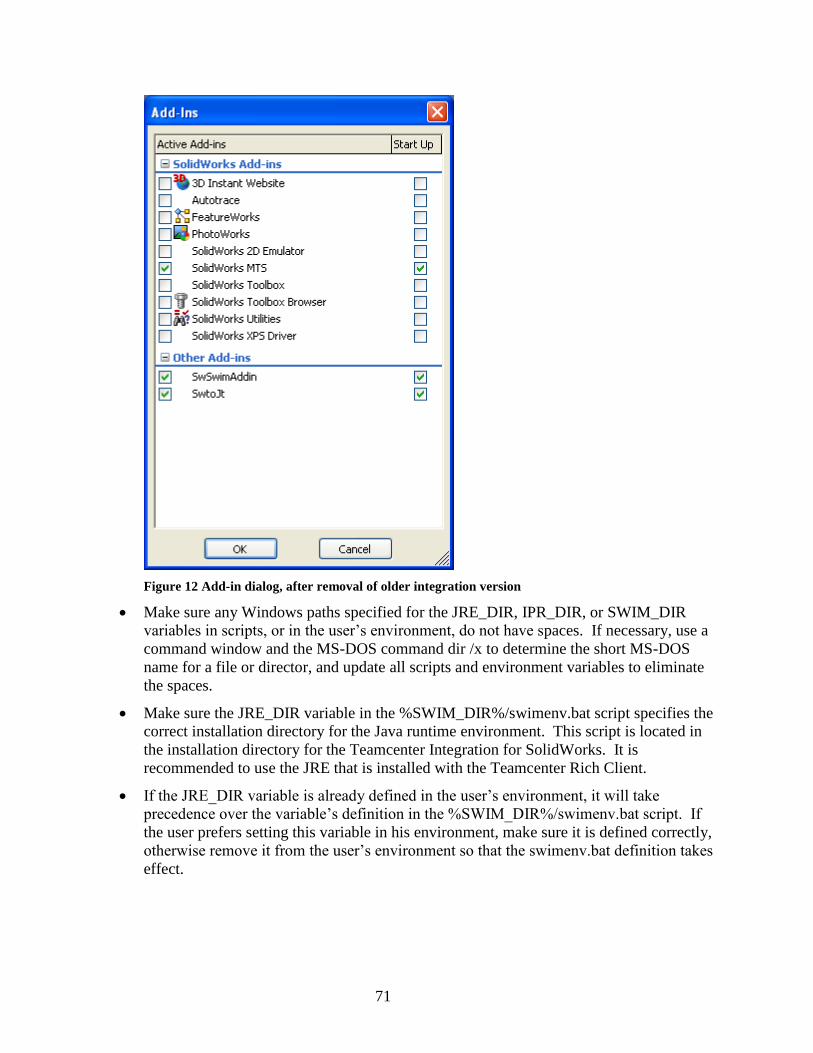
71
Figure 12 Add-in dialog, after removal of older integration version
Make sure any Windows paths specified for the JRE_DIR, IPR_DIR, or SWIM_DIR
variables in scripts, or in the user’s environment, do not have spaces. If necessary, use a
command window and the MS-DOS command dir /x to determine the short MS-DOS
name for a file or director, and update all scripts and environment variables to eliminate
the spaces.
Make sure the JRE_DIR variable in the %SWIM_DIR%/swimenv.bat script specifies the
correct installation directory for the Java runtime environment. This script is located in
the installation directory for the Teamcenter Integration for SolidWorks. It is
recommended to use the JRE that is installed with the Teamcenter Rich Client.
If the JRE_DIR variable is already defined in the user’s environment, it will take
precedence over the variable’s definition in the %SWIM_DIR%/swimenv.bat script. If
the user prefers setting this variable in his environment, make sure it is defined correctly,
otherwise remove it from the user’s environment so that the swimenv.bat definition takes
effect.
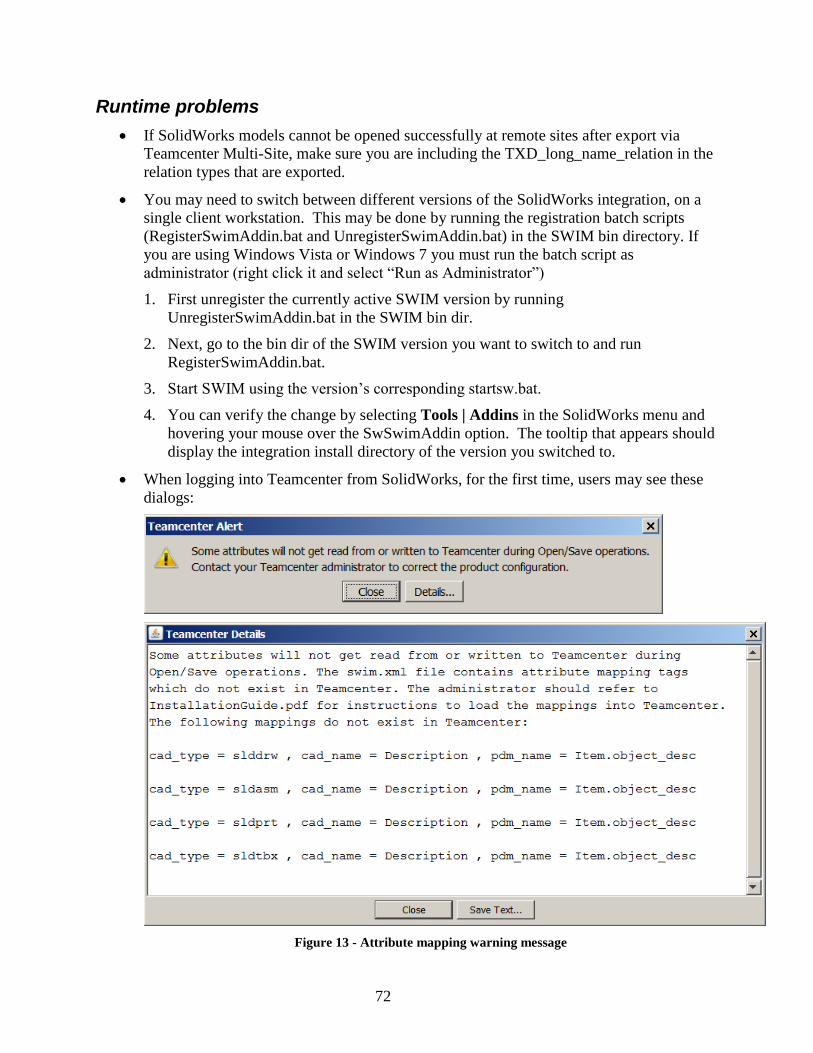
72
Runtime problems
If SolidWorks models cannot be opened successfully at remote sites after export via
Teamcenter Multi-Site, make sure you are including the TXD_long_name_relation in the
relation types that are exported.
You may need to switch between different versions of the SolidWorks integration, on a
single client workstation. This may be done by running the registration batch scripts
(RegisterSwimAddin.bat and UnregisterSwimAddin.bat) in the SWIM bin directory. If
you are using Windows Vista or Windows 7 you must run the batch script as
administrator (right click it and select “Run as Administrator”)
1. First unregister the currently active SWIM version by running
UnregisterSwimAddin.bat in the SWIM bin dir.
2. Next, go to the bin dir of the SWIM version you want to switch to and run
RegisterSwimAddin.bat.
3. Start SWIM using the version’s corresponding startsw.bat.
4. You can verify the change by selecting Tools | Addins in the SolidWorks menu and
hovering your mouse over the SwSwimAddin option. The tooltip that appears should
display the integration install directory of the version you switched to.
When logging into Teamcenter from SolidWorks, for the first time, users may see these
dialogs:
Figure 13 - Attribute mapping warning message

73
The problem is explained in the dialog text itself, but sometimes causes confusion. This
simply means that the attribute map in the swim.xml file contains definitions that have
not been loaded into Teamcenter, or have been loaded incorrectly. Users will continue to
see this dialog at each login until (a) the Administrator loads the attribute mappings
correctly or (b) the Adminstrator removes (or comments out) the attribute mappings from
the swim.xml file.