team a:faculty.kutztown.edu/tan/csc355/datafiles/artifacts/class... · web viewexamples could be a...
TRANSCRIPT

User Manual Document May 2, 2018
User Manual Document
CSC 355
Dr. Tan
1

User Manual Document May 2, 2018
Team A: 7
Development Information 7
Code and File Formatting 7
Code Management 8
Git & Github 8
Merging 8
Contributions 9
Task Creator/Editor 9
Task Assignment 9
Voice-to-Text 9
Communication 9
Intra-Team 9
Inter-Team 10
MRR 10
Issues 10
Merging 10
Voice-to-Text 10
Site Usage 10
Task Creator 11
Task Editor 11
Task Assignment 11
Team B: 12
Supervisor Accounts 12
SQLAlchemy 12
Library 13
2

User Manual Document May 2, 2018
Admin Dash & Dashboard 13
Github 13
Cloning 13
Making changes/committing 13
Keeping up-to-date 14
Team UI: 15
Overview of Team UI this semester 15
How to login to TMST to view Team UI’s testing environment: 15
Site Map: 15
Top-Bar: 16
Supervisor Pages: 16
Dashboard: 16
Library: 16
Task Creation Page: 17
Task Editor: 17
Task Assignment: 18
Supervisor Account: 18
Survey Management: 18
Reports: 19
User Account: 19
Admin Pages: 20
Dashboard: 20
User Account: 20
Register New Supervisor Account: 20
Create New User Account: 21
User Assignment: 21
Team QA: 23
3

User Manual Document May 2, 2018
Running Testing Environment 23
Blackbox Testing Procedure 23
Regression Testing 24
Modification Request Report 24
Accounts to test TMS Website 25
Functional Requirements 26
MRs Statistics: 27
Team DB:. 28
QA Testing Environment: 28
WSGI Setup 28
Example tms.wsgi file 29
Example TMS.conf 30
Storing Flask Configuration Settings 31
Coding/Team Testing: 32
Restoring Database From a Backup: 33
Configuring Automatic Database Backups: 35
Team PM: 36
Accessing the Survey Management Page: 36
Survey Management Page: 36
Sort 36
Edit 36
Creating a Survey 36
Deleting, Archiving, and Unarchiving a Survey 37
Change Who is Assigned a Survey 37
Recommended Method to Record Tasks 37
Jamaal’s Method 37
Theresa’s Method 374

User Manual Document May 2, 2018
David’s Method 38
Creating and Updating the Gantt Charts 38
Creating a New Task 38
Updating Progress 39
Submitting the Gantt Charts 40
Google Drive 40
Modification Request Report 40
ID 40
Found By 41
Date Found 41
Severity Level 41
Assigned To 41
Summary 42
Risk Management Plan 42
Slack 42
Poster Board Creation 43
The Printer 43
In OM156 43
Not In OM156 44
Creating The Poster Board 45
Printing The Poster Board 47
Referenced Documents 48
5

User Manual Document May 2, 2018
6

User Manual Document May 2, 2018
Team A:Development Information
This Development Information section will attempt to cover all information needed to understand how Team A’s sections are organized and function. It will include all files and functions we have implemented as well as our formatting standards.
Code and File FormattingBefore getting into the description of our formatting, it is worth noting that this is only the
formatting for Team A; formatting has not entirely been standardized across the entire class, but should be by the end of the project.
File names are written in all lowercase letters and separated by underscores. This is also the case for function names as well. The exception to this rule is the unspoken standard that has arised in the class for the helper_methods folder, which has every file use capitalized words and no spaces or other methods of separating words.
The look of the code has been dictated by PEP8 standards, which was the agreed upon standard to be followed by the class. PEP8 dictates the spacing, indentation, line length, and more of code and can be found here. The class uses PyCharm to work with code, which has built in PEP8 recognition to help with this, though other editors might have something similar either in the main program or a plugin/add on.
Commenting is attempted throughout the code to explain everything that is happening so it will be clear for later revisits by the same or other team(s). The main formal way of commenting is for functions. We comment a function using the built in template from PyCharm, which is based on PEP8. This format is three sets of double quotes (“””) on the first line and nothing else. After this is the author/contributors for the function, labelled with “Authors:” followed by the name(s) and any relevant information. The next line is a one-line description of the function and its use. The following lines are for parameters and returned values. each parameter gets its own line, labelled with “:param” followed by the name of the parameter, then a description which often includes its type. Returned values start with “:return” and have a description of what is returned. To end the description block, another line of three double quotes follows the return line. Labeling sections of code are one line comments starting and ending with three sets of double quotes (“””). Any comment describing specifically what the code is doing will use the pound sign (#) followed by a space and then comment.
Code ManagementThe Code Management section will cover how code is distributed to developers and how the
main code is updated after each sprint. It will cover some of the software used and explain how to use git to work cooperatively.
7

User Manual Document May 2, 2018
Git & GithubGit is a type of software known as Version Control. It is used to easily work on features while
keeping a working version of the system in what is called the master branch. More information on the software itself can be found here or some explanations of the basics by Team B are in their Github section.
Github is an online service that will be used as a central saving location called a repository or “repo”. This is where all of the committed code should be stored for anyone in the class to access. This is also where branch organization and merging can happen.
With the use of Git and Github, the teams can keep their code accessible and organized, as well as being able to separate their code from others to avoid interference. We suggest each team create at least one branch per sprint. This could be something like teama_sprint1 and this would be where all of Team A’s code gets merged into before a class merge. This allows the class merge to involve less files and Team A is able to test that their code works as intended before combining with the rest of the teams’ functionality.
The team branch should be broken down into either developer branches, feature branches, or both. Developer branches would be a less specific way to divide work and should include all features assigned to that developer. Feature branches should specify one feature that can be individually tested and implement only that feature. Examples could be a developer branch for Dylan Kramer during the third sprint called teama_sprint3_dk, or a branch to implement media upload during the third sprint called teama_sprint3_media_upload. These branches should be merged into the team branch either when complete or when the team wants to have their code updated. The team can decide how to do team merges.
MergingMerging of code brings one branch into another by comparing differences in the files and
allowing the person merging to choose what goes into the branch being merged into. Master is an example of a branch that would be merged into, and master specifically should only be merged into and copied; master should never be worked on directly. Ideally, this will allow master to only ever have working code. Merging into the master branch would be done by selecting the newly updated branch, and then selecting the merge into option on Github, and selecting merge into master. Ideally, this branch would be merged automatically, with no merge conflicts.
Not every developer needs to be part of every merge; instead, smaller groups of representatives with combined knowledge of the changes being merged should handle the actual merge. We suggest a merge being done into the team branch before doing a full class merge into master. Team merges most likely will include all members to share reasons behind changes and work through issues and anything that might have broken. Class merges should have at least one representative from each team which has contributed code to work through issues.
8

User Manual Document May 2, 2018
We also suggest merges happen regularly and fairly often to make the merge issues smaller and allow everyone to stay fully updated. We suggest doing merges weekly with the class if possible, and merge into the team branch whenever a new feature is completed. This will allow up to date code to be accessible to everyone and allow more time to correct issues brought from a merge.
ContributionsThis Contributions section will cover everything Team A has done for the project. It will go
through all features we have written and explain the uses of each. For further clarification, and an in depth look into the code, look at the comments in the code.
Task Creator/EditorThe backbone of the Task Management System is the creation and editing of tasks. This begins
with the Task Creator. The Task Creator builds a brand new task for the supervisor, while the Task Editor allows a supervisor to edit a previously created task, either one they have previously made or one they have claimed from another supervisor.
Task AssignmentAnother essential element to the Task Management System is Task Assignment. Task
Assignment is where a supervisor navigates in order to assign tasks to the users under their care. Additionally, Task Assignment allows supervisors to unassign tasks previously assigned to users.
Voice-to-TextVoice-to-text is a feature that appears only in the html templates throughout TMS. This feature
can be accessed only when using the Google Chrome browser, and by enabling the website to have access to a connected microphone. In order to access this functionality, the website was given https certification. This feature is accessed by clicking on the microphone button appearing next to designated text boxes, namely those in the Task Creator/Editor.
Voice-to-Text processing is done by the startDictation method in speechRecognition.js. It’s 15 lines of JS that utilize the HTML5 WebSpeechKit api. It’s enabled in Google Chrome by default which is why we limit use to Chrome. Firefox and Safari are capable of it but the feature is disabled by default. Maybe in a future release of those browsers, it’ll work out of the box.
CommunicationCommunication is important when working in a group, especially when an individual’s work can
affect everyone else as much as code. Everyone needs to be on the same page, and this section is going to outline our ideas on that concept.
Intra-TeamCommunication within the team has been handled over Discord. The team is the first place to go
for most issues in programming. Discussions should be regular and organic, especially while working on implementing features. The format of intra-team communication can be anything everyone agrees on,
9

User Manual Document May 2, 2018
and should also include a weekly meeting with all members to discuss anything related to the project, such as work done, work to be done, and issues that have come up.
Inter-TeamCommunication between teams has been handled over Slack, which was the instructor’s
suggestion. Inter-team communication, like intra-team, can be done through any service, though leaning towards professional applications might be good for the experience. This type of discussion could happen whenever there is an issue with the code or protocols that affects multiple teams, or whenever an issues arises that the team cannot answer. There were no completely formal meetings for the class; instead, the main way the entire class interacted was during class time by being in the same room for an hour and a half.
MRRThe MRR is a formal mode of communication between teams and instructor. This is used only to
report problems found while testing. Duplicate issues should be avoided, especially if grades depend on this document. If an issue has been reported previously, possibly add more to the description of how to replicate the problem. The MRR should also be checked frequently to keep updated with current issues in the system.
IssuesThe Issues section covers problems Team A has encountered over the semester and possible
solutions for future teams to avoid or fix.
MergingMerging has caused some big problems. We have only done merges at the end of sprints, which
provides possibilities for bugs and issues to slip through. We have also relied on one person to handle the full merge for the first two sprints. Our solutions to these issues have been covered in the Merging section of Code Management.
Voice-to-TextVoice-to-text implementation is currently limited to only working on Google Chrome. The
current version of Firefox (59.0.2) does not allow access to voice-to-text functionality. It is possible that future releases of Firefox may change this, but currently, voice-to-text only works on Google Chrome.
Site UsageThis section will cover what all is needed to understand navigation to Team A’s pages, how to
use those pages, and explain what everything on those pages is for. Team A has developed the logic and set up the basics for formatting while Team UI has taken those basic components and created a cohesive look for the site. The look and feel are, therefore, the combined work of both teams. Additional information on these pages can be found in the UI Team’s Supervisor Pages Section.
10

User Manual Document May 2, 2018
Team A was responsible for implementing functionality for the Task Creator/Editor and Task Assignment pages, as well as voice to text, activate/deactivate, and publishing features. A detailed explanation of the pages and features follows.
Task CreatorThe Task Creator page consists of various fields that the supervisor can edit. Firstly, each task is
given a name, short description, and possible identifying image. Additionally, one can add main steps to the task by clicking on the add main step button. Each main step has a title, text, required item, and media field. Detailed steps can be added to each main step, with each detailed step having a title, text, and image field. Detailed steps and main steps can be deleted by pressing the remove step button within each step.
Below the steps, supervisors can choose whether they wish to publish and/or activate the task by clicking the check box. Published tasks are visible to other supervisors in the library and activated tasks can be assigned to users. Additionally, the supervisor can add keywords in the keywords text box. Once the task is completed, the supervisor will click on the save button to save the task to the library.
Voice-to-text is featured on this page and can be accessed on Google Chrome by enabling access to a connected microphone and clicking on one of the microphone buttons next to a text box. Attached media is not saved upon adding or removing steps, so media must be added only as the final step.
Task EditorThe Task Editor performs identically to the Task Creator, but instead of creating a new task this
page loads a previously created task that is selected from the library. All fields on this page are the same, can changing this task will overwrite the current task in the library with new changes.
Task AssignmentThe Task Assignment page can be found by selecting it from the menu bar on any page. This
page begins with the supervisors selecting the user to assign/unassign a task from the first dropdown box. Then, the supervisor chooses whether they wish to assign or unassign a task. If the supervisor wishes to assign a task, the would click on the assign task button and select the task they wish to assign from the dropdown box. They would then select the assign task button, assigning the task to the user. If the supervisor wishes to unassign a task, they would instead select the remove button and then select the assigned task the wish to unassign from the user from the dropdown box. Then, by clicking the remove button, the user will then have that task unassigned from them.
11

User Manual Document May 2, 2018
Team B:Supervisor Accounts
Supervisor accounts can be created by going to create_supervisor page, or the following are already made in the db:
user: [email protected]
pass: 123
user: [email protected]
pass: super1
SQLAlchemySQLAlchemy uses ORM, or Object Relational Mapping, to interact with a relational database.
Using ORM solves the paradigm incompatibility between object-oriented programming languages and relational databases. ORM also allows for ease of use, security, and reusability of code. SQLAlchemy is a healthy project on Github with over 11,000 commits and 260 contributors (as of 2/18/18).
Video - Introduction to SQLAlchemy
This video goes from the fundamentals of SQLAlchemy and works it’s way up to more complex examples. And is very good tool for learning how to use SQLAlchemy.
12

User Manual Document May 2, 2018
LibraryLibrary was designed to make searching and finding tasks much easier. A supervisor can create a
new task in the task editor, and it will show up within the library. You are able to search for tasks that you created as well as those that are created by other supervisors. If you want to use another supervisor’s task then you have the option to claim that task as your own, and edit at will.
Admin Dash & DashboardDashboards for both administrator and supervisor. Each has their own tailored to the needs of
their positions. The supervisor will see, on their dashboard, seniors that they have assigned to them. The administrator will see all supervisors and the seniors that pertain to that given supervisor. From either dashboard there is an edit button adjacent to each person’s name to take you to their account page to see/edit their information.
GithubGithub is a version control software that allows big/small teams to work together on the same
project in parallel.
CloningTo get start with github you need to clone the repository to your local machine. The benefit to
having your own copy on your local machine is that your able to edit any of the files on the fly. To clone the git repository you will use the following syntax:
git clone [url-to-repo]
After calling the aforementioned command it will begin downloading the repository in your current directory (if the project is called TMS it will be downloaded to ./TMS). After this command finishes you will now have your very own copy of the project. The beauty of using github is that even though the files are now saved locally, it will be keeping track of all your changes so that you can commit them to the remote project files.
Making changes/committingNow that we have the project cloned to our local computers lets try making a change to a file. It
doesn’t matter what file, so long as it is within the project directory. After changing a file we can now use the status command:
git status
This command will tell us what branch we are on, and all the files that have been changed (in red). Notice that the files we changed are in red. Red files mean that those files were changed, but not added to the staging area. To add the files to the staging area we must use the add command:
git add .
13

User Manual Document May 2, 2018
Add . will add all unstaged files to the staging area, and have them ready to be committed. To commit the files that are ready to be updated on the project we must use:
git commit -m “commit message.”
Now we have all the changed files committed and ready to be pushed to the remote project files.
git push
After calling this command it will take all your commits and send them to the remote project folder, and make it available for everyone else to see.
Keeping up-to-dateNow we have a major issue if we only push new files to the remote project. What happens if
someone else in your team make changes. It is usually good practice to make sure that you commit your changes daily, if you have them, and before making any new changes update your files.
git pull
This will pull all new changes in your current branch down from the remote project, and update your local files with the new ones.
14

User Manual Document May 2, 2018
Team UI:Overview of Team UI this semesterThe UI Team focused of creating simple yet elegant page designs based upon our class set functional requirements. As team UI, we focused on creating a web application that was easy to use and easy on the eye. Below is our guide to work with all of the progress team UI has made over the past year.
How to login to TMST to view Team UI’s testing environment:1. Login to acad with your username and password.2. then type “ssh -Y [email protected]”3. it will prompt you to type the password “humedavid”4. must cd to Team_UI/AandB/tms5. Once you are in the tms directory type “python3 run.py”6. The process will start running
7. In a web browser, type “http://csit.kutztown.edu:55000/login” 8.The login page will render and have a login prompt, to login email: [email protected] password: 123 9. You will now be directed to the dashboard. 10. You can click on the links to navigate around the TMS web application.
Site Map:
The TMS system has two accessible sides; one for the admin and one for the supervisor. They are both accessible via the login screen. IT is important to note that these sides differ from each other in the permissions they have and accessibility to certain pages. Listed below are the differences between them.
The supervisor has access to the following pages:
- Supervisor Dashboard page- Library- Task Editor- Task Creation
15

User Manual Document May 2, 2018
- Task Assignment page- Supervisor Account page- Survey Management- Reports
The Admin has access to the following pages:
- Admin Dashboard page- Supervisor Account page- Register - New User Account page- Create - New User Account page- User Assignment page
Below will be descriptions and a guide around the TMS web application. It will start with an overall guide with the navigation bar and then followed by the pages specific to the user whether it be supervisor or administrator.
Top-Bar:
The top bar is the main method of navigation through TMS. Once logged in, there is a different top bar depending on the user logged in. Each top bar will serve the same purpose, to navigate to certain pages. All pages are accessible via the top-bar except the task editor page. Task editor is only accessible via the library. By clicking on the username in the top-bar of the signed in user, many options are displayed; including the option to sign out.
Supervisor Pages:Below are the pages that the Supervisor will have access to and the options the supervisor has on the respective pages.
Dashboard:
The Dashboard is the first page a supervisor sees when logging into TMS. At first visit, the supervisor is met with a summary of different statistical information including graphs and charts. Also, a list of all users that are assigned to that supervisor. By clicking the name of a user, TMS will bring the supervisor to that user on the user assignment page.
Library:
The Library is used by the supervisor to search through all created tasks. This can be done via 2 methods. First, a built in sort function to sort via a variety of different queries. Such as alphabetically and date created. These queries can also be shown in reverse order via the flip button. This reverses all results shown from top to bottom, to bottom to top. For example, having things sorted A-Z may be great
16

User Manual Document May 2, 2018
if you are looking for bake a chicken, but looking for zip your zipper would take very long. Using the flip button, bottom results will show first so zip your zipper would appear first, since you are essentially showing results in Z-A. There is also a search functionality that allows you to search via a search bar for task names or keywords. Including only parts of task names and keywords starting from the beginning of a string. Results appear as a picture and a string. The string will appear as a task name below the attached picture. The picture will be pulled from the database that is applied to the task, and is either an image of that task, or if no picture is available a picture of the first letter of the task. Tasks cannot be edited by a supervisor who does not own them. By claiming a task, a supervisor then owns it. Once a supervisor owns a task, they are able to edit that task via this prompt, which will take the supervisor to the task editor page for that task. The task editor is only accessible via this page. A supervisor can also filter tasks by which supervisor owns them, or by every task in the system. Only the owner of an unpublished task can see their own unpublished tasks.
When a supervisor or user adds an image to a task, it will display in the box below labeled “Task Image” with the task name below. A search bar is at the top of the page, where a supervisor can tap and type to search for a query. Before a supervisor begins to type, recently searched terms will show at the top of the search suggestions. Once a supervisor has typed a character for a search result, relevant suggestions will show. A supervisor will then hit enter to start a search, or hit the “search” button on the right side of the search bar. A supervisor can hit the microphone on the right side of the search bar, the microphone will then be activated voice to text. The supervisor can then speak and their voice will populate text in the search bar. Tasks may be sorted by using the sort option on the page. In the upper left, the option for whether to see the whole library or just the library of the supervisor can be toggled.
Task Creation Page:
The Task Creation page is where the supervisor can create new tasks. The supervisor can add an image to a task and create a task name. It can also edit existing keywords and create new ones. Task creation page can create main step names, main step text, add required items, add audio and video, and create entirely new main steps. Furthermore, it can add detailed step names, detailed step text, current images, and create new detailed steps. This page also includes functionality to change the order of main steps and detailed steps. Supervisors also have the ability to activate and deactivate tasks, save work for later, or to publish a task for every supervisor to see.
Task Editor:
The Task Editor is a page where the supervisor can edit already existing tasks. It can edit the image of already existing tasks, the task name and both edit existing keywords and edit new ones. The Supervisor can also edit main step names, main step text, edit required items, add or edit audio and video and create new main steps. Furthermore, the supervisor can edit detailed step names, detailed step text, add or edit current images and create new detailed steps. This page also includes functionality to change the order of main steps and detailed steps. Task editor can also be used to activate and deactivate tasks,
17

User Manual Document May 2, 2018
and to save their work for later, or to publish a task for every supervisor to see. Functionality is also implemented to allow the supervisor to append surveys to different tasks which are created via the survey management page.
The task editor is accessed only through the library. In the upper left displays the option to upload a task image. In the upper right, it shows the task name which can also be edited. The hamburger gives the supervisor the option to upload an image, remove detailed steps and the option to add a new detailed step. Below the main steps there is an option to add a new main step. Below that, there is a dropdown option to attach a survey to the task and a slider to enable or disable a task. At the very bottom, there are options for saving the task for later, or publishing the task.
Task Assignment:
The task assignment page is a page that allows a supervisor to assign tasks to a user. A supervisor can search through a list of users and assign them a task(s) from a list of all tasks in the database by clicking the assign task button. By clicking the view assigned tasks, it shows all tasks assigned to that user.
Supervisor Account:
The supervisor account page is a page that allows a supervisor to be able to view his or her information and update their password.
The supervisor screen will display the supervisor’s account information, three functionality buttons and five text fields. The “Upload Photo” button gives the supervisor the option to upload a photo of themselves to be displayed onto his or her account profile. Five text boxes will be launched to the supervisor to key in his or her phone number, address, email address, gender identity and affiliation to the Task Management System web application. The “Clear” button allows the supervisor to be able to clear out the form fields in case the information entered is incorrect. A “Submit” button is displayed to save entered information to the database. The supervisor account page can be accessed from any page via the upper right drop-down and by clicking account. None of the forms are required since this is just changing information that was already established when the supervisor account was created.
Survey Management:
The survey management page was made to create surveys that users can fill out. Supervisors can create a survey as well as append it a survey name. Supervisors also have the option to edit existing surveys by selecting a survey out of a dropdown. If the supervisor is creating a new survey, the information below will be populated with filler information that can be easily edited. Survey questions can be both toggled on and off or even deleted. They can also be reordered very easily. Each question can have any number of questions which can be modified, as well as a toggle to enable and disable the survey.
18

User Manual Document May 2, 2018
Reports:
The reports page is a page for the supervisor to access and view information on each user assigned to that supervisor. This includes tasks assigned to each user and specific information about each task. For example, when the task was assigned and when it was finished.
The Reports page shows the supervisor two drop down menus as well as three buttons. One button for generating, printing and emailing. The two drop down menus: GSuper and Month, the GSuper menu list will show the users assigned to the supervisor. The supervisor will be able to select a specific user, and see the reports for that specific user. The time drop down list will display the reports from a specific time. The supervisor will have the option to choose from monthly, weekly or daily. Currently, the Reports page displays the Month option when the supervisor clicks on a specific month. For example, if January is clicked, the web application will show the reports that were reported for that month. The supervisor has the option to email and print the reports. The supervisor also has the option to generate a visual graph of the reports. This displays the results of the task in a graph. The graph will show the tasks completed, when they were completed and the length of time the user took to complete the task. Depending on the selection from the supervisor, the page will display the results accordingly. For example, the month selected will show April, and the name will show the user selected. Also displayed are the number of tasks completed, the task names of the tasks completed and the date and times of the tasks completed. These results are displayed in text boxes.
User Account:
This page exists so a supervisor can view information about users. This page cannot be edited by supervisors for security purposes.
The screen will display the user’s account information, three functionality buttons and five text fields. The “Upload Photo” button gives the option to upload a photo of themselves to be displayed onto his or her account profile. Five text boxes will be launched to the supervisor to key in his or her phone number, address, email address, gender identity and affiliation to the Task Management System web application. The “Clear” button allows the supervisor to be able to clear out the form fields in case the information entered is incorrect. A “Submit” button is displayed to save entered information to the database. The supervisor account page can be accessed from any page via the upper right drop-down and by clicking account. None of the forms are required since this is just changing information that was already established when the user account was created.
19

User Manual Document May 2, 2018
Admin Pages:Below are the pages that the Administrator will have access to and the options the supervisor has on the respective pages.
Dashboard:
The admin dashboard functionality works the same as the supervisors.
User Account:
This page exists so an admin can edit the information of end users since this information is too confidential for supervisors to know.
The screen will display the user’s account information, three functionality buttons and five text fields. The “Upload Photo” button gives the option to upload a photo of themselves to be displayed onto his or her account profile. Five text boxes will be launched to the supervisor to key in his or her phone number, address, email address, gender identity and affiliation to the Task Management System web application. The “Clear” button allows the supervisor to be able to clear out the form fields in case the information entered is incorrect. A “Submit” button is displayed to save entered information to the database. The supervisor account page can be accessed from any page via the upper right drop-down and by clicking account. None of the forms are required since this is just changing information that was already established when the user account was created.
Register New Supervisor Account:
This page exists so an admin can create a new supervisor. Supervisors must be assigned a username and password. They also must have users that will be assigned to them by default. Once the the new supervisor is created, the page will route to the supervisor account page.
Create New User Account:
20

User Manual Document May 2, 2018
This page exists so an admin can create a new end user, supervisors don’t have the power to create new end user since this information is too confidential for supervisors to know. End users must be assigned a username and password. Once the user account is created, the page will route to the user account page.
User Assignment:
The user assignment page exists so an admin can assign supervisors end users. This functionality cannot be given to supervisors since they would be able to give themselves their own workloads. Admins can select a supervisor from the dropdown on the left. Each dropdown has a search bar which can search for users or supervisors in each appropriate dropdown.
21

User Manual Document May 2, 2018
Team QA:Running Testing Environment Note: Refer to Team DB QA Testing Environment part in regards to setting up testing environment.
After each sprint, the development teams must merge their code. Upon merged code being available team QA should pull it from where code is located.
In order to pull the code, first an account for team QA should be created by testing environment owner. In our case the Systems Administrator set up an account that had sudo permissions. The environment owner account then created an account for team QA. QA account is able to make changes to the environment.
Team QA Account in Testing Environment Example: team_qa
Password Example: team_qa
For Team QA to update a merged code, the following steps must be performed:
● Login as QA account (can sign in as following example ---> Login: team_qa@tms Password: team_qa)
● cd (destination where code will be used)● git clone <githuburl> (for the first time)● git fetch (to pull down new branch names)● git checkout <name_of_branch> (for every other merge, pulls updated information from the
branch)● service apache2 start (to run the server for blackbox testing)
Blackbox Testing ProcedureBlack-box testing is a method of software testing that examines the functionality of an application without peering into its internal structures or workings. Black box Testing is during System testing done after code is merged and pulled.
Common procedure to do black box testing is by following test cases. Test cases are written in Test Specification document. Test cases are built around specifications and requirements, i.e., what the application is supposed to do. Test cases are generally derived from external descriptions of the software, including specifications, requirements and design parameters. Although the tests used are primarily functional in nature, non-functional tests may also be used. The test designer selects both valid and invalid inputs and determines the correct output, often with the help of a test oracle or a previous result that is known to be good, without any knowledge of the test object's internal structure.
When writing a test case, test designer needs to have a general knowledge of how the system should behave. A web site map (acquired from team UI), and functional and non-functional requirements must be used when writing test cases for the Test Plan document. During testing, failed cases must be recorded in MRR (Modification Request Report) document.
22

User Manual Document May 2, 2018
Regression Testing At the end of each sprint, team QA performs regression testing. Regression testing, a black box testing technique that consists of re-executing those tests that are impacted by the code changes. Changes may include software enhancements, patches, configuration changes, etc. During regression testing, new software bugs or regressions may be uncovered. These areas may include functional and non-functional areas of the system.
The purpose of regression testing is to ensure that changes such as those mentioned above have not introduced new faults. One of the main reasons for regression testing is to determine whether a change in one part of the software affects other parts of the software.
Common methods of regression testing include re-running previously completed tests and checking if program behavior has changed from the previously fixed faults, when re-emerged. Regression testing can be performed to test a system efficiently by systematically selecting the appropriate minimum set of tests needed to adequately cover a particular change.
When performing regression testing the Modification Regression Report(MRR) document must be used to retest each issue that was fixed by developers. Upon testing issues written in MRR document, testers must either document the status of issue as Open or Closed. Open is assigned to issues that have to be fixed, Closed is assigned to issues that got fixed and work properly. For each MR that is Open, tester must add notes that explain what the issue is, and how the issue was found. Reference Figure #1.2 below, Modification Request Report provides a sample idea.
Modification Request ReportThroughout development and testing, all system defects must be documented on the Modification Request Report (MRR). The MRR is a guiding document that keeps track of the status of all defects discovered. All teams have access to the MRR and have the ability to record any flaws within the TMS application. The purpose of the MRR is to compile and organize all defects in one central document. Each team has the ability to coordinate and assign issues to be resolved by other teams or to a specific individual. Conversely, each individual or team is responsible for resolving issues assigned to them in a timely manner. Each MR has a status to it. When MR is first identified, it is assigned a status of being Open. As the regression testing takes place, each MR changes its status to help testers and developers observe the current state of MR. The six MRR statuses listed below are used to define the condition of each test case recorded on the MRR:
✥ Open: A new issue found by a tester or developer but has yet to be assigned by a specific developer, tester, or team.
✥ Assigned: Issues that are created and designated to a specific developer, or team responsible for resolving the issue.
✥ Fixed: Issue that have been resolved by a developer, or team; and it is ready for retest.
23

User Manual Document May 2, 2018
✥ Closed: A test case that was fixed by a developer and passed when re-tested.
✥ Failed: A test case that causes the software to fail when tested.
✥ Not Relevant: Documented issues that are not applicable to the development of the application.
Errors documented in the MRR have different severity level depending on how soon the issue needs to be resolved. The four severity levels are Critical, Major, Minor, and Enhancement. These issues are color coded with different colors representing each severity level, refer to Figure 1.1. below.
Accounts to test TMS WebsiteIn development phase, the Database team should create at least two accounts for administrator supervisor, and users. These accounts are to be used for testing by the QA team to test initial functional requirements.
After determining that pre populated accounts work, the administrator should then be able to create the Supervisor and User accounts. Supervisor should be able to assign tasks to the User accounts. These accounts should be the ones used to log in.
The initial Supervisor and User accounts should then be abandoned and new accounts must be created by Admin account to verify that system can work with new accounts. The purpose for pre populated initial accounts was to test functional requirements to view the system and not interact with it. Thus Accounts to test TMS website starting from Sprint 2 must be ones created by Admin account. Below are accounts that were used during System Testing.
24

User Manual Document May 2, 2018
Initial Accounts Login Password New Accounts Login Password
Administrator bosshog money Administrator bosshog money
admin ku12. admin ku12.
Supervisor [email protected] super1 Supervisor [email protected] 123
[email protected] 123 [email protected] 123
User [email protected] *** User [email protected] 123
[email protected] *** [email protected] 123
Table 1.3
!To acquire passwords to the provided accounts, request information from Dr. Joo Tan.
Functional RequirementsEach team established requirements for developing the web application in SRS document (See SRS text below). Each requirement defined the proper functionality and ease of usability. Our job as the QA team was to take each functional requirement and develop test cases and scenarios to test the web application for thorough functionality. Any failed requirements were documented for the developing teams to make the necessary changes, then re-tested to ensure proper functionality of the web application.
SRS: The Software Requirements Specification document is a description of the TMS web application in development. The SRS describes the services and requirements that the TMS web application will provide from the perspective of a user, and the maintenance requirements from the perspective of an administrator, in order for the web application to work.
Non Functional Requirements: Specifies how the web application should behave. The quality attributes of usability, performance, and testability are tracked during the project while testing to provide feedback for the developmenting teams to improve functionality of the web application, and to ensure ease of usability and successful execution of steps for all users. Site map was also used as testability to test performance of the TMS web application.
MRs Statistics:
Sprints Passed MRs/ Total MRs Percentage of Closed MRs
25

User Manual Document May 2, 2018
Sprint 1 33/50 66%
Sprint 2 64/112 72%
Sprint 3 30/49 39%
Post Sprint 3 7/22 32%Provided statistics are pertaining to the post merge of 4/20/2018.
26

User Manual Document May 2, 2018
Team DB:. QA Testing Environment: Before setting up a testing environment talk to Systems Administrator to determine your server name. I.E. our server name is tms.kutztown.edu
Our testing environment is hosted on the kutztown server. Christopher Walck set up 2 virtual machines for this project. tms and tmst both of them are virtual machines where there is root access. TMS is used for the developers to test their code where TMST is used for the testing environment to test the code. Do to a security issue port 80 is blocked, restricting access from off campus including dorm room internet connections. The internet connection must be bearnet wifi on the academic side of campus.
A certificate was needed for Team A to be able to use the speech to text feature. Refer to Team A’s user manual for more information, this was their functional requirement.
1. https://tms.kutztown.edua. tms.kutztown.edu/ipaws
2. https://tmst.kutztown.edua. tms.kutztown.edu/tms2
b. tms.kutztown.edu/ipaws
iPaws is the front end of the system and it can be accessed if you go to tms.kutztown.edu/ipaws or tmst.kutztown.edu/ipaws, depending on who is testing the system. TMS is used for the developers to test their code where TMST is used for the testing environment to test the code.
Nearing sprint completion, code must be merged into one branch. This branch must then be pulled down to this directory. Team QA will then test the sprint.
Both are done using a WSGI script -> See this web link on how to deploy a flask application https://www.digitalocean.com/community/tutorials/how-to-deploy-a-flask-application-on-an-ubuntu-vps
WSGI Setup Also know that you need sudo or root permissions to perform most of these actions
Please note: Apache2 must be installed in order to use mod_wsgi. You can feel free to use any environment you see fit, but the instructions below are for Apache2 and mod_wsgi.
Also be aware of
1) After reading the link above, follow the steps to install mod_wsgi and to enable it with Apache2
27

User Manual Document May 2, 2018
2) First, you’ll need to add the site to your apache config. Use step four from the link above to see what directories you need to go to. Also placed below is an example sites file. This allows for HTTPS connections to your website. It can be changed to allow for HTTP connections, but the current version of the application does not allow for that.
3) Below is the .wsgi file I used to start the application. It should be similar to whatever setup you choose. You will create this file in your application's directory (i.e. /var/www/tms2/ )
4) SSLEngine must also be loaded, this is a default Apache module that gets installed when apache is installed. More information about this module can be found here: https://httpd.apache.org/docs/2.4/mod/mod_ssl.html
5) Remember to use google and problem solving skills, chances are someone has gone through the same problems.
28

User Manual Document May 2, 2018
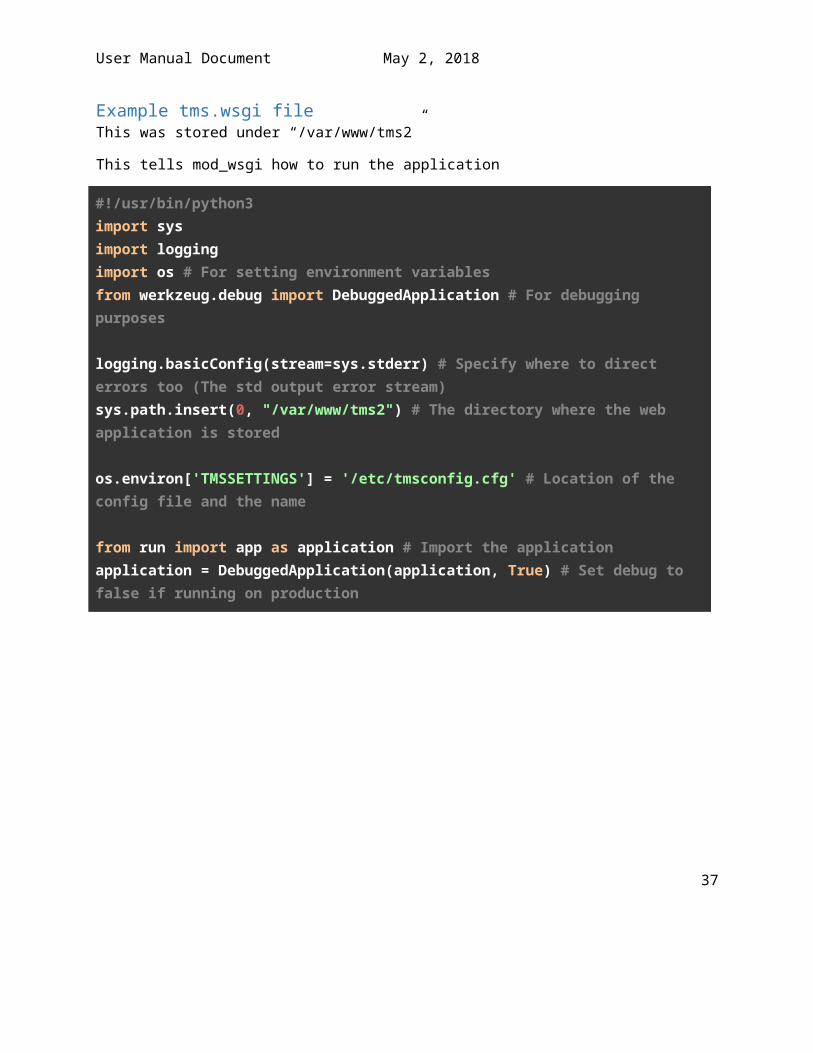
Example tms.wsgi fileThis was stored under “/var/www/tms2”
This tells mod_wsgi how to run the application
#!/usr/bin/python3import sys import logging import os # For setting environment variablesfrom werkzeug.debug import DebuggedApplication # For debugging purposes
logging.basicConfig(stream=sys.stderr) # Specify where to direct errors too (The std output error stream)sys.path.insert(0, "/var/www/tms2") # The directory where the web application is stored
os.environ['TMSSETTINGS'] = '/etc/tmsconfig.cfg' # Location of the config file and the name
from run import app as application # Import the applicationapplication = DebuggedApplication(application, True) # Set debug to false if running on production
29

User Manual Document May 2, 2018
Example TMS.confThis is file stored under /etc/apache2/sites-available/TMS-ssl.conf on tms.kutztown.edu
The “-ssl” part is to specify the https part for the website. Currently there isn’t a valid cert for the website.
The config options below can be further explained at this link: https://modwsgi.readthedocs.io/en/develop/
<VirtualHost *:443> # This lets apache know what port and host to listen on.
ServerName tms.kutztown.edu # The hostname of the machine ServerAdmin [email protected] # The email address of someone in managing this
SSLEngine on # Since we decided to use SSL, this must be on in order to serve the application over HTTPS SSLCertificateFile /var/www/tms2/cert.pem # Location of cert file SSLCertificateKeyFile /var/www/tms2/key.pem # Location of the Key file
WSGIDaemonProcess tms.kutztown.edu threads=15 display-name=%{GROUP} group=www-data # Run the application as a Daemon Process WSGIProcessGroup tms.kutztown.edu # The process group WSGIPassAuthorization On # This needs to be on for flask-login
WSGIScriptAlias /tms2 /var/www/tms2/tms.wsgi # Where the application is located <Directory /var/www/tms2/> Order allow,deny Allow from all </Directory>
Alias /tms2/static /var/www/tms2/static # The static files <Directory /var/www/tms2/static/> Order allow,deny Allow from all </Directory> ErrorLog /var/www/tms2/tmserror.log # Where to store the error log LogLevel info # Log Level CustomLog ${APACHE_LOG_DIR}/access.log combined</VirtualHost>
30

User Manual Document May 2, 2018
Storing Flask Configuration SettingsAs of now, each user that logs into tms or tmst gets an environment variable added to their bash shell. The environment variable is called TMSSETTINGS. This was added to /etc/profile which gets sourced via bashrc.
Running via mod_wsgi, the environment variable is added via the .wsgi script.
This variable points the location of the config file. This stores information like usernames and passwords to databases, SMTP, etc. It is important that this file stays out of the public’s eye.
Flask’s docs goes deeper on explaining the various ways to handle storing a config file:
http://flask.pocoo.org/docs/0.12/config/
31

User Manual Document May 2, 2018
Coding/Team Testing:tmst.kutztown.edu
To Login: If off-campus you must login to the VNP and then ssh into csit using your normal KU login, then ssh into tms(t). Otherwise if on campus you can just login to the VM directly.
Port Assignments for teams from Spring 2018:
Team A: 5000 & 5001Team B: 5002 & 5003Team DB: 5004 & 5005Team QA: 5006Team PM: 5007
Team UI: 5008
Team Logins:
User: team_<team_name> i.e team_db
Password: Ask your team leader.
If you need a package installed ask your team leader as well.
Testing your code:
1) Edit run.py a) Change the port parameter inside of app.run to your team’s assigned
port(s)b) Optional: Add a “debug=true” parameter to app.run, this will
automatically restart the server if you make any changes to the code. As well as allow you to see python errors in the console and on the web page.
2) Launch using python3 run.py3) On-campus:
a) Launch a web browser and type in tmst.kutztown.edu:<your team’s port>4) Off-Campus with port 80 enabled:
a) Use Mason’s guide using X11. Launch firefox on CSIT and from there you can go to tmst.kutztown.edu:<your team’s port>
5) Off-Campus with port 80 blocked:a) You must have VPN access to the kutztown network. You must contact
christopher walck at [email protected]. He will then grant you
32

User Manual Document May 2, 2018
permission of your able to have it. The login is your kutztown credentials. If you have an issues contact IT about it.
33

User Manual Document May 2, 2018
Storing Data FilesAll the images, and videos are stored on the server, where as the database stores the image name and the developers determine the location of the files. SharePoint is not currently set up and will be set up next semester.
Restoring Database From a Backup:1. Ensure you have the backup to restore to, the extension should be example.sql2. Navigate to the current database inside phpmyadmin3. Back up the current database. It may seem unnecessary, but it is good practice incase your
backup fails or does not contain what is expected4. Head to the database tab. BE SURE YOU ARE HERE, IF YOU ARE ON A TABLES TAB IT WILL ONLY
BACKUP THAT TABLES DATA.
a.5. Navigate to the Export tab and then click Go at the bottom
a.6. To import a database backup first drop all the current tables
34

User Manual Document May 2, 2018
a.7. Verify that all the tables have been dropped. Alternatively you can just empty the tables, but if
you have changed a constraint you may get errors when populating the tables8. Navigate to the import tab and select choose file. Be sure to select the correct backup file with
the .sql extension. Then click Go at the bottom of the page to import the database backup.
9. Verify no errors occurred when importing the database
10. The tables and the contents that were backed up will appear in the left navigation bar and the data has been restored
35

User Manual Document May 2, 2018
Configuring Automatic Database Backups:https://community.rackspace.com/products/f/public-cloud-forum/7803/a-simple-rolling-mysql-database-backup-script
1. on the tmstadmin account the backups are stored in a folder called databases at the location /home/tmsadmin/backups
2. inside this folder is a bash script called mysql_backup.sh which is called at a specified interval to back up the database. The settings in this file must be correct to be able to backup the database
3. the database dump files are stored in tmst_db folder4. cron is a command in unix that is used to specify a time interval to run the bash scripts5. type crontab -e will open the file for cron6. specify the time interval and the script location, the example executes the script at 5 am every
sunday
36
User Manual Document May 2, 2018
Team PM:
Accessing the Survey Management Page:This is How you access the code to be able to develop on the survey management page.
Ssh Open Putty
Connect to ACAD (ACAD Is known as the CSIT UNIX system)
ssh tmst -l team_pm --> yes
password -> team_pm
ls -> cd go into Team_PM -> cd TMS directory
python3 run.py
We run on port 5007
http://tmst.kutztown.edu:5007/surveys/
Survey Management Page:The Survey Management page is necessary for supervisors to create and manage surveys for their users. Within Survey Management page, a supervisor can sort, edit, create, delete, archive, unarchive, assign surveys.
SortTo sort by title or by description, click on the word “Title” or the word “Description” at the top of the table.
EditTo edit a completed survey, click the “Edit” button. This page is similar to creating a survey, but with options filled in from the previous survey. Note: Saving your changes will create a new survey.
Creating a SurveyTo start a new survey, click “Create Survey” button. Type the name of the new Survey title in the Survey Name text box. To add a description, type your description into the description textbox.
To set a survey as active or inactive, click the “Active” button. The check means a survey is active, while a white square specifies that a survey is currently inactive.
37

User Manual Document May 2, 2018
To add questions to a survey, click the “Add Question” button. The question will appear with a text box where one can add a title to the question. From here, one can set the active state of the question, delete the question, or add a response. Clicking “Add Response” brings a text box with the option to type in the response and a button to delete the response.
To save the survey, click the button “save”. To delete the survey currently in progress, click “delete”.
Deleting, Archiving, and Unarchiving a SurveyTo delete a survey, click the “Delete” button.
To Archive a survey, click the “Archive” button. To unarchive a survey after it has been archived, click the “Unarchive” button.
Change Who is Assigned a SurveyTo change who is assigned a survey, click the drop down button at the far right of the table under the area label “Assigned”.
Recommended Method to Record Tasks for TMSThe Project Management team was tasked with creating sample tasks to upload to TMS which included videos, audio, pictures, and text instructions.
Jamaal’s Method1. Write down tasks to accomplish with steps and detailed steps on Google Docs.2. Record each step as a separate video and take pictures of the task being performed.
a. Avoid using vertical video, as vertical videos do not appear well on desktops or any display in landscape orientation.
3. Use a video editing software like iMovie to shorten clips, add text to slides, and place pictures alongside the videos
4. Use audio recording software to record a verbal reading of each step and detailed step.
Theresa’s Method1. Come up with a list of all the steps needed for the task I’m recording for, on Google Docs.2. Set up my Sony HDR-CX440 camcorder on a tripod and record myself (and a friend, if needed),
doing all the steps I wrote out. At this time I also take a picture for each individual step with my phone.
3. I import the video in Movie Studio Platinum. I separate the video into clips for each step, and attach a descriptive title screen in the beginning of each one.
38

User Manual Document May 2, 2018
4. I then use Movie Studio’s voice over feature to explain each step.
5. Then I export the clips as both .mp4 and .mp3 files.
6. End result is a document, video, audio file, and pictures explaining each step for the task.
David’s Method1. Made a list of detailed steps of how I wanted to do the video.2. Used my iPhone X and did step by step videos from there. Also I took a photo of each completed
step as it was done.3. I would then rewatch the video and check for any unwanted background noise. Checked to see
if the picture was blurry or had any unnecessary stuff that would take away from the subject. 4. I would use the app on the iPhone called Voice Memos. It is already preinstalled on the iPhone5. I would then compose detailed steps and non detailed steps on a word document.6. I would then upload the videos, memos, and word document from my phone onto our shared
Project Management Google Drive.
Creating and Updating the Gantt ChartsGantt charts are used to manage the schedule and progress for a project. Microsoft Project was used to organize this information. In our charts, we included the task, proposed start and finish dates,and the progress by percentage. We managed this information using three Gantt charts: Team B chart (managed by Theresa), Team UI and DB chart (managed by David), and Team QA and A chart (managed by Jamaal). We updated these charts every Monday and Wednesday night with any newly planned tasks, or progress that was made.
Creating a New TaskWhen going into a new sprint, we would reach out to our respective teams, and ask what their plan was for the upcoming sprint. Once we got the list from them, we would go into Microsoft Project and create the new tasks. You do so by clicking this button here, which can be found in the navigation bar:
This creates the window where you can input the task information:
39

User Manual Document May 2, 2018
- Name: Name of task- Percent complete: The progress of the task. Most likely will be started at 0%.- Dates: Where you put the proposed start and finish dates.
Tip: Choose the ‘Manually Scheduled’ option, and uncheck ‘Estimated’. Otherwise, Project tries to tell you when it thinks you should schedule things, and gives you difficulty when trying to put in the actual dates you want.
- Duration: Should be created automatically based off the start and finish dates you entered.
Updating ProgressEvery Monday and Wednesday, we reach out to our respective teams and ask about what progress they’ve made on each task. After finding out any progress made, we then go to our Gantt chart on Project, and edit the current status of the task. There’s two main ways to go about this. if the progress made is either 0%, 25%, 50%, 75%, or 100%, you can easily edit this by highlighting the task you’d like to update, and clicking one of these buttons in the navigation bar:
Alternatively, if you have a more specific number, you can go directly into the row for the task in the chart, and type in your own number, here:
40

User Manual Document May 2, 2018
Submitting the Gantt ChartsWhen you create a Gantt chart in Microsoft Project, it’s saved as a .mpp file. The only way to view a .mpp file is to have Microsoft Project on your computer, and there’s no guarantee that everyone will have that. So to ensure everyone has access to our Gantts, before submitting our updated charts, we export it as a .pdf file. You do so by clicking the File tab in the navigation bar of Project, click Export, and then choose the option to create a PDF. Here you’ll be able to name if whatever you’d like. We followed the naming convention of “date_Gantt_TeamName”, as you’ll see here:
Google DriveOn our Google Drive we have a CSC355 shared class drive that everyone has access to and has been using faithfully throughout the semester. I recommend you guys get one as well. We store documents of any type. Our MRR,RMP, and Class User Manual is hosted in here.
Modification Request ReportThis is another document we have shared as a class. This document is very nice because QA team and really anyone are able to use this whenever any bugs and errors with code are found. Below I will go over what each section should contain. We have the MRR broken up into four different charts. One for each sprint as well as a Post Sprint 3.
IDThis is useful to have because when you are talking to another member in the class about MRR you can refer to the ID instead of the actual Task.
41

User Manual Document May 2, 2018
Status
The status will always either be Assigned, Fixed or Closed.
Assigned - This section means that the corresponding team found which you can find in the Assigned To section is currently working on it.
Fixed - The team that was assigned to the risk has currently resolved their problem and has yet to be tested.
Closed - Has been re-tested and it is fixed. Do not worry about this status anymore. No point in reading any further.
Found ByThis section belongs to who ever found it should put their name next to it. That way person who is reading the error can refer to the “Author” and ask them any questions or if they are able to reproduce the bug/error.
Date FoundThe date the “Author” finds the error goes in that block.
Severity LevelSeverity Level is broken into four sections: Critical Error, Major Error, Minor Error and Enhancement.
1 = Critical Error - Project failure can occur if the risk is not handled. Having many critical severity could cause project failure as well as causing development teams to not achieve the minimum acceptable requirements needed for project completion.
2 = Major Error - If a serious risk in the Risk Management Plan is not handled, functionality could not work as implemented, which will result in secondary priority requirements not being met. In addition, scheduling time and cost may possibly increase.
3 = Minor Error - Major requirements would be achieved, while minor scheduling and cost time would increase. Functionality may still work as intended.
4 = Enhancement - Nice to have feature but Critical, Major and Minor should be tackled first. For example, If one wanted the drop down box to look prettier or do an unneeded sort. That is an enhancement as the drop down box works fine.
Assigned ToWhatever person or team is assigned to this error will be found here. This allows the team to go back and fix the error.
42

User Manual Document May 2, 2018
SummaryJust a small one word explanation, either “Environment” if environment is affected. “Security” meaning it is a security issue. “System” if its a System issues such as database or something. “Communication” meaning communication issues between groups are arising. So on and so forth.
Description (How to reproduce)
This is the description of the error and how you can reproduce it. This is where you want to go into example. The description can range from one line to five lines. Make sure you are clear with your wording so that if you are sick or sleeping the developers are able to go back and reproduce this error.
Risk Management PlanOn Google Drive, the class has a shared document in which everyone can view and edit. The Risk Management Plan for Task Management System is to ensure that the development of this project goes as smoothly as possible. Teams will document risks before and after they are encountered so future teams ensure not to repeat errors. Following this Risk Management Plan, the software engineering team can identify, avoid, and deal with potential risks in advance and not turn a $10 mistake into a $10,000 mistake. The Risk Management Plan will outline the best plan of action to minimize the severity of the risk.
The Project Management team has outlined the different types of risks (cost, technical, supportability) and how the team handles and plans for them.
Section 3.0 contains the Risk Log. Each team has risks that correspond to their team and at the bottom shows the risks that belong to every team. Risks are divided by the ID, Description, Type, Severity, Impact, Probability and by how the risk will be mitigated.
SlackDue to its popularity in the professional landscape, Slack is the default group messaging platform used heavily in this class. In the last three months, the class sent around 5,100 messages collectively. Using Slack is beneficial to teams because an individual can “pin” messages, or ensure that a message will not be filtered out by an abundance of other messages. In addition, an individual can send a direct message to anyone in the group.
43

User Manual Document May 2, 2018
Poster Board CreationThe Printer
You will need to use the 42 inch HP DesignJet Z6200 Photo Production Printer to print your poster. This printer does not get used very often and tends to have issues because of this. The ink has an expiration period of 30 months and the printer will throw an error for this when the time is up. We have changed most of the ink on 4/17/2018! You can still print if it is expired most of the time. If you can’t get it to work there is a manual from HP on how to troubleshoot everything. The key to keeping this printer working is by asking for help from IT or the CSIT Secretary. She will be able to put in a work ticket or order something. Don’t attempt a repair if your unsure you can damage this printer and its not cheap. *NOTE we have noticed that the print head for yellow is expired and needs replacing, and the clip that keeps the heads down is broken, Cynthia, the csit department secretary was notified.
In OM156In order to print your poster you must be in OM 156 or have to install the printer driver and software. First, you have to install the hpclick_x64_v2_0.exe software. This is the software for the printer that will allow you to print your poster. This is located on the shared drive on campus: S:\ComputerScience\Parson\hpclick_x64_v2_0.exe. Dr. Parson has this on his drive if it gets removed please contact him at: [email protected].
44

User Manual Document May 2, 2018
Install the HP Click Utility From Parsons Drive
Not In OM156This method is not very easy and not recommended.
1. Add the printer to your computer’s devices.
a. In Windows 10, open Settings > Devices > Printer & scanners.
b. If the printer is not there click “Add a printer or scanner.”
i. If the printer is not automatically detected, click “The printer that I want isn’t listed.”
ii. Choose “Select a shared printer by name” and input and submit the following name: \\stuprint.kutztown.edu\OM156_PLOTTER
NOTE: the computer must be connected to the KU network within the firewall (on campus).
iii. Choose “Install driver” when prompted.
2. Download and install the HP Click utility.
a. This is located on the shared drive on campus: S:\ComputerScience\Parson\hpclick_x64_v2_0.exe
b. You will need to add the printer name and ip address/hostename because it is not located in the same room as you.
45

User Manual Document May 2, 2018
3. Open the utility and accept the agreement.
4. HP Click will then attempt to discover the printer.
5. Once it has found it, you can begin printing.
Creating The Poster BoardThe poster board must be 35 inches high by 48 inches wide. We have a 42 inch max width print but currently there is 36 inch paper in so you must have these specifications correct. We have used Adobe Photoshop to create our poster.
1. Launch Adobe Photoshop2. Click on file new3. Update the width to 48 inches and the height to 35 inches. Keep the resolution at 300
pixels. Give your file a name too.
46

User Manual Document May 2, 2018
4. Click on Create at the bottom right. You now have a blank canvas. 5. You will want to add grid lines to indicate the trifold poster.
a. Click View -> New Guideb. Add a vertical guide at 12 inches and 36 inches.
c. You now have a blank poster board.
47

User Manual Document May 2, 2018
Printing The Poster BoardThe HP Click Utility on prints certain file formats( jpg, jpeg, tif, tiff, pdf, and hpgl2). It is recommended to use jpeg, or tif.
1. Is the printer on?a. Make sure that is is on and do a test print that is small like a paper size 8.5x11.b. The ink and paper are very expensive so don’t waste it!
2. Open the HP Click utility.48

User Manual Document May 2, 2018
3. Drag the file you want to print into the window or browse for the file. This can be done multiple times for multiple pages
4. Click print.
Referenced DocumentsAll Manuals: https://support.hp.com/us-en/product/hp-designjet-z6200-photo-production-printer/4231037/manuals
User Guide: http://h10032.www1.hp.com/ctg/Manual/c02576415
Parsons Shared Folder: S:\ComputerScience\Parson\hpclick_x64_v2_0.exe
49

User Manual Document May 2, 2018
Parson’s User Guide: https://drive.google.com/open?id=1IJgAeyNOsf6qljLeVS4KKt_USNgFmiy2
50