teaching interactivity: introducing design students to
TRANSCRIPT

© The Eurographics Association 2014.
EUROGRAPHICS 2014/ J.- J. Bourdin, J. Jorge, and E. Anderson Education Paper
Teaching Interactivity: Introducing Design Students to Sensors and Microcontrollers
Taro Narahara1
1 New Jersey Institute of Technology, United States
Abstract This paper presents an educational case study and its pedagogical lessons in the context of design teaching. Smart products, adaptive designs, and intelligent spaces are in the forefront of current artistic discourse. They are critical components in sustainable designs where products monitor their own performance and respond to consumers’ real-time needs and environmental factors. In order to prepare students in the design field to be able to present interaction-based ideas more effectively, the author developed a project-based course to produce interactive prototypes using sensors, actuators, and microcontrollers. The author introduces instructions using practical template materials that can demonstrate certain key notions such as feedback and kinematics at the earlier phase of learning while providing minimum yet sufficient fundamental skills and theoretical background on programming and electronics. This strategy allows students to acquire extensible knowledge that does not rely on higher-level software functions or specialized but inflexible plug-ins. Students can reinterpret given materials and modify them to produce custom tools that can realize their original project goals. By presenting methods used in the author’s course and conceptual example projects by students, an efficient way to teach relatively complex technical materials without overpowering student creativity and motivation will be offered.
Categories and Subject Descriptors (according to AC M CCS): K.3.1 [Computers and Education]: Computer Uses in Education
1. Introduction
Recently, there are newly emerging demands to make our products more adaptable and responsive in order to create smarter products that can sense users’ needs more interactively. Smart products, adaptive designs, and intelligent spaces are in the forefront of current artistic discourse. They are critical components in sustainable designs where products monitor their own performance and respond to consumers’ real-time needs and environmental factors. For example, an operable and variable shading system can provide superior energy-saving performance, and movable interior partitions can create more flexible solutions for spatial organization without requiring new construction. This trend toward smart products is not limited to the pragmatic purpose of achieving economies. Media facades in many contemporary buildings serve as means for new kinds of communication, and recent innovations in sensors, robotics, and information technologies have a potential to enrich our ways of interacting with our living environments. These demands require designers to acquire different skills to communicate their ideas more interactively through new technologies.
In conventional methodologies in design fields, including industrial design, product design, and architecture, we normally attempt to anticipate all current and future design requirements and potential changes for products prior to production, and endeavor to resolve all issues in a single static solution. Traditionally, one of the primary roles for designers is to find an aesthetically pleasing and functional formal solution. Commonly, designers communicate and visualize their design ideas through drawings and physical models, and digital tools support production of them – CAD software applications for drawings, and digital fabrication tools such as laser cutters and computer numerical control (CNC) prototyping machines for physical models. Although these digital tools are reliable for preparing representations of conventional static formal solutions, by themselves they are not always sufficient for producing and communicating ideas for smart products that can conditionally change their states over time. Both physical and digital representations of smart products require tools that can implement a feedback system. This feedback system allows evaluations of given conditions and triggers actions tailored to optimize performance of products by changing their
DOI: 10.2312/eged.20141028

© The Eurographics Association 2014.
T. Narahara / Teaching Interactivity
system states.
To show how to demonstrate smart products effectively through production of tangible physical prototypes, the author introduces the use of sensors, actuators, and an open-source microcontroller platform in the context of design education. A conventional physical scale-model made by students has a limited capability to sense, evaluate, and demonstrate varying conditions interactively. For example, a model for an operable smart shading device needs to have light sensors to sense solar radiation, motors to control shades, and microcontrollers to provide a control feedback system. Use of these technologies requires most designers to learn new skills in addition to their existing skills such as operating rapid prototyping machines. This paper focuses on introducing an effective way to teach students in design who lack adequate knowledge of programming and electronics how to produce interactive physical prototypes. 2. Course Structure and Framework
The author has taught a course on physical computing using microcontrollers to undergraduate students in various design fields for the past three years, and this paper is based on the author’s findings. Although students were expected to use hours outside of the class for productions, it was an elective course that met only once per week for three hours and was not funded for costs of materials. An average enrollment of 12 to 18 students allowed for providing project-based individual instructions to each student.
The challenge here was to introduce adequate technical materials to students in design without overpowering their creativity and motivation. Typical students in design can easily be overwhelmed by the complexity of technical materials that they need to master before using these learnings for more creative purposes. However, without sufficient technical background, students will simply copy and paste given template materials as they are and will not obtain capabilities to further modify and develop implementations based on their own ideas. Some minimal instruction, in conjunction with several pedagogical strategies, is required to get them ready for creative productions
Although most students at the author’s institution were at least familiar with the basic syntax of a general programming language and keywords such as “if,” “else,” and “for,” most did not have extensive programming skills or experience using electronic hardware. Unlike typical courses in science and technology, this course’s main objective was to elicit students’ own creative and interactive applications in design using hardware technologies such as microcontrollers, sensors, and actuators. Introducing basic programming techniques and knowledge of electronic hardware has great potential to enable design students to enhance their creativity to produce more interactive projects beyond traditional aesthetics-based formal design works.
3. Methods
The first half of the semester was dedicated to learning fundamental technical knowledge and skills based on template materials provided by the author; then more project-based individual creative productions followed. I list a few key technical teaching materials for students in design, though some materials may appear to be trivial to readers teaching students in science and technology. 3.1. Learning a Feedback System
The use of an open-source microcontroller platform such as Arduino [Ard, Bor11, Igo11, Mar11] allows students to focus on developing their own feedback logics by reducing the amount of work in producing a one-off electronic circuit. Without producing a custom analog circuit for every project, most of the project can be done by writing a simple code to control and regulate input and output signals inside the microcontroller's memory. Students will learn how the system can sense the environment by receiving input from various sensors and how it can affect its surroundings by controlling lights, motors, and other actuators.
Figure 1. A simple feedback mechanism with a servo motor and a light sensor.
Figure 2. Teaching the concept behind a voltage divider using a potentiometer.
26

© The Eurographics Association 2014.
T. Narahara / Teaching Interactivity
The author uses a simple practical example with a light sensor (photo resister) and a canopy attached to a servo motor to demonstrate a simple feedback mechanism (Figure 1). When the light sensor senses a brighter light value, the microcontroller processes this input information and sends an output signal to rotate the servo motor to move the attached canopy to shade the area. This one-way interaction can be implemented by providing a simple conditional statement in a source code. Next, we can provide another code that can open the canopy when the area around the sensor gets darker than a certain threshold value. This simple mechanism can produce a feedback system for a shading device that can provide more light when it is too dark and more shade when it is too bright. By adjusting threshold values in the above two conditional statements, we can produce an autonomous device that can perpetually repeat opening and closing movements without any human intervention. This device forms a single autonomous interactive unit. In principle, such units can be placed next to each other to produce a more complex network. Multiple units can be clustered and function in tandem to produce a global system that works bottom-up for more advanced applications.
In the example above, replacing the light sensor and the servo motor with different sensors such as IR or ultrasonic distance sensors, temperature sensors, or sound sensors, and different actuators such as LED lights, speakers, shape memory alloys (SMA), and so on will instantaneously produce different types of physical interactions depending on students' own application areas. In order to use a sensor, it is necessary to learn at least basic concepts of a voltage divider and a conditional statement for coding. The concept behind the voltage divider can be easily taught by demonstrating the internal mechanism of a potentiometer and by showing how it works internally as a simple sensor by dimming an LED light attached to a microcontroller (Figure 2). Students can learn how to get a reference voltage signal proportional to the voltage to be measured that represents the reading from an attached sensor. In addition to teaching a conditional statement, providing supplementary commands such as a random function allows students to pursue more original implementations. Figure 3 shows a student project called “SHY-Light” that lights up a randomly selected spike out of six spikes. When users touch and shade the spike, it will turn off the light and randomly flip the location of lights as if it is avoiding users. The project was conceived based on the above simple template with a student’s original additional use of a random function.
3.2. Mechanics and Kinematics
After learning the basics of a feedback system, students will learn how to produce efficient kinetic motions by fabricating mechanical systems composed of appropriate gears and joints. Through a minimum number of actuators and modest power requirements by reducing redundancy in mechanical systems, there is an opportunity to derive
various complex motions. Today, students in any design school are trained in 3-D CAD applications and physical fabrication techniques using various CNC rapid prototyping tools such as 3D printers. However, the author’s students needed to master efficient, economical, and rapid ways to fabricate mechanical components due to the limited time and budget of the course.
Figure 3. A student project called “SHY-Light” uses a simple application of a random function.
Figure 4. A delta robot was used to explain inverse kinematics and snap-in friction-fit joints for FAB.
The author often uses a delta robot as an example to introduce a basic concept of inverse kinematics and several key fabrication techniques that allow students to produce complex kinetic components rapidly. A delta robot consists of three arms connected to universal joints at the base, and the author demonstrates how such a complex mechanism can be fabricated by cutting planar materials with snap-in friction-fit joints without using expensive metal fittings or adhesives excessively (Figure 4). In addition, the inverse kinematics of a delta robot can be solved purely geometrically using trigonometry and ordinary algebraic equations without recourse to advanced calculus [Gar10]. Understanding the inverse kinematics allows students to determine the joint parameters, such as rotation angles, that achieve a desired configuration. In
27

© The Eurographics Association 2014.
T. Narahara / Teaching Interactivity
this case, it finds three motors’ rotation angles to move an end-effector to a specific unique target location in a 3-D space. In the early part of the course, prepared template materials such as a model kit of a delta robot prepared by the author were introduced for accelerated learning of target materials before students start more creative and open-ended project-based productions.
4. Project-specific Explorations
Once students master the required essential skills to develop a basic interactive project, they can start developing original projects based on their own ideas. The instructor provides and teaches any necessary skills and techniques based on their project-specific directions. The following are several project-based case studies. 4.1. Interactive Façade System
Figure 5. A student controlling local opacity of the façade using OpenNI Framework (top). Differentials in rotation angles can control the vertical location of a crease (bottom right). Two students in architecture proposed an interactive façade system that can locally change its opacity based on a user’s gesture in order to shade certain areas to prevent direct sunlight. It can also open certain areas to reveal a desired partial exterior view to users while it maintains
opacity in other areas to provide privacy for users in the inside. Students were interested in using a series of operable louvers with twisted vertical strips to locally vary opacities in the façade. In order to make the rotation angles of louvers variable, we attached servo motors at the top and bottom of each vertical strip. Strips were made of flexible fabric, and the differential in the rotation angles of servo motors at the top and bottom could control the vertical location of a crease to add a dynamic vertical motion. The relationship between the crease location in height and the differential in rotation angles was thoroughly studied (Figure 5 and Video Figure 1). By arraying the vertical strips in a horizontal direction, the louver system can move the position of an open area by varying the locations of creases both vertically and horizontally. By sending the right set of rotation angles to servo motors based on a corresponding user’s hand location in front of the louver system, an open area created by creases can be controlled by the user in real time.
Initially, we employed a grid of conventional IR distance sensors to capture motions of users. However, the proposed sensor grid size was not as precise as we had anticipated. Additionally, it was time-consuming to install sensors and expensive to purchase multiple sensors. Therefore, the author proposed to incorporate a depth sensor from Microsoft, the Kinect sensor with the Open Natural Interaction (OpenNI) framework [ONI]. Using the depth information acquired from the Kinect, algorithms in the OpenNI framework can construct a user’s skeleton using simple vector graphics in real time. The author began by explaining how to track a hand’s location with a simple template code. First, a user’s body motion is tracked by the Kinect located at the bottom of the façade system. Then the OpenNI library processes the algorithm to create a skeleton from a silhouette of the user and start tracking a user’s right hand location. The x and y coordinates of the right hand location are sent to the Arduino microcontroller using serial communication through a USB cable. Subsequently, the program stored inside Arduino receives the x and y coordinates as inputs and returns rotation angles to servo motors to move creases to the corresponding user’s right hand location. The above procedures are executed simultaneously in real time as the user moves his or her hand.
4.2. Exploring Dimensions with the Persistence of Vision
The goal of this project was to explore the phenomenon called Persistence of Vision (POV). POV is the phenomenon of the eye by which an afterimage is thought to persist for approximately one-twenty-fifth of a second on the retina. Rapidly moving a one-dimensional linear array of LEDs can display a two-dimensional graphic image in mid-air, and this student explored and produced a three-dimensional display by sweeping a 2-D grid of LEDs. A 10x10 LED grid was created and processed by Arduino using multiplexing. A series of matrices consisting of 1’s and 0’s were manually manipulated to
28

© The Eurographics Association 2014.
T. Narahara / Teaching Interactivity
Figure 6. A 3-D display system using a grid of LEDs with the persistence of vision (POV). A concept sketch shows the addition of sensors for an interactive experience (middle).
produce a specific pattern in the code. The grid was then attached to a base that spun at a high velocity, thus revealing a 3-D volume of the generated pattern (see Figure 6). The experiment utilized both static and dynamic patterns along with the speed at which the dynamic pattern would change. The timing for the flicker of LEDs needs to be further adjusted in accordance with the rotation speed of the grid. The student had a further advanced idea to influence LEDs’ patterns based on proximity of hands using sensors installed at the corners of the grid, though this remains for future exploration.
Figure 7. Beat Grid visualizes sound using a beat detection library (middle). A student’s model and sketches show an idea to fabricate a 3-D form made of planar surfaces using a laser cutter. (top and bottom). 4.3. Beat Grid
The student worked as a DJ at a local discotheque, and his goal was to produce an interactive lighting fixture. His device visualized sound, which is formless and invisible, through a grid of LED lights based on the frequency of incoming sounds using a beat detection library (see Figure 7). The student developed his own application to produce graphical patterns based on a sound frequency using an open source programming language and integrated development environment called Processing [Pro, Rea07]
29
© The Eurographics Association 2014.
T. Narahara / Teaching Interactivity
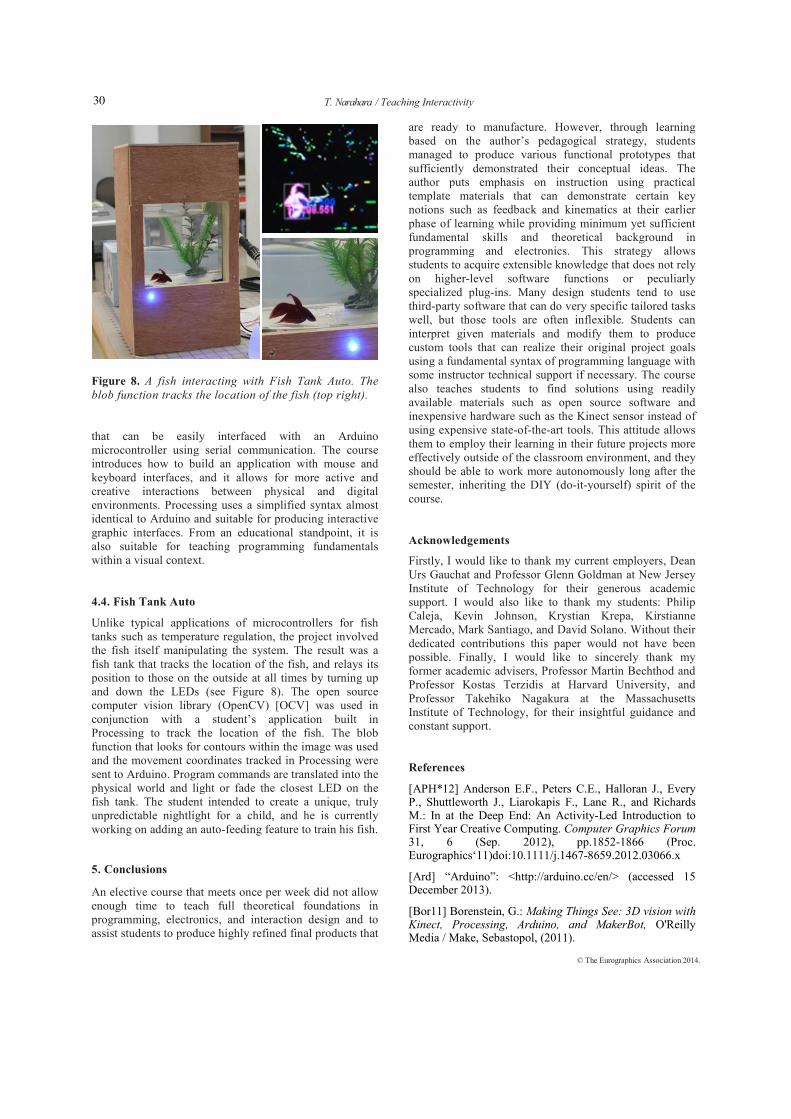
Figure 8. A fish interacting with Fish Tank Auto. The blob function tracks the location of the fish (top right). that can be easily interfaced with an Arduino microcontroller using serial communication. The course introduces how to build an application with mouse and keyboard interfaces, and it allows for more active and creative interactions between physical and digital environments. Processing uses a simplified syntax almost identical to Arduino and suitable for producing interactive graphic interfaces. From an educational standpoint, it is also suitable for teaching programming fundamentals within a visual context.
4.4. Fish Tank Auto
Unlike typical applications of microcontrollers for fish tanks such as temperature regulation, the project involved the fish itself manipulating the system. The result was a fish tank that tracks the location of the fish, and relays its position to those on the outside at all times by turning up and down the LEDs (see Figure 8). The open source computer vision library (OpenCV) [OCV] was used in conjunction with a student’s application built in Processing to track the location of the fish. The blob function that looks for contours within the image was used and the movement coordinates tracked in Processing were sent to Arduino. Program commands are translated into the physical world and light or fade the closest LED on the fish tank. The student intended to create a unique, truly unpredictable nightlight for a child, and he is currently working on adding an auto-feeding feature to train his fish.
5. Conclusions An elective course that meets once per week did not allow enough time to teach full theoretical foundations in programming, electronics, and interaction design and to assist students to produce highly refined final products that
are ready to manufacture. However, through learning based on the author’s pedagogical strategy, students managed to produce various functional prototypes that sufficiently demonstrated their conceptual ideas. The author puts emphasis on instruction using practical template materials that can demonstrate certain key notions such as feedback and kinematics at their earlier phase of learning while providing minimum yet sufficient fundamental skills and theoretical background in programming and electronics. This strategy allows students to acquire extensible knowledge that does not rely on higher-level software functions or peculiarly specialized plug-ins. Many design students tend to use third-party software that can do very specific tailored tasks well, but those tools are often inflexible. Students can interpret given materials and modify them to produce custom tools that can realize their original project goals using a fundamental syntax of programming language with some instructor technical support if necessary. The course also teaches students to find solutions using readily available materials such as open source software and inexpensive hardware such as the Kinect sensor instead of using expensive state-of-the-art tools. This attitude allows them to employ their learning in their future projects more effectively outside of the classroom environment, and they should be able to work more autonomously long after the semester, inheriting the DIY (do-it-yourself) spirit of the course.
Acknowledgements
Firstly, I would like to thank my current employers, Dean Urs Gauchat and Professor Glenn Goldman at New Jersey Institute of Technology for their generous academic support. I would also like to thank my students: Philip Caleja, Kevin Johnson, Krystian Krepa, Kirstianne Mercado, Mark Santiago, and David Solano. Without their dedicated contributions this paper would not have been possible. Finally, I would like to sincerely thank my former academic advisers, Professor Martin Bechthod and Professor Kostas Terzidis at Harvard University, and Professor Takehiko Nagakura at the Massachusetts Institute of Technology, for their insightful guidance and constant support.
References
[APH*12] Anderson E.F., Peters C.E., Halloran J., Every P., Shuttleworth J., Liarokapis F., Lane R., and Richards M.: In at the Deep End: An Activity-Led Introduction to First Year Creative Computing. Computer Graphics Forum 31, 6 (Sep. 2012), pp.1852-1866 (Proc. Eurographics‘11)doi:10.1111/j.1467-8659.2012.03066.x
[Ard] “Arduino”: <http://arduino.cc/en/> (accessed 15 December 2013).
[Bor11] Borenstein, G.: Making Things See: 3D vision with Kinect, Processing, Arduino, and MakerBot, O'Reilly Media / Make, Sebastopol, (2011).
30

© The Eurographics Association 2014.
T. Narahara / Teaching Interactivity
[Gar10] García, J. M.: <www.jonmartinez.neositios.com/> “Inverse - Forward Kinematics of a Delta Robot”, (2010), (accessed 15 December 2013).
[Igo11] Igoe, T.: Making Things Talk: Using Sensors, Networks, and Arduino to see, hear, and feel your world, 2nd Edition, O'Reilly Media / Make, Sebastopol, (2011).
[Mar11] Margolis, M.: Arduino Cookbook, 1 edition, O'Reilly Media, Sebastopol, (2011).
[OCV] “OpenCV”: <http://www.opencv.org/> (accessed 15 December 2013).
[ONI] “OpenNI”: <http://www.openni.org/> (accessed 15 December 2013).
[Pro] “Processing ”: <http://processing.org/> (accessed 15 December 2013).
[Rea07] Reas, C.: Processing: A Programming Handbook for Visual Designers and Artists, The MIT Press, Massachusetts, (2007).
31