tclad: tools for an optimal design optimal design white...page 8 of this document). figure 2:...
TRANSCRIPT

TCLAD: TOOLS FOR AN OPTIMAL DESIGNTHINGS TO CONSIDER WHEN DESIGNING CIRCUITSMany factors come into play in circuit design with respect to etching, surface finishing and mechanical fabrication processes; such as holes, flatness, singulation and tolerances.
Fabrication of TCLAD is similar to traditional FR-4 circuit boards with regard to imaging and wet processing operations. However, secondary mechanical operations are unique, so the consideration of specific design recommendations are critical to ensure the manufacture of reliable, cost-effective TCLAD circuits. This white paper will address design recommendations for circuit image, soldermask, legend and mechanical fabrication. Additional consideration for trace widths, spacing and clearances may be required for electrical integrity based on application voltage.

TCLAD: TOOLS FOR AN OPTIMAL DESIGN
2 l of 10
COST-EFFECTIVE BASIC MATERIALS FOR AN OPTIMAL DESIGNIdeas For Minimizing CostMaterial Stack-Up - 5052 aluminum is the most cost effective base material. 6061-T6 aluminum is also available for applications which utilize the aluminum as a base for retaining fasteners or when considering specific fabrication applications.
Base Material Thickness - Using standard gauges will help control cost. Most common standard aluminum thicknesses are 1.0mm (0.040'') and 1.6mm (0.062'') and standard copper is 1.0mm (0.040''). Other thicknesses are also available.
Dielectric - The majority of applications are able to utilize our MP (multi-purpose) dielectric. If your application requires higher thermal performance or dielectric strength, please reference our characteristics of dielectric summary within our TCLAD Selection Guide. Copper Circuit Foil - The thinner the circuit foil chosen, the lower the cost. As a result of Henkel’s BERGQUIST brand of thermally conductive dielectrics, it is common for customers to realize a 40% increase in current carrying capability as compared to FR-4 (see the chart below). Copper thickness can often be reduced by using TCLAD.
Checklist To Optimal Design
Ideas For Minimizing Cost (Page 2)
Submit Appropriate File Types (Page 2)
Circuit Design (Page 3)
Part Fabrication Methods (Pages 3-4)
Testing Options (Page 5)
Advanced Circuit Processing (Page 5)
Two-Layer Design Considerations (Page 7)
Designing A Non-Rectangular Part Array (Page 7)
Circuit Design Standards (Pages 8-9)
Legend Design Standards (Pages 8-9)
Soldermask Design Standards (Pages 8-9)
Surface Finish Standards (Pages 8-9)
Mechanical Design Standards (Pages 8-9)
Acceptable File Types For Design Submission
1. Preferred data format Gerber RS274X – include all layers (with embedded aperture list). DXF and some other formats are acceptable but take time to convert to Gerber and may become corrupted in the conversion process.
2. Provide mechanical print with part and array dimensions (if applicable), identify material, soldermask type and color and surface finish.
3. Identify areas of possible design violation.4. Include operating voltage and maximum operating
temperature.5. Include engineering or circuit design contact information.

3 l of 10
CIRCUIT DESIGNMaterial UtilizationIndependent of the fabrication method chosen, square or rectangular designs will utilize the material most efficiently. The usable area of an 457 x 610mm (18.0'' x 24.0'') panel is 432 x 584mm (17.0'' x 23.0''), for a 508 x 610mm (20.0'' x 24.0'') panel it is 483 x 584mm (19.0'' x 23.0'') and for a 457 x 635mm (18.0'' x 25.0'') panel it is 432 X 610mm (17.0'' X 24.0''). For best cost value, maximize use of this usable area. The shape of the part effects cost, so please reference the section on part singulation for helpful guidelines.
Surface Finish• Green is the most commonly used soldermask color in
the industry, and as a result it is the most cost-effective. Other colors such as black, white, red and blue are also available.
• If possible, try to include legend (nomenclature) in the soldermask design. Offering white and black nomenclature.
• Regarding solder pad finish, HASL and Pb-free HASL are the most cost-effective finishes. Other surface finishes such as Immersion Tin or Silver, ENIG, Ag, ENEPIG (for gold wire bond surfaces), and OSP (in panel and array form only) are available.
• Henkel’s StabiLUX is a non-silicone coating that is color and UV stable, even after exposure to multiple solder reflow processes. The white product is screen coated over a solder mask allowing for optimum visual performance, even with continued use.
Baseplate Finish• When using aluminum, a brushed finish is typical.
Other finishes like anodize and chemical conversion are available for additional cost. With copper, a brushed finish is also typical but may oxidize from handling and atmospheric conditions. Other finishes like bright electroless nickel, ENIG and/or ENEPIG are available to prevent oxidation but will drive cost up.
• When considering finishing the part edge and/or through hole edge, please note that an unfinished edge is more economical.
Figure 1: Layout For Effective Use Of Space
PART FABRICATIONV-ScoringV-scoring is a viable process selection for both low and high volume production because it allows for maximum material utilization. V-scoring is also a preferred process for prototypes with rectangular geometries having the benefit of no tooling costs. Holes can be drilled or punched prior to scoring. Typical tolerance for part size, hole position to part edge, and circuit to edge is +/-0.25mm (0.010''). V-scoring is a great alternative for arrays. Circuit to edge spacing can be reduced over a typical blanked part (see Section 1.4 on page 8 of this document).
Figure 2: V-Scoring Guidelines
Part size is an important consideration in cost control. In Figure 1, part size is 146 x 142mm (5.75'' x 5.59'') and panel utilization is 90%. This high utilization was achieved by reducing part size from the original 146 x 145mm (5.75'' x 5.71'') - only a 3mm change. The result is an increase in parts per panel from 8 to 12 utilizing the same amount of material (30% gain in panel utilization).
60.0º
TCLAD: TOOLS FOR AN OPTIMAL DESIGN
4 l of 10
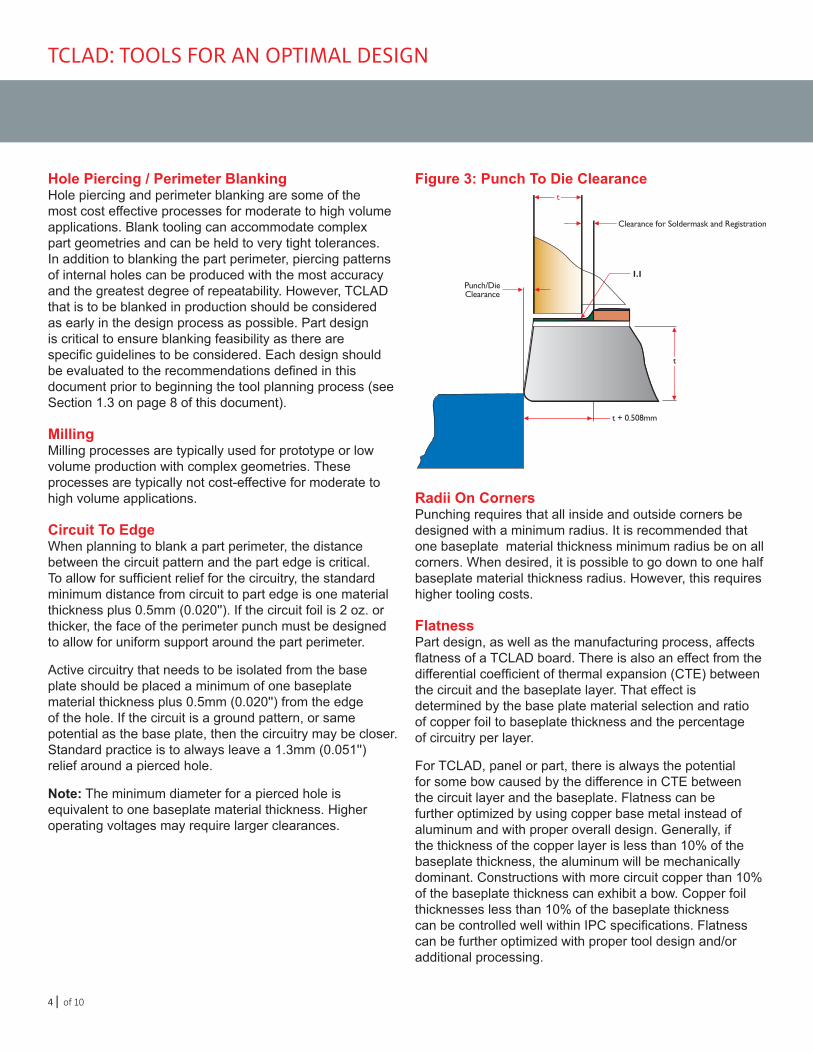
Hole Piercing / Perimeter BlankingHole piercing and perimeter blanking are some of the most cost effective processes for moderate to high volume applications. Blank tooling can accommodate complex part geometries and can be held to very tight tolerances. In addition to blanking the part perimeter, piercing patterns of internal holes can be produced with the most accuracy and the greatest degree of repeatability. However, TCLAD that is to be blanked in production should be considered as early in the design process as possible. Part design is critical to ensure blanking feasibility as there are specific guidelines to be considered. Each design should be evaluated to the recommendations defined in this document prior to beginning the tool planning process (see Section 1.3 on page 8 of this document).
MillingMilling processes are typically used for prototype or low volume production with complex geometries. These processes are typically not cost-effective for moderate to high volume applications.
Circuit To EdgeWhen planning to blank a part perimeter, the distance between the circuit pattern and the part edge is critical. To allow for sufficient relief for the circuitry, the standard minimum distance from circuit to part edge is one material thickness plus 0.5mm (0.020''). If the circuit foil is 2 oz. or thicker, the face of the perimeter punch must be designed to allow for uniform support around the part perimeter.
Active circuitry that needs to be isolated from the base plate should be placed a minimum of one baseplate material thickness plus 0.5mm (0.020'') from the edge of the hole. If the circuit is a ground pattern, or same potential as the base plate, then the circuitry may be closer. Standard practice is to always leave a 1.3mm (0.051'') relief around a pierced hole.
Note: The minimum diameter for a pierced hole is equivalent to one baseplate material thickness. Higher operating voltages may require larger clearances.
Figure 3: Punch To Die Clearance
Radii On CornersPunching requires that all inside and outside corners be designed with a minimum radius. It is recommended that one baseplate material thickness minimum radius be on all corners. When desired, it is possible to go down to one half baseplate material thickness radius. However, this requires higher tooling costs.
FlatnessPart design, as well as the manufacturing process, affects flatness of a TCLAD board. There is also an effect from the differential coefficient of thermal expansion (CTE) between the circuit and the baseplate layer. That effect is determined by the base plate material selection and ratio of copper foil to baseplate thickness and the percentage of circuitry per layer.
For TCLAD, panel or part, there is always the potential for some bow caused by the difference in CTE between the circuit layer and the baseplate. Flatness can be further optimized by using copper base metal instead of aluminum and with proper overall design. Generally, if the thickness of the copper layer is less than 10% of the baseplate thickness, the aluminum will be mechanically dominant. Constructions with more circuit copper than 10% of the baseplate thickness can exhibit a bow. Copper foil thicknesses less than 10% of the baseplate thickness can be controlled well within IPC specifications. Flatness can be further optimized with proper tool design and/or additional processing.
t

5 l of 10
TESTING OPTIONSElectrical Opens And Shorts1. For single-layer boards using A.O.I. (Automatic Optical
Inspection) is the most cost-effective method. Using original Gerber data to compare to the etch panel will find any anomalies, even in an etch-down condition.
2. The more traditional “Bed-of-Nails” testing is also available. This requires a fixture charge and is a higher cost method. It is the only viable method for two-layer constructions.
Proof Testing (HiPot)Testing is done to verify dielectric strength integrity of a TCLAD board.1. Proof testing done in panel form is the most cost-
effective method. This form of testing is done at post- etch condition, prior to surface finish or final fabrication.
2. The recommended method for safety agency requirements on TCLAD assemblies is an individual piece-part or array-part test. This method 100% tests and marks each finished board and/or array. This method requires a fixture charge.
3. When higher test voltages are required to meet safety agency requirements; standard clearances for fabrication may not be enough to allow for “Creepage Clearance” to meet test voltages. These minimum creepage distances can be found in safety agency standards or IPC-2221 for reference.
ADVANCED CIRCUIT PROCESSINGPart FormingTCLAD is designed with a copper or aluminum baseplate that can be formed. In order to maintain thermal and electrical integrity, circuits cannot go across the formed area.
Ultra Thin CircuitsUltra Thin Circuits (UTC) utilize TCLAD dielectrics without the typical thick base layer. These circuits are often used for component level packaging where the thick aluminum or copper base is not required for mechanical or thermal mass. The circuit layer can be a “stand-alone” ceramic submount replacement. The total profile of a UTC can be as thin as 0.23mm (0.009'') and can be used in double-sided structures.
Figure 4: Hole And Circuit To Edge ClearancePlanned ViewCross Section View
Note: Use of a soldermask is recommended.
Photographic example of UTC versus a standard 1.57mm (0.062'') aluminum substrate.

TCLAD: TOOLS FOR AN OPTIMAL DESIGN
6 l of 10
Figure 5: Selective Dielectric Removal
Henkel has developed a process for selectively removing dielectric to expose the baseplate. This surface can have surface finishes like the other circuit pads.
Figure 6: Pedestal
Using a copper base and by selectively removing the dielectric a pedestal can be formed moving the baseplate metal up to be coplanar with adjacent circuits.
Figure 7: Blind Plated Via To Baseplate
Allows for the copper base metal to be connected to the surface circuit copper and/or the inner-layer copper circuit.
Figure 8: Filled Via
Thermal/electrical via’s can be filled with a electrical and thermally conductive polymer material. It can also be overplated with copper to provide a plateable, solderable and nearly coplanar surface that is void free.
Figure 9: Via In Pad
Allows for minimum via size, full copper plating for good electrical and thermal conductivity. Provides for a truly coplanar surface.
Figure 10: Electrical / Thermal Via
Typical “Thru Via” connecting the inner layer to the outer layer. Reduces thermal impedance by shortening the thermal path while maintaining electrical isolation from the baseplate.
Dielectric Removal Area
Dielectric Edge
TCLAD Dielectric
Baseplate
Copper Foil (Circuit)
Baseplate
OverplateThermally Conductive
Polymer FillTCLAD Dielectric
TCLAD DielectricBaseplate
Copper Foil (Circuit)Pedestal TCLAD DielectricBaseplate
Copper Foil (Circuit)
TCLAD Dielectric
Baseplate
Copper Foil (Circuit) TCLAD Dielectric
Baseplate
Copper Foil (Circuit)

7 l of 10
TWO-LAYER DESIGN CONSIDERATIONSBenefits And ConsiderationsTCLAD dielectrics in two-layer constructions have significantbenefits in overall design when compared to two-layer FR-4constructions. These benefits include; higher power density, electromagnetic shielding and/or improved capacitive coupling.While designing your two-layer circuit, please keep these items in mind:• Inner layer copper thickness is limited to 140 micron (4 oz.)
before plating.• Due to the lower thermal impedance of TCLAD dielectric
as compared to FR-4, thermal via’s are not usually required. However, if thermal via’s are used better thermal performance can be achieved.
• When using a copper base plate, connections from the circuits to the baseplate are possible using a plated Blind-via or thruhole.
• Using electrical/thermally conductive via fill materials and overplating with copper creates a flat surface area enabling solderable pads for devices eliminating solder voiding.
• A selective dielectric removal process can be used to expose the inner-layer and/or the baseplate for component attachment to these layers if desirable.This type of design reduces thermal resistance.
Material Selection And FabricationTwo-layer designs incorporate additional amounts of copper and dielectric thickness over single-layer designs. As a result, additional considerations must be made with regard to material construction choices and fabrication.• Flatness is affected by the amount of copper so CTE
rules must be considered in the equation. Most heavy copper constructions will require a thicker aluminum base substrate or copper base to prevent bowing.
• The additional dielectric thickness will also create the need for larger minimum distances in drilling, scoring, routing and punching. See the section regarding fabrication.
• Copper plating adds approximately 1 oz. to the copper foil layer
DESIGNING A NON-RECTANGULAR PART ARRAYComparing An Array In Three Different Considerations• Non-rectangular designs typically require additional
spacing in the array for milling or punching the shape. Often a combination of scoring and milling/punching is required to create the part shape and allow parts to be separated from the array after assembly. Additional process steps and reduced material utilization can impact cost.
Design Considerations For Better Material Utilization• Are rails required for assembly? Rails consume material
that will be discarded after parts are separated from the array. When designing an array, size and number of rails should be considered to optimize panel utilization. The reduced rail design in Figure 12 below uses less material than the one in Figure 11, and even less material is required for the design with no rails in Figure 13.
• Will assembled components require parts to be spaced further apart? This can result in multiple score lines and reduced material utilization. Consider part orientation in the array. Alternating orientation may allow components to nest, maximizing material utilization. In the original array design (Figure 11), parts are spaced further apart and use more material as compared to the common score lines used in the improved and optimized designs (Figures 12 and 13).
Figure 11: Original Array Design Figure 12: Improved Design Figure 13: Optimized DesignParts spaced apart, lack of common score lines
Large rails with pin holes
Parts moved together for common score lines
Pinning off internal holes Rail size reduced
Parts moved together for common score lines
Pinning off internal holes Rails removed

Design Category
1.0Circuit Design
1.1 Minimum Circuit Width
CIRCUIT THICKNESS MINIMUM LINE WIDTH
35μm (1 oz) 0.13mm (0.005'') IPC-6012 35.1 80%
70μm (2 oz) 0.15mm (0.006'') IPC-6012 35.1 80%
105μm (3 oz) 0.18mm (0.007'') IPC-6012 35.1 80%
140μm (4 oz) 0.20mm (0.008'') IPC-6012 35.1 80%
210μm (6 oz) 0.25mm (0.010'') IPC-6012 35.1 80%
280μm (8 oz) 0.38mm (0.015'') IPC-6012 35.1 80%
350μm (10 oz) 0.50mm (0.020'') IPC-6012 35.1 80%
1.2 Minimum Space and Gap Single and Double Layer
SINGLE-LAYER (NON-PLATED) TWO-LAYER (PLATED)
35μm (1 oz) - 0.18mm (0.007'') 35μm (1 oz) - 0.23mm (0.009'') IPC-6012 35.2 20%
70μm (2 oz) - 0.23mm (0.009'') 70μm (2 oz) - 0.30mm (0.012'') IPC-6012 35.2 20%
105μm (3 oz) - 0.30mm (0.012'') 105μm (3 oz) - 0.36mm (0.014'') IPC-6012 35.2 20%
140μm (4 oz) - 0.36mm (0.014'') 140μm (4 oz) - 0.41mm (0.016'') IPC-6012 35.2 20%
210μm (6 oz) - 0.51mm (0.020'') 210μm (6 oz) - 0.56mm (0.022'') IPC-6012 35.2 20%
280μm (8 oz) - 0.61mm (0.024'') 280μm (8 oz) - 0.66mm (0.026'') IPC-6012 35.2 20%
350μm (10 oz) - 0.76mm (0.030'') 350μm (10 oz) - 0.81mm (0.032'') IPC-6012 35.2 20%
1.3 Minimum Circuit to Edge Blanking One baseplate material thickness + 0.5mm (0.20'')
1.4a Minimum Circuit to Edge, V-Scored
MATERIAL THICKNESS1.0mm (0.040'')1.6mm (0.062'')2.0mm (0.080'')3.2mm (0.125'')
CIRCUIT TO EDGE DISTANCE0.66mm (0.026'')0.74mm (0.029'')0.79mm (0.031'')0.94mm (0.037'')
1.4b Minimum Circuit to Edge, Milled 0.5mm (0.020'')
1.5 Minimum Conductor to Hole Edge One baseplate material thickness
1.6 Copper Land w/Non-Plated Through Holes Punched non-plated thru-hole is 0.76mm (0.030'') minimum
1.7 Minimum Character Height for Etched Nomenclature (Foil Thickness Dependent) 1.5mm (0.060'')
2.0Soldermask Design
2.1 Minimum Soldermask Line Width 0.20mm (0.008'')
2.2 Soldermask Pad AperturesHenkel recommends that whenever possible, design the soldermask
overlap on top of 0.25mm (0.010'') copper foil or 0.13mm (0.005'') larger than exposed copper
2.3 Minimum Soldermask Aperture 0.20mm x 0.20mm (0.008'' x 0.008'')
2.4 Minimum Character Height and Line Width for Nomenclature 1.50mm x 0.25mm (0.060’’ x 0.010’’)
2.5 Soldermask Color Green, White, Black, Red, Blue are available
2.6 Character Height / Width (In Soldermask) Minimum character height / Minimum line width 0.25mm (0.010'')
3.0Legend Design
3.1 Nomenclature to Pad (Ink Jet Printing) Recommended min. distance from nomenclature feature to nearest pad is 0.25mm (0.010'')
3.2 Character Height / Width 1.0mm (0.040'') minimum height, 0.15mm (0.006'') minimum width
3.3 Minimum Distance to Board Edge Same as circuit distance
3.4 Nomenclature Color White and black
4.0Surface Finish
4.1 Surface Finish Available HASL, Lead-free HASL, ENEPIG, ENIG, OSP (Entek CU56), Immersion Ag, Immersion Sn
5.0Mechanical Design
5.1 Hole to Board Edge Min. distance from edge of hole to edge of board is one baseplate material thickness
5.2 Punched Hole Size Minimum punched hole size is 1.5x baseplate material thickness
5.3 Minimum Drilled Hole Diameter - Copper Baseplate One baseplate material thickness
5.4 Minimum Drilled Hole Diameter - Aluminum Baseplate
MATERIAL THICKNESS1.0mm (0.040'')1.6mm (0.062'')2.0mm (0.080'')3.2mm (0.125'')
DRILLED HOLE DIAMETER0.76mm (0.030’’)0.76mm (0.030'')1.0mm (0.040'')1.6mm (0.062'')
5.5 Minimum Drilled Via Diameter for Circuit Layer (Foil Thickness Dependent) 0.25mm (0.010'')
5.6 Minimum Edge Radius One baseplate material thickness for blanking, no radius for V-scoring
8 l of 10
Design Parameter Standard Design Recommendation and Specification Tolerances

9 l of 10
Guideline 1.3: The minimum circuit to edge blanking distance allows the punch to engage the metal baseplate and dielectric without damaging adjacent circuitry and improves tool life.
Guideline 1.4: The minimum distance from circuit to edge must be met to provide isolation from the circuitry to the baseplate. Note: Additional distance from circuit to hole may be required depending on application and proof testing requirements.
Guideline 1.5: The minimum conductor to hole edge distance must be achieved to provide isolation from circuitry to the base.
Guideline 1.7: The minimum character height for etched nomenclature must be met for optimum legibility.
Guideline 2.1: Minimum soldermask line width is needed for proper adhesion of the soldermask to the board surface.This is also an important consideration for maintaining separation between pads (solderdams).
Guideline 2.2: Solder pad apertures designed with overlap ensure proper adhesion of the soldermask to the board surface and prevention of exposure to copper and bridging between features.
Guideline 2.3: The minimum soldermask specification keeps the pads exposed so they can accept the surface plating and ensures the pad will remain large enough to be functional.
Guideline 2.4: A standard minimum character height and width is set to ensure legibility.
Guideline 3.1: A character width and height are specified for silk screening to assure legibility and adhesion.
Guideline 3.2: The minimum distance from silk screen to the nearest pad is required for registration to keep the legend ink off of solderable surfaces.
Guideline 3.3: A minimum distance to board edge is specified to ensure clearance for punch land, for registration purposes and to maintain legibility.
Guideline 5.1: The minimum distance from hole edge to board edge is important to avoid material distortion during processing.
Guideline 5.2: A minimum punched hole size is recommended to ensure tool strength integrity during processing and to avoid premature tool wear.
Guideline 5.3: A minimum drilled hole diameter for the copper baseplate is in place to ensure tool strength integrity during processing and to avoid premature tool wear.
Guideline 5.4: The aluminum baseplate has a minimum drilled hole diameter specification to ensure tool strength integrity during processing and to avoid premature tool wear.
Guideline 5.5: The circuit layer’s recommended minimum drilled via diameter ensures tool strength integrity during processing and helps to avoid premature tool wear.
The areas shaded with dark gray represent Henkel’s circuit processing capabilities.If your application requires different specifications, please contact your Henkel Sales Representative.

USA
Henkel Electronics Materials, LLC.
1600 Orrin Rd
Prescott, WI 54021 USA
Toll-Free: (800) 950-7956
www.henkel-adhesives.com/thermal
All marks used above are trademarks and/or registered trademarks of Henkel and its affiliates in the U.S., Germany and elsewhere. © 2016 Henkel Corporation. All rights reserved. 14573/LT-8116 (11/15)