talend esb mediation componentsdownload-mirror1.talend.com/esb/user-guide-download/v562/...cconfig...
TRANSCRIPT

Talend ESBMediation ComponentsReference Guide
5.6.2

Talend ESB Mediation Components
Adapted for v5.6.2. Supersedes previous releases.
Publication date: May 12, 2015Copyright © 2011-2015 Talend Inc. All rights reserved.
Copyleft
This documentation is provided under the terms of the Creative Commons Public License (CCPL).
For more information about what you can and cannot do with this documentation in accordance with the CCPL,please read: http://creativecommons.org/licenses/by-nc-sa/2.0/
Notices
Talend and Talend ESB are trademarks of Talend, Inc.
Apache CXF, CXF, Apache Karaf, Karaf, Apache Cellar, Cellar, Apache Camel, Camel, Apache Maven, Maven,Apache Archiva, Archiva, Apache Syncope, Syncope, Apache ActiveMQ, ActiveMQ, Apache Log4j, Log4j,Apache Felix, Felix, Apache ServiceMix, ServiceMix, Apache Ant, Ant, Apache Derby, Derby, Apache Tomcat,Tomcat, Apache ZooKeeper, ZooKeeper, Apache Jackrabbit, Jackrabbit, Apache Santuario, Santuario, ApacheDS, DS, Apache Avro, Avro, Apache Abdera, Abdera, Apache Chemistry, Chemistry, Apache CouchDB,CouchDB, Apache Kafka, Kafka, Apache Lucene, Lucene, Apache MINA, MINA, Apache Velocity, Velocity,Apache FOP, FOP, Apache HBase, HBase, Apache Hadoop, Hadoop, Apache Shiro, Shiro, Apache Axiom,Axiom, Apache Neethi, Neethi, Apache WSS4J, WSS4J are trademarks of The Apache Foundation. EclipseEquinox is a trademark of the Eclipse Foundation, Inc. SoapUI is a trademark of SmartBear Software. Hyperic isa trademark of VMware, Inc. Nagios is a trademark of Nagios Enterprises, LLC.
All other brands, product names, company names, trademarks and service marks are the properties of theirrespective owners.
This product includes software developed at AOP Alliance (Java/J2EE AOP standards), ASM, AntlR, ApacheActiveMQ, Apache Ant, Apache Avro, Apache Axiom, Apache Axis, Apache Axis 2, Apache Batik, ApacheCXF, Apache Camel, Apache Chemistry, Apache Common Http Client, Apache Common Http Core, ApacheCommons, Apache Commons Bcel, Apache Commons JxPath, Apache Commons Lang, Apache Derby DatabaseEngine and Embedded JDBC Driver, Apache Geronimo, Apache Hadoop, Apache Hive, Apache HttpClient,Apache HttpComponents Client, Apache JAMES, Apache Log4j, Apache Lucene Core, Apache Neethi, ApachePOI, Apache Pig, Apache Qpid-Jms, Apache Tomcat, Apache Velocity, Apache WSS4J, Apache WebServicesCommon Utilities, Apache Xml-RPC, Apache Zookeeper, Box Java SDK (V2), CSV Tools, DataStax Java Driverfor Apache Cassandra, Ehcache, Ezmorph, Ganymed SSH-2 for Java, Google APIs Client Library for Java, GoogleGson, Groovy, Guava: Google Core Libraries for Java, H2 Embedded Database and JDBC Driver, HsqlDB,Ini4j, JClouds, JLine, JSON, JSR 305: Annotations for Software Defect Detection in Java, JUnit, Jackson JavaJSON-processor, Java API for RESTful Services, Jaxb, Jaxen, Jettison, Jetty, Joda-Time, Json Simple, MetaStuff,Mondrian, OpenSAML, Paraccel JDBC Driver, PostgreSQL JDBC Driver, Resty: A simple HTTP REST clientfor Java, Rocoto, SL4J: Simple Logging Facade for Java, SQLite JDBC Driver, Simple API for CSS, SshJ, StAXAPI, StAXON - JSON via StAX, Talend Camel Dependencies (Talend), The Castor Project, The Legion of theBouncy Castle, W3C, Woden, Woodstox : High-performance XML processor, XML Pull Parser (XPP), Xalan-J, Xerces2, XmlBeans, XmlSchema Core, Xmlsec - Apache Santuario, Zip4J, atinject, dropbox-sdk-java: Javalibrary for the Dropbox Core API, google-guice. Licensed under their respective license.

Talend ESB Mediation Components Reference Guide
Table of ContentsPreface .................................................. v
General information . . . . . . . . . . . . . . . . . . . . . . . . . . . . . vPurpose . . . . . . . . . . . . . . . . . . . . . . . . . . . . . . . . . . . . vAudience . . . . . . . . . . . . . . . . . . . . . . . . . . . . . . . . . . . vTypographical conventions . . . . . . . . . . . . . . . . v
Feedback and Support . . . . . . . . . . . . . . . . . . . . . . . . . . . vContext components ............................... 1
cBeanRegister . . . . . . . . . . . . . . . . . . . . . . . . . . . . . . . . . . . . . 2cBeanRegister properties . . . . . . . . . . . . . . . . . . 2Related Scenario . . . . . . . . . . . . . . . . . . . . . . . . . . . 2
cConfig . . . . . . . . . . . . . . . . . . . . . . . . . . . . . . . . . . . . . . . . . . . . 3cConfig properties . . . . . . . . . . . . . . . . . . . . . . . . . 3Scenario: Implementing a datasetfrom the Registry . . . . . . . . . . . . . . . . . . . . . . . . . . 3
cMQConnectionFactory . . . . . . . . . . . . . . . . . . . . . . . . . 7cMQConnectionFactory properties . . . . . . . . 7Related scenario: . . . . . . . . . . . . . . . . . . . . . . . . . . 8
Exception components ............................ 9cErrorHandler . . . . . . . . . . . . . . . . . . . . . . . . . . . . . . . . . . 10
cErrorHandler properties . . . . . . . . . . . . . . . . . 10Scenario: Logging the exceptionthrown during a client/server talk . . . . . . . . 10
cIntercept . . . . . . . . . . . . . . . . . . . . . . . . . . . . . . . . . . . . . . . . 14cIntercept properties . . . . . . . . . . . . . . . . . . . . . . 14Scenario: Intercepting several routesand redirect them in a single newroute . . . . . . . . . . . . . . . . . . . . . . . . . . . . . . . . . . . . . . 14
cOnException . . . . . . . . . . . . . . . . . . . . . . . . . . . . . . . . . . . . 18cOnException properties . . . . . . . . . . . . . . . . . 18Scenario: Using cOnException toignore exceptions and continuemessage routing . . . . . . . . . . . . . . . . . . . . . . . . . . 18
cTry . . . . . . . . . . . . . . . . . . . . . . . . . . . . . . . . . . . . . . . . . . . . . . 23cTry properties . . . . . . . . . . . . . . . . . . . . . . . . . . . 23Scenario: Using cTry to build Try/Catch/Finally blocks for exceptionhandling . . . . . . . . . . . . . . . . . . . . . . . . . . . . . . . . . . 23
Messaging components .......................... 29cAMQP . . . . . . . . . . . . . . . . . . . . . . . . . . . . . . . . . . . . . . . . . . 30
cAMQP properties . . . . . . . . . . . . . . . . . . . . . . . 30Scenario: Sending messages to andreceiving messages from an AMQPbroker . . . . . . . . . . . . . . . . . . . . . . . . . . . . . . . . . . . . . 30
cCXF . . . . . . . . . . . . . . . . . . . . . . . . . . . . . . . . . . . . . . . . . . . . . 37cCXF properties . . . . . . . . . . . . . . . . . . . . . . . . . . 37Scenario 1: Providing a Web serviceusing cCXF from a WSDL file . . . . . . . . . . 40Scenario 2: Providing a Web serviceusing cCXF from a Java class . . . . . . . . . . . . 43Scenario 3: Providing a Web servicefrom a Route Resource . . . . . . . . . . . . . . . . . . . 46
cCXFRS . . . . . . . . . . . . . . . . . . . . . . . . . . . . . . . . . . . . . . . . . . 51cCXFRS properties . . . . . . . . . . . . . . . . . . . . . . . 51Scenario: Providing and consuming aREST service using cCXFRS . . . . . . . . . . . . 52
cDataset . . . . . . . . . . . . . . . . . . . . . . . . . . . . . . . . . . . . . . . . . . 59cDataset properties . . . . . . . . . . . . . . . . . . . . . . . 59Scenario: Using cDataset to receivemessages . . . . . . . . . . . . . . . . . . . . . . . . . . . . . . . . . . 59
cDirect . . . . . . . . . . . . . . . . . . . . . . . . . . . . . . . . . . . . . . . . . . . 63cDirect properties . . . . . . . . . . . . . . . . . . . . . . . . 63Related scenario: . . . . . . . . . . . . . . . . . . . . . . . . . 63
cDirectVM . . . . . . . . . . . . . . . . . . . . . . . . . . . . . . . . . . . . . . . 64cDirectVM properties . . . . . . . . . . . . . . . . . . . . 64Scenario: Direct and synchronousmessaging within the same JVM . . . . . . . . . 64
cFile . . . . . . . . . . . . . . . . . . . . . . . . . . . . . . . . . . . . . . . . . . . . . . 69cFile properties . . . . . . . . . . . . . . . . . . . . . . . . . . . 69
Scenario: Reading files from onedirectory and writing them toanother . . . . . . . . . . . . . . . . . . . . . . . . . . . . . . . . . . . . 69
cFtp . . . . . . . . . . . . . . . . . . . . . . . . . . . . . . . . . . . . . . . . . . . . . . . 72cFtp properties . . . . . . . . . . . . . . . . . . . . . . . . . . . 72Related scenario: . . . . . . . . . . . . . . . . . . . . . . . . . 72
cHttp . . . . . . . . . . . . . . . . . . . . . . . . . . . . . . . . . . . . . . . . . . . . . 73cHttp properties . . . . . . . . . . . . . . . . . . . . . . . . . . 73Scenario 1: Retrieving the content ofa remote file . . . . . . . . . . . . . . . . . . . . . . . . . . . . . . 74Scenario 2: Using cHttp to produce aWeb service . . . . . . . . . . . . . . . . . . . . . . . . . . . . . . 78
cJMS . . . . . . . . . . . . . . . . . . . . . . . . . . . . . . . . . . . . . . . . . . . . . 81cJMS properties . . . . . . . . . . . . . . . . . . . . . . . . . . 81Scenario 1: Sending and receiving amessage from a JMS queue . . . . . . . . . . . . . . 81Scenario 2: Setting up a JMS localtransaction . . . . . . . . . . . . . . . . . . . . . . . . . . . . . . . . 85Scenario 3: Sending and receiving ascheduled delivery of messages froma JMS Queue using Camel Quartz . . . . . . . 91
cMail . . . . . . . . . . . . . . . . . . . . . . . . . . . . . . . . . . . . . . . . . . . . . 97cMail Properties . . . . . . . . . . . . . . . . . . . . . . . . . . 97Scenario: Using cMail to send andreceive mails . . . . . . . . . . . . . . . . . . . . . . . . . . . . . 97
cMessagingEndpoint . . . . . . . . . . . . . . . . . . . . . . . . . . . 101cMessagingEndpoint properties . . . . . . . . 101Commonly used Camel components . . . . 101Scenario 1: Moving files from onemessage endpoint to another . . . . . . . . . . . . 107Scenario 2: Sending files to anothermessage endpoint . . . . . . . . . . . . . . . . . . . . . . . 108Scenario 3: Using an Xqueryendpoint to filter messages . . . . . . . . . . . . . 110
cMQTT . . . . . . . . . . . . . . . . . . . . . . . . . . . . . . . . . . . . . . . . . 118cMQTT properties . . . . . . . . . . . . . . . . . . . . . . 118Scenario: Sending messages to andreceiving messages from an MQTTbroker . . . . . . . . . . . . . . . . . . . . . . . . . . . . . . . . . . . 118
cSEDA . . . . . . . . . . . . . . . . . . . . . . . . . . . . . . . . . . . . . . . . . . 125cSEDA properties . . . . . . . . . . . . . . . . . . . . . . . 125Scenario: Using cSEDA, cVM andcDirect to produce and consumemessages separately . . . . . . . . . . . . . . . . . . . . . 126
cTimer . . . . . . . . . . . . . . . . . . . . . . . . . . . . . . . . . . . . . . . . . . 136cTimer properties . . . . . . . . . . . . . . . . . . . . . . . 136Related Scenario: . . . . . . . . . . . . . . . . . . . . . . . 136
cVM . . . . . . . . . . . . . . . . . . . . . . . . . . . . . . . . . . . . . . . . . . . . . 137cVM properties . . . . . . . . . . . . . . . . . . . . . . . . . 137Related scenario: . . . . . . . . . . . . . . . . . . . . . . . . 138
Miscellaneous components ................... 139cLog . . . . . . . . . . . . . . . . . . . . . . . . . . . . . . . . . . . . . . . . . . . . . 140
cLog properties . . . . . . . . . . . . . . . . . . . . . . . . . 140Related scenario: . . . . . . . . . . . . . . . . . . . . . . . . 140
cLoop . . . . . . . . . . . . . . . . . . . . . . . . . . . . . . . . . . . . . . . . . . . 141cLoop properties . . . . . . . . . . . . . . . . . . . . . . . . 141Related scenario: . . . . . . . . . . . . . . . . . . . . . . . . 141
cStop . . . . . . . . . . . . . . . . . . . . . . . . . . . . . . . . . . . . . . . . . . . . 142cStop properties . . . . . . . . . . . . . . . . . . . . . . . . . 142Related scenario: . . . . . . . . . . . . . . . . . . . . . . . . 142
Processor components ......................... 143cBean . . . . . . . . . . . . . . . . . . . . . . . . . . . . . . . . . . . . . . . . . . . 144
cBean properties . . . . . . . . . . . . . . . . . . . . . . . . 144Related Scenario . . . . . . . . . . . . . . . . . . . . . . . . 144
cDelayer . . . . . . . . . . . . . . . . . . . . . . . . . . . . . . . . . . . . . . . . 145cDelayer properties . . . . . . . . . . . . . . . . . . . . . 145Scenario: Using cDelayer to delaymessage routing . . . . . . . . . . . . . . . . . . . . . . . . . 145
cExchangePattern . . . . . . . . . . . . . . . . . . . . . . . . . . . . . 149cExchangePattern properties . . . . . . . . . . . . 149Scenario: Enabling the InOutexchange pattern to get replies . . . . . . . . . . 149

Talend ESB Mediation Components
iv Talend ESB Mediation Components Reference Guide
cJavaDSLProcessor . . . . . . . . . . . . . . . . . . . . . . . . . . . . 153cJavaDSLProcessor properties . . . . . . . . . . 153Related scenario: . . . . . . . . . . . . . . . . . . . . . . . . 153
cProcessor . . . . . . . . . . . . . . . . . . . . . . . . . . . . . . . . . . . . . . 154cProcessor properties . . . . . . . . . . . . . . . . . . . 154Related scenario: . . . . . . . . . . . . . . . . . . . . . . . . 154
cTalendJob . . . . . . . . . . . . . . . . . . . . . . . . . . . . . . . . . . . . . 155cTalendJob properties . . . . . . . . . . . . . . . . . . . 155Scenario: Using cTalendJob to call aDI Job . . . . . . . . . . . . . . . . . . . . . . . . . . . . . . . . . . . 156
Routing components ............................ 163cAggregate . . . . . . . . . . . . . . . . . . . . . . . . . . . . . . . . . . . . . 164
cAggregate . . . . . . . . . . . . . . . . . . . . . . . . . . . . . . 164Scenario: Aggregating threemessages into one . . . . . . . . . . . . . . . . . . . . . . . 166
cDynamicRouter . . . . . . . . . . . . . . . . . . . . . . . . . . . . . . . 171cDynamicRouter properties . . . . . . . . . . . . . 171Scenario: Routing files conditionallyto different file paths . . . . . . . . . . . . . . . . . . . 171
cIdempotentConsumer . . . . . . . . . . . . . . . . . . . . . . . . 176cIdempotentConsumer properties . . . . . . . 176Scenario: Deduplicating messageswhile routing them . . . . . . . . . . . . . . . . . . . . . . 176
cLoadBalancer . . . . . . . . . . . . . . . . . . . . . . . . . . . . . . . . . 181cLoadBalancer properties . . . . . . . . . . . . . . . 181Scenario: Distributing messages toreceiver endpoints based on roundrobin . . . . . . . . . . . . . . . . . . . . . . . . . . . . . . . . . . . . . 182
cMessageFilter . . . . . . . . . . . . . . . . . . . . . . . . . . . . . . . . . 186cMessageFilter properties . . . . . . . . . . . . . . . 186Scenario: Filtering messagesaccording to a criterion . . . . . . . . . . . . . . . . . 186
cMessageRouter . . . . . . . . . . . . . . . . . . . . . . . . . . . . . . . . 190cMessageRouter properties . . . . . . . . . . . . . 190Scenario: Routing messagesaccording to a criterion . . . . . . . . . . . . . . . . . 190
cMulticast . . . . . . . . . . . . . . . . . . . . . . . . . . . . . . . . . . . . . . 195cMulticast properties . . . . . . . . . . . . . . . . . . . . 195Scenario: Route a message tomultiple endpoints and set a newbody for each . . . . . . . . . . . . . . . . . . . . . . . . . . . 195
cPipesAndFilters . . . . . . . . . . . . . . . . . . . . . . . . . . . . . . . 201cPipesAndFilters properties . . . . . . . . . . . . . 201Scenario: Using cPipesAndFilters toprocess the task in sequence . . . . . . . . . . . . 201
cRecipientList . . . . . . . . . . . . . . . . . . . . . . . . . . . . . . . . . . 205cRecipientList properties . . . . . . . . . . . . . . . 205Scenario: Routing a message tomultiple recipients . . . . . . . . . . . . . . . . . . . . . . 206
cRoutingSlip . . . . . . . . . . . . . . . . . . . . . . . . . . . . . . . . . . . . 210cRoutingSlip properties . . . . . . . . . . . . . . . . . 210Scenario 1: Routing a messageconsecutively to a series ofendpoints . . . . . . . . . . . . . . . . . . . . . . . . . . . . . . . . 210Scenario 2: Routing each messageconditionally to a series of endpoints . . . 214
cSplitter . . . . . . . . . . . . . . . . . . . . . . . . . . . . . . . . . . . . . . . . . 217cSplitter properties . . . . . . . . . . . . . . . . . . . . . . 217Scenario: Using cSplitter to split amessage and aggregate replies fromsub-messages . . . . . . . . . . . . . . . . . . . . . . . . . . . . 218
cThrottler . . . . . . . . . . . . . . . . . . . . . . . . . . . . . . . . . . . . . . . 223cThrottler properties . . . . . . . . . . . . . . . . . . . . 223Scenario: Throttling the messageflow . . . . . . . . . . . . . . . . . . . . . . . . . . . . . . . . . . . . . 223Viewing the code and executing theRoute . . . . . . . . . . . . . . . . . . . . . . . . . . . . . . . . . . . . 225
cWireTap . . . . . . . . . . . . . . . . . . . . . . . . . . . . . . . . . . . . . . . 227cWireTap properties . . . . . . . . . . . . . . . . . . . . 227Scenario: Wiretapping a message ina Route . . . . . . . . . . . . . . . . . . . . . . . . . . . . . . . . . . 227
Transformation components ................ 231
cContentEnricher . . . . . . . . . . . . . . . . . . . . . . . . . . . . . . 232cContentEnricher properties . . . . . . . . . . . . 232Scenario: Receiving messages from alist of URLs . . . . . . . . . . . . . . . . . . . . . . . . . . . . . 232
cConvertBodyTo . . . . . . . . . . . . . . . . . . . . . . . . . . . . . . . 239cConvertBodyTo properties . . . . . . . . . . . . 239Scenario: Converting the bodyof an XML file into anorg.w3c.dom.Document.class . . . . . . . . . . . 239
cMap . . . . . . . . . . . . . . . . . . . . . . . . . . . . . . . . . . . . . . . . . . . . 244cMap properties . . . . . . . . . . . . . . . . . . . . . . . . . 244Scenario: Mapping data with cMap . . . . . 245
cSetBody . . . . . . . . . . . . . . . . . . . . . . . . . . . . . . . . . . . . . . . . 248cSetBody properties . . . . . . . . . . . . . . . . . . . . . 248Scenario: Replacing the content ofmessages with their extracts . . . . . . . . . . . . 248
cSetHeader . . . . . . . . . . . . . . . . . . . . . . . . . . . . . . . . . . . . . 252cSetHeader properties . . . . . . . . . . . . . . . . . . . 252Scenario: Splitting a messageand renaming the sub-messagesaccording to contained information . . . . . 252Related scenarios . . . . . . . . . . . . . . . . . . . . . . . 256

Talend ESB Mediation Components Reference Guide
Preface
General information
Purpose
This Reference Guide explains in detail the major Camel components of the Mediation perspectiveof Talend Studio.
Information presented in this document applies to Talend Studio 5.6.2.
Audience
This guide is for users and administrators of Talend Studio.
The layout of GUI screens provided in this document may vary slightly from your actual GUI.
Typographical conventions
This guide uses the following typographical conventions:
• text in bold: window and dialog box buttons and fields, keyboard keys, menus, and menu options,
• text in [bold]: window, wizard, and dialog box titles,
• text in courier: system parameters typed in by the user,
• text in italics: file, schema, column, row, and variable names referred to in all use cases, and alsonames of the fields in the Basic and Advanced setting views referred to in the property table foreach component,
•The icon indicates an item that provides additional information about an important point. It isalso used to add comments related to a table or a figure,
•The icon indicates a message that gives information about the execution requirements orrecommendation type. It is also used to refer to situations or information the end-user needs to beaware of or pay special attention to.
Feedback and SupportYour feedback is valuable. Do not hesitate to give your input, make suggestions or requests regardingthis documentation or product and find support from the Talend team, on Talend's Forum website at:

Feedback and Support
vi Talend ESB Mediation Components Reference Guide
http://talendforge.org/forum

Talend ESB Mediation Components Reference Guide
Context componentsThis chapter details the major components that you can find in the Context family from the Palette of theMediation perspective of Talend Studio.
The Context family groups components that define contexts you want to use in your Routes.

cBeanRegister
2 Talend ESB Mediation Components Reference Guide
cBeanRegister
cBeanRegister properties
Component Family Context
Function cBeanRegister registers a Java bean in the registry that can be called on using the ID of thebean in message exchanges.
Purpose cBeanRegister allows you to register a Java bean in the registry to be used in message exchanges.
Basic settings Id Enter any string which is used to look up the bean in the registry.
Simple Select this option to call a bean class that is stored in the Codenode of the Repository.
Customized Select this option to define the Java bean by entering the code inthe Code box.
Class Name This field appears when the Simple option is selected.
Enter the name of the bean class that is stored in the Code nodeof the Repository.
For more information about creating and using Java Beans, seeTalend Studio User Guide.
Specify Arguments This check box appears when the Simple option is selected. Selectthis check box to set the optional arguments in the correspondingtable. Click [+] as many times as required to add arguments to thetable.
Imports This box appears when the Customized option is selected.
Enter the Java code that helps to import, if necessary, externallibraries used in the Code box.
Code This box appears when the Customized option is selected.
Enter the code of the bean in the box.
Usage cBeanRegister cannot be added directly in a Route.
Limitation n/a
Related Scenario
For a related scenario, see:
• cConvertBodyTo: Scenario: Converting the body of an XML file into an org.w3c.dom.Document.class.

cConfig
Talend ESB Mediation Components Reference Guide 3
cConfig
cConfig properties
Component Family Context
Function cConfig manipulates the CamelContext, which is the single routing rule base in a Route.
Purpose cConfig allows you to set the CamelContext using Java code.
Basic settings Imports Enter the Java code that helps to import, if necessary, externallibraries used in the Code box.
Code Write a piece of code to manipulate the CamelContext.
Dependencies Select the library or libraries that is required by the CamelContextor Typeconverter Registry from the list.
Usage cConfig cannot be added directly in a Route.
Limitation n/a
Scenario: Implementing a dataset from the Registry
In this scenario, an instance of dataset is added in the Registry and implemented by a cMessagingEndpointcomponent.
Dropping and linking the components
1. From the Palette, expand the Context folder, and drop a cConfig component onto the design workspace.
2. Expand the Messaging folder, and drop a cMessagingEndpoint component onto the design workspace.
3. Expand the Processor folder, and drop a cProcessor component onto the design workspace.
4. Right-click the input cMessagingEndpoint component, select Row > Route from the contextual menu andclick the cProcessor component.
5. Label the components to better identify their functionality.

Scenario: Implementing a dataset from the Registry
4 Talend ESB Mediation Components Reference Guide
Configuring the components
1. Double-click the cConfig component, which is labelled Create_dataset, to display its Basic settings viewin the Component tab. and set its parameters.
2. Write a piece of code in the Code field to register the dataset instance foo into the registry, as shown below.
org.apache.camel.impl.SimpleRegistry registry = neworg.apache.camel.impl.SimpleRegistry(); registry.put("foo", new org.apache.camel.component.dataset.SimpleDataSet());camelContext.setRegistry(registry);
3. Double-click the input cMessagingEndpoint component, which is labelled Read_dataset, to display its Basicsettings view in the Component tab.
4. In the URI field, enter dataset:foo between the quotation marks.
5. Double-click the cProcessor component, which is labelled Monitor, to display its Basic settings view in theComponent tab.

Scenario: Implementing a dataset from the Registry
Talend ESB Mediation Components Reference Guide 5
6. In the Code box, customize the code as follows so that the Run console displays the message contents:
System.out.println("Message content: "+ exchange.getIn().toString());
7. Press Ctrl+S to save your route.
Viewing code and executing the Route
1. Click the Code tab at the bottom of the design workspace to have a look at the generated code.
As shown in the code, a message route is built from the endpoint identified byRead_dataset andcProcessor_1 gets the message content and displays it on the console.
2. Click the Run view to display it and click the Run button to launch the execution of your route. You canalso press F6 to execute it.
RESULT: The message content is printed in the console.

Scenario: Implementing a dataset from the Registry
6 Talend ESB Mediation Components Reference Guide

cMQConnectionFactory
Talend ESB Mediation Components Reference Guide 7
cMQConnectionFactory
cMQConnectionFactory properties
Component Family Context
Function cMQConnectionFactory encapsulates a set of connection configuration parameters to connect toa MQ server. This component replaces the former cJMSConnectionFactory and provides someenhancements.
Purpose cMQConnectionFactory is used to create a connection to a MQ server that can be called by multiplecJMS, cAMQP or cMQTT components in a Route.
MQ Server Select an MQ server from ActiveMQ, WebSphere MQ, AMQP1.0, MQTT, or Customized.
Use Transaction
(for ActiveMQ, WebSphere MQ,and Customized only)
Select this check box to enable local transaction in the current Route.
Broker URI
(for ActiveMQ only)
Type in the URI of the message broker.
For intra-Route message handling, you can simply use the defaultURI vm://localhost?broker.persistent=false for ActiveMQ.
HTTP Transport
(for ActiveMQ only)
Select this check box to enable the HTTP based connection to theActiveMQ broker.
Use PooledConnectionFactory
(for ActiveMQ only)
Select this check box to use PooledConnectionFactory.
Max Connections
(for ActiveMQ only)
Specify the maximum number of connections of thePooledConnectionFactory. This field is available only when the UsePooledConnectionFactory check box is selected.
Max Active
(for ActiveMQ only)
Specify the maximum number of sessions per connection. This fieldis available only when the Use PooledConnectionFactory checkbox is selected.
Idle Timeout (in ms)
(for ActiveMQ only)
Specify the maximum waiting time (in milliseconds) before theconnection breaks. This field is available only when the UsePooledConnectionFactory check box is selected.
Expiry Timeout (in ms)
(for ActiveMQ only)
Specify the time (in milliseconds) before the connection breaks sinceit is used for the first time. The default value is 60000. The expiry isdisabled if 0 is specified. This field is available only when the UsePooledConnectionFactory check box is selected.
Host Name
(for WebSphere MQ, AMQP 1.0and MQTT only)
Type in the name or IP address of the host on which the IBMWebSphere MQ server or the MQTT broker is running. ForWebSphere MQ and AMQP 1.0, the default is localhost. ForMQTT, the default is 127.0.0.1.
Port
(for WebSphere MQ, AMQP 1.0and MQTT only)
Type in the port of the MQ server. For WebSphere MQ, the defaultis 1414. For AMQP 1.0, the default is 5672. For MQTT, the defaultis 1883.
Transport Type
(for WebSphere MQ only)
Select a type of message transport between the IBM WebSphereMQ server and the WebSphere MQ broker from Bindings, Bindingsthen Client, and Client.
Queue Manager
(for WebSphere MQ only)
Type in the name of the queue manager, or specify the name of theIBM WebSphere MQ server to find a queue manager.

Related scenario:
8 Talend ESB Mediation Components Reference Guide
Authentication
(for ActiveMQ, WebSphere MQ,and AMQP 1.0 only)
Select this check box and provide the username and password for theMQ server to validate the access permission. To enter the password,click the [...] button next to the password field, and then in the pop-up dialog box enter the password between double quotes and clickOK to save the settings.
Dependencies
(for WebSphere MQ andCustomized only)
Specify additional libraries required by the MQ broker.
Use SSL
(for AMQP 1.0 and MQTT only)
Select this check box to connect to the MQ server over the SSLprotocol. For MQTT, specify the TrustStore file containing the listof certificates that the MQ server trusts and enter the password usedto check the integrity of the TrustStore data.
Connect Attempts
(for MQTT only)
The maximum number of attempts to establish an initial connection,-1 by default to use unlimited attempts.
Reconnect Attempts
(for MQTT only)
The maximum number of attempts to re-establish a connection aftera failure, -1 by default to use unlimited attempts.
Reconnect Delay
(for MQTT only)
The time in milliseconds between attempts to re-establish an initialor failed connection, 10 by default.
Quality of Service
(for MQTT only)
The MQTT Quality of Service to use for message exchanges. It canbe one of AtMostOnce, AtLeastOnce or ExactlyOnce.
Connect Wait In Seconds
(for MQTT only)
Delay in seconds that the component will wait for a connection to beestablished to the MQTT broker, 10 by default.
Disconnect Wait In Seconds
(for MQTT only)
The number of seconds the component will wait for a validdisconnect from the MQTT broker, 5 by default.
Send Wait In Seconds
(for MQTT only)
The maximum time the component will wait for a receipt from theMQTT broker to acknowledge a published message before throwingan exception, 5 by default.
Codes
(for Customized only)
Write a piece of code to specify the MQ connection factory to beused for message handling.
Usage cMQConnectionFactory cannot be added directly in a Route.
Limitation Due to the license incompatibility, one or more JAR files required to use this component are not provided.You can install these missing JAR files by clicking the Install button in the Basic settings view of theComponent tab. For more information, see the section about how to configure the Studio of the TalendInstallation and Upgrade Guide.
Related scenario:
For a related scenario, see Scenario 1: Sending and receiving a message from a JMS queue.

Talend ESB Mediation Components Reference Guide
Exception componentsThis chapter details the major components that you can find in the Exception family from the Palette of theMediation perspective of Talend Studio.
The Exception family groups components that are dedicated to exception handling of Routes.

cErrorHandler
10 Talend ESB Mediation Components Reference Guide
cErrorHandler
cErrorHandler properties
Component Family Exception
Function cErrorHandler provides multiple strategies to deal with errors in a Route.
Purpose cErrorHandler is used to process errors in the message routing.
Basic settings Default Handler This error handler does not support a dead letter queue and willreturn exceptions back to the caller.
Set Maximum Redeliveries: select this check box to set thenumber of redeliveries in the Maximum Redeliveries (int) field.
Set Redelivery Delay: select this check box to set the initialredelivery delay (in milliseconds) in the Redelivery Delay (long)field.
Set Retry Attempted Log Level: select this check box to selectthe log level in the Level list for log messages when retries areattempted.
Asynchronized Delayed Redelivery: select this check box toallow asynchronous delayed redelivery.
More Configurations by Code: select this check box to entercodes in the Code box for further configuration.
Dead Letter This handler supports attempting to redeliver the messageexchange a number of times before sending it to a dead letterendpoint.
Dead Letter Uri: select this check box to define the endpoint ofthe dead letter queue.
Other parameters share the same meaning as those of the defaulthandler.
Logging Handler This handler logs the exceptions.
Set Logger Name: select this check box to give a name to thelogger in the Name field.
Set Log Level: select this check box to decide the log level fromthe Level list.
Usage cErrorHandler is used separately or as a middle or end component in a Route. If this componentis used separately, it will handle errors in all sub-routes. If this component is used in the middleor end of a sub-route, it will only handle exceptions that happen in the components of this sub-route, either before or after the cErrorHandler.
Limitation n/a
Scenario: Logging the exception thrown during aclient/server talk
In this scenario, a Jetty server is started before a client browser requests access to it. Then an exception is thrownat the server side and logged by cErrorHandler.

Scenario: Logging the exception thrown during a client/server talk
Talend ESB Mediation Components Reference Guide 11
Dropping and linking the components
1. Drop the following components from the Palette onto the workspace: cMessagingEndpoint,cErrorHandler and cProcessor, labelled as Jetty_Server, Error_Handler and Throw_Exceptionrespectively.
2. Link cMessagingEndpoint and cProcessor using a Row > Route connection.
Configuring the components
1. Double-click cErrorHandler to open its Basic settings view in the Component tab.
2. Select Logging Handler to log the exceptions that are thrown.
3. Double-click cMessagingEndpoint to open its Basic settings view in the Component tab.
4. In the Uri field, enter jetty:http://localhost:8889/service to specify the Jetty server.
5. Click Advanced settings for further setup.

Scenario: Logging the exception thrown during a client/server talk
12 Talend ESB Mediation Components Reference Guide
6. In the Dependencies table, click the [+] button to add a line and select jetty from the Camel component list.
7. Double-click cProcessor to open its Basic settings view in the Component tab.
8. In the Code box, enter throw new Exception("server side error") to throw an exception.
9. Press Ctrl+S to save your Route.
Viewing code and executing the Route
1. Click the Code tab at the bottom of the design workspace to check the generated code.
As shown above, the route starts from the endpoint Jetty_Server and throws the exception of server sideerror via cProcessor_1.

Scenario: Logging the exception thrown during a client/server talk
Talend ESB Mediation Components Reference Guide 13
2. Press F6 to execute the Route.
The Jetty server has started.
3. Launch an Internet browser and enter http://localhost:8889/service (the Jetty server URI configuredabove) in the address bar to access the server.
As shown above, the request failed due to the server error.
4. Go to the Studio and check the results in the Run tab.
As shown above, cErrorHandler has logged the exception at the level of ERROR.

cIntercept
14 Talend ESB Mediation Components Reference Guide
cIntercept
cIntercept propertiesComponent Family Exception
Function cIntercept intercepts the messages in all the sub-routes on a Route before they are produced, androutes them in a new single sub-route without modifying the original ones. When this detour iscomplete, message routing to the originally intended target endpoints continues.
Purpose cIntercept intercepts each message sub-route and redirects it in another sub-route without modifyingthe original one. This can be useful at testing time to simulate error handling.
Usage cIntercept is a start component of a sub-route.
Connections Row / Route Select the Route link to intercept all the messages of all the sub-routes listenedto by the cIntercept.
Trigger / When Select the When link to filter the messages to intercept and click the Componentview.
In the Type list, select the type of language you will use to declare yourcondition.
In the Condition field, type in the condition that will be used to filter themessages.
All the messages that do not match this condition are dropped by default or canbe retrieved with the Otherwise link to a different channel.
Limitation To keep the original sub-routes untouched, cIntercept only be used in a separate sub-route .
Scenario: Intercepting several routes and redirectthem in a single new routeIn this scenario, messages on two sub-routes are intercepted and routed along a new sub-route, which is thenterminated before the original sub-routes continue.
Dropping and linking the components
This scenario requires five cFile components, one cIntercept component, one cProcessor component, and onecStop component.

Scenario: Intercepting several routes and redirect them in a single new route
Talend ESB Mediation Components Reference Guide 15
1. From the Messaging folder of the Palette, drop four cFile components onto the design workspace.
2. Connect the two pairs of cFile components using Row > Route connections. Messages on these two sub-routes will be intercepted.
3. From the Exception folder, drop a cIntercept component onto the design workspace.
4. From the Processor folder, drop a cProcessor component onto the design workspace.
5. From the Messaging folder, drop a fifth cFile component onto the design workspace.
6. From the Miscellaneous folder, drop a cStop component onto the design workspace.
7. Connect these four components one to the next using Row > Route connections. Along this sub-route,intercepted messages will be directed to a new endpoint before the entire Route is terminated.
8. Label the components to better identify their roles in the Route.
Configuring the components and connections
In this scenario, the cIntercept component intercepts all the messages on all the sub-routes as soon as the messagesare sent and does not have properties to set. The cStop component stops the sub-route on which it is dropped beforeit completes and does not have properties to set. Therefore, you only need to configure the messaging endpointsand monitor components.
1. Double-click the cFile component labeled Sender_1 to display its Basic settings view in the Component tab.
2. In the Path field, specify the file path to the first source your are going to send messages from, and leavethe other parameters as they are.
3. Double-click the cFile component labeled Receiver_1 to display its Basic settings view in the Componenttab.

Scenario: Intercepting several routes and redirect them in a single new route
16 Talend ESB Mediation Components Reference Guide
4. In the Path field, specify the file path to the first destination you are going to send messages to, and leavethe other parameters as they are.
5. In the same way, set the cFile components labeled Sender_2 and Receiver_2 across the second sub-route.
6. Double-click the cProcessor component, which is labeled Monitor, to display its Basic settings view inthe Component tab, and customize the code in the Code area to display the file names of the messagesintercepted on the console:
System.out.println("Message intercepted: "+exchange.getIn().getHeader("CamelFileName"));
7. Double-click the cFile component labeled Receiver_3 to display its Basic settings view in the Componenttab.
8. In the Path field, specify the file path to the destination for the intercepted messages, and leave the otherparameters as they are.
9. Press Ctrl+S to save your Route.
Viewing code and executing the Route
1. Click the Code tab at the bottom of the design workspace to have a look at the generated code.

Scenario: Intercepting several routes and redirect them in a single new route
Talend ESB Mediation Components Reference Guide 17
As shown in this piece of code, Interceptor intercepts all messages on route, the intercepted messages aredirected .to the endpoint Receiver_3, and cStop_1 terminates message routing before the messages are routedfrom the endpoint Sender_1 .to the endpoint Receiver_1 and from the endpoint Sender_2 .to the endpointReceiver_2.
2. Click the Run view and click the Run button to launch the execution of your Route. You can also pressF6 to execute it.
RESULT: Files are sent from the endpoints, caught by the cIntercept component, monitored by thecProcessor component and sent to a new endpoint, and then the original sub-routes are terminated beforethey can continue.

cOnException
18 Talend ESB Mediation Components Reference Guide
cOnException
cOnException properties
Component Family Exception
Function cOnException catches the exceptions defined and triggers certain actions which are thenperformed on these exceptions and the message routing.
Purpose cOnException allows you to specify the error handling you require on an exception type basis.
Basic settings Exceptions Click the plus button to add as many lines as needed in the tableto define the exceptions to be caught.
Set a redelivering triescount
Select this check box to set the maximum redelivering tries in theMaximum redelivering tries field.
Non blocking asynchronousbehavior
Select this check box to enable asynchronous delayed redelivery.
For details, go to http://camel.apache.org/exception-clause.html.
Exception behavior None: select this option to take no action on the original route.
Handle the exceptions: select this option to handle exceptions andbreak out the original route.
Ignore the exceptions: select this option to ignore the exceptionsand continue routing in the original route.
Route the original inputbody instead of the currentbody
Select this check box to route the original message instead of thecurrent message that might be changed during the routing.
Usage cOnException is used as a separate component in a Route.
Limitation n/a
Scenario: Using cOnException to ignore exceptionsand continue message routing
In this scenario, a cOnException component is used to ignore an IO exception thrown by a Java bean so that themessage is successfully routed to the destination in spite of the exception.

Scenario: Using cOnException to ignore exceptions and continue message routing
Talend ESB Mediation Components Reference Guide 19
Dropping and linking the components
1. Drag and drop these components from the Palette onto the workspace: a cOnException component, a cFilecomponent, a cBean component, and cProcessor component.
2. Link cFile to cBean using a Row > Route connection.
3. Link cBean to cProcessor using a Row > Route connection.
4. Label the components to better identify their roles in the Route.
Configuring the components
1. Double-click the cOnException component, which is labelled Ignore_exception, to open its Basic settingsview in the Component tab.
2. Click the plus button to add a line in the Exceptions table, and define the exception to catch. In this example,enter java.io.IOException to handle IO exceptions.
In the Exception behavior area, select the Ignore the exceptions option to ignore exceptions and let messagerouting continue. Leave the other parameters as they are.
3. Double-click the cFile component, which is labelled Source, to open its Basic settings view in theComponent tab.

Scenario: Using cOnException to ignore exceptions and continue message routing
20 Talend ESB Mediation Components Reference Guide
4. In the Path field, enter the path of the message source, and leave the other parameters as they are.
5. Double-click the cBean component, which is labelled Throw_exception, to open its Basic settings view inthe Component tab.
6. Select New Instance and in the Bean class field, enter the name of the bean to throw an IO exception,beans.throwIOException.class in this scenario.
Note that this bean has already been defined in the Code node of the Repository and it looks like this:
package beans;
import java.io.IOException;
import org.apache.camel.Exchange;
public class throwIOException {
/**
* @throws IOException */ public static void helloExample(String message, Exchange exchange) throws IOException { throw new IOException("An IOException has been caught"); }}
For more information about creating and using Java Beans, see Talend Studio User Guide.
7. Double-click the cProcessor component, which is labelled Monitor, to open its Basic settings view in theComponent tab.

Scenario: Using cOnException to ignore exceptions and continue message routing
Talend ESB Mediation Components Reference Guide 21
8. In the Code area, customize the code to display the file name of the consumed message on the Run console:
System.out.println("Message consumed: "+ exchange.getIn().getHeader("CamelFileName"));
9. Press Ctrl+S to save your Route.
Viewing code and executing the Route
1. Click the Code tab at the bottom of the design workspace to check the generated code.
As shown above, Ignore_exception handles any IO exception thrown by.bean(beans.throwIOException.class) invoked by cBean_1, so that messages from the endpointSource can be successfully routed onwards (continued(true)) in spite of the exception.
2. Press F6 to execute the Route.
The route gets executed successfully and the files from the source are successfully routed to the destination.

Scenario: Using cOnException to ignore exceptions and continue message routing
22 Talend ESB Mediation Components Reference Guide
3. Change the exception handling option in the cOnException component or deactivate the component and runthe Route again.
The exception thrown by the Java bean prevents the messages from being routed successfully.

cTry
Talend ESB Mediation Components Reference Guide 23
cTry
cTry properties
Component Family Exception
Function cTry offers the Java equivalent exception handling abilities by building Try/Catch/Finally blocksto isolate the part of your Route likely to generate an error, catch the errors, and execute finalinstructions regardless of the errors.
Purpose cTry is designed to build Try/Catch/Finally blocks to handle exceptions.
Usage cTry is used as a middle component in a Route.
Try Select this link to isolate the part of your Route that is likely to throw anexception or exceptions.
When the Try link is followed by multiple components, a compileerror may occur showing "The method doCatch() is
undefined for the type ExpressionNode". In this case, use acJavaDSLProcessor component to end the Try block with the code.endDoTry() as a workaround.
Catch Select this link to catch any exception thrown in the Route.
In the Exceptions field, type in an expression to filter the type of exception tocatch.
This link can be used only when a Try link is present.
Finally Select link to execute final instructions regardless of any exceptions that mayoccur in the Route.
This link can be used only when a Try link is present.
Connections
Route Select this link to route all the messages from the sender to the next endpoint.
Limitation n/a
Scenario: Using cTry to build Try/Catch/Finally blocksfor exception handling
In this scenario, the content of each file sent from the message sender to the receiver is checked and if any file doesnot meet the content requirement, an exception is thrown and the relevant information is displayed on the console.

Scenario: Using cTry to build Try/Catch/Finally blocks for exception handling
24 Talend ESB Mediation Components Reference Guide
Dropping and linking components
1. From the Messaging folder of the Palette, drop twocFile components onto the design workspace, one as themessage sender and the other as the message receiver.
2. From the Exception folder, drop a cTry component onto the design workspace to build Try, Catch andFinally blocks.
3. From the Processor folder, drop two cProcessor components onto the design workspace.
4. Link the cFile component serving as message sender to the cTry component using a Row > Route connection.
5. Link the cTry component to one cProcessor using a Row > Try connection. This cProcessor componentwill throw an exception if any file coming via this connection does not contain the required content.
6. Link the cTry component to the other cProcessor component using a Row > Catch connection to catch theexception. This cProcessor component will display the information related to the exception and the file namethat does not contain the required content.
7. Link the cTry component to the receiving cFile component using a Row > Finally connection.
8. Label the components according to their roles in the Route.
Configuring the components and connections
1. Double-click the cFile component labeled Sender to open its Basic settings view in the Component tab.

Scenario: Using cTry to build Try/Catch/Finally blocks for exception handling
Talend ESB Mediation Components Reference Guide 25
2. In the Path field, fill in or browse to the path to the folder that holds the source files.
3. From the Encoding list, select the encoding type of your source files. Leave the other parameters as they are.
4. Repeat these step to define the output file path and encoding type in the Basic settings view of the othercFile component, which is labeled Receiver.
5. Double-click the cProcessor component labeled Throw_exception to open its Basic settings view in theComponent tab, and customize the code in the Code area to throw an exception and display relevantinformation if any file coming via the try connection does not meet the content requirement, as follows:
String body = exchange.getIn().getBody(String.class);System.out.println("\nTrying: "+body);Exception e = new Exception("Only 'Talend Integration Solutions' is acceptable. Please check the file:");if(!"Talend Integration Solutions".equals(body)){ throw e;}else{ System.out.println("File is good.");}
6. Click the catch connection and then the Component tab to open its Basic settings view, and fill theExpression field with an expression to specify the type of exception to catch.
In this scenario, fill in Exception.class to catch any exception thrown.
7. Double-click cProcessor component labeled Show_exception to open its Basic settings view in theComponent tab, and customize the code in the Code area to display the exception information and the relatedfile name, as follows:
System.out.println(exchange.getProperty("CamelExceptionCaught")+" " + exchange.getIn().getHeader("CamelFileName"));
8. Click Ctrl+S to save your Route.

Scenario: Using cTry to build Try/Catch/Finally blocks for exception handling
26 Talend ESB Mediation Components Reference Guide
Viewing code and executing the Route
1. Click the Code tab at the bottom of the design workspace to check the generated code.
As shown above, while messages are routed from the sender .to the receiver, .doTry(), .doCatch() and.doFinally() blocks are built by cTry_1. Thus, when any file does not meet the content requirement, anexception is thrown and caught, before each file is finally routed to the receiver.
2. Press F6 to execute the Route.

Scenario: Using cTry to build Try/Catch/Finally blocks for exception handling
Talend ESB Mediation Components Reference Guide 27
RESULT: When a file that does not meet the content requirement is detected, an exception is thrown, and theexception information is displayed on the console. Regardless of the exception, all the files from the senderare sent to the receiver.

Talend ESB Mediation Components Reference Guide

Talend ESB Mediation Components Reference Guide
Messaging componentsThis chapter details the major components that you can find in the Messaging family from the Palette of theMediation perspective of Talend Studio.
The Messaging family groups components that provide access to messaging endpoints, file systems, repositoryof code, and so on.
cAMQP
30 Talend ESB Mediation Components Reference Guide
cAMQP
cAMQP properties
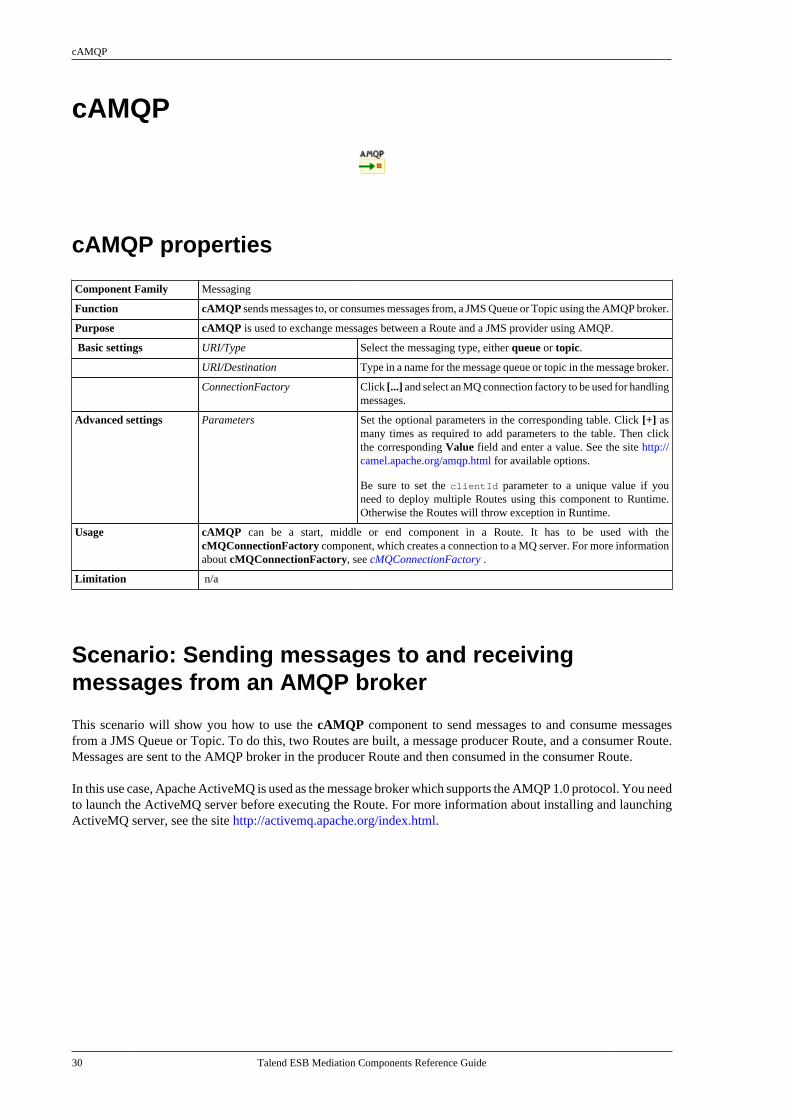
Component Family Messaging
Function cAMQP sends messages to, or consumes messages from, a JMS Queue or Topic using the AMQP broker.
Purpose cAMQP is used to exchange messages between a Route and a JMS provider using AMQP.
Basic settings URI/Type Select the messaging type, either queue or topic.
URI/Destination Type in a name for the message queue or topic in the message broker.
ConnectionFactory Click [...] and select an MQ connection factory to be used for handlingmessages.
Advanced settings Parameters Set the optional parameters in the corresponding table. Click [+] asmany times as required to add parameters to the table. Then clickthe corresponding Value field and enter a value. See the site http://camel.apache.org/amqp.html for available options.
Be sure to set the clientId parameter to a unique value if youneed to deploy multiple Routes using this component to Runtime.Otherwise the Routes will throw exception in Runtime.
Usage cAMQP can be a start, middle or end component in a Route. It has to be used with thecMQConnectionFactory component, which creates a connection to a MQ server. For more informationabout cMQConnectionFactory, see cMQConnectionFactory .
Limitation n/a
Scenario: Sending messages to and receivingmessages from an AMQP broker
This scenario will show you how to use the cAMQP component to send messages to and consume messagesfrom a JMS Queue or Topic. To do this, two Routes are built, a message producer Route, and a consumer Route.Messages are sent to the AMQP broker in the producer Route and then consumed in the consumer Route.
In this use case, Apache ActiveMQ is used as the message broker which supports the AMQP 1.0 protocol. You needto launch the ActiveMQ server before executing the Route. For more information about installing and launchingActiveMQ server, see the site http://activemq.apache.org/index.html.

Scenario: Sending messages to and receiving messages from an AMQP broker
Talend ESB Mediation Components Reference Guide 31
Building the producer Route
Dropping and linking the components
1. From the Palette, drag and drop a cMQConnectionFactory, a cTimer, a cSetBody, a cAMQP, and a cLogcomponent onto the design workspace.
2. Label the components for better identification of their roles and link them with the Row > Route connectionas shown above.
Configuring the components
1. Double-click the cMQConnectionFactory component to display its Basic settings view in the Componenttab.
2. From the MQ Server list, select AMQP 1.0 to handle messages. Keep the default settings of the other options.
3. Double-click the cTimer component to open its Basic settings view in the Component tab.
4. In the Repeat field, enter 5 to generate the message exchange five times. Keep the default settings of theother options.

Scenario: Sending messages to and receiving messages from an AMQP broker
32 Talend ESB Mediation Components Reference Guide
5. Double-click the cSetBody component to open its Basic settings view in the Component tab.
6. Select SIMPLE from the Language drop-down list and type in "Hello world" in the Expression fieldas the message body.
7. Double-click the cAMQP component to open its Basic settings view in the Component tab.
8. From the Type list, select queue or topic to send the messages to a JMS queue or topic. In this use case,queue is used.
In the Destination field, type in a name for the queue, for example "myqueue".
In the ConnectionFactory field, click [...] and select the MQ connection factory that you have just configuredto handle messages.
9. Keep the default settings of the cLog component to log the message exchanges.
10. Press Ctrl+S to save your Route.
Viewing the code and executing the Route
1. Click the Code tab at the bottom of the design workspace to check the generated code.

Scenario: Sending messages to and receiving messages from an AMQP broker
Talend ESB Mediation Components Reference Guide 33
As shown above, the message flow from cTimer_1 is given a payload by cSetBody_1 and then sent tocAMQP_1 and cLog_1.
2. Press F6 to execute the Route. The logs of the message exchange are printed in the console.
3. In the ActiveMQ Web Console, you can see that the message queue myqueuehas been created.

Scenario: Sending messages to and receiving messages from an AMQP broker
34 Talend ESB Mediation Components Reference Guide
Building the consumer Route
Dropping and linking the components
1. From the Palette, drag and drop a cMQConnectionFactory, a cAMQP, and a cLog component onto thedesign workspace.
2. Label the components for better identification of their roles and link them with the Row > Route connectionas shown above.
Configuring the components
1. Double-click the cMQConnectionFactory component to display its Basic settings view in the Componenttab.

Scenario: Sending messages to and receiving messages from an AMQP broker
Talend ESB Mediation Components Reference Guide 35
2. From the MQ Server list, select AMQP 1.0 to handle messages. Keep the default settings of the other options.
3. Double-click the cAMQP component to display its Basic settings view in the Component tab.
4. Specify the same URI Type and Destination in the consumer cAMQP component as in the producer.
In the ConnectionFactory field. click [...] and select the MQ connection factory that you have just configuredto handle messages.
5. Keep the default settings of the cLog component to log the message exchanges.
6. Press Ctrl+S to save your Route.
Viewing the code and executing the Route
1. Click the Code tab at the bottom of the design workspace to check the generated code.

Scenario: Sending messages to and receiving messages from an AMQP broker
36 Talend ESB Mediation Components Reference Guide
As shown above, the message flow is routed from cAMQP_1 to cLog_1.
2. Press F6 to execute the Route. The logs of the message exchange are printed in the console.
3. In the ActiveMQ Web Console, you can see that the messages in myqueue have been consumed.

cCXF
Talend ESB Mediation Components Reference Guide 37
cCXF
cCXF properties
Component Family Messaging
Function cCXF provides integration with Apache CXF for connecting to JAX-WS services.
Purpose cCXF is used to provide or consume Web services.
Basic settings Service/Address The service endpoint URL where the Web service is provided.
In case cCXF is used to consume a Web service and the endpointlookup shall use the Service Locator (the Use Service Locatorcheck box is selected), the URL needs to be "locator://anyAddress/".
Service/Type Select which type you want to use to provide Web service. EitherwsdlURL or serviceClass.
wsdlURL: Select this type to provide the Web service from aWSDL file. Choose Repository or File to provide the Web servicefrom a Route Resource or the file system.
serviceClass: Select this type to provide the Web service from anSEI (Service Endpoint Interface) Java class.
Service/WSDL File This field appears when the wsdlURL service type is selected. Ifthe WSDL file is from the file system, browse to or enter the pathto the WSDL file. If the WSDL file is from a Route Resource, click[...] and select the one you want from the Resources tree view. TheVersion list appears allowing you to choose from all the versionsof the Route Resource.
Service/Serviceconfiguration
This option appears when wsdlURL is selected in the Typelist. It allows you to configure the service endpoint informationconveniently. Click [...] to open the service configuration wizard.
The WSDL field in the wizard is filled in with the WSDL filedefined in the WSDL File field automatically. You can also set theWSDL file directly in the service configuration wizard in one ofthe following ways:
• Click Browse... to browse to or enter the path to the WSDL filein the file system.
• Click Services to select a service under the Services node in theIntegration perspective of the Studio,
• Click Resources to select a service under the Resources node.
After setting the WSDL file, click to show the port(s) andoperation(s) available in the Port Name and Operation boxesrespectively. Select the one you want to use and click Finish. TheOperation box only shows when the cCXF component is used toconsume a Web service.
Service/Service Class This field appears when the serviceClass service type is selected.Enter the name of the service class to be used to provide the Webservice.
Service/Dataformat The exchange data style. POJO, PAYLOAD, RAW, orCXF_MESSAGE.

cCXF properties
38 Talend ESB Mediation Components Reference Guide
POJOs (Plain Old Java Objects) are the Java parameters to themethod being invoked on the target server.
PAYLOAD is the message payload, the contents of thesoap:body.
RAW is the raw message that is received from the transport layerwithout SAM (Service Activity Monitor) support.
CXF_MESSAGE is the raw message that is received from thetransport layer with SAM support.
Service Name The service name this service is implementing. It maps to thewsdl:service@name in the format of ns:SERVICE_NAME wherens is a namespace prefix valid at this scope. This field gets filledin automatically upon completion of the Service configuration.
Port Name The endpoint name this service is implementing. It maps to thewsdl:port@name, in the format of ns:PORT_NAME where ns isa namespace prefix valid at this scope. This field gets filled inautomatically upon completion of the Service configuration.
Operation Name The operation name this service is implementing. It maps to thewsdl:operation@name, in the format of ns:OPERATION_NAMEwhere ns is a namespace prefix valid at this scope. This optionappears when the cCXF component is used consume a Webservice. This field gets filled in automatically upon completion ofthe Service configuration.
Use Service Registry This option is only available if you subscribed to Talend EnterpriseESB solutions.
Select this check box to enable the service registry. It providesdynamic endpoint lookup and allows services to be redirectedbased upon information retrieved from the registry. It works inRuntime only.
When the cCXF component is used to provide a Web service, theservice deployed in Runtime will work with the service registry.
When the cCXF component is used to consume a Web service:
In the Correlation Value field, specify a correlation ID or leavethis field empty. For more information, see the Use BusinessCorrelation option.
In the Username and the Password fields, enter the authenticationcredentials. To enter the password, click the [...] button next tothe password field, and then in the pop-up dialog box enter thepassword between double quotes and click OK to save the settings.
If SAML token is registered in the service registry, you need tospecify the client's role in the Role field. You can also select thePropagate Credentials check box to make the call on behalf of analready authenticated user by propagating the existing credentials.You can enter the username and the password to authenticate withSTS to propagate credentials using username and password, orprovide the alias, username and the password to propagate usingcertificate. For more information, see the Use Authenticationoption.
For more information about how to set up and use the ServiceRegistry, see the Talend Administration Center User Guide andTalend ESB Infrastructure Services Configuration Guide.
Use Service Locator Provides service consumers with a mechanism to discover serviceendpoints at runtime without specifying the physical location of theendpoint. Additionally, it allows service providers to automaticallyregister and unregister their service endpoints at the ServiceLocator.

cCXF properties
Talend ESB Mediation Components Reference Guide 39
For service consumers, the URL additionally needs tobe set to "locator://anyAddress/" in the CXFConfiguration / Address field.
The Custom Properties table appears when the Use Service
Locator check box is selected. Click to add as manyproperties as needed to the table. Enter the name and the value ofeach property in the Property Name field and the Property Valuefield respectively to identify the service. For more information, seeTalend ESB Infrastructure Services Configuration Guide for howto install and configure the Service Locator.
Use Service ActivityMonitor
Captures events and stores this information to facilitate in-depth analysis of service activity and track-and-trace of messagesthroughout a business transaction. This can be used to analyzeservice response times, identify traffic patterns, perform root causeanalysis and more.
This feature is not supported when MESSAGE is used as theprocessing mode. When MESSAGE is selected in the Dataformatfield, the Use Service Activity Monitor check box is disabled.
This option is also disabled when the Use Service Registrycheck box is selected if you subscribed to Talend Enterprise ESBsolutions.
Use Authentication Select this check box to enable the authentication option. Selectfrom Username Token, SAML Token (ESB runtime only),HTTP Basic, and HTTP Digest.
When the cCXF component is used to produce a Web service,authentication with the Username Token, SAML token, andHTTP Basic work in runtime only. HTTP Digest is not supported.When SAML Token (ESB runtime only) is selected, cCXF willget the SAML Token from the request header for further use in themessage routing.
When the cCXF component is used to consume a Web service,authentication with the Username Token, HTTP Basic, andHTTP Digest work in both the studio and runtime. Authenticationwith the SAML token works in runtime only. Enter a usernameand a password in the corresponding fields as required. To enterthe password, click the [...] button next to the password field, andthen in the pop-up dialog box enter the password between doublequotes and click OK to save the settings.
When SAML Token (ESB runtime only) is selected, you caneither provide the user credentials to send the request or make thecall on behalf of an already authenticated user by propagating theexisting credentials. Select from:
-: Enter the username and the password in the corresponding fieldsto access the service.
Propagate using U/P: Enter the user name and the password usedto authenticate via STS.
Propagate using Certificate: Enter the alias and the passwordused to authenticate via STS.
This check box disappears when the Use Service Registry checkbox is selected.
Use Authorization This option is only available if you subscribed to Talend EnterpriseESB solutions. It appears when SAML Token (ESB runtimeonly) is selected in the Use Authentication list.
When the cCXF component is used to provide a Web service, selectthis check box to enable authorization.
Scenario 1: Providing a Web service using cCXF from a WSDL file
40 Talend ESB Mediation Components Reference Guide
When the cCXF component is used to consume a Web service,select this check box to invoke authorized call and specify theclient's role in the Role field.
For more information about the management of user roles andrights, see the Talend Administration Center User Guide andTalend ESB Infrastructure Services Configuration Guide.
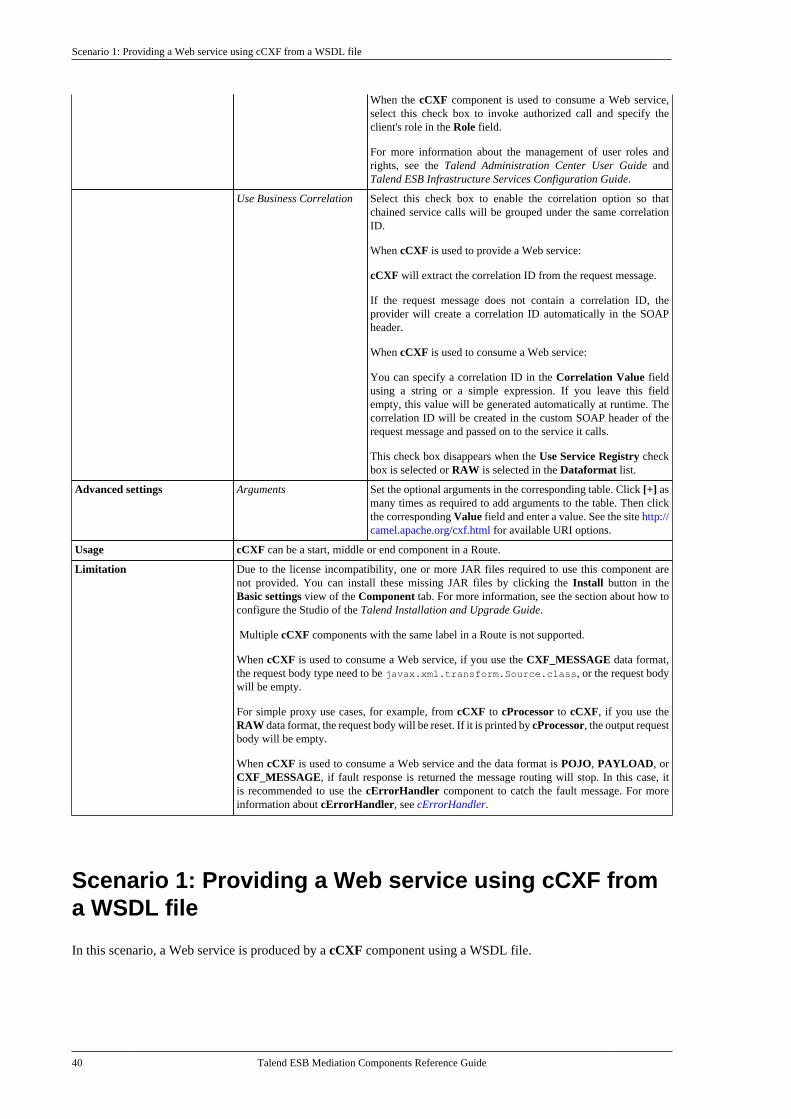
Use Business Correlation Select this check box to enable the correlation option so thatchained service calls will be grouped under the same correlationID.
When cCXF is used to provide a Web service:
cCXF will extract the correlation ID from the request message.
If the request message does not contain a correlation ID, theprovider will create a correlation ID automatically in the SOAPheader.
When cCXF is used to consume a Web service:
You can specify a correlation ID in the Correlation Value fieldusing a string or a simple expression. If you leave this fieldempty, this value will be generated automatically at runtime. Thecorrelation ID will be created in the custom SOAP header of therequest message and passed on to the service it calls.
This check box disappears when the Use Service Registry checkbox is selected or RAW is selected in the Dataformat list.
Advanced settings Arguments Set the optional arguments in the corresponding table. Click [+] asmany times as required to add arguments to the table. Then clickthe corresponding Value field and enter a value. See the site http://camel.apache.org/cxf.html for available URI options.
Usage cCXF can be a start, middle or end component in a Route.
Limitation Due to the license incompatibility, one or more JAR files required to use this component arenot provided. You can install these missing JAR files by clicking the Install button in theBasic settings view of the Component tab. For more information, see the section about how toconfigure the Studio of the Talend Installation and Upgrade Guide.
Multiple cCXF components with the same label in a Route is not supported.
When cCXF is used to consume a Web service, if you use the CXF_MESSAGE data format,the request body type need to be javax.xml.transform.Source.class, or the request bodywill be empty.
For simple proxy use cases, for example, from cCXF to cProcessor to cCXF, if you use theRAW data format, the request body will be reset. If it is printed by cProcessor, the output requestbody will be empty.
When cCXF is used to consume a Web service and the data format is POJO, PAYLOAD, orCXF_MESSAGE, if fault response is returned the message routing will stop. In this case, itis recommended to use the cErrorHandler component to catch the fault message. For moreinformation about cErrorHandler, see cErrorHandler.
Scenario 1: Providing a Web service using cCXF froma WSDL file
In this scenario, a Web service is produced by a cCXF component using a WSDL file.

Scenario 1: Providing a Web service using cCXF from a WSDL file
Talend ESB Mediation Components Reference Guide 41
Dropping and linking the components
This use case requires one cCXF component and one cProcessor component.
1. From the Palette, expand the Messaging folder, and drop a cCXF component onto the design workspace.
2. Expand the Processor folder, and drop a cProcessor component onto the design workspace.
3. Right-click the cCXF component, select Row > Route from the contextual menu and click the cProcessorcomponent.
4. Label the cCXF component for better identification of its functionality.
Configuring the components
In this scenario, the cProcessor component is used only to enable the cCXF component to function as a serviceproducer. Therefore, it does not need any configuration.
1. Double-click the cCXF component to display its Basic settings view in the Component tab.
2. In the Address field, type in the service endpoint URL for the Web service to be provided,http://192.168.0.212:8000/service.endpoint in this example.
3. From the Type list, select wsdlURL to enable producing the Web service from a WSDL file.

Scenario 1: Providing a Web service using cCXF from a WSDL file
42 Talend ESB Mediation Components Reference Guide
4. In the Wsdl File field, browse to or type in the path to the WSDL file to be used.
5. Click [...] next to Service Configuration to open the service configuration wizard. The WSDL field has been
filled in with the selected WSDL file. Click to show the available port in the Port Name box. Select theairportSoap port and click Finish to close the wizard. The Service Name and Port Name fields in theBasic settings view are filled in automatically.
6. From the Dataformat list, select PAYLOAD mode for the wsdlURL data format.
7. Press Ctrl+S to save your route.
Viewing code and executing the Route
1. Click the Code tab at the bottom of the design workspace to have a look at the generated code.
As shown in the code, the cCXF component labelled WebService_producer produces the Web servicefrom an input file airport_soap_route.wsdl using the endpoint URL http://192.168.0.212:8000/service.endpoint.
2. Click the Run view to display it and click the Run button to launch the execution of your Route. You canalso press F6 to execute it.
RESULT: The service is successfully started. You can access it from a Web browser using the serviceendpoint URL followed by ?wsdl.

Scenario 2: Providing a Web service using cCXF from a Java class
Talend ESB Mediation Components Reference Guide 43
Scenario 2: Providing a Web service using cCXF froma Java class
In this scenario, a Web service is provided from a Java class file using a cCXF component.
Creating a Java class
1. From the repository tree view, expand the Code node and right click the Beans node. In the contextual menu,select Create Bean.
2. The [New Bean] wizard opens. In the Name field, type in a name for the bean, for example, CXFdemobean.Click Finish to close the wizard.

Scenario 2: Providing a Web service using cCXF from a Java class
44 Talend ESB Mediation Components Reference Guide
3. Change the class type to interface, change the return type to string and remove the message body.
package beans;
public interface CXFdemobean { public String helloExample(String message) ;}
4. Press Ctrl+S to save your bean.
Dropping and linking the components
This use case requires one cCXF component and one cProcessor component.
1. From the Palette, expand the Messaging folder, select the cCXF component and drop it onto the designworkspace.
2. Expand the Processor folder, select the cProcessor component and drop it onto the design workspace.
3. Right-click the cCXF component, select Row > Route in the contextual menu and click the cProcessorcomponent.

Scenario 2: Providing a Web service using cCXF from a Java class
Talend ESB Mediation Components Reference Guide 45
4. Label the components for better identification of their functionality.
Configuring the components
In this scenario, the cProcessor component is used only to enable the cCXF component to function as a serviceproducer. Therefore, it does not need any configuration.
1. Double-click the cCXF component to display its Basic settings view in the Component tab.
2. In the Address field, type in the service endpoint URL for the Web service to be provided,http://192.168.0.212:8001/service.endpoint in this example.
3. From the Type from, select serviceClass to start the Web service from a Java class.
4. In the Service Class field, specify the predefined bean class, CXFdemobean in this example.
5. From the Dataformat list, select POJO as the serviceClass service data format.
6. Press Ctrl+S to save your Route.
Viewing code and executing the Route
1. Click the Code tab at the bottom of the design workspace to have a look at the generated code.
As shown in the code, the cCXF component labelled WebService_producer produces the Web servicefrom an predefined bean beans.CXFdemobean using the endpoint URL http://192.168.0.212:8001/service.endpoint.
2. Click the Run view to display it and click the Run button to launch the execution of your Route. You canalso press F6 to execute it.

Scenario 3: Providing a Web service from a Route Resource
46 Talend ESB Mediation Components Reference Guide
RESULT: The service is successfully started. You can access it from a Web browser using the serviceendpoint URL followed by ?wsdl.
Scenario 3: Providing a Web service from a RouteResource
In this scenario, a Web service is provided from a Route Resource using a cCXF component.
Creating a Route Resource
1. From the Repository tree view, right-click the Resources node and select Create Resource from the contextmenu.
2. The [New Route Resource] wizard opens. In the Name field, type in a name for the Resource, for example,DemoServiceWsdl. Click Finish to close the wizard.

Scenario 3: Providing a Web service from a Route Resource
Talend ESB Mediation Components Reference Guide 47
3. Browse to an existing WSDL file from the local file system and click Finish.
4. Press Ctrl+S to save your Route Resource.
Dropping and linking the components
This use case requires a cCXF and a cProcessor component.
1. From the Palette, expand the Messaging folder, and drop a cCXF component onto the design workspace.
2. Expand the Processor folder, and drop a cProcessor component onto the design workspace.
3. Right-click the cCXF component, select Row > Route from the contextual menu and click the cProcessorcomponent.
4. Label the cCXF component for better identification of its functionality.
Scenario 3: Providing a Web service from a Route Resource
48 Talend ESB Mediation Components Reference Guide
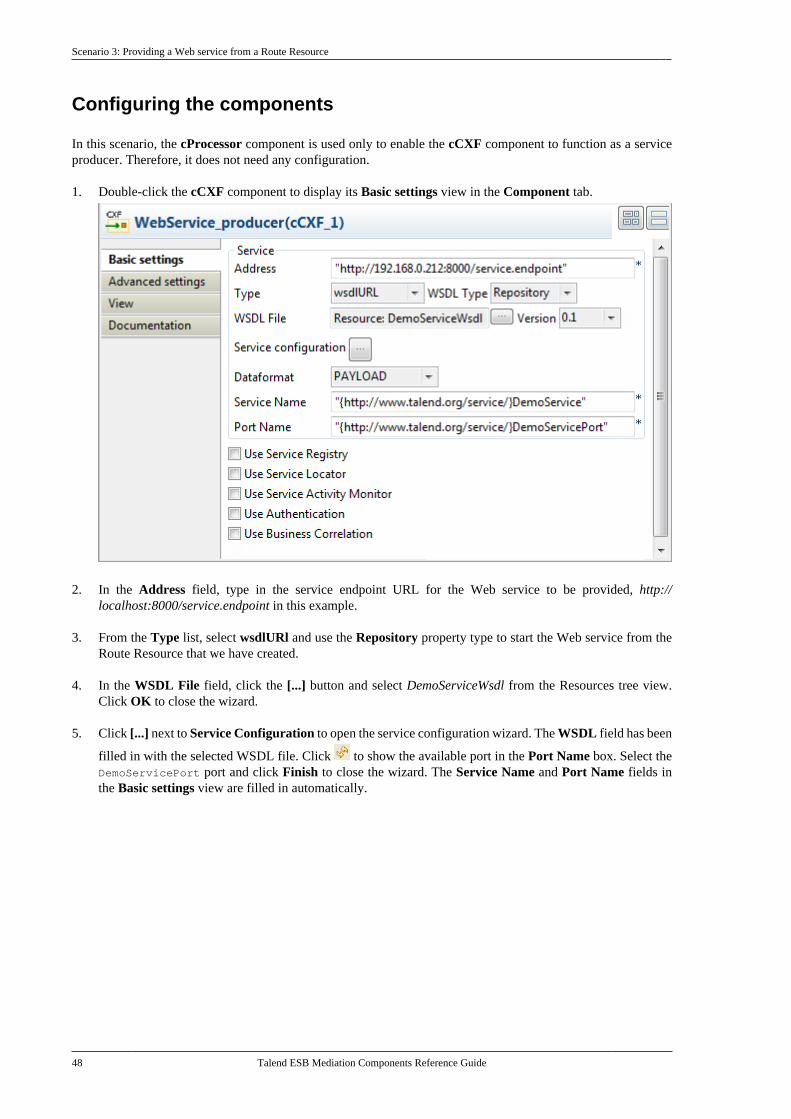
Configuring the components
In this scenario, the cProcessor component is used only to enable the cCXF component to function as a serviceproducer. Therefore, it does not need any configuration.
1. Double-click the cCXF component to display its Basic settings view in the Component tab.
2. In the Address field, type in the service endpoint URL for the Web service to be provided, http://localhost:8000/service.endpoint in this example.
3. From the Type list, select wsdlURl and use the Repository property type to start the Web service from theRoute Resource that we have created.
4. In the WSDL File field, click the [...] button and select DemoServiceWsdl from the Resources tree view.Click OK to close the wizard.
5. Click [...] next to Service Configuration to open the service configuration wizard. The WSDL field has been
filled in with the selected WSDL file. Click to show the available port in the Port Name box. Select theDemoServicePort port and click Finish to close the wizard. The Service Name and Port Name fields inthe Basic settings view are filled in automatically.

Scenario 3: Providing a Web service from a Route Resource
Talend ESB Mediation Components Reference Guide 49
6. Press Ctrl+S to save your Route.
Viewing code and executing the Route
1. Click the Code tab at the bottom of the design workspace to have a look at the generated code.
As shown in the code, the cCXF component labelled WebService_producer produces the Web servicefrom an predefined Route Resource DemoServiceWsdl using the endpoint URL http://localhost:8000/service.endpoint.
2. Click the Run view to display it and click the Run button to launch the execution of your Route. You canalso press F6 to execute it.
RESULT: The service is successfully started. You can access it from a Web browser using the serviceendpoint URL followed by ?wsdl.

Scenario 3: Providing a Web service from a Route Resource
50 Talend ESB Mediation Components Reference Guide

cCXFRS
Talend ESB Mediation Components Reference Guide 51
cCXFRS
cCXFRS properties
Component Family Messaging
Function cCXFRS provides integration with Apache CXF for connecting to JAX-RS services hosted inCXF.
Purpose cCXFRS is used to provide or consume REST-ful Web services.
Basic settings Endpoint The service endpoint URL where the REST service is provided.
Type Select which type you want to use to provide the REST service.Either Manual or resourceClass.
Manual: Determine the REST API mapping manually in the tableif cCXFRS is used as a service provider, or set HTTP Method andother parameters if the component is used as a service consumer.
resourceClass: Select this type to provide the resource class whichyou want to export as the REST service.
REST API Mapping This table appears when the Manual service type is selected andcCXFRS is used as a service provider.
Click [+] under the table to add as many rows as needed to specifythe HTTP request:
Output Flow: Specify the name of an output flow.
HTTP Verb: Select a HTTP method from GET, POST, PUT,DELETE, OPTIONS and HEAD in the list.
URI pattern: Fill this field with the REST URI that describes theresource.
Consumes: Select the format type of the consume content that thecomponent will use from XML or JSON, XML, JSON, Form,Multipart, and Any when HTTP Verb is POST or PUT.
Produces: Select the format type of the produce content that thecomponent will use from XML or JSON, XML, JSON, HTML,Any when HTTP Verb is GET, POST, PUT or DELETE.
Bean class: Set the bean class when the HTTP Verb is POST orPUT and the consume content format is XML or JSON, XMLor JSON.
Resource Class This field appears when the resourceClass service type is selected.Enter the name of the resource class which you want to export asthe REST service.
Operation This field appears when the resourceClass service type is selectedand cCXFRS is used as the service consumer. Enter the name ofthe operation.
Relative Path This field appears when the Manual service type is selected andcCXFRS is used as the service consumer. Enter the relative pathof the REST server to be invoked.
HTTP Method This option appears when the Manual service type is selected andcCXFRS is used as the service consumer. Select a HTTP methodfromGET, POST, PUT, and DELETE in the list.
Content Type This option appears when the Manual service type is selected andcCXFRS is used as the service consumer.

Scenario: Providing and consuming a REST service using cCXFRS
52 Talend ESB Mediation Components Reference Guide
Select XML, JSON, or FORM according to the media type ofthe content to be uploaded to the server end. This list appears onlywhen you select the POST or PUT in the HTTP Method list.
Accept Type This field appears when the Manual service type is selected andcCXFRS is used as the service consumer.
Select the media type the client end is prepared to accept for theresponse from the server end. Available options are XML, JSON,and ANY. When ANY is selected, the response message can be ofany type and will be transformed into a string. This list does notappear when you select the DELETE method.
Response Class This field appears when the Manual service type is selected andthe cCXFRS is used as the service consumer. Enter the name ofthe response class.
Use Service Locator Select this check box to enable the Service Locator. Specify theservice namespace and the service name in the correspondingfields.
Use Service ActivityMonitor
Select this check box to enable the Service Activity Monitor.
Use Authentication Select this check box to enable the authentication option. Selectfrom SAML Token (ESB runtime only) and HTTP Basic.
When the cCXFRS component is used as consumer, enter ausername and a password in the corresponding fields as required.To enter the password, click the [...] button next to the passwordfield, and then in the pop-up dialog box enter the password betweendouble quotes and click OK to save the settings.
Use Authorization This option is only available if you subscribed to Talend EnterpriseESB solutions. It appears when SAML Token (ESB runtimeonly) is selected in the Use Authentication list.
When the cCXFRS component is used as the service provider,select this check box to enable authorization.
When the cCXFRS component is used as the service consumer,select this check box to invoke authorized call and specify theclient's role in the Role field.
Use Business Correlation Select this check box to create a correlation ID in this component.
You can specify a correlation ID in the Correlation Value field.
Advanced settings Log messages Select this check box to log the message exchanges in the Route.
Arguments Set the optional arguments in the corresponding table. Click [+] asmany times as required to add arguments to the table. Then clickthe corresponding Value field and enter a value. See the site http://camel.apache.org/cxfrs.html for available URI options.
Usage cCXFRS can be a start component in a Route as the service provider, or middle or end componentas the service consumer.
Limitation Due to the license incompatibility, one or more JAR files required to use this component arenot provided. You can install these missing JAR files by clicking the Install button in theBasic settings view of the Component tab. For more information, see the section about how toconfigure the Studio of the Talend Installation and Upgrade Guide.
Scenario: Providing and consuming a REST serviceusing cCXFRS
This scenario demonstrates how to use the cCXFRS component to provide and consume a REST service. To doso, two Routes are built, a service provider Route and a consumer Route.

Scenario: Providing and consuming a REST service using cCXFRS
Talend ESB Mediation Components Reference Guide 53
Building the service provider Route
This Route provides a REST Web service which will be accessible for requests.
Dropping and linking the components
1. From the Palette, drag and drop a cCXFRS, a cSetBody, a cLog and a cBeanRegister component onto thedesign workspace.
2. Link the cCXFRS, cSetBody and cLog using the Row > Route connection.
3. Label the components for better identification of their roles.
Configuring the components
1. Double-click the cBeanRegister component to display its Basic settings view in the Component tab.
2. In the Id field, enter "customers" to name the bean.
Select the Customized option and enter the following code in the Code box to create two customers and setthe firstName, lastName, city, and id values for each of them:

Scenario: Providing and consuming a REST service using cCXFRS
54 Talend ESB Mediation Components Reference Guide
beans.Customers customers = new beans.Customers();
beans.Customer customer = new beans.Customer();customer.setFirstName(TalendDataGenerator.getFirstName());customer.setLastName(TalendDataGenerator.getLastName());customer.setCity(TalendDataGenerator.getUsCity());customers.addCustomer(customer);
customer = new beans.Customer();customer.setFirstName(TalendDataGenerator.getFirstName());customer.setLastName(TalendDataGenerator.getLastName());customer.setCity(TalendDataGenerator.getUsCity());customers.addCustomer(customer);
beanInstance = customers;
3. Double-click the cCXFRS component to display its Basic settings view in the Component tab.
4. In the Endpoint field, type in the endpoint URL where the Web service will be provided, "http://localhost:8040/services/customers" in this example.
From the Type list, select Manual to determine the REST API mapping manually.
In the REST API mapping table, click [+] to add a row in the table. In the Output Flow field, entergetAllCustomers as the name of it. Select GET in the HTTP Verb list. Keep the default settings in the othercolumns.
5. Double-click the cSetBody component to display its Basic settings view in the Component tab.
6. Select SIMPLE from the Dataformat list. In the Expression field, enter "ref:customers" to refer to the beandefined in the cBeanRegister component.
7. Keep the default settings of the cLog component to log the message exchanges.

Scenario: Providing and consuming a REST service using cCXFRS
Talend ESB Mediation Components Reference Guide 55
8. Press Ctrl+S to save your route.
Viewing code and executing the Route
1. Click the Code tab at the bottom of the design workspace to have a look at the generated code.
As shown in the code, the Route is built from cCXFRS_1, set message body in cSetBody_1 and then tocLog_1.
2. Click the Run view to display it and click the Run button to launch the execution of your Route. You canalso press F6 to execute it.
RESULT: The service is successfully started. You can access it from a Web browser using the serviceendpoint URL.

Scenario: Providing and consuming a REST service using cCXFRS
56 Talend ESB Mediation Components Reference Guide
Building the service consumer Route
This Route will consume the REST service that is built in the provider Route.
Dropping and linking the components
1. From the Palette, drag and drop a cTimer, a cCXFRS, and a cLog component onto the design workspace.
2. Link the cTimer, cCXFRS and cLog using the Row > Route connection.
3. Label the components for better identification of their roles.
Configuring the components
1. Double-click the cTimer component to display its Basic settings view in the Component tab.

Scenario: Providing and consuming a REST service using cCXFRS
Talend ESB Mediation Components Reference Guide 57
2. In the Repeat field, enter 1 to generate the message exchange one time. Keep the default settings of the otheroptions.
3. Double-click the cCXFRS component to display its Basic settings view in the Component tab.
4. In the Endpoint field, type in the URL of the Web service built in the provider Route, "http://localhost:8040/services/customers" in this example.
Select Manual from the Type list. In the Relative Path field, enter constant(""). Select GET in the HTTPMethod list. Keep the default settings of the other options.
5. Keep the default settings of the cLog component to log the message exchanges.
6. Press Ctrl+S to save your route.

Scenario: Providing and consuming a REST service using cCXFRS
58 Talend ESB Mediation Components Reference Guide
Viewing code and executing the Route
1. Click the Code tab at the bottom of the design workspace to have a look at the generated code.
As shown in the code, the Route is built from cTimer_1. The HTTP_PATH, HTTP_METHOD,ACCEPT_CONTENT_TYPE, and CxfConstants.CAMEL_CXF_RS_RESPONSE_CLASS are set in cCXFRS_1. Themessage is then routed to cLog_1.
2. Click the Run view to display it and click the Run button to launch the execution of your Route. You canalso press F6 to execute it.
RESULT: The customers information is displayed in the console.

cDataset
Talend ESB Mediation Components Reference Guide 59
cDataset
cDataset properties
Component Family Messaging
Function The cDataset component allows you to create a new dataset or reference an existing dataset tosend or receive messages.
Purpose The cDataset component provides a mechanism to easily perform load and soak testing of yoursystem. It works by allowing you to create dataset instances both as a source of messages andas a way to assert that the data set is received.
Basic settings Id The ID of the Dataset bean.
Produce Delay Specify a delay in milliseconds to cause producers to pause.
Consume Delay Specify a delay in milliseconds to cause consumers to pause.
Preload Size Specify how many messages should be sent before the Routecompletes its initialization.
Initial Delay Specify the time in milliseconds to wait before starting sendingmessages.
Minimum Rate Specify the least number of messages that the dataset shouldcontain before starting sending messages.
Register new Bean Select this check box to register a new bean.
Bean Class Enter the class of the bean. This field appears when the Registernew Bean check box is selected.
Arguments Set the optional arguments in the corresponding table. Click [+] asmany times as required to add arguments to the table. This tableappears when the Register new Bean check box is selected.
Usage cDataset can be a start, middle, or end component of a Route.
Limitation n/a
Scenario: Using cDataset to receive messages
In this scenario, a cDataset component is used to receive messages triggered by a cTimer.
Dropping and linking the components
1. From the Messaging folder of the Palette, drag and drop a cTimer and a cDataset component onto thedesign workspace.

Scenario: Using cDataset to receive messages
60 Talend ESB Mediation Components Reference Guide
2. From the Transformation folder, drag and drop a cSetBody component onto the design workspace.
3. From the Processor folder, drag and drop one cProcessor component onto the design workspace.
4. Connect the components using Row > Route connections.
5. Label the components to better identify their roles in the Route, as shown above.
Configuring the components
1. Double-click the first cTimer component, which is labelled Starter, to open its Basic settings view in theComponent tab.
2. In the Repeat field, enter 2 to generate the message exchange twice. Keep the default settings of the otheroptions.
3. Double-click the cSetBody component, which is labelled Set_message_body, to open its Basic settings viewin the Component tab.
4. Select Constant in the Language list and enter "Hello!" in the Expression field as the message body.
5. Double-click the cDataset component, which is labelled Receive_message, to open its Basic settings viewin the Component tab.

Scenario: Using cDataset to receive messages
Talend ESB Mediation Components Reference Guide 61
6. In the Id field, enter "myDataset" as the dataset bean ID. Keep the default settings of the other options.
In the Bean Class field, the default implementation that is shipped by Camelorg.apache.camel.component.dataset.SimpleDataSet is set. In this use case, a new dataset bean isregistered.
7. Double-click the first cProcessor component, which is labelled Monitor, to open its Basics settings viewin the Component tab.
8. In the Code area, customize the code to show the body of the message exchanges.
System.out.println("---------BODY--------");System.out.println(exchange.getIn().getBody(String.class));System.out.println("---------END---------")
9. Press Ctrl+S to save your Route.

Scenario: Using cDataset to receive messages
62 Talend ESB Mediation Components Reference Guide
Viewing the code and executing the Route
1. Click the Code tab at the bottom of the design workspace to have a look at the generated code.
As shown in the code, the Route is built from the Starter_cTimer_1 endpoint, set the message body as"Hello!" by cSetBody_1, routed .to cDataset_1, and then processed by cProcessor_1.
2. Press F6 to execute the Route.
RESULT: The message body is displayed twice in the execution console.

cDirect
Talend ESB Mediation Components Reference Guide 63
cDirect
cDirect properties
Component Family Messaging
Function cDirect provides direct, synchronous invocation of any consumers when a producer sends amessage exchange.
Purpose cDirect allows you to produce and consume messages synchronously in different threads withina single CamelContext.
Basic settings Name This option appears when cDirect is used as a start component ina Route.
Type in any string that uniquely identifies the endpoint.
Use Exist cDirect This option appears when cDirect is used as a middle or endcomponent in a Route.
Click [...] and select the corresponding consumer in the dialog box.
Usage cDirect is used as a start, middle, or end component in a Route.
Limitation n/a
Related scenario:
For a related scenario, see Scenario: Using cSEDA, cVM and cDirect to produce and consume messagesseparately.

cDirectVM
64 Talend ESB Mediation Components Reference Guide
cDirectVM
cDirectVM properties
Component Family Messaging
Function cDirectVM provides direct, synchronous invocation of any consumers when a producer sendsa message exchange. It supports communication within the same CamelContext and acrossCamelContexts in the same JVM.
Purpose cDirectVM allows you to produce and consume messages synchronously in different threadswithin a single CamelContext and across CamelContexts in the same JVM. You can use thismechanism to communicate across Web applications.
Basic settings When using as a start component in a Route:
Endpoint Name Type in any string that uniquely identifies the endpoint.
When using as a middle or end component in a Route:
Select From Existing(s) Click this radio button to select an existing consumer. Click [...]beside the Consumer field to show the existing consumer(s) andselect the one to consume the message.
Input Endpoint Name Click this radio button to enter the name of the consumer in theEndpoint Name field.
Block if Consumer is notactive
Select this check box to let the producer block if the consumer isnot active in the Timeout period.
Timeout This option appears when the block is enabled. Specify the time inmilliseconds before the producer stops waiting for the consumerto become active.
Usage cDirectVM is used as a start, middle, or end component in a Route.
Limitation n/a
Scenario: Direct and synchronous messaging withinthe same JVM
In this scenario, a message exchange is triggered in one sub-route and synchronously consumed in another sub-Route using the Direct-VM mechanism. At the consumer end, the message content is processed and displayedon the console.
Dropping and linking the components
1. From the Palette, drag and drop the following components onto the design workspace: a cTimer, acSetHeader, a cSetBody, two cDirectVM, and a cProcessor.
2. Link the cTimer, the cSetHeader, the cSetBody and the first cDirectVM components using Row > Routeconnections to form a sub-route.
3. Link the other cDirectVM component to the cProcessor component using a Row > Route connection toform another sub-route.

Scenario: Direct and synchronous messaging within the same JVM
Talend ESB Mediation Components Reference Guide 65
4. Label the components to better identify their roles in the Route.
Configuring the components
Configuring the first sub-route
1. Double-click the cTimer component (labelled Starter in this example) to display its Basic settings view onthe Component tab.
2. In the Repeat field, enter 1 so that the message exchange is triggered only once. Leave the other settingsas they are.
3. Double-click the cSetHeader component (labelled Set_message_headers in this example) to display its Basicsettings view on the Component tab.

Scenario: Direct and synchronous messaging within the same JVM
66 Talend ESB Mediation Components Reference Guide
4. Click the [+] button to add two headers in the Headers table, and then give each header a name and a value.
In this example, we name the headers Name and Company respectively, and enter Bill and Talend as theirvalues.
5. Double-click the cSetBody component (labelled Set_message_body in this example) to display its Basicsettings view on the Component tab.
6. Select SIMPLE from the Language list as we will trigger a simple text message exchange in this example.
7. In the Expression field, enter Hi there in double quotation marks as the content of the message body.
8. Double-click the first cDirectVM component (labelled D-VM_producer in this example) to display its Basicsettings view on the Component tab.
9. Select an existing consumer endpoint, or specify the name of the consumer endpoint.
In this example, we will name the consumer endpoint dvm, so select the Input Endpoint Name option, andenter the name of the consumer endpoint dvm in the Endpoint Name field.

Scenario: Direct and synchronous messaging within the same JVM
Talend ESB Mediation Components Reference Guide 67
Configuring the second sub-route
1. Double-click the second cDirectVM component (labelled D-VM_consumer in this example) to display itsBasic settings view on the Component tab.
2. In the Endpoint Name field, enter dvm in double quotation marks to name the endpoint.
3. Double-click the cProcessor (labelled Show_message in this example) component to display its Basicsettings view.
4. In the Code area, enter the following code to display the content of the message headers and the message body:
exchange.getOut().setHeader("header1",exchange.getIn().getHeader("Name"));exchange.getOut().setHeader("header2",exchange.getIn().getHeader("Company"));exchange.getOut().setBody(exchange.getIn().getBody(String.class));System.out.println();System.out.println("Message for "+exchange.getOut().getHeader("header1")+" of "+exchange.getOut().getHeader("header2")+":");System.out.println(exchange.getOut().getBody(String.class));
Executing the Route
Click the Run view and click the Run button to launch your Route. You can also press F6 to execute it.

Scenario: Direct and synchronous messaging within the same JVM
68 Talend ESB Mediation Components Reference Guide
RESULT: The message generated in the first sub-route is consumed synchronously in the consumer endpoint anddisplayed on the console after processing. The message exchange is triggered once as configured.

cFile
Talend ESB Mediation Components Reference Guide 69
cFile
cFile properties
Component Family Messaging
Function cFile provides access to file systems.
Purpose cFile allows files to be processed by any other Camel components or messages from othercomponents to be saved to disk.
Basic settings Path Path to the file or files to be accessed or saved.
Parameters/Noop Select this check box to keep the file or files in the original folderafter being read.
Parameters/Flatten Select this check box to flatten the file name path to strip anyleading paths. This allows you to consume recursively into sub-directories, but when you, for example, write the files to anotherdirectory, they will be written in a single directory.
Parameters/AutoCreate Select this check box to create the directory specified in the Pathfield automatically if it does not exist.
Parameters/BufferSize(kb) Write buffer sized in bytes.
Encoding Specify the encoding of the file, ISO-8859-15, UTF-8, orCUSTOM.
FileName The name of the file to be processed. Use this option if you wantto consume only a single file in the specified directory.
Advanced settings Advanced Set the optional arguments in the corresponding table. Click [+] asmany times as required to add arguments to the table. Then clickthe corresponding Value field and enter a value. See the site http://camel.apache.org/file2.html for available URI options.
Usage cFile can be a start, middle or end component in a Route.
Limitation n/a
Scenario: Reading files from one directory and writingthem to another
In this scenario, an input cFile component is configured to visit a local file directory and send the files in thedirectory to an output cFile component which writes the files in another directory.

Scenario: Reading files from one directory and writing them to another
70 Talend ESB Mediation Components Reference Guide
Dropping and linking the components
1. From the Palette, expand the Messaging folder and select the cFile component. Drop one as the inputcomponent and another as the output component onto the design workspace.
2. Right-click the input cFile component, select Row > Route in the contextual menu and click the output cFilecomponent.
3. Label the components to better identify their respective functionality.
Configuring the components
1. Double-click the input cFile component to display its Basic settings view in the Component tab.
2. In the Path field, browse to or enter the input file path, and leave the other parameters as they are.
3. Double-click the output cFile component to display its Basic settings view in the Component tab.
4. In the Path field, browse to or enter the output file path, as shown above. Leave the other parameters asthey are.
5. Press Ctrl+S to save your route.
Viewing code and executing the Route
1. Click the Code tab at the bottom of the design workspace to have a look at the generated code.

Scenario: Reading files from one directory and writing them to another
Talend ESB Mediation Components Reference Guide 71
As shown in the code, a message route is built from one endpoint .to another.
2. Click the Run view to display it and click the Run button to launch the execution of your Route. You canalso press F6 to execute it.
RESULT: The input files are written to specified output directory.

cFtp
72 Talend ESB Mediation Components Reference Guide
cFtp
cFtp properties
Component Family Messaging
Function cFtp provides access to remote file systems over the FTP, FTPS and SFTP protocols.
Purpose cFtp allows data exchange over remote file systems.
Basic settings Parameters/type Select the file transfer protocol, ftp or sftp, ftps.
Parameters/server Type in the remote server address to be accessed.
Parameters/port Type in the port number to be accessed.
Parameters/username Type in the user authentication information.
Parameters/password Type in the user authentication information. To enter the password,click the [...] button next to the password field, and then in the pop-up dialog box enter the password between double quotes and clickOK to save the settings.
Parameters/directory Enter the directory you want to access on the remote server. If notspecified, the root directory will be accessed.
Advanced settings Advanced Set the optional arguments in the corresponding table. Click [+] asmany times as required to add arguments to the table. Then clickthe corresponding Value field and enter a value. See the site http://camel.apache.org/ftp.html for available URI options.
Usage cFtp can be a start, middle or end component in a Route.
Limitation n/a
Related scenario:
No scenario is available for this component yet.

cHttp
Talend ESB Mediation Components Reference Guide 73
cHttp
cHttp properties
Component Family Messaging
Function cHttp provides HTTP-based endpoints for consuming and producing HTTP requests.
Purpose cHttp allows you to consume external HTTP resources as a client, and to produce Web servicesas a server.
Basic settings Uri The URI of the Http resource to call.
Client Select this option to use cHttp as a client to call external servers.
Server Select this option to use cHttp as a server to produce Webservices.
Client Configuration /Method
Select an Http request method from GET, POST, PUT,DELETE, HEAD, OPTIONS, and TRACE in the list.
GET: Retrieve the information identified by the request URI.
Parameters: click the [+] button to add lines as needed and definethe key and value in the table.
Encoder Charset: enter the encoder charset in the field.
POST: Request that the origin server accept the entity enclosedin the request as a new subordinate of the resource identified bythe request URI.
Plain Text: select the Content-Type from text/plain, text/html,text/xml, application/x-www-form-urlencoded, application/xml,application/JSON, or other... (specify the Content-Type in thenext field that appears when other... is selected), and type in thetext in the Content box as the request message.
Form Style: click the [+] button to add lines as needed and definethe key and value in the Parameters table. Also, enter the encodercharset in the Encoder Charset field.
Use Message Body: use the incoming message body as theHttp request. Select the Content-Type from text/plain, text/html, text/xml, application/x-www-form-urlencoded, application/xml, application/JSON, or other... (specify the Content-Type inthe next field that appears when other... is selected),
PUT: Request that the enclosed entity be stored under the suppliedrequest URI.
Plain Text: select the Content-Type from text/plain, text/html,text/xml, application/x-www-form-urlencoded, application/xml,application/JSON, or other... (specify the Content-Type in thenext field that appears when other... is selected), and type in thetext in the Content box as the request message.
Form Style: click the [+] button to add lines as needed and definethe key and value in the Parameters table. Also, enter the encodercharset in the Encoder Charset field.
Use Message Body: use the incoming message body as theHttp request. Select the Content-Type from text/plain, text/html, text/xml, application/x-www-form-urlencoded, application/xml, application/JSON, or other... (specify the Content-Type inthe next field that appears when other... is selected),

Scenario 1: Retrieving the content of a remote file
74 Talend ESB Mediation Components Reference Guide
DELETE: Request that the origin server delete the resourceidentified by the request URI.
Parameters: click the [+] button to add lines as needed and definethe key and value in the table.
Encoder Charset: enter the encoder charset in the field.
HEAD: Identical to GET except that the server MUST NOT returna message body in the response.
Parameters: click the [+] button to add lines as needed and definethe key and value in the table.
Encoder Charset: enter the encoder charset in the field.
OPTIONS: Represent a request for information about thecommunication options available on the request/response chainidentified by the request URI.
TRACE: Invoke a remote, application-layer loop-back of therequest message.
Server Configuration /Disable Stream Cache
DefaultHttpBinding will copy the request input stream into astream cache and put it into message body. When this check boxis selected, DefaultHttpBinding will set the request input streamdirectly into the message body.
Server Configuration /Session Support
Select this check box to enable the session manager on the serverside of Jetty.
Server Configuration / UseTransfer-Encoding
This option is enabled by default. If this check box is cleared, Jettyservlet will disable the HTTP streaming and set the content-lengthheader on the response.
Server Configuration /Enable JMX
Select this option to enable Jetty JMX support for this endpoint.For more information about this option, see the sitehttp://camel.apache.org/jetty.html#Jetty-JettyJMXsupport.
Server Configuration /Match on URI Prefix
Select this check box to use the CamelServlet to find a targetconsumer by matching the URI prefix if no exact match isfound. For more information about this option, see the site http://camel.apache.org/how-do-i-let-jetty-match-wildcards.html.
Server Configuration / UseJetty Continuation
Select this check box to use Jetty continuations for the JettyServer. For more information about this option, see the site http://wiki.eclipse.org/Jetty/Feature/Continuations.
Server Configuration /Enable HTTP TRACE
Select this option to enable the HTTP TRACE method.
Advanced settings Headers Click the [+] button to add lines as needed and define the key andvalue for headers.
Usage cHttp provides Http based endpoints for consuming external Http resources, that is to say as aclient to call external servers using Http.
Limitation Due to the license incompatibility, one or more JAR files required to use this component arenot provided. You can install these missing JAR files by clicking the Install button in theBasic settings view of the Component tab. For more information, see the section about how toconfigure the Studio of the Talend Installation and Upgrade Guide.
Scenario 1: Retrieving the content of a remote file
In this scenario, cHttp is used to request the body of a weather condition definition file that is available at http://wsf.cdyne.com/WeatherWS/Weather.asmx.

Scenario 1: Retrieving the content of a remote file
Talend ESB Mediation Components Reference Guide 75
Dropping and linking the components
1. Drop the following components from the Palette onto the workspace: cMessagingEndpoint,cSetBody, cHttp and cProcessor, labelled as STARTER, HTTP_REQUEST_BODY,GET_WEATHER_DESCRIPTION and PRINT_RESPONSE respectively.
2. Link the components using a Row > Route connection.
Configuring the components
1. Double-click cMessagingEndpoint to open its Basic settings view in the Component tab.
2. In the URI field, enter timer:go?repeatCount=1 to define a timer for starting message exchanges. In thisexample, only one message exchange will be carried out due to the setting of repeatCount=1.
3. Double-click cSetBody to open its Basic settings view in the Component tab.
4. In the Language field, select Constant.
5. In the Expression field, enter the following as the body of the request message:
<soapenv:Envelope xmlns:soapenv=\"http://schemas.xmlsoap.org/soap/envelope/\" xmlns:weat=\"http://ws.cdyne.com/WeatherWS/\"><soapenv:Header/><soapenv:Body><weat:GetWeatherDefinitionInformation/></soapenv:Body></soapenv:Envelope>
6. Double-click cHttp to open its Basic settings view in the Component tab.

Scenario 1: Retrieving the content of a remote file
76 Talend ESB Mediation Components Reference Guide
7. In the Uri field, enter the location of the file to fetch, http://wsf.cdyne.com/WeatherWS/Weather.asmx in thisexample.
8. Click the Client radio button to use this cHttp component as a client.
9. Select POST in the Method list and then the Use Message Body radio button. Select text/xml in the Content-Type list.
10. Click Advanced settings for further setup.
11. Click the [+] button to add a line in the Headers table.
Type in SOAPAction and http://ws.cdyne.com/WeatherWS/GetWeatherInformation for the Key andValue fields.
12. Double-click cProcessor to open its Basic settings view in the Component tab.
13. In the Code area, enter the following to print the response from the remote website, the body of the desired file:
System.out.println("--------------------RESPONSE--------------------");System.out.println(exchange.getIn().getBody(String.class));System.out.println("--------------------END--------------------");

Scenario 1: Retrieving the content of a remote file
Talend ESB Mediation Components Reference Guide 77
14. Press Ctrl+S to save your Route.
Viewing code and executing the Route
1. Click the Code tab at the bottom of the design workspace to check the generated code.
As shown above, the message exchange starts from the endpoint STARTER, gets its bodyset to <soapenv:Envelope xmlns:soapenv=\"http://schemas.xmlsoap.org/soap/envelope/
\"xmlns:weat=\"http://ws.cdyne.com/WeatherWS/\"><soapenv:Header/
><soapenv:Body><weat:GetWeatherDefinitionInformation/></soapenv:Body></
soapenv:Envelope> at cSetBody_1, and then is sent out to the specified website by cHttp_1. Finally, theresponse is printed out via cProcessor_1.
2. Press F6 to execute the Route.

Scenario 2: Using cHttp to produce a Web service
78 Talend ESB Mediation Components Reference Guide
As shown above, the retrieved file defines up to 37 weather conditions with detailed description.
Scenario 2: Using cHttp to produce a Web service
In this scenario, cHttp is used to as a server to start a Web service. A cProcessor component is used to requestthe service.
Dropping and linking the components
1. Drag and drop a cHttp and a cProcessor from the Palette onto the design workspace.
2. Link the components using a Row > Route connection.
3. Label the components for better identification of their roles.
Configuring the components
1. Double-click cHttp to open its Basic settings view in the Component tab.
2. In the URI field, enter "http://localhost:8088/user" where the service will be accessible for requests.
3. Click the Server radio button to use this cHttp component as a server. Keep the default settings of the otheroptions.
4. Double-click cProcessor to open its Basic settings view in the Component tab.

Scenario 2: Using cHttp to produce a Web service
Talend ESB Mediation Components Reference Guide 79
5. In the Code area, enter the following code to get the header id of the exchange message:
System.out.println(exchange.getIn().getHeader("id"));
6. Press Ctrl+S to save your Route.
Viewing code and executing the Route
1. Click the Code tab at the bottom of the design workspace to check the generated code.
As shown above, the route is built from the endpoint server_cHttp_1 and the message header id is printedout by cProcessor_1.
2. Press F6 to execute the Route.
3. Start a Web browser. In the address bar, type in http://localhost:8088/user?id=1 and click Enter. Ablank page opens up.

Scenario 2: Using cHttp to produce a Web service
80 Talend ESB Mediation Components Reference Guide
4. Switch back to the studio. The id 1 is printed in the console.

cJMS
Talend ESB Mediation Components Reference Guide 81
cJMS
cJMS properties
Component Family Messaging
Function cJMS sends messages to, or consumes messages from, a JMS Queue or Topic.
Purpose cJMS is used to exchange messages between a Route and a JMS provider.
URI/Type Select the messaging type, either queue or topic.
URI/Destination Type in a name for the JMS queue or topic.
ConnectionFactory Click the three-dot button and select a JMS connection factory to beused for handling messages or enter the name of the correspondingcMQConnectionFactory component directly in the field.
Advanced settings URI Options Set the optional arguments in the corresponding table. Click [+] asmany times as required to add arguments to the table. Then clickthe corresponding value field and enter a value. See the site http://camel.apache.org/jms.html for available URI options.
Usage cJMS can be a start, middle or end component in a Route. It has to be used with thecMQConnectionFactory component, which creates a connection to a MQ server. For more informationabout cMQConnectionFactory, see cMQConnectionFactory .
Limitation n/a
Scenario 1: Sending and receiving a message from aJMS queue
In this scenario, a cJMS component sends messages from the local file system to a message queue in one sub-route, and the messages are then consumed by another cJMS component in the other sub-route.
Dropping and linking the components
1. From the Palette, expand the Context folder, and drop a cMQConnectionFactory component onto thedesign workspace to specify the JMS connection factory for handling messages.

Scenario 1: Sending and receiving a message from a JMS queue
82 Talend ESB Mediation Components Reference Guide
2. From the Messaging folder, drop one cFile and two cJMS components onto the design workspace.
3. From the Processor folder, drop a cProcessor component onto the design workspace.
4. Connect the cFile component to a cJMS component using a Row > Route connection as the message producersub-route.
5. Connect the other cJMS component to the cProcessor component using a Row > Route connection as themessage consumer sub-route.
6. Label the components properly for better identification of their functionalities.
Configuring the components
1. Double-click the cMQConnectionFactory component to display its Basic settings view in the Componenttab.
2. From the MQ Server list, select an MQ server. In this use case, we use the default ActiveMQ server tohandle the messages.
In the Broker URI field, type in the URI of the message broker. Here we simply use the default URI "vm://localhost?broker.persistent=false".
3. In the message producer sub-route, double-click the cFile component to display its Basic settings view.
4. Define the properties of the cFile component.
In this use case, simply specify the path to the folder that holds the source file to be sent as electronic message,and leave the other parameters as they are.
5. Double-click the cJMS component labeled Message_producer to display its Basic settings view.

Scenario 1: Sending and receiving a message from a JMS queue
Talend ESB Mediation Components Reference Guide 83
6. From the Type list, select queue to send the messages to a JMS queue.
In the Destination field, type in a name for the JMS queue, "queue.hello" in this use case.
Double-click the [...] button next to ConnectionFactory. Select the MQ connection factory that you havejust configured in the dialog box and click OK.
7. Switch to the message consumer sub-route, and double click the cJMS component labeledMessage_consumer to display its Basic settings view.
8. Configure the message consumer using exactly the same parameters as in the message producer.
9. Double-click the cProcessor component to display its Basic settings view.

Scenario 1: Sending and receiving a message from a JMS queue
84 Talend ESB Mediation Components Reference Guide
10. In the Code area, customize the code as shown below to display the file names of the consumed messageson the Run console.
System.out.println("Message consumed: "+exchange.getIn().getHeader("CamelFileName"));
11. Press Ctrl+S to save your Routes.
Viewing code and executing the Route
1. Click the Code tab at the bottom of the design workspace to have a look at the generated code.
In the partially shown code, a message route is built from the File_source_cFile_1 .to the cJMS_1which then sends the message to a message queue via a broker identified by vm://localhost?broker.persistent=false. The message from the Message_consumer_cJMS_2 is processed bycProcessor_1.
2. Click the Run button in the Run view to launch the execution of your Route. You can also press F6 toexecute it.
RESULT: The message is received by the consumer, as shown on the Run console.

Scenario 2: Setting up a JMS local transaction
Talend ESB Mediation Components Reference Guide 85
Scenario 2: Setting up a JMS local transaction
In this scenario, a local transaction with three steps is performed to send, test and consume a JMS message:
1. The first Route is used to send a "hello world!" message to feed the queue.hello JMS queue.
2. The second Route is used to test the received JMS message. This message is redelivered six times to thequeue.hello queue and is then moved to the Dead Letter JMS queue. The Route is programmed to throw anexception every time an exchange is processed by the Route.
3. The last Route is used to consume the "hello world!" message from the Dead Letter JMS queue.
In this use case, we use the local ActiveMQ server to handle messages between different Routes. The ActiveMQserver need to be started before executing the Routes. For more information on installing and launching ActiveMQserver, see the Apache Web site http://activemq.apache.org/index.html.
Sending a message to the queue.hello JMS queue
Dropping and linking the components
1. From the Palette, drop the five following components onto the design workspace: onecMQConnectionFactory, one cConfig, one cMessagingEndpoint, one cJMS and one cProcessorcomponent.
2. Connect the cMessagingEndpoint component to the cJMS using a Row > Route connection.
3. Connect the cJMS component to the cProcessor component using a Row > Route connection.
Configuring the components
1. Double-click the cMQConnectionFactory component labelled AMQ_Send_ConnectionFactory to displayits Basic settings view in the Component tab.
2. From the MQ Server list, select an MQ server. In this use case, we use the default ActiveMQ server tohandle the messages.

Scenario 2: Setting up a JMS local transaction
86 Talend ESB Mediation Components Reference Guide
3. In the Broker URI field, type in Active MQ's default URI of the localhost server: "tcp://localhost:61616".
4. Double-click the cConfig component, which is labelled DatasetConfig, to display its Basic settings view inthe Component tab and set its parameters.
5. Write a piece of code in the Code field to register the dataset instance hello into the registry, as shown below.
org.apache.camel.component.dataset.SimpleDataSet dataset = new org.apache.camel.component.dataset.SimpleDataSet(1);dataset.setDefaultBody("Test Data: hello world!");org.apache.camel.impl.SimpleRegistry registry = new org.apache.camel.impl.SimpleRegistry(); registry.put("hello",dataset);camelContext.setRegistry(registry);
6. Double-click the cMessagingEndpoint component, which is labelled SimpleDatasetGen, to display its Basicsettings view in the Component tab. and set its parameters.
7. In the URI field, enter dataset:hello between the quotation marks.
8. Double-click the cJMS component labeled AMQ_Send to display its Basic settings view.

Scenario 2: Setting up a JMS local transaction
Talend ESB Mediation Components Reference Guide 87
9. From the Type list, select queue to send the message to a JMS queue.
In the Destination field, type in a name for the JMS queue, "queue.hello" in this use case.
Double-click the [...] button next to ConnectionFactory. Select the MQ connection factory that you havejust configured in the dialog box and click OK.
10. Double-click the cProcessor component labelled PrintSendMsg to display its Basic settings view in theComponent tab, and customize the code in the Code area to display the sent message intercepted on theconsole.
System.out.println("AMQ Send: "+exchange.getIn().getBody(String.class));
Executing the Route
• Click the Run button in the Run view to launch the execution of your Route. You can also press F6 toexecute it.
RESULT: One "hello world!" message is sent to the JMS Queue, as shown in the Run console.

Scenario 2: Setting up a JMS local transaction
88 Talend ESB Mediation Components Reference Guide
Testing the received message
Dropping and linking the components
1. From the Palette, drop the four following components onto the design workspace: one cJMS, two cProcessorcomponents and one cMQConnectionFactory.
2. Connect the cJMS component to the first cProcessor using a Row > Route connection.
3. Connect the first cProcessor component to the second cProcessor component using a Row > Routeconnection.
Configuring the components
1. Double-click the cMQConnectionFactory component labelled AMQ_Rev_ConnectionFactory to display itsBasic settings view in the Component tab.
2. From the MQ Server list, select an MQ server. In this use case, we use the default ActiveMQ server tohandle the messages.
Select the Use transaction check box.
3. In the Broker URI field, type in Active MQ's default URI of the localhost server: "tcp://localhost:61616".
4. Double-click the cJMS component labeled AMQ_Rev to display its Basic settings view.
5. From the Type list, select queue to send the messages to a JMS queue.
In the Destination field, type in a name for the JMS queue, "queue.hello" in this use case.

Scenario 2: Setting up a JMS local transaction
Talend ESB Mediation Components Reference Guide 89
Double-click the [...] button next to ConnectionFactory. Select the MQ connection factory that you havejust configured in the dialog box and click OK.
6. Double-click the first cProcessor component labelled PrintRevMsg to display its Basic settings view in theComponent tab, and customize the code in the Code area to display the received message intercepted onthe console.
System.out.println("AMQ Receive: "+exchange.getIn().getBody(String.class));
7. Double-click the second cProcessor component labelled ThrowEx to display its Basic settings view in theComponent tab, and customize the code in the Code area to throw the Force fail exception every time anexchange is processed by the route.
throw new Exception("Force fail")
Executing the Route
• Click the Run button in the Run view to launch the execution of your Route. You can also press F6 toexecute it.
RESULT: The "hello world!" message is tested and a rollback transaction is performed. Once the messageredelivery attempts exceeds six times, the pending message is sent to the Dead Letter JMS Queue.
Consuming the message from the DeadLetter JMS queue
Dropping and linking the components
1. From the Palette, drop the three following components onto the design workspace: onecMQConnectionFactory, one cJMS and one cProcessor component.
2. Connect the cJMS component to the cProcessor component using a Row > Route connection.
Configuring the components
1. Double-click the cMQConnectionFactory component to display its Basic settings view in the Componenttab.

Scenario 2: Setting up a JMS local transaction
90 Talend ESB Mediation Components Reference Guide
2. From the MQ Server list, select an MQ server. In this use case, we use the default ActiveMQ server tohandle the messages.
3. In the Broker URI field, type in Active MQ's default URI of the localhost server: "tcp://localhost:61616".
4. Double-click the cJMS component labeled DeadLetterQueueJMS to display its Basic settings view.
5. From the Type list, select queue to send the messages to a JMS queue.
In the Destination field, type in a name for the JMS queue, "ActiveMQ.DLQ" in this use case (the defaultDead Letter Queue in ActiveMQ).
Double-click the [...] button next to ConnectionFactory. Select the MQ connection factory that you havejust configured in the dialog box and click OK.
6. Double-click the cProcessor component labelled PrintMsg to display its Basic settings view in theComponent tab, and customize the code in the Code area to display the received message intercepted onthe console.
System.out.println("AMQ Receive: "+ exchange.getIn().getBody(String.class));
Executing the Route
• Click the Run button in the Run view to launch the execution of your Route. You can also press F6 toexecute it.

Scenario 3: Sending and receiving a scheduled delivery of messages from a JMS Queue using Camel Quartz
Talend ESB Mediation Components Reference Guide 91
RESULT: The "hello world!" message that was in the Dead Letter queue is consumed, as shown in the Runconsole.
Scenario 3: Sending and receiving a scheduleddelivery of messages from a JMS Queue using CamelQuartz
This scenario will show you how to use the Camel Quartz component to provide a scheduled delivery of messagesfrom a JMS Queue.
To do this, we will build two Routes, a message producer Route and a consumer Route. We will implement theQuartz component in the producer Route to send scheduled messages to a JMS Queue. The messages are thenconsumed by the consumer Route.
In this use case, we will use Apache ActiveMQ as the message broker. We need to launch the ActiveMQ serverbefore executing the Route. For more information about installing and launching ActiveMQ server, see the sitehttp://activemq.apache.org/index.html.
Building the producer Route
Dropping and linking the components

Scenario 3: Sending and receiving a scheduled delivery of messages from a JMS Queue using Camel Quartz
92 Talend ESB Mediation Components Reference Guide
1. From the Palette, drag and drop a cMQConnectionFactory, a cJMS, a cSetBody, and twocMessagingEndpoint components onto the design workspace.
2. Label the components for better identification of their roles and link them with the Row > Route connectionas shown above.
Configuring the components
1. Double-click the cMQConnectionFactory component to display its Basic settings view in the Componenttab.
2. From the MQ Server list, select ActiveMQ to handle messages.
In the Broker URI field, type in the URI of the local Active MQ server, "tcp://localhost:61616".
Select the Use PooledConnectionFatory check box and keep the default settings.
3. Double-click the quartzConsumer component to open its Basic settings view in the Component tab.
4. In the URI field, enter the code "quartz://HelloWorld?
trigger.repeatInterval=2000&trigger.repeatCount=-1" to define a timer for starting messageexchanges. In this use case, we want the message to be delivered endlessly between an interval of two seconds.For more information about Quartz, see the site http://camel.apache.org/quartz.html.
5.Click the Advanced settings view. Click at the bottom of the Dependencies list to add a row andselect quartz from the drop-down list. For more information about the Quartz component, see the site http://camel.apache.org/quartz.html.

Scenario 3: Sending and receiving a scheduled delivery of messages from a JMS Queue using Camel Quartz
Talend ESB Mediation Components Reference Guide 93
6. Double-click the cSetBody component to open its Basic settings view in the Component tab.
7. Select Simple from the Language list box and type in "Hello world" in the Expression field.
8. Double-click the logMessage component to open its Basic settings view in the Component tab.
9. In the URI field, enter "log:quartzMessage" where the message exchanges are logged.
10. Double-click the jmsProducer component to display its Basic settings view in the Component tab.

Scenario 3: Sending and receiving a scheduled delivery of messages from a JMS Queue using Camel Quartz
94 Talend ESB Mediation Components Reference Guide
11. From the Type list, select queue to send the messages to a JMS queue.
In the Destination field, type in a name for the JMS queue, "quartzTest" in this use case.
In the ConnectionFactory field, click [...] and select the MQ connection factory that you have just configured.
12. Press Ctrl+S to save your Route.
Viewing the code and executing the Route
1. Click the Code tab at the bottom of the design workspace to check the generated code.
As shown above, the message flow from quartzConsumer is given a payload by cSetBody_1 and then sentto logMessage and jmsProducer.
2. Press F6 to execute the Route.
RESULT: The logs of the message exchange are printed in the console.

Scenario 3: Sending and receiving a scheduled delivery of messages from a JMS Queue using Camel Quartz
Talend ESB Mediation Components Reference Guide 95
Building the consumer Route
Dropping and linking the components
1. From the Palette, drag and drop a cMQConnectionFactory, a cJMS, and a cMessagingEndpointcomponent onto the design workspace.
2. Label the components for better identification of their roles and link them with the Row > Route connectionas shown above.
Configuring the components
1. Double-click the cMQConnectionFactory component to display its Basic settings view in the Componenttab.
2. Configure the cMQConnectionFactory component the same as in the producer Route.
3. Double-click the jmsConsumer component to display its Basic settings view in the Component tab.
4. Configure the jmsConsumer component the same as the jmsProducer component in the producer Route toconsume the messages in the defined queue "quartzTest".
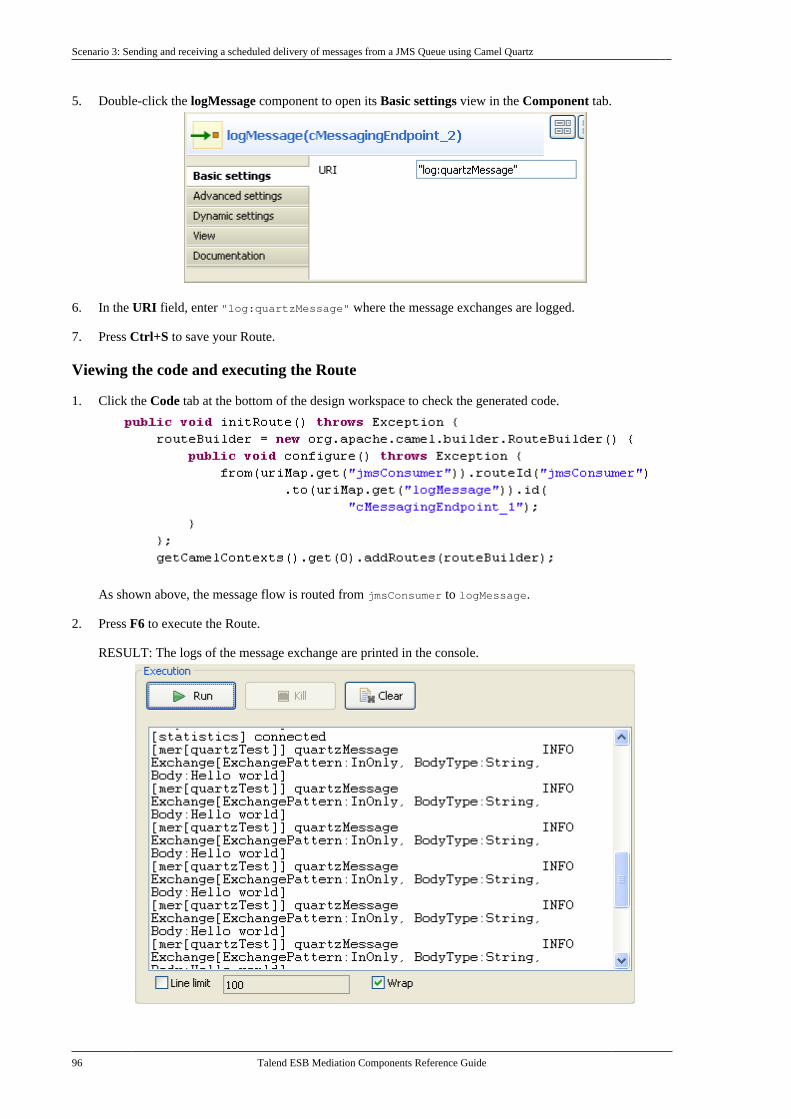
Scenario 3: Sending and receiving a scheduled delivery of messages from a JMS Queue using Camel Quartz
96 Talend ESB Mediation Components Reference Guide
5. Double-click the logMessage component to open its Basic settings view in the Component tab.
6. In the URI field, enter "log:quartzMessage" where the message exchanges are logged.
7. Press Ctrl+S to save your Route.
Viewing the code and executing the Route
1. Click the Code tab at the bottom of the design workspace to check the generated code.
As shown above, the message flow is routed from jmsConsumer to logMessage.
2. Press F6 to execute the Route.
RESULT: The logs of the message exchange are printed in the console.

cMail
Talend ESB Mediation Components Reference Guide 97
cMail
cMail Properties
Component family Messaging
Function cMail provides access to Email via Spring's Mail support and the underlying Java Mail system.
Purpose cMail is designed to send or receive mails in a Route.
Basic settings Protocols List of protocols for sending or receiving mails.
Host Host name of the mail server.
Port Port number of the mail server.
UserName and Password Login authentication data. To enter the password, click the [...]button next to the password field, and then in the pop-up dialogbox enter the password between double quotes and click OK tosave the settings.
Subject Subject of the mail being sent.
Content Type The mail content type.
From The mail sender.
To The mail receivers.
CC The CC recipients of the mail. Separate multiple email addresseswith a comma.
BCC The BCC recipients of the mail. Separate multiple emailaddresses with a comma.
Advanced settings Arguments Click the [+] button to add lines as needed in the Argumentstable. Then, enter the name and value of an argument.
Usage When used as a start component, cMail is intended to receive mails. Otherwise, it is intendedto send mails.
Limitation Due to the license incompatibility, one or more JAR files required to use this component arenot provided. You can install these missing JAR files by clicking the Install button in theBasic settings view of the Component tab. For more information, see the section about howto configure the Studio of the Talend Installation and Upgrade Guide.
Scenario: Using cMail to send and receive mailsThis scenario includes two routes. The first one sends a mail while the second receives it.
Now we build a route to send a mail.
Mail sending
1. Drop the components from the Palette onto the workspace: cFile, cMail and cProcessor, respectivelylabelled as Mail_to_send, Send_Mail and Mail_Sent.
2. Link the components using a Row > Route connection.

Scenario: Using cMail to send and receive mails
98 Talend ESB Mediation Components Reference Guide
3. Double-click cFile to open its Basic settings view in the Component tab.
4. Click the [...] button next to the Path field to select the folder that has the file to send.
5. In the FileName field, enter the name of the file to send, test mail.txt in this use case. Keep the default setupof other items.
The content of this file is test mail body.
6. Double-click cMail to open its Basic settings view in the Component tab.
7. In the Protocols list, select smtps.
In the Host field, type in the host name of the smtp server, smtp.gmail.com in this use case.
In the UserName and Password fields, enter the login authentication credentials, which are in the form ofcontext variables in this example. For more information about context variable setup, see Talend Studio UserGuide.
Keep the default setting of the ContentType field, text/plain.
In the To field, enter the receiver of the mail, which is also in the form of context variable in this example.
8. Double-click cProcessor to open its Basic settings view in the Component tab.
9. In the Code box, enter the code below to give a prompt after the mail is sent.

Scenario: Using cMail to send and receive mails
Talend ESB Mediation Components Reference Guide 99
System.out.println("Mail sent");
10. Save the route and press F6 to run.
As shown above, the mail has been sent out successfully.
Now we build a route to receive the mail.
Mail receiving
1. Drop the components from the Palette onto the workspace: cMail and cProcessor, respectively labelled asReceive_Mail and Mail_Body.
2. Link the components using a Row > Route connection.
3. Double-click cMail to open its Basic settings view in the Component tab.
4. In the Protocols list, select imaps.
5. In the Host field, type in the host name of the imap server, imap.gmail.com in this use case.
6. In the Port field, type in the port number, 993 in this use case.
7. In the UserName and Password fields, enter the login authentication credentials, which are in the form ofcontext variables in this example. For more information about context variable setup, see Talend Studio UserGuide.
8. Keep the default setting of the ContentType field, text/plain.
9. Double-click cProcessor to open its Basic settings view in the Component tab.

Scenario: Using cMail to send and receive mails
100 Talend ESB Mediation Components Reference Guide
10. In the Code box, enter the code below to print the mail body.
System.out.println(exchange.getIn().getBody(String.class));
11. Save the route and press F6 to run.
As shown above, the mail has been received and its content is test mail body.

cMessagingEndpoint
Talend ESB Mediation Components Reference Guide 101
cMessagingEndpoint
cMessagingEndpoint properties
Component Family Messaging
Function cMessagingEndpoint allows two applications to communicate by either sending or receivingmessages, one endpoint can not do both.
Purpose cMessagingEndpoint sends or receives messages.
Basic settings URI URI of the messages to send or receive. It can be of differentformat:
-File: "file:/",
-Database: "jdbc:/",
-Protocols: "ftp:/", "http:/"
-etc.
You can add parameters to the URI using the generic URI syntax,for example:
"file:/directoryName?option=value&option=value"
For more information on the different components that can beused in cMessagingEndpoint, see Apache Camel's Website: http://camel.apache.org/components.html.
Advanced settings Dependencies By default, the camel core supports the following components:bean, browse, class, dataset, direct, file, language, log, mock,properties, ref, seda, timer, vm.
To use other components, you have to provide the dependenciescorresponding to those components in the cMessagingEndpointcomponent. To do so:
Click the plus button to add new lines in the Camel componentlist. In the line added, select the component you want to use incMessagingEndpoint. For more information about the commonlyused Camel components, see Commonly used Camel components.
Use a custom component If you want to use a custom component, select this check boxand click the three-dot button to upload a jar file with your owncomponent.
All the transitive dependencies of this customcomponent should be included in the jar file.
Usage This component can be used as sending and/or receiving message endpoint according to itsposition in the Route.
Limitation n/a
Commonly used Camel components
The following table lists the most commonly used Camel components that can be called by cMessagingEndpoint.Click the links in the table to go to the Apache Camel's Website for the latest information of the these components.

Commonly used Camel components
102 Talend ESB Mediation Components Reference Guide
Make sure to use the information applicable for the Camel Version included in Talend ESB. See also Talend ESBMediation Developer Guide for details of the Camel components.
Component / ArtifactId / URI Description
ActiveMQ / activemq-camel
activemq:[topic:]destinationName
For JMS Messaging with Apache ActiveMQ
AHC / camel-ahc
ahc:http[s]://hostName[:port][/resourceUri][?
options]
To call external HTTP services using Async Http Client.
APNS / camel-apns
apns:<notify|consumer>[?options]
For sending notifications to Apple iOS devices.
Avro / camel-avro
avro:[transport]:[host]:[port][/messageName][?
options]
Working with Apache Avro for data serialization.
Atom / camel-atom
atom:uri
Working with Apache Abdera for atom integration, such asconsuming an atom feed.
Bean / camel-core
bean:beanName[?method=someMethod]
Uses the Camel Bean Binding to bind message exchanges to beansin the Camel Registry. Is also used for exposing and invokingPOJO (Plain Old Java Objects).
Cache / camel-cache
cache://cachename[?options]
The cache component facilitates creation of caching endpoints andprocessors using EHCache as the cache implementation.
Class / camel-core
class:className[?method=someMethod]
Uses the Camel Bean Binding to bind message exchanges to beansin the Camel Registry. Is also used for exposing and invokingPOJOs (Plain Old Java Objects).
CMIS / camel-cmis
cmis://cmisServerUrl[?options]
Uses the Apache Chemistry client API to interface with CMISsupporting CMS.
Context / camel-context
context:camelContextI localEndpointName
Used to refer to endpoints within a separate CamelContext toprovide a simple black box composition approach so that routescan be combined into a CamelContext and then used as a blackbox component inside other routes in other CamelContexts
CouchDB / camel-couchdb
couchdb:hostName[:port]/database[?options]
To integrate with Apache CouchDB.
Crypto (Digital Signatures) / camel-crypto
crypto:sign:name[?options], crypto:verify:name[?
options]
Used to sign and verify exchanges using the Signature Service ofthe Java Cryptographic Extension.
CXF / camel-cxf
cxf:address[?serviceClass=...]
Working with Apache CXF for web services integration
CXF Bean / camel-cxf
cxf:bean name
Process the exchange using a JAX WS or JAX RS annotated beanfrom the registry. Requires less configuration than the above CXFComponent
CXFRS / camel-cxf
cxfrs:address[?resourcesClasses=...]
Working with Apache CXF for REST services integration
Direct / camel-core
direct:name
Synchronous call to another endpoint from same CamelContext
Disruptor / camel-disruptor
disruptor-vm:someName[?<option>]
To provide the implementation of SEDA which is based ondisruptor.
ElasticSearch / camel-elasticsearch
elasticsearch://clusterName[?options]
Uses the Bean Binding to bind message exchanges to EJBs. Itworks like the Bean component but just for accessing EJBs.Supports EJB 3.0 onwards.

Commonly used Camel components
Talend ESB Mediation Components Reference Guide 103
Component / ArtifactId / URI Description
Spring Event / camel-spring
event://default, spring-event://default
Working with Spring ApplicationEvents
Exec / camel-exec
exec://executable[?options]
For executing system commands
Facebook / camel-facebook
facebook://endpoint[?options]
Providing access to all of the Facebook APIs accessible usingFacebook4J
File / camel-core
file://nameOfFileOrDirectory
Sending messages to a file or polling a file or directory.
Flatpack / camel-flatpack
flatpack:[fixed|delim]:configFile
Processing fixed width or delimited files or messages using theFlatPack library
FOP / camel-fop
fop:outputFormat[?options]
Renders the message into different output formats using ApacheFOP.
FreeMarker / camel-freemarker
freemarker:someTemplateResource
Generates a response using a Freemarker template
FTP / camel-ftp
ftp:contextPath[?options]
Sending and receiving files over FTP.
FTPS / camel-ftp
ftps://[username@]hostName[:port]/directoryName[?
options]
Sending and receiving files over FTP Secure (TLS and SSL).
Geocoder / camel-geocoder
geocoder:address|latlng:latitude,longitude>[?
options]
Supports looking up geocoders for an address, or reverse lookupgeocoders from an address.
Google Guava EventBus / camel-guava-eventbus
guava-eventbus:busName[?options]
The Google Guava EventBus allows publish-subscribe-stylecommunication between components without requiring thecomponents to explicitly register with one another (and thus beaware of each other). This component provides integration bridgebetween Camel and Google Guava EventBus infrastructure.
HBase / camel-hbase
hbase://table[?options]
For reading/writing from/to an HBase store (Hadoop database).
HDFS / camel-hdfs
hdfs://hostName[:port][/path][?options]
For reading/writing from/to an HDFS file system using Hadoop1.x.
HDFS2 / camel-hdfs2
hdfs2://hostName[:port][/path][?options]
For reading/writing from/to an HDFS file system using Hadoop2.x.
HL7 / camel-hl7
mina2:tcp://hostname[:port]
For working with the HL7 MLLP protocol and the HL7 modelusing the HAPI library.
HTTP4 / camel-http4
http4://hostname[:port]
For calling out to external HTTP servers using Apache HTTPClient 4.x
IMAP / camel-mail
imap://hostname[:port]
Receiving email using IMap
Infinispan / camel-infinispan
infinispan://hostName[?options]
For reading/writing from/to Infinispan distributed key/value storeand data grid
Jasypt / camel-jasypt
jasypt: uri
Simplified on-the-fly encryption library, integrated with Camel.

Commonly used Camel components
104 Talend ESB Mediation Components Reference Guide
Component / ArtifactId / URI Description
JCR / camel-jcr
jcr://user:password@repository/path/to/node
Storing a message in a JCR (JSR-170) compliant repository likeApache Jackrabbit
JDBC / camel-jdbc
jdbc:dataSourceName?options
For performing JDBC queries and operations
Jetty / camel-jetty
jetty:url
For exposing services over HTTP
JGroups / camel-jgroups
jgroups:clusterName[?options]
The jgroups: component provides exchange of messagesbetween Camel infrastructure and JGroups clusters.
JMS / camel-jms
jms:[topic:]destinationName
Working with JMS providers
JMX / camel-jmx
jmx://platform?options
For working with JMX notification listeners
JPA / camel-jpa
jpa://entityName
For using a database as a queue via the JPA specification forworking with OpenJPA, Hibernate or TopLink
Jsch / camel-jsch
scp://localhost/destination
Support for the scp protocol.
Kafka / camel-kafka
kafka://server:port[?options]
For producing to or consuming from Apache Kafka messagebrokers.
Krati / camel-krati
krati://[path to datastore/][?options]
For producing to or consuming to Krati datastores.
Log / camel-core
log:loggingCategory[?level=ERROR]
Uses Jakarta Commons Logging to log the message exchange tosome underlying logging system like log4j
Lucene / camel-lucene
lucene:searcherName:insert [?analyzer=<analyzer>]
Uses Apache Lucene to perform Java-based indexing and full textbased searches using advanced analysis/tokenization capabilities
MINA2 / camel-mina2
mina2:[tcp|udp|vm]:host[:port][?options]
Working with Apache MINA 2.x.
Mock / camel-core
mock:name
For testing routes and mediation rules using mocks
MongoDB / camel-mongodb
mongodb:connectionBean[?options]
Interacts with MongoDB databases and collections. Offersproducer endpoints to perform CRUD-style operations and moreagainst databases and collections, as well as consumer endpointsto listen on collections and dispatch objects to Camel routes.
MQTT / camel-mqtt
mqtt:name[?options]
Component for communicating with MQTT M2M messagebrokers
Mustache / camel-mustache
mustache:templateName[?options]
Generates a response using a Mustache template.
MyBatis / camel-mybatis
mybatis://statementName
Performs a query, poll, insert, update or delete in a relationaldatabase using MyBatis.
Netty / camel-netty-http
netty-http:http:[port]/context-path[?options]
Works as Netty HTTP server and client using the Netty project.
OptaPlanner / camel-optaplanner
optaplanner:solverConfig[?options]
Solves the planning problem contained in a message withOptaPlanner.

Commonly used Camel components
Talend ESB Mediation Components Reference Guide 105
Component / ArtifactId / URI Description
POP3 / camel-mail
pop3://user-info@host:port
Receiving email using POP3 and JavaMail.
Properties / camel-core
properties://key[?options]
The properties component facilitates using property placeholdersdirectly in endpoint uri definitions.
Quartz / camel-quartz
quartz://groupName/timerName
Provides a scheduled delivery of messages using the Quartzscheduler
Quartz2 / camel-quartz2
quartz2://groupName/timerName[?options]
Provides a scheduled delivery of messages using the Quartz 2.xscheduler.
RabbitMQ / camel-rabbitmq
rabbitmq://hostname[:port]/exchangeName[?options]
Component for integrating with RabbitMQ.
Ref / camel-core
ref:name
Component for lookup of existing endpoints bound in the CamelRegistry.
RMI / camel-rmi
rmi://host[:port]
Working with RMI
RSS / camel-rss
rss:uri
Working with ROME for RSS integration, such as consuming anRSS feed.
Salesforce / camel-salesforce
salesforce:topic[?options]
To integrate with Salesforce.
SAP NetWeaver / camel-sap-netweaver
sap-netweaver:hostName[:port][?options]
To integrate with SAP NetWeaver Gateway.
SEDA / camel-core
seda:name
Asynchronous call to another endpoint in the same Camel Context
SERVLET / camel-servlet
servlet:uri
For exposing services over HTTP through the servlet which isdeployed into the Web container.
SJMS / camel-sjms
sjms:[queue:|topic:]destinationName[?options]
A ground up implementation of a JMS client.
SFTP / camel-ftp
sftp://host[:port]/fileName
Sending and receiving files over SFTP (FTP over SSH).
SMTP / camel-mail
smtp://user-info@host[:port]
Sending email using SMTP and JavaMail
SMPP / camel-smpp
smpp://user-info@host[:port]?options
To send and receive SMS using Short Messaging Service Centerusing the JSMPP library
SNMP / camel-snmp
snmp://host[:port]?options
Polling OID values and receiving traps using SNMP via SNMP4Jlibrary
Solr / camel-solr
solr://hostName[:port]/solr[?options]
Uses the Solrj client API to interface with an Apache Lucene Solrserver.
Splunk / camel-splunk
splunk://[endpoint]?[options]
For working with Splunk
SpringBatch / camel-spring-batch
spring-batch:jobName[?options]
To bridge Camel and Spring Batch.
SpringIntegration / camel-spring-integration The bridge component of Camel and Spring Integration

Commonly used Camel components
106 Talend ESB Mediation Components Reference Guide
Component / ArtifactId / URI Description
spring-integration: defaultChannelName
Spring LDAP / camel-spring-ldap
spring-ldap:springLdapTemplateBean[?options]
Camel wrapper for Spring LDAP
Spring Redis / camel-spring-redis
spring-redis://hostName:port[?options]
Component for consuming and producing from Redis key-valuestore Redis
Spring Web Services / camel-spring-ws
spring-ws:[mapping-type:]address[?options]
Client-side support for accessing web services, and server-sidesupport for creating your own contract-first web services usingSpring Web Services
SQL / camel-sql
sql:select * from table where id=#
Performing SQL queries using JDBC
SSH / camel-ssh
ssh:[username[:password]@]host [:port][?options]
For sending commands to a SSH server
StAX / camel-stax
stax:(contentHandlerClassName|#myHandler)
Process messages through a SAX ContentHandler.
Stomp / camel-stomp
stomp:queue:destinationName[?options]
For communicating with Stomp compliant message brokers, likeApache ActiveMQ or ActiveMQ Apollo
Stub / camel-core
stub:someOtherCamelUri
Allows you to stub out some physical middleware endpoint foreasier testing or debugging
Test / camel-spring
test:expectedMessagesEndpointUri
Creates a Mock endpoint which expects to receive all the messagebodies that could be polled from the given underlying endpoint
Timer / camel-core
timer://name
A timer endpoint
Twitter / camel-twitter
twitter://endpoint[?options]
A twitter endpoint
Velocity / camel-velocity
velocity:someTemplateResource
Generates a response using an Apache Velocity template
Vertx / camel-vertx
vertx:eventBusName
Working with the vertx event bus
VM / camel-core
vm:name
Asynchronous call to another endpoint in the same JVM
Weather / camel-weather
weather://name[?options]
Polls the weather information from Open Weather Map.
Websocket / camel-websocket
websocket://hostname[:port][/resourceUri][?
options]
Communicating with Websocket clients.
XQuery / camel-saxon
xquery:someXQueryResource
Generates a response using an XQuery template
XSLT / camel-spring
xslt:someTemplateResource
Generates a response using an XSLT template
Yammer / camel-yammer
yammer://function[?options]
Allows you to interact with the Yammer enterprise social network.
Zookeeper / camel-zookeeper Working with ZooKeeper cluster(s)

Scenario 1: Moving files from one message endpoint to another
Talend ESB Mediation Components Reference Guide 107
Component / ArtifactId / URI Description
zookeeper://zookeeperServer[:port][/path][?
options]
Scenario 1: Moving files from one message endpointto another
This scenatio uses two cMessagingEndpoint components to read and move files from one endpoint to another.
Dropping and linking the components
1. From the Messaging folder of the Palette, drag and drop two cMessagingEndpoint components onto thedesign workspace, one as the message sender and the other as the message receiver, and label them Senderand Receiver respectively to better identify their roles in the Route.
2. Right-click the component labeled Sender, select Row > Route in the menu and drag to the Receiver to linkthem together with a route link.
Configuring the components and connections
1. Double-click the component labeled Sender to open its Basic settings view in the Component tab.
2. In the URI field, type in the URI of the messages you want to route.
As we are handling files, type in "file:///" and the path to the folder containing the files.
3. Double-click the component labeled Receiver to open its Basic settings view in the Component tab.
4. In the URI field, type in the URI of the folder where you want to route your message.
As we are handling files, type in "file:///" and the path to the folder to which the files will be sent.

Scenario 2: Sending files to another message endpoint
108 Talend ESB Mediation Components Reference Guide
5. Press Ctrl+S to save your Route.
Viewing code and executing the Route
1. To have a look at the generated code, click the Code tab at the bottom of the design workspace.
The code shows the from and .to corresponding to the two endpoints: from for the sending one and .tofor the receiving one.
2. In the Run view, click the Run button to launch the execution of your Route.
You can also press F6 to execute it.
RESULT: The files are moved from their original folder to the target one. Furthermore, a new .camel folderis created in the source folder containing the consumed files. This is Camel's default behavior. Thus, the fileswill not be processed endlessly but they are backed up in case of problems.
Scenario 2: Sending files to another messageendpoint
This scenario accesses FTP service and transfers files from one endpoint to another.

Scenario 2: Sending files to another message endpoint
Talend ESB Mediation Components Reference Guide 109
Dropping and linking components
1. From the Messaging folder of the Palette, drag and drop two cMessagingEndpoint components onto thedesign workspace, one as the message sender and the other as the message receiver, and label them Senderand Receiver respectively to better identify their roles in the Route.
2. Right-click the component labeled Sender, select Row > Route in the menu and drag to the Receiver to linkthem together with a route link.
Configuring the components and connections
1. Double-click the component labeled Sender to display its Basic settings view in the Component tab.
2. In the URI field, type in the URI of the message you want to route.
Here, we are using an FTP component: ftp://indus@degas/remy/camel with URI specific parametersauthenticating the FTP connection: ?username=indus&password=indus.
3. For the FTP component to work in Camel, click the Advanced settings tab of cMessagingEndpoint, click the[+] button to add a Camel component in the Dependencies table, and select ftp from the Camel componentlist to activate the FTP component.
4. Double-click the component labeled Receiver to open its Basic settings view in the Component tab.
5. In the URI field, type in the URI of the folder to which you want your message to be routed.
As we are handling files, type in "file:///" and the path to the folder to which the files will be sent.

Scenario 3: Using an Xquery endpoint to filter messages
110 Talend ESB Mediation Components Reference Guide
6. Press Ctrl+S to save your Route.
Viewing code and executing the Route
1. To have a look at the generated code, click the Code tab at the bottom of the design workspace.
In this part of code, we can see a route represented by from and .to, corresponding to the sending andreceiving endpoints.
2. In the Run view, click the Run button to launch the execution of your Route.
You can also press F6 to execute it.
RESULT: The message is sent (copied) to the receiving endpoint.
Scenario 3: Using an Xquery endpoint to filtermessages
In this scenario, we will use a cMessagingEndpoint component to call a Route Resource as an Xquery parser toextract messages from the local file system.
The following sample XML file is used in this scenario:

Scenario 3: Using an Xquery endpoint to filter messages
Talend ESB Mediation Components Reference Guide 111
<people> <person id="8"> <firstName>Ellen</firstName> <lastName>Ripley</lastName> <city>Washington</city> </person> <person id="9"> <firstName>Peter</firstName> <lastName>Green</lastName> <city>London</city> </person></people>
Creating a Route Resource
1. From the repository tree view, right-click the Resources node and select Create Resource from the contextmenu.
2. The [New Route Resource] wizard opens. In the Name field, type in a name for the Resource, for example,SampleXquery. Click Finish to close the wizard.

Scenario 3: Using an Xquery endpoint to filter messages
112 Talend ESB Mediation Components Reference Guide
3. Enter the following code in the editor to extract the firstName and lastName of all the person elements.
declare namespace ns0="http://com.sap/b";<people>{for $p in /people//personreturn <person> <firstName>{$p/firstName/text()}</firstName> <lastName>{$p/lastName/text()}</lastName> </person>}</people>
4. Press Ctrl+S to save your Route Resource.
Dropping and linking the components
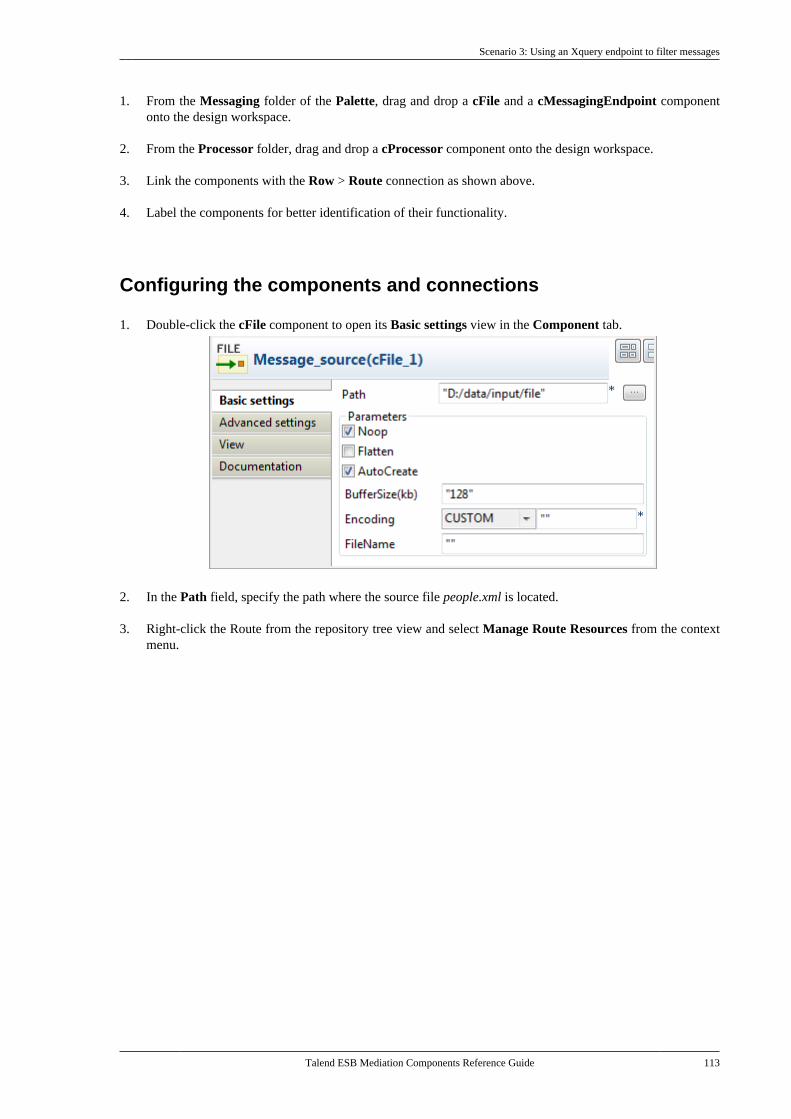
Scenario 3: Using an Xquery endpoint to filter messages
Talend ESB Mediation Components Reference Guide 113
1. From the Messaging folder of the Palette, drag and drop a cFile and a cMessagingEndpoint componentonto the design workspace.
2. From the Processor folder, drag and drop a cProcessor component onto the design workspace.
3. Link the components with the Row > Route connection as shown above.
4. Label the components for better identification of their functionality.
Configuring the components and connections
1. Double-click the cFile component to open its Basic settings view in the Component tab.
2. In the Path field, specify the path where the source file people.xml is located.
3. Right-click the Route from the repository tree view and select Manage Route Resources from the contextmenu.

Scenario 3: Using an Xquery endpoint to filter messages
114 Talend ESB Mediation Components Reference Guide
The [Manage Route Resources] wizard is opened.
4. In the [Manage Route Resources] wizard, click Add and select SampleXquery from the Resources tree viewin the dialog. Click OK.

Scenario 3: Using an Xquery endpoint to filter messages
Talend ESB Mediation Components Reference Guide 115
The SampleXquery Route Resource is added in the table of the [Manage Route Resources] wizard.
5. Select the SampleXquery from the Route Resources list and click Copy Path. Click OK to close the wizard.
6. Double click the cMessagingEndpoint component to display its Basic settings view in the Component tab.
7. In the URI field, enter xquery: and paste the path of the Route Resource SampleXquery that we just copiedin double quotation marks.
8. Click the Advanced settings tab, add the Camel component saxon in the Dependencies list. For moreinformation about Xquery, see Apache Camel's Website: http://camel.apache.org/xquery-endpoint.html.

Scenario 3: Using an Xquery endpoint to filter messages
116 Talend ESB Mediation Components Reference Guide
9. Double-click the cProcessor component to open its Basic settings view in the Component tab.
10. In the Code area, enter the following code to display the messages intercepted on the console:
System.out.println(exchange.getIn().getBody(String.class));
11. Press Ctrl+S to save your Route.
Viewing code and executing the Route
1. To have a look at the generated code, click the Code tab at the bottom of the design workspace.

Scenario 3: Using an Xquery endpoint to filter messages
Talend ESB Mediation Components Reference Guide 117
As shown in the code above, the message is routed from Message_source_cFile_1 .to
cMessagingEndpoint_1 and then processed by cProcessor_1.
2. In the Run view, click the Run button to launch the execution of your Route. You can also press F6 toexecute it.
RESULT: The firstName and lastName of all the person elements of the source file is printed in the console.

cMQTT
118 Talend ESB Mediation Components Reference Guide
cMQTT
cMQTT properties
Component Family Messaging
Function cMQTT sends messages to, or consumes messages from MQTT compliant message brokers.
Purpose cMQTT is used for communicating with MQTT compliant message brokers.
Basic settings ConnectionFactory This option appears when Use Connection Factory is selected.Click [...] and select a connection factory to be used for handlingmessages.
Topic Name Type in a name for the message topic in the message broker.
Advanced settings Parameters Set the optional parameters in the corresponding table. Click [+] asmany times as required to add parameters to the table. Then clickthe corresponding value field and enter a value. See the site http://camel.apache.org/amqp.html for available options.
Usage cMQTT can be a start, middle or end component in a Route. It has to be used with thecMQConnectionFactory component, which creates a connection to a MQ server. For more informationabout cMQConnectionFactory, see cMQConnectionFactory .
Limitation Due to the license incompatibility, one or more JAR files required to use this component are not provided.You can install these missing JAR files by clicking the Install button in the Basic settings view of theComponent tab. For more information, see the section about how to configure the Studio of the TalendInstallation and Upgrade Guide.
Scenario: Sending messages to and receivingmessages from an MQTT broker
This scenario will show you how to use the cMQTT component to send messages to and consume messages froman MQTT broker. To do this, two Routes are built, a message producer Route, and a consumer Route. Messagesare sent to the MQTT broker in the producer Route and then consumed in the consumer Route.
In this use case, Apache ActiveMQ is used as the message broker which supports the MQTT protocol. You needto launch the ActiveMQ server before executing the Route. For more information about installing and launchingActiveMQ server, see the site http://activemq.apache.org/index.html.

Scenario: Sending messages to and receiving messages from an MQTT broker
Talend ESB Mediation Components Reference Guide 119
Building the producer Route
Dropping and linking the components
1. From the Palette, drag and drop a cMQConnectionFactory, a cTimer, a cSetBody, a cMQTT, and a cLogcomponent onto the design workspace.
2. Label the components for better identification of their roles and link them with the Row > Route connectionas shown above.
Configuring the components
1. Double-click the cMQConnectionFactory component to display its Basic settings view in the Componenttab.
2. From the MQ Server list, select MQTT to handle messages.
In the Host Name field, keep the default value "127.0.0.1" as the local ActiveMQ server is used as themessage broker in this example.
In the Port field, keep the default 1883.
Keep the default settings of the other options.
3. Double-click the cTimer component to open its Basic settings view in the Component tab.
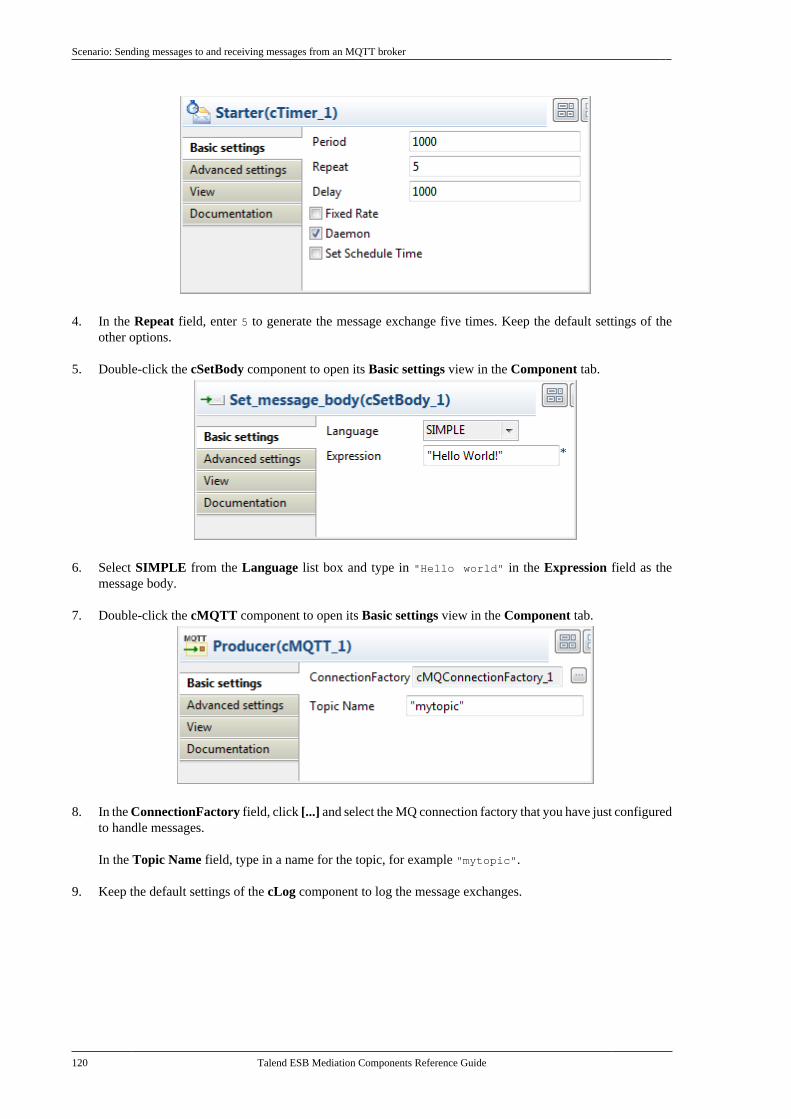
Scenario: Sending messages to and receiving messages from an MQTT broker
120 Talend ESB Mediation Components Reference Guide
4. In the Repeat field, enter 5 to generate the message exchange five times. Keep the default settings of theother options.
5. Double-click the cSetBody component to open its Basic settings view in the Component tab.
6. Select SIMPLE from the Language list box and type in "Hello world" in the Expression field as themessage body.
7. Double-click the cMQTT component to open its Basic settings view in the Component tab.
8. In the ConnectionFactory field, click [...] and select the MQ connection factory that you have just configuredto handle messages.
In the Topic Name field, type in a name for the topic, for example "mytopic".
9. Keep the default settings of the cLog component to log the message exchanges.

Scenario: Sending messages to and receiving messages from an MQTT broker
Talend ESB Mediation Components Reference Guide 121
10. Press Ctrl+S to save your Route.
Viewing the code
• Click the Code tab at the bottom of the design workspace to check the generated code.
As shown above, the message flow from cTimer_1 is given a payload by cSetBody_1 and then sent tocMQTT_1 and cLog_1.
Building the consumer Route
Dropping and linking the components
1. From the Palette, drag and drop a cMQConnectionFactory, a cMQTT, and a cLog component onto thedesign workspace.
2. Label the components for better identification of their roles and link them with the Row > Route connectionas shown above.
Configuring the components
1. Double-click the cMQConnectionFactory component to display its Basic settings view in the Componenttab.

Scenario: Sending messages to and receiving messages from an MQTT broker
122 Talend ESB Mediation Components Reference Guide
2. Configure the cMQConnectionFactory component as the one in the producer Route to connect to the sameMQTT broker.
3. Double-click the cMQTT component to display its Basic settings view in the Component tab.
4. In the ConnectionFactory field, click [...] and select the MQ connection factory that you have just configuredto handle messages.
Specify the same Topic Name in the consumer cMQTT component as in the producer.
5. Keep the default settings of the cLog component to log the message exchanges.

Scenario: Sending messages to and receiving messages from an MQTT broker
Talend ESB Mediation Components Reference Guide 123
6. Press Ctrl+S to save your Route.
Viewing the code and executing the Route
1. Click the Code tab at the bottom of the design workspace to check the generated code.
As shown above, the message flow is routed from cMQTT_1 to cLog_1.
2. Press F6 to execute the Route. In the execution console you can see that there's no message exchange yet.
3. Execute the producer Route. The logs of the message exchange are printed in the console.
4. In the consumer Route, the messages are consumed and shown in the execution console.

Scenario: Sending messages to and receiving messages from an MQTT broker
124 Talend ESB Mediation Components Reference Guide
5. In the ActiveMQ Web Console, you can see that the topic mytopic has been created and the messages areconsumed.
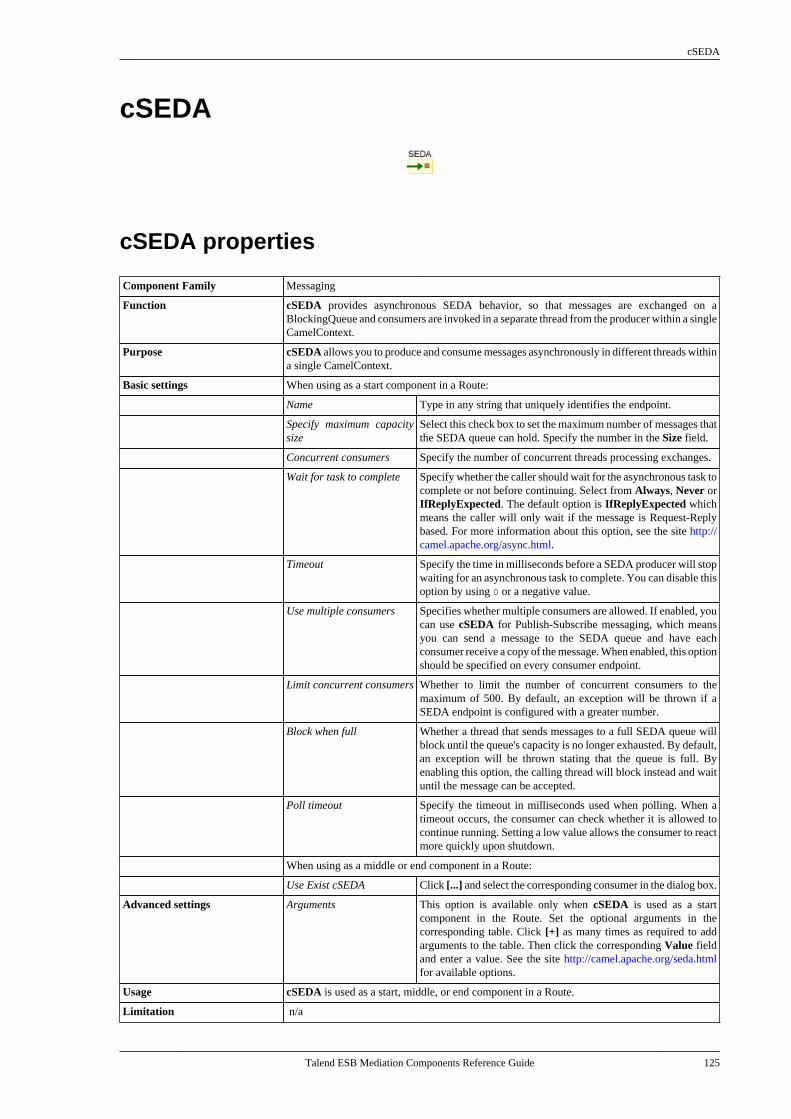
cSEDA
Talend ESB Mediation Components Reference Guide 125
cSEDA
cSEDA properties
Component Family Messaging
Function cSEDA provides asynchronous SEDA behavior, so that messages are exchanged on aBlockingQueue and consumers are invoked in a separate thread from the producer within a singleCamelContext.
Purpose cSEDA allows you to produce and consume messages asynchronously in different threads withina single CamelContext.
Basic settings When using as a start component in a Route:
Name Type in any string that uniquely identifies the endpoint.
Specify maximum capacitysize
Select this check box to set the maximum number of messages thatthe SEDA queue can hold. Specify the number in the Size field.
Concurrent consumers Specify the number of concurrent threads processing exchanges.
Wait for task to complete Specify whether the caller should wait for the asynchronous task tocomplete or not before continuing. Select from Always, Never orIfReplyExpected. The default option is IfReplyExpected whichmeans the caller will only wait if the message is Request-Replybased. For more information about this option, see the site http://camel.apache.org/async.html.
Timeout Specify the time in milliseconds before a SEDA producer will stopwaiting for an asynchronous task to complete. You can disable thisoption by using 0 or a negative value.
Use multiple consumers Specifies whether multiple consumers are allowed. If enabled, youcan use cSEDA for Publish-Subscribe messaging, which meansyou can send a message to the SEDA queue and have eachconsumer receive a copy of the message. When enabled, this optionshould be specified on every consumer endpoint.
Limit concurrent consumers Whether to limit the number of concurrent consumers to themaximum of 500. By default, an exception will be thrown if aSEDA endpoint is configured with a greater number.
Block when full Whether a thread that sends messages to a full SEDA queue willblock until the queue's capacity is no longer exhausted. By default,an exception will be thrown stating that the queue is full. Byenabling this option, the calling thread will block instead and waituntil the message can be accepted.
Poll timeout Specify the timeout in milliseconds used when polling. When atimeout occurs, the consumer can check whether it is allowed tocontinue running. Setting a low value allows the consumer to reactmore quickly upon shutdown.
When using as a middle or end component in a Route:
Use Exist cSEDA Click [...] and select the corresponding consumer in the dialog box.
Advanced settings Arguments This option is available only when cSEDA is used as a startcomponent in the Route. Set the optional arguments in thecorresponding table. Click [+] as many times as required to addarguments to the table. Then click the corresponding Value fieldand enter a value. See the site http://camel.apache.org/seda.htmlfor available options.
Usage cSEDA is used as a start, middle, or end component in a Route.
Limitation n/a

Scenario: Using cSEDA, cVM and cDirect to produce and consume messages separately
126 Talend ESB Mediation Components Reference Guide
Scenario: Using cSEDA, cVM and cDirect to produceand consume messages separately
In this scenario, we will use a cTimer component to trigger a message exchange. The message is routed to acSEDA, a cVM and a cDirect sequentially with a message body set for each of them, which is then consumedin another thread.
We will create a Route Resource to define the repeat count of the message exchange (the number of times themessage should be sent), which will be used by the cTimer component.
Creating a Route Resource and calling it in the Route
1. From the repository tree view, right-click the Resources node and select Create Resource from the contextmenu.
2. The [New Route Resource] wizard opens. In the Name field, type in a name for the Resource, for example,SetRepeatCount. Click Finish to close the wizard.

Scenario: Using cSEDA, cVM and cDirect to produce and consume messages separately
Talend ESB Mediation Components Reference Guide 127
3. Enter repeat.count=2 in the design workspace to set the repeat count.
4. Press Ctrl+S to save your Route Resource.
5. Right-click the Route from the repository tree view and select Manage Route Resources from the contextmenu.

Scenario: Using cSEDA, cVM and cDirect to produce and consume messages separately
128 Talend ESB Mediation Components Reference Guide
The [Manage Route Resources] wizard is opened.
6. Click Add and select SetRepeatCount from the Resources tree view in the dialog. Click OK.

Scenario: Using cSEDA, cVM and cDirect to produce and consume messages separately
Talend ESB Mediation Components Reference Guide 129
The SetRepeatCount Route Resource is added in the table.
7. Click OK to close the wizard.
For more information about creating and using Route Resources, see Talend Studio User Guide.
8. Click the Spring tab on the lower half of the design workspace of the Route.

Scenario: Using cSEDA, cVM and cDirect to produce and consume messages separately
130 Talend ESB Mediation Components Reference Guide
9. Enter the following code in this view to call the Route Resource you just created.
<bean id="properties" class="org.apache.camel.component.properties.PropertiesComponent"> <property name="location" value="classpath:SetRepeatCount.properties"/> </bean>
For more information about using Spring configuration in a Route, see Talend Studio User Guide.
Dropping and linking the components
1. From the Palette, drag and drop a cTimer, two cSEDA, two cVM, two cDirect, three cSetbody, and threecLog components onto the design workspace.
2. Link the components using the Row > Route connection as shown above.
3. Label the components to better identify their roles in the Route.

Scenario: Using cSEDA, cVM and cDirect to produce and consume messages separately
Talend ESB Mediation Components Reference Guide 131
Configuring the components and connections
1. Double-click Starter in the design workspace to display its Basic settings view in the Component tab.
2. In the Repeat field, enter "{{repeat.count}}" that is defined in the Route resource.
3. Double-click Set_body_SEDA in the design workspace to display its Basic settings view in the Componenttab.
4. Select SIMPLE in the Language list.
In Expression field, enter the "to cSEDA" as the message body.
Repeat this step to set the message body in Set_body_VM and Set_body_Direct as "to cVM" and "tocDirect" respectively.
Set_body_VM:
Set_body_Direct:

Scenario: Using cSEDA, cVM and cDirect to produce and consume messages separately
132 Talend ESB Mediation Components Reference Guide
5. Double-click SEDA_producer to display its Basic settings view in the Component tab.
6. Click [...] and select SEDA_consumer in the [Select a Node:] wizard, which will consume the message thatis sent to SEDA_producer.
Repeat this step to select the node VM_consumer for VM_producer.
Select the node Direct_consumer for VM_producer.

Scenario: Using cSEDA, cVM and cDirect to produce and consume messages separately
Talend ESB Mediation Components Reference Guide 133
7. Double-click SEDA_consumer to display its Basic settings view in the Component tab.
8. In the Name field, type in "seda" to identify this endpoint. Keep the default settings of the other options.
Repeat this step to give the name "vm" to VM_consumer.
Give the name "direct" to Direct_consumer.

Scenario: Using cSEDA, cVM and cDirect to produce and consume messages separately
134 Talend ESB Mediation Components Reference Guide
9. Double-click Monitor_SEDA to display its Basic settings view in the Component tab.
10. Select INFO in the Level list and select Specify output log message. In the Message field, enter "logcSEDA:${body}" to print the message body in the console.
Repeat this step to specify the output message for Monitor_VM and Monitor_Direct as "log cVM:${body}"and "log cDirect:${body}" respectively.
11. Press Ctrl+S to save your Route.
Viewing code and executing the Route
1. Click the Code tab at the bottom of the design workspace to have a look at the generated code.
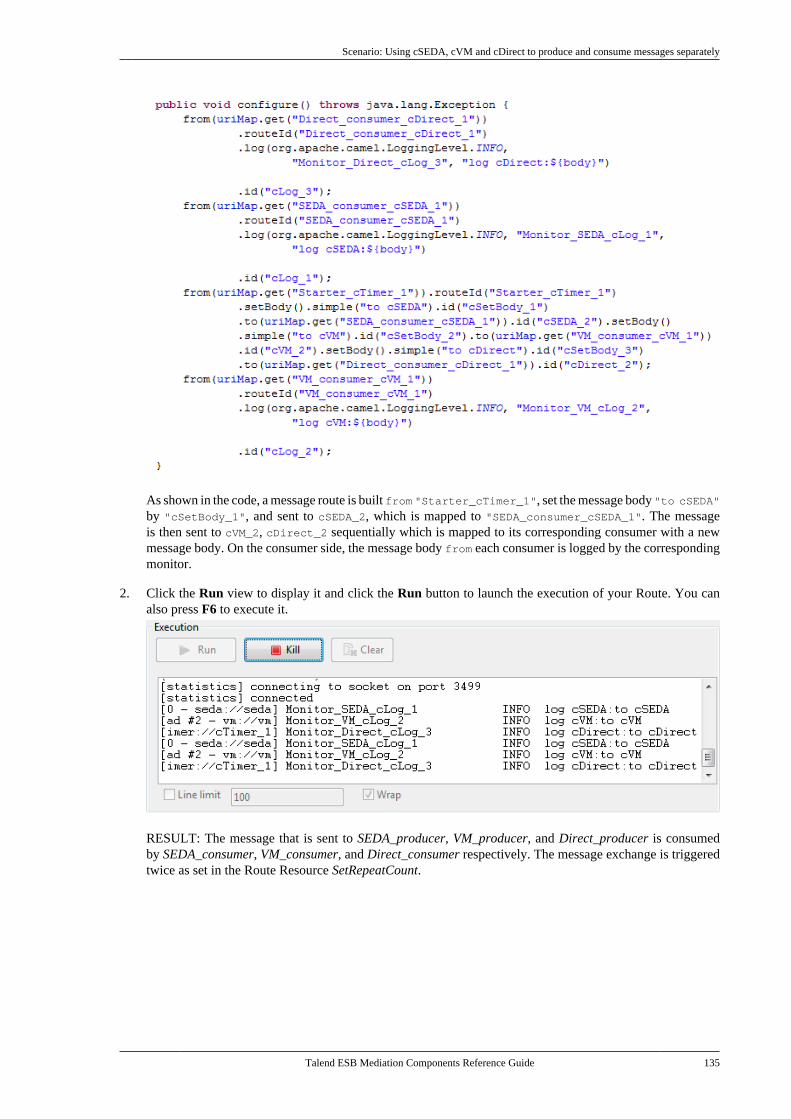
Scenario: Using cSEDA, cVM and cDirect to produce and consume messages separately
Talend ESB Mediation Components Reference Guide 135
As shown in the code, a message route is built from "Starter_cTimer_1", set the message body "to cSEDA"by "cSetBody_1", and sent to cSEDA_2, which is mapped to "SEDA_consumer_cSEDA_1". The messageis then sent to cVM_2, cDirect_2 sequentially which is mapped to its corresponding consumer with a newmessage body. On the consumer side, the message body from each consumer is logged by the correspondingmonitor.
2. Click the Run view to display it and click the Run button to launch the execution of your Route. You canalso press F6 to execute it.
RESULT: The message that is sent to SEDA_producer, VM_producer, and Direct_producer is consumedby SEDA_consumer, VM_consumer, and Direct_consumer respectively. The message exchange is triggeredtwice as set in the Route Resource SetRepeatCount.

cTimer
136 Talend ESB Mediation Components Reference Guide
cTimer
cTimer properties
Component Family Messaging
Function The cTimer component generates message exchanges when a timer triggers.
Purpose The cTimer component allows you to schedule message exchanges.
Basic settings Period Fill this field with an integer (in milliseconds) to generate messageexchanges every period.
Repeat Specifies a maximum limit of message exchange numbers. A valueof zero or negative will generate message exchanges forever.
Delay The number of milliseconds to wait before the first messageexchange is generated. This option should not be used with the SetSchedule Time option.
Fixed Rate Select this check box to generate message exchanges at regularintervals, separated by the specified period.
Daemon Specify whether the thread associated with the timer endpoint runsas a daemon.
Set Schedule Time Select this check box to specify the time that the first messageexchange should be generated. In the Time field, enter thetime using the pattern yyyy-MM-dd HH:mm:ss or yyyy-MM-dd'T'HH:mm:ss.
Usage cTimer can only be used as a start component in a Route.
Limitation n/a
Related Scenario:
For a related scenario, see Scenario: Using cDataset to receive messages.

cVM
Talend ESB Mediation Components Reference Guide 137
cVM
cVM properties
Component Family Messaging
Function cVM provides asynchronous SEDA behavior, so that messages are exchanged on aBlockingQueue and consumers are invoked in a separate thread from the producer acrossCamelContext instances.
Purpose cVM allows you to produce and consume messages asynchronously in different threads acrossCamelContext. You can use this mechanism to communicate across Web applications.
Basic settings When using as a start component in a Route:
Name Type in any string that uniquely identifies the endpoint.
Specify maximum capacitysize
Select this check box to set the maximum number of messages thatthe SEDA queue can hold. Specify the number in the Size field.
Concurrent consumers Specify the number of concurrent threads processing exchanges.
Wait for task to complete Specify whether the caller should wait for the asynchronous task tocomplete or not before continuing. Select from Always, Never orIfReplyExpected. The default option is IfReplyExpected whichmeans the caller will only wait if the message is Request-Replybased. For more information about this option, see the site http://camel.apache.org/async.html.
Timeout Specify the time in milliseconds before a SEDA producer will stopwaiting for an asynchronous task to complete. You can disable thisoption by using 0 or a negative value.
Use multiple consumers Specifies whether multiple consumers are allowed. If enabled, youcan use cVM for Publish-Subscribe messaging, which means youcan send a message to the SEDA queue and have each consumerreceive a copy of the message. When enabled, this option shouldbe specified on every consumer endpoint.
Limit concurrent consumers Whether to limit the number of concurrent consumers to themaximum of 500. By default, an exception will be thrown if aSEDA endpoint is configured with a greater number.
Block when full Whether a thread that sends messages to a full SEDA queue willblock until the queue's capacity is no longer exhausted. By default,an exception will be thrown stating that the queue is full. Byenabling this option, the calling thread will block instead and waituntil the message can be accepted.
Poll timeout Specify the timeout in milliseconds used when polling. When atimeout occurs, the consumer can check whether it is allowed tocontinue running. Setting a lower value allows the consumer toreact more quickly upon shutdown.
When using as a middle or end component in a Route:
Input endpoint name Select this check box to enter the name of the correspondingconsumer in the Name field.
Use Exist cVM This option appears when the Input endpoint name check box iscleared. Click [...] and select the corresponding consumer in thedialog box.
Name This option appears when the Input endpoint name check box isselected. Enter the name of the consumer in this field directly.
Advanced settings Arguments This option is available only when cVM is used as a startcomponent in the Route. Set the optional arguments in thecorresponding table. Click [+] as many times as required to add
Related scenario:
138 Talend ESB Mediation Components Reference Guide
arguments to the table. Then click the corresponding Value fieldand enter a value. See the site http://camel.apache.org/vm.html foravailable options.
Usage cVM is used as a start, middle, or end component in a Route.
Limitation n/a
Related scenario:
For a related scenario, see Scenario: Using cSEDA, cVM and cDirect to produce and consume messagesseparately.

Talend ESB Mediation Components Reference Guide
Miscellaneous componentsThis chapter details the major components that you can find in Miscellaneous family from the Palette of theMediation perspective of Talend Studio.
The Miscellaneous family groups components that cover the needs such as iterating a Route or stopping a Route.

cLog
140 Talend ESB Mediation Components Reference Guide
cLog
cLog properties
Component Family Miscellaneous
Function cLog logs message exchanges to the underlying logging mechanism. Apache Camel provides the regularlogger and the throughput logger. The default logger logs every exchange. The throughput logger logsexchanges on a group basis. By default regular logging is used.
Purpose cLog is used to log message exchanges.
Logging Category Enter the name of the logging category to use.
Level Select a logging level from DEBUG, ERROR, INFO, OFF,TRACE, or WARN.
Use default output log message Select this option to use the default output log message provided bythe underlying logging mechanism.
Options / None
(For default output log messageonly)
Select this option to take no action on the log message.
Options / Specifies a group size forthroughput logging
(For default output log messageonly)
Select this option to use throughput logging and specify a group sizefor the throughput logging.
Size: Enter an integer that specifies a group size for throughputlogging.
Options / Group message stats bytime interval (in millis)
(For default output log messageonly)
Select this option to use throughput logging and group messagestatistics.
Interval: Specify the time interval (in milliseconds) by which themessage statistics will be grouped.
Delay: Set the initial delay (in milliseconds) for message statistics.
Options / Format the log output
(For default output log messageonly)
Select this option to format the log output. Click [+] as many times asrequired to add arguments to the table. Then click the correspondingvalue field and enter a value. See the site http://camel.apache.org/log.html for available options.
Specify output log message Select this option to specify the output log message.
Message: Use Simple language to construct a dynamic messagewhich gets logged.
Usage cLog is used as a middle or end component in a Route.
Limitation n/a
Related scenario:
For a related scenario, see Scenario: Routing messages according to a criterion.

cLoop
Talend ESB Mediation Components Reference Guide 141
cLoop
cLoop properties
Component Family Miscellaneous
Function cLoop allows you to process a message or messages a number of times and possibly in differentways.
Purpose cLoop is used to process a message or messages repetitively.
Basic settings Loop Type Select a type of loop to be carried out: Expression, Header, orValue.
Expression: Use an expression to determine the loop count.
Header: Use a header to determine the loop count.
Value: Use an argument to set the loop count.
When using Expression: In the Language field, select thelanguage of the expression you want to use to determine theloop count between Constant, EL, Groovy, Header, Javascript,JoSQL, JXPath, MVEL, None, OGNL, PHP, Property,Python, Ruby, Simple, SpEL, SQL, XPath, XQuery. Type inthe expression in the Expression field.
The Add Namespaces option appears when XPath is selected inthe Language list. Select this check box to add namespaces for theXpath expression. Click [+] to add as many namespaces as requiredto the table and define the prefix and URI in the correspondingcolumns.
When using Header: Enter the name of the header that you wantto use to determine the loop count in header field.
When using Value: Enter an integer you want to set as the loopcount in the value field.
Usage cLoop can be a middle component in a Route.
Limitation n/a
Related scenario:
No scenario is available for this component yet.

cStop
142 Talend ESB Mediation Components Reference Guide
cStop
cStop properties
ComponentFamily
Miscellaneous
Function cStop stops the Route to which it is connected.
Purpose cStop is used to stop a message routing.
Usage cStop is not a start component, but it can be a middle or end component in a Route.
Limitation n/a
Related scenario:
For a related scenario, see Scenario: Intercepting several routes and redirect them in a single new route ofcIntercept.

Talend ESB Mediation Components Reference Guide
Processor componentsThis chapter details the major components that you can find in Processor family from the Palette of the Mediationperspective of Talend Studio.
The Processor family groups components that help you to perform all types of processing tasks on message flowssuch monitoring the message sent or received, setting the message exchange mode, controlling the delivery time,and so on.

cBean
144 Talend ESB Mediation Components Reference Guide
cBean
cBean properties
Component Family Processor
Function cBean invokes a Java bean that is stored in the Code node of the Repository or registered bya cBeanRegister.
Purpose cBean allows you to call a predefined Java bean.
Basic settings Reference Select this option to reference a Java bean registered by acBeanRegister.
In the Id field that appears, enter the Id of the Java bean.
New Instance Select this option to invoke a Java bean that is stored in the Codenode of the Repository.
In the Bean class field that appears, enter the name of the beanclass.
For more information about creating and using Java Beans, seeTalend Studio User Guide.
Specify the method Select this check box to enter the name of a method to be includedin the bean.
Usage cBean can be a start, middle or end component in a Route.
Limitation n/a
Related Scenario
For a related scenario, see:
• cConvertBodyTo: Scenario: Converting the body of an XML file into an org.w3c.dom.Document.class.

cDelayer
Talend ESB Mediation Components Reference Guide 145
cDelayer
cDelayer properties
Component Family Processor
Function The cDelayer component delays the delivery of messages.
Purpose The cDelayer component allows you to set a latency in message routing.
Basic settings Time to wait (in ms) Fill this field with an integer (in milliseconds) to define the timeto wait before sending the message to the subsequent endpoint.
Usage This component is usually used in the middle of a Route.
Limitation n/a
Scenario: Using cDelayer to delay message routing
In this scenario, a cDelayer component is used to delay the routing of each message to the target endpoint by20 seconds.
Dropping and linking the components
This use case requires one cDelayer component, two cFile components, and two cProcessor components.
1. From the Messaging folder of the Palette, drop two cFile components onto the design workspace, one toread files from a local folder and the other to write the files to another local folder.
2. From the Processor folder of the Palette, drop two cProcessor components onto the design workspace, onenext to the reading component to monitor messages read from the source file folder, and the other next to thewriting component to monitor messages written to the target file folder.
3. From the Processor folder of the Palette, drop one cDelayer component onto the design workspace, betweenthe message reading monitor component and the message writing component.
4. Connect the components using Row > Route connections.
5. Label the components to better identify their roles in the Route, as shown above.
Configuring the components
1. Double-click the first cFile component, which is labelled Read, to open its Basic settings view in theComponent tab.

Scenario: Using cDelayer to delay message routing
146 Talend ESB Mediation Components Reference Guide
2. In the Path field, enter or browse to the path to the source files, and leave the other parameters as they are.
3. Repeat these steps to define the target folder in property settings of the second cFile component, which islabelled Write.
4. Double-click the first cProcessor component, which is labelled Read_monitor, to open its Basics settingsview in the Component tab.
5. In the Code area, customize the code to display the time each message is read from the source:
Date date=new Date();SimpleDateFormat formatter = new SimpleDateFormat("HH:mm:ss");String s = formatter.format(date);System.out.println("\nMessage "+exchange.getIn().getHeader("CamelFileName")+" read at "+(s));
6. Repeat these steps to configure the second cProcessor component, which is labelled Write_monitor, todisplay the time each message is written to the target:
Date date=new Date();SimpleDateFormat formatter = new SimpleDateFormat("HH:mm:ss");String s = formatter.format(date);System.out.println("Message "+exchange.getIn().getHeader("CamelFileName")+ " written at "+(s));
7. Double-click the cDelayer component, which is labelled Delay_timer, to open its Basic settings view in theComponent tab.

Scenario: Using cDelayer to delay message routing
Talend ESB Mediation Components Reference Guide 147
8. In the Time to wait (in ms) field, enter the number of milliseconds by which you want to delay messagedelivery. Note that the value must be a positive integer.
In this use case, we want each message to be delivered after a 20-second delay.
9. Press Ctrl+S to save your Route.
Viewing the code and executing the Route
1. Click the Code tab at the bottom of the design workspace to have a look at the generated code.
As shown in the code, a 20-second delay is implemented according to .delay(20000) in the message routingfrom the Read endpoint .to the Write endpoint.
2. Press F6 to execute the Route.
RESULT: Each message read from the source folder is routed to the target folder after a 20-second delay.

Scenario: Using cDelayer to delay message routing
148 Talend ESB Mediation Components Reference Guide
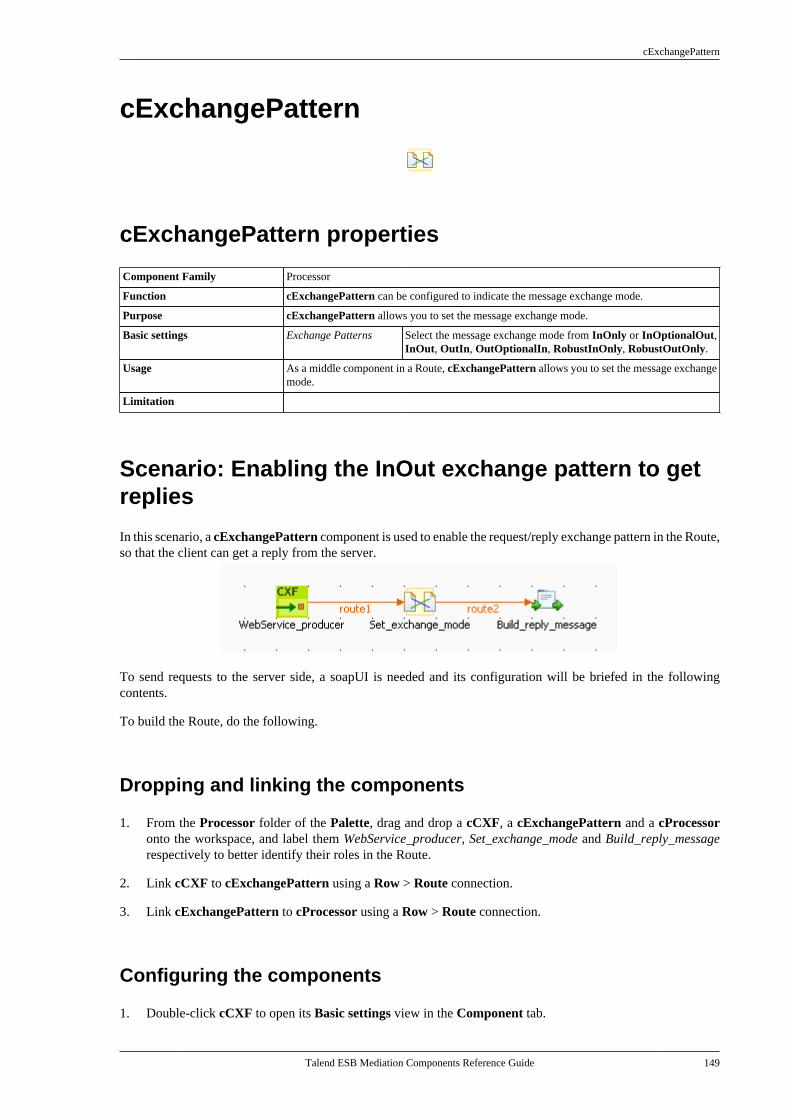
cExchangePattern
Talend ESB Mediation Components Reference Guide 149
cExchangePattern
cExchangePattern properties
Component Family Processor
Function cExchangePattern can be configured to indicate the message exchange mode.
Purpose cExchangePattern allows you to set the message exchange mode.
Basic settings Exchange Patterns Select the message exchange mode from InOnly or InOptionalOut,InOut, OutIn, OutOptionalIn, RobustInOnly, RobustOutOnly.
Usage As a middle component in a Route, cExchangePattern allows you to set the message exchangemode.
Limitation
Scenario: Enabling the InOut exchange pattern to getreplies
In this scenario, a cExchangePattern component is used to enable the request/reply exchange pattern in the Route,so that the client can get a reply from the server.
To send requests to the server side, a soapUI is needed and its configuration will be briefed in the followingcontents.
To build the Route, do the following.
Dropping and linking the components
1. From the Processor folder of the Palette, drag and drop a cCXF, a cExchangePattern and a cProcessoronto the workspace, and label them WebService_producer, Set_exchange_mode and Build_reply_messagerespectively to better identify their roles in the Route.
2. Link cCXF to cExchangePattern using a Row > Route connection.
3. Link cExchangePattern to cProcessor using a Row > Route connection.
Configuring the components
1. Double-click cCXF to open its Basic settings view in the Component tab.

Scenario: Enabling the InOut exchange pattern to get replies
150 Talend ESB Mediation Components Reference Guide
2. In the Address field, leave the default setting unchanged.
3. In the Type list, select wsdlURL.
4. In the WSDL File field, enter the URL of the wsdl file. You can also click the three-dot button to browse for it.
5. In the Dataformat list, select PAYLOAD.
6. Double-click cExchangePattern to open its Basic settings view in the Component tab.
7. In the Exchange Patterns list, select InOut to enable the request/reply message exchange mode.
8. Double-click cProcessor to open its Basic settings view in the Component tab.
9. In the Code box, enter the code below.
StringBuilder sb = new StringBuilder();sb.append("<tns:getAirportInformationByISOCountryCodeResponse xmlns:tns=\"http://airportsoap.sopera.de\">");sb.append("<tns:getAirportInformationByISOCountryCodeResult>This is a response</tns:getAirportInformationByISOCountryCodeResult>");

Scenario: Enabling the InOut exchange pattern to get replies
Talend ESB Mediation Components Reference Guide 151
sb.append("</tns:getAirportInformationByISOCountryCodeResponse>");exchange.getOut().setBody(sb.toString());
As shown above, a string is built here and is used as a reply message of the route. It is in line with the messagedefinition of the above wsdl file.
10. Press Ctrl+S to save your Route.
Viewing code and executing the Route
1. Click the Code tab at the bottom of the design workspace to check the generated code.
As shown above, the route has its message exchange pattern set as InOut using the method.setExchangePattern(org.apache.camel.ExchangePattern.InOut). In the meantime, a string iscreated using StringBuilder sb = new StringBuilder() at cProcessor_1 and is used as the replymessage via the method exchange.getOut().setBody( sb.toString()).
2. Press F6 to execute the Route.
The server Route gets started.
Creating and sending a request to the server Route and getting areply
1. In the soapUI, create a Test project and edit a request, as illustrated below:

Scenario: Enabling the InOut exchange pattern to get replies
152 Talend ESB Mediation Components Reference Guide
Note that the wsdl file must be same as that configured for cCXF, so that the request can be in line with thedefinition of the web service.
2. Send the request to the server Route and you can get the reply, as illustrated below:

cJavaDSLProcessor
Talend ESB Mediation Components Reference Guide 153
cJavaDSLProcessor
cJavaDSLProcessor properties
Component Family Processor
Function cJavaDSLProcessor implements producers and consumers of message exchanges orimplements a Message Translator using the Java Domain Specific Language (DSL).
Purpose cJavaDSLProcessor can be usable for quickly whirling up some code using Java DSL. If thecode in the inner class gets a bit more complicated it is of course advised to refactor it into aseparate class.
Basic settings Code Type in the code you want to implement using Java DSL.
Usage cJavaDSLProcessor is used as a middle or end component in a Route.
Limitation n/a
Related scenario:
For a related scenario, see Scenario: Wiretapping a message in a Route.

cProcessor
154 Talend ESB Mediation Components Reference Guide
cProcessor
cProcessor properties
Component Family Processor
Function cProcessor implements consumers of message exchanges or implements a Message Translator.
Purpose cProcessor can be usable for quickly whirling up some code. If the code in the inner class getsa bit more complicated it is of course advised to refactor it into a separate class.
Basic settings Imports Enter the Java code that helps to import, if necessary, externallibraries used in the Code box.
Code Type in the Java code you want to implement.
Usage cProcessor is used as a middle or end component in a Route.
Limitation n/a
Related scenario:
For a related scenario, see Scenario: Intercepting several routes and redirect them in a single new route ofcIntercept.

cTalendJob
Talend ESB Mediation Components Reference Guide 155
cTalendJob
cTalendJob properties
Component Family Processor
Function cTalendJob calls a Data Integration Job either from the repository or exported as an OSGIBundle For ESB. For more information on how to build a Job and how to export a Job as anOSGI Bundle for ESB, see Talend Studio User Guide.
Purpose cTalendJob allows you to exchange messages between a Data Integration Job and a MediationRoute.
Basic settings Repository Select this option to call a Job from the Repository.
External Select this option to call a Job that is exported as an OSGI Bundle For ESB.
Repository/UseSelectedContext
This field appears when Repository is selected. Select this check box to usethe context that is selected in the Context list when executing the Job.
Repository/UseRoute Context
This field appears when Repository is selected. Select this check box to use theJob context that has the same name as the one that is used in the Route whenexecuting the Job.
If context does not exist in the Job, null values of the contextparameters will be used during the Job execution. Make sure that youhave the needed context in the Job.
Repository/UseJob Context
This field appears when Repository is selected. Select this check box to usethe selected context on the Job side when executing the Job.
Repository/Job This field appears when Repository is selected. Click [...] to show the [AssignJob] wizard. Choose between Create a new Job and Assign it to thiscTalendJob component and Assign an existing Job to this cTalendJobcomponent and follow the prompts.
When assigning an existing Job to cTalendJob, only the Jobs withthe tRouteInput component can be selected.
You can double click cTalendJob to open the referenced Job in the Mediationperspective, or right-click cTalendJob and select Open Job in Integration inthe context menu to switch to the Integration perspective and open the Job.
Repository/Version
This field appears when Repository is selected. Select the version of the Job ifmore than one version of the Job is available.
Repository/Context
This field appears when Repository is selected. Select from the list the contextto use to execute the referenced Job.
This option works only when Use Selected Context is selected.
External Jar/Library
This field appears when External is selected. Select the library you want toimport from the list, or click on the [...] button to import the jar library of yourJob.
External Jar/Job
This field appears when External is selected. Type in the name of thepackage and the name of your Job separated by a point. For example:route_project.txmlmap_0_1.tXMLMap . To get this naming, you can openthe jar library of your Job, go to OSGI-INF > blueprint and edit thejob.xml file, the naming is available in a bean node like <bean id="job"class="route_project.txmlmap_0_1.tXMLMap"/>.
External Jar/Context
This field appears when External is selected. Type in the name of the contextto use to execute the referenced Job.

Scenario: Using cTalendJob to call a DI Job
156 Talend ESB Mediation Components Reference Guide
Context Param Use this table to change the variable values of the specified context in thereferenced Job.
Click [+] to add as many rows as required to the table. Select the contextvariable that you want to change in the Parameters list of each row, and enterthe value you want to give it in the Values field. This value will replace theone that is defined on the Job side.
Advanced settings PropagateHeader
Select this check box to pass the message header to the referenced Job as acontext variable.
Usage cTalendJob can be a start, middle or end component in a Route. It is mandatory that atRouteInput component is used in the Data Integration Job. The reason for it is that thiswill prevent the referenced Job from starting automatically when deployed in Talend Runtime.Instead it will only start when it gets called by the Route.
Limitation n/a
Scenario: Using cTalendJob to call a DI Job
In this scenario, we will build a Data Integration Job with context in the Integration perspective first. Then, wewill create a Route in the Mediation perspective with a cTalendJob component to call the Job and set the contextvariables in the Job.
Creating an Data Integration Job
In this section, we will build a Job named RouteCommunication to accept the message from a Route. For moreinformation on how to build a Job, see Talend Studio User Guide.
Dropping and linking the components
1. Drag and drop a tRouteInput and a tLogRow from the Palette onto the design workspace.
2. Right-click the tRouteInput component, select Row > Main from the contextual menu and click thetLogRow component.
Configuring the components
1. Create two variables, header and body in the Default context group. Give the value world to the bodyvariable. The header variable will receive its value propagated from the Route. For more information aboutcontext setup, see Talend Studio User Guide.

Scenario: Using cTalendJob to call a DI Job
Talend ESB Mediation Components Reference Guide 157
2. Double-click the tRouteInput component to open its Basic settings view in the Component tab.
3. Click [...] next to Edit Schema. In the schema dialog box, click [+] to add two lines of String type and namethem header and body respectively. Click OK to close the dialog box.
4. In the Simple Expression field for the header element, enter context.header to use the variable headerin the context group which will be propagated from the Route.
In the same field for the body element, enter context.body to use the variable body in the context groupas the message body.

Scenario: Using cTalendJob to call a DI Job
158 Talend ESB Mediation Components Reference Guide
5. The tLogRow component will monitor the message exchanges and does not need any configuration.
6. Press Ctrl+S to save your Job.
Creating a Mediation Route
In this section, we will switch to the Mediation perspective and create a Route to send a message to the Job.
Dropping and linking the components
1. Drag and drop a cTimer, a cSetHeader, and a cTalendJob from the Palette onto the design workspace.
2. Link the components with the Row > Route connection as shown above.
3. Label the components for better identification of their roles.
Configuring the components
1. Double-click the cTimer component to open its Basic settings view in the Component tab.
2. Set the values for the Period (200), Repeat (1) and Delay (1000) fields as shown above to trigger a messageexchange after a delay of 1000 milliseconds.
3. Double-click the cSetHeader component to display its Basic settings view in the Component tab.

Scenario: Using cTalendJob to call a DI Job
Talend ESB Mediation Components Reference Guide 159
4. Click [+] to add a row to the Headers table.
In the Name field, type in "header" as the header name.
Select Constant in the Language list, and enter "FileName" in the Value field.
5. Double-click the cTalendJob component to display its Basic settings view in the Component tab.
6. Select Repository to call a Job from the repository.
7. In the Repository Job area, select Use Selected Context.
Click [...] next to the Job field to open the [Assign Job] wizard. Select Assign an existing Job to thiscTalendJob component and click Next.

Scenario: Using cTalendJob to call a DI Job
160 Talend ESB Mediation Components Reference Guide
In the Job selection view, select RouteCommunication that we just created in the Job designs tree viewand click Finish.
RouteCommunication is now displayed in the Job field. By default, the latest version and the default contextof it is selected.
8. Click [+] under the Context Param to add a row to it.
The Parameters list contains the variables in the default context group of the referenced Job. Select bodyin the list.
Enter "Hello World!" in the Values field. It will replace the value world that is defined in the Job context.
9. Click the Advanced settings view. Select the Propagate Header check box to pass the header that is definedin cSetHeader to the Job as a context variable.
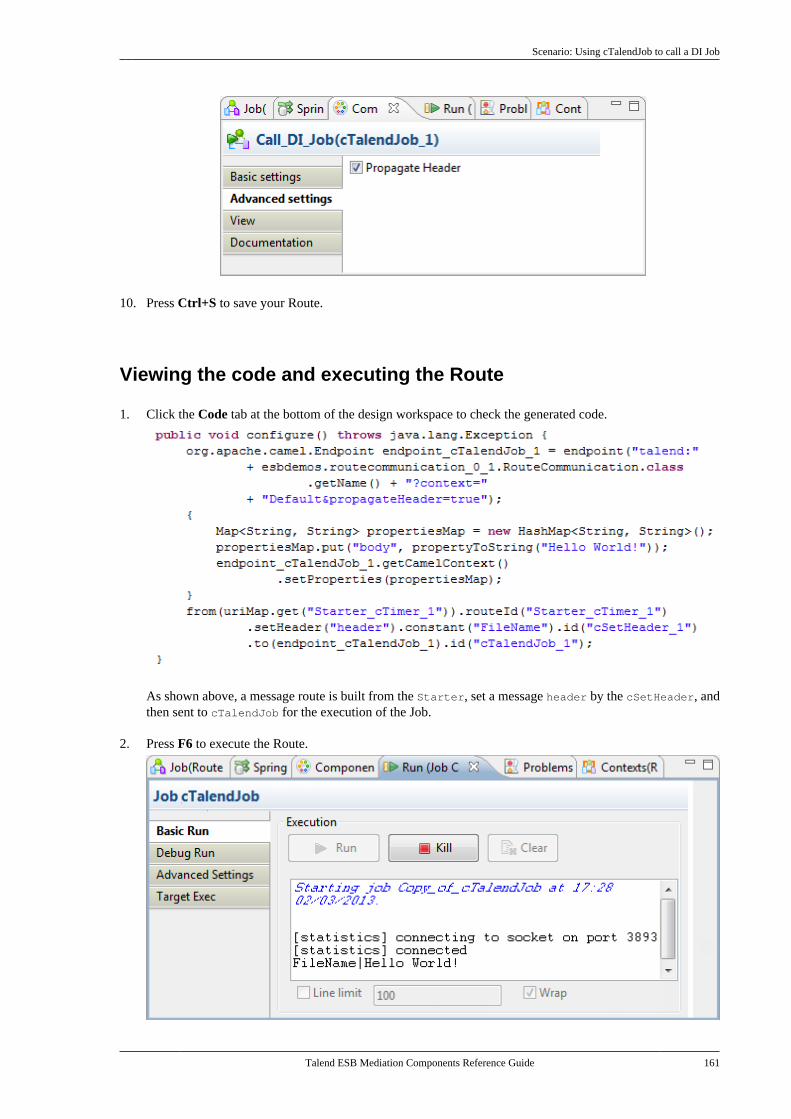
Scenario: Using cTalendJob to call a DI Job
Talend ESB Mediation Components Reference Guide 161
10. Press Ctrl+S to save your Route.
Viewing the code and executing the Route
1. Click the Code tab at the bottom of the design workspace to check the generated code.
As shown above, a message route is built from the Starter, set a message header by the cSetHeader, andthen sent to cTalendJob for the execution of the Job.
2. Press F6 to execute the Route.

Scenario: Using cTalendJob to call a DI Job
162 Talend ESB Mediation Components Reference Guide
As shown above, the header and body of the message is printed in the execution console by the tLogRow.The header value is FileName. It is defined by the cSetHeader and passed to the Job as a context variable.The body value is Hello World!. It is defined by tRouteInput using the context variable body of the Job.The value for this variable is set as world in the Job, but changed to Hello World! in cTalendJob.

Talend ESB Mediation Components Reference Guide
Routing componentsThis chapter details the major components that you can find in Routing family from the Palette of the Mediationperspective of Talend Studio.
The Routing family groups components that moves messages from one endpoint to another based on a set ofconditions.

cAggregate
164 Talend ESB Mediation Components Reference Guide
cAggregate
cAggregate
Component Family Routing
Function cAggregate aggregates messages together according to specified conditions.
Purpose cAggregate allows you to combine a number of messages together into a single message.
Language Select the language of the expression you want to use to filteryour messages, from None, Constant, CorrelationID, Header,Property, Simple and XPath.
Select CorrelationID to use the existing correlation ID of themessage as the correlation key if the correlation ID is availablein the closest cCXF connected to this component. For moreinformation about the cCXF component, see cCXF.
Correlation expression/Expression
Type in the expression that evaluates the correlation key to be usedfor the aggregation.
This field disappears when CorrelationID is selected in theLanguage list. In this case, the existing correlation ID from theclosest cCXF connected to this component will be used. For moreinformation about the cCXF component, see cCXF.
Correlation expression/AddNamespaces
This option appears when XPath is selected in the Language list.
Select this check box to add namespaces for the Xpath expression.Click [+] to add as many namespaces as required to the table anddefine the prefix and URI in the corresponding columns.
Strategy Specify a Java bean to use as the aggregation strategy.
Completion conditions/Number of messages
Select this check box to specify the number of messages toaggregate per batch before the aggregation is complete.
By default, this check box is selected and the numberof messages is set to 3. If you clear this check box, andat least one of the other four completion conditions ismet, all the messages retrieved will be aggregated in onebatch.
Completion conditions/Inactivity timeout (inmilliseconds)
Select this check box to specify the time (in milliseconds) that anaggregated exchange should be inactive before it is complete. Thisoption can be set as either a fixed value or using an Expressionwhich allows you to evaluate a timeout dynamically.
You can not use this option together with Scheduledinterval. Only one of them can be used at a time.
Completion conditions/Scheduled interval (inmilliseconds)
Select this check box to specify a repeating period (in milliseconds)by which the aggregator will complete all current aggregatedexchanges.
You cannot use this option together with Inactivitytimeout. Only one of them can be used at a time.
Completion conditions/Predicate matched
Select this check box to specify a predicate to indicate when anaggregated exchange is complete.
Basic settings
Completion conditions/Batch consumer
Select this check box to aggregate all files consumed from a fileendpoint in a given poll.
Advanced settings Check completion beforeaggregating
Select this check box to check for completion when a newincoming exchange has been received. This option influences thebehavior of the Predicate matched option as the exchange being
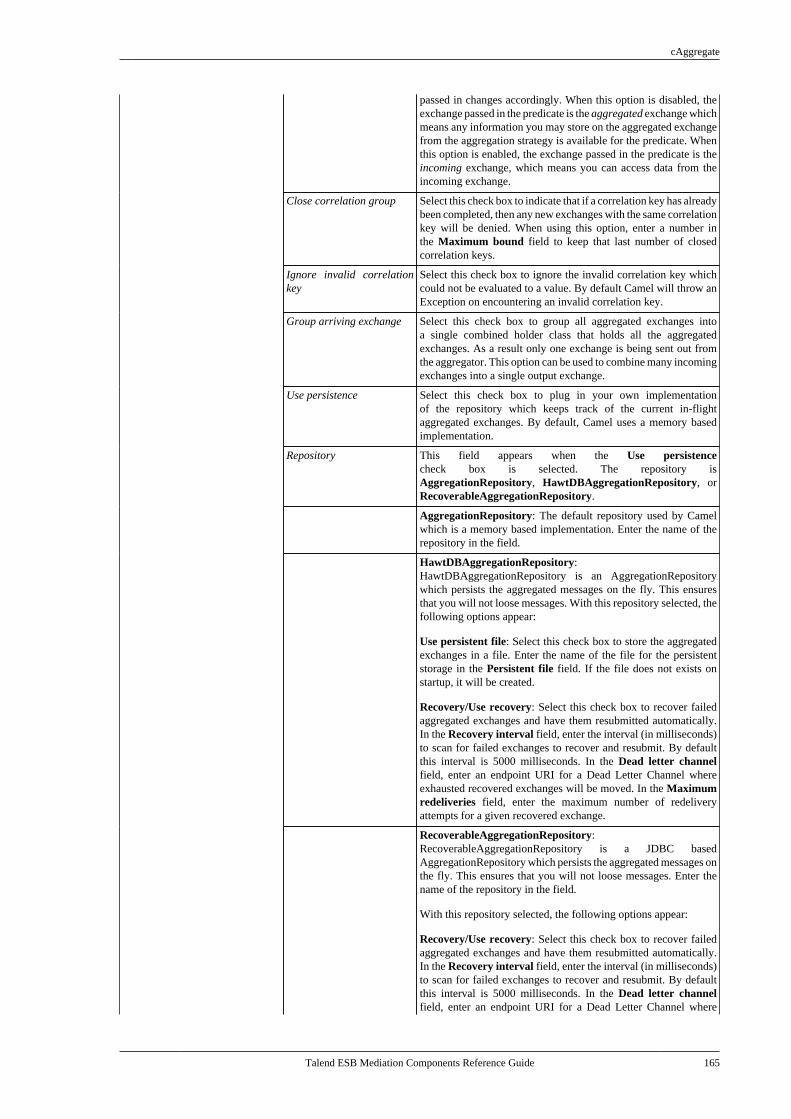
cAggregate
Talend ESB Mediation Components Reference Guide 165
passed in changes accordingly. When this option is disabled, theexchange passed in the predicate is the aggregated exchange whichmeans any information you may store on the aggregated exchangefrom the aggregation strategy is available for the predicate. Whenthis option is enabled, the exchange passed in the predicate is theincoming exchange, which means you can access data from theincoming exchange.
Close correlation group Select this check box to indicate that if a correlation key has alreadybeen completed, then any new exchanges with the same correlationkey will be denied. When using this option, enter a number inthe Maximum bound field to keep that last number of closedcorrelation keys.
Ignore invalid correlationkey
Select this check box to ignore the invalid correlation key whichcould not be evaluated to a value. By default Camel will throw anException on encountering an invalid correlation key.
Group arriving exchange Select this check box to group all aggregated exchanges intoa single combined holder class that holds all the aggregatedexchanges. As a result only one exchange is being sent out fromthe aggregator. This option can be used to combine many incomingexchanges into a single output exchange.
Use persistence Select this check box to plug in your own implementationof the repository which keeps track of the current in-flightaggregated exchanges. By default, Camel uses a memory basedimplementation.
Repository This field appears when the Use persistencecheck box is selected. The repository isAggregationRepository, HawtDBAggregationRepository, orRecoverableAggregationRepository.
AggregationRepository: The default repository used by Camelwhich is a memory based implementation. Enter the name of therepository in the field.
HawtDBAggregationRepository:HawtDBAggregationRepository is an AggregationRepositorywhich persists the aggregated messages on the fly. This ensuresthat you will not loose messages. With this repository selected, thefollowing options appear:
Use persistent file: Select this check box to store the aggregatedexchanges in a file. Enter the name of the file for the persistentstorage in the Persistent file field. If the file does not exists onstartup, it will be created.
Recovery/Use recovery: Select this check box to recover failedaggregated exchanges and have them resubmitted automatically.In the Recovery interval field, enter the interval (in milliseconds)to scan for failed exchanges to recover and resubmit. By defaultthis interval is 5000 milliseconds. In the Dead letter channelfield, enter an endpoint URI for a Dead Letter Channel whereexhausted recovered exchanges will be moved. In the Maximumredeliveries field, enter the maximum number of redeliveryattempts for a given recovered exchange.
RecoverableAggregationRepository:RecoverableAggregationRepository is a JDBC basedAggregationRepository which persists the aggregated messages onthe fly. This ensures that you will not loose messages. Enter thename of the repository in the field.
With this repository selected, the following options appear:
Recovery/Use recovery: Select this check box to recover failedaggregated exchanges and have them resubmitted automatically.In the Recovery interval field, enter the interval (in milliseconds)to scan for failed exchanges to recover and resubmit. By defaultthis interval is 5000 milliseconds. In the Dead letter channelfield, enter an endpoint URI for a Dead Letter Channel where

Scenario: Aggregating three messages into one
166 Talend ESB Mediation Components Reference Guide
exhausted recovered exchanges will be moved. In the Maximumredeliveries field, enter the maximum number of redeliveryattempts for a given recovered exchange.
Usage cAggregate is used as a middle or end component in a Route.
Aggregate Select this link to route messages to the next endpoint accordingto the selected aggregation strategy.
Connections
Route Select this link to route all the messages from the sender to the nextendpoint.
Limitation n/a
Scenario: Aggregating three messages into one
In this scenario, the cAggregate component combines three messages from the local file system into one and printsthe messages in the console. A Java bean will be used as the aggregation strategy.
Creating a Java bean as the aggregation strategy
To aggregate the messages, we will use a Java bean that will help us build an aggregation strategy.
1. From the repository tree view, expand the Code node and right click the Beans node. In the contextual menu,select Create Bean.
2. The [New Bean] wizard opens. In the Name field, type in a name for the bean, for example, AggregateBody.Click Finish to close the wizard.

Scenario: Aggregating three messages into one
Talend ESB Mediation Components Reference Guide 167
3. Type in the codes as shown in the figure below. In this use case, we just want to aggregate all messages intoa single message.
package beans;
import org.apache.camel.Exchange;import org.apache.camel.processor.aggregate.AggregationStrategy;
public class AggregateBody implements AggregationStrategy{
public Exchange aggregate(Exchange oldEx, Exchange newEx) { if(oldEx==null){ return newEx; } String oldBody = oldEx.getIn().getBody(String.class); String newBody = newEx.getIn().getBody(String.class); newEx.getIn().setBody(oldBody+newBody); return newEx; }}
4. Press Ctrl+S to save your bean.

Scenario: Aggregating three messages into one
168 Talend ESB Mediation Components Reference Guide
Dropping and linking the components
1. From the Palette, expand the Messaging folder, and drop a cFile component onto the design workspace.
2. Expand the Routing folder, and drop a cAggregate component onto the design workspace.
3. Expand the Processor folder, and drop two cProcessor components onto the design workspace.
4. Right-click the cFile component, select Row > Route from the contextual menu and click the first cProcessorcomponent.
5. Repeat this operation to connect the first cProcessor component to the cAggregate component.
6. Right-click the cAggregate component, select Row > Aggregate from the contextual menu and click thesecond cProcessor component.
7. Label all the components to better identify their functionality, as shown above.
Configuring the components
1. Double-click the cFile component, which is labelled File_source, to display its Basic settings view in theComponent tab.
2. In the Path field, browse to or enter the input file path, and leave the other parameters as they are.
In this scenario, there are four text files in the specified directory: a.txt, b.txt, c.txt and d.txt, the contents ofwhich are This is a! , This is b! , This is c! , and This is d! respectively.
3. Double-click the cAggregate component, which is labelled Aggregator, to display its Basic settings viewin the Component tab.

Scenario: Aggregating three messages into one
Talend ESB Mediation Components Reference Guide 169
4. In the Language field, select Constant or Simple as the expression language.
In the Expression field, enter the expression "getBody(String.class)" to retrieve the body of themessage.
In the Strategy field, enter the name of the Java bean AggregateBody you just created.
Select the Number of messages check box and type in 2 in the field.
5. Double-click the cProcessor component labelled Monitor_before to display its Basic settings view in theComponent tab.
6. In the Code box, customize the code as follows so that the Run console displays the message contents beforean aggregation takes place:
System.out.println("Before aggregation: "+exchange.getIn().getBody(String.class));
7. In the same way, configure the cProcessor component labelled Monitor_after so that the Run console displaysthe message contents after an aggregation takes place:
System.out.println("After aggregation: "+exchange.getIn().getBody(String.class));
8. Press Ctrl+S to save your route.
Viewing code and executing the Route
1. Click the Code tab at the bottom of the design workspace to have a look at the generated code.

Scenario: Aggregating three messages into one
170 Talend ESB Mediation Components Reference Guide
As shown in the code, a message from the File_source endpoint is routed via cProcessor_1 and thenaggregated according to the condition .aggregate.
2. Click the Run view to display it and click the Run button to launch the execution of your route. You canalso press F6 to execute it.
RESULT: The four messages are aggregated in two batches, two messages combined into one each batch.

cDynamicRouter
Talend ESB Mediation Components Reference Guide 171
cDynamicRouter
cDynamicRouter properties
Component Family Routing
Function cDynamicRouter allows you to route messages while avoiding the dependency of the router onall possible destinations.
Purpose cDynamicRouter is used to route a message or messages to different endpoints on specifiedconditions.
Basic settings Bean class Enter the name of the bean class to be used for the dynamic router.
Specify the method Select this check box to specify the method to be used which isdefined in the bean class.
Ignore Invalid Endpoints Select this check box to ignore unresolved endpoint URIs. Clearthe check box to throw an exception when endpoint URIs are notvalid.
Usage cDynamicRouter is used as a middle or end component in a Route.
Limitation n/a
Scenario: Routing files conditionally to different filepaths
In this scenario, three file messages containing people information are routed to different endpoints according tothe city names they contain.
The following is an extract of the example XML files used in this use case:
Message_1.xml:
<person> <firstName>Ellen</firstName> <lastName>Ripley</lastName> <city>Washington</city></person>
Message_2.xml:
<person> <firstName>Peter</firstName> <lastName>Green</lastName> <city>London</city></person>
Message_3.xml:
<person> <firstName>Alice</firstName> <lastName>Yang</lastName> <city>Beijing</city>

Scenario: Routing files conditionally to different file paths
172 Talend ESB Mediation Components Reference Guide
</person>
A predefined Java bean, setDynaURI, is called in this use case to return endpoint URIs according to the city namecontained in each message, so that the message containing the city name Washington will be routed to endpointWashington and so forth.
For more information about creating and using Java Beans, see Talend Studio User Guide.
package beans;
import org.apache.camel.Exchange;import org.apache.camel.Header;import org.w3c.dom.Document;import org.w3c.dom.Element;import org.w3c.dom.NodeList;
public class setDynaURI {
public String setURI(Document document, @Header(Exchange.SLIP_ENDPOINT) String previous) { if(previous!=null){ return null; } NodeList cities = document.getDocumentElement().getElementsByTagName( "city"); Element city = (Element) cities.item(0); String textContent = city.getTextContent(); return "direct:"+textContent; } }
Dropping and linking the components
1. From the Palette, expand the Messaging folder, and drop one cFile and three cMessagingEndpointcomponents onto the design workspace.
2. Expand the Routing folder, and drop a cDynamicRouter component onto the design workspace.
3. Expand the Processor folder, and drop three cProcessor components onto the design workspace.
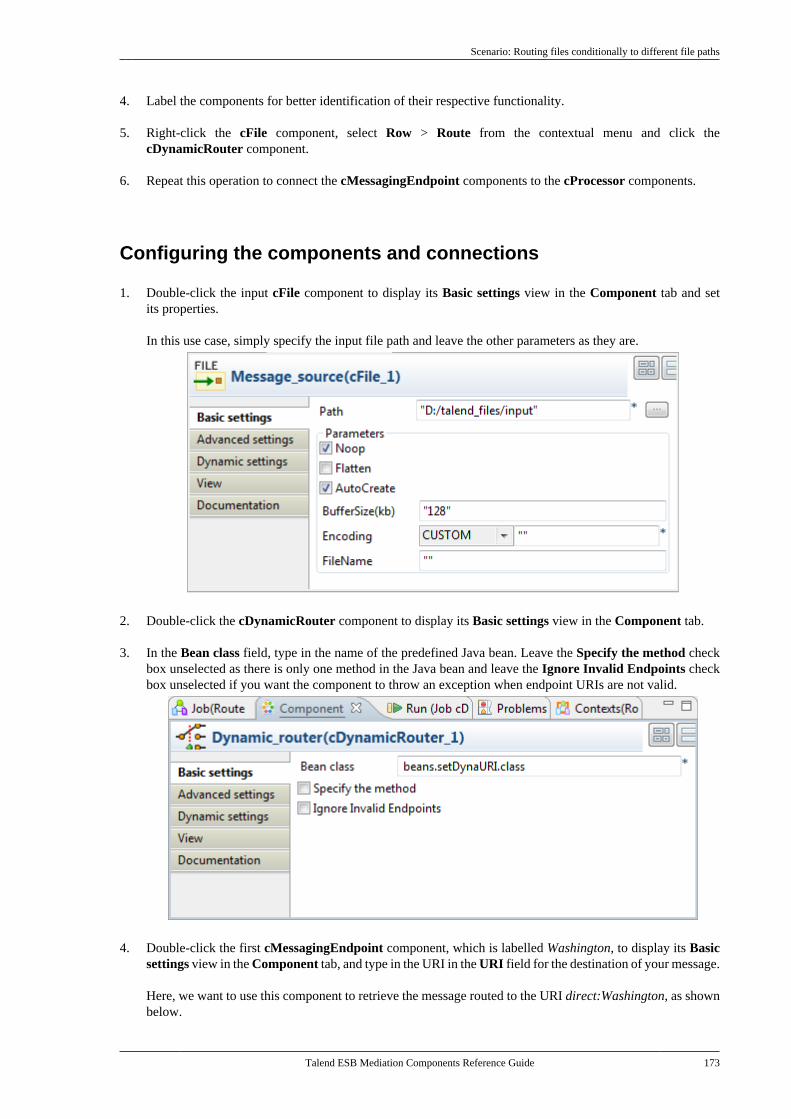
Scenario: Routing files conditionally to different file paths
Talend ESB Mediation Components Reference Guide 173
4. Label the components for better identification of their respective functionality.
5. Right-click the cFile component, select Row > Route from the contextual menu and click thecDynamicRouter component.
6. Repeat this operation to connect the cMessagingEndpoint components to the cProcessor components.
Configuring the components and connections
1. Double-click the input cFile component to display its Basic settings view in the Component tab and setits properties.
In this use case, simply specify the input file path and leave the other parameters as they are.
2. Double-click the cDynamicRouter component to display its Basic settings view in the Component tab.
3. In the Bean class field, type in the name of the predefined Java bean. Leave the Specify the method checkbox unselected as there is only one method in the Java bean and leave the Ignore Invalid Endpoints checkbox unselected if you want the component to throw an exception when endpoint URIs are not valid.
4. Double-click the first cMessagingEndpoint component, which is labelled Washington, to display its Basicsettings view in the Component tab, and type in the URI in the URI field for the destination of your message.
Here, we want to use this component to retrieve the message routed to the URI direct:Washington, as shownbelow.

Scenario: Routing files conditionally to different file paths
174 Talend ESB Mediation Components Reference Guide
5. Repeat this step to set the endpoint URIs for the other two cMessagingEndpoint components: direct:Londonand direct:Beijing respectively.
6. Double-click the first cProcessor component, which is labelled Monitor_Washington, to display its Basicsettings view in the Component tab.
7. In the Code box, customize the code to display the file name of the message routed to the endpoint Washingtonon the console.
System.out.println("Message on endpoint Washington: "+exchange.getIn().getHeader("CamelFileName"));
8. Repeat these steps to configure the other two cProcessor components to display the file names of the messagesrouted to the endpoints London and Beijing respectively.
9. Press Ctrl+S to save your Route.
Viewing code and executing the Route
1. Click the Code tab at the bottom of the design workspace to have a look at the generated code.
As shown in the code, the incoming message from the endpoint Message_source is routedby .dynamicRouter to endpoints the URIs of which are dynamically set according tobeans.setDynaURI.class.
2. Click the Run view to display it and click the Run button to launch the execution of your Route.

Scenario: Routing files conditionally to different file paths
Talend ESB Mediation Components Reference Guide 175
You can also press F6 to execute it.
RESULT: The source messages are routed to different endpoints based on the city names contained in themessages.

cIdempotentConsumer
176 Talend ESB Mediation Components Reference Guide
cIdempotentConsumer
cIdempotentConsumer properties
Component Family Routing
Function cIdempotentConsumer deduplicates messages and thereby prevents the receiving messageendpoint from receiving duplicate messages.
Purpose cIdempotentConsumer identifies messages that have already been sent to the receiver andeliminates them. Messages are still sent by the sender but are ignored by the receiver at thedelivery stage.
Basic settings Repository Type Message identifiers need to be stored in a repository. For newincoming messages, identifiers are checked against the ones storedin the repository to identify and drop duplicates. There are twoways to store them:
Memory: messages identifiers are stored temporarily.
The in-memory storage mode can easily run out ofmemory and does not work in a clustered environment.
File: messages identifiers are stored in a file. Specify the path tothis file in the File store field.
File store Specify the path and name of the file storing messages identifiers.
Cache Size Type in the size of the cache, namely the number of messageidentifiers to store.
Use language Select this check box if you want to specify the language used inthe Predicate field to specify the identifier of the messages.
Expression Type in the expression to use to specify the identifier of themessages.
Eager Select this check box to detect duplicate messages even whenmessages are currently in progress; clear it to detect duplicates onlywhen messages have successfully been processed.
By default, this check box is selected.
SkipDuplicate Select this check box to drop duplicates; clear it to ignoreduplicates so that all messages will be continued.
By default, this check box is selected.
Usage cIdempotentConsumer is used as a middle component in a Route.
Connections idemp The idemp link retrieves messages deduplicated by thecIdempotentConsumer component.
Route As an optional link, the Route link retrieves all messages from themessage sender.
Limitation n/a
Scenario: Deduplicating messages while routing them
In this scenario, duplicated messages are filtered and only the unique one is routed to the destination.
Three XML files that have the same content, as shown below, are used in this use case.

Scenario: Deduplicating messages while routing them
Talend ESB Mediation Components Reference Guide 177
<people> <person id="8"> <firstName>Ellen</firstName> <lastName>Ripley</lastName> <city>Washington</city> </person></people>
Dropping and linking the components
This use case requires one cFile component, one cIdempotentComsumer component, and two cProcessorcomponents.
1. From the Palette, expand the Messaging folder, select the cFile component, and drop it onto the designworkspace as the message source component.
2. Expand the Routing folder, select the cIdempotentComsumer component and drop it onto the designworkspace as the message deduplicator.
3. Expand the Processor folder, drop two cProcessor components onto the design workspace, one as theconsumer for deduplicated messages and another for all messages.
4. Right-click the cFile component, select Row > Route from the contextual menu and click thecIdempotentComsumer component.
5. Right-click the cIdempotentComsumer component, select Row > idemp from the contextual menu andclick the cProcessor component on the top.
6. Connect the cIdempotentComsumer component to the other cProcessor component using a Row > Routeconnection. This optional connection will retrieve all the messages coming from the source.
7. Label the components to better identify their roles in the Route.
Configuring the components and connections
1. Double-click the cFile component, which is labelled Source, to display its Basic settings view in theComponent tab.

Scenario: Deduplicating messages while routing them
178 Talend ESB Mediation Components Reference Guide
2. In the Path field, specify the file path to the message source.
From the Encoding list, select the encoding type of your source files, and leave all the other parameters asthey are.
3. Double-click the cIdempotentComsumer component, which is labelled Deduplicator, to display its Basicsettings view in the Component tab.
4. From the Repository Type list, select between Memory and File to specify where the message identifierswill be stored before the deduplication process. For this scenario, select File.
In the File store field, specify the location of the file storing message identifiers.
In the Expression field, enter an expression to filter the messages. In this scenario, enter the followingexpression to filter the messages according to the person node of the XML files: xpath("/people/person"), and leave all the other parameters as they are. Alternatively, you can select the Use languagecheck box, select XPath from the Language list, and enter "/people/person" in the Predicate field.
5. Double-click the cProcessor component labelled Unique to display its Basic settings view in the Componenttab.

Scenario: Deduplicating messages while routing them
Talend ESB Mediation Components Reference Guide 179
6. In the Code area, customize the code to display the file name of the message that passes the deduplication:
System.out.println("Message consumed on Unique: "+exchange.getIn().getHeader("CamelFileName"));
7. Repeat these steps to configure the other cProcessor component, which is labelled All, to display the filenames of all the messages coming from the source:
System.out.println("Message consumed on All: "+exchange.getIn().getHeader("CamelFileName"));
8. Press Ctrl+S to save your Route.
Viewing code and executing the Route
1. Click the Code tab at the bottom of the design workspace to view the generated code.
In this partially shown piece of code, messages from the Source are filtered according to the expressionxpath("/people/person") and deduplicated by cIdempotentConsumer_1.
2. Click the Run view to display it and click the Run button to launch the execution of your Route. You canalso press F6 to execute it.
RESULT: When several files have the same content, only the first one is routed to the receiving endpoint.

Scenario: Deduplicating messages while routing them
180 Talend ESB Mediation Components Reference Guide

cLoadBalancer
Talend ESB Mediation Components Reference Guide 181
cLoadBalancer
cLoadBalancer properties
Component Family Routing
Function cLoadBalancer distributes the messages it received to multiple endpoints according to the loadbalancing policy.
Purpose cLoadBalancer allows you to distribute messages among several endpoints using a variety of loadbalancing strategies.
Basic settings Strategy Select between Random, Round Robin, Sticky, Topic, Failover, andCustom. Each method is described below.
Random The receiving endpoint is chosen randomly at each exchange.
Round Robin Messages are distributed according to the round robin method which distributes the load evenly.
Sticky Language Select the language of the expression to use in the Expression field todistribute the messages.
Expression Type in the expression that will be used to calculate a correlation key thatwill determine the endpoint to choose.
Topic Select this option to send all the messages to all the endpoints.
Failover Basic mode By default, the failover load balancing always sends the messages to thefirst endpoint. If the first endpoint fails, the messages are sent to subsequentendpoints.
Specify exceptions Specify the exceptions to which the failover should react to in the Exceptiontable.
Use with Round robin Select this option to use failover with advanced options.
From the Maximum failover attempt list, select the number of attempt tobe proceed before giving up the transfer:
-Attempt forever: always attempts to transfer the messages and always tryto failover.
-Never failover: gives up immediately the transfer of messages and nevertry to failover.
-A number of attempts: attempts n number of time to transfer messages,specify that number in the Number of attempts field.
Inherit error handler: Select true if you want Camel error handler to beused. If you select false, the load balancer will immediately failover whenan exception is thrown.
Use Round robin: Select true if you want to combine failover with roundrobin. Failover load balancing with round robin mode distributes the loadevenly between the services, and it provides automatic failover.
Custom Load balancer Type in the name of your custom load balancer.
Usage cLoadBalancer is used as a middle component in a Route.
Connections Load Balance Select this link to route messages to the next endpoint according to theselected load-balancing strategy.
Route Select this link to route all the messages from the sender to the next endpoint.
Limitation n/a
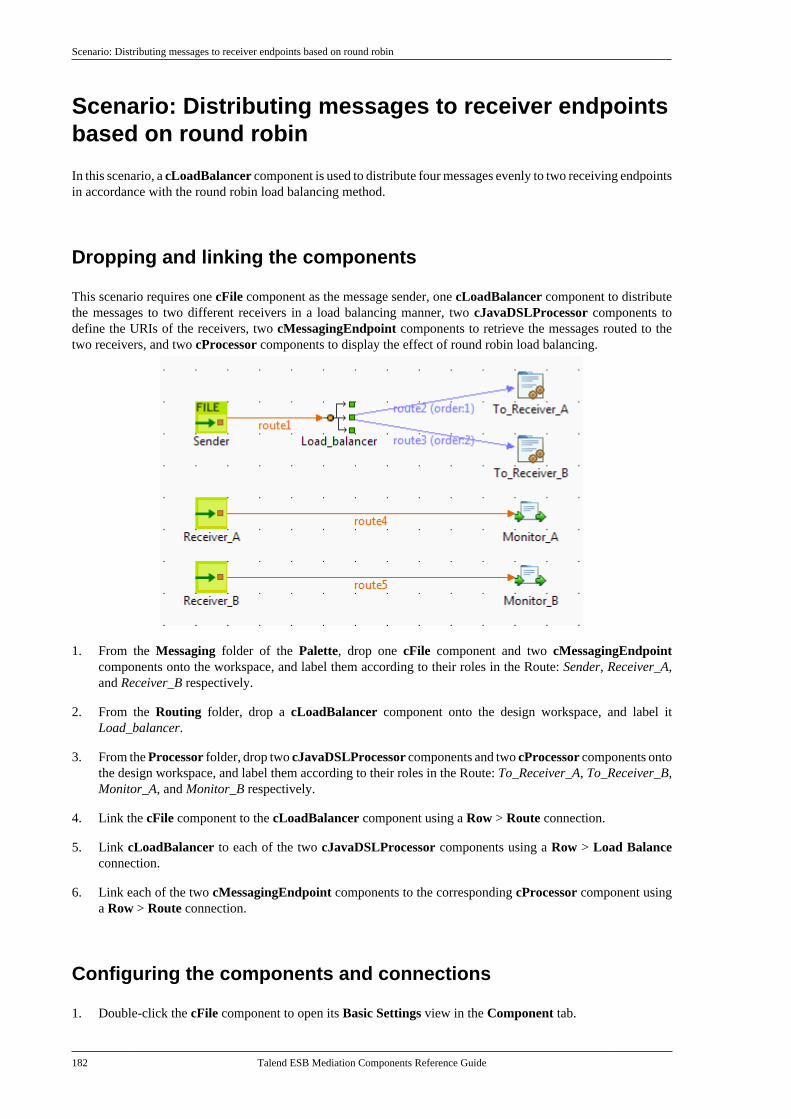
Scenario: Distributing messages to receiver endpoints based on round robin
182 Talend ESB Mediation Components Reference Guide
Scenario: Distributing messages to receiver endpointsbased on round robin
In this scenario, a cLoadBalancer component is used to distribute four messages evenly to two receiving endpointsin accordance with the round robin load balancing method.
Dropping and linking the components
This scenario requires one cFile component as the message sender, one cLoadBalancer component to distributethe messages to two different receivers in a load balancing manner, two cJavaDSLProcessor components todefine the URIs of the receivers, two cMessagingEndpoint components to retrieve the messages routed to thetwo receivers, and two cProcessor components to display the effect of round robin load balancing.
1. From the Messaging folder of the Palette, drop one cFile component and two cMessagingEndpointcomponents onto the workspace, and label them according to their roles in the Route: Sender, Receiver_A,and Receiver_B respectively.
2. From the Routing folder, drop a cLoadBalancer component onto the design workspace, and label itLoad_balancer.
3. From the Processor folder, drop two cJavaDSLProcessor components and two cProcessor components ontothe design workspace, and label them according to their roles in the Route: To_Receiver_A, To_Receiver_B,Monitor_A, and Monitor_B respectively.
4. Link the cFile component to the cLoadBalancer component using a Row > Route connection.
5. Link cLoadBalancer to each of the two cJavaDSLProcessor components using a Row > Load Balanceconnection.
6. Link each of the two cMessagingEndpoint components to the corresponding cProcessor component usinga Row > Route connection.
Configuring the components and connections
1. Double-click the cFile component to open its Basic Settings view in the Component tab.

Scenario: Distributing messages to receiver endpoints based on round robin
Talend ESB Mediation Components Reference Guide 183
2. In the Path field, specify the file path to message source.
3. From the Encoding list, select the encoding type of your message files. Leave the other parameters as they are.
4. Double-click the cLoadBalancer component to open its Basic Settings view in the Component tab, andselect the load balancing method you want to use from the Strategy list. In this scenario, we use the defaultRound robin method.
5. Double-click the cJavaDSLProcessor component labeled To_Receiver_A to open its Basic Settings viewin the Component tab, and enter URI of the first receiver between the double quotation marks in the Codearea, direct:a in this example.
Repeat this step to define the URI of the other receiver, direct:b, in the cJavaDSLProcessor componentlabeled To_Receiver_B.
6. Double-click the cMessagingEndpoint component labeled Receiver_A to open its Basic Settings view inthe Component tab, and enter URI of the first receiver between the double quotation marks in the URI field,direct:a in this example.

Scenario: Distributing messages to receiver endpoints based on round robin
184 Talend ESB Mediation Components Reference Guide
Repeat this step to define the URI of the other receiver, direct:b, in the cMessagingEndpoint componentlabeled Receiver_B.
7. Double-click the cProcessor component labeled Monitor_A to open its Basic Settings view in theComponent tab, and customize the code in the Code area to display the file names of the messages routedto Receiver_A on the console:
System.out.println("Message on Receiver_A: "+exchange.getIn().getHeader("CamelFileName"));
Repeat this step to customize the code in the cProcessor component labeled Monitor_B to display the filenames of the messages routed to Receiver_B on the console.
8. Press Ctrl+S to save your Route.
Viewing the code and executing the Route
1. Click the Code tab at the bottom of the design workspace to check the generated code:
As shown above, while messages are routed from the source endpoint .to the destination endpoints, routingload balancing is implemented according to the .roundRobin() method by cLoadBalancer_1.
2. Press F6 to run your Route.
RESULT: Of the four messages from the sender, two are routed to Receiver_A and two are routed toReceiver_B in a round robin manner.

Scenario: Distributing messages to receiver endpoints based on round robin
Talend ESB Mediation Components Reference Guide 185

cMessageFilter
186 Talend ESB Mediation Components Reference Guide
cMessageFilter
cMessageFilter properties
Component Family Routing
Function cMessageFilter filters the content of messages according to the specified criterion and routes the filteredmessages to the specified output channel. All messages that do not match the criteria will be dropped.
For more information on the Camel Message Filter EIP: http://camel.apache.org/message-filter.html.
Purpose Use cMessageFilter to eliminate unwanted messages from a channel according to the defined criterion.
Basic settings Language Select the language of the expression you use to filter your messages from Constant,EL, Groovy, Header, JavaScript, JoSQL, JXPath, MVEL, None, OGNL, PHP,Property, Python, Ruby, Simple, SpEL, SQL, XPath, and XQuery.
Expression Type in the expression to use to filter the messages.
Add Namespaces This option appears when XPath is selected in the Language list.
Select this check box to add namespaces for the Xpath expression. Click [+] to addas many namespaces as required to the table and define the prefix and URI in thecorresponding columns.
Usage cMessageFilter is used as a middle component in a Route.
Connections Filter Select this link to route the filtered messages to the next endpoint.
Route Select this link to route all the messages from the sender to the next endpoint.
Limitation n/a
Scenario: Filtering messages according to a criterion
In this use case, we filter XML messages that are sent from the sending endpoint according to a defined criterion:only the XML files in which the value of the city node is Paris are sent to a folder named Paris_only.
Of the four XML files used in this scenario, Message_1.xml and Message_4.xml contain the city name of Paris.The following is an example:
<person> <firstName>Pierre</firstName> <lastName>Dupont</lastName> <city>Paris</city></person>
Dropping and linking the components
This scenario requires one cMessageFilter component to filter the messages from the sender, one cFile componentas the message sender, one cFile component to receiver the messages containing Paris, one cFile component toreceiver all the messages from the sender, and two cProcessor components to monitor the messages routed tothe two receivers.

Scenario: Filtering messages according to a criterion
Talend ESB Mediation Components Reference Guide 187
1. From the Messaging folder of the Palette, drop three cFile components onto the design workspace, and labelthem Sender, Paris_only, and Unfiltered respectively to better identify their roles.
2. From the Routing folder, drop a cMessageFilter component onto the design workspace, and label it Filter.
3. From the Processor folder, drop two cProcessor components onto the design workspace, and label themMonitor_Paris and Monitor_Unfiltered respectively.
4. Right-click the cFile component labeled Sender, select Row > Route from the contextual menu and clickthe cMessageFilter component.
5. Right-click the cMessageFilter component, select Row > Filter from the contextual menu and click the cFilecomponent labeled Paris_only. This endpoint will retrieve the messages that meet the defined criterion.
6. Right-click the cMessageFilter component, select Row > Route from the contextual menu and click thecFile component labeled Unfiltered. This endpoint will collect all the messages, including those meeting thefilter criterion. This connection is optional.
7. Right-click the cFile component labeled Paris_only, select Row > Route from the contextual menu and clickthe cProcessor component labeled Monitor_Paris. Repeat this step to connect the cFile component labeledUnfiltered to the cProcessor component labeled Monitor_Unfiltered.
Configuring the components and connections
1. Double-click the cFile component labeled Sender to open its Basic settings view in the Component tab.
2. In the Path field, specify the file path to message source.

Scenario: Filtering messages according to a criterion
188 Talend ESB Mediation Components Reference Guide
3. From the Encoding list, select the encoding type of your message files. Leave the other parameters as they are.
4. Double-click the cMessageFilter component to open its Basic settings view in the Component tab.
5. Select the language of the expression you want to use to filter your messages, and enter an expression todefine a criterion according to which you want to filter your messages.
In this scenario, we want to sort out the XML files containing a city node with the value of Paris, sowe select XPath from the Language list, and fill the in the Expression field with this expression: "/person[city='Paris']".
6. Double-click the cFile component labeled Paris_only to open its Basic settings view in the Componentview, and specify the path for the messages meeting the filter criterion in the Path field.
Repeat this step to define the path for all the messages from the sender in the cFile component labeledUnfiltered.
7. Double-click the cProcessor component labeled Monitor_Paris to open its Basic settings view in theComponent view, and customize the code in the Code area to display the file names of the messages thatmeet the filter criterion on the console:
System.out.println("Message sent to folder Paris_only: "+exchange.getIn().getHeader("CamelFileName"));
Repeat this step to customize the code in the cProcessor component labeled Monitor_Unfiltered to displaythe file names of all the messages from the sender.
8. Press Ctrl+S to save your Route.
Viewing the code and executing the Route
1. To have a look at the generated code, click the Code tab at the bottom of the design workspace.

Scenario: Filtering messages according to a criterion
Talend ESB Mediation Components Reference Guide 189
As shown in this piece of code, messages from the sender are filtered by cMessageFilter_1 accordingto .xpath("/person[city='Paris']") and the messages matching the filter are send .to the endpointParis_only, while all messages are sent .to the endpoint Unfiltered.
2. Click the Run view to display it and click the Run button to launch the execution of your Route.
You can also press F6 to execute it.
RESULT: The messages are filtered according to the defined criterion and the messages containing "Paris"are redirected to the Paris_only folder, all the messages, including those containing "Paris", are sent to theUnfiltered folder.

cMessageRouter
190 Talend ESB Mediation Components Reference Guide
cMessageRouter
cMessageRouter properties
Component Family Routing
Function cMessageRouter routes messages in different channels according to specified conditions.
Purpose cMessageRouter creates different channels for each filtered message types so that messagescan later on be treated more accurately in each new channel.
Usage cMessageRouter is used as a middle component in a Route. It can only have one input channelbut multiple output channels. Messages can be outputted through either a When, Otherwise orRoute types of connection.
Connections Row / Route Select this link to pass on all the messages to the next component.
Trigger / When Select the When link and click the Component view.
In the Type list, select the type of language you will use to declareyour condition.
Append endChoice(): If the When link is followed by acMessageFilter or cLoadBalancer and so on, there will be a compileerror. This is because once there is such a component there, the flowtype will change from choice() to loadbalance(), which can notbe followed by a When or Otherwise link. Select this check box tochange the flow type back from loadbalance() to choice().
In the Condition field, type in the condition that will be used to filterthe messages.
All the messages that do not match this condition are retrieved withthe Otherwise link to a different channel or dropped if an Otherwiselink does not present.
There can be more than one When link in a Route.
Trigger / Otherwise This link automatically retrieves the messages that do not match theWhen conditions.
There can be only one Otherwise link, which is optional,in a Route.
Limitation It is recommended not to put any message handling after the When or the Otherwise link.Always use a Mock/Direct endpoint to replace them and make a new Route to handle themessages.
Scenario: Routing messages according to a criterion
In this use case, we route XML messages that are sent from the sending endpoint according to a defined criterion:those XML files in which the value of the city node is Paris are sent to a folder named Paris_only, and othermessages are sent to a folder named Other_cities.

Scenario: Routing messages according to a criterion
Talend ESB Mediation Components Reference Guide 191
Of the four XML files used in this scenario, Message_1.xml and Message_4.xml contain the city name of Paris.The following is an example:
<person> <firstName>Pierre</firstName> <lastName>Dupont</lastName> <city>Paris</city></person>
Dropping and linking the components
1. From the Messaging folder of the Palette, drop three cFile and four cMessagingEndpoint componentsonto the design workspace, and label them Sender, Receiver_Paris, and Receiver_Others, directParis,directOthers, directParisRoute, and directOthersRoute respectively to better identify their roles.
2. From the Routing folder, drop a cMessageRouter component onto the design workspace, and label itMessage_router.
3. From the Miscellaneous folder, drop two cLog components onto the design workspace, and label themMonitor_Paris and Monitor_Others respectively.
4. Right-click the cFile component labeled Sender, select Row > Route from the contextual menu and clickthe cMessageRouter component.
5. Right-click the cMessageRouter component, select Trigger > When from the contextual menu and clickthe cMessagingEndpoint component labeled directParis. This endpoint will retrieve the messages that meetthe defined criterion.
6. Right-click the cMessageRouter component, select Trigger > Otherwise from the contextual menu andclick the cMessagingEndpoint component labeled directOthers. This endpoint will collect all the messagesthat do not meet the filter criterion.
7. Right-click the cMessagingEndpoint component labeled directParis, select Row > Route from thecontextual menu and click the cFile component labeled Receiver_Paris. Repeat this operation to linkthe component labeled Receiver_Paris to Monitor_Paris, directOthersRoute to Receiver_Others, andReceiver_Others to Monitor_Others respectively using the Row > Route connection.

Scenario: Routing messages according to a criterion
192 Talend ESB Mediation Components Reference Guide
Configuring the components and connections
The cMessageRouter component does not have any property as it filters and routes the messages from oneendpoint to others based on the conditions set in its When connection(s).
1. Double-click the cFile component labeled Sender to open its Basic settings view in the Component tab.
2. In the Path field, specify the file path to message source.
From the Encoding list, select the encoding type of your message files. Leave the other parameters as they are.
3. In the design workspace, click the When connection you created and click the Component view to definea filter against which messages will be routed.
4. In the Type list, select xpath because the format of the messages used is XML.
In the Condition field, type in "/person[city='Paris']" to retrieve only those messages in which thevalue of the city node is Paris.
5. Double-click the cMessagingEndpoint component labeled directParis to open its Basic settings view in theComponent tab.
6. In the URI field, enter the endpoint URI, for example, "direct:Paris" to receive the filtered message.

Scenario: Routing messages according to a criterion
Talend ESB Mediation Components Reference Guide 193
7. Repeat these steps to set the endpoint URI of the cMessagingEndpoint components labeled directOthers as"direct:Others". Set the endpoint URIs of the cMessagingEndpoint components labeled directParisRouteand directOthersRoute as "direct:Paris" and "direct:Others" respectively.
8. Double-click the cFile component labeled Receiver_Paris to open its Basic settings view in the Componenttab, and specify the path for the messages meeting the filter criterion in the Path field.
Repeat this step to define the path for all the other messages from the sender in the cFile component labeledReceiver_Others.
9. Double-click the cLog component labeled Monitor_Paris to open its Basic settings view in the Componenttab.
10. Select INFO in the Level list. Select the Specify output log message option and enter the following code inthe Message field to display the filename of the message sent to the specified directory.
Message sent to folder Paris_only: ${header.CamelFileNameOnly}
Repeat this step to customize the message in the cLog component labeled Monitor_Others to display thefilename of the message sent to the specified directory.
11. Press Ctrl+S to save your Route.
Viewing code and executing the Route
1. Click the Code tab at the bottom of the design workspace to have a look at the generated code.

Scenario: Routing messages according to a criterion
194 Talend ESB Mediation Components Reference Guide
As shown in the code, the messages are routed according to conditions initialized with the .choice() pieceof code. The filter you defined is initialized with the .when() piece of code, and the non filtered messagesare routed through the .otherwise() piece of code.
2. Click the Run button in the Run view or press F6 to execute your Route.
RESULT: The files containing "Paris" are sent to a folder named Paris_only, and the other messages aresent in a folder called Other_cities.

cMulticast
Talend ESB Mediation Components Reference Guide 195
cMulticast
cMulticast properties
Component Family Routing
Function cMulticast routes one or more messages to a number of endpoints at one go.
Purpose cMulticast is used to route one or more messages to a number of endpoints at one go and processthem in different ways.
Basic settings URIS Add as many lines as needed in the URIs table to define the endpointsto route the message(s) to.
Use ParallelProcessing Select this check box to multicast the message(s) to the specifiedendpoints simultaneously.
set timeout Select this check box and set a timeout in the Timeout field, inmilliseconds. If cMulticast fails to send and process all the messageswithin the set timeframe, it breaks out and continues.
Note that this check box appears only when the UseParallelProcessing check box is selected.
Use AggregationStrategy
Select this check box to refer to a predefined Java bean as anaggregation strategy for assembling the messages from the messagesource into a single outgoing message.
By default, the last message acts as the outgoing message.
Stop On Exception Select this check box to stop the processing immediately when anexception occurred.
Connections Route Select this link to route the message(s) from the sender to the nextendpoint.
EndBlock Select this link to route the message(s) from the end block of the Routeto the next endpoint.
Usage cMulticast can be used as a middle or end component in a Route.
Limitation n/a
Scenario: Route a message to multiple endpoints andset a new body for each
In this scenario, a cMulticast component is used to route a message to two endpoints. The source message and themessage on each endpoint is then set a new body. The cProcessor component is used to monitor the messages.

Scenario: Route a message to multiple endpoints and set a new body for each
196 Talend ESB Mediation Components Reference Guide
Dropping and linking the components
1. From the Palette, expand the Messaging folder. Drag and drop a cFile and two cMessagingEndpointcomponents onto the design workspace.
2. From the Routing folder, drag and drop a cMulticast component onto the design workspace.
3. From the Process folder, drag and drop four cProcessor components onto the design workspace.
4. From the Transformation folder, drag and drop three cSetBody components onto the design workspace.
5. Label the components as shown above to better identify their roles in the Route.
6. Right-click the cMulticast component, select Row > EndBlock in the context menu and click the cProcessorcomponent labeled Monitor_endblock.
7. Right-click the cFile component, select Row > Route in the context menu and click the cMulticastcomponent. Repeat this step to link the rest components in the Route as shown above using the Row > Routeconnection.
Configuring the components
1. Double-click the cFile component labeled Source_file to open its Basic settings view in the Component tab.
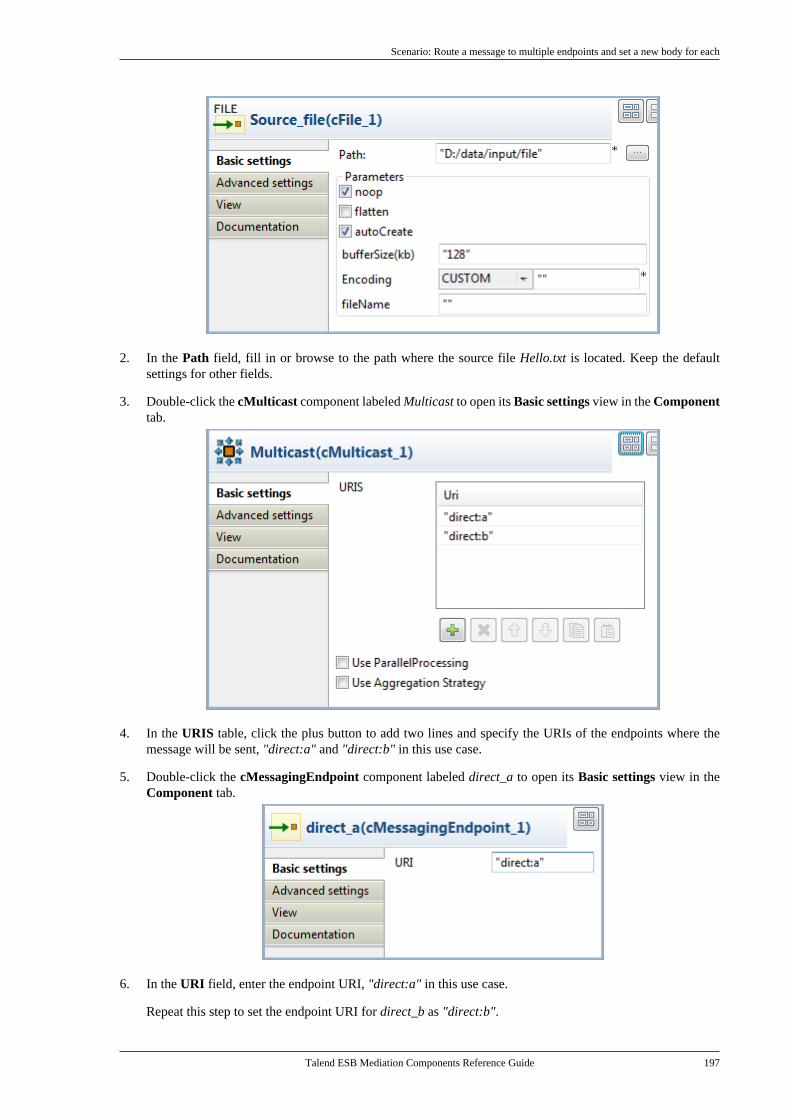
Scenario: Route a message to multiple endpoints and set a new body for each
Talend ESB Mediation Components Reference Guide 197
2. In the Path field, fill in or browse to the path where the source file Hello.txt is located. Keep the defaultsettings for other fields.
3. Double-click the cMulticast component labeled Multicast to open its Basic settings view in the Componenttab.
4. In the URIS table, click the plus button to add two lines and specify the URIs of the endpoints where themessage will be sent, "direct:a" and "direct:b" in this use case.
5. Double-click the cMessagingEndpoint component labeled direct_a to open its Basic settings view in theComponent tab.
6. In the URI field, enter the endpoint URI, "direct:a" in this use case.
Repeat this step to set the endpoint URI for direct_b as "direct:b".

Scenario: Route a message to multiple endpoints and set a new body for each
198 Talend ESB Mediation Components Reference Guide
7. Double-click the cProcessor component labeled Monitor_source to open its Basic settings view in theComponent tab.
8. In the Code box, enter the code below to print the source message in the console.
System.out.println("The source message is: " + exchange.getIn().getBody(String.class));
Repeat this step to customize the code of Monitor_endblock, Monitor_direct_a, and Monitor_direct_b asshown below to print the message of each endpoint.
Monitor_endblock:
System.out.println("The endblock message is: " + exchange.getIn().getBody(String.class));
Monitor_direct_a:
System.out.println("direct a just downloaded: "+exchange.getIn().getBody(String.class));
Monitor_direct_b:
System.out.println("direct b just downloaded: "+exchange.getIn().getBody(String.class));
9. Double-click the cSetBody component labeled Set_new_body to open its Basic settings view in theComponent tab.
10. Select SIMPLE in the Language list.
In the Expression field, enter "New message" as the new message body.
Repeat this step to set the message body for direct:a and direct:b as "message A" and "message B"respectively.
11. Press Ctrl+S to save your Route.

Scenario: Route a message to multiple endpoints and set a new body for each
Talend ESB Mediation Components Reference Guide 199
Viewing code and executing the Route
1. Click the Code tab at the bottom of the design workspace to check the generated code.
In the partially shown code, the source message is routed from "Source_file_cFile_1" .to direct:a anddirect:b via "cMulticast_1". The message is then processed by "cProcessor_1" and given the messagebody "New message" by "cSetBody_3". The .end block of the route is processed by "cProcessor_2".The message from "direct_a_cMessagingEndpoint_1" is set the message body "message A" by"cSetBody_1" and processed by "cProcessor_3". The message from direct:b is processed similarly.
2. Click the Run view to display it and click the Run button to launch the execution of your Route. You canalso press F6 to execute it.

Scenario: Route a message to multiple endpoints and set a new body for each
200 Talend ESB Mediation Components Reference Guide
RESULT: The source file message is Hello world!. The message routed to direct:a and direct:b is set themessage body message A and message B respectively. The end block message of this Route is New messagethat is set by the component labeled Set_new_body.

cPipesAndFilters
Talend ESB Mediation Components Reference Guide 201
cPipesAndFilters
cPipesAndFilters properties
Component Family Routing
Function The cPipesAndFilters component divides message processing into a sequence of independent endpointinstances, which can then be chained together.
Purpose This component allows you to split message routing into a series of independent processing stages.
Basic settings URI list Click the plus button to add new lines for URIs that identify endpoints.
Usage cPipesAndFilters is usually used in the middle of a Route.
Limitation n/a
Scenario: Using cPipesAndFilters to process the taskin sequence
In this scenario, a cPipesAndFilters component is used so that messages sent from the sender endpoint undergostage A and stage B. Upon completion of both stages, the messages are routed to a file system, which is the receiverendpoint for the messages.
Dropping and linking the components
1. From the Messaging folder of the Palette, drop two cFile components onto the design workspace, one asthe message sender and the other as the message receiver, and label them Sender and Receiver respectivelyto better identify their roles in the Route.
2. From the Routing folder, drop one cPipesAndFilters component onto the design workspace, between thetwo cFile components.
3. From the Messaging folder, drop two cMessagingEndpoint components onto the design workspace, oneas the endpoint of stage A and the other as the endpoint of stage B, and label them Stage_A and Stage_Brespectively to better identify their roles in the Route.

Scenario: Using cPipesAndFilters to process the task in sequence
202 Talend ESB Mediation Components Reference Guide
4. From the Processor folder, drop three cProcessor components onto the design workspace to monitormessages received on the receiver, stage A and stage B endpoints respectively, and label themMonitor_Receiver, Monitor_stage_A, and Monitor_stage_B respectively to better identify their roles in theRoute.
5. Right-click the cFile component labeled Sender, select Row > Route from the contextual menu, and clickthe cPipesAndFilters component.
Repeat this step to set up the rest Row > Route connections, as shown above.
Configuring the components
1. Double-click the cFile component labeled Sender to open its Basic settings view in the Component tab.
2. In the Path field, fill in or browse to the path to the folder that holds the source files.
3. From the Encoding list, select the encoding type of your source files. Leave the other parameters as they are.
4. Repeat these steps to define the path to the output files and the output encoding type in the Basic settingsview of the cFile component labeled Receiver.
5. Double-click the cPipesAndFilters component to open its Basic settings view in the Component tab.

Scenario: Using cPipesAndFilters to process the task in sequence
Talend ESB Mediation Components Reference Guide 203
6. Click the plus button to add two lines to the URI list table, and fill the first line with "direct:a" and thesecond line with "direct:b" to define the URIs of stage A and stage B that the messages will undergo.
7. Double-click the cMessagingEndpoint component labeled Stage_A to configure the component in its Basicsettings view and define the URI of stage A.
Repeat this step to define the URI of stage B in the Basic settings view of the cMessagingEndpointcomponent labeled Stage_B.
8. Double-click the cProcessor component labeled Monitor_Receiver to open its Basic settings view, andcustomize the code in the Code area to display the file names of the messages received on Receiver, asfollows:
System.out.println("Message sent to Receiver: "+exchange.getIn().getHeader("CamelFileName"));
Repeat this step to customize the code in the other two cProcessor components to display the file names ofthe messages received on stage A and stage B respectively:
System.out.println("Message sent to stage A: "+exchange.getIn().getHeader("CamelFileName"));
System.out.println("Message sent to stage B: "+exchange.getIn().getHeader("CamelFileName"));
9. Press Ctrl+S to save your Route.
Viewing code and executing the Route
1. Click the Code tab at the bottom of the design workspace to have a look at the generated code.
As shown in the code, messages sent from Sender are redirected to endpoints identified by direct:a anddirect:b by cPipesAndFilters_1 before being routed to Receiver.
2. Press F6 to run your Route.
RESULT: The message delivery goes through stage A and then stage B before reaching Receiver.

Scenario: Using cPipesAndFilters to process the task in sequence
204 Talend ESB Mediation Components Reference Guide

cRecipientList
Talend ESB Mediation Components Reference Guide 205
cRecipientList
cRecipientList properties
Component Family Routing
Function cRecipientList routes messages to a list of user defined recipients. It can also process themessage before sending it to the recipients and assemble the replies from the sub-messages intoa single outgoing message.
Purpose cRecipientList allows you to route messages to a number of dynamically specified recipients.
Basic settings Language Select the expression language from the drop-down list.
Expression Type in the expression that returns multiple endpoints.
Use Result Class Type This option appears when XPath is selected in the Language list.Select this check box to set the result type of the sub-messages in thefield that appears.
Add Namespaces This option appears when XPath is selected in the Language list.
Select this check box to add namespaces for the Xpath expression.Click [+] to add as many namespaces as required to the table anddefine the prefix and URI in the corresponding columns.
Use Delimiter Select this check box to customize the separator for the Expression.Enter the characters, strings or regular expressions to be used as theseparator in the Delimiter field.
Use Strategy Select this check box to refer to an aggregation strategy to assemblethe replies from the sub-messages into a single outgoing message fromthe recipient list. Enter the ID of the aggregation strategy in the field.
Parallel Processing Select this check box to send the message to the recipientssimultaneously.
Use ExecutorService This option appears when Parallel Processing is enabled. Select thischeck box to use a custom thread pool for parallel processing. Specifythe thread pool in the ExecutorService field.
Stop On Exception Select this check box to stop processing immediately when anexception occurred.
Ignore InvalidEndpoints
Select this check box to ignore invalid endpoints.
Streaming Select this check box to process the sub-message replies in the orderthat the replies are received from each recipient. If this option isdisabled, the replies will be processed in the same order as specifiedby the Expression.
Timeout Specify a total timeout in millisecond. If the message is not routed tothe recipients and processed within the given time frame, the timeouttriggers and the recipient list breaks out.
Use On-PrepareProcessor
Select this check box to use a custom processor to prepare the copyof the exchange that each recipient will receive. Enter the ID of theprocessor in the next field. You can use the cBeanRegister to registera Java bean as a processor.
Share Unit of Work Select this check box to share the unit of work between the parentexchange and each recipient exchange. See the same option ofcSplitter for more information.
Usage cRecipientList is used as a middle component in a Route.
Limitation n/a

Scenario: Routing a message to multiple recipients
206 Talend ESB Mediation Components Reference Guide
Scenario: Routing a message to multiple recipients
In this scenario, a cRecipientList component is used to route a message to a list of recipients.
To build the Route, do the following.
Dropping and linking the components
1. Drag and drop the components from the Palette onto the workspace: cFile, cSetHeader, cRecipientList,two cMessagingEndpoint and two cProcessor. Change the label of the cFile component to Read_Input.Change the labels of the two cMessagingEndpoint components to Recipient_A and Recipient_B. Changethe labels of the two cProcessor components to Print_File_Name_A and Print_File_Name_B.
2. Link Read_Input to cSetHeader using a Row > Route connection.
3. Link cSetHeader to cRecipientList using a Row > Route connection.
4. Link Recipient_A to Print_File_Name_A using a Row > Route connection.
5. Link Recipient_B to Print_File_Name_B using a Row > Route connection.
Configuring the components
1. Double-click cFile to open its Basic settings view in the Component tab.
2. In the Path field, type in the path to the source message, for example, "E:/data/input". Keep other defaultsettings unchanged.

Scenario: Routing a message to multiple recipients
Talend ESB Mediation Components Reference Guide 207
3. Double-click cSetHeader to open its Basic settings view in the Component tab.
4. Click [+] to add a row to the Headers table.
In the Name field, enter the header name, for example, "ListOfRecipients".
In the Language list, select Constant.
In the Value field, enter the endpoint URIs, for example, "direct:a,direct:b".
5. Double-click cRecipientList to open its Basic settings view in the Component tab.
6. In the Language list, select Header.
In the Expression field, enter the name of the header that contains the recipients list, that is,"ListOfRecipients".
7. Double-click Recipient_A to open its Basic settings view in the Component tab and define the URI ofrecipient A.

Scenario: Routing a message to multiple recipients
208 Talend ESB Mediation Components Reference Guide
Perform the same operation to Recipient_B to define the URI of recipient B.
8. Double-click Print_File_Name_A to open its Basic settings view in the Component tab and enter the codebelow to print out the message received by Recipient_A.
System.out.println("Recipient_a just downloaded:"+exchange.getIn().getHeader("CamelFileName"));
Perform the same operation to Print_File_Name_B and type in the code below in its code box:
System.out.println("Recipient_b just downloaded:"+exchange.getIn().getHeader("CamelFileName"));
9. Press Ctrl+S to save your Route.
Viewing code and executing the Route
1. Click the Code tab at the bottom of the design workspace to check the generated code.

Scenario: Routing a message to multiple recipients
Talend ESB Mediation Components Reference Guide 209
As shown above, the route gets the message from Read_Input_cFile_1,and .setHeader("ListOfRecipients") using .constant("direct:a,direct:b"). Then,cRecipientList_1 reads .header("ListOfRecipients") and routes the message to the recipientsincluded in it.
2. Press F6 to execute the Route.
The message is sent to recipients included in the header.

cRoutingSlip
210 Talend ESB Mediation Components Reference Guide
cRoutingSlip
cRoutingSlip properties
Component Family Routing
Function cRoutingSlip allows you to route a message or messages consecutively through a series ofprocessing steps, with the sequence of steps unknown at design time and variable for eachmessage.
Purpose cRoutingSlip is used to route a message or messages consecutively to a series of endpoints.
Basic settings Header name Type in name of the message header as defined in the precedingcSetHeader component, mySlip by default. The header shouldcarry a list of endpoint URIs you wish each message to be routedto.
URI delimiter Delimiter used to separate multiple endpoint URIs carried in themessage header, comma (,) by default.
Usage cRoutingSlip is used as a middle or end component of a sub-route. It always follows acSetHeader component, which sets a header to each message to carry a list of endpoint URIs.
Limitation n/a
Scenario 1: Routing a message consecutively to aseries of endpoints
In this scenario, messages from a file system is routed consecutively to a series of endpoints according to the URIscarried in the message header.
Dropping and linking the components
This use case requires a cFile component as the message sender, a cSetHeader component to define aseries of endpoints, a cRoutingSlip component to route messages to the endpoints consecutively, threecMessagingEndpoint components to retrieve messages routed to the endpoints, and three cProcessor componentsto monitor messages routed to the connected messaging endpoints.

Scenario 1: Routing a message consecutively to a series of endpoints
Talend ESB Mediation Components Reference Guide 211
1. From the Palette, expand the Messaging folder, drop one cFile and three cMessagingEndpoint componentsonto the design workspace, and label them to better identify their roles in the Route, as shown above.
2. From the Transformation folder, drop a cSetHeader component onto the design workspace, and label it tobetter identify its role in the Route.
3. From the Routing folder, drop a cRoutingSlip component onto the design workspace, and label it to betteridentify its role in the Route.
4. From the Processor folder, drop three cProcessor components onto the design workspace, and label themto better identify their roles in the Route.
5. Right-click the cFile component, select Row > Route from the contextual menu and click the cSetHeadercomponent.
6. Right-click the cSetHeader component, select Row > Route from the contextual menu and click thecRoutingSlip component.
7. Repeat this operation to connect the cMessagingEndpoint components to the corresponding cProcessorcomponents.
Configuring the components and connections
1. Double-click the cFile component, which is labelled Sender, to display its Basic settings view in theComponent tab.

Scenario 1: Routing a message consecutively to a series of endpoints
212 Talend ESB Mediation Components Reference Guide
2. In the Path field, fill in or browse to the path to the folder that holds the source files Beijing.xml, London.xml,Paris.xml, and Washington.xml.
From the Encoding list, select the encoding type of your source files. Leave the other parameters as they are.
3. Double-click the cSetHeader component, which is labelled Set_endpoints, to display its Basic settings viewin the Component tab.
4. Click [+] to add a row to the Headers table.
In the Name field, type in the name of the header you want to add to each message.
In this use case, we simply use mySlip, which is the default value filled in the Header name field of thecRoutingSlip component.
5. From the Language list box, select the Constant or Simple, and in the Value field, type in the URIs youwish the message to be routed consecutively to, separated by a comma, which is the default value of the URIdelimiter field of the cRoutingSlip component.
In this use case, we want the message to be routed first to endpoint c, then to endpoint a, and finally toendpoint b.
6. Double-click the cRoutingSlip component, which is labelled Routing_slip, to display its Basic settings viewin the Component tab, and define the message header in the Header name field and the URI delimiter inthe URI delimiter field.
In this use case, we simply use the default settings.
7. Double-click the cMessagingEndpoint component labelled Endpoint_a to display its Basic settings view inthe Component tab, and type in the URI in the URI field for the destination of your messages.
Here, we want to use this component to retrieve the message routed to the URI direct:a.

Scenario 1: Routing a message consecutively to a series of endpoints
Talend ESB Mediation Components Reference Guide 213
Repeat this step to set the endpoint URIs in the other cMessagingEndpoint components: direct:b and direct:crespectively.
8. Double-click the cProcessor component, which is labelled Monitor_a, to display its Basic settings view inthe Component tab, and customize the code so that the console will display information the way you wish.
Here, we want to use this component to monitor the messages routed to the connected endpoint a and displaythe file name, so we customize the code accordingly, as follows:
System.out.println("Message received on endpoint a: "+ exchange.getIn().getHeader("CamelFileName"));
Repeat this step to customize the code for the other two cProcessor components, for messages routed to theconnected endpoints b and c respectively.
System.out.println("Message received on endpoint b: "+ exchange.getIn().getHeader("CamelFileName"));
System.out.println("Message received on endpoint c: "+ exchange.getIn().getHeader("CamelFileName"));
9. Press Ctrl+S to save your Route.
Viewing code and executing the Route
1. Click the Code tab at the bottom of the design workspace to have a look at the generated code.
In this partially shown code, messages from the sender are given a header according to .setHeader, whichcarries a list of URIs ("direct:c,direct:a,direct:b"), and then routed in the slip pattern according bycRoutingSlip_1.
2. Click the Run view to display it and click the Run button to launch the execution of your Route.
You can also press F6 to execute it.

Scenario 2: Routing each message conditionally to a series of endpoints
214 Talend ESB Mediation Components Reference Guide
RESULT: The source file messages are routed consecutively to the defined endpoints: c, then a, and then b.
Scenario 2: Routing each message conditionally to aseries of endpoints
In this scenario, which is based on the previous scenario, each message from a file system is routed consecutivelyto different endpoints according to the city name it contains.
All files used in this use case are named after the city name they contain. The following are the extracts of twoexamples:
Beijing.xml:
<person> <firstName>Nicolas</firstName> <lastName>Yang</lastName> <city>Beijing</city></person>
Paris.xml:
<person> <firstName>Pierre</firstName> <lastName>Dupont</lastName> <city>Paris</city></person>
A predefined Java Bean, setEndpoints, is called in this use case to return endpoint URIs according to the city namecontained in each message, so that the messages will be routed as follows:
• The message containing the city name Paris will be routed first to endpoint a, then to endpoint b, and finallyto endpoint c.
• The message containing the city name Beijing will be routed first to endpoint c, then to endpoint a, and finallyto endpoint b.
• Any other messages will be routed to endpoint b and then to endpoint c.

Scenario 2: Routing each message conditionally to a series of endpoints
Talend ESB Mediation Components Reference Guide 215
For more information about creating and using Java Beans, see Talend Studio User Guide.
package beans;
import org.w3c.dom.Document;import org.w3c.dom.Element;import org.w3c.dom.NodeList;
public class setEndpoints { public String helloExample(Document document) { NodeList cities = document.getDocumentElement().getElementsByTagName( "city"); Element city = (Element) cities.item(0); String textContent = city.getTextContent(); if ("Paris".equals(textContent)) { return "direct:a,direct:b,direct:c"; } else if ("Beijing".equals(textContent)) { return "direct:c,direct:a,direct:b"; } else return "direct:b,direct:c"; }}
Dropping and linking the components
In this scenario, we will reuse the Route set up in the previous scenario, without adding or removing anycomponents or modifying any connections.
Configuring the components and connections
In this scenario, we only need to configure the cSetHeader component to call the predefined Java Bean, and keepthe settings of all the other components are they are in the previous scenario.
1. Double-click the cSetHeader component to display its Basic settings view in the Component tab.
2. Select Bean from the Language list box, and in the Value field, specify the Java Bean that will return theendpoint URIs. In this use case, type in:
beans.setEndpoints
3. Press Ctrl+S to save your Route.

Scenario 2: Routing each message conditionally to a series of endpoints
216 Talend ESB Mediation Components Reference Guide
Viewing code and executing the Route
1. Click the Code tab at the bottom of the design workspace to have a look at the generated code.
In this partially shown code, messages from the sender are given a header according to .setHeader, whichcarries a list of URIs returned by the beans.setEndpoints.class, and then routed to the cRoutingSlip_1.
2. Click the Run view to display it and click the Run button to launch the execution of your Route.
You can also press F6 to execute it.
RESULT: The sources are routed consecutively to the defined endpoints: the message containing the cityname Beijing is routed first to endpoint c, then to endpoint a, and finally to endpoint b; the message containingthe city name Paris is routed first to endpoint a, then to endpoint b, and finally to endpoint c; the othermessages are routed to endpoint b and then to endpoint c.

cSplitter
Talend ESB Mediation Components Reference Guide 217
cSplitter
cSplitter properties
Component Family Routing
Function cSplitter splits a message into several sub-messages according to a condition.
Purpose cSplitter separates multiple elements of a message so that they can be handled and treateddifferently in individual routes.
Basic settings Language Select the language of the expression you want to use to splityour messages, from None, Constant, EL, Groovy, Header,JavaScript, JoSQL, JXPath, MVEL, OGNL, PHP, Property,Python, Ruby, Simple, SpEL, SQL, XPath, and XQuery.
Correlation expression/Expression
Type in the expression to use to split the messages.
Correlation expression/UseResult Class Type
This option appears when XPath is selected in the Language list.
Select this check box to set the result type of the sub-messagesin the field that appears. The default native XML objectsorg.w3c.dom.NodeList will be used if not specified.
Correlation expression/AddNamespaces
This option appears when XPath is selected in the Language list.
Select this check box to add namespaces for the Xpath expression.Click [+] to add as many namespaces as required to the table anddefine the prefix and URI in the corresponding columns.
Use Strategy Select this check box to refer to an aggregation strategy to assemblethe replies from the sub-messages into a single outgoing messagefrom the splitter. Enter the ID of the aggregation strategy in theStrategy field. The sub-message replies will be aggregated in theorder they come back if Streaming is enabled. If not, the sub-message replies will be aggregated in the same order as they weresplit.
Parameters/ParallelProcessing
Select this check box to process the sub-messages concurrently.The caller thread will wait until all sub-messages have been fullyprocessed before it continues.
Parameters/Stop onException
Select this check box to stop processing immediately when anexception occurs.
Parameters/Streaming Select this check box to split the message in a streaming fashion,which means it will split the input message in chunks. It isrecommended to enable this option when processing big messages.
Parameters/Share Unit ofWork
Select this check box to share the unit of work between the parentexchange and each split exchange. For more information andan use case of this option, see the site http://camel.apache.org/splitter.html.
Parameters/Timeout Specify a total timeout in millisecond. If the message is not splitand processed within the given time frame, the timeout triggersand the splitter breaks out.
Usage cSplitter is used as a middle component in a Route.
split Select this link to route the split messages to the next endpoint.Connections
Route Select this link to route all the messages from the sender to the nextendpoint.
Limitation n/a

Scenario: Using cSplitter to split a message and aggregate replies from sub-messages
218 Talend ESB Mediation Components Reference Guide
Scenario: Using cSplitter to split a message andaggregate replies from sub-messages
In this scenario, we will use the cSplitter component to split a message and aggregate the replies from sub-messages.
A predefined Java Bean, AppendAggregator will be called to as the strategy to aggregate the replies from sub-messages. For more information about creating and using Java beans, see Talend Studio User Guide.
package beans;import org.apache.camel.Exchange;import org.apache.camel.processor.aggregate.AggregationStrategy;
public class AppendAggregator implements AggregationStrategy {
public Exchange aggregate(Exchange oldEx, Exchange newEx) { if(oldEx==null){ return newEx; } String oldBody = oldEx.getIn().getBody(String.class); String newBody = newEx.getIn().getBody(String.class); newEx.getIn().setBody(oldBody + "\n" + newBody); return newEx; }}
Dropping and linking the components
1. From the Palette, expand the Context folder. Drag and drop a cBeanRegister component onto the designworkspace.
2. From the Messaging folder, drag and drop a cTimer and two cDirect components onto the design workspace.
3. From the Transformation folder, drag and drop two cSetBody components onto the design workspace.
4. From the Routing folder, drag and drop a cSplitter component onto the design workspace.
5. From the Miscellaneous folder, drag and drop two cLog components onto the design workspace.

Scenario: Using cSplitter to split a message and aggregate replies from sub-messages
Talend ESB Mediation Components Reference Guide 219
6. Label the components to better identify their roles in the Route as shown above.
7. Right-click the cSplitter component, select Row > Split from the contextual menu and click the cDirectcomponent labeled directA_sender.
8. Right-click the cSplitter component again, select Row > Route from the contextual menu and click the cLogcomponent labeled Log_Finished.
9. In the same way, link the other components in the Route using the Row > Route connection as shown above.
Configuring the components and connections
1. Double-click the cBeanRegister component labeled appendAggregator to display its Basic settings view inthe Component tab.
2. In the Id field, enter "appendAggregator". Select the Simple option and in the Class Name field, enterthe name of the predefined Java bean, beans.AppendAggregator in this scenario, which will be called laterby the cSplitter component.
3. Double-click the cTimer component labeled Starter to display its Basic settings view in the Component tab.
4. In the Repeat field, enter 1 to trigger the message exchange. Keep the default settings of the other options.
5. Double-click the cSetbody component labeled Set_body to display its Basic settings view in the Componenttab.
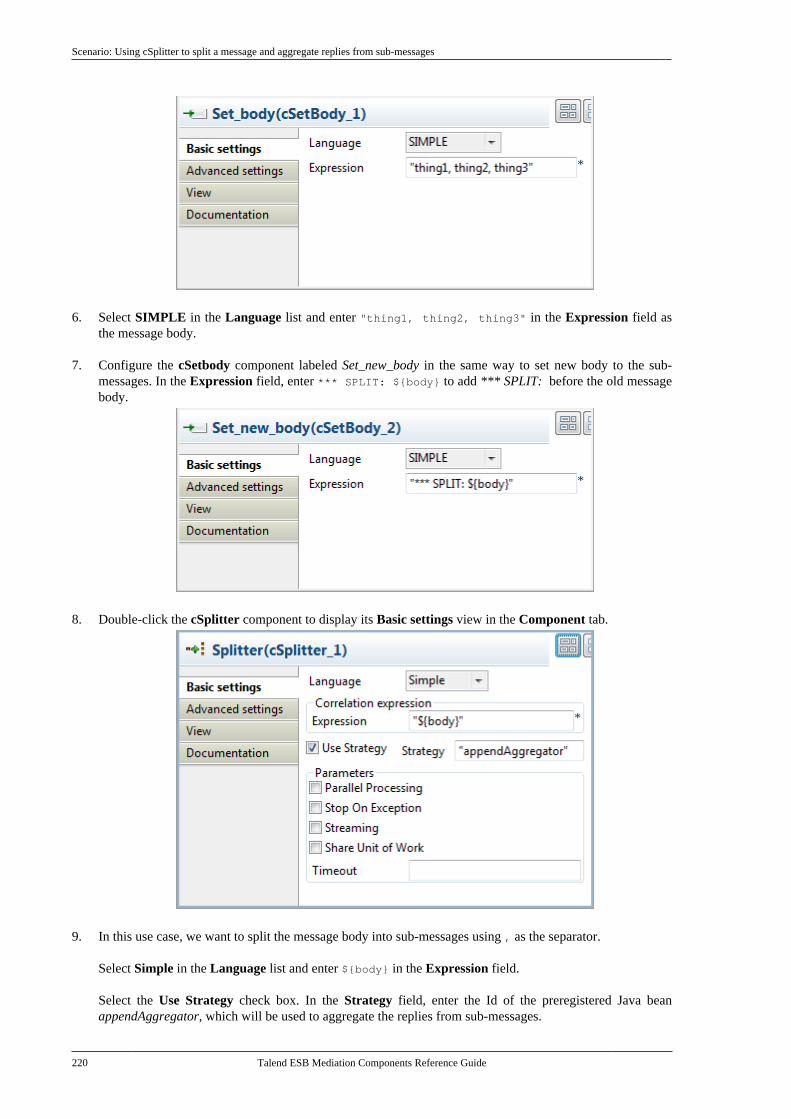
Scenario: Using cSplitter to split a message and aggregate replies from sub-messages
220 Talend ESB Mediation Components Reference Guide
6. Select SIMPLE in the Language list and enter "thing1, thing2, thing3" in the Expression field asthe message body.
7. Configure the cSetbody component labeled Set_new_body in the same way to set new body to the sub-messages. In the Expression field, enter *** SPLIT: ${body} to add *** SPLIT: before the old messagebody.
8. Double-click the cSplitter component to display its Basic settings view in the Component tab.
9. In this use case, we want to split the message body into sub-messages using , as the separator.
Select Simple in the Language list and enter ${body} in the Expression field.
Select the Use Strategy check box. In the Strategy field, enter the Id of the preregistered Java beanappendAggregator, which will be used to aggregate the replies from sub-messages.

Scenario: Using cSplitter to split a message and aggregate replies from sub-messages
Talend ESB Mediation Components Reference Guide 221
10. Double-click the cDirect component labeled directA_sender to display its Basic settings view in theComponent tab.
11. Click [...] and select the directA_receiver node to receive the sub-messages.
12. Double-click the cDirect component labeled directA_receiver to display its Basic settings view in theComponent tab.
13. In the Name field, type in "directA" to identify this endpoint.
14. Keep the default settings of the cLog components labeled Log_Finished and Log_Split. Log_Finished willlog the aggregated replies from sub-messages. Log_Split will log the sub-messages.
15. Press Ctrl+S to save your Route.
Viewing code and executing the Route
1. Click the Code tab at the bottom of the design workspace to have a look at the generated code.

Scenario: Using cSplitter to split a message and aggregate replies from sub-messages
222 Talend ESB Mediation Components Reference Guide
As shown in the code, the message route is built from one endpoint .to another. The message sent tocSplitter_1 is split by the method .split().simple("${body}") and the replies from the sub-messagesare aggregated by the method .aggregationStrategyRef("appendAggregator").
2. Click the Run view to display it and click the Run button to launch the execution of your Route. You canalso press F6 to execute it.
RESULT: The source message is split into sub-messages using , as the separator and each sub-message isgiven a new message body. The replies from the sub-messages are aggregated then into a single outgoingmessage from the cSplitter component.

cThrottler
Talend ESB Mediation Components Reference Guide 223
cThrottler
cThrottler properties
Component Family Routing
Function cThrottler is designed to limit the number of messages flowing to the subsequent endpoint.
Purpose cThrottler allows you to limit the number of messages flowing to a specific endpoint in orderto prevent it from getting overloaded.
Basic settings Request per period The number of messages allowed to pass cThrottler within thedefined time period.
Set time period Select this check box to set the value of the time period (inmilliseconds) and enable throttling.
Use asynchronousdelaying
If this check box is selected, any messages that are delayed will berouted asynchronously using a scheduled thread pool.
Usage Being a middle component, cThrottler allows you to limit the number of messages flowing toa specific endpoint in order to prevent it from getting overloaded.
throttler Select this link to route the throttled messages to the next endpoint.Connections
Route Select this link to route all the messages from the sender to the nextendpoint.
Limitation n/a
Scenario: Throttling the message flow
In this scenario, a cThrottler component is used to reduce the number of messages flowing out within a timeperiod.
To build the Route, do the following.

Scenario: Throttling the message flow
224 Talend ESB Mediation Components Reference Guide
Dropping and linking the components
1. Drag and drop the components from the Palette onto the workspace: cThrottler, cFile and two cProcessor.Change the label of the cFile component to Read_Output. Change the labels of the two cProcessorcomponents to Print_File_Name and Print_File_Content.
2. Link Read_Output to cThrottler using a Row > Route connection.
3. Link cThrottler to Print_File_Name using a Row > Throttler connection, and to Print_File_Content usinga Row > Route connection.
Configuring the components
1. Double-click Read_Output to open its Basic settings view in the Component tab.
2. In the Path field, type in the path to the source message, for example, "E:/data/output". Keep the defaultsettings for other fields.
3. Double-click cThrottler to open its Basic settings view in the Component tab.
4. In the Request per period field, type in the number of messages allowed to pass the throttler per period,for example, 1.
In the Set time period field, type in the value of the period, for example, 8000.
5. Double-click Print_File_Name to open its Basic settings view in the Component tab.
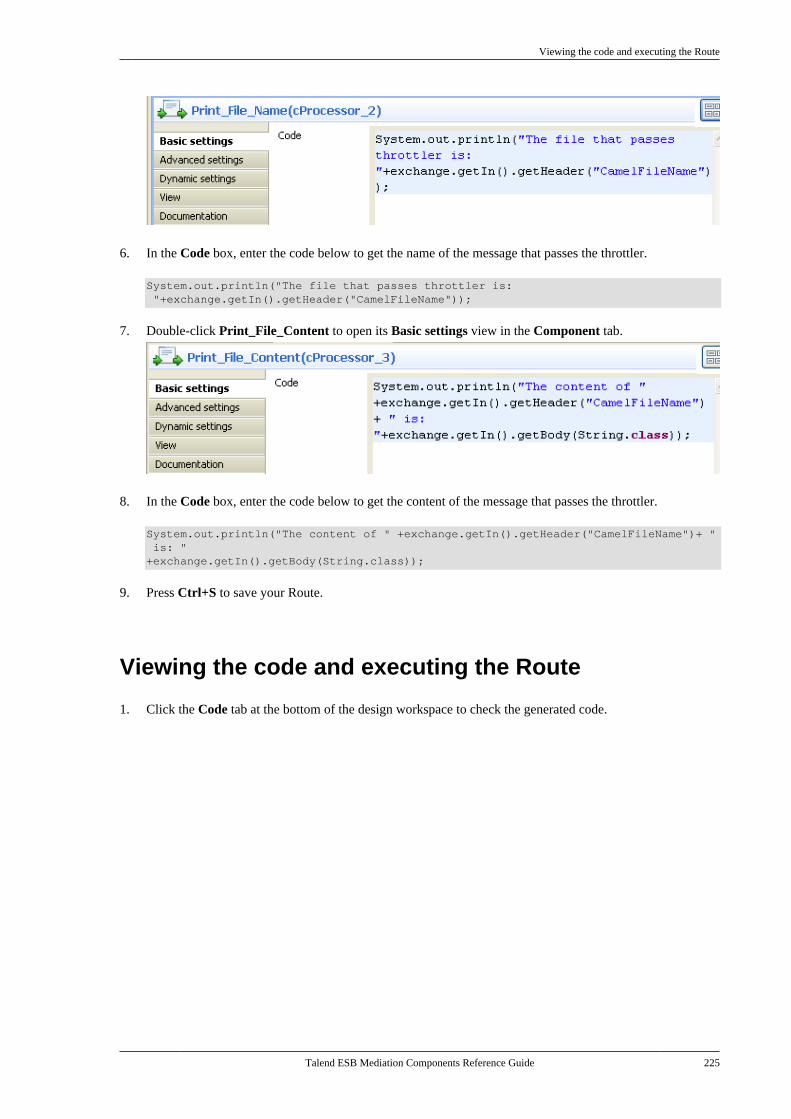
Viewing the code and executing the Route
Talend ESB Mediation Components Reference Guide 225
6. In the Code box, enter the code below to get the name of the message that passes the throttler.
System.out.println("The file that passes throttler is: "+exchange.getIn().getHeader("CamelFileName"));
7. Double-click Print_File_Content to open its Basic settings view in the Component tab.
8. In the Code box, enter the code below to get the content of the message that passes the throttler.
System.out.println("The content of " +exchange.getIn().getHeader("CamelFileName")+ " is: "+exchange.getIn().getBody(String.class));
9. Press Ctrl+S to save your Route.
Viewing the code and executing the Route
1. Click the Code tab at the bottom of the design workspace to check the generated code.

Viewing the code and executing the Route
226 Talend ESB Mediation Components Reference Guide
As shown above, the messages from Read_Output go through throttling at cThrottler_1, with only (1)message allowed to leave the throttler within each timePeriodMillis(8000). Meanwhile, the filename andthe content of the throttled message are printed out via the two processors.
2. Press F6 to execute the Route.
As shown below, File_A.txt was delivered within the first time period while in the second period, File_B.txtwas delivered as well.

cWireTap
Talend ESB Mediation Components Reference Guide 227
cWireTap
cWireTap propertiesComponent Family Routing
Function cWireTap wiretaps messages to a user defined URI while they are sent to their original endpoint.It also allows you to populate a new message to this wiretap URI concurrently.
Purpose cWireTap is used to route messages to a separate endpoint while forwarded to the ultimatedestination.
Basic settings URI The endpoint URI to send the wire tapped message.
Populate new exchange Select this check box to populate a new message to the wiretapURI.
Populate Type This option appears when the Populate new exchange check boxis selected. The Populate Type is either Expression or Processor.
Expression: Using expression allows you to set the message bodyof the new exchange.
Language: Select the language of the expression you want touse to set the message body between Constant, Header, None,Property, Simple, XPath.
Expression TXT: Enter the expression to set the message body.
Processor: Using processor gives you full power to specify howthe exchange is populated as you can set properties, headers andso on to the message with a piece of Java code in the Code field.
Copy the original message Select this check box to create a copy of the original exchange,which will be the totally the same as the original one. If this checkbox is not selected, only a new exchange with the same endpointname will be created. The message body and headers are null.
The exchange pattern is InOnly for both conditions.
Usage cWireTap can be a middle component in a Route.
Limitation n/a
Scenario: Wiretapping a message in a RouteIn this scenario, a cWireTap component is used to route a message to a separate endpoint while it is routed tothe ultimate destination.

Scenario: Wiretapping a message in a Route
228 Talend ESB Mediation Components Reference Guide
Dropping and linking the components
1. From the Palette, expand the Messaging folder, and drop a cFile and two cMessagingEndpoint componentsonto the design workspace.
2. Expand the Routing folder, and drop a cWireTap component onto the design workspace.
3. Expand the Processor folder, and drop a cJavaDSLProcessor and two cProcessor components onto thedesign workspace.
4. Right-click the cFile component, select Row > Route from the contextual menu and click the cWireTapcomponent.
5. Repeat this operation to connect the components as shown above.
6. Label the components to better identify their functionality.
Configuring the components
1. Double-click the cFile component labeled Source to display its Basic settings view in the Component tab.
2. In the Path field, browse to or enter the input file path. In this use case, there is a Hello.txt file in the specifiedfile path, which contains the content Hello World!. Leave the other parameters as they are.
3. Double-click the cWireTap component to display its Basic settings view in the Component tab.
4. Enter "direct:a" in the URI field to route the wiretapped message to this endpoint.

Scenario: Wiretapping a message in a Route
Talend ESB Mediation Components Reference Guide 229
Select the Populate new exchange check box, select Processor as the populate type, and then enter thefollowing code in the Code box to display the file name of the wiretapped message and its content on theconsole:
System.out.println("\nMessage wiretapped: "+exchange.getIn().getHeader("CamelFileName"));System.out.println("Message content: "+exchange.getIn().getBody(String.class)+"\n");
5. Double-click the cJavaDSLProcessor component to display its Basic settings view in the Component tab.
6. In the Code field, enter the Java code .to("direct:b") to define the URI of the endpoint to route theoriginal message to.
7. Double-click the cMessagingEndpoint component labeled Endpoint_a to display its Basic settings view inthe Component tab. Enter "direct:a" in the URI field to retrieve the message routed to this endpoint.
Repeat this operation to set the endpoint URI for Endpoint_b.
8. Double-click the cProcessor component labeled Monitor_a to display its Basic settings view in theComponent tab. Enter the following code in the Code box to display the file name of the message routedto Endpoint_a.
System.out.println("Message on endpoint a: "+exchange.getIn().getHeader("CamelFileName"));
Then, configure the other cProcessor component in the same way to display the file name of the messagerouted to Endpoint_b.
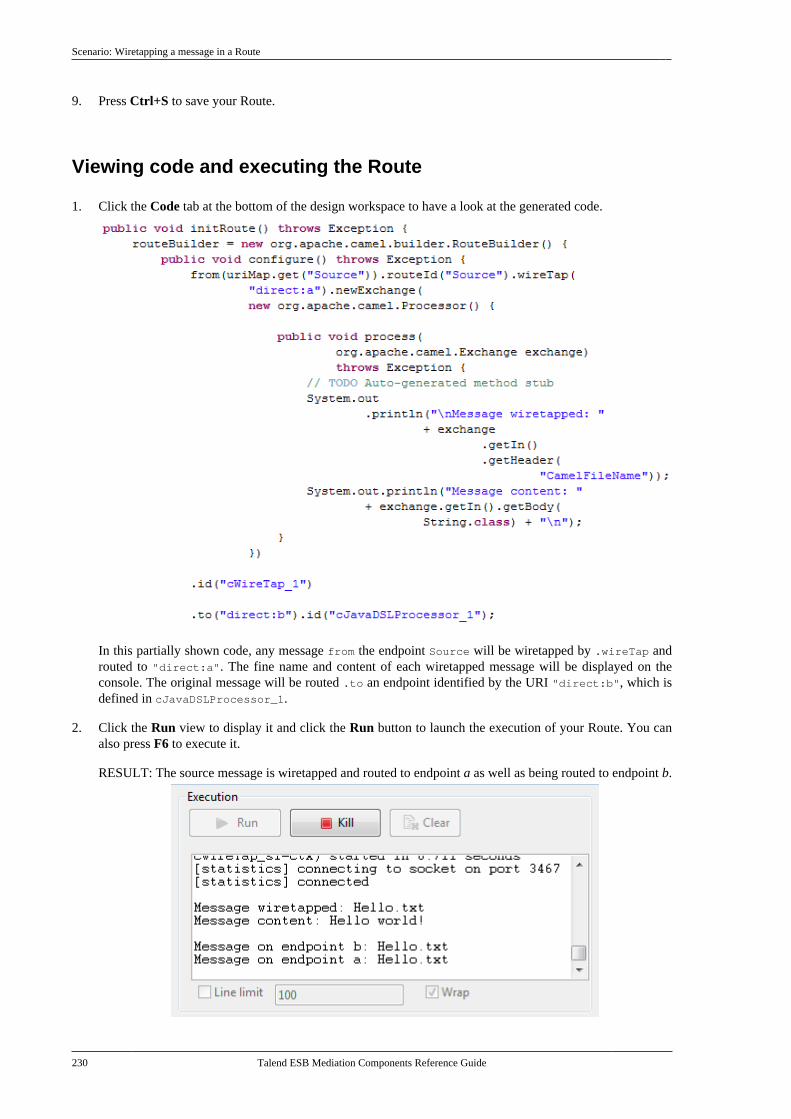
Scenario: Wiretapping a message in a Route
230 Talend ESB Mediation Components Reference Guide
9. Press Ctrl+S to save your Route.
Viewing code and executing the Route
1. Click the Code tab at the bottom of the design workspace to have a look at the generated code.
In this partially shown code, any message from the endpoint Source will be wiretapped by .wireTap androuted to "direct:a". The fine name and content of each wiretapped message will be displayed on theconsole. The original message will be routed .to an endpoint identified by the URI "direct:b", which isdefined in cJavaDSLProcessor_1.
2. Click the Run view to display it and click the Run button to launch the execution of your Route. You canalso press F6 to execute it.
RESULT: The source message is wiretapped and routed to endpoint a as well as being routed to endpoint b.

Talend ESB Mediation Components Reference Guide
Transformation componentsThis chapter details the major components that you can find in Transformation family from the Palette of theMediation perspective of Talend Studio.
The Transformation family groups component that execute data transformation processes.

cContentEnricher
232 Talend ESB Mediation Components Reference Guide
cContentEnricher
cContentEnricher properties
Component Family Transformation
Function cContentEnricher is designed to use a consumer or producer to obtain additional data,respectively intended for event messaging and request/reply messaging.
Purpose cContentEnricher allows you to enrich the message.
Basic settings Resource URI This refers to the destination to which a message will be deliveredif using a producer is selected; it refers to the source from which amessage will be obtained if using a consumer is selected.
Using a producer Select this check box to use a producer to provide additional data, thatis to say sending a message to the defined URI.
Using a consumer Select this check box to use a consumer to obtain additional data, thatis to say requesting a message from the defined URI.
Use AggregationStrategy
Select this check box to define the aggregation strategy for assemblingthe basic message and the additional data.
Specify timeout This area appears when Using a consumer is selected. The timeoutoptions are as follows:
Wait until a message arrive: the component keeps waiting for amessage.
Immediately polls the message: the component immediately pollsfrom the defined URI.
Waiting at most until the timeout triggers: select this check boxto type in a timeout value in Millis. The component waits for themessage only within the defined time period.
Usage cContentEnricher allows you to use a consumer or producer to obtain additional data,respectively intended for event message messaging and request/reply messaging.
Limitation n/a
Scenario: Receiving messages from a list of URLs
In this scenario, we will use the Camel component HTTP4 and the cContentEnricher component to retrievemessages from a list of URLs. To do this, we need to build two sub-routes, one to read a file with a list of URLsand send the messages to the local file system, the other to retrieve the messages on these URLs.
In this use case, we will take a list of URLs on the local Tomcat server as the example. So we need to start ApacheTomcat before executing the Route.
A TXT file URLlist is used to provide the list of URLs, as shown below.
docs/introduction.htmldocs/setup.html

Scenario: Receiving messages from a list of URLs
Talend ESB Mediation Components Reference Guide 233
Dropping and linking the components
1. From the Palette, drag and drop a cSplitter, a cJavaDSLProcessor, a cContentEnricher, two cFile, twocMessagingEndpoint, and three cSetHeader components onto the design workspace.
2. Label the components properly for better identification of their roles and link them using the Row > Routeconnection as shown above.
Configuring the components
Configuring the first sub-route
1. Double-click the URLlist component to display its Basic settings view in the Component tab.
2. In the Path field, browse to the file path where the URL list file is saved.
In the FileName field, enter the filename URLlist.txt.
3. Double-click the cSplitter component to display its Basic settings view in the Component tab.

Scenario: Receiving messages from a list of URLs
234 Talend ESB Mediation Components Reference Guide
4. Select None in the Language list. In the Expression field, enter the codebody(String.class).tokenize("\r\n") to split the message in each row into sub-messages.
Note that this piece of code is for Windows only. For Unix, change it to body(String.class).tokenize("\n"),and for Mac, body(String.class).tokenize("\r").
5. Double-click the cJavaDSLProcessor component to display its Basic settings view in the Component tab.
6. In the Code area, enter the code .log("splitterOutput: ${body}") to get the split message body.
7. Double-click the cContentEnricher component display its Basic settings view in the Component tab.
8. Select using a producer to use a producer to provide additional data and send the message to a defined URI.
In the Resource URI field, enter "direct:fetchURL" where the message will be delivered.
9. Double-click the setFileName component to display its Basic settings view in the Component tab.

Scenario: Receiving messages from a list of URLs
Talend ESB Mediation Components Reference Guide 235
10. Click [+] to add a row to the Headers table.
In the Name field, enter org.apache.camel.Exchange.FILE_NAME to define the file name for eachincoming message.
Select Simple in the Language list.
In the Value field, enter "${header.CamelHttpPath}" to get the URI's path of the incoming message.
11. Double-click the retrievedFiles component to display its Basic settings view in the Component tab.
12. In the Path field, browse to the destination file path where you want the messages to be saved.
Configuring the second sub-route
1. Double-click the fetchURL component to display its Basic settings view in the Component tab.
2. In the URI field, enter "direct:fetchURL" that is defined in the cContentEnricher component.
3. Double-click the setURI component to display its Basic settings view in the Component tab.

Scenario: Receiving messages from a list of URLs
236 Talend ESB Mediation Components Reference Guide
4. Click [+] to add a row to the Headers table.
In the Name field, enter org.apache.camel.Exchange.HTTP_URI to define the HTTP URI of eachmessage.
Select Simple in the Language list.
In the Value field, enter "http://localhost:8080" of the local Tomcat server.
5. Double-click the setPATH component to display its Basic settings view in the Component tab.
6. Click [+] to add a row to the Headers table.
In the Name field, enter org.apache.camel.Exchange.HTTP_PATH to define the HTTP path of eachmessage.
Select Simple in the Language list.
In the Value field, enter "${body}" that is split from the original message.
7. Double-click the http4Endpoint component to display its Basic settings view in the Component tab.

Scenario: Receiving messages from a list of URLs
Talend ESB Mediation Components Reference Guide 237
8. In the URI field, enter "http4:localhost:8080" to consuming HTTP resources on the local Tomcat server.
9.Click the Advanced settings view. Click at the bottom of the Dependencies list to add a row and selecthttp4 from the drop-down list. For more information about HTTP4, see the site http://camel.apache.org/http4.html.
Press Ctrl+S to save your Route.
Viewing code and executing the Route
1. Click the Code tab at the bottom of the design workspace to have a look at the generated code.
As shown above, a message route is built from the URLlist to the retrievedFiles via the .split, .log,.enrich, and .setHeader. The other message route is built from fetchURL to http4Endpoint via two.setHeader.
2. Press F6 to execute the Route.
RESULT: The split message is printed on the Run console.

Scenario: Receiving messages from a list of URLs
238 Talend ESB Mediation Components Reference Guide
The messages from the list of URLs are saved in defined directory of the local file system.

cConvertBodyTo
Talend ESB Mediation Components Reference Guide 239
cConvertBodyTo
cConvertBodyTo properties
Component Family Transformation
Function cConvertBodyTo converts the message body to the given class type.
Purpose cConvertBodyTo is used to change the class type of the message body.
Basic settings Target Class Name Enter the name of the class type that you want to convert themessage body to.
Usage cConvertBodyTo is used as a middle component in a Route.
Limitation n/a
Scenario: Converting the body of an XML file into anorg.w3c.dom.Document.class
In this scenario, a cConvertBodyTo component is used to convert the body of an XML file into anorg.w3c.dom.Document.class. Then a cBean component imports the org.w3c.dom.Document class, checks itscontent and prints out the root element name and the content of each category element.
The XML file is as follows:
<bookstore> <bookshelf> <category>Cooking</category> <quantity>100</quantity> </bookshelf> <bookshelf> <category>Languages</category> <quantity>200</quantity> </bookshelf> <bookshelf> <category>Arts</category> <quantity>300</quantity> </bookshelf> <bookshelf> <category>Science</category> <quantity>400</quantity> </bookshelf></bookstore>
Creating a Bean
1. From the repository tree view, expand the Code node and right click the Beans node. In the contextual menu,select Create Bean.

Scenario: Converting the body of an XML file into an org.w3c.dom.Document.class
240 Talend ESB Mediation Components Reference Guide
2. The [New Bean] wizard opens. In the Name field, type in a name for the bean, for example,PrintConvertToBean. Click Finish to close the wizard.
3. Enter the following code in the design workspace.
package beans;
import org.w3c.dom.Document;import org.w3c.dom.Element;import org.w3c.dom.NodeList;public class PrintConvertToBean {
/** * print input message * @param message */ public static void helloExample(Document message) {

Scenario: Converting the body of an XML file into an org.w3c.dom.Document.class
Talend ESB Mediation Components Reference Guide 241
if (message == null) { System.out.println("There's no message here!"); return; } Element rootElement = message.getDocumentElement(); if (rootElement == null) { System.out.println("There's no root element here!"); return; } System.out.println("The root element name is:" + rootElement.getNodeName()); System.out.println("The book categories are:"); NodeList types = rootElement.getElementsByTagName("category"); for(int i = 0;i<types.getLength();i++){ Element child = (Element) types.item(i); System.out.println(child.getFirstChild().getNodeValue()); } }}
4. Press Ctrl+S to save your bean.
For more information about creating and using Java Beans, see Talend Studio User Guide.
Dropping and linking the components
1. Drag and drop a cFile, a cConvertBodyTo, a cBean and a cBeanRegister from the Palette onto theworkspace.
2. Link the cFile, cConvertBodyTo and cBean using the Row > Route connection as shown above.
3. Label the components to better identify their functionality.
Configuring the components
1. Double-click the cFile component to open its Basic settings view in the Component tab.

Scenario: Converting the body of an XML file into an org.w3c.dom.Document.class
242 Talend ESB Mediation Components Reference Guide
2. In the Path field, enter or browse to the path to the source XML file.
If the source file folder contains more than one file, enter the name of the XML file of interest in the FileNamefield, and leave the other parameters as they are.
3. Double-click the cConvertBodyTo component to open its Basic settings view in the Component tab.
4. In the Target Class Name field, enter your target class name, org.w3c.dom.Document.class in this scenario.
5. Double-click the cBeanRegister component to open its Basic settings view in the Component tab.
6. In the Id field, enter "bean".
Select the Simple option and in the Class Name field, enter the name of the bean to be invoked,beans.PrintConvertToBean in this scenario.
7. Double-click the cBean component to open its Basic settings view in the Component tab.

Scenario: Converting the body of an XML file into an org.w3c.dom.Document.class
Talend ESB Mediation Components Reference Guide 243
8. Select Reference and in the Id field, enter "bean" to call the bean that is registered by the cBeanRegister.
9. Press Ctrl+S to save your Route.
Viewing code and executing the Route
1. Click the Code tab at the bottom of the design workspace to check the generated code.
As shown above, the message from the endpoint Read_message_cFile_1 has its body converted toorg.w3c.dom.Document.class by cConvertBodyTo_1, and then processed by bean invoked by cBean_1.
2. Press F6 to execute the Route.
RESULT: The root element name and the contents of the category elements are displayed.

cMap
244 Talend ESB Mediation Components Reference Guide
cMap
This component will be available in the Palette of Talend Studio on the condition that you have subscribed to one of theTalend platform solutions.
cMap propertiesComponent Family Transformation
Function cMap transforms data from a wide range of sources to a wide range of destinations. If you wantto use multiple inputs and/or outputs, you must use Talend Data Mapper I/O functions. For moreinformation, see Talend Data Mapper User Guide.
Purpose cMap executes transformations (called maps) between different sources and destinations byharnessing the capabilities of Talend Data Mapper, available in the Mapping perspective.
Basic settings Open Map Editor Click the [...] button to open the map specifed in the Map Path inthe Mapping perspective.
Map Path Specifies the map to be executed.
Click the [...] button next to the Map Path field to open a dialogbox in which you can select the map you want to use, then clickthe [...] button next to Open Map Editor to work with the mapselected. Note that this map must have previously been created inthe Mapping perspective.
Log Level From the drop-down list, select how often you want events to belogged.
• Infrequent: Logs only events related to startup, shutdown andexceptions.
• Frequent (default): Logs events related to startup, shutdownand exceptions, and once per map execution.
• Info: Logs all events at an informational level or higher.
• All: Logs all events.
• None: Logs nothing.
Exception Threshold Talend Data Mapper returns an execution status with an severityvalue which can be OK, Info, Warning, Error or Fatal. Bysetting the exception threshold, you can specify the severitylevel at which an exception is thrown, thus enabling downstreamcomponents to detect the error in cases other than the default valueof Fatal.
From the drop-down list, select the severity level at which anexception may be thrown during the execution of a map.
• Fatal (default): An exception is thrown when a fatal erroroccurs.
• Error: An exception is thrown when an error (or higher) occurs.
• Warning: An exception is thrown when a warning (or higher)occurs.
Output Type From the drop-down list, select how you want the output to bewritten.
• Default: The default output is the same as the input, or Java ifthe map outputs Java.
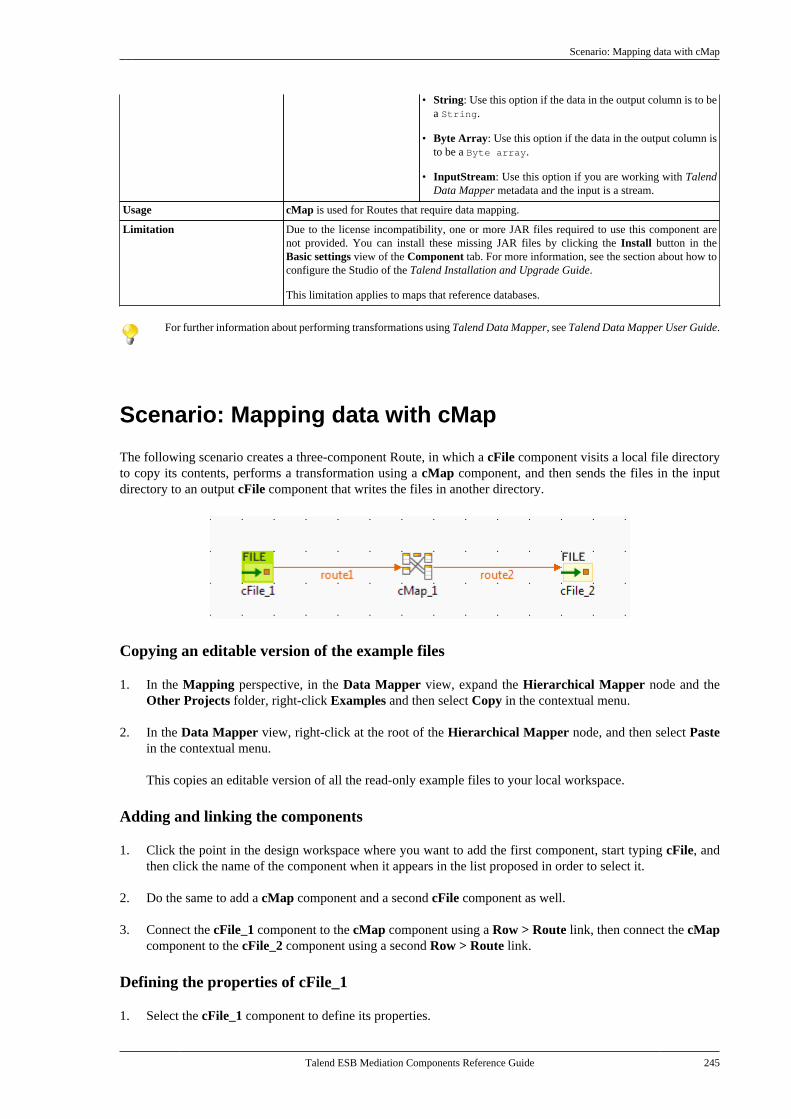
Scenario: Mapping data with cMap
Talend ESB Mediation Components Reference Guide 245
• String: Use this option if the data in the output column is to bea String.
• Byte Array: Use this option if the data in the output column isto be a Byte array.
• InputStream: Use this option if you are working with TalendData Mapper metadata and the input is a stream.
Usage cMap is used for Routes that require data mapping.
Limitation Due to the license incompatibility, one or more JAR files required to use this component arenot provided. You can install these missing JAR files by clicking the Install button in theBasic settings view of the Component tab. For more information, see the section about how toconfigure the Studio of the Talend Installation and Upgrade Guide.
This limitation applies to maps that reference databases.
For further information about performing transformations using Talend Data Mapper, see Talend Data Mapper User Guide.
Scenario: Mapping data with cMap
The following scenario creates a three-component Route, in which a cFile component visits a local file directoryto copy its contents, performs a transformation using a cMap component, and then sends the files in the inputdirectory to an output cFile component that writes the files in another directory.
Copying an editable version of the example files
1. In the Mapping perspective, in the Data Mapper view, expand the Hierarchical Mapper node and theOther Projects folder, right-click Examples and then select Copy in the contextual menu.
2. In the Data Mapper view, right-click at the root of the Hierarchical Mapper node, and then select Pastein the contextual menu.
This copies an editable version of all the read-only example files to your local workspace.
Adding and linking the components
1. Click the point in the design workspace where you want to add the first component, start typing cFile, andthen click the name of the component when it appears in the list proposed in order to select it.
2. Do the same to add a cMap component and a second cFile component as well.
3. Connect the cFile_1 component to the cMap component using a Row > Route link, then connect the cMapcomponent to the cFile_2 component using a second Row > Route link.
Defining the properties of cFile_1
1. Select the cFile_1 component to define its properties.

Scenario: Mapping data with cMap
246 Talend ESB Mediation Components Reference Guide
2. In the Path field, browse to or enter the path to where the input file is located.
3. In the fileName field, enter the name of the input file: PayPalPO.csv in this example.
4. Leave the other parameters unchanged.
Defining the properties of cMap
1. Select the cMap component to define its properties.
2. Click the [...] button next to the Map Path field to open the picker and select the map to use, Maps/CSV/POPayPalCsv_PO2, then click OK. This map transforms a CSV file into an XML file.
Defining the properties of cFile_2
1. Select the cFile_2 component to define its properties.

Scenario: Mapping data with cMap
Talend ESB Mediation Components Reference Guide 247
2. In the Path field, browse to or enter the path to where the output file is to be located.
3. In the fileName field, enter a name for the output file with the extension .xml.
4. Leave the other parameters unchanged.
Saving and executing the Route
1. Press Ctrl+S to save your Route.
2. In the Run tab, click Run to execute the Route.
3. Browse to the output directory on your file system to check that the input files have been transformed andwritten in the output directory.

cSetBody
248 Talend ESB Mediation Components Reference Guide
cSetBody
cSetBody properties
Component Family Transformation
Function cSetBody replaces the payload of each message sent to it.
Purpose cSetBody is used to set the message body in the Route.
Basic settings Language Select the language of the expression you use to set the contentfor matched messages, from Constant, EL, Groovy, Header,JavaScript, JoSQL, JXPath, MVEL, None, OGNL, PHP,Property, Python, Ruby, Simple, SpEL, SQL, XPath, andXQuery.
Expression Type in the expression to set the message content.
Correlation expression/AddNamespaces
This option appears when XPath is selected in the Language list.
Select this check box to add namespaces for the Xpath expression.Click [+] to add as many namespaces as required to the table anddefine the prefix and URI in the corresponding columns.
Usage cSetBody is used as a middle component in a Route.
Limitation n/a
Scenario: Replacing the content of messages withtheir extracts
In this scenario, file messages are routed from one endpoint to another, with the content of each message replacedwith the information extracted from it.
The following is an example of the XML files used in this use case:
<people> <person> <firstName>Pierre</firstName> <lastName>Dubois</lastName> <city>Paris</city> </person></people>
Dropping and linking the components
This use case uses two cFile components, one as the message sender and the other as the receiver, a cSetBodycomponent to replace the content of the messages on route, and a cProcessor component to display the new contentof the messages routed to the receiving endpoint.

Scenario: Replacing the content of messages with their extracts
Talend ESB Mediation Components Reference Guide 249
1. From the Palette, expand the Messaging folder, and drop two cFile components onto the design workspace.
2. From the Transformation folder, drop a cSetBody component onto the design workspace, between the twocFile components.
3. From the Processor folder, drop a cProcessor component onto the design workspace, following the secondcFile component.
4. Right-click the first cFile select Row > Route from the contextual menu and click the cSetBody component.
5. Repeat this operation to connect the cSetBody component to the second cFile component, and the secondcFile component to the cProcessor component.
6. Label the components to better identify their roles in the Route, as shown above.
Configuring the components and connections
1. Double-click the cFile component labeled Sender to display its Basic settings view in the Component tab.
2. In the Path field, fill in or browse to the path to the folder that holds the source files.
3. From the Encoding list, select the encoding type of your source files. Leave the other parameters as they are.
4. Repeat these steps to define output file path and encoding type in the Basic settings view of the other cFilecomponent, which is labeled Receiver.
5. Double-click the cSetBody component to display its Basic settings view in the Component tab.
6. From the Language list box, select the language of the expression you are going to use.
Here we are handling XML files, so select XPath from the list box.
7. In the Expression field, type in the expression that will return the new message content you want.

Scenario: Replacing the content of messages with their extracts
250 Talend ESB Mediation Components Reference Guide
In this use case, we want person to be the root element of each file when routed to the receiving endpoint,so type in "/people/person" in the Expression field.
8. Double-click the cProcessor component to display its Basic settings view in the Component tab, andcustomize the code so that the console will display information the way you wish.
In this use case, we want to display the file name and content of each message routed to the receiving endpoint,so we customize the code as follows:
System.out.println("File received: " +exchange.getIn().getHeader("CamelFileName") + "\nContent:\n " + exchange.getIn().getBody(String.class));
9. Press Ctrl+S to save your Route.
Viewing code and executing the Route
1. Click the Code tab at the bottom of the design workspace to have a look at the generated code.
In this partially shown code, a message route is built from one endpoint .to another, and while inrouting, the content of each message is replaced according to the condition .xpath("/people/person")by "cSetBody_1".
2. Click the Run view to display it and click the Run button to launch the execution of your Route. You canalso press F6 to execute it.
RESULT: The XML files are sent to the receiver, where person has become the root element of each file.

Scenario: Replacing the content of messages with their extracts
Talend ESB Mediation Components Reference Guide 251

cSetHeader
252 Talend ESB Mediation Components Reference Guide
cSetHeader
cSetHeader properties
Component Family Transformation
Function cSetHeader sets headers on each message sent to it.
Purpose cSetHeader is used to set headers or customize the default headers, if any, on each message sentto it for subsequent message processing.
Basic settings Headers Click [+] to add as many headers as required to the table.
Name: Type in a name for the message header.
The header name CorrelationID is reserved. The value of thisheader will be overridden by the correlation ID of the message ifit exist.
Language: Select the language of the expression you use fromBean, None, Constant, CorrelationID, EL, Groovy, Header,JavaScript, JoSQL, JXPath, MVEL, OGNL, PHP, Property,Python, Ruby, Simple, SpEL, SQL, XPath, and XQuery.
Select Bean if you want to call a predefined Java Bean to returnthe header value.
Select CorrelationID to use the existing correlation ID of themessage as the header value if the correlation ID is available in theclosest cCXF connected to this component. For more informationabout the cCXF component, see cCXF.
Value: Type in the expression to set the value of the messageheader, or the Bean class that will return a value for the messageheader, in the form of beans.BEAN_NAME.
If CorrelationID is selected in the Language list, this field isgrayed out. The existing correlation ID from the closest cCXFconnected to this component will be set as the header value. Formore information about the cCXF component, see cCXF.
Add Namespaces Select this check box to add namespaces for the expression. Click[+] to add as many namespaces as required to the table and definethe prefix and URI in the corresponding columns.
Usage cSetHeader is used as a middle component in a Route.
Limitation n/a
Scenario: Splitting a message and renaming the sub-messages according to contained information
In this scenario, a file message containing people information is split into sub-messages. Each sub-messages isrenamed according the city name it contains, and then routed to another endpoint.
The following is the example XML file used in this use case:
<people> <person> <firstName>Pierre</firstName>

Scenario: Splitting a message and renaming the sub-messages according to contained information
Talend ESB Mediation Components Reference Guide 253
<lastName>Dubois</lastName> <city>Paris</city> </person> <person> <firstName>Nicolas</firstName> <lastName>Yang</lastName> <city>Beijing</city> </person> <person> <firstName>Ellen</firstName> <lastName>Ripley</lastName> <city>Washington</city> </person></people>
A predefined Java Bean, setFileNames, is called by the cSetHeader component used in this use case to define afile name for each message according to the city name it contains. For more information about creating and usingJava Beans, see Talend Studio User Guide.
package beans;
import org.w3c.dom.Document;import org.w3c.dom.Element;import org.w3c.dom.NodeList;
public class setFileNames { public String getCityName(Document document) { NodeList cities = document.getDocumentElement().getElementsByTagName( "city"); Element city = (Element) cities.item(0); String textContent = city.getTextContent(); return textContent+".xml"; }}
Dropping and linking the components
This use case uses two cFile components, one as the message sender and the other as the receiver, a cSplittercomponent to split the source message into sub-messages, a cSetHeader component to rename each sub-message,and a cProcessor component to display the file name of each message routed to the receiver.
1. From the Palette, expand the Messaging folder, and drop two cFile components onto the design workspace.
2. From the Routing folder, drop a cSplitter component onto the design workspace, between the two cFilecomponents.
3. From the Transformation folder, drop a cSetHeader component onto the design workspace, between thecSplitter component and the receiving cFile component.

Scenario: Splitting a message and renaming the sub-messages according to contained information
254 Talend ESB Mediation Components Reference Guide
4. Right-click the first cFile component, select Row > Route from the contextual menu and click the cSplittercomponent.
5. Right-click the cSplitter component, select Row > Split from the contextual menu and click the cSetHeadercomponent.
6. Right-click the cSetHeader component, select Row > Route from the contextual menu and click the secondcFile component.
7. Right-click the second cFile component, select Row > Route from the contextual menu and click thecProcessor component.
8. Label the components to better identify their roles in the Route, as shown above.
Configuring the components and connections
1. Double-click the cFile component labeled Sender to display its Basic settings view in the Component tab.
2. In the Path field, fill in or browse to the path to the folder that holds the source files.
From the Encoding list, select the encoding type of your source files.
In the FileName field, type in the file name of the source message. You can skip this step if the source foldercontains only one file.
3. Repeat steps 1 and 2 above to define the output file path and encoding type in the Basic settings view of theother cFile component, which is labeled Receiver. Leave the FileName field blank.

Scenario: Splitting a message and renaming the sub-messages according to contained information
Talend ESB Mediation Components Reference Guide 255
4. Double-click the cSplitter component to display its Basic settings view in the Component tab.
In this use case, as we want to split the message into sub-messages at each person node of the XML file.Select XPath in the Language list and type in "/people/person") in the Expression field.
5. Double-click the cSetHeader component, which is labeled Set_file_name to display its Basic settings viewin the Component tab.
6. Click [+] to add a row to the Headers table.
In the Name field, type in the name of the header you want to give to the messages.
Here, as we want to define the file name for each incoming message, fill in "CamelFileName" as the headername.
Select Bean in the Language field and type in the name of the predefined Java Bean in the Value field,beans.setFileNames.class in this use case.
7. Double-click the cProcessor component to display its Basic settings view in the Component tab, andcustomize the code so that the console will display information the way you wish.

Related scenarios
256 Talend ESB Mediation Components Reference Guide
In this use case, we want to display the file name each message routed to the receiving endpoint, so wecustomize the code as follows:
System.out.println("File received: "+ exchange.getIn().getHeader("CamelFileName"));
8. Press Ctrl+S to save your Route.
Viewing code and executing the Route
1. Click the Code tab at the bottom of the design workspace to have a look at the generated code.
As shown in the code, a message route is built from one endpoint .to another, and while in routing,the source message is split according to the condition xpath("/people/person") by cSplitter_1,and each sub-message is given a header named CamelFileName, the value of which is returned by.method(beans.setFileNames.class).
2. Click the Run view to display it and click the Run button to launch the execution of your Route. You canalso press F6 to execute it.
RESULT: The source file message is split into sub-messages and each sub-message is renamed after the cityname it contains and routed to the receiving endpoint.
Related scenarios
For more scenarios, see:

Related scenarios
Talend ESB Mediation Components Reference Guide 257
Scenario: Using cTalendJob to call a DI Job
Scenario 1: Routing a message consecutively to a series of endpoints
Scenario 2: Routing each message conditionally to a series of endpoints

Talend ESB Mediation Components Reference Guide