tactical field care tactical combat casualty care 02 june 2014
TRANSCRIPT

Tactical Field Care
Tactical Combat Casualty Care02 June 2014

OBJECTIVES
• STATE the common causes of altered states of consciousness on the battlefield.
• STATE why a casualty with an altered state of consciousness should be disarmed.
• DESCRIBE airway control techniques and devices appropriate to the Tactical Field Care phase.

• DEMONSTRATE the recommended procedure for surgical cricothyroidotomy.
• LIST the criteria for the diagnosis of tension pneumothorax on the battlefield.
• DESCRIBE the diagnosis and initial treatment of tension pneumothorax on the battlefield.
OBJECTIVES

• DEMONSTRATE the appropriate procedure for needle decompression of the chest.
• DESCRIBE the progressive strategy for controlling hemorrhage in tactical field care.
• DEMONSTRATE the correct application of a CoTCCC-recommended hemostatic dressing.
• DEMONSTRATE the correct application of a CoTCCC-recommended junctional tourniquet.
OBJECTIVES

• DEMONSTRATE the appropriate procedure for initiating a rugged IV field setup.
• STATE the rationale for obtaining intraosseous access in combat casualties.
• DEMONSTRATE the appropriate procedure for initiating an intraosseous infusion.
OBJECTIVES

• STATE the tactically relevant indicators of shock in combat settings.
• DESCRIBE the pre-hospital fluid resuscitation strategy for hemorrhagic shock in combat casualties.
• DESCRIBE the management of penetrating eye injuries in TCCC.
• DESCRIBE how to prevent blood clotting problems from hypothermia.
OBJECTIVES

• DESCRIBE the appropriate use of pulse oximetry in pre-hospital combat casualty care
• STATE the pitfalls associated with interpretation of pulse oximeter readings.
• LIST the recommended agents for pain relief in tactical settings along with their indications, dosages, and routes of administration.
• DESCRIBE the rationale for early antibiotic intervention in combat casualties.
OBJECTIVES

• LIST the factors involved in selecting antibiotic drugs for use on the battlefield.
• DISCUSS the management of burns in TFC.• EXPLAIN why cardiopulmonary resuscitation
is not generally used for cardiac arrest in battlefield trauma care.
• DESCRIBE the procedure for documenting TCCC care with the TCCC Casualty Card.
OBJECTIVES

• DESCRIBE the three ISAF categories for evacuation priority
• LIST the nine items in a MEDEVAC request• DISCUSS the rules of thumb for calling for
Tactical Evacuation and the importance of careful calculation of the risk/benefit ratio prior to initiating the call
• DESCRIBE the appropriate procedures for providing trauma care for wounded hostile combatants.
OBJECTIVES

Tactical Field Care• Distinguished from Care Under Fire by:
– A reduced level of hazard from hostile fire – More time available to provide care based
on the tactical situation• Medical gear is still limited to that carried by
the medic or corpsman or unit members (may include gear in tactical vehicles)

• May consist of rapid treatment of the most serious wounds with the expectation of a re-engagement with hostile forces at any moment, or
• There may be ample time to render whatever care is possible in the field.
• Time to evacuation may vary from minutes to several hours or longer.
Tactical Field Care

Battlefield Priorities in the
Tactical Field Care Phase
• This section describes the recommended care to be provided in TFC.
• This sequence of priorities shown assumes that any obvious life-threatening bleeding has been addressed in the Care Under Fire phase.
• If this is not the case – address the massive bleeding first.
• After that – care is provided in the sequence shown. This sequence is compatible with the MARCH algorithm found in the USSOCOM Tactical Trauma Protocols.

MARCH
• Massive hemorrhage – control life-threatening bleeding.
• Airway – establish and maintain a patent airway.
• Respiration – decompress suspected tension pneumothorax, seal open chest wounds, and support ventilation/oxygenation as required.

• Circulation – establish IV/IO access and administer fluids as required to treat shock.
• Head injury/Hypothermia – prevent/treat hypotension and hypoxia to prevent worsening of traumatic brain injury and prevent/treat hypothermia.
MARCH

Tactical Field Care Guidelines
1. Casualties with an altered mental status should be disarmed immediately.

Disarm Individuals with Altered Mental Status
• Armed combatants with an altered mental status may use their weapons inappropriately.
• Secure long gun, pistols, knives, grenades, explosives.
• Possible causes of altered mental status are Traumatic Brain Injury (TBI), shock, hypoxia, and pain medications.
• Explain to casualty: “Let me hold your weapon for you while the doc checks you out.”

Tactical Field Care Guidelines
2. Airway Management
a. Unconscious casualty without airway obstruction:
- Chin lift or jaw thrust maneuver
- Nasopharyngeal airway
- Place casualty in recovery position

Tactical Field Care Guidelines
2. Airway Managementb. Casualty with airway obstruction or impending airway
obstruction:- Chin lift or jaw thrust maneuver- Nasopharyngeal airway
- Allow casualty to assume any position that best protects the airway, to include sitting up.
- Place unconscious casualty in recovery position.
- If previous measures unsuccessful:- Surgical cricothyroidotomy (with
lidocaine if conscious)

Nasopharyngeal Airway
• The “Nose Hose,” “Nasal Trumpet,” “NPA”• Excellent success in GWOT• Well tolerated by the conscious patient• Lube before inserting• Insert at 90 degree angle to the face NOT along
the axis of the external nose• Tape it in• Don’t use oropharyngeal airway (‘J’ Tube)
– Will cause conscious casualties to gag– Easily dislodged

Nasopharyngeal Airway

What’s wrong with this NPA insertion?
Nasopharyngeal Airway

Maxillofacial Trauma
• Casualties with severe facial injuries can often protect their own airway by sitting up and leaning forward.• Let them do it if they can!

Airway Support
Place unconscious casualties in the recovery position after the airway has been opened.

Surgical Airway(Cricothyroidotomy)
• The following series of slides and the video demonstrate a horizontal (transverse) incision technique for performing a surgical airway.
• A vertical (mid-sagittal) incision technique is preferred by many trauma specialists and is recommended in the Iraq/Afghanistan War Surgery textbook.
• Steps are the same except for the orientation of the incision.
• Use a 6.0 tube for the airway

Surgical Airway(Cricothyroidotomy)

Surface Landmarks for Cricothyrotomy
Top of thyroid cartilage
Bottom of thyroid cartilage
Cricothyroid membrane
Cricoid cartilage
Thyroid prominence – Adam’s apple usually visible only in males

Beneath the Surface Landmarks
Hyoid Bone
Thyroid prominence (Adam’s apple ) - usually visible only in males
Thyroid cartilage
Cricothyroid membrane
Cricoid cartilage
Thyroid gland

Macdonald J C , Tien H C CMAJ 2008;178:1133-1135
Locating the Cric Incision Line

Surgical Incision overCricothyroid Membrane

Incise through the epidermis & dermis
Epidermis
Dermis
Cricothyroidmembrane
Surgical Airway

Epidermis Cricothyroidmembrane
Surgical Airway

Single stabbing incision through cricothyroid membrane
Surgical Airway
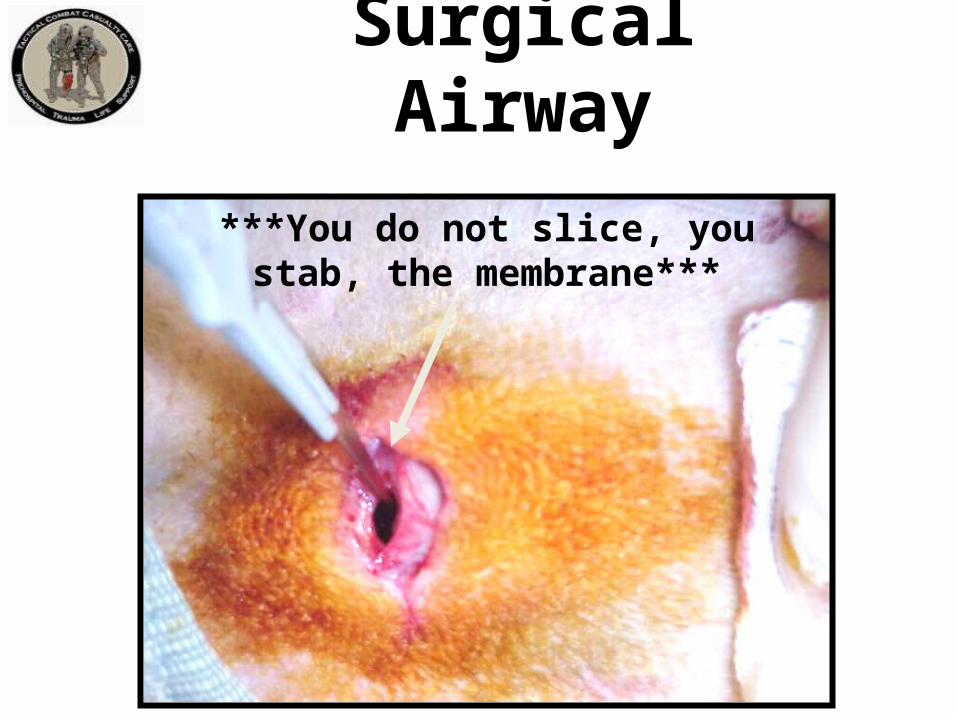
***You do not slice, you stab, the membrane***
Surgical Airway

Insert the scalpel handle and rotate 90 degrees
Surgical Airway

Insert Mosquito hemostat into incision and dilate
Surgical Airway

Insert ET Tube
Insert Endotracheal Tube – direct the tube into the trachea and towards the chest.
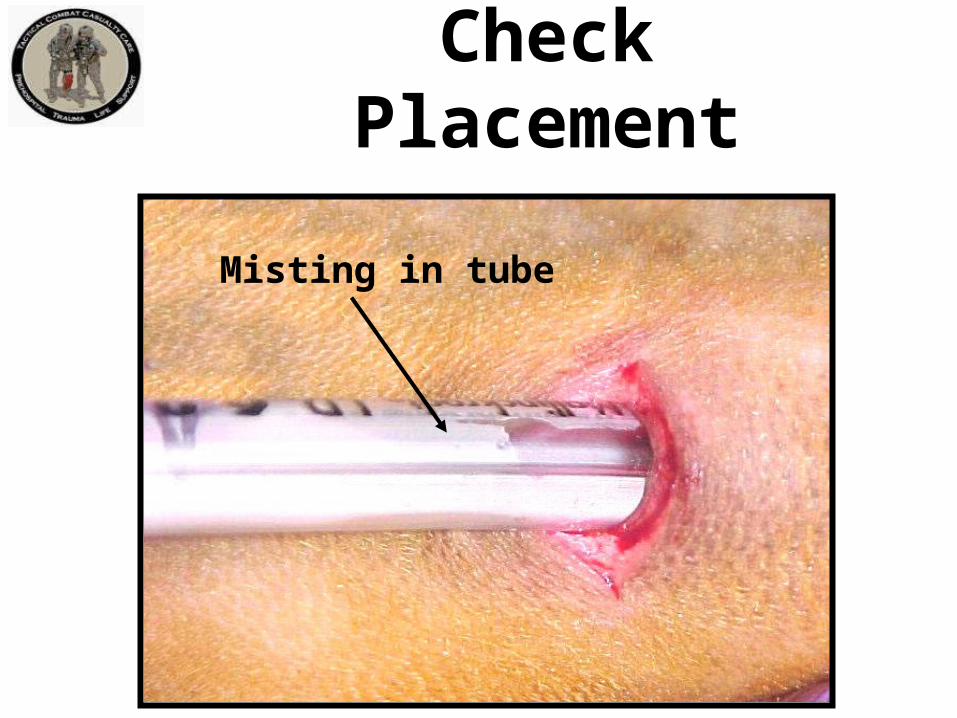
Check Placement
Misting in tube

Inflate cuff and REMOVE SYRINGE
Inflating the Cuff
Note: Corpsman/medic may wish to cut ET tube off just above the inflation tube so it won’t be sticking out so far.

Ventilate
Attach Bag

Secure the Tube
At this point, the tube should be taped securely in place with surgical tape.

Dress the Wound
Tape a gauze dressing over the surgical airway site.

Repetition and Realismin Cric Training
To prepare for scenarios like this one, combat medics should perform cricothyrotomy at least five times during training on an anatomically realistic model.

Video: Surgical Airway

Video: An Actual Cricothyroidotomy
Courtesy Dr. Peter Rhee,
Univ. of Arizona

QuestionsAirway PracticalNasopharyngeal Airway
Surgical Airway

Tactical Field Care Guidelines
3. Breathing
a. In a casualty with progressive respiratory distress and known or suspected torso trauma, consider a tension pneumothorax and decompress the chest on the side of the injury with a 14-gauge, 3.25-inch needle/catheter unit inserted in the second intercostal space at the midclavicular line. Ensure that the needle entry into the chest is not medial to the nipple line and is not directed towards the heart. An acceptable alternate site is the 4th or 5th intercostal space at the anterior axillary line (AAL).

3. Breathingb. All open and/or sucking chest wounds should be
treated by immediately applying a vented chest seal to cover the defect. If a vented chest seal is not available, use a non-vented chest seal. Monitor the casualty for the potential development of a subsequent tension pneumothorax. If the casualty develops increasing hypoxia, respiratory distress, or hypotension and a tension pneumothorax is suspected, treat by burping or removing the dressing or by needle decompression.
Tactical Field Care Guidelines

Tactical Field Care Guidelines
3. Breathing
c. Casualties with moderate/severe TBI should be given supplemental oxygen when available to maintain an oxygen saturation > 90%.

Tension Pneumothorax
• Tension pneumothorax is another common cause of preventable death encountered on the battlefield.
• Easy to treat.• Tension pneumo may occur with entry
wounds in abdomen, shoulder, or neck.• Blunt (motor vehicle accident) or
penetrating trauma (GSW) may also cause it.

Pneumothorax
A pneumothorax is a collection of air between the lung and chest wall due to an injury to the chest and/or lung. The lung then collapses as shown.

Side with gunshot wound
A tension pneumothorax is worse. Injured lung tissue acts as a one-way valve, trapping more and moreair between the lung and the chest wall. Pressure buildsup and compresses both lungs and the heart.
Tension Pneumothorax

• Both lung function and heart function are
impaired with a tension pneumothorax, causing
respiratory distress and shock.• Treatment is to let the trapped air under
pressure escape.• Done by inserting a needle into the chest.• 14 gauge and 3.25 inches long is the
recommended needle size.
Tension Pneumothorax

• Question: “What if the casualty does not have a tension pneumothorax when you do your needle decompression?”
• Answer:– If he has penetrating trauma to that side of the
chest, there is already a collapsed lung and blood in the chest cavity.
– The needle won’t make it worse if there is no tension pneumothorax.
– If he DOES have a tension pneumothorax, you will save his life.
Tension Pneumothorax

Picture of general location for needle insertion
This is a general location for
needle insertion
Location for Needle Entry• 2nd intercostal space in
the midclavicular line• 2 to 3 finger widths below the middle of the collar bone

Warning!
• The heart and great vessels are nearby• Do not insert needle medial to the nipple line or point it towards the heart.

Needle Decompression – EnterOver the Top of the Third Rib
Chest wallRib
Intercostal artery &vein
Air collectionLung
Catheter
Needle
• This avoids the artery and vein on the bottom of the second rib.

Alternate Site for Needle Decompression
• An acceptable alternate site is the 4th or 5th intercostal space at the anterior axillary line.
• The 5th intercostal space is located at the level of the nipple in young, fit males.
• The AAL is located at approximately the lateral aspect of the pectoralis major muscle.
X

Remember!!!• Tension pneumothorax is a common but easily
treatable cause of preventable death on the
battlefield.
• Diagnose and treat aggressively!

Needle Decompression Practical

Sucking Chest Wound(Open Pneumothorax)
Takes a hole in the chest the size of a nickel or bigger for this to occur.
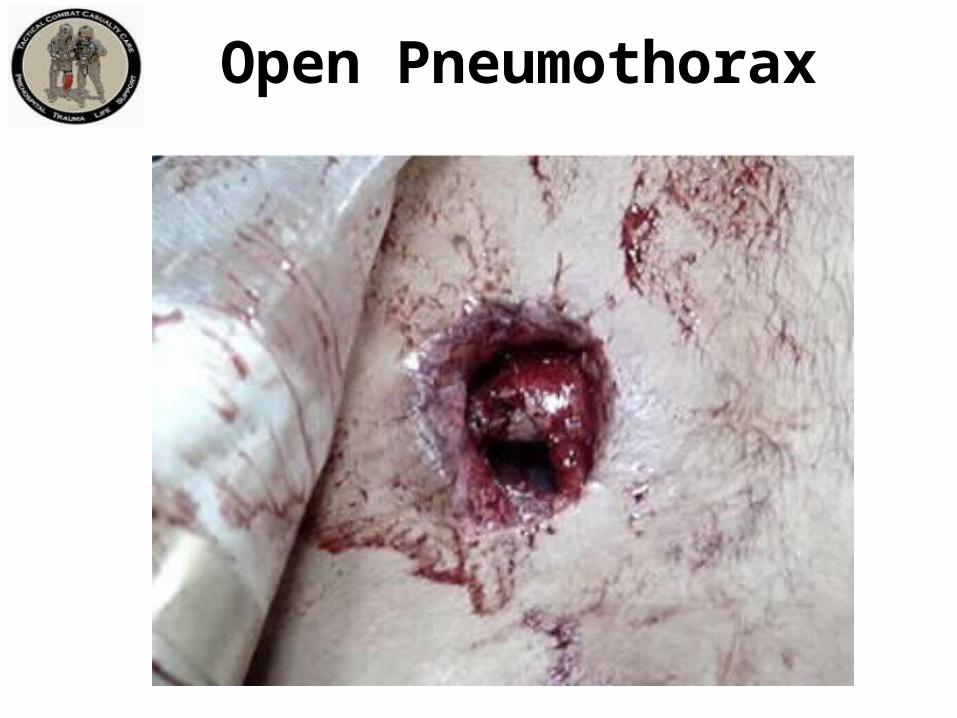
Open Pneumothorax

Management of Open Pneumothorax
• Input from the USCENTCOM/JTS assessment of prehospital trauma care in Afghanistan questioned the use of unvented chest seals in the treatment of open pneumothorax.
• New animal research from both USAISR and Naval Medical Center Portsmouth has shown that vented chest seals work reliably to prevent a tension pneumothorax in the presence of an open pneumothorax and an ongoing air leak from the lung, but non-vented chest seals do not.

Sucking Chest Wound
• May result from large defects in the chest wall and may interfere with ventilation
• Treat by applying a vented occlusive dressing completely over the defect during expiration.
• Monitor for possible development of subsequent tension pneumothorax.
• Allow the casualty to adopt the sitting position if breathing is more comfortable.
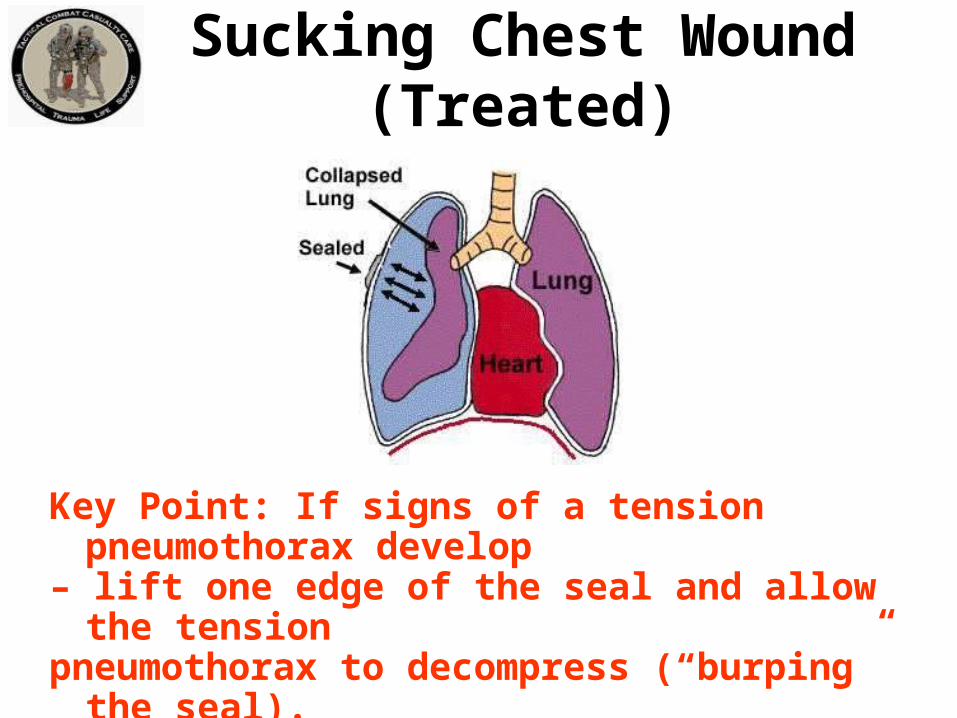
Sucking Chest Wound(Treated)
Key Point: If signs of a tension pneumothorax develop– lift one edge of the seal and allow the tensionpneumothorax to decompress (“burping” the seal).Alternatively, remove the seal for a few seconds to accomplish the decompression, then re-apply.

Video: Sucking Chest Wound

Video: Sucking Chest Wound(Treated)

Questions?

Tactical Field Care Guidelines
4. Bleedinga. Assess for unrecognized hemorrhage and
control all sources of bleeding. If not already done, use a CoTCCC-recommended tourniquet to control life-threatening external hemorrhage that is anatomically amenable to tourniquet application or for any traumatic amputation. Apply directly to the skin 2-3 inches above wound.
4. Bleedingb. For compressible hemorrhage not amenable to tourniquet use
or as an adjunct to tourniquet removal (if evacuation time is anticipated to be longer than two hours), use Combat Gauze as the CoTCCC hemostatic dressing of choice. Celox Gauze and ChitoGauze may also be used if Combat Gauze is not available. Hemostatic dressings should be applied with at least 3 minutes of direct pressure. Before releasing any tourniquet on a casualty who has been resuscitated for hemorrhagic shock, ensure a positive response to resuscitation efforts (i.e., a peripheral pulse normal in character and normal mentation if there is no traumatic brain injury (TBI).
Tactical Field Care Guidelines

Tactical Field Care Guidelines
4. Bleedingb. (cont.) If the bleeding site is appropriate for use of a
junctional tourniquet, immediately apply a CoTCCC-recommended junctional tourniquet. Do not delay in the application of the junctional tourniquet once it is ready for use. Apply hemostatic dressings with direct pressure if a junctional tourniquet is not available or while the junctional tourniquet is being readied for use.

Tactical Field Care Guidelines
4. Bleedingc. Reassess prior tourniquet application.
Expose wound and determine if tourniquet is needed. If so, replace tourniquet over uniform with another applied directly to skin 2-3 inches above wound. If tourniquet is not needed, use other techniques to control bleeding.

Tactical Field Care Guidelines
4. Bleedingd. When time and the tactical situation
permit, a distal pulse check should be accomplished. If a distal pulse is still present, consider additional tightening of the tourniquet or the use of a second tourniquet, side-by-side and proximal to the first, to eliminate the distal pulse.

Tactical Field Care Guidelines
4. Bleeding
e. Expose and clearly mark all tourniquet sites with the time of tourniquet application. Use an indelible marker.

Tourniquets:Points to Remember
• Damage to the arm or leg is rare if the tourniquet is left on for less than two hours.
• Tourniquets are often left in place for several hours during surgical procedures.
• In the face of massive extremity hemorrhage, it is better to accept the small risk of damage to the limb than to have a casualty bleed to death.

• All unit members should have a CoTCCC-approved tourniquet at a standard location on their battle gear. – Should be easily accessible if wounded – DO
NOT bury it at the bottom of your pack• Tourniquets should be left in their protective
packaging until needed to treat casualties.– Harsh environments may contribute to tourniquet
failure if not left in packaging
Tourniquets:Points to Remember

• Training tourniquets should never be used as mission tourniquets
• Repetitive applications may cause tourniquet failure
Tourniquets:Points to Remember

• When a tourniquet has been applied, DO NOT periodically loosen it to allow circulation to return to the limb.– Causes unacceptable additional blood
loss– It HAS been happening, and caused at
least one near fatality in 2005
Tourniquets:Points to Remember
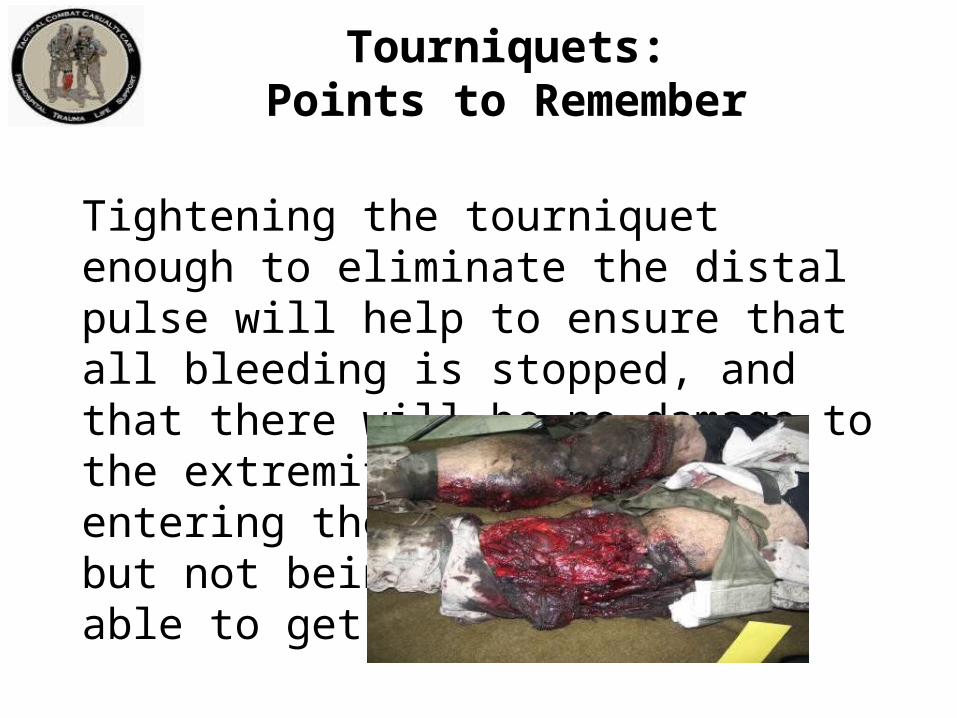
Tightening the tourniquet enough to eliminate the distal pulse will help to ensure that all bleeding is stopped, and that there will be no damage to the extremity from blood entering the extremitybut not being able to get out.
Tourniquets:Points to Remember

Removing the Tourniquet
Do not remove the tourniquet if:– The extremity distal to the tourniquet has been
traumatically amputated.– The casualty is in shock.– The tourniquet has been on for more than 6 hours.– The casualty will arrive at a medical treatment
facility within 2 hours after time of application.– Tactical or medical considerations make transition
to other hemorrhage control methods inadvisable.
Note: If the casualty will be delayed beyond 2 hours, re-assess the need for the tourniquet at the 2-hour point.

• Consider removing the tourniquet if bleeding can be controlled by other methods.
• Only a combat medic/corpsman/PJ, a PA, or a physician should loosen tourniquets.
Removing the Tourniquet

• Loosen the tourniquet slowly.– Observe for bleeding.
• Apply Combat Gauze to the wound per instructions later in the presentation if wound is still bleeding.
• If bleeding remains controlled, cover the Combat Gauze with a pressure dressing. – Leave loose tourniquet in place.
• If bleeding is not controlled without the tourniquet, re-tighten it.
Removing the Tourniquet

CoTCCC-recommendedHemostatic Agents
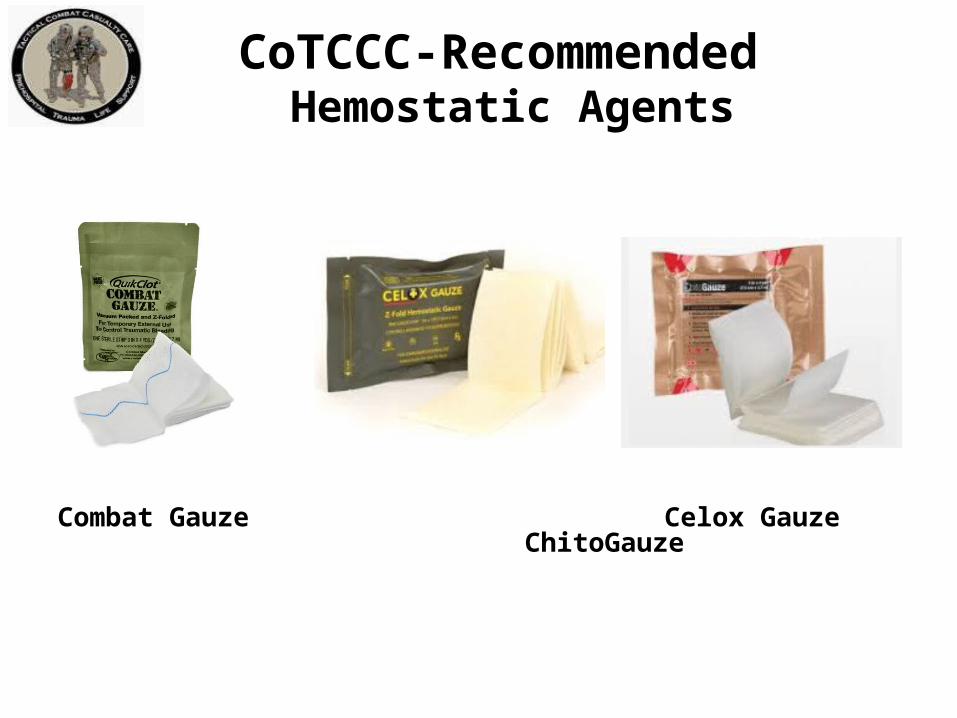
CoTCCC-Recommended Hemostatic Agents
Combat Gauze Celox Gauze ChitoGauze

Combat Gauze
• Tested in the ISR safety model• Widely fielded in the DoD• Case series from the battlefield
and the civilian sector:– CG is effective at stopping
bleeding– No safety issues reported
• Recommended by CoTCCC as first choice for hemostatic dressing

Alternative Hemostatic Agents
• Celox Gauze• ChitoGauze
– May be used if Combat Gauze is not available– Active ingredient is chitosan, a mucoadhesive
• Function is independent of coagulation cascade• There are case series that report that chitosan dressings
have stopped bleeding in surgical patients with life-threatening bleeding and severe coagulopathy
• Does not cause reactions in persons allergic to shellfish

Alternative Hemostatic Agents
• Celox Gauze and ChitoGauze are as effective as Combat Gauze at hemorrhage control in laboratory studies:
– Rall JM, Cox JM, Songer AG, et al. Comparison of novel hemostatic gauzes to QuikClot Combat Gauze in a standardized swine model of uncontrolled hemorrhage. J Trauma Acute Care Surg. 2013; 75(2 Suppl 2):S150-6.
– Satterly S, Nelson D, Zwintscher N, et al. Hemostasis in a noncompressible hemorrhage model: An end-user evaluation of hemostatic agents in a proximal arterial injury. J Surg Educ. 2013;70(2):206-11.
– Watters JM, Van PY, Hamilton GJ, et al. Advanced hemostatic dressings are not superior to gauze for care under fire scenarios. J Trauma 2011;70:1413-18.
– Schwartz RB, Reynolds BZ, Shiver SA, et al. Comparison of two packable hemostatic Gauze dressings in a porcine hemorrhage model. Prehosp Emerg Care 2011;15:477-482

Alternative Hemostatic Agents
• Neither ChitoGauze nor Celox Gauze have been tested in the USAISR safety model, but
• Chitosan-based hemostatic dressings have been used in combat since 2004 with no safety issues reported.

CoTCCC-Recommended Hemostatic Agents
• For more information:– Combat Gauze
• http://www.z-medica.com/military/Home.aspx
– Celox Gauze• http://www.celoxmedical.com/usa/products/celox-
gauze/
– ChitoGauze• http://www.hemcon.com/Products/
ChitoGauzeHemostaticGauzeOverview.aspx

• Combat Gauze is a 3-inch x 4-yard roll of sterile gauze impregnated with kaolin, a material that causes blood to clot.
• Found (in lab studies and actual use) to be safe and effective in controlling bleeding that would otherwise be fatal.
Combat GauzeNSN 6510-01-562-3325

• Open clothing around the wound.
• If possible, remove excess pooled blood from the wound while preserving any clots already formed in the wound.
• Locate the source of the most active bleeding.
Combat Medical Systems, LLC, Tel: 910-426-0003, Fax: 910-426-0009, Website: www.combatgauze.com
Combat Gauze Directions (1) Expose Wound & Identify Bleeding

• Pack Combat Gauze tightly into wound and directly onto the source of bleeding.
• More than one gauze may be required to stem blood flow.
• Combat Gauze may be re-packed or adjusted in the wound to ensure proper placement.
Combat Medical Systems, LLC, Tel: 910-426-0003, Fax: 910-426-0009, Website: www.combatgauze.com
Combat Gauze Directions (2)Pack Wound Completely

• Quickly apply pressure until bleeding stops.
• Hold continuous pressure for 3 minutes.
• Reassess to ensure bleeding is controlled.
• Combat Gauze may be repacked or a second gauze used if initial application fails to provide hemostasis.
Combat Gauze Directions (3)Apply Direct Pressure
Combat Medical Systems, LLC, Tel: 910-426-0003, Fax: 910-426-0009, Website: www.combatgauze.com

• Leave Combat Gauze in place.
• Wrap to effectively secure the dressing in the wound.
Combat Medical Systems, LLC, Tel: 910-426-0003, Fax: 910-426-0009, Website: www.combatgauze.com
Combat Gauze Directions (4)Bandage over Combat Gauze
Although the Emergency Trauma Bandage is shown in this picture, the wound may be secured with any compression bandage, Ace wrap, roller gauze, or cravat.

• Do not remove the bandage or Combat Gauze.
• Transport casualty to next level of medical care as soon as possible.
Combat Gauze Directions (5)Transport & Monitor Casualty
Combat Medical Systems, LLC, Tel: 910-426-0003, Fax: 910-426-0009, Website: www.combatgauze.com

Combat Gauze Video
92
Access Z-Medica’s training module at:
http://www.z-medica.com/Training/TrainingLinks.aspx

Questions?

Direct Pressure
• Can be used as a temporary measure.• It works most of the time for external bleeding.• It can stop even carotid and femoral bleeding.• Bleeding control requires very firm pressure.• Don’t let up pressure to check the wound until
you are prepared to control bleeding with a hemostatic agent or a tourniquet!
• Use for 3 full minutes after applying a hemostatic dressing.
• It is hard to use direct pressure alone to maintain control of big bleeders while moving the casualty.

Hemostatic Dressing Practical

Junctional Hemorrhage
• Term is used to include:– Groin– Buttocks– Perineum– Axilla– Base of neck
Junctional Tourniquets
Why have these devices only recently been added to TCCC?
This war has been going on for 13 years.

Increasing Amputation RatesSep-Dec 2010
Dr. John Holcomb Brief to Defense Health Board 2011

- Amputation rates for evacuated Marines have increased from 6 to 18% over the last 10 months (a 200% increase over baseline.)- The rate in December 2010 was 38%. - The double amputation rate increased by 3 fold in the last 4 months.- Increased genitalia injuries- Most of the amputations are high proximal injuries that are extremely disabling.
Amputation Summary Dr. John Holcomb

IEDSIraq vs Afghanistan
• Iraq– Large amount of explosives – recycled 155
shells– Command or vehicle-detonated– Designed to destroy vehicles
• Afghanistan– Smaller amount of explosives– Homemade explosives– Personnel pressure-detonated– Designed to maim

Dismounted Complex Blast Injury (DCBI)

DCBI Task Force Report – BG Joseph Caravalho Chair

Typically caused by dismounted IED attacks
Wounds that May Result in Junctional Hemorrhage

U.S. Combat Fatalities:Death from Hemorrhage
Eastridge BJ, Mabry RL, Seguin PG, et al. Death on the battlefield (2001-2011): implications for the future of combat casualty care. Journal of Trauma 2012, 73(6) Suppl 5: 431-7.
91%(n=888)
7.9%(n=77) 1.1%
(n=11)0
102030405060708090
100
Hemorrhage Airway Obstruction Tension Pneumothorax
Perc
ent
Physiologic Cause
Extremity [119/888] = 13.5%Junctional [171/888] = 19.2%
Truncal [598/888] = 67.3%

“Groin hemorrhage is the most common type of junctional bleeding where regular tourniquets cannot work.”
Kelly JF, et al.
J Trauma. 2008; 64(suppl 2)
Junctional Hemorrhage

Superficial Anatomyof the Groin
Anterior Superior Iliac Spine
Pubic Tubercle
Inguinal Ligament
Femoral Vessels

Anatomy of the Inguinal Region
Pubic Tubercle
Anterior Superior Iliac Spine
Femoral Artery
External Iliac Artery
Inguinal Ligament
Internal Iliac Artery
Common Iliac Artery

Inguinal Ligament
Ext. iliac a. passing under inguinal lig.
Aorta posterior on the spine
Common femoral vein passing into the leg
Common femoral a. passing into the leg
Int. iliac a. bifurcates from common iliac a.
Ext. iliac a. rising out of pelvis
Bifurcation of common femoral a. into superficial femoral a. and femoral profunda a.
Vascular Anatomy of the Abdomen and Groin

TCCC Management of Junctional Hemorrhage
• The three CoTCCC-recommended junctional tourniquets are:– The Combat Ready Clamp (CRoC)– The Junctional Emergency Treatment Tool
(JETT)– The SAM Junctional Tourniquet (SJT)

TCCC Management of Junctional Hemorrhage
Combat Ready Junctional Emergency Sam Junctional Clamp Treatment Tool Tourniquet
Training materials for all 3 devices are contained in separate modules of the TCCC curriculum.

Abdominal Aortic Tourniquet
• The Abdominal Aortic Tourniquet (a truncal tourniquet) is another option for junctional hemorrhage control.
• It previously had a shorter maximum length of application (1 hour) than the 3 junctional tourniquets listed above. It was also relatively contraindicated in the presence of penetrating abdominal injuries.
• These restrictions have now been removed in a new FDA clearance for the device. • CoTCCC re-evaluation pending

Continued Reassessment!
• Once applied, the junctional tourniquet, as well as the casualty’s other hemorrhage control interventions, must be frequently reassessed to assure continued hemorrhage control.– DO NOT EVER APPLY IT AND
FORGET IT!

Junctional Tourniquet Practical

Thank You!
117Questions?