table of contents table of contents 1 freestyle … · data management system required, available...
TRANSCRIPT
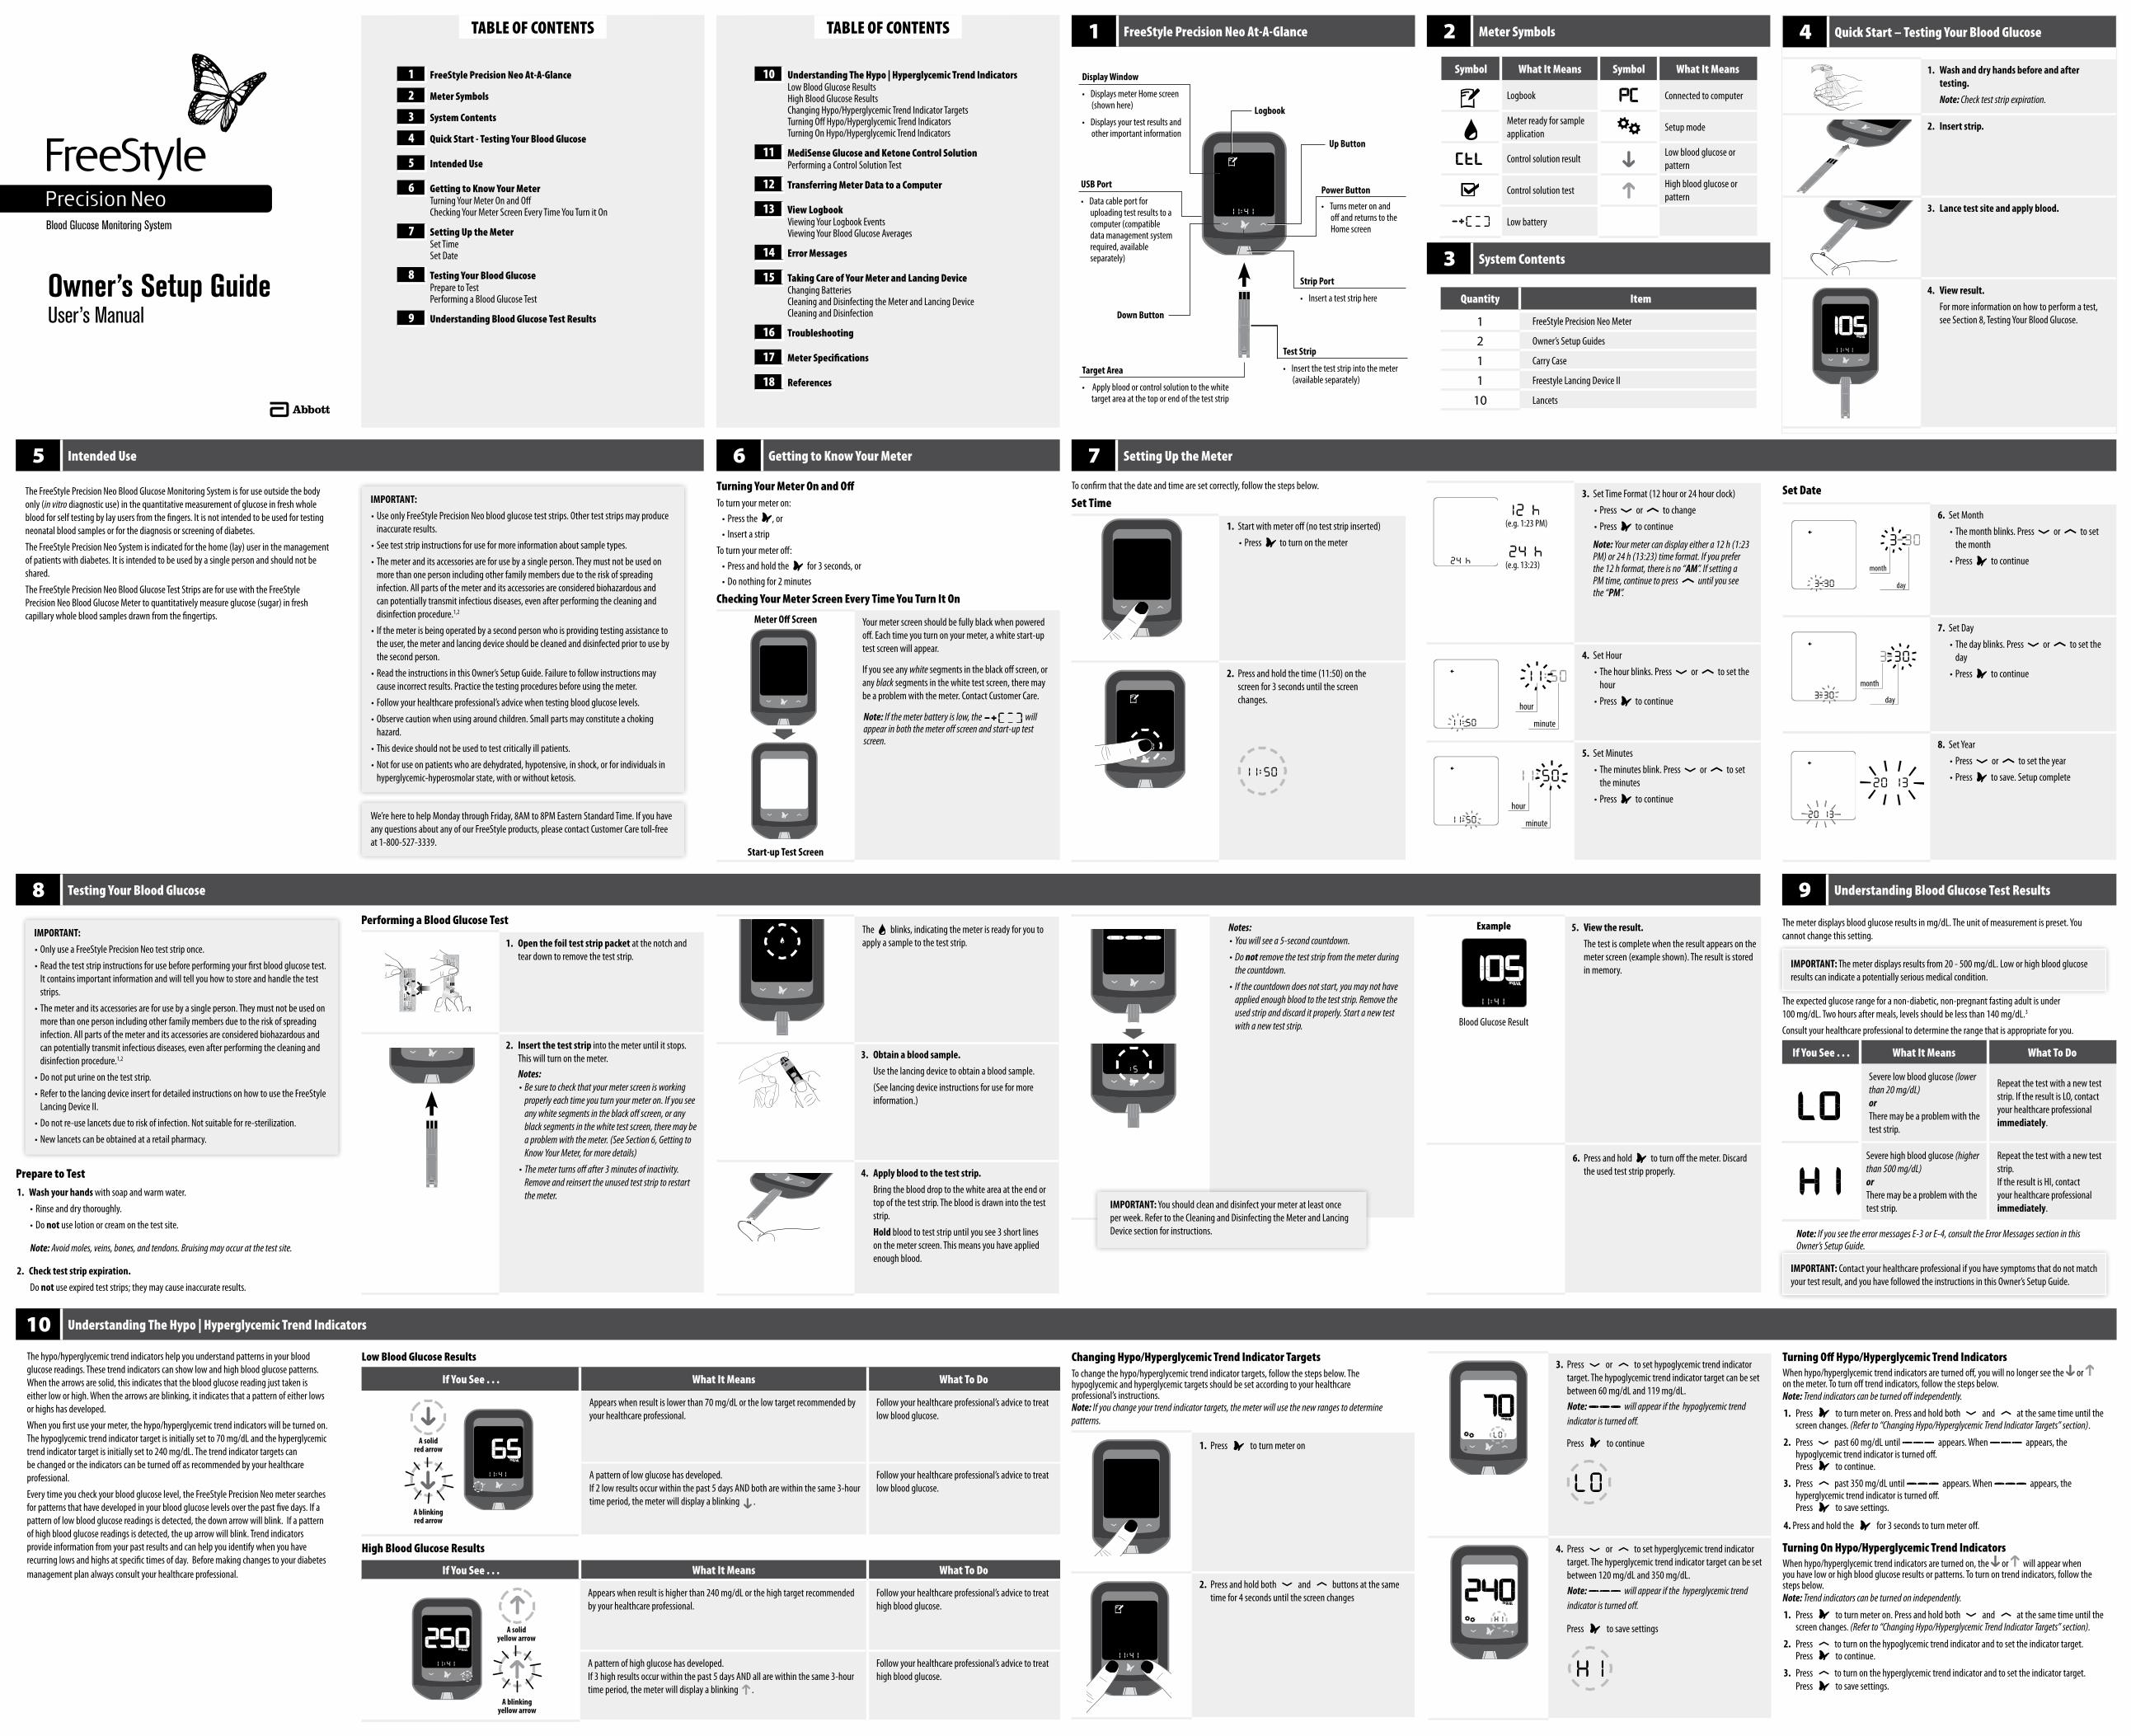
1 FreeStyle Precision Neo At-A-Glance
Logbook
Up Button
Power Button
• Turns meter on and off and returns to the Home screen
USB Port
• Data cable port for uploading test results to a computer (compatible data management system required, available separately)
USB Port
• Data cable port for uploading test results to a computer (compatible data management system required, available separately)
Strip Port
• Insert a test strip here
Test Strip
• Insert the test strip into the meter(available separately)
Target Area
• Apply blood or control solution to the white target area at the top or end of the test strip
Display Window
• Displays meter Home screen (shown here)
• Displays your test results and other important information
Down Button
2 Meter Symbols
Symbol What It Means Symbol What It Means
Logbook Connected to computer
Meter ready for sample application
Setup mode
Control solution resultLow blood glucose or pattern
Control solution testHigh blood glucose or pattern
Low battery
3 System Contents
Quantity Item
1 FreeStyle Precision Neo Meter
2 Owner’s Setup Guides
1 Carry Case
1 Freestyle Lancing Device II
10 Lancets
4 Quick Start – Testing Your Blood Glucose
1. Wash and dry hands before and after testing.
Note: Check test strip expiration.
2. Insert strip.
3. Lance test site and apply blood.
4. View result.
For more information on how to perform a test, see Section 8, Testing Your Blood Glucose.
5 Intended Use
Prepare to Test1. Wash your hands with soap and warm water.
• Rinse and dry thoroughly.
• Do not use lotion or cream on the test site.
Note: Avoid moles, veins, bones, and tendons. Bruising may occur at the test site.
2. Check test strip expiration.
Do not use expired test strips; they may cause inaccurate results.
IMPORTANT:
• Only use a FreeStyle Precision Neo test strip once.
• Read the test strip instructions for use before performing your first blood glucose test. It contains important information and will tell you how to store and handle the test strips.
• The meter and its accessories are for use by a single person. They must not be used on more than one person including other family members due to the risk of spreading infection. All parts of the meter and its accessories are considered biohazardous and can potentially transmit infectious diseases, even after performing the cleaning and disinfection procedure.1,2
• Do not put urine on the test strip.
• Refer to the lancing device insert for detailed instructions on how to use the FreeStyle Lancing Device II.
• Do not re-use lancets due to risk of infection. Not suitable for re-sterilization.
• New lancets can be obtained at a retail pharmacy.
6 Getting to Know Your Meter
Turning Your Meter On and OffTo turn your meter on:
• Press the , or• Insert a strip
To turn your meter off:• Press and hold the for 3 seconds, or• Do nothing for 2 minutes
Checking Your Meter Screen Every Time You Turn It On
Meter Off Screen Your meter screen should be fully black when powered off. Each time you turn on your meter, a white start-up test screen will appear.
If you see any white segments in the black off screen, or any black segments in the white test screen, there may be a problem with the meter. Contact Customer Care.
Note: If the meter battery is low, the will appear in both the meter off screen and start-up test screen.
Start-up Test Screen
➧
7 Setting Up the Meter
To confirm that the date and time are set correctly, follow the steps below.
Set Time
1. Start with meter off (no test strip inserted)
• Press to turn on the meter
2. Press and hold the time (11:50) on the screen for 3 seconds until the screen changes.
(e.g. 1:23 PM)
(e.g. 13:23)
3. Set Time Format (12 hour or 24 hour clock)
• Press or to change
• Press to continue
Note: Your meter can display either a 12 h (1:23 PM) or 24 h (13:23) time format. If you prefer the 12 h format, there is no “AM”. If setting a PM time, continue to press until you see the “PM”.
4. Set Hour
• The hour blinks. Press or to set the hour
• Press to continue
5. Set Minutes
• The minutes blink. Press or to set the minutes
• Press to continue
minute
hour
minute
hour
Set Date
6. Set Month
• The month blinks. Press or to set the month
• Press to continue
7. Set Day
• The day blinks. Press or to set the day
• Press to continue
8. Set Year
• Press or to set the year
• Press to save. Setup complete
day
month
day
month
Performing a Blood Glucose Test
1. Open the foil test strip packet at the notch and tear down to remove the test strip.
2. Insert the test strip into the meter until it stops. This will turn on the meter.Notes:• Be sure to check that your meter screen is working
properly each time you turn your meter on. If you see any white segments in the black off screen, or any black segments in the white test screen, there may be a problem with the meter. (See Section 6, Getting to Know Your Meter, for more details)
• The meter turns off after 3 minutes of inactivity. Remove and reinsert the unused test strip to restart the meter.
Abbo
tt D
iabe
tes C
are
Ltd.
Rang
e Ro
adW
itney
, Oxo
n, O
X29
0YL
Mad
e in
UK.
Bloo
d G
luco
seSe
nsor
Ele
ctro
deAb
bott
Dia
bete
s Car
e Lt
d.Ra
nge
Road
Witn
ey, O
xon,
OX2
9 0Y
LM
ade
in U
K.
4˚C
The blinks, indicating the meter is ready for you to apply a sample to the test strip.
3. Obtain a blood sample.
Use the lancing device to obtain a blood sample.
(See lancing device instructions for use for more information.)
4. Apply blood to the test strip.
Bring the blood drop to the white area at the end or top of the test strip. The blood is drawn into the test strip.
Hold blood to test strip until you see 3 short lines on the meter screen. This means you have applied enough blood.
8 Testing Your Blood Glucose
10 Understanding The Hypo | Hyperglycemic Trend Indicators
Notes:• You will see a 5-second countdown.
• Do not remove the test strip from the meter during the countdown.
• If the countdown does not start, you may not have applied enough blood to the test strip. Remove the used strip and discard it properly. Start a new test with a new test strip.➧
The FreeStyle Precision Neo Blood Glucose Monitoring System is for use outside the body only (in vitro diagnostic use) in the quantitative measurement of glucose in fresh whole blood for self testing by lay users from the fingers. It is not intended to be used for testing neonatal blood samples or for the diagnosis or screening of diabetes.
The FreeStyle Precision Neo System is indicated for the home (lay) user in the management of patients with diabetes. It is intended to be used by a single person and should not be shared.
The FreeStyle Precision Neo Blood Glucose Test Strips are for use with the FreeStyle Precision Neo Blood Glucose Meter to quantitatively measure glucose (sugar) in fresh capillary whole blood samples drawn from the fingertips.
IMPORTANT:
• Use only FreeStyle Precision Neo blood glucose test strips. Other test strips may produce inaccurate results.
• See test strip instructions for use for more information about sample types.
• The meter and its accessories are for use by a single person. They must not be used on more than one person including other family members due to the risk of spreading infection. All parts of the meter and its accessories are considered biohazardous and can potentially transmit infectious diseases, even after performing the cleaning and disinfection procedure.1,2
• If the meter is being operated by a second person who is providing testing assistance to the user, the meter and lancing device should be cleaned and disinfected prior to use by the second person.
• Read the instructions in this Owner’s Setup Guide. Failure to follow instructions may cause incorrect results. Practice the testing procedures before using the meter.
• Follow your healthcare professional’s advice when testing blood glucose levels.
• Observe caution when using around children. Small parts may constitute a choking hazard.
• This device should not be used to test critically ill patients.
• Not for use on patients who are dehydrated, hypotensive, in shock, or for individuals in hyperglycemic-hyperosmolar state, with or without ketosis.
We’re here to help Monday through Friday, 8AM to 8PM Eastern Standard Time. If you have any questions about any of our FreeStyle products, please contact Customer Care toll-free at 1-800-527-3339.
Example
-
Blood Glucose Result
5. View the result.
The test is complete when the result appears on the meter screen (example shown). The result is stored in memory.
6. Press and hold to turn off the meter. Discard the used test strip properly.
9 Understanding Blood Glucose Test Results
The meter displays blood glucose results in mg/dL. The unit of measurement is preset. You cannot change this setting.
IMPORTANT: The meter displays results from 20 - 500 mg/dL. Low or high blood glucose results can indicate a potentially serious medical condition.
The expected glucose range for a non-diabetic, non-pregnant fasting adult is under 100 mg/dL. Two hours after meals, levels should be less than 140 mg/dL.3
Consult your healthcare professional to determine the range that is appropriate for you.
If You See . . . What It Means What To Do
Severe low blood glucose (lower than 20 mg/dL) orThere may be a problem with the test strip.
Repeat the test with a new test strip. If the result is LO, contact your healthcare professional immediately.
Severe high blood glucose (higher than 500 mg/dL)orThere may be a problem with the test strip.
Repeat the test with a new test strip.If the result is HI, contact your healthcare professional immediately.
Note: If you see the error messages E-3 or E-4, consult the Error Messages section in this Owner’s Setup Guide.
IMPORTANT: Contact your healthcare professional if you have symptoms that do not match your test result, and you have followed the instructions in this Owner’s Setup Guide.
IMPORTANT: You should clean and disinfect your meter at least once per week. Refer to the Cleaning and Disinfecting the Meter and Lancing Device section for instructions.
Low Blood Glucose Results
If You See . . . What It Means What To Do
Appears when result is lower than 70 mg/dL or the low target recommended by your healthcare professional.
Follow your healthcare professional’s advice to treat low blood glucose.
A pattern of low glucose has developed.If 2 low results occur within the past 5 days AND both are within the same 3-hour time period, the meter will display a blinking .
Follow your healthcare professional’s advice to treat low blood glucose.
High Blood Glucose Results
If You See . . . What It Means What To Do
Appears when result is higher than 240 mg/dL or the high target recommended by your healthcare professional.
Follow your healthcare professional’s advice to treat high blood glucose.
A pattern of high glucose has developed.If 3 high results occur within the past 5 days AND all are within the same 3-hour time period, the meter will display a blinking .
Follow your healthcare professional’s advice to treat high blood glucose.
A solid red arrow
A blinkingred arrow
A solid yellow arrow
A blinkingyellow arrow
Changing Hypo/Hyperglycemic Trend Indicator TargetsTo change the hypo/hyperglycemic trend indicator targets, follow the steps below. The hypoglycemic and hyperglycemic targets should be set according to your healthcare professional’s instructions.Note: If you change your trend indicator targets, the meter will use the new ranges to determine patterns.
1. Press to turn meter on
2. Press and hold both and buttons at the same time for 4 seconds until the screen changes
3. Press or to set hypoglycemic trend indicator target. The hypoglycemic trend indicator target can be set between 60 mg/dL and 119 mg/dL.
Note: will appear if the hypoglycemic trend indicator is turned off.
Press to continue
4. Press or to set hyperglycemic trend indicator target. The hyperglycemic trend indicator target can be set between 120 mg/dL and 350 mg/dL.
Note: will appear if the hyperglycemic trend indicator is turned off.
Press to save settings
Turning Off Hypo/Hyperglycemic Trend IndicatorsWhen hypo/hyperglycemic trend indicators are turned off, you will no longer see the or on the meter. To turn off trend indicators, follow the steps below.Note: Trend indicators can be turned off independently.
1. Press to turn meter on. Press and hold both and at the same time until the screen changes. (Refer to “Changing Hypo/Hyperglycemic Trend Indicator Targets” section).
2. Press past 60 mg/dL until appears. When appears, the hypoglycemic trend indicator is turned off. Press to continue.
3. Press past 350 mg/dL until appears. When appears, the hyperglycemic trend indicator is turned off. Press to save settings.
4. Press and hold the for 3 seconds to turn meter off.
Turning On Hypo/Hyperglycemic Trend IndicatorsWhen hypo/hyperglycemic trend indicators are turned on, the or will appear when you have low or high blood glucose results or patterns. To turn on trend indicators, follow the steps below.Note: Trend indicators can be turned on independently.
1. Press to turn meter on. Press and hold both and at the same time until the screen changes. (Refer to “Changing Hypo/Hyperglycemic Trend Indicator Targets” section).
2. Press to turn on the hypoglycemic trend indicator and to set the indicator target. Press to continue.
3. Press to turn on the hyperglycemic trend indicator and to set the indicator target. Press to save settings.
The hypo/hyperglycemic trend indicators help you understand patterns in your blood glucose readings. These trend indicators can show low and high blood glucose patterns. When the arrows are solid, this indicates that the blood glucose reading just taken is either low or high. When the arrows are blinking, it indicates that a pattern of either lows or highs has developed.
When you first use your meter, the hypo/hyperglycemic trend indicators will be turned on. The hypoglycemic trend indicator target is initially set to 70 mg/dL and the hyperglycemic trend indicator target is initially set to 240 mg/dL. The trend indicator targets can be changed or the indicators can be turned off as recommended by your healthcare professional.
Every time you check your blood glucose level, the FreeStyle Precision Neo meter searches for patterns that have developed in your blood glucose levels over the past five days. If a pattern of low blood glucose readings is detected, the down arrow will blink. If a pattern of high blood glucose readings is detected, the up arrow will blink. Trend indicators provide information from your past results and can help you identify when you have recurring lows and highs at specific times of day. Before making changes to your diabetes management plan always consult your healthcare professional.
TABLE OF CONTENTSTABLE OF CONTENTS
10 Understanding The Hypo | Hyperglycemic Trend IndicatorsLow Blood Glucose ResultsHigh Blood Glucose ResultsChanging Hypo/Hyperglycemic Trend Indicator TargetsTurning Off Hypo/Hyperglycemic Trend IndicatorsTurning On Hypo/Hyperglycemic Trend Indicators
11 MediSense Glucose and Ketone Control SolutionPerforming a Control Solution Test
12 Transferring Meter Data to a Computer
13 View LogbookViewing Your Logbook EventsViewing Your Blood Glucose Averages
14 Error Messages
15 Taking Care of Your Meter and Lancing DeviceChanging BatteriesCleaning and Disinfecting the Meter and Lancing Device Cleaning and Disinfection
16 Troubleshooting
17 Meter Specifications
18 References
1 FreeStyle Precision Neo At-A-Glance
2 Meter Symbols
3 System Contents
4 Quick Start - Testing Your Blood Glucose
5 Intended Use
6 Getting to Know Your MeterTurning Your Meter On and OffChecking Your Meter Screen Every Time You Turn it On
7 Setting Up the MeterSet TimeSet Date
8 Testing Your Blood GlucosePrepare to TestPerforming a Blood Glucose Test
9 Understanding Blood Glucose Test Results
Blood Glucose Monitoring System
Owner’s Setup GuideUser’s Manual
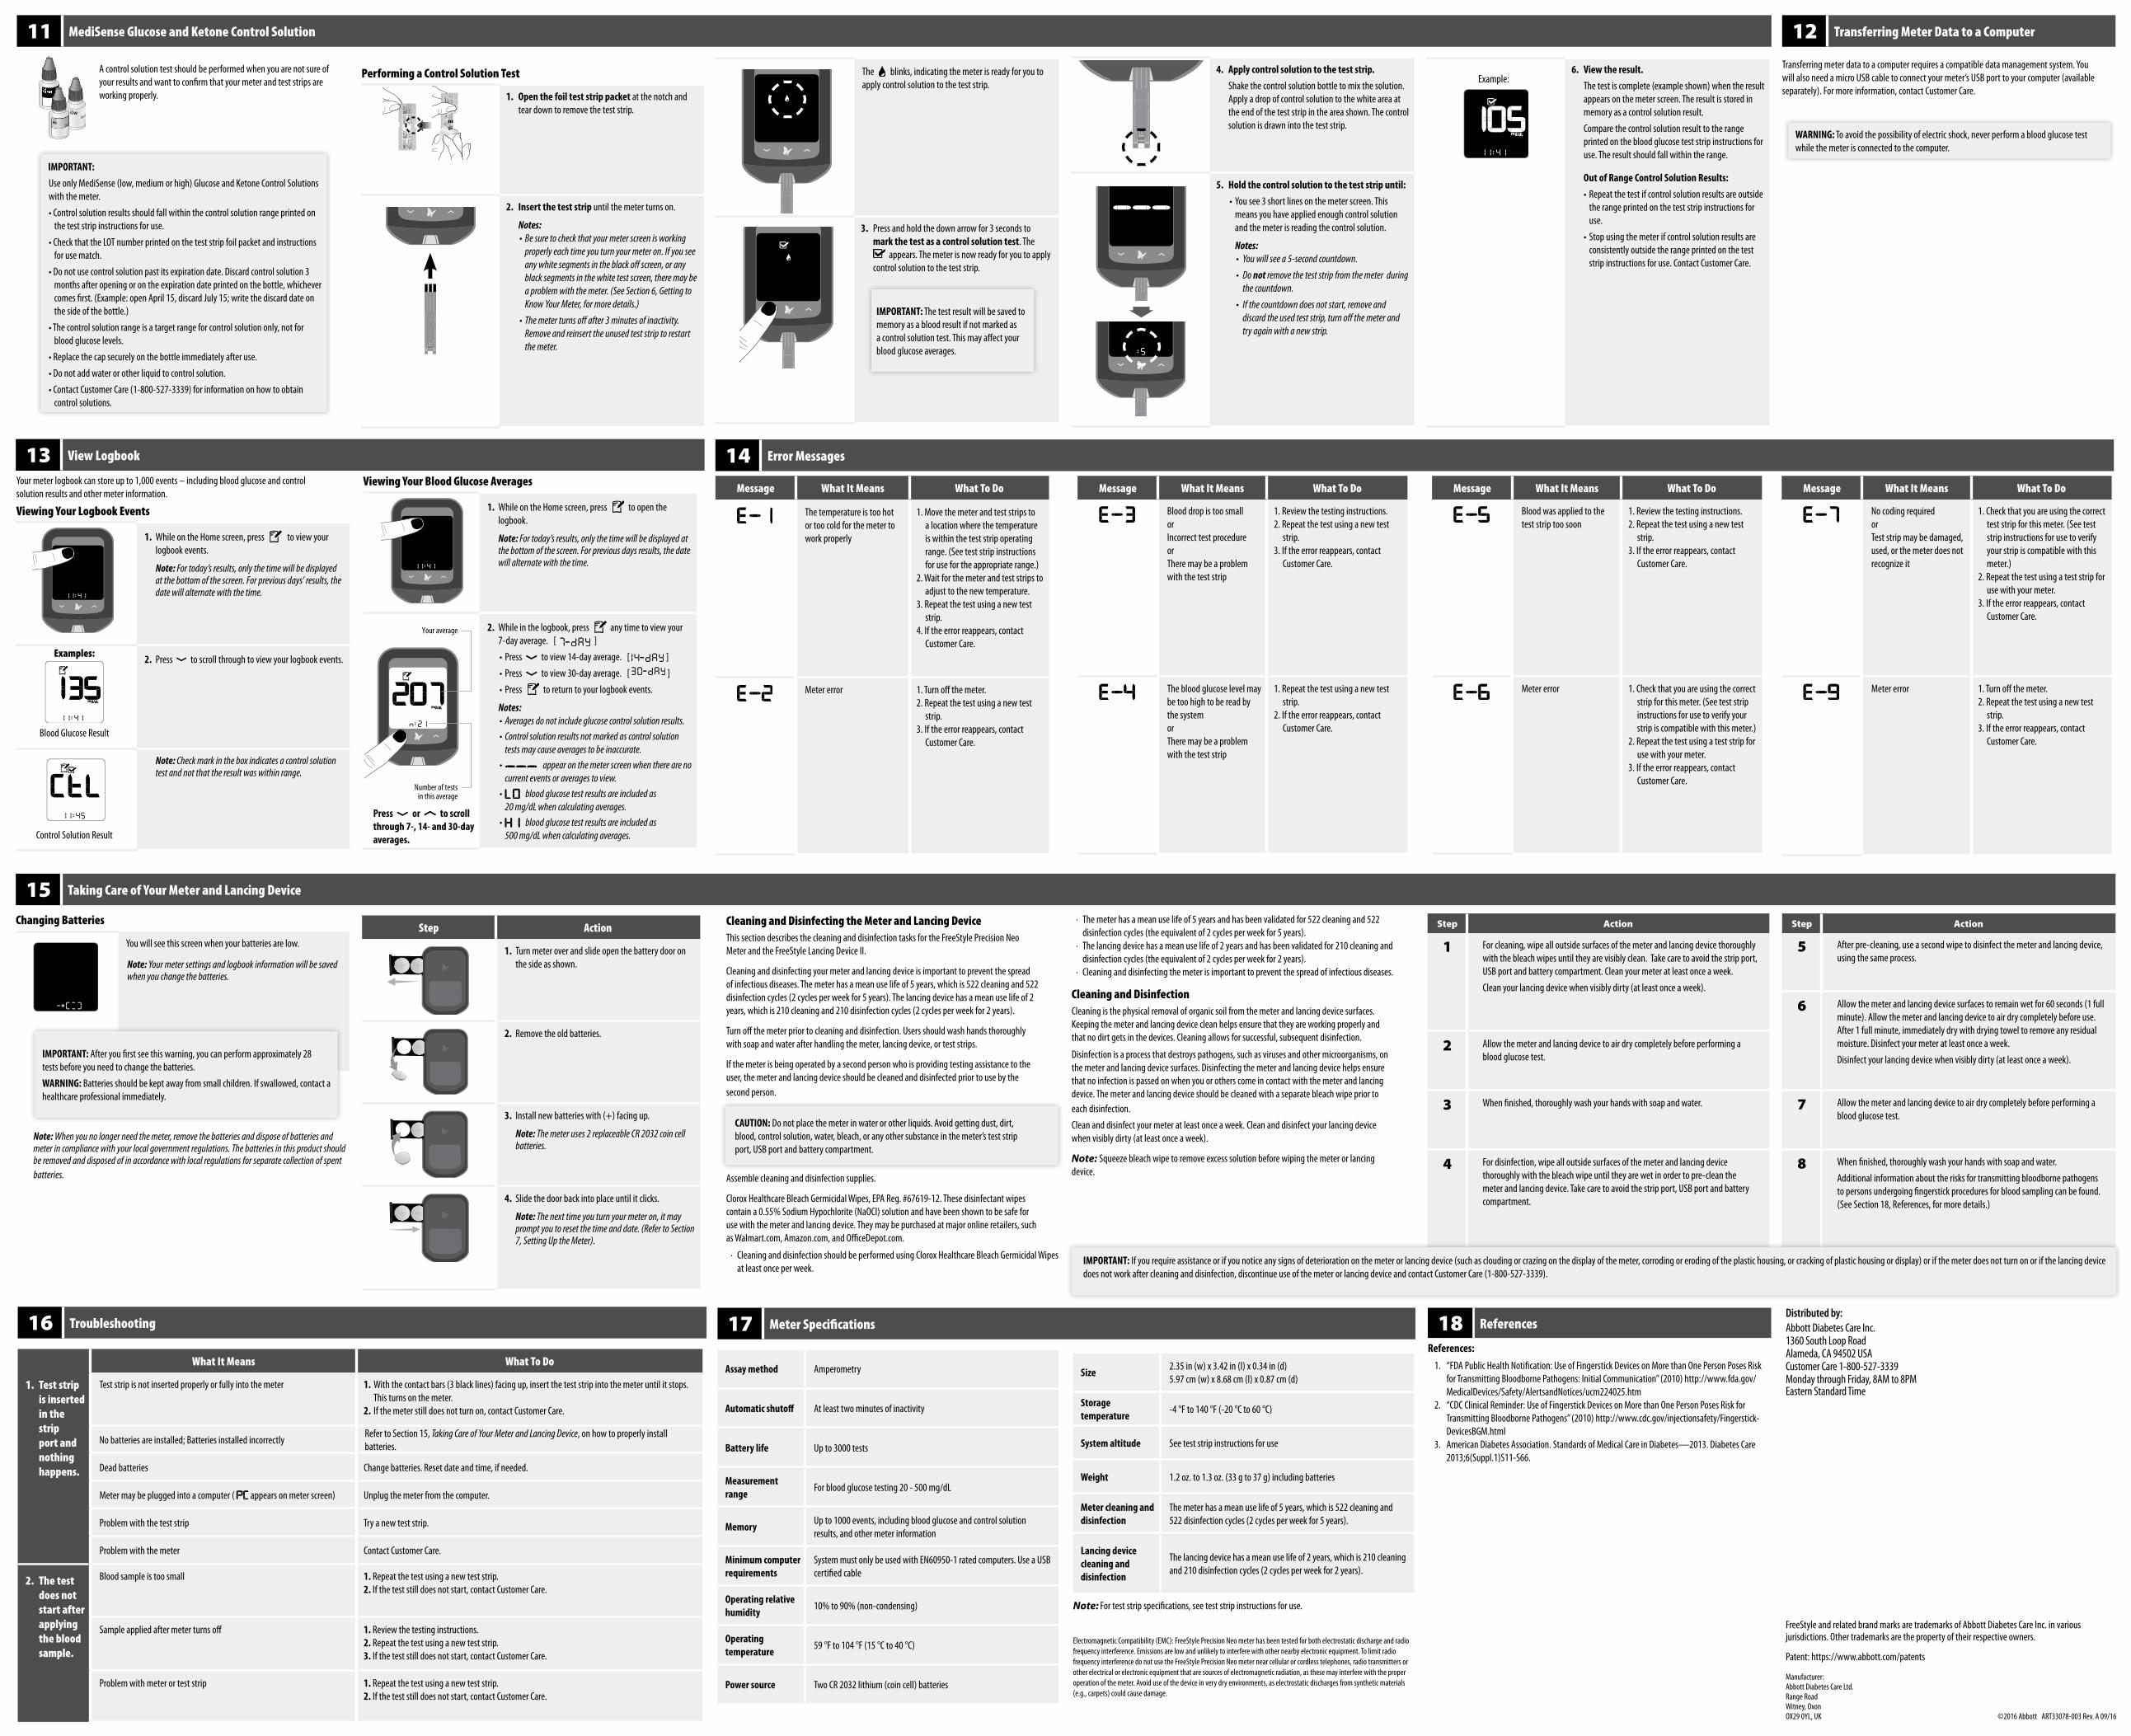
A control solution test should be performed when you are not sure of your results and want to confirm that your meter and test strips are working properly.
IMPORTANT:
Use only MediSense (low, medium or high) Glucose and Ketone Control Solutions with the meter.
• Control solution results should fall within the control solution range printed on the test strip instructions for use.
• Check that the LOT number printed on the test strip foil packet and instructions for use match.
• Do not use control solution past its expiration date. Discard control solution 3 months after opening or on the expiration date printed on the bottle, whichever comes first. (Example: open April 15, discard July 15; write the discard date on the side of the bottle.)
• The control solution range is a target range for control solution only, not for blood glucose levels.
• Replace the cap securely on the bottle immediately after use.
• Do not add water or other liquid to control solution.
• Contact Customer Care (1-800-527-3339) for information on how to obtain control solutions.
11 MediSense Glucose and Ketone Control Solution
Performing a Control Solution Test
1. Open the foil test strip packet at the notch and tear down to remove the test strip.
2. Insert the test strip until the meter turns on.
Notes:• Be sure to check that your meter screen is working
properly each time you turn your meter on. If you see any white segments in the black off screen, or any black segments in the white test screen, there may be a problem with the meter. (See Section 6, Getting to Know Your Meter, for more details.)
• The meter turns off after 3 minutes of inactivity. Remove and reinsert the unused test strip to restart the meter.
Abbo
tt Di
abet
es C
are
Ltd.
Rang
e Ro
adW
itney
, Oxo
n, O
X29
0YL
Mad
e in
UK.
Bloo
d Gl
ucos
eSe
nsor
Ele
ctro
deAb
bott
Diab
etes
Car
e Lt
d.Ra
nge
Road
Witn
ey, O
xon,
OX2
9 0Y
LM
ade
in U
K.
4˚C
The blinks, indicating the meter is ready for you to apply control solution to the test strip.
3. Press and hold the down arrow for 3 seconds to mark the test as a control solution test. The
appears. The meter is now ready for you to apply control solution to the test strip.
IMPORTANT: The test result will be saved to memory as a blood result if not marked as a control solution test. This may affect your blood glucose averages.
4. Apply control solution to the test strip.
Shake the control solution bottle to mix the solution. Apply a drop of control solution to the white area at the end of the test strip in the area shown. The control solution is drawn into the test strip.
5. Hold the control solution to the test strip until:
• You see 3 short lines on the meter screen. This means you have applied enough control solution and the meter is reading the control solution.
Notes:• You will see a 5-second countdown.
• Do not remove the test strip from the meter during the countdown.
• If the countdown does not start, remove and discard the used test strip, turn off the meter and try again with a new strip.
➧
Example:6. View the result.
The test is complete (example shown) when the result appears on the meter screen. The result is stored in memory as a control solution result.
Compare the control solution result to the range printed on the blood glucose test strip instructions for use. The result should fall within the range.
Out of Range Control Solution Results:
• Repeat the test if control solution results are outside the range printed on the test strip instructions for use.
• Stop using the meter if control solution results are consistently outside the range printed on the test strip instructions for use. Contact Customer Care.
12 Transferring Meter Data to a Computer
Transferring meter data to a computer requires a compatible data management system. You will also need a micro USB cable to connect your meter’s USB port to your computer (available separately). For more information, contact Customer Care.
WARNING: To avoid the possibility of electric shock, never perform a blood glucose test while the meter is connected to the computer.
14 Error Messages
16 Troubleshooting
What It Means What To Do
1. Test strip is inserted in the strip port and nothing happens.
Test strip is not inserted properly or fully into the meter 1. With the contact bars (3 black lines) facing up, insert the test strip into the meter until it stops. This turns on the meter.
2. If the meter still does not turn on, contact Customer Care.
No batteries are installed; Batteries installed incorrectlyRefer to Section 15, Taking Care of Your Meter and Lancing Device, on how to properly install batteries.
Dead batteries Change batteries. Reset date and time, if needed.
Meter may be plugged into a computer ( appears on meter screen) Unplug the meter from the computer.
Problem with the test strip Try a new test strip.
Problem with the meter Contact Customer Care.
2. The test does not start after applying the blood sample.
Blood sample is too small 1. Repeat the test using a new test strip.2. If the test still does not start, contact Customer Care.
Sample applied after meter turns off 1. Review the testing instructions.2. Repeat the test using a new test strip.3. If the test still does not start, contact Customer Care.
Problem with meter or test strip 1. Repeat the test using a new test strip.2. If the test still does not start, contact Customer Care.
17 Meter Specifications
Message What It Means What To Do
The temperature is too hot or too cold for the meter to work properly
1. Move the meter and test strips to a location where the temperature is within the test strip operating range. (See test strip instructions for use for the appropriate range.)
2. Wait for the meter and test strips to adjust to the new temperature.
3. Repeat the test using a new test strip.
4. If the error reappears, contact Customer Care.
Meter error 1. Turn off the meter.2. Repeat the test using a new test
strip.3. If the error reappears, contact
Customer Care.
Message What It Means What To Do
Blood drop is too smallorIncorrect test procedureorThere may be a problem with the test strip
1. Review the testing instructions.2. Repeat the test using a new test
strip.3. If the error reappears, contact
Customer Care.
The blood glucose level may be too high to be read by the systemorThere may be a problem with the test strip
1. Repeat the test using a new test strip.
2. If the error reappears, contact Customer Care.
Message What It Means What To Do
Blood was applied to the test strip too soon
1. Review the testing instructions.2. Repeat the test using a new test
strip.3. If the error reappears, contact
Customer Care.
Meter error 1. Check that you are using the correct strip for this meter. (See test strip instructions for use to verify your strip is compatible with this meter.)
2. Repeat the test using a test strip for use with your meter.
3. If the error reappears, contact Customer Care.
15 Taking Care of Your Meter and Lancing Device
Changing Batteries
You will see this screen when your batteries are low.
Note: Your meter settings and logbook information will be saved when you change the batteries.
Note: When you no longer need the meter, remove the batteries and dispose of batteries and meter in compliance with your local government regulations. The batteries in this product should be removed and disposed of in accordance with local regulations for separate collection of spent batteries.
IMPORTANT: After you first see this warning, you can perform approximately 28 tests before you need to change the batteries.
WARNING: Batteries should be kept away from small children. If swallowed, contact a healthcare professional immediately.
Step Action
1. Turn meter over and slide open the battery door on the side as shown.
2. Remove the old batteries.
3. Install new batteries with (+) facing up.
Note: The meter uses 2 replaceable CR 2032 coin cell batteries.
4. Slide the door back into place until it clicks.
Note: The next time you turn your meter on, it may prompt you to reset the time and date. (Refer to Section 7, Setting Up the Meter).
Cleaning and Disinfecting the Meter and Lancing DeviceThis section describes the cleaning and disinfection tasks for the FreeStyle Precision Neo Meter and the FreeStyle Lancing Device II.
Cleaning and disinfecting your meter and lancing device is important to prevent the spread of infectious diseases. The meter has a mean use life of 5 years, which is 522 cleaning and 522 disinfection cycles (2 cycles per week for 5 years). The lancing device has a mean use life of 2 years, which is 210 cleaning and 210 disinfection cycles (2 cycles per week for 2 years).
Turn off the meter prior to cleaning and disinfection. Users should wash hands thoroughly with soap and water after handling the meter, lancing device, or test strips.
If the meter is being operated by a second person who is providing testing assistance to the user, the meter and lancing device should be cleaned and disinfected prior to use by the second person.
Assemble cleaning and disinfection supplies.
Clorox Healthcare Bleach Germicidal Wipes, EPA Reg. #67619-12. These disinfectant wipes contain a 0.55% Sodium Hypochlorite (NaOCl) solution and have been shown to be safe for use with the meter and lancing device. They may be purchased at major online retailers, such as Walmart.com, Amazon.com, and OfficeDepot.com.
· Cleaning and disinfection should be performed using Clorox Healthcare Bleach Germicidal Wipes at least once per week.
CAUTION: Do not place the meter in water or other liquids. Avoid getting dust, dirt, blood, control solution, water, bleach, or any other substance in the meter’s test strip port, USB port and battery compartment.
· The meter has a mean use life of 5 years and has been validated for 522 cleaning and 522 disinfection cycles (the equivalent of 2 cycles per week for 5 years).
· The lancing device has a mean use life of 2 years and has been validated for 210 cleaning and disinfection cycles (the equivalent of 2 cycles per week for 2 years).
· Cleaning and disinfecting the meter is important to prevent the spread of infectious diseases.
Cleaning and DisinfectionCleaning is the physical removal of organic soil from the meter and lancing device surfaces. Keeping the meter and lancing device clean helps ensure that they are working properly and that no dirt gets in the devices. Cleaning allows for successful, subsequent disinfection.
Disinfection is a process that destroys pathogens, such as viruses and other microorganisms, on the meter and lancing device surfaces. Disinfecting the meter and lancing device helps ensure that no infection is passed on when you or others come in contact with the meter and lancing device. The meter and lancing device should be cleaned with a separate bleach wipe prior to each disinfection.
Clean and disinfect your meter at least once a week. Clean and disinfect your lancing device when visibly dirty (at least once a week).
Note: Squeeze bleach wipe to remove excess solution before wiping the meter or lancing device.
Assay method Amperometry
Automatic shutoff At least two minutes of inactivity
Battery life Up to 3000 tests
Measurement range
For blood glucose testing 20 - 500 mg/dL
MemoryUp to 1000 events, including blood glucose and control solution results, and other meter information
Minimum computer requirements
System must only be used with EN60950-1 rated computers. Use a USB certified cable
Operating relative humidity
10% to 90% (non-condensing)
Operating temperature
59 °F to 104 °F (15 °C to 40 °C)
Power source Two CR 2032 lithium (coin cell) batteries
Size2.35 in (w) x 3.42 in (l) x 0.34 in (d)5.97 cm (w) x 8.68 cm (l) x 0.87 cm (d)
Storage temperature
-4 °F to 140 °F (-20 °C to 60 °C)
System altitude See test strip instructions for use
Weight 1.2 oz. to 1.3 oz. (33 g to 37 g) including batteries
Meter cleaning and disinfection
The meter has a mean use life of 5 years, which is 522 cleaning and 522 disinfection cycles (2 cycles per week for 5 years).
Lancing device cleaning and disinfection
The lancing device has a mean use life of 2 years, which is 210 cleaning and 210 disinfection cycles (2 cycles per week for 2 years).
Note: For test strip specifications, see test strip instructions for use.
Electromagnetic Compatibility (EMC): FreeStyle Precision Neo meter has been tested for both electrostatic discharge and radio frequency interference. Emissions are low and unlikely to interfere with other nearby electronic equipment. To limit radio frequency interference do not use the FreeStyle Precision Neo meter near cellular or cordless telephones, radio transmitters or other electrical or electronic equipment that are sources of electromagnetic radiation, as these may interfere with the proper operation of the meter. Avoid use of the device in very dry environments, as electrostatic discharges from synthetic materials (e.g., carpets) could cause damage.
Distributed by:Abbott Diabetes Care Inc.1360 South Loop RoadAlameda, CA 94502 USACustomer Care 1-800-527-3339Monday through Friday, 8AM to 8PM Eastern Standard Time
FreeStyle and related brand marks are trademarks of Abbott Diabetes Care Inc. in various jurisdictions. Other trademarks are the property of their respective owners.
Patent: https://www.abbott.com/patents
©2016 Abbott ART33078-003 Rev. A 09/16
Message What It Means What To Do
No coding requiredorTest strip may be damaged, used, or the meter does not recognize it
1. Check that you are using the correct test strip for this meter. (See test strip instructions for use to verify your strip is compatible with this meter.)
2. Repeat the test using a test strip for use with your meter.
3. If the error reappears, contact Customer Care.
Meter error 1. Turn off the meter.2. Repeat the test using a new test
strip.3. If the error reappears, contact
Customer Care.
18 References
References:
1. “FDA Public Health Notification: Use of Fingerstick Devices on More than One Person Poses Risk for Transmitting Bloodborne Pathogens: Initial Communication” (2010) http://www.fda.gov/MedicalDevices/Safety/AlertsandNotices/ucm224025.htm
2. “CDC Clinical Reminder: Use of Fingerstick Devices on More than One Person Poses Risk for Transmitting Bloodborne Pathogens” (2010) http://www.cdc.gov/injectionsafety/Fingerstick-DevicesBGM.html
3. American Diabetes Association. Standards of Medical Care in Diabetes—2013. Diabetes Care 2013;6(Suppl.1)S11-S66.
Step Action
1 For cleaning, wipe all outside surfaces of the meter and lancing device thoroughly with the bleach wipes until they are visibly clean. Take care to avoid the strip port, USB port and battery compartment. Clean your meter at least once a week.
Clean your lancing device when visibly dirty (at least once a week).
2 Allow the meter and lancing device to air dry completely before performing a blood glucose test.
3 When finished, thoroughly wash your hands with soap and water.
4 For disinfection, wipe all outside surfaces of the meter and lancing device thoroughly with the bleach wipe until they are wet in order to pre-clean the meter and lancing device. Take care to avoid the strip port, USB port and battery compartment.
Manufacturer: Abbott Diabetes Care Ltd.Range RoadWitney, OxonOX29 0YL, UK
Step Action
5 After pre-cleaning, use a second wipe to disinfect the meter and lancing device, using the same process.
6 Allow the meter and lancing device surfaces to remain wet for 60 seconds (1 full minute). Allow the meter and lancing device to air dry completely before use. After 1 full minute, immediately dry with drying towel to remove any residual moisture. Disinfect your meter at least once a week.
Disinfect your lancing device when visibly dirty (at least once a week).
7 Allow the meter and lancing device to air dry completely before performing a blood glucose test.
8 When finished, thoroughly wash your hands with soap and water.
Additional information about the risks for transmitting bloodborne pathogens to persons undergoing fingerstick procedures for blood sampling can be found. (See Section 18, References, for more details.)
IMPORTANT: If you require assistance or if you notice any signs of deterioration on the meter or lancing device (such as clouding or crazing on the display of the meter, corroding or eroding of the plastic housing, or cracking of plastic housing or display) or if the meter does not turn on or if the lancing device does not work after cleaning and disinfection, discontinue use of the meter or lancing device and contact Customer Care (1-800-527-3339).
13 View Logbook
Your meter logbook can store up to 1,000 events – including blood glucose and control solution results and other meter information.
Viewing Your Logbook Events
1. While on the Home screen, press to view your logbook events.
Note: For today’s results, only the time will be displayed at the bottom of the screen. For previous days’ results, the date will alternate with the time.
Examples:
Blood Glucose Result
2. Press to scroll through to view your logbook events.
-Control Solution Result
Note: Check mark in the box indicates a control solution test and not that the result was within range.
Viewing Your Blood Glucose Averages
1. While on the Home screen, press to open the logbook.
Note: For today’s results, only the time will be displayed at the bottom of the screen. For previous days results, the date will alternate with the time.
2. While in the logbook, press any time to view your 7-day average. [ ]
• Press to view 14-day average. [ ]
• Press to view 30-day average. [ ]
• Press to return to your logbook events.
Notes:• Averages do not include glucose control solution results.• Control solution results not marked as control solution
tests may cause averages to be inaccurate.• appear on the meter screen when there are no
current events or averages to view.• blood glucose test results are included as
20 mg/dL when calculating averages.• blood glucose test results are included as
500 mg/dL when calculating averages.
Press or to scroll through 7-, 14- and 30-day averages.
Your average
Number of tests in this average