table of contents - native instruments
TRANSCRIPT


Table of Contents1. Disclaimer ................................................................................................................ 1
2. Foreword .................................................................................................................. 2
3. Welcome to MODULAR ICONS ................................................................................... 3
4. Document Conventions ............................................................................................. 4
5. Installation and Setup ............................................................................................... 5
6. Overview of MODULAR ICONS ................................................................................... 6
7. Browser .................................................................................................................... 87.1. Browser Overview ............................................................................................. 8
8. Snapshots ............................................................................................................... 108.1. Overview of Snapshots .................................................................................... 108.2. Saving a User Snapshot .................................................................................. 118.3. Loading a Snapshot ........................................................................................ 118.4. Deleting a User Snapshot ................................................................................ 12
9. Sound View .............................................................................................................. 149.1. Layer ............................................................................................................. 149.2. Effects ........................................................................................................... 159.3. Filter .............................................................................................................. 169.4. LFO ............................................................................................................... 179.5. Modulation Envelope ....................................................................................... 189.6. Amp Envelope ................................................................................................ 199.7. Modulation ..................................................................................................... 20
10. FX View ................................................................................................................. 2110.1. Overview of the FX View ................................................................................ 2110.2. Managing FX Presets .................................................................................... 22
11. Sequencer View ..................................................................................................... 2411.1. Overview of the Sequencer ............................................................................ 2411.2. Pitch and Velocity ......................................................................................... 2511.3. Macros ........................................................................................................ 2611.4. Sequencing Pitch .......................................................................................... 2711.5. Sequencing Macros ...................................................................................... 2811.6. Managing Sequencer Presets ........................................................................ 29
12. Macros View .......................................................................................................... 3012.1. Overview of the Macros ................................................................................. 3012.2. Macro Assignments ...................................................................................... 3112.3. Macro Options Menu ..................................................................................... 3412.4. Managing Macro Shaper Presets .................................................................... 35
13. Settings View ......................................................................................................... 3613.1. Velocity Curve ............................................................................................... 3813.2. Editing the Velocity Curve .............................................................................. 3913.3. Managing Velocity Curve Presets ................................................................... 40
14. Credits List ............................................................................................................ 41
2

1. Disclaimer
The information in this document is subject to change without notice and does not represent acommitment on the part of Native Instruments GmbH. The software described by this document issubject to a License Agreement and may not be copied to other media. No part of this publicationmay be copied, reproduced or otherwise transmitted or recorded, for any purpose, without priorwritten permission by Native Instruments GmbH, hereinafter referred to as Native Instruments.
“Native Instruments”, “NI” and associated logos are (registered) trademarks of Native InstrumentsGmbH.
Mac, macOS, GarageBand, Logic and iTunes are registered trademarks of Apple Inc., registered inthe U.S. and other countries.
Windows and DirectSound are registered trademarks of Microsoft Corporation in the United Statesand/or other countries.
All other trademarks are the property of their respective owners and use of them does not implyany affiliation with or endorsement by them.
Document authored by Hannah Lockwood, David Gover
Software version: 2.0 (09/2020)
DISCLAIMER 1

2. Foreword
I’m Michelle Moog-Koussa, Executive Director of the Bob Moog Foundation. I’m also Bob’sdaughter. As I write this, and even though I’ve written it countless times before, I am in awe of myconnection to the man that I simply knew as my father—but to legions of people around the worldhe was, and even 15 years after his passing, still remains a source of profound musical andcreative inspiration. After my father's passing in 2005, thousands of people in the electronic musiccommunity reached out to my family with testimonials about how Bob Moog has inspired,changed, or sometimes even transformed their lives. It was at that point we understood theundeniable power of his legacy; a power that deserved, even demanded, to be carried forward tofuture generations. The Bob Moog Foundation was created to do just that.
At the very core of the Foundation is our mission to inspire people of all ages through science,music, and technology, and to encourage them to think creatively and embrace the process ofdiscovery. This mission is, of course, a mirror image of Bob Moog’s long and storied career.Through this focus, we have created Dr. Bob’s SoundSchool, a 10-week curriculum that teachesthousands of elementary school students every year about the science of sound, giving them afoundation upon which to build an advanced understanding of sound as they get older. We havealso dedicated ourselves to the preservation of the history of the Moog Legacy by preserving a vastarray of materials, over 10,000 items, in the Bob Moog Foundation Archives. Recently, we were ableto combine those educational and historic preservation projects to create the Moogseum, a facilitythat brings the history, science, and power of the Moog Legacy alive for thousands of visitors.
The Bob Moog Foundation is fortunate to have the support of companies in the music technologyindustry whose very foundations can be traced back to Bob Moog’s pioneering work in synthesis. Itis in this spirit that we were introduced to Native Instruments, and they enthusiastically embracedthe idea of celebrating Bob’s legacy and supporting the Foundation by creating a uniqueinstrument that would serve to inspire their users. It has always been a goal of mine to celebratenot only my father’s work, but those who have carried it forward through their own innovations.Being that my father’s most seminal work was in modular synthesis, I proposed that we bring hisand others’ foundational sound sculpting instruments to the NI community with hopes that itwould help expand sonic horizons and historical awareness of these early modular synths.
I was thrilled when NI embraced the idea, and delighted when a variety of talented and legendaryartists and sound designers agreed to participate, donating their time and talents to the cause.Collaborators include Jean-Michel Jarre, Steve Porcaro (TOTO), Mark Isham, Michael Boddicker,Jeff Rona, Benge, Walter Holland, Robin Rimbaud, Dan Goldstein, Kurt Ader, Paca Thomas, FrancisPreve, and EMEAPP, who together used a plethora of legendary instruments including KeithEmerson’s iconic Moog modular and a wide variety of other vintage Moog modular synthesizers,as well as Buchla, ARP 2500 and 2600, Roland System 700, Polyfusion, Serge, EMS, EML, plus themammoth TONTO, made famous by Stevie Wonder, and reputed to be the most famous modularsynths in the world. To have over 150 sounds from this array of vintage modular synthesizers istruly unprecedented. I was extremely proud of this offering, as it is a celebration of, and a tribute tomany synthesizer pioneers’ work, bringing a huge diversity of sounds to a new audience. Many NIusers have shared with me how special it is for them to use these sounds, given their human andtechnological origins. I hope you enjoy this very special instrument as much as they have.
Happy Creating, Michelle
FOREWORD 2

3. Welcome to MODULAR ICONS
As part of the KONTAKT Play Series of instruments, MODULAR ICONS was created in collaborationwith the Bob Moog Foundation and brings some of history’s most coveted synth sounds into yourstudio. A collection of over 150 presets have been created from the sounds of legendary artistsand their prized modular instruments from Moog, Roland, ARP, Buchla, and more.
As with all Play Series instruments, MODULAR ICONS aims to balance intuitive, performance-focused sound design and detailed editing. The macros offer quick and dynamic control over thesynth engine, designed for smooth operation and playability that enables you to effortlessly shapeand save your own sounds.
For those who wish to go deeper in sound design, you will find powerful sound editing tools andcustom effects chains that offer further control and inspiration. MODULAR ICONS also contains ananalog-style sequencer that can produce complex melodic and rhythmical patterns. If you'researching for some inspiration, you can try the randomize feature and see where it takes you.Ultimately, MODULAR ICONS' flexibility and playability should encourage you to explore sounds inan exciting and intuitive way.
Thank you for using MODULAR ICONS, and we hope you enjoy it!
WELCOME TO MODULAR ICONS 3

4. Document Conventions
In this document the following formatting is used to highlight useful information:
Italics Indicates paths to locations on your hard disk or other storage devices
Bold Highlights important names, concepts and UI elements.
[Brackets] References keys on a computer’s keyboard
The following three icons represent different types of information:
The tick icon indicates a useful tip, suggestion or interesting fact.
The exclamation mark highlights important information that is essential for the givencontext.
The warning icon alerts you of serious issues and potential risks that require your fullattention.
DOCUMENT CONVENTIONS 4

5. Installation and Setup
Before you can make music with MODULAR ICONS, you must install and setup the necessarysoftware. Follow these instructions to get started:
Native AccessNative Access is where you will install the software for MODULAR ICONS. If you are new to NativeInstruments, you will first have to create your Native ID.
1. Download and install Native Access here.2. Login to Native Access using your Native ID.3. Click the Not installed tab.4. Click INSTALL for the following products:
• KONTAKT or KONTAK PLAYER• MODULAR ICONS
→ The software is installed automatically.
If the software is already installed, click the Available updates tab and check for newupdates before proceeding.
To learn more about Native Access, visit our support page here.
MODULAR ICONS via KONTAKTOnce installed, you can start using MODULAR ICONS in KONTAKT. MODULAR ICONS is not anindependent plug-in, so you first need to open an instance of KONTAKT or KONTAKT PLAYER:
1. Open KONTAKT as a plug-in in your host software (DAW), or as stand-alone application.2. Locate MODULAR ICONS in the Browser, on the left side of the user interface.3. Click Instruments to open the product's content.4. Double-click the Modular Icons.nki file to load the instrument.
If you are new to KONTAKT and want more information, visit KONTAKT PLAYER andKONTAKT.
INSTALLATION AND SETUP 5

6. Overview of MODULAR ICONS
MODULAR ICONS offers a simple but powerful interface built around two sound source layers andsix macro controls. Five additional views—Sound, FX, Sequencer, Macros and Settings—providefurther controls and editing options for different parts of the synth engine. The six macros can beassigned to various dedicated sound parameters for instant sound sculpting from any view.
The Sound view covers all sound generating features, including traditional subtractive synthesizercontrols and MODULAR ICONS' lo-fi sound-shaping tools. In the FX view, you can create customeffects chains for further tonal control and expression. In the Macros view, you can assign andmanage the six macros to suit your . In the Settings view, you can tweak how the synthesizerreacts to your playing style and how notes are prioritized for each layer. Using the sequencer, youcan create a 16-step melodic phrase, with velocity modulation for control over dynamics. Sixadditional sequencing lanes provide further control over the six macros, allowing for precise andnuanced sound design, as well as dramatic and unexpected discoveries.
MODULAR ICONS contains the following key elements and controls:
1. SOUND: Opens and closes the Sound view. Here you can edit the individual sound sources(A/B ) and access parameters for tuning, filters, effects, envelopes, and modulation. For moreinformation, see Sound View.
2. FX: Opens and closes the FX view. Here you can edit effects parameters and the effects chain.Click the power icon next to FX to switch all FX on or off. For more information, see FX View.
3. SEQ: Opens and closes the Sequencer view. Use the Sequencer to create a melodic sequenceof up to sixteen steps, and use the additional six lanes to modulate each of the macroassignments. For more information, see Sequencer View.
4. MACROS: Opens and closes the Macros view. Here you can assign macros, set minimum andmaximum macro values, adjust the Macro Shaper Curve and change the order of the macrocontrols. For more information, see Macros View and Macro Assignments.
5. SETTINGS (cog icon): Opens and closes the Settings view. Here you can set Note Priority, KeyRange, Glide, Velocity Curve, Voice Preserve, and Bend Range. For more information, seeSettings View.
OVERVIEW OF MODULAR ICONS 6
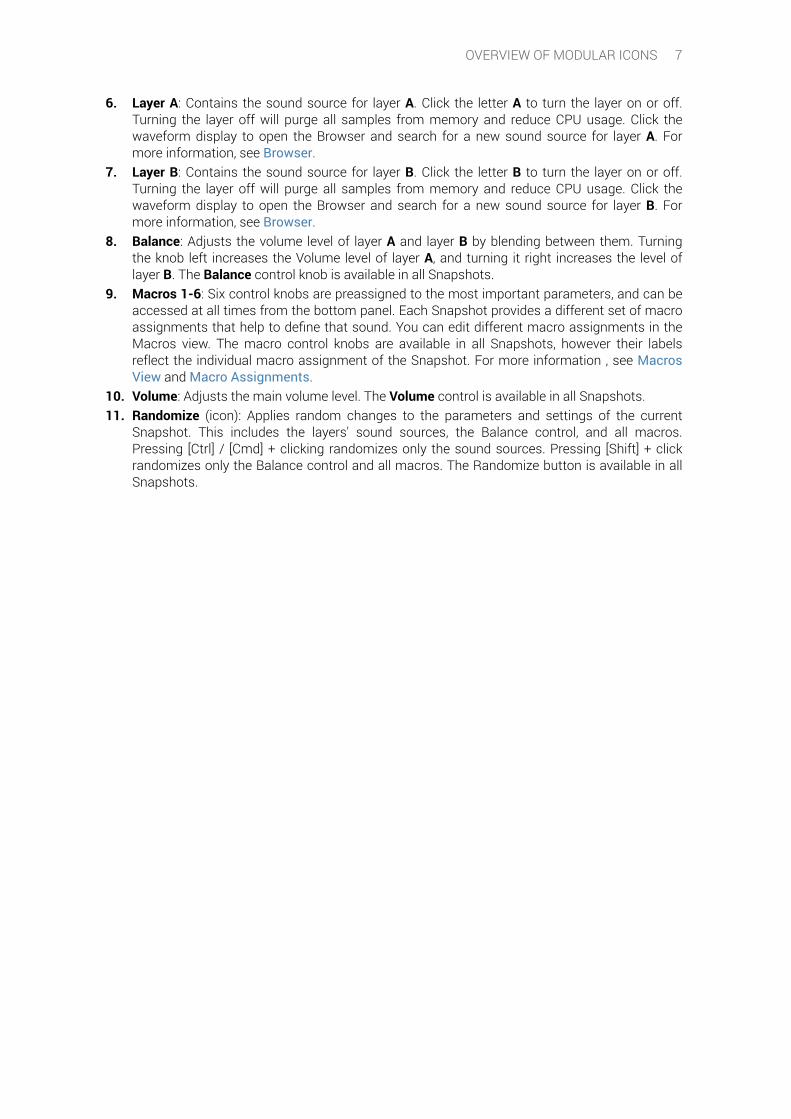
6. Layer A: Contains the sound source for layer A. Click the letter A to turn the layer on or off.Turning the layer off will purge all samples from memory and reduce CPU usage. Click thewaveform display to open the Browser and search for a new sound source for layer A. Formore information, see Browser.
7. Layer B: Contains the sound source for layer B. Click the letter B to turn the layer on or off.Turning the layer off will purge all samples from memory and reduce CPU usage. Click thewaveform display to open the Browser and search for a new sound source for layer B. Formore information, see Browser.
8. Balance: Adjusts the volume level of layer A and layer B by blending between them. Turningthe knob left increases the Volume level of layer A, and turning it right increases the level oflayer B. The Balance control knob is available in all Snapshots.
9. Macros 1-6: Six control knobs are preassigned to the most important parameters, and can beaccessed at all times from the bottom panel. Each Snapshot provides a different set of macroassignments that help to define that sound. You can edit different macro assignments in theMacros view. The macro control knobs are available in all Snapshots, however their labelsreflect the individual macro assignment of the Snapshot. For more information , see MacrosView and Macro Assignments.
10. Volume: Adjusts the main volume level. The Volume control is available in all Snapshots.11. Randomize (icon): Applies random changes to the parameters and settings of the current
Snapshot. This includes the layers' sound sources, the Balance control, and all macros.Pressing [Ctrl] / [Cmd] + clicking randomizes only the sound sources. Pressing [Shift] + clickrandomizes only the Balance control and all macros. The Randomize button is available in allSnapshots.
OVERVIEW OF MODULAR ICONS 7

7. Browser
The Browser contains a collection of custom sound sources and can be used to search and loaddifferent sounds for layers A and B. Access the Browser by clicking the Browser icon (magnifyingglass) in the Sound or Settings view, or via the waveform display in the Main view.
Opening the Browser you will find the source audio that has been produced by some of the mostinfluential electronic music pioneers of the last 60 years and created using some incredibly raremodular systems, from Emu to ARP 2500, Roland System 700, and custom Moog modulars. Othersynthesizers that contributed to the Emu, EMS, Serge Modular, and EML were also recorded, aswell as a Buchla contributed by Benge and Robin Rimbaud. Also included are the sounds of StevePorcaro’s Polyfusion modular synth, who worked closely with synth technician Jim Soloman, tosample the system for MODULAR ICONS. Francis Preve is the sound designer who explored thelegendary TONTO, with access provided by the National Music Centre in Calgary.
Collaborators came from varied backgrounds. Some were decade long users, and others wererecording artists, synth developers, producers and film composers. All were aiming to capture abroad range of samples that showcase the diverse sonic character of modular synthesizers.
7.1. Browser OverviewThe Browser contains the follow features and controls:
1. Layer Selection: Selects the layer of the current Snapshot. Click the letter A or B to switchbetween each layer. Once a layer is selected, you can browse and load a different soundsource for that layer.
2. Sound Sources: Lists the sound sources that are available for each layer. The letter A or B nextto the name of a sound source indicates that it is currently selected for that layer. Click asound source to select it for the current layer. Double-click a sound source to select it for thecurrent layer and close the Browser. The type of sound source is indicated on the right side ofthe sound source, and is defined in the four categories SUS (Sustain), DCY (Decay), PLK(Pluck), and WT (Wavetable).
3. Pages: Provides access to the different pages of sound sources. Click the dot symbols to openthe corresponding page of sound sources, or use the arrow icons (<>) to browse through eachpage.
4. Source Information: Displays details of the selected sound source, including details of whorecorded the sample and what instrument was used.
BROWSER 8

5. X: Closes the Browser and returns to the Main view.
BROWSER 9

8. Snapshots
MODULAR ICONS offers 150 Snapshots divided across five categories: Bass, FX, Lead, Pad andPerc. For this unique project, the Moog Foundation brought together a range of sonically diversemusicians and sound artists to contribute to the preset collection. The presets draw on samplesfrom renowned synthesizers including Keith Emerson's iconic Moog modular and a range of othervintage modular systems from Buchla, ARP 2500 and 2600, Roland System 700, Polyfusion, Serge,EMS, EML, and the legendary TONTO. With such a varied group of musicians and expansivemodular collection, the presets are naturally diverse, and aim to provide you with inspiration foryour own sound creation and exploration.
When browsing Snapshots, the macros are an effective way to explore the sonic potential of eachpreset sound. Snapshots are also a useful starting point from which you can tweak and tailor yourown sounds. When a User Snapshot is saved, the macro settings, parameter controls, andsequence are also stored within the preset. Using Snapshots, you can create your own presetsounds, save them in the .nksn file format and use them in other projects, across computers oreven share them with other users.
8.1. Overview of SnapshotsSnapshots offer a quick and convenient way of browsing for new sounds and saving custompresets. Key features relating to Snapshots include:
1. Load Snapshot: Opens the Snapshot menu where you can load a Snapshot from the Factoryor User library. For more information, see Loading a Snapshot.
2. Snapshot Name: Displays the name of the currently selected Snapshot.3. Snapshot Previous/Next (<> icons): Allows you to quickly browse and load Snapshots.
Pressing an arrow icon will load the previous or next Snapshot in the selected category. If noSnapshot is active, the first Snapshot on the list will be loaded. For more information, seeLoading a Snapshot.
4. Save Snapshot (floppy disk icon): Allows you to save changes made to a sound. When a UserSnapshot is saved, the macros settings, parameter controls, and sequence are stored within itand can be accessed at any time via the User library. For more information, see Saving a UserSnapshot.
5. Delete Snapshot (bin icon): Deletes the currently selected Snapshot from the User library. Youcan only delete User Snapshots and not Factory Snapshots. For more information, seeDeleting a User Snapshot.
6. Snapshot View (camera icon): Provides access to the Snapshot features described above;saving, loading, browsing, and deleting. When Snapshot View is selected, configurationsettings and features relating to the Info View are replaced in the display.
SNAPSHOTS 10

8.2. Saving a User SnapshotSnapshots can be saved at any time while you are working on them. When a Snapshot is saved, themacro settings, parameter controls, and the sequence are also saved. You can choose to save asequence separately using the Sequencer Preset Manager and then load it back later to try it outwith another sound. For more information, see Managing Sequencer Presets.
To save a Snapshot:
1. Click the Snapshot View button (camera icon) to open Snapshot view.2. Click the Save button (floppy disk icon).3. Enter a name for your new Snapshot in the Save dialog box.4. Click Save to finish the process and close the dialog box.
→ Your Snapshot .nksn file is saved to the User Snapshot Library. It appears in the UserSnapshot list.
To overwrite a Snapshot:
1. Click the Snapshot View button (camera icon) to open Snapshot view.2. Click the Save button (floppy disk icon).3. Click Overwrite to confirm the process.
→ Your Snapshot .nksn file is saved to the User Snapshot Library, in replace of the old file.
8.3. Loading a SnapshotSnapshots are loaded from the drop-down menu in the top header of the instrument. You can alsouse the arrows to the left of the floppy disk icon to load the previous or next preset.
To load and browse Snapshots using the arrows:
1. Click the Snapshot View (camera icon) to open Snapshot view.
SNAPSHOTS 11

2. Click the arrow icons (<>) in the Snapshot header to browse through the Snapshots list.
→ The previous or next Snapshot will load immediately each time an arrow icon is clicked.
To load a Snapshot from the library:
1. Click the Snapshot View (camera icon) to open Snapshot view.2. Click the arrow next to the Snapshot name field.3. Select the Factory category to load a Factory preset, or select the User category to load one of
your own snapshots.4. Select an instrument category.5. Click a Snapshot to load it.
Note that the User category will not appear until you have first saved a Snapshot.
8.4. Deleting a User SnapshotSnapshots can be deleted using the bin icon in the instrument header. To delete a User Snapshot:
1. Click the Snapshot view (camera icon) to open Snapshot view.2. Load the User Snapshot you wish to delete.3. Click the Delete button (bin icon).
SNAPSHOTS 12

4. Confirm deletion of the Snapshot by selecting Yes in the dialog box.
SNAPSHOTS 13

9. Sound View
The Sound view displays all controls related to the selection and editing of your sound sources.You can edit each layer separately, or edit both at the same time using Layer Link.
The Sound view contains the following sections and controls:
1. Layer Link: When activated, this control links both layers and any edits performed in theselected layer will also be applied to the other layer. Press [Ctrl] / [Cmd] + click the Layer Linkbutton to instantly set all parameters on the layers to match. Layer linking does not applywhen assigning or moving macros, and if one layer uses a sample as the sound source andthe other a wavetable, some parameters in the Lo-fi effects section will not be matchedbecause they each use a different set of Lo-fi effects.
2. LAYER: This includes all sample settings such as tuning, pan, and volume. For moreinformation, see Layer.
3. EFFECTS: Adds various digital artefacts, like quantization noise or aliasing, to your layer. Formore information, see Effects.
4. FILTER: Adjust the brightness of the sound and determine how this changes across the rangeof the keyboard. There are a range of filter types available, each providing a different soundcharacteristic. For more information, see Filter.
5. LFO: Provides controls relating to the function and behavior of the two Low-FrequencyOscillators. LFOs produce periodic modulation, which can be used to modulate variousparameters in the Sound and FX views. For more information, see LFO.
6. MOD ENVELOPE: Adjusts how the modulation is applied to a sound over time. For moreinformation, see Modulation Envelope.
7. AMP ENVELOPE: Adjusts how the amplitude of a sound changes over time, from the momentthe note is played to its release. For more information, see Amp Envelope.
8. MODULATION: Selects a Modulation Source from which you can send modulation to variousparameters. Once the Modulation Source is selected, sliders appear next to the availableparameters to adjust the amount of modulation applied. For more information, seeModulation.
9.1. LayerThe Layer section sets the foundation of the sound. Here you can select a sound source, set keytracking and adjust the base pitch. Additionally, you can place the sound source in the stereo fieldand adjust its volume.
SOUND VIEW 14
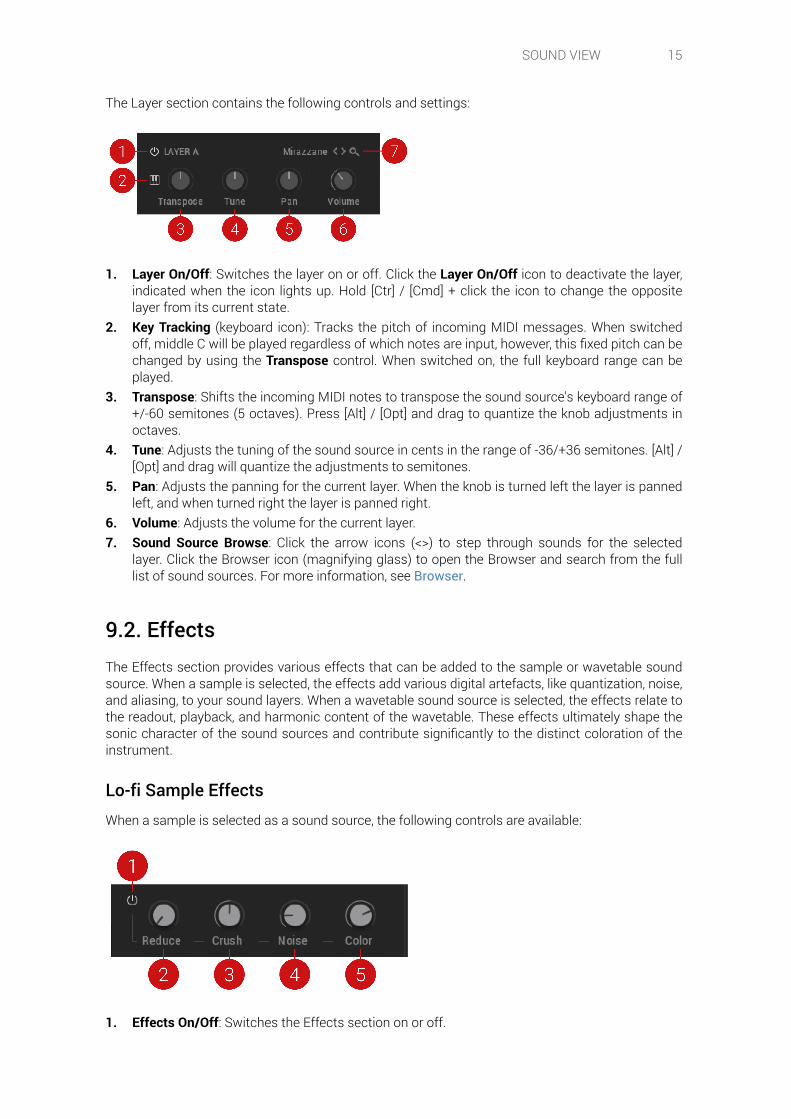
The Layer section contains the following controls and settings:
1. Layer On/Off: Switches the layer on or off. Click the Layer On/Off icon to deactivate the layer,indicated when the icon lights up. Hold [Ctr] / [Cmd] + click the icon to change the oppositelayer from its current state.
2. Key Tracking (keyboard icon): Tracks the pitch of incoming MIDI messages. When switchedoff, middle C will be played regardless of which notes are input, however, this fixed pitch can bechanged by using the Transpose control. When switched on, the full keyboard range can beplayed.
3. Transpose: Shifts the incoming MIDI notes to transpose the sound source's keyboard range of+/-60 semitones (5 octaves). Press [Alt] / [Opt] and drag to quantize the knob adjustments inoctaves.
4. Tune: Adjusts the tuning of the sound source in cents in the range of -36/+36 semitones. [Alt] /[Opt] and drag will quantize the adjustments to semitones.
5. Pan: Adjusts the panning for the current layer. When the knob is turned left the layer is pannedleft, and when turned right the layer is panned right.
6. Volume: Adjusts the volume for the current layer.7. Sound Source Browse: Click the arrow icons (<>) to step through sounds for the selected
layer. Click the Browser icon (magnifying glass) to open the Browser and search from the fulllist of sound sources. For more information, see Browser.
9.2. EffectsThe Effects section provides various effects that can be added to the sample or wavetable soundsource. When a sample is selected, the effects add various digital artefacts, like quantization, noise,and aliasing, to your sound layers. When a wavetable sound source is selected, the effects relate tothe readout, playback, and harmonic content of the wavetable. These effects ultimately shape thesonic character of the sound sources and contribute significantly to the distinct coloration of theinstrument.
Lo-fi Sample EffectsWhen a sample is selected as a sound source, the following controls are available:
1. Effects On/Off: Switches the Effects section on or off.
SOUND VIEW 15

2. Reduce: Re-samples the signal to an adjustable sample rate. The re-sampling is done withoutany kind of (usually mandatory) low-pass filtering, which causes all kinds of wonderful aliasingartefacts. The sample rate goes all the way down to 50 Hz, which will omit most of the originalsignal. When the control in the left-most position there is no reduction. Turn the control to theright to reduce the sample rate.
3. Crush: Re-quantizes the signal to an adjustable bit depth. Fractional bit levels (such as 12.4bits) are possible and can add a significant gritty quality to the sound. Audio CDs have aquantization depth of 16 bits, old samplers' frequently used 8 or 12 bits, and 4 bits evokememories of countless children’s toys. When the control is turned fully left, no effect is appliedto the signal. Turn the control right to reduce the bit rate.
4. Noise: Adds hiss to the audio signal. Turning the control from left to right increases the noiselevel.
5. Color: Adjusts the frequency characteristic of the noise and acts as a low-pass filter. Turn thecontrol from left to right to increase the amount of filtering applied to the Noise parameter.
Lo-fi Wavetable EffectsWhen a wavetable is selected as a sound source, the following controls are available:
1. Position: Morphs between the waveforms included in the loaded wavetable. Modulate thiswith an LFO for more interesting results.
2. Form: Adjusts the amount of waveshaping applied to the phase of the oscillator.3. Warp: Selects one of 14 types of waveshaping that is applied to the wavetable's phase. This
fundamentally changes the way the wavetable is read out, therefore bending and warping theresulting waveform.
4. Inharmonic: Adds a second oscillator which can be detuned against the first one to produceinharmonic sounds. Turning the control left and right adjusts the amount of detuning in Hertz.
5. Inharmonic On/Off: Switches Inharmonic on or off. Switching Inhamonic off can help reduceCPU load.
9.3. FilterFilters take the basic, raw sound of the samples and subtracts frequencies, changing the harmoniccontent and thereby the character of the sound. This change can be varied over time usingmodulation to produce more dynamic, animated timbres.
MODULAR ICONS offers a range of different filters from KONTAKT, each providing their own uniquecharacteristics, as well as low-pass, notch, high-pass, and band-pass modes.
SOUND VIEW 16
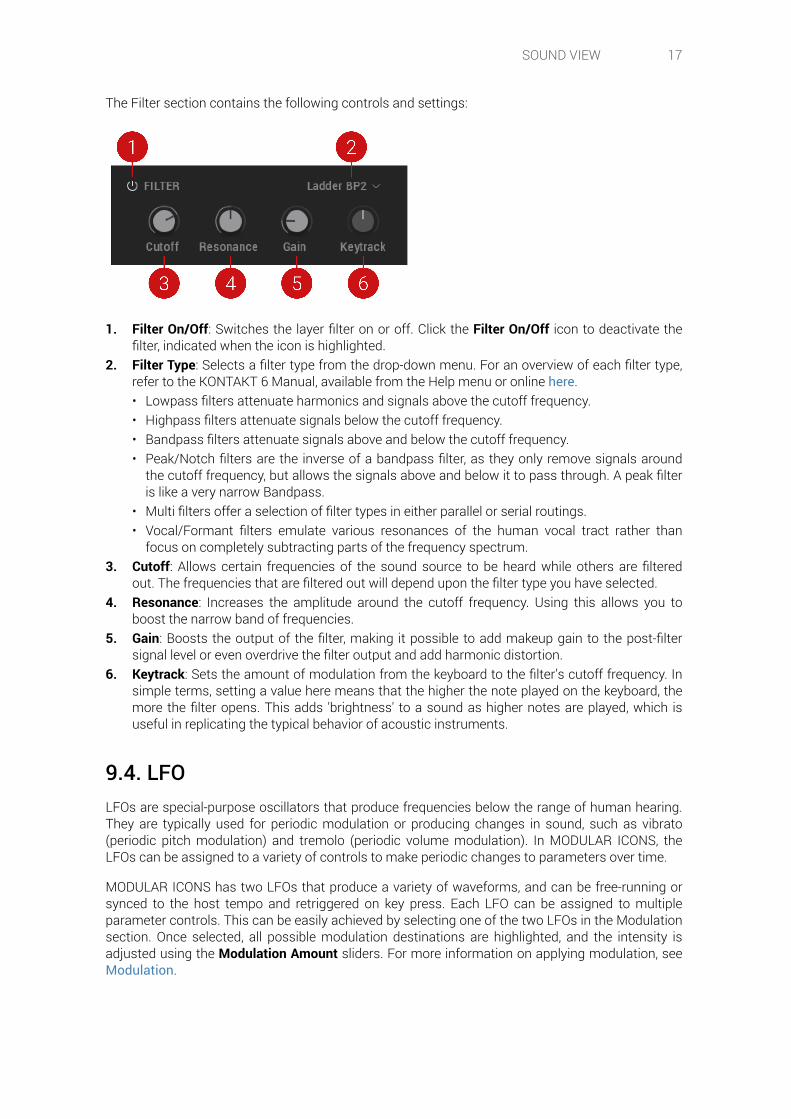
The Filter section contains the following controls and settings:
1. Filter On/Off: Switches the layer filter on or off. Click the Filter On/Off icon to deactivate thefilter, indicated when the icon is highlighted.
2. Filter Type: Selects a filter type from the drop-down menu. For an overview of each filter type,refer to the KONTAKT 6 Manual, available from the Help menu or online here.• Lowpass filters attenuate harmonics and signals above the cutoff frequency.• Highpass filters attenuate signals below the cutoff frequency.• Bandpass filters attenuate signals above and below the cutoff frequency.• Peak/Notch filters are the inverse of a bandpass filter, as they only remove signals around
the cutoff frequency, but allows the signals above and below it to pass through. A peak filteris like a very narrow Bandpass.
• Multi filters offer a selection of filter types in either parallel or serial routings.• Vocal/Formant filters emulate various resonances of the human vocal tract rather than
focus on completely subtracting parts of the frequency spectrum.3. Cutoff: Allows certain frequencies of the sound source to be heard while others are filtered
out. The frequencies that are filtered out will depend upon the filter type you have selected.4. Resonance: Increases the amplitude around the cutoff frequency. Using this allows you to
boost the narrow band of frequencies.5. Gain: Boosts the output of the filter, making it possible to add makeup gain to the post-filter
signal level or even overdrive the filter output and add harmonic distortion.6. Keytrack: Sets the amount of modulation from the keyboard to the filter’s cutoff frequency. In
simple terms, setting a value here means that the higher the note played on the keyboard, themore the filter opens. This adds 'brightness' to a sound as higher notes are played, which isuseful in replicating the typical behavior of acoustic instruments.
9.4. LFOLFOs are special-purpose oscillators that produce frequencies below the range of human hearing.They are typically used for periodic modulation or producing changes in sound, such as vibrato(periodic pitch modulation) and tremolo (periodic volume modulation). In MODULAR ICONS, theLFOs can be assigned to a variety of controls to make periodic changes to parameters over time.
MODULAR ICONS has two LFOs that produce a variety of waveforms, and can be free-running orsynced to the host tempo and retriggered on key press. Each LFO can be assigned to multipleparameter controls. This can be easily achieved by selecting one of the two LFOs in the Modulationsection. Once selected, all possible modulation destinations are highlighted, and the intensity isadjusted using the Modulation Amount sliders. For more information on applying modulation, seeModulation.
SOUND VIEW 17

The LFOs contain the following controls and settings:
1. Waveform: Selects the waveform for the LFO. The available waveforms are Sine, Triangle,Sawtooth, 5% Pulse, 15% Pulse, 25% Pulse, 33% Pulse, Square, 66% Pulse, 75% Pulse, 85%Pulse, 95% Pulse, Random, Multi.
2. Tempo Sync: Synchronizes the speed of the LFO to your host tempo, or an external MIDI clock.When Tempo Sync is on, the Rate control will display how many notes of this value will makeup the duration of one cycle. When inactive, the Rate control operates in Hz rather thanrhythmic divisions.
3. Rate: Adjusts the frequency of this LFOs output signal in Hz (cycles per second). Values rangefrom 0.01 Hz (one cycle in 100 seconds) to around 210 Hz.
4. RT (Retrigger): When activated, the LFO waveform will be restarted at the same position eachtime a note is received. When inactive, the LFO will run, without reacting to incoming notes.
5. Fade In: If this value is greater than zero, the LFO will not start the waveform immediatelywhen a note is received, but rather smoothly ramp it up over a time of up to 10 seconds. Thisparameter is only available when RT is activated.
9.5. Modulation EnvelopeThe Modulation Envelope is used to shape the contour of the destination over time by giving youcontrol over its attack, decay, sustain, and release stages. It provides flexibility by allowing you tofreely assign it to multiple destinations at once and control the amount of modulation applied.Additionally, the Modulation Envelope provides additional control for defining its attack curve.
The Mod Envelope contains the following controls:
SOUND VIEW 18

1. Attack Curve: Defines the shape of the attack portion of the envelope. Use in combination withthe A (Attack Time) to define how the modulation starts after a key is pressed. Click and dragthe curve upward or downward to change its shape.
2. A (Attack Time): Adjusts the time it takes once a key is pressed, for the envelope to reach thepeak level. This control can be used to create modulation with a fast or slow fade-in. Turnedfully left, the envelope will start immediately.
3. D (Decay Time): Adjusts the time it takes for the envelope to fall from the attack's maximumlevel to the level defined by the Sustain control. Turning the knob right increases the DecayTime.
4. S (Sustain Level): Sets the modulation level that the envelope remains at while the key is helddown, after the Decay Time has expired.
5. R (Release Time): Adjusts the amount of time it takes for the envelope to fall from the setSustain Level and fade to zero, once the key is release. It can be used to create modulationwith a short or long fade-out.
9.6. Amp EnvelopeThe Amp Envelope has a dedicated, four-stage envelope generator that is used to shape thecontour of the volume of a sound over time by giving you control over its attack, decay, sustain, andrelease stages. Additionally, the Amp Envelope provides additional control for defining its attackcurve.
The Amp Envelope contains the following controls:
1. Attack Curve: Defines the shape of the attack portion of the envelope. Use in combination withA (Attack Time) to define how the sound starts after a key is pressed. Click + drag the curveupward or downward to change its shape.
2. A (Attack Time): Adjusts the time it takes once a key is pressed, for the volume to climb fromzero to full volume. It can be used to create a sound with a slow fade-in.
3. D (Decay Time): Adjusts the time it takes for the volume to fall from its initial full volume to thelevel set by the Sustain contro,l while a key is held down.
4. S (Sustain Level): Sets the volume level that the envelope remains at while the key is helddown, after the Decay Time has expired.
5. R (Release Time): Adjusts the time it takes for the volume to fall from the Sustain Level tozero once the key is released. It can be used to create sounds that have a short or long fade-out.
SOUND VIEW 19

9.7. ModulationModulation adds movement to your sound by changing parameters over time. When you applymodulation to controls, the controls change their value according to the shape of the modulationsignal. The modulation section allows you to select the source of your modulation and then add anamount to the destination.
There are many sources for modulation, one of the most basic being an envelope. When triggeredby a note event, the envelope produces a single contour that can be used to change controls overthe course of a note. Likewise, LFOs provide a periodic change at a set rate.
Modulation can also be applied manually by using Velocity, Aftertouch or a Modwheel as thesource. This allows you to be expressive and add movement, dynamics, and variation to a soundwhile you're playing. For example, you could set the modulation wheel on your keyboard as thesource to control the Effects or use Velocity to control the amount of filter Cutoff.
The Modulation section contains the following controls:
1. Modulation Source: Selects a target source from the seven Modulation Sources that allowsyou to apply modulation tovarious other parameters. The Modulation Sources include a ModEnvelope, Amp Envelope, LFO 1, LFO 2, Velocity, Aftertouch and Modwheel. Hold [CTR] / [CMD]+ click the Modulation Source button to reset all modulation assignments to their defaultvalue.
2. Modulation Sliders: When a Modulation Source has been selected, sliders appear next to therelevant parameter controls that are available for modulation.
3. Modulation Amount: Use the sliders to set the amount of modulation applied a parameter.This determines the strength of the modulation applied from the selected Modulation Source.Click + drag the mouse up and down to set the amount. The value range is -100% to 100%.
SOUND VIEW 20

10. FX View
MODULAR ICONS features a range of powerful KONTAKT effects that can be loaded into six FXunit slots and applied globally to both layers. From classic time-based effects like reverb, delay andchorus, to dynamic effects, saturation, amp emulations and more, the FX view encouragescreativity and allows you to further define the character of your sound.
In the FX view, you can access the various parameter controls and settings relating to the FX units,FX chain and FX presets. Using the parameter controls you can alter the effects chain of any presetand build custom effects chains for your own user presets. Browse and replace effects from thedropdown menus, and quickly change the order of the FX chain by dragging an FX unit to anotherposition. Both layers A and B have their own EQ, which can be bypassed using the power buttons.Additionally, you can assign parameters of the loaded effects to any of the macro controls. Formore information, see Macros View.
10.1. Overview of the FX ViewThe FX view contains the following elements and controls:
1. FX Preset Menu: Enables you to save and load your effects unit presets, your effects chainsand quickly initialize either an effects unit or effects chain. For more information see,Managing FX Presets.
2. Layer A/B EQ: Selects the equalizer for Layer A or B. Equalization, or EQ for short, meansboosting or reducing (attenuating) the levels of different frequencies in a signal. When an EQ isselected the controls for the equalizer appear below and the settings for each frequency band(low, low mid, high mid and high) and their respective gain can be adjusted. Q allows you toattenuate or boost a very narrow or wide range of frequencies within each EQ band.
3. FX Chain: Represents the effects chain i.e., the order of the effects for both layers which run inseries. You can change the order of the effects by clicking + dragging an FX unit left or right.
4. FX Units: Represents each effect within the FX Chain. Switch the effect on or off by clickingthe power button. Use the drop-down menu on the right of each unit to load an effect. Thecontrols for the selected FX unit are displayed below. For more information on the effects,refer to the KONTAKT manual. Its available from the Help menu or the Native Instrumentswebsite.
5. FX Parameter Controls: Displays the parameter controls for the selected FX unit. Each effecthas a its own range of controls and settings that are specific to its function and behavior. Formore information on the effects and their related controls, refer to the KONTAKT manual,available from the Help menu or the Native Instruments website.
FX VIEW 21

10.2. Managing FX PresetsWhile FX settings are automatically saved with each snapshot, the FX Preset Management allowsyou to save FX unit and FX chain presets separately, and load them onto other sounds. Otherfeatures includes a clear function that removes the loaded FX unit or FX chain, and an option toreset an FX unit to its default values.
The following workflows demonstrate how to save, load, reset and clear your FX units and chains:
Saving an FX PresetTo save an FX preset:
1. Click FX to enter the FX view.2. Click the FX Preset Management icon in the top left corner.3. Select Save FX unit preset... or Save FX chain preset...4. Enter a name for your preset.5. Click Save.→ The FX preset is saved as an .nka file.
Any macro assignments made to effects parameters are not stored in the effects unit oreffects chain presets.
Loading an FX Preset.To load an FX preset:
1. Click FX to enter the FX view.2. When loading an FX unit preset, first select the target FX unit slot in the chain.3. Click the FX Preset Management icon in the top left corner.4. Select Load FX unit preset... or Load FX chain preset....5. Select a preset file.6. Click Load.→ The FX preset is loaded in to the selected FX unit or the FX chain.
FX VIEW 22

Loading an FX preset will overwrite any current user preset being used with the snapshot.
Resetting an FX UnitTo reset an FX unit:
1. Click FX to enter the FX view.2. Select the FX unit you want to reset.3. Click the FX Preset Management icon in the top left corner.4. Select Reset FX unit.→ The FX unit is restored to its default settings.
Clearing FXTo clear an FX unit or FX chain:
1. Click FX to enter the FX view.2. Select the FX unit or FX chain you want to clear.3. Click the FX Preset Management icon in the top left corner.4. Select Clear FX unit or Clear FX chain.→ The loaded FX is removed and None will be displayed in the FX unit(s).
A few parameters require some processing latency so they will not respond in real-time.These are Cabinet/IRVerb Size, HPF and LPF.
FX VIEW 23

11. Sequencer View
MODULAR ICONS replicates the power and functionality of an analog sequencer. Accessed via theSEQ tab, the sequencer provides one lane for creating a melodic sequence of up to sixteen steps,and a further six lanes to modulate each of the macro controls and its respective assignments.These additional sequencing lanes allow you to shape your sound with precision and nuance overthe course of a sequence.
Sequencing the pitch means you can create a musical phrase, and then modulate the velocity ofeach step to change the dynamics of the sound. Additionally, the velocity of the modulated stepscan be set to change relative to how hard you play, using the Scale by Velocity feature in theSettings view. For more information, see Settings View.
The sequencer can be set to affect only one layer, or both layers together. Additional parameterslike Rate, Direction, and Swing provide further flexibility and control over the playback of yoursequences.
11.1. Overview of the SequencerThe Sequencer contains the following controls that are available at all times and apply to allsequencer lanes (Pitch/Velocity and Macros 1–6):
1. Sequencer Preset menu: Use this menu to save and load sequencer presets, and initializesequencer lanes. For more information see, Managing Sequencer Presets.
2. Latch: Latches the sequencer on or off. When Latch is on, the sequencer will run continuouslyfrom a single note trigger. Notes played will continue to play until the sequencer or Latch isturned off. Pressing a new note will transpose the sequence relative to the new note value.
3. Retrigger: Switches retrigger on or off. When Retrigger is on the sequencer restarts every timea new note is played.
4. Rate: Sets the playback rate of the sequencer relative to the DAW/host tempo (in BPM) and isadjustable in specific note values.
5. Swing: Sets the sequencer swing amount. Turning the Swing knob to the right to increases theamount of swing added to the sequence.
6. First Step: Sets the starting step of the sequence when it is retriggered.7. Root Key: Sets the root key of the sequencer.8. Scale: Sets the scale of the sequencer. Turn the control or use the drop-down menu to select a
scale.
SEQUENCER VIEW 24

9. Global: Sets the sequencer scale lock on or off. When activated, the currently selected scaletype and its root key will be used for all Snapshots.
10. Sequence Lanes: Displays the individual sequence lanes for the selected set of controls.
11.2. Pitch and VelocityThe following controls are displayed when the Pitch / Velocity tab is selected in the Sequencerview:
1. Pitch / Velocity tab. Displays the pitch and velocity sequencing lanes where you can enternotes and velocity levels.
2. Pitch Sequence Lane: Sets the offset for the pitch. The range is +/- 2 octaves.3. Velocity Sequence Lane: Sets the offset for the velocity. The range is 0–127. A value of 0
results in no note being triggered for that step, even if there is a value already set in the pitchlane.
4. Scale by Velocity: Switches the Scale by Velocity on or off. This function scales the notevelocity of the sequence with input velocity that is played via a keyboard or MIDI device.
5. Layer Routing: Sets which layers are affected by the pitch sequencer. Turn the control to routethe pitch sequence to a layer. The available options are as follows:• None: Plays no layers.• A: Plays only layer A.• B: Plays only layer B.• A+B: Plays both layers A and B. The balance of the layers can be adjusted using the Balance
macro knob on the far-left.6. Steps: Sets the sequence length in steps. Click and drag the mouse up or down to adjust the
number of steps.
SEQUENCER VIEW 25

7. Direction: Sets the direction of the sequencer. Click and drag the mouse up or down to adjustthe direction of the sequence. The available options are in the following order:• Forward: This is the default playback direction. The sequence plays forward from left to
right.• Backward: The sequence plays in reverse, beginning with the final note of the sequence.• Fwd > Bwd (Forward-Backward): The sequence plays forward in its entirety, then backward
in its entirety.• Bwd > Fwd (Backward-Forward): The sequence plays backward in its entirety, then forward
in its entirety.• |Fwd > Bwd| (Forward-Backward with repeating edge notes): The sequence plays forward in
its entirety, then backward in its entirety with repeating edge notes.• |Bwd > Fwd| (Backward-forward with repeating edge notes): The sequence plays backward
in its entirety, then forward in its entirety with repeating edge notes.• Random: The sequence plays in continuously varying random order.
8. Gate: Sets the note sequence gate length (scales to a percentage of the sequencer rate value).
11.3. MacrosThe following controls appear when a Macro tab is selected in the Sequencer:
1. Macro 1 / 2 : In the sequencer lanes that appear you can add modulation for up to 16 steps.2. Macro 3 / 4: Displays the sequence lanes for Macros 3 and 4. In the sequencer lanes that
appear you can add modulation for up to 16 steps.3. Macro 5 / 6: Displays the sequence lanes for Macros 5 and 6. In the sequencer lanes that
appear you can add modulation for up to 16 steps.4. Macro Sequence Lane: Draw in the modulation amount for the corresponding macro. Press
[Ctrl] / [Cmd] + click any step to reset any its current modulation value.5. Macro Sequence Lane: Draw in the modulation amount for the corresponding macro.6. Steps: Sets the sequence length of the corresponding macro in steps. Click + drag the mouse
up or down to adjust the number of steps.7. Direction: Sets the sequence playback direction for the corresponding macro. The options are
the same as listed for the Pitch and Velocity controls above.8. Amount: Sets the sequence modulation amount for the corresponding macro. Press [Ctrl] /
[Cmd] + click to disable this macro sequencer. Press [Alt] / [Opt] + click to set the amount tothe maximum positive value, or press [Ctrl] / [Cmd] + [Alt] / [Opt] + click to set the amount tothe maximum negative value.
SEQUENCER VIEW 26

11.4. Sequencing PitchUsing the sequencer you can create a musical phrase of up to 16 steps long. Each step has arange of +/- two octaves from the root note. The root note is equal to the note information receivedfrom your keyboard, MIDI device or DAW. A sequence is automatically transposed relative to anynew note that's played. For greater range, use the Transpose Up or Transpose Down buttons onyour keyboard.
To sequence pitch:
1. Open the sequencer by clicking SEQ in the top-right header.2. If your snapshot already contains a sequence, you can initialize it using the Sequencer Preset
menu, see Managing Sequencer Presets.3. Select the Pitch / Velocity tab to open the Pitch and Velocity Sequence lanes.4. Set the number of steps for your sequence by adjusting the Steps value. The default setting is
16.5. Set the Root Key and Scale for your sequence.6. To add a pitch value to each step of the sequence, click + drag the mouse upwards or
downwards from the horizontal line in the middle. The horizontal line represents the root noteof the pitch played. To add note values in semitones above the root note, click + drag upwards.To add values below the root note, click + drag the mouse downwards. As you drag upwardsor downwards, the distance from the root note is indicated in semitones and octaves anddisplayed on the interface.
7. Turn on Latch and trigger a note to hear the sequence play. With Latch activated, thesequencer will run continuously from a single trigger, freeing up your hands to adjust and fine-tune the pitch values for each step.
8. Adjust the Velocity amount for each step to change the dynamics of the sound. By default, allsteps are set to full Velocity. Drag the mouse down to decrease the Velocity amount for theselected step.
9. Optionally, you can decide if the sequence affects layer A, layer B or both layers using the Layerrouting control on the right-hand side. You can adjust this at any time.
10. Experiment with the Swing control.11. When you are satisfied with your sound you can save it as a User snapshot or as a separate
Sequencer Preset. For more information, see Saving a User Snapshot and ManagingSequencer Presets.
SEQUENCER VIEW 27

11.5. Sequencing MacrosIn addition to sequencing notes, you can also sequence Macros. These are the six knobs along thebottom of the instrument used to control the preassigned parameters that work best with theselected Snapshot. By sequencing the Macros you can change the sound of the Snapshot overtime to create interesting textures and movement when the sequence is triggered. As whensequencing notes, you can also set each Macro to can have a different playback length anddirection for more complex modulation patterns.
The Macros are present in pairs but each Macro has its own individual sequence lane wheremodulation values can be added for each step of the sequence.
To sequence a Macro:
1. Access the sequencer by clicking SEQ in the top-right header.2. If your Snapshot already contains a sequence, you can initialize it using the Sequencer Preset
Management menu, see Managing Sequencer Presets.3. Select the sequence lane of the macro you want to sequence, for example, if you want to
sequence the fifth macro, select the Macro 5 / 6 tab. In this example, the horizontalsequencing lanes for Macros 5 and 6 open with the sequencing lane for Macro 5 appearing atthe top.
4. Set the number of steps you would like to sequence by adjusting the Steps value on the right.Setting a different number of steps for each macro can create interesting tonal polyrhythms.
5. To add a parameter modulation value to a step, click + drag the mouse upwards from thehorizontal line in the middle to add positive values, or click + drag the mouse downwards toadd negative values.
6. Turn on Latch and trigger a note to hear the sequence play. With Latch activated, thesequencer will run continuously from a single trigger, freeing up your hands to adjust and fine-tune the modulation values for each step.
7. Adjust the modulation Amount to determine how much the sequence affects the macrocontrol. Dragging the knob left decreases the modulation amount, and dragging it rightincreases the amount.
8. Optionally, to create more diverse patterns, experiment with the Direction controls. For moreinformation on these controls, see Overview of the Sequencer.
SEQUENCER VIEW 28

11.6. Managing Sequencer PresetsWhile sequences are automatically saved with each Snapshot, the Sequencer Preset Managementallows you to save sequences separately and load them onto other sounds. Additionally, the menuprovides an initialization function that enables you to reset any part of a sequence to the defaultvalues.
The following workflows demonstrate how to use Sequencer Preset Management to save, load andinitialize your sequences.
Saving a SequenceTo save a sequencer preset:
1. Click SEQ to enter the Sequencer view.2. Click the Sequencer Preset Management icon in the top left corner.3. Select Save sequencer preset...4. Enter a name for your sequence.5. Click Save.
Loading a SequenceTo load a sequencer preset:
1. Click SEQ to enter the Sequencer view.2. Click the Sequencer Preset Management icon in the top left corner.3. Select Load sequencer preset...4. Select a sequence file.5. Click Load.
Loading a sequence will overwrite any current user sequence being used with theSnapshot.
Initializing a SequenceTo initialize all or any part of a sequence:
1. Click SEQ to enter the Sequencer view.2. Click the Sequencer Preset Management icon in the top left corner.3. To reset all note values, select Initialize note sequence.4. To individually reset any of the macro sequences, select Initialize macro 1–6 sequence5. To reset the whole sequence (note values and all macros), select Initialize all sequences.
SEQUENCER VIEW 29

12. Macros View
The six macro controls are a core element to the Play Series performance style and workflows. Themacro controls, alongside the Balance and Volume knobs, are the only parameters that remainaccessible from any view within MODULAR ICONS. You can assign up to 12 parameters to eachmacro, with separately adjustable min/max range for each assignment, and a Shaper Curve thatgoverns how the macro behaves within the defined min/max range. The Shaper Curve is alsoavailable for each assigned parameter.
The Snapshots that were created for MODULAR ICONS each come with their own distinct macroassignments and implementations. In the Macros view, you can edit the assigned macro controlsof existing snapshots and their parameter ranges or create your own macro assignments.
In the Macros view, toggle between the six macros by clicking the colored buttons displayedhorizontally across the top of the view. Clicking any of the buttons allows you to see the list ofparameters assigned to them. Located to the top-right of the Shaper Curve is the Macro ShaperOptions menu. This provides various processing and editing options, as well as ways to manageyour preset shapes.
12.1. Overview of the MacrosThe Macros view contains the following elements and controls:
1. Macro Controls: Each colored block represents a macro control. Click on a macro to displaythe group of parameters assigned to it and access the parameters' editing tools. Click + drag acolored block left or right to rearrange the order of the six macro controls. For moreinformation, see Macro Assignments.
2. Macro Range: Sets the minimum and maximum range for the parameter selected in theMacro Slot list.
3. Macro Slot List: Displays all parameters assigned to the selected macro control. Each macrohas 12 macro slots, facilitating up to 12 different parameter assignments per macro. Click ona macro slot to access the editing options for that assignment, including the Macro ShaperCurve and Range controls.
4. Macro Assignment (icons): The arrow dot icon jumps directly to the view containing theparameter assigned to the macro slot. The dot next to the parameter will blink to drawattention and indicate the assignment. The X icon deletes the assigned parameter from theselected macro.
MACROS VIEW 30

5. Macro Shaper Curve: Sets the shape of the curve for the selected parameter in the Macro Slotlist.
6. Macro Options Menu: Provides options to manage your Macro Shaper presets, and containspredefined curve shapes which you can quickly recall for convenience or inspiration. For moreinformation, see Macro Options Menu.
7. Macro Shaper Shift (arrow icons): Click the arrow icons to shift the values in the MacroShaper Curve left, right, up or down. Press [Shift] + click the left or right arrows to move thevalues in the specified direction, but to retain the first or last value in the table. This creates alimiter-style effect, whereby the first value is repeated as you press [Shift] + click the rightarrow. Holding [Shift] + clicking the up or down arrows will create expansion or compression.Pressing [Ctrl] / [Cmd] + clicking will repeat the process ten times.
8. Macro Shaper Smoothing: Switches the interpolation for the Macro Shaper Curve on or off. Asthe Macro Shaper contains only 100 values and macro knobs have a much higher resolutionof 1,000,000 values, the shaper curve needs to be mapped to the larger range. When MacroShaper Smoothing is turned off, transitions between curve steps are strictly quantized. This isuseful in certain use cases, for example, a macro assigned to the Tune parameter, and aquantized Curve Shaper to hit various pitches of a scale. When Macro Shaper Smoothing isturned on, transitions between curve steps are linearly interpolated, which provides more fluidbehavior. This is especially useful when assigning macros to a filter Cutoff or various effectsparameters.
12.2. Macro AssignmentsAssigning macros in MODULAR ICONS is intuitive and easy. Not all parameters are available forassignment, including buttons, menus, Transpose, and Envelope Attack Curve. Valid parametersare found only in the Sound and FX views.
Macros are also a quick and useful way to navigate around the synth engine, allowing you to movebetween the Macros view and the assigned parameters with a mouse click. The followingworkflows demonstrate how to assign, remove, rename and rearrange your macro assignments.
Assigning a MacroTo assign a parameter to a macro:
1. From any view in MODULAR ICONS, select the macro you want to assign.2. Click the colored dot in the top-left corner of a macro knob. It will start blinking to show you
that it's in Learn mode.
3. While the dot is blinking, click on the parameter you want to assign to the macro. Validparameters are found only on Sound and FX views.
→ The parameter is assigned to the macro, represented by it matching colored dot,
If you no longer want to make an assignment, or you selected the wrong macro, you canexit Learn mode by clicking the same colored macro dot again.
MACROS VIEW 31

Setting the Macro RangeWhen a macro is assigned to a parameter, a popup will appear. Here you can set the parameterrange within which the macro will operate.
To set the Macro Range:
1. Drag the arrows left or right to adjust the parameter range.2. Drag the bar in the middle to shift the whole range left or right3. [Ctrl] / [Cmd] + click this bar to restore the range to the default value (full parameter range).
→ The range is set. When you have finished, click the X to exit the Macro Range popup.
Removing a Single Macro AssignmentIn the Macros view, you can delete a parameter assignment from the Macro Slot list, using the Xicon. Alternatively you can delete an assignment from the parameters.
To remove a macro assignment from a parameter:
1. Locate the parameter in the Sound or FX view.2. Press [Ctrl] / [Cmd] + click the dot next to the assigned parameter.
→ The assignment is removed from the macro.
Press [Shift] + click the colored dot next to a parameter to instantly jumps to the Macrosview where the assignment is listed. This provides a nice workflow if you often have tojump between pages.
Removing All Macros AssignmentsTo remove all macro assignments from a macro control at once:
1. From any view in MODULAR ICONS, select the macro you want remove all assignments.
MACROS VIEW 32

2. Press [Ctrl] / [Cmd] + click the colored dot next to a macro control.
→ All assignments are removed from the selected macro.
Renaming a MacroRenaming a macro can be used to help you remember what the assigned parameters do.
To rename a macro:
1. Click on the text below the macro knob to edit the current name. Double-click the text to entera new name.
2. Type in your new macro name.
→ The macro now displays the new name.
Note that text input is not possible when the sequencer is running.
Rearranging the MacrosOnce you have set up all your macro controls, you might want to rearrange the order in which theyappear. This is useful for keeping related controls close to each other, and can be tailored to suityou performance needs or playing style.
To change the order of the macros:
1. Click MACROS to enter the Macros view.2. Click a colored macro button.
3. Drag the macro button left or right and drop at a new position.
→ The order of the macros controls is changed.
MACROS VIEW 33

12.3. Macro Options MenuThe Macro Options menu provides a range of tools for editing the Macro Shaper Curve andmanaging your Macro Shaper presets. Tools dedicated to editing the shape of your curve includeoptions for copying, mirroring, inverting, and straightening. Additionally, the initialization functionenables you to reset the Macro Shaper Curve to its default values.
The Macro Options menu also offers options for saving and recalling Macro Shaper presets, as wellas pre-defined curves to help you get started. There are also a number of quantization optionsprovided to suit your various needs; from smooth and free-running, to grid-snapped blocks, theseadditional editing options provide flexibility and inspiration for utilizing the full potential of theMacro controls.
The Macro Options menu contains the the following elements:
1. Macro Options Menu: Opens the Macro Options menu, which provides a range of tools andoptions for editing the Macro Curve Shaper and managing your Macro Shaper presets. Thismenu also contains predefined curve shapes, which you can conveniently recall when needed.
2. Managing Macro Shaper Presets: Options for saving and loading your Macro Shaper presets.For more information, see Managing Macro Shaper Presets
3. Copy and Paste: Options that allow you to copy the Macro Shaper Curve of the currentlyselected parameter, and paste it onto other parameters. This is useful for testing ShaperCurves on various parameters, without having to save them as presets.
4. Shaper Editing Tools: A range of tools that provide various editing functions for creatingshapes with the Macro Shaper Curve. Tools include Normalize, Rectify, Fractalize, Soften andStraighten. Editing tools like Invert, Reverse and Mirror, allow you to reflect states in theMacro Shaper, providing inspiration and further control over your shapes. Initialize allows youto reset the Macro Shaper Curve to its default state.
MACROS VIEW 34

5. Quantize: Provides 10 options for quantizing values of the Macro Shaper Curve. The Quantizevalue (2, 3, 4, 5, 6, 7, 8, 9, 10, 12) indicates the numeric division that will be applied to yourcurve. For example, if Quantize 4 is selected, your curve values will be quantized to 0, 250,500, 750 and 1000.
6. Predefined Shapes: Provides six options for predefined curve shapes that can be quicklyimplemented in the Macro Shaper Curve.
12.4. Managing Macro Shaper PresetsWhile macros are automatically saved with each Snapshot, the Macro Shaper Options menuallows you to save Macro Shaper presets separately and load them onto other sounds.
The following workflows demonstrate how to save and load your Macro Shaper presets from theMacros view:
Saving a Macro Shaper PresetTo save a Macro Shaper preset:
To save a Macro Shaper preset:
1. Click the MACROS tab to enter the Macros view.2. Click the Macro Shaper Options menu icon.3. Select Save macro shaper preset....4. Enter a name for your preset.5. Click Save.→ The macro shaper preset is saved as an .nka file.
Loading a Macro Shaper PresetTo load a Macro Shaper preset:
1. Click the MACROS tab to enter the Macros view.2. Click the Macro Options menu icon.3. Select Load macro shaper preset....4. Select a preset file.5. Click Load.→ The selected macro shaper preset is loaded in to the Macro Shaper.
MACROS VIEW 35

13. Settings View
In the Settings view, you can change how MODULAR ICONS responds to your keyboard or MIDI.These settings include Velocity, Note Priority, Key Range, Pitch Bend Range, and Glide, all of whichcan be assigned to affect the instrument globally or separately for each layer. The settings madehere are saved per Snapshot unless stated otherwise.
The following shows the parameters of the Settings view:
1. Layer: Click the A icon to turn the layer on and off. Turning the layer off will purge all samplesfrom memory and reduce CPU usage. When the layer is turned off, the icon is dimmed.
2. Browser: To open the Browser, click on the sound source name, the waveform display or theBrowser icon (magnifying glass icon). This gives you access to all sound sources available forlayers A and B. To browse and load sound sources without opening the Browser, click thearrow icons (<>) to move through the list of sound sources.
3. Play Mode: This set of controls defines the play mode, as follows:• Mono: Monophonic mode retrigger sets the notes to behave like a monophonic synthesizer,
meaning only one note can be triggered at a time. This is useful when you want to recreatean authentic monophonic synthesizer sound, especially when used in combination withLegato and Glide . You can change the Mono settings for both layers simultaneously bypressing [Alt] / [Opt] + clicking and dragging your mouse.
• Legato: The legato playing technique typically allows for smooth, seamless transitionsbetween notes. If Legato is turned on and detached notes are played, each attack will still beretriggered, but when overlapping notes are played, the pitches will change without newattacks, for a Legato response.
4. Velocity Curve: Sets your defined Velocity Curve for the keyboard to adjust the velocityresponse to your playing style. For more information, see Velocity Curve.
SETTINGS VIEW 36

5. Note Priority: This determines what note has priority when more than one note is played inmono or mono legato mode. You can change the Note Priority settings for both layerssimultaneously by pressing [Alt] / [Opt] + clicking and dragging your mouse. The following notepriority settings are available:• Last: Gives priority to the last note played. With last note priority, priority is based on the
order in which keys are played• Low: Gives priority to the lowest note played. With low note priority, new notes that are lower
in pitch than ones being already played replace currently playing notes from the highest onup. Low note priority is most common on monophonic vintage synths.
• High: Gives priority to the highest note played. With high note priority, new notes that arehigher in pitch than ones being already played replace currently playing notes from thelowest on up. Setting one layer to low note priority and the other to high note priority youcan simulate duophonic behavior of certain vintage synths.
6. Key Range: This allows you to set the highest and lowest key in the range for the current layer.This could, for example, be used to set the left side of the keyboard to play layer A sound andthe right-side to play layer B, or to blend the layers anywhere on the keyboard necessary. Toset the key range use the following settings:• Low Key: Sets the low key limit for layer A or B.• High Key: Sets the low key limit for layer A or B• Learn Key Range via MIDI: Click this icon to set the key range for the selected layer via MIDI.
Then set the range by pressing the high and low key range on your MIDI keyboard or device.By pressing [Ctrl] / [Cmd] + clicking the icon you can reset the key range to the defaultsetting.
7. Bend Range: You can set the pitch bend wheel range for layers A and B individually or for bothof the two layers using your MIDI keyboard, based on your playing preference. The range is upto 24 semitones (2 octaves). Many musicians use a range of 2 semitones (a whole step) asthis is the bend range of many acoustic instruments. For more special effects, you may wishto set a wider range. You can set the bend range using Bend Up and Bend Down:• Bend Up: Sets the pitch bend up range for layer A or B.• Bend Down: Sets the pitch bend down range for layer A or B.
8. Glide Mode: The Glide Mode button switches the Glide mode between a constant rate or aconstant time setting for the glide as follows:• Constant Rate: The glide between notes has a constant rate of change regardless of
intervals played, which makes glides between intervals take more time than glides onsmaller intervals.
• Constant Time: The glide between notes have a constant time (duration) regardless ofintervals played.
9. Glide: This causes the pitch of a note to glide up or down from the pitch of the previouslyplayed note. Glide speed is set using the Glide knob. If the Glide knob is set to the far-leftposition, glide has no effect. In the far-right position, the glide is in full effect. Use Glide incombination with the Glide Mode button (8). You can change the Glide settings for both layerssimultaneously by pressing [Alt] / [Opt] + clicking and dragging your mouse.
10. Preserve Voices: Preserve Voices mode allows only one voice to be played per key. This is aglobal control and as such is not stored in Snapshots.
11. Lock Bend Ranges: Locks pitch bend ranges across all Snapshots. This is a global control andas such is not stored in snapshots.
SETTINGS VIEW 37

13.1. Velocity CurveThe Velocity Curve Shaper allows you to define velocity curve for the keyboard and and to adjustthe velocity response to your playing style. The Velocity Curve has two modes of operation; in thedefault mode, the Velocity Curve is set using the Curve Slope and Curve Table controls. In Usermode, the table becomes a free canvas for you to draw within. You can edit the curve by clickingand dragging your mouse across the table, and then save your curves as presets, to recall atanother time.
Velocity Curve ShaperThe Velocity Curve Table contains the following controls:
1. Velocity Curve Menu: This menu defines the operation of the Velocity Curve and allows you tosave and recall your Velocity Curve presets. For more information, see Managing VelocityCurve Presets.
2. Velocity Curve Table: This area displays your velocity curve. When in User mode, this area isused to draw a customized curve shape by clicking + dragging your mouse.
3. Velocity Curve minimum value: Use the vertical slider on the left of the Curve Table to set theminimum value of the velocity curve. Pressing [Alt] / [Opt] + dragging the mouse will setminimum and maximum to the same value. Press [Ctrl] / [Cmd] + click to set to the minimumvalue.
4. Velocity Curve maximum value: Use the vertical slider on the right of the Curve Table to setthe maximum value of the velocity curve. Pressing [Alt] / [Opt] + dragging the mouse will setminimum and maximum to the same value. Press [Ctrl] / [Cmd] + click to set to the maximumvalue.
5. Velocity Curve slope: Use the horizontal slider directly underneath the Curve Table to set theslope of the velocity curve
All Velocity Curve controls are global and as such are not by default stored in Snapshots! Ifyou want to save a velocity curve, see Managing Velocity Curve Presets.
User Velocity CurveThe User Velocity Curve Table contains the following controls:
SETTINGS VIEW 38

1. Velocity Curve Menu: This menu defines the operation of the Velocity Curve and allows you tosave and recall your Velocity Curve presets. For more information, see Managing VelocityCurve Presets.
2. Velocity Curve Table: When in User mode, this area is used to draw a customized curve shapeby clicking + dragging your mouse.
3. Reset Table: Resets the Velocity Curve Table to its default linear curve.
13.2. Editing the Velocity CurveThe following workflows demonstrate how to edit the Velocity Curve in the two different operatingmodes:
Editing the Velocity Curve ShaperTo edit the Velocity Curve:
1. Click the settings icon to enter the Settings view.2. Click the Velocity Curve Menu icon in the top left corner.3. Select Velocity curve shaper.4. Use the three sliders to create a curve.
Editing the User Velocity CurveTo create a User Velocity Curve:
SETTINGS VIEW 39

1. Click the settings icon to enter the Settings view.2. Click the Velocity Curve Menu icon in the top left corner.3. Select User velocity curve.4. Draw in your Velocity Curve shape using you computer mouse.
13.3. Managing Velocity Curve PresetsUsing the Velocity Curve Preset menu, you can manage all you custom Velocity curve presets. Thefollowing workflows demonstrate how to save and load your presets from the Settings view.
Saving a Velocity Curve PresetTo save a Velocity Curve preset:
1. Click the Settings button (cog icon) to enter the Settings view.2. Click the Velocity Curve Preset menu icon in the top left corner of the Velocity Curve.3. Select User velocity curve.4. Make changes to you preset.5. Select Save user velocity curve...6. Enter a name for your preset and click Save.
Loading a Velocity Curve PresetTo load a Velocity Curve preset:
1. Click the Velocity Curve Preset menu icon in the top left corner of the Velocity Curve.2. Select Load user velocity curve....3. Select the user velocity curve preset you want to load.4. Click OK.
SETTINGS VIEW 40

14. Credits List
Product Design: Mario Krušelj and Tommaso De Donatis
Product Scripting, Programming and Production: Mario Krušelj
User Interface Design: Resonant Design
Sound Design: Jonathan Kranz and Stewart Walker
Product Owner: Barry McManus
Musicians: Jean-Michel Jarre, Michael Boddicker, Walter Holland, Paca Thomas, Steve Porcaro,Robin Rimbaud, Jeff Rona, Mark Isham, Kurt Ader, Dan Goldstein, Benge, Francis Preve
Documentation: Hannah Lockwood and David Gover
Sound Presets: Jonathan Kranz, Stewart Walker, Andre Ettema, Joakim Hellgren, Francis Preve,John Valasis, Dan Byers, Elliyas Nicholas Kelly, Ksenija Ladić and Damian Press
Quality Assurance: Konstantin Fichtner and Bymski Stempka
Marketing Manager: Mark Cummins
Artwork: Resonant Design
Finalization and Encoding: Bymski Stempka
Special Thanks: Michelle Moog-Koussa, The Bob Moog Foundation, the National Music Centre(Calgary, Canada) and the Electronic Music Education and Preservation Project (EMEAPP), JamesSoloman and Matt Baxley.
CREDITS LIST 41