table of contents (fancy design) - azenqos · table of contents 0. introduction to version 3.0.3 5...
TRANSCRIPT

AZQ Android 3.0
User’s Manual
RC1: 22 September 2013
2
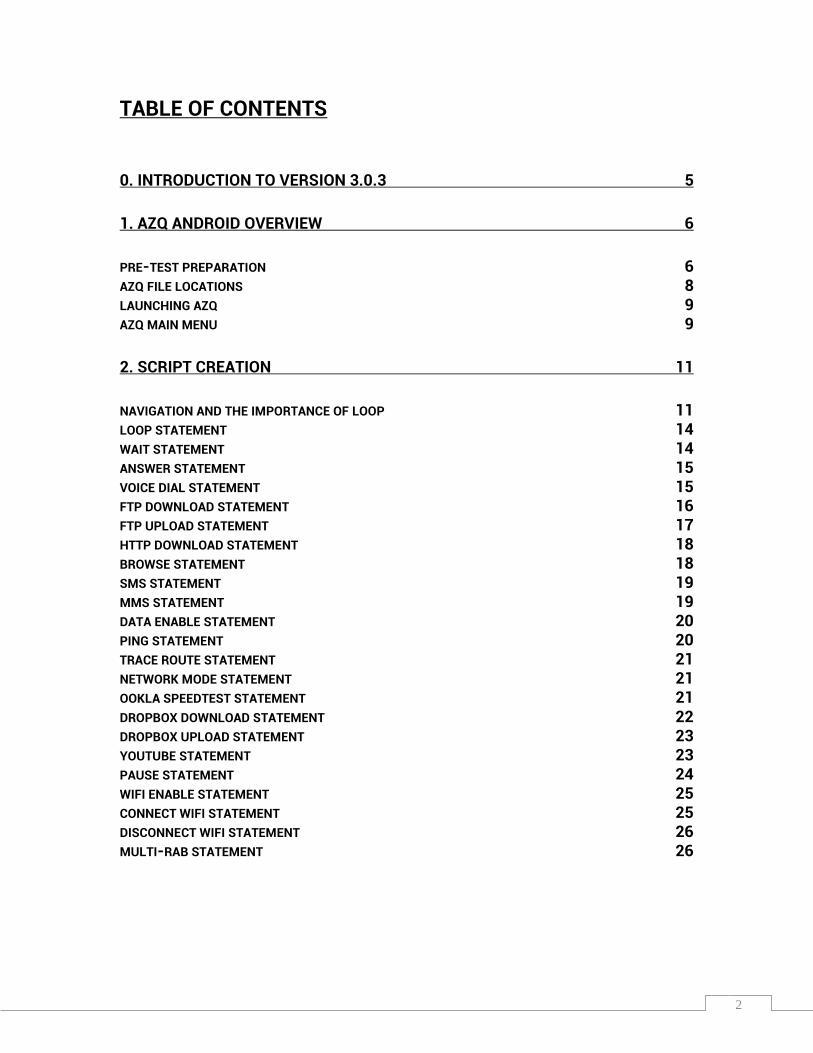
TABLE OF CONTENTS
0. INTRODUCTION TO VERSION 3.0.3 5
1. AZQ ANDROID OVERVIEW 6
PRE-TEST PREPARATION 6 AZQ FILE LOCATIONS 8 LAUNCHING AZQ 9 AZQ MAIN MENU 9
2. SCRIPT CREATION 11
NAVIGATION AND THE IMPORTANCE OF LOOP 11 LOOP STATEMENT 14 WAIT STATEMENT 14 ANSWER STATEMENT 15 VOICE DIAL STATEMENT 15 FTP DOWNLOAD STATEMENT 16 FTP UPLOAD STATEMENT 17 HTTP DOWNLOAD STATEMENT 18 BROWSE STATEMENT 18 SMS STATEMENT 19 MMS STATEMENT 19 DATA ENABLE STATEMENT 20 PING STATEMENT 20 TRACE ROUTE STATEMENT 21 NETWORK MODE STATEMENT 21 OOKLA SPEEDTEST STATEMENT 21 DROPBOX DOWNLOAD STATEMENT 22 DROPBOX UPLOAD STATEMENT 23 YOUTUBE STATEMENT 23 PAUSE STATEMENT 24 WIFI ENABLE STATEMENT 25 CONNECT WIFI STATEMENT 25 DISCONNECT WIFI STATEMENT 26 MULTI-RAB STATEMENT 26

3
3. AZQ SETTINGS 28
GSM CELL FILES AND CELL SEARCH METHOD 28 WCDMA CELL FILES AND CELL SEARCH METHOD 29 UNATTENDED MODE SETTINGS 35 ALARM SETTINGS 35 SCHEDULE SETTINGS 36 EMAIL REPORT SETTINGS 36 ADDITIONAL COMPONENT 37
4. DATA PANELS 39
SCRIPT PANEL 40 EVENTS PANEL 41 LAYER 3 MESSAGES PANEL 42 SYS PANEL 42 GSM PANEL 43 C/I PANEL 43 2G CELLS PANEL 44 EDGE/GPRS PANEL 44 WCDMA PANEL 45 HSDPA/HSPA+ PANEL 45 HSUPA PANEL 46 LTE PANEL 46 WIFI PANEL 47 SCANNED WIFI PANEL 47 BEARERS PANEL 47 SPLIT PANEL FUNCTION 48
5. OUTDOOR MAP 50
EXPORTING AND OPENING .MIF GRID FILE IN AZQ 50 MY LOCATION FUNCTION 53 GET DIRECTION FUNCTION 54 ROUTE PLOTTING ON GOOGLE MAPS 55 GOOGLE MAPS IN OFFLINE MODE 56

4
6. INDOOR MAP 57
LOADING MAP INTO AZQ 57 PLOTTING INDOOR LOCATION 58
7. LOG FILE 60
START RECORDING 60 STOP RECORDING 62 BACKGROUND MODE 62
8. APPENDIX 64
LIST OF MEASUREMENTS 64
AZQ ERROR MESSAGE EXPLANATION #

5
What’s new in AZQ Android version 3.0
- Background Mode User can now switch to conduct other activities while recording, this allows for radio parameter collection of other apps such as OOKLA speedtest and games
- Live Layer 3 Messages Display User can now view Layer 3 messages and its content live on the phone
- Youtube Testing Scripted testing of Youtube will now open a Youtube vdo, recording KPIs such as buffer time and data transfer rate
- Speedtest Service Testing Scripted testing of Speedtest will now open the speedtest app allowing user to cllect radio parameter in the background
- Multi-RAB Testing
Scripted testing of simultaneous voice & data
- Google Maps Navigation Users can use Google maps navigation during drive test
- Cell Display
Users can import cell files into AZQ and display them on the map during drive test
- Split Panel
Users display 2 data sets at the same time while testing
- New Indoor Marking Method
Indoor marking has been completely redone for more convenient walk testing

6
1. AZQ Android overview Pre-test preparation (For beginners) To ensure a stable and smooth operation of AZQ please make sure that the following conditions has been checked 1. The APN is correctly set for the test In modern smart phones, APN must be properly set before data operations can be made, in any test cases special APN are required for the testing and must be set beforehand
To setup APN Go to the phone’s setting
in Android 2.3 or in newer versions of Android Go to Wireless & networks and choose Mobile networks
Choose Access Point Names and choose your APN accordingly
Select Mobile networks

7
2. Selecting the correct network mode Be mindful of the nature of the test. It might requires 2G only, 3G only, 4G only or automatic network parameter recording, to choose the one appropriate to the test, go to Mobile Networks and choose network mode
3. Check phone’s data storage If the phone’s data storage is less 200 MB then no script can be started. Please delete unnecessary applications & images. If your phone is using an external SD card and it’s showing 0.0 available space, the SD card might be defective 4. Check system clock Correct date & time ensures that the log will come up on the server correctly

8
To setup the clock Go to the phone’s setting and select Date & Time
Select Automatic Time zone, Automatic date & time
AZQ File Locations Below are the location where AZQ stores its files
Test Script Located at sdcard/AZQ.script
Test Schedule Located at sdcard/AZQ.schedule
Log files Located at sdcard/diag_logs

9
Cell files Located at sdcard/AZQ.cellfiles Grid files Located at sdcard/AZQ.gridfiles
Launching AZQ
Locate and tap on the AZQ icon to launch AZQ
AZQ Main menu Once AZQ has finished launching, you will be greeted with the menu screen
Start Script
Run and record a pre-configured script.
Current AZQ version
10
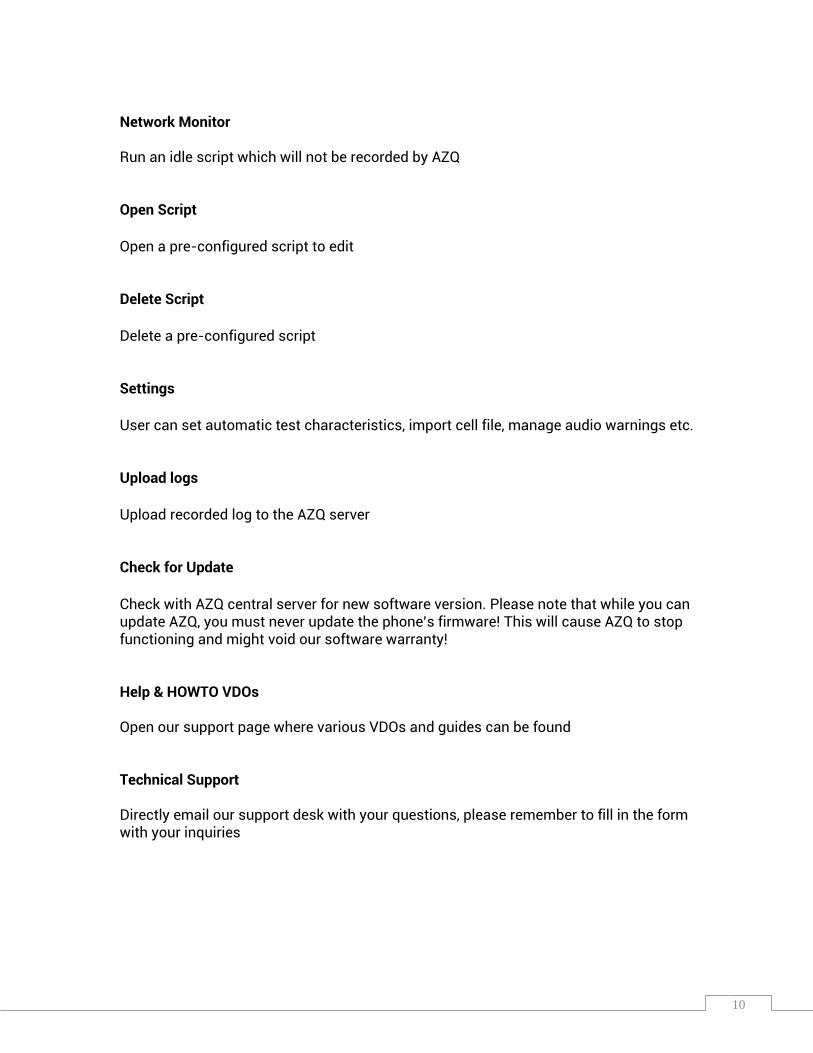
Network Monitor Run an idle script which will not be recorded by AZQ Open Script
Open a pre-configured script to edit Delete Script
Delete a pre-configured script Settings
User can set automatic test characteristics, import cell file, manage audio warnings etc. Upload logs
Upload recorded log to the AZQ server Check for Update
Check with AZQ central server for new software version. Please note that while you can update AZQ, you must never update the phone’s firmware! This will cause AZQ to stop functioning and might void our software warranty! Help & HOWTO VDOs Open our support page where various VDOs and guides can be found Technical Support Directly email our support desk with your questions, please remember to fill in the form with your inquiries
11
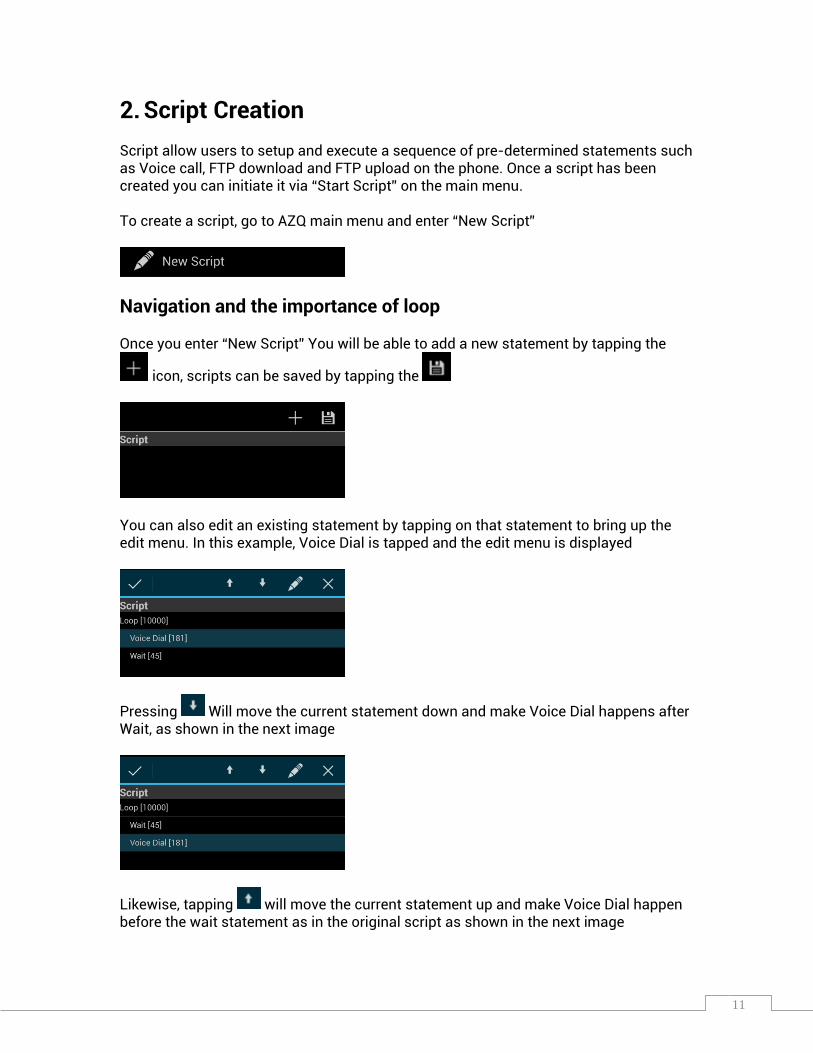
2. Script Creation Script allow users to setup and execute a sequence of pre-determined statements such as Voice call, FTP download and FTP upload on the phone. Once a script has been created you can initiate it via “Start Script” on the main menu. To create a script, go to AZQ main menu and enter “New Script”
Navigation and the importance of loop Once you enter “New Script” You will be able to add a new statement by tapping the
icon, scripts can be saved by tapping the
You can also edit an existing statement by tapping on that statement to bring up the edit menu. In this example, Voice Dial is tapped and the edit menu is displayed
Pressing Will move the current statement down and make Voice Dial happens after Wait, as shown in the next image
Likewise, tapping will move the current statement up and make Voice Dial happen before the wait statement as in the original script as shown in the next image
12
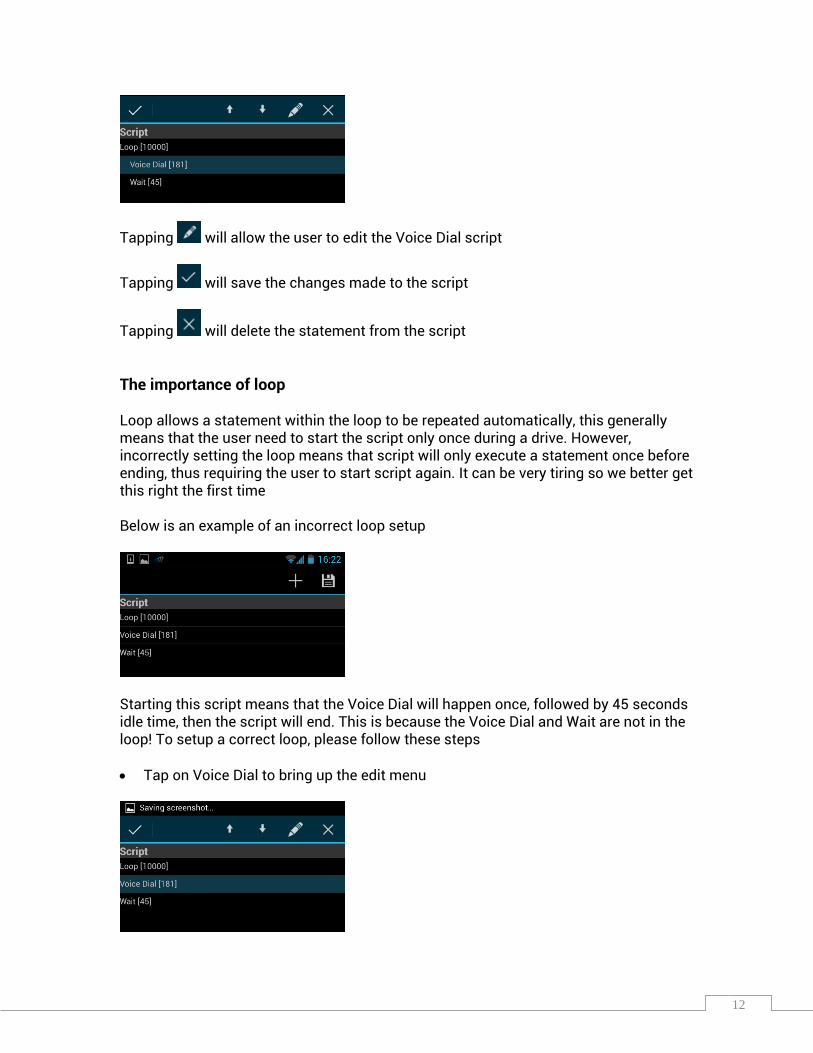
Tapping will allow the user to edit the Voice Dial script
Tapping will save the changes made to the script
Tapping will delete the statement from the script
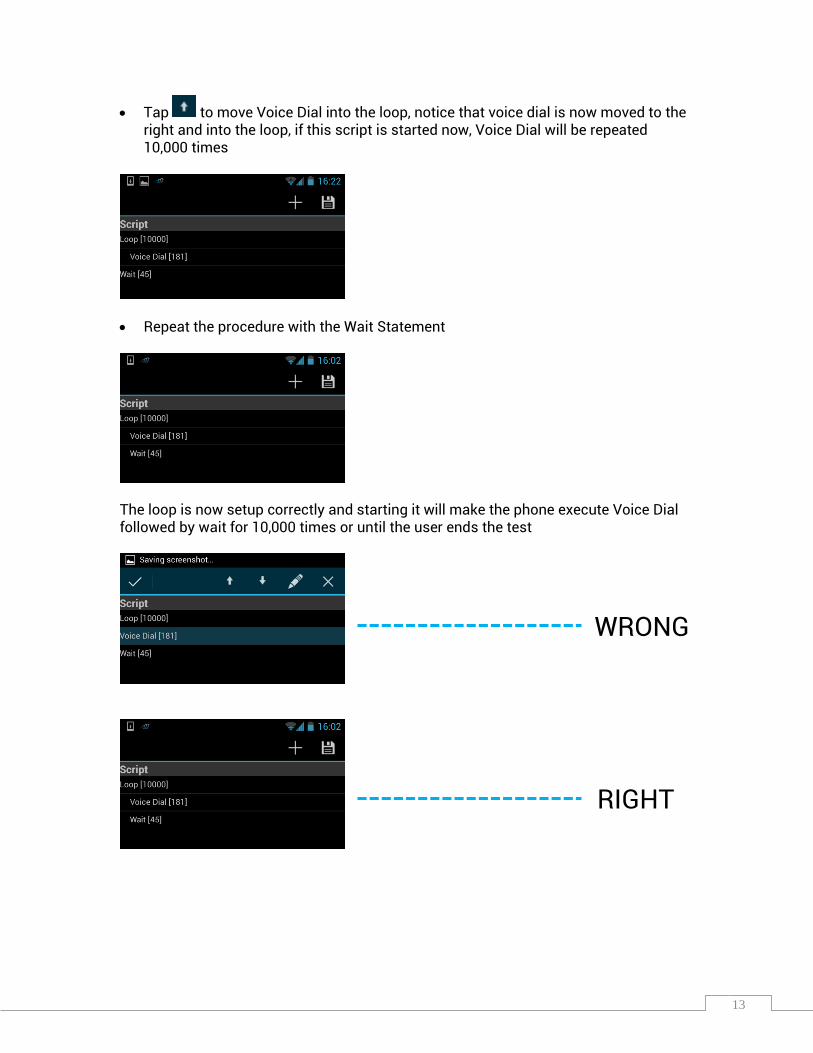
The importance of loop Loop allows a statement within the loop to be repeated automatically, this generally means that the user need to start the script only once during a drive. However, incorrectly setting the loop means that script will only execute a statement once before ending, thus requiring the user to start script again. It can be very tiring so we better get this right the first time Below is an example of an incorrect loop setup
Starting this script means that the Voice Dial will happen once, followed by 45 seconds idle time, then the script will end. This is because the Voice Dial and Wait are not in the loop! To setup a correct loop, please follow these steps Tap on Voice Dial to bring up the edit menu
13
Tap to move Voice Dial into the loop, notice that voice dial is now moved to the right and into the loop, if this script is started now, Voice Dial will be repeated 10,000 times
Repeat the procedure with the Wait Statement
The loop is now setup correctly and starting it will make the phone execute Voice Dial followed by wait for 10,000 times or until the user ends the test
WRONG
RIGHT

14
By tapping the icon, a list of statements will be displayed, the user can then tap a statement to add it into the script
Loop statement
Loop count: The number of times a script will repeat itself before ending, please keep in mind the importance of keeping statements in the loop
Wait statement
Wait will make the phone enters into idle mode, log will still be recorded during this time and the user can execute actions such as calls or use applications manually. Ideal for collecting coverage information Report Status to Server: Enabling this will allow the phone to send its status (Location, Battery level, Type of test being done) back to the server when wait is being executed Duration: The duration of the idle time
15
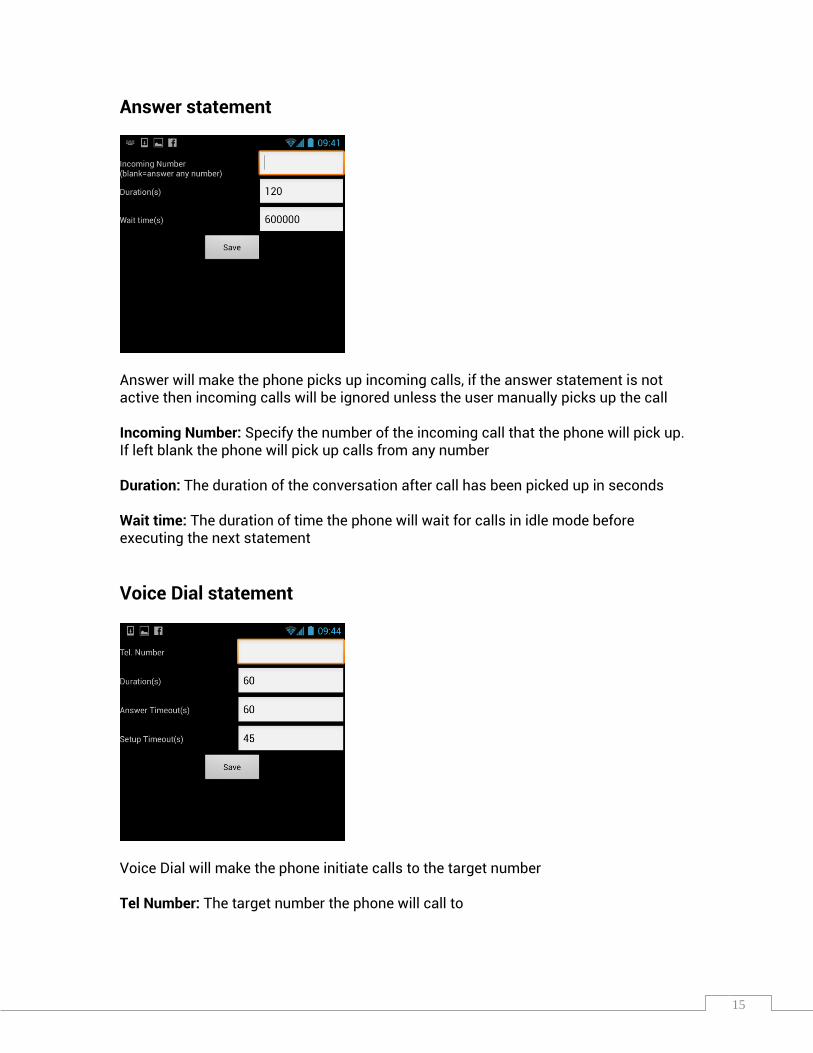
Answer statement
Answer will make the phone picks up incoming calls, if the answer statement is not active then incoming calls will be ignored unless the user manually picks up the call Incoming Number: Specify the number of the incoming call that the phone will pick up. If left blank the phone will pick up calls from any number Duration: The duration of the conversation after call has been picked up in seconds Wait time: The duration of time the phone will wait for calls in idle mode before executing the next statement
Voice Dial statement
Voice Dial will make the phone initiate calls to the target number Tel Number: The target number the phone will call to

16
Duration: The duration of the conversation after call has been picked up on the receiving side Answer timeout: The duration of time (in seconds) the phone will wait for the call to be picked up after ringing has started Setup timeout: The duration of time (in seconds) the phone will wait for the call to ring after it has been initiated on the caller side
FTP Download statement FTP download will download a file from the target server, please note that the target file name must exist on the server for the download to be started
File name: Specify the file name to download, please make sure that it must follow the exact same convention (Capital letters, spacing) as the file name on the server Username: User name for the FTP server IP: IP of the FTP server Password: Password of the FTP server Number of sessions: The number of simultaneous download sessions Timeout: Specify the download time before the FTP download is considered as failed Inactivity Timeout: Specify the period of no data activity before the FTP download is considered as fail
17
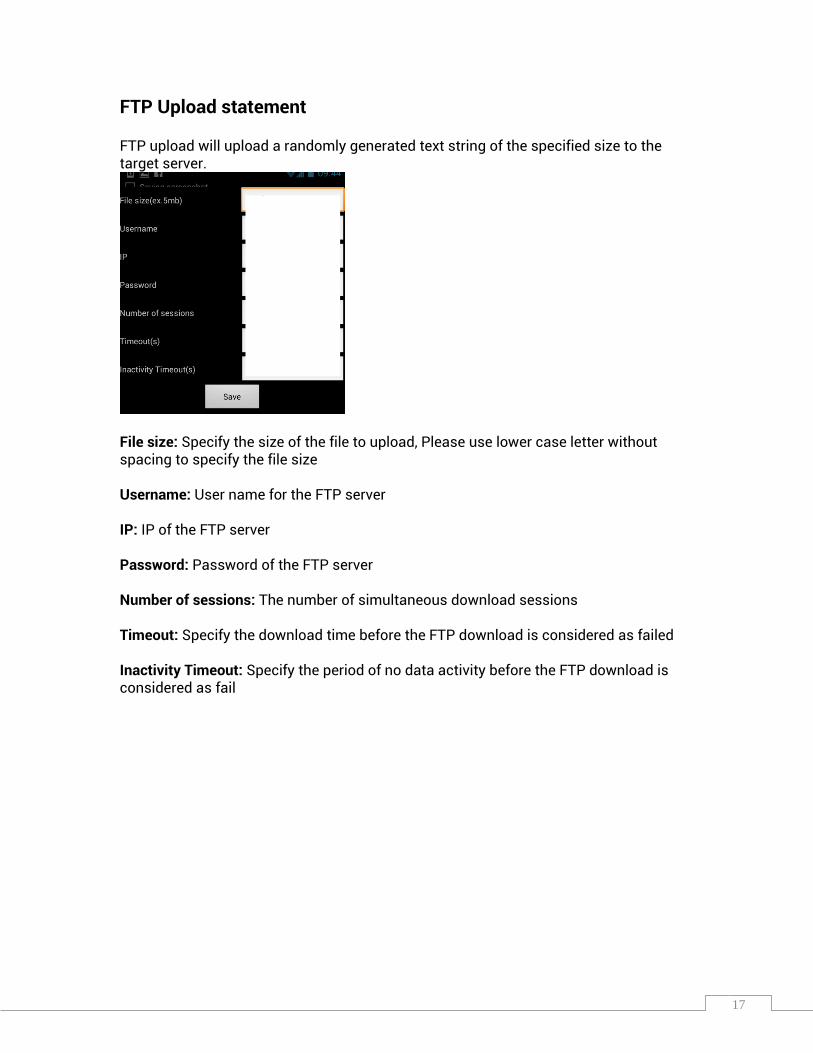
FTP Upload statement FTP upload will upload a randomly generated text string of the specified size to the target server.
File size: Specify the size of the file to upload, Please use lower case letter without spacing to specify the file size Username: User name for the FTP server IP: IP of the FTP server Password: Password of the FTP server Number of sessions: The number of simultaneous download sessions Timeout: Specify the download time before the FTP download is considered as failed Inactivity Timeout: Specify the period of no data activity before the FTP download is considered as fail

18
HTTP Download statement HTTP Download will download the target URL, this is not the same as browsing a web page
URL: The URL of the target web page Number of sessions: The number of simultaneous download sessions Timeout: Specify the download time before the FTP download is considered as failed Inactivity Timeout: Specify the period of no data activity before the FTP download is considered as fail
Browse statement Browse will use the Android web browsing API to open a webpage and download the page’s resources. Please note that Java script will not be downloaded
URL: The URL of the target web page to open Number of sessions: The number of simultaneous open web page sessions Timeout: Specify the download time before the FTP download is considered as failed
19
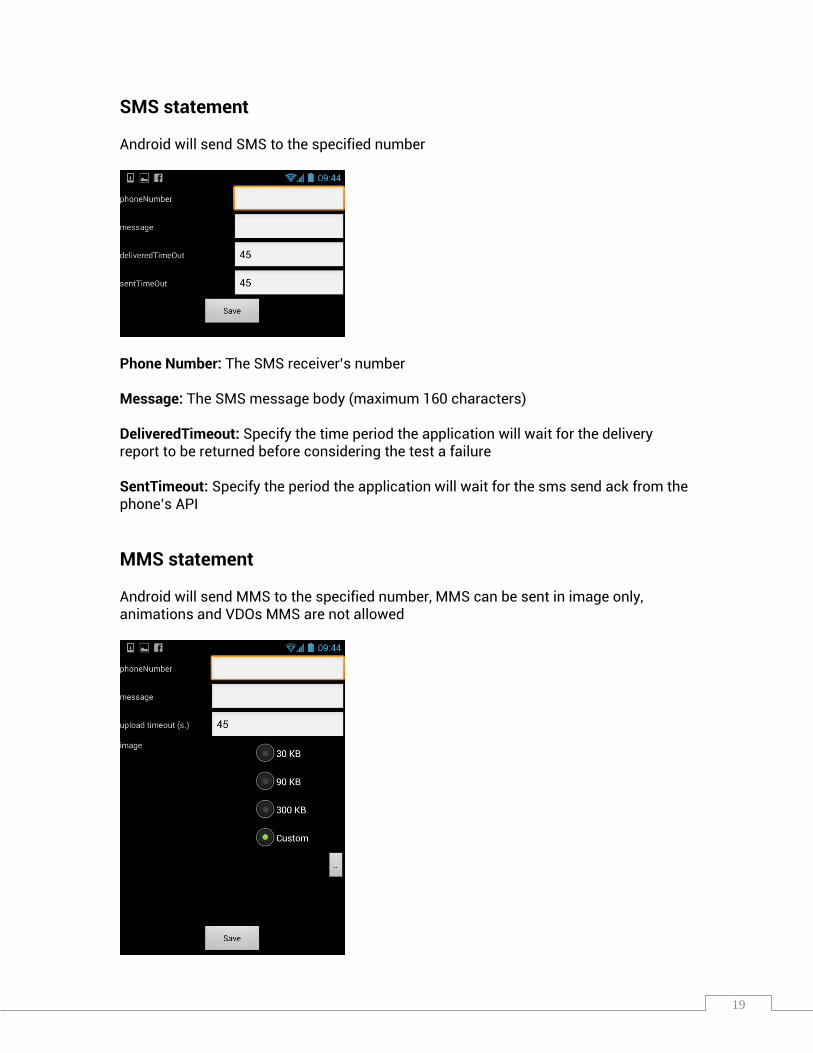
SMS statement Android will send SMS to the specified number
Phone Number: The SMS receiver’s number Message: The SMS message body (maximum 160 characters) DeliveredTimeout: Specify the time period the application will wait for the delivery report to be returned before considering the test a failure SentTimeout: Specify the period the application will wait for the sms send ack from the phone’s API
MMS statement Android will send MMS to the specified number, MMS can be sent in image only, animations and VDOs MMS are not allowed
20
Phone Number: The MMS receiver’s number Message: The MMS message body (maximum 160 characters) UploadTimeout: Specify the time period the application will wait for the MMS upload to be finished Image: Choose from a pre-defined image or image from the photo gallery
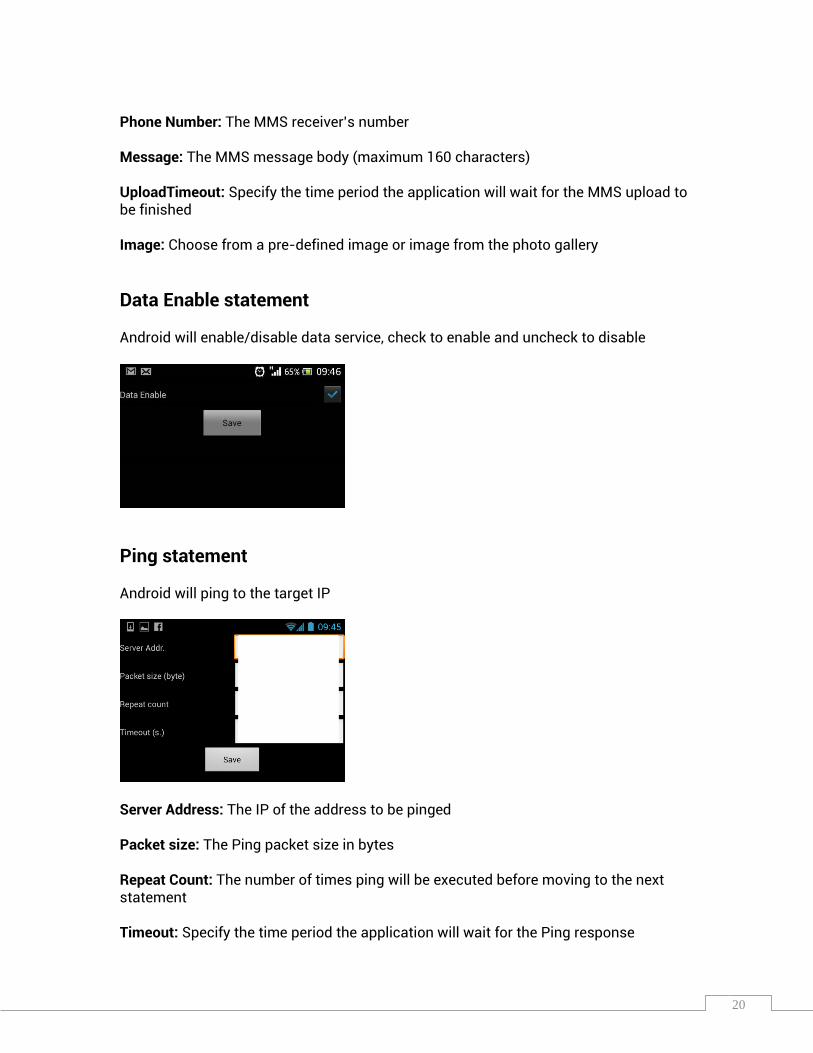
Data Enable statement Android will enable/disable data service, check to enable and uncheck to disable
Ping statement Android will ping to the target IP
Server Address: The IP of the address to be pinged Packet size: The Ping packet size in bytes Repeat Count: The number of times ping will be executed before moving to the next statement Timeout: Specify the time period the application will wait for the Ping response
21
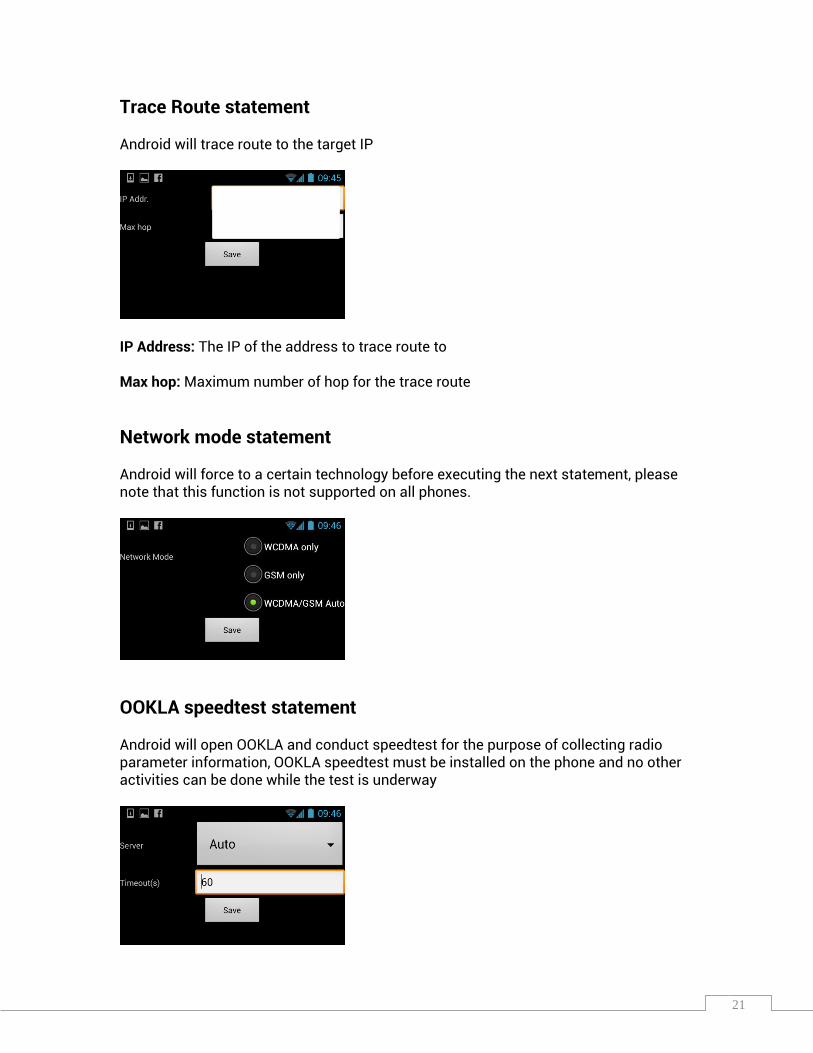
Trace Route statement Android will trace route to the target IP
IP Address: The IP of the address to trace route to Max hop: Maximum number of hop for the trace route
Network mode statement Android will force to a certain technology before executing the next statement, please note that this function is not supported on all phones.
OOKLA speedtest statement Android will open OOKLA and conduct speedtest for the purpose of collecting radio parameter information, OOKLA speedtest must be installed on the phone and no other activities can be done while the test is underway
22
Server: The Speedtest server to use for the test Timeout: Specify the time period the application will wait for the Speedtest to complete
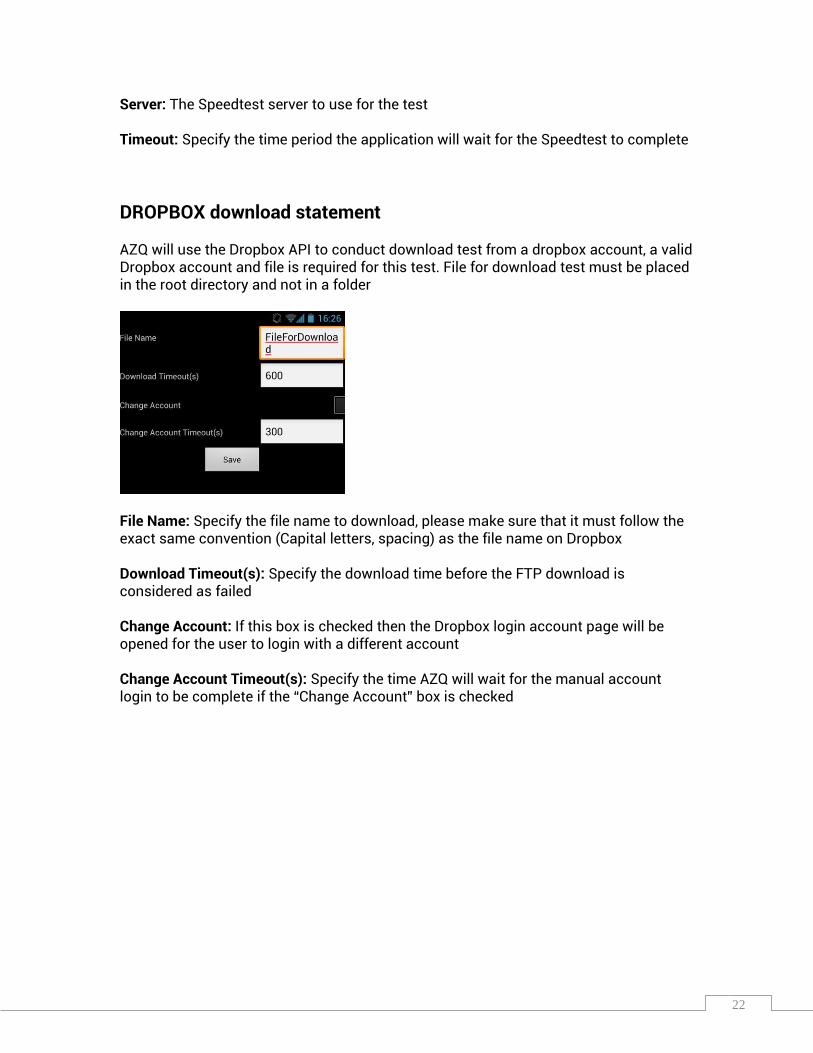
DROPBOX download statement AZQ will use the Dropbox API to conduct download test from a dropbox account, a valid Dropbox account and file is required for this test. File for download test must be placed in the root directory and not in a folder
File Name: Specify the file name to download, please make sure that it must follow the exact same convention (Capital letters, spacing) as the file name on Dropbox Download Timeout(s): Specify the download time before the FTP download is considered as failed Change Account: If this box is checked then the Dropbox login account page will be opened for the user to login with a different account Change Account Timeout(s): Specify the time AZQ will wait for the manual account login to be complete if the “Change Account” box is checked

23
DROPBOX upload statement AZQ will use the Dropbox API to conduct upload test to a dropbox account, a valid Dropbox account is required for this test.
File Size: Specify the file size to upload, Upload Timeout(s): Specify the download time before the FTP download is considered as failed Change Account: If this box is checked then the Dropbox login account page will be opened for the user to login with a different account Change Account Timeout(s): Specify the time AZQ will wait for the manual account login to be complete if the “Change Account” box is checked
Youtube statement AZQ will use the Youtube API to open a streaming VDO from Youtube while collecting radio parameters, data throughput and buffering statistics. Youtube must be installed on the phone with user account registered. No other activities can be done while the VDO is playing
VDO ID: Specify the streaming VDO to play, VDO ID can be found by opening the target Youtube VDO on a browser

24
1. VDO ID is the string behind /watch?v= 2. For this VDO, the ID is T6DJcgm3wNY 3. VDO ID is case sensitive Timeout(s): Specify the duration before the FTP download is considered as failed Timeout Before Playing (s): Specify the duration before the FTP download is considered as failed High Quality: Specify the time AZQ will wait for the manual account login to be complete if the “Change Account” box is checked
Pause statement AZQ will pause the script from continuing to the next statement, user can click Unpause at any time to release the pause. While pausing the radio parameters will not be recorded but Test KPIs (events) are still recorded.
Timeout(s): Specify the pause period duration, at the end of the timeout the next statement will be started even if Unpause hasn’t been clicked. You can also pause the script during testing by pressing option select “Pause recording”

25
WIFI Enable statement
Android will enable/disable WIFI connection, check to enable and uncheck to disable. The phone’s WIFI connection must be enabled for the WIFI connect/disconnect statement can be used.
Connect WIFI statement
Android will connect to a WIFI access point SSID: The name of the Wireless Network the Android will connect to WEP Key/ Password: The password to the wireless network Security: The security type of the Wireless Network Public Wifi(Show web login): In case a public hotspot is being connected to, this must be checked to open the login page on the browser
26
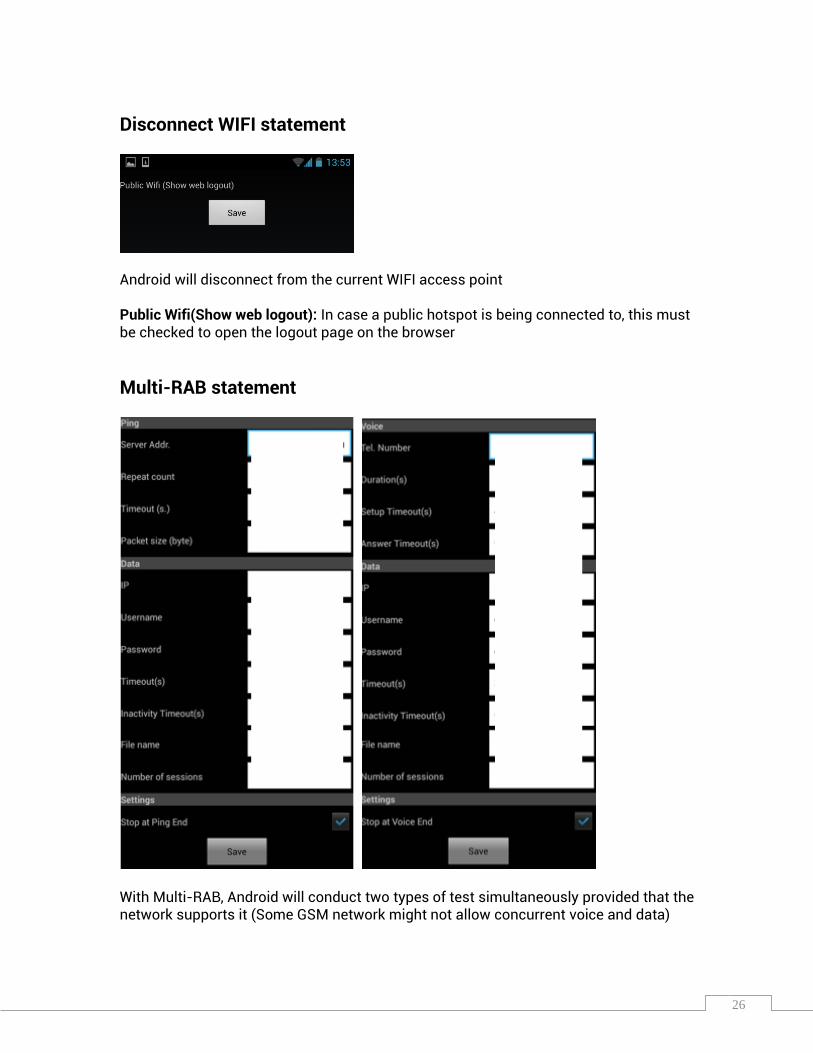
Disconnect WIFI statement
Android will disconnect from the current WIFI access point Public Wifi(Show web logout): In case a public hotspot is being connected to, this must be checked to open the logout page on the browser
Multi-RAB statement
With Multi-RAB, Android will conduct two types of test simultaneously provided that the network supports it (Some GSM network might not allow concurrent voice and data)
27
4 types of Multi-RAB tests are possible, Voice + FTP Download / Voice + FTP Upload / Ping + FTP Download and Ping + FTP Upload. The same rules for each of the statement applies. Stop at Ping End: If this is checked, Android will end the Ping + FTP Download or Ping + FTP Upload statement once Ping is done. FTP Download or FTP Upload at that moment will count as fail if it’s not successful before Ping is done Stop at Voice End: If this is checked, Android will end the Voice + FTP Download or Voice + FTP Upload statement once voice call has ended (From normal call clearing/ Call drop/Call block). FTP Download or FTP Upload at that moment will count as fail if it’s not successful before Voice Call is done

28
3. AZQ Settings AZQ Settings can be accessed from AZQ main menu, here users can import cell file for display during outdoors drive test, setup automatic mode testing, enable audio alarms and download components for additional testing.
Importing Cell files into AZQ Users can now import cell files into AZQ for display during outdoors testing,
GSM Cell File Format
Mandatory cell parameters
Parameter Keyword Type Description
Cell name CELL_NAME string Name of the cell
Site name SITE_NAME string Name of the site
Latitude LAT float Latitude of the site in degrees
Longitude LON float Longitude of the site in degrees
Antenna beam width
ANT_BW integer Values range from 1-360
Cell direction DIR integer Values range from 0-360
MCC MCC integer
MNC MNC integer
Optional cell parameters
Parameter Keyword Type Description
Location Area Code
LAC integer Values range from 0-65535
Cell ID CELL_ID string Values range from 0-65535
Channel Number CH integer ARFCN. Values range from 0 to 1024
BSIC BSIC string Base Station Identity Code in decimal format
29
Example
CELL_NAME SITE_NAME LAT LON ANT_BW DIR MCC MNC LAC CELL_ID BCCH BSIC
XXX9340B1 XXX9340B 13.74864 100.5357 360 0 XX0 XX 15061 20257 573 1-0
XXX9340B2 XXX9340B 13.74864 100.5357 360 50 XX0 XX 15061 20258 571 2-0
XXX9340B3 XXX9340B 13.74864 100.5357 360 120 XX0 XX 15061 20259 569 0-2
XXX9340B4 XXX9340B 13.74864 100.5357 360 210 XX0 XX 15061 20261 567 0-8
XXX9341B1 XXX9341B 13.7446 100.533 360 0 XX0 XX 15061 20151 571 2-1
Cell search method Name of cell (In AZQ Android and AZQ Replay) and lines drawn from current location to serving/neighboring cells (In AZQ Replay) are searched based on the following algorithm Matching CGI (MCC, MNC, LAC, CELL_ID)
Matching MCC, MNC, CH, BSIC. If multiple matching cells are found, closest cell is
selected. The cell is matched only if distance is less than 50km.
WCDMA Cell File Format
Mandatory cell parameters
Parameter Keyword Type Description
Cell name CELL_NAME string Name of the cell
Site name SITE_NAME string Name of the site
Latitude LAT float Latitude of the site in degrees
Longitude LON float Longitude of the site in degrees
Antenna beam width
ANT_BW integer Values range from 1-360
Cell direction DIR integer Values range from 0-360
MCC MCC integer
MNC MNC integer
Optional cell parameters
Parameter Keyword Type Description
Location Area Code
LAC integer Values range from 0-65535
Cell ID CELL_ID string Values range from 0-65535

30
Channel Number CH integer ARFCN. Values range from 0 to 1024
Scrambling code SCR integer Value range from 0-512
Routing Area Code
RAC Integer Values range from 0 to 255.
Example
CELL_NAME SITE_NAME LAT LON ANT_BW DIR MCC MNC SCR CH LAC CELL_ID RAC
XXX-BKK0006-1A BKKXXXX 13.7668 100.586 360 0 XXX XX 437 4433 14701 12003 41
XXX-BKK0006-1B BKKXXXX 13.7668 100.586 360 120 XXX XX 438 4433 14701 12006 41
XXX-BKK0006-1C BKKXXXX 13.7668 100.586 360 270 XXX XX 439 4433 14701 12007 41
XXX-BKK0007-1A BKKXXXX 13.7594 100.541 360 30 XXX XX 357 4433 14701 12008 41
Cell search method Name of cell (In AZQ Android and AZQ Replay) and lines drawn from current location to serving/neighboring cells (In AZQ Replay) are searched based on the following algorithm Matching MCC, MNC, SC, CH. If multiple matching cells are found, closest cell is
selected. The cell is matched only if distance is less than 50km.
Cell file format that contains both GSM, WCDMA cells You can create cell file that contains both GSM and WCDMA cells by adding column SYSTEM_TYPE. Put value GSM if current row is GSM cell and put value WCDMA if current row is WCDMA cell.
Parameter Keyword Type Description
System Type SYSTEM_TYPE string Possible values are GSM WCDMA
31
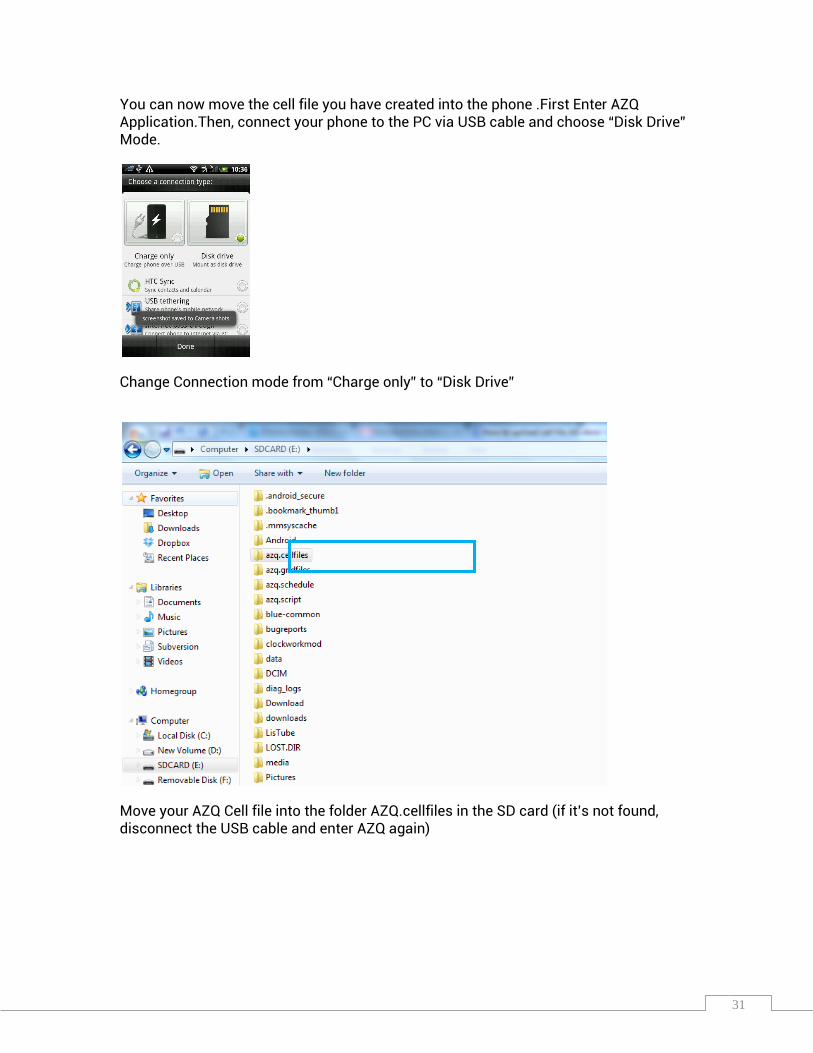
You can now move the cell file you have created into the phone .First Enter AZQ Application.Then, connect your phone to the PC via USB cable and choose “Disk Drive” Mode.
Change Connection mode from “Charge only” to “Disk Drive”
Move your AZQ Cell file into the folder AZQ.cellfiles in the SD card (if it’s not found, disconnect the USB cable and enter AZQ again)
32
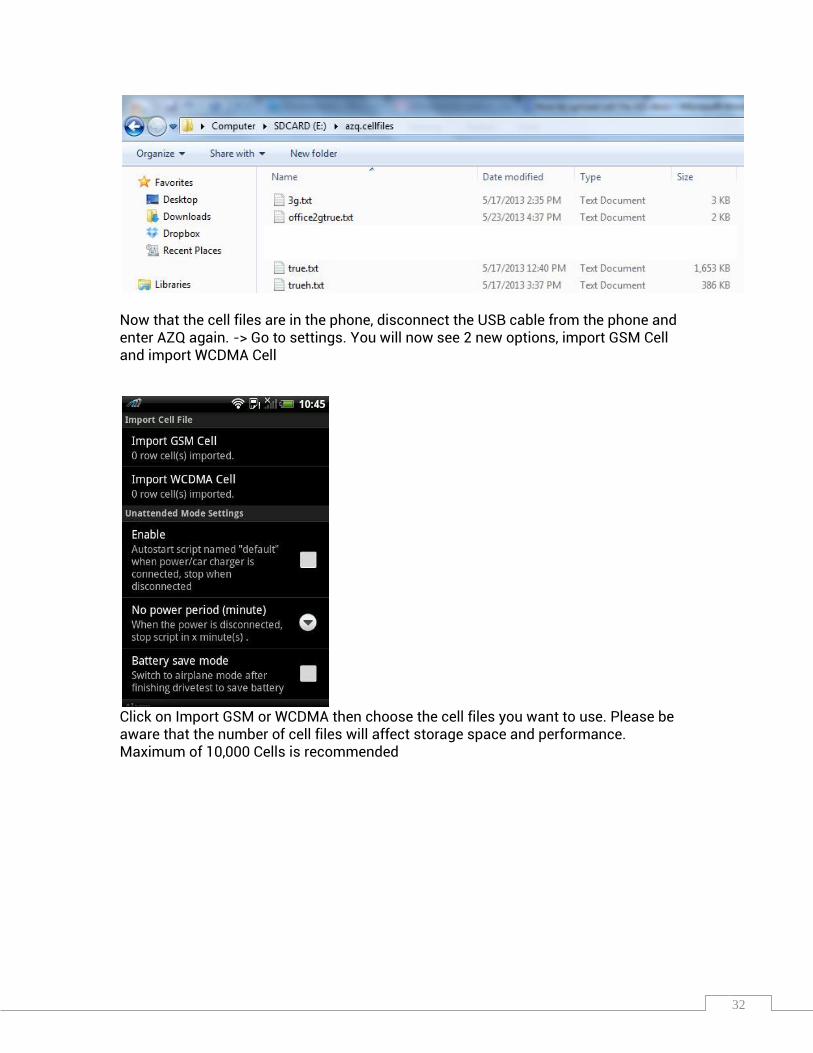
Now that the cell files are in the phone, disconnect the USB cable from the phone and enter AZQ again. -> Go to settings. You will now see 2 new options, import GSM Cell and import WCDMA Cell
Click on Import GSM or WCDMA then choose the cell files you want to use. Please be aware that the number of cell files will affect storage space and performance. Maximum of 10,000 Cells is recommended

33
After the import is successful, the number of cell files will be changed, as shown in figure7
If the number of imported cells is “0” after import, it means the cell file is incompatible with AZQ
During Drive Test, user can now see Cell files displayed on the map. Maximum of 100 Cells can be displayed

34
GSM Cell will be displayed in Green/WCDMA cell will be displayed in Blue, Outdoor cells will be displayed in Triangles while Indoors cell will be displayed in squares

35
Unattended Mode Settings In unattended mode the phone will start testing the script named “default” whenever power is plugged in and will stop testing and start uploading the log once power has been unplugged for a specified period of time. User must create a valid script named “default” for this mode to work. If schedule is also checked, the phone will instead connect to AZQ server and download the appropriate script.
Enable: Check to enable automatic mode No power period (minute): User can change the interval between the loss of power source and end of the test. Default setting is 1 minute Clear SMS/MMS: If checked, Android will delete all SMS/MMS message in the inbox every time the test is started. SMS or MMS deleted in this way can’t be recovered
Alarm Settings
User can enable/disable various audio notification during drive test
No Power Alarm: Check to enable audio warning when phone is not plugged into a power source during testing GPS Alarm: Check to enable audio warning when GPS connection is lost
36
Audio Notification: Check to enable audio notification for various events usch as call setup, call block, call drop, Handover
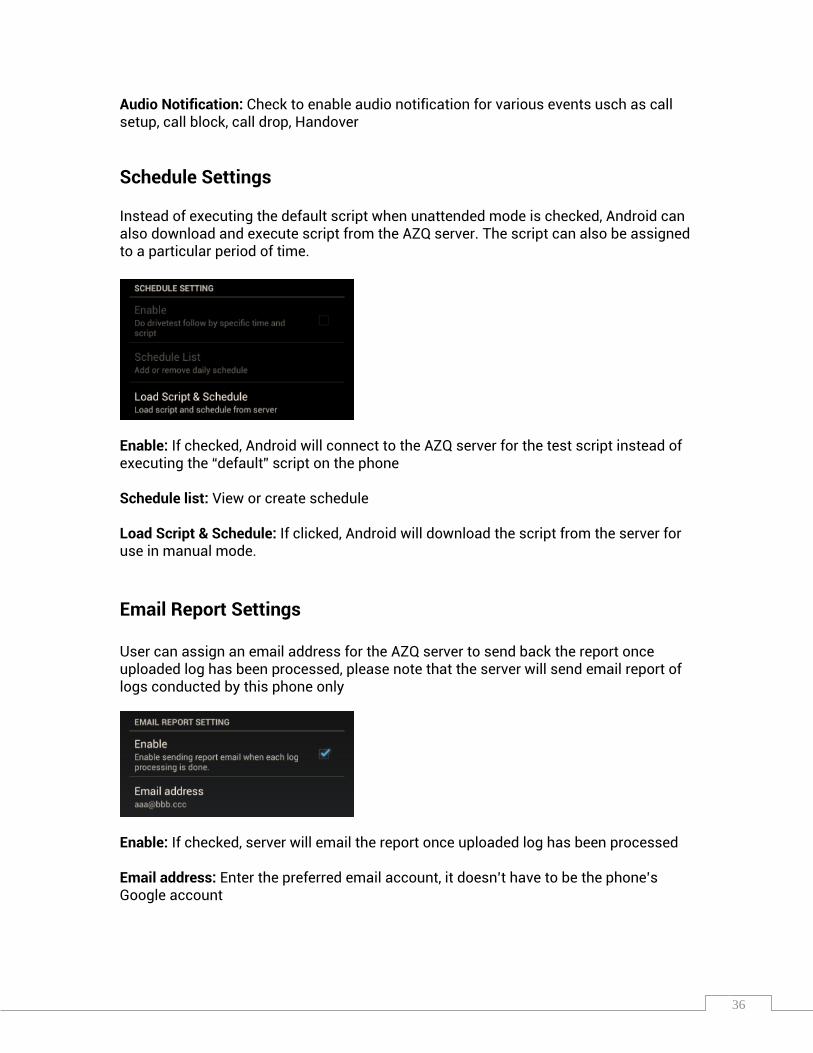
Schedule Settings Instead of executing the default script when unattended mode is checked, Android can also download and execute script from the AZQ server. The script can also be assigned to a particular period of time.
Enable: If checked, Android will connect to the AZQ server for the test script instead of executing the “default” script on the phone Schedule list: View or create schedule Load Script & Schedule: If clicked, Android will download the script from the server for use in manual mode.
Email Report Settings User can assign an email address for the AZQ server to send back the report once uploaded log has been processed, please note that the server will send email report of logs conducted by this phone only
Enable: If checked, server will email the report once uploaded log has been processed Email address: Enter the preferred email account, it doesn’t have to be the phone’s Google account
37
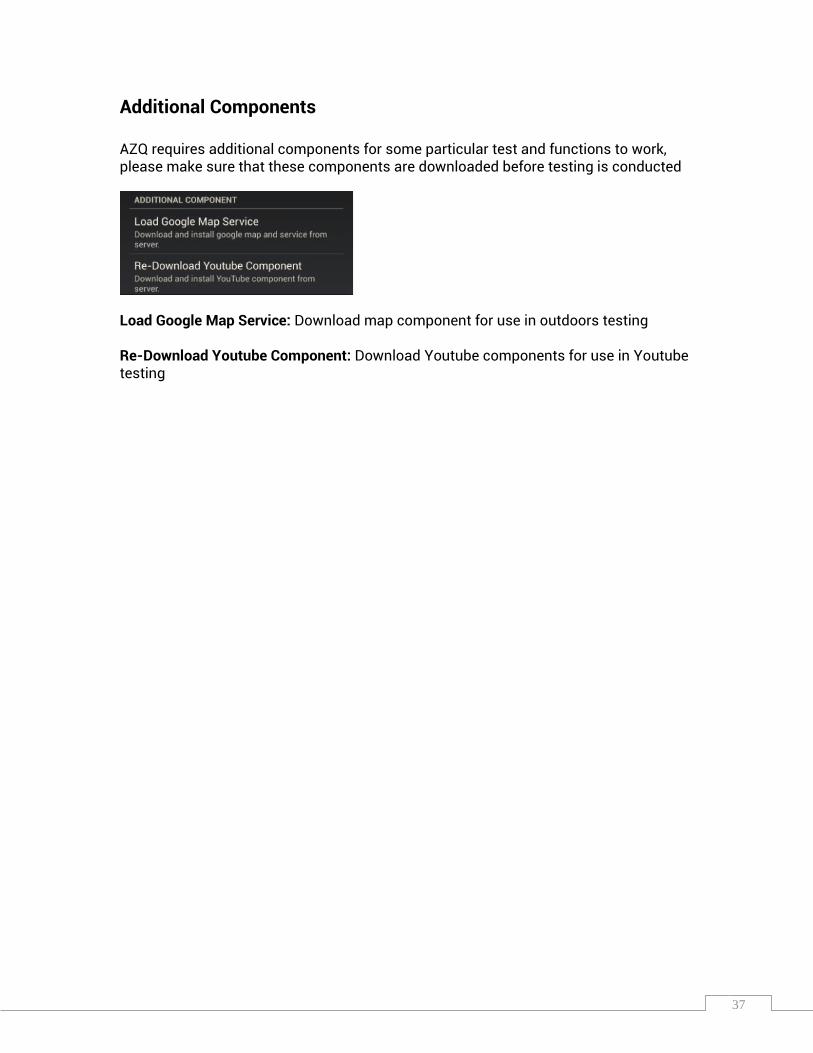
Additional Components AZQ requires additional components for some particular test and functions to work, please make sure that these components are downloaded before testing is conducted
Load Google Map Service: Download map component for use in outdoors testing Re-Download Youtube Component: Download Youtube components for use in Youtube testing

38
4. Data Panels
Once testing has been initiated, AZQ will open the main testing screen where various event and radio information can be viewed, you can swipe the data tabs to navigate between panels and also swipe the left side of the screen to enable split panel views
Split Panel View
User can click on this part of the screen or swipe any left part of the screen to bring up split panel view
or hardware key on some Android phones
User can click to bring up the option to pause log during recording or mute audio notification sound during drive testing
39
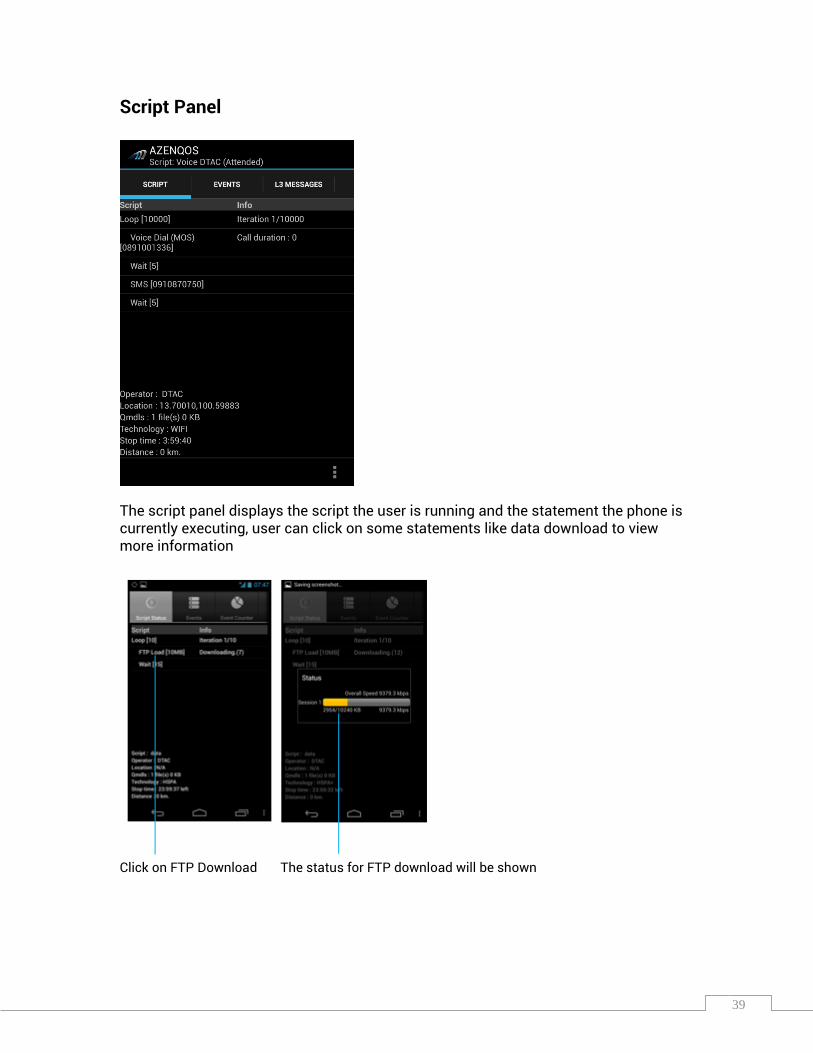
Script Panel
The script panel displays the script the user is running and the statement the phone is currently executing, user can click on some statements like data download to view more information
Click on FTP Download The status for FTP download will be shown

40
Events Panel
The event panel displays the KPI event and handover information for the user. This Screen can be swapped to the right to display the summary event counter

41
Layer 3 Messages Panel
The Layer 3 Messages panel displays the Layer 3 Messages of the test, user can click on the layer message itself to view additional information of the message
42
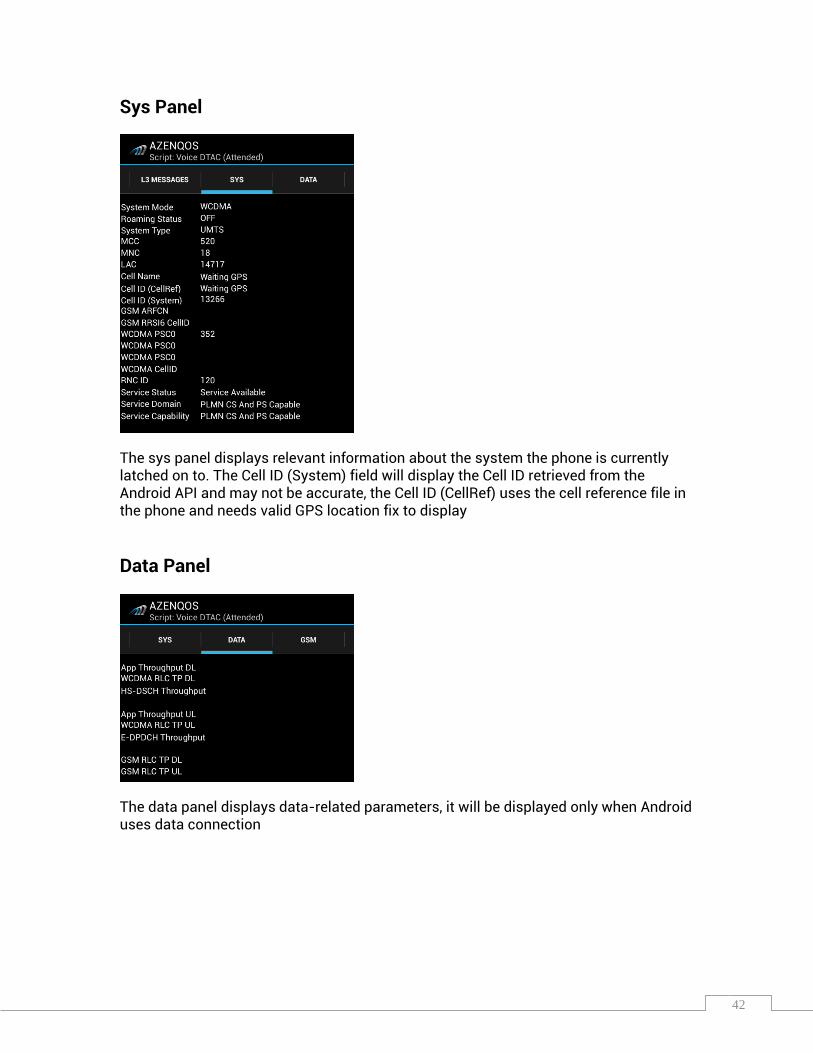
Sys Panel
The sys panel displays relevant information about the system the phone is currently latched on to. The Cell ID (System) field will display the Cell ID retrieved from the Android API and may not be accurate, the Cell ID (CellRef) uses the cell reference file in the phone and needs valid GPS location fix to display
Data Panel
The data panel displays data-related parameters, it will be displayed only when Android uses data connection

43
GSM Panel
The GSM panel displays the relevant 2G radio parameter and SpeechCodec during voice call test
C/I Panel
The C/I panel displays the C/I statistics while the phone is in GSM mode

44
2G Cells Panel
The 2G Cells panel displays the serving and neighboring cell information
EDGE/GPRS Panel
The EDGE/GPRS panel displays the 2G data related radio parameter when Android uses data or conduct data tests
45
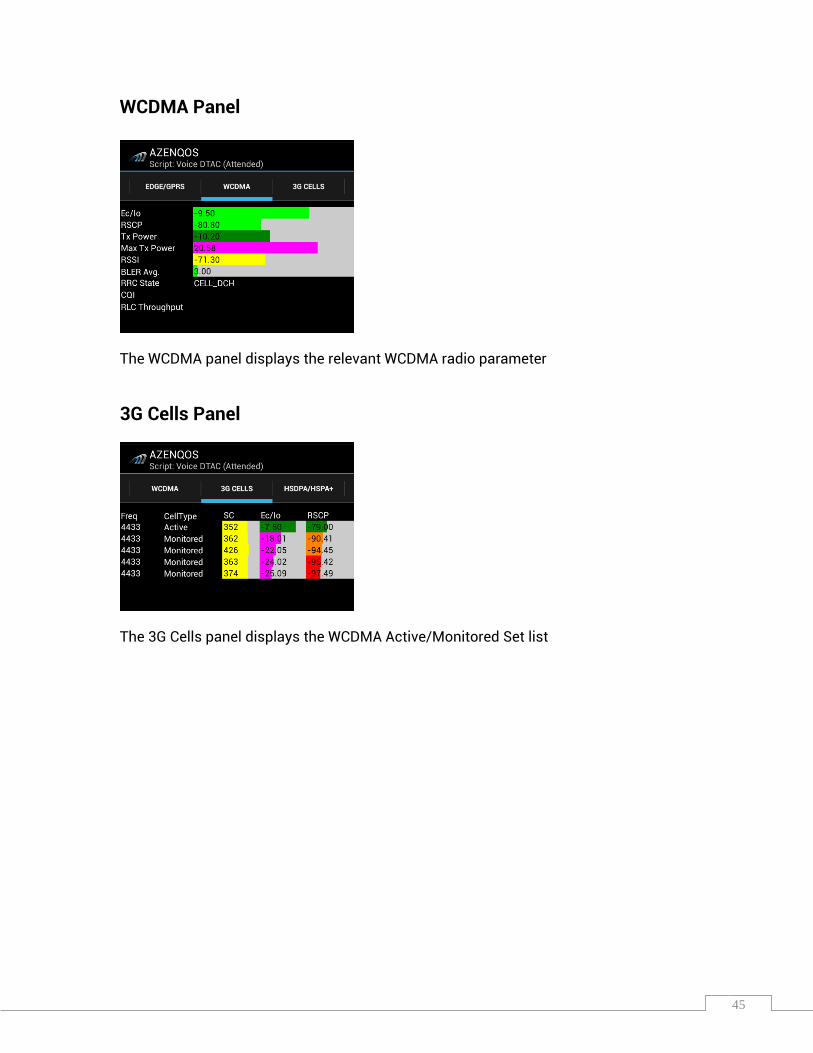
WCDMA Panel
The WCDMA panel displays the relevant WCDMA radio parameter
3G Cells Panel
The 3G Cells panel displays the WCDMA Active/Monitored Set list
46
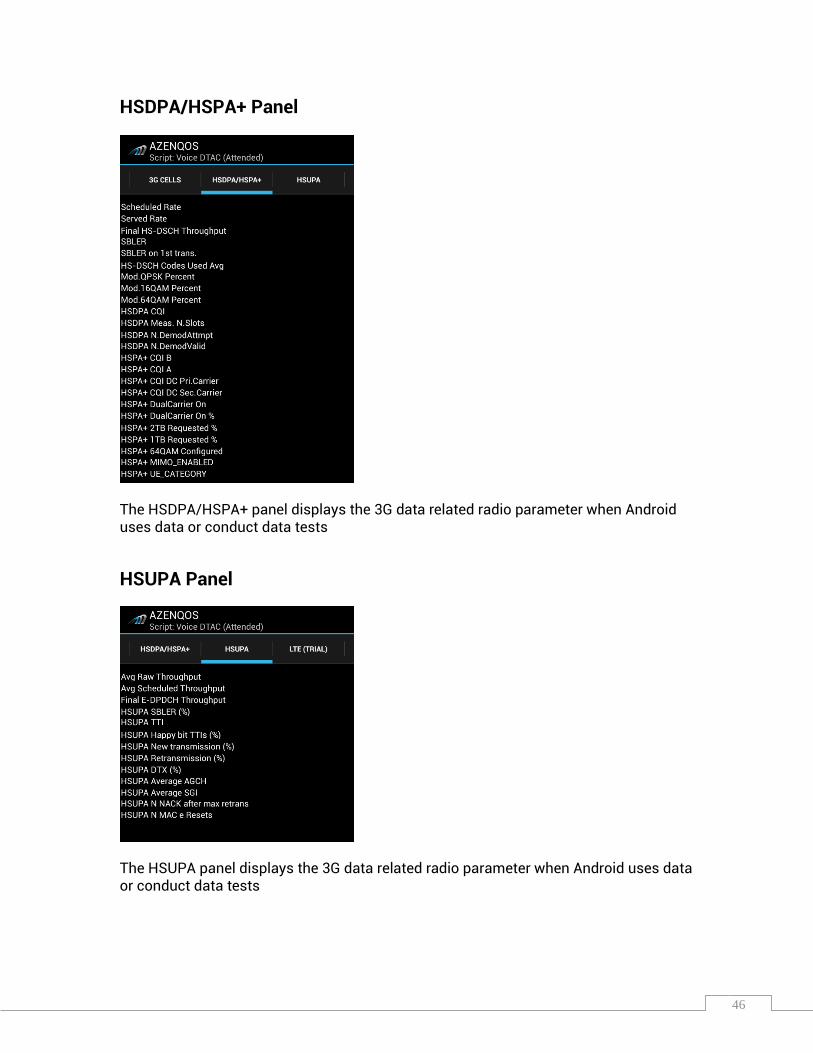
HSDPA/HSPA+ Panel
The HSDPA/HSPA+ panel displays the 3G data related radio parameter when Android uses data or conduct data tests
HSUPA Panel
The HSUPA panel displays the 3G data related radio parameter when Android uses data or conduct data tests
47
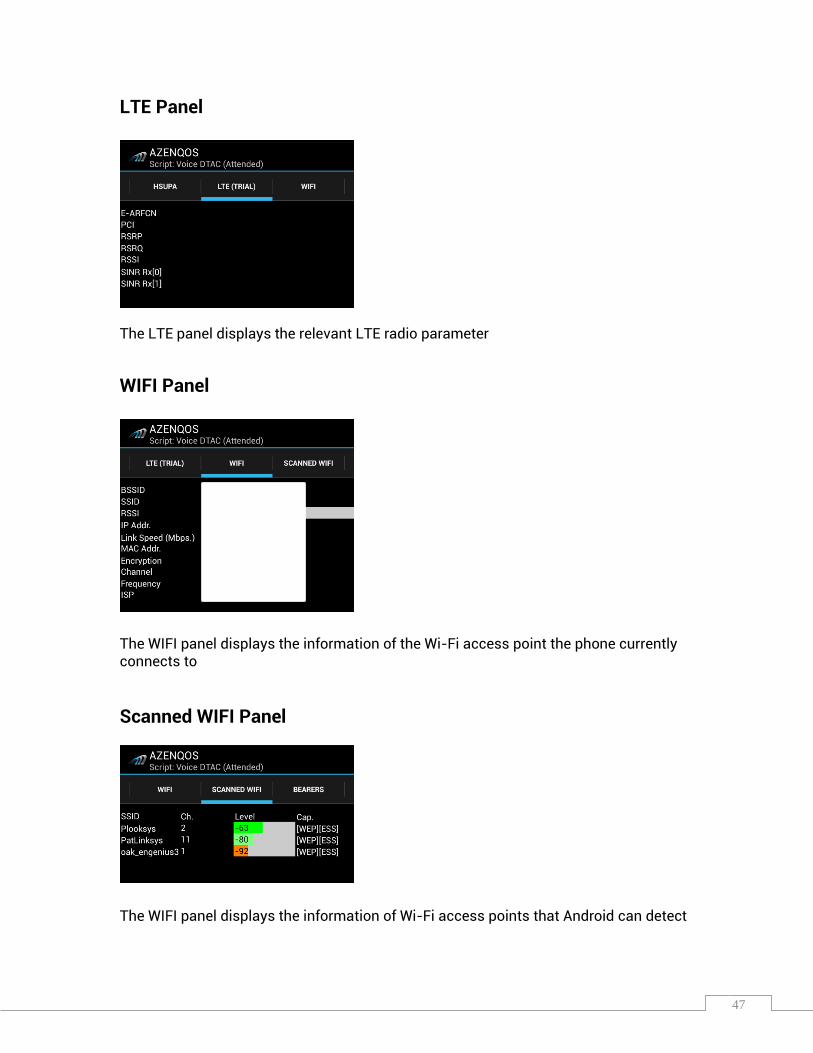
LTE Panel
The LTE panel displays the relevant LTE radio parameter
WIFI Panel
The WIFI panel displays the information of the Wi-Fi access point the phone currently connects to
Scanned WIFI Panel
The WIFI panel displays the information of Wi-Fi access points that Android can detect

48
Bearers Panel
The Bearers panel displays the voice and data bearer currently assigned to the phone
Split Panel
User can click on this part of the screen or swipe any left part of the screen to bring up split panel view, user can then choose the split panel to display
With split panel, two sets of information can be seen on the screen at the same time, for example, if WCDMA is chosen as a split panel while in Layer 3 Message tab, the user can view both information at the same time

49
Split panel is designed to allow users to display multiple sets of information at the same time and allow for easier analysis during testin

50
5. Outdoor map
Exporting and opening .mif grid file in AZQ After starting script, select “Outdoor” tab and click “Open Map” button. From map screen, touch at the menu button on the phone then select “Choose Grid Tab” then choose grid files that you want.
You will see grid map overlay to Google map as below

51
How to use your own grid files in AZQ AZQ support only .MIF map file format but normally your grid will come as .TAB. You can use MapInfo program to convert from .TAB to .MIF by following below instruction
1. Open MapInfo Professional then click File
2. Select open
3. Choose grid file (*.TAB) that you want to export
4. Click “Open”
5. Click Table
6. Select Export
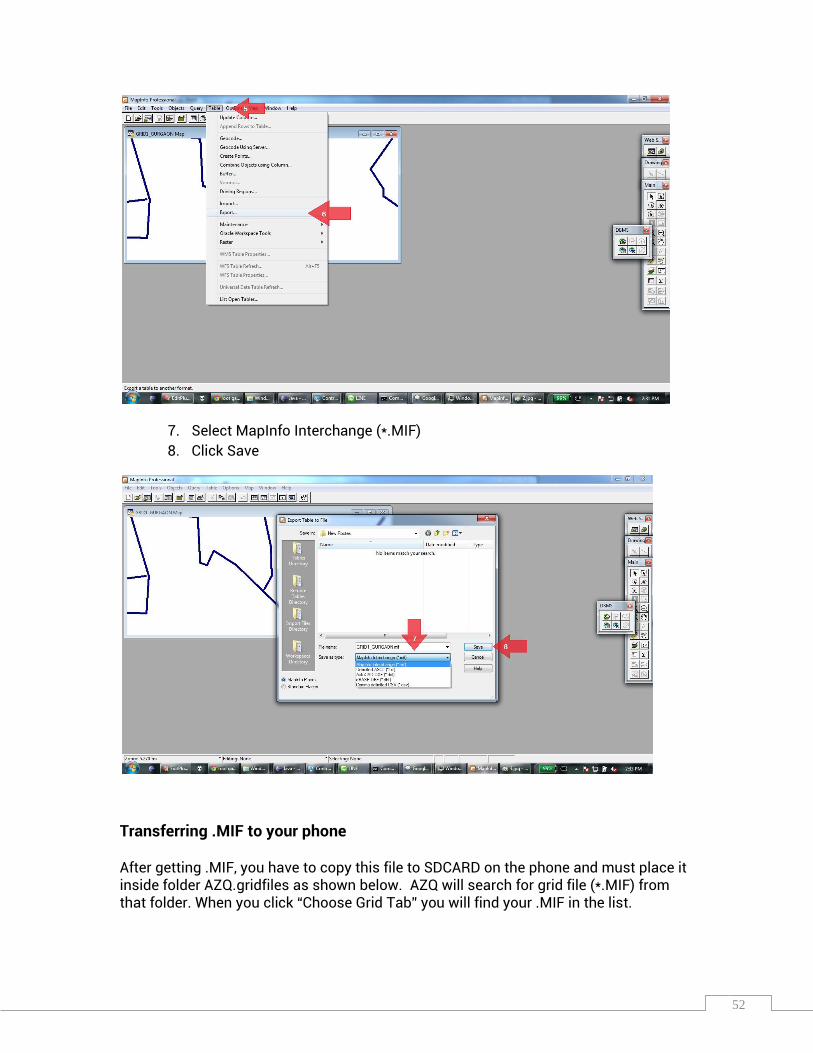
52
7. Select MapInfo Interchange (*.MIF)
8. Click Save
Transferring .MIF to your phone
After getting .MIF, you have to copy this file to SDCARD on the phone and must place it inside folder AZQ.gridfiles as shown below. AZQ will search for grid file (*.MIF) from that folder. When you click “Choose Grid Tab” you will find your .MIF in the list.

53
My Location function Once user opens the map, navigation and location functions will become available

54
My location will zoom in on the user’s location once GPS has been fixed, the GPS icon
on the screen will notify the user when GPS location is fixed
Lat/Lon is displayed The GPS icons stop blinking
Get Direction function User can navigate from one location to another with the get direction function, press on any point on the screen, the upper right will now display “Set as origin” and “Set as destination”

55
User can then set that location as origin or destination, once two points has been selected, click on “Get direction” to bring up the navigation screen
User can also use “Search Cell” to use the cell name as origin or destination, select Get direction and drive route will be generated
Route Plotting on Google Maps AZQ will display Rxlvl and EC/IO on the drive route, user can also use the split panel function to display additional information such as Cell name & Color Theme

56
Google Maps in Offline Mode Maps information may not update properly if the phone doesn’t have data connection. However, user can cache the map beforehand by opening the map before the drive test in AZQ’s network monitoring and glide around the designated drive test areas at various zoom levels before exiting. This will cache map information and will allow map to display correctly in the drive test even without data connection.

57
6. Indoor Map For indoor testing without GPS, users can use the Indoor map function in AZQ to open a PNG or JPG floor plan format and mark walk test path. Please be noted that one log can’t contain both indoors and outdoors location information
.
Loading map file into AZQ
On the map indoor tab, click on the “open map” icon

58
User can then choose the floor plan image from the gallery, If the image file larger than 1MB the phone might run out of memory, in that case please restart the test.
Plotting Indoor Location
59
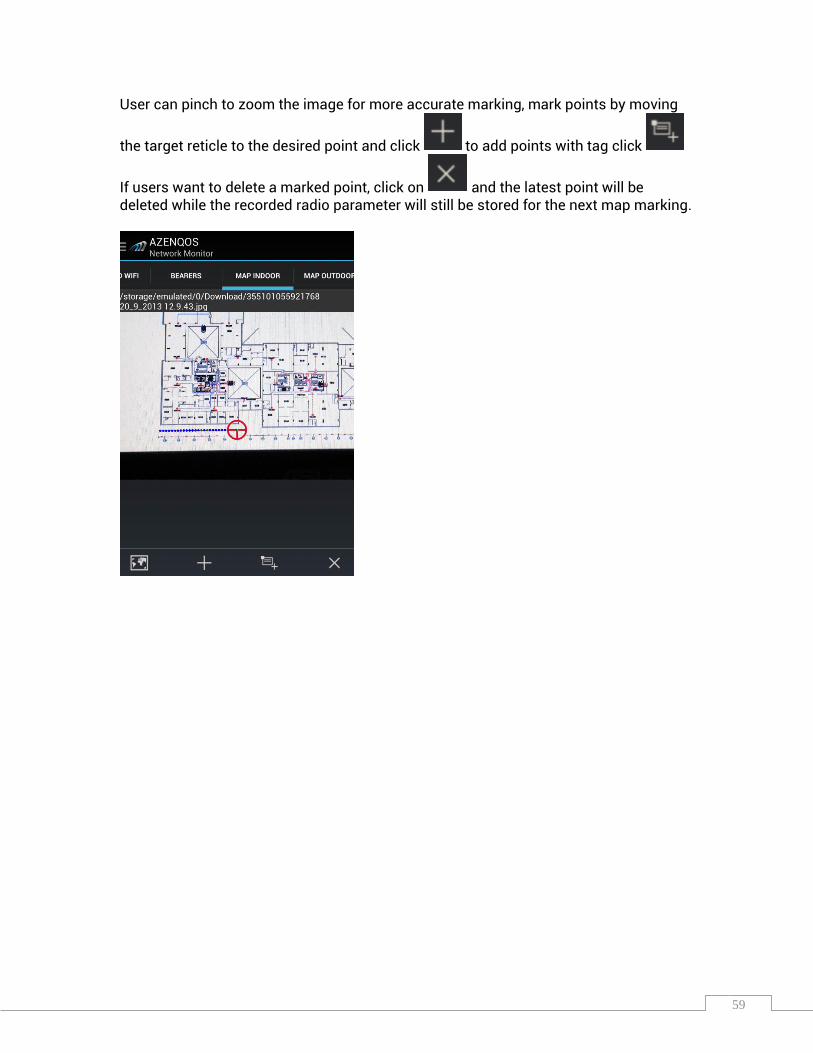
User can pinch to zoom the image for more accurate marking, mark points by moving
the target reticle to the desired point and click to add points with tag click
If users want to delete a marked point, click on and the latest point will be deleted while the recorded radio parameter will still be stored for the next map marking.

60
7. Log File
Start Recording To start recording log, click on start script
User can then select the desired script to run.
61
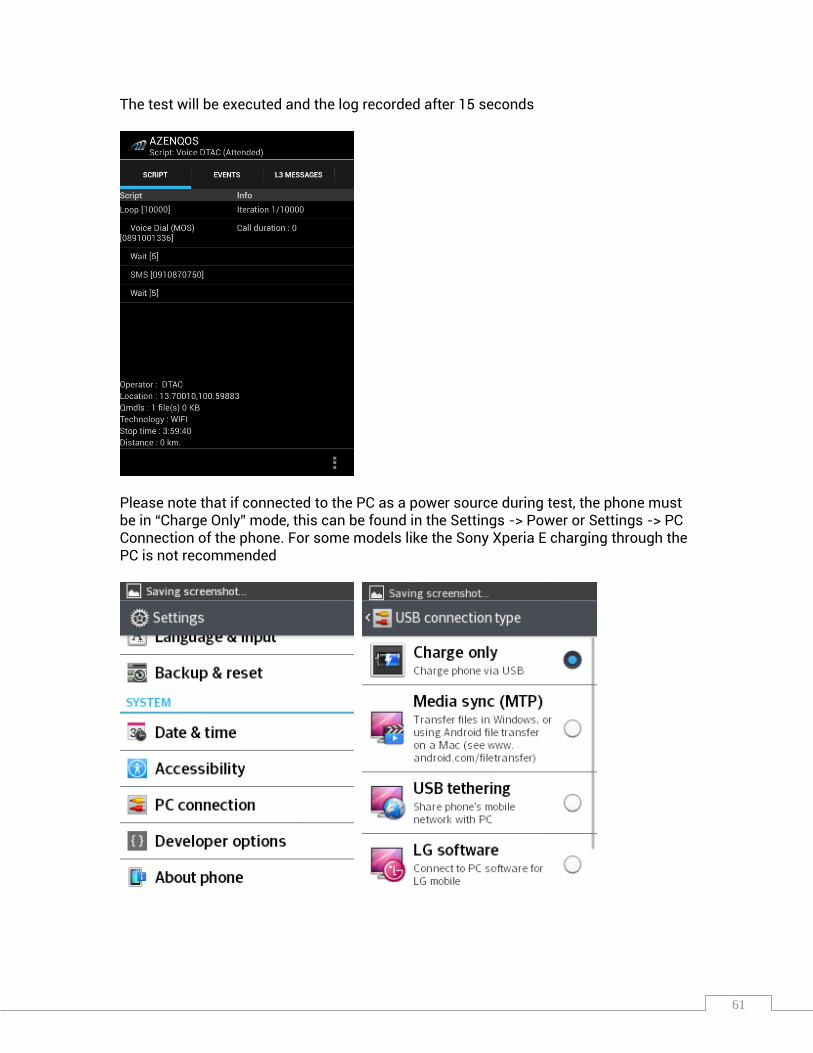
The test will be executed and the log recorded after 15 seconds
Please note that if connected to the PC as a power source during test, the phone must be in “Charge Only” mode, this can be found in the Settings -> Power or Settings -> PC Connection of the phone. For some models like the Sony Xperia E charging through the PC is not recommended

62
Stop Recording Once testing is complete, user can press the back button on Android to end script and stop recording
Back

63
Tag name or Job ID can be entered at this time, please note that the tag must be in English only with no spacing Yes: will save the log and exit testing No: will stop testing without saving the log Cancel: will bring you back to the testing screen Log file will be saved to the sdcard/diag_logs folder, once uploaded it will be moved into sdcard/diag_logs/uploaded, the file can be moved to sdcard/diag_logs again in case log upload has to be retried
Background Mode During testing, the user can press the home button to come out to the main menu and conduct other activities while the log is being recorded, please be noted that activities that require heavy memory usage might cause the phone and AZQ to crash,
Home

64
8. Appendix
List of Measurements
1.0 Access Technology
1.1 GSM (GSM 850/900/1800/1900)
1.2 WCDMA (850/900/2100) HSPA+ 42.2 Mbps/HSUPA 5.76 Mbps
1.3 LTE (FDD LTE 800/850/1800/2100/2600) 100 Mbps/50 Mbps
1.4 Wifi (IEEE802.11a/b/g/n)
2.0 Android Test Terminal
2.1.1 Support Android OS 4.1 or higher
2.1.2 Support for locally-sourced & supported Commercial Android mobile phones
2.1.3 Ablility to sync benchmarking scripts with upto 3 other phones
2.1.4 Ablility to connect to Bluetooth GPS
3.0 Parameter Measurement Items
3.1 GSM
3.1.1 Absolute Radio Frequency Channel Number (ARFCN – BCCH and TCH)
3.1.2 Timing Advance (TA)
3.1.3 BSIC
3.1.4 Used time slot (TS)
3.1.5 RxLev (Full/Sub)
3.1.6 RxQuality (Full/Sub)
3.1.7 Hopping Information (Hopping frequency, MAIO, Hopping Sequence)
3.1.8 Speech codec (FR, HR, EFR, AMR)
3.1.9 Frame Error Rate (FER)
3.1.10 C/I (hopping list)
3.1.11 Radio link timeout (RLT)
3.1.12 MS power level
3.1.13 C1/C2
3.1.14 DTX (on/off)
3.1.15 Neighbor information
3.1.16 Cell reselection
3.1.17 Call Disconnect cause
3.1.18 Cell Global Indication (CGI)/LAC
3.1.19 Band (900/1800 MHz)
3.2 GPRS/EDGE
3.2.1 CS/MCS usage (UL/DL)
3.2.2 Modulation method
3.2.3 Time slot usage (/UL/DL)
3.2.4 SNDCP/LLC/RLC throughput
3.2.5 GMM/SM state

65
3.2.6 RAC (Routing Area Code)
3.2.7 Routing area update
3.3 WCDMA
3.3.1 Ec/Io (Active set, Monitor set, Detect set)
3.3.2 RSCP (Active set, Monitor set, Detect set)
3.3.3 RSSI
3.3.4 SF usage
3.3.5 UE Tx power
3.3.6 RRC state
3.3.7 UARFCN
3.3.8 Speech codec (AMR – codec rate)
3.3.9 Active and neighbour set information (both WCDMA and GSM - Rxlev)
3.3.10 Handover state
3.3.11 RACH power
3.3.12 BLER
3.3.13 DL Frequency
3.3.14 UL Frequency
3.3.15 Scrambling Code
3.3.16 Rx Power
3.3.17 Tx Power
3.4 Packet switch (R99)
3.4.1 Application/RLC throughput
3.4.2 PDP context activaiton info. (TP/state)
3.4.3 Data amount (sent/receive)
3.4.4 Session information (FTP get info, FTP download)
3.5 Packet switch (HSPA)
3.5.1 HSDPA Scheduled Rate
3.5.2 HSDPA Served Rate
3.5.3 HSDPA MAC Layer Rate
3.5.4 HSDPA SBLER on 1st Transmission
3.5.5 HSDPA SBLER
3.5.6 HSDPA CQI Number avg.
3.5.7 HSDPA Num Codes Used Avg.
3.5.8 HSDPA MOD QPSK Percent
3.5.9 HSDPA MOD 16QAM Percent
3.5.10 HSDPA Meas from num 2MS Slots
3.5.11 WCDMA RLC DL Throughput
3.6 Signalling
3.6.1 L3 message display in replay
3.6.2 L3 message display on Android
3.6.3 RRC signaling
66
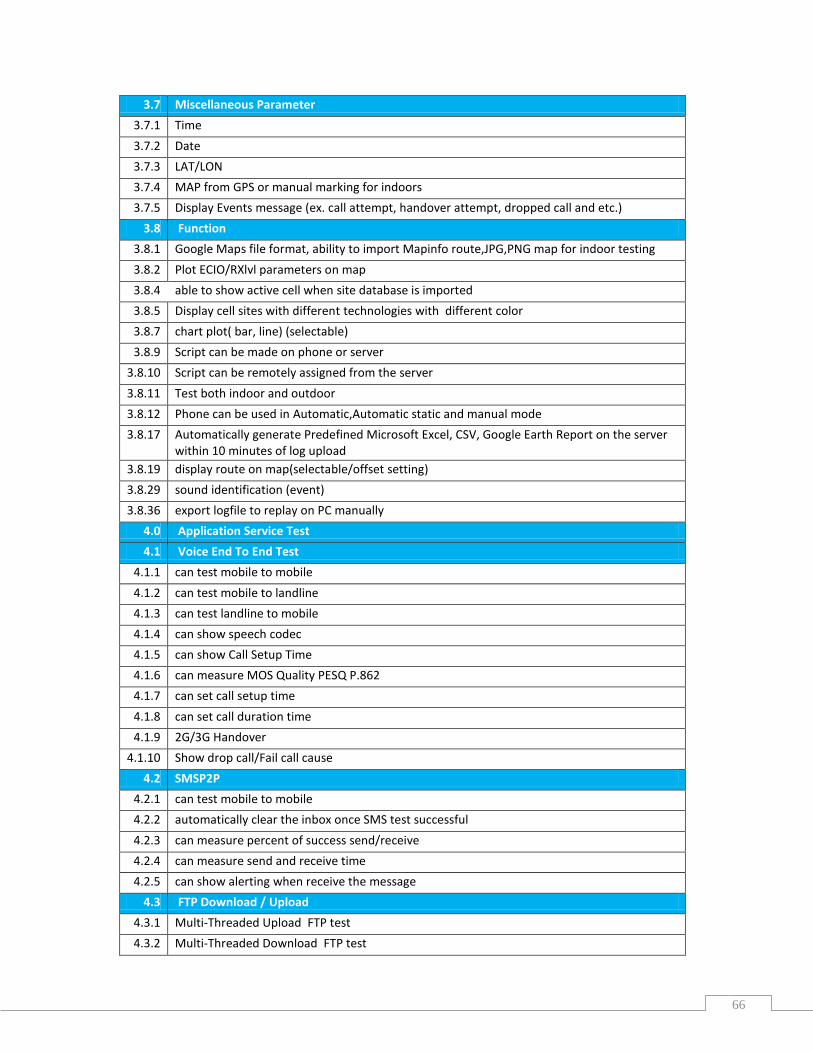
3.7 Miscellaneous Parameter
3.7.1 Time
3.7.2 Date
3.7.3 LAT/LON
3.7.4 MAP from GPS or manual marking for indoors
3.7.5 Display Events message (ex. call attempt, handover attempt, dropped call and etc.)
3.8 Function
3.8.1 Google Maps file format, ability to import Mapinfo route,JPG,PNG map for indoor testing
3.8.2 Plot ECIO/RXlvl parameters on map
3.8.4 able to show active cell when site database is imported
3.8.5 Display cell sites with different technologies with different color
3.8.7 chart plot( bar, line) (selectable)
3.8.9 Script can be made on phone or server
3.8.10 Script can be remotely assigned from the server
3.8.11 Test both indoor and outdoor
3.8.12 Phone can be used in Automatic,Automatic static and manual mode
3.8.17 Automatically generate Predefined Microsoft Excel, CSV, Google Earth Report on the server within 10 minutes of log upload
3.8.19 display route on map(selectable/offset setting)
3.8.29 sound identification (event)
3.8.36 export logfile to replay on PC manually
4.0 Application Service Test
4.1 Voice End To End Test
4.1.1 can test mobile to mobile
4.1.2 can test mobile to landline
4.1.3 can test landline to mobile
4.1.4 can show speech codec
4.1.5 can show Call Setup Time
4.1.6 can measure MOS Quality PESQ P.862
4.1.7 can set call setup time
4.1.8 can set call duration time
4.1.9 2G/3G Handover
4.1.10 Show drop call/Fail call cause
4.2 SMSP2P
4.2.1 can test mobile to mobile
4.2.2 automatically clear the inbox once SMS test successful
4.2.3 can measure percent of success send/receive
4.2.4 can measure send and receive time
4.2.5 can show alerting when receive the message
4.3 FTP Download / Upload
4.3.1 Multi-Threaded Upload FTP test
4.3.2 Multi-Threaded Download FTP test
67
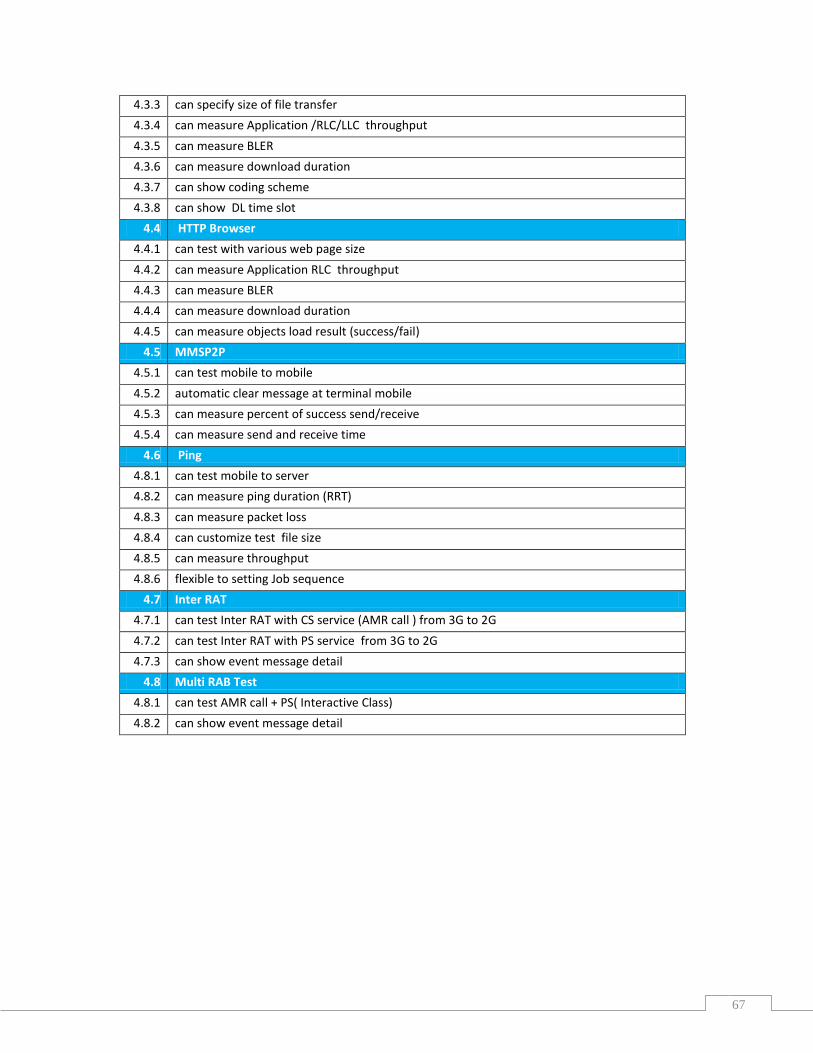
4.3.3 can specify size of file transfer
4.3.4 can measure Application /RLC/LLC throughput
4.3.5 can measure BLER
4.3.6 can measure download duration
4.3.7 can show coding scheme
4.3.8 can show DL time slot
4.4 HTTP Browser
4.4.1 can test with various web page size
4.4.2 can measure Application RLC throughput
4.4.3 can measure BLER
4.4.4 can measure download duration
4.4.5 can measure objects load result (success/fail)
4.5 MMSP2P
4.5.1 can test mobile to mobile
4.5.2 automatic clear message at terminal mobile
4.5.3 can measure percent of success send/receive
4.5.4 can measure send and receive time
4.6 Ping
4.8.1 can test mobile to server
4.8.2 can measure ping duration (RRT)
4.8.3 can measure packet loss
4.8.4 can customize test file size
4.8.5 can measure throughput
4.8.6 flexible to setting Job sequence
4.7 Inter RAT
4.7.1 can test Inter RAT with CS service (AMR call ) from 3G to 2G
4.7.2 can test Inter RAT with PS service from 3G to 2G
4.7.3 can show event message detail
4.8 Multi RAB Test
4.8.1 can test AMR call + PS( Interactive Class)
4.8.2 can show event message detail