system unit - computer savvy...
TRANSCRIPT

1
Parts of a Computer
System Unit This rectangular box (# 3) is the core of the computer system
ON BUTTON - turn on computer here. Usually turn off computer
using mouse CPU – the Central Processing Unit acts as the brain of the
computer RAM – Random Access Memory – temporarily stores information
while the computer is on, and ROM – Read-only memory - "built-in" computer memory containing
data that normally can only be read, and not changed
STORAGE – Hard disc drive – the computer’s primary means of
storage CD and DVD DRIVES AND CD ROM DRIVES - to listen to music or
copy information from the computer to a CD , watch movies on your computer, or play games from a disc.

2
USB PORTS – (universal serial bus) - outlets to plug in connection cords for cameras, printers, scanners, flash drives etc. There are outlets on the front
and the back of the system unit.
MONITOR (# 1)
Displays information in visual form using text and graphics
It works like a television screen and can show still or moving pictures.
MOUSE (#4)
Attached to the System Unit (or wireless) and moves the cursor on the desktop of the monitor
Moves by placing your palm over the mouse and sliding it around the mouse pad.
It appears on the desktop as an arrow, a hand, or a vertical line as
text Consists of two buttons, a scroll wheel and a ball on the underside.
Basic movements are Point, Click, Double Click, Press and Drag and Right Click
o LEFT BUTTON – makes things happen
o RIGHT BUTTON - gives you choices o SCROLL WHEEL – allows you to move up and down quickly
through a document
SPEAKERS (#5)
May be built into the system and sound may come from the monitor. External speakers may be connected to system by cords or be wireless
PRINTER (# 6)
Transfers data from the computer onto paper. If you choose to have a printer you can print e-mails, cards,
invitations, announcements, photo, and documents
MODEM (#2) (or network card)
Connects your computer to the internet Sends and receives information over a telephone line or high-sped
cable May be built into the system unit.

3
Computer Keyboard (#7)
Allows users to type various types of information to the screen
Alphabet keys – used mainly for typing text into your computer
Numeric keypad - allows you to enter numbers quickly
Function keys - perform different functions depending on where they are used
Navigation keys - Arrows, Home, End, Page up, Page down keys allow you move your position within a document or web page
Control keys - Enter, Shift, Space bar, Caps Lock, Delete, Backspace, Control, Insert, Alt (alternate), Ctrl (control) Keys perform specific functions in entering text or to perform some of the same functions that the mouse does.
Turning on Your Computer
Push on power button.
Booting - When you turn on your computer, the software that is stored on the hard drives become activated and allows the computer to become ready for use.
When the computer is completely booted, the desktop is displayed. At this point, the computer is waiting for you to choose what you want to do.
Space bar
Caps lock
shift
delete
tab
Back space

4
Desktop
Task Bar – (usually at the bottom of the screen) show the open applications or windows (anything you currently have open or are working on)
Icons – small pictures placed on the desktop representing a file or an application. The icons name appears directly below it.
Shortcuts – icons placed on the desktop so you can open them quickly after you turn on your computer. An icon shortcut has a small arrow in the bottom left corner.
Personalized Desktop - designs you put on the desktop – pictures of family members, flowers, etc.
My Computer, Recycle Trash Can, My Documents, My Network Neighborhood, Internet Explorer - the icons normally appearing on the desk top. Any other icons appear as programs are added or added when personalizing the desktop.
Start Button - from this menu, you have access to all parts of your computer o Programs installed on your computer o Documents you have saved o Setting that control your computer o The log off command to use if several people access your computer o The shut down command to turn off your computer.
START
BUTTON TASK BAR
ICONS

5
Working with the open window
Title Bar – colored bar across the top of the window that tells you the title of the window you have on our desktop. This is the “active window”. If the bar is a gray color is not “active” and you cannot perform any functions on the window.
Scrolling –bars and arrows located on the side and bottom of the window. Used to move the page up and down and from side to side to see the whole page.
Minimize window – makes the window disappear to the bottom task bar. When you click on it in the task bar it reappears on the desk top.
Resize the window – restore down – makes the window smaller so you can see and use multiple applications on the desktop at the same time.
Moving the window – press and drag the title bar. Moves the window on the desktop allowing you to use multiple applications on the desktop
Minimize window – hides the window, but keeps the title on the bottom task bar. Clicking the title on the task bar makes it reappear on the desktop.
Back/Forward arrows - goes back one page or forward on page in your website.
Home button – takes you back to the first window you opened on the desktop.
Title Bar Back/Forward Buttons
Minimize
Window Resize
Window
Close
Window
Web Site
Address
Scrolling Home Button
6
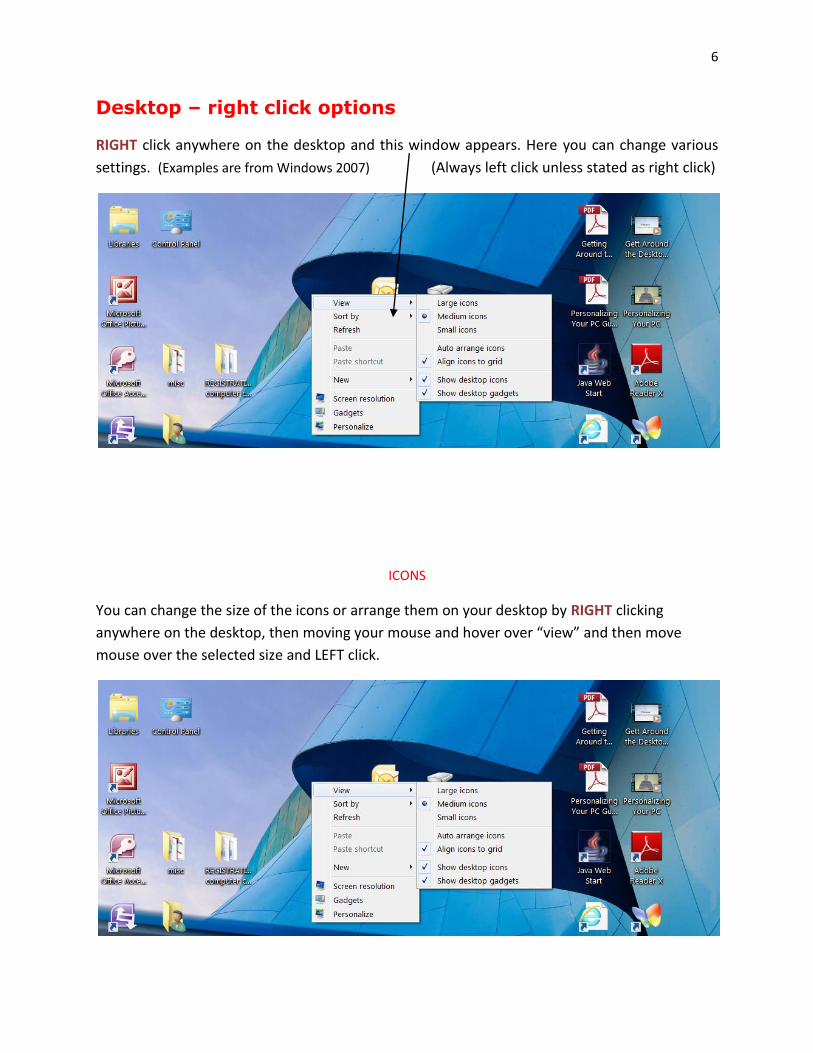
Desktop – right click options
RIGHT click anywhere on the desktop and this window appears. Here you can change various
settings. (Examples are from Windows 2007) (Always left click unless stated as right click)
ICONS
You can change the size of the icons or arrange them on your desktop by RIGHT clicking
anywhere on the desktop, then moving your mouse and hover over “view” and then move
mouse over the selected size and LEFT click.

7
NEW FOLDER ON DESKTOP
Making a folder for the desktop; RIGHT click anywhere on the desktop,
Hover over list to “New” then hover to “Folder” and LEFT click.
A folder labeled “new folder” will appear
The words are highlighted and ready for you to rename the folder.

8
Word Document
Wordpad (not Microsoft Word)
1) Click on START button 2) Move mouse up to PROGRAMS 3) Hover mouse over and up to ACCESSORIES 4) Hover mouse over and down to WORDPAD 5) Left click on WORDPAD
Font Size of type Color choice
Note: access to games and a calculator.
9
Wordpad
This is a word document
You can create a letter, type out a recipe, or anything you may want to save or print
This is like starting out with a blank sheet of paper.
When you move the mouse next to the cursor, the arrow turns into a line. You start typing here.
Save your document
Move mouse to top of menu bar
Click on File. A pull down menu appears. Choose SAVE AS
Name your document/file. Select location where to save, such as Desktop or My documents
Click on Save.
Printing
With your document open, go to FILE in top left corner.
CHOOSE PRINT PREVIEW.
If the document looks suitable, CHOOSE PRINT (top left).
A window opens to let you:
1. Select the printer 2. Choose which pages to print (Page Range) 3. Choose how many copies to print (No. of copies)
At Bottom, CHOOSE PRINT.
Delete a File or Folder
On the Desktop, DRAG the icon to the Recycle Bin
OR
In My Documents, Click on the folder, right click, choose Delete from the menu.

10
HOW TO SHUT DOWN YOUR COMPUTER
Close ALL programs by clicking on the “X” in the top right corner.
Go to START BUTTON and click it.
CHOOSE SHUT DOWN above the START button, a window opens.
The small blue arrow offers choices: Log off, Shut down, Restart, or Stand by. CHOOSE SHUT DOWN.
Wait until the screen goes black. Then turn off your
monitor and any other components.