symantec netbackup installation guide - trinitech...
TRANSCRIPT

Symantec NetBackup™Installation Guide
UNIX and Linux
Release 7.0
20654086
Symantec NetBackup™ Installation Guide,The software described in this book is furnished under a license agreement and may be usedonly in accordance with the terms of the agreement.
Documentation version:
PN: 20654086
Legal NoticeCopyright © 2009 Symantec Corporation. All rights reserved.
Symantec, the Symantec Logo are trademarks or registered trademarks of SymantecCorporation or its affiliates in the U.S. and other countries. Other names may be trademarksof their respective owners.
This Symantec product may contain third party software for which Symantec is requiredto provide attribution to the third party (“Third Party Programs”). Some of the Third PartyPrograms are available under open source or free software licenses. The License Agreementaccompanying the Software does not alter any rights or obligations you may have underthose open source or free software licenses. Please see the Third Party Legal Notice Appendixto this Documentation or TPIP ReadMe File accompanying this Symantec product for moreinformation on the Third Party Programs.
The product described in this document is distributed under licenses restricting its use,copying, distribution, and decompilation/reverse engineering. No part of this documentmay be reproduced in any form by any means without prior written authorization ofSymantec Corporation and its licensors, if any.
THE DOCUMENTATION IS PROVIDED "AS IS" AND ALL EXPRESS OR IMPLIED CONDITIONS,REPRESENTATIONS AND WARRANTIES, INCLUDING ANY IMPLIED WARRANTY OFMERCHANTABILITY, FITNESS FOR A PARTICULAR PURPOSE OR NON-INFRINGEMENT,ARE DISCLAIMED, EXCEPT TO THE EXTENT THAT SUCH DISCLAIMERS ARE HELD TOBE LEGALLY INVALID. SYMANTEC CORPORATION SHALL NOT BE LIABLE FOR INCIDENTALOR CONSEQUENTIAL DAMAGES IN CONNECTION WITH THE FURNISHING,PERFORMANCE, OR USE OF THIS DOCUMENTATION. THE INFORMATION CONTAINEDIN THIS DOCUMENTATION IS SUBJECT TO CHANGE WITHOUT NOTICE.
The Licensed Software and Documentation are deemed to be commercial computer softwareas defined in FAR 12.212 and subject to restricted rights as defined in FAR Section 52.227-19"Commercial Computer Software - Restricted Rights" and DFARS 227.7202, "Rights inCommercial Computer Software or Commercial Computer Software Documentation", asapplicable, and any successor regulations. Any use, modification, reproduction release,performance, display or disclosure of the Licensed Software and Documentation by the U.S.Government shall be solely in accordance with the terms of this Agreement.

Symantec Corporation350 Ellis StreetMountain View, CA 94043
http://www.symantec.com
Printed in the United States of America.
10 9 8 7 6 5 4 3 2 1
Technical SupportSymantec Technical Support maintains support centers globally. TechnicalSupport’s primary role is to respond to specific queries about product featuresand functionality. The Technical Support group also creates content for our onlineKnowledge Base. The Technical Support group works collaboratively with theother functional areas within Symantec to answer your questions in a timelyfashion. For example, the Technical Support group works with Product Engineeringand Symantec Security Response to provide alerting services and virus definitionupdates.
Symantec’s maintenance offerings include the following:
■ A range of support options that give you the flexibility to select the rightamount of service for any size organization
■ Telephone and Web-based support that provides rapid response andup-to-the-minute information
■ Upgrade assurance that delivers automatic software upgrade protection
■ Global support that is available 24 hours a day, 7 days a week
■ Advanced features, including Account Management Services
For information about Symantec’s Maintenance Programs, you can visit our Website at the following URL:
www.symantec.com/techsupp/
Contacting Technical SupportCustomers with a current maintenance agreement may access Technical Supportinformation at the following URL:
www.symantec.com/techsupp/
Before contacting Technical Support, make sure you have satisfied the systemrequirements that are listed in your product documentation. Also, you should beat the computer on which the problem occurred, in case it is necessary to replicatethe problem.
When you contact Technical Support, please have the following informationavailable:
■ Product release level
■ Hardware information
■ Available memory, disk space, and NIC information
■ Operating system
■ Version and patch level
■ Network topology
■ Router, gateway, and IP address information
■ Problem description:
■ Error messages and log files
■ Troubleshooting that was performed before contacting Symantec
■ Recent software configuration changes and network changes
Licensing and registrationIf your Symantec product requires registration or a license key, access our technicalsupport Web page at the following URL:
www.symantec.com/techsupp/
Customer serviceCustomer service information is available at the following URL:
www.symantec.com/techsupp/
Customer Service is available to assist with the following types of issues:
■ Questions regarding product licensing or serialization
■ Product registration updates, such as address or name changes
■ General product information (features, language availability, local dealers)
■ Latest information about product updates and upgrades
■ Information about upgrade assurance and maintenance contracts
■ Information about the Symantec Buying Programs
■ Advice about Symantec's technical support options
■ Nontechnical presales questions
■ Issues that are related to CD-ROMs or manuals
Maintenance agreement resourcesIf you want to contact Symantec regarding an existing maintenance agreement,please contact the maintenance agreement administration team for your regionas follows:
[email protected] and Japan
[email protected], Middle-East, and Africa
[email protected] America and Latin America
Additional enterprise servicesSymantec offers a comprehensive set of services that allow you to maximize yourinvestment in Symantec products and to develop your knowledge, expertise, andglobal insight, which enable you to manage your business risks proactively.
Enterprise services that are available include the following:
These solutions provide early warning of cyber attacks, comprehensive threatanalysis, and countermeasures to prevent attacks before they occur.
Symantec Early Warning Solutions
These services remove the burden of managing and monitoring security devicesand events, ensuring rapid response to real threats.
Managed Security Services
Symantec Consulting Services provide on-site technical expertise fromSymantec and its trusted partners. Symantec Consulting Services offer a varietyof prepackaged and customizable options that include assessment, design,implementation, monitoring, and management capabilities. Each is focused onestablishing and maintaining the integrity and availability of your IT resources.
Consulting Services
Educational Services provide a full array of technical training, securityeducation, security certification, and awareness communication programs.
Educational Services
To access more information about Enterprise services, please visit our Web siteat the following URL:
www.symantec.com
Select your country or language from the site index.
Technical Support . . . . . . . . . . . . . . . . . . . . . . . . . . . . . . . . . . . . . . . . . . . . . . . . . . . . . . . . . . . . . . . . . . . . . . . . . . . . . . . . . . . . . . . . . . . . . . . 4
Chapter 1 Preparing for installation . . . . . . . . . . . . . . . . . . . . . . . . . . . . . . . . . . . . . . . . . . . . . . . . . . 11
Changes in NetBackup 7.0 ... . . . . . . . . . . . . . . . . . . . . . . . . . . . . . . . . . . . . . . . . . . . . . . . . . . . . . . . . . . . 11NetBackup mixed version support ... . . . . . . . . . . . . . . . . . . . . . . . . . . . . . . . . . . . . . . . . . . . . . . . . 14About NetBackup 7.0 availability ... . . . . . . . . . . . . . . . . . . . . . . . . . . . . . . . . . . . . . . . . . . . . . . . . . 14
About the NetBackup media kit ... . . . . . . . . . . . . . . . . . . . . . . . . . . . . . . . . . . . . . . . . . . . . . . 15About the Electronic Software Distribution (ESD) images ... . . . . . . . . . . . 17
Requirements for UNIX NetBackup server installation .... . . . . . . . . . . . . . . . . . . . . 18Special guidelines for Solaris systems .... . . . . . . . . . . . . . . . . . . . . . . . . . . . . . . . . . . . . 19Special guidelines for HP-UX systems .... . . . . . . . . . . . . . . . . . . . . . . . . . . . . . . . . . . . . 20Special guidelines for UNIX clustered environments ... . . . . . . . . . . . . . . . . . . 21About NetBackup Access Control ... . . . . . . . . . . . . . . . . . . . . . . . . . . . . . . . . . . . . . . . . . . . 21
About storage device configuration .... . . . . . . . . . . . . . . . . . . . . . . . . . . . . . . . . . . . . . . . . . . . . . 21Locating supported robot types ... . . . . . . . . . . . . . . . . . . . . . . . . . . . . . . . . . . . . . . . . . . . . . . 22
About replacing NetBackup server types not supported in NetBackup7.0 ... . . . . . . . . . . . . . . . . . . . . . . . . . . . . . . . . . . . . . . . . . . . . . . . . . . . . . . . . . . . . . . . . . . . . . . . . . . . . . . . . . . . . 23How to replace unsupported NetBackup master servers ... . . . . . . . . . . . . . 25How to replace unsupported NetBackup media servers ... . . . . . . . . . . . . . . . 26
Chapter 2 NetBackup licenses . . . . . . . . . . . . . . . . . . . . . . . . . . . . . . . . . . . . . . . . . . . . . . . . . . . . . . . . . . . . . 29
About NetBackup license key requirements ... . . . . . . . . . . . . . . . . . . . . . . . . . . . . . . . . . . . . 29NetBackup license compatibility ... . . . . . . . . . . . . . . . . . . . . . . . . . . . . . . . . . . . . . . . . . . . . 30Methods for entering license keys ... . . . . . . . . . . . . . . . . . . . . . . . . . . . . . . . . . . . . . . . . . . 30Frequently asked questions about license keys ... . . . . . . . . . . . . . . . . . . . . . . . . . 31
Chapter 3 Installing server software . . . . . . . . . . . . . . . . . . . . . . . . . . . . . . . . . . . . . . . . . . . . . . . . . . 35
Installation sequence .... . . . . . . . . . . . . . . . . . . . . . . . . . . . . . . . . . . . . . . . . . . . . . . . . . . . . . . . . . . . . . . . . 35How the installation script works ... . . . . . . . . . . . . . . . . . . . . . . . . . . . . . . . . . . . . . . . . . . . 36
Mounting the software media ... . . . . . . . . . . . . . . . . . . . . . . . . . . . . . . . . . . . . . . . . . . . . . . . . . . . . . . 37AIX .... . . . . . . . . . . . . . . . . . . . . . . . . . . . . . . . . . . . . . . . . . . . . . . . . . . . . . . . . . . . . . . . . . . . . . . . . . . . . . . . . . . 38FreeBSD .... . . . . . . . . . . . . . . . . . . . . . . . . . . . . . . . . . . . . . . . . . . . . . . . . . . . . . . . . . . . . . . . . . . . . . . . . . . . 38HP-UX .... . . . . . . . . . . . . . . . . . . . . . . . . . . . . . . . . . . . . . . . . . . . . . . . . . . . . . . . . . . . . . . . . . . . . . . . . . . . . . 39Linux .... . . . . . . . . . . . . . . . . . . . . . . . . . . . . . . . . . . . . . . . . . . . . . . . . . . . . . . . . . . . . . . . . . . . . . . . . . . . . . . . 40
Contents
Solaris ... . . . . . . . . . . . . . . . . . . . . . . . . . . . . . . . . . . . . . . . . . . . . . . . . . . . . . . . . . . . . . . . . . . . . . . . . . . . . . . 41Installing NetBackup master server software on UNIX .... . . . . . . . . . . . . . . . . . . . . 41
Continuing with NetBackup software installation .... . . . . . . . . . . . . . . . . . . . . . 46Installing NetBackup media server software on UNIX .... . . . . . . . . . . . . . . . . . . . . . 46About pushing client software from a master server to clients ... . . . . . . . . . . . 49
Installing client type software on a master server ... . . . . . . . . . . . . . . . . . . . . . 50Installing NetBackup add-on products ... . . . . . . . . . . . . . . . . . . . . . . . . . . . . . . . . . . . . . . . . . . 50How to configure the window manager for the Java Interface
(NetBackup-Java compatible platforms) ... . . . . . . . . . . . . . . . . . . . . . . . . . . . . . . . . . . . 51Setting up the Common Desktop Environment (CDE) window
manager ... . . . . . . . . . . . . . . . . . . . . . . . . . . . . . . . . . . . . . . . . . . . . . . . . . . . . . . . . . . . . . . . . . . . . . . 51
Chapter 4 Installing alternative administrative interfaces . . . . . . . . . . . 53
About the NetBackup Remote Administration Console forWindows .... . . . . . . . . . . . . . . . . . . . . . . . . . . . . . . . . . . . . . . . . . . . . . . . . . . . . . . . . . . . . . . . . . . . . . . . . . . 53Installing the NetBackup Remote Administration Console ... . . . . . . . . . . 54Configuring server lists for the NetBackup Remote
Administration Console ... . . . . . . . . . . . . . . . . . . . . . . . . . . . . . . . . . . . . . . . . . . . . . . . . . . 56Adding remote servers to administer from an existing NetBackup
Remote Administration Console ... . . . . . . . . . . . . . . . . . . . . . . . . . . . . . . . . . . . . . . . 57About the NetBackup-Java Administration Console ... . . . . . . . . . . . . . . . . . . . . . . . . . 57
Installing version 7.0 of the NetBackup Java AdministrationConsole on Windows .... . . . . . . . . . . . . . . . . . . . . . . . . . . . . . . . . . . . . . . . . . . . . . . . . . . . . . 58
Installing or removing multiple versions of the NetBackup-JavaAdministration Console on Windows .... . . . . . . . . . . . . . . . . . . . . . . . . . . . . . . . 59
Methods for administering multiple versions of NetBackupservers ... . . . . . . . . . . . . . . . . . . . . . . . . . . . . . . . . . . . . . . . . . . . . . . . . . . . . . . . . . . . . . . . . . . . . . . . . 60
Chapter 5 Upgrading server and client software . . . . . . . . . . . . . . . . . . . . . . . . . . . . . 63
Requirements for upgrading UNIX servers to NetBackup 7.0 ... . . . . . . . . . . . . . 63Allowing for reinstallation of earlier versions of NetBackup .... . . . . . . . 67Upgrade sequence .... . . . . . . . . . . . . . . . . . . . . . . . . . . . . . . . . . . . . . . . . . . . . . . . . . . . . . . . . . . . . . . 68
Upgrading server software from version 6.x to 7.0 ... . . . . . . . . . . . . . . . . . . . . . . . . . . 69Upgrading clients after servers are upgraded .... . . . . . . . . . . . . . . . . . . . . . . . . . . . . . . . . 75Completing your system update after an upgrade .... . . . . . . . . . . . . . . . . . . . . . . . . . . . 79Automatic file changes from an upgrade .... . . . . . . . . . . . . . . . . . . . . . . . . . . . . . . . . . . . . . . 80
Chapter 6 Removing NetBackup server software . . . . . . . . . . . . . . . . . . . . . . . . . . . . 83
About NetBackup server software removal ... . . . . . . . . . . . . . . . . . . . . . . . . . . . . . . . . . . . . . 83Removing NetBackup from Solaris servers ... . . . . . . . . . . . . . . . . . . . . . . . . . . . . . . . 83Removing NetBackup from non-Solaris UNIX servers ... . . . . . . . . . . . . . . . . 88
Contents8
Chapter 7 Installing client software . . . . . . . . . . . . . . . . . . . . . . . . . . . . . . . . . . . . . . . . . . . . . . . . . . . 95
About NetBackup client installation .... . . . . . . . . . . . . . . . . . . . . . . . . . . . . . . . . . . . . . . . . . . . . 95About NetBackup client installation on Windows .... . . . . . . . . . . . . . . . . . . . . . . . . . . . 96
Windows client system requirements ... . . . . . . . . . . . . . . . . . . . . . . . . . . . . . . . . . . . . . 96Installation methods for Windows clients ... . . . . . . . . . . . . . . . . . . . . . . . . . . . . . . . . 97Installing NetBackup Windows clients locally ... . . . . . . . . . . . . . . . . . . . . . . . . . . . 98Installing NetBackup Windows clients remotely ... . . . . . . . . . . . . . . . . . . . . . . 101Installing NetBackup Windows clients silently ... . . . . . . . . . . . . . . . . . . . . . . . . 107How to configure NetBackup clients ... . . . . . . . . . . . . . . . . . . . . . . . . . . . . . . . . . . . . . . 108Removing NetBackup Windows client software .... . . . . . . . . . . . . . . . . . . . . . . 109
About NetBackup client installation on UNIX .... . . . . . . . . . . . . . . . . . . . . . . . . . . . . . . 109Installation methods for UNIX clients ... . . . . . . . . . . . . . . . . . . . . . . . . . . . . . . . . . . . 111Installing UNIX clients locally ... . . . . . . . . . . . . . . . . . . . . . . . . . . . . . . . . . . . . . . . . . . . . . 112Installing UNIX clients remotely ... . . . . . . . . . . . . . . . . . . . . . . . . . . . . . . . . . . . . . . . . . . 112Adding a UNIX client after initial server installation .... . . . . . . . . . . . . . . . 118Removing UNIX NetBackup client software .... . . . . . . . . . . . . . . . . . . . . . . . . . . . 119
Chapter 8 Configuring NetBackup servers . . . . . . . . . . . . . . . . . . . . . . . . . . . . . . . . . . . . . . 123
About NetBackup startup and shutdown scripts ... . . . . . . . . . . . . . . . . . . . . . . . . . . . . 123About NetBackup configuration .... . . . . . . . . . . . . . . . . . . . . . . . . . . . . . . . . . . . . . . . . . . . . . . . . 125
Starting the NetBackup Administration Console ... . . . . . . . . . . . . . . . . . . . . . 126About the Device Configuration Wizard .... . . . . . . . . . . . . . . . . . . . . . . . . . . . . . . . . 127About the Volume Configuration Wizard .... . . . . . . . . . . . . . . . . . . . . . . . . . . . . . . 129About the Catalog Backup Wizard .... . . . . . . . . . . . . . . . . . . . . . . . . . . . . . . . . . . . . . . . . 130About the Backup Policy Configuration Wizard .... . . . . . . . . . . . . . . . . . . . . . . 131
Index . . . . . . . . . . . . . . . . . . . . . . . . . . . . . . . . . . . . . . . . . . . . . . . . . . . . . . . . . . . . . . . . . . . . . . . . . . . . . . . . . . . . . . . . . . . . . . . . . . . . . . . . . . . . . . . . . . . 133
9Contents

Contents10
Preparing for installation
This chapter includes the following topics:
■ Changes in NetBackup 7.0
■ NetBackup mixed version support
■ About NetBackup 7.0 availability
■ Requirements for UNIX NetBackup server installation
■ About storage device configuration
■ About replacing NetBackup server types not supported in NetBackup 7.0
Changes in NetBackup 7.0This release of NetBackup contains many changes and enhancements. Thefollowing describes some important changes to NetBackup version 7.0. Forcomplete details, see the NetBackup Release Notes.
This product has reached its end of life and is no longersupported.
Veritas Storage Migrator(VSM)
Starting with NetBackup 7.0, NOM has been replaced withOpsCenter.
If your current 6.x NetBackup environment includes NOM6.x, you can upgrade NOM to OpsCenter with an upgrade toNetBackup 7.0.
NetBackup OperationsManager (NOM)
1Chapter

Starting with NetBackup 7.0, the following platform supportchanges apply:
■ Except for FreeBSD clients and Mac clients, all UNIX32-bit system support has been discontinued.
To upgrade these systems to NetBackup 7.0, you mustfirst migrate your current NetBackup 6.x catalogs anddatabases to a system with a supported 64-bit platform.
However, 32-bit media servers and clients that useNetBackup 6.x are compatible with NetBackup 7.0 64-bitmaster servers.
Also, NetBackup requires OpenStorage vendor plug-insto be 64-bit. When you upgrade a media server that isused for OpenStorage to NetBackup 7.0, you also mustupdate the vendor plug-in to a 64-bit version.
For details about how to replace servers that currentlyuse these unsupported platforms, refer to the followingsection:
See “About replacing NetBackup server types notsupported in NetBackup 7.0” on page 23.
■ IRIX and Tru64 are no longer supported.
Servers and clients with these operating systems thatuse NetBackup 6.x are compatible with NetBackup 7.0servers.
■ All 64-bit platforms are supported except for FreeBSDclients and Mac clients.
■ Windows IA64 is supported only as a client.
■ Linux SUSE and Linux RedHat Itanium are no longersupported for use as master or media servers. Theseplatforms are only supported as a client.
■ HP-UX PA-RISC is no longer supported as a masterserver. This platform is supported only as a true mediaserver (media server without the EMM server) or a trueclient.
■ Novell NetWare is no longer supported for use as a mediaserver. This platform is only supported as a client.
Platform and operatingsystem support changes
Preparing for installationChanges in NetBackup 7.0
12
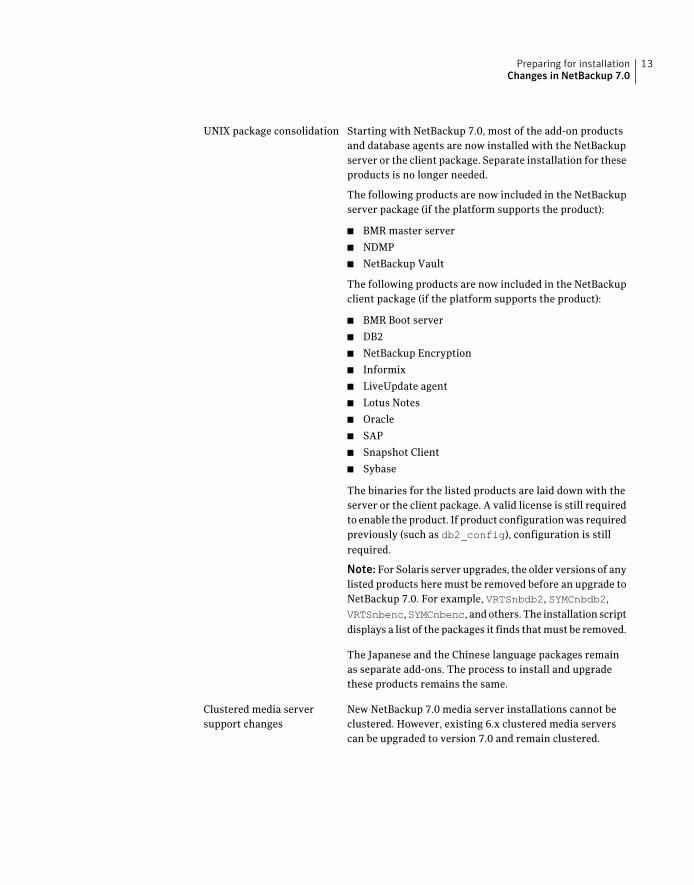
Starting with NetBackup 7.0, most of the add-on productsand database agents are now installed with the NetBackupserver or the client package. Separate installation for theseproducts is no longer needed.
The following products are now included in the NetBackupserver package (if the platform supports the product):
■ BMR master server
■ NDMP
■ NetBackup Vault
The following products are now included in the NetBackupclient package (if the platform supports the product):
■ BMR Boot server
■ DB2
■ NetBackup Encryption
■ Informix
■ LiveUpdate agent
■ Lotus Notes
■ Oracle
■ SAP
■ Snapshot Client
■ Sybase
The binaries for the listed products are laid down with theserver or the client package. A valid license is still requiredto enable the product. If product configuration was requiredpreviously (such as db2_config), configuration is stillrequired.
Note: For Solaris server upgrades, the older versions of anylisted products here must be removed before an upgrade toNetBackup 7.0. For example, VRTSnbdb2, SYMCnbdb2,VRTSnbenc,SYMCnbenc, and others. The installation scriptdisplays a list of the packages it finds that must be removed.
The Japanese and the Chinese language packages remainas separate add-ons. The process to install and upgradethese products remains the same.
UNIX package consolidation
New NetBackup 7.0 media server installations cannot beclustered. However, existing 6.x clustered media serverscan be upgraded to version 7.0 and remain clustered.
Clustered media serversupport changes
13Preparing for installationChanges in NetBackup 7.0
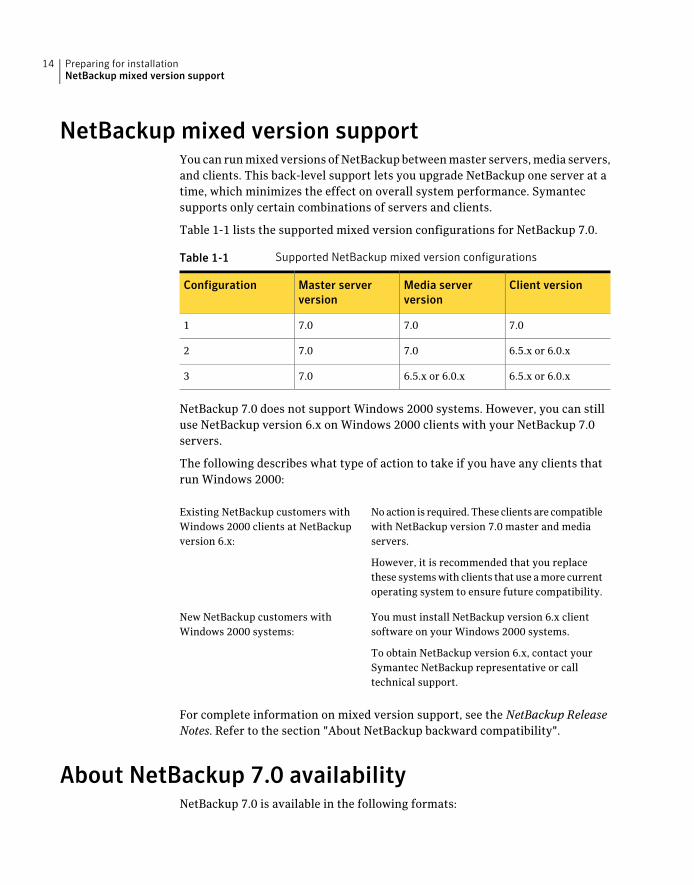
NetBackup mixed version supportYou can run mixed versions of NetBackup between master servers, media servers,and clients. This back-level support lets you upgrade NetBackup one server at atime, which minimizes the effect on overall system performance. Symantecsupports only certain combinations of servers and clients.
Table 1-1 lists the supported mixed version configurations for NetBackup 7.0.
Table 1-1 Supported NetBackup mixed version configurations
Client versionMedia serverversion
Master serverversion
Configuration
7.07.07.01
6.5.x or 6.0.x7.07.02
6.5.x or 6.0.x6.5.x or 6.0.x7.03
NetBackup 7.0 does not support Windows 2000 systems. However, you can stilluse NetBackup version 6.x on Windows 2000 clients with your NetBackup 7.0servers.
The following describes what type of action to take if you have any clients thatrun Windows 2000:
No action is required. These clients are compatiblewith NetBackup version 7.0 master and mediaservers.
However, it is recommended that you replacethese systems with clients that use a more currentoperating system to ensure future compatibility.
Existing NetBackup customers withWindows 2000 clients at NetBackupversion 6.x:
You must install NetBackup version 6.x clientsoftware on your Windows 2000 systems.
To obtain NetBackup version 6.x, contact yourSymantec NetBackup representative or calltechnical support.
New NetBackup customers withWindows 2000 systems:
For complete information on mixed version support, see the NetBackup ReleaseNotes. Refer to the section "About NetBackup backward compatibility".
About NetBackup 7.0 availabilityNetBackup 7.0 is available in the following formats:
Preparing for installationNetBackup mixed version support
14
■ DVD media kitAll necessary software and documentation files are provided on several DVDs.See “About the NetBackup media kit” on page 15.
■ Electronic Software Distribution (ESD) imagesThe DVD image files are posted and available for download on the FileConnectWebsite.See “About the Electronic Software Distribution (ESD) images” on page 17.
About the NetBackup media kitThe media kit includes a DVD for each supported UNIX platform or operatingsystem and one DVD for Windows. The label on each DVD provides a briefdescription of its contents.
NetBackup documentation is also included. All documentation for the NetBackupsoftware products in this release is included.
Printed materials include a getting started guide. Documentation on the DVDs isin Portable Document Format (PDF). You can use Acrobat Reader to open, view,and print the files.
If Autorun is enabled on your Windows system, you see a Web page that lists thedocuments that you can select to view. On UNIX or Linux systems, or if Autorunis disabled on the Windows system, navigate to the DVD drive to view the DVDcontents. From that drive, you can select the documents to view or copy them toa local drive.
Table 1-2 describes the contents of each DVD.
Table 1-2 NetBackup 7.0 DVD contents
ContentsPlatform OSDVD No.
■ Server
■ All UNIX clients
■ OpsCenter
■ ICS components:
Symantec Product Authentication Service (AT)
Symantec Product Authorization Service (AZ)
■ NetBackup documentation
AIX 64-bit1
15Preparing for installationAbout NetBackup 7.0 availability

Table 1-2 NetBackup 7.0 DVD contents (continued)
ContentsPlatform OSDVD No.
■ Server
■ All UNIX clients
■ OpsCenter
■ ICS components:
Symantec Product Authentication Service (AT)
Symantec Product Authorization Service (AZ)
■ NetBackup documentation
HP IA642
■ Server
■ All UNIX clients
■ ICS components:
Symantec Product Authentication Service (AT)
Symantec Product Authorization Service (AZ)
■ NetBackup documentation
HP-UX PA-RISC3
■ Server
■ All UNIX clients
■ OpsCenter
■ ICS components:
Symantec Product Authentication Service (AT)
Symantec Product Authorization Service (AZ)
■ NetBackup documentation
Linux RedHat x86_644
■ Server
■ All UNIX clients
■ OpsCenter
■ ICS components:
Symantec Product Authentication Service (AT)
Symantec Product Authorization Service (AZ)
■ NetBackup documentation
Linux SuSE x86_645
■ Server
■ All UNIX clients
■ OpsCenter
■ ICS components:
Symantec Product Authentication Service (AT)
Symantec Product Authorization Service (AZ)
■ NetBackup documentation
Solaris SPARC646
Preparing for installationAbout NetBackup 7.0 availability
16
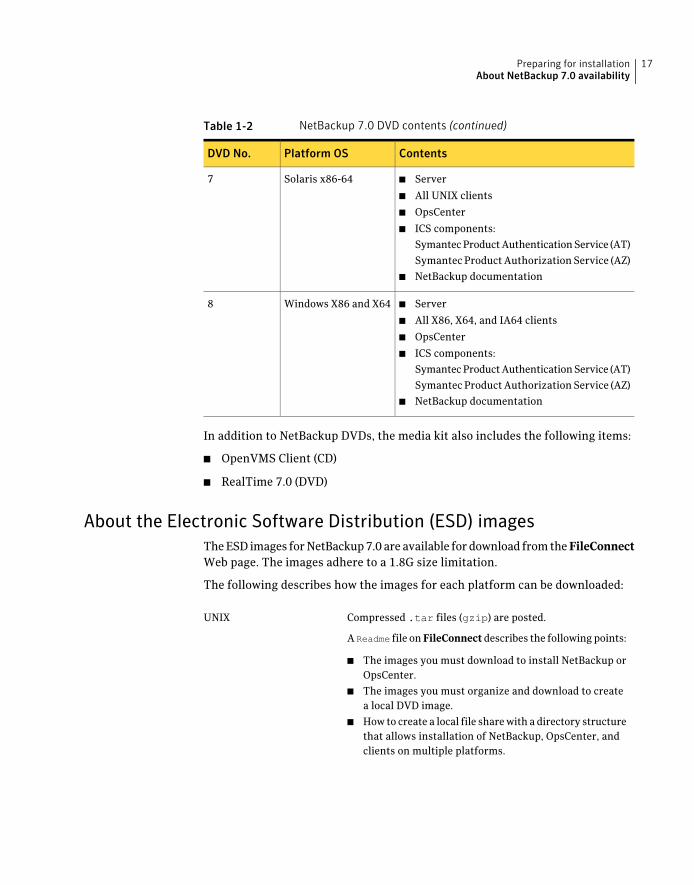
Table 1-2 NetBackup 7.0 DVD contents (continued)
ContentsPlatform OSDVD No.
■ Server
■ All UNIX clients
■ OpsCenter
■ ICS components:
Symantec Product Authentication Service (AT)
Symantec Product Authorization Service (AZ)
■ NetBackup documentation
Solaris x86-647
■ Server
■ All X86, X64, and IA64 clients
■ OpsCenter
■ ICS components:
Symantec Product Authentication Service (AT)
Symantec Product Authorization Service (AZ)
■ NetBackup documentation
Windows X86 and X648
In addition to NetBackup DVDs, the media kit also includes the following items:
■ OpenVMS Client (CD)
■ RealTime 7.0 (DVD)
About the Electronic Software Distribution (ESD) imagesThe ESD images for NetBackup 7.0 are available for download from the FileConnectWeb page. The images adhere to a 1.8G size limitation.
The following describes how the images for each platform can be downloaded:
Compressed .tar files (gzip) are posted.
A Readme file on FileConnect describes the following points:
■ The images you must download to install NetBackup orOpsCenter.
■ The images you must organize and download to createa local DVD image.
■ How to create a local file share with a directory structurethat allows installation of NetBackup, OpsCenter, andclients on multiple platforms.
UNIX
17Preparing for installationAbout NetBackup 7.0 availability
The DVD image is broken down into smaller files.
You must download all files that are associated with theWindows image.
A Readme file on FileConnect describes how to assemblethese files into a single .zip file.
Windows
Requirements for UNIXNetBackup server installationBefore you install NetBackup, make sure that your backup environment meetsthe following requirements:
Make sure that you have the following hardware andsoftware already set up:
■ All NetBackup installation DVDs or ESD images,appropriate license keys, and the root password for allservers.
■ The gzip and the gunzip commands must be installedon the local system. The directories where thesecommands are installed must be part of the root user’sPATH environment variable setting.
■ A server of a supported hardware type that runs asupported version of its operating system (withapplicable patches), adequate disk space, and supportedperipherals. For details on these requirements, refer tothe NetBackup Release Notes.
■ All NetBackup servers must recognize and berecognizable by their client systems. In someenvironments, this means that each must be defined inthe other’s /etc/hosts file. Other environments mayuse the Network Information Service (NIS) or DomainName Service (DNS).
■ For reasonable performance of the NetBackup-Javainterfaces, you need 512 MB of RAM. Of that space, 256MB must be available to the interface program (jnbSAor jbpSA).
■ The minimum screen resolution configuration is1024x768, 256 colors.
General requirements
Symantec recommends that you remove any other vendorbackup software currently configured on your system beforeyou install this product. Other vendor backup software cannegatively affect how NetBackup installs and functions.
Other backup software
Preparing for installationRequirements for UNIX NetBackup server installation
18

Ignore references to media servers if you do not plan toinstall any. They are not required.
Media servers
To accommodate the NetBackup server software andNetBackup catalogs, Symantec recommends the following:
■ Master and media servers in a production environmentwith several database agents enabled, should have aminimum of 2 GB of memory each.
■ Any client should have a minimum of 512 MB of memoryin this type of environment.
Memory considerations
On the NetBackup server, the installation directory containsthe software and the NetBackup catalog. Both of these canbecome quite large.
If space is an issue, you can install NetBackup on analternate file system. The installation lets you select analternate install location, and creates the appropriate linkfrom /usr/openv.
Disk space considerations
Symantec does not support installation of NetBackup in anNFS-mounted directory. File locking in NFS-mounted filesystems can be unreliable.
NFS compatibility
For some peripherals and platforms, kernel reconfigurationis required.
For more details, see the NetBackup Device ConfigurationGuide.
Kernel reconfiguration
For Red Hat Linux, NetBackup requires server networking.Red Hat Linux
Special guidelines for Solaris systemsSeveral kernel-tunable parameters, such as Message Queue, Semaphore, andShared Memory Parameters, can affect NetBackup performance. If you adjustthese values, you may prevent your system performance from slowing down oreven reaching a deadlock state.
For more information about parameter definitions and examples, see theNetBackup Backup Planning and Performance Tuning Guide on the support Website.
The following examples show how you may need to modify certain parametersfor Solaris 10 systems:
19Preparing for installationRequirements for UNIX NetBackup server installation
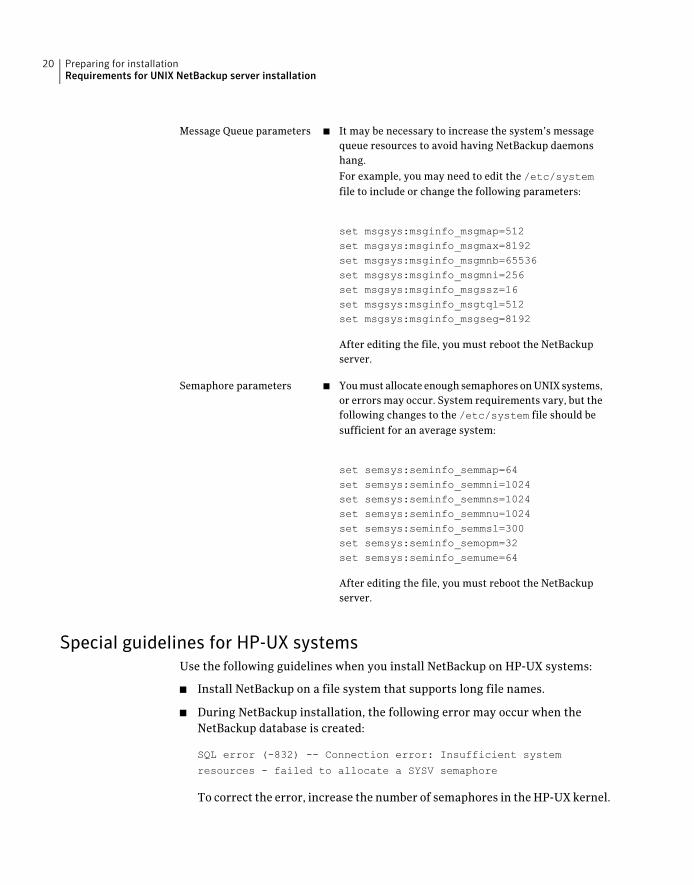
■ It may be necessary to increase the system’s messagequeue resources to avoid having NetBackup daemonshang.
For example, you may need to edit the /etc/systemfile to include or change the following parameters:
set msgsys:msginfo_msgmap=512set msgsys:msginfo_msgmax=8192set msgsys:msginfo_msgmnb=65536set msgsys:msginfo_msgmni=256set msgsys:msginfo_msgssz=16set msgsys:msginfo_msgtql=512set msgsys:msginfo_msgseg=8192
After editing the file, you must reboot the NetBackupserver.
Message Queue parameters
■ You must allocate enough semaphores on UNIX systems,or errors may occur. System requirements vary, but thefollowing changes to the /etc/system file should besufficient for an average system:
set semsys:seminfo_semmap=64set semsys:seminfo_semmni=1024set semsys:seminfo_semmns=1024set semsys:seminfo_semmnu=1024set semsys:seminfo_semmsl=300set semsys:seminfo_semopm=32set semsys:seminfo_semume=64
After editing the file, you must reboot the NetBackupserver.
Semaphore parameters
Special guidelines for HP-UX systemsUse the following guidelines when you install NetBackup on HP-UX systems:
■ Install NetBackup on a file system that supports long file names.
■ During NetBackup installation, the following error may occur when theNetBackup database is created:
SQL error (-832) -- Connection error: Insufficient system
resources - failed to allocate a SYSV semaphore
To correct the error, increase the number of semaphores in the HP-UX kernel.
Preparing for installationRequirements for UNIX NetBackup server installation
20
For details on how to change HP-UX parameters, see the NetBackup BackupPlanning and Performance Tuning Guide, Chapter 11: OS-Related TuningFactors.
Special guidelines for UNIX clustered environmentsUse the following guidelines when you install NetBackup in clustered systems:
■ Ensure that each node in the NetBackup cluster can run the rsh command orits equivalent (on HP-UX, the command is remsh). The root user must be ableto perform a remote login to each node in the cluster without entering apassword. This remote login is necessary for installation and configuration ofthe NetBackup server and any NetBackup options. After installation andconfiguration are completed, it is no longer required.
■ You must install, configure, and start the cluster framework before you installNetBackup. For additional installation prerequisites and installation notes,see the NetBackup High Availability Administrator’s Guide.
■ You must have defined a virtual name using DNS, NIS, or /etc/hosts. The IPaddress is defined at the same time. (The virtual name is a label for the IPaddress.) Use this virtual name and IP address only for the NetBackup resource.
About NetBackup Access ControlUse the following guidelines if you want to use NetBackup Access Control (NBAC):
■ To use the access control features in NetBackup 7.0, you must install theSymantec Product Authentication and Authorization components.
■ If access control is not installed in your current NetBackup environment,you must first upgrade to NetBackup 7.0. Then, you can install the accesscontrol components.
■ If access control is already installed in your current NetBackupenvironment, you must install the new access control components beforeyou upgrade to NetBackup 7.0.
For NetBackup Access Control installation and upgrade instructions, see theNetBackup Security and Encryption Guide.
About storage device configurationReliable use of NetBackup depends on the proper configuration of your storagedevices. To ensure reliable backups and restores, you must first install andconfigure devices to work with the operating system.
21Preparing for installationAbout storage device configuration
Before you install or upgrade to NetBackup 7.0, use the following guidelines toconfigure storage devices to work with the operating system:
Before you install or upgrade to NetBackup 7.0, Symantecrecommends that you install and configure your deviceswith the latest version of drivers.
New installations andupgrades
To prepare and connect new devices, perform the followingtasks:
■ Set the SCSI ID (target). Make sure that it is set it to anavailable SCSI ID.
■ Physically attach your device to a compatible host busadapter where that SCSI ID is available.
Compatible means that both the device and the host busadapter are of the same type. For example, single-ended,high voltage differential, low voltage differential, orFibre Channel.
Connections and settings
To configure storage devices to work with the operatingsystem, refer to the following documentation:
■ The instructions from the device and the operatingsystem vendors.
■ The NetBackup Device Configuration Guide. See thechapter that is appropriate for your operating system.
Configuration
After all storage devices are installed, configured, andverified to work with the operating system, you can installNetBackup.
NetBackup installation
Warning: An improperly configured device can lead to backup failures, data loss,or both.
Locating supported robot typesYou can find a list of the supported robot types in the NetBackup Release Notes.
Symantec periodically adds new robots to this list. For your convenience, Symantecupdates the supported robots lists on the Symantec support Web site.
Preparing for installationAbout storage device configuration
22
To find the latest robot types that this release supports
1 In a Web browser, open the following:
http://entsupport.symantec.com
2 In the Knowledge Base Search for All Products field, enter NetBackupEnterprise Server and click >.
3 On the Search Results page, in the Search Suggestions section, clickCompatibility List.
4 Click in the Product field and select NetBackup Enterprise Server.
5 Click in the Product Version field and select 7.0.
6 Click in the Platform field and select All Platforms.
7 Click the following link to open a new page of document links:
Where to find and download the Hardware Compatibility and SoftwareCompatibility lists on the Support site for NetBackup Server, NetBackupEnterprise Server, NetBackup PureDisk, and Backup Reporter
8 Click either NetBackup Enterprise Server or NetBackup Server.
About replacing NetBackup server types notsupported in NetBackup 7.0
Certain hardware support and operating system support has been discontinuedin NetBackup 7.0. These systems must be replaced with supported systems beforean upgrade to NetBackup 7.0.
For complete details about hardware and operating system support in NetBackup7.0, refer to the following documents:
■ NetBackup Release Noteshttp://entsupport.symantec.com/docs/20654069.htmRefer to the sections "About platform and operating system support changes"and "About NetBackup Compatibility Lists".
■ NetBackup Enterprise Server and Server 7.x OS Software Compatibility Listhttp://entsupport.symantec.com/docs/337048
■ NetBackup server 7.0 hardware compatibility listhttp://entsupport.symantec.com/docs/336875
The following describes the general guidelines to replace unsupported serversbefore an upgrade to NetBackup 7.0:
23Preparing for installationAbout replacing NetBackup server types not supported in NetBackup 7.0

The platform and the architecture of the new system canbe different than the system that you replace, provided thatyou observe the following rules:
■ An unsupported Windows server (hardware or operatingsystem) should be replaced with a supported Windowsserver.
■ An unsupported UNIX or Linux server (hardware oroperating system) should be replaced with any othersupported UNIX or Linux server platform and operatingsystem. However, Red Hat Linux master servers are anexception (see the following item).
■ An unsupported Red Hat Linux master server must bereplaced by another Red Hat Linux master server. Theversion of Red Hat Linux and the server architecturemay be different.
For complete details on replacing NetBackup servers inregard to platforms and operating systems, refer to thefollowing documents on the Symantec support Web site:
■ For Windows master servers:
http://entsupport.symantec.com/docs/337969.htm
■ For UNIX master servers:
http://entsupport.symantec.com/docs/337970.htm
■ For media servers:
http://entsupport.symantec.com/docs/338425.htm
■ OpenStorage users should also refer to the followingdocument for details about specific considerations inregard to upgrades to NetBackup 7.0:
http://entsupport.symantec.com/docs/338426.htm
Platform and operatingsystem
The new supported system must use the exact same versionof NetBackup as the old system. You cannot migrate catalogsand databases from one NetBackup version to a differentversion.
For example, the old server uses NetBackup 6.5.2. You mustinstall this same version on the new server before you canupgrade.
NetBackup version
Preparing for installationAbout replacing NetBackup server types not supported in NetBackup 7.0
24
On the old system, you must create a hot catalog backup.This backup is then used to restore the catalog to the newsupported system and complete the migration.
The method that you use to create the catalog backup canmake a difference in how you restore it on the new system.For example:
■ Whether you back up the catalog to tape or disk
■ Whether you back up the catalog to a master server ora media server
For complete details on how to create a hot catalog backup,see the NetBackup Troubleshooting Guide.
Hot catalog backup
How to replace unsupported NetBackup master serversThe following steps describe only the primary tasks to replace an unsupportedmaster server.
For complete detailed instructions, refer to the following documents on theSymantec support Web site:
http://entsupport.symantec.com/docs/337969.htm
http://entsupport.symantec.com/docs/337970.htm
OpenStorage users should also refer to the following document for details aboutspecific considerations in regard to upgrades to NetBackup 7.0:
http://entsupport.symantec.com/docs/338426.htm
To replace an unsupported master server
1 Configure a new supported master server with the same name as the oldunsupported master server.
See “About replacing NetBackup server types not supported in NetBackup7.0” on page 23.
2 Install the same version of NetBackup on the new master server that is usedon the old master server.
You must install NetBackup to the exact same path and location as the oldserver.
3 On the old master server, create a hot catalog backup.
For complete details on how to create a hot catalog backup, see theNetBackupTroubleshooting Guide.
4 Shut down the old master server and remove it from your backupenvironment.
25Preparing for installationAbout replacing NetBackup server types not supported in NetBackup 7.0
5 Install the new master server in your backup environment.
6 Restore the catalog backup.
7 Run some test backups and restores to verify successful operation.
After you verify successful operation, you can upgrade to NetBackup 7.0.
How to replace unsupported NetBackup media serversThe following steps describe only the primary tasks to replace an unsupportedmedia server.
For complete detailed instructions, refer to the following document on theSymantec support Web site:
http://entsupport.symantec.com/docs/338425.htm
OpenStorage users should also refer to the following document for details aboutspecific considerations in regard to upgrades to NetBackup 7.0:
http://entsupport.symantec.com/docs/338426.htm
To replace an unsupported media server
1 Deactivate the old media server through the NetBackup AdministrationConsole, or by running the following command:
nbemmcmd -updatehost -machinename <Media Server> -machinestateop
set_admin_pause -machinetype media -masterserver <Master Server>
2 Shut down the old media server.
3 Configure a new supported media server with the same name and IP addressas the old media server.
Note: To use a new IP address, make sure that you update the DNS.
4 Connect all backup storage devices to the new media server.
5 Install the same version of NetBackup on the new media server that is usedon the old media server. You must install NetBackup to the exact same pathand location as the old server.
Also, make sure that you specify the same list of additional servers that wereidentified on the old server.
6 Install the new media server in your backup environment.
Preparing for installationAbout replacing NetBackup server types not supported in NetBackup 7.0
26

7 Activate the new media server through the NetBackup Administration Console,or by running the following command:
nbemmcmd -updatehost -machinename <Media Server> -machinestateop
clr_admin_pause -machinetype media -masterserver <Master Server>
8 Run the device discovery on the new media server so that all connected backupstorage devices are recognized.
9 Run some test backups and restores to verify successful operation.
After you verify successful operation, you can upgrade to NetBackup 7.0.
27Preparing for installationAbout replacing NetBackup server types not supported in NetBackup 7.0

Preparing for installationAbout replacing NetBackup server types not supported in NetBackup 7.0
28
NetBackup licenses
This chapter includes the following topics:
■ About NetBackup license key requirements
About NetBackup license key requirementsTo install NetBackup master server or media server software, you must enter aNetBackup product license key.
To obtain license keys, you must order a license SKU when you order yourNetBackup products.
After you place your order, Symantec sends you an email with a license certificatethat includes the following information:
This list includes all of the licenses for the products thatyou ordered.
Keep this list in a secure location. You may be asked for aproduct license key if you ever need to contact technicalsupport for assistance.
List of NetBackup licensespurchased
Instead of a DVD media kit, you can use this serial numberto download the Electronic Software Distribution (ESD)images for NetBackup product installation.
Go to the following Web site and enter this serial numberto download the ESD images to your system:
https://fileconnect.symantec.com/LangSelection.jsp
Serial number for access todownload NetBackupproducts
When you install NetBackup, Symantec recommends that you enter all otherproduct license keys on the master server when you are prompted. Although youcan add these license keys later, it is easier to enter them when you install themaster server software.
2Chapter
For detailed information on how to administer NetBackup license keys, refer tothe NetBackup Administration Guide, Volume I.
NetBackup license compatibilityTo use your current NetBackup license keys to upgrade servers, add-on products,and database agents to NetBackup 7.0, the following are required:
■ NetBackup version 6.0.x or 6.5.x must already be installed.
■ You must have a valid maintenance contract for all licensed NetBackupproducts.
Note: You cannot upgrade to NetBackup 7.0 if your current installed version isNetBackup 5.x. You must first upgrade to NetBackup 6.0 or 6.5, and then you canupgrade to NetBackup 7.0. Any 6.x version can be upgraded directly to 7.0.
Upgrade licenses and software may be obtained from the Symantec LicensingPortal at the following Web site:
https://licensing.symantec.com/acctmgmt/index.jsp
For detailed information and procedures on how to administer license keys, referto the NetBackup Administrator’s Guide, Volume I.
Methods for entering license keysAll NetBackup product license keys must be entered on the master server. Enterlicense keys by using one of the following methods:
■ During NetBackup master server installation (recommended)The installation script prompts you to enter the license keys for all NetBackupproducts that you plan to install.
■ NetBackup Administration ConsoleAfter NetBackup master server installation, open the console and click Help> License Keys.
■ Command-line interface (UNIX only)After NetBackup master server installation, use the following command:
/usr/openv/netbackup/bin/admincmd/get_license_key
For some features and products, license keys must also be entered on the mediaserver. Those features and products are as follows:
■ Library-based tape drives feature
NetBackup licensesAbout NetBackup license key requirements
30
■ NDMP
Note: You can log on to a NetBackup server from almost any server in a systemto view, enter, and administer license keys. When you administer license keysremotely, ensure that you view the licenses of the system you intend to change.You do not want to add or change a license key on the wrong server.
Frequently asked questions about license keysSymantec customers have asked the following questions about how to managelicense keys.
NetBackup uses a common license system that otherSymantec products also use. Please remember, however,that the common license system provides flexibility in thelicense features that each product implements. For example,NetBackup does not have a node-locked license system, butsome other products do.
Is the license system forNetBackup the same as thelicense system in otherSymantec products?
No. The media kit by itself does not allow any access toNetBackup. You always need a license key (either permanentor evaluation). License keys should always be delivered withthe media kit, so you should never find yourself with a mediakit and no key.
Can I use NetBackup if all Ihave is a media kit?
The key is a multi-digit alphanumeric string (for example:8EPP-ABCD-9XYZ-XYZ9-8881-VCF4-OIUF-AJDC). The keycontains information on the following:
■ Whether the key is for NetBackup Server or NetBackupEnterprise Server
■ Whether the key is for a server, a client, an agent, or anoption (and which one)
■ Whether the key is a permanent key or an evaluationkey
■ Information about how and where the key was generated
What does the license keylook like? What informationdoes it contain?
Yes, serialization information is embedded in the key.Is the license key serialized?
31NetBackup licensesAbout NetBackup license key requirements
Yes. Information about license keys is stored on the masterserver.
To access the information, open the NetBackupAdministration Console and select Help > License Keys.
On UNIX servers, you can also run the following command:
/usr/openv/netbackup/bin/admincmd/get_license_key
For more information on how to view reports, refer to theNetBackup Administrator’s Guide, Volume I.
Can I see reports on whatlicense keys I have?
When you install NetBackup, you are prompted to enter thelicense keys for all options and agents.
If you purchase an agent or other add-on product at a laterdate, you can enter its license key manually. Open theNetBackup Administration Console and select Help >License Keys.
On UNIX servers, you can also run the following command:
/usr/openv/netbackup/bin/admincmd/get_license_key
Some options require that you have your original NetBackupDVDs, because additional binaries must be installed. Youshould always keep your NetBackup DVDs in a safe place.
How do I enable options andagents?
Yes. Always store copies of your license keys in a secureplace.
Should I save license keysafter they have been entered?
Symantec has a record of all license keys that are issued tocustomers. Customers who lose their license key(s) can callOrder Management to get copies of their license keys.
■ For Americas, Japan, PacRim, Australia:
650.318.4265 FAX: 650.335.8428
■ For Europe, Middle East and Africa:
00.353.61.365232 FAX: 00.353.61.365223
If you have purchased NetBackup from a Symantec partner,you need to contact that partner for information on yourkey.
What should I do if I havelost my license key(s)?
NetBackup licensesAbout NetBackup license key requirements
32

Many NetBackup installations are very large, and the licensekeys are long. License keys that you enter multiple timescan be time-consuming. You can request a single licensekey for each type of NetBackup component you purchase.For example, you can obtain one license key for use with 50Oracle agents. Site licenses enable unrestricted use forspecific NetBackup agents or options.
You still need a unique license key for each type ofNetBackup component that you purchase. Separate licensekeys are required for components like NetBackup Server, aLotus Notes agent, or any NDMP option.
How are large volume ordershandled?
Site licenses are handled much like large volume orders are.The certificate for a site license states that the license keyis good for unlimited copies.
What about license keys forcustomers with site licenses?
No. NetBackup Remote Administration Consoles do notrequire special license keys. You can install them on anycomputer with access to the master server.
Do I need a license key toenable NetBackup RemoteAdministration Consoles?
Yes. You can use your license keys multiple times. You are,however, legally bound to install and use only the numberof NetBackup servers, clients, agents, and options for whichyou purchase licenses.
Can a license key be usedmultiple times?
All NetBackup customers who have current maintenancecontracts with Symantec automatically receive the latestversion of NetBackup. You receive the NetBackup media kitand license keys for every component for which youpurchased licenses.
If your maintenance is through a Symantec partner, youupgrade through the partner. Contact the partner for moredetails.
How do existing customersget license keys?
If you believe that you received an incorrect license key,contact Order Management using the number on yourlicense key certificate. Technical support does not issuepermanent license keys. You can obtain license keys onlythrough Order Management. Technical support can providetemporary one-month license keys to you while issuesregarding permanent license keys are resolved.
What if I do not get the rightlicense keys?
The evaluation license key enables unrestricted use ofNetBackup, its agents, and its options for a predeterminedperiod of time.
What does an evaluationlicense key enable?
33NetBackup licensesAbout NetBackup license key requirements
To find out when a license key expires, open the NetBackupAdministration Console and select Help > License Keys.
On UNIX servers, you can also run the following command:
/usr/openv/netbackup/bin/admincmd/get_license_key
Am I notified when anevaluation is about to expire?
The NetBackup services or daemons are shut down. Whenyou attempt to use the product you are informed that itsevaluation period has expired.
What happens when anevaluation license keyexpires?
Yes. Customers who add a permanent license key to anevaluation version of NetBackup have immediate access totheir catalog information and configuration information.
Does NetBackup save thebackup configuration andcatalog information whenevaluation license keysexpire?
It is easy. When you purchase a permanent license, you addthat license to NetBackup. All the configuration informationand catalog data from your evaluation version is retained.
To enter your permanent license key, open the NetBackupAdministration Console and select Help > License Keys.
On UNIX servers, you can also run the following command:
/usr/openv/netbackup/bin/admincmd/get_license_key
How do I upgrade from anevaluation license to apermanent license?
NetBackup licensesAbout NetBackup license key requirements
34
Installing server software
This chapter includes the following topics:
■ Installation sequence
■ Mounting the software media
■ Installing NetBackup master server software on UNIX
■ Installing NetBackup media server software on UNIX
■ About pushing client software from a master server to clients
■ Installing NetBackup add-on products
■ How to configure the window manager for the Java Interface (NetBackup-Javacompatible platforms)
Installation sequenceFor new NetBackup installations, install the software in the following order:
■ Master servers
■ Media servers (NetBackup Enterprise only)
■ NetBackup Remote Administration Console
■ Clients
■ Any NetBackup add-on products (such as language packages)
Before you proceed with any installation procedure, be sure to review theinstallation requirements.
See “Requirements for UNIX NetBackup server installation” on page 18.
3Chapter
How the installation script worksWhen you install NetBackup server software, client software is also installed.
When you install NetBackup 7.0, the following options are also installed if theplatform supports them:
■ BMR Master Server
■ NDMP
■ NetBackup Vault
■ BMR Boot Server
■ DB2
■ Encryption
■ Informix
■ LiveUpdate agent
■ Lotus Notes
■ Oracle
■ SAP
■ Snapshot Client
■ Sybase
After installation is completed, a valid license key for each option must be enteredto enable its functionality. Each option must also be configured as needed.
In addition to server software and options, the installation script performs thefollowing tasks:
Places the host name in the/usr/openv/netbackup/bp.conf file on the server.
For clustered environments, the script places the virtualhost name in the /usr/openv/netbackup/bp.conf fileon the server.
Host names
Adds automatic startup and shutdown scripts to theappropriate directories on the various supported platforms.
Automatic startup andshutdown scripts
Installing server softwareInstallation sequence
36
The installation procedure prompts you for the name of analternate root path. An alternate boot environment lets youinstall NetBackup on a different file system.
For example, suppose that Host B’s root, usr, and var filesystems are mounted on Host A as /alt, /alt/usr, and/alt/var. When you log in to Host A, you can specify/altas the alternate root environment and install NetBackup onHost B.
This feature applies to NetBackup servers only and notoptions or clients.
Solaris systems
For the platforms that support PBX, NetBackup versions7.0 and later install or update PBX when the client softwareis installed.
If the computer where you install NetBackup does notalready have PBX and the platform supports it, theinstallation script installs PBX.
If PBX already exists on the computer, the installation scriptperforms one of the following tasks:
■ Updates the existing version if it is older than the versionthat is included with 7.0.
■ Does not update PBX if the existing version is the sameor later than the version that is included with 7.0.
Note: If you upgrade from NetBackup 6.0 or 6.5, PBX maynot upgrade correctly. If the PBX upgrade is not successful,use the ICS disk from your 6.0 or 6.5 package to remove theolder version. For complete details, see the InfrastructureCore Services Installation Guide for those NetBackupversions.
PBX
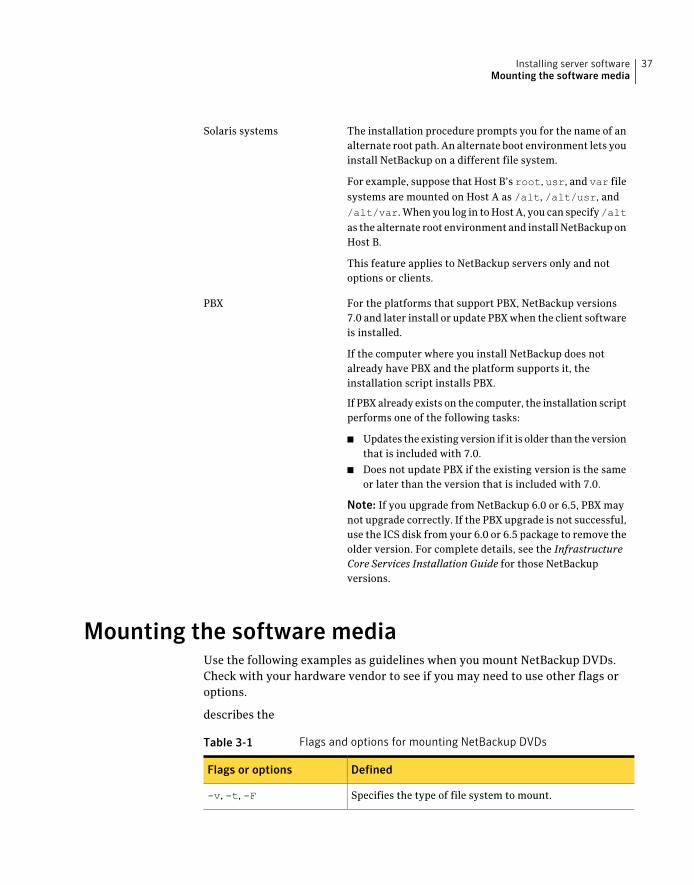
Mounting the software mediaUse the following examples as guidelines when you mount NetBackup DVDs.Check with your hardware vendor to see if you may need to use other flags oroptions.
describes the
Table 3-1 Flags and options for mounting NetBackup DVDs
DefinedFlags or options
Specifies the type of file system to mount.-v, -t, -F
37Installing server softwareMounting the software media
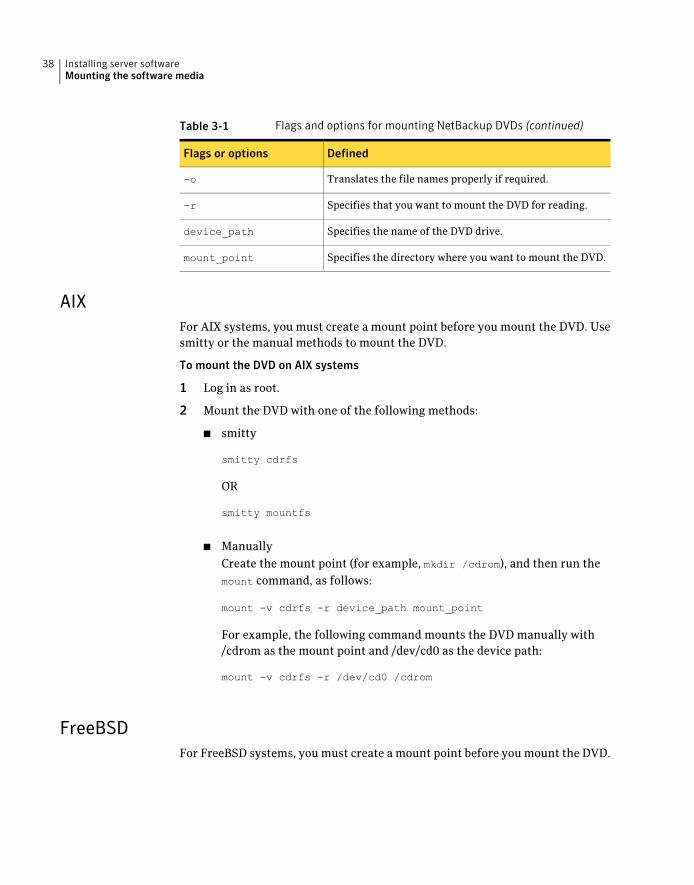
Table 3-1 Flags and options for mounting NetBackup DVDs (continued)
DefinedFlags or options
Translates the file names properly if required.-o
Specifies that you want to mount the DVD for reading.-r
Specifies the name of the DVD drive.device_path
Specifies the directory where you want to mount the DVD.mount_point
AIXFor AIX systems, you must create a mount point before you mount the DVD. Usesmitty or the manual methods to mount the DVD.
To mount the DVD on AIX systems
1 Log in as root.
2 Mount the DVD with one of the following methods:
■ smitty
smitty cdrfs
OR
smitty mountfs
■ ManuallyCreate the mount point (for example, mkdir /cdrom), and then run themount command, as follows:
mount -v cdrfs -r device_path mount_point
For example, the following command mounts the DVD manually with/cdrom as the mount point and /dev/cd0 as the device path:
mount -v cdrfs -r /dev/cd0 /cdrom
FreeBSDFor FreeBSD systems, you must create a mount point before you mount the DVD.
Installing server softwareMounting the software media
38
To mount the DVD on FreeBSD systems
1 Log in as root.
2 Create the mount point. For example, mkdir /cdrom.
3 Mount the DVD, as follows:
mount -r -t cd9660 device_path mount_point
For example, the following command mounts the DVD using /cdrom as themount point and /dev/acd0c as the device path:
mount -r -t cd9660 /dev/acd0c /cdrom
HP-UXTo mount and unmount the DVD on HP-UX varies, depending on the version ofthe operating system you are running.
To mount the DVD on HP-UX operating systems earlier than 11.23
1 Log in as root.
2 Create the mount point. For example, mkdir /cdrom.
3 Start the PFS daemons, as follows:
nohup pfs_mountd &
nohup pfsd &
4 Mount the DVD, as follows:
pfs_mount -o xlat=unix device_path mount_point
To find the device path, you can run ioscan -fn.
For example, the following command mounts the DVD using /cdrom as themount point and /dev/rdsk/c3t2d0 as the device path:
pfs_mount -o xlat=unix /dev/rdsk/c3t2d0 /cdrom
39Installing server softwareMounting the software media
To unmount the DVD on HP-UX operating systems earlier than 11.23
1 Unmount the DVD, as follows:
pfs_umount mount_point
For example, the following command unmounts a DVD that used /cdrom asthe mount point:
pfs_umount /cdrom
2 Stop the following processes with the kill command:
pfs_mountd
pfsd
pfs_mountd.rpc
pfsd.rpc
To mount the DVD on HP-UX 11.23 or later operating systems
1 Log in as root.
2 Mount the DVD, as follows:
mount -F cdfs device_path mount_point
To unmount the DVD on HP-UX 11.23 or later operating systems
1 Unmount the DVD, as follows:
umount mount_point
2 Remove the DVD from the drive.
LinuxFor Linux systems, you must create a mount point before you mount the DVD.
Installing server softwareMounting the software media
40
To mount the DVD on Linux systems
1 Log in as root.
2 Create the mount point. For example, mkdir /cdrom.
3 Mount the DVD, as follows:
mount device_path mount_point
For example, the following command mounts the DVD using /cdrom as themount point and /dev/cdrom as the device path:
mount /dev/cdrom /cdrom
SolarisFor Solaris systems, use Volume Manager to mount the DVD.
To mount the DVD on Solaris systems
1 Log in as root.
2 If Volume Manager (vold) is running, the DVD mounts automatically.
If vold is not running, start it up as follows:
/usr/sbin/vold &
InstallingNetBackupmaster server software onUNIXThe master server manages backups, archives, and restores. The master serveris where the NetBackup catalog resides which includes the internal databases thatcontain information about NetBackup configuration and backups.
Use the following guidelines for a new master server installation:
Designate the computer that you want to be the masterserver and install the master server software on thatcomputer first.
Designate master server
41Installing server softwareInstalling NetBackup master server software on UNIX

By default, the installation script installs the EnterpriseMedia Manager (EMM) Server software on the master server.This configuration is preferred and is the most efficient.
Note: Although the EMM server can be located on a mediaserver, Symantec recommends that you keep it on themaster server. To locate the EMM on a media server requiresthat you perform another procedure. After all NetBackupserver software (master and media) is installed, you mustmove the NetBackup database and the EMM server to thedesignated media server. For complete details, refer to theNetBackup Administration Guide for UNIX and Linux,Volume I. See the section "Moving the NetBackup Databasefrom one host to another".
EMM server
During master server installation, you must enter aNetBackup product license key. You must also enter licensekeys for any additional NetBackup product options or agentsthat are used on the server or its clients. These additionallicense keys must be entered on the master server.
If you add, delete, or make and save any license key updatesin the NetBackup-Java Administration Console, you mustrestart the console.
For more information on how to administer NetBackuplicenses, see theNetBackupAdministrator’s Guide, VolumeI.
License keys
Starting with NetBackup 7.0, this platform is not supportedas a master server or as a media server that contains theEMM server. It is only supported as a true media server (noEMM) or a true client.
HP-PA-RISC
To install NetBackup master server software
1 Log in to the server as root.
2 Use one of the following methods to start the installation script:
Installing server softwareInstalling NetBackup master server software on UNIX
42

■ Insert the NetBackup DVD for the appropriateplatform in the drive.
Check the DVD label to identify its contents.
See “About the NetBackup media kit” on page 15.
■ If necessary, mount the DVD.
See “Mounting the software media” on page 37.
■ Enter the following command:
cd_directory/install
The cd_directory is the path to the directory whereyou can access the DVD.
DVD
■ Navigate to the location where the installationimages reside.
■ Enter the following command:
./install
ESD images (downloadedfiles)
3 When the menu selections appear, select NetBackupServer and press Enter.
4 For Solaris systems, NetBackup is set up by default to install to the runningroot environment.
■ To install to the running root environment, press Enter.
■ To change the NetBackup installation location, type n and identify theappropriate path where you want NetBackup installed.
5 When you see the following message, type y.
NetBackup and Media Manager binaries will be installed in
/opt/openv
and a link will be created from /usr/openv to opt/openv, if it
does not exist.
Is this okay? (y) [y, n,?, q]
6 Enter the NetBackup Server or Enterprise Server license key.
7 Type y, then follow the prompts to add license keys for other NetBackupoptions and agents.
Although you can add license keys later, you should enter them now. If youadd any license keys later through the NetBackup-Java AdministrationConsole, you must restart the console.
8 After all license keys are entered, type q to quit the License Key Utility andcomplete the server software installation.
43Installing server softwareInstalling NetBackup master server software on UNIX
9 Verify or enter the correct computer name when prompted by the followingmessage:
Installing NetBackup Enterprise Server version: 7.0GA
If this machine will be using a different network interface than
the default (machine name), the name of the preferred interface
should be used as the configured server name. If this machine
will be part of a cluster, the virtual name should be used as the
configured server name.
The domain name of your server appears to be (name.domain). You
may choose to use this domain name in your configured NetBackup
server name, or simply use (machine name) as the configured
NetBackup server name.
Would you like to use (name.domain) as the configured name of
the NetBackup server? [y, n] (y)
■ To accept the displayed (default) name, press Enter.
■ To change the displayed (default) name, type n and enter the name thatyou want.
■ For a clustered NetBackup server, enter the virtual name for the NetBackupserver and not the actual local host name.
10 Identify or verify the master server by answering the following question whenit appears:
Is <name> the master server? [y, n] (y)
■ To accept the displayed name (which is the name that you identified inthe previous step), press Enter.
■ If you entered a virtual name for the server in the previous step, theinstallation script presents the following question:
Is this server part of a cluster installation?
If the answer is yes, press y and answer the series of cluster configurationquestions that appear.If the answer is no, press n. The installation script defaults automaticallyto use REQUIRED_INTERFACE and adds the server name to the bp.conf file.
For more information on REQUIRED_INTERFACE, see the NetBackupAdministrator's Guide for UNIX and Linux, Volume II.
11 Identify whether there are any media servers for this master server byanswering the following question when it appears:
Do you have any media servers? [y, n] (n)
Installing server softwareInstalling NetBackup master server software on UNIX
44
■ If there are no media servers for this master server, press Enter andproceed to the next step.
■ If there are media servers for this master server, type y and enter thename of each media server.When you enter the media server names, you must enter the computername and the domain name. For example:
alpha.min.symantec.com
Where alpha is the computer name and min.symantec.com is the domainname.The media server names that you enter here are added to the bp.conf fileon the master server, automatically. After you install the media serversoftware later, the master server can then communicate with the mediaservers immediately.
■ To add a media server to an existing and operational NetBackupenvironment, you cannot use the procedures in this guide. For completedetails on how to add a media server to an existing and operationalNetBackup environment, see theNetBackupAdministrationGuide,VolumeII.
12 When the following message appears, identify the name of the EMM server.
NetBackup maintains a centralized catalog (separate from the
image catalog) for data related to media and device
configuration, device management, storage units, hosts and host
aliases, media server status, NDMP credentials, and other
information. This is managed by the Enterprise Media Manager
server.
Enter the name of the Enterprise Media Manager (default: name)
■ To accept the displayed (default) master server name and install the EMMserver on the master server, press Enter.
■ On a clustered master server, enter the virtual name of the master server.Symantec does not support installing the EMM on an NFS-mount.
13 Answer the following question when it appears:
Do you want to start the NetBackup bprd process so backups and
restores can be initiated? [y, n] (y)
■ If you have (or want to have) a clustered NetBackup server, type n.
45Installing server softwareInstalling NetBackup master server software on UNIX
■ For non-clustered installations, press Enter to accept the default answer(y) and start the NetBackup processes and the EMM server.
You must start these processes now because the EMM server must berunning when you install any media servers later.
14 For a clustered NetBackup master server, repeat these steps on every nodeon which you want to run NetBackup.
Continuing with NetBackup software installationAfter you have installed the master server software, you are ready to install mediaserver software or client software depending on your environment.
■ If you have media servers in your system, you are ready to install media serversoftware.See “Installing NetBackup media server software on UNIX” on page 46.
■ If there are no media servers in your environment, you are ready to installclient software on client machines.
■ See “Installing UNIX clients locally” on page 112.
■ To install client software on clients from the master server location(recommended), you must first install the client type software on the masterserver.See “Installing client type software on a master server” on page 50.
Installing NetBackup media server software on UNIXThis section describes how to install a new NetBackup media server. Use thisinformation to install the server software on a computer with no existing versionof NetBackup.
Media server software manages the robotic and the storage devices within yourNetBackup environment.
After you have installed the master server and the EMM server software, you areready to install media server software on media server machines.
Use the following guidelines when you install media servers:
■ Designate the computers that you want to be media servers and install themedia server software on them.
■ New or initial NetBackup 7.0 media servers cannot be installed as clusters.However, existing media servers with NetBackup 6.x that are clustered can beupgraded to NetBackup 7.0 and still remain clustered.
Installing server softwareInstalling NetBackup media server software on UNIX
46

■ The EMM server must be installed and running before you install media serversoftware.
■ When you install NetBackup media server software, you must enter aNetBackup product license key. You must also enter license keys for anyadditional NetBackup product options or agents that are used on the serveror its clients. These additional license keys must be entered on each mediaserver.For more information on how to administer NetBackup licenses, see theNetBackup Administrator’s Guide for UNIX and Linux, Volume I.
■ If you add, delete, or make and save any license key updates in theNetBackup-Java Administration Console, you must restart the console.
To install NetBackup media server software
1 Log in to the server as root.
2 Use one of the following methods to start the installation script:
■ Insert the NetBackup DVD for the appropriateplatform in the drive.
Check the DVD label to identify its contents.
See “About the NetBackup media kit” on page 15.
■ If necessary, mount the DVD.
See “Mounting the software media” on page 37.
■ Enter the following command:
cd_directory/install
The cd_directory is the path to the directory whereyou can access the DVD.
DVD
■ Navigate to the location where the installationimages reside.
■ Enter the following command:
./install
ESD images (downloadedfiles)
3 When the menu selections appear, select NetBackupServer and press Enter.
4 For Solaris systems, NetBackup is set up by default to install to the runningroot environment.
■ To install to the running root environment, press Enter.
■ To change the NetBackup installation location, type n and identify theappropriate path where you want NetBackup installed.
47Installing server softwareInstalling NetBackup media server software on UNIX
5 When you see the following message, type y.
NetBackup and Media Manager binaries will be installed in
/opt/openv
and a link will be created from /usr/openv to opt/openv, if it
does not exist.
Is this okay? (y) [y, n,?, q]
6 Enter the NetBackup Server or NetBackup Enterprise Server license key.
7 Type y, then follow the prompts to add license keys for other NetBackupoptions and agents.
Although you can add license keys later, you should enter them now. If youadd any license keys later through the NetBackup-Java AdministrationConsole, you must restart the console.
8 After all license keys are entered, type q to quit the License Key Utility andcomplete the server software installation.
9 Verify or enter the correct computer name when prompted by the followingmessage:
Installing NetBackup Enterprise Server version: 7.0GA
If this machine will be using a different network interface than
the default (machine name), the name of the preferred interface
should be used as the configured server name. If this machine
will be part of a cluster, the virtual name should be used as the
configured server name.
The domain name of your server appears to be (name.domain). You
may choose to use this domain name in your configured NetBackup
server name, or simply use (machine name) as the configured
NetBackup server name.
Would you like to use (name.domain) as the configured name of
the NetBackup server? [y, n] (y)
■ If the displayed (default) media server name is correct, press Enter.
■ If the displayed (default) media server name is not correct, type n andenter the correct name. If you enter a virtual name, the installation scriptdefaults automatically to use REQUIRED_INTERFACE. This process adds thevirtual name of the media server to the bp.conf file.
For more information on REQUIRED_INTERFACE, see the NetBackupAdministrator's Guide for UNIX and Linux, Volume II.
10 Identify the master server that you have already installed, by answering thefollowing question when it appears:
Installing server softwareInstalling NetBackup media server software on UNIX
48
Is (name) the master server? [y,n]
■ Type n and enter the fully qualified domain name of the master server.
■ If the master server is clustered, enter the virtual name of the masterserver.
11 When the following message appears, identify the name of the EMM server.
Enter the name of the Enterprise Media Manager (default: name)
The master server name is displayed by default.
■ If you installed the EMM server on the master server, press Enter to acceptthe displayed (default) name.If you have a clustered master server, enter the virtual name for the masterserver and not the actual local host name.
12 Repeat steps 1 through 11 to install media server software on any remainingmedia servers.
About pushing client software from a master serverto clients
You can increase the speed of client installation by pushing the software fromthe master server to the clients. This method eliminates the need for a localinstallation at each client.
The following describes how to prepare your NetBackup environment for clientsoftware installation from the master server.
■ Install the client type software on the master server. Be sure to install all ofthe client types that pertain to your NetBackup configuration.See “Installing client type software on a master server” on page 50.
■ Before you can push client software from the master server, each client namemust be assigned to a NetBackup policy. Policies are created on the masterserver.When you create a policy, you must identify the policy type, which indicatesthe operating system on the clients that are assigned to that policy. Withouta policy, the remote installation (or push) fails because the master server doesnot know the operating system of the client.For information on how to create NetBackup policies, refer to the NetBackupAdministrator’s Guide for UNIX and Linux, Volume I.
■ After the required policies are created, you can push client software from themaster server to the clients.
49Installing server softwareAbout pushing client software from a master server to clients
See “Installing UNIX clients remotely” on page 112.
Installing client type software on a master serverClient type software must be installed on the master server to perform thefollowing operations:
■ Assign clients to NetBackup policies so that those clients can be backed up.
■ Install (or push) client software from the master server to clients.For each UNIX client type, the client installation script lets you install theclient software onto the master server. You can then install (or push) the clientsoftware from the master server to the clients.
To install client type software on a master server
1 Log in to the server as root.
2 Use one of the following methods to start the installation script:
■ Insert the NetBackup DVD for the appropriateplatform in the drive.
Check the DVD label to identify its contents.
See “About the NetBackup media kit” on page 15.
■ If necessary, mount the DVD.
See “Mounting the software media” on page 37.
■ Enter the following command:
cd_directory/install
The cd_directory is the path to the directory whereyou can access the DVD.
DVD
■ Navigate to the location where the installationimages reside.
■ Enter the following command:
./install
ESD images (downloadedfiles)
3 When the menu selections appear, select NetBackupClient and press Enter
4 Select all of the client types that you want to install and follow the installationprompts.
Installing NetBackup add-on productsAfter your initial installation is complete, you can install any other NetBackupadd-on products (such as language packages).
Installing server softwareInstalling NetBackup add-on products
50
How to configure the window manager for the JavaInterface (NetBackup-Java compatible platforms)
Always set your window manager so that windows become active only when youclick inside the windows. Do not enable auto focus, where windows become activeif you move the mouse pointer over them. The NetBackup-Java interfaces do notrun properly with auto focus enabled.
Setting up the Common Desktop Environment (CDE) window managerThe CDE window manager is the preferred window manager for NetBackup-Javaapplications.
To set up a CDE window manager
1 On the front panel in the CDE window, click the StyleManager control icon.
2 On the Style Manager toolbar, click the Window control icon.
3 In the StyleManager -Window dialog box, select Click InWindowToMakeActive.
Click OK.
4 When you see the prompt to Restart the Workspace Manager, click OK.
51Installing server softwareHow to configure the window manager for the Java Interface (NetBackup-Java compatible platforms)

Installing server softwareHow to configure the window manager for the Java Interface (NetBackup-Java compatible platforms)
52
Installing alternativeadministrative interfaces
This chapter includes the following topics:
■ About the NetBackup Remote Administration Console for Windows
■ About the NetBackup-Java Administration Console
About theNetBackupRemoteAdministrationConsolefor Windows
If your NetBackup server has no graphics display capabilities, you must installan alternative administrative interface. It may also be desirable for various otherconfigurations, such as mixed environments that use the Windows and the UNIXplatforms.
Note: You can skip this section if you do not want or need to administer aNetBackup server remotely from a Windows NetBackup client.
The NetBackup Remote Administration Console is an interface-only version ofNetBackup for Windows that you can use to administer NetBackup servers fromanother computer. The computer that runs the NetBackup Remote AdministrationConsole does not require NetBackup software.
The following is a brief description of the NetBackup Remote AdministrationConsole operation:
■ The console lets you perform all NetBackup operations exactly like theNetBackup Administration Console on a local Windows NetBackup server. You
4Chapter
can create backup policies, manage volumes, view status, monitor tape drives,and perform other operations.
■ The console displays the name of the server it administers, rather than a localhost name.
■ The console can only administer other NetBackup servers. It cannot act as amaster or a media server.
Installing the NetBackup Remote Administration ConsoleThe NetBackup Remote Administration Console is supported on Windows Server2003/XP, Windows Server 2008/Vista, and Windows Server 2008 R2/Windows 7.
Installation is a two-step process as follows:
■ Install the NetBackup Remote Administration Console.
■ Add the NetBackup Remote Administration Console host name to the serverlist of the hosts that you want to administer.You must also add the host names of the servers that you want to administerto the server list on the host where you install the remote console.The following table shows an example of the required server list entries foreach host. RAC1 refers to the Remote Administration Console.
Required server list entriesHost name
RAC1Master1
RAC1Media1
RAC1Media2
Master1, Media1, Media2RAC1
To install the NetBackup Remote Administration Console
1 On the computer where you want to install the NetBackup RemoteAdministration Console, start the NetBackup Installation Wizard with oneof the following methods:
■ DVD mediaInsert the NetBackup for Windows DVD in the drive. If Autorun is disabled,navigate to the DVD drive and run Browser.exe.
■ ESD images (downloaded files)Navigate to the directory where the images reside and run Browser.exe.
2 On the initial screen, click Installation.
Installing alternative administrative interfacesAbout the NetBackup Remote Administration Console for Windows
54
3 On the Installation screen, click Server Software Installation.
4 On the Welcome screen, review the content and click Next.
5 On the LicenseAgreement screen, accept the terms of the license agreementand click Next.
6 On the Installation Type screen, select Install to this computer only, clickTypical, and then click Next.
7 On the NetBackup License Key and Server Type screen, select NetBackupRemoteAdministrationConsole. You do not need a license key to install theRemote Administration Console.
8 On the NetBackupSystemNames screen, provide the following information:
Enter the name of the local computer where you wantto install the remote console. (The name should appearby default.)
Client Name
Enter the name of the NetBackup master server. (IfNetBackup master server software is installed on thiscomputer, the name should appear by default.)
Master Server
Enter the names of any additional NetBackup serversthat you want to allow access to this server. To entermore than one name, separate each name with acomma or press Enter after you enter each name.
Additional Servers
9 On the Ready to Install the Program screen, review the summary of yourselections. Then, click Install.
10 After the installation completes, do the following:
■ Click View Log to review the installation details.
■ Click Finish.If you clicked the box next to LaunchNetBackupAdministrationConsolenow, the Remote Administration Console appears. If you did not click thebox, start the console by selecting Start > Programs > SymantecNetBackup > NetBackup Administration Console.This action starts the console on the local host, not on any remote host.
11 Add the required host names to the server lists of all hosts.
See “Configuring server lists for the NetBackup Remote AdministrationConsole” on page 56.
55Installing alternative administrative interfacesAbout the NetBackup Remote Administration Console for Windows

Configuring server lists for the NetBackup Remote AdministrationConsole
The following methods are available to configure server lists for the NetBackupRemote Administration Console:
■ Use the NetBackup Administration Console
■ On UNIX servers, edit the bp.conf file.
■ On Windows servers, edit the system registry.
To configure server lists for the NetBackup Remote Administration Console byusing the NetBackup Administration Console
1 On the NetBackup Administration Console in the left pane, click HostProperties > Master Servers.
2 In the Master Servers window in the right pane, right-click the name of thehost server and select Properties.
3 In the Master Server Properties window, click the Servers icon from thetree in the left pane.
4 In the Servers window, click Add.
5 Enter the name of the host that is to run the NetBackup RemoteAdministration Console.
6 Click Add. The name of the host appears in the Additional Servers list.
7 Click Close and OK.
To configure server lists for the NetBackup Remote Administration Console byediting the bp.conf file on UNIX servers
1 Log in to the master server as root.
2 Edit the following file:
/usr/openv/netbackup/bp.conf.
3 At the end of the SERVER = lines, add the following line:
SERVER = Remote-Administration-Console-machine-name
The Remote-Administration-Console-machine-name is the name of thecomputer where you installed the NetBackup Remote Administration Console.
To configure server lists for the NetBackup Remote Administration Console byediting the system registry on Windows servers
1 Log on to the master server as the administrator.
2 Click Start > Run....
Installing alternative administrative interfacesAbout the NetBackup Remote Administration Console for Windows
56
3 Enter regedit.exe and click OK.
4 In the Registry Editor window, locate the following file:
HKEY_LOCAL_MACHINE\SOFTWARE\VERITAS\NetBackup\CurrentVersion\Config
5 In the right pane, double-click on Server.
6 In the Edit Multi-String window, enter the name of the RemoteAdministration Console host and click OK.
7 Close the Registry Editor window.
Adding remote servers to administer from an existing NetBackupRemote Administration Console
If you have an existing NetBackup Remote Administration Console installed andyou want to add a remote master server to administer, use this procedure.
To add a remote server to administer from an existing NetBackup RemoteAdministration Console
1 Log on to the host where the NetBackup Remote Administration Console isinstalled, and open the console.
2 In the left pane of the NetBackup Remote Administration Console, select HostProperties > Master Server.
3 In the Master Servers window in the right pane, right-click the name of thehost server and select Properties (Read/Write).
4 In the Master Server Properties window, click the Servers tab.
5 In the Global Operations field, in the Add to all lists field, enter the hostname. Make sure that you enter the name of the host that is to run theNetBackup Remote Administration Console.
6 Click the + icon (the name of the host appears in the AdditionalServers list),then click OK.
About the NetBackup-Java Administration ConsoleThe NetBackup-Java Administration Console can be used to administer one ormore UNIX or Windows NetBackup servers. It provides all of the standardNetBackup server interfaces. The console can be used to create backup policies,manage volumes, view status, monitor tape drives, and other operations.
On Java-capable UNIX hosts (servers and clients), this console is installedautomatically when you install NetBackup.
57Installing alternative administrative interfacesAbout the NetBackup-Java Administration Console
On Windows hosts, this console must be installed separately.
Note: You can skip this section if you do not want or need to administer aNetBackup server remotely from a Windows NetBackup client.
Installing version 7.0 of the NetBackup Java Administration Consoleon Windows
Use the following guidelines when you install version 7.0 of the console:
■ Install the console from the NetBackup DVD for Windows or from the ESD(downloaded) files.
■ To use NetBackup Access Control, the Symantec Product Authentication andAuthorization client components must be installed on the Windows host beforethe console is installed. This order of installation ensures that the Java WindowsAdministration Console uses the Symantec Product Authentication andAuthorization components correctly.
■ Any computer that runs the console should have at least 512 MB of physicalmemory.
To install version 7.0 of the NetBackup Java Administration Console on Windows
1 On the computer where you want to install the console, do one of the following:
■ Insert the appropriate DVD that contains the NetBackup software.On Windows systems with Autorun enabled, the installation startsautomatically.On Windows systems with Autorun disabled, navigate to the DVD directoryand run Browser.exe.
■ Navigate to the location where the downloaded files reside and runBrowser.exe.
2 On the initial screen, select Installation.
3 On the Installation screen, select Java Windows Administration ConsoleInstallation.
4 On the Welcome screen, review the content and click Next.
5 On the License Agreement screen, accept the agreement and click Next.
6 On the NetBackup Installation Type screen, select Install to this computeronly and Typical.
7 On the ReadytoInstalltheProgram screen, review the Installation Summaryand click Install.
Installing alternative administrative interfacesAbout the NetBackup-Java Administration Console
58

8 On the Installation Complete screen, click Finish.
9 To open the console, click Start > Programs > Symantec NetBackup >NetBackup Java version 7.0.
Installing or removing multiple versions of the NetBackup-JavaAdministration Console on Windows
A NetBackup environment may contain multiple servers with multiple NetBackupversions. This section describes how to install and remove multiple versions ofthe NetBackup-Java Administration Console.
Installing multiple versions of the NetBackup-JavaAdministration Console on WindowsTo install multiple versions of the NetBackup interface in a mixed versionenvironment, note the following restrictions and guidelines:
Only the most recent version of the NetBackup-JavaAdministration Console can be updated (or patched).
Updates
The NetBackup-Java Capabilities Authorizationconfiguration file (auth.conf), must always be located ininstall_path\java. For example, C:\ProgramFiles\Veritas\java. The file must exist there regardlessof how many versions of the console are installed, or inwhich directories they are installed.
The file is only used for administering NetBackup on thisWindows host, and default settings exist if the file is notpresent. For more information about these defaults, see thesection "Authorizing NetBackup-Java users" in theNetBackup Administrator’s Guide for Windows, Volume I.
auth.conf file
You must install each Java console version to a differentfolder.
Console version location
To install earlier versions of the NetBackup-Java Administration Console
1 Insert the appropriate version NetBackup Windows installation CD or DVDwith the NetBackup-Java Administration Console that you want to install.
2 Select one of the following consoles, based on the NetBackup version:
■ For NetBackup 6.0 versions, select NetBackup Installation and clickInstall Java Administration Console. Select whether you want to installthe 32-bit or the 64-bit console.
59Installing alternative administrative interfacesAbout the NetBackup-Java Administration Console
■ For NetBackup 6.5 versions, select NetBackup Installation and clickInstall JavaWindowsAdministrationConsole. Select whether you wantto install the 32-bit or the 64-bit console.
3 If a different version of the Java console has already been installed, specifya new folder location to prevent overwriting the earlier installation.
For example, specify C:\Program Files\Veritas\nbjava65 for version 6.5Java consoles.
4 To complete the installation, click Finish.
Removing earlier versions of the NetBackup-JavaAdministration Console on WindowsIn some cases, you can remove earlier versions of the NetBackup-JavaAdministration Console by using the Add/Remove Programs feature. You canuse this method if the version that you want to remove appears in the list ofprograms.
If the version that you want to remove does not appear in the list of programs,you must manually remove it. Use the following procedure.
Tomanually remove earlier versions of theNetBackup-Java Administration Console
1 Remove the folder where the earlier version NetBackup-Java AdministrationConsole is installed.
2 Remove the appropriate menu item from the Start>Programs>NetBackupmenu.
3 Remove any relevant desktop shortcuts.
Methods for administering multiple versions of NetBackup serversTable 4-1 describes the available methods to administer NetBackup 7.0 with anearlier version console. The order of the listed methods does not imply anypreference.
Installing alternative administrative interfacesAbout the NetBackup-Java Administration Console
60
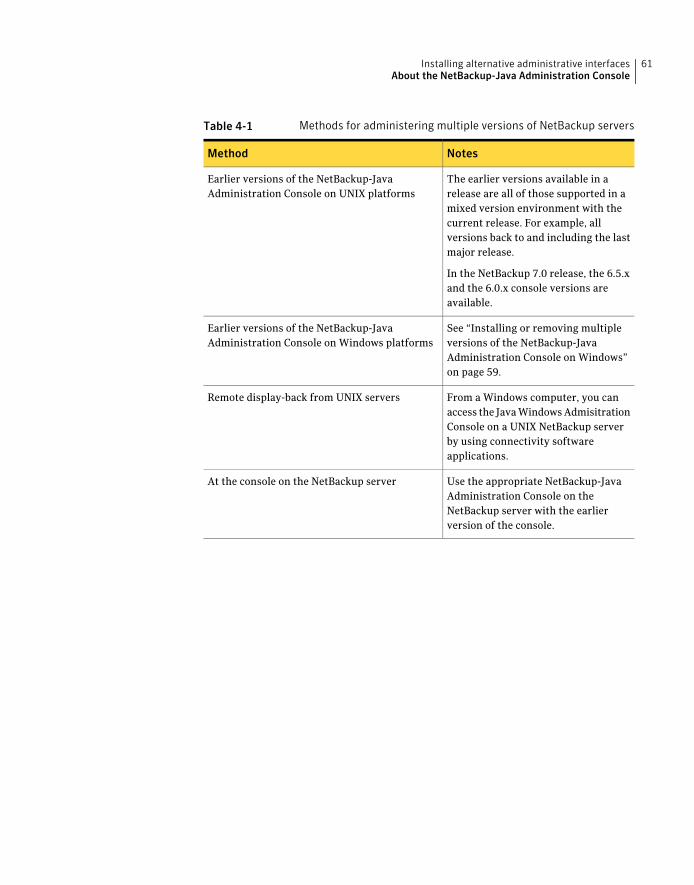
Table 4-1 Methods for administering multiple versions of NetBackup servers
NotesMethod
The earlier versions available in arelease are all of those supported in amixed version environment with thecurrent release. For example, allversions back to and including the lastmajor release.
In the NetBackup 7.0 release, the 6.5.xand the 6.0.x console versions areavailable.
Earlier versions of the NetBackup-JavaAdministration Console on UNIX platforms
See “Installing or removing multipleversions of the NetBackup-JavaAdministration Console on Windows”on page 59.
Earlier versions of the NetBackup-JavaAdministration Console on Windows platforms
From a Windows computer, you canaccess the Java Windows AdmisitrationConsole on a UNIX NetBackup serverby using connectivity softwareapplications.
Remote display-back from UNIX servers
Use the appropriate NetBackup-JavaAdministration Console on theNetBackup server with the earlierversion of the console.
At the console on the NetBackup server
61Installing alternative administrative interfacesAbout the NetBackup-Java Administration Console

Installing alternative administrative interfacesAbout the NetBackup-Java Administration Console
62
Upgrading server and clientsoftware
This chapter includes the following topics:
■ Requirements for upgrading UNIX servers to NetBackup 7.0
■ Upgrading server software from version 6.x to 7.0
■ Upgrading clients after servers are upgraded
■ Completing your system update after an upgrade
■ Automatic file changes from an upgrade
Requirements for upgrading UNIX servers toNetBackup 7.0
NetBackup version 7.0 includes many new features, and it also includes manychanges that affect compatibility with other products and platforms.
Before you upgrade, refer to theNetBackupReleaseNotes document for completedetails about the changes that may affect how to upgrade your NetBackupenvironment.
The following describes the general requirements for UNIX server upgrades:
5Chapter
■ Direct upgrades to NetBackup 7.0
You can upgrade directly to NetBackup 7.0 only from 6.xversions. Any 6.0 or 6.5 version can be upgraded directlyto NetBackup 7.0.
This installation guide includes the procedures forupgrading from 6.x 7.0.
■ Upgrades from 5.x versions
If you currently use NetBackup 5.x versions, you cannotupgrade directly to 7.0. You must first upgrade toNetBackup 6.0 or 6.5. Symantec recommends that youupgrade to 6.5.
An upgrade guide is posted on the upgrade portal at thefollowing location:
http://seer.entsupport.symantec.com/docs/290185.htm.
After you upgrade to 6.5, you can upgrade to 7.0.
Supported upgrade paths
Before you proceed with any upgrade procedure, alwaysback up your existing NetBackup database. If an error occursduring the upgrade, you can roll back to the previous versionand still retain your information from the database backup.
Backup databases
Many of the NetBackup server installation requirementsalso apply to NetBackup upgrades. Review theserequirements before you upgrade.
See “Requirements for UNIX NetBackup server installation”on page 18.
Review installationrequirements
When you perform an upgrade, a master server cannot bechanged to a media server. To make this change, you mustfirst remove the earlier version of NetBackup, then installthe new version.
Converting a master serverto a media server
For NetBackup Enterprise upgrades, you cannot convert anexisting non-failover server to a highly available failoverNetBackup server.
Converting a non-failoverserver to a NetBackupfailover server
Make sure that the NetBackup version on each server is atleast equal to the version on any clients. Earlier softwareversions on servers can encounter problems with latersoftware versions on clients.
Version support betweenservers and clients
Add-ons must be at the same version as the NetBackupserver or the client where the add-on is installed.
Add-on product versions
Upgrading server and client softwareRequirements for upgrading UNIX servers to NetBackup 7.0
64
If you currently use NBAC in your NetBackup 6.xenvironment, the following describes how to upgrade thatfeature:
■ Master servers
You must upgrade NBAC before you upgrade NetBackup.
For NBAC installation and upgrade instructions, see theNetBackup Security and Encryption Guide.
■ Media servers and clients
NBAC is upgraded at the same time when you upgradeNetBackup. A separate upgrade is not required.
NetBackup Access Control(NBAC)
If you have NetBackup clients that are unsupported forNetBackup 7.0, you may encounter problems with newfeatures in this release. If you do not plan to upgrade theseearlier version clients, move them to a separate policy.
Conflicts with older clientsand new features
Ensure that the gzip and the gunzip commands areinstalled on the local system. The directories where thesecommands are installed must be part of the root user’s pathenvironment variable setting.
gzip and gunzip locations
An upgrade to NetBackup 7.0 overwrites the nblog.conffile with a new file and resets all logging levels to theirdefault values. If you changed any logging level values fromtheir default in your NetBackup 6.x environment, you mustchange them after the upgrade.
Upgrades to NetBackup 7.0 also reset the following features:
■ Logging Level
This feature was introduced in NetBackup 6.0 GA.Upgrading to 7.0 resets this feature to its default(DebugLevel=1 and DiagnosticLevel=6).
To change the Logging Level to the desired setting afteryou upgrade, refer to the NetBackup Administrator’sGuide, Volume I.
■ LogRecycle
This feature was introduced in NetBackup 6.0 MP4.Upgrading to 7.0 resets this feature to False (off).
To change LogRecycle to the desired setting after youupgrade, refer to theNetBackupTroubleshootingGuide.You should also refer to the information at the followingWebsite:
http://seer.entsupport.symantec.com/docs/279590.htm
nblog.conf file updates
The following describes requirements for NetBackup server upgrades that arespecific to certain configurations:
65Upgrading server and client softwareRequirements for upgrading UNIX servers to NetBackup 7.0

With NetBackup 7.0, NOM has been replaced withOpsCenter. The new name retains the same functionalityas NOM and includes additional features.
All NOM 6.0 MPx and 6.5.x versions can be upgraded toOpsCenter (NetBackup 7.0).
NetBackup OperationsManager (NOM)
The installation procedure prompts you for the name of analternate root path. This path is used in an alternate bootenvironment that lets you install NetBackup on a differentfile system.
For example, suppose that Host B’s root, usr, and var filesystems are mounted on Host A as /alt, /alt/usr, and/alt/var. When you log in to Host A, you can specify/altas the alternate root environment and install NetBackup onHost B.
This feature applies to NetBackup servers only and notoptions or clients.
Solaris systems
Upgrading server and client softwareRequirements for upgrading UNIX servers to NetBackup 7.0
66
■ Refer to theNetBackupHighAvailabilityAdministrator’sGuide for cluster installation prerequisites and notes,specific to your cluster environment. This installationguide describes cluster installation, but may not providedetails for your particular configuration.
■ An existing non-failover NetBackup server cannot beconverted to a highly available failover NetBackupserver.
■ Before you upgrade, you must have the clusterframeworks installed, configured, and started.
■ Cluster environments are only supported with NetBackupEnterprise Server.
■ The name that you enter during the upgrade for theNetBackup server must be the virtual server name, notthe actual local host name.
■ Make sure that each node in the cluster where you installNetBackup can run the rsh command or its equivalent.(On HP-UX, the command is remsh).
As the root user you must be able to perform a remotelogin to each node in the cluster without entering apassword. Remote login without a password is onlynecessary for installation and configuration of theNetBackup server, and any NetBackup agents andoptions. After installation and configuration arecomplete, it is no longer required.
■ The virtual server name must be defined by using DNS,NIS, or /etc/hosts. The IP address is defined at thesame time. (The virtual name is a label for the IPaddress.)
■ The CLUSTER_NAME must be exactly the same in eachbp.conf configuration file. This requirement ensuresthat the device configuration information for eachcluster node in the EMM database is stored properly.Otherwise, the upgrade may not detect all of the clusternodes.
Clustered environments
Allowing for reinstallation of earlier versions of NetBackupIf you ever intend to reinstall a previous version of NetBackup after you haveperformed an upgrade, backups are essential. If you need to reinstall, these backupscontain your most recent data.
67Upgrading server and client softwareRequirements for upgrading UNIX servers to NetBackup 7.0

Note: For clustered environments, you cannot reinstall an earlier version ofNetBackup.
To allow for reinstalling earlier versions of NetBackup
1 Back up all databases (media, volume, configuration, device) and catalogs onthe master and the remote media servers.
2 Back up all NetBackup patches, scripts, and the bp.conf entries that arespecific to the earlier NetBackup version.
You do not have to upgrade your clients at this time; only the master and theremote media servers.
Upgrade sequenceWhen you upgrade from NetBackup 6.x to 7.0, Symantec recommends the followingorder of tasks:
■ Back up the current 6.x NetBackup databases
■ Upgrade NetBackup Access Control (if installed) on all master servers to beupgraded to 7.0
■ Upgrade master servers
■ Upgrade media servers
■ Upgrade NetBackup Remote Administration Consoles
■ Upgrade NetBackup clients
■ Upgrade any NetBackup add-on products (such as language packs)
Note: If your current NetBackup environment uses a remote EMM (EMM installedon a media server), you must upgrade this server first. Once you upgrade theremote EMM, you must upgrade all master servers that communicate with it toNetBackup 7.0. NetBackup does not support the use of a 7.0 EMM server with a6.x master server.
The installation process automatically searches to determine if an earlierNetBackup version exists on your system. The presence of an existing versiondictates that you are about to perform an upgrade.
Upgrading server and client softwareRequirements for upgrading UNIX servers to NetBackup 7.0
68

Upgrading server software from version 6.x to 7.0Before you begin an upgrade, Symantec recommends that you review theNetBackup Release Notes document that is included with your media kit or theelectronic product image files. This document describes important changes inNetBackup 7.0 that you should be familiar with before you upgrade.
The following information is a reminder of major changes in NetBackup 7.0 thataffect upgrades:
Starting with NetBackup 7.0, this platform is not supportedas a master server or as a media server that contains theEMM server. It is only supported as a true media server (noEMM) or a true client.
HP-PARISC
VSM has reached its end of life and is not supported inversions 7.0 or later.
Before you upgrade to version 7.0, you must decide whichof the following actions to take:
■ To keep VSM, leave the server at the current 6.x version.
■ Before you upgrade to version 7.0, unmigrate all filesand remove VSM and any related products.
For instructions on how to remove VSM, refer to one ofthe following sources:
NetBackup Storage Migrator Installation Guide.
VSM_README.txt file (located at the top of the SolarisSPARC and HP-PARISC media)
Veritas NetBackup StorageMigrator (VSM)
NetBackup 7.0 server software is 64-bit compatible only andcannot be installed on 32-bit systems.
If you have 32-bit systems with NetBackup 6.x masterservers that you want to upgrade, you must first migratethe NetBackup catalog and databases to a supported 64-bitsystem.
See “About replacing NetBackup server types not supportedin NetBackup 7.0” on page 23.
32-bit systems
69Upgrading server and client softwareUpgrading server software from version 6.x to 7.0
Starting with NetBackup 7.0, most of the add-on productsand database agents are now installed with the NetBackupserver or the client package. Separate installation for theseproducts is no longer needed.
The following products are now included in the NetBackupserver package (if the platform supports the product):
■ BMR master server
■ NDMP
■ NetBackup Vault
The following products are now included in the NetBackupclient package (if the platform supports the product):
■ BMR Boot server
■ DB2
■ NetBackup Encryption
■ Informix
■ LiveUpdate agent
■ Lotus Notes
■ Oracle
■ SAP
■ Snapshot Client
■ Sybase
The binaries for the listed products are laid down with theserver or the client package. A valid license is still requiredto enable the product. If product configuration was requiredpreviously (such as db2_config), configuration is stillrequired.
Note: For Solaris server upgrades, the older versions of anylisted products here must be removed before an upgrade toNetBackup 7.0. For example, VRTSnbdb2, SYMCnbdb2,VRTSnbenc,SYMCnbenc, and others. The installation scriptdisplays a list of the packages it finds that must be removed.
The Japanese and the Chinese language packages remainas separate add-ons. The process to install and upgradethese products remains the same.
Warning: If you remove the earlier versions after anupgrade to version 7.0, part of the NetBackup installationis destroyed and the product cannot function.
UNIX package consolidation
Starting with NetBackup 7.0, the active node must beupgraded before the inactive nodes.
Clusters
Upgrading server and client softwareUpgrading server software from version 6.x to 7.0
70
The NetBackup Administration Console must be closed whenyou upgrade NetBackup. Otherwise, NetBackup may causea failure that forces you to restart the procedure.
NetBackup AdministrationConsole
Note: If you currently have NetBackup Access Control (NBAC) 6.x installed, youmust upgrade that product before you upgrade to NetBackup 7.0. For access controlupgrade instructions, see the NetBackup Security and Encryption Guide.
You should schedule your upgrade and reconfiguration for a time when backupsdo not run. However, the upgrade procedure instructs you to deactivate all policiesto ensure that backups do not interfere with the upgrade. You can also temporarilymodify policies so that backups do not run while you upgrade and reconfigureNetBackup.
To upgrade server software from version 6.x to 7.0
1 If you have not already done so, back up the existing NetBackup 6.x databases.If an error occurs during the upgrade, you can roll back to the previous versionand still retain your information from the database backups.
2 Log on as the root user on the server.
3 Deactivate all NetBackup policies and storage lifecycle policies as follows:
■ Open the NetBackup Administration Console on themaster server.
■ From the tree on the left, select Policies.
■ In the right pane, select all of the NetBackup policiesthat appear.
■ Right-click on the selected policies, then selectDeactivate.
To deactivate storage lifecycle policies, see the followingcommand-line instruction.
For NetBackupAdministration Consoleusers:
For command-line users, enter the following commands for the appropriatepolicies:
■ Navigate to the following directory:cd /usr/openv/netbackup/bin/admincmd
■ To deactivate NetBackup policies:/bpplinfo policy_name -modify -inactive
■ To deactivate storage lifecycle policies:/nbstlutil inactive -lifecycle policy_name -modify -inactive
71Upgrading server and client softwareUpgrading server software from version 6.x to 7.0
4 Deactivate disk staging storage units as follows:
■ Open the NetBackup Administration Console on themaster server.
■ From the tree on the left, expand NetBackupManagement > Storage Units.
■ In the right pane, double-click on a disk staging storageunit.
■ When the Change Storage Unit window appears, selectStaging Schedule.
■ When the Disk Staging Schedule window appears, clickon the Exclude Dates tab.
■ Select the date in the calendar that matches the dateof the system upgrade.
■ Repeat these tasks for each disk staging storage unit.
For NetBackupAdministration Consoleusers:
For command-line users, navigate to the following directory:
/usr/openv/netbackup/bin/admincmd
Enter the following command:
/bpschedulerep schedulename -excl mm/dd/yyyy
5 Deactivate all media servers as follows:
■ Open the NetBackup Administration Console on themaster server.
■ From the tree on the left, select Media and DeviceManagement > Devices > Hosts.
■ In the right pane, select all of the media servers thatappear.
■ Right-click the media servers and select Deactivate.
For NetBackupAdministration Consoleusers:
For command-line users:
/usr/openv/volmgr/bin/vmoprcmd -deactivate_host -h device_host
6 If the NetBackup Administration Console is open, you must close it now.
7 For clustered environments, freeze the NetBackup Group so that migrationsdo not occur while the inactive nodes are upgraded.
If you have a VCS cluster configured, you can freeze the NetBackup Groupby using the Cluster Manager interface or the command line.
Upgrading server and client softwareUpgrading server software from version 6.x to 7.0
72
8 For Solaris servers only, remove the 6.x versions of all add-on products anddatabase agents.
The installation script displays a list of the add-on products and the agentsthat are currently installed. The script also offers to remove these earlierversions for you and Symantec recommends this method.
You also have the option to remove these items manually before the upgradeoccurs. These items must be removed before you upgrade to version 7.0. Ifyou remove these items after an upgrade to version 7.0, part of the NetBackupinstallation is destroyed and the product cannot function.
If you decide to remove these products manually, you must stop the upgradehere. Refer to the appropriate NetBackup 6.x documentation for instructionson how to remove each add-on product or agent.
9 For Solaris systems, all of the NetBackup scripts that you may have modifiedare removed when you complete this step.
Perform each of the following tasks in the order as shown:
■ Save any files that you have modified and want to keep.
■ Remove the current NetBackup server package by using the appropriatecommand:
pkgrm VRTSnetbpFor version 6.0:
pkgrm SYMCnetbpFor version 6.5:
The following prompt appears:
Are you doing this pkgrm as a step in an upgrade
process?
■ Enter y.
10 For AIX systems, this step deletes any robotic control paths. In an AIXclustered environment, you must perform this step on all nodes in the cluster.
For more information about the robotic control paths, see the NetBackupDevice Configuration Guide.
■ Uninstall the ovpass driver, as follows:
/usr/openv/volmgr/bin/driver/remove_ovpass
73Upgrading server and client softwareUpgrading server software from version 6.x to 7.0
11 Ensure that you have license keys for all of the NetBackup servers, clients,options, and agents that you ordered.
When you install a NetBackup Enterprise master or a media server, you mustenter a NetBackup Enterprise server license key.
For more information on how to administer NetBackup licenses, see theNetBackup Administrator’s Guide, Volume I.
12 Use one of the following methods to start the upgrade script:
■ Insert the NetBackup DVD for the appropriateplatform in the drive.
Check the DVD label to identify its contents.
See “About the NetBackup media kit” on page 15.
■ If necessary, mount the DVD.
See “Mounting the software media” on page 37.
■ Enter the following command:
cd_directory/install
The cd_directory is the path to the directory whereyou can access the DVD.
DVD
■ Navigate to the location where the installationimages reside.
■ Enter the following command:
./install
ESD images (downloadedfiles)
13 Follow the prompts in the installation script to install the NetBackup serverbinaries.
For clustered environments, upgrade the active node first, then upgrade theinactive nodes.
During the active node upgrade, the following question appears:
Do you want to start the NetBackup bprd process so
backups and restores can be initiated? [y,n] (y)
Enter n and press Enter.
Do not start the NetBackup bprd process until all nodes are upgraded.
Upgrading server and client softwareUpgrading server software from version 6.x to 7.0
74
14 Optional step to upgrade clients:
During the upgrade, the correct NetBackup client software for this servertype is automatically installed on the server. To install additional clientsoftware on your current server, you can mount the appropriate client DVDand select NetBackup Client from the menu.
The installation script lets you load the client software on the server for eachof the UNIX client types that NetBackup supports. You can then "push" thisclient software from the server to your UNIX clients.
See “Upgrading clients after servers are upgraded” on page 75.
15 For clustered environments only, unfreeze the NetBackup group.
16 After you have finished the upgrade, you can install and configure NetBackupAccess Control (NBAC).
For detailed information, see the NetBackup Security and Encryption Guide.
17 After all servers are upgraded, reactivate the following in the order as shown:
■ All media servers
■ All disk staging storage units
■ All NetBackup policies
■ All storage lifecycle policies
Upgrading clients after servers are upgradedThe update_clients installation script lets you push client software to clients.It does not let you push client software to a remote client that is also a NetBackupmedia or master server. You cannot push software this way because the serversoftware and client binaries must be of the same version on a single host.
The update_clients installation script can determine the full client list that isconfigured on the server. When it is run without any parameters, it attempts toupdate all clients (as determined by/usr/openv/netbackup/bin/admincmd/bpplclients). If you do not want toupgrade all clients, you can specify a subset of clients. Use the hardware type andoperating system parameters or use the -ClientList parameter.
You can run update_clients from a media server. The -ClientList parameteris required in this situation. The script lets you maintain a media server and a setof clients at an earlier release level than the master server. Doing so requires theinformed use of the update_clients -ClientList command on a master serverand a media server to avoid unwanted client upgrades.
75Upgrading server and client softwareUpgrading clients after servers are upgraded
For clustered environments, you can push client software only from the activenode.
To upgrade clients after you have upgraded servers
1 Use one of the following methods to start the installation script:
■ Insert the NetBackup DVD for the appropriateplatform in the drive.
Check the DVD label to identify its contents.
See “About the NetBackup media kit” on page 15.
■ If necessary, mount the DVD.
See “Mounting the software media” on page 37.
■ Enter the following command:
cd_directory/install
The cd_directory is the path to the directory whereyou can access the DVD.
DVD
■ Navigate to the location where the installationimages reside.
■ Enter the following command:
./install
ESD images (downloadedfiles)
2 When the menu selections appear, select NetBackupClient and press Enter.
The binaries that are provided for the client operating system levels representthe operating system levels on which the binaries were compiled. The binariestypically function perfectly on later versions of the operating system. Forexample, HP-PARISC 11.11 binaries also are used on the HP-PARISC 11.23level of the operating system. The installation script attempts to load theappropriate binaries for your system. If the script does not recognize thelocal operating system, it presents choices.
3 Select the client type that you want to load and follow the prompts to installthat client type. Repeat as necessary until all desired client types have beenloaded.
Make sure that you load the software for all the UNIX client types you intendto back up onto the server. Otherwise, you cannot add these client types tothe NetBackup policy configuration.
4 After the installation is complete, unmount the DVD.
Upgrading server and client softwareUpgrading clients after servers are upgraded
76

5 As a root user on the NetBackup master server, enter the following commandto see whether bprd is running:
/usr/openv/netbackup/bin/bpps
If bprd is running, stop it with the following command:
/usr/openv/netbackup/bin/admincmd/bprdreq -terminate
6 Enter the following command to make sure that backups or restores are notin progress:
/usr/openv/netbackup/bin/admincmd/bpdbjobs
7 Update UNIX client software by running the update_clients script. Specifythe host names of the individual nodes (not virtual names) in the list of clients.
Use one of the following commands:
/usr/openv/netbackup/bin/update_clientsIf you do not use a-ClientList file:
/usr/openv/netbackup/bin/update_clients
-ClientList filename
If you use a-ClientList file:
The -ClientList parameter is required on a media server.
For more than 30 clients, you can divide the list into multiple files and runupdate_clients for each file.
To create a client list file, perform the following steps:
■ Change to the NetBackup admincmd directory, as follows:
cd /usr/openv/netbackup/bin/admincmd
■ Use the bpplclients command to create a file that contains a list of clientscurrently configured in the NetBackup database. The options to use onthis command differ depending on whether you push from a master serveror from a media server, as follows:
./bpplclients -allunique -noheader > fileIf you push from themaster server:
./bpplclients -allunique -noheader -M \
m_server_name > file
If you push from a mediaserver:
The option descriptions are as follows:
77Upgrading server and client softwareUpgrading clients after servers are upgraded

Name of the NetBackup master server in this environment.m_server_name
Name of the file to contain the list of unique clients. If noclients have been configured in the NetBackup database, fileis empty. Create file using the same format as that generatedby bpplclients.
file
The bpplclients command writes output to file in the following format:
hardware os client
The hardware name. For example, run the ls command indirectory /usr/openv/netbackup/client.
hardware
The operating system name. For example, run the lscommand in directory/usr/openv/netbackup/client/hardware.
os
The name of the client.client
The contents of file might look like the following example:
Solaris Solaris9 curry
■ (Optional) Edit file.
Perform this step to change the contents of file. Edit file to containonly those clients you want to update with NetBackup client software.The host names of the clients must be the clients’ individual node names.They cannot be virtual names. The correct value for the individual nodenames is returned by the hostname and by the domainname commands.The format can be either hostname or hostname.domainname.
Upgrading server and client softwareUpgrading clients after servers are upgraded
78

8 The update_clients script requests information from you. The followinginformation appears in the script:
Starting update_clients script.
There are N clients to upgrade.
Do you want the bp.conf file on the clients updated to list this
server as the master server? (y/n) [y]
Type either y or n.
Enter the number of simultaneous updates you wish to take
place. [1 - 30] (default: 15):
Press Enter.
The upgrade will likely take Y to Z minutes.
Do you want to upgrade clients now? (y/n) [y]
Type either y or n.
9 After all servers and clients are updated, start the bprd daemon as the rootuser on the master server by entering the following command:
/usr/openv/netbackup/bin/initbprd
10 After you have upgraded the NetBackup software, proceed to Completingyour system update after an upgrade.
Completing your system update after an upgradeAfter you have upgraded servers and clients, you may need to perform additionaltasks to complete the update of your NetBackup environment.
Perform any of the following that apply to your NetBackup environment:
If you upgraded a master server that allowed nonroot usersto administer NetBackup, you must reconfigure thepermissions and the group. The default permissions andgroup on the newly installed files allow only a root user toperform NetBackup administration.
Master server privileges
Upgrade any add-on products (such as NetBackup languagepackages) on all upgraded clients. All add-on productsshould be at the same version as the NetBackup client.
Add-on products
79Upgrading server and client softwareCompleting your system update after an upgrade
If you made changes to NetBackup scripts before theupgrade, apply those changes to the new, upgraded versionsof the scripts.
NetBackup scripts
Automatic file changes from an upgradeWhen you upgrade from an earlier NetBackup version, certain customizable scriptsare overwritten. Before NetBackup overwrites these scripts, it saves copies ofthem as a record of your modifications.
The following examples describe how this process works:
Your current NetBackup version is 6.5 and you modifiedfiles in the goodies directory. For example:
/usr/openv/netbackup/goodies
After an upgrade to NetBackup 7.0, the following directoryis created automatically and contains the modified filesfrom the earlier version:
/usr/openv/netbackup/goodies.6.5GA
If you made changes to these scripts before the upgrade,apply those changes to the new 7.0 scripts.
Example 1: goodies directory
Your current NetBackup version is 6.5 and you modifiedfiles in the bin directory. For example:
/usr/openv/netbackup/bin/backup_notify
After an upgrade to NetBackup 7.0, any modified scripts inthe bin directory now include the earlier version in theirfile name. For example:
backup_notify.6.5
If you made changes to these scripts before the upgrade,apply those changes to the new 7.0 scripts.
Example 2: bin directory
Table 5-1 describes the files and scripts that are overwritten when you upgradefrom an earlier UNIX version of NetBackup:
Table 5-1 Overwritten files and scripts on UNIX systems
Affected files and scriptsPath
All files/usr/openv/netbackup/bin/goodies
All files/usr/openv/netbackup/help
Upgrading server and client softwareAutomatic file changes from an upgrade
80
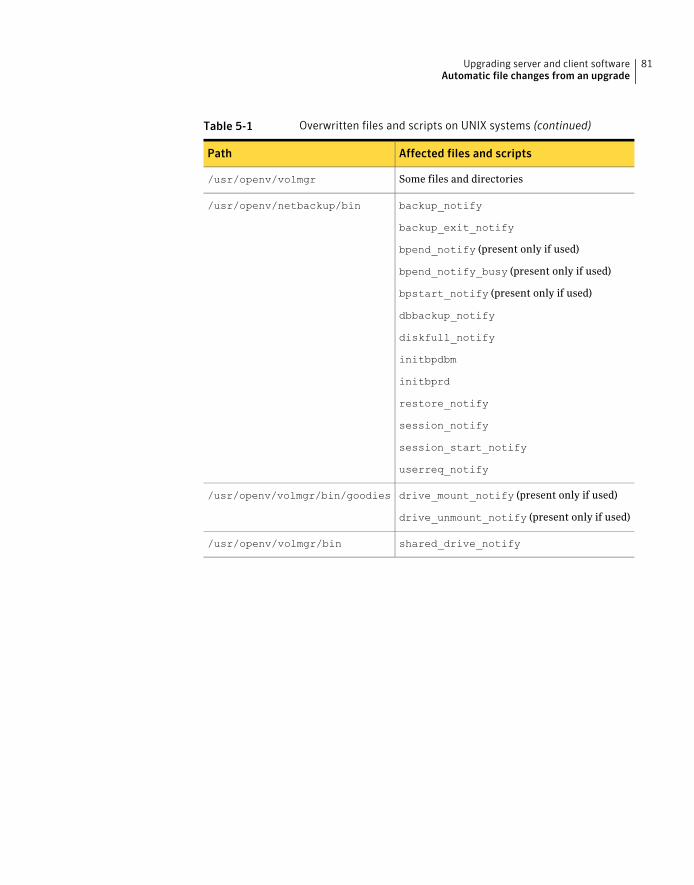
Table 5-1 Overwritten files and scripts on UNIX systems (continued)
Affected files and scriptsPath
Some files and directories/usr/openv/volmgr
backup_notify
backup_exit_notify
bpend_notify (present only if used)
bpend_notify_busy (present only if used)
bpstart_notify (present only if used)
dbbackup_notify
diskfull_notify
initbpdbm
initbprd
restore_notify
session_notify
session_start_notify
userreq_notify
/usr/openv/netbackup/bin
drive_mount_notify (present only if used)
drive_unmount_notify (present only if used)
/usr/openv/volmgr/bin/goodies
shared_drive_notify/usr/openv/volmgr/bin
81Upgrading server and client softwareAutomatic file changes from an upgrade

Upgrading server and client softwareAutomatic file changes from an upgrade
82
Removing NetBackup serversoftware
This chapter includes the following topics:
■ About NetBackup server software removal
About NetBackup server software removalThe procedures in this chapter remove NetBackup completely, along with anyinstalled add-on products.
Symantec recommends that you use the following order when you removeNetBackup server software:
■ Save any data that you require. This task is very important if you plan toreinstall NetBackup at a later date.
■ Remove any add-on products before you remove NetBackup server software.
■ Remove the NetBackup server software.
Each procedure in this chapter gives you the opportunity to save any data thatyou want and to remove add-on products before you remove NetBackup.
Removing NetBackup from Solaris serversUse this procedure to remove NetBackup from a Solaris server. You may also needto reference other documents for procedures of specific tasks to remove NetBackupsuccessfully.
Use the following guidelines when you remove NetBackup on Solaris servers:
6Chapter

If you moved the catalog database files in/usr/openv/db/data to another location, the procedurein this guide does not remove these files.
For procedures on how to remove database files fromalternate locations, refer to theNetBackupAdministrator’sGuide, Volume I.
Catalog database file location
Before you begin to remove NetBackup, you must removeNetBackup from the cluster application. Follow theinstructions in your cluster documentation on how toremove a group, then you can remove NetBackup.
You must remove NetBackup from each node in the cluster.
Clustered environments
If you identified an alternate root path in your NetBackup7.0 installation or upgrade, the process prompts you withthe alternate root path. You can use thepkgrm -R commandfrom the alternate root location.
This command applies to NetBackup server only, notadd-ons or clients.
Alternate root path
When you remove NetBackup, PBX is not removed. You mustremove PBX manually. This procedure includes a step thatdescribes how to perform this task.
Warning: Do not remove PBX if your server uses otherSymantec software products that require PBX to run.
PBX
The NetBackup Administration Console must be closed whenyou remove NetBackup. Otherwise, NetBackup may causea failure that forces you to restart the procedure.
NetBackup AdministrationConsole
To remove NetBackup from a Solaris server
1 Log on as the root user on the server.
2 Perform a catalog backup.
3 If the NetBackup Administration Console is open, you must close it now.
4 Identify any installed add-on products and ICS native packages by using thefollowing command:
pkginfo
5 Save all important data from any add-on products you have installed.
6 Stop the NetBackup/Media Manager daemons:
/usr/openv/netbackup/bin/bp.kill_all
Removing NetBackup server softwareAbout NetBackup server software removal
84
7 Remove each add-on product that was identified in step 4.
8 To remove the ICS native packages, use the pkgrm command. Remove thepackages in the order in which they appear in the following list. You mustfollow this order to help prevent a failed package removal.
If any package does not appear on your pkginfo list, skip to the next package.
Note: Before you remove any ICS native packages, make sure that no otherinstalled Symantec products use them.
Symantec Product Authorization Servicepkgrm VRTSaz
Symantec Product Authentication Servicepkgrm VRTSat
9 Remove PBX.
Remember, you should not remove PBX if your server uses other Symantecsoftware products that require PBX to run.
PBX can be found in the following location:
/usr/openv/netbackup/client/Solaris/<os>
When you remove PBX, it is recommended that you use the installpbx
command with the -u option. However, you may also use the appropriatenative command.
The following describes both command types:
■ To remove with installpbx, enter:
installpbx -u
■ To remove with the native command, enter:pkgrm VRTSpbx
10 To remove the NetBackup package, run the following command:
pkgrm SYMCnetbp
11 When the script asks if you want to remove the installed package SYMCnetbp,enter y and press Enter.
12 When the script asks if you want to continue with the package removal usingsuperuser permission, enter y and press Enter.
13 When the script asks if you want to stop NetBackup and Media Managerprocesses, enter y and press Enter (optional).
85Removing NetBackup server softwareAbout NetBackup server software removal
14 When the script asks if the package removal is a step in an upgrade process,enter n and press Enter.
15 When the script asks if you want to remove any directory in the /opt/openvdirectory path that is not empty, enter y and press enter.
16 When the script asks if you want to remove references to NetBackup andMedia Manager from services and the inetd configuration files, enter y andpress Enter.
After a few minutes, you should see the following message:
Removal of <SYMCnetbp> was successful.
17 Remove the startup scripts, as follows:
rm -f /etc/rc2.d/S77netbackup
rm -f /etc/rc1.d/K01netbackup
rm -f /etc/rc0.d/K01netbackup
rm -f /etc/init.d/netbackup
The following startup scripts appear only if NetBackup Fiber Transport wasenabled on the server.
rm -f /etc/rc0.d/K03nbftserver
rm -f /etc/rc2.d/S21nbftserver
rm -f /etc/rc1.d/K03nbftserver
rm -f /etc/init.d/nbftserver
18 Remove Symantec LiveUpdate components as follows:
■ If NetBackup is the only Symantec product that currently uses LiveUpdate,run the following command:/opt/Symantec/LiveUpdate/uninstall.sh -a
■ If LiveUpdate is the only product installed in the /opt/Symantecdirectory,remove the following files:rm -f /etc/Symantec.conf
rm -f /etc/Product.Catalog.JavaLiveUpdate
Removing NetBackup server softwareAbout NetBackup server software removal
86
19 To remove the NetBackup-Java application state data for the root account,run the following commands:
Warning: Do not insert a space between the slash character (/) and the periodor dot character (.) of "/.nbjava". A space between these characters removesall of your files from the root level and beyond.
/bin/rm -rf /.nbjava
/bin/rm -rf /.java/.userPrefs/vrts
20 Inform NetBackup-Java users, that they can remove their $HOME/.nbjavadirectory and portions of the $HOME/.java directory.
The $HOME/.nbjava and $HOME/.java directories contain application stateinformation, that is saved when the user exits NetBackup-Java applications.The saved information includes table column order and size. The processremoves this directory for the root user only.
The common subdirectory in $HOME/.java/.userPrefs/vrts can be removed.
21 If you enabled NetBackup Access Control, NetBackup placed several files onclients and servers. These files can be divided into the following categories:
These files are removed with NetBackup.NetBackup applicationtemporary files
87Removing NetBackup server softwareAbout NetBackup server software removal
These cache files reside in the$HOME/.vxssdirectory.Inform all users that they can remove this directory.
Files are generated in the/.vxss directory by a SingleSign-On operation of the NetBackup AdministrationConsole on the host where the console runs. TheNetBackup Administration Console cleans these fileswhen an exit function is performed, so the directorydoes not always contain temporary files. However, ifa system crash were to occur, any files in the directorymay be left behind. With the console shut down, youcan delete these files safely with no data loss.
NetBackup also creates cached certificates for clientand server NetBackup applications. These files residewithin the/.vxssdirectory. These files typically havea name that is consistent with a DNS entry for anetwork interface, as in machine.company.com.Example directory entries are as follows:
/usr/openv/var/vxss/credentials/machine.company.com
/usr/openv/var/vxss/credentials/dhcp
These files are created with the command bpnbat
-LoginMachine. If you plan to reinstall NetBackup onthe same computer at a later date, do one of thefollowing:
■ Preserve the certificates in thevxss/credentials directory.
■ If you do not preserve the certificates, you mustprovide the machine identity password as originallyset on the Root+AB broker. As an alternative, youcan reset the password on the Root+AB broker whenyou reinstall.
For more information on Root+AB brokers, see theNetBackup Security and Encryption Guide.
For more information on NetBackup Access Controland how to remove it, see the NetBackup Security andEncryption Guide.
Individual user (cache) files
Removing NetBackup from non-Solaris UNIX serversUse this procedure to remove NetBackup from a non-Solaris server. You may alsoneed to reference other documents for procedures of specific tasks to removeNetBackup successfully.
Removing NetBackup server softwareAbout NetBackup server software removal
88
Use the following guidelines when you remove NetBackup on non-Solaris servers:
If you moved the catalog database files in/usr/openv/db/data to another location, the procedurein this guide does not remove these files.
For procedures on how to remove database files fromalternate locations, refer to theNetBackupAdministrator’sGuide, Volume I.
Catalog database file location
Before you begin to remove NetBackup, you must removeNetBackup from the cluster application. Follow theinstructions in your cluster documentation on how toremove a group, then you can remove NetBackup.
You must remove NetBackup from each node in the cluster.
Clustered environments
If NetBackup has been configured to run as a clusteredpackage, you must also delete the following directory:
/etc/cmcluster/netbackup
HP-UX Service GuardClusters
When you remove NetBackup, PBX is not removed. You mustremove PBX manually. This procedure includes a step thatdescribes how to perform this task.
Warning: Do not remove PBX if your server uses otherSymantec software products that require PBX to run.
PBX
The NetBackup Administration Console must be closed whenyou remove NetBackup Otherwise, NetBackup may cause afailure that forces you to restart the procedure.
NetBackup AdministrationConsole
To remove NetBackup from a non-Solaris UNIX server
1 Log on as the root user on the server.
2 Perform a catalog backup.
3 If the NetBackup Administration Console is open, you must close it now.
4 Stop the NetBackup/Media Manager daemons:
/usr/openv/netbackup/bin/bp.kill_all
5 To unregister NetBackup from the VxUL master configuration that is storedin the /etc/vx/vrtslog.conf file, run the following command:
/usr/openv/netbackup/bin/vxlogcfg -r -p 51216
The -p option specifies the product ID, which is 51216 for NetBackup.
89Removing NetBackup server softwareAbout NetBackup server software removal
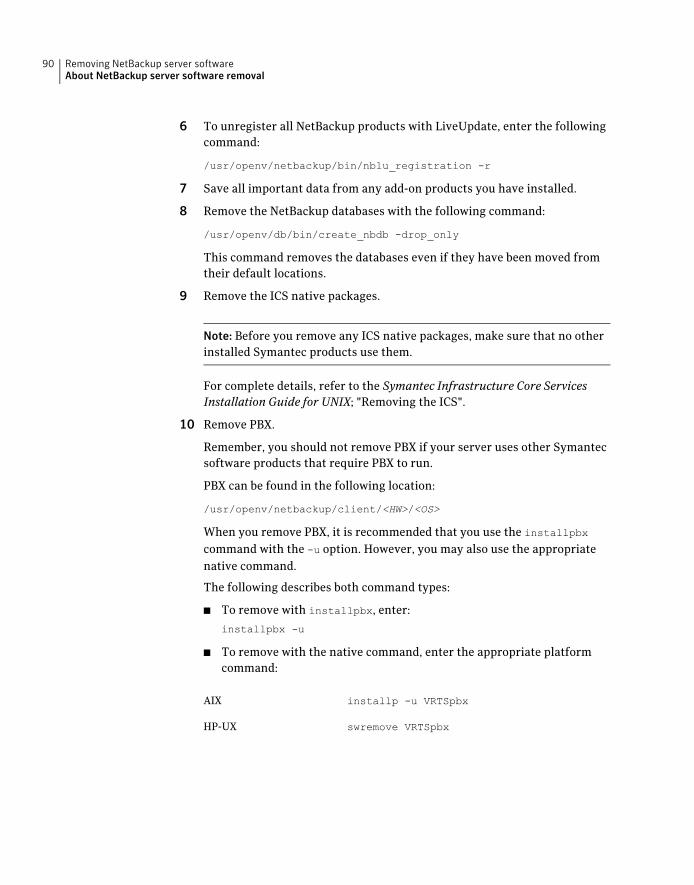
6 To unregister all NetBackup products with LiveUpdate, enter the followingcommand:
/usr/openv/netbackup/bin/nblu_registration -r
7 Save all important data from any add-on products you have installed.
8 Remove the NetBackup databases with the following command:
/usr/openv/db/bin/create_nbdb -drop_only
This command removes the databases even if they have been moved fromtheir default locations.
9 Remove the ICS native packages.
Note: Before you remove any ICS native packages, make sure that no otherinstalled Symantec products use them.
For complete details, refer to the Symantec Infrastructure Core ServicesInstallation Guide for UNIX; "Removing the ICS".
10 Remove PBX.
Remember, you should not remove PBX if your server uses other Symantecsoftware products that require PBX to run.
PBX can be found in the following location:
/usr/openv/netbackup/client/<HW>/<OS>
When you remove PBX, it is recommended that you use the installpbx
command with the -u option. However, you may also use the appropriatenative command.
The following describes both command types:
■ To remove with installpbx, enter:
installpbx -u
■ To remove with the native command, enter the appropriate platformcommand:
installp -u VRTSpbxAIX
swremove VRTSpbxHP-UX
Removing NetBackup server softwareAbout NetBackup server software removal
90
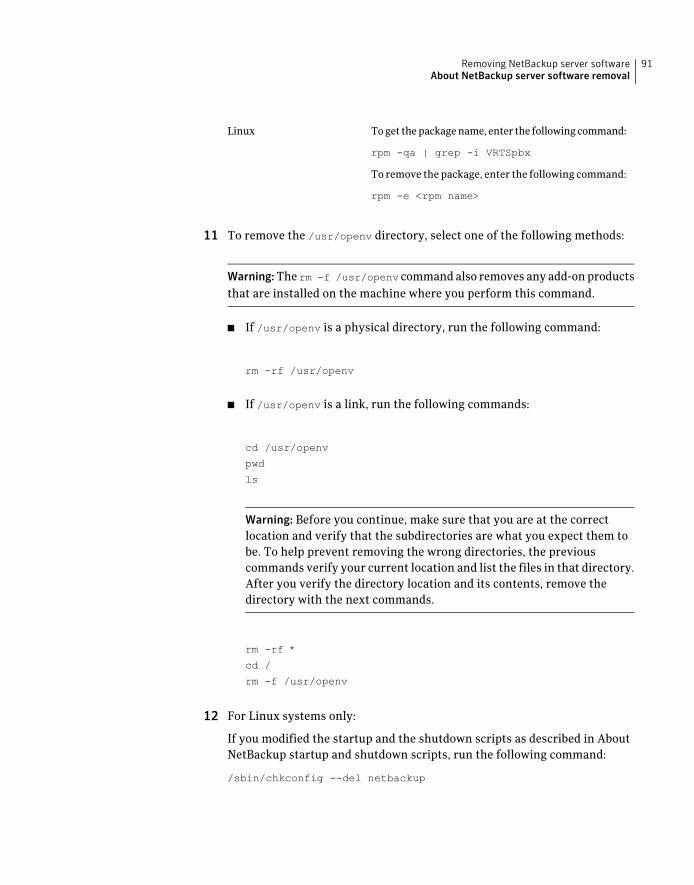
To get the package name, enter the following command:
rpm -qa | grep -i VRTSpbx
To remove the package, enter the following command:
rpm -e <rpm name>
Linux
11 To remove the /usr/openv directory, select one of the following methods:
Warning:The rm -f /usr/openv command also removes any add-on productsthat are installed on the machine where you perform this command.
■ If /usr/openv is a physical directory, run the following command:
rm -rf /usr/openv
■ If /usr/openv is a link, run the following commands:
cd /usr/openv
pwd
ls
Warning: Before you continue, make sure that you are at the correctlocation and verify that the subdirectories are what you expect them tobe. To help prevent removing the wrong directories, the previouscommands verify your current location and list the files in that directory.After you verify the directory location and its contents, remove thedirectory with the next commands.
rm -rf *
cd /
rm -f /usr/openv
12 For Linux systems only:
If you modified the startup and the shutdown scripts as described in AboutNetBackup startup and shutdown scripts, run the following command:
/sbin/chkconfig --del netbackup
91Removing NetBackup server softwareAbout NetBackup server software removal
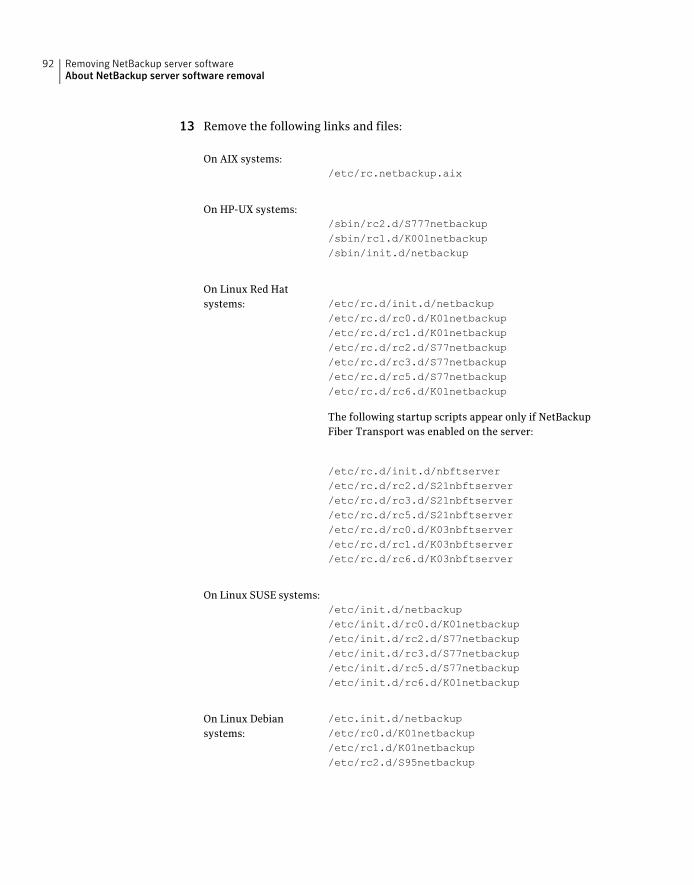
13 Remove the following links and files:
/etc/rc.netbackup.aixOn AIX systems:
/sbin/rc2.d/S777netbackupOn HP-UX systems:
/sbin/rc1.d/K001netbackup/sbin/init.d/netbackup
/etc/rc.d/init.d/netbackupOn Linux Red Hatsystems:
/etc/rc.d/rc0.d/K01netbackup/etc/rc.d/rc1.d/K01netbackup/etc/rc.d/rc2.d/S77netbackup/etc/rc.d/rc3.d/S77netbackup/etc/rc.d/rc5.d/S77netbackup/etc/rc.d/rc6.d/K01netbackup
The following startup scripts appear only if NetBackupFiber Transport was enabled on the server:
/etc/rc.d/init.d/nbftserver/etc/rc.d/rc2.d/S21nbftserver/etc/rc.d/rc3.d/S21nbftserver/etc/rc.d/rc5.d/S21nbftserver/etc/rc.d/rc0.d/K03nbftserver/etc/rc.d/rc1.d/K03nbftserver/etc/rc.d/rc6.d/K03nbftserver
/etc/init.d/netbackupOn Linux SUSE systems:
/etc/init.d/rc0.d/K01netbackup/etc/init.d/rc2.d/S77netbackup/etc/init.d/rc3.d/S77netbackup/etc/init.d/rc5.d/S77netbackup/etc/init.d/rc6.d/K01netbackup
/etc.init.d/netbackup/etc/rc0.d/K01netbackup
On Linux Debiansystems:
/etc/rc1.d/K01netbackup/etc/rc2.d/S95netbackup
Removing NetBackup server softwareAbout NetBackup server software removal
92
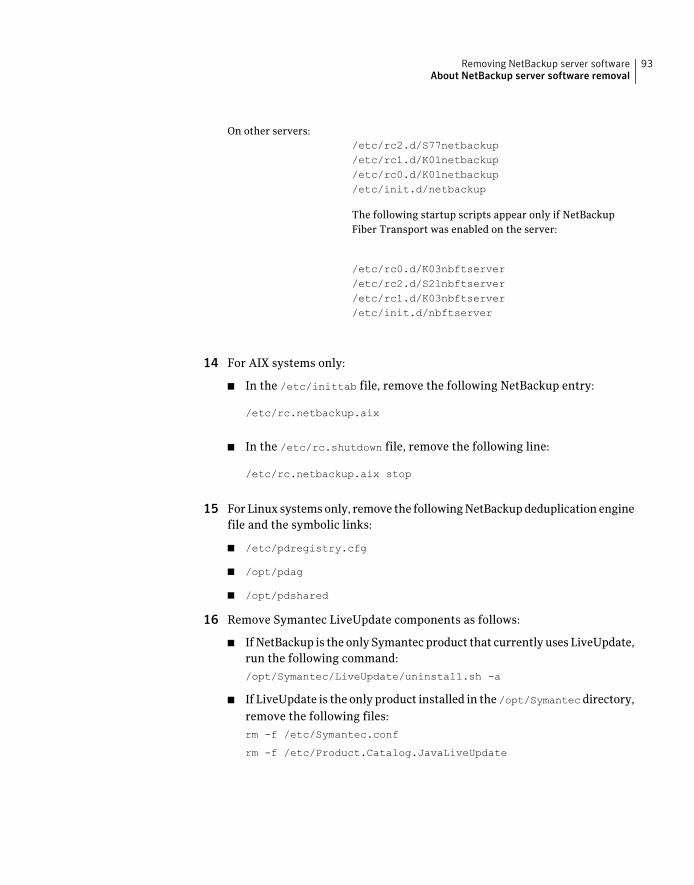
/etc/rc2.d/S77netbackup/etc/rc1.d/K01netbackup/etc/rc0.d/K01netbackup/etc/init.d/netbackup
The following startup scripts appear only if NetBackupFiber Transport was enabled on the server:
/etc/rc0.d/K03nbftserver/etc/rc2.d/S21nbftserver/etc/rc1.d/K03nbftserver/etc/init.d/nbftserver
On other servers:
14 For AIX systems only:
■ In the /etc/inittab file, remove the following NetBackup entry:
/etc/rc.netbackup.aix
■ In the /etc/rc.shutdown file, remove the following line:
/etc/rc.netbackup.aix stop
15 For Linux systems only, remove the following NetBackup deduplication enginefile and the symbolic links:
■ /etc/pdregistry.cfg
■ /opt/pdag
■ /opt/pdshared
16 Remove Symantec LiveUpdate components as follows:
■ If NetBackup is the only Symantec product that currently uses LiveUpdate,run the following command:/opt/Symantec/LiveUpdate/uninstall.sh -a
■ If LiveUpdate is the only product installed in the /opt/Symantecdirectory,remove the following files:rm -f /etc/Symantec.conf
rm -f /etc/Product.Catalog.JavaLiveUpdate
93Removing NetBackup server softwareAbout NetBackup server software removal
17 Run the following commands to remove the NetBackup-Java application statedata for the root account:
/bin/rm -rf /.nbjava
/bin/rm -rf /.java/.userPrefs/vrts
18 Inform NetBackup-Java users that they can remove their $HOME/.nbjavadirectory.
The $HOME/.nbjava and the $HOME/.java directories contain applicationstate information, that is saved when the user exits NetBackup-Javaapplications. The saved information includes table column order and size.The process removes this directory for the root user only.
The common subdirectory in$HOME/.java/.userPrefs/vrts can be removed.
Removing NetBackup server softwareAbout NetBackup server software removal
94
Installing client software
This chapter includes the following topics:
■ About NetBackup client installation
■ About NetBackup client installation on Windows
■ About NetBackup client installation on UNIX
About NetBackup client installationBy definition, NetBackup servers are also clients. When you install NetBackupserver software, client software is also installed.
When you install client software, you perform a true client installation since noserver software is installed.
Client software can be installed locally at each individual computer or remotelyfrom a NetBackup server. The operating system determines which clients can beinstalled remotely.
A Windows host can only push client software to Windowsclients.
NetBackup does not need to be installed on the host that isused to perform the client installation.
Windows
A NetBackup UNIX server can only push client software toUNIX clients.
NetBackup software and client type software must beinstalled on the server that is used to perform the clientinstallation.
UNIX
7Chapter
About NetBackup client installation on WindowsThe NetBackup client installation wizard for Microsoft Windows lets you selectthe appropriate setup and installation options from a series of wizard screens.After you select options, a window appears that lets you verify your selectionsbefore the installation begins.
While the installation is in progress, a dialog box provides details of the installationand the setup progress. When the installation is completed, a final window showsthe results.
Note the following when you install NetBackup client software on Windowssystems:
You cannot install NetBackup client software on thecomputers that currently have NetBackup server software.In these cases, you must first remove the NetBackup serversoftware.
See the NetBackup Installation Guide for Windows..
Client installationrestrictions
■ By default on Windows 2003, 2008, and 2008 R2 Serversystems, only administrators have write permission tothe Program Files directory.
■ NetBackup writes log files and progress files to thefollowing location:
Program Files\VERITAS\NetBackup\Logs
To perform backups and restores with the Backup,Archive, and Restore interface, users must have writepermission to the Logs directory. Users without writepermission to this directory receive an error message,and the backup or restore is canceled. The administratoraccount has write permission by default, but you mustensure that other users also have write permission.
User permissions
Windows client system requirementsThe following describes the hardware and the software requirements for successfulinstallation of NetBackup client software.
Installing client softwareAbout NetBackup client installation on Windows
96
To install NetBackup client software locally, the systemmust meet the following configuration requirements.
■ Microsoft Windows 2003/XP, Windows 2008/Vista, orWindows 2008 R2/Windows 7
■ Any TCP/IP transport that is Windows Socketscompliant. (Use of the TCP/IP transport that comes withthe server or the operating system is recommended.)
■ A network adapter that your TCP/IP transport supports
Local installation
To install NetBackup client software remotely, the systemmust meet the following configuration requirements:
■ All the requirements for local installations must be met.
■ The source system must run Windows 2003, 2008, or2008 R2 Server.
■ Administrator privileges are required for the user thatperforms remote installations.
Remote installation
The NetBackup client version that you install must be thesame or earlier than the installed version of NetBackupserver software. Later client versions cannot be used withearlier server versions.
See “NetBackup mixed version support” on page 14.
NetBackup versioncompatibility
Installation methods for Windows clientsYou can install NetBackup clients on Windows systems with the following methods:
The installation wizard installs the client software only onthe computer where you run the installation.
Local installation
The installation wizard scans the network for availableclients where you can install the client software.
The source computer must run Windows 2003, 2008, or2008 R2 Server.
Also, a remote installation requires system administratorprivileges.
Note: You cannot install clients remotely from NetBackupWindows servers to UNIX computers.
Remote installation
A silent installation is a process that does not requireinteractive input. However, you must edit thesilentclient.cmd file before you run it.
Silent installation
97Installing client softwareAbout NetBackup client installation on Windows
Installing NetBackup Windows clients locallyFollow these instructions to install the NetBackup client software on your localWindows system. You can stop the installation process at any time by clickingCancel or by clicking Back to return to the previous window.
Note:After client installation, you may need to restart the system for the changesto take effect.
To install NetBackup client software locally on Windows systems
1 Log on as administrator on the host where you want to install the clientsoftware.
2 Start the NetBackup Installation Wizard with one of the following methods:
■ DVD mediaInsert the NetBackup for Windows DVD in the drive. If Autorun is disabled,navigate to the DVD drive and run Browser.exe.
■ ESD images (downloaded files)Navigate to the directory where the images reside and run Browser.exe.
3 On the initial screen, select Installation.
4 On the Installation screen, select Client Software Installation.
5 On the Welcome screen, review the content and click Next.
6 On the License Agreement screen, accept the terms of the agreement andclick Next.
7 On the Symantec NetBackup Client Installation Type screen, provide thefollowing information:
For a local installation, select Install to thiscomputeronly.
Where to install
Select this option to install NetBackup default featuresand settings.
Typical
Select this option to choose the NetBackup features toinstall and the settings that you want.
Custom
Click Next.
8 This step applies only to Custom installations. For Typical installations, skipto step 10.
Installing client softwareAbout NetBackup client installation on Windows
98
On the Symantec NetBackup Client Features screen, you can select thefeatures to install and where the NetBackup files are installed.
Click the icon next to any feature and a drop-downmenu appears.
Select Install or Do not install.
Feature List
By default, NetBackup files are installed to thefollowing location:
C:\Program Files\VERITAS
To change the folder destination where NetBackup isinstalled:
■ Click Change.
■ Browse to the preferred location and designate anew or an existing folder.
■ Click Next.
Note: For upgrades, you cannot change the destination.
Destination Folder
9 This step applies only to Custom installations. For Typical installations, skipto the next step.
On the NetBackup Options screen, select from the following options:
Enable or disable the following options:
■ Start NetBackup Client Service AutomaticallyBy default, this option is enabled so that NetBackupservices are available immediately after systemstartup.
■ StartNetBackupClientJobTrackerAutomaticallyBy default, this option is disabled. To start thisoption manually after installation, click Start>AllPrograms > Symantec NetBackup > NetBackupClient Job Tracker.
At System Startup
By default, this option is enabled so that NetBackupservices are available immediately after installation.
To prevent NetBackup services from startingautomatically after installation, click this box to clearthe check mark.
Start NetBackup ClientService After Install
99Installing client softwareAbout NetBackup client installation on Windows
On this screen, you can change port numbers, if it isnecessary in your configuration.
You may need to change a port number if youencounter conflicts when NetBackup and anotherindustry product try to share the same port. Anotherexample is if a port conflict occurs with a firewall,which may cause security issues.
To change a port number, select the port number thatyou want to replace and type the new number.
Ports
Click Next.
10 On the NetBackup Services screen, provide the following startup accountand startup type information for NetBackup client services:
By default, this box is checked so that NetBackup usesthe built-in system account. When this box is checked,the fields below it are disabled.
To specify a different system account:
■ Click this box to remove the check mark.
■ Enter the account information in the followingfields:
UsernamePasswordDomain
Use the built-in systemaccount
This option determines how the installation proceedsif a restart is required as part of the installation orupgrade.
If you select this option and the installation processdetermines that a restart is required, the installation(or upgrade) stops. The system is then rolled back toits original state.
If you do not select this option, the installation (orupgrade) proceeds even if the installation processdetermines that a restart is required.
Abort install if a reboot isrequired
Installing client softwareAbout NetBackup client installation on Windows
100

11 On the NetBackupSystemNames screen, the following fields are populatedautomatically. Normally, changes are not required. Except for the ClientName, you can make changes as needed for your configuration.
Do not change this name.Client Name
If necessary, change this name to the appropriatemaster server where the client backup images are tobe stored.
Master Server Name
Enter all of the master server and media server namesthat you want this client to access.
Additional Servers
12 On the ReadytoInstalltheProgram screen, review the InstallationSummarythat shows your selections from the previous steps. Then select one of thefollowing options:
■ Click Install to start the installation.
■ Click Back to view the previous screens and make any changes, then returnto this screen and click Install.
■ Click Cancel to cancel the installation.
After you click Install, the installation process begins and a screen appearsthat shows you the installation progress. This process may take severalminutes.
13 On the Installation Complete screen, click Finish.
Installing NetBackup Windows clients remotelyUse this procedure to install NetBackup client software to multiple computers onyour network, including the local computer. You can stop the installation processat any time by clicking Cancel.
When you install Windows clients remotely, note the following:
Review the requirements for Windows client installation.
See “Windows client system requirements” on page 96.
Requirements
You must have administrator privileges on the remoteclients for the NetBackup installation to completesuccessfully.
Privileges
101Installing client softwareAbout NetBackup client installation on Windows

During installation, the client name is written to the registryin lowercase. For backups to work, the policies on theNetBackup server must specify the client names inlowercase.
Client name entries
You may need to restart the local or the remote systems forthe changes to take effect. A message appears to alert youif a restart is needed.
Reboot after installation
To install NetBackup client software remotely on Windows systems
1 Log on as administrator on the host or the system server.
2 Start the NetBackup Installation Wizard with one of the following methods:
■ DVD mediaInsert the NetBackup for Windows DVD in the drive. If Autorun is disabled,navigate to the DVD drive and run Browser.exe.
■ ESD images (downloaded files)Navigate to the directory where the images reside and run Browser.exe.
On the initial screen (Home), select Installation.
3 On the Installation screen, select Client Software Installation.
4 On the Welcome screen, review the content and click Next.
5 On the License Agreement screen, accept the terms of the agreement andclick Next.
6 On the Symantec NetBackup Client Installation Type screen, provide thefollowing information:
For remote installation, select Install to multiplecomputers on your network.
The procedure does not install the client on the localhost unless you add it to the list of systems that youwant to install.
Where to install
Select this option to install NetBackup default featuresand settings.
Typical
Select this option to choose the NetBackup features toinstall and the settings that you want.
Custom
7 This step applies only to Custom installations. For Typical installations, skipto the next step.
Installing client softwareAbout NetBackup client installation on Windows
102
On the NetBackup Options screen, select from the following options:
Enable or disable the following options:
■ Start NetBackup Client Service AutomaticallyBy default, this option is enabled so that NetBackupservices are available immediately after systemstartup.
■ StartNetBackupClientJobTrackerAutomaticallyBy default, this option is disabled. To start thisoption manually after installation, click Start>AllPrograms > Symantec NetBackup > NetBackupClient Job Tracker.
At System Startup
By default, this option is enabled so that NetBackupservices are available immediately after installation.
To prevent NetBackup services from startingautomatically after installation, click this box to clearthe check mark.
Start NetBackup ClientService After Install
On this screen, you can change port numbers, if it isnecessary in your configuration.
You may need to change a port number if youencounter conflicts when NetBackup and anotherindustry product try to share the same port. Anotherexample is if a port conflict occurs with a firewall,which may cause security issues.
To change a port number, select the port number thatyou want to replace and type the new number.
Ports
8 On the NetBackup Services screen, provide the following startup accountand startup type information for NetBackup client services:
By default, this box is checked so that NetBackup uses the built-insystem account. When this box is checked, the fields below it aredisabled.
To specify a different system account:
■ Click this box to remove the check mark.
■ Enter the account information in the following fields:
UsernamePasswordDomain
Use the built-insystem account
103Installing client softwareAbout NetBackup client installation on Windows
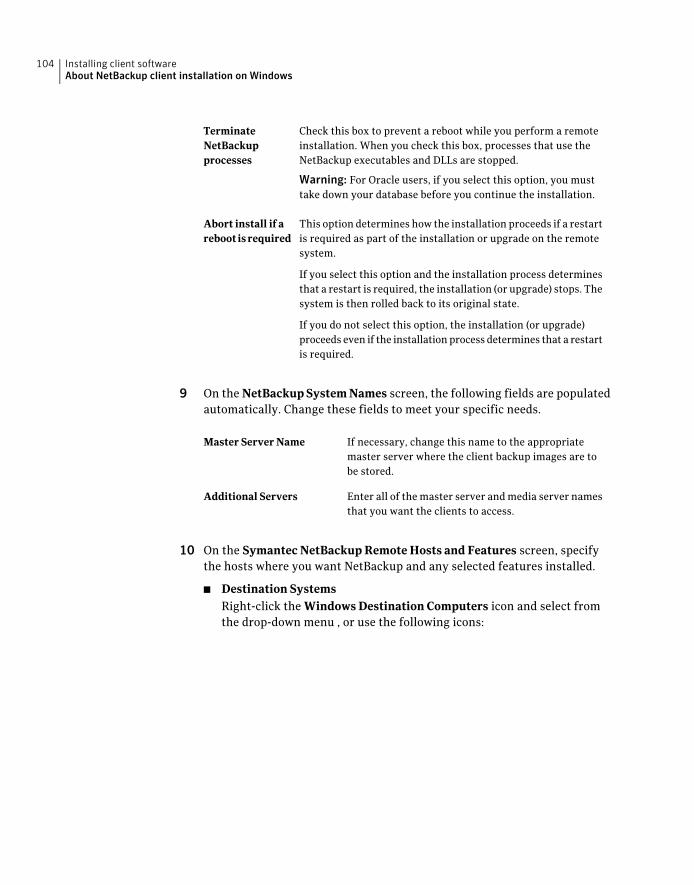
Check this box to prevent a reboot while you perform a remoteinstallation. When you check this box, processes that use theNetBackup executables and DLLs are stopped.
Warning: For Oracle users, if you select this option, you musttake down your database before you continue the installation.
TerminateNetBackupprocesses
This option determines how the installation proceeds if a restartis required as part of the installation or upgrade on the remotesystem.
If you select this option and the installation process determinesthat a restart is required, the installation (or upgrade) stops. Thesystem is then rolled back to its original state.
If you do not select this option, the installation (or upgrade)proceeds even if the installation process determines that a restartis required.
Abort install if areboot isrequired
9 On the NetBackupSystemNames screen, the following fields are populatedautomatically. Change these fields to meet your specific needs.
If necessary, change this name to the appropriatemaster server where the client backup images are tobe stored.
Master Server Name
Enter all of the master server and media server namesthat you want the clients to access.
Additional Servers
10 On the Symantec NetBackup Remote Hosts and Features screen, specifythe hosts where you want NetBackup and any selected features installed.
■ Destination SystemsRight-click the Windows Destination Computers icon and select fromthe drop-down menu , or use the following icons:
Installing client softwareAbout NetBackup client installation on Windows
104
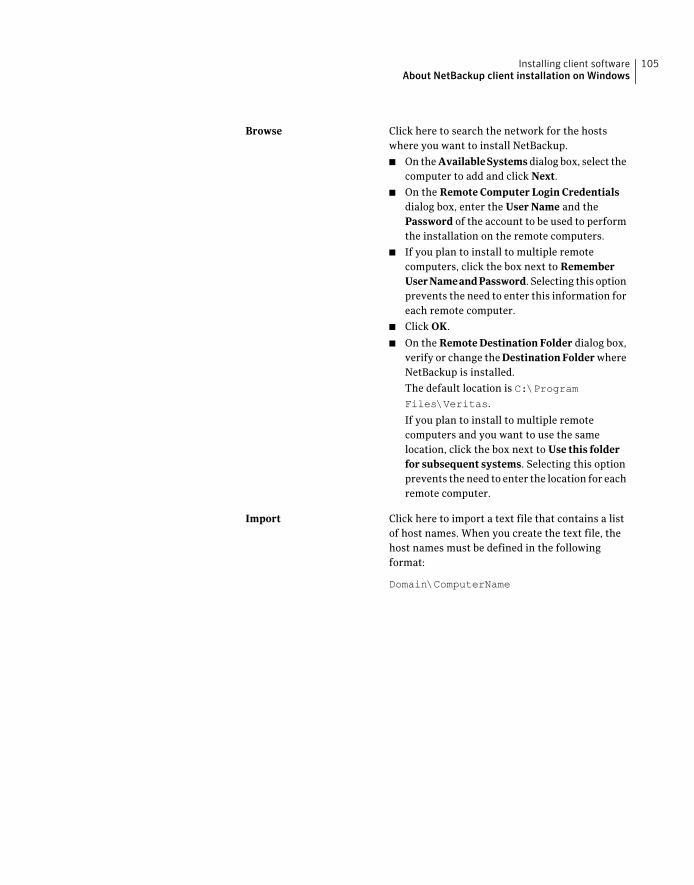
Click here to search the network for the hostswhere you want to install NetBackup.
■ On the AvailableSystems dialog box, select thecomputer to add and click Next.
■ On the Remote Computer Login Credentialsdialog box, enter the User Name and thePassword of the account to be used to performthe installation on the remote computers.
■ If you plan to install to multiple remotecomputers, click the box next to RememberUserNameandPassword. Selecting this optionprevents the need to enter this information foreach remote computer.
■ Click OK.
■ On the Remote Destination Folder dialog box,verify or change the DestinationFolder whereNetBackup is installed.
The default location is C:\ProgramFiles\Veritas.
If you plan to install to multiple remotecomputers and you want to use the samelocation, click the box next to Use this folderfor subsequent systems. Selecting this optionprevents the need to enter the location for eachremote computer.
Browse
Click here to import a text file that contains a listof host names. When you create the text file, thehost names must be defined in the followingformat:
Domain\ComputerName
Import
105Installing client softwareAbout NetBackup client installation on Windows

Click here to add a host manually.
■ On the Manual Remote Computer Selectiondialog box appears, enter the Domain and theComputer Name, then click OK.
■ On the Remote Computer Login Credentialsdialog box, enter the User Name and thePassword of the account to be used to performthe installation on the remote computers.
If you plan to add and install to multiple remotecomputers, click the box next to RememberUserNameandPassword. Selecting this optionprevents the need to enter this information foreach remote computer.
■ Click OK.
■ On the Remote Destination Folder dialog box,verify or change the DestinationFolder whereNetBackup is installed.
The default location is C:\ProgramFiles\Veritas.
If you plan to install to multiple remotecomputers and you want to use the samelocation, click the box next to Use this folderfor subsequent systems. Selecting this optionprevents the need to enter the location for eachremote computer.
■ Click OK.
Add
To remove a host from the Destination Systemslist, select the host and click here.
Remove
Click here to change the destination for NetBackupfile installation on the selected remote host.
Change
■ FeaturesClick a feature icon and select either Install or Do not install from thedrop-down menu .
■ Click Next.
11 On the ReadytoInstalltheProgram screen, review the InstallationSummarythat shows your selections from the previous steps. Then select one of thefollowing options:
■ Click Install to initiate the installation.
■ Click Back to view the previous screens and make any changes, then returnto this screen and click Install.
Installing client softwareAbout NetBackup client installation on Windows
106
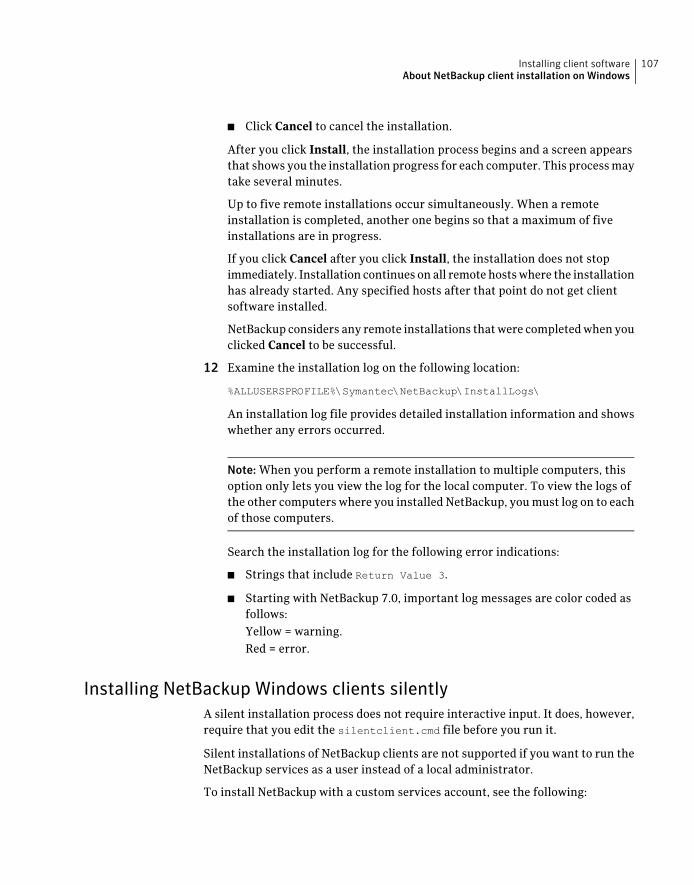
■ Click Cancel to cancel the installation.
After you click Install, the installation process begins and a screen appearsthat shows you the installation progress for each computer. This process maytake several minutes.
Up to five remote installations occur simultaneously. When a remoteinstallation is completed, another one begins so that a maximum of fiveinstallations are in progress.
If you click Cancel after you click Install, the installation does not stopimmediately. Installation continues on all remote hosts where the installationhas already started. Any specified hosts after that point do not get clientsoftware installed.
NetBackup considers any remote installations that were completed when youclicked Cancel to be successful.
12 Examine the installation log on the following location:
%ALLUSERSPROFILE%\Symantec\NetBackup\InstallLogs\
An installation log file provides detailed installation information and showswhether any errors occurred.
Note: When you perform a remote installation to multiple computers, thisoption only lets you view the log for the local computer. To view the logs ofthe other computers where you installed NetBackup, you must log on to eachof those computers.
Search the installation log for the following error indications:
■ Strings that include Return Value 3.
■ Starting with NetBackup 7.0, important log messages are color coded asfollows:Yellow = warning.Red = error.
Installing NetBackup Windows clients silentlyA silent installation process does not require interactive input. It does, however,require that you edit the silentclient.cmd file before you run it.
Silent installations of NetBackup clients are not supported if you want to run theNetBackup services as a user instead of a local administrator.
To install NetBackup with a custom services account, see the following:
107Installing client softwareAbout NetBackup client installation on Windows
Installing NetBackup Windows clients locally
Installing NetBackup Windows clients remotely
Use the following procedure to perform a silent installation of a local NetBackupclient.
To perform a silent installation of NetBackup client software on Windows
1 Insert the NetBackup installation DVD in the drive or navigate to the locationwhere the ESD images (downloaded files) reside.
2 In a Microsoft Windows Explorer window, navigate to the DVD drive.
3 Copy the contents of the one of the following directories to a temporary folderon your hard drive. For example, C:\temp.
■ PC_Clnt\x86
■ PC_Clnt\x64
■ PC_Clnt\IA64
4 Since the original source files are read-only, change the permissions for thecopied files on the hard drive to allow the update.
5 In the temporary directory, use a text editor to edit the silentclient.cmd
file so the script installs the client software as needed.
6 Run the silentclient.cmd script.
7 To verify that the installation was successful, check the installation log filein the following directory:
%ALLUSERSPROFILE%\Symantec\NetBackup\InstallLogs
How to configure NetBackup clientsYou can configure NetBackup clients by performing one of the following actions:
■ Start the Backup, Archive, and Restore interface.
■ Click File > Specify NetBackup Machines.
To add servers or mediaservers:
■ Start the Backup, Archive, and Restore interface.
■ Click File > NetBackup Client Properties.
To display and change theclient properties:
Installing client softwareAbout NetBackup client installation on Windows
108
■ Open the NetBackup Administration Console.
■ Expand Host Properties and click Clients.
■ In the right pane, right-click on the client and chooseProperties.
In the dialog box that appears, on the Servers tab, allNetBackup servers that require access to your Windowsclient must be listed.
To display and change theserver properties:
For complete information on client configuration, see the NetBackupAdministration Guide, Volume I.
Note: For NetBackup Novell NetWare Clients: The NetBackup Novell NetWareClient System Administrator's Guide describes how to use that client to back upand restore the data on NetWare servers.
Removing NetBackup Windows client softwareUse the following procedure to remove NetBackup Windows client software.
To remove NetBackup Windows client software
1 If it is open, close the NetBackup Administration Console.
2 Open the Windows Control Panel (select Start > Settings > Control Panel).
3 Select Add/Remove Programs.
4 Select Symantec NetBackup Client.
5 Click Remove.
About NetBackup client installation on UNIXYou can install UNIX clients either locally at the client computer or remotely fromyour UNIX NetBackup server. To install client software remotely from a UNIXNetBackup server, the client type software must first be installed on the UNIXserver.
Note:Macintosh OS X 10.5.x clients are UNIX-based clients. Follow the same UNIXclient installation procedures in this section.
Note the following when you install NetBackup client software on UNIX systems:
109Installing client softwareAbout NetBackup client installation on UNIX

Starting with NetBackup 7.0, many of the add-on productsand database agents are now installed with the NetBackupclient package. Separate installation for these products isno longer needed.
The following products are now included in the NetBackupclient package (if the platform supports the product):
■ BMR Boot server
■ DB2
■ NetBackup Encryption
■ Informix
■ LiveUpdate agent
■ Lotus Notes
■ Oracle
■ SAP
■ Snapshot Client
■ Sybase
The binaries for the listed products are laid down with theclient package. A valid license is still required to enable theproduct. If product configuration was required previously(such as db2_config), configuration is still required.
The Japanese and the Chinese language packages remainas separate add-ons. The process to install and upgradethese products remains the same.
UNIX package consolidation
The gzip and the gunzip commands must be installed oneach system. The directories where the commands areinstalled must be part of the root user’s PATH environmentvariable setting.
gzipandgunzipcommands
To initiate a backup or a restore from a UNIX client, thefollowing graphical interfaces are available:
■ Clients that are compatible with NetBackup-Java mayuse the NetBackup-Java interface (jbpSA).
Refer to the for a list of NetBackup-Java capable hosts.
■ Clients that are not compatible with NetBackup-Java canuse the bp interface. They also support a login from anyNetBackup 7.0 UNIX server’s NetBackup client consolewith the jbpSA command.
Clients that are not compatible with NetBackup-Java areMacintosh OS X 10.5.x, IBM zSeries Linux, IBM pSeriesLinux, and FreeBSD.
NetBackup-Javacompatibility
Installing client softwareAbout NetBackup client installation on UNIX
110
Installation methods for UNIX clientsYou can install NetBackup clients on UNIX systems with the following methods:
■ This method installs the client software on the computerwhere you run the installation script.
■ To install clients to a location other than the default,you must create and link a directory before you installthe client software. First create the directory where youwant the software to reside, then create /usr/openvas a link to that directory.
■ On IBM zSeries Linux clients, you must transfer theNetBackup DVD or ESD image contents to a location thatis readable by the virtual Linux environment. You cantransfer the image with FTP or NFS mountingcommands.
Local installations
■ You can "push" the client software from your UNIXNetBackup server to your UNIX client computers. TheUNIX client must be a true client and not a media serveror a master server. The preferred installation method isto push the client software.
■ Before you can push to a UNIX client, you must firstinstall the NetBackup client type software on the server.Then, you must create a policy that includes the clientname.
See “Installing client type software on a master server”on page 50.
■ You cannot install Windows client software remotelyfrom a NetBackup UNIX server. Firewalls can alsoprevent remote client installation.
■ Clients such as the IBM zSeries Linux may not have alocally mounted DVD device or access to the NetBackupDVD or ESD images, In these cases, you must push theclient software from a UNIX master server or a mediaserver.
■ The following remote installation methods are available:
See “Installing client software with the ftp method”on page 115.
See “Installing client software with the rsh method”on page 113.
See “Installing client software with the ssh method”on page 116.
See “Installing client software with the sftp method”on page 117.
Remote (push) installations
111Installing client softwareAbout NetBackup client installation on UNIX
Installing UNIX clients locallyThe following procedure installs the NetBackup client software on a local machine.
To install client software locally on a UNIX client
1 Use one of the following methods to start the installation script:
■ Insert the NetBackup DVD for the appropriateplatform in the drive.
Check the DVD label to identify its contents.
See “About the NetBackup media kit” on page 15.
■ If necessary, mount the DVD.
See “Mounting the software media” on page 37.
■ Enter the following command:
cd_directory/install
The cd_directory is the path to the directory whereyou can access the DVD.
DVD
■ Navigate to the location where the installationimages reside.
■ Enter the following command:
./install
ESD images (downloadedfiles)
2 When the menu selections appear, select NetBackupClient and press Enter.
The client binaries represent the operating system versions where the binarieswere compiled. Often, the binaries function perfectly on later versions of theoperating system. For example, HP-PARISC 11.11 binaries also are used onthe HP-PARISC 11.23 level of the operating system. The installation procedureattempts to load the appropriate binaries for your system. If the script doesnot recognize the local operating system, it presents choices.
3 Follow the prompts to complete the installation.
4 After the installation is complete, select Exit from this script.
Installing UNIX clients remotelyYou can push the client software from a UNIX master server to a client host byusing the following methods:
■ rsh
■ ftp
Installing client softwareAbout NetBackup client installation on UNIX
112
■ ssh
■ sftp
Note: For installation in clustered environments, enter the virtual name for theNetBackup server and not the actual local host name. You can only push clientsoftware from the active node.
Installing client software with the rshmethod
Before you perform this procedure, read the following guidelines:
To use this method, the UNIX client must have an entry forthe server in its /.rhosts file. The /.rhosts entriesenable software installation, but they are not necessary forcorrect operation of NetBackup software.
Client ./rhosts file
If you want to install client software to a location other thanthe default, you must first create and link to the desireddirectory. Create the directory where you want the clientsoftware to reside, and then create /usr/openv as a linkto that directory.
Client software location
Make sure that the clients are assigned to a backup policy.Backup policies
By default, this operating system version does not enablethe Remote Shell daemon (rshd). Run the followingcommand to enable the daemon:
/sbin/service shell start
For Macintosh OS X 10.5.x
To install client software from a UNIX master server to UNIX clients with the rshmethod
1 Start the NetBackup Administration Console.
2 On the Login dialog box, provide the name of the NetBackup server thatcontains the policy configuration with the clients.
You can install the client software only from the NetBackup server that youspecify in the Login dialog box when you start the interface. The clients mustbe defined in a policy on this NetBackup server.
3 In the NetBackupAdministrationConsole window, click on the NetBackupManagement icon to show the available options.
4 In the left pane, click Policies.
113Installing client softwareAbout NetBackup client installation on UNIX
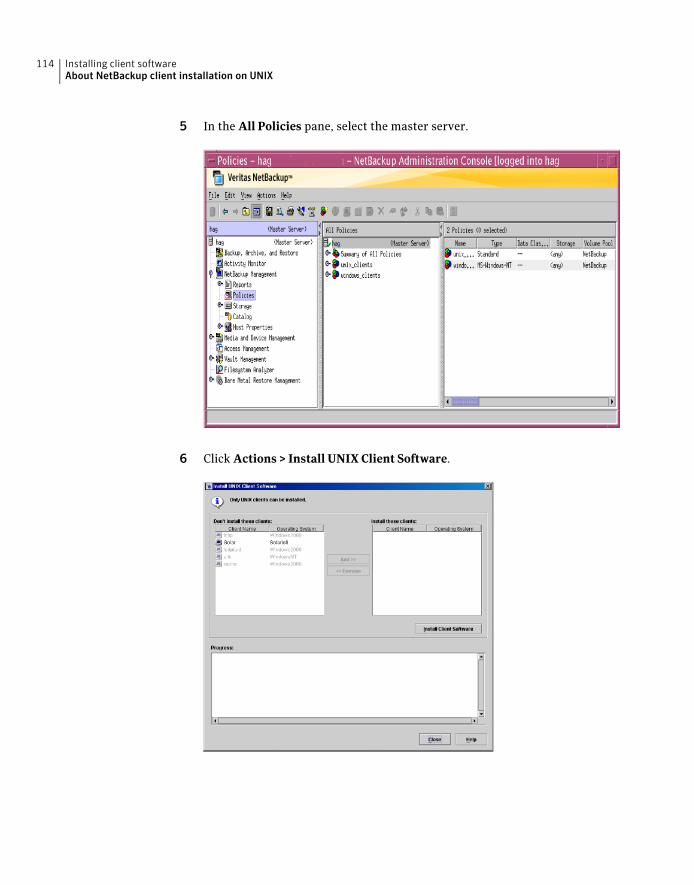
5 In the All Policies pane, select the master server.
6 Click Actions > Install UNIX Client Software.
Installing client softwareAbout NetBackup client installation on UNIX
114

7 In the Don’t install these clients list, select the clients you want to installand click Add >>.
The clients are moved to the Install these clients list.
8 To start the installation, click Install Client Software.
You cannot stop the installation after it has started.
Client software installation can take a minute or more per client. NetBackupwrites messages in the Progress field as the installation proceeds.
During installation, NetBackup copies client software from/usr/openv/netbackup/client on the server to /usr/openv/netbackup onthe client.
If the installation fails on a client, NetBackup notifies you but keeps the clientin the policy.
9 After the installation is complete, click Close.
Installing client software with the ftp methodBefore you perform this procedure, read the following guidelines:
You must have a login ID and password that you can use toaccess the clients through FTP.
Access to clients
If you want to install client software to a location other thanthe default, you must first create and link the desireddirectory. Create the directory where you want the softwareto reside, and then create /usr/openv as a link to thatdirectory.
Client software location
Make sure that the clients are assigned to a backup policy.Backup policies
■ By default, this operating system version does not enablethe FTP daemon (ftpd), which is required. In the sharingpane of the SystemPreferences application, check AllowFTP access to enable ftpd.
■ If you have a firewall that is enabled, you must enableFTP access. In the System Preferences sharing paneunder Firewall, check FTP Access to allow FTPconnections.
Macintosh OS X 10.5.x
To install client software from a UNIX master server to UNIX clients with the ftpmethod
1 To move the client software from the server to the /tmp directory on theclient, run the install_client_files script on the NetBackup server.
115Installing client softwareAbout NetBackup client installation on UNIX

Use one of the following commands:
■ To move software to one client at a time:/usr/openv/netbackup/bin/install_client_files ftp client user
The client is the host name of the client.
The user is the login ID that FTP requires on the client.
■ To move software to all clients at once:/usr/openv/netbackup/bin/install_client_files ftp ALL user
The ALL option specifies that you want to install all clients that areconfigured in any backup policy on the server.The user is the login ID required by FTP on the client.
If you do not have a .netrc file set up, the install_client_files scriptprompts you for a password for each client.
2 After the script runs, the root user on each client computer must run thefollowing script:
sh /tmp/bp.<pid>/client_config
The pid is the process ID. The client_config script installs the binaries.
Installing client software with the ssh methodBefore you perform this procedure, read the following guidelines:
To use the ssh method, the UNIX client must have sshdenabled and configured to allow root user logins.
SSH daemon (sshd)
If you want to install client software to a location other thanthe default, you must first create and link the desireddirectory. Create the directory where you want the clientsoftware to reside, and then create /usr/openv as a linkto that directory.
Client software location
Make sure that the clients are assigned to a backup policy.Backup policies
■ By default, this operating system version does not enablesshd. You must first enable this daemon to perform thefollowing procedure successfully.
In the SystemPreferences sharing pane, check RemoteLogin to enable sshd.
■ If you have a firewall that is enabled, you must enablessh connections. In the System Preferences sharingpane under Firewall, check RemoteLogin-SSH to allowSSH connections.
Macintosh OS X 10.5.x
Installing client softwareAbout NetBackup client installation on UNIX
116

To install client software from a UNIX master server to UNIX clients with the sshmethod
◆ On the NetBackup server, run the install_client_files script.
Use one of the following commands:
■ To move software to only one client at a time:/usr/openv/netbackup/bin/install_client_files ssh client
The client is the host name of the client.
■ To move software to all clients at once:/usr/openv/netbackup/bin/install_client_files ssh ALL
The ALL option specifies that you want to install all clients that areconfigured in any backup policy on the server.
Installing client software with the sftpmethod
Before you perform this procedure, read the following guidelines:
To use this method, the UNIX client must havesshd enabledand configured to allow root or non-root user logins.
SSH daemon (sshd)
If you want to install client software to a location other thanthe default, you must first create and link the desireddirectory. Create the directory where you want the softwareto reside, and then create /usr/openv as a link to thatdirectory.
Client file location
Make sure that the clients are assigned to a backup policy.Backup policies
■ By default, these operating system versions do not enablessh. You must first enable this daemon to perform thefollowing procedure successfully.
In the SystemPreferences sharing pane, check RemoteLogin to enable sshd.
■ If you have a firewall that is enabled, you must enableSSH connections.In the System Preferences sharingpane under Firewall, check RemoteLogin-SSH to allowSSH connections.
Macintosh OS X 10.5.x
To install client software from a UNIX master server to UNIX clients with the sftpmethod
1 To move the client software from the server to the /tmp directory on theclient, run the install_client_files script on the NetBackup server.
Use one of the following commands:
117Installing client softwareAbout NetBackup client installation on UNIX
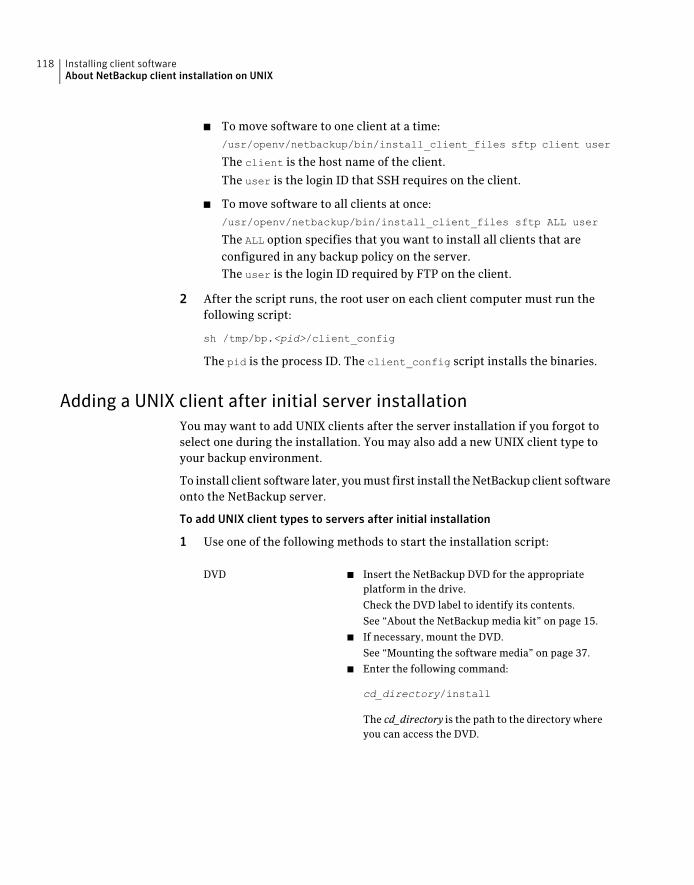
■ To move software to one client at a time:/usr/openv/netbackup/bin/install_client_files sftp client user
The client is the host name of the client.
The user is the login ID that SSH requires on the client.
■ To move software to all clients at once:/usr/openv/netbackup/bin/install_client_files sftp ALL user
The ALL option specifies that you want to install all clients that areconfigured in any backup policy on the server.The user is the login ID required by FTP on the client.
2 After the script runs, the root user on each client computer must run thefollowing script:
sh /tmp/bp.<pid>/client_config
The pid is the process ID. The client_config script installs the binaries.
Adding a UNIX client after initial server installationYou may want to add UNIX clients after the server installation if you forgot toselect one during the installation. You may also add a new UNIX client type toyour backup environment.
To install client software later, you must first install the NetBackup client softwareonto the NetBackup server.
To add UNIX client types to servers after initial installation
1 Use one of the following methods to start the installation script:
■ Insert the NetBackup DVD for the appropriateplatform in the drive.
Check the DVD label to identify its contents.
See “About the NetBackup media kit” on page 15.
■ If necessary, mount the DVD.
See “Mounting the software media” on page 37.
■ Enter the following command:
cd_directory/install
The cd_directory is the path to the directory whereyou can access the DVD.
DVD
Installing client softwareAbout NetBackup client installation on UNIX
118
■ Navigate to the location where the installationimages reside.
■ Enter the following command:
./install
ESD images (downloadedfiles)
2 When the menu selections appear, select NetBackupClient and press Enter.
The client binaries represent the operating system versions on which thebinaries were compiled. Often the binaries function perfectly on later versionsof the operating system. For example, HP-PARISC 11.11 binaries also areused on the HP-PARISC 11.23 level of the operating system. The installationprocedure attempts to load the appropriate binaries for your system. If thescript does not recognize the local operating system, it presents choices.
3 Select the client type that you want to load and follow the prompts to installthat client type. Repeat as necessary until all of the client types you want areloaded.
Make sure that you load the software for all of the UNIX client types that youintend to install remotely from the server.
4 After the installation is complete, unmount the DVD.
5 Install the NetBackup client software on the clients you specified.
See “Installing UNIX clients remotely” on page 112.
Removing UNIX NetBackup client softwareUse the following procedure to remove all NetBackup client software componentsfrom a UNIX client.
If the NetBackup-Java Display Console is installed on the client, the console isalso removed.
To remove NetBackup software from a UNIX client
1 Log in to the client system as the root user.
2 Stop the NetBackup daemons by entering the following command:
/usr/openv/netbackup/bin/bp.kill_all
3 Navigate to the /usr/openv directory.
■ If /usr/openv is a physical directory, run the following command:
rm -rf /usr/openv
■ If /usr/openv is a link, run the following commands:
119Installing client softwareAbout NetBackup client installation on UNIX
cd /usr/openv
pwd
ls
Warning:Make sure that you are at the proper location and verify that thesubdirectories are what you would expect them to be before continuing.You do not want to remove the wrong directories. For this reason, the firstcommands verify your current location and the files in that directory,before you remove the files.
rm -rf *
cd /
rm -f /usr/openv
Warning: The rm -f /usr/openv command also removes any add-onproducts that are installed on this machine.
4 If PBX is supported and installed on the client, you can remove it.
Do not remove PBX if your client uses other Symantec software products thatrequire PBX to run.
To remove PBX with the native command, enter the appropriate platformcommand:
installp -u VRTSpbxAIX
swremove VRTSpbxHP-UX
To get the package name, enter the following command:
rpm -qa | grep -i VRTSpbx
To remove the package, enter the following command:
rpm -e <rpm name>
Linux
5 For the NetBackup-Java capable clients that run the NetBackup AdministrationConsole for UNIX, remove the NetBackup-Java state data, as follows:
■ /bin/rm -rf /.nbjava
■ /bin/rm -rf /.java/.userPrefs/vrts
Installing client softwareAbout NetBackup client installation on UNIX
120

Warning: There should be no space between the slash (/) and the period (.) of/.nbjava. If you add a space between these characters, all files on this machineare removed.
6 Inform users of NetBackup-Java that they can remove the $HOME/.nbjava
directory and portions of the $HOME/.java directories.
The $HOME/.nbjava and $HOME/.java directories contain application stateinformation (such as table column order and size). This information is savedwhen the user exits NetBackup-Java applications. When you removeNetBackup, the process removes this directory only for the root user.
The common subdirectory in $HOME/.java/.userPrefs/vrts can be removed.
7 If you enabled NetBackup Access Control, NetBackup created new files onthe clients and the servers that can be divided into the following categories:
■ Individual user filesIndividual user cache files exist in their home directories (for example, in$HOME/.vxss). Inform those users that they can remove the $HOME/.vxssdirectory.
■ NetBackup application temporary filesNetBackup temporary files are removed with NetBackup.For more information on NetBackup Access Control, please see theNetBackup Security and Encryption Guide.
121Installing client softwareAbout NetBackup client installation on UNIX

Installing client softwareAbout NetBackup client installation on UNIX
122
Configuring NetBackupservers
This chapter includes the following topics:
■ About NetBackup startup and shutdown scripts
■ About NetBackup configuration
About NetBackup startup and shutdown scriptsWhen you install NetBackup, the installation script also performs configurationof startup and shutdown scripts. Startup scripts allow the Media Manager andNetBackup daemons to start automatically when the system boots. Shutdownscripts automatically terminate the startup scripts at system shutdown.
The installation process copies the NetBackup startup and shutdown scripts tothe appropriate operating system location.
For non-cluster upgrades, any existing NetBackup related startup and shutdownscripts are saved, and the newly released versions of those scripts are installed.
For clustered environments, all of the startup and the shutdown scripts areremoved from the rc directories. Clustered NetBackup environments do not usethese scripts.
Table 8-1 lists the links for the startup and the shutdown scripts for the variousplatforms that are installed during NetBackup installation.
8Chapter
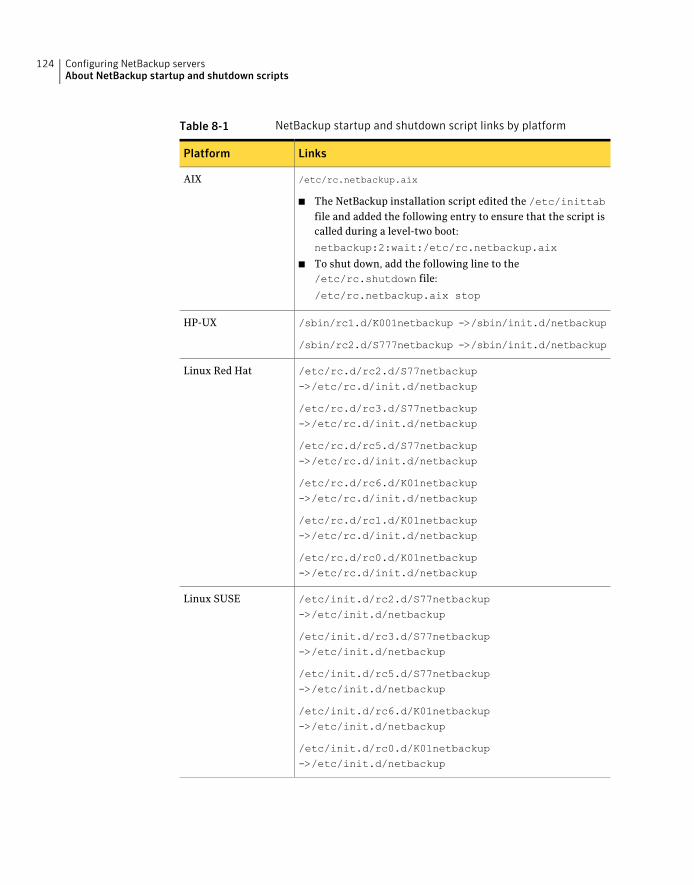
Table 8-1 NetBackup startup and shutdown script links by platform
LinksPlatform
/etc/rc.netbackup.aix
■ The NetBackup installation script edited the /etc/inittabfile and added the following entry to ensure that the script iscalled during a level-two boot:
netbackup:2:wait:/etc/rc.netbackup.aix
■ To shut down, add the following line to the/etc/rc.shutdown file:
/etc/rc.netbackup.aix stop
AIX
/sbin/rc1.d/K001netbackup ->/sbin/init.d/netbackup
/sbin/rc2.d/S777netbackup ->/sbin/init.d/netbackup
HP-UX
/etc/rc.d/rc2.d/S77netbackup
->/etc/rc.d/init.d/netbackup
/etc/rc.d/rc3.d/S77netbackup
->/etc/rc.d/init.d/netbackup
/etc/rc.d/rc5.d/S77netbackup
->/etc/rc.d/init.d/netbackup
/etc/rc.d/rc6.d/K01netbackup
->/etc/rc.d/init.d/netbackup
/etc/rc.d/rc1.d/K01netbackup
->/etc/rc.d/init.d/netbackup
/etc/rc.d/rc0.d/K01netbackup
->/etc/rc.d/init.d/netbackup
Linux Red Hat
/etc/init.d/rc2.d/S77netbackup
->/etc/init.d/netbackup
/etc/init.d/rc3.d/S77netbackup
->/etc/init.d/netbackup
/etc/init.d/rc5.d/S77netbackup
->/etc/init.d/netbackup
/etc/init.d/rc6.d/K01netbackup
->/etc/init.d/netbackup
/etc/init.d/rc0.d/K01netbackup
->/etc/init.d/netbackup
Linux SUSE
Configuring NetBackup serversAbout NetBackup startup and shutdown scripts
124

Table 8-1 NetBackup startup and shutdown script links by platform (continued)
LinksPlatform
/etc/rc0.d/K01netbackup ->/etc/init.d/netbackup
/etc/rc1.d/K01netbackup ->/etc/init.d/netbackup
/etc/rc2.d/S95netbackup ->/etc/init.d/netbackup
Linux Debian
/usr/local/etc/rc.d/S77netbackup.sh
->/usr/local/etc/netbackup
FreeBSD
/Library/StartupItems/netbackup/Resources/netbackupMac
/etc/rc2.d/S77netbackup ->/etc/init.d/netbackup
/etc/rc1.d/K01netbackup ->/etc/init.d/netbackup
/etc/rc0.d/K01netbackup ->/etc/init.d/netbackup
Solaris
About NetBackup configurationAfter all server software is installed, you are ready to configure NetBackup towork with the robotic and the storage devices in your environment. Remember,these devices must already be configured and recognized by the operating systembefore you can configure NetBackup.
See “About storage device configuration” on page 21.
Use the following guidelines when you configure NetBackup:
The procedures for configuring master and media serversare very similar. However, Symantec recommends that youconfigure all server information such as storage devicesand volumes from the master server. Following this orderhelps ensure that the master servers properly administerthe media servers.
Warning: Communication problems between the masterserver and the media server do not prevent you fromrunning the configuration wizards. Therefore, do not runthe wizards on the media server until the problems arecorrected. If you run any of the wizards when acommunication problem exists, the master server cannotrecognize the information that you enter. You must firstcorrect the problem. After you correct the problem, run theconfiguration wizards from the master server.
NetBackup Enterpriseservers
125Configuring NetBackup serversAbout NetBackup configuration
■ Configure devices on every node in the cluster.
■ Start by configuring all storage devices from the activenode so that they work with NetBackup.
■ For a NetBackup failover server, attach all of the devicesto each node in the cluster on which NetBackup isinstalled. Refer to the clustering vendor’s documentationfor information on how to migrate to another node.
■ Unless otherwise noted, configure NetBackup to use thevirtual host names of master servers and media serversin the cluster.
For complete information on to how to configure anadd-on product to fail over, see the NetBackup HighAvailability Administration Guide.
Clustered environments
For initial NetBackup configuration, Symantec recommends that you launch theNetBackup Administration Console and click the Getting Started icon. A seriesof wizards guide you through the following configuration procedures:
■ Configure Storage DevicesSee “About the Device Configuration Wizard” on page 127.
■ Configure VolumesSee “About the Volume Configuration Wizard” on page 129.
■ Configure the Catalog BackupSee “About the Catalog Backup Wizard” on page 130.
■ Create a Backup PolicySee “About the Backup Policy Configuration Wizard” on page 131.
If NetBackup is already configured and you want to change a specific area, clickthe appropriate wizard on the NetBackup Administration Console.
For complete information on NetBackup wizards and how to configure NetBackup,see the NetBackup Administration Guide.
Starting the NetBackup Administration ConsoleUse the following procedures to open the NetBackup Administration Console toconfigure NetBackup.
Note: Other wizards are available from the initial NetBackup AdministrationConsole window that are not part of the Getting Started wizard. For example, youcan configure disk pools or create a snapshot backup policy. See the NetBackupAdministrator’s Guide for UNIX and Linux, Volume I for complete informationabout all NetBackup wizards.
Configuring NetBackup serversAbout NetBackup configuration
126
To start the NetBackup Administration Console on UNIX
1 Log in to the NetBackup server machine as root.
For clustered environments, log on to the active node as root.
If you need to run the user interface on a computer other than the NetBackupserver, log on to that computer.
On UNIX systems, log on as root.
For Windows systems log on as the Administrator.
2 On UNIX systems, run the following command:
/usr/openv/netbackup/bin/jnbSA &
3 Enter the password for root.
For clustered environments, when you log in to the NetBackup AdministrationConsole, specify the virtual host name in the Host field.
4 Click Login.
5 To begin configuration, on the Administrator’s Console, click GettingStarted.
6 On the Welcome to NetBackup screen, review the content and click Next.
The ConfigureStorageDevices screen appears and prompts you to begin theDevice Configuration wizard.
Note: If you still need to configure devices to work with the operating system,close the wizard. You must first configure those devices as specified by thedevice and operating system vendors.
About the Device Configuration WizardBefore you can run backups, you must define your storage devices for NetBackup.This wizard guides you through this process. However, you must be certain thatyou have correctly configured your storage devices for your operating system.NetBackup cannot function reliably unless devices are correctly installed andconfigured.
For clustered environments, begin configuring all storage devices from the activenode. For a NetBackup failover server, Symantec recommends that you attach allof the devices to every node on which NetBackup is installed.
For instructions, refer to the NetBackup High Availability Administration Guide
This wizard takes you through the following processes:
127Configuring NetBackup serversAbout NetBackup configuration
■ Scans the hosts for backup devices
■ Verifies the devices that were automatically detected
■ Verifies and corrects the drive configuration
■ Updates the device configuration
The wizard presents the following information when you configure devices:
■ When the wizard displays the DeviceHosts screen, youmust specify the hosts on which to auto-discover andconfigure devices (NetBackup Enterprise servers only).
■ When the wizard displays the Backup Devices screen,confirm that the list of devices is complete and accurate.If a known backup device does not appear in this list,take the following action:
■ Verify that the backup device is physically attachedto the host.
■ Verify that all installation procedures specified bythe device and by the operating system vendor havebeen performed successfully.
■ Verify that all drives correspond to the proper device.If you need to move a drive, select the drive and dragit to the correct location.
■ For clusters, ensure that you perform storage deviceconfiguration on each node. Begin on the active node,then move the NetBackup active node to another nodeand perform the storage device configuration on thatnode. Repeat for each node of the cluster on whichNetBackup runs.
Note:By default, robotic daemons and NetBackup add-onproducts do not cause NetBackup to failover if they fail.You can configure robotic devices and NetBackup add-onproducts to fail over NetBackup if the robot or the add-onproduct fails. Before you configure NetBackup to failover,robots must be configured and recognized by theoperating system. For complete details about fail overconfiguration, refer to the NetBackup High AvailabilityAdministrator’s Guide.
Device configuration
Configuring NetBackup serversAbout NetBackup configuration
128
■ You define storage units from the Configure StorageUnits screen. If your system does not have a tape device,you can store data on a disk by defining disk storageunits.
■ When you enter a path for a storage unit, the followingrules apply:
■ Use the correct path separators (forward slash (/) forUNIX and backward slash (\) for Windows).
■ Use a colon (:) to specify a drive separation onWindows platforms.
■ Use the following characters only:
Alphabetic characters (ASCII A-Z, a-z)
Numeric characters (0-9)
Miscellaneous characters: plus (+), minus (-),underscore (_), or period (.)
Defining storage units
About the Volume Configuration WizardAfter you have configured your storage devices, the Getting Started Wizard startsthe Volume Configuration Wizard. However, if you only have disk storagecapability, NetBackup skips this wizard.
This wizard lets you initiate an inventory of each configured robot. NetBackupautomatically updates the volume database if it finds new robotic media duringthe inventory. In addition, you can define new volumes for use in stand-alonedrives.
For complete information about volumes or volume configuration for stand-alonedrives, refer to the NetBackup Administrator's Guide, Volume 1.
Note: For clustered environments, configure volumes from the active node.
This wizard lets you do the following tasks:
■ Select a device for volume configuration
■ Perform an inventory of the robot
■ Create new volumes
■ Create new volume groups
The wizard presents the following information when you configure volumes andperform inventory:
129Configuring NetBackup serversAbout NetBackup configuration
■ NetBackup conducts an inventory of the robot or thedevice that you selected. To view the results after theinventory has completed, see the Results: field.
■ After the device inventory has completed, the wizardprompts you to identify which device slots containcleaning media.
If you upgraded NetBackup and have pre-existingbarcode rules, the barcode reader automatically detectsthe designated slots for the cleaning media. If you donot designate cleaning slots, NetBackup considers allmedia (including cleaning media) as typical media andtries to overwrite it.
■ After the inventory has completed, you are prompted toidentify which device slots contain cleaning media.
If you identify one or more slots as cleaning media inthe Identify Cleaning Media screen, you see the RobotInventory(CleaningMedia) screen. This screen displaysthe results after the software updates the EMM database.
If you do not designate cleaning media, NetBackupconsiders all media to be typical media (includingcleaning media) and tries to overwrite it.
Robot or device inventory
■ Specify the number of volumes for the device.
■ The wizard does not let you configure cleaning tapes forstandalone drives.
Standalone drives
When you specify multiple drive types, the following aretrue:
■ Media that is written by one robot drive may not workin any other drive. If this situation occurs, NetBackupconsiders the robot to have more than one type of drive.
■ If the robot has more than one type of drive, the wizardcannot inventory the robot.
Multiple drive types
About the Catalog Backup WizardThe NetBackup catalog contains information about your configuration and thelocations of backed up files and directories. If a disk fails and your catalog is lost,a catalog backup makes it easy to restore your data and resume your backupschedule.
Therefore, you must configure a catalog backup policy before any data gets backedup.
Configuring NetBackup serversAbout NetBackup configuration
130
This wizard lets you create a policy for an online, hot catalog backup. Online, hotcatalog backups can back up the catalog while normal client backups are inprogress.
A catalog backup policy lets you specify the following information:
■ The destinations for the catalog backupA backup destination can be any configured storage device. For additionaldisaster recovery protection, you can specify a second location for your catalogbackup.
Note: Although NetBackup supports catalog backup to disk, Symantecrecommends that you back up the catalog to removable media that gets storedoffsite.
■ When the catalog backup occurs
■ The location of the disaster recovery file that is needed to recover from thecatalog backup
Use the following guidelines to configure a catalog backup:
■ Configure a catalog backup policy before any other files or data are backed up.
■ For clustered systems, configure the catalog backup policy from the activenode.
For complete details about catalog backups, see the chapter "Protecting theNetBackup catalog" in the NetBackup Administrator's Guide, Volume 1.
For instructions on how to configure a catalog backup in clustered environments,see the NetBackup High Availability Administration Guide.
About the Backup Policy Configuration WizardThis wizard lets you define a backup policy for a group of one or more clients. Forclustered environments, configure the policy from the active node.
The wizard lets you specify the following:
■ Policy names and types
■ Clients
■ Files and directories to back up
■ Backup types
■ Backup rotations
131Configuring NetBackup serversAbout NetBackup configuration
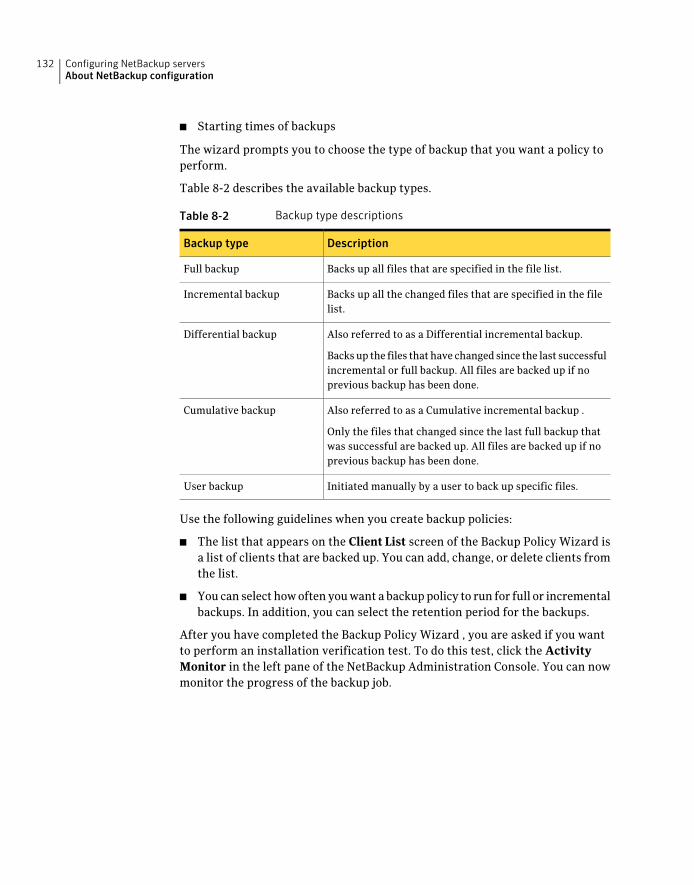
■ Starting times of backups
The wizard prompts you to choose the type of backup that you want a policy toperform.
Table 8-2 describes the available backup types.
Table 8-2 Backup type descriptions
DescriptionBackup type
Backs up all files that are specified in the file list.Full backup
Backs up all the changed files that are specified in the filelist.
Incremental backup
Also referred to as a Differential incremental backup.
Backs up the files that have changed since the last successfulincremental or full backup. All files are backed up if noprevious backup has been done.
Differential backup
Also referred to as a Cumulative incremental backup .
Only the files that changed since the last full backup thatwas successful are backed up. All files are backed up if noprevious backup has been done.
Cumulative backup
Initiated manually by a user to back up specific files.User backup
Use the following guidelines when you create backup policies:
■ The list that appears on the Client List screen of the Backup Policy Wizard isa list of clients that are backed up. You can add, change, or delete clients fromthe list.
■ You can select how often you want a backup policy to run for full or incrementalbackups. In addition, you can select the retention period for the backups.
After you have completed the Backup Policy Wizard , you are asked if you wantto perform an installation verification test. To do this test, click the ActivityMonitor in the left pane of the NetBackup Administration Console. You can nowmonitor the progress of the backup job.
Configuring NetBackup serversAbout NetBackup configuration
132

Aabout
Backup Policy Wizard 131client installation on UNIX 109client installation on Windows 96NetBackup access control (NBAC) 21NetBackup catalog backup configuration 130NetBackup Remote Administration Console for
Windows 53NetBackup server configuration 125NetBackup-Java Administration Console 57push client software 49replacement of unsupported server types 23startup and shutdown scripts 123storage device configuration 21
add-on prouctsinstall 50
adding UNIX clients 118administering NetBackup
multiple versions 60administration consoles
back-level support 60AIX
mount NetBackup DVD 38allow for reinstallation
of earlier versions 67automatic file changes
after upgrade 80
Bback-level support
administration consoles 60backup
online, hot catalog 130backup policies
guidelines for creating 131backup policy
backup types 131create 131
Backup Policy Wizardabout 131
backup typesbackup policy 131
barcode rulescleaning media 130
bp.conf fileinstallation script 36
bpplclients command 78create client list 77
Ccatalog backup configuration
NetBackup wizards 130changes
in NetBackup 7.0 11cleaning media
barcode rules 130client installation on UNIX
about 109client installation on Windows
about 96client software
install locally on Windows 98client type software
install on master server 50client_config script 115, 117clients
adding after initial install 118loading onto server 75, 118pushing software to 75, 118upgrading after server upgrades 75
clustered systemsupgrade requirements for 67
commandsbpplclients 78
Common Desktop Environment (CDE)setup 51window manager 51
compatibilitylicense keys 30NetBackup-Java 110
Index
complete system updateafter upgrade 79
configurationmaster and media servers 125NetBackup servers 125
configuration guidelinesNetBackup Enterprise servers 125
configureNetBackup catalog backup 130NetBackup storage devices 127NetBackup volumes 129Windows client 108
configure catalog backupguidelines 130
configure storage devicesfor the operating system 21
configure window managerfor Java interface 51NetBackup-Java compatible platforms 51
continue installationafter master server installation 46
createbackup policy 131
create client listbpplclients command 77
Ddefine
storage units 129device configuration
guidelines 128NetBackup wizards 127
Domain Name Service (DNS) 18
FFreeBSD
mount NetBackup DVD 38frequently asked questions
license keys 31ftp method
install UNIX client 115
Ggeneral requirements
UNIX server installation 18Getting Started
NetBackup wizards 125
guidelinesconfigure catalog backup 130device configuration 128for creating backup policies 131robot inventory 130standalone drive inventory 130
gunzip commandrequired for installation 18UNIX client installation 110
gzip commandrequired for installation 18UNIX client installation 110
gzip, gunzipinstallation requirements for 65
Hhosts file 18how to start
NetBackup Administration Console 126HP-UX
mount NetBackup DVD 39
Iinetd.conf file
installation script 36install
add-on products 50Java Windows Administration Console 58NetBackup Remote Administration Console 54
install locallyclient software on Windows 98
install multiple versions of NetBackup AdministrationConsole
restrictions and guidelines 59install multiple versions on Windows
NetBackup-Java Administration Console 59install NetBackup clients
locally 112install on master server
client type software 50install remotely
Windows client software 101install silently
Windows client 107install UNIX client
ftp method 115rsh method 113sftp method 117
Index134
install UNIX client (continued)ssh method 116
install_client_files script 116–117installation
sequence for new 35UNIX clients locally 112
installation methodsWindows clients 97
installation requirementsfor gzip, gunzip 65
installation restrictionsWindows client 96
installation scriptbp.conf file 36inetd.conf file 36server installation 36services file 36
inventoryrobot 130standalone drive 130
JJava interface
configure window manager 51Java Windows Administration Console
install 58
Llicense keys 74
compatibility 30frequently asked questions 31methods for entering 30methods to enter 30requirements 29
Linuxmount NetBackup DVD 40
loading client types onto server 75, 118local installation
UNIX client 111Windows client 97
local installation requirementsWindows client 97
Mmaster and media servers
configuration 125master server
continue installation after 46
master server (continued)install client type software 50software installation 41
media serversoftware installation 46
methodsto administer multiple versions of NetBackup
servers 60to enter license keys 30
methods for administeringmultiple NetBackup versions 60
mount DVDNetBackup installation 37
mount mediaNetBackup DVD 37
mount NetBackup DVDAIX 38FreeBSD 38HP-UX 39Linux 40Solaris 41
multiple NetBackup versionsmethods for administering 60
NNetBackup 7.0
changes 11NetBackup Access Control
remove files 87NetBackup access control (NBAC)
about 21NetBackup Administration Console
how to start 126NetBackup catalog backup configuration
about 130NetBackup client
remove software 119NetBackup client software
add a UNIX client type 118install locally 112
NetBackup DVDmount media 37
NetBackup Enterprise serversconfiguration guidelines 125
NetBackup installationmount DVD 37
NetBackup Remote Administration Consoleconfigure server lists for 56installation 54
135Index

NetBackup Remote Administration Console forWindows
about 53NetBackup scripts
startup and shutdown 123UNIX 123
NetBackup server configurationabout 125
NetBackup server requirementsWindows client 97
NetBackup serversconfiguration 125
NetBackup storage devicesconfigure 127
NetBackup volumesconfigure 129
NetBackup wizardsbackup policy configuration 131catalog backup configuration 130device configuration 127Getting Started 125volume configuration 129
NetBackup-Javacompatibility 110
NetBackup-Java Administration Consoleabout 57install multiple versions on Windows 59remove multiple versions on Windows 60
NetBackup-Java compatible platformsconfigure window manager 51
Network Information Service (NIS) 18NOM
now OpsCenter 66upgrade limitations 66
non-Solaris UNIX serversremove NetBackup 88
Oonline, hot catalog
backup 130operating system
configure storage devices for 21OpsCenter
formerly NOM 66ovpass driver
AIX 73
PPBX
remove 84, 89remove from non-Solaris 89remove from Solaris 84
push client softwareabout 49
push installationUNIX client 111
pushing client software 75, 118
Rreinstall earlier versions
allowing for 67remote installation
UNIX client 111Windows client 97
remote installation requirementsWindows client 97
remove multiple versions on WindowsNetBackup-Java Administration Console 60
remove NetBackupfrom Solaris servers 83non-Solaris UNIX servers 88
remove NetBackup softwareWindows client 109
remove softwareNetBackup client 119
replaceunsupported master servers 25unsupported media servers 26
required changesafter upgrade 79
requirementsfor upgrades 63license keys 29
requirements for server installationRed Hat Linux 19
restrictions and guidelinesinstall multiple versions of NetBackup
Administration Console 59robot
inventory 130robot inventory
guidelines 130robot types
locate supported 22rsh method
install UNIX client 113
Index136
Sscripts
client_config 115, 117install_client_files 116install_client_files using ftp 115install_client_files using sftp 117install_client_files using ssh 116
sequencefor new installation 35
server installationinstallation script 36requirements for Red Hat Linux 19
server listsconfigure for NetBackup Remote Administration
Console 56services file
installation script 36setup
Common Desktop Environment (CDE) 51sftp method
install UNIX client 117silent Installations
Windows client 97software installation
master server 41media server 46
Solarismount NetBackup DVD 41
Solaris serversremove NetBackup from 83
Solaris systemsupgrade requirements for 66
ssh methodinstall UNIX client 116
standalone driveinventory 130
standalone drive inventoryguidelines 130
startup and shutdownNetBackup scripts 123
startup and shutdown scriptsabout 123
storage device configurationabout 21
storage unitsdefine 129
supported robot typeslocate for this release 22
system requirementsWindows clients 96
UUNIX
NetBackup scripts 123UNIX client
local installation 111push installation 111remote installation 111
UNIX clientsinstalling locally 112, 118
UNIX server installationgeneral requirements 18
unsupported master servershow to replace 25
unsupported media servershow to replace 26
unsupported server typesabout replacement 23
upgradeautomatic file changes after 80complete system update after 79required changes after 79
upgrade clientsafter upgrading servers 75
upgrade from 6.xserver software 69
upgrade limitationsNOM 66
upgrade requirementsfor clustered systems 67for Solaris systems 66
upgrade server softwarefrom 6.x 69
upgradesrequirements for 63
user permissionsuser-directed operations 96Windows client 96
user-directed operationsuser permissions 96
Vvolume configuration
NetBackup wizards 129
137Index
Wwindow manager
Common Desktop Environment (CDE) 51Windows client
configure 108install silently 107installation restrictions 96local installation 97local installation requirements 97NetBackup server requirements 97remote installation 97remote installation requirements 97remove NetBackup software 109silent installation 97user permissions 96
Windows client softwareinstall remotely 101
Windows clientsinstallation methods 97system requirements 96
Index138