sybase® adaptive servertm enterprise · pdf filesybase, the sybase logo, accelatrade, ada...
TRANSCRIPT

Sybase® Adaptive ServerTM
Enterprise Troubleshooting andError Messages Guide
Volume 1
Sybase Adaptive Server Enterprise
11.9.x-12.5

DOCUMENT ID: 39996-01-1250-01
LAST REVISED: May 2002
Copyright © 1989-2002 by Sybase, Inc. All rights reserved.
This publication pertains to Sybase software and to any subsequent release until otherwise indicated in new editions or technical notes. Information in this document is subject to change without notice. The software described herein is furnished under a license agreement, and it may be used or copied only in accordance with the terms of that agreement.
To order additional documents, U.S. and Canadian customers should call Customer Fulfillment at (800) 685-8225, fax (617) 229-9845.
Customers in other countries with a U.S. license agreement may contact Customer Fulfillment via the above fax number. All other international customers should contact their Sybase subsidiary or local distributor. Upgrades are provided only at regularly scheduled software release dates. No part of this publication may be reproduced, transmitted, or translated in any form or by any means, electronic, mechanical, manual, optical, or otherwise, without the prior written permission of Sybase, Inc.
Sybase, the Sybase logo, AccelaTrade, ADA Workbench, Adaptable Windowing Environment, Adaptive Component Architecture, Adaptive Server, Adaptive Server Anywhere, Adaptive Server Enterprise, Adaptive Server Enterprise Monitor, Adaptive Server Enterprise Replication, Adaptive Server Everywhere, Adaptive Server IQ, Adaptive Warehouse, Anywhere Studio, Application Manager, AppModeler, APT Workbench, APT-Build, APT-Edit, APT-Execute, APT-FORMS, APT-Translator, APT-Library, Backup Server, BizTracker, ClearConnect, Client-Library, Client Services, Convoy/DM, Copernicus, Data Pipeline, Data Workbench, DataArchitect, Database Analyzer, DataExpress, DataServer, DataWindow, DB-Library, dbQueue, Developers Workbench, Direct Connect Anywhere, DirectConnect, Distribution Director, e-ADK, E-Anywhere, e-Biz Integrator, E-Whatever, EC-GATEWAY, ECMAP, ECRTP, eFulfillment Accelerator, Embedded SQL, EMS, Enterprise Application Studio, Enterprise Client/Server, Enterprise Connect, Enterprise Data Studio, Enterprise Manager, Enterprise SQL Server Manager, Enterprise Work Architecture, Enterprise Work Designer, Enterprise Work Modeler, eProcurement Accelerator, EWA, Financial Fusion, Financial Fusion Server, Gateway Manager, ImpactNow, Industry Warehouse Studio, InfoMaker, Information Anywhere, Information Everywhere, InformationConnect, InternetBuilder, iScript, Jaguar CTS, jConnect for JDBC, MainframeConnect, Maintenance Express, MDI Access Server, MDI Database Gateway, media.splash, MetaWorks, MySupport, Net-Gateway, Net-Library, New Era of Networks, ObjectConnect, ObjectCycle, OmniConnect, OmniSQL Access Module, OmniSQL Toolkit, Open Biz, Open Client, Open ClientConnect, Open Client/Server, Open Client/Server Interfaces, Open Gateway, Open Server, Open ServerConnect, Open Solutions, Optima++, PB-Gen, PC APT Execute, PC Net Library, Power++, power.stop, PowerAMC, PowerBuilder, PowerBuilder Foundation Class Library, PowerDesigner, PowerDimensions, PowerDynamo, PowerJ, PowerScript, PowerSite, PowerSocket, Powersoft, PowerStage, PowerStudio, PowerTips, Powersoft Portfolio, Powersoft Professional, PowerWare Desktop, PowerWare Enterprise, ProcessAnalyst, Rapport, Report Workbench, Report-Execute, Replication Agent, Replication Driver, Replication Server, Replication Server Manager, Replication Toolkit, Resource Manager, RW-DisplayLib, S-Designor, SDF, Secure SQL Server, Secure SQL Toolset, Security Guardian, SKILS, smart.partners, smart.parts, smart.script, SQL Advantage, SQL Anywhere, SQL Anywhere Studio, SQL Code Checker, SQL Debug, SQL Edit, SQL Edit/TPU, SQL Everywhere, SQL Modeler, SQL Remote, SQL Server, SQL Server Manager, SQL SMART, SQL Toolset, SQL Server/CFT, SQL Server/DBM, SQL Server SNMP SubAgent, SQL Station, SQLJ, STEP, SupportNow, S.W.I.F.T. Message Format Libraries, Sybase Central, Sybase Client/Server Interfaces, Sybase Financial Server, Sybase Gateways, Sybase MPP, Sybase SQL Desktop, Sybase SQL Lifecycle, Sybase SQL Workgroup, Sybase User Workbench, SybaseWare, Syber Financial, SyberAssist, SyBooks, System 10, System 11, System XI (logo), SystemTools, Tabular Data Stream, TradeForce, Transact-SQL, Translation Toolkit, UNIBOM, Unilib, Uninull, Unisep, Unistring, URK Runtime Kit for UniCode, Viewer, Visual Components, VisualSpeller, VisualWriter, VQL, WarehouseArchitect, Warehouse Control Center, Warehouse Studio, Warehouse WORKS, Watcom, Watcom SQL, Watcom SQL Server, Web Deployment Kit, Web.PB, Web.SQL, WebSights, WebViewer, WorkGroup SQL Server, XA-Library, XA-Server and XP Server are trademarks of Sybase, Inc. 04/02
Unicode and the Unicode Logo are registered trademarks of Unicode, Inc.
All other company and product names used herein may be trademarks or registered trademarks of their respective companies.
Use, duplication, or disclosure by the government is subject to the restrictions set forth in subparagraph (c)(1)(ii) of DFARS 52.227-7013 for the DOD and as set forth in FAR 52.227-19(a)-(d) for civilian agencies.
Sybase, Inc., 5000 Hacienda Drive, Dublin, CA 94568.
Contents
iii
About This Book ......................................................................................................................... xxi
CHAPTER 1 System Database Recovery ........................................................... 1Ensuring Recoverability ................................................................... 1Finding the Appropriate Recovery Scenario..................................... 3master Database Is Corrupt and Adaptive Server Does Not Start ... 4
Valid Dump of the master Database Exists............................... 4Valid Dump of the master Database Does Not Exist................. 6
master Database Is Corrupt and Adaptive Server Starts ................. 7Valid Dump of the master Database Exists............................... 7Valid Dump of the master Database Does Not Exist................. 7
Master Device Is Lost and Valid Dump Exists.................................. 8Valid Dump with Default Sort Order .......................................... 8Valid Dump with Non-Default Sort Order ................................ 11
Master Device Is Lost and Valid Dump Does Not Exist ................. 12The model Database Is Lost or Corrupted ..................................... 13
ASE 12.5.x and Later .............................................................. 13ASE 12.0.x and Earlier ............................................................ 14
Non-Master Device Containing Pieces of tempdb Is Lost .............. 14Master Device Is Going Bad .......................................................... 16Adaptive Server Does Not Start After Altering Configuration......... 17Manually Rebuilding Adaptive Server with bcp .............................. 17
Checklist .................................................................................. 18Considerations ........................................................................ 18Steps for Rebuilding Adaptive Server ..................................... 19If You Cannot Use bcp or a Dump .......................................... 24
CHAPTER 2 Encyclopedia of Tasks ................................................................. 25Disaster Recovery Tasks ............................................................... 25
How to Build a New Master Device ......................................... 25How to Rebuild master Database and Leave Master Device Intact
27How to Start Adaptive Server in Single-User Mode ................ 33
Contents
iv
How to Run the installmaster and installmodel Scripts ........... 35How to Load the master Database from Backup..................... 36How to Restore System Table Information in master Database 36How to Alter the number of devices Parameter Manually ....... 38How to Alter tempdb................................................................ 39How to Alter the model Database............................................ 39How to Reset Adaptive Server to Its Default Configuration..... 39How to Set A Default Backup Server Manually in Adaptive Server
40How to Fix Problems Encountered by Disk Refit..................... 40Problem 1: Duplicate Keys ...................................................... 41Problem 2: Deleted Database dbid ......................................... 42Problem 3: Allocation Pages from Deleted Database ............. 42Problem 4: Incomplete sysusages Entries .............................. 43Queries to Find Suspect sysusages Entries............................ 43
Avoiding Disaster through Good DBA Practices ............................ 44Online Recovery and Recovery Fault Isolation .............................. 49
Background ............................................................................. 49Online Recovery Concepts...................................................... 49Recovery With RFI .................................................................. 51What To Do When Online Recovery Fails............................... 53RFI Example............................................................................ 56
How to Manually Change Sort Order or Default Character Set ..... 58Manual Process....................................................................... 59How to Load a Sort Order or Additional Character Set ........... 61How to Change the Sort Order................................................ 62How to Change the Default Character Set .............................. 62How to Find a Sort Order File Name....................................... 63How to Find a Sort Order ID.................................................... 64How to Find a Character Set ID .............................................. 65How to View Your Existing Sort Order and Character Sets .... 65
Useful dbcc Commands ................................................................. 66Standard dbcc Commands...................................................... 66Other dbcc Commands ........................................................... 66
How to Analyze dbcc checkstorage Faults .................................... 69Fault Analysis .......................................................................... 70 dbcc checkstorage startup and drop table ............................. 73Faults Due to sp_placeobject .................................................. 73
Troubleshooting XP Server Issues................................................. 73Background ............................................................................. 73Correcting Common XP Server Problems............................... 73Information to Collect Before Calling Technical Support......... 74
Other Useful Tasks ........................................................................ 75How to Fix a Corrupted Index on System Tables.................... 75

Contents
v
How to Rescue Data from a Corrupted Table ......................... 78How to Start Adaptive Server with Trace Flags....................... 80How to Reload a Suspect User Database............................... 84How to Drop a Database When drop database Fails .............. 84How to Fix and Prevent Allocation Errors................................ 85How to Find an Object Name from a Page Number................ 93How to Interpret sp_who Output.............................................. 95Device Administration Issues .................................................. 96How to Choose Between Raw Partitions and UNIX Files ....... 96How to Move a Sybase Device or Database With Disk Mirroring
100How to Gather Information About Read/Write Errors ............ 101How to Mark a Database “suspect'” ...................................... 103How to Reset a Database's “suspect” Status ........................ 105How to Find a Device's Virtual Device Number..................... 108How to Detect and Clear Long-Running Transactions .......... 109How to Reduce the Size of tempdb....................................... 111How to Remap All Objects in a Database ............................. 114How to Prepare for Analyzing an Optimizer Problem............ 116How to Determine Which Physical Devices a Database is On 125How to Identify and Fix a Corrupted Table............................ 126How to Monitor the Error Log ................................................ 127Checking the Operating System Error Log............................ 131 How to Obtain a CSMD Dump ............................................. 132
CHAPTER 3 Error Message Writeups............................................................. 135Error Message Severity Levels .................................................... 135Variables in Error Message Text .................................................. 135Finding Object Names from Error Message Text ......................... 136How to Determine Your Adaptive Server Version ........................ 136
Field Order in Version String ................................................. 137Creating Error Messages ............................................................. 138Reporting Errors........................................................................... 138
Faxing Error Log Fragments ................................................. 140Reproducing Problems.......................................................... 141
Error Message Writeups .............................................................. 141Parser Errors................................................................................ 142
Error 102 ............................................................................... 142Error 107 ............................................................................... 143Error 195 ............................................................................... 145
Sequencer Errors ......................................................................... 147Error 207 ............................................................................... 147Error 208 ............................................................................... 148Error 213 ............................................................................... 150

Contents
vi
Error 216 ............................................................................... 151Error 225 ............................................................................... 153Error 226 ............................................................................... 154Error 229 ............................................................................... 155Error 232 ............................................................................... 156Error 233 ............................................................................... 157Error 241 ............................................................................... 159Error 247 ............................................................................... 160Error 257 ............................................................................... 162Error 259 ............................................................................... 163Error 265 ............................................................................... 165Error 266 ............................................................................... 166Error 268 ............................................................................... 169Error 277 ............................................................................... 171
Query Processor Errors ............................................................... 171Error 301 ............................................................................... 172Error 311 ............................................................................... 172Error 313 ............................................................................... 174Error 314 ............................................................................... 176Error 403 ............................................................................... 178Error 404 ............................................................................... 178Error 414 ............................................................................... 179Error 428 ............................................................................... 180Error 511 ............................................................................... 181Error 512 ............................................................................... 181Error 515 ............................................................................... 183Error 530 ............................................................................... 185Error 539 ............................................................................... 185Error 540 ............................................................................... 186Error 546 ............................................................................... 187Error 547 ............................................................................... 188Error 551 ............................................................................... 190Error 584 ............................................................................... 191
Access Method Errors.................................................................. 192Error 601 ............................................................................... 192Error 603 ............................................................................... 193Error 605 ............................................................................... 195Error 611 ............................................................................... 198Error 614 ............................................................................... 199Error 622 ............................................................................... 202Error 623 ............................................................................... 202Error 624 ............................................................................... 204Error 625 ............................................................................... 207Error 629 ............................................................................... 210

Contents
vii
Error 631 ............................................................................... 211Error 644 ............................................................................... 215Error 678 ............................................................................... 216Error 691 ............................................................................... 216Error 692 ............................................................................... 218Error 693 ............................................................................... 219Error 694 ............................................................................... 220Error 695 ............................................................................... 222Error 696 ............................................................................... 223Error 697 ............................................................................... 224
Memory Manager Errors .............................................................. 225Error 701 ............................................................................... 225Error 702 ............................................................................... 227Error 703 ............................................................................... 229Error 706 ............................................................................... 230Error 707 ............................................................................... 231Error 709 ............................................................................... 231
Buffer Manager Errors.................................................................. 232Error 803 ............................................................................... 232Error 804 ............................................................................... 234Error 806 ............................................................................... 235Error 813 ............................................................................... 237Error 820 ............................................................................... 238Error 821 ............................................................................... 240Error 822 ............................................................................... 241Error 823 ............................................................................... 243Error 832 ............................................................................... 245Error 834 ............................................................................... 246Error 835 ............................................................................... 248Error 840 ............................................................................... 248Error 842 ............................................................................... 249Error 847 ............................................................................... 250Error 849 ............................................................................... 251Error 852 ............................................................................... 253Error 855 ............................................................................... 254Error 861 ............................................................................... 255Error 863 ............................................................................... 256
Open Database Manager Errors .................................................. 257Error 903 ............................................................................... 257Error 905 ............................................................................... 258Error 906 ............................................................................... 260Error 908 ............................................................................... 261Error 911 ............................................................................... 262Error 913 ............................................................................... 263
Contents
viii
Error 916 ............................................................................... 264Error 921 ............................................................................... 266Error 924 ............................................................................... 267Error 925 ............................................................................... 268Error 926 ............................................................................... 270Error 930 ............................................................................... 272Error 935 ............................................................................... 273Error 940 ............................................................................... 275Error 941 ............................................................................... 276Error 945 ............................................................................... 277Error 950 ............................................................................... 279
Page Manager Errors................................................................... 281Error 1105 ............................................................................. 281Error 1108 ............................................................................. 289Error 1120 ............................................................................. 290Error 1124 ............................................................................. 291Error 1127 ............................................................................. 292Error 1129 ............................................................................. 294Error 1131 ............................................................................. 296Error 1133 ............................................................................. 297Error 1141 ............................................................................. 298Error 1142 ............................................................................. 300Error 1143 ............................................................................. 304
Lock Manager Errors.................................................................... 306Error 1203 ............................................................................. 306Error 1204 ............................................................................. 306Error 1205 ............................................................................. 308Error 1243 ............................................................................. 310Error 1249 ............................................................................. 311Error 1265 ............................................................................. 312Error 1279 ............................................................................. 313
Sort Manager Errors..................................................................... 315Error 1501 ............................................................................. 315Error 1505 ............................................................................. 316Error 1508 ............................................................................. 318Error 1509 ............................................................................. 319Error 1510 ............................................................................. 321Error 1514 ............................................................................. 322Error 1530 ............................................................................. 323Error 1531 ............................................................................. 324
Initialization Errors........................................................................ 326Error 1601 ............................................................................. 326Error 1602 ............................................................................. 327Error 1603 ............................................................................. 329

Contents
ix
Error 1605 ............................................................................. 330Error 1608 ............................................................................. 333Error 1613 ............................................................................. 334Error 1621 ............................................................................. 335Error 1622 ............................................................................. 336Error 1623 ............................................................................. 337
Create Utilities Errors ................................................................... 339Error 1702 ............................................................................. 339Error 1732 ............................................................................. 339Error 1803 ............................................................................. 340Error 1808 ............................................................................. 342Error 1809 ............................................................................. 343Error 1810 ............................................................................. 344Error 1813 ............................................................................. 344Error 1820 ............................................................................. 345Error 1902 ............................................................................. 346Error 1903 ............................................................................. 347Error 1916 ............................................................................. 348Error 1928 ............................................................................. 349Error 2110 ............................................................................. 349
High Availability Utility Errors ....................................................... 352Error 2243 ............................................................................. 352
Character Set Conversion Errors ................................................. 353Error 2401 ............................................................................. 353Error 2402 ............................................................................. 354Error 2409 ............................................................................. 355
dbcc Errors................................................................................... 357Error 2501 ............................................................................. 357Error 2502 ............................................................................. 358Error 2503 ............................................................................. 359Error 2506 ............................................................................. 361Error 2507 ............................................................................. 362Error 2509 ............................................................................. 364Error 2510 ............................................................................. 366Error 2511 ............................................................................. 367Error 2513 ............................................................................. 368Error 2514 ............................................................................. 369Error 2517 ............................................................................. 371Error 2520 ............................................................................. 372Error 2521 ............................................................................. 373Error 2524 ............................................................................. 377Error 2525 ............................................................................. 378Error 2529 ............................................................................. 381Error 2540 ............................................................................. 382
Contents
x
Error 2546 ............................................................................. 386Error 2547 ............................................................................. 390Error 2550 ............................................................................. 392Error 2558 ............................................................................. 394Error 2559 ............................................................................. 401Error 2572 ............................................................................. 403Error 2573 ............................................................................. 404Error 2574 ............................................................................. 405Error 2575 ............................................................................. 406Error 2578 ............................................................................. 407Error 2582 ............................................................................. 408Error 2583 ............................................................................. 410Error 2591 ............................................................................. 412Error 2596 ............................................................................. 413
Insert Errors ................................................................................. 416Error 2601 ............................................................................. 416Error 2610 ............................................................................. 416Error 2615 ............................................................................. 418Error 2619 ............................................................................. 419Error 2620 ............................................................................. 420Error 2626 ............................................................................. 422Error 2628 ............................................................................. 424
Create Utilities Errors (continued) ................................................ 426Error 2714 ............................................................................. 426Error 2729 ............................................................................. 427Error 2753 ............................................................................. 427Error 2762 ............................................................................. 428
Procedure Manager Errors........................................................... 431Error 2805 ............................................................................. 431Error 2806 ............................................................................. 432Error 2811 ............................................................................. 433Error 2812 ............................................................................. 433Error 2824 ............................................................................. 436Error 2835 ............................................................................. 437
dump and load Errors................................................................... 438Error 3019 ............................................................................. 438Error 3020 ............................................................................. 439Error 3105 ............................................................................. 440Error 3120 ............................................................................. 441Error 3201 ............................................................................. 442Error 3203 ............................................................................. 443Error 3211 ............................................................................. 444Error 3212 ............................................................................. 445Error 3216 ............................................................................. 446

Contents
xi
Error 3225 ............................................................................. 446Error 3230 ............................................................................. 447Error 3233 ............................................................................. 448Error 3240 ............................................................................. 449
Commit and Abort Errors ............................................................. 450Error 3301 ............................................................................. 450Error 3307 ............................................................................. 451
Recovery Errors ........................................................................... 454Error 3401 ............................................................................. 454Error 3403 ............................................................................. 455Error 3404 ............................................................................. 456Error 3414 ............................................................................. 457Error 3418 ............................................................................. 458Error 3425 ............................................................................. 459Error 3429 ............................................................................. 459Error 3434 ............................................................................. 461Error 3445 ............................................................................. 462Error 3446 ............................................................................. 463Error 3447 ............................................................................. 464Error 3452 ............................................................................. 465Error 3454 ............................................................................. 465Error 3470 ............................................................................. 467
Error and Exception Handling Errors ........................................... 469Error 3604 ............................................................................. 469Error 3621 ............................................................................. 469Error 3624 ............................................................................. 470Error 3626 ............................................................................. 471
drop Errors ................................................................................... 473Error 3701 ............................................................................. 473Error 3702 ............................................................................. 474Error 3703 ............................................................................. 475Error 3704 ............................................................................. 476Error 3731 ............................................................................. 477
Transaction Errors........................................................................ 479Error 3904 ............................................................................. 479Error 3905 ............................................................................. 480Error 3906 ............................................................................. 481Error 3908 ............................................................................. 483Error 3917 ............................................................................. 484
dataserver Errors ......................................................................... 487Error 4001 ............................................................................. 487Error 4002 ............................................................................. 488Error 4020 ............................................................................. 491
dump and load Errors (continued)................................................ 493

Contents
xii
Error 4204 ............................................................................. 493Error 4205 ............................................................................. 497Error 4207 ............................................................................. 497Error 4216 ............................................................................. 498Error 4221 ............................................................................. 500Error 4222 ............................................................................. 501Error 4305 ............................................................................. 502Error 4322 ............................................................................. 503
truncate table Errors..................................................................... 505Error 4716 ............................................................................. 505
Bulk Copy Utility Errors ................................................................ 506Error 4801 ............................................................................. 506Error 4806 ............................................................................. 506
alter table Errors.......................................................................... 508Error 4951 ............................................................................. 508Error 4953 ............................................................................. 508Error 4954 ............................................................................. 509Error 4956 ............................................................................. 510Error 4964 ............................................................................. 510
alter database Errors................................................................... 512Error 5006 ............................................................................. 512Error 5013 ............................................................................. 513Error 5018 ............................................................................. 515Error 5034 ............................................................................. 517
Disk Errors ................................................................................... 519Error 5115 ............................................................................. 519Error 5123 ............................................................................. 521Error 5142 ............................................................................. 523
ASTC Errors................................................................................. 524Error 5602 ............................................................................. 524
Open Client Errors ....................................................................... 525Error 5701 ............................................................................. 525Error 5704 ............................................................................. 525
Configuration Errors ..................................................................... 527Error 5808 ............................................................................. 527Error 5824 ............................................................................. 528Error 5846 ............................................................................. 529Error 5847 ............................................................................. 530Error 5848 ............................................................................. 531Error 5849 ............................................................................. 532Error 5850 ............................................................................. 532Error 5851 ............................................................................. 533Error 5852 ............................................................................. 534Error 5853 ............................................................................. 535

Contents
xiii
Error 5854 ............................................................................. 536Error 5857 ............................................................................. 537Error 5859 ............................................................................. 538Error 5861 ............................................................................. 538Error 5863 ............................................................................. 539Error 5865 ............................................................................. 541Error 5866 ............................................................................. 542Error 5867 ............................................................................. 542Error 5868 ............................................................................. 543Error 5893 ............................................................................. 544
Process Kill Errors........................................................................ 546Error 6103 ............................................................................. 546Error 6107 ............................................................................. 547
Timestamp Errors......................................................................... 548Error 6901 ............................................................................. 548Error 6902 ............................................................................. 549
Text Manager Errors .................................................................... 552Error 7101 ............................................................................. 552Error 7105 ............................................................................. 553Error 7114 ............................................................................. 555Error 7130 ............................................................................. 556Error 7134 ............................................................................. 558
Distributed Database Network Errors........................................... 560Error 7201 ............................................................................. 560Error 7205 ............................................................................. 561Error 7207 ............................................................................. 562Error 7211 ............................................................................. 563Error 7212 ............................................................................. 565Error 7214 ............................................................................. 566Error 7215 ............................................................................. 567Error 7218 ............................................................................. 568Error 7220 ............................................................................. 569Error 7221 ............................................................................. 571Error 7223 ............................................................................. 574Error 7227 ............................................................................. 575Error 7234 ............................................................................. 576Error 7235 ............................................................................. 577
Parser Errors (continued)............................................................. 579Error 7380 ............................................................................. 579
Threshold Errors .......................................................................... 580Error 7401 ............................................................................. 580Error 7402 ............................................................................. 581Error 7403 ............................................................................. 582Error 7404 ............................................................................. 583
Contents
xiv
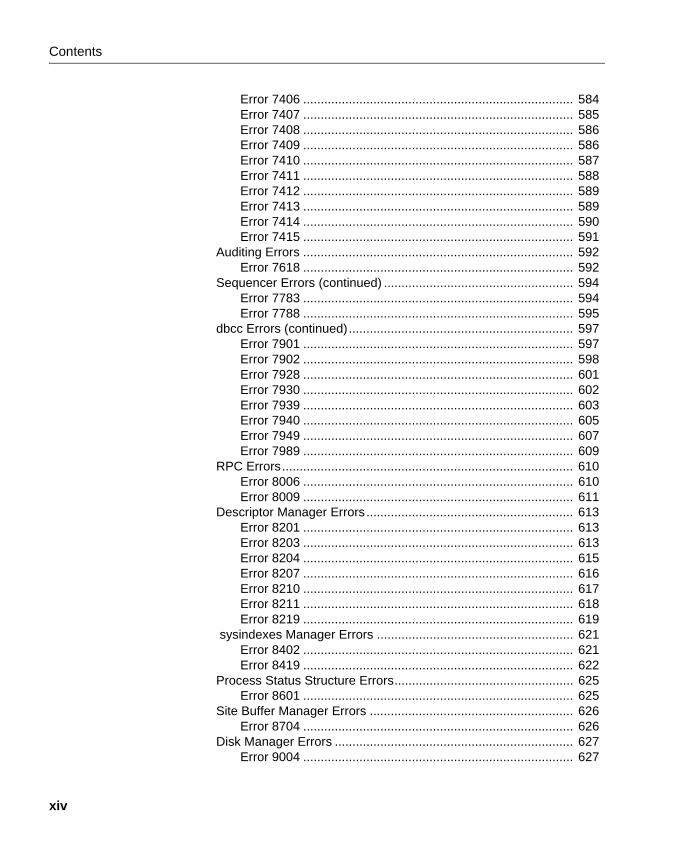
Error 7406 ............................................................................. 584Error 7407 ............................................................................. 585Error 7408 ............................................................................. 586Error 7409 ............................................................................. 586Error 7410 ............................................................................. 587Error 7411 ............................................................................. 588Error 7412 ............................................................................. 589Error 7413 ............................................................................. 589Error 7414 ............................................................................. 590Error 7415 ............................................................................. 591
Auditing Errors ............................................................................. 592Error 7618 ............................................................................. 592
Sequencer Errors (continued) ...................................................... 594Error 7783 ............................................................................. 594Error 7788 ............................................................................. 595
dbcc Errors (continued)................................................................ 597Error 7901 ............................................................................. 597Error 7902 ............................................................................. 598Error 7928 ............................................................................. 601Error 7930 ............................................................................. 602Error 7939 ............................................................................. 603Error 7940 ............................................................................. 605Error 7949 ............................................................................. 607Error 7989 ............................................................................. 609
RPC Errors................................................................................... 610Error 8006 ............................................................................. 610Error 8009 ............................................................................. 611
Descriptor Manager Errors........................................................... 613Error 8201 ............................................................................. 613Error 8203 ............................................................................. 613Error 8204 ............................................................................. 615Error 8207 ............................................................................. 616Error 8210 ............................................................................. 617Error 8211 ............................................................................. 618Error 8219 ............................................................................. 619
sysindexes Manager Errors ........................................................ 621Error 8402 ............................................................................. 621Error 8419 ............................................................................. 622
Process Status Structure Errors................................................... 625Error 8601 ............................................................................. 625
Site Buffer Manager Errors .......................................................... 626Error 8704 ............................................................................. 626
Disk Manager Errors .................................................................... 627Error 9004 ............................................................................. 627

Contents
xv
Log Transfer Errors ...................................................................... 628Error 9122 ............................................................................. 628
Configuration Errors (Continued) ................................................. 629Error 10841 ........................................................................... 629
Sequencer Errors (continued) ...................................................... 630Error 11018 ........................................................................... 630
Remote Create Errors .................................................................. 631Error 11202 ........................................................................... 631Error 11203 ........................................................................... 632
Fault Isolation Utility Errors .......................................................... 633Error 12716 ........................................................................... 633Error 12717 ........................................................................... 634
Create Utilities Errors (continued) ................................................ 636Error 12818 ........................................................................... 636
Sequencer Errors (continued) ...................................................... 637Error 14200 ........................................................................... 637
System Procedure Errors............................................................. 639Error 17461 ........................................................................... 639Error 17715 ........................................................................... 640Error 17716 ........................................................................... 640Error 17737 ........................................................................... 641Error 17870 ........................................................................... 641Error 17871 ........................................................................... 642Error 17872 ........................................................................... 642Error 17873 ........................................................................... 643Error 17874 ........................................................................... 643Error 17875 ........................................................................... 644Error 17903 ........................................................................... 644Error 17904 ........................................................................... 645Error 17905 ........................................................................... 645Error 17906 ........................................................................... 645Error 17910 ........................................................................... 646Error 18031 ........................................................................... 646Error 18032 ........................................................................... 647Error 18033 ........................................................................... 647Error 18097 ........................................................................... 648Error 18123 ........................................................................... 648Error 18145 ........................................................................... 649Error 18750 ........................................................................... 649
Kernel Errors ................................................................................ 651basis_daioconfig: Asynchronous I/O not available................ 651Buffer Mismatch Error ........................................................... 653Character Set Error ............................................................... 654Could Not Create Shared Memory Error ............................... 655

Contents
xvi
Current Process Infected with %d......................................... 655dopen Error ........................................................................... 657Dstart I/O Request Repeatedly Delayed ............................... 659Failed to Open Device Error.................................................. 663File Already in Use Error ....................................................... 664Memory Too Fragmented Error............................................. 665Memory Usage in Procedure Headers .................................. 666Network Information Message............................................... 667No More Alarms Available Error............................................ 668Open Objects Parameter May Be Too Low........................... 669os_attach_region Error.......................................................... 670os_create_region Errors........................................................ 671Read/Write Error ................................................................... 673Server Is Unnamed ............................................................... 674Stack Guardword Error.......................................................... 675t_rcvconnect Error ................................................................. 678udunmirror Errors .................................................................. 678ueoffline: no more engines can be offlined............................ 680
CHAPTER 4 Backup Server Error Messages.................................................. 683Commonly Encountered Errors.................................................... 683
“No language handler installed” Message............................. 683LOGCONN Errors in Adaptive Server After Using Backup Server
684 load {database | transaction} with listonly Locks Database.. 684Some Messages from Backup Server Are Lost .................... 684 dump database on Digital OpenVMS Alpha/Digital UNIX Raises
Error................................................................................ 684Error 5704 in the OpenVMS Backup Server error log ........... 685Unable to use Async IO when dumping to disk on HP-UX.... 686Maximum Number of DBPROCESSes Already Allocated..... 687
Error Conditions Without Messages............................................. 687Errors in Backup Server Error Log ............................................... 688
Net-Library routine net_dict_open failed in srv__open_dictionary 688
Net-Library routine net_listen failed in srv_start_net ............ 688Net-Library routine net_init failed in srv__init_net ................ 688No driver of the requested protocol class is available ........... 689Net-lib protocol driver call to connect two endpoints failed ... 689
Open Server Error Messages Related to Backup Server ............ 689Error 5704.10.0 ..................................................................... 689Error 16240.20.0 ................................................................... 690
A Listing of All Backup Server Error Messages ........................... 690Error Number Format ............................................................ 690

Contents
xvii
List of Error Messages .......................................................... 691Backup Server Error Messages 1.1.2 - 1.63.2 ............................ 692Backup Server Error Messages 2.1.2 - 3.55.2 ............................. 702Backup Server Error Messages 4.1.2 - 4.75.3 ............................. 712Backup Server Error Messages 4.76.3 - 4.147.2 ......................... 721Backup Server Error Messages 5.1.2 - 6.89.2 ............................. 732Backup Server Error Messages 7.1.2 - 8.17.2 ............................. 740
CHAPTER 5 Component Integration Services Error Messages................... 745Component Integration Services Error Messages ...................... 745
CHAPTER 6 Adaptive Server Error Messages............................................... 755Working with Error Messages ...................................................... 755Server Error Messages 1 - 199 .................................................... 757Server Error Messages 200 - 299 ................................................ 765Server Error Messages 300 - 399 ................................................ 773Server Error Messages 400 - 499 ................................................ 776Server Error Messages 500 - 599 ................................................ 780Server Error Messages 600 - 699 ................................................ 789Server Error Messages 700 - 799 ................................................ 797Server Error Messages 800 - 899 ................................................ 799Server Error Messages 900 - 999 ................................................ 807Server Error Messages 1000-1099 .............................................. 813Server Error Messages 1100-1199 .............................................. 816Server Error Messages 1200-1299 .............................................. 821Server Error Messages 1300-1399 .............................................. 828Server Error Messages 1500-1599 .............................................. 830Server Error Messages 1600-1699 .............................................. 839Server Error Messages 1700-1799 .............................................. 841Server Error Messages 1800-1899 .............................................. 848Server Error Messages 1900-1999 .............................................. 851Server Error Messages 2000–2099 ............................................. 855Server Error Messages 2100–2199 ............................................. 856Server Error Messages 2200–2299 ............................................. 857Server Error Messages 2300–2399 ............................................. 864Server Error Messages 2400–2499 ............................................. 871Server Error Messages 2500–2599 ............................................. 874Server Error Messages 2600–2699 ............................................. 883Server Error Messages 2700–2799 ............................................. 885Server Error Messages 2800–2899 ............................................. 892Server Error Messages 2900–2999 ............................................. 896Server Error Messages 3000 - 3099 ............................................ 897Server Error Messages 3100 - 3199 ............................................ 898

Contents
xviii
Server Error Messages 3200 - 3299 ............................................ 902Server Error Messages 3300 - 3399 ............................................ 907Server Error Messages 3400 - 3499 ............................................ 909Server Error Messages 3500 - 3599 ............................................ 918Server Error Messages 3600 - 3699 ............................................ 918Server Error Messages 3700 - 3799 ............................................ 921Server Error Messages 3800 - 3899 ............................................ 924Server Error Messages 3900 – 3999 ........................................... 926Server Error Messages 4000 – 4099 ........................................... 931Server Error Messages 4200 - 4299 ............................................ 935Server Error Messages 4300 - 4399 ............................................ 938Server Error Messages 4400 - 4499 ............................................ 941Server Error Messages 4500 - 4599 ............................................ 943Server Error Messages 4600 - 4699 ............................................ 944Server Error Messages 4700 - 4799 ............................................ 948Server Error Messages 4800 - 4899 ............................................ 949Server Error Messages 4900 - 4999 ............................................ 953Server Error Messages 5000 - 5099 ............................................ 962Server Error Messages 5100 - 5199 ............................................ 965Server Error Messages 5200 - 5299 ............................................ 971Server Error Messages 5600 - 5699 ............................................ 972Server Error Messages 5700 - 5799 ............................................ 976Server Error Messages 5800 - 5899 ............................................ 977Server Error Messages 5900 - 5999 ............................................ 985Server Error Messages 6000 - 6099 ............................................ 986Server Error Messages 6100 - 6199 ............................................ 987Server Error Messages 6200 - 6299 ............................................ 988Server Error Messages 6400 - 6499 ............................................ 995Server Error Messages 6500 - 6599 ............................................ 996Server Error Messages 6700 - 6799 ............................................ 999Server Error Messages 6900 - 6999 .......................................... 1000Server Error Messages 7000 - 7099 .......................................... 1002Server Error Messages 7100 - 7199 .......................................... 1004Server Error Messages 7200 - 7299 .......................................... 1008Server Error Messages 7300 - 7399 .......................................... 1012Server Error Messages 7400 - 7499 .......................................... 1020Server Error Messages 7600 - 7699 .......................................... 1023Server Error Messages 7700 - 7799 .......................................... 1026Server Error Messages 7900 - 7999 .......................................... 1035Server Error Messages 8000 - 8099 .......................................... 1046Server Error Messages 8200 - 8299 .......................................... 1047Server Error Messages 8400 - 8499 .......................................... 1050Server Error Messages 8500 - 8599 .......................................... 1053Server Error Messages 8600 - 8699 .......................................... 1054

Contents
xix
Server Error Messages 8700 - 8799 .......................................... 1055Server Error Messages 8800 - 8899 .......................................... 1055Server Error Messages 8900 - 8999 .......................................... 1056Server Error Messages 9000 - 9099 .......................................... 1057Server Error Messages 9100 - 9199 .......................................... 1058Server Error Messages 9200 - 9299 .......................................... 1063Server Error Messages 9300 - 9399 .......................................... 1070Server Error Messages 9500 – 9599 ......................................... 1074Server Error Messages 9600 - 9699 .......................................... 1080Server Error Messages 9700 - 9799 .......................................... 1080Server Error Messages 9800 - 9899 .......................................... 1083Server Error Messages 9900 - 9999 .......................................... 1085Server Error Messages 10100 - 10199 ...................................... 1095Server Error Messages 10200 - 10299 ...................................... 1096Server Error Messages 10300 - 10399 ...................................... 1100Server Error Messages 10400 - 10499 ...................................... 1107Server Error Messages 10500 - 10599 ...................................... 1116Server Error Messages 10600 - 10699 ...................................... 1117Server Error Messages 10700 - 10799 ...................................... 1127Server Error Messages 10800 - 10899 ...................................... 1135Server Error Messages 10900 - 10999 ...................................... 1140Server Error Messages 11000 - 11099 ...................................... 1141Server Error Messages 11100 - 11199 ...................................... 1146Server Error Messages 11200 - 11299 ...................................... 1153Server Error Messages 11300 - 11399 ...................................... 1153Server Error Messages 11400 - 11499 ...................................... 1155Server Error Messages 11500 - 11599 ...................................... 1163Server Error Messages 11600 - 11699 ...................................... 1168Server Error Messages 11700 - 11799 ...................................... 1169Server Error Messages 11900 - 11999 ...................................... 1173Server Error Messages 12000 - 12099 ...................................... 1176Server Error Messages 12100 - 12199 ...................................... 1179Server Error Messages 12200 - 12299 ...................................... 1180Server Error Messages 12300 - 12399 ...................................... 1181Server Error Messages 12400 - 12499 ...................................... 1184Server Error Messages 12500 - 12599 ...................................... 1184Server Error Messages 12700 - 12799 ...................................... 1189Server Error Messages 12800 - 12899 ...................................... 1197Server Error Messages 12900 - 12999 ...................................... 1199Server Error Messages 13000 - 13099 ...................................... 1205Server Error Messages 13100 - 13199 ...................................... 1213Server Error Messages 13200 - 13299 ...................................... 1216Server Error Messages 13900 - 13999 ...................................... 1217Server Error Messages 14000 - 14099 ...................................... 1222

Contents
xx
Server Error Messages 14100 - 14199 ...................................... 1225Server Error Messages 14200 - 14299 ...................................... 1226Server Error Messages 14300 - 14399 ...................................... 1228Server Error Messages 14400 - 14499 ...................................... 1229Server Error Messages 17000 - 18999 ...................................... 1229
Glossary ................................................................................................................................... 1231
Index ......................................................................................................................................... 1235
xxi
About This Book
The Sybase Adaptive Server Enterprise Troubleshooting and Error Messages Guide contains troubleshooting procedures for problems that Sybase® users may encounter when using Sybase Adaptive Server EnterpriseTM. The problems addressed here are those which the Sybase Technical Support staff hear about most often. The guide is applicable to Versions 11.9.2 through 12.5.0.1, and its purpose is:
• To provide enough information about certain error conditions so that you can resolve problems without help from Technical Support.
• To provide lists of information that you can gather before calling Technical Support, which will help resolve your problem more quickly.
• To provide you with a greater understanding of Sybase products.
Note Adaptive Server Enterprise is referred to as Adaptive Server in the remainder of this book.
AudienceThis guide is intended for the following:
• Sybase System and Database Administrators
• Sybase Technical Support contacts
• Developers of applications using Sybase software
This guide assumes that you are thoroughly familiar with the Sybase products. If you are unfamiliar with any of the procedures described in this guide, call Sybase Technical Support for assistance.
What This Guide Contains
xxii
What This Guide ContainsThe Troubleshooting and Error Messages Guide contains the following chapters:
• The System Database Recovery chapter includes step-by-step procedures for recovering from various disaster situations involving Sybase system databases. Read this chapter before disasters occur so that recovery will be easier.
• The Encyclopedia of Tasks chapter describes a variety of useful tasks, including those required for recovery from disaster situations.
• The Error Message Writeupschapter contains detailed information about common Sybase Adaptive Server error messages, including the text of each message, potential causes of the error, and what you can do to recover from the error. The messages are listed in numerical order. Some error message types fall into more than one number sequence. For example, dbcc errors are in the 25xx range and are also in the 79xx range. Since the error message writeups are presented in numerical order, there is more than one section titled “dbcc Errors.” Only the most commonly occurring error messages are documented in this chapter.
You can create a complete listing of the Adaptive Server error messages for your installation by issuing the following isql commands:
1> use master2> go1> select * from sysmessages2> go
• Additional chapters contain reference information about Sybase Adaptive Server, Backup Server, and Component Integration Services (CIS) error messages, including the text of each message and a brief troubleshooting tip with instructions on what to do first when you encounter the error. All numbered error messages are documented in these chapters.

xxiii
Related DocumentsThe Troubleshooting and Error Messages Guide refers you to other Sybase manuals for additional information about commands and concepts mentioned in the writeups as well as information you need to make decisions about your Adaptive Server. The following documents are referred to frequently:
• Adaptive Server Enterprise Reference Manual – this manual contains detailed information on Adaptive Server commands and system stored procedures. This document is referred to as the Reference Manual in the remainder of this book.
• Adaptive Server Enterprise System Administration Guide – this guide provides detailed information about administering servers and databases. This document is referred to as the System Administration Guide in the remainder of this book.
• Adaptive Server Enterprise Performance and Tuning Guide – this guide provides detailed information on Adaptive Server performance and tuning. This document is referred to as the Performance and Tuning Guide in the remainder of this book.
• Adaptive Server Enterprise Transact-SQL User's Guide – this guide describes Transact-SQL®, the Sybase-enhanced version of the relational database language. This document is referred to as the Transact-SQL User's Guide in the remainder of this book.
Changes to This BookThe following changes have been made to the Troubleshooting and Error Messages Guide:
• The following topic has been added to the System Database Recovery chapter:
• How to Fix Problems Encountered by disk refit
• The following topics have been updated in the System Database Recovery chapter:
• Finding the Appropriate Recovery Scenario
• Master Device Is Lost and Valid Dump Exists
• The model Database is Lost or Corrupted

Changes to This Book
xxiv
• Master Device is Going Bad
• Manually Rebuilding Adaptive Server with bcp (previously Manually Rebuilding Adaptive Server with bcp and buildmaster).
• The following topics have been added to the Encyclopedia of Tasks chapter:
• Troubleshooting XP Server Issues.
• How to Obtain a CSMD Dump.
• The following topics have been updated in the Encyclopedia of Tasks chapter:
• How to Rebuild master Database and Leave Master Device Intact
• How to Analyze dbcc checkstorage Faults
• How to Reduce the Size of tempdb
• New detailed writeups have been added to the Error Message Writeups chapter for the following messages:
• Parser Error: 195
• Sequencer Errors: 241, 7783, 11018, 14200
• Query Processor Errors: 301, 546
• Buffer Manager Error: 832
• dbcc Error: 2547
• dump and load Errors: 3019, 3020
• Component Integration Services (CIS) Error: 11203
• Kernel Errors: basis_daioconfig Error
• Detailed writeups of the following messages in the Error Message Writeups chapter have been modified (or the message text changed):
• Sequencer Errors: 216
• Query Processor Errors: 414, 511, 539, 540
• Access Method Errors: 629, 631
• Memory Manager Error: 701
• Open Database Manager Error: 950
• Lock Manager Error: 1205

xxv
• Sort Manager Error: 1501
• Initialization Errors: 1605, 1613, 1621
• Create Utility Errors: 1702
• dbcc Errors: 2509, 2510, 2511
• Bulk Copy Utility Error: 4806
• alter table Errors: 4951, 4964, 4981
• Configuration Error: 5852, 5861, 5863
• Text Manager Error: 7105
• Kernel Errors: Stack Guardword Error
• All Adaptive Server error message listings have been updated, including the message text and troubleshooting guidelines.
• Updated instructions are provided on how to access the Sybase Customer Service and Support World Wide Web page for the latest support information and services.
Your Comments About this BookIn order to continue to improve the Troubleshooting and Error Messages Guide, we need your feedback. Send your comments about the guide to the email address [email protected].
Comments might include:
• Corrections
• Requests for specific additions
• Material you would like to submit
• Comments about which sections are particularly helpful
• Comments about which sections are not clear
Style Conventions
xxvi
• Any other input you might have
Note The [email protected] email address is for comments about the troubleshooting guide. It is not for reporting problems or asking technical questions. To report a problem or ask a technical question, contact Sybase Technical Support.
Style ConventionsWherever possible, the Troubleshooting and Error Messages Guide uses the style conventions of the Sybase product manuals. This section contains a brief summary of those conventions.
Style Conventions in TextCommands and script names appear in bold type; for example:
To change the isql command terminator...
Object names appear in italics; for example:
Use the installmodel script to complete the installation of the model database.
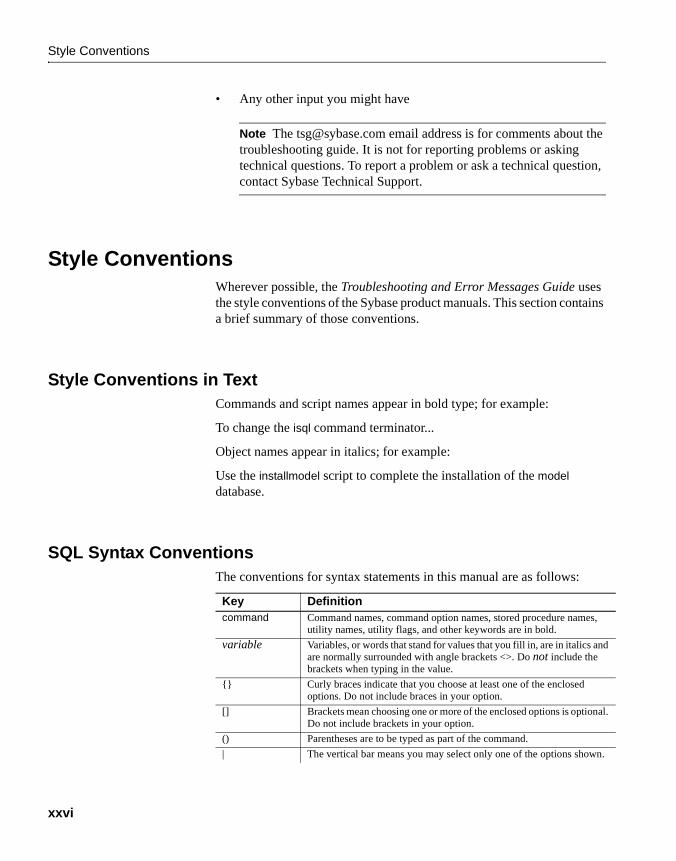
SQL Syntax ConventionsThe conventions for syntax statements in this manual are as follows:
Key Definition command Command names, command option names, stored procedure names,
utility names, utility flags, and other keywords are in bold.
variable Variables, or words that stand for values that you fill in, are in italics and are normally surrounded with angle brackets <>. Do not include the brackets when typing in the value.
{} Curly braces indicate that you choose at least one of the enclosed options. Do not include braces in your option.
[] Brackets mean choosing one or more of the enclosed options is optional. Do not include brackets in your option.
() Parentheses are to be typed as part of the command.
| The vertical bar means you may select only one of the options shown.

xxvii
SQL syntax statements (displaying the syntax and options for a command) are printed as follows:
sp_dropdevice <device_name>
Examples showing the use of Transact-SQL commands are printed as follows:
1> select * from publishers2> go
Examples of computer output are printed as follows:
pub_id pub_name city state ------ ------------------- ----------- -----0736 New Age Books Boston MA0877 Binnet & Hardley Washington DC1389 Algodata Infosystems Berkeley CA
(3 rows affected)
Electronic Information SourcesFor the most up-to-date information on troubleshooting and technical tips, refer to Sybase's electronic services:
• The Customer Service and Support (CS&S) World Wide Web page. To access the CS&S page:
a Go to the Sybase Support home page:
http://support.sybase.com
b Under the Support Services heading, click on Technical Documents, Solved Cases, or other links.
To view or download support information, you need a Web browser such as Netscape NavigatorTM that supports SSL (Secure Sockets Layer). If you are behind a firewall, your proxy server must also support SSL. Your browser must be configured to allow cookies.
, The comma means you may choose as many of the options shown as you like, separating your choices with commas to be typed as part of the command.
<> Words in angle brackets should be replaced with the corresponding name (such as a table or device). Do not include brackets in your entry.
Key Definition

If You Need Help
xxviii
Alternatively, you may use Sybase's customized support site,
http://my.sybase.com
If You Need Help Help with your Sybase software is available in the form of documentation and Sybase Technical Support. If you have any questions about the procedures contained in this guide, ask the designated person at your site to contact Sybase Technical Support. You can find additional contact information at
http://support.sybase.com
by clicking on Support Centers Directory.
For a checklist that helps you collect information when contacting Technical Support, refer to “Reporting Errors”in the Error Message Writeups chapter.

1
C H A P T E R 1 System Database Recovery
This chapter provides step-by-step procedures for recovering from various disaster situations involving Sybase system databases or the entire master device.
Some procedures describe how to rebuild the master database or master device. Prior to Adaptive Server version 12.5, these tasks used buildmaster. Starting with version 12.5, the buildmaster functionality has been incorporated into the dataserver (Unix) and sqlsrvr (Windows) programs. The server now allows you to create master devices and databases with 2K, 4K, 8K or 16K logical page sizes. The recovery instructions describe both the new procedure and the older pre-12.5 techniques.
Warning! Storing the system databases sybsystemprocs, sybsecurity, and sybsyntax, and user databases on the master device is not recommended, as this greatly complicates disaster recovery.
Ensuring RecoverabilityThe best time to prepare for a disaster is before it happens.
Review the procedures in this chapter before an actual disaster occurs, such as a power failure, hard disk crash, or other severe problem that could cause the loss of your master device, your master database, or other vital system resource. Here are some hints for making these procedures the most effective:
• Create and keep backups of complete, detailed scripts to re-create your system exactly as it existed before the disaster and to perform recovery as efficiently as possible. In particular, your scripts should contain the following information:

Ensuring Recoverability
2
• Copies of key system tables in the master database, particularly sysdatabases, sysdevices, sysusages, sysconfigures, syscharsets , syslogins, sysremotelogins, sysresourcelimits, and systimeranges. You can make copies of these tables by using bcp with the -c option.
• Records of disk init, disk reinit, create database, alter database, sp_addsegment, and sp_extendsegment commands.
• Records of all changes made to syslogins and sysloginroles. You may want to keep an ongoing script of all the sp_addlogin and sp_droplogin commands.
• Records of creations and modifications of system and user databases, particularly for structural changes, and particularly for master.
• SQL records. Even if you are adding only a single disk device or a couple of logins, it is good system administration practice to save all this information in scripts and hard copy.
• Take steps to prevent other users logging into Adaptive Server while you are working with the master database or device. To do this always start Adaptive Server using the -m option. You can also temporarily use a different interfaces file (unix) or sql.ini file (Windows), or entry with a different port number and name, so that other users will not find the server you are working on.
• Use dump database to back up the master database frequently; this helps simplify solving problems with the master database. Back it up after any changes to system tables, especially changes to sysusages, sysdatabases, sysdevices, syslogins, sysloginroles, sysservers, and sysconfigures.
• Truncate the master database log frequently.
• Keep statistics on how much time and space are required for dumps and loads.
• Avoid keeping user databases on the master device, as it complicates recovery scenarios.
• Always issue a dump database command after the following:
• bcp (fast version)
• create index
• select into
• dump transaction with no_log
• dump transaction with truncate_only

CHAPTER 1 System Database Recovery
3
• Where appropriate, automate the use of operating system threshold procedures and scripts that run backups.
• Verify that your interfaces file (unix) or sql.ini file (Windows) is correct.
• Catalog and label your backup media carefully.
• Try to run dbcc commands at the time you make dumps to ensure that the dump is not corrupted.
Different versions of the configuration file are maintained on disk in $SYBASE directory for reference.
Refer to
• “Developing a Backup and Recovery Plan” in the System Administration Guide
• Avoiding Disaster through Good DBA Practices in Encyclopedia of Tasks
to learn more about the procedures described in this chapter so that you are ready for an emergency.
Finding the Appropriate Recovery ScenarioUse the following table to determine where to look in this chapter for information on your system database recovery problem.
If And And Then see
The master database is corrupt
Adaptive Server does not start
A valid dump of the master database exists
“Valid Dump of the master Database Exists”
The master database is corrupt
Adaptive Server does not start
A valid dump of the master database does not exist
“Valid Dump of the master Database Does Not Exist”
The master database is corrupt
Adaptive Server starts A valid dump of the master database exists
“Valid Dump of the master Database Exists”
The master database is corrupt
Adaptive Server starts A valid dump of the master database does not exist
“Manually Rebuilding Adaptive Server with bcp”
The master device is completely lost
A valid dump of the master database exists
“Master Device Is Lost and Valid Dump Exists”
The master device is completely lost
A valid dump of the master database does not exist
“Master Device Is Lost and Valid Dump Does Not Exist”

master Database Is Corrupt and Adaptive Server Does Not Start
4
Most of these problems (with the exception of “You have lost a device, other than the master device, that contained pieces of tempdb”) can also be addressed with the procedure for “Manually Rebuilding Adaptive Server with bcp”.
Note If you need to undertake recovery and a valid dump of master exists, but your server uses a non-default sort order, be sure to follow the instructions in “Valid Dump with Non-Default Sort Order.”
master Database Is Corrupt and Adaptive Server Does Not Start
This section is divided into two sub-sections: one applies if you have a valid dump of the master database and the other applies if you do not.
Valid Dump of the master Database Exists
Note These procedures assume that the rest of the master device and the sybsystemprocs database are intact.
If your master device has a non-default sort order, go to “Valid Dump with Non-Default Sort Order”.
The model database is lost or corrupted
“The model Database Is Lost or Corrupted”
You have lost a device, other than the master device, that contained pieces of tempdb
“Non-Master Device Containing Pieces of tempdb Is Lost”
The master device is going bad
“Master Device Is Going Bad”
Adaptive Server does not start after you have made configuration changes
“Adaptive Server Does Not Start After Altering Configuration”
If And And Then see

CHAPTER 1 System Database Recovery
5
1 Rebuild the master database without initializing the master device. Refer to “How to Rebuild master Database and Leave Master Device Intact”.
After rebuilding master, you may need to alter the master database on the master device to ensure that the lstart, vstart, and size values of master match up with those on the dump. Otherwise, you may see corruption following the load of master in a subsequent step.
2 Start Adaptive Server in single-user mode. Refer to “How to Start Adaptive Server in Single-User Mode”.
Note In Adaptive Server version 12.0.x and later, be sure to start the server with trace flag 3608 in single-user mode. Starting the server with trace flag 3608 prevents sybsystemdb creation at start-up time, avoiding the potential for overwriting any user databases that may have existed on the master device.
3 Ensure that the Adaptive Server has the correct name for the Backup Server in the sysservers table. Refer to “How to Set A Default Backup Server Manually in Adaptive Server” for instructions.
4 Load the master database from backup using the load database command to specify the physical device or file name to reference. For example:
1> load database master from "device_name"2> go
Adaptive Server automatically shuts down after the load is complete.
5 With Adaptive Server still down, manually reestablish the number of devices configuration parameter if necessary. Refer to “How to Alter the number of devices Parameter Manually”.
6 Start Adaptive Server in single-user mode.
7 Restore system catalog information for the master database if changes were made to it since the last dump. Refer to “How to Restore System Table Information in master Database”.
8 Dump the master database.
9 Shut down Adaptive Server.
10 Start Adaptive Server in multiuser mode. Refer to “Returning Adaptive Server to Multiuser Mode”.

master Database Is Corrupt and Adaptive Server Does Not Start
6
Valid Dump of the master Database Does Not Exist
Note These procedures assume that the rest of the master device is intact. If this is not the case, see the following section “Master Device Is Lost and Valid Dump Exists”.
1 Rebuild the master database without initializing the master device. Refer to “How to Rebuild master Database and Leave Master Device Intact”.
2 With Adaptive Server still down, manually reestablish the number of devices configuration parameter if necessary. Refer to “How to Alter the number of devices Parameter Manually”.
3 Start Adaptive Server in single-user mode. Refer to “How to Start Adaptive Server in Single-User Mode”.
Note In Adaptive Server version 12.0.x and later, be sure to start the server with trace flag 3608 in single-user mode. Starting the server with trace flag 3608 prevents sybsystemdb creation at start-up time, avoiding the potential for overwriting any user databases that may have existed on the master device.
4 Restore the system tables information contained in the master database. This information describes all Sybase devices and user databases. If you have bcp files of the system tables, refer to “Manually Rebuilding Adaptive Server with bcp”; otherwise refer to “Restoring Device and Database Information in the System Catalog”.
5 Use sp_addserver to add a SYB_BACKUP entry to the sysservers table:
1> sp_addserver "SYB_BACKUP" null, 2> <correct_backup_server_name>3> go
6 Dump the master database.
7 Shut down Adaptive Server.
8 Start Adaptive Server in multiuser mode. Refer to “Returning Adaptive Server to Multiuser Mode”.

CHAPTER 1 System Database Recovery
7
master Database Is Corrupt and Adaptive Server StartsThis section is divided into two sub-sections: one in which you have a valid dump of the master database and one in which you do not.
Valid Dump of the master Database ExistsPerform these steps to recover a master database that is corrupt but usable by Adaptive Server (for example, some tables in the master database are corrupt but Adaptive Server can start, and the System Administrator can to a certain extent use the master database).
Note This procedure assumes that the rest of the master device is intact.
1 Start Adaptive Server in single-user mode. Refer to “How to Start Adaptive Server in Single-User Mode”.
2 Load the master database from backup. Refer to “How to Load the master Database from Backup”.
Adaptive Server will automatically shut down after the load is complete.
3 Start Adaptive Server in single-user mode. Refer to “How to Start Adaptive Server in Single-User Mode”.
4 Restore system catalog information of master database if changes were made to it since the last dump. Refer to “How to Restore System Table Information in master Database”.
5 Start Adaptive Server in multiuser mode. Refer to “Returning Adaptive Server to Multiuser Mode”.
Valid Dump of the master Database Does Not ExistIf you do not have a valid dump of the master database, you have lost your master database. To resolve this problem, follow the procedure described under “Manually Rebuilding Adaptive Server with bcp”.
Master Device Is Lost and Valid Dump Exists
8
Master Device Is Lost and Valid Dump Exists
Valid Dump with Default Sort OrderUse this procedure only if your Adaptive Server was installed with your platform's default sort order. If you have installed a non-default sort order, refer to “Valid Dump with Non-Default Sort Order”.
ASE 12.5 and Later
1 Rebuild the lost master device. Refer to “How to Build a New Master Device” for instructions.
2 Start Adaptive Server in single-user mode. Refer to “How to Start Adaptive Server in Single-User Mode”.
3 Ensure that the Adaptive Server has the correct name for the Backup Server in the sysservers table. Refer to “How to Set A Default Backup Server Manually in Adaptive Server” for instructions.
4 Load the master database from backup using the load database command to specify the physical device or file name to reference. For example:
1> load database master from device_name2> go
Note You can only load a dump of master that matches your server level. Loading an older version dump to a newer server is not permitted.
The server inspects the master device and makes any corrections needed in the newly loaded sysdatabases and sysusages. These corrections affect only the master device, since that is the only device that changed -- the server assumes that all your other devices are undamaged and need not be inspected.
After this step, it is possible that your new master device contains database entries for databases that also exist on other devices in your system. This may happen if you moved tempdb to a different device, or created sybsystemdb on a different device. The server recognizes and handles this situation: if it finds pre-existing entries for those databases on other devices, it presumes that the existing entries are correct and does not change them.
CHAPTER 1 System Database Recovery
9
After the load completes but before shutting down, the server does some post-processing to reconcile the newly loaded sysdatabases and sysusages tables against the information in the master device. At this time the server may print a variety of error messages regarding failures to use or find the master database, and/or attempts to insert duplicate keys or duplicate rows to sysusages. Ignore these messages; they occur only during the reconciliation phase, and will not affect the server’s operation after it shuts down and is restarted.
After the checks and validations are complete the server shuts down. You may now restart it normally.
5 When you created a new master device in step 1 above, the server created only its default set of databases, with minimal data. You will probably need to load dumps of the databases (notably model) that used to be there.
Are the databases on your new master device large enough to hold the dumps you will be loading into them? Are all the necessary databases present? Is there any obsolete data that you need to clean up?
Log in as sa and inspect the databases on your system:
1> declare @pgspermb int2> select @pgspermb = 1048576 / @@maxpagesize3> select "db name"=db_name(dbid), dbid, "size"=sum(size) / @pgspermb4> from master.dbo.sysusages5> group by dbid6> go
This command shows you all the databases present on your system, and their total size. Note that the size column in the output is expressed in megabytes.
Does this list contain any entries where database name is null? These sysusages entries don’t have any matching entries in sysdatabases; they are unnecessary and should be deleted. You may be especially susceptible to this if you upgraded from pre-12.0 versions, and created sybsystemdb on the older version; sybsystemdb will have a different dbid than the default dbid. To remove these entries, use a script like the following:
1> exec sp_configure "allow updates", 12> go1> delete sysusages2> where db_name(<dbid>) is null3> go1> exec sp_configure "allow updates", 02> go

Master Device Is Lost and Valid Dump Exists
10
where <dbid> corresponds to the null database name.
Are any databases missing? Create those databases. Are the databases large enough? If not, alter them to be at least large enough to hold the dumps. (It is okay if they are too large; the server simply clears the excess space.)
ASE 12.0.x and Earlier
1 Rebuild the lost master device. Refer to “How to Build a New Master Device” for instructions.
2 Start Adaptive Server in single-user mode. Refer to “How to Start Adaptive Server in Single-User Mode”.
3 Ensure that the Adaptive Server has the correct name for the Backup Server in the sysservers table. Refer to “How to Set A Default Backup Server Manually in Adaptive Server” for instructions.
4 Run installmaster or alter master for 2MB if master was originally 5MB.
5 Load the master database from backup using the load database command to specify the physical device or file name to reference. For example:
1> load database master from device_name2> go
Adaptive Server will shut itself down after the load is complete.
6 With Adaptive Server still down, manually reestablish the number of devices configuration parameter if necessary. Refer to “How to Alter the number of devices Parameter Manually”.
7 Start Adaptive Server.
8 Restore system catalog information for the master database if changes were made to it since the last dump. Refer to “How to Restore System Table Information in master Database”.
9 Load or rebuild the model database if necessary. Refer to “How to Alter the model Database”.
10 Drop, re-create, and load any user databases located fully or partially on the master device.
Warning! Storing system databases sybsystemprocs, sybsecurity, and sybsyntax, and user databases on the master device is not recommended, as this greatly complicates disaster recovery.

CHAPTER 1 System Database Recovery
11
Valid Dump with Non-Default Sort Order
Note This section uses unix examples. Consult the Utilities Programs for Windows for equivalent Windows syntax.
1 Comment out the entry for the Adaptive Server in the interfaces file.
2 Rename the RUN_SERVER file for the Adaptive Server to RUN_SERVER.old. Rename your configuration file, adding “.old” to the name.
3 Run srvbuild to install a new Adaptive Server. Install the Adaptive Server using the original master device, the original Adaptive Server name, and the sort order and character set to reflect that on the dump. This creates a new entry in the interfaces file as well as a new RUN_SERVER file to replace the one you renamed in step 2.
4 Start Adaptive Server in single-user mode. Refer to “How to Start Adaptive Server in Single-User Mode”.
5 Ensure that the Adaptive Server has the correct name for the Backup Server in the sysservers table. Refer to “How to Set A Default Backup Server Manually in Adaptive Server” for instructions.
Note The master database must look exactly as it did and occupy exactly the same location on the master device as it did before the database was lost.
6 Load the master database from backup using the load database command to specify the physical device or file name to reference. For example:
1> load database master from device_name2> go
Adaptive Server shuts itself down after the load is complete.
7 With Adaptive Server still down, manually reestablish the number of devices configuration parameter if necessary. Refer to “How to Alter the number of devices Parameter Manually”.
8 Start Adaptive Server. Change the name of the start-up file with the “.old” suffix created in step 2 back to the original name and start Adaptive Server with that file.

Master Device Is Lost and Valid Dump Does Not Exist
12
9 Restore system catalog information for the master database if changes were made to it since the last dump. Refer to “How to Restore System Table Information in master Database”.
10 Load or rebuild the model database if necessary. Refer to “How to Alter the model Database”.
11 Drop, re-create, and load any user databases located fully or partially on the master device.
Master Device Is Lost and Valid Dump Does Not Exist1 Build a new master device. Refer to “How to Build a New Master
Device”.
2 With Adaptive Server still down, manually reestablish the number of devices configuration parameter if necessary. Refer to “How to Alter the number of devices Parameter Manually”.
3 Start Adaptive Server in single-user mode. Refer to “How to Start Adaptive Server in Single-User Mode”.
4 Restore system catalog information for the master database. Refer to “How to Restore System Table Information in master Database” or “Manually Rebuilding Adaptive Server with bcp”.
5 Alter the tempdb database if necessary. Refer to “How to Alter tempdb”.
6 Check Adaptive Server to verify that the system database sybsystemprocs is still intact. If it is not, rebuild sybsystemprocs by running disk init to initialize a device for the database and then creating sybsystemprocs on the new device.
7 Execute the installmaster and installmodel scripts. Refer to “How to Run the installmaster and installmodel Scripts”.
8 Use sp_addserver to add a SYB_BACKUP entry to the sysservers table:
1> sp_addserver "SYB_BACKUP" null, 2> <correct_backup_server_name>3> go
9 Dump the master database.

CHAPTER 1 System Database Recovery
13
10 Drop, re-create, and load any user databases located fully or partially on the master device.
Warning! Storing system databases sybsystemprocs, sybsecurity, and sybsyntax and user databases on the master device is not recommended, as this greatly complicates disaster recovery.
11 Use the latest version of the configuration file to restore the configuration parameters.
12 Shut down Adaptive Server.
13 Start Adaptive Server in multiuser mode with the old configuration file. Refer to “Returning Adaptive Server to Multiuser Mode”.
The model Database Is Lost or CorruptedIf you can use the model database with the use model command, and if you have a valid dump of the database, then you can load the model database from backup.
If you cannot use the model database or do not have a dump of the model database, follow these steps:
ASE 12.5.x and LaterASE 12.5.x and later versions do not use buildmaster. Use the following steps to rebuild model:
1 Shut down Adaptive Server.
2 Run the following command:
% dataserver -d master_device_path_name -w model
Note This is a unix example. On Windows platforms, you use the sqlsrvr program; refer to your Utility Guide for details.
3 Restart Adaptive Server.

Non-Master Device Containing Pieces of tempdb Is Lost
14
4 Reload any user-specific structures or data in model, such as data types, tables, stored procedures, users and permissions.
ASE 12.0.x and Earlier1 Shut down Adaptive Server.
2 Run the following command:
% buildmaster -x -dmaster_device_name -s master_device_size
Note Due to the 6MB master in Adaptive Server 12.0.x, an additional precaution is necessary for sites running version 12.0.x. If you installed Adaptive Server starting with version 12.0.x, use the 12.0.x buildmaster for this step. Otherwise, if you upgraded from pre-12.0.x Adaptive Server to 12.0.x, use the pre-12.0.x buildmaster. Using the correct version of buildmaster avoids potential problems due to the increased size of master in 12.0.x.
3 Restart Adaptive Server.
4 Reload any user-specific structures or data in model, such as tables, stored procedures, users and permissions.
Non-Master Device Containing Pieces of tempdb Is Lost
Follow this procedure if a device containing pieces of tempdb, other than the master device, has been lost:
1 Start Adaptive Server in single-user mode. Refer to “How to Start Adaptive Server in Single-User Mode”.
2 Print out the sysusages table for tempdb using the following command:
1> select * from sysusages where dbid=22> go
CHAPTER 1 System Database Recovery
15
3 Delete all but the first entry in sysusages for tempdb (dbid=2). Make sure that the segmap column for the first entry is 7. If the model database has been increased beyond its default size, do not reduce the size of tempdb so that it is smaller than model. If the size of model is larger than the default 2MB, call Sybase Technical Support.
Warning! disk refit or disk reinit will fail on any master database on which this procedure is used.
For example:
1> begin transaction2> delete master..sysusages 3> where dbid=2 and lstart != 04> go1> update master..sysusages set segmap = 72> where dbid = 23> go1> select * from master..sysusages where dbid=22> go
4 If the above select command produced the following output:
dbid segmap lstart size2 7 0 1024
continue to step 5. If it did not, roll back the transaction and contact Sybase Technical Support.
5 Commit the transaction and shut down Adaptive Server using the following commands:
1> commit transaction2> go1> shutdown2> go
6 Start Adaptive Server in multiuser mode. Refer to “Returning Adaptive Server to Multiuser Mode”.
7 Disallow updates to system catalogs:
1> sp_configure "allow updates", 02> go
8 Drop (sp_dropdevice) and reinitialize (disk init) the lost device. If user databases are on the same device with tempdb, you may have to drop those databases also, before dropping and reinitializing the lost device.

Master Device Is Going Bad
16
9 Use the alter database command to restore tempdb to the desired size.
10 Dump the master database.
Master Device Is Going BadIf your master device is working fine but you are starting to notice other symptoms that could lead to major problems, use the procedure in this section to prevent those major problems.
Here are some examples of symptoms that could lead to problems with your master device:
• Your operating system log reports I/O disk errors.
• Databases other than master are starting to exhibit problems.
• There is a problem with tempdb or model.
Perform the following procedure if your master device is going bad:
1 Ensure the consistency of the master database by running dbcc checkalloc and dbcc checkdb.
2 Ensure the consistency of any user databases located fully or partially on the master device by running dbcc checkalloc and dbcc checkdb.
3 Dump any user databases located fully or partially on the master device. Save the contents of sysusages, sysdevices, sysdatabases, syslogins, sysloginroles, sysservers, and sysconfigures.
4 If the consistency checks on the master database do not produce errors, and changes have been made since the last backup, dump the master database.
5 Perform steps 1 and 2 for the model database if it has been changed since the original installation.
6 Have your hardware checked and repaired. If the device is replaced, follow the steps listed in “Master Device Is Lost and Valid Dump Exists”.

CHAPTER 1 System Database Recovery
17
Adaptive Server Does Not Start After Altering Configuration
When Adaptive Server starts, it reads the configuration parameters contained in the configuration file for your Adaptive Server.
The values of these variables are used at start-up time to determine how much memory to allocate for various resources needed by Adaptive Server. If sufficient resources are not available to satisfy all the requests, Adaptive Server will not start. This situation most often occurs when one or more erroneously high values are set with the sp_configure command.
Refer to “How to Reset Adaptive Server to Its Default Configuration” for information about resetting configuration parameters.
Manually Rebuilding Adaptive Server with bcpManually rebuilding Adaptive Server with bcp and server building utilities enables you to create a new master device/configuration block and preserve system tables.
As of version 12.5, master devices and servers are built with the dataserver (Unix) and sqlsrvr (Windows) programs. In pre-12.5 versions, they are built with buildmaster.
Some of the most common uses for a manual rebuild are when:
• The master device has no more available space. You can migrate the system table information to a new, larger master device while retaining all current data on the original devices.
• Restoring the master device resulted in 605 errors due to an incorrect sysusages table. You can use trace flags, along with the bcp and server build steps, to get the information needed for a rebuild.
• No backup of the master database exists. The old master database is accessible, although it is not runnable. You can migrate the system information to a new master database.
You can also use manual rebuild steps for immediate recovery when:
• Severe data corruption necessitates a speedy recovery. You can run the bcp and server build commands, instead of using the sybinit utility, running the disk reinit/refit commands, or creating/loading from backups.

Manually Rebuilding Adaptive Server with bcp
18
• You need to perform a recovery from an inadvertent configuration change, such as memory set too high.
• Major corruption problems on, or loss of, the master device requires creating a new server. In this case, you must use bcp on your system tables immediately.
Note Ensure that your backup procedures include bcp commands for all relevant tables, including the six system tables listed under “Steps for Rebuilding Adaptive Server”. You can then more easily restore the master database if necessary.
ChecklistYou can use the following checklist when you manually rebuild Adaptive Server with bcp and the server build utility for your ASE version and platform. Details on each step follow.
1 Copy the system tables to files (bcp...out with the -c option).
2 Get configuration information and shut down the server.
3 Run the dataserver (Unix)/sqlsrvr (Windows) program for version 12.5 and later, or the buildmaster command on pre-12.5 versions to create the new master device.
4 Bring up the server in single user mode.
5 Delete sysconfigures, and then copy the files into the system tables (bcp...in), including sysconfigures.
6 Reconfigure, shut down with nowait and then restart the server.
7 Run the install scripts for master and model.
8 Shut down/bring up the server in multi-user mode.
9 Test the results.
ConsiderationsBefore performing Adaptive Server recovery, carefully evaluate the issues specific to your system, and then choose the best approach.

CHAPTER 1 System Database Recovery
19
You may also find it helpful to review appropriate recovery and rebuild information in earlier sections of this chapter.
If using bcp version 11.1.1, ensure that you have applied the latest EBF for this version. As an alternative, you can use the -Q option in bcp 11.1.1 to revert to the version 10.0.4 behavior, which converts null data to spaces.
Steps for Rebuilding Adaptive Server
Note This section uses Unix syntax and examples. For the equivalent Windows information, refer to your Utility Programs guide for Windows.
Let us say that your master device is full and is producing 1105 errors (system segment is full). As a last resort, you have run the dump transaction command with the truncate_only or no_log option, which did not free any database space. You cannot even run alter database to add rows to the sysusages system table, because the system segment is full. This section details how to manually rebuild Adaptive Server in this common situation, focusing on these six system tables:
• sysdevices represents the available physical devices.
• sysdatabases represents the databases known to Adaptive Server.
• sysusages plots how individual databases use the device fragments, such as for data and transaction logging.
• syslogins holds the login information about users allowed to work in the server.
• sysconfigures contains the user-settable configuration parameters.
• syscharsets contains the character sets and sort orders defined for Adaptive Server use.
Your Adaptive Server configuration may include other system tables of critical importance. If so, be sure to include them when recreating the original environment. For example:
• sysservers holds the names of other remote servers.
• sysremotelogins contains the login information for the remote hosts.
• sysloginroles may be necessary for sites doing extensive group/security work.

Manually Rebuilding Adaptive Server with bcp
20
The following procedures rely on the bcp command. If bcp is unavailable, see “If You Cannot Use bcp or a Dump”.
Copy the System Tables to Files
Copy the system tables to data files as follows:
1 Execute the bcp...out command for each of the six main tables. At a Sybase bin directory prompt, enter:
bcp master..sysdevices out /directory.spec/devs -Usa -P -cbcp master..sysdatabases out /directory.spec/dbs -Usa -P -cbcp master..sysusages out /directory.spec/usages -Usa -P -cbcp master..syslogins out /directory.spec/logins -Usa -P -cbcp master..sysconfigures out /directory.spec/configures -Usa -P -cbcp master..syscharsets out /directory.spec/charsets -Usa -P -c
2 If your site needs other system tables, such as sysservers, and sysremotelogins, run bcp...out for them now as well. The syntax is:
bcp master..<table_name> out /directory.spec/<filename> -Usa -P -c
Where:
• table_name is the name of the table, for example sysservers.
• filename is the name you want to give the bcp file, for example srvrs.
For details on using the bcp command, see the Adaptive Server utilities manual for your platform.
Note You cannot use bcp and buildmaster to recover user databases on the master device. You must manually drop and reload these user databases from backups.
Get Configuration Information and Shut Down the Server
Print current configuration values to an output file, and then shut down the Adaptive Server as follows:
1 At a Sybase bin directory prompt:
isql -Usa -P -S<server> << EOF > /directory.spec/sp_configure.out
For details on isql parameters, see the Adaptive Server utilities manual for your platform.
2 At the isql prompt, enter:
CHAPTER 1 System Database Recovery
21
1> sp_configure2> go1> shutdown2> goEOF
Create New Master Device and Edit the run_server File
Consider these guidelines before creating a new master device:
• Preserve the original. When creating a new master device, preserve the original device in case you need information from it. First do all the work on a new device (a filesystem is adequate for this.) Once the server is running, you can either repeat the same work on the original master device or copy the new device with an operating system utility, such as dd (Unix).
• Keep tempdb on master. If you previously moved tempdb off the master device, sysusages for master will be nonstandard if the master database was altered after moving tempdb.
Maintaining tempdb on the master device ensures a standard master device layout that you can restore conveniently if the device is lost. It is recommended that you take this opportunity to move tempdb back to the master device. For details, refer to TechNote 2829 in the Technical Library at http://www.sybase.com/detail?id=2829.
To create a new master device:
1 Create a new master device/configuration block. Use the procedure described in How to Build a New Master Device.
Note To find where the current master device path is set, look in the “run_server” file under the Sybase install directory. The default name is RUN_SYBASE; if the server name is not SYBASE, the filename is RUN_servername.
2 Copy the “run_server” file under the Sybase install directory, and then edit the copy as follows:
• Change the -d<path_to_old_master_device> to reflect the <path_to_new_master_device> that you created in step 1.
• Change the comment, # Size of Master Device: <old_master_device_size>”, to reflect the <new_master_device_size>.

Manually Rebuilding Adaptive Server with bcp
22
Bring Up the Server in Single-User Mode
1 Copy the “run_server” file and name it with a “m_” prefix to indicate single user mode; for example, m_RUN_servername.
2 Edit the m_RUN_servername file to add the single-user mode flag (-m on Unix) in the dataserver command.
3 At a Sybase install directory prompt, enter:
startserver -f m_RUN_servername
For details refer to “How to Start Adaptive Server in Single-User Mode”.
Copy the Files into the System Tables
1 Log into the Adaptive Server that contains the new master device. No password is needed.
2 Delete the sysconfigures table. You will replace the rows in step 4.
3 Remove the rows in the sysusages output file /directory.spec/usages for dbid 1 (master), 2 (tempdb), and 3 (model). dbid is the leftmost value in each row.
This step prevents incorrect sysusages errors. Otherwise, databases try to use uninitialized space from rows in the output file that are not in the new sysusages table.
4 Copy the files back into the system tables by entering the following commands at a Sybase bin directory prompt:
bcp master..sysdevices in /directory.spec/devs -Usa -P -b 1 -cbcp master..sysdatabases in /directory.spec/dbs -Usa -P -b 1 -cbcp master..sysusages in /directory.spec/usages -Usa -P -b 1 -cbcp master..syslogins in /directory.spec/logins -Usa -P -b 1 -cbcp master..sysconfigures in /directory.spec/configures -Usa -P -b 1 -cbcp master..syscharsets in /directory.spec/charsets -Usa -P -b 1 -c
The -b 1 parameter allows processing to continue when bcp encounters duplicate records, such as the SA login created during the initial buildmaster process.
Note Remember to run bcp...in for any other tables that you included in the step “Copy the System Tables to Files”.
5 Look at your error log prior to failure for the default sort order and character set ID. Then invoke isql and enter:
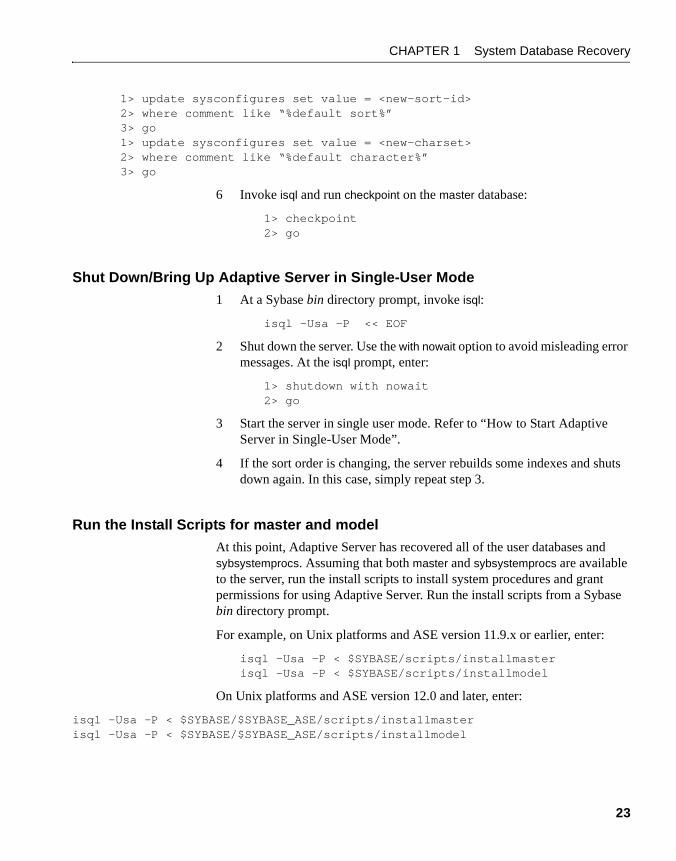
CHAPTER 1 System Database Recovery
23
1> update sysconfigures set value = <new-sort-id>2> where comment like “%default sort%”3> go1> update sysconfigures set value = <new-charset>2> where comment like “%default character%”3> go
6 Invoke isql and run checkpoint on the master database:
1> checkpoint2> go
Shut Down/Bring Up Adaptive Server in Single-User Mode
1 At a Sybase bin directory prompt, invoke isql:
isql -Usa -P << EOF
2 Shut down the server. Use the with nowait option to avoid misleading error messages. At the isql prompt, enter:
1> shutdown with nowait2> go
3 Start the server in single user mode. Refer to “How to Start Adaptive Server in Single-User Mode”.
4 If the sort order is changing, the server rebuilds some indexes and shuts down again. In this case, simply repeat step 3.
Run the Install Scripts for master and model
At this point, Adaptive Server has recovered all of the user databases and sybsystemprocs. Assuming that both master and sybsystemprocs are available to the server, run the install scripts to install system procedures and grant permissions for using Adaptive Server. Run the install scripts from a Sybase bin directory prompt.
For example, on Unix platforms and ASE version 11.9.x or earlier, enter:
isql -Usa -P < $SYBASE/scripts/installmasterisql -Usa -P < $SYBASE/scripts/installmodel
On Unix platforms and ASE version 12.0 and later, enter:
isql -Usa -P < $SYBASE/$SYBASE_ASE/scripts/installmasterisql -Usa -P < $SYBASE/$SYBASE_ASE/scripts/installmodel

Manually Rebuilding Adaptive Server with bcp
24
Shut Down/Bring Up the Server in Multi-User Mode
From the Sybase install directory prompt, enter:
startserver -f RUN_<server>
Verify the Results and Test Applications
Recommendations for verifying and recording the manual rebuild results:
• Perform dbcc commands on all databases.
• Dump the master database.
• Make and store hard copies of system tables, especially:
• sysdevices
• sysdatabases
• sysusages
• syslogins
• sysconfigures
• syscharsets
• Test applications to ensure that they work as expected.
If You Cannot Use bcp or a DumpIf you cannot use bcp or a dump to restore master database information, refer to the information on using disk reinit and disk refit in “How to Restore System Table Information in master Database”.
Also note that if you do not have disk reinit scripts, you can get device information from these sources:
• Error log, which provides the physical and logical device names and vdevno
• Operating system, which provides the size

25
C H A P T E R 2 Encyclopedia of Tasks
This chapter provides step-by-step procedures for tasks needed to recover from various disaster situations involving Sybase system databases or the entire master device, as well as for other tasks not strictly related to disaster recovery.
Note Although this chapter provides examples for a range of platforms, availability of Adaptive Server Enterprise varies. For example, Stratus, OpenVMS, Novell Netware, and OS/2 are not available on all server versions.
Disaster Recovery TasksThis section takes you through tasks necessary for recovery from various disaster situations involving Sybase system databases or the entire master device.
How to Build a New Master Device
ASE 12.5 and Later
When creating the new master device, make sure you use the same page size as your old master device and make the new device at least as large as the old one. The following example creates a device with a 2048-byte (2K) logical page size, and total size 100 megabytes + 8 Kilobytes (the 8 KB is extra space for the configuration area).
% $SYBASE/bin/dataserver -d$SYBASE/d_master.dat

Disaster Recovery Tasks
26
-z 2k -b 51204
Note This example applies to Unix platforms; Windows users can find the equivalent syntax in ASE Utility Programs for Windows and Windows NT. Also note that starting with 12.5, the dataserver command allows a space between option and parameter.
Use the -s option with this command to specify the server name. You can also specify the -b size in Kb, Mb, or Gb. In the above example you would use -b 100.00782M. Without one of the K, M, or G modifiers, the default device size is expressed in server virtual pages, 2048 bytes each.
At device creation, the server issues large numbers of "upgrade" messages tracking its progress; these messages help troubleshoot any problems. They are upgrade messages because the server creates a new installation by doing an "upgrade" of a device that it has just created.
When finished, the server shuts down. You now have a master database containing minimal system information, including an sa login whose password is null, and minimally sized master, model, tempdb, and sybsystemdb databases.
ASE 12.0.x and Earlier
To build a new master device, execute buildmaster, specifying the location and size of the master device. buildmaster should always be run by the operating system user who owns the Adaptive Server devices. Remember that buildmaster takes the size in 2K blocks. For example, if you want a 14MB master device, set the size parameter to 7168 2K blocks.
Warning! Never execute buildmaster while Adaptive Server is running!
To build a new 14MB master device, use a command similar to one in the following table:
Operating System Command
UNIX buildmaster -ddevice_name -s7168
Digital OpenVMS buildmaster/disk=device_name/size=7168
Novell NetWare load bldmastr -ddevice_name -s7168
OS/2, Windows NT bldmastr -ddevice_name -s7168

CHAPTER 2 Encyclopedia of Tasks
27
If the master database has been altered, alter it again using exactly the same commands. The master database must be re-created both logically and physically to look exactly the way it did at the time of the last dump. This includes any alterations to tempdb or model.
buildmaster initializes the specified device as the Sybase master device and creates the master, model, and tempdb databases on this device. Any information existing on the device will be overwritten.
buildmaster installs default character set and sort order. On HP-UX, buildmaster installs the roman_8 character set and sort order, the default sort order/character set for this platform; srvbuild and srvbuildres are capable of installing additional character sets.
Refer to buildmaster, srvbuild and srvbuildres in the Adaptive Server utility programs manual for additional information.
Note Be sure to execute buildmaster from the correct Adaptive Server version. Refer to “How to Determine Your Adaptive Server Version” in the Error Message Writeups chapter for instructions.
How to Rebuild master Database and Leave Master Device Intact
ASE 12.5 and Later
Use this procedure when the current master device is usable, but you are unable to use the server because of master database corruption. These steps enable you to create a new master database and reload it from backup.
Note Use this procedure only for ASE version 12.5.x and higher. The examples shown here apply to unix platforms; for equivalent Windows commands, see your platform’s Utility Guide and operating system manual as appropriate.
Step 1. Create a New master Database
The approach to creating the new master database depends on the extent and nature of the corruption. Three different scenarios are possible:

Disaster Recovery Tasks
28
• Basic recreation, which is sufficient if only the data in master was affected. The server reads the master device to determine page and device sizes.
• Recreating when the device’s configuration area is corrupted. You will need to provide page and device sizing information.
• Recreating when the master database allocation pages are also corrupted. All corrupt or unallocated extents on the device are allocated to master.
If you are unsure of the scope of corruption, start with the “Basic Recreation” steps below; use the instructions for the other scenarios only if necessary.
Basic Recreation of master Database
This command instructs the server to read the device’s configuration area to obtain page size and device size and determine where to place the master database:
% dataserver -d <device_name> -w master
The server creates a master of the same size, and in the same locations on disk, as the database it is replacing. It will not have the old database’s data! Instead, it contains a default set of data that you will replace later using load database. The default data includes information about any databases existing on the master device, but no other devices. It also has minimal system information, including a login for sa with a null password.
This process produces a large number of messages tracking the progress of database creation which are helpful in troubleshooting any problems. They are "upgrade" messages because the server creates a new master database by "upgrading" the device.
Note If the configuration area is corrupt or unavailable, this command returns the message: "The configuration area in device ’xxx’ appears to be corrupt. The server needs this data to boot, and so
cannot continue." If this occurs, continue with the instructions below.
Recreation with a corrupt configuration area
The "Basic Recreation" process above may fail if the device’s configuration area has become corrupt. If so, you must supply sizing information. You will need two parameters: the page size (you need to know what this was), and the device size, which you can determine directly from the device:
% ls -l $SYBASE/d_master.dat

CHAPTER 2 Encyclopedia of Tasks
29
Divide the size shown by the page size (2048, say) to obtain the number of server pages, by 1024 to obtain KB, or by 1048576 to obtain MB.
Provide this information on the command line as follows:
% $SYBASE/bin/dataserver -d $SYBASE/d_master.dat -w master-z page_size -b device_size
For example, if your page size is 2K and the device size is 51204 server pages (100 MB, plus 8K space for the configuration area), the command looks like this:
% $SYBASE/bin/dataserver -d $SYBASE/d_master.dat -w master -z 2k -b 51204
You may also specify the device size as Kb, Mb, or Gb; for example,-b 100M.
Recreation when master database allocation pages are corrupted
If the above procedures for recreating the master database fail, the database’s allocation pages are corrupt. (This may happen, for instance, if the database device was inadvertently written over by a completely different file.)
In this case, you can force the server to allocate all corrupted or unallocated extents to the master database:
% $SYBASE/bin/dataserver -d $SYBASE/d_master.dat -w master -f
This allocates all corrupted or otherwise unrecognizable extents to the master database. Depending on the extent of your master device corruption, and how much free space it originally had, this will probably leave master much larger than it needs to be, causing it to occupy space that used to belong to other databases like model, tempdb, and sybsystemdb. We will consider recovering from that situation later.
Note You may combine the -f, -b, and -z options as necessary.
The server shuts down after recreating the master database.
Step 2: Account for Missing Databases (if you used -f)
Note This step is only needed if you used the -f option in Step 1 to recreate the master database due to allocation page corruption. If you did not use -f, skip this step.
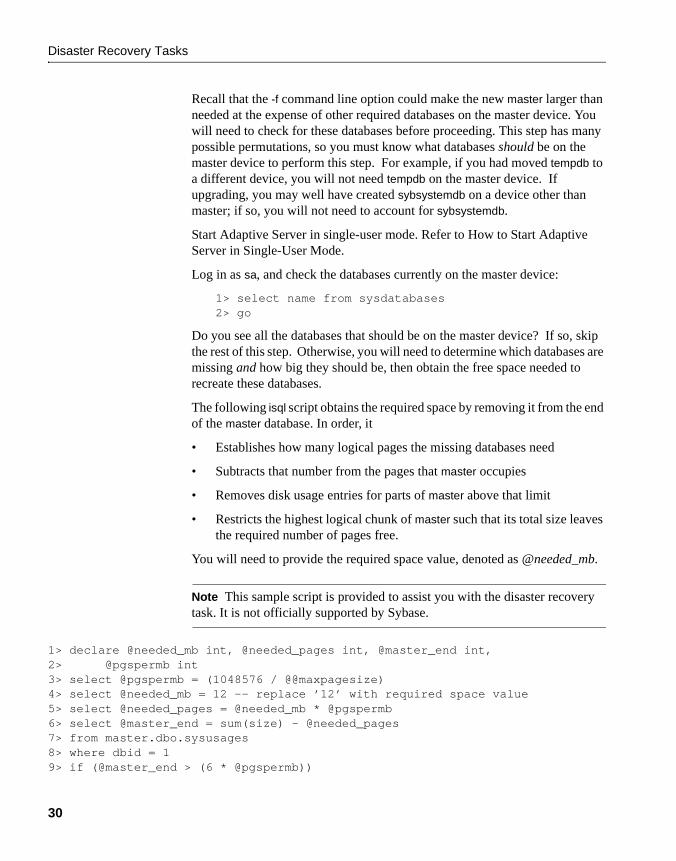
Disaster Recovery Tasks
30
Recall that the -f command line option could make the new master larger than needed at the expense of other required databases on the master device. You will need to check for these databases before proceeding. This step has many possible permutations, so you must know what databases should be on the master device to perform this step. For example, if you had moved tempdb to a different device, you will not need tempdb on the master device. If upgrading, you may well have created sybsystemdb on a device other than master; if so, you will not need to account for sybsystemdb.
Start Adaptive Server in single-user mode. Refer to How to Start Adaptive Server in Single-User Mode.
Log in as sa, and check the databases currently on the master device:
1> select name from sysdatabases2> go
Do you see all the databases that should be on the master device? If so, skip the rest of this step. Otherwise, you will need to determine which databases are missing and how big they should be, then obtain the free space needed to recreate these databases.
The following isql script obtains the required space by removing it from the end of the master database. In order, it
• Establishes how many logical pages the missing databases need
• Subtracts that number from the pages that master occupies
• Removes disk usage entries for parts of master above that limit
• Restricts the highest logical chunk of master such that its total size leaves the required number of pages free.
You will need to provide the required space value, denoted as @needed_mb.
Note This sample script is provided to assist you with the disaster recovery task. It is not officially supported by Sybase.
1> declare @needed_mb int, @needed_pages int, @master_end int,2> @pgspermb int3> select @pgspermb = (1048576 / @@maxpagesize)4> select @needed_mb = 12 -- replace ’12’ with required space value5> select @needed_pages = @needed_mb * @pgspermb6> select @master_end = sum(size) - @needed_pages7> from master.dbo.sysusages8> where dbid = 19> if (@master_end > (6 * @pgspermb))

CHAPTER 2 Encyclopedia of Tasks
31
10> begin11> delete master.dbo.sysusages12> where lstart > @master_end13> update master.dbo.sysusages14> set size = @master_end - lstart15> where dbid = 116> and lstart = (select max(lstart) from master.dbo.sysusages17> where dbid = 1)18> end19> else20> begin21> print "Can’t take enough space from the master database!"22> print "Need to find %1! pages", @needed_pages23> print "That would leave master with %1! pages", @master_end24> print "Cannot continue."25> end26> go
Note If the procedure fails, your master device is not big enough to hold all the databases you are trying to create. Check the required MBs of space that you specified. If it is correct, it may be necessary to create a new master device using the instructions in How to Build a New Master Device.
You now have enough space to recreate your required databases. Create them one at a time. For example:
1> create database model on default = 32> go
Repeat for each database. Then shut down the server.

Disaster Recovery Tasks
32
ASE 12.0.x and Earlier
To rebuild the master database only and leave the master device intact, run buildmaster with the -m option (on UNIX, Novell NetWare) or the /master option (on Digital OpenVMS). Be sure to specify the correct size of the master device, not the master database.
Note Due to the new 6MB master in Adaptive Server 12.0.x, an additional precaution is necessary for sites running version 12.0.x. If you installed Adaptive Server starting with version 12.0.x, use the 12.0.x buildmaster for this step. Otherwise, if you upgraded from pre-12.0.x Adaptive Server to 12.0.x, use the pre-12.0.x buildmaster. Using the correct version of buildmaster avoids potential problems due to the increased size of master in 12.0.x.
The commands in the following table build a new master database without changing the configuration block or initializing the master device. These commands also set sort order and character set values to their defaults.
Warning! Never run the buildmaster utility while Adaptive Server is running!
After rebuilding master, and prior to loading the backup, alter the master database on the master device as necessary to ensure that the lstart, size, and vstart values of master match up with those on the dump. Otherwise, you may see corruption following the load of master.
buildmaster installs default character set and sort order. On HP-UX, buildmaster installs the roman_8 character set and sort order, the default sort order/character set for this platform; srvbuild and srvbuildres are capable of installing additional character sets.
Refer to buildmaster, srvbuild and srvbuildres in your platform’s utility programs manual for additional information.
Operating System Command
UNIX buildmaster -ddevice_name -sdevice_size -m
SCO UNIX buildmaster -d/dev/rid001d -s5120 -m
Digital OpenVMS buildmaster /disk=device_name /master /size=device_size
Novell NetWare load bldmastr -ddevice_name -sdevice_size -m
OS/2, Windows NT bldmastr -ddevice_name -sdevice_size -m
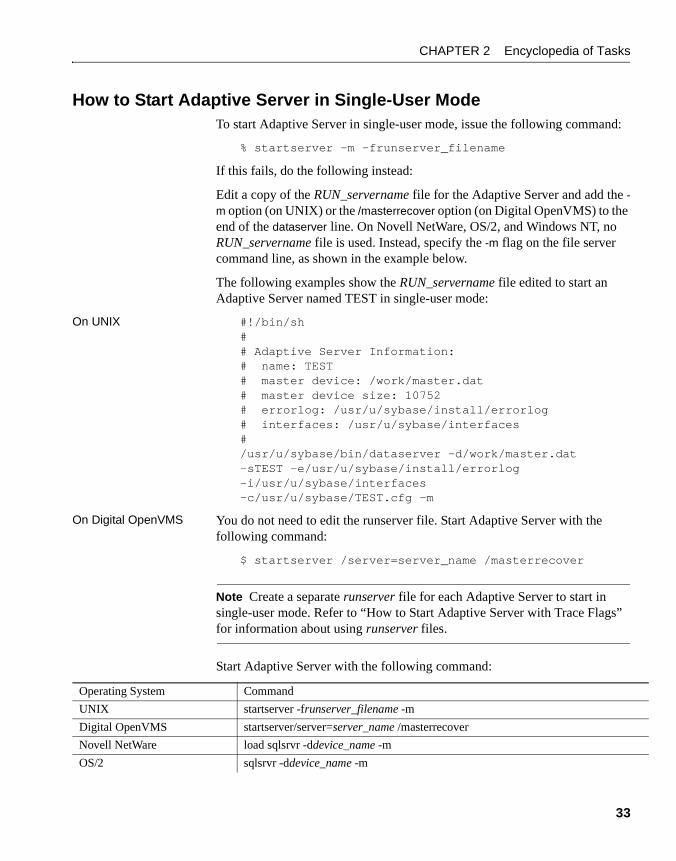
CHAPTER 2 Encyclopedia of Tasks
33
How to Start Adaptive Server in Single-User ModeTo start Adaptive Server in single-user mode, issue the following command:
% startserver -m -frunserver_filename
If this fails, do the following instead:
Edit a copy of the RUN_servername file for the Adaptive Server and add the -m option (on UNIX) or the /masterrecover option (on Digital OpenVMS) to the end of the dataserver line. On Novell NetWare, OS/2, and Windows NT, no RUN_servername file is used. Instead, specify the -m flag on the file server command line, as shown in the example below.
The following examples show the RUN_servername file edited to start an Adaptive Server named TEST in single-user mode:
On UNIX #!/bin/sh## Adaptive Server Information:# name: TEST# master device: /work/master.dat# master device size: 10752# errorlog: /usr/u/sybase/install/errorlog# interfaces: /usr/u/sybase/interfaces#/usr/u/sybase/bin/dataserver -d/work/master.dat -sTEST -e/usr/u/sybase/install/errorlog -i/usr/u/sybase/interfaces-c/usr/u/sybase/TEST.cfg -m
On Digital OpenVMS You do not need to edit the runserver file. Start Adaptive Server with the following command:
$ startserver /server=server_name /masterrecover
Note Create a separate runserver file for each Adaptive Server to start in single-user mode. Refer to “How to Start Adaptive Server with Trace Flags” for information about using runserver files.
Start Adaptive Server with the following command:
Operating System Command
UNIX startserver -frunserver_filename -m
Digital OpenVMS startserver/server=server_name /masterrecover
Novell NetWare load sqlsrvr -ddevice_name -m
OS/2 sqlsrvr -ddevice_name -m

Disaster Recovery Tasks
34
Once Adaptive Server is running and recovery is complete on all databases, review the error log and verify that no errors occurred. If you have successfully started Adaptive Server in single-user mode, a message like the following should appear in the error log:
00:95/12/29 13:09:53.14 server *** WARNING ******************00:95/12/29 13:09:53.17 server Adaptive Server booted single user mode - updates allowed to system catalogs
On Windows NT Follow these steps to start Adaptive Server in single-user mode on Windows NT:
1 Log into Windows NT using an account with Windows NT administrator privileges.
2 Double-click the Server Config icon in the Sybase for Windows NT program group.
3 Select the Adaptive Server icon.
4 Select Configure Adaptive Server.
5 Select the name of the Adaptive Server to configure, and choose Continue.
6 Enter “sa” for login name. (No password is required.)
7 If the Adaptive Server is not running, Server Config asks you to start it now; choose Yes.
8 Select the Command Line Option or the Command Line Parameters button.
Server Config displays the Command Line Parameters dialog box.
9 Edit the text in the Command Line Parameters dialog box to include the start-up parameter - m.
10 Click OK.
11 Choose Save at the Adaptive Server's configuration dialog box.
12 Exit Server Config.
Returning Adaptive Server to Multiuser Mode
To start Adaptive Server in multiuser mode, use the original runserver file without the -m option.
Windows NT See directions below.

CHAPTER 2 Encyclopedia of Tasks
35
On Novell, restart Adaptive Server without the -m flag.
On Digital OpenVMS, restart Adaptive Server without the /masterrecover option.
How to Run the installmaster and installmodel ScriptsTo execute the installmaster and installmodel scripts, located in the $SYBASE/$SYBASE_ASE/scripts directory, type the command for your platform.
Note On the Novell NetWare platform, each LOAD command must be on a single line.
The installmaster and installmodel scripts install the system procedures, set up some required Sybase internal tables, and install the privileges for the model database.
Operating System Command
UNIX isql -Usa -Psa_password -Sserver_name< installmaster
isql -Usa -Psa_password -Sserver_name< installmodel
SCO UNIX isql -Usa -Psa_password-i/usr/sybase/scripts/installmaster
isql -Usa -Psa_password-i/usr/sybase/scripts/installmodel
Digital OpenVMS isql/u="sa"/p="sa password"/input=installmaster
isql/u="sa"/p="sa password"/input=installmodel
Novell NetWare load isql -Usa -Psa_password -Sserver_name-isys:sybase\scripts\instmstr.sql
load isql -Usa -Psa_password -Sserver_name-isys:sybase\scripts\instmodl.sql
OS/2, Windows NT isql -Usa -Psa_password -Sserver_name-ic:\sybase\scripts\instmstr
isql -Usa -Psa_password -Sserver_name-ic:\sybase\scripts\instmodl

Disaster Recovery Tasks
36
How to Load the master Database from BackupThis is a three-step procedure:
1 Put Adaptive Server in single-user mode. Refer to “How to Start Adaptive Server in Single-User Mode”.
2 Start isql as sa.
3 Execute these commands:
1> load database master2> from logical_dump_device_name3> go
OR
1> load database master2> from “physical_dump_device_name”3> go
Alternatively, if the database was dumped to a remote site, refer to “load database” in the Reference Manual for information about loading the master database.
Once the master database is loaded successfully, Adaptive Server automatically shuts itself down and the isql session exits with the following message:
DB-Library: Unexpected EOF from SQL Server.
How to Restore System Table Information in master DatabaseThis section is divided into two parts. The first part describes how to reestablish device and database information in the system catalog, and the second part describes how to reestablish Adaptive Server logins.
Restoring Device and Database Information in the System Catalog
If a create database, alter database, or disk init command has been issued since the last database dump of master, or if no valid dump of master exists, and no valid bcp files of system tables exist, refer to “Backing Up and Restoring the System Databases” in the System Administration Guide for information on the use of the disk reinit and disk refit commands. These commands restore the system tables information contained in the master database, which describes all Sybase devices and user databases.
CHAPTER 2 Encyclopedia of Tasks
37
If you kept the disk init scripts originally used to initialize the database devices, you can use them to formulate the disk reinit commands, since disk reinit uses the same parameters. If these scripts are not available, examine the contents of sysdevices before a disaster and build the necessary disk reinit command scripts for use when needed. This information is also available from the server error log and the operating system.
Execute disk reinit on the device on which sybsystemprocs is located if it is on a device other than master. To retrieve the correct parameters for disk reinit, check the values you saved from sysdevices. If this information is not available, check the most recent error log.
Note The device on which sybsystemprocs resides will not be included in your disk init script, as srvbuild creates that device during installation. Therefore, record the values in sysdevices for the device on which sybsystemprocs resides, even if you plan to use your disk init scripts.
After all the disk reinit commands complete, compare the current contents of sysdevices with a copy of the sysdevices table that was made before the master device was lost. Since the disk refit command is based on the contents of that table, it is crucial that the table accurately reflect all devices.
After the disk refit command is complete, manually compare the contents of the current sysdatabases and sysusages with copies of those same tables that were made prior to the loss of the master device.
Keep up-to-date copies of these tables on hand, using bcp with the -c option, to ensure the quickest recovery after a disaster. If sysdatabases and sysusages do not match your hardcopy records, contact Sybase Technical Support for assistance.
Re-establishing Adaptive Server Logins
If you have added Adaptive Server logins since the last database dump of master, or if no valid dump of master exists, restore the syslogins table.
How you restore the table depends on what information you have on hand:
• If you saved the scripts with all sp_addlogin and sp_droplogin statements made in the correct order, run those scripts.
• If you do not have the scripts, but have a copy of syslogins saved, reconstruct the sp_addlogin and sp_droplogin commands and the corresponding suids.

Disaster Recovery Tasks
38
• If neither the scripts nor the copy of syslogins is available, follow these steps:
a Query all of the user databases to determine the name and the suid of each user. The sp_addlogin system procedure assigns an suid to each login in numerical order, and this suid is mapped to the sysusers table in each user database.
b Once all names and suids are known, execute sp_addlogin for each user, in the appropriate order, so that newly generated logins have the same suid as the users in the user databases. You might have to enter dummy accounts for users whose logins have been dropped in order to keep current users' suid values in the correct sequence. Drop these dummy accounts when you are done.
How to Alter the number of devices Parameter ManuallyThis step is necessary only if you are using a virtual device number (vdevno) that is greater than the default value for the number of devices configuration parameter (in this case, some of your devices will be inaccessible until you perform this step). The default value for number of devices is 10 on most platforms.
Note Perform this task only if the configuration file prior to an Adaptive Server crash is lost. If the configuration file is available, use that file to start up Adaptive Server or use the number of devices from the last configuration file.
To aid in the recovery process, determine whether this step will be needed before an actual disaster. Do this by examining the device_number column in the sp_helpdevice output.
If Adaptive Server is not up and running, check the start-up section of the most recent error log, which contains the device number.
If a virtual device number greater than the default is being used, increase the number of devices parameter in the configuration file before you start Adaptive Server. For example, if the highest vdevno in use is 30 and the default is 10, edit the configuration file to set the number of devices parameter to 31.

CHAPTER 2 Encyclopedia of Tasks
39
How to Alter tempdbIf tempdb has been enlarged and these changes are not reflected in your current master database, alter tempdb again to ensure that there is enough space to process your normal work load. Refer to the System Administration Guide for more information.
To help prevent errors from occurring during disaster recovery, record the commands you used originally to alter tempdb.
How to Alter the model DatabaseBecause the model database is created at the same time as the master database, no action is needed to build it. If you have made any changes to model, however, you must reapply them.
If you need to alter the size of the model database, alter the size of the tempdb database so that it is at least as big as model. If you attempt to start Adaptive Server, and model is bigger than tempdb, Adaptive Server will not start.
How to Reset Adaptive Server to Its Default ConfigurationWhenever you make a change to your configuration values using sp_configure, Adaptive Server saves the old configuration file under the name servername.sequential_number. This means that your default configuration should exist in one of these files.
If you successfully locate the desired configuration file, do the following:
1 Name the current servername.cfg file to servername.cfg.old.
2 Rename the file you located to servername.cfg.
3 Restart Adaptive Server.
If you are unable to locate the desired configuration file, do the following:
1 Rename the servername.cfg file in your Sybase home directory to servername.cfg.old.
2 Start Adaptive Server without specifying a configuration file name.
Adaptive Server will use the default configuration and create a new configuration file if there is no servername.cfg file available at start-up time.

Disaster Recovery Tasks
40
How to Set A Default Backup Server Manually in Adaptive ServerThis procedure is needed to allow the Adaptive Server that is being recovered to access its Backup Server. If this step is not performed when needed, then Adaptive Server will not be able to process any dump or load commands.
As a Sybase System Administrator (“sa_role”), execute the following commands in an isql session on the Adaptive Server that is being recovered:
1> use master2> go1> select srvname, srvnetname from sysservers 2> where srvname = "SYB_BACKUP"3> go
There are three possible outcomes to this query. The following table matches each outcome to the steps you should take in that circumstance:
How to Fix Problems Encountered by Disk Refitdisk refit is used to restore sysdatabases and sysusages when you must perform disaster recovery on a failed database, but the last database dump does not contain the most current information about devices and/or databases. disk refit examines the disk allocations in sysdevices and rebuilds sysdatabases and sysusages.
Outcome Action
Adaptive Server returns a single row and the srvnetname column contains the correct reference for the Backup Server
No further action is needed
Adaptive Server returns a single row but the srvnetname column does not contain the correct reference
Issue the following commands:1> update sysservers2> set srvnetname = “backup_server_name” 3> where srvname = “SYB_BACKUP”4> go
where backup_server_name is the name of the Backup Server as it appears in the interfaces file.
Adaptive Server returns 0 rows Issue the following command:1> sp_addserver SYB_BACKUP, null,2> backup_server_name3> go
where backup_server_name is the name of the Backup Server as it appears in the interfaces file.

CHAPTER 2 Encyclopedia of Tasks
41
However, disk refit can abort or encounter an error if it finds incorrect device allocation. For example, suppose you drop a database and recreate it (or create a new database) on a different set of devices. If you never reuse some or all of the space previously occupied by the old database, this leaves two sets of allocation pages written to disk for the same dbid: one for the old database version and one for the new. The same issue can occur in tempdb if you simply update sysusages by hand to show that tempdb is on a different device, then reboot the server. If allocation page 0 of the old database remains on the disk, this also leaves an old copy of that database’s dbinfo structure.
These types of activities cause a variety of problems that manifest in different ways when you must later run disk refit as part of disaster recovery. This writeup examines the various problems, their symptoms and how to correct them.
Problem 1: Duplicate KeysWhile rebuilding sysusages and sysdatabases, disk refit may attempt to insert rows with duplicate keys because it finds duplicate data in two different devices.
Symptom: disk refit aborts with a message about an attempt to insert a duplicate key into sysusages or sysdatabases. disk refit aborts silently, without reporting the database or sysusages entry that caused the problem. This is the only form of the problem that causes disk refit to fail.
Corrective Action: Determine which device caused the problem, delete that device entry from sysdevices, and re-try disk refit.
tempdb is a common source of this problem, so if tempdb was previously moved off the master device onto a separate device, begin by dropping the new tempdb device to see if that fixes the problem.
You do not need to shut down and restart the server when correcting this problem.
Note To check for the other problems described below after correcting this problem, restart the server using -m and trace flag 3608 as you did initially for disk reinit and disk refit.

Disaster Recovery Tasks
42
Problem 2: Deleted Database dbiddisk refit finds a previously deleted database that was partially overwritten by a subsequent create database or alter database. The dbid of the deleted database was not reused by any subsequent database creation.
Symptom: You see one of the following:
• rows in sysusages with no matching dbid entry in sysdatabases, or
• a sysdatabases dbid entry with corresponding rows in sysusages that show a numbering gap; that is, (lstart + size) for the dbid does not equal the lstart of a subsequent entry with the same dbid, but one or more rows exist with a greater lstart for the same dbid.
Corrective Action: Follow the instructions in "Queries to Find Suspect sysusages Entries" below. If there were usage gaps, be sure to delete sysusages entries and any sysdatabases entry for the dbid where the gap(s) exist.
Problem 3: Allocation Pages from Deleted Databasedisk refit finds allocation pages from a previously deleted database; another database was subsequently created that reuses the dbid of the old database, but the combined set of sysusages entries created from these allocation pages do not cause any duplicate keys in sysusages.
Symptom: Rows exist in sysusages such that (lstart + size) of a previous entry with the same dbid does not equal this row’s lstart.
Corrective Action: Follow the instructions in "Queries to Find Suspect sysusages Entries" below. Be sure to delete any row whose sysusages.lstart does not equal the (lstart + size) of the preceding entry.
Warning! When correcting this problem, work from low to high lstart. Delete the lowest incorrect row first. This ensures that you do not accidentally delete an entry that should be there, because its lstart did not match the (lstart + size) of an earlier row that should not be there.

CHAPTER 2 Encyclopedia of Tasks
43
Problem 4: Incomplete sysusages EntriesThis is similar to the second problem, except that a sysdatabases entry does exist, and the sysusages entries are apparently correct, but are not complete because the end entries have been overwritten by subsequent database creation/alteration.
Symptom 1: A database exists that should not be present.
Symptom 2: Attempting to work in the database generates 806 errors, "Could not find virtual page for logical page n in database
<dbid>."
Corrective Action: Delete the sysdatabases entry and all sysusages entries for that dbid.
Queries to Find Suspect sysusages EntriesThe following queries disclose any bad sysdatabases or sysusages rows leading to problems 2 and 3 above. Run these queries in the order given, since this makes it easier to interpret returns from the last query in the set.
1 This query discloses overlapping sysusages rows, which you should delete:
select u1.dbid, u1.lstart, u1.size, u1.vstartfrom sysusages u1, sysusages u2where u1.dbid = u2.dbidand u1.lstart > u2.lstartand u1.lstart < (u2.lstart + u2.size)and not exists (select 1 from sysusages u3
where u3.dbid = u1.dbidand u1.lstart = u3.lstart + u3.size)
Any row returned by this query falls within the range of another entry for the same database. Such an entry is suspect; remove it.
Note This query may fail to disclose all problem rows for a given database. This happens because removing the first such row may uncover another row whose lstart matched the earlier problem row’s lstart+size. Remove the first sysusages row named in the query’s result set, then run the query again; continue until it returns no rows.
2 2. This query shows sysusages rows not belonging to any database:
select * from sysusages uwhere not exists (select 1 from sysdatabases d

Avoiding Disaster through Good DBA Practices
44
where d.dbid = u.dbid)
If such rows exist, either:
• They belong to a previously dropped database and you should remove them, or
• You need to reinitialize another disk and rerun disk refit.
3 This query discloses gaps in a database’s logical page numbering. It also discloses rows covered by queries 1 and 2, so you should ensure that those queries return no rows before attempting this query:
select * from sysusages u1where lstart != 0and not exists (select 1 from sysusages u2
where u2.dbid = u1.dbidand u1.lstart = u2.lstart + u2.size)
This query shows that sysusages entries are missing from the database whose dbid appears in the result set. This has the same two possible causes, and the same fixes, as rows in query 2.
Avoiding Disaster through Good DBA Practices This section provides a number of recommendations for keeping your Adaptive Server installation working at peak effectiveness. By maintaining these good practices, you can maximize server uptime, correct problems proactively, and be as prepared as possible to handle emergencies.
1 Keep Up-to-Date Backups
Maintaining current backups of your data is vital for any recovery plan. Keep multiple generations of backups, and keep some offsite as an extra precaution.
Make regular database dumps of:
• the master database. To insure that your backup of master is always current, back up master after each maintenance command that affects disks, storage, databases, or segments - for example, after creating or deleting databases, initializing new devices, and creating or modifying segments.
• the model database
• the sybsystemprocs database

CHAPTER 2 Encyclopedia of Tasks
45
• user databases.
2 Maintain copies of System Tables and DDL
Keep the latest offline copies of the following tables:
• sysusages
• syslogins
• sysloginroles
• sysdatabases
• sysdevices
• syscharsets
• sysconfigures
• sysservers
• sysremotelogins
• sysresourcelimits
• systimeranges
Use the bcp utility to copy out these tables. In addition, maintain a hardcopy by printing the output of the following queries:
select * from sysusages order by vstartselect * from sysusages order by dbid, lstartselect * from sysloginsselect * from sysloginrolesselect * from sysdatabasesselect * from sysdevicesselect * from syscharsetsselect * from sysconfiguresselect * from sysserversselect * from sysremoteloginsselect * from sysresourcelimits select * from systimeranges
Also maintain:
• copies of your configuration file.
• the first two blocks (2 pages) of the master device.
• a copy of the config block. You can generate this using Sybase Central or Power Designer. On Unix platforms, you can obtain a copy of the config block with this command:
Avoiding Disaster through Good DBA Practices
46
dd if=master_device of=$SYBASE/config_block.bak bs=1024 count=8
• all Data Definition Language (DDL) scripts you use to create user objects, specially stored procedures if you elect to use sp_hidetext.
Note Implement all changes to schema in the same way that the installmaster script is implemented.
3 Verify Database Consistency
Run dbcc checks on a regular basis to monitor the health of your databases. Database-wide checks are available with dbcc checkdb, dbcc checkalloc, and dbcc checkstorage. dbcc checkcatalog is also a useful tool. For a brief overview of dbcc commands, see “Useful dbcc Commands”. Detailed information appears in the System Administration Guide.
Since dbcc checks can be resource intensive, consider adopting a strategy to take advantage of object level dbcc's. On a given day run a certain number of checktable and tablealloc commands for a portion of the database. On subsequent days, run different tables. Over a period of days you can accomplish a complete check of your databases for integrity. For example if your database has 200 tables in addition to the system tables, run dbcc's on the system tables on night one, run dbcc's on each of the first 50 of the user tables on night two, the next 50 the next night and so on, until at the end of five nights you have checked every table in the database. On the sixth night you can begin the cycle again.
Note Running table-level dbcc's misses the GAM page checks.
Alternative strategies include:
• loading the database to another server, and running the dbcc's on that server;
• dbcc checkstorage.
Building dbcc checks into your regular backup/maintenance schedule can ensure that you have consistent, accurate backups available at all times.
4 Implement Mirroring
Mirroring, either at the Adaptive Server level or at the operating system level, can provide nonstop recovery in the event of media failure.

CHAPTER 2 Encyclopedia of Tasks
47
The factors you need to consider, and instructions on implementing Adaptive Server mirroring, are detailed in the section titled "Mirroring Database Devices" in the System Administration Guide.
5 Perform Ongoing Maintenance
As part of a routine program of server maintenance, you should:
• Monitor the Adaptive Server error log for errors. Note that users may not report errors of severity 17 or 18 if their work is not interrupted.
Set up a routine that browses the error log, searching for errors. See “How to Monitor the Adaptive Server Error Log” for an example. For information on the error log format and severity levels, see the System Administration Guide.
Note NT users can also monitor server messages by means of the Windows NT Event Log.
Prune the error log regularly as it grows constantly since Adaptive Server appends informational messages to the log during startup. A full error log with no space to write to may cause the server to freeze. Remember to shut down the server first, and make a copy of the log before pruning.
An example of log pruning on unix follows:
% cp errorlog errorlog.date% cp /dev/null errorlog
where date is the current date.
• Monitor the operating system log to keep an eye on the health of the hardware and the server environment. Many Adaptive Server errors can be due to underlying hardware problems, and can therefore indicate hardware problems.
Refer to “Checking the Operating System Error Log” for information on how to locate your log and how to check it.
• Monitor space usage with system procedures such as sp_helpsegment, sp_spaceused, and sp_helpdb. By running sp_spaceused regularly, for example, you can determine if a database is running out of space for new objects.
Alternatively, you can set up thresholds to monitor free space on database segments.

Avoiding Disaster through Good DBA Practices
48
See "Getting Information About Database Storage" and “Creating Threshold Procedures” in the System Administration Guide for details.
• Monitor and maintain optimizer statistics. As a table grows and changes, these statistics become old, and the server may start to choose the wrong index strategy for queries.
Adaptive Server maintains statistics in the sysstatistics and systabstats tables. For a detailed description of tbese tables and their use, refer to “Managing Statistics to Improve Performance” in the Performance and Tuning Guide
6 Avoid Risky Practices
• Avoid moving tempdb off the master device. When Adaptive Server is installed, tempdb resides on the master device. Although it is possible to move tempdb off the master device later for space considerations, this is not advisable. Once tempdb is moved off the master device, it is difficult and time-consuming to recover if a problem occurs on the master device or the device to which tempdb is moved.
• Never put anything other than master, model and tempdb on the master device. Storing user databases on the master device may make it difficult to recover the system databases or user databases if either become damaged.
7 Recovery Tips, Or What to do When Things Go Wrong
• Choose the correct recovery method. Your choice of methods will be dictated by the type of failure you encounter. For example, loss of a device will require restoring from backups.
Network/machine failure usually has little impact on the server but could corrupt data in some situations, and recovery may fail.
• If mirroring is enabled at your site, disable the mirror before loading a dump, thus preserving a copy of what you had before in case dumps are bad.
• Never run device creation utilities (dataserver for 12.5 and later, buildmaster for 12.0.x and earlier) on the original master device. It may contain information you need later. Instead, do the device build on a different device, and when your environment is completely restored, you can move back to your original master device.
8 Additional Tips

CHAPTER 2 Encyclopedia of Tasks
49
After an operating system upgrade, check permissions on your sybase devices.
Online Recovery and Recovery Fault IsolationAdaptive Server features Recovery Fault Isolation (RFI) to enhance the granularity of recovery. This discussion surveys various recovery options and focuses on the difference between traditional online recovery and RFI. We use examples to show how RFI can be used to enhance the recovery scenarios and how it can help to avoid extensive downtime due to recovery problems.
BackgroundRecovery can mean several things:
• Online recovery is the process by which the database is brought into a consistent state after the server is restarted.
• Recovery from backups means restoring a corrupt database by loading a database dump, then applying transaction log dumps to the database to bring it back to a consistent state.
• Finally, although Adaptive Server does not offer this functionality, recovery can also refer to recovering specific objects from a dump or other offline storage and restoring only that object rather than the database as a whole. While this technique is outside the scope of the current discussion, it may be useful in some of the recovery processes outlined below.
Online Recovery Concepts Online recovery brings the database to a consistent state after you restart the server.

Online Recovery and Recovery Fault Isolation
50
During routine Adaptive Server operation, all changes to the database are written first to the log, then to the data pages on disk. Log pages are written to disk when the transaction completes, that is, when the transaction commits. However, because all changed pages are written to disk whenever a checkpoint occurs, for other reasons prior to commit, changes can be written to the log or data pages as part of an as-yet-incomplete transaction. If the server fails after an uncommitted transaction is written to the log but before the transaction completes, online recovery reads the log and ensures that no uncommitted changes are reflected in the database. Likewise, online recovery ensures that any changes recorded in the log for committed transactions that have not yet been flushed to disk are updated on the data pages and written to disk.
Prior to RFI, online recovery was an all-or-nothing proposition. If recovery failed due to some corruption, there was no way to partially recover the database and leave the corrupt portion offline. The preferable option was to restore the database from backups. However, if backups were not available or time constraints made it difficult to go through the extensive procedures necessary to restore through backups, customers often used an undocumented and risky procedure, referred to as "suiciding the log", to skip recovery and get the database back on line.
Recovery from Backups
The traditional recovery option, when online recovery fails, is to restore the database from dumps, and incrementally apply transaction logs to bring the restored database back to the most current possible state. This is the best solution for restoring to an absolutely consistent state after corruption. It often brings the database to a state of consistency to within seconds of the point of original failure.
However, the drawback with this traditional approach is that the recovery granularity is at the level of the transaction dump. If a transaction causing corruption is dumped, the traditional method means loading a database dump and applying transaction log dumps up to, but not including, the transaction dump containing the offending transaction. This can result in hours of lost transactions.
CHAPTER 2 Encyclopedia of Tasks
51
Suiciding the Log
While suiciding the log can usually bring the server back online, it also frequently results in both physical and logical corruption in the database, because it bypasses the normal process of rolling back incomplete transactions in the log (and rolling forward completed transactions) that takes place during online recovery. Frequently, the resulting corruption is not encountered until a later time, and the connection with the earlier log suicide is not always recognized.
Warning! Log suicide is highly risky, and is not recommended except in extreme cases.
Recovery With RFIASE implements Recovery Fault Isolation (RFI), an online recovery feature that provides a level of granularity in recovery by means of partial recovery. RFI can isolate corruption, encountered during recovery, to the corrupt pages. This enables you to restore database integrity by isolating and repairing corruption on a page by page (and, consequently, on an object by object) basis without having to restore the entire database and transaction logs from backups.
Note While RFI can only define granularity at the page or database level, corruption is typically corrected at the object level with, for example, an entire index being recreated or an entire table being replaced.
Using RFI
Note RFI allows partial recovery only on user objects. If it encounters corruption on system tables, recovery fails for the entire database.
RFI allows the database administrator (DBA) to select the granularity of recovery for each user database. The choices are:
• Mark the whole database suspect on any recovery failure. This is the default behavior and it is how recovery worked in previous versions.

Online Recovery and Recovery Fault Isolation
52
• Set the number of pages that can be offlined during recovery and still allow the database to be opened. The DBA can decide whether the partially recovered database is to be open for updates or for reads only.
Finally, the DBA can set the database to be marked suspect on any recovery failure, then change the setting to recover all but the corrupt pages. In this mode users cannot access the database, enabling the DBA to determine the appropriate course of action and proceed accordingly.
There is a significant difference between RFI's page-level and database-level granularity. Database granularity mandates that all transactions in the database should either be completed and rolled forward, or rolled back and all changes backed out. In either case the database is in a logically consistent state at the end of recovery. In short, recovery is all or nothing. Any interruption in recovery that makes this impossible causes recovery to fail entirely, and the only sure way to guarantee a consistent state is to restore from backups. This can be problematical, depending on how many backups are available, their validity, and how recent they are.
Page level granularity, on the other hand, allows the server to offline corrupt pages in a transaction while onlining other pages. Since recovery has not been able to complete and verify the transactions, this will leave some of the transactions only partially available and all other transactions completely recovered as usual. There is no way to determine whether transactions that involved offlined pages are complete except by manual examination.
If, for example, a transaction changes rows on three pages and the changes on two pages are written to disk before the server stops, recovery would normally assure that the third page also was written to disk. If, however, recovery marks as suspect the page to which the third update is to be made, there is no way to determine whether the transaction is complete or incomplete; that is, whether all three pages are updated or only the first two. A transaction in this state is deemed to be partially available, as the changes to the first two pages are available while the change to the third page is unavailable, and it is not known whether it was changed.
CHAPTER 2 Encyclopedia of Tasks
53
At another level, consider a case where a page from a specific table is marked offline. Subsequent work is dependent on this page but only at an implicit level, meaning that it is assumed that business rules will be handled without explicitly coding referential checks. If the code were to explicitly check for the offline data, an error would be raised; but if this is not done and the work proceeds with only an implicit dependence on the offline pages (which cannot be restored to a consistent state), it may result in logical inconsistencies in the database. This is yet another reason we recommend that all dependencies between data be explicity coded via declared referential constraints, triggers or existence checks.
It is important to understand that while it is possible to bring corrupt pages online, doing so without first repairing the pages will result in logical and data inconsistency. When restoring a database by repairing offline pages (or by restoring objects to which the offlined pages belonged), therefore, the DBA must explicitly determine the degree to which logical consistency of the database may be suspect according to business rules and coding practices. Of course, restoring the database from a database backup and incremental transaction backups assures both the logical and physical integrity of the database through the last successful load of a transaction dump.
It is also important to run dbcc tablealloc or dbcc indexalloc with the fix option on any objects with suspect pages because the allocation information for these objects is also suspect.
What To Do When Online Recovery FailsThe options for recovering from a failure in online recovery, in order from most desirable to least, are:
• Restoring from Backups
• Partial online recovery using RFI
• Suiciding the Log.

Online Recovery and Recovery Fault Isolation
54
Restoring from Backups
Prior to RFI, this was the only option if recovery failed, the database could not be repaired, and suicide of the log was not desirable. It is still the preferred option for recovering the database after failure during online recovery if a) the entire database is marked suspect due to thresholds being exceeded, or b) system table(s) are corrupt. It is also the preferred method whenever the absolute need for physical and logical consistency overrides all other concerns.
Note It is highly recommended that you run dbcc checks prior to and following a dump, to ensure that the backup is valid. Refer to Backup and Recovery in the System Administration Guide for details.
Partial online recovery using RFI
Implementing RFI gives the DBA many more choices in the event of failure during online recovery. Before opting for log suicide, consider these advantages of RFI over log suicide:
1 Isolated pages are known and can be examined. You can thus make an informed decision on whether to repair the faults or restore from backups.
• If the isolated pages belong to an index, the corruption can often be fixed by dropping and recreating the index.
• If the isolated pages are data pages, the data can sometimes be recovered via other means. You can also leave the pages safely offline; transactions that explicitly depend on their presence will fail until they are made available.
• Pages referenced in recovery that are marked suspect, but are subsequently deallocated further along in the recovery process, are assumed to have been properly written for the earlier transaction and are taken off the suspect list, thus making the corruption for that page "self-healing".
2 You can set thresholds to determine at what level page faults are unacceptable, and at which the whole database should remain unrecovered.
3 You can make the database available to users while conducting repairs. The database can be configured to allow updates or to allow read-only access.
4 Faults on system table pages cause recovery to fail for the entire database.

CHAPTER 2 Encyclopedia of Tasks
55
5 You can implement a limited form of suicide recovery by disregarding all or some of the suspect pages and onlining them even if they are corrupt. The suicide is limited in the sense that only transactions associated with those pages are suspect. Recovery rolls forward (or back) other transactions in the log properly.
Implementing Recovery with RFI
The default granularity of recovery is at the database level. Take the following steps to implement page level granularity:
1 Check or implement page granularity on desired databases using the sp_setsuspect_granularity stored procedure:
sp_setsuspect_granularity [dbname [,{"database" | "page"} [, "read_only"]]]
If you set the granularity to page level, you have the option to set the database to read_only mode when recovery detects suspect pages. By default, all available pages are accessible for both reads and writes.
Note Wherever possible, use the read_only mode. If a query attempts to access an offline page, the server raises error messages 12716 and 12717 regardless of whether the database is read_only. For more information on these errors see the chapter titled “Error Message Writeups.”
2 Set the threshold for escalating page level granularity to database granularity using the sp_setsuspect_threshold stored procedure:
sp_setsuspect_threshold [dbname [,threshold ]]
Once the number of offlined pages reaches this threshold value, recovery marks the entire database suspect. The default threshold value is 20 pages. It is unlikely that setting it much higher will be of much use since 20 corrupt pages is very likely to indicate corruption at a level than cannot be effectively repaired.
3 Bring the suspect pages or database on line. You can print a list of pages or databases that are suspect after recovery using the sp_listsuspect_db and sp_listsuspect_page stored procedures:
sp_listsuspect_dbsp_listsuspect_page [dbname]
You can bring these pages or database online using the sp_forceonline_db or sp_forceonline_page stored procedures:

Online Recovery and Recovery Fault Isolation
56
sp_forceonline_db dbname {"sa_on" | "sa_off" | "all_users"}
sp_forceonline_page dbname, pagenumber {"sa_on" | "sa_off" | "all_users"}
sa_on and sa_off toggle the database or page online and offline, and allow access to the database or page only to those with the sa_role set on. This permits the DBA to examine and repair the suspect database or pages without other users being able to access them.
Warning! The all_users option is irreversible and makes the database or page available to all users. If no repairs have been made, this may result in some level of logical inconsistency.
Suiciding the Log
RFI eliminates most of the need for suiciding the log. The two most common reasons for suiciding the log in the past were:
1 No backups are available or the backups are too old.
2 Insufficient time to restore.
There should never, of course, be a situation where backups are unavailable or are too old. Unfortunately that is too often the case, either because the dumps are bad or due to poor planning. In such situations, suiciding the log may be the only recourse. Aside from those situations, however, you should never consider suiciding a viable option.
Note DBAs should test all backup and restore procedures before relying on them. If you attempt to load a dump on the original database and it completes only partially, you will have eliminated the possibility of using that database again and may even have eliminated the final chance to recover data by suiciding the log.
RFI ExampleHere is an example of recovery using RFI's page level features:

CHAPTER 2 Encyclopedia of Tasks
57
During recovery of a database, five pages were marked suspect. The DBA examined the pages and determined that three of them are index pages on a single allpages-locked (APL) table, and that the other two marked suspect are data pages belonging to different tables. The database has been marked as read_only and while users can query the database, no changes can currently take place.
First the DBA onlines the pages with the sa_on option. The DBA then immediately dumps the transaction log to ensure the ability to recover to this point should something else go wrong. Recovery would involve loading a database dump and all subsequent transaction dumps.
Before RFI, a dump of a suspect database was not possible. With RFI, the DBA can make a dump of the slightly corrupt database in case it is needed later. Often a recent dump with a few problems is preferable to an older dump with no problems. This is purely a safety measure as the DBA hopes to be able to repair the database, which is currently partly unrecovered.
Next the DBA runs dbcc indexalloc on the index containing the three offline pages. indexalloc reveals errors, and it is decided that the best thing to do is to rebuild the index. If the index was a nonclustered index, or a data-only-locked (DOL) clustered (placement) index, it could simply be dropped and recreated. However, this is an APL clustered index and any time the clustered index is suspect, the table is suspect as well. The DBA runs dbcc checktable to examine the integrity of the data pages. dbcc checktable always checks the data page linkage before checking the index structures. (Keep in mind that a DOL table's data and non-leaf index pages do not maintain sibling links that can be followed by dbcc pglinkage type of checks.) By looking at the output of dbcc checktable, the DBA determines that the data page linkage is intact. This means that it is safe to drop the clustered index.
Note If the data page linkage also showed corruption, the DBA would have to resort to backups or find another way to restore the table (an offline bcp copy, for example).
Looking at the data pages for the other two objects, it is found that the first object is a static reference table, and an offline copy of this table's data exists. The DBA decides to truncate the table and bcp in a new copy. For the second object, an APL clustered table, the data page linkage is found to be broken, but the clustered index is still intact. With this information the DBA is able to locate all of the rows, bcp them out, truncate the table and bcp them back in.

How to Manually Change Sort Order or Default Character Set
58
Once all of these tasks are complete, the question of possible incomplete logical changes to the tables due to incomplete transactions still remains. The only way to test for data integrity is to use user-written queries and reports that expose inconsistencies. After doing this, the DBA can determine if those inconsistencies can be tolerated, or repaired, or if backups are the best option.
The final step is to detect and fix any allocation inconsistencies that may exist due to recovery having only partially completed. The DBA can run dbcc checkalloc to check the entire database, or dbcc tablealloc and dbcc indexalloc can be run on the suspect objects.
From this example it is clear that Recovery Fault Isolation makes many more choices available to the DBA. With database-only granularity, the DBA has no way to examine the extent of the corruption and make a decision as to what the best solution to the failed recovery might be.
How to Manually Change Sort Order or Default Character Set
Follow these instructions to change the sort order or default character set for your Adaptive Server if errors occurred when you tried to use sybinit to do this.
This writeup includes the following sections:
• “Manual Process”
• “How to Load a Sort Order or Additional Character Set”
• “How to Change the Sort Order”
• “How to Change the Default Character Set”
• “How to Find a Sort Order File Name”
• “How to Find a Sort Order ID”
• “How to Find a Character Set ID”
• “How to View Your Existing Sort Order and Character Sets”
Before deciding to use the manual process:
1 Read “Changing the Default Character Set, Sort Order, or Message Language” in the System Administration Guide for information about the consequences of changing the sort order and default character set.

CHAPTER 2 Encyclopedia of Tasks
59
2 Look at your Adaptive Server error log and in $SYBASE/init/logs (11.9.x and earlier) or $SYBASE/$SYBASE_ASE/init/logs (12.0.x and later) to determine why sybconfig failed to change the sort order or default character set.
3 If you find errors in the error log, correct them. See below for common causes of failure.
4 Try again to use sybconfig to change the sort order or default character set. If it still fails, go to “Manual Process”.
Some common causes of the failure to change the sort order or default character set using sybconfig include:
• You are changing to a case-insensitive sort order and duplicates would exist in a system table (because “A” is now equal to “a”, and so on). You should be able to determine which table(s) has this problem from information in the error log. Modify the data so that duplicates will not exist under a case-insensitive sort order.
• There is insufficient system segment space to re-create system indexes. Use sp_extendsegment to increase the system segment space for user databases or use alter database to increase the size of the system segment for the master database. Refer to “Extending the Scope of Segments” and “A Segment Tutorial” in the System Administration Guide for details.
• There is insufficient log space. Refer to “Using the Special dump transaction Options” in the System Administration Guide for what to do in this case.
• A problem exists in sybconfig.
Manual ProcessThe manual process to change the sort order is:
1 Do the following steps first:
• Make sure the environment variable (or logical name) LANG is not defined.
• Set the environment variable (or logical name) SYBASE.
• Login to Adaptive Server and make sure the default database for user “sa” is master:
1> select dbname, name from master..syslogins where name = "sa"

How to Manually Change Sort Order or Default Character Set
60
2> godbname name----------- ------------------master sa
• Make the users aware that Adaptive Server will be going down.
2 If you do not already know the file name for the sort order you want to load, go to “How to Find a Sort Order File Name”.
3 Load the sort order or additional character set you want into syscharsets. Refer to “How to Load a Sort Order or Additional Character Set” for instructions.
4 Determine the value for sort order ID if you plan to change the sort order. Refer to “How to Find a Sort Order ID” for instructions.
5 Determine the value for character set ID if you plan to change the default character set. Refer to “How to Find a Character Set ID” for instructions.
6 If you planned to change the default character set, do it now. Refer to “How to Change the Default Character Set” for instructions.
7 If you planned to change the sort order, do it now. Refer to “How to Change the Sort Order” for instructions.
8 Before proceeding, make sure no one is actively using Adaptive Server.
9 Shut down Adaptive Server.
10 Restart Adaptive Server. If you changed the sort order, Adaptive Server will make a number of changes at this time. Refer to “Recovery After Reconfiguration” in the System Administration Guide for details about what Adaptive Server does during this database recovery. Look at the Adaptive Server error log to make sure no problems have occurred.
11 When Adaptive Server has finished the changes related to the changed sort order, it automatically shuts down.
12 Restart Adaptive Server.
13 Confirm the change by running sp_helpsort or looking at the end of the error log.
For example:
1> sp_helpsort2> goSort Order Description------------------------------------------------------------------- Character Set = 1, iso_1

CHAPTER 2 Encyclopedia of Tasks
61
ISO 8859-1 (Latin-1) - Western European 8-bit character set. Sort Order = 50, bin_iso_1
Binary sort order for the ISO 8859/1 character set (iso_1).Characters, in Order------------------------------------------------------------------- ! " # $ % & ' ( ) * + , - . / 0 1 2 3 4 5 6 7 8 9 : ; < = > ? @ A B C D E F G H I J K L M N O P Q R S T U V W X Y Z [ \ ] ^ _ ` a b c d e f g h i j k l m n o p q r s t u v w x y z { | } ~ á â ã ä å æ ç è é ê ë ì í î ï d ñ ò ó ô õ ö / ø ù ú û ü y p
.
.
14 If the sort order did not change:
• Use sp_configure to return to the old values for sort order ID and default character set ID as in steps 6 and 7 above.
• Study the error log to determine why the change failed.
• Fix the problem that caused the change to fail.
• Try again, starting at step 6 above.
15 Refer to “If You Changed the Sort Order or Default Character Set” in the System Administration Guide and do the steps described there. It is very important that you do these steps to guarantee the integrity of your data.
You are now finished changing your sort order or default character set.
The following procedures are referenced in this “Manual Process”section.
How to Load a Sort Order or Additional Character SetUse one of the following commands to load a sort order or an additional character set into syscharsets:
Operating System Command
UNIX $SYBASE/$SYBASE_ASE/bin/charset -P sa_pwd -S server_name sort_filechar_set or$SYBASE/$SYBASE_ASE/bin/charset ... in 12.0 and later
Digital OpenVMS charset /pass="sa_pwd" -/server="server_name" sort_file -/local=sybase_system:[sybase.charsets.char_set]
Novell NetWare load $SYBASE/$SYBASE_ASE/bin/charset -Psa_pwd -Sserver_namesort_filechar_set orload $SYBASE/$SYBASE_ASE/bin/charset ... in 12.0 and later

How to Manually Change Sort Order or Default Character Set
62
where:
• sa_pwd is the “sa” password
• server_name is the name of the Adaptive Server
• sort_file is the appropriate sort order name from the charsets directory; to load a character set, use “charset.loc” for the value for sort_file
• char_set is the name of the character set you are loading
For example, to load the case-insensitive sort order for character set iso_1 on UNIX, the command is:
% $SYBASE/$SYBASE_ASE/bin/charset -Psa_pwd-Sserver_name nocase.srt iso_1
For example, to load the cp850 character set on OpenVMS, the command is:
$ charset /pass="sa_pwd" -/server="server_name" charset.loc -/local=sybase_system:[sybase.charsets.cp850]
How to Change the Sort OrderUse the following command to change the sort order:
1> sp_configure "default sortorder id", sort_order_ID2> go
How to Change the Default Character SetUse the following command to change the default character set:
1> sp_configure "default character set id", charset_ID2> go
OS/2, Windows NT $SYBASE/$SYBASE_ASE/bin/charset -Psa_pwd -Sserver_name sort_filechar_setor$SYBASE/$SYBASE_ASE/bin/charset ... in 12.0 and later
Operating System Command

CHAPTER 2 Encyclopedia of Tasks
63
How to Find a Sort Order File NameThe charset command which allows you to load a sort order into syscharsets requires the specification of a sort order file name. In addition, you need to know the sort order file name to determine the sort order ID. This section describes two different methods for determining sort order file names.
Method 1: If You Know the Sort Order Description
Use this method if you know the sort order description.
• Go to the appropriate character set directory and display the sybinit (or sybconfig) menu options for that character set's sort order files. For example:
UNIX:
% cd $SYBASE/$SYBASE_ASE/charsets/char_set_dir% grep menuname *.srt
OpenVMS:
$ set default -sybase_system:[sybase.charsets.char_set_dir]$ search *.srt menuname
For example, for character set iso_1 on UNIX:
% cd $SYBASE/$SYBASE_ASE/charsets/iso_1% grep menuname *.srtbinary.srt:menuname = "Binary ordering, for the ISO 8859/1 or Latin-1 character set (iso_1)."dictionary.srt:menuname = "General purpose dictionary ordering."espdict.srt:menuname = "Spanish dictionary ordering."espnoac.srt:menuname = "Spanish case and accent insensitive dictionary order."espnocs.srt:menuname = "Spanish case insensitive dictionary order."noaccents.srt:menuname = "Dictionary order, case insensitive, accent insensitive."nocase.srt:menuname = "Dictionary order, case insensitive."nocasepref.srt:menuname = "Dictionary order, case insensitive with preference."
• Identify the appropriate file name based on the menu description.
Method 2: If You Know the Sort Order ID
Use this method if you know the sort order ID.

How to Manually Change Sort Order or Default Character Set
64
• Go to the appropriate character set directory. For example:
UNIX: % cd $SYBASE/$SYBASE_ASE/charsets/char_set_dir
OpenVMS: $ set default -sybase_system:[sybase.charsets.char_set_dir]
• Using the sort order ID, determine the file name:
UNIX: % grep sort_order_id *.srt | grep ID
For example, to find sort order 52 on UNIX:
% cd $SYBASE/charsets/iso_1% grep 52 *.srt | grep IDnocase.srt:id = 0x34 ; Unique ID # (52) for the sort order
OpenVMS: $ search *.srt sort_order_id,ID /match=and
For example, to find sort order 52 on OpenVMS:
$ set default sybase_system:[sybase.charsets.iso_1]$ search *.srt 52,ID /match=and******************************SYBASE1150_SYSTEM:[SYBASE.CHARSETS.ISO_1]NOCASE.SRT;1id = 0x34 ; Unique ID # (52) for the sort order
For both of these examples, the file name for sort order ID 52 is nocase.srt.
How to Find a Sort Order IDTo find a sort order ID, search the sort order file for “ID”.
For example, use the following command if you want the sort order ID for “Dictionary order, case insensitive” for character set iso_1 (the sort order file name is nocase.srt):
UNIX:
% cd $SYBASE/$SYBASE_ASE/charsets/iso_1% grep ID nocase.srt
id = 0x34 ; Unique ID # (52) for the sort order
OpenVMS:
$ set default sybase_system:[sybase.charsets.iso_1]$ search nocase.srt ID
******************************SYBASE1150_SYSTEM:[SYBASE.CHARSETS.ISO_1]NOCASE.SRT;1id = 0x34 ; Unique ID # (52) for the sort order

CHAPTER 2 Encyclopedia of Tasks
65
How to Find a Character Set IDTo find a character set ID, search the character set data file for “id”.
For example, on a UNIX machine use the following command if you want the character set ID for character set iso_1:
% cd $SYBASE/$SYBASE_ASE/charsets/iso_1% grep id charset.locid = 0x01
How to View Your Existing Sort Order and Character SetsEnter the following command to view the character sets and sort orders that are currently available in your Adaptive Server:
1> select id, csid, name, description from master..syscharsets2> go
In the output:
• When csid = 0, the value of id represents the character set ID
• When csid = the character set ID (something other than 0), the value of id represents the sort order ID
For example:
1> select id, csid, name, description from master..syscharsets2> goid csid name description--- ---- ---------- --------------------------------------------0 0 ascii_8 ASCII-8 - 7-bit ASCII, with implementation-
defined characters for values 128-255.1 0 iso_1 ISO 8859-1 (Latin-1) - Western European
8-bit character set.50 1 bin_iso_1 Binary sort order for the ISO 8859/1 character set (iso_1).
In the example:
• For character set ascii_8, the character set ID is 0
• For character set iso_1, the character set ID is 1
• For sort order bin_iso_1, the character set ID is 1 and the sort order ID is 50
Useful dbcc Commands
66
Useful dbcc CommandsThis section provides an overview of a number of database consistency checker (dbcc) commands described in this manual for diagnosing and troubleshooting Adaptive Server problems.
Standard dbcc CommandsThe standard, supported dbcc commands used in this document are as follows:
For a complete description of these commands, see the System Administration Guide.
Other dbcc CommandsThis document utilizes a number of additional dbcc commands. These commands, listed below, are useful in specific troubleshooting situations to gather information and diagnose problems.
dbcc Command Purpose
tablealloc checks allocation information for the specified table.
textalloc checks allocation information in text pages for the specified table.
indexalloc checks allocation information for the specified index.
checkalloc runs the same checks as tablealloc, for all pages in a database.
checktable checks the integrity of data and index pages in the specified table.
checkdb runs the same checks as checktable, for all tables in a database.
checkstorage combines some of the checks of the above commands, and provides additional checks.
checkverify Checks faults identified by checkstorage to see if they are indeed hard errors.
reindex checks the integrity of indexes on user tables. prints a message when it finds the first index error and then drops/recreates the index.

CHAPTER 2 Encyclopedia of Tasks
67
Use of dbcc page and many other undocumented dbcc commands requires that you have sybase_ts_role enabled.
Warning! These are undocumented and non-standard commands. Sybase Technical Support does not support them for general use. Although the command syntax is provided here for reference, you should use these commands only in the specific diagnostic situations described in this document, and with the specific syntax shown in those sections. Failure to do so could cause performance problems and/or database corruption.
dbcc page
Purpose: Prints the contents of a page within a database.
Usage:
dbcc page (dbid, pageno,[printopt [,cache [,logical [,cachename]]]])
or
dbcc page (dbname, pageno,[printopt [,cache [,logical [,cachename]]]])
dbid - database IDdbname - database namepageno - page numberprintopt - output format: 0 - print buffer and page header only (default) 1 - print buffer and page headers, rows and offset table 2 - print buffer and page headers, hex dump of data and offset tablecache - where to get the page: 0 - read page from disk 1 - read page from cache if present, otherwise read from disk (default)logical - the page type 0 - pageno is a virtual page 1 - pageno is a logical page (default)cachename - the cache name -1 - all caches
dbcc pglinkage
Purpose: checks the linkage of a page chain.

Useful dbcc Commands
68
Usage:
dbcc pglinkage (dbid, start_pg_num, number_pages, printopt, search_for, search_order)
dbid - database IDstart_pg_num - page number at which to start checkingnumber_pages - the number of pages to check: 0 - check all pages printopt - denotes which pages to display: 0 - display only the number of pages checked 1 - display the last 16 pages checked 2 - display all the page numbers checkedsearch_for - stop checks when this page number is reachedsearch_order - direction of search: 0 - follow previous page pointers 1 - follow next page pointers
dbcc log
Purpose: displays transaction log records.
Usage:
dbcc log (dbid, objid, pageno, rowno, nrecs, type, printopt)
dbid - database IDobjid - can be < 0, zero, or > 0. Meaning of this option depends on the values of 'pageno' and/or 'rowno'. For example, if objid >0 and 'pageno' and 'rowno' = 0, all records for that object are displayed.pageno - page number (or 0)rowno - row number (or 0)nrecs - number of records and log scan directiontype - the type of log record to displayprintopt - denotes display options 0 - display header and data 1 - display header only.

CHAPTER 2 Encyclopedia of Tasks
69
dbcc traceflags
(available with 11.0.3 and later)
Purpose: Shows what traceflags, if any, are currently active in the server.
Usage:
dbcc traceflags
dbcc traceon
Purpose: activates the specified trace flag.
Usage:
dbcc traceon (trace_flag)
dbcc traceoff
Purpose: de-activates the specified trace flag.
Usage:
dbcc traceoff (trace_flag)
dbcc memusage
Purpose: Shows memory allocation for server structures and objects, for example the size and number of stored procedures.
Usage:
dbcc memusage
Warning! Running dbcc memusage on a multi-engine server can cause the other running processes to timeslice.
How to Analyze dbcc checkstorage Faultsdbcc checkstorage reports any faults it finds during database checks. checkstorage performs a number of checks not performed by the otherdbcc commands, as well as a subset of checks of the other commands.

How to Analyze dbcc checkstorage Faults
70
Fault AnalysisThe following table lists by type code the common faults that dbcc checkstorage reports, and shows the techniques you can use to further evaluate these faults. The most common approach is to use object level dbcc commands, such as dbcc checktable, to understand and further investigate checkstorage faults. Where the Action/Follow-up column lists multiple options, these appear in the order of most preferable option first. Where the Action/Follow-up column lists an error number, see the writeup for the error in Chapter 3, “Error Message Writeups” for details.
Table 2-1: checkstorage fault analysis
checkstorage Type Code Fault Description Action/Follow-up
100000 Disk read failed Check Sybase device
100001 Page ID errors such as page number out of range Similar to 2523 Error
100002 pfreeoff field on header page has an invalid value Similar to 2505 Error
100003 1. Allocation page in wrong location or location of an allocation page contains something else
2. Object ID reference error
dbcc checktable, dbcc tablealloc, dbcc checkalloc
Similar to 2529 Error
dbcc checktable, dbcc tablealloc, dbcc checkalloc
Similar to 1133, 2522, 2540 Errors
100006 Object allocation error dbcc tablealloc
Similar to 2522, 2525 Errors
100008 Incorrect page status bit in page header dbcc checktable
Similar to 7948 Error
100009 Column/row size error, or other row format error dbcc checktable
Similar to 2506, 2507, 2508 Errors
100010 Row location error dbcc checktable
Similar to 2509 Error
100014 Page referenced by more than one object Similar to 2502 Error
100015 Page referenced more than once for an object Similar to 2502 Error
100016 Page allocated but not linked dbcc checktable
Similar to 2540 Error
100017 Fault encountered on Object Allocation Map (OAM) page linkage
Similar to 2502 Error
100018 Allocation is not recorded in the Object Allocation Map (OAM)
dbcc indexalloc, dbcc tablealloc, dbcc checkalloc
Similar to 7939 Error
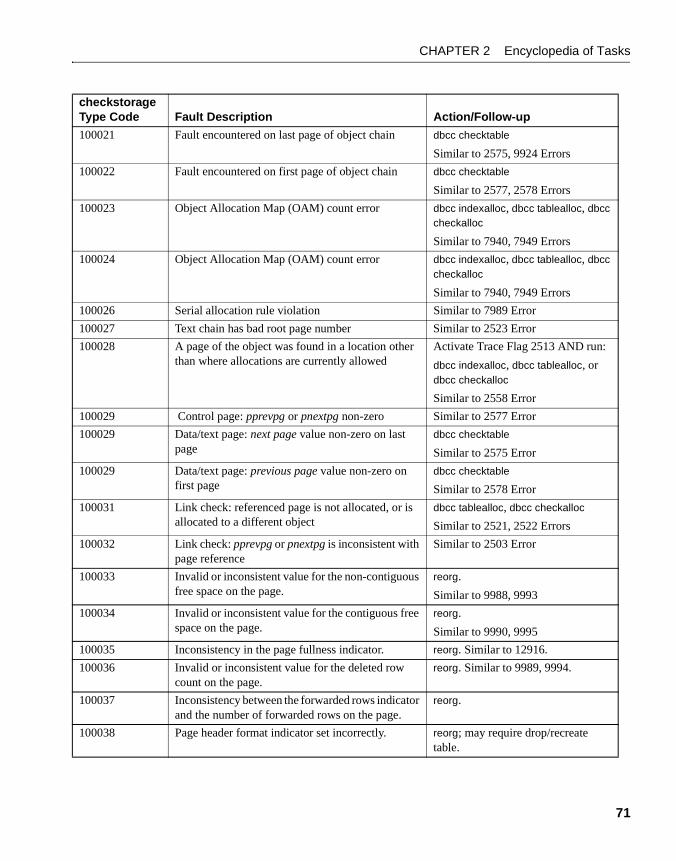
CHAPTER 2 Encyclopedia of Tasks
71
100021 Fault encountered on last page of object chain dbcc checktable
Similar to 2575, 9924 Errors
100022 Fault encountered on first page of object chain dbcc checktable
Similar to 2577, 2578 Errors
100023 Object Allocation Map (OAM) count error dbcc indexalloc, dbcc tablealloc, dbcc checkalloc
Similar to 7940, 7949 Errors
100024 Object Allocation Map (OAM) count error dbcc indexalloc, dbcc tablealloc, dbcc checkalloc
Similar to 7940, 7949 Errors
100026 Serial allocation rule violation Similar to 7989 Error
100027 Text chain has bad root page number Similar to 2523 Error
100028 A page of the object was found in a location other than where allocations are currently allowed
Activate Trace Flag 2513 AND run:
dbcc indexalloc, dbcc tablealloc, or dbcc checkalloc
Similar to 2558 Error
100029 Control page: pprevpg or pnextpg non-zero Similar to 2577 Error
100029 Data/text page: next page value non-zero on last page
dbcc checktable
Similar to 2575 Error
100029 Data/text page: previous page value non-zero on first page
dbcc checktable
Similar to 2578 Error
100031 Link check: referenced page is not allocated, or is allocated to a different object
dbcc tablealloc, dbcc checkalloc
Similar to 2521, 2522 Errors
100032 Link check: pprevpg or pnextpg is inconsistent with page reference
Similar to 2503 Error
100033 Invalid or inconsistent value for the non-contiguous free space on the page.
reorg.
Similar to 9988, 9993
100034 Invalid or inconsistent value for the contiguous free space on the page.
reorg.
Similar to 9990, 9995
100035 Inconsistency in the page fullness indicator. reorg. Similar to 12916.
100036 Invalid or inconsistent value for the deleted row count on the page.
reorg. Similar to 9989, 9994.
100037 Inconsistency between the forwarded rows indicator and the number of forwarded rows on the page.
reorg.
100038 Page header format indicator set incorrectly. reorg; may require drop/recreate table.
checkstorage Type Code Fault Description Action/Follow-up

How to Analyze dbcc checkstorage Faults
72
The following checkstorage faults do not correspond to any existing dbcc errors:
Table 2-2: checkstorage faults that do not map to dbcc errors
checkstorage “soft” faults may or may not reflect actual corruption. Use dbcc checkverify to see if the faults are indeed hard errors.
checkstorage Type Code Fault Description
100004 Pages with a timestamp in the future.
100005 Pages from the wrong database.
100007 Extent ID - pages allocated to a non-existent object. checkalloc with the fix option can correct this error.
100011 Text pointer - a corrupt text/image value for a table row/column. Look for other faults to determine the nature of the problem.
100012 Page status bits for the page show page type is different from the page chain being examined.
100019 Extra Object Allocation Map (OAM) Entry.
Similar to 7940, 7949 Errors. checkalloc or tablealloc with the fix option can correct this error.
100025 Row count or rows per page error in Object Allocation Map (OAM). checktable corrects this error.
100029 1) index page only flag incorrectly set on a data page. Creating a clustered index or bulk copying data out and back in can correct this error. 2) poffset does not match the contents of the page. 3) plastrowoff is not the offset of the last row on an index page. 4) Out of range values in OAM page header fields.
Many 100029 faults can be corrected by bulk copying data out and back in.
100030 Page formatting requirements for pages other than data and index. Checks depend on page type. OAM page: entries are for allocation pages and total of used+unused is less than 255. Control page: first or last page is invalid for database; the affinity table is corrupt. Text page: timestamps on the first page are invalid or inconsistent. Allocation page: extent on allocation page is not correctly allocated and is not free for allocation (similar to 2525 error).

CHAPTER 2 Encyclopedia of Tasks
73
dbcc checkstorage startup and drop tabledbcc checkstorage can fail during its initialization phase if another session concurrently performs a drop table. This is not a serious problem. If it occurs, simply run dbcc checkstorage again.
Note The problem may only occur during checkstorage startup. Once startup is complete and checkstorage processing is underway, drop table commands can be issued again.
Faults Due to sp_placeobjectIf you use sp_placeobject, checkstorage generates a 100028 soft fault for the object. This may also be followed by a 100025 fault, but this does not mean that the OAM row count is wrong. It merely indicates that checkstorage could not collect an accurate row count because of the use of sp_placeobject.
When 100028 and 100025 faults occur in pairs, therefore, you do not need to be concerned about the 100025 fault. The 100028 (and corresponding 100025) fault can be removed by using bcp to unload and reload the table.
Troubleshooting XP Server Issues
BackgroundXP Server is an Open Server application which runs on the same machine as Adaptive Server and allows you to implement Extended Stored Procedures (ESPs).
Following are some troubleshooting tips for XP Server.
Correcting Common XP Server Problems1 If you are unsure whether XP Server is running, check by using sp_who.
For example, if your Adaptive Server is named stores, run the following isql command:

Troubleshooting XP Server Issues
74
1> exec STORES_XP...sp_who2> go
This command connects to XP Server and shows the spids that are currently running on XP Server.
2 If you are not sure whether XP Server is configured, run the following command:
1> select * from master..sysservers2> go
This command will show a row for each server; check that the sysservers table includes the row for the XP server (the XP server name should appear in the srvname column).
3 If XP Server is not running and you get an 11018 error when you attempt to execute an ESP, check that your interfaces file (Unix) or sql.ini file (Windows) has the correct entry for XP Server. The XP Server name must be all upper case and it should have the format ASE_SERVERNAME_XP. (See the “Error Message Writeups” chapter for a detailed explanation of Error 11018.)
4 Check that your environment contains the correct locations of extended stored procedures and the associated DLL’s:
• Check the definitions of library variables such as LD_LIBRARY_PATH and SHLIB_PATH (exact name may be platform-dependent).
• On Unix platforms, the $SYBASE/lib path must be defined. For additional information, refer to the installation and configuration guide for your platform.
Information to Collect Before Calling Technical SupportHave the following information ready before you call Sybase Technical Support about XP Server issues:
• Output of select @@version in isql
• The interfaces file (Unix) or sql.ini file (Windows)
• Output of sp_helpserver in isql
• Output of select * from sysservers in isql

CHAPTER 2 Encyclopedia of Tasks
75
• Complete output of Adaptive Server log file with startup message when xp_cmdshell is executed
• Complete XP Server log file.
Other Useful TasksThis section steps you through tasks that are useful for resolving problems you may encounter that are not strictly related to disaster recovery.
How to Fix a Corrupted Index on System TablesIf the index on one of your system tables has been corrupted, you can use the sp_fixindex stored procedure to repair the index.
Warning! Do not run sp_fixindex on the clustered index of the sysobjects or sysindexes tables or on user tables. Read the following section for these and other important warnings.
Read These Warnings First
• Do not run sp_fixindex on the clustered index of the sysobjects or sysindexes tables. If you do, sp_fixindex will return this error message:
The index with id 1 on sysobjects cannot be recreated.
• Do not run sp_fixindex on user tables.
Note You can run sp_fixindex on a nonclustered index on sysobjects, but you will encounter a known problem. For a workaround, refer to “Workaround for sysobjects Nonclustered Indexes”.
• Sybase would like to pursue the source of any persistent index corruption that is not hardware related. This debugging process requires that you do two things:
• Leave your system catalogs untouched. Sybase must dial in to your database and examine the corruption prior to any modifications to the system catalogs.
Other Useful Tasks
76
• Preserve your transaction logs. Sybase must examine your transaction logs to find the source of modifications to the pages involved.
Repairing the System Table Index
Repairing a corrupted system table index is a multi-step process; running sp_fixindex is one of those steps.
To perform the repair:
1 Get the object name, object ID, and index ID of the corrupted index. If you only have a page number, refer to “How to Find an Object Name from a Page Number”.
2 If the corrupted index is on a system table in the master database, put Adaptive Server in single-user mode. Refer to “How to Start Adaptive Server in Single-User Mode” for details.
3 If the corrupted index is on a system table in a user database, put the database in single-user mode and reconfigure to allow updates to system tables:
1> use master2> go1> sp_dboption database_name, "single user", true2> go1> sp_configure "allow updates", 12> go
4 Issue the sp_fixindex command:
1> use database_name2> go
1> checkpoint2> go
1> sp_fixindex database_name, object_name, index_ID2> go
Note To run sp_fixindex, you must possess “sa_role” permissions.
5 Run dbcc checktable to verify that the corrupted index is now fixed.
6 Disallow updates to system tables:
1> use master2> go1> sp_configure "allow updates", 0

CHAPTER 2 Encyclopedia of Tasks
77
2> go
7 Turn off single-user mode:
1> sp_dboption database_name, "single user", false2> go
1> use database_name2> go
1> checkpoint2> go
Workaround for sysobjects Nonclustered Indexes
Running sp_fixindex to repair a nonclustered index on sysobjects requires several additional steps.
1 Perform steps 1–3, as described above.
2 Issue the following Transact-SQL query:
1> use database_name2> go
1> checkpoint2> go
1> select sysstat from sysobjects2> where id = 13> go
3 Save the original sysstat value.
4 Change the sysstat column to the value required by sp_fixindex:
1> update sysobjects2> set sysstat = sysstat | 40963> where id = 14> go
5 Run sp_fixindex:
1> sp_fixindex database_name, sysobjects, 22> go
6 Restore the original sysstat value:
1> update sysobjects2> set sysstat = sysstat_ORIGINAL3> where id = object_ID4> go

Other Useful Tasks
78
7 Run dbcc checktable to verify that the corrupted index is now fixed.
8 Disallow updates to system tables:
1> sp_configure "allow updates", 02> go
9 Turn off single-user mode:
1> sp_dboption database_name, "single user", false2> go
1> use database_name2> go
1> checkpoint2> go
How to Rescue Data from a Corrupted TableThis section describes the steps needed to copy data from a corrupted table into a new table or file. Note that you will probably be able to copy only some of your data.
Back Up Data to a New Table
Copy the data from the corrupted table into a new table by creating a dummy table, and copying the old data into the dummy table.
You can create the new table in any database (except model) where enough space is available. Follow these steps:
1 Check the table size that you want to copy, as follows:
1> sp_spaceused table_name 2> go
2 Check the amount of available space in the database in which you plan to create the new table:
1> use database_name2> go
1> sp_spaceused2> go
The easiest way to copy the table into a new one is to select all the data from your corrupted table into a temporary table. This way, you can skip step 3.

CHAPTER 2 Encyclopedia of Tasks
79
If space is too limited to create your table in any database, you may back up the data to an operating system file. Refer to “Back Up Data to an Operating System File”.
3 Enable the select into/bulkcopy option on the database where you want to create the new table. You do not need to enable the select into/bulkcopy option on tempdb, as tempdb already has this option enabled. For more information about enabling the select into/bulkcopy option on a database, refer to Error 268.
After you have run a select into command or used non-logged bulkcopy to move data into a database, you cannot perform a transaction log dump to a device. Therefore, once you have made unlogged changes to your database, issue a dump database command.
Setting the select into/bulkcopy option to “on” still allows you to use dump transaction database_name with truncate_only.
Warning! Be careful about running select into across databases if you have column names that exist in both databases, as this may cause problems.
4 Copy the old table into the new table:
1> select * into database_name..new_table 2> from old_table 3> go
Or, if you select all the data into a temporary table:
1> select * into tempdb..new_table from old_table 2> go
5 Drop the original table.
6 Use sp_rename to give the new table the old name.
7 Recreate all views, triggers, stored procedures, constraints, defaults, and so on that referenced the table.
An alternative approach is to bulk copy data out of the old table into a file and bulk copy back into the new table.
Back Up Data to an Operating System File
To back up data into an operating system file, perform the following steps:

Other Useful Tasks
80
1 Use bcp to copy the data from the table into a file. For information about bcp, refer to bcp in the Adaptive Server utility programs manual for your platform.
2 Drop and re-create the table.
3 Use bcp to copy the file into the re-created table.
4 Recreate all views, triggers, stored procedures, constraints, defaults, and so on that referenced the table.
Note If there are space constraints, and the table needs a clustered index, consider creating the index before adding the data to the table, then run update statistics after the data is added.
How to Start Adaptive Server with Trace FlagsFollow the instructions in this section to start Adaptive Server with a trace flag. If you have a UNIX or Digital OpenVMS system, you can modify the RUN_server file to start Adaptive Server with a trace flag. OS/2 and Novell NetWare systems use the command line to start Adaptive Server with a trace flag. Windows NT uses a command-line option set with the Server Config program.
Look for the section below that matches your operating system.
Warning! Start Adaptive Server with a trace flag only when instructed to do so in this manual or as directed by Sybase Technical Support or an SWR letter. Using these flags at any other time may create serious problems.
Do not attempt a normal shutdown after using trace flags 3607 or 3608. Always use shutdown with nowait in these cases.
Modifying the RUN_server File to Include Trace Flags for UNIX
1 Make a copy of the RUN_server file. A common naming convention for this new file is RUN_SERVERNAME_TRACEFLAG. For example, if you wanted to start an Adaptive Server named PRODUCTION with trace flag 3605, you could copy your existing RUN_server file into a file named RUN_PRODUCTION_3605.
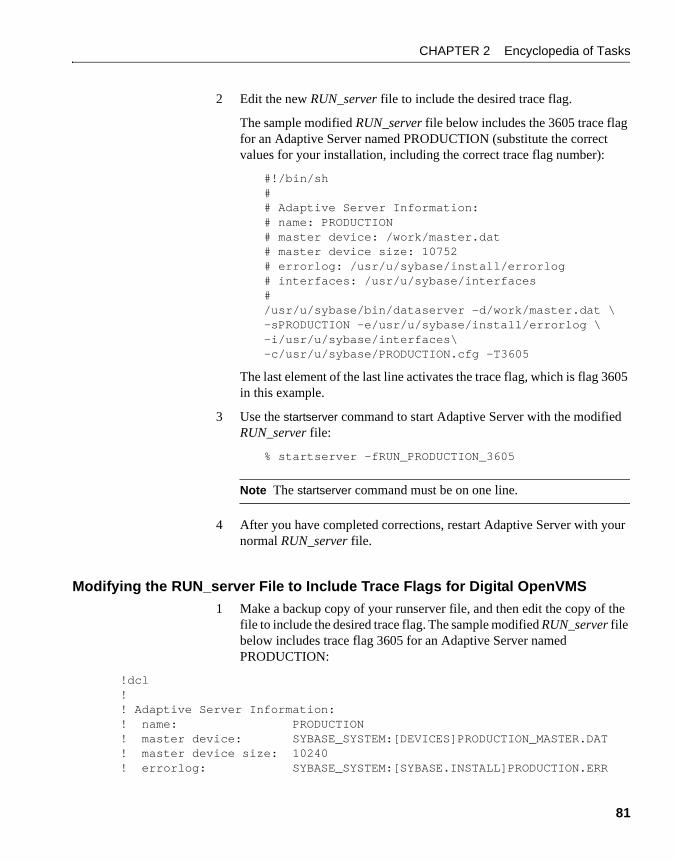
CHAPTER 2 Encyclopedia of Tasks
81
2 Edit the new RUN_server file to include the desired trace flag.
The sample modified RUN_server file below includes the 3605 trace flag for an Adaptive Server named PRODUCTION (substitute the correct values for your installation, including the correct trace flag number):
#!/bin/sh## Adaptive Server Information:# name: PRODUCTION# master device: /work/master.dat# master device size: 10752# errorlog: /usr/u/sybase/install/errorlog# interfaces: /usr/u/sybase/interfaces#/usr/u/sybase/bin/dataserver -d/work/master.dat \-sPRODUCTION -e/usr/u/sybase/install/errorlog \-i/usr/u/sybase/interfaces\-c/usr/u/sybase/PRODUCTION.cfg -T3605
The last element of the last line activates the trace flag, which is flag 3605 in this example.
3 Use the startserver command to start Adaptive Server with the modified RUN_server file:
% startserver -fRUN_PRODUCTION_3605
Note The startserver command must be on one line.
4 After you have completed corrections, restart Adaptive Server with your normal RUN_server file.
Modifying the RUN_server File to Include Trace Flags for Digital OpenVMS
1 Make a backup copy of your runserver file, and then edit the copy of the file to include the desired trace flag. The sample modified RUN_server file below includes trace flag 3605 for an Adaptive Server named PRODUCTION:
!dcl!! Adaptive Server Information:! name: PRODUCTION! master device: SYBASE_SYSTEM:[DEVICES]PRODUCTION_MASTER.DAT! master device size: 10240! errorlog: SYBASE_SYSTEM:[SYBASE.INSTALL]PRODUCTION.ERR

Other Useful Tasks
82
! interfaces: SYBASE_SYSTEM:[SYBASE]!$ define sybase_system SYBASE1150_SYSTEM:$ define sybase sybase_system:[sybase]$ define syb_devcreate sybase_system:[sybase.bin]devcreate.exe$ define dslisten "PRODUCTION"$ server :== $SYBASE_SYSTEM:[SYBASE.bin]dataserver.exe$ server -/DEVICE=(SYBASE_SYSTEM:[DEVICES]PRODUCTION_MASTER.DAT) -/ERRORFILE=SYBASE_SYSTEM:[SYBASE.INSTALL]PRODUCTION.ERR -/INTERFACES=SYBASE_SYSTEM:[SYBASE] -/TRACE=3605
To set more than one trace flag, modify the last line, as in the following example:
$ server -/DEVICE=(SYBASE_SYSTEM:[DEVICES]PRODUCTION_MASTER.DAT) -/ERRORFILE=SYBASE_SYSTEM:[SYBASE.INSTALL]PRODUCTION.ERR -/INTERFACES=SYBASE_SYSTEM:[SYBASE] -/TRACE=(3605,3608)
2 Use the startserver command to start Adaptive Server with the modified runserver file:
$ startserver /server=production
3 Change the name of the modified runserver file to store it as a backup should you need to run Adaptive Server with this trace flag again. Then restore the backup copy of the original runserver file you made in step 1 to its original name.
4 After you have completed corrections, restart Adaptive Server with your normal runserver file.
Warning! Do not attempt a normal shutdown after using trace flags 3607 or 3608. Always use shutdown with nowait in these cases.
Using the Load Command With Trace Flags in Novell NetWare
To start Adaptive Server with a special trace flag, add the trace flag to the load command on the console command line. For example:
:load SQLSRVR -dDEVICE_NAME -Ttrace_flag_number

CHAPTER 2 Encyclopedia of Tasks
83
Using Trace Flags in OS/2
To start Adaptive Server with trace flags in OS/2, use a command similar to the following:
sqlserver /ddevice_name /Ttrace_flag_number
Substitute your site's master device physical device name and the trace flag number you want to use.
Using Server Configuration to Include Trace Flags in Windows NT
Follow these steps to start Adaptive Server with trace flags in Windows NT:
1 Log into Windows NT using an account with Windows NT administrator privileges.
2 Double-click the Server Config icon in the Sybase for Windows NT program group.
3 Select the Adaptive Server icon.
4 Select Configure Adaptive Server.
5 Select the name of the Adaptive Server to configure, and choose Continue.
6 Enter “sa” for login name. (No password is required.)
7 If the Adaptive Server is not running, Server Config asks you to start it now; choose Yes.
8 Select the Command Line Option or the Command Line Parameters button.
Server Config displays the Command Line Parameters dialog box.
9 Edit the text in the Command Line Parameters dialog box to include the trace flag parameter -T, followed by the trace flag you want.
10 Click OK.
11 Choose Save at the Adaptive Server's configuration dialog box.
12 Exit Server Config.

Other Useful Tasks
84
How to Reload a Suspect User DatabaseIf all other methods of restoring a user database marked “suspect” have failed, perform the steps in this section to reload the suspect database from a known, clean backup.
Reload the suspect user database from backup by following the steps in “Recovering a Database: Step-by-Step Instructions” in the System Administration Guide. It is very important to follow that procedure to ensure that the segment sizes and locations are created in the proper order, or your database will not reload properly.
If you cannot drop the database using the normal procedure, use the dbcc dbrepair command. Refer to “How to Drop a Database When drop database Fails”.
For more information about reloading databases, refer to “Error 2558”.
How to Drop a Database When drop database Fails Follow the steps in this section to drop a database when drop database fails. Do not use these steps unless directed to do so by this book, or unless there is no critical data in the database.
1 Log in as the “sa”.
2 Check to make sure the database has been marked “suspect.” The following query produces a list of all databases which are marked suspect:
1> select name from master..sysdatabases 2> where status & 320 = 3203> go
3 If the database is marked “suspect”, go to step 4. If it is not marked “suspect”, mark it in one of the following ways:
a Execute the sp_marksuspect stored procedure discussed under “How to Mark a Database “suspect'””, and restart Adaptive Server to initialize the change.
b Use the procedure below:
1> sp_configure "allow updates", 12> go1> use master 2> go1> begin transaction

CHAPTER 2 Encyclopedia of Tasks
85
2> update sysdatabases set status = 3203> where name = database_name4> go
Verify that only one row was affected and commit the transaction:
1> commit transaction2> go
Reset the allow updates option of sp_configure:
1> sp_configure "allow updates", 02> go
4 Shut down Adaptive Server with nowait:
1> shutdown with nowait2> go
Restart the server to initialize the change.
5 Remove the database:
1> dbcc dbrepair(database_name,dropdb)2> go
dbcc dbrepair sometimes displays an error message even though it successfully drops the database. If an error message occurs, verify that the database is gone by executing the use database_name command. This command should fail with a 911 error, since you dropped the database. If you find any other error, contact Sybase Technical Support.
How to Fix and Prevent Allocation ErrorsThis section describes allocation errors, how to fix them, and how to prevent them from recurring. Errors 2521, 2540, 2546, 7939, 7940, and 7949 are covered.

Other Useful Tasks
86
Understanding Allocation Errors
The dbcc checkalloc, dbcc tablealloc, and dbcc indexalloc commands check the consistency of the allocation structures in a database. If an inconsistency is detected between information in the page chain of an object and information in the allocation structures of that object, an error is displayed. Additionally, if you run dbcc checkalloc while the database is not in single-user mode, errors that do not really exist (spurious errors) may be reported. Spurious errors may be reported when changes in the database occur while dbcc checkalloc is running.
Allocation errors 2521, 2540, 2546, 7939, 7940, and 7949 have different levels of severity, but they should all be corrected.
Fixing Allocation Errors
If only one table is affected, then use this command:
1> dbcc tablealloc(tablename)2> go
Otherwise, follow these steps to correct any allocation error that has occurred, including errors 2521, 2540, 2546, and 7940:
1 Set the database that encountered the error in single-user mode. If the error was on the master database, set it to single-user mode by shutting down and restarting Adaptive Server in single-user mode. Refer to “How to Start Adaptive Server in Single-User Mode” for instructions. If the database is a user database, use this procedure:
1> sp_dboption database_name, single, true2> go
1> use database_name 2> go
1> checkpoint2> go
Note dbcc checkalloc with the fix option fails with Error 2595 if the database is not set in single-user mode. If you cannot run Adaptive Server with the database in single-user mode, refer to Chapter 3, “Error Message Writeups”for the particular error you are trying to correct, or call Sybase Technical Support.
2 Run dbcc checkalloc with the fix option to correct the error:

CHAPTER 2 Encyclopedia of Tasks
87
1> use master 2> go
1> dbcc checkalloc(database_name, fix)2> go
3 Reset the database from single-user mode. To reset the master database, shut down and restart Adaptive Server without the special single-user mode procedure. To reset a user database, use the following procedure:
1> sp_dboption database_name, single, false2> go
1> use database_name 2> go
1> checkpoint2> go
Note For large databases, you may want to execute the commands in steps 1–3 from a script file, which allows you to save the results for future reference.
4 Examine the dbcc checkalloc output. If there are any errors, refer to Chapter 3, “Error Message Writeups” or contact Sybase Technical Support.
Fixing Allocation Errors when Object ID and Index ID are Known
Follow these steps when the allocation errors affect a single table and the Object ID and Index ID are known, including errors 7939 and 7949:
Identify Table: User or System Table
Look at the value for the object ID in the error message. If it is 100 or greater, the object is a user table and you should continue with “Action for User Tables”. If it is below 100, the object is a system table and requires a different procedure described in the section “Action for System Tables”.
Action for User Tables
If the object ID from the error message is 100 or greater, follow these steps to correct the error:
1 Check the value of the index ID in the error message to determine whether it is a table (value is 0) or an index (value is greater than 0).
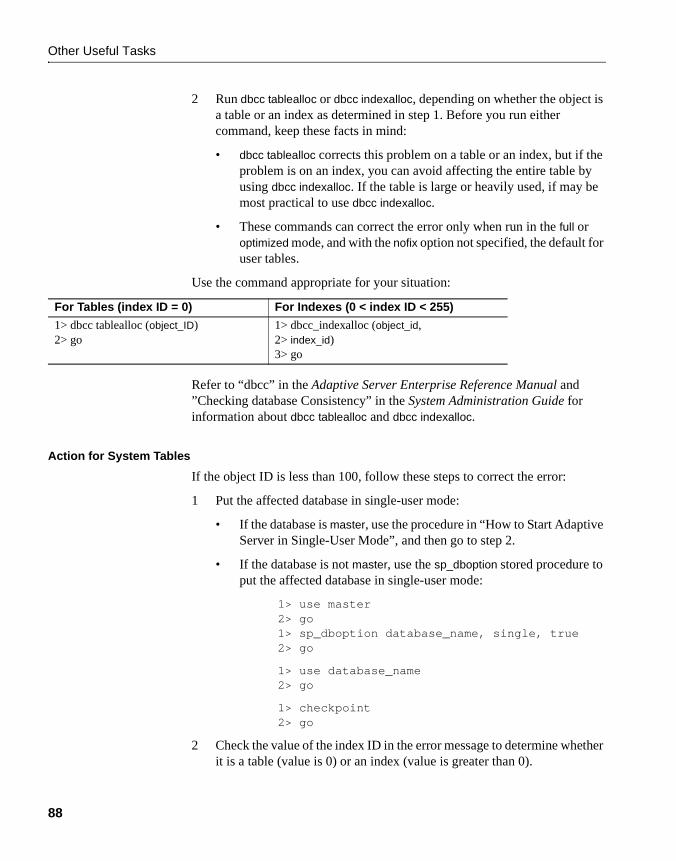
Other Useful Tasks
88
2 Run dbcc tablealloc or dbcc indexalloc, depending on whether the object is a table or an index as determined in step 1. Before you run either command, keep these facts in mind:
• dbcc tablealloc corrects this problem on a table or an index, but if the problem is on an index, you can avoid affecting the entire table by using dbcc indexalloc. If the table is large or heavily used, if may be most practical to use dbcc indexalloc.
• These commands can correct the error only when run in the full or optimized mode, and with the nofix option not specified, the default for user tables.
Use the command appropriate for your situation:
Refer to “dbcc” in the Adaptive Server Enterprise Reference Manual and ”Checking database Consistency” in the System Administration Guide for information about dbcc tablealloc and dbcc indexalloc.
Action for System Tables
If the object ID is less than 100, follow these steps to correct the error:
1 Put the affected database in single-user mode:
• If the database is master, use the procedure in “How to Start Adaptive Server in Single-User Mode”, and then go to step 2.
• If the database is not master, use the sp_dboption stored procedure to put the affected database in single-user mode:
1> use master 2> go1> sp_dboption database_name, single, true2> go
1> use database_name 2> go
1> checkpoint2> go
2 Check the value of the index ID in the error message to determine whether it is a table (value is 0) or an index (value is greater than 0).
For Tables (index ID = 0) For Indexes (0 < index ID < 255)
1> dbcc tablealloc (object_ID)2> go
1> dbcc_indexalloc (object_id,2> index_id)3> go

CHAPTER 2 Encyclopedia of Tasks
89
3 Run dbcc tablealloc or dbcc indexalloc, depending on whether the object named in the error message is a table or an index. Then execute the appropriate command, using the object ID from the error message. Before you run the appropriate command, keep these facts in mind:
• dbcc tablealloc corrects either a table or an index, but if the problem is on an index, you can avoid affecting the entire table by using dbcc indexalloc. If you need to minimize the amount of time the table is unavailable, it may be most practical to use dbcc indexalloc.
• These commands correct the error only when run in the full or optimized mode, with the fix option specified, because the default value is nofix on system tables.
Use the command appropriate for your situation:
4 Turn off single-user mode in the database:
• If the database is master, use “Returning Adaptive Server to Multiuser Mode”.
• If the database is not master, use the following procedure:
1> use master 2> go1> sp_dboption database_name, single, false2> go
1> use database_name 2> go
1> checkpoint2> go
Refer to “dbcc” in the Reference Manual and “Checking Database Consistency” in the System Administration Guide for information about dbcc tablealloc and dbcc indexalloc.
Detecting Allocation Errors as Early as Possible
This section provides some strategies for detecting allocation errors 2521, 2540, 2546, 7939, 7940, and 7949 as early as possible:
For Tables (index ID = 0) For Indexes (0 < index ID < 255)
1> dbcc tablealloc (object_ID,2> full, fix)3> go
1> dbcc indexalloc (object_ID, 2> index_ID, full, fix) 3> go

Other Useful Tasks
90
• Refer to “Single-User Mode Method (Spurious and Non-Spurious Errors)” if the database can be placed in single-user mode to perform maintenance tasks.
• Refer to “Multiuser Mode Method (Spurious Errors Only)” if you cannot invoke single-user mode on the database in question (for example a 24-hour production site).
• Consider running your dbcc checks on groups of tables in successive off-peak periods. For example, if you have 210 tables, run checks on 70 tables nightly until you cycle through all the tables. If you adopt this approach, placing the database in single-user mode is only necessary when running dbcc tablealloc on system tables. The same approach can be taken for dbcc checktable but there is no need to place the database in single-user mode.
Without single-user mode, you cannot prevent non-spurious error messages from occurring.
Single-User Mode Method (Spurious and Non-Spurious Errors)
If you can run dbcc checkalloc in single-user mode, replace each occurrence of dbcc checkalloc in scripts and procedures with dbcc checkalloc with the fix option, as follows:
1> use master 2> go1> sp_dboption database_name, single, true2> go
1> use database_name 2> go
1> checkpoint2> go
1> use master 2> go
1> dbcc checkalloc(database_name, fix)2> go
1> sp_dboption database_name, single, false2> go
1> use database_name 2> go
1> checkpoint

CHAPTER 2 Encyclopedia of Tasks
91
2> go
Note Use dbcc checkalloc with the fix option while in a database other than the one that is being repaired.
Before you implement this strategy, consider these facts:
• dbcc checkalloc with the fix option must be run in single-user mode.
• Because dbcc checkalloc with the fix option may report other errors, Sybase recommends that you save the output from the dbcc checkalloc command and examine it.
• dbcc checkalloc with the fix option is the same program as dbcc checkalloc, except that dbcc checkalloc with the fix option requires single-user mode and fixes errors instead of just reporting them. dbcc checkalloc with the fix option is not slower than dbcc checkalloc.
• Because the master database is usually updated less frequently, allocation errors occur much less often. Therefore, you may not need to use this strategy on master. If you do use it on master, refer to “How to Start Adaptive Server in Single-User Mode” of this guide for instructions on how to activate single-user mode (it cannot be invoked via sp_dboption on master).
• You do not ever need to run dbcc checkalloc after dbcc checkalloc with the fix option to ensure that the errors were corrected.
• Although no actual users are logged on, you may not be able to enable single-user mode if there are processes still active.
If you have databases on which you cannot run allocation checks in single-user mode, use the following procedure to eliminate the spurious allocation errors that can occur when dbcc checkalloc is run in multiuser mode.
Multiuser Mode Method (Spurious Errors Only)
If your site does not allow single-user operation (such as a 24-hour production Adaptive Server), you cannot completely prevent spurious allocation errors, but you can prevent spurious errors on the transaction log-where most occur. Use both of the strategies described in this section to stop occurrences of spurious allocation errors.
Strategy 1 Do not run dbcc check commands when performing operations like create index, truncate table, or bcp; or when doing large numbers of inserts into the database.

Other Useful Tasks
92
Strategy 2 Before you implement this strategy, consider these facts:
• This strategy is unnecessary if you can run the database in single-user mode. If you can run the database in single-user mode, use the strategy described in “Single-User Mode Method (Spurious and Non-Spurious Errors)”.
• Because the master database is usually updated less frequently than user databases, allocation errors occur much less frequently. Therefore, this strategy may be unnecessary on master.
For this strategy, replace each occurrence of dbcc checkalloc in scripts and procedures with the following:
1> dbcc traceon (2512)2> go1> dbcc checkalloc (database_name)2> go
1> dbcc traceoff (2512)2> go
1> use database_name 2> go
1> dbcc tablealloc (syslogs)2> go
This procedure prevents dbcc checkalloc from examining the syslogs table, where most spurious errors originate (dbcc tablealloc checks syslogs instead). If you get genuine allocation errors, refer to Chapter 3, “Error Message Writeups” for instructions.
Syntax for dbcc checkalloc with the fix Option
This section explains only dbcc checkalloc with the fix option. Refer to “dbcc” in the Reference Manual for information about dbcc and its other keywords and options.
Function dbcc checkalloc with the fix option detects and fixes allocation errors in databases.
Syntax dbcc checkalloc(database_name, fix)
Example 1> sp_dboption database_name, single, true2> go
1> use database database_name 2> go

CHAPTER 2 Encyclopedia of Tasks
93
1> checkpoint 2> go
1> dbcc checkalloc(database_name, fix)2> go
1> use master2> go
1> sp_dboption database_name, single, false2> go
1> use database_name2> go
1> checkpoint2> go
Comments Databases must be in single-user mode or dbcc checkalloc with the fix option will fail with error 2595.
How to Find an Object Name from a Page NumberSome Adaptive Server error messages only specify a logical page number and do not indicate the table or index name to which the page belongs. This section describes how to determine to which object a particular database page belongs.
Suppose you encounter this error message:
Error 614, Severity 21, State 1. A row on page 121 was accessed that has an illegal length of 0 in database 'production'.
This error occurs when Adaptive Server accesses a data or index row whose length is smaller than the minimum row size or greater than the maximum row size. The error message provides the relevant page number and database name, but not the name of the affected table or index.
To determine which table or index is involved, follow these steps:
1 Log into Adaptive Server as “sa”.
2 Enable trace flag 3604 to allow dbcc output to appear at your terminal: 1> dbcc traceon(3604) 2> go
3 Use dbcc page to display information about the page in question.
Here is the syntax:

Other Useful Tasks
94
dbcc page (database_name, page_number)
Note The dbcc page command is not a supported feature and Sybase Technical Support cannot answer any questions regarding any values other than object ID and index ID.
To find information about page 121 (the index or table page indicated in the error message) in the salaries database, execute the following command:
1> dbcc page (salaries, 121)2> go
Page found in cache default data cache.BUFFER:Buffer header for buffer 0x13d6800page=0x13d7000 bdnew=0x0 bdold=0x0 bhash=0x0 bmass_next=0x0 bmass_prev=0x0 bvirtpg=0 bdbid=0 bkeep=0 bmass_stat=0x0800 bbuf_stat=0x0000 bpageno=121 bxls_pin = 0x00000000 bxls_next = 0x00000000b bxls_flushseq 0 bxls_pinseq 0PAGE HEADER:Page header for page 0x13d7000pageno=121 nextpg=122 prevpg=120 objid=7 timestamp=0001 0000043fnextrno=1 level=10 indid=0 freeoff=1 minlen=1page status bits: 0x8000,0x8,
DBCC execution completed. If DBCC printed error messages, contact a user with System Administrator (SA) role.
Warning! Be sure to provide the correct page number.
4 Translate the object ID (objid) into a table name. For example:
1> use production2> go1> select object_name(7) 2> go--------------bad_table
5 Translate the index ID (indid) into an index name, if applicable:
1> use database_name2> go

CHAPTER 2 Encyclopedia of Tasks
95
1> select name 2> from sysindexes 3> where id = objid 4> and indid = indid 5> go
Refer to the table below to determine the type of object to which the page belongs. The object type corresponds to its index ID value on the page:
Index ID 3, for example, corresponds to a nonclustered index. If the index ID is 0, the page does not belong to an index.
6 Disable trace flag 3604:
1> dbcc traceoff(3604)2> go
How to Interpret sp_who Outputcmd Column Contains the Entry “Maintenance Token”
Adaptive Server generates sp_who output by reading values from sysprocesses, which is a “fake” table built by the server. The command listed in the cmd column is from the cmd column of the sysprocesses table.
“Maintenance Token” in the cmd column of sysprocesses indicates that the status value of the process is zero. This means that the process is initializing or in a transient state. A process completing initialization or running recovery may display the command string “Maintenance Token”.
The presence of “Maintenance Token” does not indicate a problem.
loginame Value Changes During Stored Procedure Execution
During recompilation, Adaptive Server sets the user to the owner of the procedure being recompiled in order to resolve the names of referenced objects correctly.
Index ID Meaning
0 Actual table data
1 Clustered index
2-250 Nonclustered indexes
255 Text/image page

Other Useful Tasks
96
If a user is executing a stored procedure, sp_who shows “sa” under the loginame for the duration of the stored procedure's execution. When execution is complete, sp_who again shows the user name under loginame.
Sleep Classifications
If an Adaptive Server process is asleep, sp_who shows the state of the process in the status column using one of the following classifications:
Table 2-3: Sleep classifications from sp_who output
Device Administration IssuesThis section discusses issues to consider when choosing between raw partitions and UNIX files and describes how to use partitions correctly.
How to Choose Between Raw Partitions and UNIX FilesA raw partition on a UNIX system is a part of the disk where there is no file system. Although Adaptive Server can use UNIX files for database devices, Sybase strongly recommends that UNIX files only be used if the buffer cache is disabled for writes to the files. For any database device that is running on a UNIX file, you should disallow the use of buffer cache for writes by running the sp_deviceattr stored procedure and setting the dsync option to true.
For example, to ensure that you disallow the use of buffer cache for writes to the database device datadev1, run the following command:
1> sp_deviceattr datadev1, dsync, true
Classification Meaning
send sleep Adaptive Server process is going to sleep until the network service task completes the send to the client.
recv sleep Adaptive Server process is sleeping until it receives something from the client. This is the most common status.
lock sleep Adaptive Server process is waiting for locks (resource, logical, semaphore, and so on) to be released.
alarm sleep Adaptive Server process is waiting for an alarm to wake it up (user executed a waitfor delay command).
sleeping Adaptive Server process is waiting for a resource to post network or disk I/O.

CHAPTER 2 Encyclopedia of Tasks
97
2> go
Note The ability to disallow the use of buffered writes to UNIX files by setting dsync option to true was first introduced in Adaptive Server version 12.0. In pre-12.0 servers, there is no way to avoid the use of buffer cache for writes on database devices placed on UNIX files. For this reason, Sybase strongly recommends that only raw partitions be used as database devices on any installation running a pre-12.0 version of Adaptive Server.
Most UNIX systems use a buffer cache for disk I/O. Writes to disk are stored in the buffer and may not be written to disk immediately. If Adaptive Server completes a transaction and sends the result to a UNIX file, the transaction is considered complete even though the UNIX buffer cache may not have been written to disk. If the system crashes before this buffer cache is written, you lose data. In this situation, Adaptive Server has no way of knowing that the write to disk eventually failed, and the transaction is not rolled back. In addition, some UNIX operating systems do partial writes. In that case, if the system crashes, the Sybase device will be corrupted.
Using raw partitions for Sybase devices allows Adaptive Server to process its own I/O requests, without having to go through the UNIX buffering scheme. In this way, Adaptive Server knows exactly what portions of a transaction completed or failed in the event of a system crash. If Sybase devices use UNIX files, corruption could occur.
Refer to the Adaptive Server installation and configuration guides or your operating system documentation for more information.
Correct Use of Raw Partitions
If you choose to use raw partitions, examine your operating system's use of partitions carefully. Otherwise, you may overwrite valuable data. In particular, avoid the following situations:
• Partition is already in use.
• Partition overlaps with another partition.
• Operating system is using partition for swap space.
• A file system is mounted on the partition
• Character or block devices for each disk partition (one or the other should be used, not both).
The following sections describe these situations in detail.

Other Useful Tasks
98
Partition Is Already In Use
Ask your UNIX system administrator what the partition was originally configured for and make sure that it was not designated to serve for any other purpose except for the use of your Adaptive Server. If your partition is used for any other purpose, most of the information it stores might be corrupted or destroyed.
Partition Overlaps with Another Partition
Verify that the partition you intend to use does not share cylinders with another partition. In particular, watch for the following scenarios:
• On some UNIX systems (for example, SunOS BSD), partition c is, by convention, defined to be the whole disk, so it is expected that partition c will overlap all the other partitions.
If you are using partition c for your database device, do not use any other partitions on that drive, or check with your UNIX System Administrator to make sure that partition c is not defined as being the whole disk.
• On other UNIX systems (AT&T SVR4), partition s6 is defined to be the whole disk.
Operating System Is Using Partition for Swap Space
Refer to your operating system administration guide for steps to determine whether a partition is being used for swap space.
For example, on AT&T SVR4 and HP, determine whether your partition is included in the output that is generated, using the following commands:
On AT&T SVR4:
% /etc/swap -l
On HP-UX:
% /etc/swapinfo or % /usr/sam/bin/swapinfo
These commands report information on swap partitions only if the entries are found in the file system table.

CHAPTER 2 Encyclopedia of Tasks
99
If the output of these commands includes the device name associated with your database partition, then the device is being used for swap space. Ask your operating system administrator which partition you may use for your database. For more information on how to choose raw partitions, refer to your Adaptive Server installation and configuration guides.
A File System Is Mounted on the Partition
Determine whether your partition is included in the output generated by the following command(s):
% df % /etc/mount
If the output from these commands includes the device name associated with your database partition, ask your operating system administrator to unmount the file system from the partition or to help you choose another disk partition. Note that using the partition as a raw database partition will destroy all file system information that was there.
Getting Information About Your Partition
There are several ways to determine how a raw partition is being used:
• Interview your operating system administrator.
• Examine your file system table.
• Examine the partition map.
Examine the File System Table
The file system table name varies by platform. Check your operating system manual for the correct name.
Note Good commenting in the file system table helps prevent most disk partition errors.
Examine the Partition Map
Each partition includes a partition map, which is usually in the first sector of the first cylinder.

Other Useful Tasks
100
The partition includes the partition map, which is usually in the first sector of the first cylinder. Refer to your operating system administration guide for steps to determine at what cylinder a partition starts.
Note If you are running the Logical Volume Manager (LVM) on an AIX operating system, verify that the first AIX cylinder of your raw partition is free (except for the master device) and is available for the use of the LVM configuration. In order to do this, make sure that vstart = 2 (one AIX cylinder = 2 Sybase pages on default server) for all user-defined disks.
Refer to your operating system documentation for more information about disk partition administration. The Adaptive Server installation and configuration guide contains additional information about choosing a raw partition for your database device.
Other Situations to Avoid
Do not let multiple Adaptive Server devices or mirrors use the same partition. Make a list of all partitions used by all Adaptive Servers on the machine and look for duplicates. The $SYBASE/install/RUN_SERVERNAME ($SYBASE/$SYBASE_ASE/install/RUN_SERVERNAME in 12.0 and later) file contains the master device name. Use the stored procedure sp_helpdevice in each Adaptive Server to find all the database devices and mirrors in use by that Adaptive Server.
Having two or more Adaptive Servers on the same machine with two or more Sybase System Administrators increases the likelihood of this problem. Any process logged in as “sybase” can write to that partition since the user “sybase” owns it. To minimize the risk, keep a log of all the partitions in use by UNIX and by Adaptive Server. Establish procedures for updating the log when any configuration changes are made.
As an extra security check, make sure that the permissions for the device are read and write only by the “sybase” user. Then, if another user attempts to write anything to that partition, no damage will occur.
How to Move a Sybase Device or Database With Disk MirroringAlthough the primary purpose of disk mirroring is to expedite recovery, it can also be used to move a Sybase device.

CHAPTER 2 Encyclopedia of Tasks
101
The commands in this example move devices from disk1 and disk2 to disk3 and disk4:
1> disk mirror name = "disk1",2> mirror = "/usr/u/sybase/disk3"3> go1> disk mirror name = "disk2", 2> mirror = "/usr/u/sybase/disk4" 3> go1> disk unmirror name = "disk1",2> side = primary, mode = remove3> go1> disk unmirror name = "disk2",2> side = primary, mode = remove3> go
To move a database to new devices using this procedure, move all the devices on which the database resides.
Warning! This procedure will partially or fully move any other databases that reside on the target devices.
For more information on disk mirroring, refer to “Mirroring Database Devices” in the System Administration Guide.
How to Gather Information About Read/Write ErrorsThe commands to create a procedure called sp_diskblock, which translates a Sybase virtual disk and block number into the corresponding Sybase device, database, and logical page number, are shown below. Use sp_diskblock to gather information about read or write errors that Adaptive Server might encounter. Refer to “Read/Write Error” for more information.
sp_diskblock collects information from the system tables of the Adaptive Server on which it is executed; therefore, you must execute it on the Adaptive Server that has the read/write error.
Warning! The sp_diskblock stored procedure is provided for your information-it is not supported at this time.
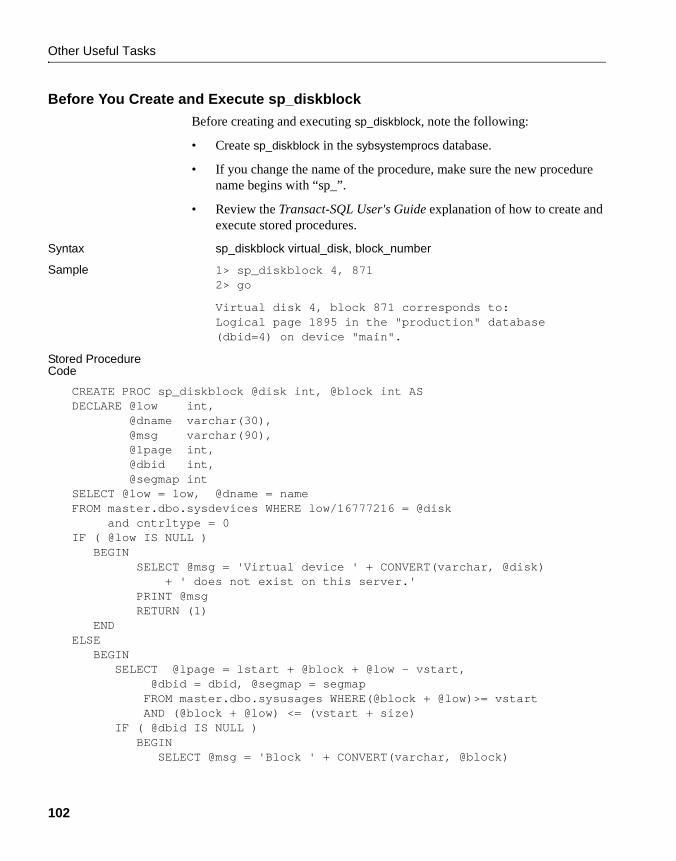
Other Useful Tasks
102
Before You Create and Execute sp_diskblock
Before creating and executing sp_diskblock, note the following:
• Create sp_diskblock in the sybsystemprocs database.
• If you change the name of the procedure, make sure the new procedure name begins with “sp_”.
• Review the Transact-SQL User's Guide explanation of how to create and execute stored procedures.
Syntax sp_diskblock virtual_disk, block_number
Sample 1> sp_diskblock 4, 8712> go
Virtual disk 4, block 871 corresponds to:Logical page 1895 in the "production" database(dbid=4) on device "main".
Stored Procedure Code
CREATE PROC sp_diskblock @disk int, @block int ASDECLARE @low int, @dname varchar(30), @msg varchar(90), @lpage int, @dbid int, @segmap intSELECT @low = low, @dname = nameFROM master.dbo.sysdevices WHERE low/16777216 = @disk and cntrltype = 0IF ( @low IS NULL ) BEGIN SELECT @msg = 'Virtual device ' + CONVERT(varchar, @disk) + ' does not exist on this server.' PRINT @msg RETURN (1) ENDELSE BEGIN SELECT @lpage = lstart + @block + @low - vstart, @dbid = dbid, @segmap = segmap FROM master.dbo.sysusages WHERE(@block + @low)>= vstart AND (@block + @low) <= (vstart + size) IF ( @dbid IS NULL ) BEGIN SELECT @msg = 'Block ' + CONVERT(varchar, @block)

CHAPTER 2 Encyclopedia of Tasks
103
+' on disk "' + @dname + '" is currently not in use for any database.' PRINT @msg RETURN (1) END ELSE BEGIN SELECT @msg = "Virtual disk" + convert(varchar,@disk) + ", block " + convert(varchar,@block) + " corresponds to:" PRINT @msg SELECT @msg ='Logical page ' + convert(varchar,@lpage) + ' in the "' + DB_NAME(@dbid) + '" database (dbid=' + convert(varchar(3),@dbid) + ') on device "' + @dname + '".' PRINT @msg END ENDRETURN (0)
How to Mark a Database “suspect'”The commands to create a procedure called sp_marksuspect, which turns on the suspect status bit on the specified database, are described in the stored procedure code below.
Use sp_marksuspect to prepare a damaged database that is to be dropped with dbcc dbrepair.
Warning! The sp_marksuspect stored procedure is provided for your information-it is not supported at this time.
Before You Create and Execute sp_marksuspect
Before creating and executing sp_marksuspect, note the following:
• Create sp_marksuspect in the master database.
• Since this procedure modifies the system catalog, you must enable updates to the catalog before executing the procedure. Use the procedure below to enable updates:
1> use master

Other Useful Tasks
104
2> go1> sp_configure "allow updates", 12> go
• If you change the name of the procedure, make sure the new procedure name begins with “sp_”.
• Review the Transact-SQL User's Guide explanation of how to create and execute stored procedures.
After You Execute sp_marksuspect
Once the procedure is created successfully, updates to the system catalog should be immediately disabled as follows:
1> sp_configure "allow updates", 02> go
Syntax sp_marksuspect database_name
Example 1> sp_marksuspect PRODUCTION2> go
Database 'PRODUCTION' has been marked suspect!
NOTE: You may now drop this databasevia dbcc dbrepair (dbname, dropdb).
Stored Procedure Code
CREATE PROC sp_marksuspect @dbname varchar(30) AS DECLARE @msg varchar(80) IF @@trancount > 0 BEGIN PRINT "Can't run sp_marksuspect from within a transaction." RETURN (1) END IF suser_id() != 1 BEGIN SELECT @msg = "You must be the System Administrator (SA) SELECT @msg = @msg + "to execute this procedure." PRINT @msg RETURN (1) END IF (SELECT COUNT(*) FROM master..sysdatabases WHERE name = @dbname) != 1 BEGIN SELECT @msg = "Database '" + @dbname + "' does not exist!" PRINT @msg

CHAPTER 2 Encyclopedia of Tasks
105
RETURN (1) END IF (SELECT COUNT(*) FROM master..sysdatabases WHERE name = @dbname and status & 320 = 320) = 1 BEGIN SELECT @msg = "Database '" + @dbname + "' " SELECT @msg = @msg + "is already marked suspect." PRINT @msg RETURN (1) END BEGIN TRAN update master..sysdatabases set status = status|320 WHERE name = @dbname IF @@error != 0 or @@rowcount != 1 ROLLBACK TRAN ELSE BEGIN COMMIT TRAN SELECT @msg = "Database '" + @dbname + "' has been marked suspect!" PRINT @msg PRINT " " SELECT @msg = "NOTE: You may now drop this database" SELECT @msg = @msg + "via dbcc dbrepair (dbname, dropdb)." PRINT @msg PRINT " " END
How to Reset a Database's “suspect” StatusThe commands to create a procedure called sp_resetstatus, which turns off the “suspect” flag on a database while leaving all other database options intact, are shown below. This is the safest method. An alternative approach using Transact-SQL commands is also presented.
Reset a database's “suspect” status only when instructed in this manual or by Sybase Technical Support. Otherwise, you may damage your database.
Warning! The sp_resetstatus stored procedure is provided for your information-it is not supported at this time.

Other Useful Tasks
106
Before You Create and Execute sp_resetstatus
Before creating and executing sp_resetstatus, note the following:
• Create sp_resetstatus in the master database.
• You must have sa_role to execute this procedure.
• Since this procedure modifies the system catalog, you must enable updates to the catalog before executing the procedure. Use the procedure below to enable updates:
1> use master 2> go1> sp_configure "allow updates", 12> go
• If you change the name of the procedure, make sure the new procedure name begins with “sp_”.
• Review the Transact-SQL User's Guide explanation of how to create and execute stored procedures.
After You Execute sp_resetstatus
After successfully executing this procedure, you must do two things:
1 Immediately shut down Adaptive Server.
2 Restart Adaptive Server and immediately disable updates to the system catalog as follows:
1> sp_configure "allow updates", 02> go
Syntax sp_resetstatus database_name
Example 1> sp_resetstatus PRODUCTION2> go
Database 'PRODUCTION' status reset!
WARNING: You must reboot Adaptive Server prior to accessing this database!
Stored Procedure Code
CREATE PROC sp_resetstatus @dbname varchar(30) ASDECLARE @msg varchar(80)IF @@trancount > 0 BEGIN
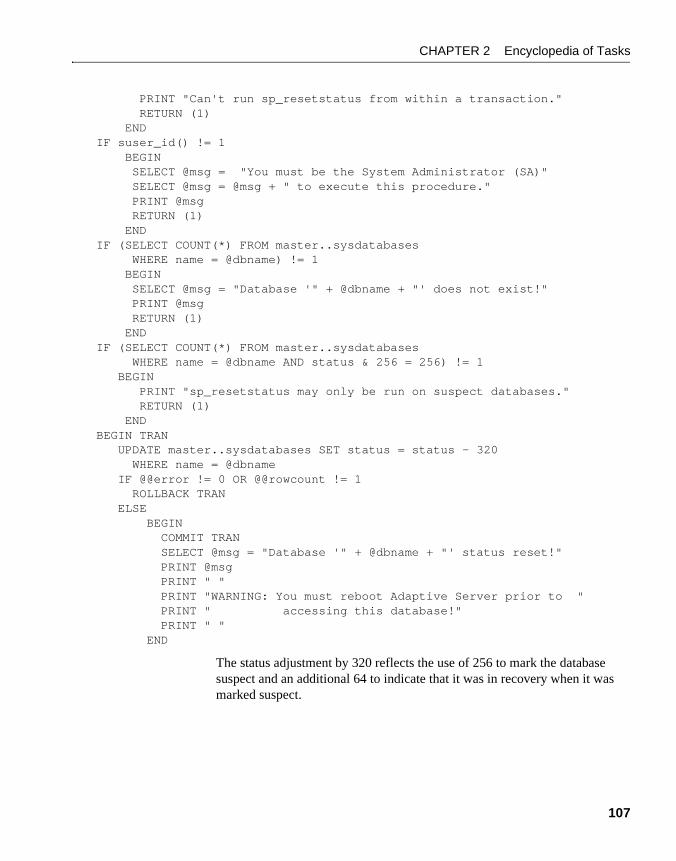
CHAPTER 2 Encyclopedia of Tasks
107
PRINT "Can't run sp_resetstatus from within a transaction." RETURN (1) ENDIF suser_id() != 1 BEGIN SELECT @msg = "You must be the System Administrator (SA)" SELECT @msg = @msg + " to execute this procedure." PRINT @msg RETURN (1) ENDIF (SELECT COUNT(*) FROM master..sysdatabases WHERE name = @dbname) != 1 BEGIN SELECT @msg = "Database '" + @dbname + "' does not exist!" PRINT @msg RETURN (1) ENDIF (SELECT COUNT(*) FROM master..sysdatabases WHERE name = @dbname AND status & 256 = 256) != 1 BEGIN PRINT "sp_resetstatus may only be run on suspect databases." RETURN (1) ENDBEGIN TRAN UPDATE master..sysdatabases SET status = status - 320 WHERE name = @dbname IF @@error != 0 OR @@rowcount != 1 ROLLBACK TRAN ELSE BEGIN COMMIT TRAN SELECT @msg = "Database '" + @dbname + "' status reset!" PRINT @msg PRINT " " PRINT "WARNING: You must reboot Adaptive Server prior to " PRINT " accessing this database!" PRINT " " END
The status adjustment by 320 reflects the use of 256 to mark the database suspect and an additional 64 to indicate that it was in recovery when it was marked suspect.

Other Useful Tasks
108
Alternative Method of Resetting a Database's “suspect” Status
Note The sp_resetstatus stored procedure is the safest method for resetting the suspect status of a database.
1 Use the following procedure on the suspect database:
1> sp_configure "allow updates", 12> go1> use master 2> go1> begin transaction2> go1> update sysdatabases 2> set status = status & ~2563> where name="database_name"4> go
If only one row is affected by the update transaction, continue with these instructions. If more than one row is affected by the update transaction, roll back the transaction and find out why other rows are being affected.
2 If the above commands affect only one row, use the commands below to commit the transaction, disable updates to the system tables, issue a checkpoint, and shut down Adaptive Server:
1> commit transaction2> go1> sp_configure "allow updates", 02> go1> checkpoint2> go1> shutdown2> go
3 Start Adaptive Server.
How to Find a Device's Virtual Device NumberThe commands to create a procedure called sp_vdevno, which finds the virtual device number of a given device, are shown below.
sp_vdevno returns results similar to the following:
1> sp_vdevno2> go
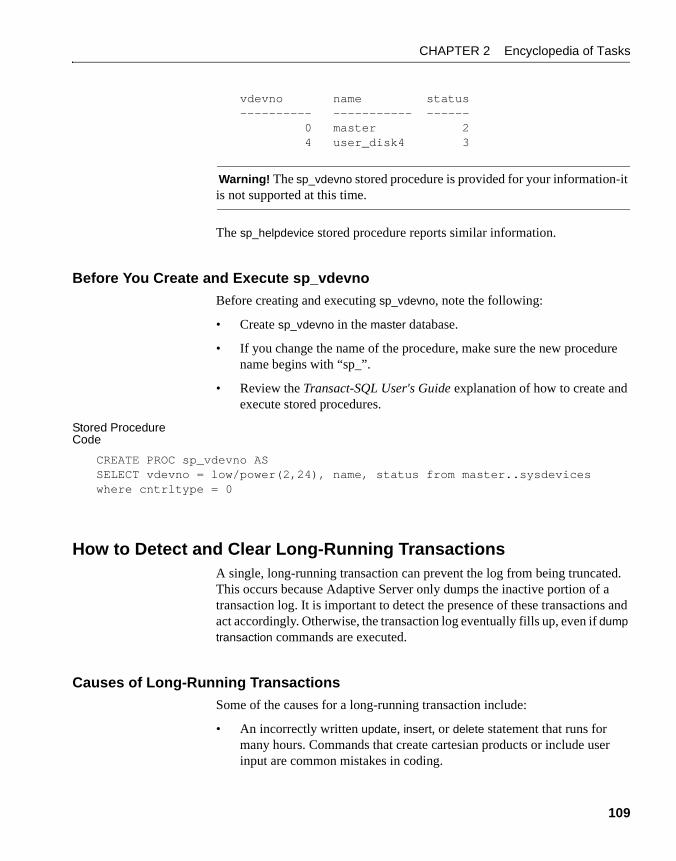
CHAPTER 2 Encyclopedia of Tasks
109
vdevno name status---------- ---–------- ------
0 master 2 4 user_disk4 3
Warning! The sp_vdevno stored procedure is provided for your information-it is not supported at this time.
The sp_helpdevice stored procedure reports similar information.
Before You Create and Execute sp_vdevno
Before creating and executing sp_vdevno, note the following:
• Create sp_vdevno in the master database.
• If you change the name of the procedure, make sure the new procedure name begins with “sp_”.
• Review the Transact-SQL User's Guide explanation of how to create and execute stored procedures.
Stored Procedure Code
CREATE PROC sp_vdevno ASSELECT vdevno = low/power(2,24), name, status from master..sysdeviceswhere cntrltype = 0
How to Detect and Clear Long-Running TransactionsA single, long-running transaction can prevent the log from being truncated. This occurs because Adaptive Server only dumps the inactive portion of a transaction log. It is important to detect the presence of these transactions and act accordingly. Otherwise, the transaction log eventually fills up, even if dump transaction commands are executed.
Causes of Long-Running Transactions
Some of the causes for a long-running transaction include:
• An incorrectly written update, insert, or delete statement that runs for many hours. Commands that create cartesian products or include user input are common mistakes in coding.

Other Useful Tasks
110
• An application error that starts a transaction but never completes it.
Detecting Long-Running Transactions
The syslogshold table in the master database contains information about each database's oldest active transaction (if any) and Replication Server truncation point (if any) for the transaction log. This table is built dynamically when you query it.
Check syslogshold for old transactions for the database for which the error occurred:
1> use master2> go1> select * from syslogshold 2> where dbid = database_ID3> go
Determine whether the oldest active transaction can be terminated; it may have been left inactive intentionally. Continue this procedure until there are no other old transactions that can be terminated.
For more information about the syslogshold table, refer to “Backing Up and Restoring User Databases” in the System Administration Guide.
Clearing Long-Running Transactions
You can clear a long-running transaction in one of two ways:
1 Using the Transact-SQL kill command.
2 Restarting Adaptive Server.
If the long-running transaction is due to a runaway query, and the process with the open transaction has been identified, use the kill command to stop the process. This clears the transaction and allows the log to be truncated. If the kill command cannot stop the process, restart Adaptive Server to resolve the problem.
Restarting Adaptive Server causes the database to go through normal recovery, so any outstanding transactions are either committed or rolled back.
If this type of problem occurs frequently, Sybase Technical Support may be able to identify which process is involved.

CHAPTER 2 Encyclopedia of Tasks
111
How to Reduce the Size of tempdbThe tempdb (temporary) database provides storage for temporary tables and other temporary working storage needs. If you have a corrupted disk that contains portions of tempdb, you should first reduce tempdb to its default size and then extend it onto any new device.
This section describes how to reduce tempdb to its default size (2MB of data and log on the master device).
Reset tempdb to Default Size
Before proceeding, start Adaptive Server in single-user mode to prevent another user from altering the database while you are manually updating sysusages. Refer to “How to Start Adaptive Server in Single-User Mode” for instructions on doing this.
1 Log into Adaptive Server as the System Administrator:
% isql -Usa -Sserver_name -Ppassword
2 Dump the master database in case something goes wrong and you need to restore from the backup:
1> dump database master2> to "dump_device"3> go
where dump_device is the name of the target dump device.
3 Save the following key system tables to data files with the bcp..out command, to aid in master database recovery if necessary:
• master..sysusages
• master..sysdevices
• master..sysdatabases
• master..syslogins
• master..sysconfigures
• master..syscharsets
• master..sysloginroles
• master..sysservers
• master..sysremotelogins
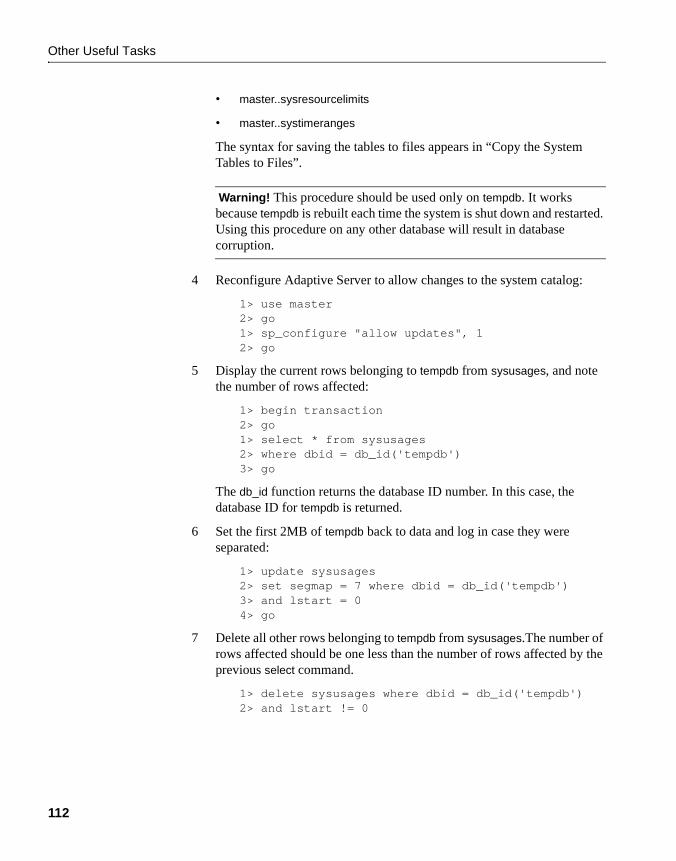
Other Useful Tasks
112
• master..sysresourcelimits
• master..systimeranges
The syntax for saving the tables to files appears in “Copy the System Tables to Files”.
Warning! This procedure should be used only on tempdb. It works because tempdb is rebuilt each time the system is shut down and restarted. Using this procedure on any other database will result in database corruption.
4 Reconfigure Adaptive Server to allow changes to the system catalog:
1> use master2> go1> sp_configure "allow updates", 12> go
5 Display the current rows belonging to tempdb from sysusages, and note the number of rows affected:
1> begin transaction2> go1> select * from sysusages2> where dbid = db_id('tempdb')3> go
The db_id function returns the database ID number. In this case, the database ID for tempdb is returned.
6 Set the first 2MB of tempdb back to data and log in case they were separated:
1> update sysusages2> set segmap = 7 where dbid = db_id('tempdb')3> and lstart = 04> go
7 Delete all other rows belonging to tempdb from sysusages.The number of rows affected should be one less than the number of rows affected by the previous select command.
1> delete sysusages where dbid = db_id('tempdb')2> and lstart != 0

CHAPTER 2 Encyclopedia of Tasks
113
3> go
Warning! Each time Adaptive Server is shut down and restarted, the model database is copied to tempdb. Therefore, if the model database has been increased beyond its default size, do not reduce the size of tempdb so that it is smaller than model.
8 Verify that tempdb has one entry that looks like this:
1> select * from sysusages2> where dbid = db_id('tempdb')
dbid segmap lstart size vstart--- ------ ----- ---- ------ 2 7 0 1024 2564
9 If the information is correct, go to step 10 to commit the transaction.
If you see a problem, back out of your changes by entering the following commands:
1> rollback transaction2> go
Do not continue with the procedure. Review the steps you performed to determine the cause of the problem.
10 Complete the transaction:
1> commit transaction2> go
11 Reconfigure Adaptive Server to disallow changes to the system catalog (the normal state for Adaptive Server):
1> sp_configure "allow updates", 02> go
12 Immediately issue a checkpoint and shut down Adaptive Server:
Warning! You must shut down Adaptive Server before altering the size of tempdb again. If you continue to run without shutting down and restarting, you will receive serious errors on tempdb.
1> checkpoint2> go
1> shutdown2> go

Other Useful Tasks
114
13 Restart Adaptive Server.
Verify and Alter tempdb on Desired Devices
Verify that tempdb has been correctly reset, and alter the database as required to include any additional devices:
1 Log into Adaptive Server as the System Administrator:
% isql -Usa -Sserver_name -Ppassword
2 Verify that tempdb has one 2MB fragment for data and log on the master device:
1> sp_helpdb tempdb2> go
3 Alter tempdb as required to extend the database onto the desired devices. For example:
1> alter database tempdb2> on device_name = device_size3> go
Note device_size is specified in megabytes.
4 Back up the master database again, in case you need to restore from this point:
1> dump database master to "dump_device"2> go
where dump_device is the name of the target dump device.
You can use sp_logdevice to place the transaction log on another device. The first 2MB of tempdb must remain on the master device, but future log space allocations will be made on the device specified by sp_logdevice.
How to Remap All Objects in a DatabaseIf the query remapping phase fails while you are upgrading your Adaptive Server, the query trees for your stored procedures are out of date and you have to remap them. You know the remapping phase has failed if the following message is written to the upgrade log:
Terminating remapping of query trees due to
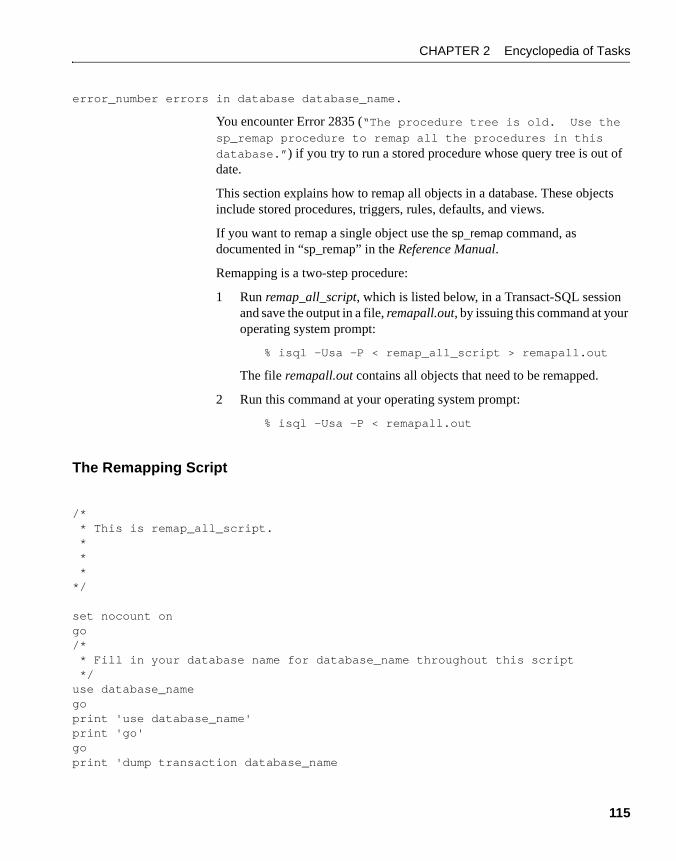
CHAPTER 2 Encyclopedia of Tasks
115
error_number errors in database database_name.
You encounter Error 2835 (“The procedure tree is old. Use the sp_remap procedure to remap all the procedures in this
database.”) if you try to run a stored procedure whose query tree is out of date.
This section explains how to remap all objects in a database. These objects include stored procedures, triggers, rules, defaults, and views.
If you want to remap a single object use the sp_remap command, as documented in “sp_remap” in the Reference Manual.
Remapping is a two-step procedure:
1 Run remap_all_script, which is listed below, in a Transact-SQL session and save the output in a file, remapall.out, by issuing this command at your operating system prompt:
% isql -Usa -P < remap_all_script > remapall.out
The file remapall.out contains all objects that need to be remapped.
2 Run this command at your operating system prompt:
% isql -Usa -P < remapall.out
The Remapping Script
/* * This is remap_all_script. * * **/
set nocount ongo/* * Fill in your database name for database_name throughout this script */use database_namegoprint 'use database_name'print 'go'goprint 'dump transaction database_name
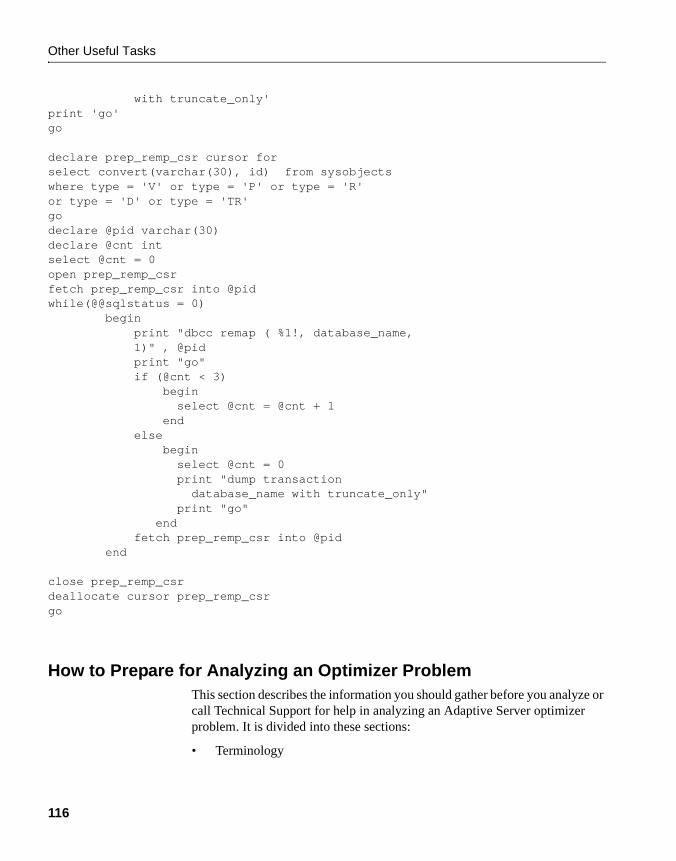
Other Useful Tasks
116
with truncate_only'print 'go'go
declare prep_remp_csr cursor forselect convert(varchar(30), id) from sysobjectswhere type = 'V' or type = 'P' or type = 'R'or type = 'D' or type = 'TR'godeclare @pid varchar(30)declare @cnt intselect @cnt = 0open prep_remp_csrfetch prep_remp_csr into @pidwhile(@@sqlstatus = 0) begin print "dbcc remap ( %1!, database_name, 1)" , @pid print "go" if (@cnt < 3) begin select @cnt = @cnt + 1 end else begin select @cnt = 0 print "dump transaction database_name with truncate_only" print "go" end fetch prep_remp_csr into @pid end
close prep_remp_csrdeallocate cursor prep_remp_csrgo
How to Prepare for Analyzing an Optimizer ProblemThis section describes the information you should gather before you analyze or call Technical Support for help in analyzing an Adaptive Server optimizer problem. It is divided into these sections:
• Terminology
CHAPTER 2 Encyclopedia of Tasks
117
• Questions to Ask First
• Steps to Take Before Analysis
• How to Gather the Information
• Understanding the Information you have gathered
Have this information on hand when analyzing optimizer issues, and if you decide to seek help from Technical Support.
Terminology
The following terms are used in this section:
• join clause – the clause that joins tables. Here is an example:
select * from tableA, tableB where tableA.col = tableB.col
• join transitive closure allows the optimizer to consider a join order other than those made available explicitly by the query’s where clause.
• optdiag - A command-line tool for reading, writing, and simulating table, index, and column statistics.
• query – Any SQL statement, such as a batch query, the SQL content of a stored procedure or trigger, or the SQL that is used to create a view (view definition).
• SARG- A predicate in the query’s where clause that qualifies the rows to be returned. Here is an example:
select * from stores where store_id = "4914"
Questions to Ask First
Here are some factors to consider before you start analysis:
• Is this a new query? If not, has it been rewritten?
• Has the query just started to perform poorly, or has it performed poorly all along?
• Have there been any changes to the database or table? Have columns and/or indexes been added?
• Have any buffer pools been added, deleted, or resized? Have any cache bindings changed? Have any caches been resized?

Other Useful Tasks
118
• Has the data changed significantly?
• Have you upgraded Adaptive Server?
Steps to Take Before Analysis
Take the following steps first:
1 Check whether sort-merge joins are enabled (12.0 and later).
2 Check whether join transitive closure is enabled (12.0 and later).
3 Check whether an abstract plan is in use (12.0 and later).
4 Determine when update statistics was last run, and the extent to which performance improved as a result.
5 If a stored procedure problem appeared following an upgrade, drop and recreate the procedure to see if performance improves.
6 For a new query, verify there are no datatype mismatches. Mismatches that prevent a query from using an index are commonly seen:
• when you specify a search clause or a stored procedure parameter using a different datatype than the column, for example
where int_col = @smallint_param
• when you join columns having different datatypes, for example
where tableA.datetime_col = tableB.smalldatetime_col
Check that the datatype the query uses in join clauses and search arguments matches the column datatype. For details, see “Datatype Mismatches and Query Optimization” in the Performance and Tuning Guide.
7 Proceed with analysis if these steps do not help.
If one or more of the following is true, your problem may be related to the optimizer:
• A new query is not using the expected indexes
• Forcing an index or join order (using forceplan) improves performance
• You experience drastic performance differences between Adaptive Server versions

CHAPTER 2 Encyclopedia of Tasks
119
How to Gather the Information
Gathering information to solve an optimizer problem is a multi-step procedure, involving distinct Transact-SQL sessions or commands. You will save each session’s output to a file. You can then examine the information in these files, or make the files available to your Sybase Technical Support representative.
Steps for Gathering the Information
Here are the steps for gathering the information:
1 Save the text of the Transact-SQL query that provoked the optimizer problem to a file called query_text.
2 Create an input file, input_file1, that contains the following Transact-SQL:
1> use database_name2> go1> sp_help table_name2> go
database_name is the name of the database containing table_name, the relevant table. If there is more than one table involved in the problem query, run the input_file1 script once and name each file according to its table name.
If the query’s FROM clause involves a view, input_file1 should look like this:
1> use database_name2> go1> sp_helptext view_name2> go1> sp_help base_table_name2> go...repeat for other base tables in view
3 Run input_file1 through isql, saving the results to output_file1:
% isql -Usa -P < input_file1 > output_file1 -e
Save output_file1.
4 Create a second input file, input_file2, that contains the following Transact-SQL:
1> use database_name2> go1> select @@version2> go

Other Useful Tasks
120
1> set showplan on2> go1> set statistics io on2> go1> set statistics time on2> go1> dbcc traceon(3604)2> go1> dbcc traceon(302)2> go1> dbcc traceon(310)2> go... contents of query_text
Note You must have “sa_role” to run dbcc traceon(302) and dbcc traceon(310).
At the end of input_file2, include the contents of query_text, the file you created in step 1, which includes the Transact-SQL code that provoked the optimizer problem.
5 Run input_file2 through isql, saving the results of the commands in input_file2 to output_file2:
% isql -Usa -P < input_file2 > output_file2 -e
Save output_file2 .
6 Run optdiag to capture table statistics, saving the results of the command to output_file3:
% optdiag statistics database..table -o output_file3
Note If the query involves multiple tables, run optdiag for each table and save the output in separate files.
You should now have the following text files:
File name Contains
query_text The text of the Transact-SQL query, stored procedure, trigger, or view definition that provoked your optimizer problem.
output_file1 The results of running sp_help on the table(s) implicated in the optimizer problem.
output_file2 The results of running set showplan on, set statistics io on, set statistics time on, dbcc traceon (302), dbcc traceon (310), and the Transact-SQL query that provoked the optimizer problem.

CHAPTER 2 Encyclopedia of Tasks
121
Understanding the Information You Have Gathered
You have taken a number of steps to get information about your optimizer problem. Here is an explanation of each of these steps:
select @@version
select @@version displays the version of Adaptive Server you are running, including the SWR level and platform.
sp_help
sp_help provides more accurate information about a table than the script you used to create the table and its indexes. In the event that indexes have been added or changed or that columns have been added via alter table, sp_help will show the present state of the table(s).
set showplan on
The set showplan on command shows which query plan the optimizer has chosen for your query. Use set showplan on before running any query or procedure you will be analyzing.
In some cases you may need to issue the set noexec on command to save time when you are running a very long query. The order of these commands is important:
set showplan onset noexec ongo<query text...>go
There are several important items of information to look for when reading showplan output:
• Cache Utilization
output_file3 The output from the optdiag utility.
File name Contains

Other Useful Tasks
122
Adaptive Server uses two major strategies, named LRU and MRU respectively, for its data cache. The type of strategy used in a given query depends on whether a cached page needs to be accessed more than once. showplan’s "Buffer Replacement Strategy" messages show the cache strategy used for data pages and index leaf pages. See “Caches and Object Bindings” in the Performance and Tuning Guide for more information about cache strategies.
If you want to investigate your caches, for example to learn whether a cache is under- or over-utilized, you can use sp_sysmon. See “Data Cache Management” in the Performance and Tuning Guide.
• Index Utilization
Was an index used? Which one? Was a table scan done? To answer these questions, check the portion of showplan output following FROM TABLE for messages like "Table Scan" or "Using Clustered Index".
• Join Information
When evaluating joins, look for
• the order of tables in a join, also known as join order; knowing the order that the optimizer chose for joins is critical to your analysis. When your query joins two or more tables, showplan’s FROM TABLE messages show the order in which the optimizer will join the tables.
• Whether it is a nested-loop join or a sort-merge join (applies to 12.0 and later).
Refer to “Using set showplan” in the Performance and Tuning Guide for more information on interpreting showplan results.
set statistics io on
Since any analysis of a performance problem will require knowledge of the number and types of I/Os performed for the query, the set statistics io on command is critical.
Note If your query is taking very long to complete, using statistics io and statistics time may not be feasible. If you analyze your long-running query using set noexec on, you cannot obtain I/O information since noexec on stops all the output of statistics io.
The set statistics io on command provides you with the following information:

CHAPTER 2 Encyclopedia of Tasks
123
• Physical reads
This is the number of times Adaptive Server accesses the disk. The first time a query is run, the number of physical reads will generally be high. This happens because the required pages are not usually in cache. Subsequent runs of the query can access the pages in cache, and physical reads are minimized, if not avoided. If the number of physical reads remains high during subsequent executions of a query, you will need to take a close look at how the query executes.
In some instances, the size of the data cache may also be a problem. If it is too small, pages have to be read from disk more often. Likewise, configuration of named caches and use of large I/O buffer pools can have an impact on performance. See “Memory Use and Performance” in the Performance and Tuning Guide for details on configuring the data cache to improve performance.
• Logical reads
Logical reads are a combination of physical reads and "cache hits" - reads from pages in cache. If your statistics show a number of logical reads and no physical reads, it means that all required pages are in cache, which is the ideal situation. To determine the cache hit ratio (the percentage of pages that were found in cache) for your query, use the formula:
Logical reads - (Physical reads * Pages per I/O)Cache hit ratio = -----------------------------------------------
Logical reads
Use set showplan on to see the I/O size used by the query. With 2K pages, a query using 4K I/O reads 2 pages with each I/O.
• Scan count
This is the number of times the table was read (using either a table scan or an index) in order to find rows to satisfy the query or join. In nearly all simple single table queries, the scan count will be 1. When an OR clause is present there will be one scan count for each OR in the query. In the case of a join, the scan count can be crucial.
If the optimizer chose a bad join order, you are likely to see a very high number of scan counts on a large table, causing a very high number of logical reads. However, you should take the table size into account when interpreting scan counts. A high scan count on a small table is preferable to a moderate scan count on a large table. Although the scan count of the small table is high, the physical reads should be low. A 1000-scan count for a 1-page table is better than a 100-scan count of a 1000-page table.

Other Useful Tasks
124
The following example demonstrates how join order and scan count affect the number of reads (on 12.0 and later, the example represents a nested-loop join):
Table A has 1 page and 10 rows that qualify for the join. Table B has 1000 pages and 10 rows that qualify for the join.
If Table B is the outer table of the join Adaptive Server will only need to read through it once in order to find all qualifying rows. The single scan totals 1000 reads. Adaptive Server then reads Table A for each qualifying row found in B. The single page in A is scanned 10 times, equaling 10 reads, with a total of 1010 reads for the query. If A were the outer table Adaptive Server would have to read B once for each of the ten qualifying rows on A: 1000 pages multiplied by 10 scans equals 10,000 reads.
This example assumes that there is no useful index available.
• Total writes for this command
This is the total number of writes Adaptive Server did for the query. This count includes inserts, updates and deletes on user tables, temporary tables and work tables. Even queries that do not include data manipulation statements may require writes to work tables or temporary tables, which are counted here.
set statistics time on
set statistics time on provides the following information:
• Adaptive Server elapsed time
This is the total accumulated elapsed time that is recorded for the query or command. This can seem long if, for example, a query was blocked by a lock, network traffic or other resource contention. The time the query must wait for the blockage to clear is added to the elapsed time.
• Adaptive Server CPU time
This is the amount of time for which the query had exclusive use of the CPU. It reflects the time taken to parse, compile, and execute the query. Functions add to the CPU time. For example, a convert statement will increase the CPU time slightly. Also, compute-intensive queries and queries that perform a large amount of I/O take more CPU time.
The output of set statistics time on may be useful, but it is not usually a significant factor in most optimizer analyses.

CHAPTER 2 Encyclopedia of Tasks
125
dbcc traceon (3604)
This trace flag sends the output of dbcc traceon (302) and dbcc traceon (310) to the screen.
dbcc traceon (302)
This trace flag returns the optimizer's cost estimates for each SARG and join clause in the query. Trace flag 302 is documented in greater detail in “Tuning with dbcc traceon” in the Performance and Tuning Guide.
Here is the information to watch for in dbcc traceon (302) output:
• All SARGs and join clauses in the query should be shown in the optimizer's cost estimates. If not, determine why.
• Check that row and page counts are accurate, since these counts are important for optimization.
If you think that the page and row counts are off, check the counts. Run optdiag statistics. To improve performance, counts and other statistics are changed in memory and flushed to systabstats periodically by the housekeeper task. You can also flush in-memory statistics to systabstats by running optdiag statistics or executing sp_flushstats table_name.
dbcc traceon (310)
dbcc traceon (310) gives the optimizer cost estimates for permutations of a join or joins. Examine the dbcc traceon (310) output to determine whether the query is “connected.” If so, it indicates that the join will not result in a cartesian product. The statement “query is connected” will appear after the optimizer has performed cost estimates on all possible indexes, as indicated in the output of dbcc traceon (302) .
How to Determine Which Physical Devices a Database is On Use the following steps to find the physical devices on which a database resides:
1 Find the dbid of the database in sysdatabases.
2 For that dbid, select from sysusages to list all of the device fragments belonging to that database.
Other Useful Tasks
126
3 Using sysdevices, determine which device has a low through high virtual page range that includes the vstarts from step 2. The device fragment whose vstart you used is on that device.
How to Identify and Fix a Corrupted Table
Note This task should only be used to correct specific errors as directed in Chapter 3, “Error Message Writeups”.
1 Use the procedure in “How to Find an Object Name from a Page Number” to identify which table and/or index correspond to the page number in the error message text.
2 If the object with the error is not a system table (a system table's object ID is less than 100), continue with step 3.
If the object with the error is a system table and the index ID is not 0, refer to “How to Fix a Corrupted Index on System Tables” for instructions on how to repair the system table index.
If the index ID is 0, contact Sybase Technical Support. They may be able to help you repair the corruption but it may be necessary to restore from clean backups.
3 For user tables, if the index ID is 0 or 255, continue with step 4.
If the index ID is not 0 or 255, first run dbcc checktable to verify that the data is good. Next, translate the index ID into an index name:
1> use database_name 2> go
1> select name from sysindexes 2> where id = object_ID and indid = index_ID3> go
To ensure that the information needed to re-create the index is available, run sp_helpindex on the index before dropping it.
Drop the index.
Re-create the index. This clears the corruption in most cases.
Run dbcc checktable on the table to verify that the corruption is gone.
4 If the index ID is 0 or 255, do one of the following:

CHAPTER 2 Encyclopedia of Tasks
127
• Restore the database from clean backups.
• Refer to “How to Rescue Data from a Corrupted Table”.
How to Monitor the Error LogYou can create a script that periodically checks the Adaptive Server error log and alerts the database administrator when a new error is written into the log. An example of such a script appears below. You can alter the sleep interval to suit your needs. You must also modify the script to identify file locations, server names, and – as necessary – to provide the equivalent syntax and path names for the shell commands used here.
Warning! The dba_alert script is provided for your information - it is not supported at this time.
/* #!/usr/bin/ksh#set -x################################################################ Ensures that this Shell Script is executed in the KORN Shell################################################################# Author: Alan Harris ## Created: 09/15/97 ################################################################# This script checks to make sure Sybase Server is still up. ## Also Checks the Server Errorlog for any Errors as well. ## It will check these items every hour until the server is ## down, at which time it terminates automatically. ## Just remember to add the startup instructions for this ## Script, which is to be started right after you have started ## your Sybase Server. ################################################################# Notes on what to change so this script will work for you... ##-------------------------------------------------------------## Check location of Errorlog and where you want the work ## and .msg files to be created. ## Change all "plsql1" & "PLSQL1" to be your Sybase Server ## Name so that you can make a copy of this script for ## each of you Sybase Servers. ## Enter E-mail Addresses where noted below inside << >> #

Other Useful Tasks
128
# ################################################################ERRORLOG=/usr/u/sybase/install/errorlogDIFF_ERRORLOG=/usr/u/sybase/logs/errorlog.plsql1.diffPRIOR_ERRORLOG=/usr/u/sybase/logs/errorlog.plsql1.priorTAIL_ERRORLOG=/usr/u/sybase/logs/errorlog.plsql1.tailINTERNET_ID=<<Your E-mail Address>>INTERNET_ID_BKUP=<<Your Backup's E-mail Address>>INTERNET_OPS_STAFF=<<Your Operations Staff E-mail Address>>LOGS=/usr/u/sybase/logsMSG=/usr/u/sybase/logsMSG_ERRORLOG=/usr/u/sybase/logs/errorlog_error_mail_plsql1.msgMSG_SERVER=/usr/u/sybase/logs/server_down_mail_plsql1.msgMSG_SERVER_OPS=/usr/u/sybase/logs/server_down_OPS_mail_plsql1.msgDSQUERY=PLSQL1SYBASE=/usr/u/sybasePATH=/usr/bin:/etc:/usr/sbin:/usr/ucb:$SYBASE/bin: $SYBASE/install:/usr/bin/X11:/sbin:.export SYBASE PATH ERRORLOG DIFF_ERRORLOG PRIOR_ERRORLOG LOGS MSGexport MSG_ERRORLOG MSG_SERVER DSQUERY cd ${LOGS}################################################################ While loop to do the following until Server is down! ## Checking to make sure Server is still up and Running ## Checking Server Errorlog for any Errors as well. ## Including a 60 min. sleep ################################################################ while [ 1 ]do ################################################################ Removing any previous error plsql1.msg files... ################################################################if [ -e ${MSG_ERRORLOG} ] then rm ${MSG_ERRORLOG} fi if [ -e ${MSG_SERVER} ] then rm ${MSG_SERVER} fi if [ -e ${MSG_SERVER_OPS} ]

CHAPTER 2 Encyclopedia of Tasks
129
then rm ${MSG_SERVER_OPS} fi################################################################ Checking SQL Server Errorlog for Errors ################################################################ ################################################################ If 1st time the shell executes then search entire errorlog ## otherwise search the file containing the difference than ## the last time the errorlog was searched. ################################################################ if [ ! -e "${PRIOR_ERRORLOG}" ] then ERRORLOG_ERROR_YN=`grep -E "Error: |infected|WARNING:|severity|encountered" ${ERRORLOG} | grep -vE "1608,|21,"`tail -n 50 ${ERRORLOG} > ${PRIOR_ERRORLOG} if [ ! -z "${ERRORLOG_ERROR_YN}"] then print "Subject: Error Messages were found in ${DSQUERY} errorlog, Check Immediately! \n " > ${MSG_ERRORLOG} print "Error Messages were found in ${ERRORLOG}, \n \n Check immediately! \n ." >> ${MSG_ERRORLOG} grep -E "Error|infected|WARNING:|severity|encountered " ${ERRORLOG} >> ${MSG_ERRORLOG}
print "\nCheck Immediately!." >> ${MSG_ERRORLOG} sendmail ${INTERNET_ID} < ${MSG_ERRORLOG} sendmail ${INTERNET_ID_BKUP} < ${MSG_ERRORLOG} sendmail SYBASE < ${MSG_ERRORLOG} fi else tail -n 50 ${ERRORLOG} > ${TAIL_ERRORLOG} diff ${TAIL_ERRORLOG} ${PRIOR_ERRORLOG} | grep \< | cut -c 2-200 > ${DIFF_ERRORLOG} cp ${TAIL_ERRORLOG} ${PRIOR_ERRORLOG} DIFF_ERRORLOG_ERROR_YN=`grep -E "Error: |infected|WARNING:|severity|encountered " ${DIFF_ERRORLOG} | grep -vE "1608,|21,"` if [ ! -z "${DIFF_ERRORLOG_ERROR_YN}"] then print "Subject: Error Messages were found in ${DSQUERY} errorlog, Check Immediately! \n " > ${MSG_ERRORLOG}print "Error Messages were found in ${ERRORLOG}, \n \n

Other Useful Tasks
130
Check immediately! \n ." >> ${MSG_ERRORLOG} grep -E "Error|infected|WARNING:|severity|encountered" ${DIFF_ERRORLOG} >> ${MSG_ERRORLOG} print "\nCheck Immediately!." >> ${MSG_ERRORLOG} sendmail ${INTERNET_ID} < ${MSG_ERRORLOG} sendmail ${INTERNET_ID_BKUP} < ${MSG_ERRORLOG} sendmail SYBASE < ${MSG_ERRORLOG} fi fi################################################################ Checking to make sure Server is still up and Running ################################################################ SERVER_UP_YN=`ps -ef|grep SYBASE|grep dataserver|grep ${DSQUERY}` if [ -z "${SERVER_UP_YN}" ] then print "Subject: The ${DSQUERY} Sybase Server is Down! Check immediately!. \n " > ${MSG_SERVER} print "The ${DSQUERY} Sybase Server is Down, \n \n Check immediately! \n \n ." >> ${MSG_SERVER} tail -n 10 ${ERRORLOG} >> ${MSG_SERVER} sendmail ${INTERNET_ID} < ${MSG_SERVER} sendmail ${INTERNET_ID_BKUP} < ${MSG_SERVER} sendmail SYBASE < ${MSG_SERVER} print "Subject: The ${DSQUERY} Sybase Server is Down! Take the following action immediately!.\n ">${MSG_SERVER_OPS} print "Hold all Mainframe jobs that require ${DSQUERY} (Production Sybase)," >> ${MSG_SERVER_OPS} print "until further notice. \n" >> ${MSG_SERVER_OPS} print "Refer to the Document, \"JCL and Procs Using OUTBOUND - Group Systems Team\". " >> ${MSG_SERVER_OPS} print "This Document can be found in the OPS Procedures Manual." >> ${MSG_SERVER_OPS} print "Hold ALL Jobs that have Sybase in the \ "Destination From/To\" column." >> ${MSG_SERVER_OPS}sendmail ${INTERNET_OPS_STAFF} < ${MSG_SERVER_OPS} sendmail SYBASE < ${MSG_SERVER_OPS} break fi sleep 3600 done
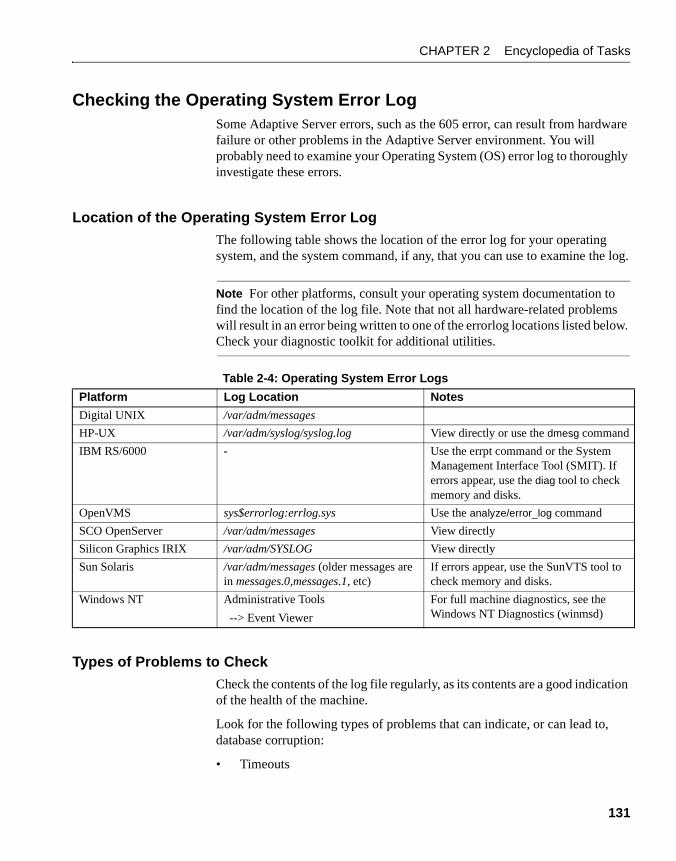
CHAPTER 2 Encyclopedia of Tasks
131
Checking the Operating System Error LogSome Adaptive Server errors, such as the 605 error, can result from hardware failure or other problems in the Adaptive Server environment. You will probably need to examine your Operating System (OS) error log to thoroughly investigate these errors.
Location of the Operating System Error Log
The following table shows the location of the error log for your operating system, and the system command, if any, that you can use to examine the log.
Note For other platforms, consult your operating system documentation to find the location of the log file. Note that not all hardware-related problems will result in an error being written to one of the errorlog locations listed below. Check your diagnostic toolkit for additional utilities.
Table 2-4: Operating System Error Logs
Types of Problems to Check
Check the contents of the log file regularly, as its contents are a good indication of the health of the machine.
Look for the following types of problems that can indicate, or can lead to, database corruption:
• Timeouts
Platform Log Location Notes
Digital UNIX /var/adm/messages
HP-UX /var/adm/syslog/syslog.log View directly or use the dmesg command
IBM RS/6000 - Use the errpt command or the System Management Interface Tool (SMIT). If errors appear, use the diag tool to check memory and disks.
OpenVMS sys$errorlog:errlog.sys Use the analyze/error_log command
SCO OpenServer /var/adm/messages View directly
Silicon Graphics IRIX /var/adm/SYSLOG View directly
Sun Solaris /var/adm/messages (older messages are in messages.0,messages.1, etc)
If errors appear, use the SunVTS tool to check memory and disks.
Windows NT Administrative Tools
--> Event Viewer
For full machine diagnostics, see the Windows NT Diagnostics (winmsd)

Other Useful Tasks
132
• System panics
• Memory problems of any kind
When investigating an Adaptive Server error which may be hardware-related, look for messages in the OS error log with date/time about the same as the initial occurrence of the Adaptive Server error.
For more information about the OS log file consult your operating system documentation.
How to Obtain a CSMD DumpAt times, you may need to obtain a snapshot of Adaptive Server shared memory to help with troubleshooting memory-related errors such as 813 or 1105 errors. The Configurable Shared Memory Dump (CSMD) tool allows you to set up conditions for capturing shared memory dumps when needed.
How to Configure a Shared Memory Dump on Conditions
Take the following steps:
1 Enable the server to generate a shared memory dump on conditions:
1> sp_configure "dump on conditions", 12> go
2 Specify the dump condition using sp_shmdumpconfig. The syntax for this stored procedure is:
sp_shmdumpconfig "action", type, value, maximum-dumps, dumpdir, dump_file
Note sp_shmdumpconfig uses positional parameters. When setting a parameter that falls to the right of parameters you do not wish to set, specify null values for the unset parameters.
For example, to request a one-time memory dump on signal 11:
1> sp_shmdumpconfig "add", signal, 11,1,"dump_dir"2> go
where dump_dir is the directory where you want the dump file deposited; this directory must have sybase read and write permission.
To request a memory dump on the occurrence of a 605 error:
CHAPTER 2 Encyclopedia of Tasks
133
1> sp_shmdumpconfig ’add’, error, 605, null, null, null, include_page2> go
To request a memory dump for the 8xx range of errors:
1> sp_shmdumpconfig ’add’, module, 8002> go
3 After collecting the desired data, you can turn off collection by deleting the dump condition. For example, to drop the condition for error 631 and disable shared memory dumps:
1> sp_shmdumpconfig "drop", "error", 6312> go
1> sp_configure "dump on conditions", 02> go

Other Useful Tasks
134