sureselect xt hs2 dna system · sureselect xt hs2 dna library preparation and target enrichment 5...
TRANSCRIPT
SureSelect XT HS2 DNA SystemDNA Library Preparation and Target Enrichment for Illumina Paired-End Multiplexed Sequencing
ProtocolVersion B0, May 2020
SureSelect platform manufactured with Agilent SurePrint Technology
For Research Use Only. Not for use in diagnostic procedures.
Agilent Technologies

Notices© Agilent Technologies, Inc. 2020
No part of this manual may be reproduced in any form or by any means (including elec-tronic storage and retrieval or translation into a foreign language) without prior agree-ment and written consent from Agilent Technologies, Inc. as governed by United States and international copyright laws.
Manual Part NumberG9983-90000
EditionVersion B0, May 2020
Printed in USA
Agilent Technologies, Inc. 5301 Stevens Creek Blvd
WarrantyThe material contained in this document is provided “as is,” and is subject to being changed, with-out notice, in future editions. Fur-ther, to the maximum extent permitted by applicable law, Agi-lent disclaims all warranties, either express or implied, with regard to this manual and any information contained herein, including but not limited to the implied warranties of merchant-ability and fitness for a particular purpose. Agilent shall not be lia-ble for errors or for incidental or consequential damages in con-nection with the furnishing, use, or performance of this document or of any information contained herein. Should Agilent and the user have a separate written agreement with warranty terms covering the material in this doc-ument that conflict with these terms, the warranty terms in the separate agreement shall control.
Technology Licenses The hardware and/or software described in this document are furnished under a license and may be used or copied only in accor-dance with the terms of such license.
Restricted Rights LegendU.S. Government Restricted Rights. Soft-ware and technical data rights granted to the federal government include only those rights customarily provided to end user cus-tomers. Agilent provides this customary commercial license in Software and techni-cal data pursuant to FAR 12.211 (Technical Data) and 12.212 (Computer Software) and, for the Department of Defense, DFARS 252.227-7015 (Technical Data - Commercial Items) and DFARS 227.7202-3 (Rights in Commercial Computer Software or Com-puter Software Documentation).
Notice to PurchaserThis product is provided under an agree-ment between Bio-Rad Laboratories and Agilent Technologies Inc., and the manufac-ture, use, sale or import of this product is subject to U.S. Pat. No. 6,627,424 and EP Pat. No.1 283 875 81, owned by Bio-Rad Laboratories, Inc. Purchase of this product conveys to the buyer the non-transferable right to use the purchased amount of the product and components of the product in PCR (but not including real-time PCR) in the Research Field (including all Applied Research Fields, including but not limited to forensics, animal testing, and food testing) and in real-time PCR in the Diagnostics and Prognostics Fields. No rights are granted for use of this product for real-time PCR in the Research Field, including all Applied Research Fields (including but not limited to forensics, animal testing and food testing).
Santa Clara, CA 95051 USA
AcknowledgmentOligonucleotide sequences © 2006, 2008, and 2011 Illumina, Inc. All rights reserved. Only for use with the Illumina sequencer systems and associated assays.
Technical SupportFor US and Canada
Call (800) 227-9770 (option 3,4,4)
Or send an e-mail to: [email protected]
For all other regionsAgilent’s world-wide Sales and Support Center contact details for your location can be obtained at www.agilent.com/en/contact-us/page.
2 SureSelect XT HS2 DNA Library Preparation and Target Enrichment
Safety Notices
CAUTION
A CAUTION notice denotes a hazard. It calls attention to an operating procedure, practice, or the like that, if not correctly performed or adhered to, could result in damage to the product or loss of important data. Do not proceed beyond a CAUTION notice until the indicated conditions are fully understood and met.
WARNING
A WARNING notice denotes a hazard. It calls attention to an operating procedure, practice, or the like that, if not correctly performed or adhered to, could result in personal injury or death. Do not proceed beyond a WARNING notice until the indicated conditions are fully understood and met.
SureSelect XT HS2 DNA Library Preparation and Target Enrichment 3
In this Guide...
4
This guide provides an optimized protocol for preparation of target- enriched Illumina paired- end multiplexed sequencing libraries using the SureSelect XT HS2 DNA system.
1
Before You BeginThis chapter contains information that you should read and understand before you start an experiment.
2
Preparation and Fragmentation of Input DNAThis chapter describes the steps to prepare and fragment gDNA samples, using either mechanical shearing or enzymatic fragmentation, prior to library preparation.
3
Library PreparationThis chapter describes the steps to prepare dual- indexed, molecular- barcoded gDNA sequencing libraries for target enrichment.
4
Hybridization and CaptureThis chapter describes the steps to hybridize and capture the prepared DNA library using a SureSelect or ClearSeq capture library.
5
Post-Capture Sample Processing for Multiplexed SequencingThis chapter describes the steps for post- capture amplification and guidelines for sequencing sample preparation.
6
Appendix: Using FFPE-derived DNA SamplesThis chapter describes the protocol modifications for gDNA isolated from FFPE samples.
7
ReferenceThis chapter contains reference information, including component kit contents and index sequences.
SureSelect XT HS2 DNA Library Preparation and Target Enrichment
What’s New in Version B0
SureSelect XT HS2 DNA Library Pre
• Replacement of P5 index sequence for primer pair 271 (see Table 57 on page 93)
• Updates to thermal cycler recommendations and usage instructions (see Table 5 on page 13, Note on page 30 and example usage instructions in step 1 on page 30)
• Update to name of AMPure XP Kits (see Table 4 on page 13)
• Update to order of appearance of materials required for enzymatic fragmentation and Covaris shearing (see Table 6 on page 15 and related content on page 11)
• Clarification of support for fresh- frozen samples (see page 11)
• Update to instructions in step 3 on page 51 to include brief spin when washes mixed by vortexing
• Updates to Technical Support contact information (see page 2)
paration and Target Enrichment 5

6
SureSelect XT HS2 DNA Library Preparation and Target Enrichment
Content
1 Before You Begin 7
Overview of the Workflow 8
Procedural Notes 10
Safety Notes 10
Materials Required 11
Optional Materials 16
2 Preparation and Fragmentation of Input DNA 17
Step 1. Prepare and analyze quality of genomic DNA samples 18
Preparation of high-quality gDNA from fresh biological samples 18Preparation and qualification of gDNA from FFPE samples 18
Step 2. Fragment the DNA 21
Method 1: Mechanical DNA Shearing using Covaris 21Method 2: Enzymatic DNA Fragmentation 24
3 Library Preparation 27
Step 1. Prepare the Ligation master mix 29
Step 2. Repair and dA-Tail the DNA ends 30
Step 3. Ligate the molecular-barcoded adaptor 32
Step 4. Purify the sample using AMPure XP beads 33
Step 5. Amplify the adaptor-ligated library 35
Step 6. Purify the amplified library with AMPure XP beads 38
Step 7. Assess quality and quantity 40
SureSelect XT HS2 DNA Library Preparation and Target Enrichment 5
Contents
4 Hybridization and Capture 45
Step 1. Hybridize DNA libraries to the probe 46
Step 2. Prepare streptavidin-coated magnetic beads 51
Step 3. Capture the hybridized DNA using streptavidin-coated beads 52
5 Post-Capture Sample Processing for Multiplexed Sequencing 55
Step 1. Amplify the captured libraries 56
Step 2. Purify the amplified captured libraries using AMPure XP beads 59
Step 3. Assess sequencing library DNA quantity and quality 61
Step 4. Pool samples for multiplexed sequencing 66
Step 5. Prepare sequencing samples 68
Step 6. Do the sequencing run and analyze the data 70
Sequence analysis resources 75
6 Appendix: Using FFPE-derived DNA Samples 77
Protocol modifications for FFPE Samples 78
Methods for FFPE Sample Qualification 78
Sequencing Output Recommendations for FFPE Samples 79
7 Reference 81
Kit Contents 82
SureSelect XT HS2 Index Primer Pair Information 84
Index Primer Pair Strip Tube and Plate Maps 85Index Nucleotide Sequences 88
Troubleshooting Guide 96
Quick Reference Protocol 100
6 SureSelect XT HS2 DNA Library Preparation and Target Enrichment
SureSelect XT HS2 DNA System Protocol
1Before You Begin
Overview of the Workflow 8
Procedural Notes 10
Safety Notes 10
Materials Required 11
Optional Materials 16
Make sure you read and understand the information in this chapter and have the necessary equipment and reagents listed before you start an experiment.
This protocol differs from the Illumina Multiplexed Paired-End sequencing manual and other SureSelect protocols at several steps. Pay close attention to the primers used for each amplification step and the blocking agents used during hybridization.
Agilent guarantees performance and provides technical support for the SureSelect reagents required for this workflow only when used as directed in this Protocol.
NOTE
NOTE
7Agilent Technologies
1 Before You Begin Overview of the Workflow
Overview of the Workflow
8
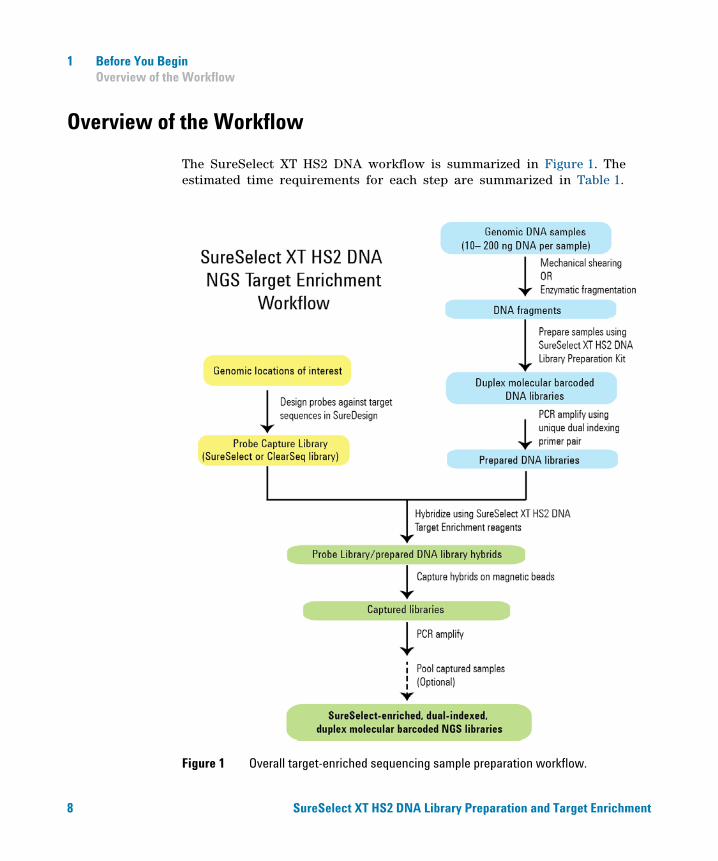
The SureSelect XT HS2 DNA workflow is summarized in Figure 1. The estimated time requirements for each step are summarized in Table 1.
Figure 1 Overall target-enriched sequencing sample preparation workflow.
SureSelect XT HS2 DNA Library Preparation and Target Enrichment

Before You Begin 1 Overview of the Workflow
SureSelect XT HS2 D
Table 1 Estimated time requirements (up to 16 sample run size)
Step Time
Library Preparation 3.5 hours
Hybridization and Capture 3.5 hours
Post-capture amplification 1 hour
QC using Bioanalyzer or TapeStation platform and sample pooling
1.5 hours
NA Library Preparation and Target Enrichment 9
1 Before You Begin Procedural Notes
Procedural Notes
10
• To prevent contamination of reagents by nucleases, always wear powder- free laboratory gloves and use dedicated solutions and pipettors with nuclease- free aerosol- resistant tips.
• Use best- practices to prevent PCR product contamination of samples throughout the workflow:
1 Assign separate pre- PCR and post- PCR work areas and use dedicated equipment, supplies, and reagents in each area. In particular, never use materials designated to post- PCR work areas for pre- PCR segments of the workflow.
2 Maintain clean work areas. Clean pre- PCR surfaces that pose the highest risk of contamination daily using a 10% bleach solution, or equivalent.
3 Always use dedicated pre- PCR pipettors with nuclease- free aerosol- resistant tips to pipette dedicated pre- PCR solutions.
4 Wear powder- free gloves. Use good laboratory hygiene, including changing gloves after contact with any potentially- contaminated surfaces.
• For each protocol step that requires removal of tube cap strips, reseal the tubes with a fresh strip of domed caps. Cap deformation may result from exposure of the cap strips to the heated lid of the thermal cycler and from other procedural steps. Reuse of strip caps can cause sample loss, sample contamination, or imprecision in sample temperatures during thermal cycler incubation steps.
• In general, follow Biosafety Level 1 (BL1) safety rules.
• Possible stopping points, where samples may be stored at –20°C, are marked in the protocol. Do not subject the samples to multiple freeze/thaw cycles.
Safety Notes
• Wear appropriate personal protective equipment (PPE) when working in the laboratory.
CAUTION
SureSelect XT HS2 DNA Library Preparation and Target Enrichment

Before You Begin 1 Materials Required
Materials Required
SureSelect XT HS2 D
Materials required to complete the SureSelect XT HS2 protocol will vary based on the following considerations:
• SureSelect XT HS2 DNA Reagent Kit format preference, where some options include ancillary reagent modules
• DNA sample type: high- quality gDNA derived from fresh/fresh- frozen samples vs. FFPE- derived gDNA samples
• DNA fragmentation method used in workflow: mechanical (Covaris- mediated) shearing vs. enzymatic fragmentation
To determine the materials required for your unique needs, first select the preferred kit format from Table 2 below and a compatible target enrichment probe from Table 3. Then refer to Table 4 through Table 7 for additional materials needed to complete the protocols using the selected kit format/DNA sample type/fragmentation method.
Table 2 SureSelect XT HS2 DNA Reagent Kit Varieties
Description Kit Part Number
16 Reaction Kit* 96 Reaction Kit†
SureSelect XT HS2 DNA Reagent Kit G9981A (with Index Pairs 1–16) G9983A (with Index Pairs 1–96)G9983B (with Index Pairs 97–192)G9983C (with Index Pairs 193–288)G9983D (with Index Pairs 289–384)
Reagent Kits with additional component modules
SureSelect XT HS2 DNA Starter Kit
Includes the following modules:
SureSelect XT HS2 DNA Reagent Kit
SureSelect Enzymatic Fragmentation Kit
SureSelect DNA AMPure® XP Beads‡
SureSelect Streptavidin Beads
G9982A (with Index Pairs 1–16) Not applicable
SureSelect XT HS2 DNA Reagent Kit with AMPure® XP/Streptavidin Beads
Not applicable G9984A (with Index Pairs 1–96),G9984B (with Index Pairs 97–192),G9984C (with Index Pairs 193–288)G9984D (with Index Pairs 289–384)
* 16-reaction kits contain enough reagents for 2 runs containing 8 samples per run.
† 96-reaction kits contain enough reagents for 4 runs containing 24 samples per run.
‡ AMPure, Beckman, and Beckman Coulter are trademarks or registered trademarks of Beckman Coulter, Inc.
NA Library Preparation and Target Enrichment 11

1 Before You BeginMaterials Required
12
Table 3 Compatible Probes
Probe Capture Library 16 Reactions 96 Reactions 480 Reactions
SureSelect Custom 1–499 kb
(reorder)
5190-4806
(5190-4811)
5190-4807
(5190-4812)
5190-4809(5190-4814)
SureSelect Custom 0.5 –2.9 Mb
(reorder)
5190-4816
(5190-4821)
5190-4817
(5190-4822)
5190-4819(5190-4824)
SureSelect Custom 3 –5.9 Mb
(reorder)
5190-4826
(5190-4831)
5190-4827
(5190-4832)
5190-4829(5190-4834)
SureSelect Custom 6 –11.9 Mb
(reorder)
5190-4836
(5190-4841)
5190-4837
(5190-4842)
5190-4839(5190-4844)
SureSelect Custom 12–24 Mb
(reorder)
5190-4896
(5190-4901)
5190-4897
(5190-4902)
5190-4899(5190-4904)
SSel XT HS and XT Low Input Human All Exon V7 5191-4028 5191-4029 —
SSel XT HS and XT Low Input Human All Exon V7 Plus 1
(reorder)
5191-4031
(5191-4049)
5191-4032
(5191-4050)
—
SSel XT HS and XT Low Input Human All Exon V7 Plus 2
(reorder)
5191-4034
(5191-4052)
5191-4035
(5191-4053)
—
SureSelectXT Clinical Research Exome V2 5190-9491 5190-9492 —
SureSelectXT Clinical Research Exome V2 Plus 1 5190-9494 5190-9495 —
SureSelectXT Clinical Research Exome V2 Plus 2 5190-9497 5190-9498 —
SureSelectXT Clinical Research Exome 5190-7338 5190-7339 —
SureSelectXT Focused Exome 5190-7787 5190-7788 —
SureSelectXT Focused Exome Plus 1 5190-7790 5190-7791 —
SureSelectXT Focused Exome Plus 2 5190-7793 5190-7795 —
SureSelectXT Mouse All Exon 5190-4641 5190-4642 —
SureSelectXT Human X-Chromosome 5190-4651 5190-4652 —
ClearSeq Comprehensive Cancer XT 5190-8011 5190-8012 —
ClearSeq Comprehensive Cancer Plus XT 5190-8014 5190-8015 —
ClearSeq Inherited Disease XT 5190-7518 5190-7519 —
ClearSeq Inherited Disease Plus XT 5190-7521 5190-7522 —
SureSelect XT HS2 DNA Library Preparation and Target Enrichment
Before You Begin 1 Materials Required
SureSelect XT HS2 D
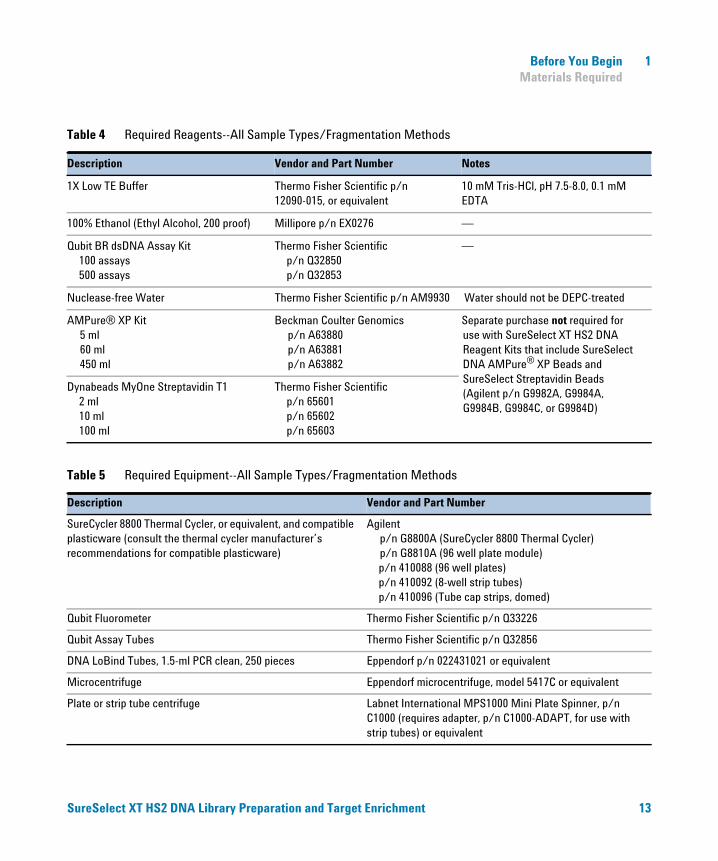
Table 4 Required Reagents--All Sample Types/Fragmentation Methods
Description Vendor and Part Number Notes
1X Low TE Buffer Thermo Fisher Scientific p/n 12090-015, or equivalent
10 mM Tris-HCl, pH 7.5-8.0, 0.1 mM EDTA
100% Ethanol (Ethyl Alcohol, 200 proof) Millipore p/n EX0276 —
Qubit BR dsDNA Assay Kit 100 assays 500 assays
Thermo Fisher Scientific p/n Q32850 p/n Q32853
—
Nuclease-free Water Thermo Fisher Scientific p/n AM9930 Water should not be DEPC-treated
AMPure® XP Kit 5 ml 60 ml 450 ml
Beckman Coulter Genomics p/n A63880 p/n A63881 p/n A63882
Separate purchase not required for use with SureSelect XT HS2 DNA Reagent Kits that include SureSelect DNA AMPure® XP Beads and SureSelect Streptavidin Beads (Agilent p/n G9982A, G9984A, G9984B, G9984C, or G9984D)
Dynabeads MyOne Streptavidin T1 2 ml 10 ml 100 ml
Thermo Fisher Scientific p/n 65601 p/n 65602 p/n 65603
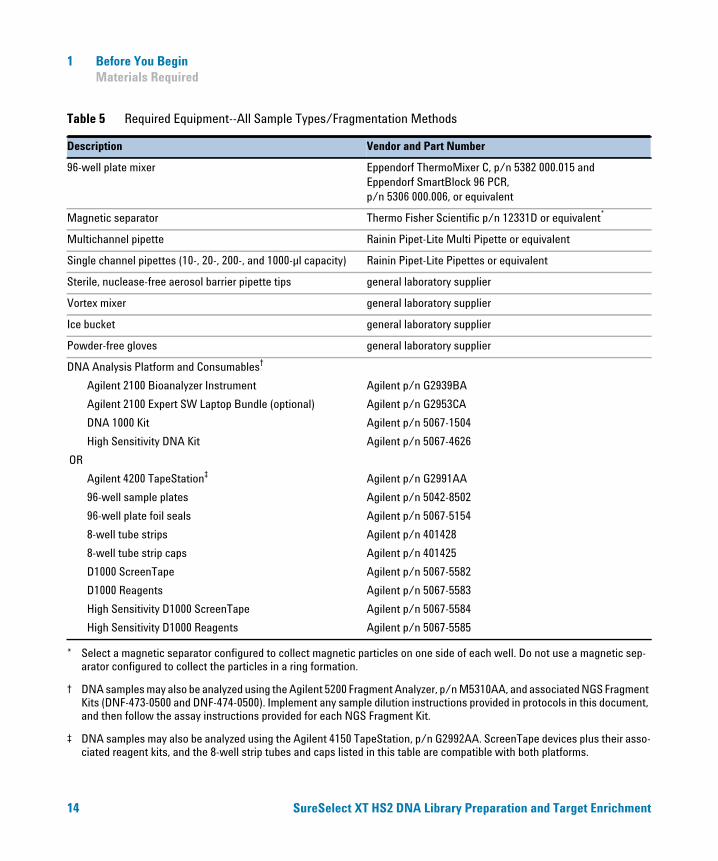
Table 5 Required Equipment--All Sample Types/Fragmentation Methods
Description Vendor and Part Number
SureCycler 8800 Thermal Cycler, or equivalent, and compatible plasticware (consult the thermal cycler manufacturer’s recommendations for compatible plasticware)
Agilent p/n G8800A (SureCycler 8800 Thermal Cycler) p/n G8810A (96 well plate module)p/n 410088 (96 well plates)p/n 410092 (8-well strip tubes)p/n 410096 (Tube cap strips, domed)
Qubit Fluorometer Thermo Fisher Scientific p/n Q33226
Qubit Assay Tubes Thermo Fisher Scientific p/n Q32856
DNA LoBind Tubes, 1.5-ml PCR clean, 250 pieces Eppendorf p/n 022431021 or equivalent
Microcentrifuge Eppendorf microcentrifuge, model 5417C or equivalent
Plate or strip tube centrifuge Labnet International MPS1000 Mini Plate Spinner, p/n C1000 (requires adapter, p/n C1000-ADAPT, for use with strip tubes) or equivalent
NA Library Preparation and Target Enrichment 13
1 Before You Begin Materials Required
96-well plate mixer Eppendorf ThermoMixer C, p/n 5382 000.015 and Eppendorf SmartBlock 96 PCR, p/n 5306 000.006, or equivalent
Magnetic separator Thermo Fisher Scientific p/n 12331D or equivalent*
Multichannel pipette Rainin Pipet-Lite Multi Pipette or equivalent
Single channel pipettes (10-, 20-, 200-, and 1000-µl capacity) Rainin Pipet-Lite Pipettes or equivalent
Sterile, nuclease-free aerosol barrier pipette tips general laboratory supplier
Vortex mixer general laboratory supplier
Ice bucket general laboratory supplier
Powder-free gloves general laboratory supplier
DNA Analysis Platform and Consumables†
Agilent 2100 Bioanalyzer Instrument
Agilent 2100 Expert SW Laptop Bundle (optional)
DNA 1000 Kit
High Sensitivity DNA Kit
OR
Agilent 4200 TapeStation‡
96-well sample plates
96-well plate foil seals
8-well tube strips
8-well tube strip caps
D1000 ScreenTape
D1000 Reagents
High Sensitivity D1000 ScreenTape
High Sensitivity D1000 Reagents
Agilent p/n G2939BA
Agilent p/n G2953CA
Agilent p/n 5067-1504
Agilent p/n 5067-4626
Agilent p/n G2991AA
Agilent p/n 5042-8502
Agilent p/n 5067-5154
Agilent p/n 401428
Agilent p/n 401425
Agilent p/n 5067-5582
Agilent p/n 5067-5583
Agilent p/n 5067-5584
Agilent p/n 5067-5585
* Select a magnetic separator configured to collect magnetic particles on one side of each well. Do not use a magnetic sep-arator configured to collect the particles in a ring formation.
† DNA samples may also be analyzed using the Agilent 5200 Fragment Analyzer, p/n M5310AA, and associated NGS Fragment Kits (DNF-473-0500 and DNF-474-0500). Implement any sample dilution instructions provided in protocols in this document, and then follow the assay instructions provided for each NGS Fragment Kit.
‡ DNA samples may also be analyzed using the Agilent 4150 TapeStation, p/n G2992AA. ScreenTape devices plus their asso-ciated reagent kits, and the 8-well strip tubes and caps listed in this table are compatible with both platforms.
Table 5 Required Equipment--All Sample Types/Fragmentation Methods
Description Vendor and Part Number
14 SureSelect XT HS2 DNA Library Preparation and Target Enrichment
Before You Begin 1 Materials Required
SureSelect XT HS2 D
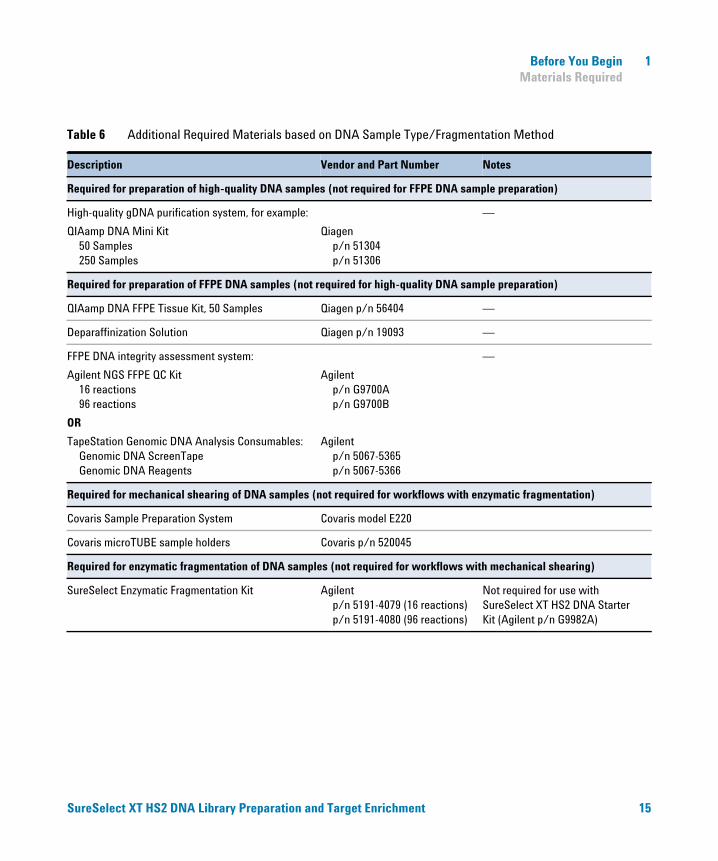
Table 6 Additional Required Materials based on DNA Sample Type/Fragmentation Method
Description Vendor and Part Number Notes
Required for preparation of high-quality DNA samples (not required for FFPE DNA sample preparation)
High-quality gDNA purification system, for example:
QIAamp DNA Mini Kit 50 Samples 250 Samples
Qiagen p/n 51304 p/n 51306
—
Required for preparation of FFPE DNA samples (not required for high-quality DNA sample preparation)
QIAamp DNA FFPE Tissue Kit, 50 Samples Qiagen p/n 56404 —
Deparaffinization Solution Qiagen p/n 19093 —
FFPE DNA integrity assessment system:
Agilent NGS FFPE QC Kit 16 reactions 96 reactions
OR
TapeStation Genomic DNA Analysis Consumables: Genomic DNA ScreenTape Genomic DNA Reagents
Agilent p/n G9700A p/n G9700B
Agilent p/n 5067-5365 p/n 5067-5366
—
Required for mechanical shearing of DNA samples (not required for workflows with enzymatic fragmentation)
Covaris Sample Preparation System Covaris model E220
Covaris microTUBE sample holders Covaris p/n 520045
Required for enzymatic fragmentation of DNA samples (not required for workflows with mechanical shearing)
SureSelect Enzymatic Fragmentation Kit Agilent p/n 5191-4079 (16 reactions) p/n 5191-4080 (96 reactions)
Not required for use with SureSelect XT HS2 DNA Starter Kit (Agilent p/n G9982A)
NA Library Preparation and Target Enrichment 15
1 Before You Begin Optional Materials
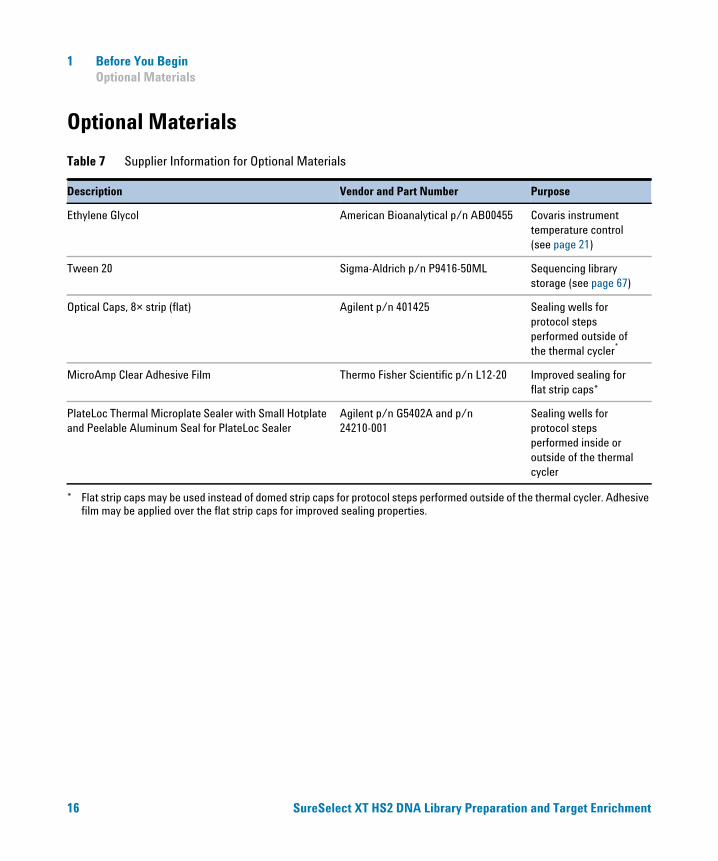
Optional Materials
Table 7 Supplier Information for Optional Materials
Description Vendor and Part Number Purpose
Ethylene Glycol American Bioanalytical p/n AB00455 Covaris instrument temperature control (see page 21)
Tween 20 Sigma-Aldrich p/n P9416-50ML Sequencing library storage (see page 67)
Optical Caps, 8× strip (flat) Agilent p/n 401425 Sealing wells for protocol steps performed outside of the thermal cycler*
* Flat strip caps may be used instead of domed strip caps for protocol steps performed outside of the thermal cycler. Adhesive film may be applied over the flat strip caps for improved sealing properties.
MicroAmp Clear Adhesive Film Thermo Fisher Scientific p/n L12-20 Improved sealing for flat strip caps*
PlateLoc Thermal Microplate Sealer with Small Hotplate and Peelable Aluminum Seal for PlateLoc Sealer
Agilent p/n G5402A and p/n 24210-001
Sealing wells for protocol steps performed inside or outside of the thermal cycler
16 SureSelect XT HS2 DNA Library Preparation and Target Enrichment
SureSelect XT HS2 DNA System Protocol
2Preparation and Fragmentation of Input DNA
Step 1. Prepare and analyze quality of genomic DNA samples 18
Preparation of high-quality gDNA from fresh biological samples 18
Preparation and qualification of gDNA from FFPE samples 18
Step 2. Fragment the DNA 21
Method 1: Mechanical DNA Shearing using Covaris 21
Method 2: Enzymatic DNA Fragmentation 24
This chapter describes the steps to prepare, quantify, qualify, and fragment input DNA samples prior to SureSelect XT HS2 library preparation and target enrichment. Protocols are provided for two alternative methods of DNA fragmentation–mechanical shearing or enzymatic DNA fragmentation.
The library preparation protocol is compatible with both high- quality gDNA prepared from fresh or fresh- frozen samples and lower- quality DNA prepared from FFPE samples. Modifications required for FFPE samples are included throughout the protocol steps. For a summary of modifications for FFPE samples see Chapter 6, “Appendix: Using FFPE- derived DNA Samples” on page 77.
The library preparation protocol requires 10 ng to 200 ng of input DNA, with adjustments to DNA input amount or quantification method required for some FFPE samples. For optimal sequencing results, use the maximum amount of input DNA available within the recommended range.
17Agilent Technologies
2 Preparation and Fragmentation of Input DNA Step 1. Prepare and analyze quality of genomic DNA samples
Step 1. Prepare and analyze quality of genomic DNA samples
Preparation of high-quality gDNA from fresh biological samples
18
1 Prepare high- quality gDNA using a suitable purification system, such as Qiagen’s QIAamp DNA Mini Kit, following the manufacturer’s protocol.
Make sure genomic DNA samples are of high quality with an OD 260/280 ratio ranging from 1.8 to 2.0.
NOTE
2 Use the Qubit BR dsDNA Assay Kit to determine the concentration of each gDNA sample. Follow the manufacturer’s instructions for the instrument and assay kit.
Additional qualification of DNA samples is not required for DNA derived from fresh biological samples. Proceed to “Step 2. Fragment the DNA” on page 21.
Preparation and qualification of gDNA from FFPE samples
1 Prepare gDNA from FFPE tissue sections using Qiagen’s QIAamp DNA FFPE Tissue Kit and Qiagen’s Deparaffinization Solution, following the manufacturer’s protocol. Elute the final gDNA samples from the MinElute column in two rounds, using 30 µl Buffer ATE in each round, for a final elution volume of approximately 60 µl.
If tissue lysis appears incomplete after one hour of digestion with Proteinase K, add an additional 10 µl of Proteinase K and continue incubating at 56°C, with periodic mixing, for up to three hours.
NOTE
Store the gDNA samples on ice for same- day library preparation, or at –20°C for later processing.
2 Assess the quality (DNA integrity) for each FFPE DNA sample using one of the methods below.
SureSelect XT HS2 DNA Library Preparation and Target Enrichment
Preparation and Fragmentation of Input DNA 2 Preparation and qualification of gDNA from FFPE samples
SureSelect XT HS2 D
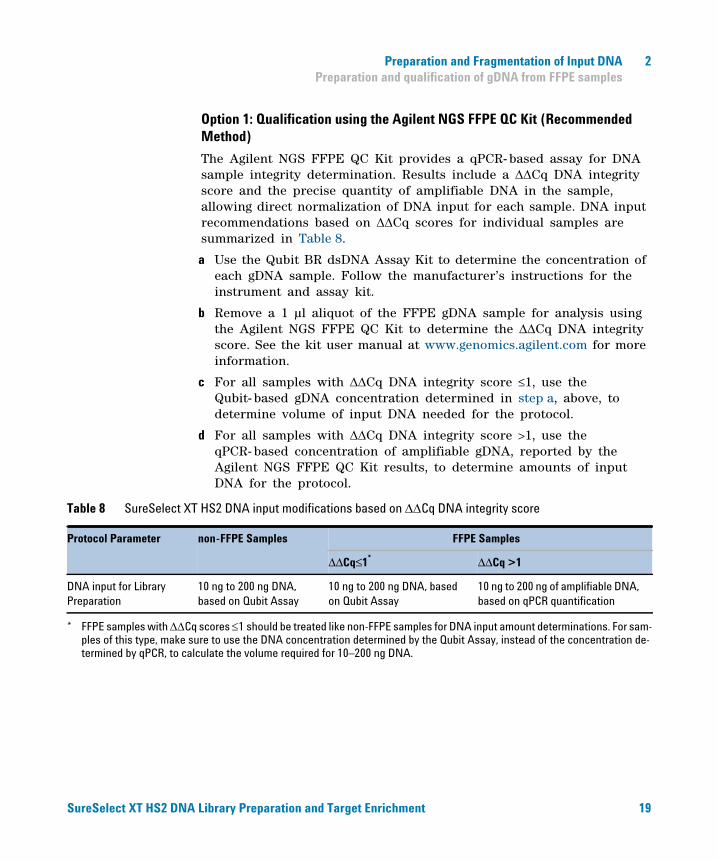
Option 1: Qualification using the Agilent NGS FFPE QC Kit (Recommended Method)
The Agilent NGS FFPE QC Kit provides a qPCR- based assay for DNA sample integrity determination. Results include a Cq DNA integrity score and the precise quantity of amplifiable DNA in the sample, allowing direct normalization of DNA input for each sample. DNA input recommendations based on Cq scores for individual samples are summarized in Table 8.
a Use the Qubit BR dsDNA Assay Kit to determine the concentration of each gDNA sample. Follow the manufacturer’s instructions for the instrument and assay kit.
b Remove a 1 µl aliquot of the FFPE gDNA sample for analysis using the Agilent NGS FFPE QC Kit to determine the Cq DNA integrity score. See the kit user manual at www.genomics.agilent.com for more information.
c For all samples with Cq DNA integrity score ≤1, use the Qubit- based gDNA concentration determined in step a, above, to determine volume of input DNA needed for the protocol.
d For all samples with Cq DNA integrity score >1, use the qPCR- based concentration of amplifiable gDNA, reported by the Agilent NGS FFPE QC Kit results, to determine amounts of input DNA for the protocol.
Table 8 SureSelect XT HS2 DNA input modifications based on Cq DNA integrity score
Protocol Parameter non-FFPE Samples FFPE Samples
ΔΔCq≤1* ΔΔCq >1
DNA input for Library Preparation
10 ng to 200 ng DNA, based on Qubit Assay
10 ng to 200 ng DNA, based on Qubit Assay
10 ng to 200 ng of amplifiable DNA, based on qPCR quantification
* FFPE samples with Cq scores 1 should be treated like non-FFPE samples for DNA input amount determinations. For sam-ples of this type, make sure to use the DNA concentration determined by the Qubit Assay, instead of the concentration de-termined by qPCR, to calculate the volume required for 10–200 ng DNA.
NA Library Preparation and Target Enrichment 19
2 Preparation and Fragmentation of Input DNA Preparation and qualification of gDNA from FFPE samples
20
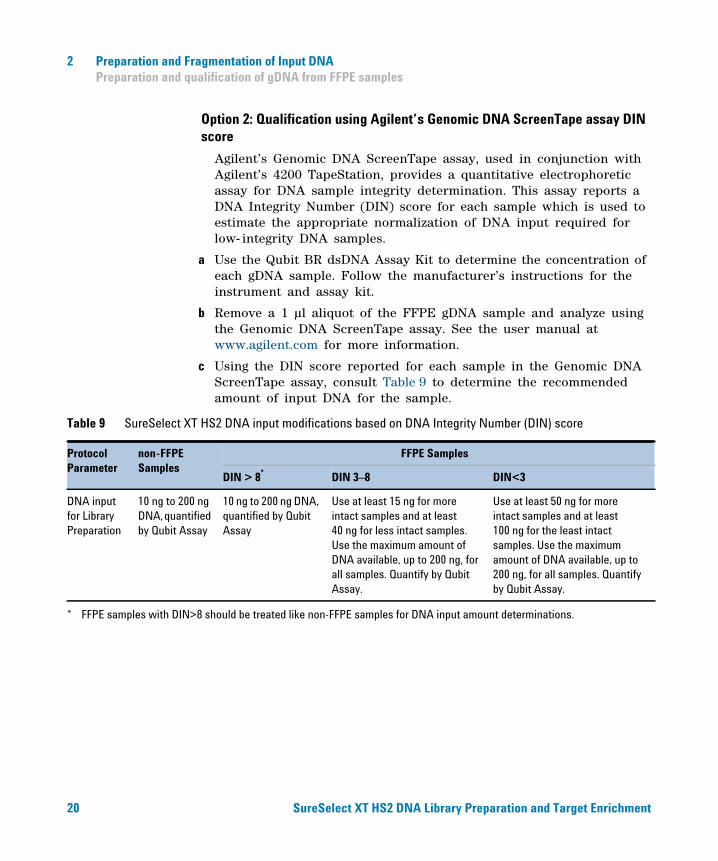
Option 2: Qualification using Agilent’s Genomic DNA ScreenTape assay DIN score
Agilent’s Genomic DNA ScreenTape assay, used in conjunction with Agilent’s 4200 TapeStation, provides a quantitative electrophoretic assay for DNA sample integrity determination. This assay reports a DNA Integrity Number (DIN) score for each sample which is used to estimate the appropriate normalization of DNA input required for low- integrity DNA samples.
a Use the Qubit BR dsDNA Assay Kit to determine the concentration of each gDNA sample. Follow the manufacturer’s instructions for the instrument and assay kit.
b Remove a 1 µl aliquot of the FFPE gDNA sample and analyze using the Genomic DNA ScreenTape assay. See the user manual at www.agilent.com for more information.
c Using the DIN score reported for each sample in the Genomic DNA ScreenTape assay, consult Table 9 to determine the recommended amount of input DNA for the sample.
Table 9 SureSelect XT HS2 DNA input modifications based on DNA Integrity Number (DIN) score
Protocol Parameter
non-FFPE Samples
FFPE Samples
DIN > 8* DIN 3–8 DIN<3
DNA input for Library Preparation
10 ng to 200 ng DNA, quantified by Qubit Assay
10 ng to 200 ng DNA, quantified by Qubit Assay
Use at least 15 ng for more intact samples and at least 40 ng for less intact samples. Use the maximum amount of DNA available, up to 200 ng, for all samples. Quantify by Qubit Assay.
Use at least 50 ng for more intact samples and at least 100 ng for the least intact samples. Use the maximum amount of DNA available, up to 200 ng, for all samples. Quantify by Qubit Assay.
* FFPE samples with DIN>8 should be treated like non-FFPE samples for DNA input amount determinations.
SureSelect XT HS2 DNA Library Preparation and Target Enrichment
Preparation and Fragmentation of Input DNA 2 Step 2. Fragment the DNA
Step 2. Fragment the DNA
Method 1: Mechanical DNA Shearing using Covaris
SureSelect XT HS2 D
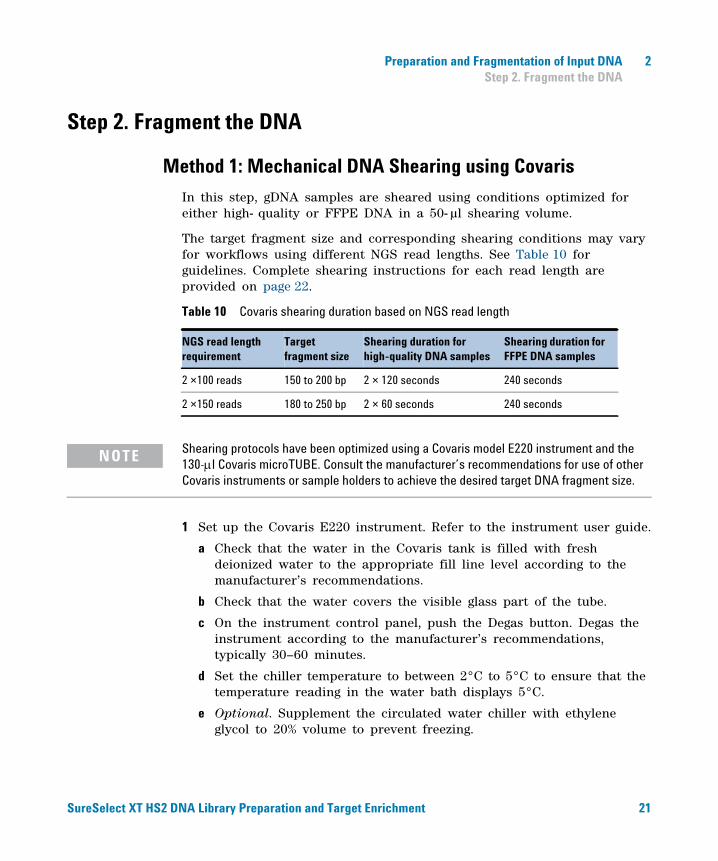
In this step, gDNA samples are sheared using conditions optimized for either high- quality or FFPE DNA in a 50- µl shearing volume.
The target fragment size and corresponding shearing conditions may vary for workflows using different NGS read lengths. See Table 10 for guidelines. Complete shearing instructions for each read length are provided on page 22. Table 10 Covaris shearing duration based on NGS read length
NGS read length requirement
Target fragment size
Shearing duration for high-quality DNA samples
Shearing duration for FFPE DNA samples
2 ×100 reads 150 to 200 bp 2 × 120 seconds 240 seconds
2 ×150 reads 180 to 250 bp 2 × 60 seconds 240 seconds
NOTE Shearing protocols have been optimized using a Covaris model E220 instrument and the 130-l Covaris microTUBE. Consult the manufacturer’s recommendations for use of other Covaris instruments or sample holders to achieve the desired target DNA fragment size.
1 Set up the Covaris E220 instrument. Refer to the instrument user guide.
a Check that the water in the Covaris tank is filled with fresh deionized water to the appropriate fill line level according to the manufacturer’s recommendations.
b Check that the water covers the visible glass part of the tube.
c On the instrument control panel, push the Degas button. Degas the instrument according to the manufacturer’s recommendations, typically 30–60 minutes.
d Set the chiller temperature to between 2°C to 5°C to ensure that the temperature reading in the water bath displays 5°C.
e Optional. Supplement the circulated water chiller with ethylene glycol to 20% volume to prevent freezing.
NA Library Preparation and Target Enrichment 21
2 Preparation and Fragmentation of Input DNA Method 1: Mechanical DNA Shearing using Covaris
22
2 Prepare the DNA samples for the run by diluting 10–200 ng of each gDNA sample with 1X Low TE Buffer (10 mM Tris- HCl, pH 7.5- 8.0, 0.1 mM EDTA) to a final volume of 50 µl. Vortex well to mix, then spin briefly to collect the liquid. Keep the samples on ice.
Do not dilute samples to be sheared using water. Shearing samples in water reduces the overall library preparation yield and complexity.
NOTE
3 Complete the DNA shearing steps below for each of the gDNA samples.
a Transfer the 50- µl DNA sample into a Covaris microTUBE, using a tapered pipette tip to slowly transfer the sample through the pre- split septa of the cap.
b Spin the microTUBE for 30 seconds to collect the liquid and to remove any bubbles from the bottom of the tube.
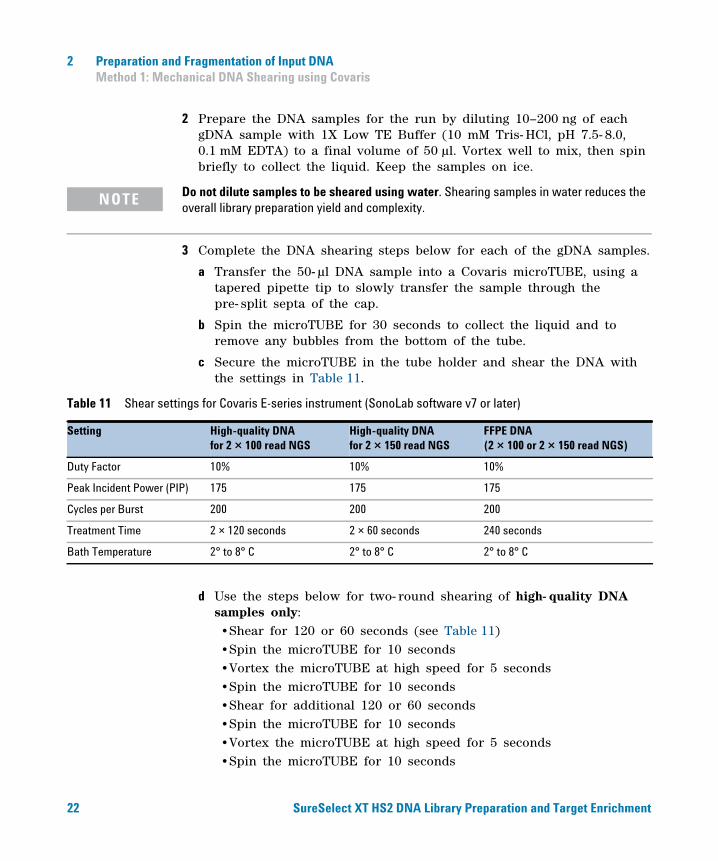
c Secure the microTUBE in the tube holder and shear the DNA with the settings in Table 11.
Table 11 Shear settings for Covaris E-series instrument (SonoLab software v7 or later)
Setting High-quality DNA for 2 × 100 read NGS
High-quality DNA for 2 × 150 read NGS
FFPE DNA(2 × 100 or 2 × 150 read NGS)
Duty Factor 10% 10% 10%
Peak Incident Power (PIP) 175 175 175
Cycles per Burst 200 200 200
Treatment Time 2 × 120 seconds 2 × 60 seconds 240 seconds
Bath Temperature 2° to 8° C 2° to 8° C 2° to 8° C
d Use the steps below for two- round shearing of high- quality DNA samples only:•Shear for 120 or 60 seconds (see Table 11)•Spin the microTUBE for 10 seconds•Vortex the microTUBE at high speed for 5 seconds•Spin the microTUBE for 10 seconds•Shear for additional 120 or 60 seconds•Spin the microTUBE for 10 seconds•Vortex the microTUBE at high speed for 5 seconds•Spin the microTUBE for 10 seconds
SureSelect XT HS2 DNA Library Preparation and Target Enrichment
Preparation and Fragmentation of Input DNA 2 Method 1: Mechanical DNA Shearing using Covaris
SureSelect XT HS2 D
e After completing the shearing step(s), put the Covaris microTUBE back into the loading and unloading station.
f While keeping the snap- cap on, insert a pipette tip through the pre- split septa, then slowly remove the sheared DNA.
g Transfer the sheared DNA sample (approximately 50 µl) to a 96- well plate or strip tube sample well. Keep the samples on ice.
h After transferring the DNA sample, spin the microTUBE briefly to collect any residual sample volume. Transfer any additional collected liquid to the sample well used in step g.
It is important to avoid loss of input DNA at this step, especially for low-abundance DNA samples. Visually inspect the microTUBE to ensure that all of the sample has been transferred. If droplets remain in the microTUBE, repeat step h.
NOTE
The 50- µl sheared DNA samples are now ready for NGS sequencing library preparation, beginning with end repair/dA- tailing. Proceed to “Library Preparation” on page 27.
NOTE This is not a stopping point in the workflow, and analysis of the sheared samples is not required before they are used for library preparation. Proceed directly to end-repair and dA-tailing.
NA Library Preparation and Target Enrichment 23
2 Preparation and Fragmentation of Input DNA Method 2: Enzymatic DNA Fragmentation
Method 2: Enzymatic DNA Fragmentation
24
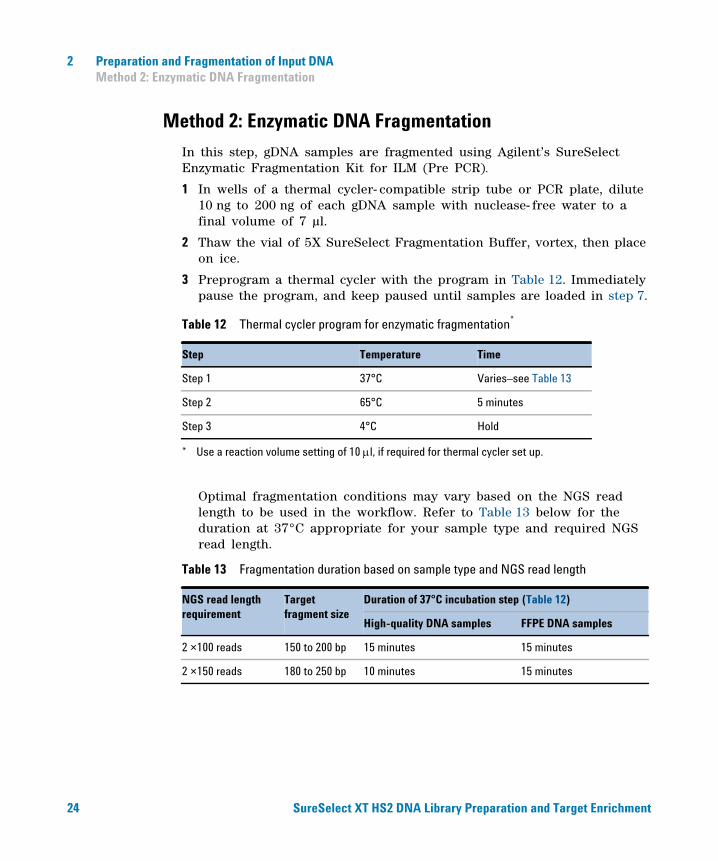
In this step, gDNA samples are fragmented using Agilent’s SureSelect Enzymatic Fragmentation Kit for ILM (Pre PCR).
1 In wells of a thermal cycler- compatible strip tube or PCR plate, dilute 10 ng to 200 ng of each gDNA sample with nuclease- free water to a final volume of 7 µl.
2 Thaw the vial of 5X SureSelect Fragmentation Buffer, vortex, then place on ice.
3 Preprogram a thermal cycler with the program in Table 12. Immediately pause the program, and keep paused until samples are loaded in step 7.
Table 12 Thermal cycler program for enzymatic fragmentation*
Optimal fragmentation conditions may vary based on the NGS read length to be used in the workflow. Refer to Table 13 below for the duration at 37°C appropriate for your sample type and required NGS read length.
Table 13 Fragmentation duration based on sample type and NGS read length
* Use a reaction volume setting of 10 l, if required for thermal cycler set up.
Step Temperature Time
Step 1 37°C Varies–see Table 13
Step 2 65°C 5 minutes
Step 3 4°C Hold
NGS read length requirement
Target fragment size
Duration of 37°C incubation step (Table 12)
High-quality DNA samples FFPE DNA samples
2 ×100 reads 150 to 200 bp 15 minutes 15 minutes
2 ×150 reads 180 to 250 bp 10 minutes 15 minutes
SureSelect XT HS2 DNA Library Preparation and Target Enrichment
Preparation and Fragmentation of Input DNA 2 Method 2: Enzymatic DNA Fragmentation
SureSelect XT HS2 D
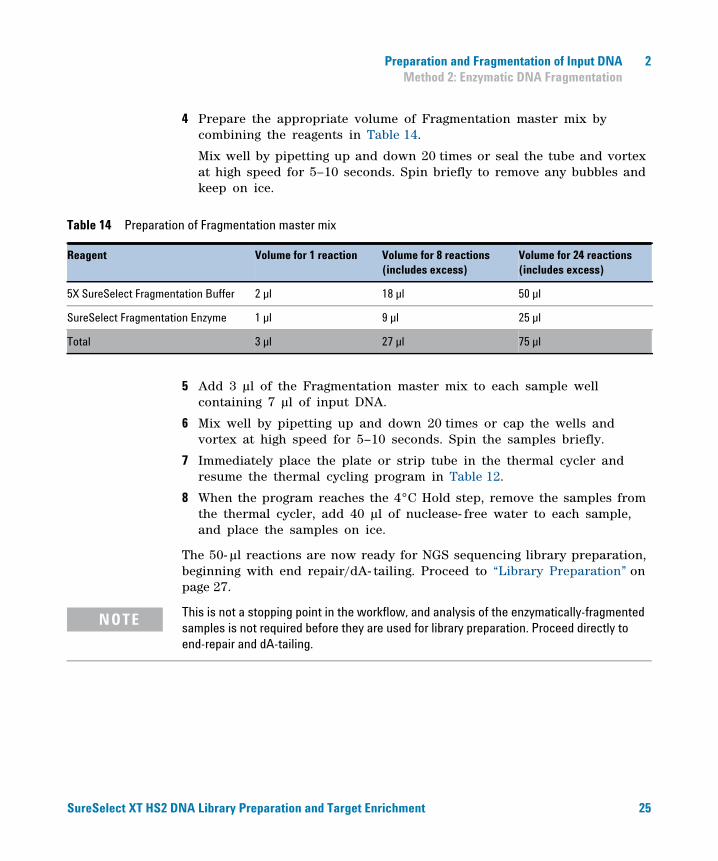
4 Prepare the appropriate volume of Fragmentation master mix by combining the reagents in Table 14.
Mix well by pipetting up and down 20 times or seal the tube and vortex at high speed for 5–10 seconds. Spin briefly to remove any bubbles and keep on ice.
Table 14 Preparation of Fragmentation master mix
Reagent Volume for 1 reaction Volume for 8 reactions(includes excess)
Volume for 24 reactions(includes excess)
5X SureSelect Fragmentation Buffer 2 µl 18 µl 50 µl
SureSelect Fragmentation Enzyme 1 µl 9 µl 25 µl
Total 3 µl 27 µl 75 µl
5 Add 3 µl of the Fragmentation master mix to each sample well containing 7 µl of input DNA.
6 Mix well by pipetting up and down 20 times or cap the wells and vortex at high speed for 5–10 seconds. Spin the samples briefly.
7 Immediately place the plate or strip tube in the thermal cycler and resume the thermal cycling program in Table 12.
8 When the program reaches the 4°C Hold step, remove the samples from the thermal cycler, add 40 µl of nuclease- free water to each sample, and place the samples on ice.
The 50- µl reactions are now ready for NGS sequencing library preparation, beginning with end repair/dA- tailing. Proceed to “Library Preparation” on page 27.
NOTE This is not a stopping point in the workflow, and analysis of the enzymatically-fragmented samples is not required before they are used for library preparation. Proceed directly to end-repair and dA-tailing.
NA Library Preparation and Target Enrichment 25

2 Preparation and Fragmentation of Input DNA Method 2: Enzymatic DNA Fragmentation
26
SureSelect XT HS2 DNA Library Preparation and Target Enrichment
SureSelect XT HS2 DNA System Protocol
3Library Preparation
Step 1. Prepare the Ligation master mix 29
Step 2. Repair and dA-Tail the DNA ends 30
Step 3. Ligate the molecular-barcoded adaptor 32
Step 4. Purify the sample using AMPure XP beads 33
Step 5. Amplify the adaptor-ligated library 35
Step 6. Purify the amplified library with AMPure XP beads 38
Step 7. Assess quality and quantity 40
This chapter describes the steps to prepare DNA libraries for sequencing using the Illumina paired- read platform. For each sample to be sequenced, an individual dual- indexed and molecular- barcoded library is prepared. For an overview of the SureSelect XT HS2 NGS sample preparation workflow, see Figure 1 on page 8.
The NGS library preparation protocol that begins here is used for fragmented DNA samples produced by mechanical shearing (as detailed on page 21 to page 23) or produced by enzymatic fragmentation (as detailed on page 24 to page 25). Samples produced by either method should contain 10–200 ng of DNA fragments in a volume of 50 µl.
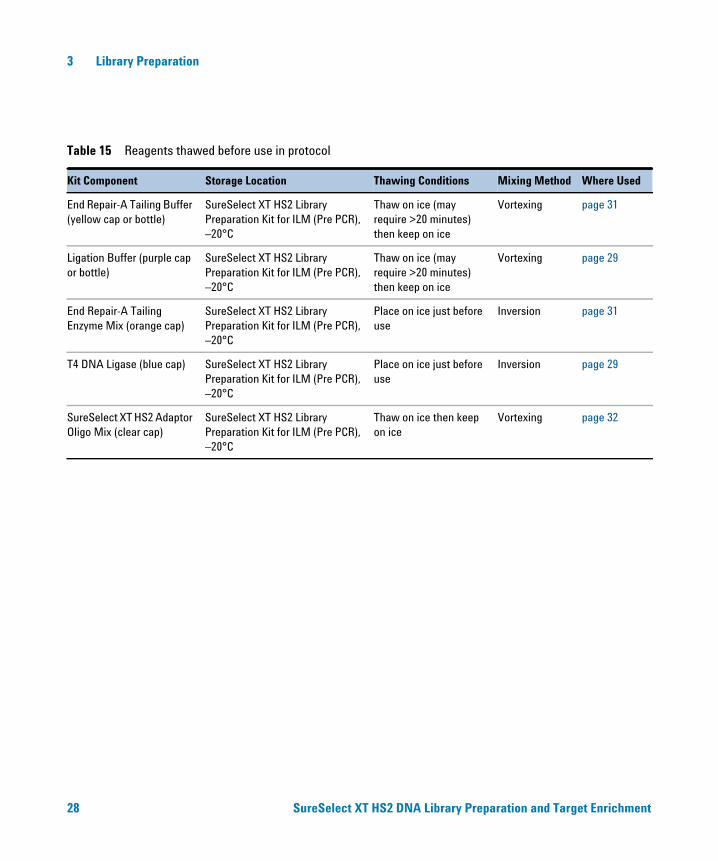
Protocol steps in this section use the components listed in Table 15. Thaw and mix each component as directed in Table 15 before use (refer to the Where Used column). Remove the AMPure XP beads from cold storage and equilibrate to room temperature for at least 30 minutes in preparation for use on page 33. Do not freeze the beads at any time.
To process multiple samples, prepare reagent mixtures with overage at each step, without the cDNA library sample. Mixtures for preparation of 8 or 24 samples (including excess) are shown in tables as examples.
27Agilent Technologies
3 Library Preparation
28
Table 15 Reagents thawed before use in protocol
Kit Component Storage Location Thawing Conditions Mixing Method Where Used
End Repair-A Tailing Buffer (yellow cap or bottle)
SureSelect XT HS2 Library Preparation Kit for ILM (Pre PCR), –20°C
Thaw on ice (may require >20 minutes) then keep on ice
Vortexing page 31
Ligation Buffer (purple cap or bottle)
SureSelect XT HS2 Library Preparation Kit for ILM (Pre PCR), –20°C
Thaw on ice (may require >20 minutes) then keep on ice
Vortexing page 29
End Repair-A Tailing Enzyme Mix (orange cap)
SureSelect XT HS2 Library Preparation Kit for ILM (Pre PCR), –20°C
Place on ice just before use
Inversion page 31
T4 DNA Ligase (blue cap) SureSelect XT HS2 Library Preparation Kit for ILM (Pre PCR), –20°C
Place on ice just before use
Inversion page 29
SureSelect XT HS2 Adaptor Oligo Mix (clear cap)
SureSelect XT HS2 Library Preparation Kit for ILM (Pre PCR), –20°C
Thaw on ice then keep on ice
Vortexing page 32
SureSelect XT HS2 DNA Library Preparation and Target Enrichment
Library Preparation 3 Step 1. Prepare the Ligation master mix
Step 1. Prepare the Ligation master mix
SureSelect XT HS2 D
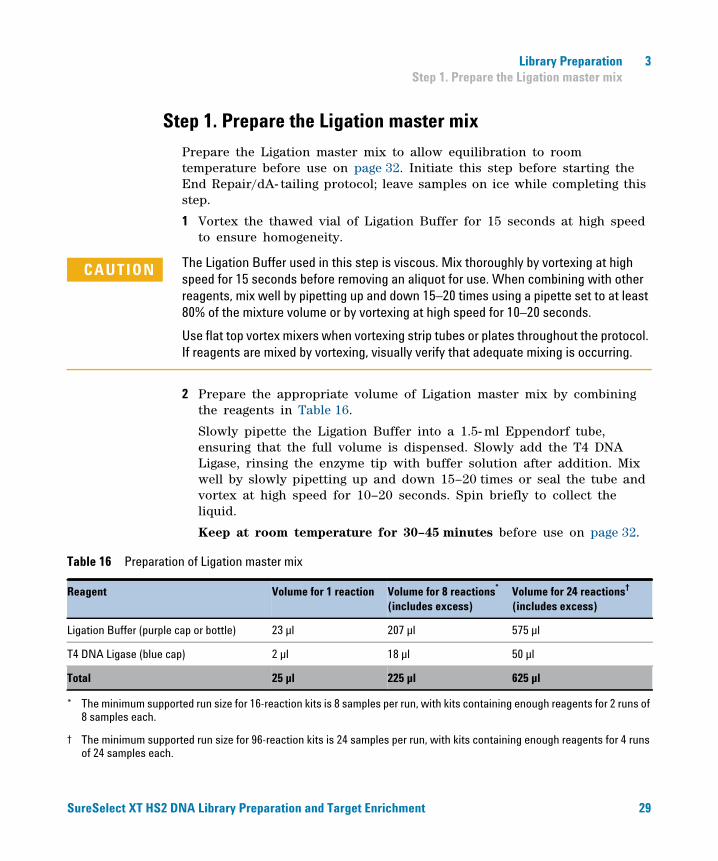
Prepare the Ligation master mix to allow equilibration to room temperature before use on page 32. Initiate this step before starting the End Repair/dA- tailing protocol; leave samples on ice while completing this step.
1 Vortex the thawed vial of Ligation Buffer for 15 seconds at high speed to ensure homogeneity.
CAUTION The Ligation Buffer used in this step is viscous. Mix thoroughly by vortexing at high speed for 15 seconds before removing an aliquot for use. When combining with other reagents, mix well by pipetting up and down 15–20 times using a pipette set to at least 80% of the mixture volume or by vortexing at high speed for 10–20 seconds.
Use flat top vortex mixers when vortexing strip tubes or plates throughout the protocol. If reagents are mixed by vortexing, visually verify that adequate mixing is occurring.
2 Prepare the appropriate volume of Ligation master mix by combining the reagents in Table 16.
Slowly pipette the Ligation Buffer into a 1.5- ml Eppendorf tube, ensuring that the full volume is dispensed. Slowly add the T4 DNA Ligase, rinsing the enzyme tip with buffer solution after addition. Mix well by slowly pipetting up and down 15–20 times or seal the tube and vortex at high speed for 10–20 seconds. Spin briefly to collect the liquid.
Keep at room temperature for 30–45 minutes before use on page 32.
Table 16 Preparation of Ligation master mix
Reagent Volume for 1 reaction Volume for 8 reactions*
(includes excess)Volume for 24 reactions†
(includes excess)
Ligation Buffer (purple cap or bottle) 23 µl 207 µl 575 µl
T4 DNA Ligase (blue cap) 2 µl 18 µl 50 µl
Total 25 µl 225 µl 625 µl
* The minimum supported run size for 16-reaction kits is 8 samples per run, with kits containing enough reagents for 2 runs of 8 samples each.
† The minimum supported run size for 96-reaction kits is 24 samples per run, with kits containing enough reagents for 4 runs of 24 samples each.
NA Library Preparation and Target Enrichment 29
3 Library Preparation Step 2. Repair and dA-Tail the DNA ends
Step 2. Repair and dA-Tail the DNA ends
30
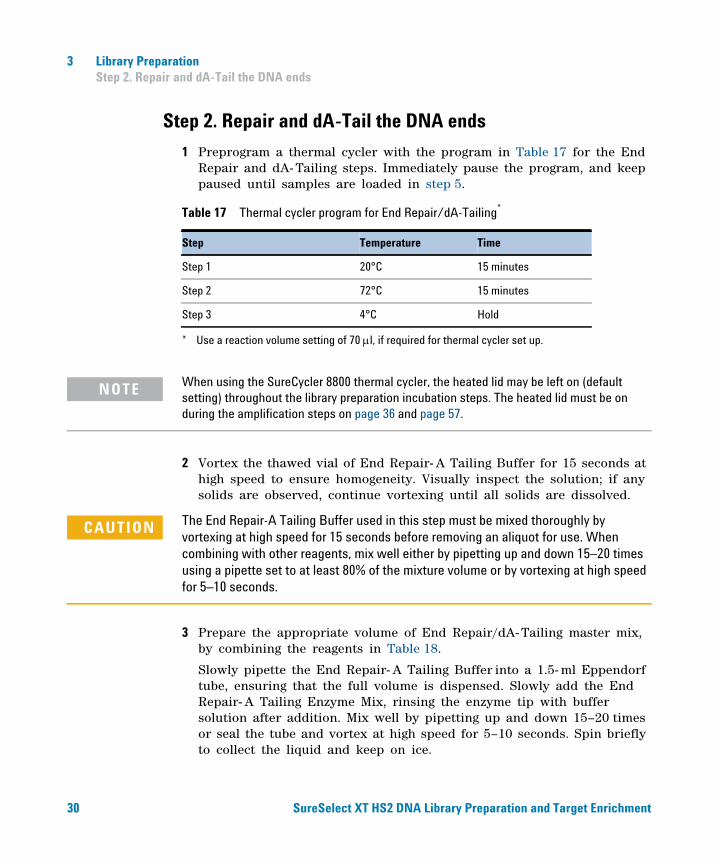
1 Preprogram a thermal cycler with the program in Table 17 for the End Repair and dA- Tailing steps. Immediately pause the program, and keep paused until samples are loaded in step 5.
Table 17 Thermal cycler program for End Repair/dA-Tailing*
* Use a reaction volume setting of 70 l, if required for thermal cycler set up.
Step Temperature Time
Step 1 20°C 15 minutes
Step 2 72°C 15 minutes
Step 3 4°C Hold
When using the SureCycler 8800 thermal cycler, the heated lid may be left on (default setting) throughout the library preparation incubation steps. The heated lid must be on during the amplification steps on page 36 and page 57.
NOTE
2 Vortex the thawed vial of End Repair- A Tailing Buffer for 15 seconds at high speed to ensure homogeneity. Visually inspect the solution; if any solids are observed, continue vortexing until all solids are dissolved.
CAUTION The End Repair-A Tailing Buffer used in this step must be mixed thoroughly by vortexing at high speed for 15 seconds before removing an aliquot for use. When combining with other reagents, mix well either by pipetting up and down 15–20 times using a pipette set to at least 80% of the mixture volume or by vortexing at high speed for 5–10 seconds.
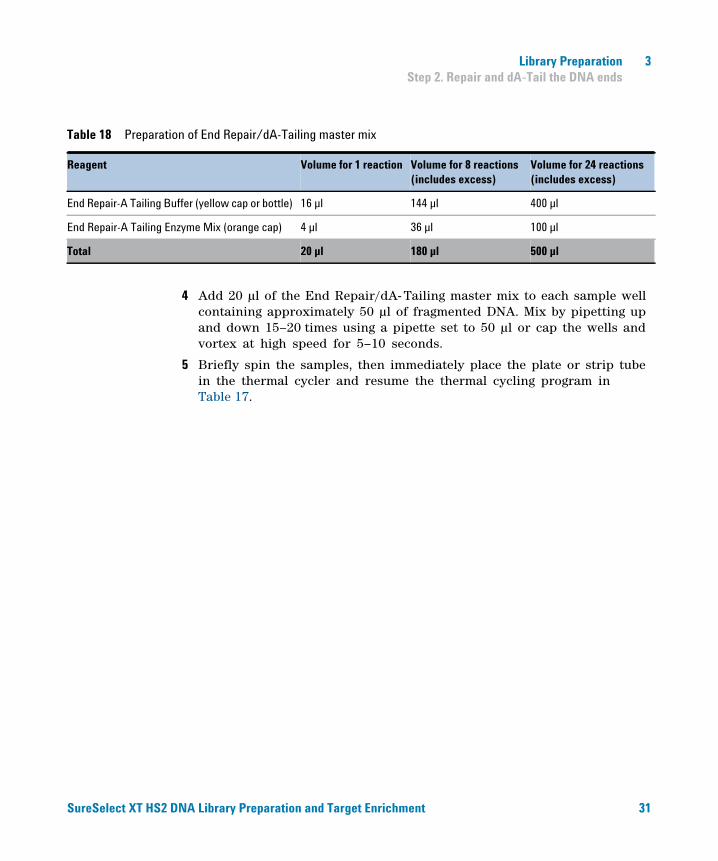
3 Prepare the appropriate volume of End Repair/dA- Tailing master mix, by combining the reagents in Table 18.
Slowly pipette the End Repair- A Tailing Buffer into a 1.5- ml Eppendorf tube, ensuring that the full volume is dispensed. Slowly add the End Repair- A Tailing Enzyme Mix, rinsing the enzyme tip with buffer solution after addition. Mix well by pipetting up and down 15–20 times or seal the tube and vortex at high speed for 5–10 seconds. Spin briefly to collect the liquid and keep on ice.
SureSelect XT HS2 DNA Library Preparation and Target Enrichment
Library Preparation 3 Step 2. Repair and dA-Tail the DNA ends
SureSelect XT HS2 D
Table 18 Preparation of End Repair/dA-Tailing master mix
Reagent Volume for 1 reaction Volume for 8 reactions(includes excess)
Volume for 24 reactions(includes excess)
End Repair-A Tailing Buffer (yellow cap or bottle) 16 µl 144 µl 400 µl
End Repair-A Tailing Enzyme Mix (orange cap) 4 µl 36 µl 100 µl
Total 20 µl 180 µl 500 µl
4 Add 20 µl of the End Repair/dA- Tailing master mix to each sample well containing approximately 50 µl of fragmented DNA. Mix by pipetting up and down 15–20 times using a pipette set to 50 µl or cap the wells and vortex at high speed for 5–10 seconds.
5 Briefly spin the samples, then immediately place the plate or strip tube in the thermal cycler and resume the thermal cycling program in Table 17.
NA Library Preparation and Target Enrichment 31
3 Library Preparation Step 3. Ligate the molecular-barcoded adaptor
Step 3. Ligate the molecular-barcoded adaptor
32
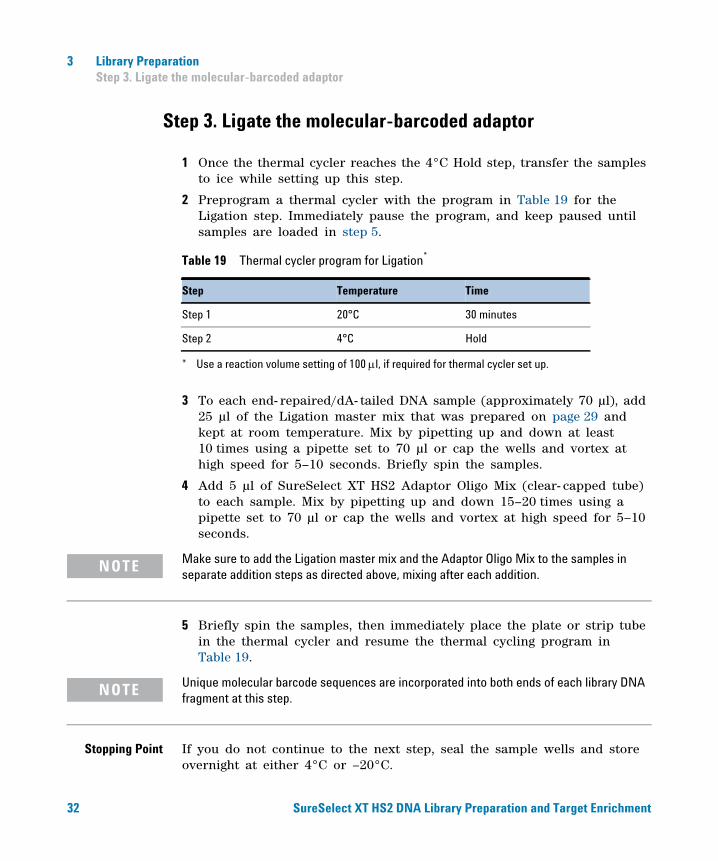
1 Once the thermal cycler reaches the 4°C Hold step, transfer the samples to ice while setting up this step.
2 Preprogram a thermal cycler with the program in Table 19 for the Ligation step. Immediately pause the program, and keep paused until samples are loaded in step 5.
Table 19 Thermal cycler program for Ligation*
3 To each end- repaired/dA- tailed DNA sample (approximately 70 µl), add 25 µl of the Ligation master mix that was prepared on page 29 and kept at room temperature. Mix by pipetting up and down at least 10 times using a pipette set to 70 µl or cap the wells and vortex at high speed for 5–10 seconds. Briefly spin the samples.
4 Add 5 µl of SureSelect XT HS2 Adaptor Oligo Mix (clear- capped tube) to each sample. Mix by pipetting up and down 15–20 times using a pipette set to 70 µl or cap the wells and vortex at high speed for 5–10 seconds.
* Use a reaction volume setting of 100 l, if required for thermal cycler set up.
Step Temperature Time
Step 1 20°C 30 minutes
Step 2 4°C Hold
Make sure to add the Ligation master mix and the Adaptor Oligo Mix to the samples in separate addition steps as directed above, mixing after each addition.
NOTE
5 Briefly spin the samples, then immediately place the plate or strip tube in the thermal cycler and resume the thermal cycling program in Table 19.
Unique molecular barcode sequences are incorporated into both ends of each library DNA fragment at this step.
NOTE
Stopping Point
If you do not continue to the next step, seal the sample wells and store overnight at either 4°C or –20°C.SureSelect XT HS2 DNA Library Preparation and Target Enrichment
Library Preparation 3 Step 4. Purify the sample using AMPure XP beads
Step 4. Purify the sample using AMPure XP beads
SureSelect XT HS2 D
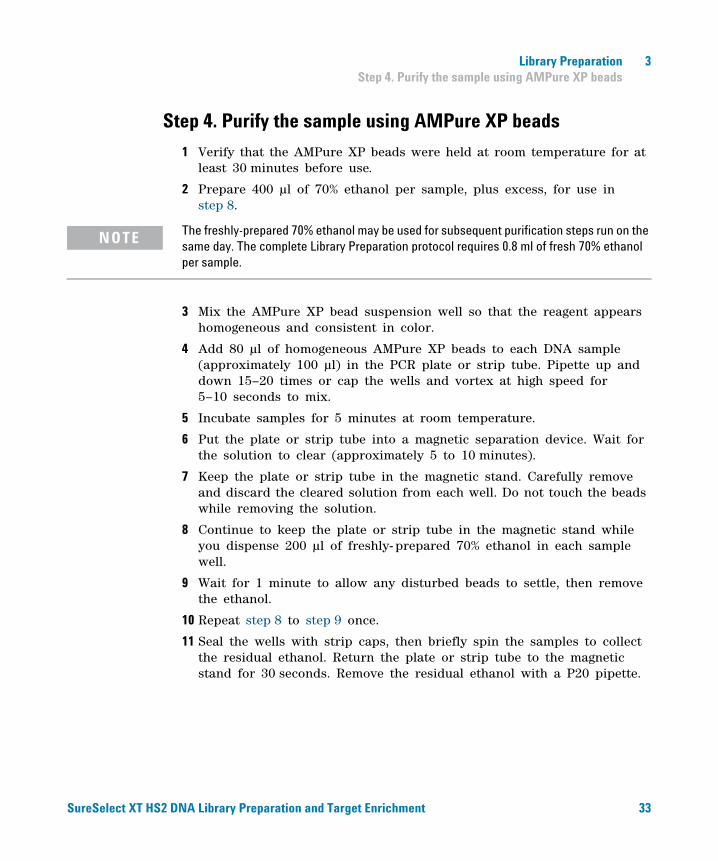
1 Verify that the AMPure XP beads were held at room temperature for at least 30 minutes before use.
2 Prepare 400 µl of 70% ethanol per sample, plus excess, for use in step 8.
The freshly-prepared 70% ethanol may be used for subsequent purification steps run on the same day. The complete Library Preparation protocol requires 0.8 ml of fresh 70% ethanol per sample.
NOTE
3 Mix the AMPure XP bead suspension well so that the reagent appears homogeneous and consistent in color.
4 Add 80 µl of homogeneous AMPure XP beads to each DNA sample (approximately 100 µl) in the PCR plate or strip tube. Pipette up and down 15–20 times or cap the wells and vortex at high speed for 5–10 seconds to mix.
5 Incubate samples for 5 minutes at room temperature.
6 Put the plate or strip tube into a magnetic separation device. Wait for the solution to clear (approximately 5 to 10 minutes).
7 Keep the plate or strip tube in the magnetic stand. Carefully remove and discard the cleared solution from each well. Do not touch the beads while removing the solution.
8 Continue to keep the plate or strip tube in the magnetic stand while you dispense 200 µl of freshly- prepared 70% ethanol in each sample well.
9 Wait for 1 minute to allow any disturbed beads to settle, then remove the ethanol.
10 Repeat step 8 to step 9 once.
11 Seal the wells with strip caps, then briefly spin the samples to collect the residual ethanol. Return the plate or strip tube to the magnetic stand for 30 seconds. Remove the residual ethanol with a P20 pipette.
NA Library Preparation and Target Enrichment 33
3 Library Preparation Step 4. Purify the sample using AMPure XP beads
34
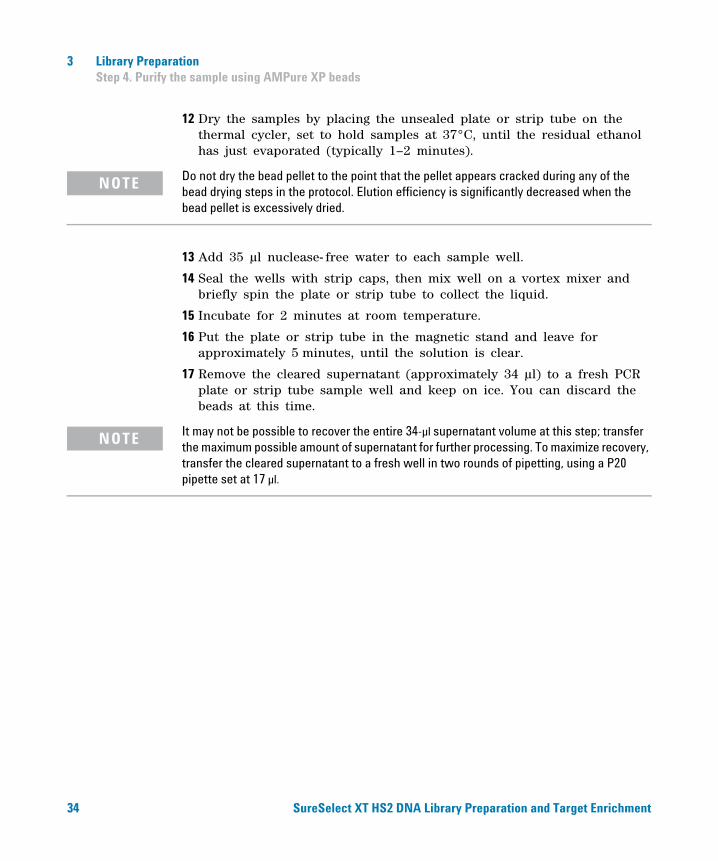
12 Dry the samples by placing the unsealed plate or strip tube on the thermal cycler, set to hold samples at 37°C, until the residual ethanol has just evaporated (typically 1–2 minutes).
Do not dry the bead pellet to the point that the pellet appears cracked during any of the bead drying steps in the protocol. Elution efficiency is significantly decreased when the bead pellet is excessively dried.
NOTE
13 Add 35 µl nuclease- free water to each sample well.
14 Seal the wells with strip caps, then mix well on a vortex mixer and briefly spin the plate or strip tube to collect the liquid.
15 Incubate for 2 minutes at room temperature.
16 Put the plate or strip tube in the magnetic stand and leave for approximately 5 minutes, until the solution is clear.
17 Remove the cleared supernatant (approximately 34 µl) to a fresh PCR plate or strip tube sample well and keep on ice. You can discard the beads at this time.
It may not be possible to recover the entire 34-µl supernatant volume at this step; transfer the maximum possible amount of supernatant for further processing. To maximize recovery, transfer the cleared supernatant to a fresh well in two rounds of pipetting, using a P20 pipette set at 17 µl.
NOTE
SureSelect XT HS2 DNA Library Preparation and Target Enrichment
Library Preparation 3 Step 5. Amplify the adaptor-ligated library
Step 5. Amplify the adaptor-ligated library
SureSelect XT HS2 D
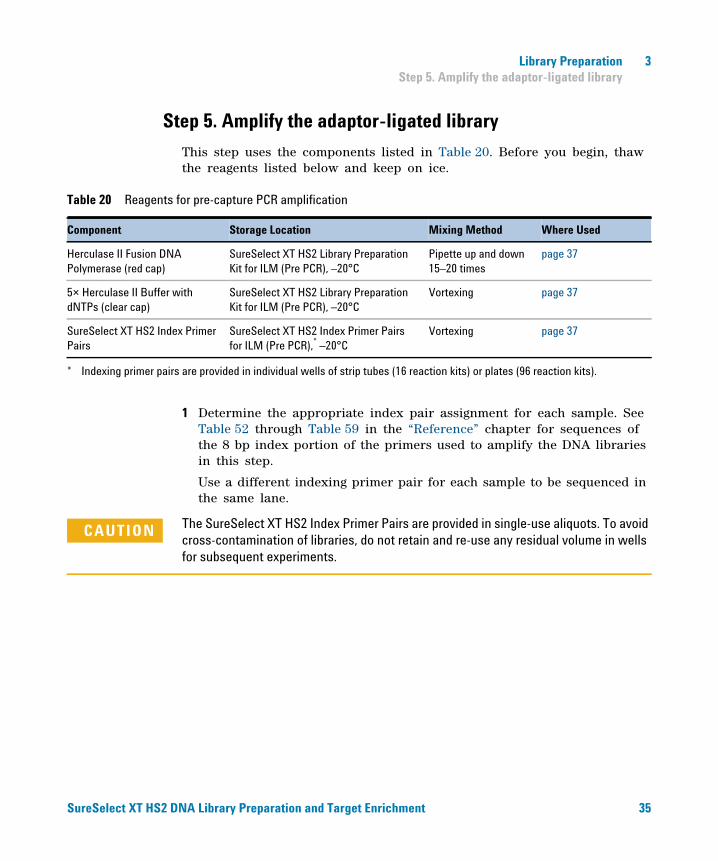
This step uses the components listed in Table 20. Before you begin, thaw the reagents listed below and keep on ice.
Table 20 Reagents for pre-capture PCR amplification
Component Storage Location Mixing Method Where Used
Herculase II Fusion DNA Polymerase (red cap)
SureSelect XT HS2 Library Preparation Kit for ILM (Pre PCR), –20°C
Pipette up and down 15–20 times
page 37
5× Herculase II Buffer with dNTPs (clear cap)
SureSelect XT HS2 Library Preparation Kit for ILM (Pre PCR), –20°C
Vortexing page 37
SureSelect XT HS2 Index Primer Pairs
SureSelect XT HS2 Index Primer Pairs for ILM (Pre PCR),* –20°C
Vortexing page 37
* Indexing primer pairs are provided in individual wells of strip tubes (16 reaction kits) or plates (96 reaction kits).
1 Determine the appropriate index pair assignment for each sample. See Table 52 through Table 59 in the “Reference” chapter for sequences of the 8 bp index portion of the primers used to amplify the DNA libraries in this step.
Use a different indexing primer pair for each sample to be sequenced in the same lane.
CAUTION The SureSelect XT HS2 Index Primer Pairs are provided in single-use aliquots. To avoid cross-contamination of libraries, do not retain and re-use any residual volume in wells for subsequent experiments.
NA Library Preparation and Target Enrichment 35
3 Library Preparation Step 5. Amplify the adaptor-ligated library
36
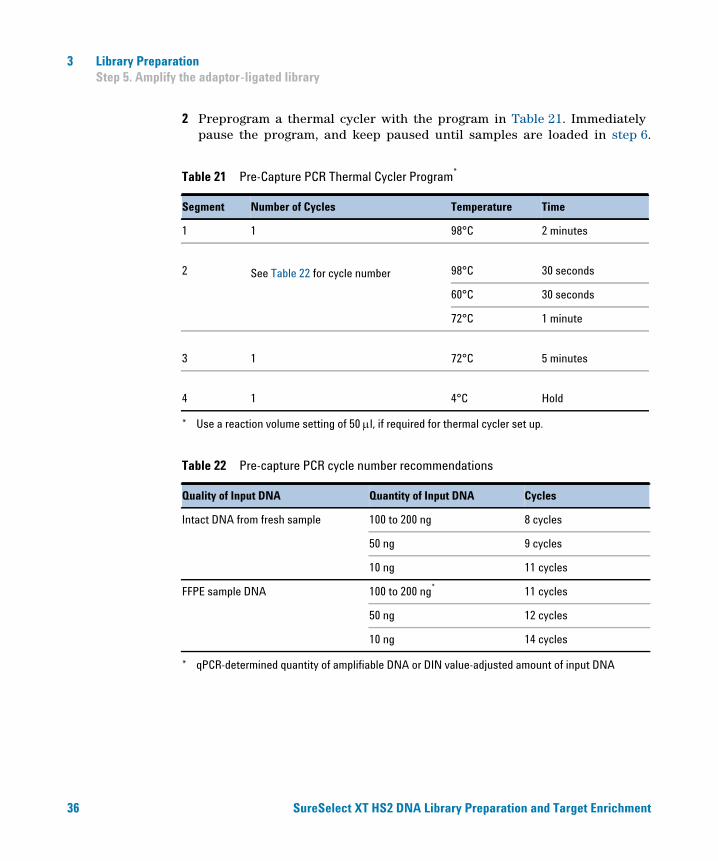
2 Preprogram a thermal cycler with the program in Table 21. Immediately pause the program, and keep paused until samples are loaded in step 6.
Table 21 Pre-Capture PCR Thermal Cycler Program*
* Use a reaction volume setting of 50 l, if required for thermal cycler set up.
Segment Number of Cycles Temperature Time
1 1 98°C 2 minutes
2 See Table 22 for cycle number 98°C 30 seconds
60°C 30 seconds
72°C 1 minute
3 1 72°C 5 minutes
4 1 4°C Hold
Table 22 Pre-capture PCR cycle number recommendations
Quality of Input DNA Quantity of Input DNA Cycles
Intact DNA from fresh sample 100 to 200 ng 8 cycles
50 ng 9 cycles
10 ng 11 cycles
FFPE sample DNA 100 to 200 ng*
* qPCR-determined quantity of amplifiable DNA or DIN value-adjusted amount of input DNA
11 cycles
50 ng 12 cycles
10 ng 14 cycles
SureSelect XT HS2 DNA Library Preparation and Target Enrichment
Library Preparation 3 Step 5. Amplify the adaptor-ligated library
SureSelect XT HS2 D
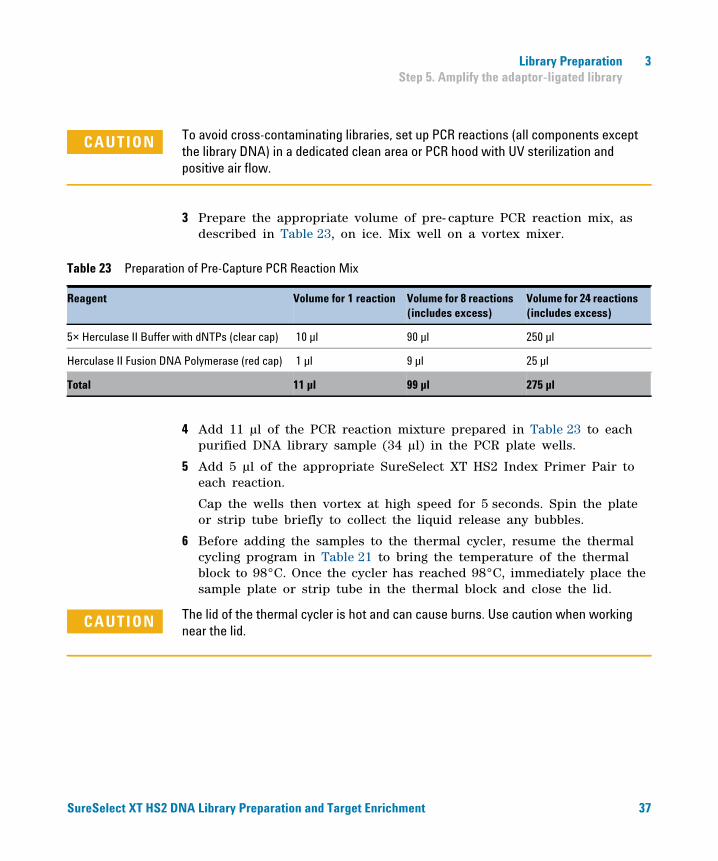
CAUTION To avoid cross-contaminating libraries, set up PCR reactions (all components except the library DNA) in a dedicated clean area or PCR hood with UV sterilization and positive air flow.
3 Prepare the appropriate volume of pre- capture PCR reaction mix, as described in Table 23, on ice. Mix well on a vortex mixer.
on of Pre-Capture PCR Reaction Mix
Table 23 PreparatiReagent Volume for 1 reaction Volume for 8 reactions (includes excess)
Volume for 24 reactions (includes excess)
5× Herculase II Buffer with dNTPs (clear cap) 10 µl 90 µl 250 µl
Herculase II Fusion DNA Polymerase (red cap) 1 µl 9 µl 25 µl
Total 11 µl 99 µl 275 µl
4 Add 11 µl of the PCR reaction mixture prepared in Table 23 to each purified DNA library sample (34 µl) in the PCR plate wells.
5 Add 5 µl of the appropriate SureSelect XT HS2 Index Primer Pair to each reaction.
Cap the wells then vortex at high speed for 5 seconds. Spin the plate or strip tube briefly to collect the liquid release any bubbles.
6 Before adding the samples to the thermal cycler, resume the thermal cycling program in Table 21 to bring the temperature of the thermal block to 98°C. Once the cycler has reached 98°C, immediately place the sample plate or strip tube in the thermal block and close the lid.
CAUTION The lid of the thermal cycler is hot and can cause burns. Use caution when working near the lid.
NA Library Preparation and Target Enrichment 37
3 Library Preparation Step 6. Purify the amplified library with AMPure XP beads
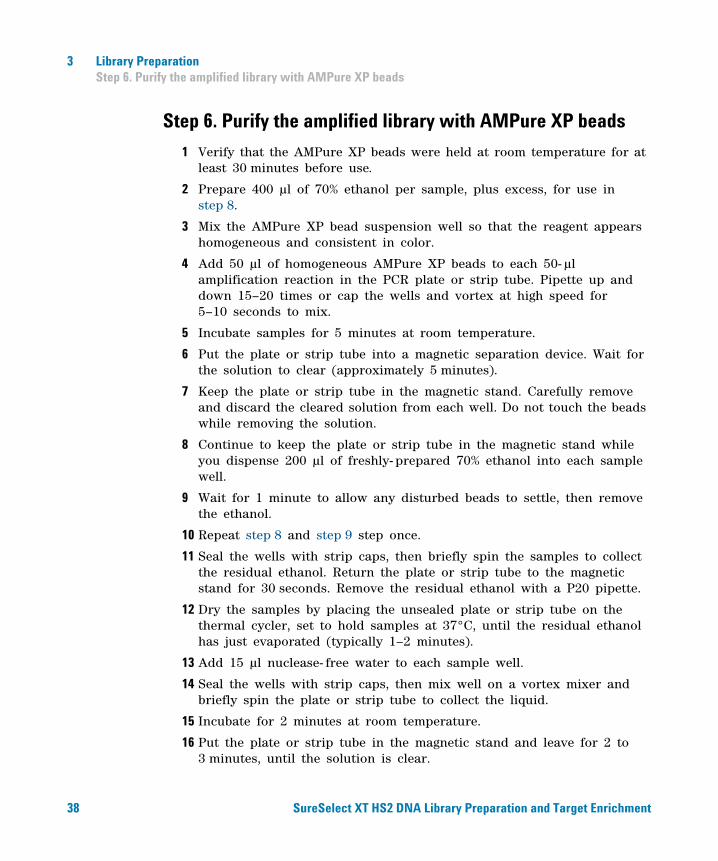
Step 6. Purify the amplified library with AMPure XP beads
38
1 Verify that the AMPure XP beads were held at room temperature for at least 30 minutes before use.
2 Prepare 400 µl of 70% ethanol per sample, plus excess, for use in step 8.
3 Mix the AMPure XP bead suspension well so that the reagent appears homogeneous and consistent in color.
4 Add 50 µl of homogeneous AMPure XP beads to each 50- µl amplification reaction in the PCR plate or strip tube. Pipette up and down 15–20 times or cap the wells and vortex at high speed for 5–10 seconds to mix.
5 Incubate samples for 5 minutes at room temperature.
6 Put the plate or strip tube into a magnetic separation device. Wait for the solution to clear (approximately 5 minutes).
7 Keep the plate or strip tube in the magnetic stand. Carefully remove and discard the cleared solution from each well. Do not touch the beads while removing the solution.
8 Continue to keep the plate or strip tube in the magnetic stand while you dispense 200 µl of freshly- prepared 70% ethanol into each sample well.
9 Wait for 1 minute to allow any disturbed beads to settle, then remove the ethanol.
10 Repeat step 8 and step 9 step once.
11 Seal the wells with strip caps, then briefly spin the samples to collect the residual ethanol. Return the plate or strip tube to the magnetic stand for 30 seconds. Remove the residual ethanol with a P20 pipette.
12 Dry the samples by placing the unsealed plate or strip tube on the thermal cycler, set to hold samples at 37°C, until the residual ethanol has just evaporated (typically 1–2 minutes).
13 Add 15 µl nuclease- free water to each sample well.
14 Seal the wells with strip caps, then mix well on a vortex mixer and briefly spin the plate or strip tube to collect the liquid.
15 Incubate for 2 minutes at room temperature.
16 Put the plate or strip tube in the magnetic stand and leave for 2 to 3 minutes, until the solution is clear.
SureSelect XT HS2 DNA Library Preparation and Target Enrichment
Library Preparation 3 Step 6. Purify the amplified library with AMPure XP beads
SureSelect XT HS2 D
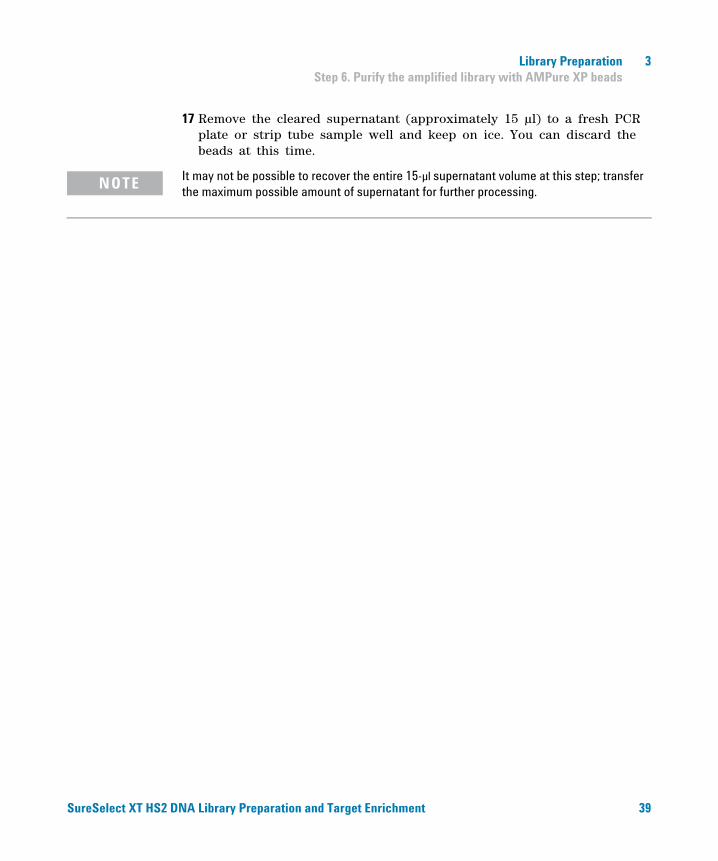
17 Remove the cleared supernatant (approximately 15 µl) to a fresh PCR plate or strip tube sample well and keep on ice. You can discard the beads at this time.
It may not be possible to recover the entire 15-µl supernatant volume at this step; transfer the maximum possible amount of supernatant for further processing.
NOTE
NA Library Preparation and Target Enrichment 39
3 Library Preparation Step 7. Assess quality and quantity
Step 7. Assess quality and quantity
40
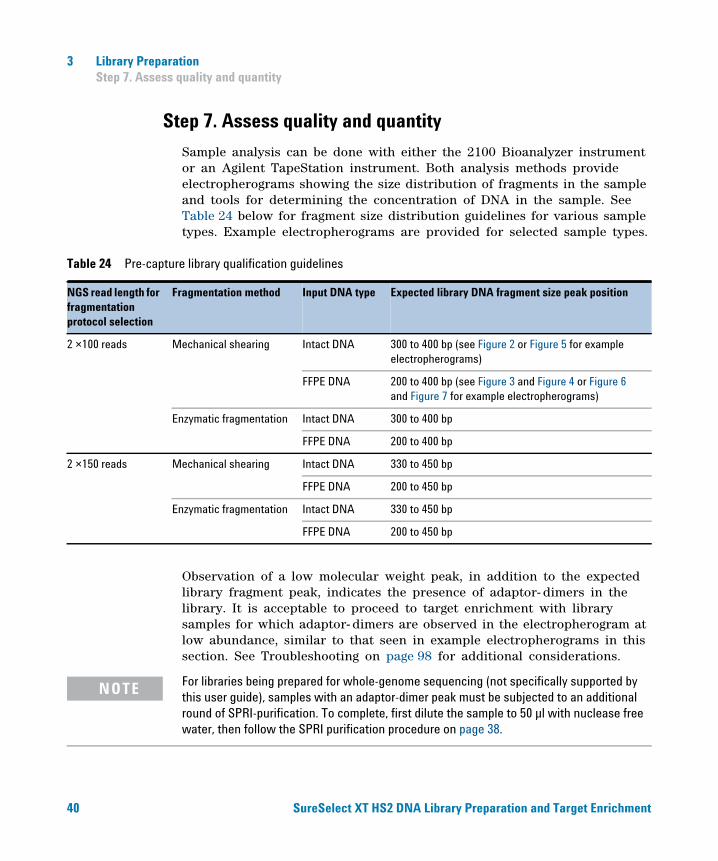
Sample analysis can be done with either the 2100 Bioanalyzer instrument or an Agilent TapeStation instrument. Both analysis methods provide electropherograms showing the size distribution of fragments in the sample and tools for determining the concentration of DNA in the sample. See Table 24 below for fragment size distribution guidelines for various sample types. Example electropherograms are provided for selected sample types.
Table 24 Pre-capture library qualification guidelines
NGS read length for fragmentationprotocol selection
Fragmentation method Input DNA type Expected library DNA fragment size peak position
2 ×100 reads Mechanical shearing Intact DNA 300 to 400 bp (see Figure 2 or Figure 5 for example electropherograms)
FFPE DNA 200 to 400 bp (see Figure 3 and Figure 4 or Figure 6 and Figure 7 for example electropherograms)
Enzymatic fragmentation Intact DNA 300 to 400 bp
FFPE DNA 200 to 400 bp
2 ×150 reads Mechanical shearing Intact DNA 330 to 450 bp
FFPE DNA 200 to 450 bp
Enzymatic fragmentation Intact DNA 330 to 450 bp
FFPE DNA 200 to 450 bp
Observation of a low molecular weight peak, in addition to the expected library fragment peak, indicates the presence of adaptor- dimers in the library. It is acceptable to proceed to target enrichment with library samples for which adaptor- dimers are observed in the electropherogram at low abundance, similar to that seen in example electropherograms in this section. See Troubleshooting on page 98 for additional considerations.
NOTE For libraries being prepared for whole-genome sequencing (not specifically supported by this user guide), samples with an adaptor-dimer peak must be subjected to an additional round of SPRI-purification. To complete, first dilute the sample to 50 µl with nuclease free water, then follow the SPRI purification procedure on page 38.
SureSelect XT HS2 DNA Library Preparation and Target Enrichment
Library Preparation 3 Step 7. Assess quality and quantity
SureSelect XT HS2 D
Option 1: Analysis using the 2100 Bioanalyzer instrument and DNA 1000 Assay
Analyze a five- fold dilution of each sample using a Bioanalyzer DNA 1000 chip and reagent kit. Perform the assay according to the Agilent DNA 1000 Kit Guide.
1 Set up the 2100 Bioanalyzer instrument as instructed in the reagent kit guide.
2 Prepare samples for analysis by diluting 1 µl of each prepared library sample in 4 µl of nuclease- free water.
3 Prepare the chip, samples and ladder as instructed in the reagent kit guide, using 1 µl of each diluted library for the analysis. Load the prepared chip into the instrument and start the run within five minutes after preparation.
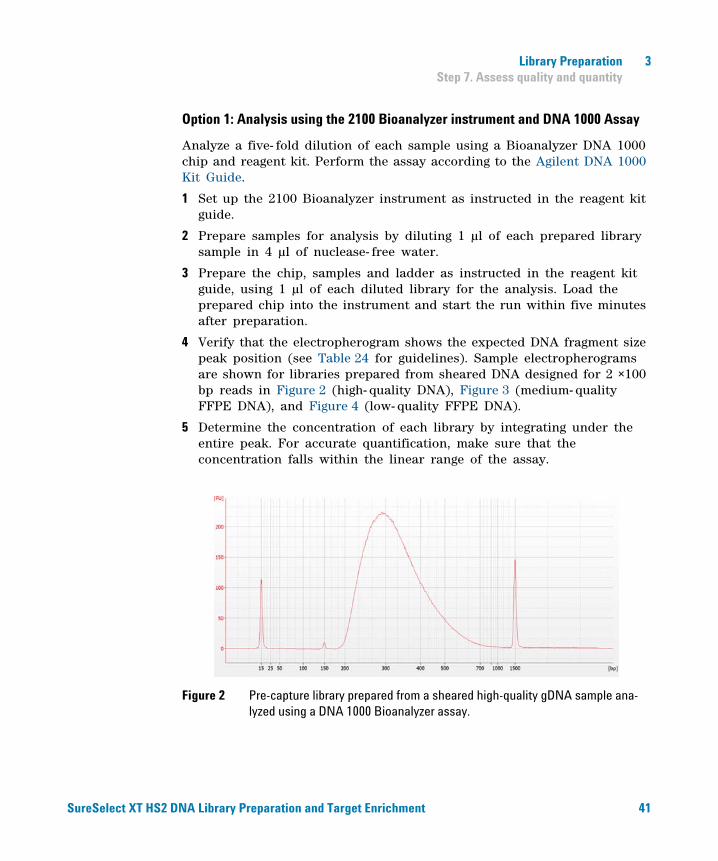
4 Verify that the electropherogram shows the expected DNA fragment size peak position (see Table 24 for guidelines). Sample electropherograms are shown for libraries prepared from sheared DNA designed for 2 ×100 bp reads in Figure 2 (high- quality DNA), Figure 3 (medium- quality FFPE DNA), and Figure 4 (low- quality FFPE DNA).
5 Determine the concentration of each library by integrating under the entire peak. For accurate quantification, make sure that the concentration falls within the linear range of the assay.
Figure 2 Pre-capture library prepared from a sheared high-quality gDNA sample ana-lyzed using a DNA 1000 Bioanalyzer assay.
NA Library Preparation and Target Enrichment 41
3 Library Preparation Step 7. Assess quality and quantity
42
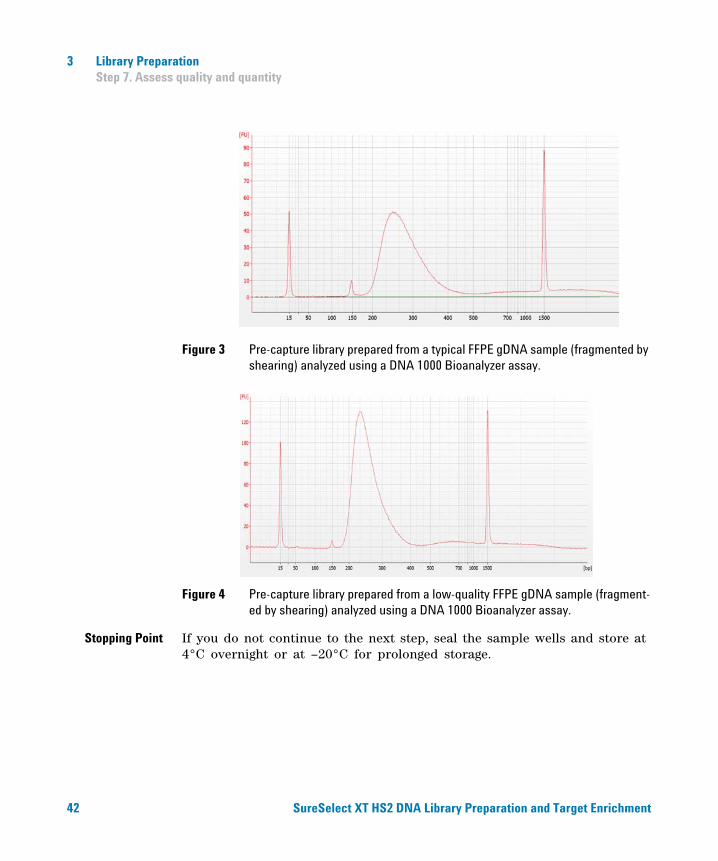
Figure 3 Pre-capture library prepared from a typical FFPE gDNA sample (fragmented by shearing) analyzed using a DNA 1000 Bioanalyzer assay.
Figure 4 Pre-capture library prepared from a low-quality FFPE gDNA sample (fragment-ed by shearing) analyzed using a DNA 1000 Bioanalyzer assay.
Stopping Point
If you do not continue to the next step, seal the sample wells and store at 4°C overnight or at –20°C for prolonged storage.SureSelect XT HS2 DNA Library Preparation and Target Enrichment
Library Preparation 3 Step 7. Assess quality and quantity
SureSelect XT HS2 D
Option 2: Analysis using an Agilent 4200 TapeStation and D1000 ScreenTape
Analyze a five- fold dilution of each sample using a D1000 ScreenTape and associated reagent kit. For more information to do this step, see the Agilent D1000 Assay Quick Guide.
1 Prepare samples for analysis by diluting 1 µl of each prepared library sample in 4 µl of nuclease- free water.
2 Prepare the TapeStation samples as instructed in the reagent kit guide, using 1 µl of each diluted library for the analysis. Combine 1 µl of the diluted DNA sample with 3 µl of D1000 sample buffer, as instructed in the reagent kit guide.
CAUTION Make sure that you thoroughly mix the combined DNA and sample buffer on a vortex mixer for 5 seconds for accurate quantitation.
3 Load the sample plate or tube strips from step 2, the D1000 ScreenTape, and loading tips into the TapeStation as instructed in the reagent kit guide. Start the run.
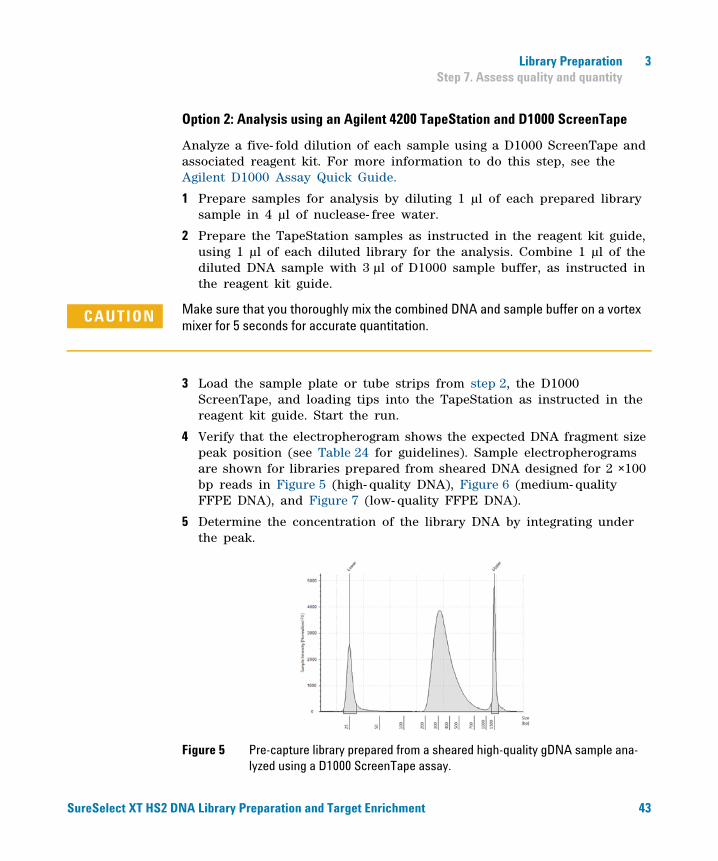
4 Verify that the electropherogram shows the expected DNA fragment size peak position (see Table 24 for guidelines). Sample electropherograms are shown for libraries prepared from sheared DNA designed for 2 ×100 bp reads in Figure 5 (high- quality DNA), Figure 6 (medium- quality FFPE DNA), and Figure 7 (low- quality FFPE DNA).
5 Determine the concentration of the library DNA by integrating under the peak.
Figure 5 Pre-capture library prepared from a sheared high-quality gDNA sample ana-lyzed using a D1000 ScreenTape assay.
NA Library Preparation and Target Enrichment 43

3 Library Preparation Step 7. Assess quality and quantity
44
Figure 6 Pre-capture library prepared from a typical FFPE gDNA sample (fragmented by shearing) analyzed using a D1000 ScreenTape assay.
Figure 7 Pre-capture library prepared from a low-quality FFPE gDNA sample (fragment-ed by shearing) analyzed using a D1000 ScreenTape assay.
Stopping Point
If you do not continue to the next step, seal the sample wells and store at 4°C overnight or at –20°C for prolonged storage.SureSelect XT HS2 DNA Library Preparation and Target Enrichment
SureSelect XT HS2 DNA System Protocol
4Hybridization and Capture
Step 1. Hybridize DNA libraries to the probe 46
Step 2. Prepare streptavidin-coated magnetic beads 51
Step 3. Capture the hybridized DNA using streptavidin-coated beads 52
This chapter describes the steps to hybridize the prepared gDNA libraries with a target- specific Probe (Capture Library). After hybridization, the targeted molecules are captured on streptavidin beads. Each DNA library sample must be hybridized and captured individually.
The standard single- day protocol includes the hybridization step (approximately 90 minutes) immediately followed by capture and amplification steps. If required, the hybridized samples may be held overnight with capture and amplification steps completed the following day by using the simple protocol modifications noted on page 47.
CAUTION The ratio of Probe to prepared gDNA library is critical for successful capture.
45Agilent Technologies
4 Hybridization and Capture Step 1. Hybridize DNA libraries to the probe
Step 1. Hybridize DNA libraries to the probe
46
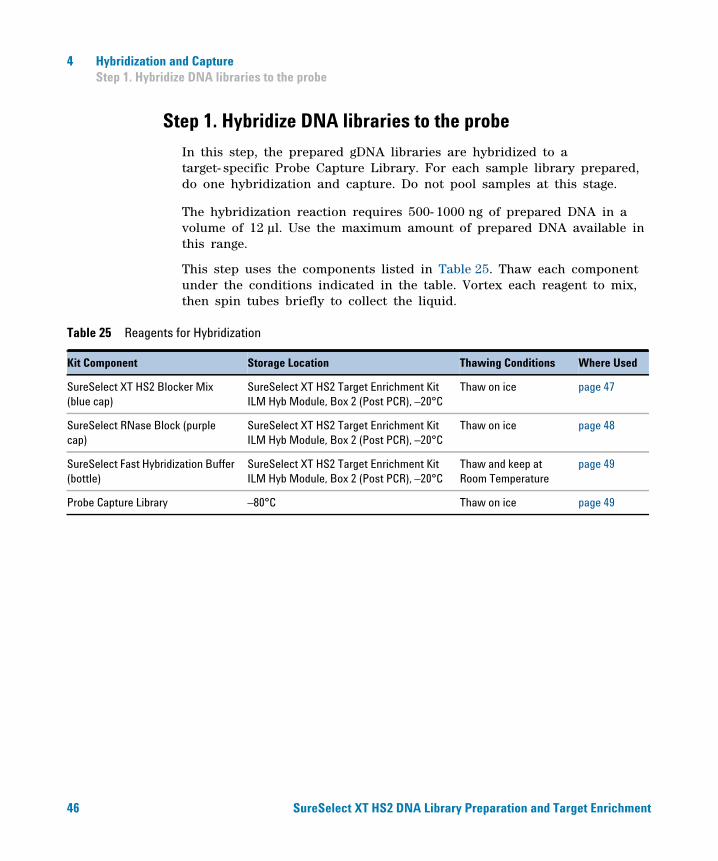
In this step, the prepared gDNA libraries are hybridized to a target- specific Probe Capture Library. For each sample library prepared, do one hybridization and capture. Do not pool samples at this stage.
The hybridization reaction requires 500- 1000 ng of prepared DNA in a volume of 12 µl. Use the maximum amount of prepared DNA available in this range.
This step uses the components listed in Table 25. Thaw each component under the conditions indicated in the table. Vortex each reagent to mix, then spin tubes briefly to collect the liquid.
Table 25 Reagents for Hybridization
Kit Component Storage Location Thawing Conditions Where Used
SureSelect XT HS2 Blocker Mix (blue cap)
SureSelect XT HS2 Target Enrichment Kit ILM Hyb Module, Box 2 (Post PCR), –20°C
Thaw on ice page 47
SureSelect RNase Block (purple cap)
SureSelect XT HS2 Target Enrichment Kit ILM Hyb Module, Box 2 (Post PCR), –20°C
Thaw on ice page 48
SureSelect Fast Hybridization Buffer (bottle)
SureSelect XT HS2 Target Enrichment Kit ILM Hyb Module, Box 2 (Post PCR), –20°C
Thaw and keep at Room Temperature
page 49
Probe Capture Library –80°C Thaw on ice page 49
SureSelect XT HS2 DNA Library Preparation and Target Enrichment
Hybridization and Capture 4 Step 1. Hybridize DNA libraries to the probe
SureSelect XT HS2 D
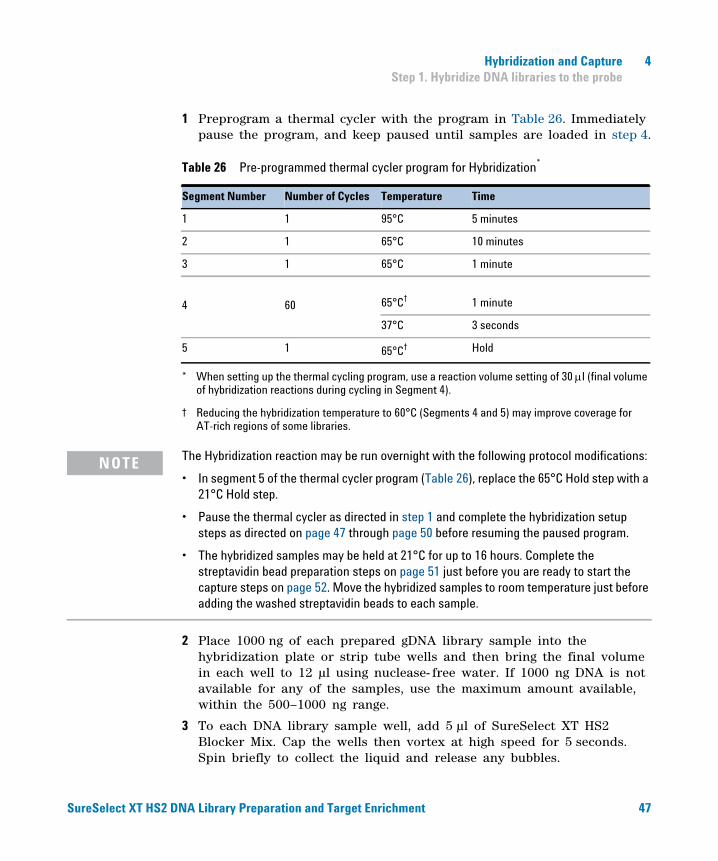
1 Preprogram a thermal cycler with the program in Table 26. Immediately pause the program, and keep paused until samples are loaded in step 4.
Table 26 Pre-programmed thermal cycler program for Hybridization*
* When setting up the thermal cycling program, use a reaction volume setting of 30 l (final volume of hybridization reactions during cycling in Segment 4).
Segment Number Number of Cycles Temperature Time
1 1 95°C 5 minutes
2 1 65°C 10 minutes
3 1 65°C 1 minute
4 60 65°C†
† Reducing the hybridization temperature to 60°C (Segments 4 and 5) may improve coverage for AT-rich regions of some libraries.
1 minute
37°C 3 seconds
5 1 65°C† Hold
The Hybridization reaction may be run overnight with the following protocol modifications:
• In segment 5 of the thermal cycler program (Table 26), replace the 65°C Hold step with a 21°C Hold step.
• Pause the thermal cycler as directed in step 1 and complete the hybridization setup steps as directed on page 47 through page 50 before resuming the paused program.
• The hybridized samples may be held at 21°C for up to 16 hours. Complete the streptavidin bead preparation steps on page 51 just before you are ready to start the capture steps on page 52. Move the hybridized samples to room temperature just before adding the washed streptavidin beads to each sample.
NOTE
2 Place 1000 ng of each prepared gDNA library sample into the hybridization plate or strip tube wells and then bring the final volume in each well to 12 µl using nuclease- free water. If 1000 ng DNA is not available for any of the samples, use the maximum amount available, within the 500–1000 ng range.
3 To each DNA library sample well, add 5 µl of SureSelect XT HS2 Blocker Mix. Cap the wells then vortex at high speed for 5 seconds. Spin briefly to collect the liquid and release any bubbles.
NA Library Preparation and Target Enrichment 47
4 Hybridization and Capture Step 1. Hybridize DNA libraries to the probe
48
CAUTION The lid of the thermal cycler is hot and can cause burns. Use caution when working near the lid.
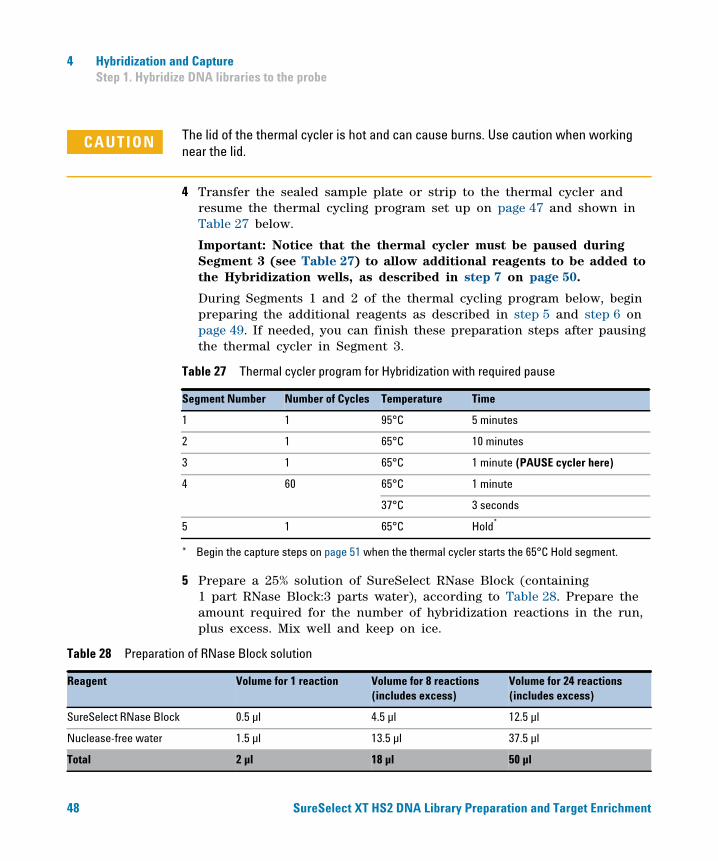
4 Transfer the sealed sample plate or strip to the thermal cycler and resume the thermal cycling program set up on page 47 and shown in Table 27 below.
Important: Notice that the thermal cycler must be paused during Segment 3 (see Table 27) to allow additional reagents to be added to the Hybridization wells, as described in step 7 on page 50.
During Segments 1 and 2 of the thermal cycling program below, begin preparing the additional reagents as described in step 5 and step 6 on page 49. If needed, you can finish these preparation steps after pausing the thermal cycler in Segment 3.
Table 27 Thermal cycler program for Hybridization with required pause
5 Prepare a 25% solution of SureSelect RNase Block (containing 1 part RNase Block:3 parts water), according to Table 28. Prepare the amount required for the number of hybridization reactions in the run, plus excess. Mix well and keep on ice.
Segment Number Number of Cycles Temperature Time
1 1 95°C 5 minutes
2 1 65°C 10 minutes
3 1 65°C 1 minute (PAUSE cycler here)
4 60 65°C 1 minute
37°C 3 seconds
5 1 65°C Hold*
* Begin the capture steps on page 51 when the thermal cycler starts the 65°C Hold segment.
Table 28 Preparation of RNase Block solution
Reagent Volume for 1 reaction Volume for 8 reactions (includes excess)
Volume for 24 reactions (includes excess)
SureSelect RNase Block 0.5 µl 4.5 µl 12.5 µl
Nuclease-free water 1.5 µl 13.5 µl 37.5 µl
Total 2 µl 18 µl 50 µl
SureSelect XT HS2 DNA Library Preparation and Target Enrichment
Hybridization and Capture 4 Step 1. Hybridize DNA libraries to the probe
SureSelect XT HS2 D
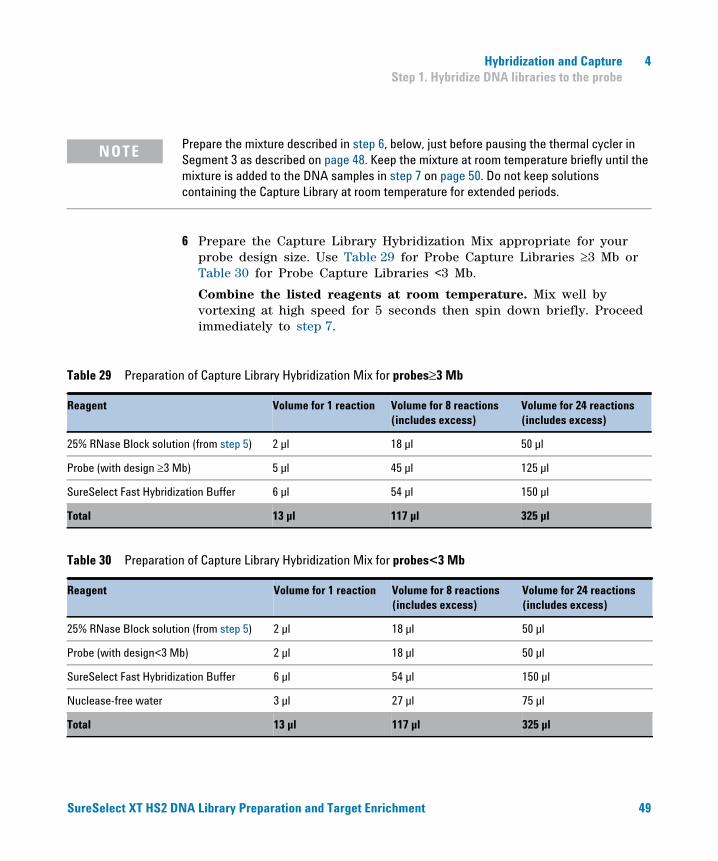
NOTE Prepare the mixture described in step 6, below, just before pausing the thermal cycler in Segment 3 as described on page 48. Keep the mixture at room temperature briefly until the mixture is added to the DNA samples in step 7 on page 50. Do not keep solutions containing the Capture Library at room temperature for extended periods.
6 Prepare the Capture Library Hybridization Mix appropriate for your probe design size. Use Table 29 for Probe Capture Libraries 3 Mb or Table 30 for Probe Capture Libraries <3 Mb.
Combine the listed reagents at room temperature. Mix well by vortexing at high speed for 5 seconds then spin down briefly. Proceed immediately to step 7.
Table 29 Preparation of Capture Library Hybridization Mix for probes≥3 Mb
Table 30 Preparation of Capture Library Hybridization Mix for probes<3 Mb
Reagent Volume for 1 reaction Volume for 8 reactions(includes excess)
Volume for 24 reactions(includes excess)
25% RNase Block solution (from step 5) 2 µl 18 µl 50 µl
Probe (with design 3 Mb) 5 µl 45 µl 125 µl
SureSelect Fast Hybridization Buffer 6 µl 54 µl 150 µl
Total 13 µl 117 µl 325 µl
Reagent Volume for 1 reaction Volume for 8 reactions(includes excess)
Volume for 24 reactions(includes excess)
25% RNase Block solution (from step 5) 2 µl 18 µl 50 µl
Probe (with design<3 Mb) 2 µl 18 µl 50 µl
SureSelect Fast Hybridization Buffer 6 µl 54 µl 150 µl
Nuclease-free water 3 µl 27 µl 75 µl
Total 13 µl 117 µl 325 µl
NA Library Preparation and Target Enrichment 49
4 Hybridization and Capture Step 1. Hybridize DNA libraries to the probe
50
7 Once the thermal cycler starts Segment 3 of the program in Table 27 (1 minute at 65°C), press the Pause button. With the cycler paused, and while keeping the DNA + Blocker samples in the cycler, transfer 13 µl of the room- temperature Capture Library Hybridization Mix from step 6 to each sample well.
Mix well by pipetting up and down slowly 8 to 10 times.
The hybridization reaction wells now contain approximately 30 µl.
8 Seal the wells with fresh domed strip caps. Make sure that all wells are completely sealed. Vortex briefly, then spin the plate or strip tube briefly to remove any bubbles from the bottom of the wells. Immediately return the plate or strip tube to the thermal cycler.
9 Press the Play button to resume the thermal cycling program to allow hybridization of the prepared DNA samples to the Probe Capture Library.
CAUTION Wells must be adequately sealed to minimize evaporation, or your results can be negatively impacted.
Before you do the first experiment, make sure the plasticware and capping method are appropriate for the thermal cycler. Check that no more than 4 µl is lost to evaporation under the conditions used for hybridization.
SureSelect XT HS2 DNA Library Preparation and Target Enrichment
Hybridization and Capture 4 Step 2. Prepare streptavidin-coated magnetic beads
Step 2. Prepare streptavidin-coated magnetic beads
SureSelect XT HS2 D
The remaining hybridization capture steps use the components listed in Table 31.
Begin the bead preparation steps described below approximately one hour after starting hybridization in step 9 on page 50.
Table 31 Reagents for Capture
Kit Component Storage Location Where Used
SureSelect Binding Buffer SureSelect Target Enrichment Kit, ILM Hyb Module, Box 1 (Post PCR), RT
page 51
SureSelect Wash Buffer 1 SureSelect Target Enrichment Kit, ILM Hyb Module, Box 1 (Post PCR), RT
page 52
SureSelect Wash Buffer 2 SureSelect Target Enrichment Kit, ILM Hyb Module, Box 1 (Post PCR), RT
page 52
SureSelect Streptavidin BeadsORDynabeads MyOne Streptavidin T1 Beads
4°C page 51
1 Vigorously resuspend the vial of streptavidin beads on a vortex mixer. The magnetic beads settle during storage.
2 For each hybridization sample, add 50 µl of the resuspended beads to wells of a fresh PCR plate or strip tube.
3 Wash the beads:
a Add 200 µl of SureSelect Binding Buffer.
b Mix by pipetting up and down 20 times or cap the wells and vortex at high speed for 5–10 seconds then spin down briefly.
c Put the plate or strip tube into a magnetic separator device.
d Wait 5 minutes or until the solution is clear, then remove and discard the supernatant.
e Repeat step a through step d two more times for a total of 3 washes.
4 Resuspend the beads in 200 µl of SureSelect Binding Buffer.
If you are equipped for higher-volume magnetic bead captures, the streptavidin beads may instead be batch-washed in an Eppendorf tube or conical vial.
NOTE
NA Library Preparation and Target Enrichment 51
4 Hybridization and Capture Step 3. Capture the hybridized DNA using streptavidin-coated beads
Step 3. Capture the hybridized DNA using streptavidin-coated beads
52
1 After the hybridization step is complete and the thermal cycler reaches the 65°C hold step (Segment 5; see Table 27 on page 48), transfer the samples to room temperature.
2 Immediately transfer the entire volume (approximately 30 µl) of each hybridization mixture to wells containing 200 µl of washed streptavidin beads using a multichannel pipette.
Pipette up and down 5–8 times to mix then seal the wells with fresh caps.
3 Incubate the capture plate or strip tube on a 96- well plate mixer, mixing vigorously (at 1400–1900 rpm), for 30 minutes at room temperature.
Make sure the samples are properly mixing in the wells.
4 During the 30- minute incubation for capture, prewarm SureSelect Wash Buffer 2 at 70°C as described below.
a Place 200- µl aliquots of Wash Buffer 2 in wells of a fresh 96- well plate or strip tubes. Aliquot 6 wells of buffer for each DNA sample in the run.
b Cap the wells and then incubate in the thermal cycler held at 70°C until used in step 9.
5 When the 30- minute capture incubation period initiated in step 3 is complete, spin the samples briefly to collect the liquid.
6 Put the plate or strip tube in a magnetic separator to collect the beads. Wait until the solution is clear, then remove and discard the supernatant.
7 Resuspend the beads in 200 µl of SureSelect Wash Buffer 1. Mix by pipetting up and down 15–20 times, until beads are fully resuspended.
8 Put the plate or strip tube in the magnetic separator. Wait for the solution to clear (approximately 1 minute), then remove and discard the supernatant.
SureSelect XT HS2 DNA Library Preparation and Target Enrichment
Hybridization and Capture 4 Step 3. Capture the hybridized DNA using streptavidin-coated beads
SureSelect XT HS2 D
CAUTION It is important to maintain bead suspensions at 70°C during the washing procedure below to ensure specificity of capture.
Make sure that the SureSelect Wash Buffer 2 is pre-warmed to 70°C before use.
Do not use a tissue incubator, or other devices with significant temperature fluctuations, for the incubation steps.
9 Remove the plate or strip tubes from the magnetic separator and transfer to a rack at room temperature. Wash the beads with Wash Buffer 2, using the protocol steps below.
a Resuspend the beads in 200 µl of 70°C prewarmed Wash Buffer 2. Pipette up and down 15–20 times, until beads are fully resuspended.
b Seal the wells with fresh caps and then vortex at high speed for 8 seconds. Spin the plate or strip tube briefly to collect the liquid without pelleting the beads.
Make sure the beads are in suspension before proceeding.
c Incubate the samples for 5 minutes at 70°C on the thermal cycler with the heated lid on.
d Put the plate or strip tube in the magnetic separator at room temperature.
e Wait 1 minute for the solution to clear, then remove and discard the supernatant.
f Repeat step a through step e five more times for a total of 6 washes.
10 After verifying that all wash buffer has been removed, add 25 µl of nuclease- free water to each sample well. Pipette up and down 8 times to resuspend the beads.
Keep the samples on ice until they are used on page 58.
Captured DNA is retained on the streptavidin beads during the post-capture amplification step.
NOTE
NA Library Preparation and Target Enrichment 53

4 Hybridization and Capture Step 3. Capture the hybridized DNA using streptavidin-coated beads
54 SureSelect XT HS2 DNA Library Preparation and Target Enrichment
SureSelect XT HS2 DNA System Protocol
5Post-Capture Sample Processing for Multiplexed Sequencing
Step 1. Amplify the captured libraries 56
Step 2. Purify the amplified captured libraries using AMPure XP beads 59
Step 3. Assess sequencing library DNA quantity and quality 61
Step 4. Pool samples for multiplexed sequencing 66
Step 5. Prepare sequencing samples 68
Step 6. Do the sequencing run and analyze the data 70
This chapter describes the steps to amplify, purify, and assess quality and quantity of the captured libraries. Sample pooling instructions are provided to prepare the indexed, molecular barcoded samples for multiplexed sequencing. Sequencing run setup and sequencing data analysis steps will vary according to your NGS platform and data analysis pipeline; guidelines for these downstream steps are also provided in this chapter.
55Agilent Technologies
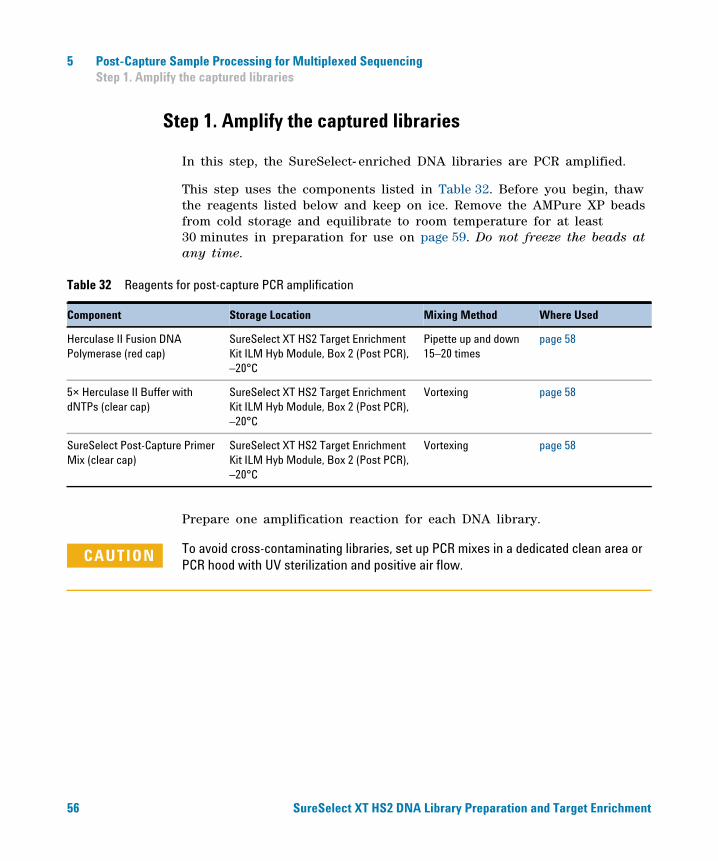
5 Post-Capture Sample Processing for Multiplexed Sequencing Step 1. Amplify the captured libraries
Step 1. Amplify the captured libraries
56
In this step, the SureSelect- enriched DNA libraries are PCR amplified.
This step uses the components listed in Table 32. Before you begin, thaw the reagents listed below and keep on ice. Remove the AMPure XP beads from cold storage and equilibrate to room temperature for at least 30 minutes in preparation for use on page 59. Do not freeze the beads at any time.
Table 32 Reagents for post-capture PCR amplification
Component Storage Location Mixing Method Where Used
Herculase II Fusion DNA Polymerase (red cap)
SureSelect XT HS2 Target Enrichment Kit ILM Hyb Module, Box 2 (Post PCR), –20°C
Pipette up and down 15–20 times
page 58
5× Herculase II Buffer with dNTPs (clear cap)
SureSelect XT HS2 Target Enrichment Kit ILM Hyb Module, Box 2 (Post PCR), –20°C
Vortexing page 58
SureSelect Post-Capture Primer Mix (clear cap)
SureSelect XT HS2 Target Enrichment Kit ILM Hyb Module, Box 2 (Post PCR), –20°C
Vortexing page 58
Prepare one amplification reaction for each DNA library.
CAUTION To avoid cross-contaminating libraries, set up PCR mixes in a dedicated clean area or PCR hood with UV sterilization and positive air flow.
SureSelect XT HS2 DNA Library Preparation and Target Enrichment
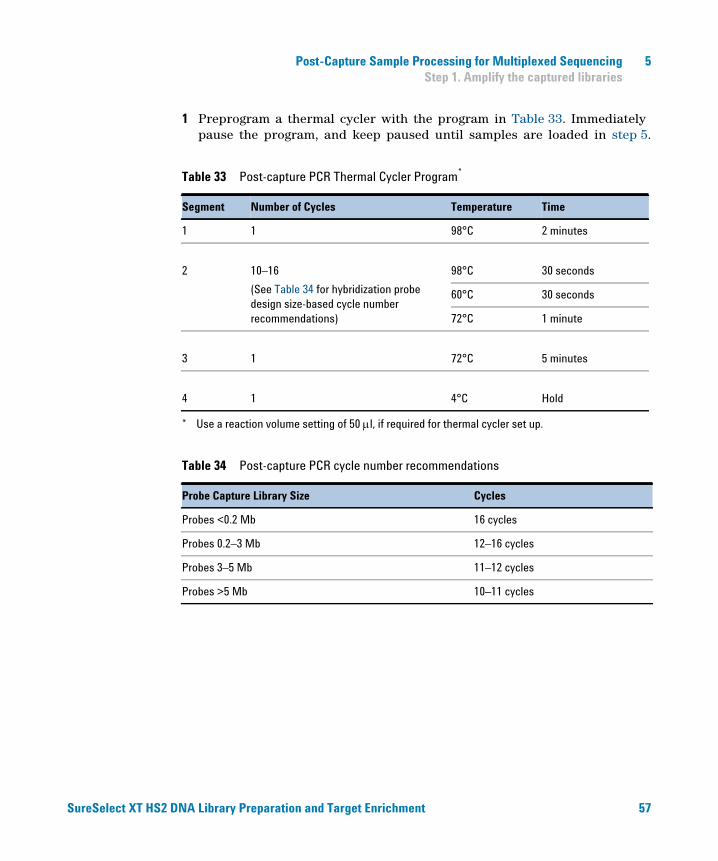
Post-Capture Sample Processing for Multiplexed Sequencing 5 Step 1. Amplify the captured libraries
SureSelect XT HS2 D
1 Preprogram a thermal cycler with the program in Table 33. Immediately pause the program, and keep paused until samples are loaded in step 5.
Table 33 Post-capture PCR Thermal Cycler Program*
* Use a reaction volume setting of 50 l, if required for thermal cycler set up.
Segment Number of Cycles Temperature Time
1 1 98°C 2 minutes
2 10–16
(See Table 34 for hybridization probe design size-based cycle number recommendations)
98°C 30 seconds
60°C 30 seconds
72°C 1 minute
3 1 72°C 5 minutes
4 1 4°C Hold
Table 34 Post-capture PCR cycle number recommendations
Probe Capture Library Size Cycles
Probes <0.2 Mb 16 cycles
Probes 0.2–3 Mb 12–16 cycles
Probes 3–5 Mb 11–12 cycles
Probes >5 Mb 10–11 cycles
NA Library Preparation and Target Enrichment 57

5 Post-Capture Sample Processing for Multiplexed Sequencing Step 1. Amplify the captured libraries
58
2 Prepare the appropriate volume of PCR reaction mix, as described in Table 35, on ice. Mix well on a vortex mixer.
Table 35 Preparation of post-capture PCR Reaction mix
Reagent Volume for 1 reaction Volume for 8 reactions(includes excess)
Volume for 24 reactions(includes excess)
Nuclease-free water 13 µl 117 µl 325 µl
5× Herculase II Buffer with dNTPs (clear cap) 10 µl 90 µl 250 µl
Herculase II Fusion DNA Polymerase (red cap) 1 µl 9 µl 25 µl
SureSelect Post-Capture Primer Mix (clear cap) 1 µl 9 µl 25 µl
Total 25 µl 225 µl 625 µl
3 Add 25 µl of the PCR reaction mix prepared in Table 35 to each sample well containing 25 µl of bead- bound target- enriched DNA (prepared on page 53 and held on ice).
4 Mix the PCR reactions well by pipetting up and down until the bead suspension is homogeneous. Avoid splashing samples onto well walls; do not spin the samples at this step.
5 Place the plate or strip tube in the thermal cycler and resume the thermal cycling program in Table 33.
6 When the PCR amplification program is complete, spin the plate or strip tube briefly. Remove the streptavidin- coated beads by placing the plate or strip tube on the magnetic stand at room temperature. Wait 2 minutes for the solution to clear, then remove each supernatant (approximately 50 µl) to wells of a fresh plate or strip tube.
The beads can be discarded at this time.
SureSelect XT HS2 DNA Library Preparation and Target Enrichment
Post-Capture Sample Processing for Multiplexed Sequencing 5 Step 2. Purify the amplified captured libraries using AMPure XP beads
Step 2. Purify the amplified captured libraries using AMPure XP beads
SureSelect XT HS2 D
1 Verify that the AMPure XP beads were held at room temperature for at least 30 minutes before use.
2 Prepare 400 µl of fresh 70% ethanol per sample, plus excess, for use in step 8.
3 Mix the AMPure XP bead suspension well so that the suspension appears homogeneous and consistent in color.
4 Add 50 µl of the homogeneous AMPure XP bead suspension to each amplified DNA sample (approximately 50 µl) in the PCR plate or strip tube. Mix well by pipetting up and down 15–20 times or cap the wells and vortex at high speed for 5–10 seconds.
Check that the beads are in a homogeneous suspension in the sample wells. Each well should have a uniform color with no layers of beads or clear liquid present.
5 Incubate samples for 5 minutes at room temperature.
6 Put the plate or strip tube on the magnetic stand at room temperature. Wait for the solution to clear (approximately 3 to 5 minutes).
7 Keep the plate or tubes in the magnetic stand. Carefully remove and discard the cleared solution from each well. Do not disturb the beads while removing the solution.
8 Continue to keep the plate or tubes in the magnetic stand while you dispense 200 µl of freshly- prepared 70% ethanol in each sample well.
9 Wait for 1 minute to allow any disturbed beads to settle, then remove the ethanol.
10 Repeat step 8 and step 9 once for a total of two washes. Make sure to remove all of the ethanol at each wash step.
11 Seal the wells with strip caps, then briefly spin to collect the residual ethanol. Return the plate or strip tube to the magnetic stand for 30 seconds. Remove the residual ethanol with a P20 pipette.
12 Dry the samples by placing the unsealed plate or strip tube on the thermal cycler, set to hold samples at 37°C, until the residual ethanol has just evaporated (typically 1–2 minutes).
13 Add 25 µl of Low TE to each sample well.
NA Library Preparation and Target Enrichment 59
5 Post-Capture Sample Processing for Multiplexed Sequencing Step 2. Purify the amplified captured libraries using AMPure XP beads
60
14 Seal the sample wells with strip caps, then mix well on a vortex mixer and briefly spin to collect the liquid without pelleting the beads.
15 Incubate for 2 minutes at room temperature.
16 Put the plate or strip tube in the magnetic stand and leave for 2 minutes or until the solution is clear.
17 Remove the cleared supernatant (approximately 25 µl) to a fresh well. You can discard the beads at this time.
SureSelect XT HS2 DNA Library Preparation and Target Enrichment
Post-Capture Sample Processing for Multiplexed Sequencing 5 Step 3. Assess sequencing library DNA quantity and quality
Step 3. Assess sequencing library DNA quantity and quality
SureSelect XT HS2 D
Sample analysis can be done with either the 2100 Bioanalyzer instrument or an Agilent TapeStation instrument. See Table 36 below for fragment size distribution guidelines for various sample types. Example electropherograms are provided for selected sample types.
Table 36 Post-capture library qualification guidelines
NGS read length for fragmentationprotocol selection
Input DNA type Expected DNA fragment size peak position
2 ×100 reads Intact DNA 200 to 400 bp (see Figure 8 or Figure 11 for sample electropherograms)
FFPE DNA 200 to 400 bp (see Figure 9 and Figure 10 or Figure 12 and Figure 13 for sample electropherograms)
2 ×150 reads Intact DNA 230 to 450 bp
FFPE DNA 200 to 450 bp
Option 1: Analysis using the Agilent 2100 Bioanalyzer instrument and High Sensitivity DNA Assay
Use the Bioanalyzer High Sensitivity DNA Assay to analyze the amplified target- enriched DNA. Perform the assay according to the High Sensitivity DNA Kit Guide.
1 Set up the 2100 Bioanalyzer instrument as instructed in the reagent kit guide.
2 Prepare the chip, samples and ladder as instructed in the reagent kit guide, using 1 µl of each sample for the analysis.
3 Load the prepared chip into the instrument and start the run within five minutes after preparation.
4 Verify that the electropherogram shows the expected DNA fragment size peak position (see Table 36 for guidelines). Sample electropherograms are shown for libraries prepared from sheared DNA designed for 2 ×100 bp reads in Figure 8 (high- quality DNA), Figure 9 (medium- quality FFPE DNA), and Figure 10 (low- quality FFPE DNA).
5 Measure the concentration of each library by integrating under the entire peak. For accurate quantification, make sure that the concentration falls within the linear range of the assay.
NA Library Preparation and Target Enrichment 61
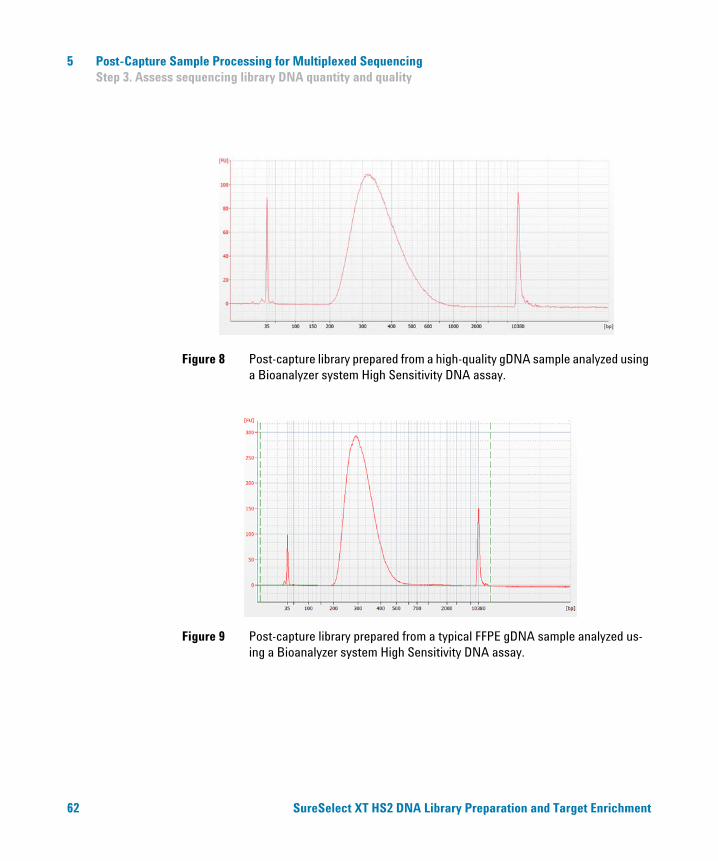
5 Post-Capture Sample Processing for Multiplexed Sequencing Step 3. Assess sequencing library DNA quantity and quality
62
Figure 8 Post-capture library prepared from a high-quality gDNA sample analyzed using a Bioanalyzer system High Sensitivity DNA assay.
Figure 9 Post-capture library prepared from a typical FFPE gDNA sample analyzed us-ing a Bioanalyzer system High Sensitivity DNA assay.
SureSelect XT HS2 DNA Library Preparation and Target Enrichment
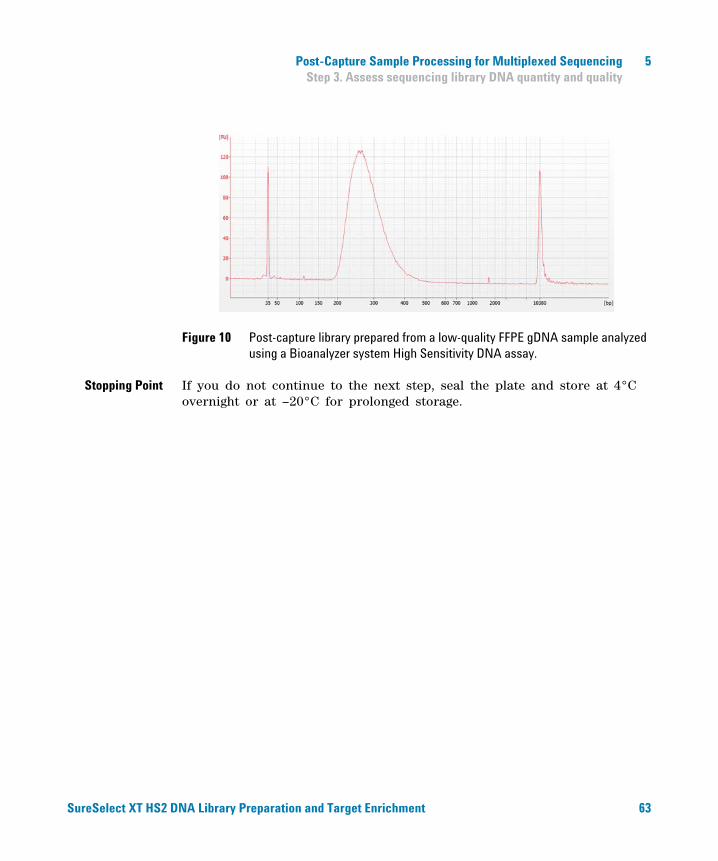
Post-Capture Sample Processing for Multiplexed Sequencing 5 Step 3. Assess sequencing library DNA quantity and quality
SureSelect XT HS2 D
Figure 10 Post-capture library prepared from a low-quality FFPE gDNA sample analyzed using a Bioanalyzer system High Sensitivity DNA assay.
Stopping Point
If you do not continue to the next step, seal the plate and store at 4°C overnight or at –20°C for prolonged storage.NA Library Preparation and Target Enrichment 63
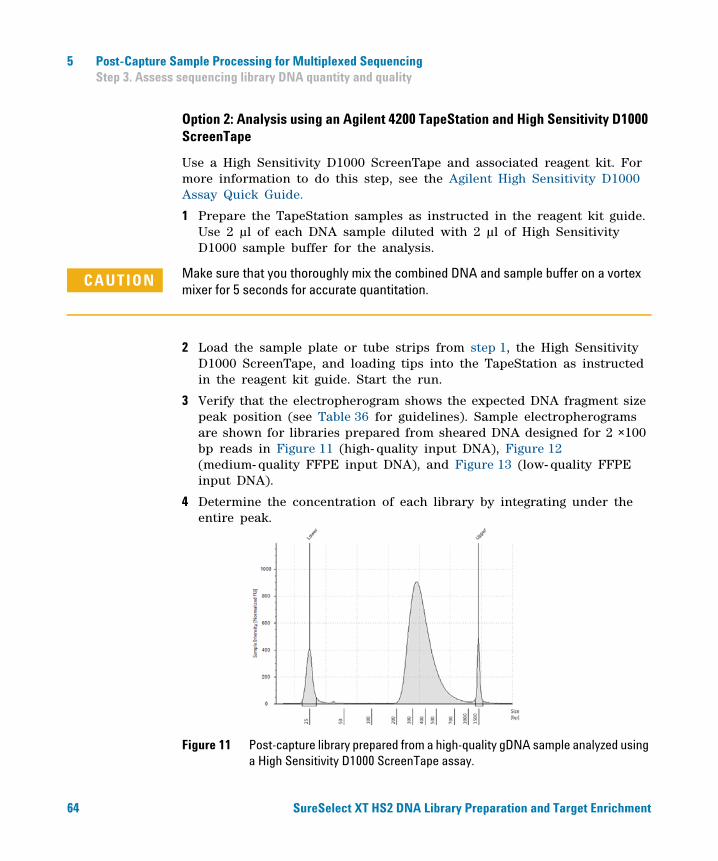
5 Post-Capture Sample Processing for Multiplexed Sequencing Step 3. Assess sequencing library DNA quantity and quality
64
Option 2: Analysis using an Agilent 4200 TapeStation and High Sensitivity D1000 ScreenTape
Use a High Sensitivity D1000 ScreenTape and associated reagent kit. For more information to do this step, see the Agilent High Sensitivity D1000 Assay Quick Guide.
1 Prepare the TapeStation samples as instructed in the reagent kit guide. Use 2 µl of each DNA sample diluted with 2 µl of High Sensitivity D1000 sample buffer for the analysis.
CAUTION Make sure that you thoroughly mix the combined DNA and sample buffer on a vortex mixer for 5 seconds for accurate quantitation.
2 Load the sample plate or tube strips from step 1, the High Sensitivity D1000 ScreenTape, and loading tips into the TapeStation as instructed in the reagent kit guide. Start the run.
3 Verify that the electropherogram shows the expected DNA fragment size peak position (see Table 36 for guidelines). Sample electropherograms are shown for libraries prepared from sheared DNA designed for 2 ×100 bp reads in Figure 11 (high- quality input DNA), Figure 12 (medium- quality FFPE input DNA), and Figure 13 (low- quality FFPE input DNA).
4 Determine the concentration of each library by integrating under the entire peak.
Figure 11 Post-capture library prepared from a high-quality gDNA sample analyzed using a High Sensitivity D1000 ScreenTape assay.
SureSelect XT HS2 DNA Library Preparation and Target Enrichment
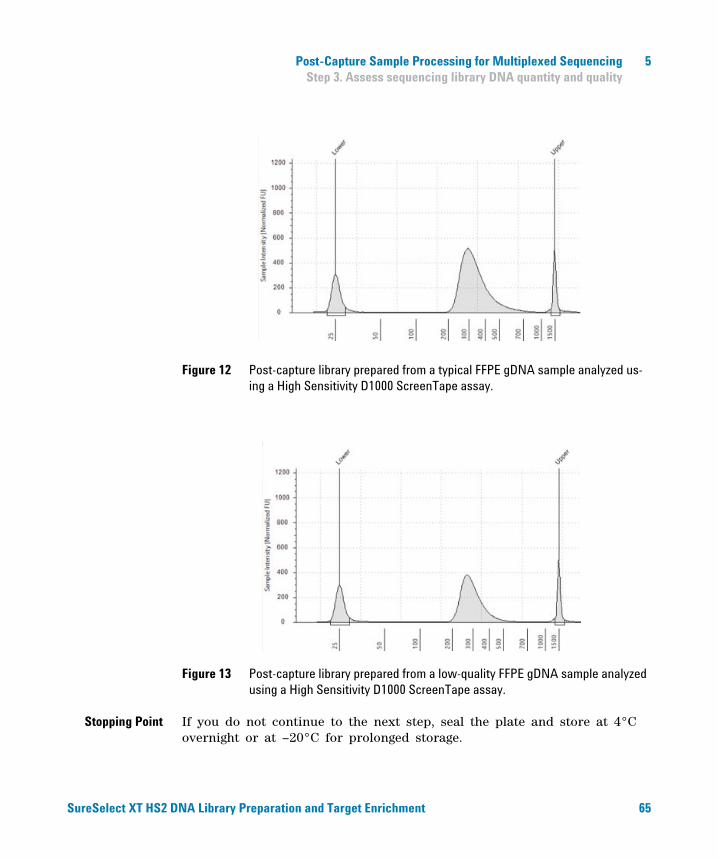
Post-Capture Sample Processing for Multiplexed Sequencing 5 Step 3. Assess sequencing library DNA quantity and quality
SureSelect XT HS2 D
Figure 12 Post-capture library prepared from a typical FFPE gDNA sample analyzed us-ing a High Sensitivity D1000 ScreenTape assay.
Figure 13 Post-capture library prepared from a low-quality FFPE gDNA sample analyzed using a High Sensitivity D1000 ScreenTape assay.
Stopping Point
If you do not continue to the next step, seal the plate and store at 4°C overnight or at –20°C for prolonged storage.NA Library Preparation and Target Enrichment 65
5 Post-Capture Sample Processing for Multiplexed Sequencing Step 4. Pool samples for multiplexed sequencing
Step 4. Pool samples for multiplexed sequencing
66
Volume of Index V f C f # C i
---------------------------------=
The number of indexed libraries that may be multiplexed in a single sequencing lane is determined by the output specifications of the platform used, together with the amount of sequencing data required for your research design. Calculate the number of indexes that can be combined per lane, according to the capacity of your platform and the amount of sequencing data required per sample.
Combine the libraries such that each index- tagged sample is present in equimolar amounts in the pool using one of the following methods:
Method 1: Dilute each sample to be pooled to the same final concentration (typically 4 nM–15 nM, or the concentration of the most dilute sample) using Low TE, then combine equal volumes of all samples to create the final pool.
Method 2: Starting with samples at different concentrations, add the appropriate volume of each sample to achieve equimolar concentration in the pool, then adjust the pool to the desired final volume using Low TE. The formula below is provided for determination of the amount of each indexed sample to add to the pool.
where V(f) is the final desired volume of the pool,
C(f) is the desired final concentration of all the DNA in the pool (typically 4 nM–15 nM or the concentration of the most dilute sample)
# is the number of indexes, and
C(i) is the initial concentration of each indexed sample
Table 37 shows an example of the amount of 4 index- tagged samples (of different concentrations) and Low TE needed for a final volume of 20 µl at 10 nM DNA.
SureSelect XT HS2 DNA Library Preparation and Target Enrichment
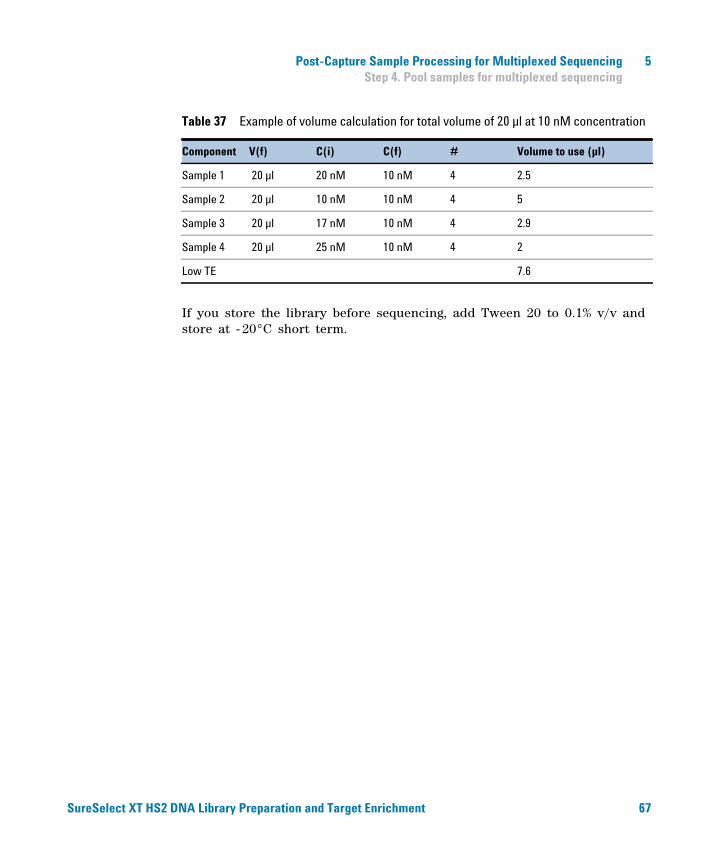
Post-Capture Sample Processing for Multiplexed Sequencing 5 Step 4. Pool samples for multiplexed sequencing
SureSelect XT HS2 D
If you store the library before sequencing, add Tween 20 to 0.1% v/v and store at - 20°C short term.
Table 37 Example of volume calculation for total volume of 20 µl at 10 nM concentration
Component V(f) C(i) C(f) # Volume to use (µl)
Sample 1 20 µl 20 nM 10 nM 4 2.5
Sample 2 20 µl 10 nM 10 nM 4 5
Sample 3 20 µl 17 nM 10 nM 4 2.9
Sample 4 20 µl 25 nM 10 nM 4 2
Low TE 7.6
NA Library Preparation and Target Enrichment 67
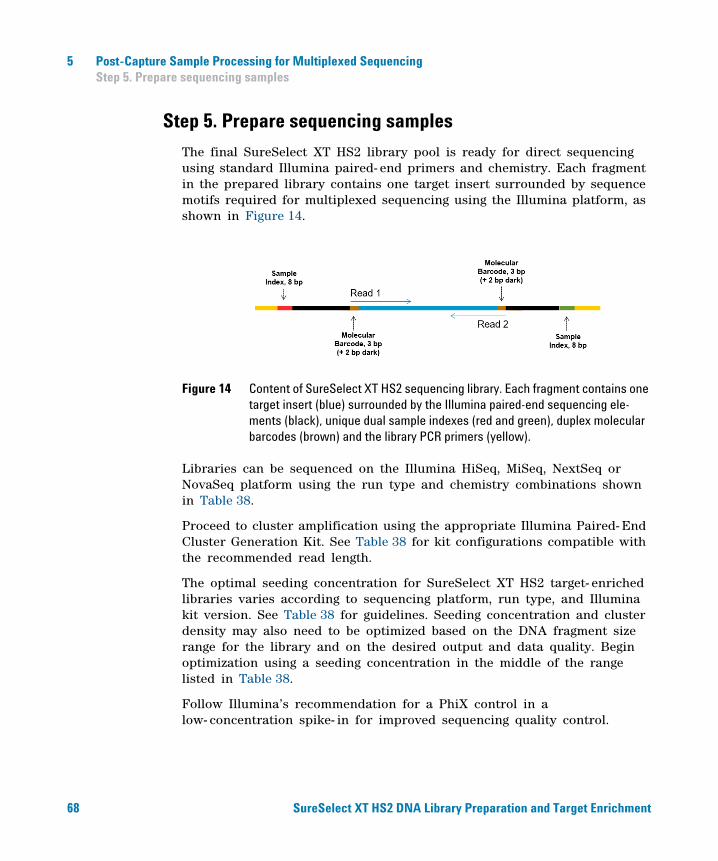
5 Post-Capture Sample Processing for Multiplexed Sequencing Step 5. Prepare sequencing samples
Step 5. Prepare sequencing samples
68
The final SureSelect XT HS2 library pool is ready for direct sequencing using standard Illumina paired- end primers and chemistry. Each fragment in the prepared library contains one target insert surrounded by sequence motifs required for multiplexed sequencing using the Illumina platform, as shown in Figure 14.
Figure 14 Content of SureSelect XT HS2 sequencing library. Each fragment contains one target insert (blue) surrounded by the Illumina paired-end sequencing ele-ments (black), unique dual sample indexes (red and green), duplex molecular barcodes (brown) and the library PCR primers (yellow).
Libraries can be sequenced on the Illumina HiSeq, MiSeq, NextSeq or NovaSeq platform using the run type and chemistry combinations shown in Table 38.
Proceed to cluster amplification using the appropriate Illumina Paired- End Cluster Generation Kit. See Table 38 for kit configurations compatible with the recommended read length.
The optimal seeding concentration for SureSelect XT HS2 target- enriched libraries varies according to sequencing platform, run type, and Illumina kit version. See Table 38 for guidelines. Seeding concentration and cluster density may also need to be optimized based on the DNA fragment size range for the library and on the desired output and data quality. Begin optimization using a seeding concentration in the middle of the range listed in Table 38.
Follow Illumina’s recommendation for a PhiX control in a low- concentration spike- in for improved sequencing quality control.
SureSelect XT HS2 DNA Library Preparation and Target Enrichment
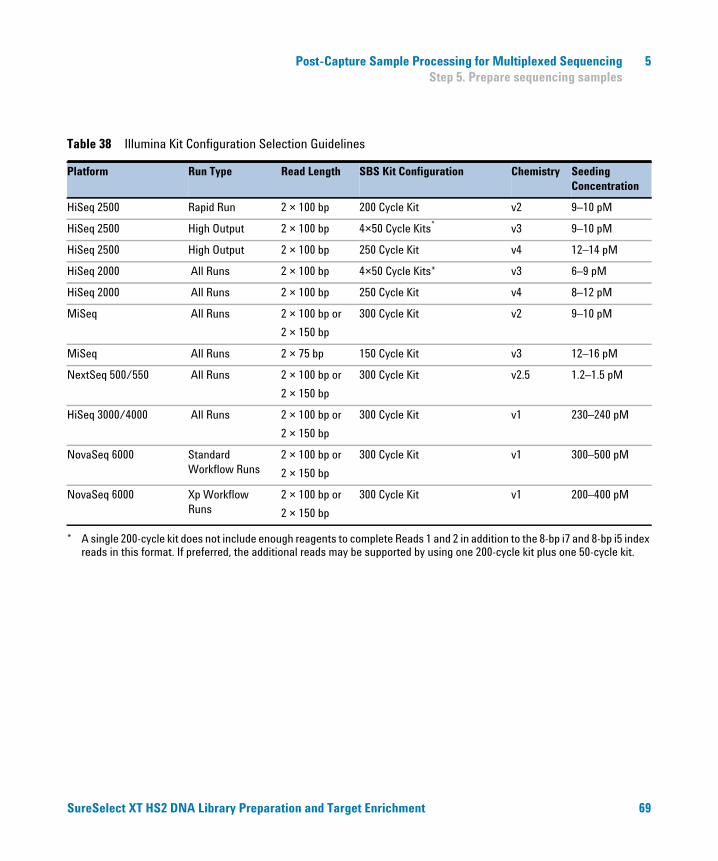
Post-Capture Sample Processing for Multiplexed Sequencing 5 Step 5. Prepare sequencing samples
SureSelect XT HS2 D
Table 38 Illumina Kit Configuration Selection Guidelines
Platform Run Type Read Length SBS Kit Configuration Chemistry Seeding Concentration
HiSeq 2500 Rapid Run 2 × 100 bp 200 Cycle Kit v2 9–10 pM
HiSeq 2500 High Output 2 × 100 bp 4×50 Cycle Kits* v3 9–10 pM
HiSeq 2500 High Output 2 × 100 bp 250 Cycle Kit v4 12–14 pM
HiSeq 2000 All Runs 2 × 100 bp 4×50 Cycle Kits* v3 6–9 pM
HiSeq 2000 All Runs 2 × 100 bp 250 Cycle Kit v4 8–12 pM
MiSeq All Runs 2 × 100 bp or
2 × 150 bp
300 Cycle Kit v2 9–10 pM
MiSeq All Runs 2 × 75 bp 150 Cycle Kit v3 12–16 pM
NextSeq 500/550 All Runs 2 × 100 bp or
2 × 150 bp
300 Cycle Kit v2.5 1.2–1.5 pM
HiSeq 3000/4000 All Runs 2 × 100 bp or
2 × 150 bp
300 Cycle Kit v1 230–240 pM
NovaSeq 6000 Standard Workflow Runs
2 × 100 bp or
2 × 150 bp
300 Cycle Kit v1 300–500 pM
NovaSeq 6000 Xp Workflow Runs
2 × 100 bp or
2 × 150 bp
300 Cycle Kit v1 200–400 pM
* A single 200-cycle kit does not include enough reagents to complete Reads 1 and 2 in addition to the 8-bp i7 and 8-bp i5 index reads in this format. If preferred, the additional reads may be supported by using one 200-cycle kit plus one 50-cycle kit.
NA Library Preparation and Target Enrichment 69
5 Post-Capture Sample Processing for Multiplexed Sequencing Step 6. Do the sequencing run and analyze the data
Step 6. Do the sequencing run and analyze the data
70
The guidelines below provide an overview of SureSelect XT HS2 library sequencing run setup and analysis considerations. Links are provided for additional details for various NGS platforms and analysis pipeline options.
• Each of the sample- level indexes requires an 8- bp index read. For complete index sequence information, see Table 52 on page 88 through Table 59 on page 95.
• For the HiSeq, NextSeq, and NovaSeq platforms, set up the run using the instrument’s user interface, following the guidelines on page 71.
• For the MiSeq platform, set up the run using Illumina Experiment Manager (IEM) using the steps detailed on page 71 to page 74 to generate a custom sample sheet.
• Demultiplex using Illumina’s bcl2fastq software to generate paired end reads based on the dual indexes and remove sequences with incorrectly paired P5 and P7 indexes.
• The duplex degenerate molecular barcodes (MBCs) in the library fragments are located in the first three bases of Read 1 and Read 2. Each MBC is immediately followed by two dark bases. If your sequence analysis pipeline includes MBC analysis, molecular barcode extraction may be performed using the Agilent Genomics NextGen Toolkit (AGeNT). See page 75 for more information. If your sequence analysis pipeline excludes MBCs, trim or mask the first five bases from each read before alignment as described in the Note on page 75.
• Before aligning reads to the reference genome, Illumina adaptor sequences should be trimmed from the reads using Agilent’s AGeNT trimmer module, which properly accounts for the degenerate MBCs in the adaptor sequence. See page 75 for more information. Do not use the adaptor trimming options in Illumina Experiment Manager (IEM). Make sure any IEM adaptor trimming option checkboxes are cleared (deselected) when setting up the sequencing run.
SureSelect XT HS2 DNA Library Preparation and Target Enrichment
Post-Capture Sample Processing for Multiplexed Sequencing 5 Step 6. Do the sequencing run and analyze the data
SureSelect XT HS2 D
HiSeq/NextSeq/NovaSeq platform sequencing run setup guidelines
Set up sequencing runs using the instrument control software interface, using the settings shown in Table 39. For HiSeq runs, select Dual Index on the Run Configuration screen of the instrument control software interface and enter the Cycles settings in Table 39.
For the NextSeq or NovaSeq platform, open the Run Setup screen of the instrument control software interface and enter the Read Length settings in Table 39. In the Custom Primers section, clear (do not select) the checkboxes for all primers (Read 1, Read 2, Index 1 and Index 2).
MiSeq platform sequencing run setup guidelines
Use the Illumina Experiment Manager (IEM) software to generate a custom Sample Sheet according to the guidelines below. Once a Sample Sheet has been generated, index sequences need to be manually changed to the SureSelect XT HS2 indexes used for each sample. See page 88 through page 95 for nucleotide sequences of the SureSelect XT HS2 index pairs.
Set up a custom Sample Sheet:
1 In the IEM software, create a Sample Sheet for the MiSeq platform using the following Workflow selections.
• Under Category, select Other.
• Under Application, select FASTQ Only.
Table 39 Run settings
Run Segment Cycles/Read Length
Read 1 100 or 150
Index 1 (i7) 8
Index 2 (i5) 8
Read 2 100 or 150
NA Library Preparation and Target Enrichment 71
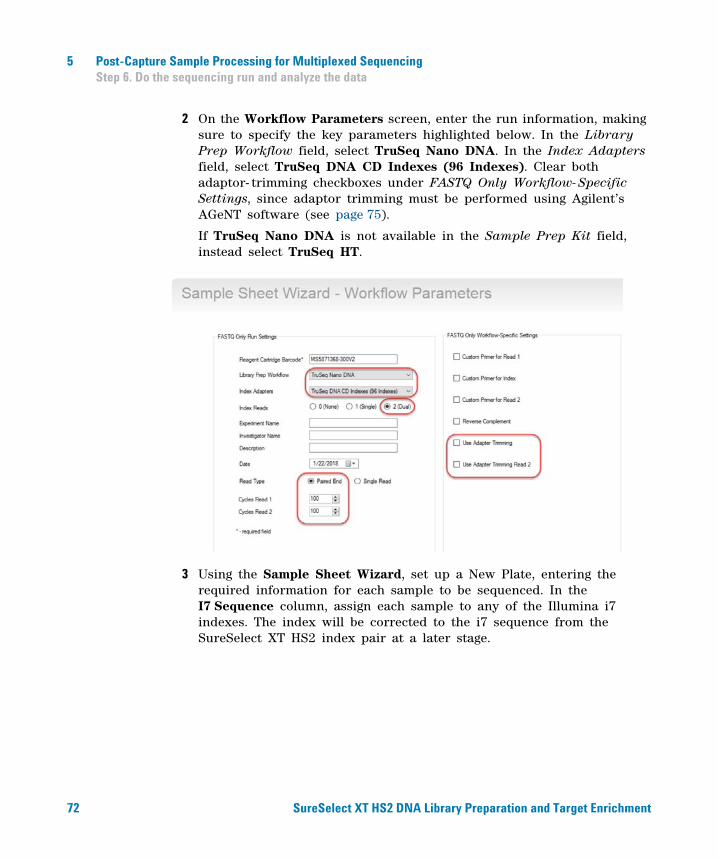
5 Post-Capture Sample Processing for Multiplexed Sequencing Step 6. Do the sequencing run and analyze the data
72
2 On the Workflow Parameters screen, enter the run information, making sure to specify the key parameters highlighted below. In the Library Prep Workflow field, select TruSeq Nano DNA. In the Index Adapters field, select TruSeq DNA CD Indexes (96 Indexes). Clear both adaptor- trimming checkboxes under FASTQ Only Workflow- Specific Settings, since adaptor trimming must be performed using Agilent’s AGeNT software (see page 75).
If TruSeq Nano DNA is not available in the Sample Prep Kit field, instead select TruSeq HT.
3 Using the Sample Sheet Wizard, set up a New Plate, entering the required information for each sample to be sequenced. In the I7 Sequence column, assign each sample to any of the Illumina i7 indexes. The index will be corrected to the i7 sequence from the SureSelect XT HS2 index pair at a later stage.
SureSelect XT HS2 DNA Library Preparation and Target Enrichment
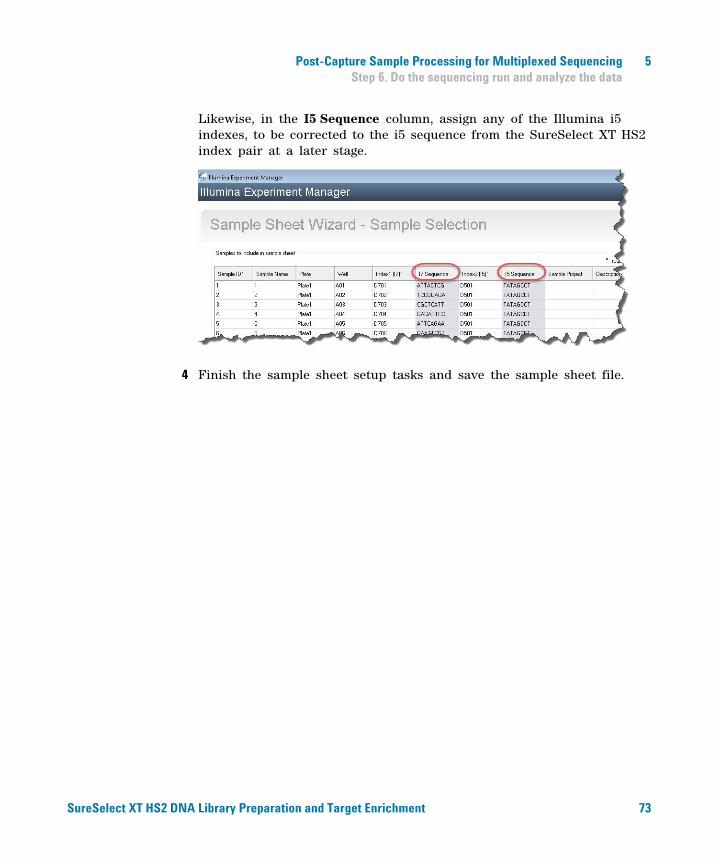
Post-Capture Sample Processing for Multiplexed Sequencing 5 Step 6. Do the sequencing run and analyze the data
SureSelect XT HS2 D
Likewise, in the I5 Sequence column, assign any of the Illumina i5 indexes, to be corrected to the i5 sequence from the SureSelect XT HS2 index pair at a later stage.
4 Finish the sample sheet setup tasks and save the sample sheet file.
NA Library Preparation and Target Enrichment 73
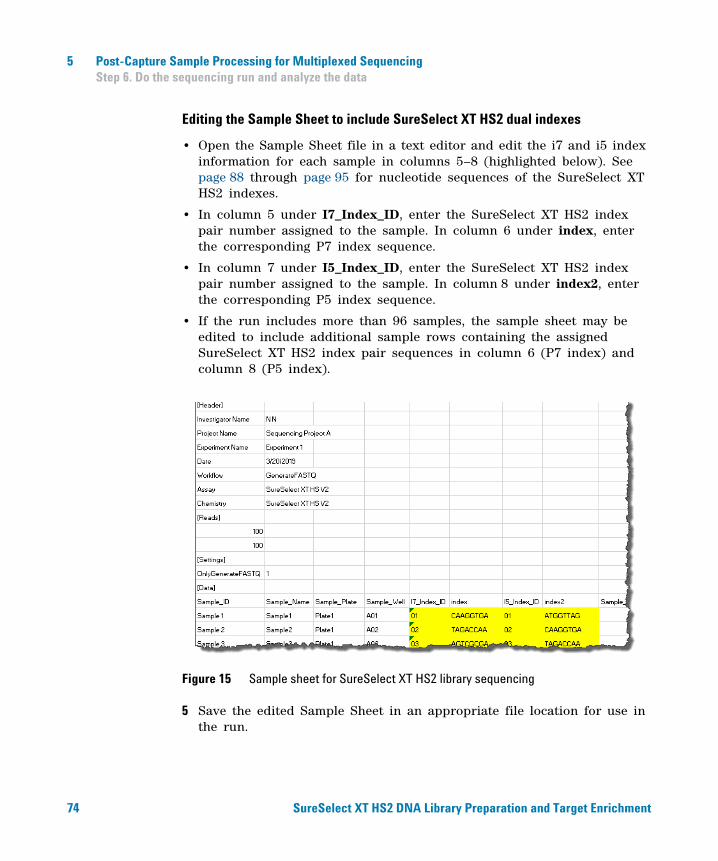
5 Post-Capture Sample Processing for Multiplexed Sequencing Step 6. Do the sequencing run and analyze the data
74
Editing the Sample Sheet to include SureSelect XT HS2 dual indexes
• Open the Sample Sheet file in a text editor and edit the i7 and i5 index information for each sample in columns 5–8 (highlighted below). See page 88 through page 95 for nucleotide sequences of the SureSelect XT HS2 indexes.
• In column 5 under I7_Index_ID, enter the SureSelect XT HS2 index pair number assigned to the sample. In column 6 under index, enter the corresponding P7 index sequence.
• In column 7 under I5_Index_ID, enter the SureSelect XT HS2 index pair number assigned to the sample. In column 8 under index2, enter the corresponding P5 index sequence.
• If the run includes more than 96 samples, the sample sheet may be edited to include additional sample rows containing the assigned SureSelect XT HS2 index pair sequences in column 6 (P7 index) and column 8 (P5 index).
Figure 15 Sample sheet for SureSelect XT HS2 library sequencing
5 Save the edited Sample Sheet in an appropriate file location for use in the run.
SureSelect XT HS2 DNA Library Preparation and Target Enrichment
Post-Capture Sample Processing for Multiplexed Sequencing 5 Sequence analysis resources
Sequence analysis resources
SureSelect XT HS2 D
Guidelines are provided below for typical NGS analysis pipeline steps appropriate for SureSelect XT HS2 library data analysis. Your NGS analysis pipeline may vary.
Use the Illumina bcl2fastq software to generate paired end reads by demultiplexing sequences based on the dual indexes and to remove sequences with incorrectly paired P5 and P7 indexes.
The demultiplexed FASTQ data needs to be pre- processed to remove sequencing adaptors and extract the molecular barcode (MBC) sequences using the Agilent Genomics NextGen Toolkit (AGeNT). AGeNT is a set of Java- based software modules that provide MBC pre- processing adaptor trimming and duplicate read identification. This toolkit is designed to enable building, integrating, maintaining, and troubleshooting internal analysis pipelines for users with bioinformatics expertise. For additional information and to download this toolkit, visit the AGeNT page at www.genomics.agilent.com.
NOTE If your sequence analysis pipeline excludes MBCs, you can remove the first 5 bases from Read 1 and Read 2 by either masking or trimming before proceeding to further analysis. To remove during demultiplexing via masking, include the base mask N5Y*,I8,I8,N5Y* (where * may be replaced with the actual read length, matching the read length value in the RunInfo.xml file). Alternatively, the first 5 bases may be trimmed from the demultiplexed fastq files using a suitable processing tool of your choice, such as seqtk. Alternatively, the AGeNT trimmer module can be used to remove the MBCs and properly remove adaptor sequences as well. Standard adaptor trimmers will fail to remove the MBC sequences from the opposite adaptor (refer to Figure 14).
The trimmed reads should be aligned, and MBC tags added to the aligned BAM file using a suitable tool such as the BWA- MEM. Once alignment and tagging are complete, the AGeNT LocatIt module may be used to generate consensus reads and mark or remove duplicates. The resulting BAM files are ready for downstream analysis including variant discovery.
NA Library Preparation and Target Enrichment 75

5 Post-Capture Sample Processing for Multiplexed Sequencing Sequence analysis resources
76 SureSelect XT HS2 DNA Library Preparation and Target Enrichment
SureSelect XT HS2 DNA System Protocol
6Appendix: Using FFPE-derived DNA Samples
Protocol modifications for FFPE Samples 78
Methods for FFPE Sample Qualification 78
Sequencing Output Recommendations for FFPE Samples 79
This chapter summarizes the protocol modifications to apply to FFPE samples based on the integrity of the FFPE sample DNA.
77Agilent Technologies
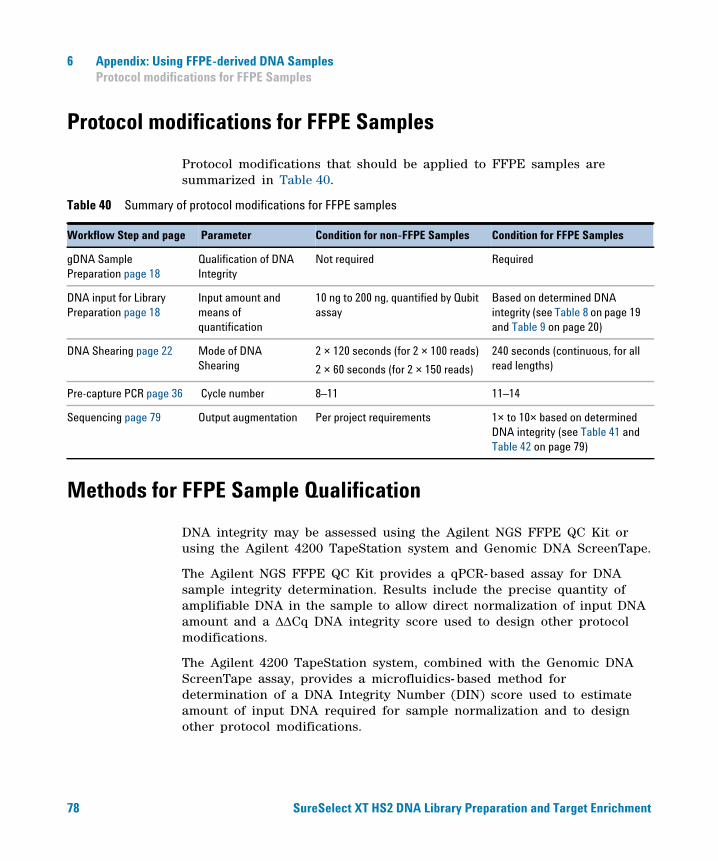
6 Appendix: Using FFPE-derived DNA Samples Protocol modifications for FFPE Samples
Protocol modifications for FFPE Samples
78
Protocol modifications that should be applied to FFPE samples are summarized in Table 40.
Methods for FFPE Sample Qualification
Table 40 Summary of protocol modifications for FFPE samples
Workflow Step and page Parameter Condition for non-FFPE Samples Condition for FFPE Samples
gDNA Sample Preparation page 18
Qualification of DNA Integrity
Not required Required
DNA input for Library Preparation page 18
Input amount and means of quantification
10 ng to 200 ng, quantified by Qubit assay
Based on determined DNA integrity (see Table 8 on page 19 and Table 9 on page 20)
DNA Shearing page 22 Mode of DNA Shearing
2 × 120 seconds (for 2 × 100 reads)
2 × 60 seconds (for 2 × 150 reads)
240 seconds (continuous, for all read lengths)
Pre-capture PCR page 36 Cycle number 8–11 11–14
Sequencing page 79 Output augmentation Per project requirements 1× to 10× based on determined DNA integrity (see Table 41 and Table 42 on page 79)
DNA integrity may be assessed using the Agilent NGS FFPE QC Kit or using the Agilent 4200 TapeStation system and Genomic DNA ScreenTape.
The Agilent NGS FFPE QC Kit provides a qPCR- based assay for DNA sample integrity determination. Results include the precise quantity of amplifiable DNA in the sample to allow direct normalization of input DNA amount and a Cq DNA integrity score used to design other protocol modifications.
The Agilent 4200 TapeStation system, combined with the Genomic DNA ScreenTape assay, provides a microfluidics- based method for determination of a DNA Integrity Number (DIN) score used to estimate amount of input DNA required for sample normalization and to design other protocol modifications.
SureSelect XT HS2 DNA Library Preparation and Target Enrichment
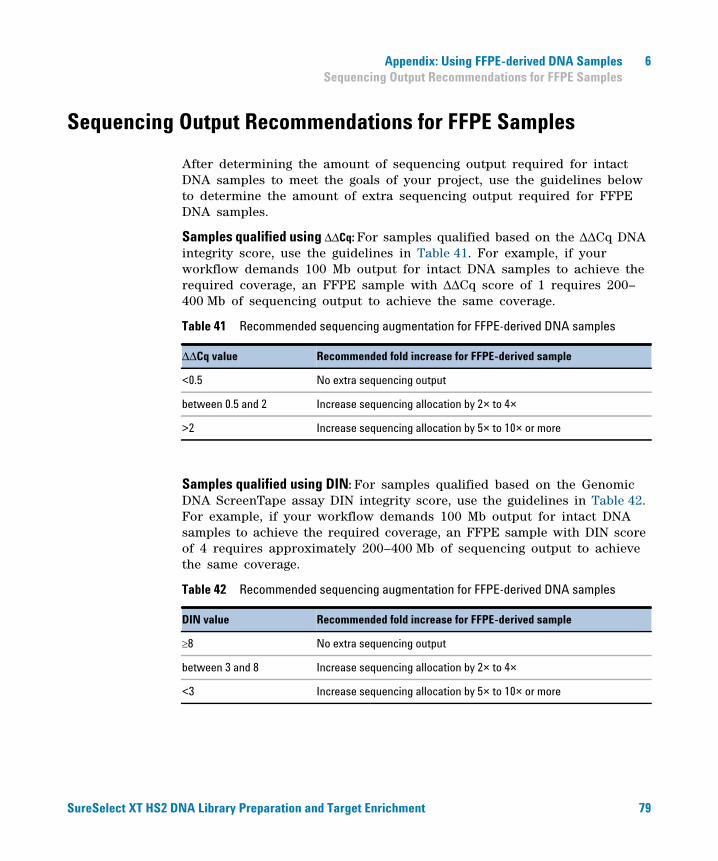
Appendix: Using FFPE-derived DNA Samples 6 Sequencing Output Recommendations for FFPE Samples
Sequencing Output Recommendations for FFPE Samples
SureSelect XT HS2 D
After determining the amount of sequencing output required for intact DNA samples to meet the goals of your project, use the guidelines below to determine the amount of extra sequencing output required for FFPE DNA samples.
Samples qualified using ΔΔCq: For samples qualified based on the Cq DNA integrity score, use the guidelines in Table 41. For example, if your workflow demands 100 Mb output for intact DNA samples to achieve the required coverage, an FFPE sample with Cq score of 1 requires 200–400 Mb of sequencing output to achieve the same coverage.
Samples qualified using DIN: For samples qualified based on the Genomic DNA ScreenTape assay DIN integrity score, use the guidelines in Table 42. For example, if your workflow demands 100 Mb output for intact DNA samples to achieve the required coverage, an FFPE sample with DIN score of 4 requires approximately 200–400 Mb of sequencing output to achieve the same coverage.
Table 41 Recommended sequencing augmentation for FFPE-derived DNA samples
ΔΔCq value Recommended fold increase for FFPE-derived sample
<0.5 No extra sequencing output
between 0.5 and 2 Increase sequencing allocation by 2× to 4×
>2 Increase sequencing allocation by 5× to 10× or more
Table 42 Recommended sequencing augmentation for FFPE-derived DNA samples
DIN value Recommended fold increase for FFPE-derived sample
8 No extra sequencing output
between 3 and 8 Increase sequencing allocation by 2× to 4×
<3 Increase sequencing allocation by 5× to 10× or more
NA Library Preparation and Target Enrichment 79

6 Appendix: Using FFPE-derived DNA Samples Sequencing Output Recommendations for FFPE Samples
80
SureSelect XT HS2 DNA Library Preparation and Target Enrichment
SureSelect XT HS2 DNA System Protocol
7Reference
Kit Contents 82
Index Nucleotide Sequences 88
Troubleshooting Guide 96
Quick Reference Protocol 100
This chapter contains reference information, including component kit contents, index sequences, troubleshooting information, and a quick- reference protocol for experienced users.
81Agilent Technologies
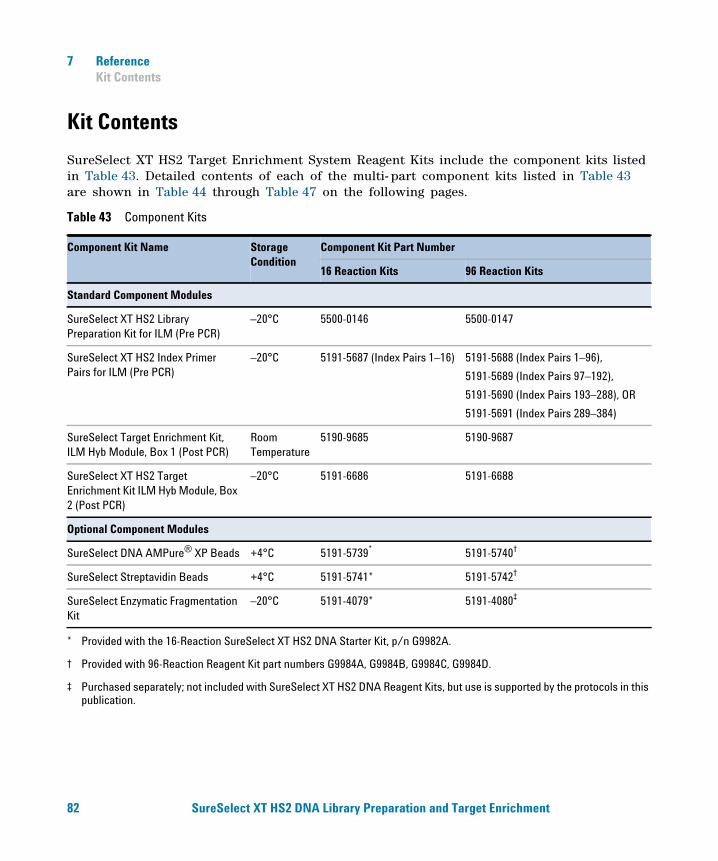
7 Reference Kit Contents
Kit Contents
SureSelect XT HS2 Target Enrichment System Reagent Kits include the component kits listed in Table 43. Detailed contents of each of the multi- part component kits listed in Table 43 are shown in Table 44 through Table 47 on the following pages.
Table 43 Component Kits
Component Kit Name Storage Condition
Component Kit Part Number
16 Reaction Kits 96 Reaction Kits
Standard Component Modules
SureSelect XT HS2 Library Preparation Kit for ILM (Pre PCR)
–20°C 5500-0146 5500-0147
SureSelect XT HS2 Index Primer Pairs for ILM (Pre PCR)
–20°C 5191-5687 (Index Pairs 1–16) 5191-5688 (Index Pairs 1–96),
5191-5689 (Index Pairs 97–192),
5191-5690 (Index Pairs 193–288), OR
5191-5691 (Index Pairs 289–384)
SureSelect Target Enrichment Kit, ILM Hyb Module, Box 1 (Post PCR)
Room Temperature
5190-9685 5190-9687
SureSelect XT HS2 Target Enrichment Kit ILM Hyb Module, Box 2 (Post PCR)
–20°C 5191-6686 5191-6688
Optional Component Modules
SureSelect DNA AMPure® XP Beads +4°C 5191-5739*
* Provided with the 16-Reaction SureSelect XT HS2 DNA Starter Kit, p/n G9982A.
5191-5740†
† Provided with 96-Reaction Reagent Kit part numbers G9984A, G9984B, G9984C, G9984D.
SureSelect Streptavidin Beads +4°C 5191-5741* 5191-5742†
SureSelect Enzymatic Fragmentation Kit
–20°C 5191-4079* 5191-4080‡
‡ Purchased separately; not included with SureSelect XT HS2 DNA Reagent Kits, but use is supported by the protocols in this publication.
82 SureSelect XT HS2 DNA Library Preparation and Target Enrichment
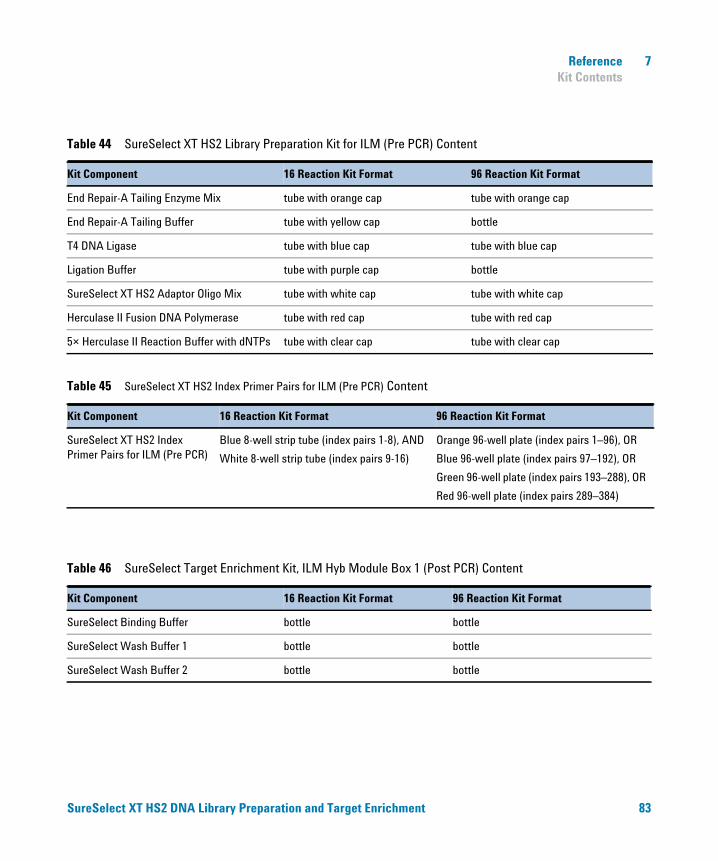
Reference 7 Kit Contents
Table 44 SureSelect XT HS2 Library Preparation Kit for ILM (Pre PCR) Content
Kit Component 16 Reaction Kit Format 96 Reaction Kit Format
End Repair-A Tailing Enzyme Mix tube with orange cap tube with orange cap
End Repair-A Tailing Buffer tube with yellow cap bottle
T4 DNA Ligase tube with blue cap tube with blue cap
Ligation Buffer tube with purple cap bottle
SureSelect XT HS2 Adaptor Oligo Mix tube with white cap tube with white cap
Herculase II Fusion DNA Polymerase tube with red cap tube with red cap
5× Herculase II Reaction Buffer with dNTPs tube with clear cap tube with clear cap
Table 45 SureSelect XT HS2 Index Primer Pairs for ILM (Pre PCR) Content
Kit Component 16 Reaction Kit Format 96 Reaction Kit Format
SureSelect XT HS2 Index Primer Pairs for ILM (Pre PCR)
Blue 8-well strip tube (index pairs 1-8), AND
White 8-well strip tube (index pairs 9-16)
Orange 96-well plate (index pairs 1–96), OR
Blue 96-well plate (index pairs 97–192), OR
Green 96-well plate (index pairs 193–288), OR
Red 96-well plate (index pairs 289–384)
Table 46 SureSelect Target Enrichment Kit, ILM Hyb Module Box 1 (Post PCR) Content
Kit Component 16 Reaction Kit Format 96 Reaction Kit Format
SureSelect Binding Buffer bottle bottle
SureSelect Wash Buffer 1 bottle bottle
SureSelect Wash Buffer 2 bottle bottle
SureSelect XT HS2 DNA Library Preparation and Target Enrichment 83
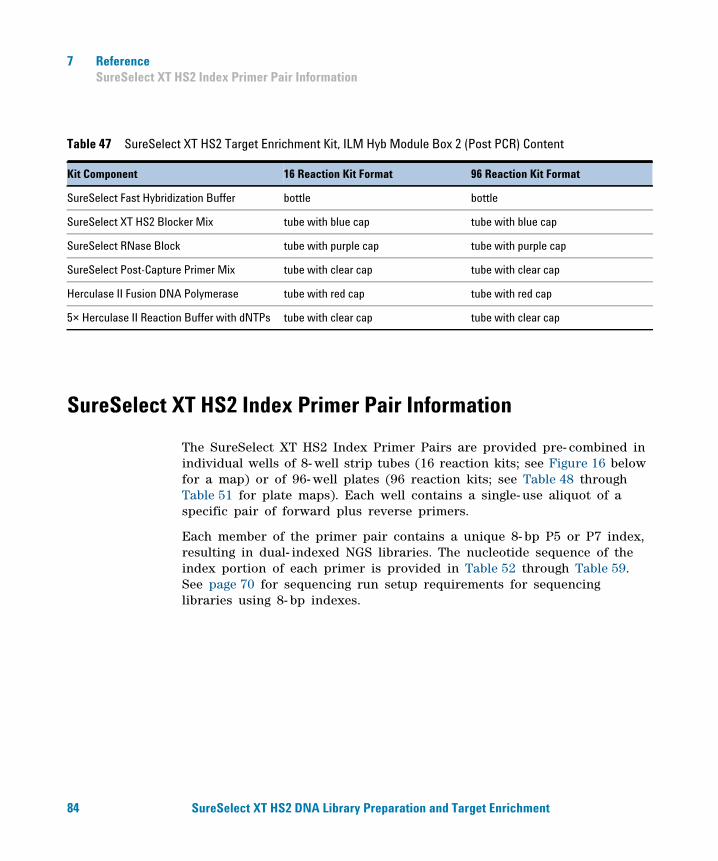
7 Reference SureSelect XT HS2 Index Primer Pair Information
Table 47 SureSelect XT HS2 Target Enrichment Kit, ILM Hyb Module Box 2 (Post PCR) Content
Kit Component 16 Reaction Kit Format 96 Reaction Kit Format
SureSelect Fast Hybridization Buffer bottle bottle
SureSelect XT HS2 Blocker Mix tube with blue cap tube with blue cap
SureSelect RNase Block tube with purple cap tube with purple cap
SureSelect Post-Capture Primer Mix tube with clear cap tube with clear cap
Herculase II Fusion DNA Polymerase tube with red cap tube with red cap
5× Herculase II Reaction Buffer with dNTPs tube with clear cap tube with clear cap
84
SureSelect XT HS2 Index Primer Pair Information
The SureSelect XT HS2 Index Primer Pairs are provided pre- combined in individual wells of 8- well strip tubes (16 reaction kits; see Figure 16 below for a map) or of 96- well plates (96 reaction kits; see Table 48 through Table 51 for plate maps). Each well contains a single- use aliquot of a specific pair of forward plus reverse primers.
Each member of the primer pair contains a unique 8- bp P5 or P7 index, resulting in dual- indexed NGS libraries. The nucleotide sequence of the index portion of each primer is provided in Table 52 through Table 59. See page 70 for sequencing run setup requirements for sequencing libraries using 8- bp indexes.
SureSelect XT HS2 DNA Library Preparation and Target Enrichment
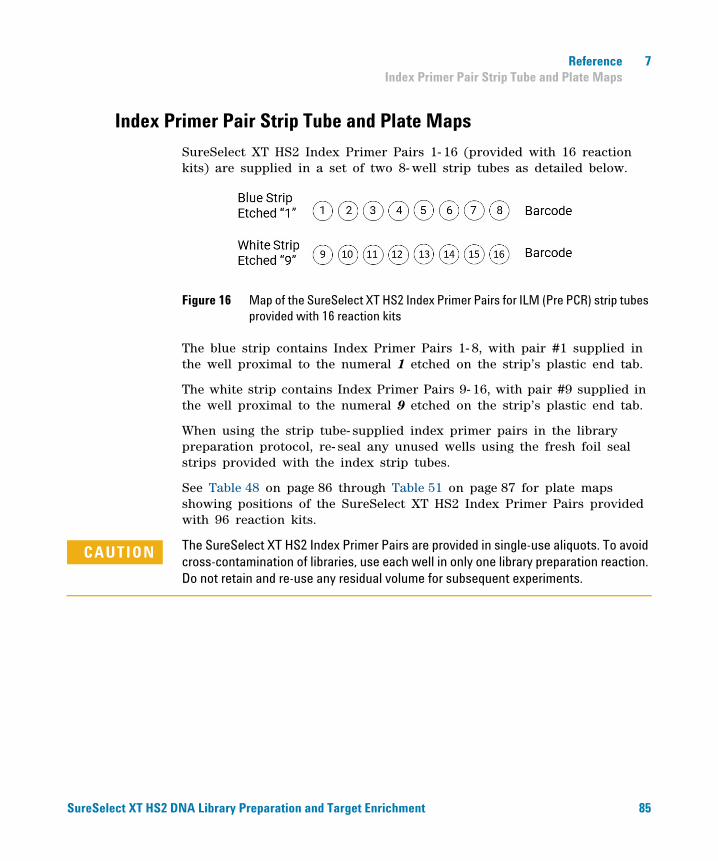
Reference 7 Index Primer Pair Strip Tube and Plate Maps
Index Primer Pair Strip Tube and Plate Maps
SureSelect XT HS2 D
SureSelect XT HS2 Index Primer Pairs 1- 16 (provided with 16 reaction kits) are supplied in a set of two 8- well strip tubes as detailed below.
Figure 16 Map of the SureSelect XT HS2 Index Primer Pairs for ILM (Pre PCR) strip tubes provided with 16 reaction kits
The blue strip contains Index Primer Pairs 1- 8, with pair #1 supplied in the well proximal to the numeral 1 etched on the strip’s plastic end tab.
The white strip contains Index Primer Pairs 9- 16, with pair #9 supplied in the well proximal to the numeral 9 etched on the strip’s plastic end tab.
When using the strip tube- supplied index primer pairs in the library preparation protocol, re- seal any unused wells using the fresh foil seal strips provided with the index strip tubes.
See Table 48 on page 86 through Table 51 on page 87 for plate maps showing positions of the SureSelect XT HS2 Index Primer Pairs provided with 96 reaction kits.
CAUTION The SureSelect XT HS2 Index Primer Pairs are provided in single-use aliquots. To avoid cross-contamination of libraries, use each well in only one library preparation reaction. Do not retain and re-use any residual volume for subsequent experiments.
NA Library Preparation and Target Enrichment 85
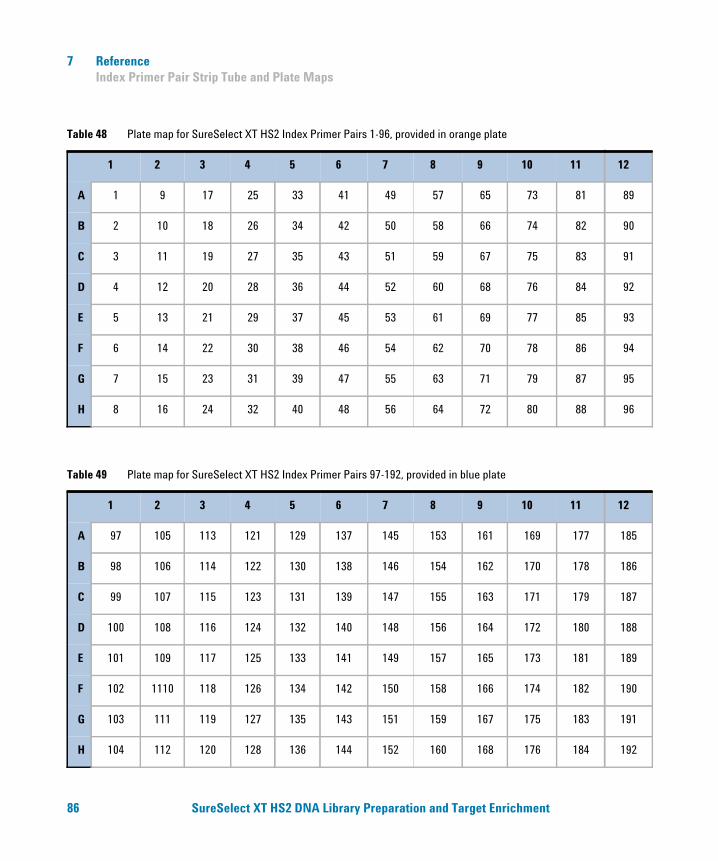
7 Reference Index Primer Pair Strip Tube and Plate Maps
86
for SureSelect XT HS2 Index Primer Pairs 1-96, provided in orange plate
Table 48 Plate map1 2 3 4 5 6 7 8 9 10 11 12
A 1 9 17 25 33 41 49 57 65 73 81 89
B 2 10 18 26 34 42 50 58 66 74 82 90
C 3 11 19 27 35 43 51 59 67 75 83 91
D 4 12 20 28 36 44 52 60 68 76 84 92
E 5 13 21 29 37 45 53 61 69 77 85 93
F 6 14 22 30 38 46 54 62 70 78 86 94
G 7 15 23 31 39 47 55 63 71 79 87 95
H 8 16 24 32 40 48 56 64 72 80 88 96
for SureSelect XT HS2 Index Primer Pairs 97-192, provided in blue plate
Table 49 Plate map1 2 3 4 5 6 7 8 9 10 11 12
A 97 105 113 121 129 137 145 153 161 169 177 185
B 98 106 114 122 130 138 146 154 162 170 178 186
C 99 107 115 123 131 139 147 155 163 171 179 187
D 100 108 116 124 132 140 148 156 164 172 180 188
E 101 109 117 125 133 141 149 157 165 173 181 189
F 102 1110 118 126 134 142 150 158 166 174 182 190
G 103 111 119 127 135 143 151 159 167 175 183 191
H 104 112 120 128 136 144 152 160 168 176 184 192
SureSelect XT HS2 DNA Library Preparation and Target Enrichment
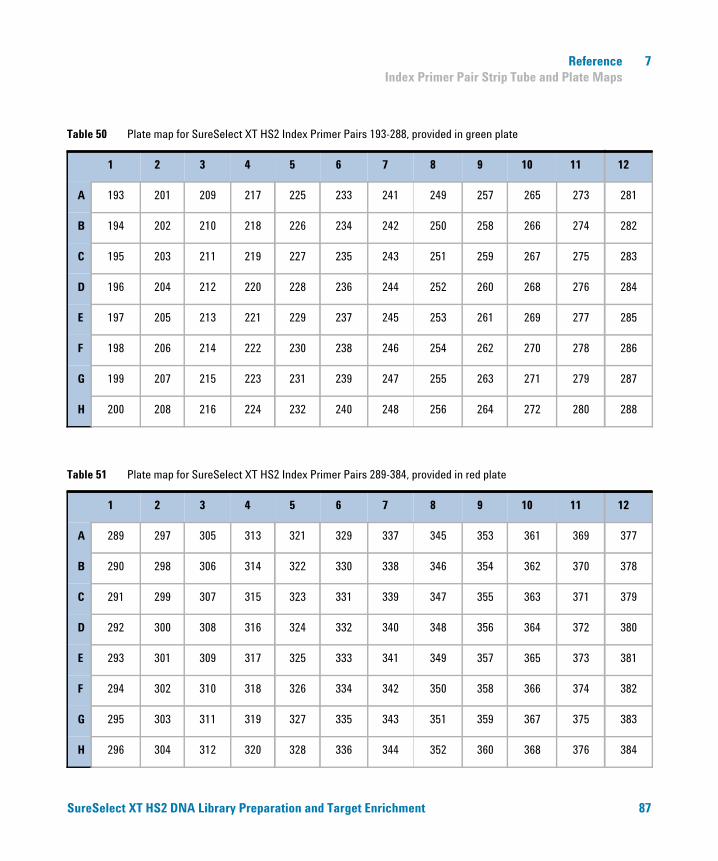
Reference 7 Index Primer Pair Strip Tube and Plate Maps
SureSelect XT HS2 D
for SureSelect XT HS2 Index Primer Pairs 193-288, provided in green plate
Table 50 Plate map1 2 3 4 5 6 7 8 9 10 11 12
A 193 201 209 217 225 233 241 249 257 265 273 281
B 194 202 210 218 226 234 242 250 258 266 274 282
C 195 203 211 219 227 235 243 251 259 267 275 283
D 196 204 212 220 228 236 244 252 260 268 276 284
E 197 205 213 221 229 237 245 253 261 269 277 285
F 198 206 214 222 230 238 246 254 262 270 278 286
G 199 207 215 223 231 239 247 255 263 271 279 287
H 200 208 216 224 232 240 248 256 264 272 280 288
for SureSelect XT HS2 Index Primer Pairs 289-384, provided in red plate
Table 51 Plate map1 2 3 4 5 6 7 8 9 10 11 12
A 289 297 305 313 321 329 337 345 353 361 369 377
B 290 298 306 314 322 330 338 346 354 362 370 378
C 291 299 307 315 323 331 339 347 355 363 371 379
D 292 300 308 316 324 332 340 348 356 364 372 380
E 293 301 309 317 325 333 341 349 357 365 373 381
F 294 302 310 318 326 334 342 350 358 366 374 382
G 295 303 311 319 327 335 343 351 359 367 375 383
H 296 304 312 320 328 336 344 352 360 368 376 384
NA Library Preparation and Target Enrichment 87

7 Reference Index Nucleotide Sequences
Index Nucleotide Sequences
88
Table 52 SureSelect XT HS2 Index Primer Pairs 1–48, provided in orange 96-well plate
Primer Pair # Well P5 Index P7 Index Primer Pair # Well P5 Index P7 Index
1 A01 ATGGTTAG CAAGGTGA 25 A04 TGGCACCA AGATGGAT
2 B01 CAAGGTGA TAGACCAA 26 B04 AGATGGAT GAATTGTG
3 C01 TAGACCAA AGTCGCGA 27 C04 GAATTGTG GAGCACTG
4 D01 AGTCGCGA CGGTAGAG 28 D04 GAGCACTG GTTGCGGA
5 E01 AAGGAGCG TCAGCATC 29 E04 GTTGCGGA AATGGAAC
6 F01 TCAGCATC AGAAGCAA 30 F04 AATGGAAC TCAGAGGT
7 G01 AGAAGCAA GCAGGTTC 31 G04 TCAGAGGT GCAACAAT
8 H01 GCAGGTTC AAGTGTCT 32 H04 GCAACAAT GTCGATCG
9 A02 AAGTGTCT CTACCGAA 33 A05 GTCGATCG ATGGTAGC
10 B02 CTACCGAA TAGAGCTC 34 B05 ATGGTAGC CGCCAATT
11 C02 TAGAGCTC ATGTCAAG 35 C05 CGCCAATT GACAATTG
12 D02 ATGTCAAG GCATCATA 36 D05 GACAATTG ATATTCCG
13 E02 GCATCATA GACTTGAC 37 E05 ATATTCCG TCTACCTC
14 F02 GACTTGAC CTACAATG 38 F05 TCTACCTC TCGTCGTG
15 G02 CTACAATG TCTCAGCA 39 G05 TCGTCGTG ATGAGAAC
16 H02 TCTCAGCA AGACACAC 40 H05 ATGAGAAC GTCCTATA
17 A03 AGACACAC CAGGTCTG 41 A06 GTCCTATA AATGACCA
18 B03 CAGGTCTG AATACGCG 42 B06 AATGACCA CAGACGCT
19 C03 AATACGCG GCACACAT 43 C06 CAGACGCT TCGAACTG
20 D03 GCACACAT CTTGCATA 44 D06 TCGAACTG CGCTTCCA
21 E03 CTTGCATA ATCCTCTT 45 E06 CGCTTCCA TATTCCTG
22 F03 ATCCTCTT GCACCTAA 46 F06 TATTCCTG CAAGTTAC
23 G03 GCACCTAA TGCTGCTC 47 G06 CAAGTTAC CAGAGCAG
24 H03 TGCTGCTC TGGCACCA 48 H06 CAGAGCAG CGCGCAAT
SureSelect XT HS2 DNA Library Preparation and Target Enrichment
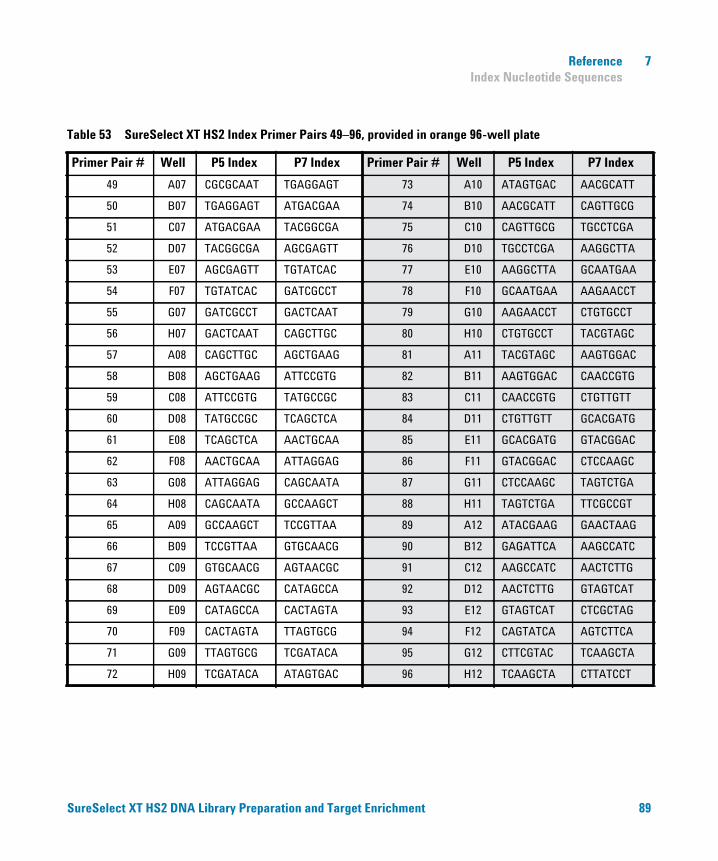
Reference 7 Index Nucleotide Sequences
SureSelect XT HS2 D
Table 53 SureSelect XT HS2 Index Primer Pairs 49–96, provided in orange 96-well plate
Primer Pair # Well P5 Index P7 Index Primer Pair # Well P5 Index P7 Index
49 A07 CGCGCAAT TGAGGAGT 73 A10 ATAGTGAC AACGCATT
50 B07 TGAGGAGT ATGACGAA 74 B10 AACGCATT CAGTTGCG
51 C07 ATGACGAA TACGGCGA 75 C10 CAGTTGCG TGCCTCGA
52 D07 TACGGCGA AGCGAGTT 76 D10 TGCCTCGA AAGGCTTA
53 E07 AGCGAGTT TGTATCAC 77 E10 AAGGCTTA GCAATGAA
54 F07 TGTATCAC GATCGCCT 78 F10 GCAATGAA AAGAACCT
55 G07 GATCGCCT GACTCAAT 79 G10 AAGAACCT CTGTGCCT
56 H07 GACTCAAT CAGCTTGC 80 H10 CTGTGCCT TACGTAGC
57 A08 CAGCTTGC AGCTGAAG 81 A11 TACGTAGC AAGTGGAC
58 B08 AGCTGAAG ATTCCGTG 82 B11 AAGTGGAC CAACCGTG
59 C08 ATTCCGTG TATGCCGC 83 C11 CAACCGTG CTGTTGTT
60 D08 TATGCCGC TCAGCTCA 84 D11 CTGTTGTT GCACGATG
61 E08 TCAGCTCA AACTGCAA 85 E11 GCACGATG GTACGGAC
62 F08 AACTGCAA ATTAGGAG 86 F11 GTACGGAC CTCCAAGC
63 G08 ATTAGGAG CAGCAATA 87 G11 CTCCAAGC TAGTCTGA
64 H08 CAGCAATA GCCAAGCT 88 H11 TAGTCTGA TTCGCCGT
65 A09 GCCAAGCT TCCGTTAA 89 A12 ATACGAAG GAACTAAG
66 B09 TCCGTTAA GTGCAACG 90 B12 GAGATTCA AAGCCATC
67 C09 GTGCAACG AGTAACGC 91 C12 AAGCCATC AACTCTTG
68 D09 AGTAACGC CATAGCCA 92 D12 AACTCTTG GTAGTCAT
69 E09 CATAGCCA CACTAGTA 93 E12 GTAGTCAT CTCGCTAG
70 F09 CACTAGTA TTAGTGCG 94 F12 CAGTATCA AGTCTTCA
71 G09 TTAGTGCG TCGATACA 95 G12 CTTCGTAC TCAAGCTA
72 H09 TCGATACA ATAGTGAC 96 H12 TCAAGCTA CTTATCCT
NA Library Preparation and Target Enrichment 89
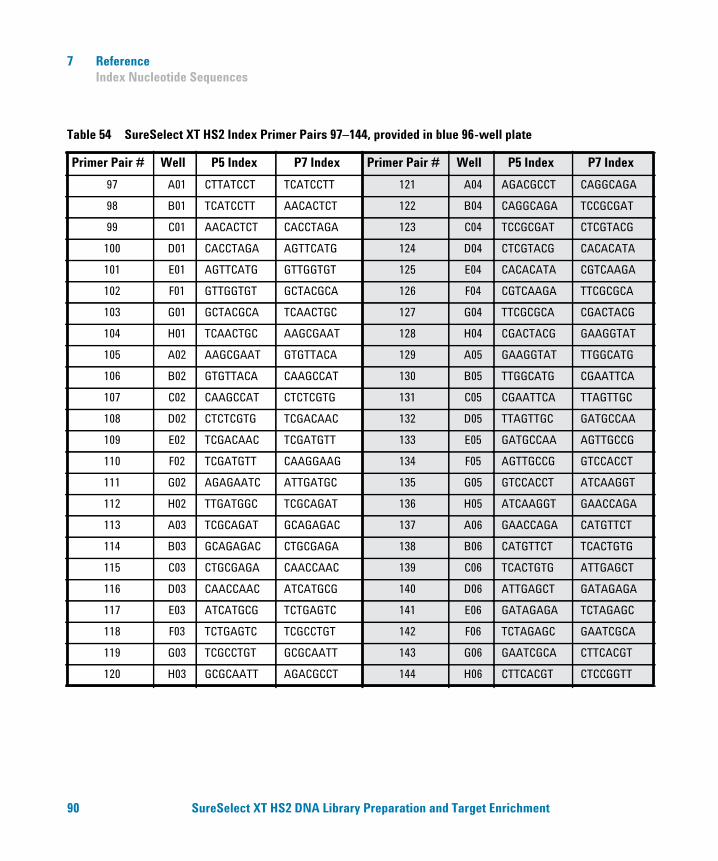
7 Reference Index Nucleotide Sequences
90
Table 54 SureSelect XT HS2 Index Primer Pairs 97–144, provided in blue 96-well plate
Primer Pair # Well P5 Index P7 Index Primer Pair # Well P5 Index P7 Index
97 A01 CTTATCCT TCATCCTT 121 A04 AGACGCCT CAGGCAGA
98 B01 TCATCCTT AACACTCT 122 B04 CAGGCAGA TCCGCGAT
99 C01 AACACTCT CACCTAGA 123 C04 TCCGCGAT CTCGTACG
100 D01 CACCTAGA AGTTCATG 124 D04 CTCGTACG CACACATA
101 E01 AGTTCATG GTTGGTGT 125 E04 CACACATA CGTCAAGA
102 F01 GTTGGTGT GCTACGCA 126 F04 CGTCAAGA TTCGCGCA
103 G01 GCTACGCA TCAACTGC 127 G04 TTCGCGCA CGACTACG
104 H01 TCAACTGC AAGCGAAT 128 H04 CGACTACG GAAGGTAT
105 A02 AAGCGAAT GTGTTACA 129 A05 GAAGGTAT TTGGCATG
106 B02 GTGTTACA CAAGCCAT 130 B05 TTGGCATG CGAATTCA
107 C02 CAAGCCAT CTCTCGTG 131 C05 CGAATTCA TTAGTTGC
108 D02 CTCTCGTG TCGACAAC 132 D05 TTAGTTGC GATGCCAA
109 E02 TCGACAAC TCGATGTT 133 E05 GATGCCAA AGTTGCCG
110 F02 TCGATGTT CAAGGAAG 134 F05 AGTTGCCG GTCCACCT
111 G02 AGAGAATC ATTGATGC 135 G05 GTCCACCT ATCAAGGT
112 H02 TTGATGGC TCGCAGAT 136 H05 ATCAAGGT GAACCAGA
113 A03 TCGCAGAT GCAGAGAC 137 A06 GAACCAGA CATGTTCT
114 B03 GCAGAGAC CTGCGAGA 138 B06 CATGTTCT TCACTGTG
115 C03 CTGCGAGA CAACCAAC 139 C06 TCACTGTG ATTGAGCT
116 D03 CAACCAAC ATCATGCG 140 D06 ATTGAGCT GATAGAGA
117 E03 ATCATGCG TCTGAGTC 141 E06 GATAGAGA TCTAGAGC
118 F03 TCTGAGTC TCGCCTGT 142 F06 TCTAGAGC GAATCGCA
119 G03 TCGCCTGT GCGCAATT 143 G06 GAATCGCA CTTCACGT
120 H03 GCGCAATT AGACGCCT 144 H06 CTTCACGT CTCCGGTT
SureSelect XT HS2 DNA Library Preparation and Target Enrichment
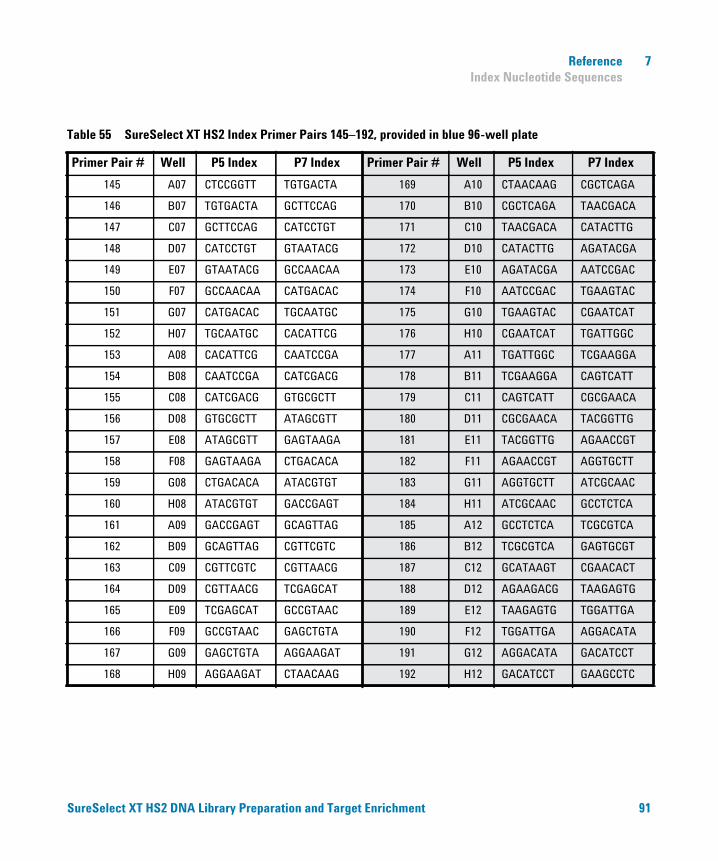
Reference 7 Index Nucleotide Sequences
SureSelect XT HS2 D
Table 55 SureSelect XT HS2 Index Primer Pairs 145–192, provided in blue 96-well plate
Primer Pair # Well P5 Index P7 Index Primer Pair # Well P5 Index P7 Index
145 A07 CTCCGGTT TGTGACTA 169 A10 CTAACAAG CGCTCAGA
146 B07 TGTGACTA GCTTCCAG 170 B10 CGCTCAGA TAACGACA
147 C07 GCTTCCAG CATCCTGT 171 C10 TAACGACA CATACTTG
148 D07 CATCCTGT GTAATACG 172 D10 CATACTTG AGATACGA
149 E07 GTAATACG GCCAACAA 173 E10 AGATACGA AATCCGAC
150 F07 GCCAACAA CATGACAC 174 F10 AATCCGAC TGAAGTAC
151 G07 CATGACAC TGCAATGC 175 G10 TGAAGTAC CGAATCAT
152 H07 TGCAATGC CACATTCG 176 H10 CGAATCAT TGATTGGC
153 A08 CACATTCG CAATCCGA 177 A11 TGATTGGC TCGAAGGA
154 B08 CAATCCGA CATCGACG 178 B11 TCGAAGGA CAGTCATT
155 C08 CATCGACG GTGCGCTT 179 C11 CAGTCATT CGCGAACA
156 D08 GTGCGCTT ATAGCGTT 180 D11 CGCGAACA TACGGTTG
157 E08 ATAGCGTT GAGTAAGA 181 E11 TACGGTTG AGAACCGT
158 F08 GAGTAAGA CTGACACA 182 F11 AGAACCGT AGGTGCTT
159 G08 CTGACACA ATACGTGT 183 G11 AGGTGCTT ATCGCAAC
160 H08 ATACGTGT GACCGAGT 184 H11 ATCGCAAC GCCTCTCA
161 A09 GACCGAGT GCAGTTAG 185 A12 GCCTCTCA TCGCGTCA
162 B09 GCAGTTAG CGTTCGTC 186 B12 TCGCGTCA GAGTGCGT
163 C09 CGTTCGTC CGTTAACG 187 C12 GCATAAGT CGAACACT
164 D09 CGTTAACG TCGAGCAT 188 D12 AGAAGACG TAAGAGTG
165 E09 TCGAGCAT GCCGTAAC 189 E12 TAAGAGTG TGGATTGA
166 F09 GCCGTAAC GAGCTGTA 190 F12 TGGATTGA AGGACATA
167 G09 GAGCTGTA AGGAAGAT 191 G12 AGGACATA GACATCCT
168 H09 AGGAAGAT CTAACAAG 192 H12 GACATCCT GAAGCCTC
NA Library Preparation and Target Enrichment 91
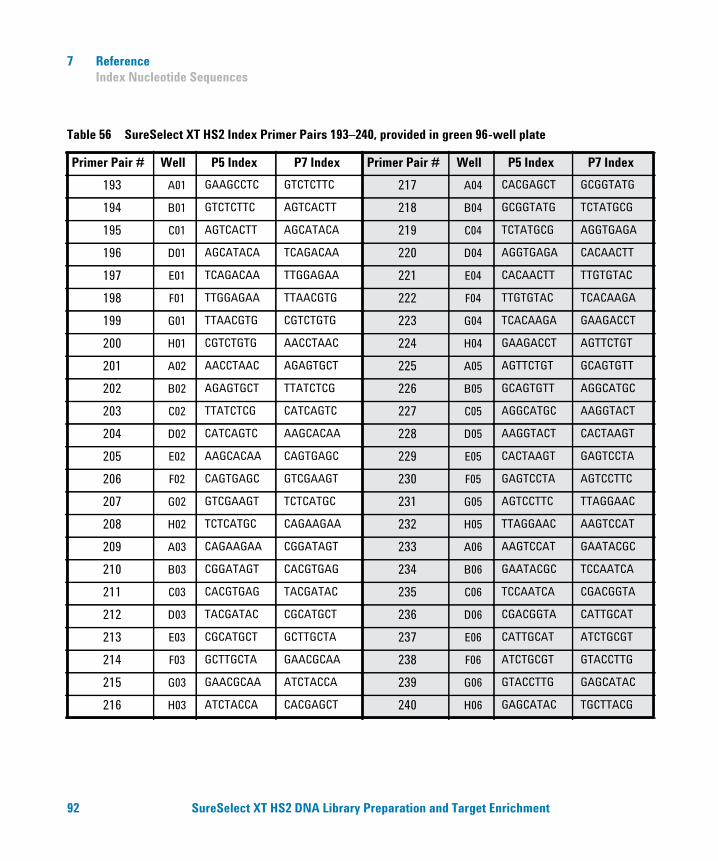
7 Reference Index Nucleotide Sequences
92
Table 56 SureSelect XT HS2 Index Primer Pairs 193–240, provided in green 96-well plate
Primer Pair # Well P5 Index P7 Index Primer Pair # Well P5 Index P7 Index
193 A01 GAAGCCTC GTCTCTTC 217 A04 CACGAGCT GCGGTATG
194 B01 GTCTCTTC AGTCACTT 218 B04 GCGGTATG TCTATGCG
195 C01 AGTCACTT AGCATACA 219 C04 TCTATGCG AGGTGAGA
196 D01 AGCATACA TCAGACAA 220 D04 AGGTGAGA CACAACTT
197 E01 TCAGACAA TTGGAGAA 221 E04 CACAACTT TTGTGTAC
198 F01 TTGGAGAA TTAACGTG 222 F04 TTGTGTAC TCACAAGA
199 G01 TTAACGTG CGTCTGTG 223 G04 TCACAAGA GAAGACCT
200 H01 CGTCTGTG AACCTAAC 224 H04 GAAGACCT AGTTCTGT
201 A02 AACCTAAC AGAGTGCT 225 A05 AGTTCTGT GCAGTGTT
202 B02 AGAGTGCT TTATCTCG 226 B05 GCAGTGTT AGGCATGC
203 C02 TTATCTCG CATCAGTC 227 C05 AGGCATGC AAGGTACT
204 D02 CATCAGTC AAGCACAA 228 D05 AAGGTACT CACTAAGT
205 E02 AAGCACAA CAGTGAGC 229 E05 CACTAAGT GAGTCCTA
206 F02 CAGTGAGC GTCGAAGT 230 F05 GAGTCCTA AGTCCTTC
207 G02 GTCGAAGT TCTCATGC 231 G05 AGTCCTTC TTAGGAAC
208 H02 TCTCATGC CAGAAGAA 232 H05 TTAGGAAC AAGTCCAT
209 A03 CAGAAGAA CGGATAGT 233 A06 AAGTCCAT GAATACGC
210 B03 CGGATAGT CACGTGAG 234 B06 GAATACGC TCCAATCA
211 C03 CACGTGAG TACGATAC 235 C06 TCCAATCA CGACGGTA
212 D03 TACGATAC CGCATGCT 236 D06 CGACGGTA CATTGCAT
213 E03 CGCATGCT GCTTGCTA 237 E06 CATTGCAT ATCTGCGT
214 F03 GCTTGCTA GAACGCAA 238 F06 ATCTGCGT GTACCTTG
215 G03 GAACGCAA ATCTACCA 239 G06 GTACCTTG GAGCATAC
216 H03 ATCTACCA CACGAGCT 240 H06 GAGCATAC TGCTTACG
SureSelect XT HS2 DNA Library Preparation and Target Enrichment
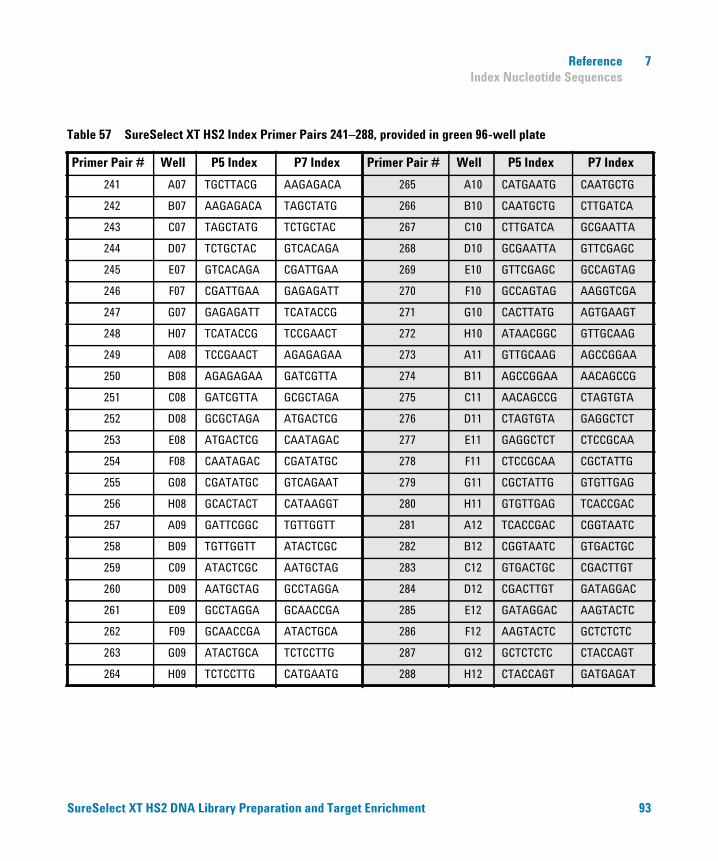
Reference 7 Index Nucleotide Sequences
SureSelect XT HS2 D
Table 57 SureSelect XT HS2 Index Primer Pairs 241–288, provided in green 96-well plate
Primer Pair # Well P5 Index P7 Index Primer Pair # Well P5 Index P7 Index
241 A07 TGCTTACG AAGAGACA 265 A10 CATGAATG CAATGCTG
242 B07 AAGAGACA TAGCTATG 266 B10 CAATGCTG CTTGATCA
243 C07 TAGCTATG TCTGCTAC 267 C10 CTTGATCA GCGAATTA
244 D07 TCTGCTAC GTCACAGA 268 D10 GCGAATTA GTTCGAGC
245 E07 GTCACAGA CGATTGAA 269 E10 GTTCGAGC GCCAGTAG
246 F07 CGATTGAA GAGAGATT 270 F10 GCCAGTAG AAGGTCGA
247 G07 GAGAGATT TCATACCG 271 G10 CACTTATG AGTGAAGT
248 H07 TCATACCG TCCGAACT 272 H10 ATAACGGC GTTGCAAG
249 A08 TCCGAACT AGAGAGAA 273 A11 GTTGCAAG AGCCGGAA
250 B08 AGAGAGAA GATCGTTA 274 B11 AGCCGGAA AACAGCCG
251 C08 GATCGTTA GCGCTAGA 275 C11 AACAGCCG CTAGTGTA
252 D08 GCGCTAGA ATGACTCG 276 D11 CTAGTGTA GAGGCTCT
253 E08 ATGACTCG CAATAGAC 277 E11 GAGGCTCT CTCCGCAA
254 F08 CAATAGAC CGATATGC 278 F11 CTCCGCAA CGCTATTG
255 G08 CGATATGC GTCAGAAT 279 G11 CGCTATTG GTGTTGAG
256 H08 GCACTACT CATAAGGT 280 H11 GTGTTGAG TCACCGAC
257 A09 GATTCGGC TGTTGGTT 281 A12 TCACCGAC CGGTAATC
258 B09 TGTTGGTT ATACTCGC 282 B12 CGGTAATC GTGACTGC
259 C09 ATACTCGC AATGCTAG 283 C12 GTGACTGC CGACTTGT
260 D09 AATGCTAG GCCTAGGA 284 D12 CGACTTGT GATAGGAC
261 E09 GCCTAGGA GCAACCGA 285 E12 GATAGGAC AAGTACTC
262 F09 GCAACCGA ATACTGCA 286 F12 AAGTACTC GCTCTCTC
263 G09 ATACTGCA TCTCCTTG 287 G12 GCTCTCTC CTACCAGT
264 H09 TCTCCTTG CATGAATG 288 H12 CTACCAGT GATGAGAT
NA Library Preparation and Target Enrichment 93
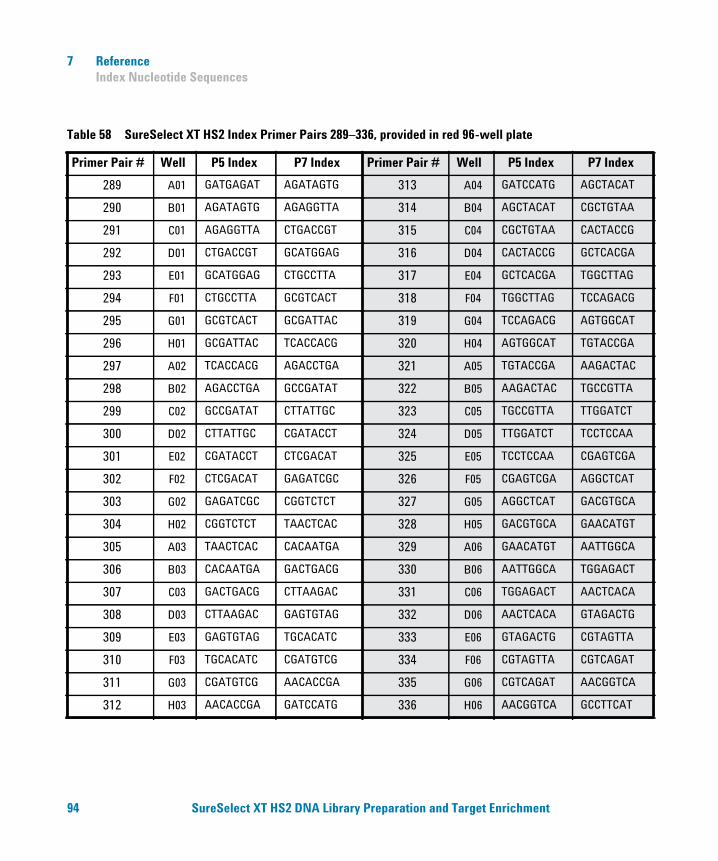
7 Reference Index Nucleotide Sequences
94
Table 58 SureSelect XT HS2 Index Primer Pairs 289–336, provided in red 96-well plate
Primer Pair # Well P5 Index P7 Index Primer Pair # Well P5 Index P7 Index
289 A01 GATGAGAT AGATAGTG 313 A04 GATCCATG AGCTACAT
290 B01 AGATAGTG AGAGGTTA 314 B04 AGCTACAT CGCTGTAA
291 C01 AGAGGTTA CTGACCGT 315 C04 CGCTGTAA CACTACCG
292 D01 CTGACCGT GCATGGAG 316 D04 CACTACCG GCTCACGA
293 E01 GCATGGAG CTGCCTTA 317 E04 GCTCACGA TGGCTTAG
294 F01 CTGCCTTA GCGTCACT 318 F04 TGGCTTAG TCCAGACG
295 G01 GCGTCACT GCGATTAC 319 G04 TCCAGACG AGTGGCAT
296 H01 GCGATTAC TCACCACG 320 H04 AGTGGCAT TGTACCGA
297 A02 TCACCACG AGACCTGA 321 A05 TGTACCGA AAGACTAC
298 B02 AGACCTGA GCCGATAT 322 B05 AAGACTAC TGCCGTTA
299 C02 GCCGATAT CTTATTGC 323 C05 TGCCGTTA TTGGATCT
300 D02 CTTATTGC CGATACCT 324 D05 TTGGATCT TCCTCCAA
301 E02 CGATACCT CTCGACAT 325 E05 TCCTCCAA CGAGTCGA
302 F02 CTCGACAT GAGATCGC 326 F05 CGAGTCGA AGGCTCAT
303 G02 GAGATCGC CGGTCTCT 327 G05 AGGCTCAT GACGTGCA
304 H02 CGGTCTCT TAACTCAC 328 H05 GACGTGCA GAACATGT
305 A03 TAACTCAC CACAATGA 329 A06 GAACATGT AATTGGCA
306 B03 CACAATGA GACTGACG 330 B06 AATTGGCA TGGAGACT
307 C03 GACTGACG CTTAAGAC 331 C06 TGGAGACT AACTCACA
308 D03 CTTAAGAC GAGTGTAG 332 D06 AACTCACA GTAGACTG
309 E03 GAGTGTAG TGCACATC 333 E06 GTAGACTG CGTAGTTA
310 F03 TGCACATC CGATGTCG 334 F06 CGTAGTTA CGTCAGAT
311 G03 CGATGTCG AACACCGA 335 G06 CGTCAGAT AACGGTCA
312 H03 AACACCGA GATCCATG 336 H06 AACGGTCA GCCTTCAT
SureSelect XT HS2 DNA Library Preparation and Target Enrichment
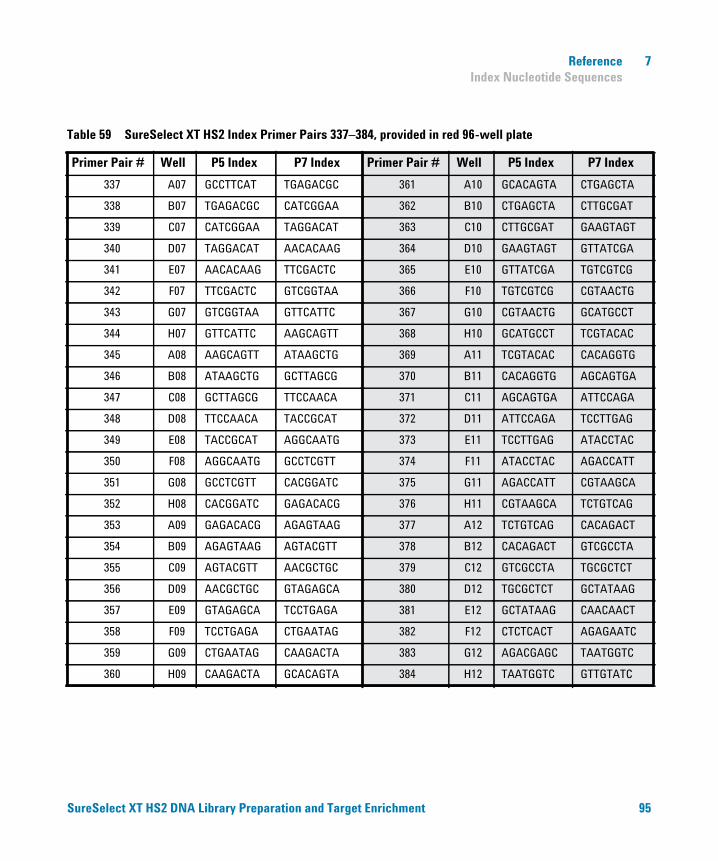
Reference 7 Index Nucleotide Sequences
SureSelect XT HS2 D
Table 59 SureSelect XT HS2 Index Primer Pairs 337–384, provided in red 96-well plate
Primer Pair # Well P5 Index P7 Index Primer Pair # Well P5 Index P7 Index
337 A07 GCCTTCAT TGAGACGC 361 A10 GCACAGTA CTGAGCTA
338 B07 TGAGACGC CATCGGAA 362 B10 CTGAGCTA CTTGCGAT
339 C07 CATCGGAA TAGGACAT 363 C10 CTTGCGAT GAAGTAGT
340 D07 TAGGACAT AACACAAG 364 D10 GAAGTAGT GTTATCGA
341 E07 AACACAAG TTCGACTC 365 E10 GTTATCGA TGTCGTCG
342 F07 TTCGACTC GTCGGTAA 366 F10 TGTCGTCG CGTAACTG
343 G07 GTCGGTAA GTTCATTC 367 G10 CGTAACTG GCATGCCT
344 H07 GTTCATTC AAGCAGTT 368 H10 GCATGCCT TCGTACAC
345 A08 AAGCAGTT ATAAGCTG 369 A11 TCGTACAC CACAGGTG
346 B08 ATAAGCTG GCTTAGCG 370 B11 CACAGGTG AGCAGTGA
347 C08 GCTTAGCG TTCCAACA 371 C11 AGCAGTGA ATTCCAGA
348 D08 TTCCAACA TACCGCAT 372 D11 ATTCCAGA TCCTTGAG
349 E08 TACCGCAT AGGCAATG 373 E11 TCCTTGAG ATACCTAC
350 F08 AGGCAATG GCCTCGTT 374 F11 ATACCTAC AGACCATT
351 G08 GCCTCGTT CACGGATC 375 G11 AGACCATT CGTAAGCA
352 H08 CACGGATC GAGACACG 376 H11 CGTAAGCA TCTGTCAG
353 A09 GAGACACG AGAGTAAG 377 A12 TCTGTCAG CACAGACT
354 B09 AGAGTAAG AGTACGTT 378 B12 CACAGACT GTCGCCTA
355 C09 AGTACGTT AACGCTGC 379 C12 GTCGCCTA TGCGCTCT
356 D09 AACGCTGC GTAGAGCA 380 D12 TGCGCTCT GCTATAAG
357 E09 GTAGAGCA TCCTGAGA 381 E12 GCTATAAG CAACAACT
358 F09 TCCTGAGA CTGAATAG 382 F12 CTCTCACT AGAGAATC
359 G09 CTGAATAG CAAGACTA 383 G12 AGACGAGC TAATGGTC
360 H09 CAAGACTA GCACAGTA 384 H12 TAATGGTC GTTGTATC
NA Library Preparation and Target Enrichment 95
7 Reference Troubleshooting Guide
Troubleshooting Guide
96
If recovery of gDNA from samples is low
✔ Using excess tissue for gDNA isolation can reduce yield. Use only the amount of each specific tissue type recommended by the gDNA isolation protocol.
✔ Tissue sample lysis may not have been optimal during gDNA isolation. Monitor the extent of sample lysis during the Proteinase K digestion at 56°C by gently pipetting the digestion reaction every 20–30 minutes, visually inspecting the solution for the presence of tissue clumps. If clumps are still present after the 1- hour incubation at 56°C, add another 10 µl of Proteinase K and continue incubating at 56°C, with periodic mixing and visual inspections, for up to two additional hours. When the sample no longer contains clumps of tissue, move the sample to room temperature until lysis is complete for the remaining samples. Do not over- digest. Individual samples may be kept at room temperature for up to 2 hours before resuming the protocol. Do not exceed 3 hours incubation at 56°C for any sample.
If yield of pre-capture libraries is low
✔ The library preparation protocol includes specific thawing, temperature control, pipetting, and mixing instructions which are required for optimal performance of the highly viscous buffer and enzyme solutions used in the protocol. Be sure to adhere to all instructions when setting up the reactions.
✔ Ensure that the ligation master mix (see page 29) is kept at room temperature for 30–45 minutes before use.
✔ PCR cycle number may require optimization. Repeat library preparation for the sample, increasing the pre- capture PCR cycle number by 1 to 2 cycles. If a high molecular weight peak (>500 bp) is observed in the electropherogram for a sample with low yield, the DNA may be overamplified. Repeat library preparation for the sample, decreasing the pre- capture PCR cycle number by 1 to 3 cycles.
✔ DNA isolated from degraded samples, including FFPE tissue samples, may be over- fragmented or have modifications that adversely affect library preparation processes. Use the Agilent NGS FFPE QC Kit to determine the precise quantity of amplifiable DNA in the sample and allow direct normalization of input DNA amount.
SureSelect XT HS2 DNA Library Preparation and Target Enrichment
Reference 7 Troubleshooting Guide
SureSelect XT HS2 D
✔ Performance of the solid- phase reversible immobilization (SPRI) purification step may be poor. Verify the expiration date for the vial of AMPure XP beads used for purification. Adhere to all bead storage and handling conditions recommended by the manufacturer. Ensure that the beads are kept at room temperature for at least 30 minutes before use. Use freshly- prepared 70% ethanol for each SPRI procedure.
✔ DNA elution during SPRI purification steps may be incomplete. Ensure that the AMPure XP beads are not overdried just prior to sample elution.
If solids observed in the End Repair-A Tailing Buffer
✔ Vortex the solution at high speed until the solids are dissolved. The observation of solids when first thawed does not impact performance, but it is important to mix the buffer until all solutes are dissolved.
If pre-capture library fragment size is larger than expected in electropherograms
✔ Shearing may not be optimal. For intact, high- quality DNA samples, ensure that shearing is completed using the two- round shearing protocol provided, including all spinning and vortexing steps.
✔ Any bubbles present on the microTUBE filament may disrupt complete shearing. Spin the microTUBE for 30 seconds before the first round of shearing to ensure that any bubbles are released.
If pre-capture library fragment size is different than expected in electropherograms
✔ FFPE DNA pre- capture libraries may have a smaller fragment size distribution due to the presence of DNA fragments in the input DNA that are smaller than the target DNA shear size.
✔ DNA fragment size selection during SPRI purification depends upon using the correct ratio of sample to AMPure XP beads. Before removing an aliquot of beads for the purification step, mix the beads until the suspension appears homogeneous and consistent in color and verify that you are using the bead volume recommended for pre- capture purification on page 38.
NA Library Preparation and Target Enrichment 97
7 Reference Troubleshooting Guide
98
If low molecular weight adaptor-dimer peak is present in pre-capture library electropherograms
✔ The presence of a low molecular weight peak, in addition to the expected peak, indicates the presence of adaptor- dimers in the library. It is acceptable to proceed to target enrichment with library samples for which adaptor- dimers are observed in the electropherogram at low abundance, similar to the samples analyzed on page 41 to page 44. The presence of excessive adaptor- dimers in the samples may be associated with reduced yield of pre- capture libraries. If excessive adaptor- dimers are observed, verify that the adaptor ligation protocol is being performed as directed on page 32. In particular, ensure that the Ligation master mix is mixed with the sample prior to adding the Adaptor Oligo Mix to the mixture. Do not add the Ligation master mix and the Adaptor Oligo Mix to the sample in a single step.
✔ For whole- genome sequencing (not specifically supported by this protocol), samples with an adaptor- dimer peak must be subjected to an additional round of SPRI- purification. To complete, first dilute the sample to 50 µl with nuclease free water, then follow the SPRI purification procedure on page 38.
If yield of post-capture libraries is low
✔ PCR cycle number may require optimization. Repeat library preparation and target enrichment for the sample, increasing the post- capture PCR cycle number by 1 to 2 cycles.
✔ The RNA Capture Library used for hybridization may have been compromised. Verify the expiration date on the Capture Library vial or Certificate of Analysis. Adhere to the recommended storage and handling conditions. Ensure that the Capture Library Hybridization Mix is prepared immediately before use, as directed on page 49, and that solutions containing the Capture Library are not held at room temperature for extended periods.
If post-capture library fragment size is different than expected in electropherograms
✔ DNA fragment size selection during SPRI purification depends upon using the correct ratio of sample to AMPure XP beads. Before removing an aliquot of beads for the purification step, mix the beads until the suspension appears homogeneous and consistent in color and verify that you are using the bead volume recommended for post- capture purification on page 59.
SureSelect XT HS2 DNA Library Preparation and Target Enrichment
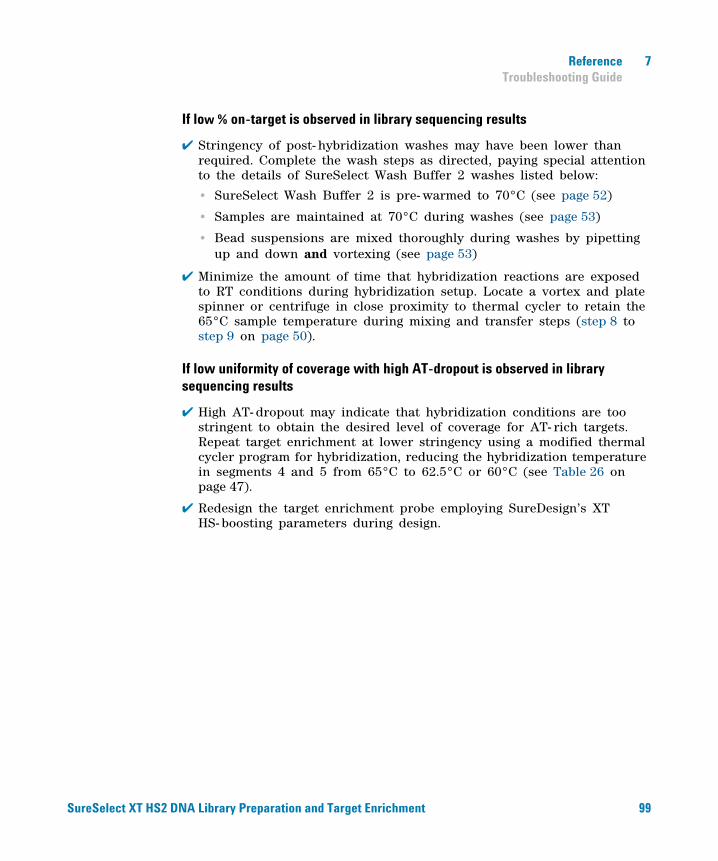
Reference 7 Troubleshooting Guide
SureSelect XT HS2 D
If low % on-target is observed in library sequencing results
✔ Stringency of post- hybridization washes may have been lower than required. Complete the wash steps as directed, paying special attention to the details of SureSelect Wash Buffer 2 washes listed below:
• SureSelect Wash Buffer 2 is pre- warmed to 70°C (see page 52)
• Samples are maintained at 70°C during washes (see page 53)
• Bead suspensions are mixed thoroughly during washes by pipetting up and down and vortexing (see page 53)
✔ Minimize the amount of time that hybridization reactions are exposed to RT conditions during hybridization setup. Locate a vortex and plate spinner or centrifuge in close proximity to thermal cycler to retain the 65°C sample temperature during mixing and transfer steps (step 8 to step 9 on page 50).
If low uniformity of coverage with high AT-dropout is observed in library sequencing results
✔ High AT- dropout may indicate that hybridization conditions are too stringent to obtain the desired level of coverage for AT- rich targets. Repeat target enrichment at lower stringency using a modified thermal cycler program for hybridization, reducing the hybridization temperature in segments 4 and 5 from 65°C to 62.5°C or 60°C (see Table 26 on page 47).
✔ Redesign the target enrichment probe employing SureDesign’s XT HS- boosting parameters during design.
NA Library Preparation and Target Enrichment 99

7 Reference Quick Reference Protocol
Quick Reference Protocol
100
An abbreviated summary of the protocol steps is provided below for experienced users. Use the complete protocol on page 18 to page 61 until you are familiar with all of the protocol details such as reagent mixing instructions and instrument settings.
H
Step Summary of Conditions
Library Prep
Prepare, qualify, and fragment DNA samples
Prepare 10–200 ng gDNA in Low TE (50 µl for Covaris/7 µl for enzymatic fragmentation)
For FFPE DNA, qualify integrity and adjust input amount as directed on page 19 and page 20
Mechanically shear DNA using Covaris with shearing conditions on page 21 OR enzymatically fragment DNA using SureSelect Enzymatic Fragmentation Kit with protocol on page 24 (50 µl final volume)
Prepare Ligation master mix
Per reaction: 23 µl Ligation Buffer + 2 µl T4 DNA Ligase
Keep at room temperature 30–45 min before use
Prepare End-Repair/dA-Tailing master mix
Per reaction: 16 µl End Repair-A Tailing Buffer + 4 µl End Repair-A Tailing Enzyme Mix
Keep on ice
End-Repair and dA-Tail the DNA fragments
50 µl DNA fragments + 20 µl End Repair/dA-Tailing master mix
Incubate in thermal cycler: 15 min @ 20°C, 15 min @ 72°C, Hold @ 4°C
Ligate adaptor 70 µl DNA sample + 25 µl Ligation master mix +5 µl SureSelect XT HS2 Adaptor Oligo Mix
Incubate in thermal cycler: 30 min @ 20°C, Hold @ 4°C
Purify DNA 100 µl DNA sample + 80 µl AMPure XP bead suspension
Elute DNA in 35 µl nuclease-free H2O, removing 34 µl to fresh well
Prepare PCR master mix Per reaction: 10 µl 5× Herculase II Reaction Buffer with dNTPs + 1 µl Herculase II Fusion DNA Polymerase
Keep on ice
Amplify the purified DNA 34 µl purified DNA + 11 µl PCR master mix + 5 µl assigned SureSelect XT HS2 Index Primer Pair
Amplify in thermal cycler using program on page 36
Purify amplified DNA 50 µl amplified DNA + 50 µl AMPure XP bead suspension
Elute DNA in 15 µl nuclease-free H2O
Quantify and qualify DNA Analyze 1 µl using Agilent 2100 Bioanalyzer or 4200 TapeStation instrument
SureSelect XT HS2 DNA Library Preparation and Target Enrichment
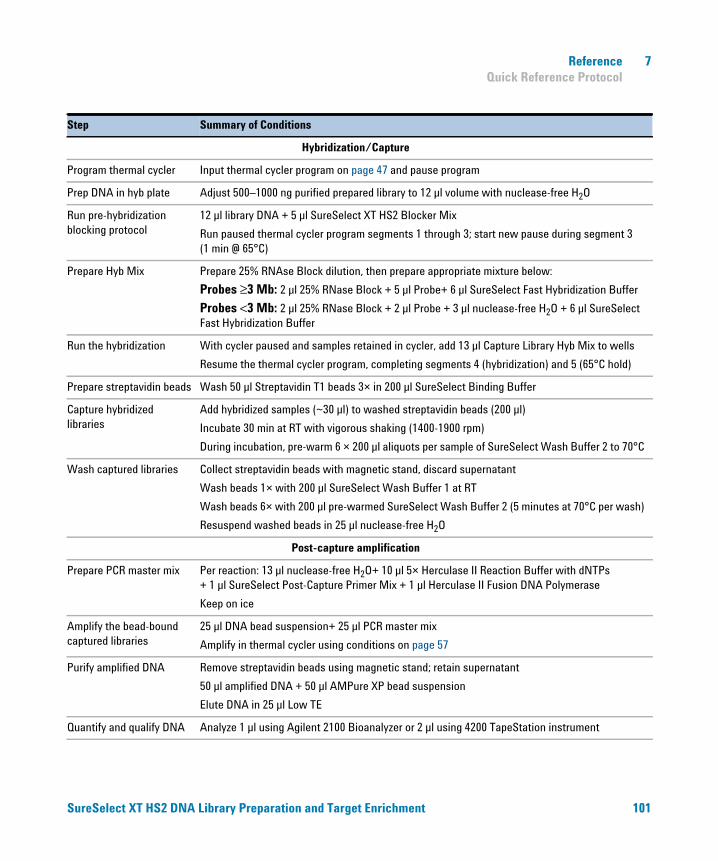
Reference 7 Quick Reference Protocol
Hybridization/Capture
Program thermal cycler Input thermal cycler program on page 47 and pause program
Prep DNA in hyb plate Adjust 500–1000 ng purified prepared library to 12 µl volume with nuclease-free H2O
Run pre-hybridization blocking protocol
12 µl library DNA + 5 µl SureSelect XT HS2 Blocker Mix
Run paused thermal cycler program segments 1 through 3; start new pause during segment 3 (1 min @ 65°C)
Prepare Hyb Mix Prepare 25% RNAse Block dilution, then prepare appropriate mixture below:
Probes ≥3 Mb: 2 µl 25% RNase Block + 5 µl Probe+ 6 µl SureSelect Fast Hybridization Buffer
Probes <3 Mb: 2 µl 25% RNase Block + 2 µl Probe + 3 µl nuclease-free H2O + 6 µl SureSelect Fast Hybridization Buffer
Run the hybridization With cycler paused and samples retained in cycler, add 13 µl Capture Library Hyb Mix to wells
Resume the thermal cycler program, completing segments 4 (hybridization) and 5 (65°C hold)
Prepare streptavidin beads Wash 50 µl Streptavidin T1 beads 3× in 200 µl SureSelect Binding Buffer
Capture hybridized libraries
Add hybridized samples (~30 µl) to washed streptavidin beads (200 µl)
Incubate 30 min at RT with vigorous shaking (1400-1900 rpm)
During incubation, pre-warm 6 × 200 µl aliquots per sample of SureSelect Wash Buffer 2 to 70°C
Wash captured libraries Collect streptavidin beads with magnetic stand, discard supernatant
Wash beads 1× with 200 µl SureSelect Wash Buffer 1 at RT
Wash beads 6× with 200 µl pre-warmed SureSelect Wash Buffer 2 (5 minutes at 70°C per wash)
Resuspend washed beads in 25 µl nuclease-free H2O
Post-capture amplification
Prepare PCR master mix Per reaction: 13 µl nuclease-free H2O+ 10 µl 5× Herculase II Reaction Buffer with dNTPs + 1 µl SureSelect Post-Capture Primer Mix + 1 µl Herculase II Fusion DNA Polymerase
Keep on ice
Amplify the bead-bound captured libraries
25 µl DNA bead suspension+ 25 µl PCR master mix
Amplify in thermal cycler using conditions on page 57
Purify amplified DNA Remove streptavidin beads using magnetic stand; retain supernatant
50 µl amplified DNA + 50 µl AMPure XP bead suspension
Elute DNA in 25 µl Low TE
Quantify and qualify DNA Analyze 1 µl using Agilent 2100 Bioanalyzer or 2 µl using 4200 TapeStation instrument
Step Summary of Conditions
SureSelect XT HS2 DNA Library Preparation and Target Enrichment 101
www.agilent.com
In This Book
This guide contains instructions for using the SureSelect XT HS2 DNA Reagent Kits and SureSelect probes to prepare target- enriched NGS libraries for the Illumina platform.
Agilent Technologies, Inc. 2020
Version B0, May 2020
*G9983-90000*p/n G9983-90000
Agilent Technologies