supereyes instruction of digital microscope ( t001 ) · supereyes instruction of digital microscope...
TRANSCRIPT

- 1 -
SUPEREYES
Instruction of Digital Microscope ( T001 )
Introduction
Thank you for using SUPEREYES Handheld Digital Microscope
Handheld Digital Microscope has a wide scope of applications, such as:
1. Skin detection
2. Hair root detection
3. Industrial inspections (such as print PCB board, precise equipment)
4. Printing
5. Textile
6. Biologic inspection
7. Antique and Jewelers inspection
8. Crime scene, imprint and material evidence investigation
9. Others
Handheld Digital Microscope can be connected with computer and easy
to operate .Using the additional software, you can make picture capture
and video recording easily.
In order to make you enjoy the funny to use Handheld Digital Microscope
please read this User's Manual.
Contents
Introduction …………………………………………………………1
Contents ……………………………………………………………….1

- 2 -
Specification and System requirements ……………………………….2
Safety Precautions ……………………………………………………..3
Component ………………………………………………………............4
Hardware installation and using ……………………………………….5
Software installation and using ………………………………………..5
Installation ……………………………………………………………..5
Starting device …………………………………………………………...5
Language selection………………………………………………………6
Basic setting ……………………………………………………………..6
Picture capture …………………………………………………………9
Video recording ………………………………………………………...10
Measurement……………………………………………………………13
Set Option……………………………………………………………….15
Output …………………………………………………………………..16
Display usage……………………………………………………………16
Difficulty resolution .…………………………………………………...17
Certificates ……………………………………………………………18
Disclaimer ……………………………………………………………19
Specification:
1. Resolution: 2-5Mega
2. Inner optic-lens
3. Magnification: 1000 times

- 3 -
4. Measurement function (special modes)
5. Anti-tremble picture capture function
6. Inner LED illumination
7. Display speed: 30FPS
8. Interface: USB (PC)
System Requirement:
The computers should be required as:
OS: Windows 98SE/Me/2000/XP,Win98/98SE/VISTA
XP/VISTA----Plug and play
CPU: Pentium 233MHz  and above
Memory: 256MB SDRAM
Interface: USB2.0
HDD storage space: 600MB and above
Safety Precautions:
1. Do not touch the lens with finger to avoid electrostatic damage.
2. Do not attempt to disassemble this product yourself. Opening the
covers may expose you to dangerous voltage points or other risks.
3. When hands are wet, do not plug in or remove the adaptor or other
connectors.
4. Using or storing USB microscope , do not plug in any other cables.
5. Do not clean the products with ethyl alcohol or other organic solvent
camera case, painted surfaces & lens.

- 4 -
6. If the lens is dirty, please use a kens brush on soft cloth to wipe clean.
Avoid touching them with your fingers. Exercise care to avoid scratching
the lens.
7. Without protection, do not put microscope outdoor to avoid the lens
damaging by high temperature or humidity.
8. Temperature: O°C ~ 40°C and Humidity: 45%~85%.
9. If liquid has entered stage, immediately turn the power off and use
dryer neither. Please send to the maintenance center
10. Using or storing USB microscope, need to watch all cables to avoid
trip over.
11. To avoid electric shock. When remove all electric PC or TV. Please
pull out the power source.
Component
1. The body of digital microscope (attached photos on hardware
installation and User's Manual)
2. CD (for special function)
- 5 -
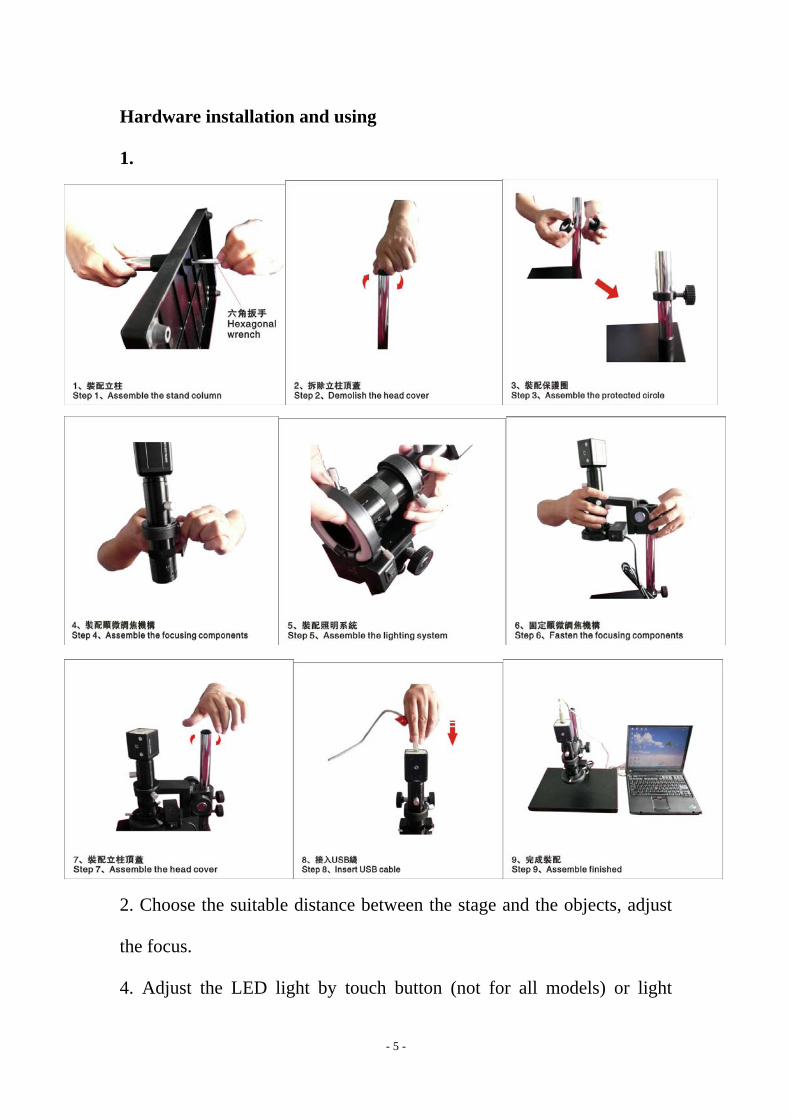
Hardware installation and using
1.
2. Choose the suitable distance between the stage and the objects, adjust
the focus.
4. Adjust the LED light by touch button (not for all models) or light

- 6 -
control
Software installation and using
1. Installation
Installation should follow the bellow SUPEREYES setup installation
2. Starting device
After plug into USB port, the computer will show “new device USB
microscope” on right bottom corner, that mean the computer find the
Microscope, than you can select “preview” to view item your are testing.
3. Language switches function.
Our software has three types language version available: Chinese Simple,
Chinese traditional, Japanese, English and German.

- 7 -
4. Basic setting
1) Device source select
Many microscopes connect the computer at the same time. Please click
the ‘Device Source, then select the device that you need.
2) Device setting
If you don’t satisfy, you can try to change Device Setting or Restoring
Default Values.

- 8 -
3) Video format setting
Setting the Video format can change the video resolution

- 9 -
5. Picture capture.
1)Setting picture document conservation
In the dialog, enter the specified directory, the default installation
directory for the IMAGES directory.
2) Shoot

- 10 -
Preview the stored picture
When the photos and videos are preset in the file, you can open it through
A . Open the picture folder
B. double click the picture in the ‘type Picture”
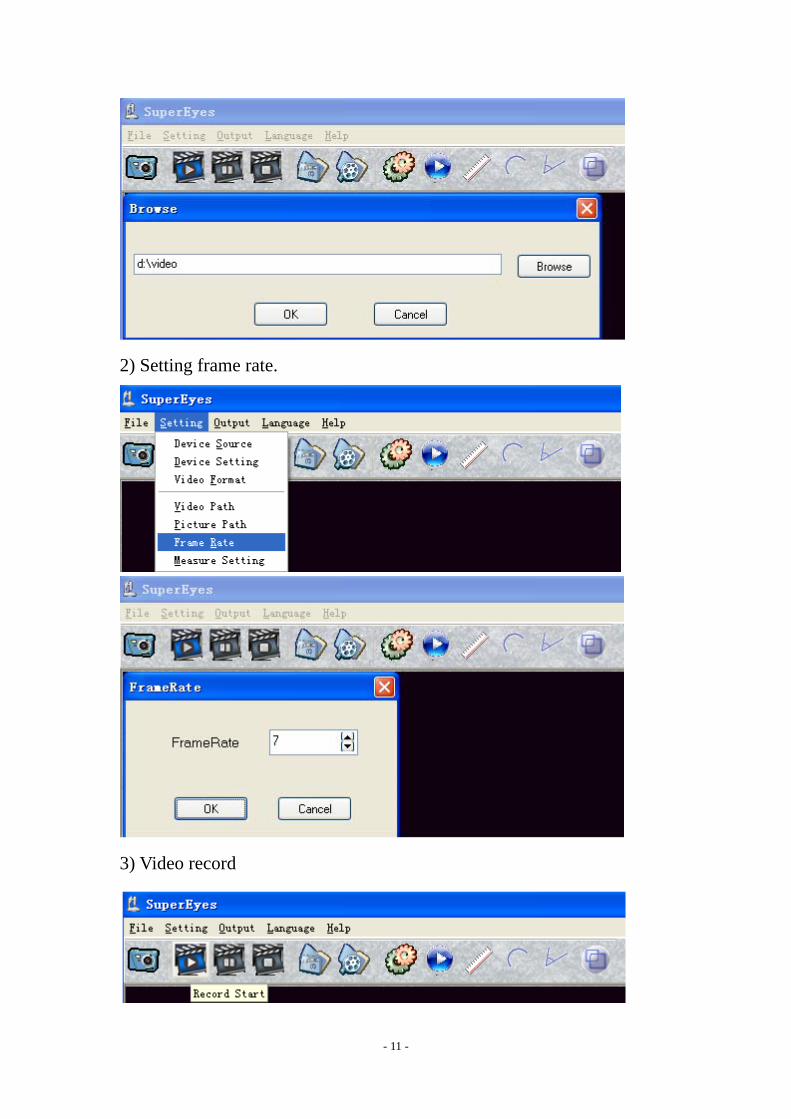
6. Video recording
1) Setting picture and video document conservation.
In the dialog, enter the specified directory, the default installation
directory for the VIDEO directory.
- 11 -
2) Setting frame rate.
3) Video record

- 12 -
4) Pause
5)Stop
6) Play video
A. click player to play (only for DZC file)
B .open video files by Video Folder
C. double click video on the ‘Type video’
7. Measurement.

- 13 -
1) Setup the measuring basis
Put a precision ruler under the lens of microscope, pull a line about one
MM and write down the analog number.
2) To measure the line
Just need to click the left key of the mouse. Click at the beginning of
the line and pull a line click the end the line.

- 14 -
3) To measure the arc length
First click left-key of mouse at the beginning point of the arc. And click
left-key of mouse at any point of arc, then pull the line make it match the
arc and click you can get the arc length
4)To measure the angle
Click left-key of mouse at the point of the angle, move mouse from this
angle point to one side and then click left-key of mouse; move mouse
from this angle point to the other side and then click left-key of mouse.
Now you can get the data of the angle

- 15 -
8. Set Option
1)select video record format
WMV(general format)or DZC( professional high compression ratio
format)
2) Select the photo size
3) Select the ruler color

- 16 -
9. Output
Print the photos
10. Display usage
Select full screen and the highest pixel

- 17 -
Difficulty resolution
Items Trouble vision Reason Solution
1 blank screen
LED is closed Preview is closed
No suitable devices Incorrect connection with
PC
Open LED Open preview
Choose suitable devices
Connect USB again
2 Picture vague、
Discoloration speed slow
Dirty lens Incorrect focusing
Incorrect connection with PC
The Configuration of PC is too low
Clean by Lens paper
Adjust focusing Connect USB again
Choose new PC
3 Picture distortion
Incorrect connection with PC
Trouble inside of microscope
Connect USB againBack to repair
4 Flicker picture Bad frequency Choose the suitable
frequency
5 Can not recognize
Incorrect connection with PC
Trouble inside of microscope
Connect USB againBack to repair
6 Touch reflect slow,
no reflect
Climate effect Trouble inside of
microscope
Make the touch- bottom Humidity
Back to repair

- 18 -
Certificate

- 19 -
Disclaimer
The manufacturer and distributor of this product shall not take the
responsibilities on the damages caused by the improper using of this
product or other artificially damages.
The content of this User manual is based on the current specification of
this product. The manufacturer D&F Corp shall not take the
responsibility of any inconsistent of the specification to the product for
the purpose of improvements and other reasons. Meanwhile, D&F Corp
do not have the obligation for updating the content and any information
of this manual momentarily.