structural safety of bridge decks prem vasant egade
TRANSCRIPT
STRUCTURAL SAFETY OF BRIDGE DECKS
WITH VARIABLE REBAR
COVER
by
PREM VASANT EGADE
Presented to the Faculty of the Graduate School of
The University of Texas at Arlington in Partial Fulfillment
of the Requirements
for the Degree of
MASTER OF SCIENCE IN STRUCTURES AND APPLIED MECHANICS
THE UNIVERSITY OF TEXAS AT ARLINGTON
December 2018

ii
Copyright © by Prem Vasant Egade 2018
All Rights Reserved

iii
Acknowledgements
Firstly, I would like to express my sincere gratitude to my advising Prof. Nur
Yazdani who provided me the resources and guidance to complete this thesis. His
guidance helped me in all phases of research and writing of this thesis.
Besides my advisor, I would like to thank the rest of my committee: Prof. Himan
Hojat Jalali and Prof. Samantha Sabatino for their encouragement and suggestions. My
sincere thanks also go to Dr. Eyosias Beneberu and Towfiqul Quadir for sharing their
experience and knowledge.
Finally, I would like to thank all the friends from The University of Texas at
Arlington for providing me with a happy environment and make me feel like home.
November 26, 2018

iv
Abstract
STRUCTURAL SAFETY OF BRIDGE DECKS
WITH VARIABLE REBAR COVER
Prem V. Egade, MS
The University of Texas at Arlington, 2018
Supervising Professor: Nur Yazdani
Construction defects are common and are difficult to avoid completely. This
arises due to improper workmanship, inspection, drawing and specification. On bridge
decks, achieving the desired cover is necessary since inadequacy can cause accelerated
corrosion in steel and for the most part spalling and delamination which ultimately led to
failure. Tolerance provided by different standards and specification also restrict the
amount of rebar. So, construction is more focused on increasing cover undermining the
loss of strength as consequence. The objective of this research is to check the safety of
decks by analyzing bridges for reduction in capacity due to cover variation.
The investigation was conducted on two old and two new bridges using Ground
Penetration Radar (GPR) for possible rebar cover variation. Data were collected with
ground coupled high-frequency 2.6GHz antenna for high accuracy. The dielectric
constant for depth calculation was estimated using migration and ground truth method
with minimum error. The hyperbolic signatures were detected and plotted in form of
contours and percent distribution was calculated.
For 0.5 in. (13mm) and 1 in. (25.4mm) increase in rebar cover, the deck capacity
is reduced by 9% and 18%, respectively for 8.5 in. (216mm) thickness of the slab. It was
found that on average the rebar cover distribution of 40% and 77% varied +1/2 inch and

v
+1 inch, respectively. The reduced negative moment capacity followed by decreased
effective depth is compared with design moments. Finally, the load on rebar cage is
modeled and deflection and stresses are calculated different bar sizes and distance of
rebar supports. The smaller size rebar with less spacing deflected more than larger size
rebars.

vi
Table of Contents
Acknowledgements .............................................................................................................iii
Abstract .............................................................................................................................. iv
Table of Contents ............................................................................................................... vi
List of Illustrations ............................................................................................................. viii
List of Tables ...................................................................................................................... xi
Chapter 1 Introduction......................................................................................................... 1
1.1 Introduction ............................................................................................................... 1
1.2 Problem Statement ................................................................................................... 1
1.3 Objective ................................................................................................................... 2
1.4 Organization of study ................................................................................................ 2
Chapter 2 Literature Review ............................................................................................... 4
2.1 Concrete Cover......................................................................................................... 4
2.2 Introduction of GPR .................................................................................................. 7
Material Properties ..................................................................................................... 8
Antenna and T-R offset ............................................................................................ 10
Working of GPR and Formation of Radargram ........................................................ 11
Scanning ................................................................................................................... 13
2.3 Previous Research ................................................................................................. 15
Chapter 3 Bridges Description .......................................................................................... 20
3.1 SH183 Over Loop 12 .............................................................................................. 20
3.2 SH183 Over MacArthur Blvd .................................................................................. 23
Chapter 4 Methodology ..................................................................................................... 27
4.1 Data Collection ....................................................................................................... 27
4.2 Post-Processing...................................................................................................... 30

vii
4.3 Determination of Dielectric Constant and Rebar Cover ......................................... 34
Migration ................................................................................................................... 34
Ground Truth ............................................................................................................ 36
4.4 Gridding and Plotting Contours .............................................................................. 36
Chapter 5 Deck Design moments ..................................................................................... 38
5.1 Total Factored Designed Negative Moment ........................................................... 38
5.2 Total Factored Negative Bending Moment ............................................................. 42
5.3 Capacity of Deck..................................................................................................... 43
Chapter 6 Result and Discussion ...................................................................................... 46
6.1 New SH183 Over Loop 12 Eastbound ................................................................... 47
6.2 New SH183 Over Loop 12 Westbound .................................................................. 49
6.3 Old SH183 Over Loop 12 Eastbound ..................................................................... 50
6.4 Old SH183 over loop 12 eastbound repaired part .................................................. 53
6.5 Old SH183 over Loop 12 Westbound ..................................................................... 54
6.6 New SH183 over MacArthur Eastbound ................................................................ 56
6.7 New SH183 over MacArthur Westbound ............................................................... 57
6.8 Old SH183 over MacArthur Eastbound .................................................................. 59
6.9 Old SH183 over MacArthur Westbound ................................................................. 62
6.10 Deflection and Stresses on Rebar ........................................................................ 64
Chapter 7 Conclusion and Future Research .................................................................... 73
7.1 Conclusion .............................................................................................................. 73
7.2 Future Work ............................................................................................................ 74
REFERENCES .................................................................................................................. 75
Biographical Information .................................................................................................. 77

viii
List of Illustrations
Figure 2-1 Cover on deck for top reinforcement ................................................................. 4
Figure 2-2 Table 5.10.1-1 (AASHTO, 2017) ....................................................................... 6
Figure 2-3 Radar waves in different medium ...................................................................... 8
Figure 2-4 Separation between transmitter and receiver (Geophysical Archaeometry
Laboratory Inc., 2018) ....................................................................................................... 11
Figure 2-5 Formation of Radargram ................................................................................. 12
Figure 2-6 Typical Radargram of Bridges Deck ................................................................ 12
Figure 2-7 Normal vs cross polarized (Geophysical Survey System, 2017) .................... 13
Figure 2-8 A-scan(left) and B-Scan(right), (Geophysical Survey System, 2017) ............. 14
Figure 2-9 C-scan (Geophysical Survey System, 2017) ................................................... 14
Figure 2-10 Variation of cover on span 3 (Hasan & Yazdani, 2014) ................................ 15
Figure 2-11 Variation of cover on span 4 (Hasan & Yazdani, 2014) ................................ 16
Figure 2-12 Variation in Asphalt Layer (gray arrow), Rebar (white arrow) and Concrete
Bottom (black arrow), (Hugenschmidt, 2002) ................................................................... 17
Figure 2-13 Exposed reinforcement in wall outline in red ................................................. 18
Figure 3-1 Impact Damage on Old SH183 over Loop 12 ................................................. 20
Figure 3-2 Time of Construction ....................................................................................... 21
Figure 3-3 Layout of Old SH183 Over loop 12 ................................................................. 21
Figure 3-4 Layout of New SH183 GPL Over Loop 12(Westbound) .................................. 22
Figure 3-5 Layout of New SH183 ML Over Loop 12(Eastbound) ..................................... 23
Figure 3-6 Fire Damage on Old SH183 over MacArthur .................................................. 24
Figure 3-7 Layout of Old SH183 Over MacArthur ............................................................. 24
Figure 3-8 Layout of New SH183 Over MacArthur ........................................................... 25

ix
Figure 3-9 Location of SH183 Over Loop 12 (red marker) and MacArthur (blue marker),
(Google maps) .................................................................................................................. 26
Figure 4-1 Tri-wheel Cart with Ground Coupled Antenna ................................................. 28
Figure 4-2 Typical Scanning Direction on Bridge Deck .................................................... 29
Figure 4-3 Drilling for true concrete cover......................................................................... 29
Figure 4-4 Aligning All Radargram In Same Direction ...................................................... 30
Figure 4-5 Measurement of Rebar Depth ......................................................................... 31
Figure 4-6 Auto-detection of Hyperbola ............................................................................ 32
Figure 4-7 Line Separating the Approach Slab at Start of Bridge .................................... 33
Figure 4-8 Strong Refection Denotes the Expansion Joint ............................................... 33
Figure 4-9 Before Migration .............................................................................................. 35
Figure 4-10 After migration ............................................................................................... 35
Figure 6-1 New SH183 over Loop 12 Eastbound ............................................................. 48
Figure 6-2: New SH183 over Loop 12 Eastbound Rebar Distribution .............................. 48
Figure 6-3 New SH183 Over Loop 12 Westbound ........................................................... 49
Figure 6-4 New SH183 Over Loop 12 Westbound Rebar Distribution ............................. 49
Figure 6-5 Negative bending moment vs clear cover ....................................................... 50
Figure 6-6 Interface Between Asphalt and Concrete ........................................................ 51
Figure 6-7 Unclear Interface Between Asphalt and Concrete .......................................... 51
Figure 6-8 No Visible Interface ......................................................................................... 52
Figure 6-9 Old SH183 Over Loop 12 Eastbound .............................................................. 53
Figure 6-10 Old SH183 Over Loop 12 Eastbound Rebar Distribution .............................. 53
Figure 6-11 Repaired Part ................................................................................................ 54
Figure 6-12 Repaired Part Rebar Distribution .................................................................. 54
Figure 6-13 Old SH183 Over Loop 12 Westbound ........................................................... 55

x
Figure 6-14 Old SH183 Over Loop 12 Westbound Rebar Distribution ............................. 55
Figure 6-15 Old SH183 over Loop 12 Capacity vs Negative bending moment comparison
.......................................................................................................................................... 56
Figure 6-16 New SH183 over MacArthur Eastbound ....................................................... 56
Figure 6-17 New SH183 over MacArthur Eastbound Rebar Distribution ......................... 57
Figure 6-18 New SH183 over MacArthur Westbound ...................................................... 58
Figure 6-19 New SH183 over MacArthur Westbound Rebar Distribution ........................ 58
Figure 6-20 New SH183 over MacArthur Capacity vs design moment comparison........ 59
Figure 6-21 Presence of Soil on Deck .............................................................................. 60
Figure 6-22 Radargram of old SH183 over MacArthur ..................................................... 60
Figure 6-23 Sign of high cover at start of radargram ........................................................ 61
Figure 6-24 Old SH183 over MacArthur Eastbound Rebar Distribution ........................... 61
Figure 6-25 Old SH183 over MacArthur Westbound ........................................................ 62
Figure 6-26 Old SH183 over MacArthur Westbound Rebar Distribution .......................... 63
Figure 6-27 Negative bending moment vs clear cover for old SH183 over MacArthur .... 64
Figure 6-28 RISA-3D Model of Rebar Cage ..................................................................... 65
Figure 6-29 Selection criteria for spacing ......................................................................... 66
Figure 6-30 Typical Location of Applied Load .................................................................. 67
Figure 6-31 Bar Size vs Bending Stress ........................................................................... 68
Figure 6-32 Bar Size vs Deflection ................................................................................... 69
Figure 6-33: Transversely supported at 8 feet .................................................................. 69
Figure 6-34 Longitudinally supported at 8 feet ................................................................. 70
Figure 6-35 Continuous Rebar mat ................................................................................... 71
Figure 6-36 Applied load position ..................................................................................... 72

xi
List of Tables
Table 2-1 Dielectric Constant of Different Materials ........................................................... 9
Table 2-2 Reflection Strength at Boundary of Two Materials ............................................. 9
Table 2-3: Reduction in Strength Due to Displaced Rebars (Erdem & Peraza, 2015) ..... 18
Table 2-4: Summary of Rebar Cover Variation (Ekolu and Solomon 2006) ..................... 19
Table 4-1 GPR setting....................................................................................................... 28
Table 4-2 Dielectric Constant from Migration.................................................................... 35
Table 4-3 Dielectric constant by ground truth method ...................................................... 36
Table 5-1 Maximum Girder Spacing ................................................................................. 39
Table 5-2 Dead Load of Slab and Wearing Surface ......................................................... 39
Table 5-3 Negative Bending due to Dead Load and Future Wearing Surface ................. 40
Table 5-4 Design Sections for Live Load Calculation ....................................................... 41
Table 5-5 Negative Live Load Moment ............................................................................. 42
Table 5-6 Total Negative Factored Bending Moments ..................................................... 42
Table 5-7 Summary of top transverse spacing and cover ................................................ 43
Table 5-8: Proposed deck capacity ................................................................................... 44
Table 5-9: Total Factored Design and Negative Moment Capacity .................................. 45
Table 6-1: Proposed clear cover for old bridges ............................................................... 46
Table 6-2: Proposed clear cover for new bridges ............................................................. 46
Table 6-3: Comparison of dielectric constant form migration and ground truth ................ 47
Table 6-4 Standard deviation ............................................................................................ 63
Table 6-5 Transverse reinforcement negative moment capacity equivalent to capacity by
#5@6-in. ............................................................................................................................ 66
Table 6-6 other parameters for negative moment calculations......................................... 66
Table 6-7 Result of missing support ................................................................................. 70

xii
Table 6-8 Continuous Rebar Cage Results ...................................................................... 72

1
Chapter 1
Introduction
1.1 Introduction
Construction defects are common and are difficult to avoid completely. Some of
the causes are improper workmanship, lack of inspection, not following specifications,
unskilled labor, incomplete design drawings and lack of knowledge. Due to this
performance of the structures, cost of maintenance or repair are severely affected. One
such defect is proper placement of rebars in the concrete member which helps achieve
desired resistance against applied loads.
The cover is also necessary to assure enough bond strength along with this
positioning is also significant, lowering the top bars or raising the bottom bars by ½ inch
more than that specified in a 6-inch-deep slab could reduce its load-carrying capacity by
20% (concreteconstruction.net, 2005). During construction, rebar may displace vertically
due to insufficient support and will result to loss in capacity.
GPR has been successfully used in the measurement of rebar depth, asphalt,
concrete deck pavement, base and sub-base with high accuracy (Al-Qadi & Samer,
2005). Earlier it was used to achieve qualitative data now with progressive research and
development of different systems quantitative data can be gathered. It has been
effectively used for mapping concrete deterioration (Parrillo & Roberts, 1997) and
corrosion in rebar (Hasan, Quantitative Non-destructive Evaluation Of Rebar Diameter
And Corrosion Damage In Concrete Using Ground Penetrating Radar, 2015) has aided to
predict maintenance required.
1.2 Problem Statement
Errors are common in construction of reinforced concrete structures. Incomplete
drawing details, improper execution, bad inspection practices, lack of knowledge and
2
experience will cause error in construction. The impact is on cost, time, loss of lives and
credibility. The Study was conducted by Multidisciplinary Center for Earthquake
Engineering Research (MCEER) on 1062 bridges in United States between 1980-2012.
Causes of failure due to environmental, earthquake, collision, scour, flood, fire, wind,
overload and internal causes were reported. The flood (28%), scour (19%) and collision
(15%) were at top but internal causes (11%) were close at fifth position. Internal cause
includes design error, material defects and deficiency in construction.
Maintaining uniform rebar clear cover is one of the challenges of bridge deck
construction. Since, corrosion is the single most important factor that governs the service
life of the deck. Hence, adequate cover is provided to ensure that rebar stays intact from
the salts and water. Tolerance are strict against providing cover less than specified this
has led contractors to implement increased rebar cover sacrificing flexural resistance.
1.3 Objective
• Analyzing the cover variation in concrete bridge deck.
• Calculation of reduced capacity of deck due to insufficient cover.
• Comparing capacity with design moment from dead and live load.
• Testing out the use of different bar sizes in concrete deck construction.
• Effect of less spacers(supports) in rebar cage construction.
1.4 Organization of study
Chapter 1 gives introduction to problem and outlines the objectives.
Chapter 2 starts with brief introduction of cover for reinforcement on bridge deck.
GPR working and theory and governing factor for depth measurement are explained.
Previous research on defects and corresponding finding are listed out.
Chapter 3 is the description of the bridges investigated for rebar cover variation.

3
Chapter 4 describes the process of data collection, post-processing and plotting
contours.
Chapter 5 deals with calculation of negative flexural resistance and design
negative moments.
Chapter 6 is results and discussions of contours along with rebar distribution,
comparative study between capacity and design moments. Analysis of a major cause of
deflection in rebar
Chapter 7 conclusions are stated for this study and future work is suggested

4
Chapter 2
Literature Review
2.1 Concrete Cover
The distance from the surface of embedded steel in concrete to the outer surface
of the concrete is termed as clear cover. It protects rebar against the outside
environment responsible for corrosion, distribute stress in concrete, responsible for bond
strength and provide thermal insulation. The thickness of the cover is mostly depended
on the type of structural element and environmental condition. On bridge deck, top of the
concrete slab is subjected to abrasion from vehicle, water and deicing salts hence
provided more as compared to bottom cover where no such forces exist. The effective
cover is measured from the center of rebar while clear cover from the outer surface.
Figure 2-1 shows the cover in deck for top reinforcement and bottom.
Figure 2-1 Cover on deck for top reinforcement

5
American Association of State Highway and Transportation Officials (AASTHO,
2017) suggest 1 in. (25mm). as minimum cover to be provided to main reinforcement
(included epoxy coated). Cover for unprotected reinforcing steel shall be less than that
specified in Figure 2-2 (Table 5.10.1-1) (AASHTO, 2017). High cover is recommended for
corrosive environment such as direct exposure to salt water and earth. Some owner has
cover requirement more that values listed in Table 5.10.1-1. Texas Department of
Transportation (TxDOT) Standard Specifications for Construction and Maintenance of
Highways, Streets, and Bridges also specify minimum cover of 1 in. (25mm) if not
specified.

6
Figure 2-2 Table 5.10.1-1 (AASHTO, 2017)

7
2.2 Introduction of GPR
GPR is a non-destructive method which uses electromagnetic waves for
subsurface imaging. It comes with various sizes and the wide range of antenna frequency
which enables to produce images of a target with different size, shape, material and at
greater depth. It has found its usefulness in utility detection, archaeological,
environmental, concrete assessment, search and rescue operation, geotechnical and
geological fields. With the advancement of the system, post-processing techniques,
research and operating practices.
GPR system consists of a control unit, power supply, and antenna. Control unit
has electronics which trigger electromagnetic pulse. Antenna housing contains
transmitter and receiver, transmitting and receiving reflected energy from objects buried,
respectively. When this radar energy encounters a difference in medium three things
happen, part of it penetrates, reflects and absorb by the surface. Figure 2-3 shows the
Transmitter (Tx) emitting radar energy (red wave) into subsurface material 1. After
reaching the interface of two material part of the energy is reflected and captured by
Receiver (Rx), part of it is refracted and enter medium 2. This process continues till the
radar energy is attenuated. Analyzing the reflected waves gives useful information about
subsurface material properties.

8
Figure 2-3 Radar waves in different medium
Material Properties
The radar energy response is governed by two physical properties of medium
electrical conductivity and dielectric constant. The absorption may be high or low
depending on the electrical conductivity. For low conductive material like dry concrete or
soil, the waves penetrate deeper. On the other hand, if it’s high for example fresh
concrete or metal the GPR energy is attenuated before it travels greater depth. The
dielectric constant controls the velocity of radar waves traveling through the medium and
is given by Equation 2-1.
ν = 𝑐
√𝜀
Equation 2-1, (Geophysical Archaeometry
Laboratory Inc., 2018)
Where, ν = velocity of radar wave in medium (x109 m/s)
𝑐 = velocity of light in vacuum, 0.3x10⁹ m/s
𝜀 = relative permittivity of medium

9
The velocity of waves is inversely proportional to the square root of the dielectric
constant of a medium. So, if it’s lower the waves travel at a high velocity and vice versa.
It is an important property in depth detection of any buried objects. Most of the
construction material it varies from 3 to 12. Some common dielectric constants are
tabulated in Table 2-1. Accurately identification will reduce error in determining the depth
of an object.
Table 2-1 Dielectric Constant of Different Materials
Materials Dielectric Constant
Materials Dielectric Constant
Air 1 Granite (dry) 5-8
Clay (dry) 2-20 Granite (wet) 5-15
clay (wet) 15-40 Limestone (dry) 4-8
Concrete (dry) 4-10 Limestone (wet) 6-15
Concrete (wet) 10-20 Sand (dry) 4-6
Asphalt 5 Sand (wet) 10-30
Fresh Water 81 Soil (average) 16
Fresh water ice 3-4 Iron Oxides 14
When radar wave enters a different medium, the contrast in the reflection in the
image is directly proportional to the difference in the dielectric constant of materials. For
example, the concrete-asphalt interface causes less contrast than the concrete-metal.
The strength of contrast is tabulated Table 2-2 for different material interface.
Table 2-2 Reflection Strength at Boundary of Two Materials
Boundary Dielectric Contrast Reflection Strength
Asphalt - Concrete Medium Medium
Concrete - Sand Low Weak
Concrete - Air High, phase reversal Strong

10
Concrete Deck - Concrete Beam None No reflection
Concrete - Metal High Strong
Concrete - Water High Strong
Concrete - PVC Low to Medium, phase reversal Weak
Antenna and T-R offset
There are various frequency antennas available ranging from 10Mhz to
2600MHz. Lower frequency antenna (10Mhz to 900Mhz) penetrates higher depth,
suitable for utility locating, geological, environmental and archaeological purposes. They
have the longer wavelength that cannot detect the smaller size targets. The high-
frequency antennas (1000Mhz-2600Mhz) are used in concrete mapping, rebar and
asphalt thickness measurement. This facilitates detection of smaller size objects since it
has a shorter wavelength but with less penetration depth.
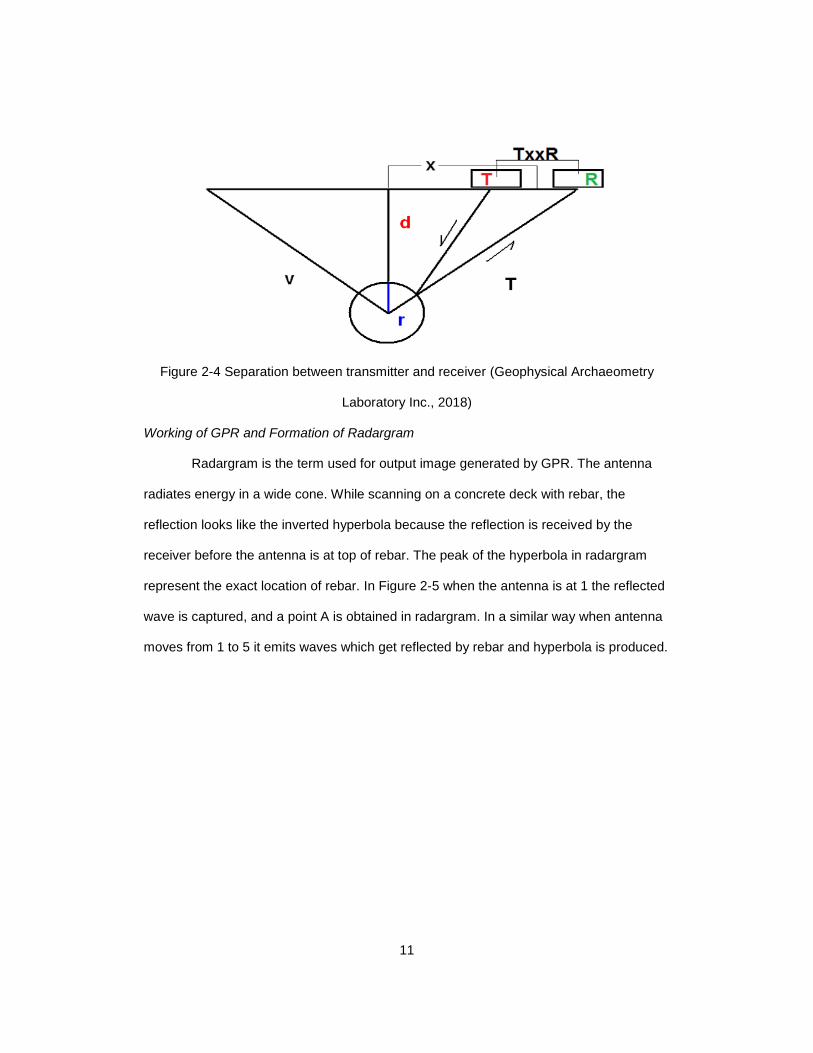
Generally, there is fix separation between transmitter and receiver. This helps in
generating hyperbolas to measure velocity of materials accurately and eliminated surface
reflection of waves before the ground (Geophysical Archaeometry Laboratory Inc., 2018).
The Figure 2-4 shows the transmitting and receiving antenna separated by the distance
TxxR.
Where,
T= two-way travel time;
V=wave velocity;
r= radius of the object;
x=horizontal separation;
d=depth of the object;
TxxR= transmitter-receiver separation
11
Figure 2-4 Separation between transmitter and receiver (Geophysical Archaeometry
Laboratory Inc., 2018)
Working of GPR and Formation of Radargram
Radargram is the term used for output image generated by GPR. The antenna
radiates energy in a wide cone. While scanning on a concrete deck with rebar, the
reflection looks like the inverted hyperbola because the reflection is received by the
receiver before the antenna is at top of rebar. The peak of the hyperbola in radargram
represent the exact location of rebar. In Figure 2-5 when the antenna is at 1 the reflected
wave is captured, and a point A is obtained in radargram. In a similar way when antenna
moves from 1 to 5 it emits waves which get reflected by rebar and hyperbola is produced.

12
Figure 2-5 Formation of Radargram
When scanning on bridge deck rebars located at certain spacing produces series
of hyperbola in radargram as shown in Figure 2-6.
Figure 2-6 Typical Radargram of Bridges Deck

13
Scanning
The antenna can be held normal or cross-polarized (Figure 2-7). The line joining
transmitter and receiver is perpendicular and parallel for normal or cross-polarized,
respectively. The metal in concrete is more sensitive when scanned perpendicular to
target and antenna held in a normal-polarized way. This is opposite when scanning over
non-metallic targets.
Figure 2-7 Normal vs cross polarized (Geophysical Survey System, 2017)
The scans are represented as one(A-scans), two(B-scans) and three(C-scans)
dimensions. When antenna transmitter and receiver is kept stationary and the image at
that point is A-scan(Figure 2-8). The first wave indicates the top surface called direct
coupling. When series of A-scans are collected with respect to time or distance covered
while the antenna is dragged the images is called B-scans(Figure 2-8). C-scans are the
collection of B-scans combined to which gives a three-dimensional image(Figure 2-9).

14
Figure 2-8 A-scan(left) and B-Scan(right), (Geophysical Survey System, 2017)
Figure 2-9 C-scan (Geophysical Survey System, 2017)

15
2.3 Previous Research
Hasan and Yazdani (2014) investigated rebar cover variation of concrete bridge
deck near Roanoke, Texas using 2.6 GHz antenna. After applying time-zero correction
and noise removal filter rebar hyperbolic signatures were picked using RADAN software
provided by GSSI. The dielectric constant was found with a standard deviation of 1.29
and 2.89 from migration and ground truth method, respectively. This was accepted by
keeping error percent below 15%. Cover at some region was inaccurately estimated due
to the presence of water for curing. Rebar location and depth were plotted in form of
contours which showed variation within range 1 to 4 in. (25.4 to 101.6 mm). It concluded
less than 48% of the area of bridge deck had an inadequate cover, less than AASTHO
specified minimum value of 2.5 in. (64mm). Span 3 (Figure 2-10) indicates most cover
within range 2.5 to 3 in. (64 to 76 mm) colored as green and span 4 (Figure 2-11)
indicates less cover within range 1 to 2 in. (25 to 51 mm) marked with warmer color.
Figure 2-10 Variation of cover on span 3 (Hasan & Yazdani, 2014)

16
Figure 2-11 Variation of cover on span 4 (Hasan & Yazdani, 2014)
In the study Hugenschmidt, 2002 horn antenna(ground coupled) with a center
frequency 1.2Ghz. A constant signal velocity of 0.9*108 m/s within the concrete was
used to convert the original time axis to depth. A comparison between radar results and
15 cores resulted in a mean difference of 0.24 in. (6 mm) for 4 bridges. Figure 2-12
shows asphalt (gray arrow), white arrow (rebar) and black arrow (concrete bottom). The
variation was seen in asphalt pavement thickness and rebar cover. The rapid
measurement of thickness from GPR for was demonstrated.

17
Figure 2-12 Variation in Asphalt Layer (gray arrow), Rebar (white arrow) and Concrete
Bottom (black arrow), (Hugenschmidt, 2002)
The case study by Erdem and Peraza (2015) involved assessment of reinforced
concrete wall defects. The building was for federal agency, so it was not subjected to
local building code regulation and special inspection during construction. This building
was constructed using insulated concrete forms which remains and serves a purpose of
thermal insulation. The reinforcement location was not in accordance to design was
found accidentally and honey combing at several location was observed. Detail
inspection at 26 locations was carried using GPR to identify other construction defeats.
The vertical reinforcing bars planned centered along the thickness of wall varied as much
as ± 2¾ in. (69.85mm) beyond the tolerances ± 3/8 in. (9.525mm) provided by ACI. This
was found in 12 of 26 located surveyed causing losses in strength for negative and
positive bending. Figure 2-13 is the exposed reinforcement resulted with corresponding
reduction of strength tabulated in Table 2-3. This indicated inspection before placement
of concrete was not performed properly.

18
Figure 2-13 Exposed reinforcement in wall outline in red
Table 2-3: Reduction in Strength Due to Displaced Rebars (Erdem & Peraza, 2015)
Bar Position Strength ΦMn (kip-ft/ft) Reduction %
Center 2.96 (4.45kNm/m ) None
3/8” (9.525mm) off center 2.57 (11.44kNm/m )
13%
1.0” (25.4mm) off center 1.91 (8.5kNm/m )
35%
1.5” (38.1mm) off center 1.39 (6.19kNm/m )
53%
2.0” (50.8mm) off center 0.82 (3.65kNm/m )
72%
2.5” (63.5mm) off center 0.25 (1.12kNm/m )
92%
Based on #5 bar @16”, Grade 60 steel, 6” thick wall, 4,000 psi concrete
19
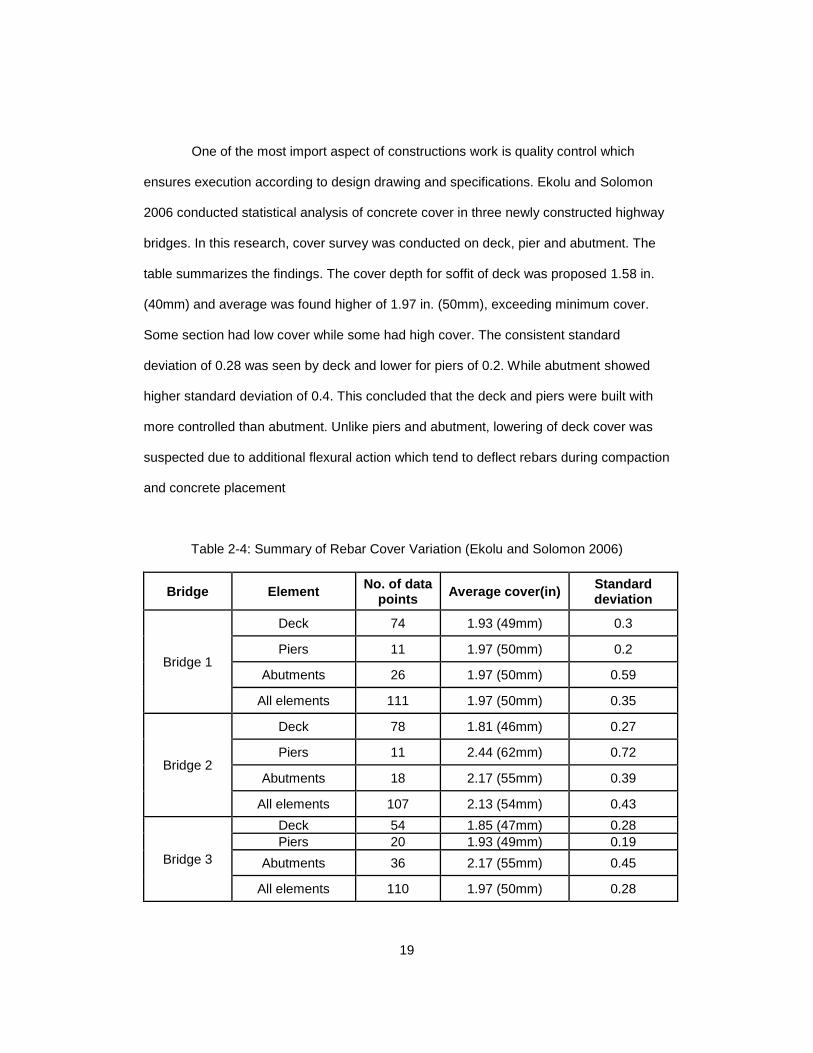
One of the most import aspect of constructions work is quality control which
ensures execution according to design drawing and specifications. Ekolu and Solomon
2006 conducted statistical analysis of concrete cover in three newly constructed highway
bridges. In this research, cover survey was conducted on deck, pier and abutment. The
table summarizes the findings. The cover depth for soffit of deck was proposed 1.58 in.
(40mm) and average was found higher of 1.97 in. (50mm), exceeding minimum cover.
Some section had low cover while some had high cover. The consistent standard
deviation of 0.28 was seen by deck and lower for piers of 0.2. While abutment showed
higher standard deviation of 0.4. This concluded that the deck and piers were built with
more controlled than abutment. Unlike piers and abutment, lowering of deck cover was
suspected due to additional flexural action which tend to deflect rebars during compaction
and concrete placement
Table 2-4: Summary of Rebar Cover Variation (Ekolu and Solomon 2006)
Bridge Element No. of data
points Average cover(in)
Standard deviation
Bridge 1
Deck 74 1.93 (49mm) 0.3
Piers 11 1.97 (50mm) 0.2
Abutments 26 1.97 (50mm) 0.59
All elements 111 1.97 (50mm) 0.35
Bridge 2
Deck 78 1.81 (46mm) 0.27
Piers 11 2.44 (62mm) 0.72
Abutments 18 2.17 (55mm) 0.39
All elements 107 2.13 (54mm) 0.43
Bridge 3
Deck 54 1.85 (47mm) 0.28
Piers 20 1.93 (49mm) 0.19
Abutments 36 2.17 (55mm) 0.45
All elements 110 1.97 (50mm) 0.28

20
Chapter 3
Bridges Description
3.1 SH183 Over Loop 12
The Loop 12 bridge carrying State Highway 183 (SH 183) over Loop 12 was
constructed in 1959 and later widened in 1969. It was a four span simply supported
bridge. Its superstructure comprised pre-stressed concrete I-girder and composite cast-
in-place concrete deck. There was impact damaged in 2006 (Figure 3-1) resulting in the
replacement of a section of the third span superstructure. Figure 3-2 is the plan of bridge
with different construction time and location of repaired deck. The location of bridge is
shown in Figure 3-9 in red marker.
Figure 3-1 Impact Damage on Old SH183 over Loop 12

21
Figure 3-2 Time of Construction
Figure 3-3 Layout of Old SH183 Over loop 12

22
The bridge was demolished and replaced in 2018 by two spans prestressed
concrete bridge, SH183 General Purpose Lane(GPL) west bound (Figure 3-4) and
(Managed Lane)ML over Loop 12 (Figure 3-5). The deck is continuous with precast panel
with Class ‘S’ high performance concrete with f’c=4000 psi (27.58 N/mm2).
Figure 3-4 Layout of New SH183 GPL Over Loop 12(Westbound)
23
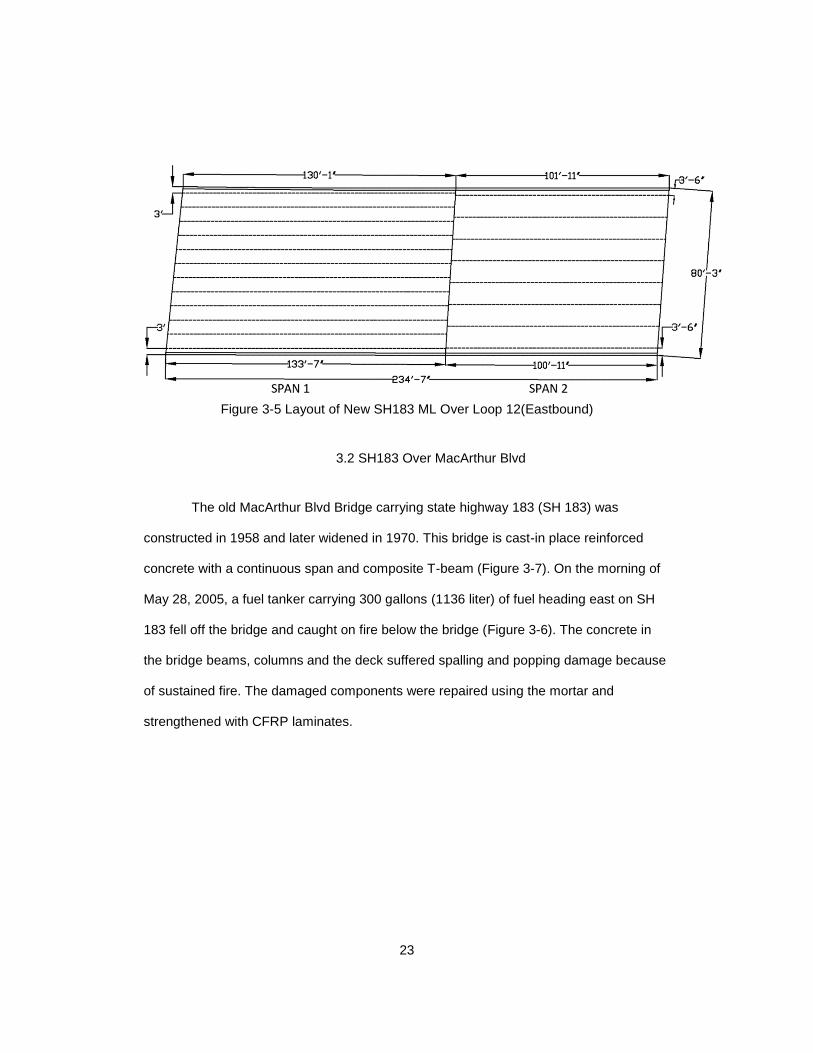
Figure 3-5 Layout of New SH183 ML Over Loop 12(Eastbound)
3.2 SH183 Over MacArthur Blvd
The old MacArthur Blvd Bridge carrying state highway 183 (SH 183) was
constructed in 1958 and later widened in 1970. This bridge is cast-in place reinforced
concrete with a continuous span and composite T-beam (Figure 3-7). On the morning of
May 28, 2005, a fuel tanker carrying 300 gallons (1136 liter) of fuel heading east on SH
183 fell off the bridge and caught on fire below the bridge (Figure 3-6). The concrete in
the bridge beams, columns and the deck suffered spalling and popping damage because
of sustained fire. The damaged components were repaired using the mortar and
strengthened with CFRP laminates.

24
Figure 3-6 Fire Damage on Old SH183 over MacArthur
Figure 3-7 Layout of Old SH183 Over MacArthur
The bridge was demolished and replaced in 2018 by three spans prestressed
concrete bridge (Figure 3-8). The location of bridge is shown in (Figure 3-9) in blue

25
marker. The deck is constructed continuous using precast panel with Class ‘S’ high
performance concrete with f’c=4000 psi (27.58 N/mm2).
Figure 3-8 Layout of New SH183 Over MacArthur

26
Figure 3-9 Location of SH183 Over Loop 12 (red marker) and MacArthur (blue marker),
(Google maps)

27
Chapter 4
Methodology
4.1 Data Collection
In this project, GPR used is SIR 30 from Geophysical Survey System, Inc and
model 52000S with center frequency 2600Mhz. This gives depth range of 0 to 12 in. (0 to
305mm) ideal for structural element assessment. The range is depended on the
conductance of concrete. So fresh or newer concrete being more conductive due to the
presence of water waves will attenuate faster resulting in shallow penetration. This
penetration range is enough to capture the top reinforcement in concrete deck and high
frequency also help in generation high-resolution scans. The hand driven tri-wheel cart
used for data collection shown Figure 4-1. The antenna was placed inside the cart such
that it remains less than 1/2 in. (13mm) to surface throughout the scanning operation. If
the antenna is not close to the surface it will result in loss of radar energy off the surface
rather than penetrate through it.
Before data is collected using GPR the site is prepared. Bridge is closed for
traffic by part or whole. The guidelines from start to end of bridge are marked at 3 feet
spacing in transverse direction. First line 3 feet from rail to accommodate cart width. The
purpose of this lines were to help to ensure the cart moves in straight line.

28
Figure 4-1 Tri-wheel Cart with Ground Coupled Antenna
The GPR setting for all four bridges is tabulated in Table 4-1. The GPR was set
to collect data in distance mode with a survey wheel used for measurement. The survey
wheel was calibrated so that distance measured should be equal to length driven or it will
affect the calculation of dielectric constant with migration. The deck is scanned in the zig-
zag pattern. For instance, scan #1 from start to end, scan #2 from end to start and so on
as shown in Figure 4-2.
Table 4-1 GPR setting
scans/sec scan/unit units/mark bits/sample
200 1 72 32

29
Figure 4-2 Typical Scanning Direction on Bridge Deck
After scanning, 1 to 3 individual rebars were located on deck and true depth or
clear cover at this location were measured by drilling (Figure 4-3). This will be used later
to calculate dielectric constant by ground truth method.
Figure 4-3 Drilling for true concrete cover
30
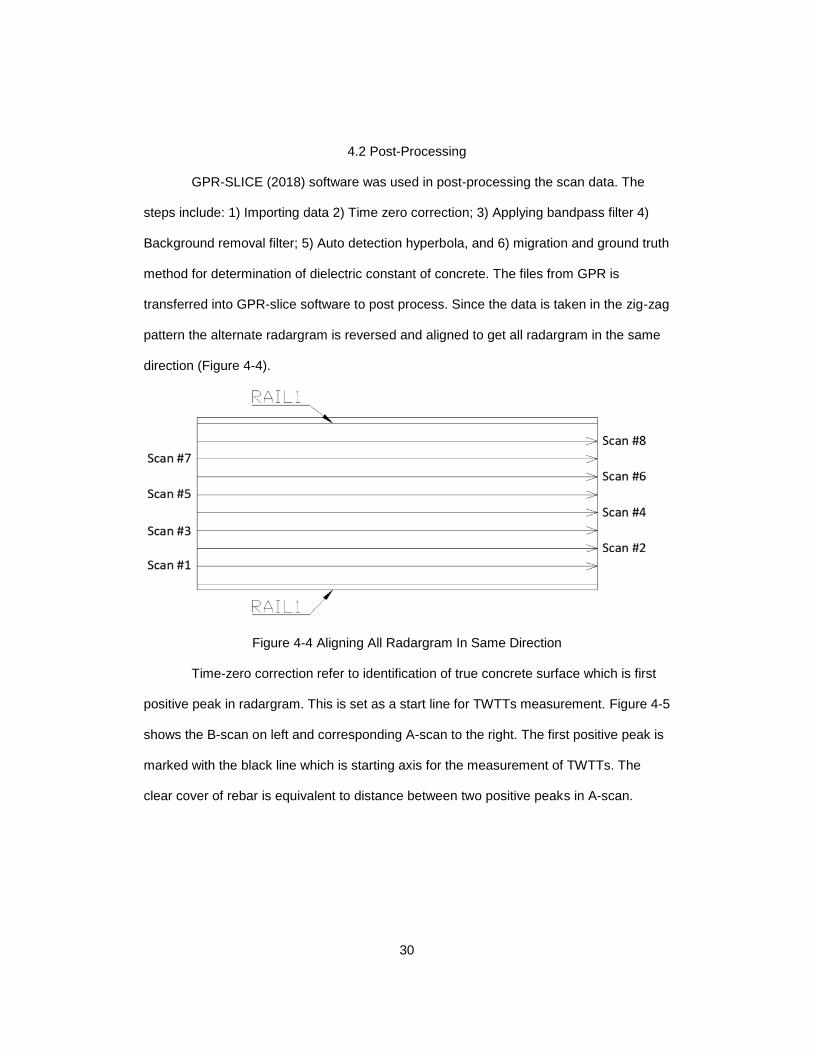
4.2 Post-Processing
GPR-SLICE (2018) software was used in post-processing the scan data. The
steps include: 1) Importing data 2) Time zero correction; 3) Applying bandpass filter 4)
Background removal filter; 5) Auto detection hyperbola, and 6) migration and ground truth
method for determination of dielectric constant of concrete. The files from GPR is
transferred into GPR-slice software to post process. Since the data is taken in the zig-zag
pattern the alternate radargram is reversed and aligned to get all radargram in the same
direction (Figure 4-4).
Figure 4-4 Aligning All Radargram In Same Direction
Time-zero correction refer to identification of true concrete surface which is first
positive peak in radargram. This is set as a start line for TWTTs measurement. Figure 4-5
shows the B-scan on left and corresponding A-scan to the right. The first positive peak is
marked with the black line which is starting axis for the measurement of TWTTs. The
clear cover of rebar is equivalent to distance between two positive peaks in A-scan.

31
Figure 4-5 Measurement of Rebar Depth
For a particular radargram, there are 1 to 2 rebars or hyperbolas per foot which
equal 150 to 480 hyperbolas per radargram dependent on the spacing of rebar and
length of the bridge. For this auto-detection module of GPR-slice is used. The
radargrams are filtered by the bandpass filter and background removal which aid in
accurate detection. Even with the filters applied detection cannot be perfected (Figure
4-6). The peaks which are off are deleted and manually adjusted. This process is time-
consuming so peaks between two linearly varying points are neglected. The information
stored in '.dat’ file is extracted for next step.

32
Figure 4-6 Auto-detection of Hyperbola
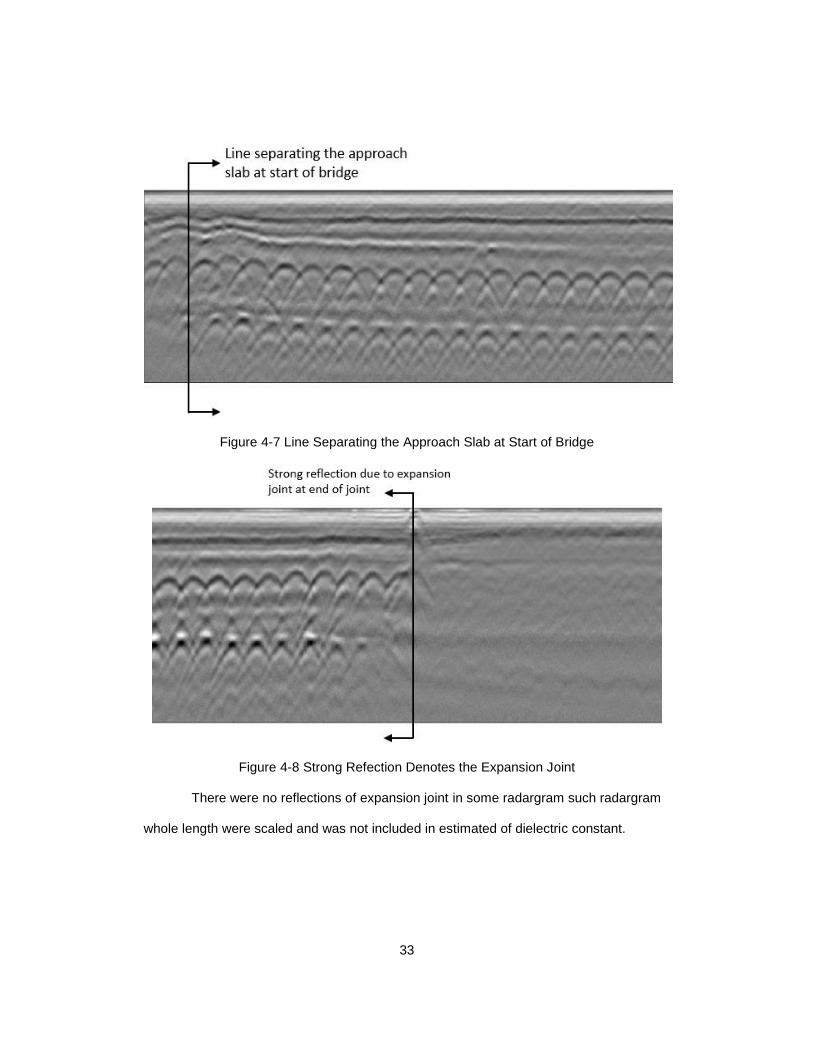
There was an error in the length of radargram of new SH183 over loop 12
eastbound, old SH183 over loop 12 east and westbound. Actual length scanned was not
equal to radargram. The correction was done by locating the start and end of the bridge
in radargram and scaling distance between them to match the actual scan (bridge)
length. The absence of bottom rebar and presence of strong reflection due to the metallic
expansion joint at the surface indicated start and end points. Figure 4-7 shows the line
separating the approach slab there is no presence of second layer of rebar before this
line and Figure 4-8 shows the end of the bridge with strong reflection by metal at the
expansion joint.
33
Figure 4-7 Line Separating the Approach Slab at Start of Bridge
Figure 4-8 Strong Refection Denotes the Expansion Joint
There were no reflections of expansion joint in some radargram such radargram
whole length were scaled and was not included in estimated of dielectric constant.

34
4.3 Determination of Dielectric Constant and Rebar Cover
Migration
As we know the GPR radiates radar waves in a wide cone. For a rebar at the
middle of the cone (just beneath the antenna), the travel time of the wave (or distance)
from the transmitter to the receiver will be less as compared to rebar situated at the end.
While antenna is dragged, reflected pulses reach at the different interval by combining
this hyperbolic pattern is formed. The velocity of the medium will determine the shape of
the hyperbola. The medium with the slower velocities or high dielectric constant will
produce narrow hyperbola and faster velocities or lower dielectric constant will produce
broader hyperbola.
Migration is geophysical signal processing filter which collapses the hyperbola to
a dot. To successfully achieve a dot the hyperbola in filter menu is matched with the
hyperbola in radargram. The migrator width is set which refer to limit of migration filter
length represented by two vertical lines. The TxxR which is distance between transmitter
and receiver is input in column and is equal to (0.04m) for 2.6 GHz antenna. After
applying this filter if hyperbola collapses to a dot the dielectric constant displayed in the
column is selected, if not the hyperbola is slightly adjusted till bright dot is achieved. The
depth is then calculated using with obtained dielectric constant and TWTTs of rebars with
Equation 4-1.
𝑑 =𝑐. 𝑡
2√𝜀
Equation 4-1 (Geophysical Archaeometry
Laboratory Inc., 2018)
Where, 𝑑 is clear cover of rebar.
Migration was applied to all four bridges and dielectric constant obtained is tabulated in
Table 4-2.

35
Figure 4-9 Before Migration
Figure 4-10 After migration
Table 4-2 Dielectric Constant from Migration
Bridge Dielectric constant
SH 183 over Loop 12 Old Eastbound 6.25
Westbound 7.01
New Eastbound 8.27
Westbound 8.38
SH 183 over MacArthur Old Eastbound 5.78
Westbound 5.44
New Eastbound 10.46
Westbound 9.37

36
Ground Truth
In ground truth method, a hyperbolic reflection of the drilled holes taken is
located in radargram. From this TWTT is found out. With the actual cover of this rebar
and TWTT known dielectric constant can be found by Equation 4-1. Since exactly
locating this reflection is not possible considering a slight error in length. To overcome the
rebars within ±1 feet (30.48 cm) are select and average TWTTs are taken into
consideration. The dielectric constant calculated form truth depth is tabulated in Table
4-3.
Table 4-3 Dielectric constant by ground truth method
Bridge #Drills Depth of rebar (in.)
TWTT (X10-9
second)
Dielectric constant
SH 183 over Loop
Old Eastbound 1 8.5 (216mm) 5.46 5.456
New Eastbound 1 4 (102mm) 7.44 7.441
2 4.25 (108mm) 5.69 5.688
New Westbound 1 3.75 (95mm) 7.48 7.479
2 3 (76mm) 7.52 7.523
SH 183 over
MacArthur
Old Eastbound 1 2.5 (64mm) 5.13 5.134
2 2.4 (61mm) 6.68 6.676
Old Westbound 1 2.6 (66mm) 7.45 7.447
New Eastbound
1 3 (76mm) 13.37 13.374
2 2.75 (70mm) 12.64 12.644
3 2.4 (61mm) 12.62 12.621
New Westbound 1 2.5 (64mm) 11.31 11.309
2 2.25 (57mm) 11.15 11.150
4.4 Gridding and Plotting Contours
After determining the rebar cover, the data is converted into a grid. Since the
scans are taken 3 feet (91mm) apart in a transverse direction the rebar location between
two scan lines are linearly interpolated. Triangulation with linear interpolation method in
Surfer software v15 (Golden software) is used for interpolation. This method does not

37
extrapolate beyond limits and is best suited to interpolate rebar cover data. This grid data
is then plotted in form of contours discuss in results.

38
Chapter 5
Deck Design moments
5.1 Total Factored Designed Negative Moment
For calculation of total factored negative bending moments, the AASTHO
appendix A4-1 (AASHTO, 2017) deck design table. The moments are calculated using
the equivalent strip method as applied to concrete slabs supported on parallel girders.
The girder all brides are parallel and can be assumed parallel for new SH183 over
MacArthur. Multiple presence factors and dynamic load allowance are included in the
tabulated values.
The method requires:
• Deck supported on more than three girders and having a width of not less
than 14 ft between the centerlines of the exterior girder.
• For overhang, minimum total overhang width of 21 in. (0.53m) is measured
from center of the exterior girder and maximum equal to or smaller of 0.625 times
the girder spacing or 6 ft.
All the requirements are satisfied for all bridges. Since, there is variation in girder
spacing for different spans maximum spacing between girders in a span was considered
for design moment calculation and is tabulated in Table 5-1.

39
Table 5-1 Maximum Girder Spacing
Bridge Span
number Girder Spacing(ft.)
SH 183 over Loop
Old Eastbound Span 1 5.5 (1.68m)
Westbound Span 1 5.917 (1.8m)
New
Eastbound Span 1 6.789 (2.07m)
Span 2 10.448 (3.18m)
Westbound Span 1 7 (2.13m)
Span 2 8.85 (2.7m)
SH 183 over MacArthur
Old Eastbound Span 1 8 (2.44m)
Westbound Span 1 8 (2.44m)
New Eastbound
Span 1 11.422 (3.48m)
Span 2 6.6 (2.01m)
Span 3 11.664 (3.56m)
The concrete of compressive strength f’c = 4 ksi (27.57 N/mm2) and steel fy =
60ksi (0.413 kN/m2)was used in all bridges. The unit weight of concrete 0.145 kcf (22.77
kN/mm3) was obtained from AASTHO Table 3.5.1-1 for f’c ≤ 5 ksi (34.47 N/mm2). Being
conservative future wearing surface load were assumed 0.025 k/ft (0.036 kN/m). The
deck thickness and dead load tabulated in Table 5-2.
Table 5-2 Dead Load of Slab and Wearing Surface
Bridge Thickness of deck (in.) Dead load (k/ft)
SH 183 over
Loop
Old Eastbound 6 (152mm) 0.073 (1.07kN/m)
Westbound 6 (152mm) 0.073 (1.07kN/m)
New Eastbound 8.5 (216mm) 0.103 (1.5kN/m)
Westbound 8.5 (216mm) 0.103 (1.5kN/m)
SH 183 over
MacArthur
Old Eastbound 6.5 (165mm) 0.079 (1.15kN/m)
Westbound 6.5 (165mm) 0.079 (1.15kN/m)
New Eastbound 8.5 (216mm) 0.103 (1.5kN/m)
Westbound 8.5 (216mm) 0.103 (1.5kN/m)

40
Table 5-3 Negative Bending due to Dead Load and Future Wearing Surface
Bridge Span
number Girder
Spacing(ft.)
Negative bending moment (k-ft)
Dead load Future
wearing surface
SH 183 over Loop
Old Eastbound Span 1 5.5 (1.68m) 0.186 (0.25kNm)
0.064 (0.09kNm)
Westbound Span 1 5.917 (1.8m)
0.216 (0.29kNm) 0.074
(0.1kNm)
New
Eastbound Span 1
6.789 (2.07m)
0.402 (0.55kNm) 0.098
(0.13kNm)
Span 2 10.448 (3.18m)
0.953 (1.29kNm) 0.232
(0.31kNm)
Westbound Span 1 7 (2.13m) 0.505 (0.68kNm)
0.81 (1.1kNm)
Span 2 8.85 (2.7m) 0.104 (0.14kNm) 0.166
(0.23kNm)
SH 183 over
MacArthur
Old Eastbound Span 1 8 (2.44m) 0.817 (1.11kNm)
0.275 (0.37kNm)
Westbound Span 1 8 (2.44m) 0.817 (1.11kNm) 0.275
(0.37kNm)
New Eastbound
and Westbound
Span 1 11.422 (3.48m)
1.139 (1.54kNm) 0.277
(0.38kNm)
Span 2 6.6 (2.01m) 0.38 (0.52kNm) 0.093
(0.13kNm)
Span 3 11.664 (3.56m)
1.188 (1.61kNm) 0.289
(0.39kNm)
The distance between the center of the girder to the location of design sections
for negative moments in the deck is given in article 4.6.2.1.6. It is one-third the flange
width, but not exceeding 15 ft. (case k) for precast I-shaped concrete beams applicable to
new MacArthur, both old and new loop 12 bridges. Old MacArthur had monolithic
construction design section is at the face of support (case e). In Table 5-4 below, type of
girders and design sections is tabulated.

41
Table 5-4 Design Sections for Live Load Calculation
Bridge Span
number
Supporting component/ type of deck
Flange width/ beam width
(in)
Design section
(in)
SH 183 over Loop
Old
Eastbound Span 1
Precast bulb tee/Cast-in-
place
12 (304.8mm) 4
(101.6mm)
Westbound Span 1 12 (304.8mm) 4
(101.6mm)
New
Eastbound
Span 1 36 (914.4mm) 12
(304.8mm)
Span 2 36 (914.4mm) 12
(304.8mm)
Westbound
Span 1 36 (914.4mm) 12
(304.8mm)
Span 2 36 (914.4mm) 12
(304.8mm)
SH 183 over MacArthur
Old
Eastbound Span 1 Cast-in-place concrete Tee
beam/monolithic
11 (279.4mm) 11
(279.4mm)
Westbound Span 1 11 (279.4mm) 11
(279.4mm)
New Eastbound
and Westbound
Span 1
Precast bulb tee/Cast-in-
place
36 (914.4mm) 12
(304.8mm)
Span 2 36 (914.4mm) 12
(304.8mm)
Span 3 36 (914.4mm) 12
(304.8mm)
The live load moments are calculated from AASTHO Table 4-1 from interpolation
and is tabulated in Table 5-5.

42
Table 5-5 Negative Live Load Moment
Bridge Span
number
Negative live load moment (k-ft)
SH 183 over Loop
Old Eastbound Span 1 3.52 (4.77kNm) Westbound Span 1 3.89 (5.27kNm)
New
Eastbound Span 1 2.67 (3.62kNm) Span 2 4.96 (6.72kNm)
Westbound Span 1 2.84 (3.85kNm) Span 2 3.69 (5kNm)
SH 183 over MacArthur
Old Eastbound Span 1 3.62 (4.91kNm) Westbound Span 1 3.62 (4.91kNm)
New Eastbound
and Westbound
Span 1 6.1 (8.27kNm) Span 2 2.57 (3.48kNm)
Span 3 6.37 (8.64kNm)
5.2 Total Factored Negative Bending Moment
The factor of 1.25, 1.5 and 1.75 is applied to dead, future wearing surface and
live load bending moment Table 5-6.
Table 5-6 Total Negative Factored Bending Moments
Bridge Span
number
Total factored bending moment,
Strength I (k-ft)
SH 183 over Loop
Old Eastbound Span 1 6.489 (8.8kNm)
Westbound Span 1 7.189 (9.75kNm)
New
Eastbound Span 1 5.324 (7.22kNm)
Span 2 10.223 (13.86kNm)
Westbound Span 1 5.46 (7.4kNm)
Span 2 9.94 (13.48kNm)
SH 183 over MacArthur
Old Eastbound Span 1 7.757 (10.52kNm)
Westbound Span 1 7.757 (10.52kNm)
New Eastbound
and Westbound
Span 1 12.52 (16.97kNm)
Span 2 5.112 (6.93kNm)
Span 3 13.069 (17.72kNm)

43
5.3 Capacity of Deck
In this section deck factored flexural resistance (capacity) was calculated for
proposed bridge deck and capacity for variable cover is discussed later. The capacity and
depth of equivalent stress block is given by Equation 5-1 and Equation 5-2, respectively.
The width of design section b= 12 in (305mm) and resistance factor for tensioned-
controlled section 0.9 (AASTHO 5.5.4.2) was considered in calculation. Bridge specific
parameters rebar size, spacing, deck thickness and top cover is listed in Table 5-7 and
capacity is tabulated in Table 5-8.
ФM𝑛 = Ф 𝐴𝑠 𝑓𝑦(d − 𝑎2⁄ ) Equation 5-1(Design of Highway
Bridges, 2013)
And
𝑎 =𝐴𝑠 𝑓𝑦
0.85 𝑓′𝑐 𝑏
Equation 5-2(Design of Highway Bridges,
2013)
Table 5-7 Summary of top transverse spacing and cover
Bridge Span
number Rebar size
Spacing of top
rebar (in)
Deck thickness,
D (in)
Top clear cover (in)
SH 183 over Loop
Old
Eastbound Span 1 5 13
(330mm) 6 (152mm)
2 (51mm)
Westbound Span 1 5 13
(330mm) 6 (152mm)
2 (51mm)
New
Eastbound
Span 1 5 6
(152mm) 8.5
(216mm) 2.5
(64mm)
Span 2 5 6
(152mm) 8.5
(216mm) 2.5
(64mm)
Westbound Span 1 5 6
(152mm) 8.5
(216mm) 2.5
(64mm)

44
Span 2 5 6
(152mm) 8.5
(216mm) 2.5
(64mm)
SH 183 over
MacArthur
Old
Eastbound Span 1 5 13
(330mm) 6.5
(165mm) 2
(51mm)
Westbound Span 1 5 13
(330mm) 6.5
(165mm) 2
(51mm)
New Eastbound
and Westbound
Span 1 5 5.25
(133mm) 8.5
(216mm) 2.5
(64mm)
Span 2 5 6
(152mm) 8.5
(216mm) 2.5
(64mm)
Span 3 5 5.25
(133mm) 8.5
(216mm) 2.5
(64mm)
Table 5-8: Proposed deck capacity
Bridge ФMn (k-ft)
SH 183 over Loop
Old
Eastbound 4.748 (6.44kNm)
Westbound 4.748 (6.44kNm)
New
Eastbound 15.868 (21.51kNm)
15.868 (21.51kNm)
Westbound 15.868 (21.51kNm)
15.868 (21.51kNm)
SH 183 over MacArthur
Old
Eastbound 5.392 (7.31kNm)
Westbound 5.392 (7.31kNm)
New Eastbound
and Westbound
18.135 (24.59kNm)
15.868 (21.51kNm)
18.135 (24.59kNm)
The proposed deck negative moment capacity and total factored bending
moment due to strength I is summarized in the Table 5-9. Old bridges negative moment
capacity was found out to be less than total factored design moment because the old
bridges was designed for light weight HS-20 as compared to heavy weight HL-93. As the

45
strip is considered 1 feet (305mm) within this two-rebar lying in it can be at different cover
depth. This variation was not considered in calculation.
Table 5-9: Total Factored Design and Negative Moment Capacity
Bridge Span number
Total factored design moment, Strength I (k-ft)
Negative moment capacity (k-ft)
Difference (k-ft)
SH 183 over Loop
Old Eastbound Span 1 6.489 (8.8kNm)
4.748 (6.44kNm) 1.741 (2.36kNm)
Westbound Span 1 7.189
(9.75kNm)
4.748 (6.44kNm) 2.441 (3.31kNm)
New
Eastbound Span 1
5.324 (7.22kNm)
15.868 (21.51kNm)
-10.544 (-14.3kNm)
Span 2 10.223
(13.86kNm)
15.868 (21.51kNm)
-5.645 (-7.65kNm)
Westbound Span 1 5.46 (7.4kNm)
15.868 (21.51kNm)
-10.408 (-14.11kNm)
Span 2 9.94
(13.48kNm)
15.868 (21.51kNm)
-5.928 (-8.04kNm)
SH 183 over
MacArthur
Old Eastbound Span 1
7.757 (10.52kNm)
5.392 (7.31kNm) 2.365 (3.21kNm)
Westbound Span 1 7.757
(10.52kNm)
5.392 (7.31kNm) 2.365 (3.21kNm)
New Eastbound
and Westbound
Span 1 12.52
(16.97kNm)
18.135 (24.59kNm)
-5.615 (-7.61kNm)
Span 2 5.112
(6.93kNm)
15.868 (21.51kNm)
-10.756 (-14.58kNm)
Span 3 13.069
(17.72kNm)
18.135 (24.59kNm)
-5.066 (-6.87kNm)

46
Chapter 6
Result and Discussion
The contours and rebar distribution of individual bridges are discussed in this
section. The vertical and horizontal axis is the width and length in feet of the bridge,
respectively. The contours are formed by joining equal cover interpolated points. The
area with low and high covers are represented with cooler and hotter colors, respectively.
All contours are aligned to north direction. The proposed clear cover during design phase
of the bridges are tabulated in Table 6-1 and Table 6-2.
Table 6-1: Proposed clear cover for old bridges
Old Bridge Asphalt overlay thickness (in.)
Proposed clear cover (in.)
Total cover (in.)
SH 183 over Loop 3 2 5
SH 183 over MacArthur 1.5 2 3.5
Table 6-2: Proposed clear cover for new bridges
New Bridge Proposed clear cover (in.)
SH 183 over Loop 2.5
SH 183 over MacArthur 2.5
TxDOT Standard Specification 2014 states that the clear cover tolerance for the
top mat reinforcement is +1/2 in. (13mm) and a minimum of 1 in. (25.4mm) is suggested.
According to the American Concrete Institute Specification for Tolerances for Concrete
Construction and Materials (ACI-117-10), the deck reinforcement cover is +1 in (25.4mm).
No tolerance allowed in an upward direction.
The dielectric constant was calculated from migration. The Table 6-3 is the
comparison of the dielectric constant from ground truth and migration. Neglecting the

47
values with the high dielectric constant value the deviation was less than 3.7. Due to
uncertainty in locating exact drilled rebar dielectric constant from migration was adopted
to calculated cover and corresponding contours.
Table 6-3: Comparison of dielectric constant form migration and ground truth
Bridge Dielectric constant
Deviation Migration Ground truth
SH 183 over Loop
Old Eastbound 6.25 5.46 0.80
Westbound 7.01 6.2 0.81
New
Eastbound 8.28 7.44 0.84
5.69 2.59
Westbound
8.38 4.83 3.55
7.48 0.90
7.52 0.86
SH 183 over MacArthur
Old
Eastbound
5.78 2.08 3.70
5.13 0.65
6.68 0.90
Westbound
5.44 16.26 10.82
7.45 2.01
47.02 41.58
New
Eastbound
10.46 13.37 2.91
12.64 2.18
12.62 2.16
Westbound
9.37 6.69 2.68
11.31 1.94
11.15 1.78
6.1 New SH183 Over Loop 12 Eastbound
The Figure 6-1 is the contour of the bridge new SH183 over loop 12 eastbound.
The rebar distribution is shown is Figure 6-2. Rebar cover was rounded off to nearest
interval. The rebar varies from 1.5 to 4 inch (38 to 102mm) throughout the bridge.
According to tolerance, the percent rebar distribution 29.03% lies within tolerance
provided by TxDOT Standard Specification and 71.02% lies within the tolerance of +1 in.
(25.4mm) provided by ACI-117-10.

48
Figure 6-1 New SH183 over Loop 12 Eastbound
Figure 6-2: New SH183 over Loop 12 Eastbound Rebar Distribution
0%
2%
4%
6%
8%
10%
12%
1.5 2 2.5 3 3.5 4 4.5
Perc
ent
dis
trib
ution
Clear cover (in)
Rebar distribution
TxDOT tolerance
ACI tolerance
Proposed cover
49
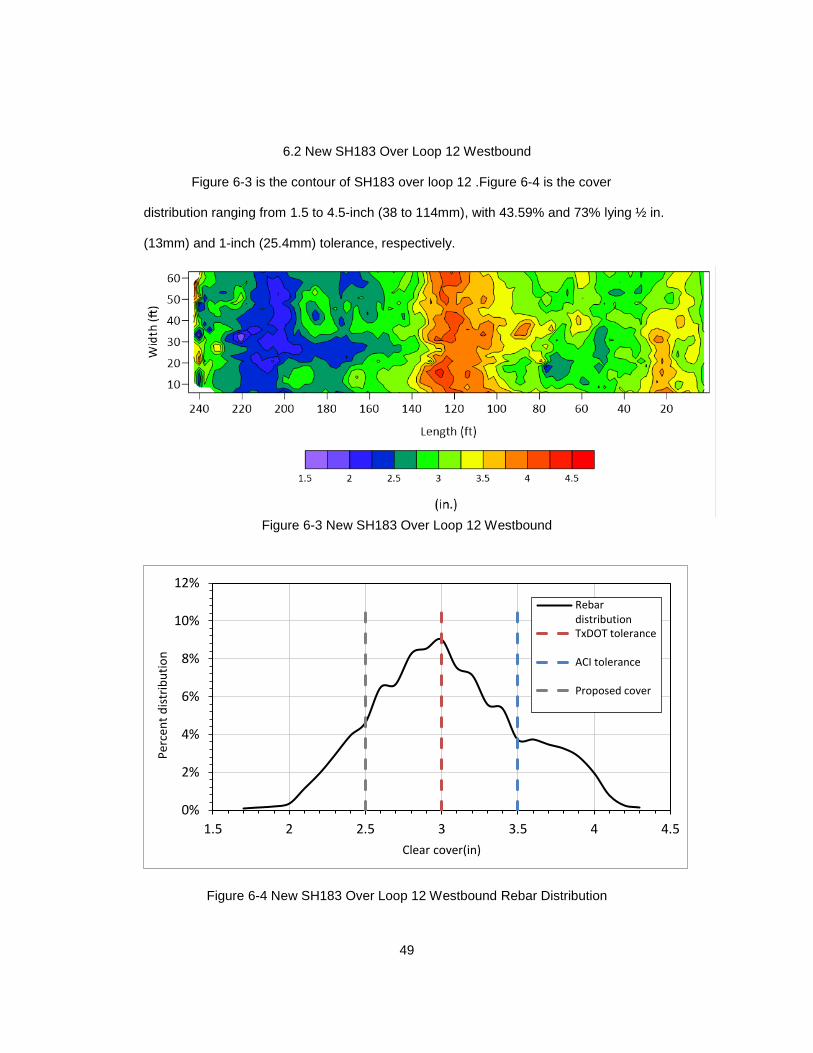
6.2 New SH183 Over Loop 12 Westbound
Figure 6-3 is the contour of SH183 over loop 12 .Figure 6-4 is the cover
distribution ranging from 1.5 to 4.5-inch (38 to 114mm), with 43.59% and 73% lying ½ in.
(13mm) and 1-inch (25.4mm) tolerance, respectively.
Figure 6-3 New SH183 Over Loop 12 Westbound
Figure 6-4 New SH183 Over Loop 12 Westbound Rebar Distribution
0%
2%
4%
6%
8%
10%
12%
1.5 2 2.5 3 3.5 4 4.5
Per
cen
t d
istr
ibu
tio
n
Clear cover(in)
RebardistributionTxDOT tolerance
ACI tolerance
Proposed cover

50
The Figure 6-5 is the comparison of design negative bending moment and the
capacity of the deck. It can be observed that design negative moment is less than the
reduced capacity due to variation. This suggest that the deck is safe even with the max
cover range. This also implies that deck is over designed.
Figure 6-5 Negative bending moment vs clear cover
6.3 Old SH183 Over Loop 12 Eastbound
The old Loop 12 bridges had asphalt overlay on top. Figure 6-6 shows the
variation of the interface between asphalt and concrete in old SH183 over Loop 12
bridges followed by the rebar hyperbolic reflection. The estimation of asphalt thickness
was limited due to unclear (Figure 6-7) and not visible (Figure 6-8) interface in some
location of radargram. This happens due to the interference of GPR waves with nearby
radio waves emitted by mobile phones or TV antennas. Neglecting this area, the asphalt
layer variation was found within 1.11 to 1.58 TWTTs which is equivalent to 3 to 4-in (76 to
3
8
13
18
23
1 1.5 2 2.5 3 3.5 4
Negative b
endin
g m
om
ent(
k-f
t)
Cover (in)
Capacity Strength 1 (eastbound span 1)
Strength 1 (eastbound span 2) Strength 1 (westbound span 2)

51
102mm) thickness considering 5 as asphalt dielectric constant mention in GSSI RADAN
7 manual. This is approximate, for exact determination of the dielectric constant of
asphalt actual thickness by drilling is needed which was not available in this case. The
distribution without asphalt can be estimated by subtracting 3 to 4-in. (76-102mm) layer
with combined depth.
Figure 6-6 Interface Between Asphalt and Concrete
Figure 6-7 Unclear Interface Between Asphalt and Concrete

52
Figure 6-8 No Visible Interface
The contour (Figure 6-9) of old Loop 12 bridges is the sum of the asphalt layer
and the concrete on top of rebar. It was observed that the rebar variation was within
range 3.5 to 7-inch (89 to 178mm) (Figure 6-10). The part SH183 over Loop 12 was
impact damaged was repaired in 2006. So, the concrete in that replaced part has
different dielectric properties. This can be observed in the repaired area marked in Figure
6-11, where there is a sudden change in contour. The low cover was found mostly in
repaired area. The distribution without asphalt was found within range 0.6 to 3 in. (15 to
76mm).

53
Figure 6-9 Old SH183 Over Loop 12 Eastbound
Figure 6-10 Old SH183 Over Loop 12 Eastbound Rebar Distribution
6.4 Old SH183 over loop 12 eastbound repaired part
Despite of the difference in concrete properties in repaired region the migration
gave almost same dielectric constant of 6.28. Actual depth by drilling was suggested in
this region to accurately determine depth of rebars in this region. The isolated contour
0%
2%
4%
6%
8%
10%
12%
14%
0.5 2.5 4.5 6.5 8.5 10.5
Perc
ent
dis
trib
ution
Cover (in.)
Rebar distributionwith asphalt
Rebar distributionwithout asphalt

54
and the rebar distribution are shown in Figure 6-11 and Figure 6-12, respectively. It is
observed the rebar variation is found with range 3-6-inch (76 to 152mm).
Figure 6-11 Repaired Part
Figure 6-12 Repaired Part Rebar Distribution
6.5 Old SH183 over Loop 12 Westbound
Old SH183 over loop 12 westbound contours (Figure 6-13) showed the rebar
variation within 4-7-in. (102 to 178mm) including the variation in asphalt layer(Figure
0%
5%
10%
15%
20%
25%
30%
35%
40%
45%
3 3.5 4 4.5 5 5.5 6
Perc
ent
dis
trib
ution
Cover (in.)
Rebar distribution

55
6-14). The distribution without asphalt layer was found within 1.3 to 3.3 inch (33 to
84mm). Figure 6-15 is the capacity vs design moment comparison.
Figure 6-13 Old SH183 Over Loop 12 Westbound
Figure 6-14 Old SH183 Over Loop 12 Westbound Rebar Distribution
0%
2%
4%
6%
8%
10%
12%
14%
16%
18%
20%
1 2 3 4 5 6 7 8 9
Perc
ent
dis
trib
ution
Cover(in)
Rebar distributionwith asphalt
Rebar distributionwithout asphalt
56
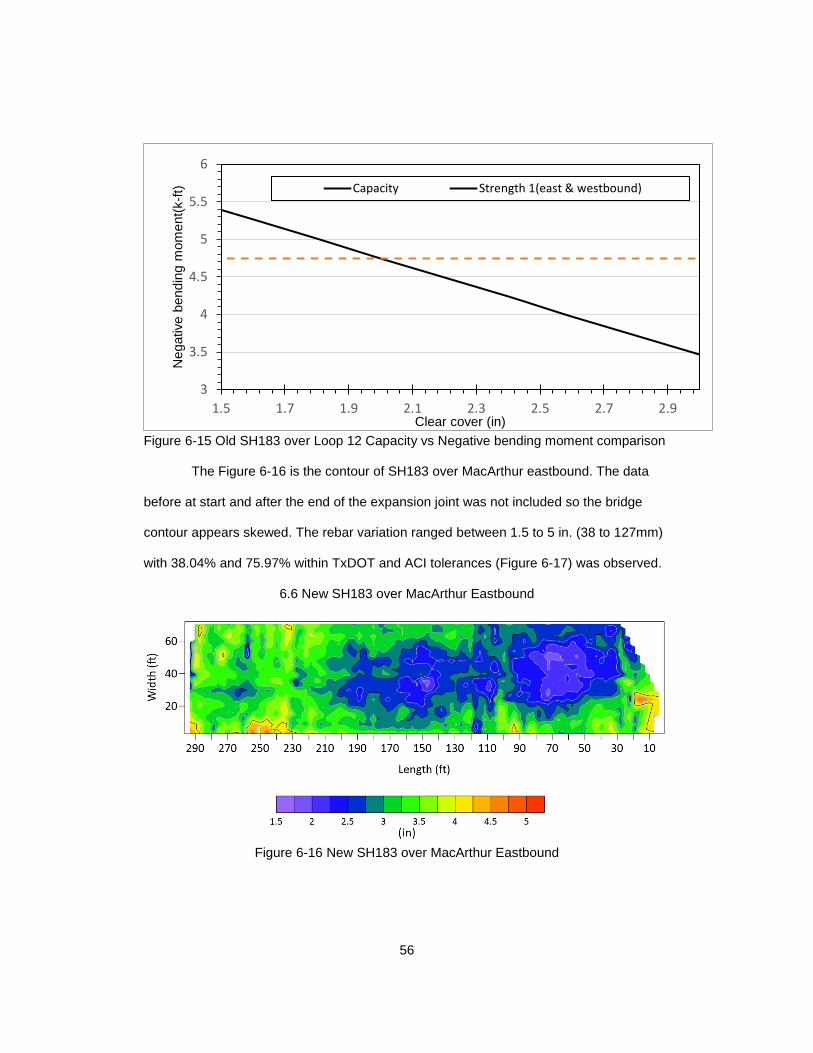
Figure 6-15 Old SH183 over Loop 12 Capacity vs Negative bending moment comparison
The Figure 6-16 is the contour of SH183 over MacArthur eastbound. The data
before at start and after the end of the expansion joint was not included so the bridge
contour appears skewed. The rebar variation ranged between 1.5 to 5 in. (38 to 127mm)
with 38.04% and 75.97% within TxDOT and ACI tolerances (Figure 6-17) was observed.
6.6 New SH183 over MacArthur Eastbound
Figure 6-16 New SH183 over MacArthur Eastbound
3
3.5
4
4.5
5
5.5
6
1.5 1.7 1.9 2.1 2.3 2.5 2.7 2.9
Negative b
endin
g m
om
ent(
k-f
t)
Clear cover (in)
Capacity Strength 1(east & westbound)
57
Figure 6-17 New SH183 over MacArthur Eastbound Rebar Distribution
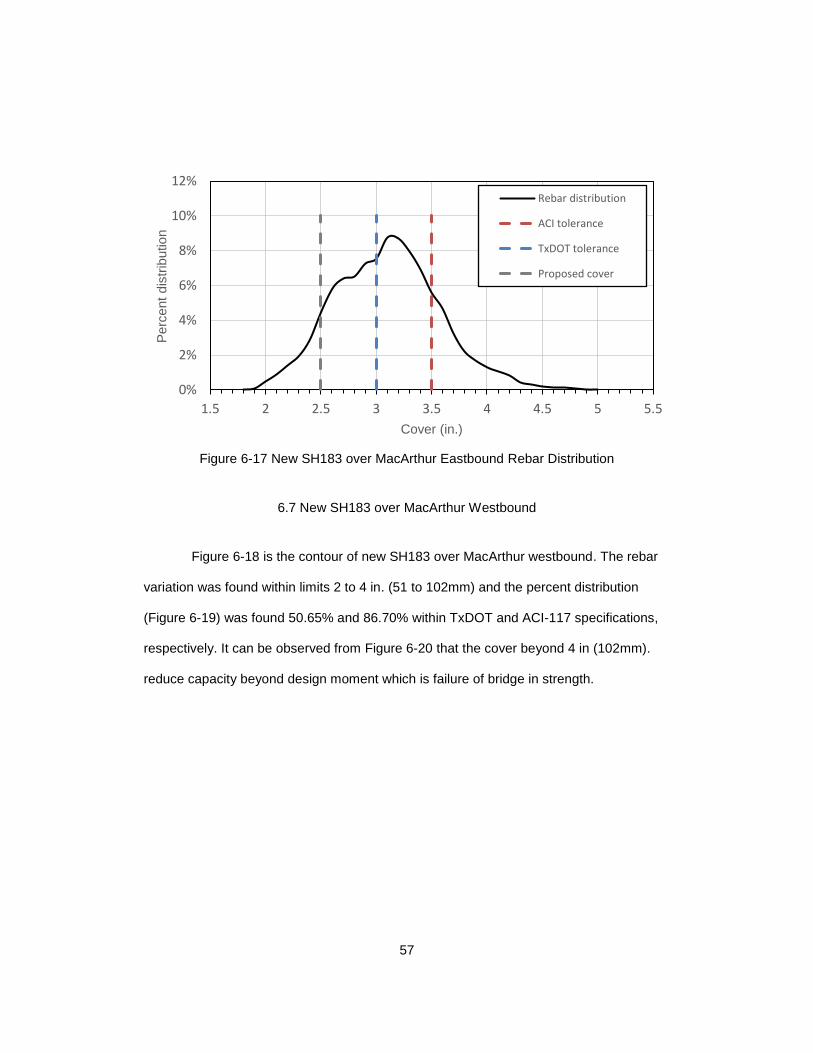
6.7 New SH183 over MacArthur Westbound
Figure 6-18 is the contour of new SH183 over MacArthur westbound. The rebar
variation was found within limits 2 to 4 in. (51 to 102mm) and the percent distribution
(Figure 6-19) was found 50.65% and 86.70% within TxDOT and ACI-117 specifications,
respectively. It can be observed from Figure 6-20 that the cover beyond 4 in (102mm).
reduce capacity beyond design moment which is failure of bridge in strength.
0%
2%
4%
6%
8%
10%
12%
1.5 2 2.5 3 3.5 4 4.5 5 5.5
Perc
ent
dis
trib
ution
Cover (in.)
Rebar distribution
ACI tolerance
TxDOT tolerance
Proposed cover

58
Figure 6-18 New SH183 over MacArthur Westbound
Figure 6-19 New SH183 over MacArthur Westbound Rebar Distribution
0%
2%
4%
6%
8%
10%
12%
2 2.5 3 3.5 4 4.5 5
Perc
ent
dis
trib
ution
Cover (in.)
Rebar distribution
ACI tolerance
TxDOT tolerance
Proposed cover

59
Figure 6-20 New SH183 over MacArthur Capacity vs design moment comparison
6.8 Old SH183 over MacArthur Eastbound
Due to stripping on asphalt layer on deck and presence on soil (Figure 6-21) the
GPR scan shown huge variation of rebar cover. The Figure 6-22 shows the disturbance
in radargram due to stripping of asphalt and presence of soil. Figure 6-23 shows the high
cover at start and end of radargram, which is present in all radargram at start. This
contributes to the high range of cover variation in old MacArthur bridge. The rebar cover
range is from 1.5 to 7 in. (38 to 178mm), about 84.83 % lies with 2 to 4 in. (51 to 102mm)
(Figure 6-24).
4
9
14
19
24
1.7 2.2 2.7 3.2 3.7 4.2 4.7 5.2
Negative b
endin
g m
om
ent(
k-f
t)
Clear cover (in)
Capacity (span 1 & 3) Capacity (span 2)
Strength 1(span 1) Strength 1(span 2)
Strength 1(span 3)

60
Figure 6-21 Presence of Soil on Deck
Figure 6-22 Radargram of old SH183 over MacArthur

61
Figure 6-23 Sign of high cover at start of radargram
Figure 6-24 Old SH183 over MacArthur Eastbound Rebar Distribution
0%
2%
4%
6%
8%
10%
12%
1.5 2.5 3.5 4.5 5.5 6.5 7.5 8.5 9.5
Per
cen
t d
istr
ibu
tio
n
Cover (in.)
Rebardistribution
ACI tolerance
62
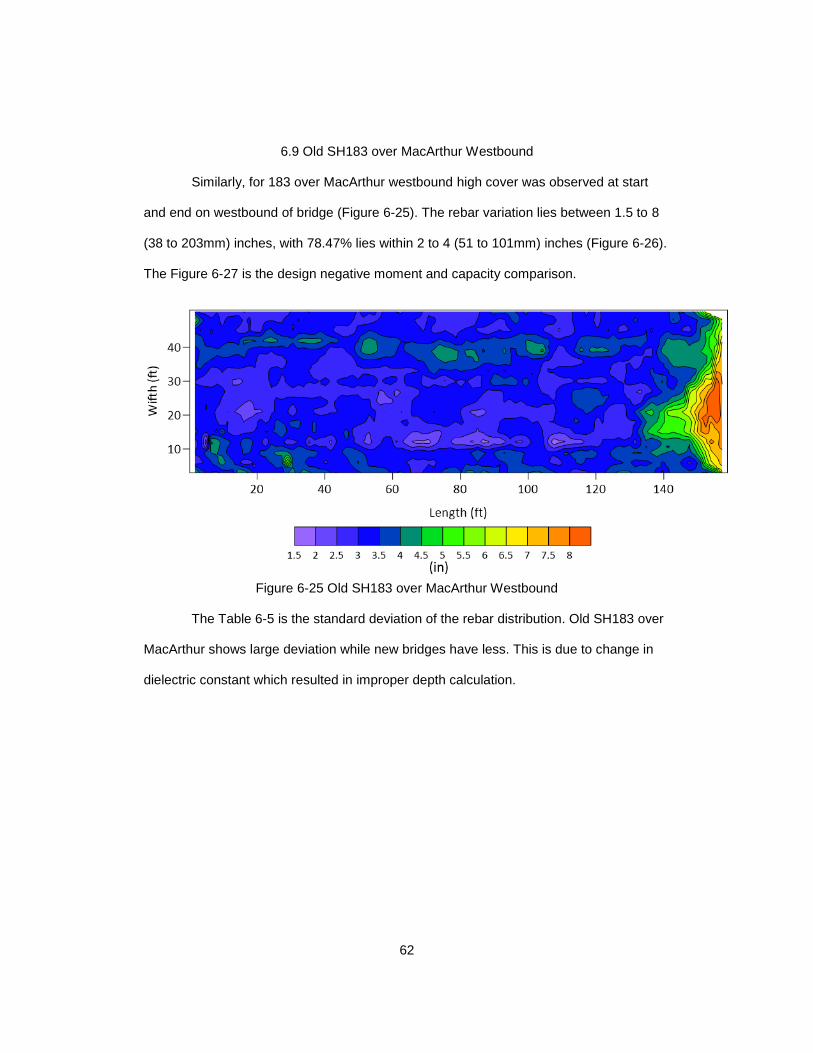
6.9 Old SH183 over MacArthur Westbound
Similarly, for 183 over MacArthur westbound high cover was observed at start
and end on westbound of bridge (Figure 6-25). The rebar variation lies between 1.5 to 8
(38 to 203mm) inches, with 78.47% lies within 2 to 4 (51 to 101mm) inches (Figure 6-26).
The Figure 6-27 is the design negative moment and capacity comparison.
Figure 6-25 Old SH183 over MacArthur Westbound
The Table 6-5 is the standard deviation of the rebar distribution. Old SH183 over
MacArthur shows large deviation while new bridges have less. This is due to change in
dielectric constant which resulted in improper depth calculation.

63
Table 6-4 Standard deviation
Bridge Standard deviation (in.) Average (in.)
SH 183 over Loop
Old Eastbound 0.48 (12mm) 2.15 (54mm)
Westbound 0.36 (9mm) 2.25 (57mm)
New Eastbound 0.41 (10mm) 2.78 (71mm)
Westbound 0.46 (12mm) 3.02 (77mm)
SH 183 over MacArthur
Old Eastbound 0.95 (24mm) 3.21 (82mm)
Westbound 1.2 (30mm) 3.74 (95mm)
New Eastbound 0.48 (12mm) 3.1 (79mm)
Westbound 0.37 (9mm) 3.01 (77mm)
Figure 6-26 Old SH183 over MacArthur Westbound Rebar Distribution
0%
2%
4%
6%
8%
10%
12%
1.5 2.5 3.5 4.5 5.5 6.5 7.5 8.5 9.5
Perc
ent
dis
trib
ution
Cover (in.)
RebardistributionACI tolerance
TxDOT tolerance

64
Figure 6-27 Negative bending moment vs clear cover for old SH183 over MacArthur
6.10 Deflection and Stresses on Rebar
One of the reasons for cover variation is the deflection of rebar due to a
construction worker or heavy machinery placed on rebars. This section analyzes the
deflection and stresses due to construction worker standing on rebar mesh and behavior
of different sizes rebar. As per TxDOT Standard Specifications for Construction and
Maintenance of Highways, Streets and Bridges gives suggestion to prevent displacement
and keep reinforcement at proper distance from the formwork. The reinforcement is to be
placed accurately in the forms and hold firmly in place before and during concrete
placement by means of bar supports that are adequate in strength and number. It is
recommended that individual bar support in rows at 4-ft (1.22m). maximum spacing in
each direction. Place continuous type supports at 4-ft (1.22). maximum spacing.
The rebar cage was modeled and analyzed in RISA-3D. The load imposed by
construction worker is 200 lb. (assumption for an average weight of construction worker)).
0
1
2
3
4
5
6
7
8
9
1.5 2 2.5 3 3.5 4 4.5 5
Negative b
endin
g m
om
ent(
k-f
t)
Clear cover (in)
Capacity Strength 1(east & westbound)

65
Since, the rebar is supported at 4-ft(1.22m) maximum spacing in both directions, the
rebar cage is modeled within 4x4 ft boundary. The Figure 6-28 shows #5@6-in spacing
modeled in RISA-3D with one force 200 lb. (890 N) at intersection of longitudinal and
transverse rebars located close to center of rebar cage. However, this location may not
be location that results in maximum deflection. The longitudinal rebar was assumed to be
#5@9-in.
Figure 6-28 RISA-3D Model of Rebar Cage
The bar size and spacing were selected to achieve flexural resistance equivalent
to deck with #5@6in, 2.5 in. (25.4mm) cover, slab thickness 8.5 in.(216mm), f’c= 4 ksi
and fy= 60 ksi. Figure 6-29 is flexural resistance for different spacing and bar size. The
bar spacing were rounded off to nearest whole number such that resistance is more than
14.6 k-ft (Table 6-5). The other parameters used for calculation of negative moment
capacity is tabulated in Table 6-6.

66
Figure 6-29 Selection criteria for spacing
Table 6-5 Transverse reinforcement negative moment capacity equivalent to capacity by
#5@6-in.
Bar size @ spacing-in ΦMn(k-ft)
#3@2in 15.82 (109N/mm2)
#4@3in 18.58 (128N/mm2)
#5@6in 14.6 (101N/mm)
#6@8in 15.26 (105N/mm2)
#7@11in 14.97 (103N/mm2)
#8@14in 15.24 (105N/mm2)
#9@18in 14.84 (102N/mm2)
#10@22in 15.14 (104N/mm2)
Table 6-6 other parameters for negative moment calculations
fy (ksi) fc (ksi) Slab thickness (in.) Top cover (in.)
60 (413.68 MPa) 4 (27.57 MPa) 8.5 (216 mm) 2.5(64 mm)
0
5
10
15
20
25
30
35
9 11 13 15 17 19
Spac
ing
(in
.)
ΦMn (k-ft)
#3 #4 #6 #7#8 #9 #10 #5@6in
Spacing selected to achieve flexural resistance of slab = 14.6 k-ft

67
The actual mechanism between the rebar cage is complex. The modeling and
analysis are based on following assumptions:
• The connection between the longitudinal and transverse rebar is fixed that is
connecting ties does not deform.
• The transverse and longitudinal rebar does not provide support to each other and
supports are only provided at each corner.
• Since, the rebar cage is continuous, and supports are provided at 4-ft (1.22mm)
maximum spacing. Modeling is done only for single span supported by pin support;
the rebar cage is continuous this represents severe condition. Continuous span will
reduce the total deflection.
Figure 6-30 Typical Location of Applied Load
All the model with different bar sizes and spacing was analyzed and there
maximum deflection and bending stresses is plotted in Figure 6-32 and Figure 6-31,
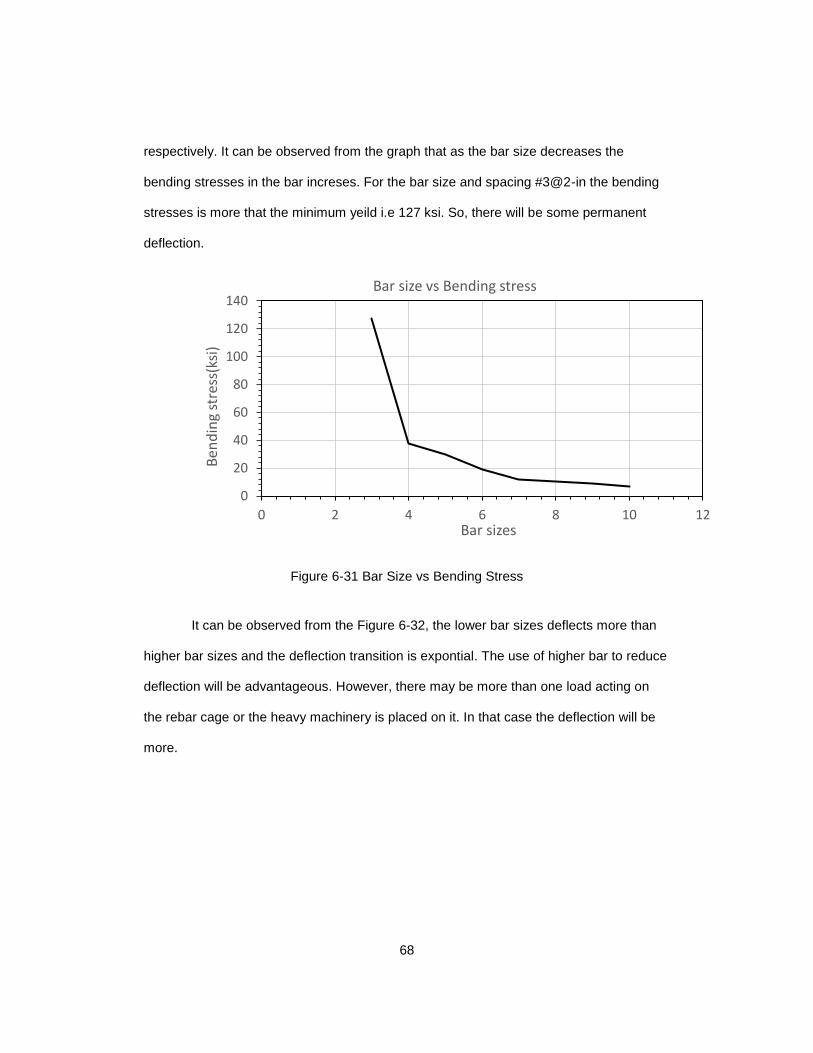
68
respectively. It can be observed from the graph that as the bar size decreases the
bending stresses in the bar increses. For the bar size and spacing #3@2-in the bending
stresses is more that the minimum yeild i.e 127 ksi. So, there will be some permanent
deflection.
Figure 6-31 Bar Size vs Bending Stress
It can be observed from the Figure 6-32, the lower bar sizes deflects more than
higher bar sizes and the deflection transition is expontial. The use of higher bar to reduce
deflection will be advantageous. However, there may be more than one load acting on
the rebar cage or the heavy machinery is placed on it. In that case the deflection will be
more.
0
20
40
60
80
100
120
140
0 2 4 6 8 10 12
Ben
din
g st
ress
(ksi
)
Bar sizes
Bar size vs Bending stress

69
Figure 6-32 Bar Size vs Deflection
Generally, while construction of rebar cage, supports or spacers are missed due
to improper inspection. This contributes to longer span and higher rebar cage deflection.
To examine this RISA model for rebar cage supported longitudinally and transversely at 8
ft is modelled. Figure 6-33 and Figure 6-34 are modeled rebar cage with load applied as
shown.
Figure 6-33: Transversely supported at 8 feet
0
0.5
1
1.5
2
2.5
3
3.5
4
4.5
0 2 4 6 8 10 12
Def
lect
ion
(in
.)
Bar sizes
Bar size vs Deflection

70
Figure 6-34 Longitudinally supported at 8 feet
Table 6-7 is the result of analysis. Longitudinally supported rebar cage will be
deflected less about 3 in. (76mm) and stresses are within elastic range while rebar
supported transversely deflects about 5 in. (127mm). with stresses exceeding yield.
Table 6-7 Result of missing support
Support Max. Stress (ksi) Max.
Deflection (in)
Support spanning 8ft longitudinally
39.3 (271N/mm2 3.03 (77mm)
Support spanning 8-ft transversely
61.91 (427N/mm3 5.08
(129mm)

71
Since, analysis is done for model with 4 ft (1.22m) boundary, the single span will
deflect more that multiple span. Now, 4 spans on each direction is tested to check
deflection of rebar. The Figure 6-35 and Figure 6-36shows the analyzed model with loads
on different position. This is for #5@6 in and #5 @ 9 in transverse and longitudinal
spacing.
Figure 6-35 Continuous Rebar mat

72
Figure 6-36 Applied load position
For single span the deflection is 0.711 in. (18mm). For continuous span rebar
supports the deflection is less than one span rebar model (Table 6-8).
Table 6-8 Continuous Rebar Cage Results
Case Stresses (ksi) Deflection (in.)
1 37.08 (256 N/mm2) 0.55 (14mm)
2 27.56 (190 N/mm2) 0.4 (10mm)
3 28.24 (195 N/mm2) 0.4 (10mm)
4 28.18 (194 N/mm2) 0.4 (10mm)
5 27.44 (189 N/mm2) 0.4 (10mm)
6 31.42 (217 N/mm2) 0.37 (9mm)
7 26.32 (181 N/mm2) 0.26 (7mm)
8 27.03 (186 N/mm2) 0.26 (7mm)
9 27.27 (188 N/mm2) 0.26 (7mm)
10 28.28 (195 N/mm2) 0.26 (7mm)

73
Chapter 7
Conclusion and Future Research
7.1 Conclusion
In this chapter, summary of findings of the research and recommendation for
future study is made in this chapter. In this study, two bridges about 58 years old at end
for service life and two newly constructed were studied for cover variation. The data was
collected with GPR, cover depths ware calculated with help of GPR-slice software and
Surfer software was used to plot contours. Dielectric constant was accurately estimated
with migration and compared with ground truth method. Due to increased cover the
reduction in flexural resistance were determined and compared with required flexural
resistance against negative moments. The following conclusion are made:
• It was found that for new bridges percent distribution of rebar for +1/2 inch (13mm)
and +1 inch (25.4mm) was 29 to 50% and 71 to 86%, respectively. This also suggest
rebar cover distribution satisfied ACI standards to a higher extent than TxDOT.
• For the old SH183 over Loop 12 the rebar depth was approximately determined
which showed a peak at 2.3 in. (58mm) close to the proposed cover of 2 in. (51mm).
• Old SH183 over MacArthur showed high standard deviation in cover due to scanning
on surface with wet soil and stripped asphalt layer. As a result, dielectric constant
was varying horizontally throughout surface. Since, same dielectric constant was
used throughout, that results in over or under estimation of cover in some areas on
deck. In addition, cracks on deck will allow water to seep and will also change
dielectric constant around it. This variability in dielectric constant is not taken into
consideration.

74
• Since, the tolerance does not allow lowering of rebar from proposed cover very less
about 17% and 5.05% of average rebar distribution was observed for New SH183
over loop 12 and MacArthur bridges.
• Since design moments and capacities are calculated with constant slab thickness,
which cannot be true. Cause of slab variation can be due to uneven shrinkage of
concrete and deflection in forms (except for stay-in-place forms).
• For new bridges, increase in rebar cover resulted in decrease in capacity, but not
beyond the total factored design moment capacity of deck due to dead, wearing and
live load. It can be concluded designing is done taking tolerance into consideration.
For old bridges, calculated design moments in accordance to AASTHO 2017 resulted
in higher design moments because older bridges were built with lower load factors
and with HS20 loads.
• Modeling of rebar cage in RISA, resulted in higher rebar size deflect less and within
elastic limit than lower sizes rebar deflects beyond elastic limit. Usage of #5 bars in
slabs with cage supported 4 ft (1.22m) maximum spacing deflect within elastic limits.
• Rebars cage supported at an interval more than 4ft (1.22 m) resulted in higher
deflection. There were differences in deflection of cage supported transversely and
longitudinally
7.2 Future Work
• The concrete pouring on the deck is not always even this result in different thickness
of slab. Using lower frequency antenna to estimate slab thickness and calculating
capacity will be an accurate approach.

75
REFERENCES
1. American Concrete Institute (ACI).(2010). Specifications for Tolerances for Concrete
Construction and Materials and Commentary, Detroit, Michigan.
2. American Association of State Highways and Transportation Officials (AASHTO).
(2017). LRFD Bridge Design Specifications. Washington, DC: American Association
of State Highways and Transportation Officials.
3. Istiaque Hasan, Md. (2015). Quantitative Non-Destructive Evaluation of Rebar
Diameter and Corrosion Damage in Concrete Using Ground Penetrating Radar.
4. Istiaque Hasan, Md & Yazdani, Nur. (2016). Ground penetrating radar utilization in
exploring inadequate concrete covers in a new bridge deck 104-114.
10.1155/2016/8536850.
5. Al-Qadi, I., & Lahouar, S. (2005). Part 4: Portland Cement Concrete Pavement:
Measuring Rebar Cover Depth in Rigid Pavements with Ground-Penetrating Radar.
Transportation Research Record: Journal of the Transportation Research Board,
1907, 80-85. doi:10.3141/1907-09
6. Parrillo, Robert ; Roberts, Roger. (1997). Ground Penetrating Radar for Highway and
Bridge Deck Condition Assessment and Inventory. NDT & E International.
10.1016/s0963-8695(97)82182-2.
7. Texas Department of Transportation (TxDOT). (2014). Standard Specifications for
Construction and Maintenance of Highways, Streets, and Bridges. Texas.
8. S Ekolu and F Solomon. (2015). Statistical Analysis of Concrete Cover in New
Highway Bridges, IOP Conf. Ser.: Mater. Sci. Eng. 96 012081
9. Hugenschmidt J. (2002). Concrete bridge inspection with a mobile GPR system.
Construct Build Mater 2002;16(200):147–54.

76
10. Geophysical Survey System, Incorporated (GSSI). (2001). RADAN7 user’s guide,
Nashua, New Hampshire 03060-3075 USA
11. Geophysical Archaeometry Laboratory Inc. GPR-Slice manual v7.0, 2018
12. Geophysical Survey System, Inc. (2011). SIR 30 Manual. Nashua, New Hampshire
03060-3075 USA
13. Geophysical Survey System, Inc. (2011). Concrete Handbook, Nashua, New
Hampshire 03060-3075 USA
14. George C. Lee, Satish B, Mohan, Chao Huang, and Bastam N. Fard. (2013). A Study
of U.S. Bridge Failures (1980-2012) (MCEER-13-0008). Buffalo, NY 14260.
15. Ibrahim Erdem and David B. Peraza. (2015). A Case Study on the Construction
Defects of Reinforced Concrete Walls with Insulated Concrete Forms. Forensic
Engineering 2015. 10.1061/9780784479711.052
16. https://maps.google.com/
17. A Nemetschek Company. RISA 3D. CA 92610
18. https://www.concreteconstruction.net/how-to/construction/placing-reinforcing-steel_o
19. Richard M. Barker Jay A. Puckett (2013). Design of Highway Bridges.

77
Biographical Information
Prem Egade is a student at The University of Texas at
Arlington currently pursuing a Master of Science in
Structural Engineering and Mechanics. He obtained his
bachelor’s degree in Civil Engineering from Mumbai
University, India in 2015. He has worked as an intern at
Larkins Realtors, India. He has done a project on
prestressed post-tensioned (segmented) bridge girder
and a case study on a prestressed bridge of New
Mumbai Metro project. He has worked on inspection of
bridge deck with Ground Penetrating Radar in
determining rebar cover profile of bridges.