stir things up -...
TRANSCRIPT

ENJOY THIS SPECIAL PREVIEW OF DELICIOUS THINGS TO COME...
stir things up
Dozens of top-rated dishes,
including this amazing
pulled pork
HURRY TO GET A FULL YEAR FREEDETAILS INSIDE
THE WORLD’S LARGEST FOOD WEBSITE IS COMING TO YOUR TABLE IN PRINT!
WORLD’S FARE, PAGE 2 EGG-CELLENT IDEAS, PAGE 22 MEALS IN MINUTES, PAGE 16 HEALTHY OR NOT? PAGE 4 LEMON LOVE, PAGE 7
<< GREAT RECIPES, MEAL SOLUTIONS, AND MORE >>
®
®

Congratulations, fellow home cook!You have been chosen to receive an exclusive sneak peek of an exciting new magazine from the world’s #1 recipe site—it’s everything you love about Allrecipes.com and much, much more!
Inside these pages, you’ll find a small taste of what you’ll get in every issue of Allrecipes magazine:
! Favorite recipes from America’s most experienced home cooks. Tried and true and trusted recipes that have been cooked, tweaked, and rated hundreds—if not thousands—of times
! Exciting new ways to personalize dishes and tailor recipes to your family’s tastes, whether it’s 5-star comfort foods, healthy meals, or few-ingredient suppers
! The relaxed feeling of cooking with your best friend—we’re supportive, encouraging, enthusiastic, and, most important, fun to be with
! Down-to-earth advice on saving time and money at the grocery store
! Secret family recipes, recommendations, comments, and other hidden gems you just won’t find anywhere else
! Practical cooking tips that make your time in the kitchen more efficient and fun, and everything you serve more delicious
! Smart ideas from other home cooks to help you make holidays and parties truly special
Plus, the new Allrecipes magazine brings you dozens of easy organizing strategies, the scoop on trendy new foods everyone’s talking about, hot new kitchen tools that will change your life... It’s so much more than recipes—you really need to see it all for yourself.
Become a Charter Subscriber today and we’ll not only reserve a hot-o!-the-press copy of our Premier Issue for you, we’ll give you two years for the price of one—a full year FREE!
So don’t miss out! Join our community of America’s best home cooks today and be the first of your friends to get the new Allrecipes magazine!
P.S. Premier Issues are limited. Guarantee yours—and your FREE YEAR—right now at allrecipes.com/free.
P.P.S. Get a year free while you can! Mail in your order card on page 14 today!
We want to
hear what you think of this
sample issue! Tell us at feedback
@allrecipes.com.
®
On th
e cov
er: P
hoto
(pul
led p
ork)
: Kat
e Mat
his.
Prop
styli
ng: M
egan
Hed
gpet
h. Fo
od st
yling
: Meg
an S
chlow
.

allrecipes.com 1
Phot
os co
urte
sy of
Allr
ecip
es.co
m.
THE FRIDGESnapshots of community members’ happy moments, silly moments, and delicious moments
cottonto it
cake face
catch of the day Top Chef!
Smell those fresh baked brownies!
pretty in pink
a taste of summer
ice cream daterolling in dough
®

2 allrecipes.com
Phot
o: Pe
ter A
rdito
. Foo
d st
yling
: Mich
ael P
eder
sen.
Pro
p st
yling
: Don
Pur
ple.
WORLD’S FARE
FROM AR KITCHEN ! This can be very hard to manage in a skillet, even an extra-large one—use a covered pot instead.! If not using nonstick cookware, add 2 tablespoons olive oil when browning meat.! Beef took 6 minutes to brown; we added 1! teaspoons salt at start and " teaspoon black pepper at end.! We simmered covered for 1! hours; it would concentrate too much if uncovered.! Total yield was 8 cups; 2 cups was enough to dress 9 ounces fresh fettuccine (4 small portions).
1 pound ground beef (85% lean) 1 cup diced onion 1 tablespoon minced garlic 1 carrot, shredded 1 tablespoon dried oregano 1 teaspoon garlic powder 1 bay leaf salt and ground black pepper to taste 42 ounces canned crushed tomatoes (such as San Marzano) 2 cups water 8 to 10 ounces dried or fresh pasta1 tablespoon butter ! cup grated Parmesan cheese, plus extra for serving
1 Heat a large skillet over high heat. Stir in the beef, onion, garlic, and carrot. Cook and stir until the beef is crumbly, evenly browned, and no longer pink. Drain and discard any excess grease. Stir in the oregano, garlic powder, bay leaf, and salt and pepper. Add the tomatoes and water. Bring to boil, then reduce heat to medium-low and continue to simmer for 1 to 1! hours. Pour all but 2 cups of the sauce in an airtight container and freeze for future use. 2 Cook pasta according to package instructions and drain.3 Stir butter and Parmesan cheese into reserved 2 cups of sauce over medium heat. Stir noodles into sauce, and toss until pasta is well coated. Serve in large bowls with more Parmesan cheese.
When I think of comfort food, I think of the way it brings you back to a time in your life when you had a really good feeling. This particular dish brings me back to three places, and it all starts with my grandma.
My grandma was living in L.A., living in a mobile home, and she had a lot of pride. One of the first things I can remember is being at her house, and it was beautifully decorated, and she would be cooking. My mom cooked, too, but this seemed di"erent; nothing was store bought. There was always a pot of sauce cooking on the stove, and homemade noodles hanging over the backs of the chairs.
Fast-forward a few years, and I would come home after school and my mom would be making spaghetti sauce in an electric skillet. Even though we had a stove, she’d use this square skillet. I could smell it as soon as I walked in, and I’d be so happy because I’d know it was spaghetti night. There would be garlic bread, and it was all perfect.
Jump ahead to when I’m 21 years old, I’m in culinary school, and I’m working at my first restaurant job while I’m in school. It’s an authentic Italian restaurant, the chef is straight from Italy, and he’s making Bolognese sauce. I realize it’s basically the same sauce my mother and grandmother had been making, but with chef techniques.
Now I kind of pull from all three of those recipes to make this dish, and I make it for my kids. Just one bite and I’m back to all three of those places in my life.
When you have kids, you realize there’s something you care about more than yourself. I want to give my kids the best things possible. The good feeling of being with my grandma, home with my parents, cooking in restaurants—now I can pass that on to my kids. I hope when they’re in their 20s and in college or traveling, they’ll think back to when they made sauce and noodles with their dad.
Tonight’s dinner destination? Italy! Combining the lessons and experience of both his mother and grandmother, as well as his training as a chef, Greg Johnson is passing the legacy of Italian cooking on to his own children.
Ciao Bella!SUBMITTED BY
Greg Johnson
PREP
15 min
COOK 1.5 hr
READY IN
2 hr
SERVINGS
4RATING
7 reviews
BOLOGNESE SAUCE ALLRECIPES.COM/BOLOGNESE-SAUCE
Listen to Greg tell his own story while you learn how to make his Bolognese sauce (and homemade noodles, if you’re feeling ambitious!) at allrecipes.com/bolognese-video.
®
GET A FREE YEAR! Mail in the RSVP card on page 14 NOW, or go to allrecipes.com/free.

Phot
o: Bl
aine
Moa
ts.
SAVE MONEY, SAVE TIME
We’ve all heard of so-called extreme couponers—you know, those rabid coupon clippers who somehow manage to snap up their groceries for mere pennies (and who live in houses stocked to the ceiling like Costco). But you don’t have to be obsessed to save big. These simple tips can slash a $500 monthly grocery bill for a family of four nearly in half, or even more!
MAKE A GROCERY LIST. And stick to it! By planning your meals in advance and making a grocery list, you’re far less likely to succumb to temptation and buy impulse items (a.k.a., things you don’t need) at the grocery store. In fact, researchers at the Wharton School found unplanned purchases can tack on at least an extra 20% to the average grocery bill. The Menu Planner on Allrecipes.com makes it easy to plan meals and create a shopping list (allrecipes .com/menuplanner). Monthly savings: $50 PAPER OR PLASTIC? We’re not talking bags here, but cash or credit. If you use plastic, make your credit card work harder for you. Look for all-purpose cards that o!er cash back on groceries, or store cards (such as Target’s) that give you an instant discount. But beware: You lose the savings if you rack up interest charges, so pay o! the balance every month. Monthly savings: $15SNIP ’N’ SAVE. Yes, coupons can save you money. No, you don’t have to go coupon crazy. Spend just 10 to 15 minutes a week thumbing through your newspaper’s weekly flyers or
cruising a couple coupon websites like Coupons.com, and you can easily find savings on stu! your family needs. Monthly savings: $15CASH INCENTIVE. Take the all-cash challenge! According to the market research firm D&B, consumers who shop with cash alone spend an average of 12% to 18% less than those who shop with credit cards. So leave the cards at home and take only what you’ve budgeted for groceries in cash. Monthly savings: $40SHOP AROUND. Research shows that consumers who do their weekly shopping at two or more stores save money (more than 15%, in fact) because they’re more likely to take advantage of lower prices for specific items. For example, you can often get a better deal on health and beauty products by visiting your drugstore in addition to shopping at the supermarket. Monthly savings: $25TRY GENERIC. Store-brand products have come a long way. Not only are they often produced by brand-name manufacturers, they can be upwards of 20% cheaper than name brands. So give generics
a try, and stick with the ones your family likes. Monthly savings: $20AVOID GIMMICK PRICING. Supermarkets can be clever in getting you to spend more. Promotions like “10 for $10” and “4 for $5” seem like a great deal, but watch out: Those products may not actually be on sale. Even if they are, remember that you rarely need to buy the stated number to get the sale price. Monthly savings: $5PRICEY THINGS COMES IN SMALL PACKAGES. Tiny items are cute, but your best bet for snack foods is almost always to buy the largest size and divvy it up yourself. (Use the nutrition label as a guide if you’re concerned about portion control.) For example, Mini Oreo cookies in snack packs cost three times more per cookie than Oreos in a family pack. Monthly savings: $20TIME IS MONEY. You pay a premium for “convenience,” whether buying pre-packaged salad greens, pre-cut fruit or spice mixes. Overall, it’s cheaper to just to make your own salad, cut your own fresh fruit or mix your own spices. Plus, going DIY in the kitchen only adds about 10 extra minutes to meal prep, according to the UCLA Center on the Everyday Lives of Families. Monthly savings: $10
Ka-ching! Hang on to $200 this month.
®

HEALTHY VS NOT-SO-MUCHSOMETIMES YOU WANT TO SPLURGE ON A CLASSIC, SOMETIMES YOU WANT SOMETHING A VERSION PUBLISHED IN 1998, AND A HEALTHIER REMAKE THAT’S RELATIVELY NEW TO
FROM AR KITCHEN ! Baked for 45 minutes, which was enough.! We left cake in the pan—di#cult to turn out.! We sprinkled nuts on top of frosting instead of mixing them in.
4 eggs $ cup vegetable oil 1! cups white sugar 2 teaspoons vanilla extract 2 cups whole wheat pastry flour 2 teaspoons baking soda 2 teaspoons baking powder ! teaspoon salt 2 teaspoons ground cinnamon 3 cups grated carrots 1 cup chopped pecans For frosting:" cup butter, softened 1 (8 ounce) package Neufchâtel cheese, softened 2 cups confectioners’ sugar 1 teaspoon vanilla extract 1 cup chopped pecans
1 Preheat oven to 350 degrees F. Grease and flour a 9x13 inch pan.2 In a bowl, beat together eggs, oil, white sugar, and 2 teaspoons vanilla. Mix in flour, baking soda, baking powder, salt, and cinnamon. Stir in carrots. Fold in pecans. Pour into prepared pan.3 Bake in the preheated oven for 40 to 50 minutes, or until a toothpick inserted into the center of the cake comes out clean. Let cool in pan for 10 minutes, then turn out onto a wire rack and cool completely.4 To make frosting: In a medium bowl, combine butter, Neufchâtel cheese, confectioners’ sugar, and 1 teaspoon vanilla. Beat until the mixture is smooth and creamy. Stir in chopped pecans. Frost the cooled cake.
SUBMITTED BY
MakeItHealthy
PREP
30 min
COOK 1 hr
READY IN
2 hr 30 min
SERVINGS
8RATING
4 reviews
“We made it with a little less oil and a little less sugar, so this carrot cake recipe is now healthier but still sure to be a favorite.” — MakeItHealthy
!!!!!5-STAR RATING
HEALTHIER CARROT CAKE III ALLRECIPES.COM/HEALTHY-CARROT-CAKE
For more healthy and delicious recipes, sign up for the Healthy Bites newsletter at allrecipes.com/healthy-newsletter.
PRO No one will know it’s been “healthified”! CON It’s not quite as moist.
PRO Every community member who commented gave it 5 stars.CON You will eat way more than you should because it’s so good.
PRO It has 399 calories per serving.CON It has fewer comments because the recipe is new.
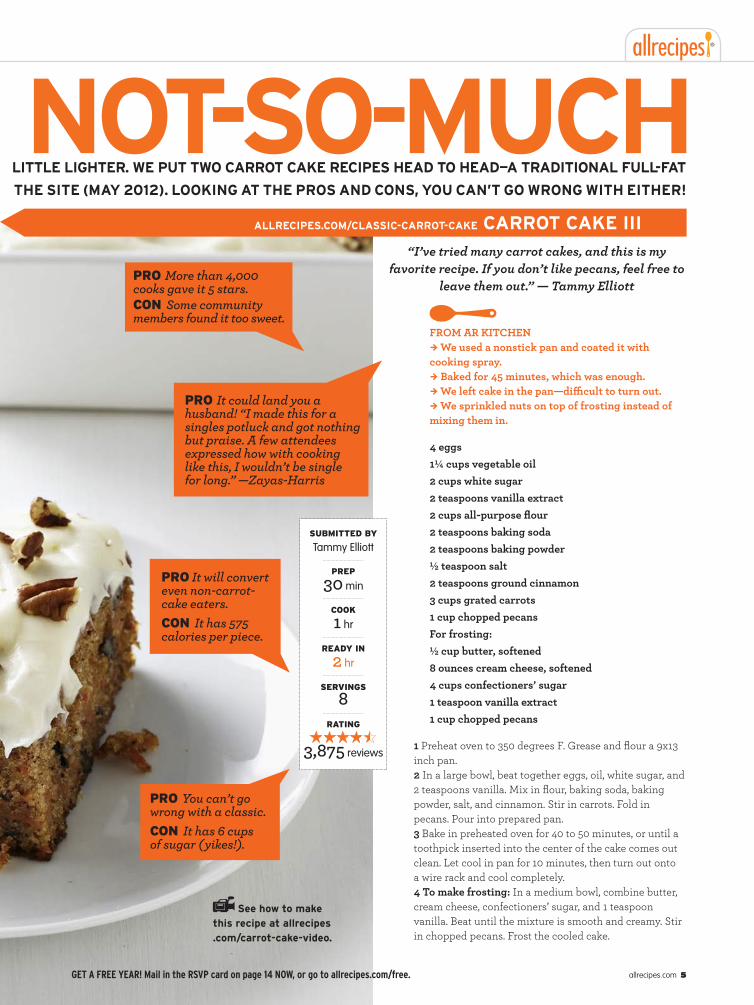
HEALTHY VS NOT-SO-MUCH LITTLE LIGHTER. WE PUT TWO CARROT CAKE RECIPES HEAD TO HEAD—A TRADITIONAL FULL-FAT THE SITE (MAY 2012). LOOKING AT THE PROS AND CONS, YOU CAN’T GO WRONG WITH EITHER!
FROM AR KITCHEN ! We used a nonstick pan and coated it with cooking spray.! Baked for 45 minutes, which was enough.! We left cake in the pan—di#cult to turn out.! We sprinkled nuts on top of frosting instead of mixing them in.
4 eggs 1" cups vegetable oil 2 cups white sugar 2 teaspoons vanilla extract 2 cups all-purpose flour 2 teaspoons baking soda 2 teaspoons baking powder ! teaspoon salt 2 teaspoons ground cinnamon 3 cups grated carrots 1 cup chopped pecans For frosting:! cup butter, softened 8 ounces cream cheese, softened 4 cups confectioners’ sugar 1 teaspoon vanilla extract 1 cup chopped pecans
1 Preheat oven to 350 degrees F. Grease and flour a 9x13 inch pan.2 In a large bowl, beat together eggs, oil, white sugar, and 2 teaspoons vanilla. Mix in flour, baking soda, baking powder, salt, and cinnamon. Stir in carrots. Fold in pecans. Pour into prepared pan.3 Bake in preheated oven for 40 to 50 minutes, or until a toothpick inserted into the center of the cake comes out clean. Let cool in pan for 10 minutes, then turn out onto a wire rack and cool completely.4 To make frosting: In a medium bowl, combine butter, cream cheese, confectioners’ sugar, and 1 teaspoon vanilla. Beat until the mixture is smooth and creamy. Stir in chopped pecans. Frost the cooled cake.
SUBMITTED BY
Tammy Elliott
PREP
30 min
COOK 1 hr
READY IN
2 hr
SERVINGS
8RATING
3,875 reviews
“I’ve tried many carrot cakes, and this is my favorite recipe. If you don’t like pecans, feel free to
leave them out.” — Tammy Elliott
ALLRECIPES.COM/CLASSIC-CARROT-CAKE CARROT CAKE III
PRO More than 4,000 cooks gave it 5 stars.CON Some community members found it too sweet.
PRO You can’t go wrong with a classic.CON It has 6 cups of sugar (yikes!).
PRO It will convert even non-carrot-cake eaters.CON It has 575 calories per piece.
PRO It could land you a husband! “I made this for a singles potluck and got nothing but praise. A few attendees expressed how with cooking like this, I wouldn’t be single for long.” —Zayas-Harris
See how to make this recipe at allrecipes .com/carrot-cake-video.
GET A FREE YEAR! Mail in the RSVP card on page 14 NOW, or go to allrecipes.com/free.
®
allrecipes.com 5

GET A FREE YEAR! Mail in the RSVP card on page 14 NOW, or go to allrecipes.com/free.
To get in on the conversation about products, kitchen solutions, recipe ideas, and more, check out The Buzz at allrecipes.com/the-buzz.
What’s in your kitchen?CAN’T LIVE WITHOUT
IRISHGINA74 ASKS Can I buy a sourdough starter? I don’t want to “grow” it in my fridge.PAULA SAYS Yes, at King Arthur Flour!
FROM AR KITCHEN Although this product is descended from a starter that’s been growing in New England since the 1700s, when you feed it, it quickly becomes your own, adapting to your specific region and climate. Kingarthurflour.com, $9 for 1 ounce
MA BOTT ASKS I love slathering Tabasco on hot dogs. I want to know what the great cooks of Allrecipes.com use their beloved Tabasco pepper sauce for. Spice up my day!TERRY TRIPP SAYS I love Tabasco on my spaghetti. Also love it in my homemade cream corn chowder and salmon stew!HEATHER SAYS Popcorn! I always sneak my bottle into the movies.BAKERBAKER SAYS Try a couple sprinkles in chocolate cupcakes. It’s that little something extra. No one knows what it is, just that it’s good!
FROM AR KITCHEN Visit tabasco.com to get coupons, recipes, and product info.
SCOTTDOG=NO PRO ASKS Does anyone remember this type of cake pan?NANNY129 STAR! SAYS My mom had them. I loved for her to bake a cake because I got to “turn” the pan to release the cake :-) Great memory—thanks. Mama would make seven-layer Italian cream cakes—she had two pans. Loved those days.RANDY SAYS I have two sets of these cake pans. They are the only ones I use when making layer cakes. I don’t quite know where I got them from, but I would sooner give up my right arm than give up these!
FROM AR KITCHEN Vermontcountrystore.com, $11 for a set of two cake pans with cutter bars
KITCHEN GADGET GIDGET SAYS Keeping a garbage bowl on the counter is very e!cient and practical. My workspace is somewhat limited, and the addition of another bowl for trash to my counter wasn’t ideal. The KitchenArt Scrap Trap bin and scraper hangs on the top of your cupboard door or drawer. I use it sometimes right below my cutting board and just scrape everything into it o" my board. The key is to place the bin within arm’s length of where you work in your kitchen so it’s always there for you ( just like chocolate).
FROM AR KITCHEN We agree: This looks like a really handy way to keep your counter clean when you’re cooking! Kitchenart.com, $10
Admit it: We all love seeing what our friends have in their cabinets, drawers, and fridges. Who doesn’t want to know about a handy tool or ingredient that could make the daily cooking routine easier? We turned to you, the Allrecipes community, to find out what products have captured your attention lately.
®
Phot
os (p
revio
us sp
read
): Ka
te M
athi
s. Pr
op st
yling
: Deb
orah
Will
iam
s. Fo
od st
yling
: Kar
en Ta
ck.

LEMONLOVE
Lemon is a secret weapon in the kitchen—completely familiar and unassuming, yet its bright flavor transforms everyday desserts into something special. Plus, find out how to
choose the juiciest lemons, get the best zest, and more.
allrecipes.com 7
QUICK TIP “I made a glaze
using 1 cup confectioners’ sugar,
about a tbsp milk, and a tsp lemon
extract.” —MAGG0214
SUBMITTED BY
Phyllis
PREP
10 min
COOK 35 min
READY IN
45 min
SERVINGS
14RATING
251 reviews
LEMON BUNDT CAKE
PAGE 9

8 allrecipes.com
FROM AR KITCHEN! Filling was a little wet—reduce water by " cup.! Use ! cup lemon juice—2 lemons may not give you enough.! Needed 12 minutes baking time.
1 cup white sugar 2 tablespoons all-purpose flour 3 tablespoons cornstarch " teaspoon salt 1! cups water 2 lemons, zested and juiced 2 tablespoons butter 4 egg yolks, beaten 1 (9 inch) piecrust, baked 4 egg whites 6 tablespoons white sugar
1 Preheat oven to 350 degrees F.2 To make lemon filling: In a medium saucepan, whisk together 1 cup sugar, flour, cornstarch, and salt. Stir in water, lemon juice, and lemon zest. Cook over medium-high heat, stirring frequently, until mixture comes to a boil. Stir in butter. Place egg yolks in a small bowl and gradually whisk in ! cup of hot sugar mixture. Whisk egg yolk mixture back into remaining sugar mixture. Bring to a boil and continue to cook while stirring constantly until thick. Remove from heat. Pour filling into baked pie shell.3 To make meringue: In a large glass or metal bowl, whip egg whites until foamy. Add sugar gradually, and continue to whip until sti" peaks form. Spread meringue over pie, sealing the edges at the crust.4 Bake in preheated oven for 10 minutes, or until meringue is golden brown.
GRANDMA’S LEMON MERINGUE PIE
ALLRECIPES.COM/LEMON-MERINGUE
“This is a very fun recipe to follow, because Grandma makes it sweet and simple. This pie is thickened with cornstarch and flour in addition to egg yolks, and contains no milk.” — Emilie S.
See how to make this recipe at allrecipes.com/lemon-meringue-video.
SUBMITTED BY
Emilie S.
PREP
30 min
COOK 10 min
READY IN
40 min
SERVINGS
8RATING
1,211 reviews
QUICK TIP Use a premade piecrust you can find in
your grocer’s freezer.
YOU SAID! Everyone who is having problems with water in your pie: You cannot cover a lemon meringue pie with plastic wrap to store it. Condensation forms and will leave you with a puddle in your pie! To store, very loosely cover it with tented aluminum foil, leaving a little opening for moisture to escape. —LOVECED
! Even though I knew better, I ended up making the filling first and then the meringue: Big mistake! Make the meringue first, set it aside, and then make the filling. —Bakeswithluv
! I use my microwave in any instance where you might use a double boiler or have to stir on the stove. So simple. Mix first 6 ingredients in 4 cup microwave bowl. Cook on high until boils, add butter, and mix hot mixture with egg yolks, return to microwave, and bring to a boil again. No stirring constantly and no mess. —Barb
Get the Most Juice Put a lemon on the counter, then roll it under the palm of your hand, pressing down hard—you’re breaking up the membranes and pulp inside, which releases more liquid. If you’ve got a hard lemon that’s not responding to rolling, microwave it for 15 to 20 seconds.

EASY LEMON COOKIESALLRECIPES.COM/LEMON-COOKIES
“The basic cake mix cookie with a twist.” — Lissa
FROM AR KITCHEN! Needed only 6 or 7 minutes bake time.! If you truly use teaspoon amounts to make each cookie, the yield will be 8 dozen cookies.
1 (18.25 ounce) package lemon cake mix2 eggs% cup vegetable oil1 teaspoon lemon extract% cup confectioners’ sugar
1 Preheat the oven to 375 degrees F.2 Pour cake mix into a large bowl. Stir in eggs, oil, and lemon extract until well blended. Drop teaspoonfuls of dough into a bowl of confectioners’ sugar. Roll them around until they’re lightly covered. Once sugared, put them on an ungreased cookie sheet.3 Bake for 6 to 9 minutes in preheated oven. The bottoms will be light brown, and the insides chewy.
YOU SAID! I used 1 tbsp lemon juice in place of the lemon extract, much better flavor. If you prefer a crisper cookie, push the ball down a little before baking and bake them till browned. Yum! —Celeste’s NO
! I made lemon, strawberry (used strawberry extract instead of lemon), and carrot cake (used & tsp of ground ginger and a tsp of vanilla) versions. Oh, and I did cook mine for 10 minutes. I guess ovens are different. —Chebber
1 (18.25 ounce) package lemon cake mix1 (3.4 ounce) package instant vanilla pudding mix$ cup vegetable oil4 eggs 1 cup lemon-lime flavored carbonated beverage
1 Preheat oven to 325 degrees F. Grease and flour a 10-inch Bundt pan.2 In a large bowl, combine cake mix and pudding mix, then stir in the oil. Beat in the eggs, one at a time, then stir in the lemon- lime soda.3 Pour batter into prepared pan. Bake in the preheated oven for 35 minutes, or until a toothpick inserted into the center of the cake comes out clean. Allow to cool.
LEMON BUNDT CAKE ALLRECIPES.COM/LEMON-BUNDT
YOU SAID! This cake was delish! I didn’t have lemon pudding, so I subbed vanilla pudding and added a tsp of lemon extract and it turned out fine! —MAGG0214
! I used Diet Sierra Mist because it was all I had and was worried after reading some reviews that the cake would taste like chemicals. It did not and was delicious! —sushilover
! Moist, delicious, and easy...Took way longer than 35 minutes, almost 1 hour. Worth the wait. —PJ
“Lemon instant pudding and lemon-lime soda make this a very moist and delicious lemon cake.” — Phyllis
SUBMITTED BY
Lissa
PREP
10 min
COOK 6 to 7 min
READY IN
17 min
SERVINGS
3 dozen
RATING
887 reviews
FROM AR KITCHEN! Needed closer to 45 minutes of baking time.! Allow to cool 15 minutes in pan before inverting onto cooling rack to cool completely.
See how to make this recipe at allrecipes.com/lemon-cookies-video.
GET A FREE YEAR! Mail in the RSVP card on page 14 NOW, or go to allrecipes.com/free.

LEMON LUSH ALLRECIPES.COM/LEMON-LUSH
“A family friend shared this lemon and cream cheese dessert with me. It has been a hit with our family now for all our get-togethers.” — MRS.KELLYZ
FROM AR KITCHEN ! Cut baking time to 20 minutes.! You can use a nonstick baking pan instead of a dish.! Butter should be chilled and cut into cubes if it’s being cut into the flour—no need to form a ball.
! Cream cheese should be softened.! Not sure how community member arrived at 55 minutes—perhaps cooling and chilling time are included? (15 minutes to cool and 1 hour to set in fridge.)
2 cups all-purpose flour1 cup butter, softened2 (8 ounce) packages cream cheese1 cup sugar2 (3.4 ounce) packages instant lemon pudding mix3! cups milk1 (12 ounce) container frozen whipped topping, thawed
1 Preheat oven to 350 degrees F. In a medium bowl, combine the flour and butter using a pastry cutter until a ball forms. Press into the bottom of a 9x13 inch baking dish.2 Bake for 25 minutes in the preheated oven, or until lightly golden. Remove from oven and allow to cool completely.3 In a medium bowl, beat the cream cheese and sugar together until smooth and well blended. Spread evenly over the cooled crust. In another bowl, whisk together the lemon pudding mix and milk for 3 to 5 minutes. Spread over the cream cheese layer. Chill until set, then top with whipped topping.
SUBMITTED BY
MRS.KELLYZ
PREP
15 min
COOK: 25 min
READY IN
55 min
SERVINGS
12RATING
149 reviews
YOU SAID! It tastes just like a cool & creamy version of lemon meringue pie, but better :) I add 2 tablespoons of lemon juice to the cream cheese part and I also use confectioners’ sugar instead of granulated. —MANOPA
! Oh baby! This was amazing! I used a Keebler Shortbread Ready Crust because I really didn’t want to have the oven on when it’s so hot, and this dessert was fabulous. —MRS. LOUDSHOES
! I prefer a graham cracker crust to lighten up this dessert. I also added & cup lemon juice to the lemon filling. My family enjoys tart desserts. —Maggie McGuire
! The only modification I would suggest (that my mother does) is add some crushed walnuts to the crust batter. Tip: Make the crust, as it is the best part of the recipe! —RACH8986
To see more lemon recipes—both sweet and savory—go to allrecipes.com/lemon-collection.
Phot
os: K
ate M
athi
s. Fo
od st
yling
: Kar
en Ta
ck. P
rop
styli
ng: D
ebor
ah W
illia
ms.

allrecipes.com 11
FROM AR KITCHEN! Bake time is 18 to 20 minutes.! Beat egg mixture for 2 minutes to fully combine.! Makes 24 servings.
2" cups all-purpose flour ! cup confectioners’ sugar1 cup butter, softened4 eggs 1! cups white sugar! cup lemon juice1 tablespoon lemon zest
1 Preheat oven to 350 degrees F.2 Mix 2 cups of flour and confectioners’ sugar together. Cut in the butter or margarine. Mix well until the dough resembles pie dough consistency. Press the dough into a 9x13 inch baking pan.3 Bake 15 to 20 minutes or until golden brown.4 Beat together eggs, sugar, 4 tablespoons flour, lemon juice, and lemon rind for at least 1 minute. Pour the mixture over the baked crust.5 Bake the bars another 20 minutes, or until the lemon topping has set. Sprinkle with confectioners’ sugar when cooled.
LEMON PIE BARSALLRECIPES.COM/LEMON-PIE-BARS
“This is a really easy recipe that my mom made before the lemon bar rage was on! Thick-skinned lemons work best. I suggest using real butter and eggs. I’ve tried using Egg Beaters—nowhere near as good!” — kukadog
YOU SAID! The lemon filling is FABULOUS! I made double the filling b/c my pregnant self has been on a lemon kick for months now and it really hit the spot. —TTV78
! Definitely a good lemon bar, but not lemony enough. I have made this many times now and I add the zest of a full lemon to make them really tangy. If you add more lemon juice they can get too runny. But you really do need to cook this longer than 20 mins (at least 25-28). —KIMBERLYT1
! The filling looks to be thin and you’ll worry that it won’t set. It will. It’s supposed to look like that. —SarahJo
SUBMITTED BY
kukadog
PREP
15 min
COOK 40 min
READY IN
55 min
SERVINGS
32RATING
383 reviews
Get the Best Zest! A Microplane grater is the easiest way to get fine zest. (And it’s way easier to clean than a box grater!)! For larger pieces of zest—for, say, cocktails or
candying—you can use a vegetable peeler, a zester (it usually has five small holes), or a channel knife.! The best lemons for juicing should have a thin skin; thick-skinned lemons are best for zesting, however.
! Scrub lemons before zesting to remove any food-grade wax from skin.! You want only the colored part of the skin for zest—that’s where the flavor is. The white pith is bitter.
GET A FREE YEAR! Mail in the RSVP card on page 14 NOW, or go to allrecipes.com/free.

PUT THE LID ON CONTAINER
CHAOS How many of us open the cupboard where we randomly toss, stack, and wedge in our food-storage containers
and get a full-on Niagara Falls moment of tumbling plastic tubs and lids rushing over our heads and scattering
all over the kitchen floor? Organizing those containers once and for all seems to be the one thing we swear we’ll do and somehow never get around to. But with these tips you can kiss your container-storage problems goodbye.
GET A FREE YEAR! Mail in the RSVP card on page 14 NOW, or go to allrecipes.com/free.

allrecipes.com 13
To get in on the conversation about kitchen dilemmas, recipes, and more, check out The Buzz at allrecipes.com/the-buzz.
1SORT, MATCH, AND RECYCLE. Start by emptying your entire cupboard of existing containers. On a counter or table, separate them into tubs and lids, then sort by size. Match a lid to each container and ditch the extras. Keep the containers designed to hold food, and
recycle any cottage-cheese and takeout containers (the plastic they’re made from degrades more quickly, and you may be exposed to harmful chemicals). Then get ruthless about recycling the rest: Do you really need 50 Tupperware bowls? If they’re in good shape, consider donating them to a shelter for people who will soon be starting over in a new home. And those containers that have seen better days? Gone!
7BRING OUT YOUR NESTING INSTINCTS. Put all lids of similar size together, and the containers as well. Nest or stack them in quantities
small enough to be easy to reach in a cupboard, but large enough to save room in your storage space. In a drawer, stack them almost to the top of the space.
10SLIDE ’EM IN, PULL ’EM OUT, OR SPIN ’EM AROUND. If ever there was a reason to install a sliding drawer in your kitchen cabinet, the storage of food containers is a pretty good one. The pull-out drawer makes !nding just what you need worlds easier than grappling for a lid that’s behind another stack. Don’t want to commit to
the carpentry involved in installing a drawer or sliding wire basket? How about placing your containers and lids in separate wicker baskets or on a large rimmed baking sheet on the shelf, which you can easily slide in and out? A turntable or lazy Susan can also work.
!INVEST IN A MATCHED SET OF CONTAINERS. Now—when you have all those tubs and lids in front of you—
might be the time to think about buying a matched set of good-quality containers. If you can a"ord them, they’ll pay you back in e#ciency (they’re easier to stack and nest) and in the freshness of your food, as the better a container is built, the better it maintains edibles. Instead of plastic, consider glass containers. They won’t compromise the flavor of your food, and you can throw them in the dishwasher! Square containers, by the way, take up less space than round ones do.
$ BE A GROUPIE. As in, if you have smallish containers (the kind, say, you store mini portions of leftovers in), use
one of your larger containers to group them together. Put all the small lids in a food-storage bag, nest the tiny containers, and lock them together in one organized place within the larger lidded bowl.
9CONSIDER SHELF LIFE. A lot of us don’t have the space to devote an entire drawer or shelf to food-storage containers. If you have
a wall shelf (or a freestanding shelf unit) in your kitchen, pick up some attractive matching storage boxes (in wicker or a colorful durable material) and nest your bowls and lids within them. You can have them in plain sight and within reach.
6RETHINK YOUR CUPBOARD
OR DRAWER CHOICE. Maybe the shallow cabinet over your stove isn’t the best place. Ideally, the cupboard will be deep and wide enough for you to have several sizes displayed without having to reach way in the back to find the container you need (remember the Niagara Falls effect). It should also be within easy reach when you need it, and not crammed with pots and pans or other kitchen tools. If possible, dedicate one space (even if it’s simply one shelf) to containers.
% USE IT OR LOSE IT. Some food-storage containers are in constant rotation, while others (pie carrier and deviled-
egg holder, we’re talkin’ to you!) are, well, basically bench warmers. So why keep them at the ready? Put them in a separate cupboard or a higher pantry shelf for the two or three times a year you actually use them.
&EVERYTHING IN ITS PLACE, EVERY TIME. Somehow the food-storage-container drawer is the one place in the kitchen we just can’t bear to keep straight. We open the drawer, shove the lid in, cram the container
in, and walk away. But now that you’ve taken all this time to organize it, keep it that way! And if you’re ever tempted to start adding to the pile (a takeout container here, a yogurt container there), resist, resist, and then resist again!
'GET THE LID OUT! One of the most economical ways to store your lids is to place them in a resealable food-storage bag. Just make sure to
keep them in size order, or even a Ziploc bag can seem chaotic. If you’re more of the filing type, install a shelf or drawer divider (or several) to keep like lids with like. A napkin holder or small dish-drying rack can keep lids upright, while an inside-the-cupboard-door hanging rack will allow you to keep lids separate and a cinch to find.
Phot
os: (
left)
Sara
Dan
ielss
on/S
tock
Food
Cre
ative
/Get
ty Im
ages
, (to
p rig
ht) C
amer
on S
adeg
hpou
r, (b
otto
m ri
ght)
Emily
Follo
will.

Introducing brand-new Allrecipes ... the only magazine
that brings you the absolute best
of the best from over 43,000
tried-and-true family favorites on
allrecipes.com!
But that’s just the beginning! Every issue brings
you hundreds of secrets you won’t
see anywhere else ... fast-and-easy
tips to save you time and money ...
step-by-step how-to’s ... plus ideas
to help you put your own spin on
every dish ...
Get it all in your Premier Issue ... Plus a FREE YEAR!
From the world’s #1 cooking authority ... ALL NEW!
Festive meals for special celebrations
Cook up 5-star dinners every time!
Fast family meals you whip up in 20 minutes or less
Decadent and delicious desserts to die for
Heirloom Tomato and Goat Cheese Tart Mediterranean Chicken SaladDouble-Chocolate Ice Cream Cake
Claim your
FREE YEAR now!
AR_PrintAd_14-15.indd 14 1/22/13 4:27 PM
Claim your FREE YEAR now
... while you still can! Mail your RSVP card or visit
allrecipes.com/free
Look at all you get in your FREE YEAR ...t!HUNDREDS!PG!EFMJDJPVT!"#TUBS!SFDJQFT!o!FBDI!POF!XJUI!B!QIPUP$
t!.0/&:"4"7*/(!5*14!UP!TUSFUDI!ZPVS!HSPDFSZ!CVEHFU
t!'00-1300'!NBLF#BIFBET%!UJNF#TBWJOH!USJDLT!BOE!TIPSUDVUT
t!0/&"0'""",*/%!QBSUZ!JEFBT!GPS!DBTVBM!FOUFSUBJOJOH
t!45&1"#:"45&1!)08"50#4!IFMQ!ZPV!HFU!JU!SJHIU!FWFSZ!UJNF
Every dish in new Allrecipes Magazine
has been tested and tasted – by the
professionals in our kitchens and by
thousands of good home cooks like
you – to guarantee each recipe is quick,
easy and uses ingredients you already
have on hand. You can be sure every
recipe will turn out perfectly the !rst
time, every time ... or we’ll send you
every penny back. No questions asked!
And much, much more ... it’s simply all the home-cooking inspiration you’ve been searching for – in one exciting new magazine!
5-STAR MONEY-BACK
GUARANTEE
HURRY! ONE-TIME OFFER
Light & luscious versions of classic comfort foods
6-Ingredient Tortilla Soup
One-dish dinners, slow-cooker suppers – and more
Slow-Cooker Marinara
Soul-satisfying dishes perfect for company
Bean and Cheese Enchiladas
Fresh new twists on all your family’s favorites
Strawberry Banana S’mores
FREE YEAR exclusively for you!
AR_PrintAd_14-15.indd 15 1/22/13 4:27 PM

000 allrecipes.com
SUBMITTED BY
MARBALET
PREP
5 min
COOK 10 min
READY IN
15 min
SERVINGS
4RATING
684 reviews

allrecipes.com 17
READY IN
Minutes...FROM AR KITCHEN! Double the cornstarch to 1 teaspoon.! Double the vegetable oil to 2 tablespoons.! Use rice wine vinegar, not rice wine.! Increase beef to 1! pounds—1 pound is not enough for 4 servings.! Cook time is only 7 minutes, which makes total time 12 minutes.
3 tablespoons soy sauce2 tablespoons rice wine1 tablespoon brown sugar! teaspoon cornstarch1 tablespoon vegetable oil1 tablespoon minced fresh ginger root1 tablespoon minced garlic1 pound beef round steak, cut into thin strips8 ounces snow peas
1 In a small bowl, combine the soy sauce, rice wine, brown sugar, and cornstarch. Set aside.2 Heat oil in a wok or skillet over medium heat. Stir-fry ginger and garlic for 30 seconds. Add the steak and stir-fry for 2 minutes or until evenly browned. Add the snow peas and stir-fry for an additional 3 minutes. Add the soy sauce mixture; bring to a boil, stirring constantly. Lower heat and simmer until the sauce thickens, about 1 minute. Serve immediately.
“Stir-fried beef in a light gingery sauce. Serve over steamed rice or hot egg noodles.” — MARBALET
ASIAN BEEF WITH SNOW PEASALLRECIPES.COM/ASIAN-BEEF-STIRFRY
You know another great way to save time? By using the Allrecipes Meal
Planner! Drag and drop recipes into a weekly meal planner and with one click you can add all the ingredients to your shopping list. And we’ll send you new menu ideas every week! Check it out at allrecipes.com/menuplanner.
YOU SAID! This was delicious and easy to make. I added sliced mushrooms, scallions, and water chestnuts. —CITYGIRL22
! All I can say is WOW! We LOVED this! I couldn’t find rice wine, so I used cooking sherry as other people suggested and it was excellent. —blue eyed CC
! My picky meat-eating boyfriend loved it! I replaced the snow peas with regular green peas. I would recommend doubling the sauce ingredients, especially when served over plain white rice...yummy! —SPIMPY
! I 4X’s the sauce—because we like sauce. Just for the 2 of us. Marinated the steak in the sauce most of the day. Added stir-fry veggies from the store. I did add a bit of toasted sesame oil at the end just because we love it. I would wear it as perfume if I could. —ppequat
Determined to avoid takeout, even though you’re starving after a long day at work? Or one kid has ballet tonight, the other has basketball practice, and you need dinner fast? We know cooking is just one of the many things you do in a day, so we’ve rounded up
meals that can be made in 15, 20, or 30 minutes—whatever you have time for!
GET A FREE YEAR! Mail in the RSVP card on page 14 NOW, or go to allrecipes.com/free.

18 allrecipes.com
FROM AR KITCHEN! We used this rub on boneless pork chops and added cooking instructions to the recipe below.
For rub:6 tablespoons ground cumin4 tablespoons hot chili powder2 tablespoons kosher salt2 tablespoons ground coriander1 tablespoon paprika1! teaspoons ground allspice1! teaspoons ground black pepperFor pork chops:4 boneless pork chops, 5 to 6 ounces each4 tablespoons cumin-coriander rub
For rub:1 Combine the cumin, chili powder, salt, coriander, paprika, allspice, and black pepper in a bowl and mix thoroughly. Store in an airtight container at room temperature until ready to use.For chops:2 Season both sides of each chop with 1! teaspoons of rub. Grill in stovetop grill pan or outdoor grill for about 3 minutes per side.
“A slightly spicy rub that is great on pork. It would also flavor beef well and makes a good gift, too!” — TYRIX16
CUMIN-CORIANDER PORK RUB
ALLRECIPES.COM/SPICE-RUB-CHOPS
!!!!!5-STAR RATING
SUBMITTED BY
TYRIX16
PREP
5 min
COOK 6 min
READY IN
11 min
SERVINGS
16 tbsp rub 4 servings
of pork chops
RATING
9 reviews
YOU SAID! This one goes to the top of my rub list. 2 lbs pork tenderloin put in a cold oven while I went to the gym. 35 minutes at 425 degrees and it came out perfect—moist and delicious. —HULK
! My daughter had us over for ribs and brushed mine with this rub—it was fantastic! Better than having the sauce all over it! —K-G
! I have never been the first to try a recipe. I am always waiting for others. I am soooo glad I did not pass this one up. DELICIOUS!!! Followed recipe and generously put on country ribs. I added some fresh lime juice and a little olive oil. —KAREN9455
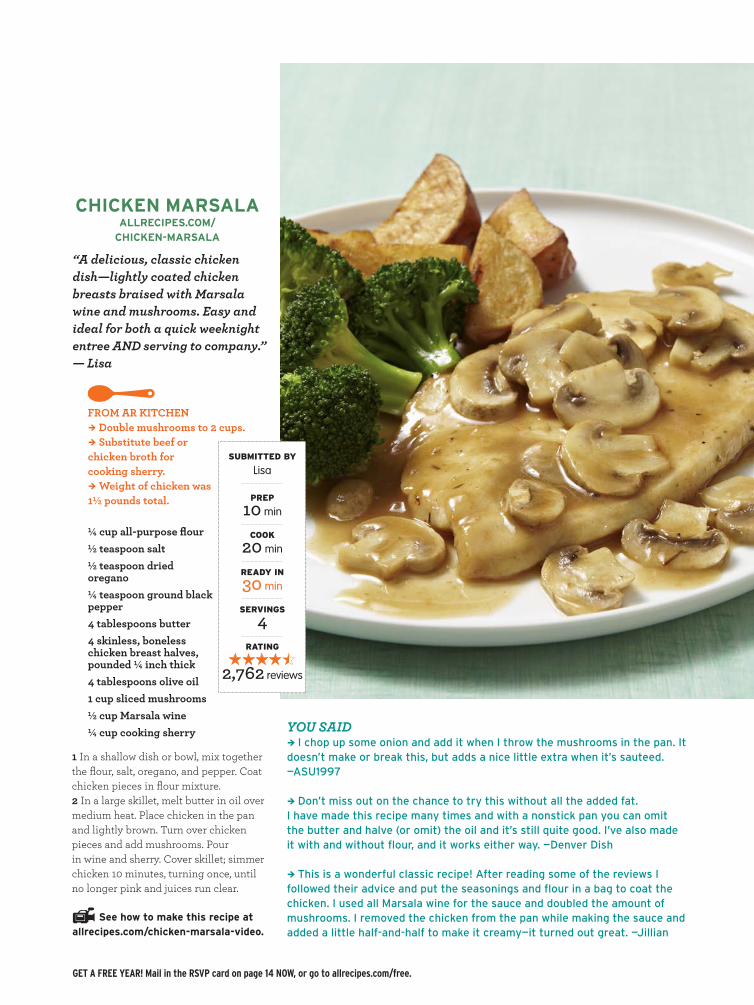
“A delicious, classic chicken dish—lightly coated chicken breasts braised with Marsala wine and mushrooms. Easy and ideal for both a quick weeknight entree AND serving to company.” — Lisa
CHICKEN MARSALAALLRECIPES.COM/
CHICKEN-MARSALA
YOU SAID! I chop up some onion and add it when I throw the mushrooms in the pan. It doesn’t make or break this, but adds a nice little extra when it’s sauteed. —ASU1997
! Don’t miss out on the chance to try this without all the added fat. I have made this recipe many times and with a nonstick pan you can omit the butter and halve (or omit) the oil and it’s still quite good. I’ve also made it with and without flour, and it works either way. —Denver Dish
! This is a wonderful classic recipe! After reading some of the reviews I followed their advice and put the seasonings and flour in a bag to coat the chicken. I used all Marsala wine for the sauce and doubled the amount of mushrooms. I removed the chicken from the pan while making the sauce and added a little half-and-half to make it creamy—it turned out great. —Jillian
SUBMITTED BY
Lisa
PREP
10 min
COOK 20 min
READY IN
30 min
SERVINGS
4RATING
2,762 reviews
FROM AR KITCHEN! Double mushrooms to 2 cups.! Substitute beef or chicken broth for cooking sherry.! Weight of chicken was 1! pounds total.
" cup all-purpose flour ! teaspoon salt ! teaspoon dried oregano " teaspoon ground black pepper 4 tablespoons butter4 skinless, boneless chicken breast halves, pounded " inch thick 4 tablespoons olive oil 1 cup sliced mushrooms ! cup Marsala wine " cup cooking sherry
1 In a shallow dish or bowl, mix together the flour, salt, oregano, and pepper. Coat chicken pieces in flour mixture.2 In a large skillet, melt butter in oil over medium heat. Place chicken in the pan and lightly brown. Turn over chicken pieces and add mushrooms. Pour in wine and sherry. Cover skillet; simmer chicken 10 minutes, turning once, until no longer pink and juices run clear.
See how to make this recipe at allrecipes.com/chicken-marsala-video.
GET A FREE YEAR! Mail in the RSVP card on page 14 NOW, or go to allrecipes.com/free.
20 allrecipes.com
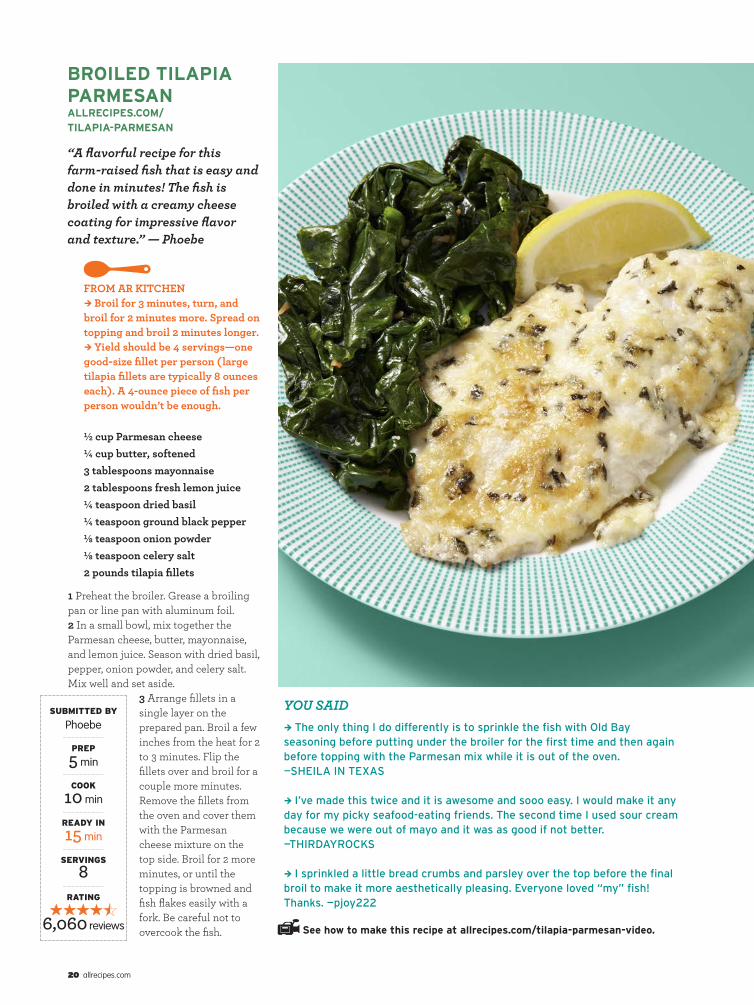
FROM AR KITCHEN! Broil for 3 minutes, turn, and broil for 2 minutes more. Spread on topping and broil 2 minutes longer.! Yield should be 4 servings—one good-size fillet per person (large tilapia fillets are typically 8 ounces each). A 4-ounce piece of fish per person wouldn’t be enough.
! cup Parmesan cheese " cup butter, softened 3 tablespoons mayonnaise 2 tablespoons fresh lemon juice " teaspoon dried basil " teaspoon ground black pepper & teaspoon onion powder & teaspoon celery salt 2 pounds tilapia fillets
1 Preheat the broiler. Grease a broiling pan or line pan with aluminum foil.2 In a small bowl, mix together the Parmesan cheese, butter, mayonnaise, and lemon juice. Season with dried basil, pepper, onion powder, and celery salt. Mix well and set aside.
3 Arrange fillets in a single layer on the prepared pan. Broil a few inches from the heat for 2 to 3 minutes. Flip the fillets over and broil for a couple more minutes. Remove the fillets from the oven and cover them with the Parmesan cheese mixture on the top side. Broil for 2 more minutes, or until the topping is browned and fish flakes easily with a fork. Be careful not to overcook the fish.
“A flavorful recipe for this farm-raised fish that is easy and done in minutes! The fish is broiled with a creamy cheese coating for impressive flavor and texture.” — Phoebe
BROILED TILAPIA PARMESANALLRECIPES.COM/TILAPIA-PARMESAN
See how to make this recipe at allrecipes.com/tilapia-parmesan-video.
YOU SAID! The only thing I do differently is to sprinkle the fish with Old Bay seasoning before putting under the broiler for the first time and then again before topping with the Parmesan mix while it is out of the oven. —SHEILA IN TEXAS
! I’ve made this twice and it is awesome and sooo easy. I would make it any day for my picky seafood-eating friends. The second time I used sour cream because we were out of mayo and it was as good if not better. —THIRDAYROCKS
! I sprinkled a little bread crumbs and parsley over the top before the final broil to make it more aesthetically pleasing. Everyone loved “my” fish! Thanks. —pjoy222
SUBMITTED BY
Phoebe
PREP
5 min
COOK 10 min
READY IN
15 min
SERVINGS
8RATING
6,060 reviews

FROM AR KITCHEN! 4 ounces of goat cheese is more than enough.! Plain goat cheese is preferable—pesto and seasoned cheese fight each other.! Chop the garlic instead of slicing. ! Yields 8 slices, serving 4.
6 tablespoons prepared pesto sauce 1 unbaked pizza crust 1 (8 ounce) package seasoned goat cheese3 Roma tomatoes, thinly sliced 2 cloves garlic, peeled and thinly sliced 1 teaspoon olive oil 1 cup fresh arugula
1 Preheat oven according to pizza package instructions.2 Dab pesto onto the center of the pizza base, and spread toward the outer edges. Cut the goat cheese into thin coins, and spread or crumble across the pizza. Arrange tomato slices over goat cheese. Sprinkle with garlic. Brush the crust edges lightly with olive oil.3 Place pizza directly on preheated oven rack. Bake for 5 to 10 minutes, or until the crust edges are golden.4 After taking pizza out of the oven, allow to cool for a few minutes so that the cheese has time to set. After a couple of minutes, cover the pizza with a few handfuls of arugula. Cut, serve, and enjoy!
“This pesto-based pizza is an amazingly simple and delicious variation on your regular pizza. Adapted from an idea at a popular Neapolitan pizza restaurant in Washington, DC, it’ll take minutes to make and will disappear in even less time!” — collmarie
GOAT CHEESE ARUGULA PIZZAALLRECIPES.COM/ARUGULA-PIZZA
!!!!!5-STAR RATING
YOU SAID! I took the advice of someone else by cutting up my greens and tossing them in lemon & pepper before putting on pizza. Definitely think that added something extra. —tincantina
! I used a little more garlic than the recipe calls for and also added olives. Also, I could not find arugula so I substituted baby spinach. Will definitely be making this again! —dmarie979
! I followed another reviewer’s recommendation and used 4 oz of goat cheese and it was great. Drain the pesto so it doesn’t have a lot of oil. Mine had too much and ran over so the oven was a mess. Other than that, yeah! —Evie
SUBMITTED BY
collmarie
PREP
10 min
COOK 10 min
READY IN
20 min
SERVINGS
8RATING
45 reviews
Phot
o: Pe
ter A
rdito
. Foo
d st
yling
: Mich
ael P
eder
sen.
Pro
p st
yling
: Don
Pur
ple.
GET A FREE YEAR! Mail in the RSVP card on page 14 NOW, or go to allrecipes.com/free.

EGG#CELLENT IDEAS FOR
EASTEREGGS
You and the kids hard-boiled and colored way too many eggs. Now what? Here are some unusual ideas for using them
up around the holidays (or any other time!), as well as tips on avoiding gray yolks, understanding egg labels, and more.

allrecipes.com 23
Phot
os: P
eter
Ard
ito. F
ood
styli
ng: M
ichae
l Ped
erse
n. P
rop
styli
ng: D
on P
urpl
e.
GET A FREE YEAR! Mail in the RSVP card on page 14 NOW, or go to allrecipes.com/free.
BRACIOLE ALLRECIPES.COM/CLASSIC-BRACIOLE
“An old family recipe for ‘brazzoles.’ These beef and pork roll-ups are made with a filling of salami, hard-boiled eggs, garlic, parsley, and cheese. Use your judgment on the amounts of parsley, garlic, and grated cheese—you want to flavor them, but not overpower with one particular flavor. The amounts of ingredients always vary according to the size of the braciola meat.” — Bon Appetit
FROM AR KITCHEN We had a lot of alterations on this one, starting with scaling it back to serve 6, and using only beef cutlets, not beef and pork. Here are the details:! 2 pounds beef round (about 6 pieces)! 6 ounces Genoa salami, thinly sliced (about 12 slices)! 5 hard-cooked eggs, sliced! ! cup chopped Italian flat-leaf parsley! 4 cloves garlic, minced! $ cup grated Pecorino Romano cheese! 3 tablespoons vegetable oil! 3 cups prepared marinara sauce! We cut the cooking time in the sauce from 2 hours to 1 hour.
2 (6 ounce) boneless pork cutlets, about ! inch thick 2 (6 ounce) top round beef cutlets 8 ounces Genoa salami, thinly sliced 6 hard-cooked eggs, sliced Italian flat-leaf parsley, chopped 4 cloves garlic, minced 1 cup Pecorino Romano cheese, grated kitchen twine1 tablespoon extra-virgin olive oil 6 cups spaghetti sauce, or as desired (or search for Bon Appetit’s recipe for Meat Gravy)
1 Place pork between two sheets of heavy plastic (resealable freezer bags work well) on a solid, level surface. Firmly pound the pork with the smooth side of a meat mallet to a thickness of $ inch (% cm). Pound beef to the same thickness.2 Lay the meats out on a work surface with the short side facing you and top them with layers of salami, eggs, parsley, minced garlic, and Pecorino Romano cheese.3 Roll up the meats to form short, fat rolls with a lot of stu&ng; secure them with twine. Roll them tightly to prevent the stu&ng from escaping. Refrigerate until your pasta sauce is simmering and you’re ready to brown the meat.
4 Heat olive oil in a skillet over medium-high heat. Panfry the rolls on each side until brown, about 5 minutes per side. (Cook the braciole in batches if they won’t all fit in the skillet.)5 Bring spaghetti sauce to a simmer over low heat and cook braciole in the sauce until tender, about 2 hours.
YOU SAID! All I can say is WOW!!!!! Fabulous dish. Truly authentic and I received rave reviews, and gave out the recipe twice. —BramptonMommyof2
! I used chicken and made a homemade rose sauce (personal preference) and added fresh basil to the filling. Also, I only cooked it in the sauce about 20 minutes. The rolls were very flavorful and looked impressive when sliced. —styrofoamplates
! We make braciole a lot, but I’ve never had it with the salami...LOVED IT! I will definitely be making this again! Thanks for sharing. —Christina
SUBMITTED BY
Bon Appetit
PREP
40 min
COOK 2 hr 20 min
READY IN
3 hr
SERVINGS
16RATING
4 reviews

24 allrecipes.com
LEMON LUSH
FROM AR KITCHEN ! Increase number of hard-boiled eggs to 8; remaining ingredient amounts stay the same.! We deep-fried in batches with oil at 360 degrees F.! We baked in oven for 20 minutes, until they reached 160 degrees F and pork was cooked through completely.
1 quart oil for frying 4 eggs (already hard-boiled, or follow procedure in step 2 for cooking)2 pounds pork sausage 1 cup all-purpose flour 4 eggs, beaten 4 cups dried bread crumbs, seasoned
1 Preheat oven to 350 degrees F. Heat oil in deep-fryer to 375 degrees F.2 Place eggs in saucepan and cover with water. Bring to boil. Cover, remove from heat, and let eggs sit in hot water for 10 to 12 minutes. Remove from hot water, cool, and peel.3 Flatten the sausage and make a patty to surround each egg. Very lightly flour the sausage and coat with beaten egg. Roll in bread crumbs to cover evenly.4 Deep-fry until golden brown, or panfry while making sure each side is well cooked. Bake in the preheated oven for 10 minutes.5 Cut in half and serve over a bed of lettuce and sliced tomatoes for garnish. If mustard is desired it looks beautiful over this.
SUBMITTED BY
Chasity LeGrand
PREP
20 min
COOK 25 min
READY IN
45 min
SERVINGS
4RATING
65 reviews
YOU SAID ! Personally, I get 8 Scotch eggs from 2 pounds of pork sausage. I usually use panko bread crumbs as they get so crunchy and delish. You don’t need 4 beaten eggs to coat them—2 are ample. I love them with Branston pickle, husband has his with spicy mustard. —Caroline C
! I baked (325 degrees for 45 min) instead of frying and they turned out great. I served them with hollandaise sauce and family loved it. Not a recipe to make on a monthly basis but good. — ABC Cook
! Husband loves these! He called me brilliant for making them! I basked in his adoration for a moment before confessing that I actually found this recipe on Allrecipes.com. Thanks! —starfouse
SCOTCH EGGS ALLRECIPES.COM/SCOTCH-EGGS
“A delicious and easy holiday recipe for your family.” — Chasity LeGrand

ARTICHOKE AND EGG SPREADALLRECIPES.COM/ARTICHOKE-EGG-SPREAD
“Eat with crackers. Friends will think you are good at exotic cooking with this mix of curry powder.”
— The genealogist cook
BUYING EGGSFood labels have gotten complicated, and eggs are no exception—your choices involve size, grade, color, conventional or organic, and animal-treatment issues. Here, a guide to cracking the code, with information from the U.S. Department of Agriculture and the Humane Society of the United States. SIZE Eggs are sold by total weight per dozen, not the size of individual eggs, which may vary within a single dozen. Here’s what it all means:
Size Minimum Weight Per Dozen Jumbo 30 ounces Extra Large 27 ounces Large 24 ounces Medium 21 ounces Small 18 ounces
GRADE The U.S. Department of Agriculture (USDA) grade is determined by the interior quality of the egg and the appearance and condition of the eggshell. Eggs of any quality grade may differ in weight (size).U.S. Grade AA eggs have whites that are thick and !rm; yolks that are high, round, and practically free from defects; and clean, unbroken shells. Grade AA and Grade A eggs are best for frying and poaching, where appearance is important. U.S. Grade A eggs have characteristics of Grade AA eggs except that the whites are “reasonably” !rm. This is the quality most often sold in stores.
COLOR A hen’s breed determines its egg color: White hens usually lay white eggs, and hens with darker feathers lay brown eggs. But there’s no difference in "avor.
USDA CERTIFIED ORGANIC eggs come from hens that are given no antibiotics or growth hormones (see Hormone-free, below) and are fed an organic, all-vegetarian diet, also free of antibiotics. The birds are uncaged inside barns or warehouses and are required to have outdoor access (although enforcement of that requirement has been lax).
HORMONE-FREE OR “NO HORMONES ADDED” Because the USDA categorically bans the use of hormones in raising poultry, all eggs are free of hormones, whether they are organic or conventional.
FROM AR KITCHEN ! We tried this on celery sticks, and it would also be good as a sandwich spread.! Was even better after refrigerating 1 or 2 hours, for flavors to develop.
1 (14 ounce) can artichoke hearts, drained and chopped ! cup mayonnaise ! cup sour cream 3 hard-boiled eggs, chopped ! teaspoon curry powder, or to taste salt and ground black pepper to taste
1 Combine artichoke hearts, mayonnaise, sour cream, eggs, curry powder, salt, and black pepper in a bowl until well mixed.
YOU SAID ! Delicious, but lots more curry puts it over the top and just for a little jolt, a sprinkle or two of red pepper and a dash of onion salt. —BeckiD
! Easy and quick to make. I love artichokes so was nice to eat them in a different way. Thanks. —Obetmaz
SUBMITTED BY
The genealogist cook
PREP
10 min
READY IN
10 min
SERVINGS
10RATING
2 reviews
GET A FREE YEAR! Mail in the RSVP card on page 14 NOW, or go to allrecipes.com/free.

26 allrecipes.com
PENNSYLVANIA DUTCH PICKLED
BEETS AND EGGSALLRECIPES.COM/PICKLED-EGGS
“A gift from the Amish.” — Cindy
FROM AR KITCHEN ! Original recipe called for canned whole pickled beets, but we think Cindy meant plain canned beets. Pickled beets typically come in jars.! We let eggs sit 12 to 15 minutes in hot water.8 eggs (already hard-boiled, or follow procedure in step 1)2 (15 ounce) cans whole pickled beets, juice reserved
1 onion, chopped1 cup white sugar$ cup cider vinegar! teaspoon salt1 pinch black pepper2 bay leaves12 whole cloves
1 Place eggs in saucepan and cover with water. Bring to a boil. Cover, remove from heat, and let eggs sit in hot water for 10 to 12 minutes. Remove from hot water, cool, and peel.2 Place beets, onion, and peeled eggs in a non-reactive glass or plastic container. Set aside.3 In a medium-size, non-reactive saucepan, combine sugar, 1 cup reserved beet juice, vinegar, salt, pepper, bay leaves, and cloves. Bring to a boil, lower heat, and simmer 5 minutes.
4 Pour hot liquid over beets and eggs. Cover, and refrigerate 48 hours before using.
YOU SAID! Don’t forget to stir or shake once or twice a day for even color. 48 hrs is a minimum, will usually take four days to be colored through. —ValerieB333
! For my taste, a bit too sweet. However, if you put some Tabasco on these, the sweet/hot flavor is very, very good. —NWOD
! Instead of canned pickled beets, I use fresh. I peel, slice, and boil them until tender (maybe 30 or 40 minutes), then proceed with the recipe. They turn out just fine. This is a super recipe. —fpu
If you’re looking for Easter dinner inspiration—ham recipes, lamb recipes, Easter breads or cakes—go to allrecipes.com/easter-recipes for delicious ideas!
SUBMITTED BY
Cindy
PREP
10 min
COOK 15 min
CHILL 48 hr
READY IN
(8 hr )' min
SERVINGS
8RATING
74 reviews
QUICK TIP To learn the
secret to perfect hard-boiled
eggs, check out allrecipes.com/boil-egg-video.

“Shrimp with chopped celery, onions, hard-boiled egg, shredded carrots, and mayonnaise.” — NIKIJO
1 pound large peeled and deveined cooked shrimp1 cup chopped celery1 large carrot, shredded! cup chopped onion2 hard-cooked eggs, chopped$ cup mayonnaisesalt and pepper to taste
1 In a large bowl, gently toss the shrimp, celery, carrot, onion, eggs, and mayonnaise. Season with salt and pepper. Chill until ready to serve.
YOU SAID ! I cut the mayo half and half with sour cream, adding just enough to hold the salad together and make it creamy. I gave it a squeeze of lemon and a few shakes of dill. Nutritious, fresh, light, delicious and “shrimple.” (I couldn’t help myself...) —Naples34102
! Really great recipe. I took other users’ ideas and cut the shrimp into smaller pieces and dried the shrimp well before mixing. —BP3
! I served it on a bed of salad greens, but it would make a great appetizer scooped onto cucumber rounds or crackers. —RCKim
SUBMITTED BY
NIKIJO
PREP
15 min
READY IN
15 min
SERVINGS
6RATING
114 reviews
1 Common wisdom has it that hard- boiled eggs should not, in fact, be
boiled. The boiling water can cause the shell to crack, and the high temperature can make for rubbery eggs. They should be “hard-cooked” instead. Bring water to a boil, then reduce heat to a bubble-less simmer (between 180 and 190 degrees F), gently add eggs, and cook for 10 to 15 minutes. Lift out eggs and transfer to a bowl of ice and cold water. In Allrecipe .com’s video on how to hard-boil an egg (allrecipes.com/boil-egg-video), the eggs are in the pot as the water
comes to a boil, but then the heat is turned off completely.
2 If the shells tend to stick to your eggs when you hard-cook them,
they might actually be too fresh. Try using eggs that have been in your fridge for several days. A tip from the video: Lightly cracking the shell before putting a hot egg in an ice water bath will also make it easy to peel.
3 Why do the yolks of hard-cooked eggs sometimes get an ugly
greenish-gray patina? That’s ferrous
sul!de, formed by a chemical reaction between the sulfur in the egg white and the iron in the yolk. It’s harmless, but you can minimize it by reducing cooking time to the bare minimum and by submerging eggs in cold water or an ice bath right out of the pot.
4 If the Easter Bunny visits your house and you plan on eating his
hard-cooked eggs, ask him to hide them within two hours of the hunt. They could go bad if left out longer at room temperature. Hard-cooked eggs keep in the fridge for about a week.
4 THINGS YOU DIDN’T KNOW ABOUT BOILING AN EGG
SHRIMPLY DELICIOUS SHRIMP SALAD ALLRECIPES.COM/SHRIMP-SALAD
GET A FREE YEAR! Mail in the RSVP card on page 14 NOW, or go to allrecipes.com/free.
28 allrecipes.com
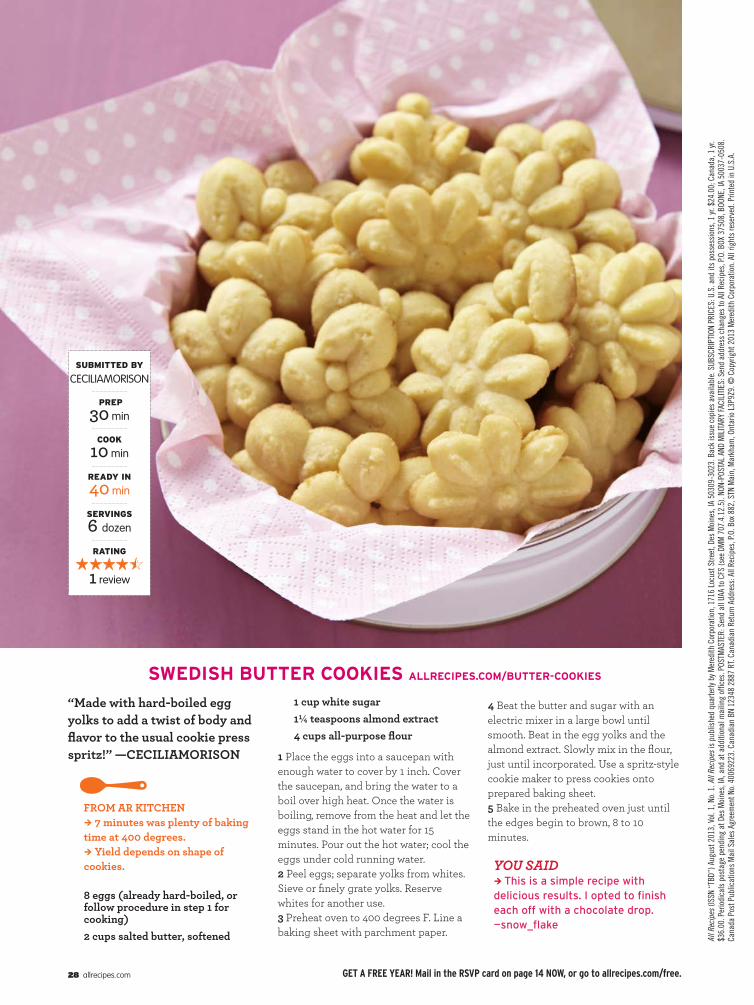
“Made with hard-boiled egg yolks to add a twist of body and flavor to the usual cookie press spritz!” —CECILIAMORISON
FROM AR KITCHEN ! 7 minutes was plenty of baking time at 400 degrees.! Yield depends on shape of cookies.
8 eggs (already hard-boiled, or follow procedure in step 1 for cooking) 2 cups salted butter, softened
1 cup white sugar 1" teaspoons almond extract 4 cups all-purpose flour
1 Place the eggs into a saucepan with enough water to cover by 1 inch. Cover the saucepan, and bring the water to a boil over high heat. Once the water is boiling, remove from the heat and let the eggs stand in the hot water for 15 minutes. Pour out the hot water; cool the eggs under cold running water. 2 Peel eggs; separate yolks from whites. Sieve or finely grate yolks. Reserve whites for another use.3 Preheat oven to 400 degrees F. Line a baking sheet with parchment paper.
4 Beat the butter and sugar with an electric mixer in a large bowl until smooth. Beat in the egg yolks and the almond extract. Slowly mix in the flour, just until incorporated. Use a spritz-style cookie maker to press cookies onto prepared baking sheet.5 Bake in the preheated oven just until the edges begin to brown, 8 to 10 minutes.
YOU SAID ! This is a simple recipe with delicious results. I opted to finish each off with a chocolate drop. —snow_flake
SUBMITTED BY
CECILIAMORISON
PREP
30 min
COOK 10 min
READY IN
40 min
SERVINGS
6 dozen
RATING
1 review
SWEDISH BUTTER COOKIES ALLRECIPES.COM/BUTTER-COOKIES
All R
ecip
es (I
SSN
“TBD
”) A
ugus
t 201
3, V
ol. 1
, No.
1. A
ll Re
cipes
is p
ublis
hed
quar
terly
by M
ered
ith C
orpo
ratio
n, 1
716
Locu
st S
treet
, Des
Moin
es, I
A 50
309-
3023
. Bac
k iss
ue co
pies
ava
ilabl
e. SU
BSCR
IPTIO
N PR
ICES
: U.S
. and
its p
osse
ssion
s, 1
yr. $
24.0
0; C
anad
a, 1
yr.
$36.
00. P
eriod
icals
post
age p
endi
ng a
t Des
Moin
es, I
A, a
nd a
t add
ition
al m
ailin
g of
!ces
. POS
TMAS
TER:
Sen
d al
l UAA
to C
FS (s
ee D
MM 7
07.4
.12.
5). N
ON-P
OSTA
L AND
MILI
TARY
FACI
LITIE
S: S
end
addr
ess c
hang
es to
All
Recip
es, P
.O. B
OX 3
7508
, BOO
NE, I
A 50
037-
0508
. Ca
nada
Pos
t Pub
licat
ions M
ail S
ales
Agr
eem
ent N
o. 40
0692
23. C
anad
ian
BN 1
2348
288
7 RT
. Can
adia
n Re
turn
Add
ress
: All
Recip
es, P
.O. B
ox 8
82, S
TN M
ain,
Mar
kham
, Ont
ario
L3P9
Z9. ©
Cop
yrigh
t 201
3 Me
redi
th C
orpo
ratio
n. A
ll rig
hts r
eser
ved.
Prin
ted
in U
.S.A
.
GET A FREE YEAR! Mail in the RSVP card on page 14 NOW, or go to allrecipes.com/free.

Princess of Pork Allrecipes.com has tens of thousands of recipes. So when thousands of people give a recipe 5 stars and most of the reviews are glowing (there are too many WOWs, YUMs, and BESTs to count), we know that something delicious is happening.
With only three ingredients, this pulled pork
recipe, from Livie’s Mammy, is the top-rated pulled pork recipe on the site and a perfect example of less is more. Sure, people have opinions about which brand of BBQ sauce to use, and there are some lively debates about the cut of pork, but by and large the community loves this simple supper—and so do we.
SUPERSTARS
SUBMITTED BY
Livie’s Mammy
PREP
10 min
COOK 7 hr
READY IN
7 hr 10 min
SERVINGS
8RATING
2,395 reviews
My husband is already asking when I will be making it again. —Devin’s Muma
Impressed the pants off my pulled-pork-despising friend. —maigread
I would have never guessed it was cooked in root beer if I hadn’t put it there myself :) —BL
Where has this recipe been all my life??? —redamberCould fool anyone
into thinking that you’ve been cooking since you were born. —cjsandy2000
I felt like a 5-star chef when my hubby bit into it and rolled his eyes in delight! —Sonoran Sweetheart
Three ingredients. Three. Made this for a BBQ pork cook-off and won using Sweet Baby Ray’s sauce. Nuff said. —rpollardva
FROM AR KITCHEN: ! The original calls for pork tenderloin—we used a pork loin roast. ! 6-hour cook time is plenty.! We used KC Masterpiece barbecue sauce.!We topped our sandwiches with slaw.
Phot
o: Pe
ter A
rdito
. Pro
p St
yling
: Les
lie S
iegel.
Food
Styl
ing:
Cyd
McD
owell
.
SLOW COOKER PULLED PORK ALLRECIPES.COM/PULLED-PORK
1 Place the pork tenderloin in a slow cooker; pour the root beer over the meat. Cover and cook on low until well cooked and shreds easily, 6 to 7 hours. Note: The actual length of time may vary according to individual slow cooker. Drain well. Stir in barbecue sauce. Serve over hamburger buns.
1 (2 pound) pork tenderloin1 (12 fluid ounce) can or bottle root beer 1 (18 ounce) bottle of your favorite barbecue sauce8 hamburger buns, split and lightly toasted
See how to make this recipe at allrecipes.com/pulled-pork-video.
®
I’m 5 months pregnant and I could eat this every night until I give birth .—thanksalot

Claim your FREE YEAR ...before it’s too late!
Our promise to you!We test and taste every recipe to guarantee all ingredients, directions and cooking times are accurate and that each dish is delicious. We promise your complete satisfaction, enjoyment,
and pure delight with Allrecipes Magazine or you get all your money back – every penny!
Go to allrecipes.com/free nowor mail the enclosed RSVP card today.
HURRY!
One-Time
Offer
AR_PrintAd_cover3.indd 3 1/22/13 4:06 PM