step 1: completing q2 (second quarter) grades
TRANSCRIPT

Page 1 of 12
PowerSchools - -Finalizing First Semester Grades and Reports
Overview of Steps:
Step 1 – Complete Q2 (Second Quarter) Grades
Step 2 – Enter Final Exam Grades
Step 3 – Complete X1 (First Semester Final Exam) Grades
Step 4 – Add comments to Report Cards (Optional)
Step 5 – Complete F1 (First Semester) Grades
Step 6 – Create and Print Final Grade Reports
Step 7 - Create and Print Attendance Verification Reports
Step 1: Completing Q2 (Second Quarter) Grades
Login to PowerTeacher and launch your Gradebook.
Select the desired Class under Semester 1 Classes and (Q2) in the Reporting Term drop down
list and verify all students’ grades.
Click the Q2 In Progress Status Bar and the Q2 Final Grades Completion Status dialog box will
appear.
-- GO TO NEXT PAGE --

Page 2 of 12
Check Final Grades Complete and enter the comment “Quarter 2 grades complete” followed
by your initials and click OK.
The Q2 Status Bar should now show Q2 Grades Complete
Q2 Grades Complete
Page 3 of 12
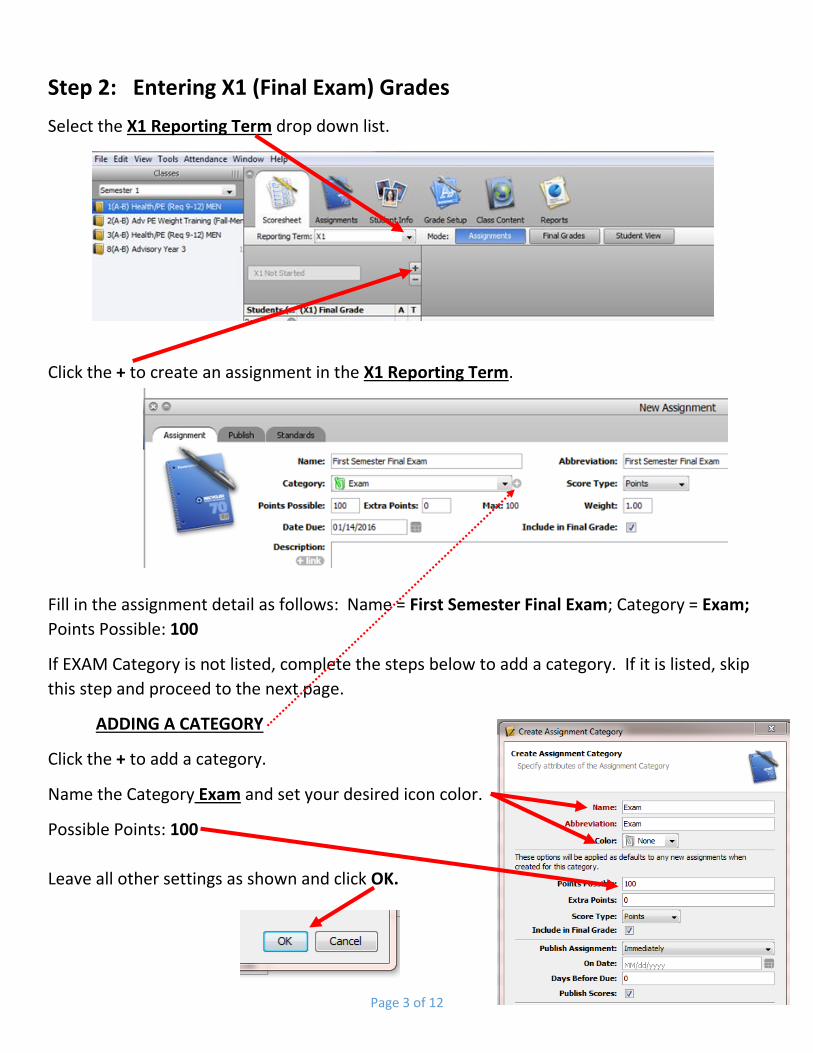
Step 2: Entering X1 (Final Exam) Grades
Select the X1 Reporting Term drop down list.
Click the + to create an assignment in the X1 Reporting Term.
Fill in the assignment detail as follows: Name = First Semester Final Exam; Category = Exam;
Points Possible: 100
If EXAM Category is not listed, complete the steps below to add a category. If it is listed, skip
this step and proceed to the next page.
ADDING A CATEGORY
Click the + to add a category.
Name the Category Exam and set your desired icon color.
Possible Points: 100
Leave all other settings as shown and click OK.

Page 4 of 12
Set the Due Date to January 15, 2016.
The Final Semester Exam assignment will now appear in your X1 Reporting Term Scoresheet
and you can enter your students’ exam grades.
Once all grades are entered and verified, click SAVE in the lower right corner.
X1 In Progress

Page 5 of 12
Step 3: Complete X1 (First Semester Final Exam) Grades
Click the X1 In Progress Status Bar
and verify all student’s exam grades.
Check Final Grades Complete and enter the comment “Exam Grades Complete” followed by
your initials and click OK.
The X1 Status Bar should now show X1 Grades Complete
X1 In Progress
X1 Final Grades Completion Status
X1 Status Comment
Exam Grades Complete - MJT
X1 Grades Complete

Page 6 of 12
Step 4 – Add comments to Report Cards (Optional)
Select First Semester (F1) in the Reporting Term drop down.
Double click the student’s final grade and the Final Grade dialog box will appear.
1. Select the Comment Tab (Use only DISTRICT COMMENT bank)
2. Click on the comment(s) to select your desired comments then click Insert Selected.
(Note: You can select multiple comments by holding down the Ctrl Key and clicking the comments)
3. Choose Separate Using option: Line Breaks or Spaces
4. Click Close
Yellow, Jacket
2. COMMENT Bank
Scroll Down for more
Use the FIND BOX to Search Key Works (Example: Tardy)
(Example:
Tardy)
3. Separate Using
Options
1. Comment Tab
Repeat the steps for each student. NOTE: You can use the up and down arrows
(Upper right corner of the dialog box) to advance to the next or previous student in your class.
Page 7 of 12
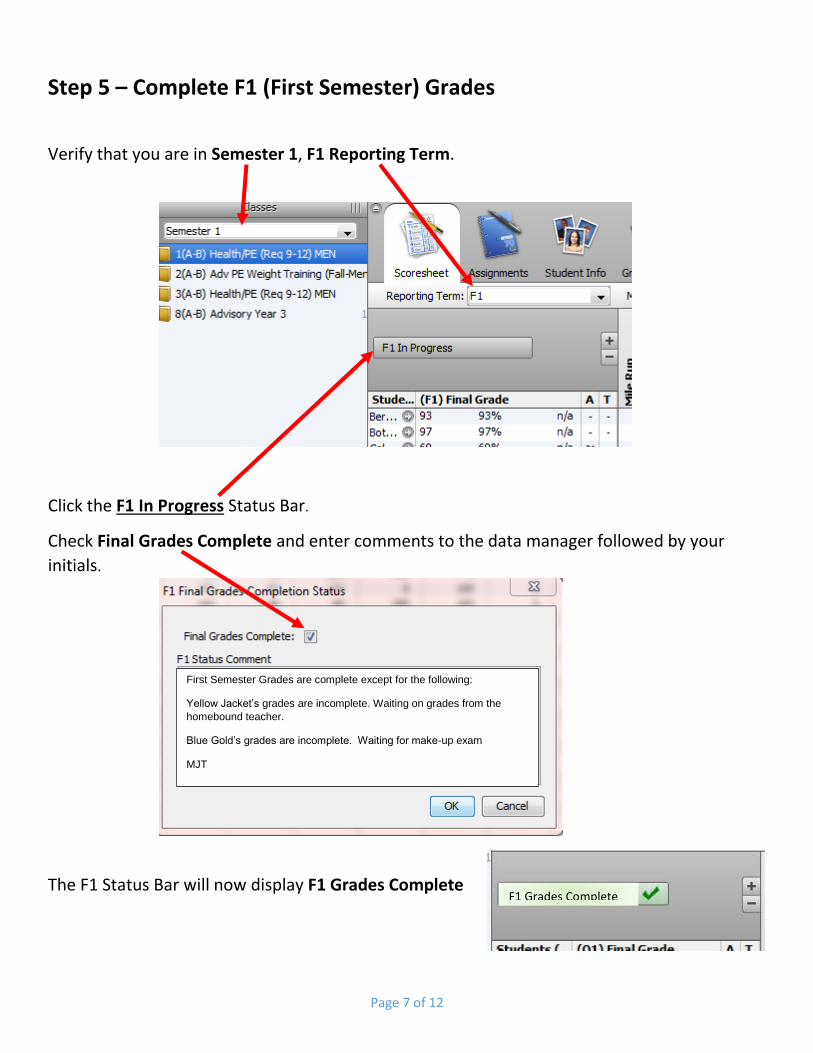
Step 5 – Complete F1 (First Semester) Grades
Verify that you are in Semester 1, F1 Reporting Term.
Click the F1 In Progress Status Bar.
Check Final Grades Complete and enter comments to the data manager followed by your
initials.
The F1 Status Bar will now display F1 Grades Complete
First Semester Grades are complete except for the following:
Yellow Jacket’s grades are incomplete. Waiting on grades from the
homebound teacher.
Blue Gold’s grades are incomplete. Waiting for make-up exam
MJT
F1 Grades Complete

Page 8 of 12
Step 6 – Create and Print Final Grade Reports
Select the desired class from the Semester 1 Classes and Click the Reports Tab
Double click Student Multi-Section Report to show report criteria and layout options.
Click the Layout Tab
-- GO TO NEXT PAGE --
Leave all settings the same
EXCEPT:
Make sure the Reporting Term
is set to ALL
Remove Check from the Include
terms with no grades box.

Page 9 of 12
Print two (2) copies – Teacher Copy and Data Manager Copy
Sign and date and deliver the Data Manager Copy
Repeat the steps for each class.
On the LAYOUT Tab
Remove the Check from the Page Breaks: On Students Box
Click Run Report
NOTE: This Report can be set to print all students at one
time, HOWEVER, it puts them in alphabetical order and
does not divide them by courses. The data manager
MUST have these reports divided by course.

Page 10 of 12
Step 7 - Create and Print Attendance Verification Reports
Return to your PowerTeacher Home Page
Select the Multi-Day Attendance Grid icon.
Click Edit to create the Attendance Date Range
-- GO TO NEXT PAGE --

Page 11 of 12
Set the dates that have been verified by the data manager. (Ignore the slowdown warnings)
Click Update.
The attendance and tardies for the defined range should be displayed for each student. Verify
that the date range is correct.

Page 12 of 12
Click the PRINTER icon to print.
Print two (2) copies – Teacher Copy and Data Manager Copy
Sign and date and deliver the Data Manager Copy
NOTE: The Record Meeting Attendance will only print what is in view. If your
roster has more than 20 students, you will need to print two sheets. Be sure to
scroll down to display the bottom half of the roster before you print the second
sheet.