starwind iscsi san software: providing shared storage for hyper
TRANSCRIPT

StarWind SoftwareTechnical Reference Series
Copyright © StarWind Software 2008-2010. All rights reserved.
StarWind iSCSI SAN Software: Providing sharedstorage for Hyper-V's Live Migration feature
www.starwindsoftware.com

StarWind SoftwareTechnical Reference Series
COPYRIGHT
Copyright © StarWind Software 2008-2010. All rights reserved. No part of thispublication may be reproduced, stored in a retrieval system, or transmitted in anyform or by any means, electronic, mechanical, photocopying, recording or otherwise,without the prior written consent of StarWind Software.
TRADEMARKS
“StarWind”, “StarWind Software” and the StarWind and the StarWind Software logosare trademarks of StarWind Software which may be registered in some jurisdictions.All other trademarks are owned by their respective owners.
CHANGES
The material in this document is for information only and is subject to change withoutnotice. While reasonable efforts have been made in the preparation of this documentto assure its accuracy, StarWind Software assumes no liability resulting from errors oromissions in this document, or from the use of the information contained herein.StarWind Software reserves the right to make changes in the product design withoutreservation and without notification to its users.
TECHNICAL SUPPORT AND SERVICES
If you have questions about installing or using this software, check this and otherdocuments first - you will find answers to most of your questions here or there. If youneed further assistance, please contact us.

StarWind SoftwareTechnical Reference Series
3Copyright © StarWind Software 2008-2010. All rights reserved.
Guide
Introduction
Note: Data Synchronization Channel redundancy is required; use NIC teaming(link aggregation).

StarWind SoftwareTechnical Reference Series
4Copyright © StarWind Software 2008-2010. All rights reserved.
Configuring StarWind Server
Preparing Storage
2 virtual disks are required for the configuration. Both of them have to be HAdevices. We will describe only the first disk creation process since theprocedure for creating the second one is just the same except the seconddevice will be used for storing virtual machines so it needs to be of a sufficientsize (e.g.100 Gb).Launch the StarWind Console: Start -> All Programs -> StarWind Software ->StarWind. Whenever the StarWind Console is running, its icon will appear inthe system tray. The StarWind Console may be accessed by double-clicking theicon using the left mouse button, or with a single click using the right mousebutton and selecting Start Management from the pop-up menu.From theConnections tree, select the computer you want to provision the iSCSI targetdevice on and Double-click it to connect.You will be prompted to enter the login and password. The default login and password are “root” and “starwind.” You can alwayschange them later.
Click the OK button to continue.Now when You are connected to the StarWind Service on the machine you can
create targets on it. Click button to continue.

StarWind SoftwareTechnical Reference Series
5Copyright © StarWind Software 2008-2010. All rights reserved.
In the wizard that appears, specify a target name. The name must be a uniquename by which the device will be declared to the iSCSI initiators connecting toStarWind over an IP network.
Click the Next button to continue.

StarWind SoftwareTechnical Reference Series
6Copyright © StarWind Software 2008-2010. All rights reserved.
Select the HA device type by going Hard Disk->Advanced Virtual->HighAvailability device.Specify the partner server parameters. Enter the server's IP address or host,and specify the user name and password for the StarWind Service.
Click the Next button to continue.

StarWind SoftwareTechnical Reference Series
7Copyright © StarWind Software 2008-2010. All rights reserved.
Enter target alias and name to be assigned to the partner target.
Click the Next button to continue.

StarWind SoftwareTechnical Reference Series
8Copyright © StarWind Software 2008-2010. All rights reserved.
Specify the location and name of your local virtual disks and your partner'svirtual disks by clicking the "..." button. If you want to create new virtual disks,tick the Create New checkbox.
Click the Next button to continue.

StarWind SoftwareTechnical Reference Series
9Copyright © StarWind Software 2008-2010. All rights reserved.
Configure the data synchronization channel parameters by specifying thenetwork interface for synchronization. You can also decide node priority bydesignating it as Primary or Secondary.
Click the Next button to continue.

StarWind SoftwareTechnical Reference Series
10Copyright © StarWind Software 2008-2010. All rights reserved.
Specify the method to initialize your HA device.
Click the Next button to continue.

StarWind SoftwareTechnical Reference Series
11Copyright © StarWind Software 2008-2010. All rights reserved.
Check that the device parameters are correct. Click the Back button should anychanges be required.
Click the Next button to continue.

StarWind SoftwareTechnical Reference Series
12Copyright © StarWind Software 2008-2010. All rights reserved.
A summary is displayed on the last wizard page.
Click the Finish button to close the wizard.

StarWind SoftwareTechnical Reference Series
13Copyright © StarWind Software 2008-2010. All rights reserved.
Configuring Windows Server 2008
The procedures described in this chapter have to be performed on bothservers.

StarWind SoftwareTechnical Reference Series
14Copyright © StarWind Software 2008-2010. All rights reserved.
Install MPIO Feature
Open Server Manager (Start->Administrative Tools->Sever Manager). Go toFeatures item. Click Add Features. An Add Features Wizard will appear. In the features list select Multipath I/Ofeature and install it.
The server might need to reboot after installation is complete.

StarWind SoftwareTechnical Reference Series
15Copyright © StarWind Software 2008-2010. All rights reserved.
Install Hyper-V Role
Open Server Manager (Start->Administrative Tools->Sever Manager). Go toRoles item. Click Add Roles. An Add Roles Wizard will appear. In the features list select Hyper-V role andinstall it.
Server will need to reboot after the installation completes.

StarWind SoftwareTechnical Reference Series
16Copyright © StarWind Software 2008-2010. All rights reserved.
Connect Targets
Open the Microsoft iSCSI Initiator by going Start -> Administrative Tools ->iSCSI Initiator. Go to the Discovery tab. Add each of the StarWind servers bypressing the Discover Portal ... button and specifying servers IP address.

StarWind SoftwareTechnical Reference Series
17Copyright © StarWind Software 2008-2010. All rights reserved.
Switch to the Targets tab.
Connect the targets by clicking the Connect button.
StarWind SoftwareTechnical Reference Series
18Copyright © StarWind Software 2008-2010. All rights reserved.
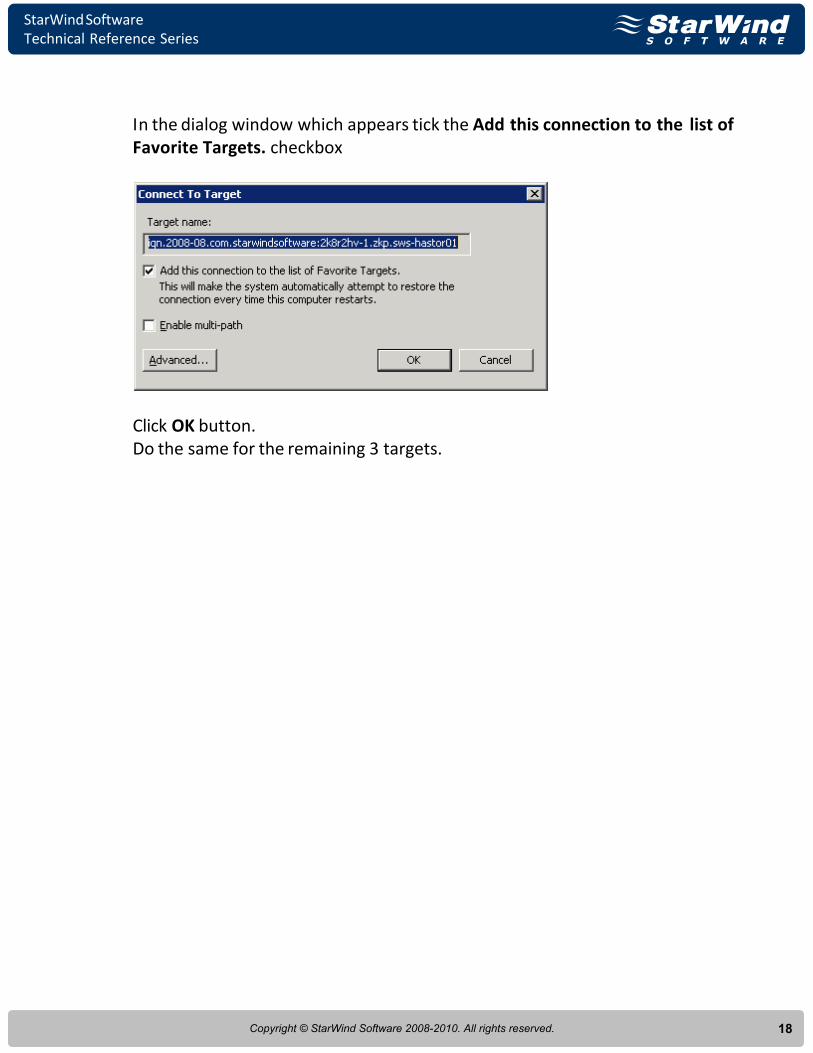
In the dialog window which appears tick the Add this connection to the list ofFavorite Targets. checkbox
Click OK button.Do the same for the remaining 3 targets.

StarWind SoftwareTechnical Reference Series
19Copyright © StarWind Software 2008-2010. All rights reserved.
Enable Multipath Support
Now open the MPIO manager (Start->Administrative Tools->MPIO). Go toDiscover Multi-Paths tab. tick the Add support for iSCSI devices checkbox.
Click the Add button.You will be prompted to reboot the server. Click the Yes button to proceed.After reboot initialize the disks and create partitions on them as you will dousing real hard drives. (the procedures on the first server will be automaticallyshown on the second one)

StarWind SoftwareTechnical Reference Series
20Copyright © StarWind Software 2008-2010. All rights reserved.
Creating Cluster
Open the Server Manager, go Features -> Failover Cluster Manager.Click on the Validate a Configuration... link to ensure that your servers meetthe requirements to build a cluster. After you have validated yourconfiguration you will be returned to Failover Cluster Manager window. NowClick the Create a Cluster... link and follow the wizard instructions.

StarWind SoftwareTechnical Reference Series
21Copyright © StarWind Software 2008-2010. All rights reserved.
Enabling Cluster Shared Volumes
After cluster creation process is complete you will be redirected to to clusterSummary page.
Click the Enable Cluster Shared Volumes... link. Read the notice, tick "I haveread the above notice" checkbox and click OK.

StarWind SoftwareTechnical Reference Series
22Copyright © StarWind Software 2008-2010. All rights reserved.
Now go to the Cluster Shared Volumes section.
Click the Add Storage link on the Actions panel.

StarWind SoftwareTechnical Reference Series
23Copyright © StarWind Software 2008-2010. All rights reserved.
In the window appeared select the HA Disk.
Click OK.

StarWind SoftwareTechnical Reference Series
24Copyright © StarWind Software 2008-2010. All rights reserved.
Now go to the Roles -> Hyper-V -> Hyper-V Manager and click Connect toServer... link from the Actions panel. In the dialog window appeared select thelocal computer and click OK.Now select New -> Virtual Machine. New Virtual Machine Wizard window willappear. On the Specify Name and Location step tick the Store the VM in a differentlocation checkboxand specify location of the cluster shared volume you have specified before.
follow the wizard instructions to complete the VM creation.

StarWind SoftwareTechnical Reference Series
25Copyright © StarWind Software 2008-2010. All rights reserved.
Making the VM Highly Available
Go to Services and applications in your cluster management section.
Click Configure a Service or Application... link from the Actions panel.
StarWind SoftwareTechnical Reference Series
26Copyright © StarWind Software 2008-2010. All rights reserved.
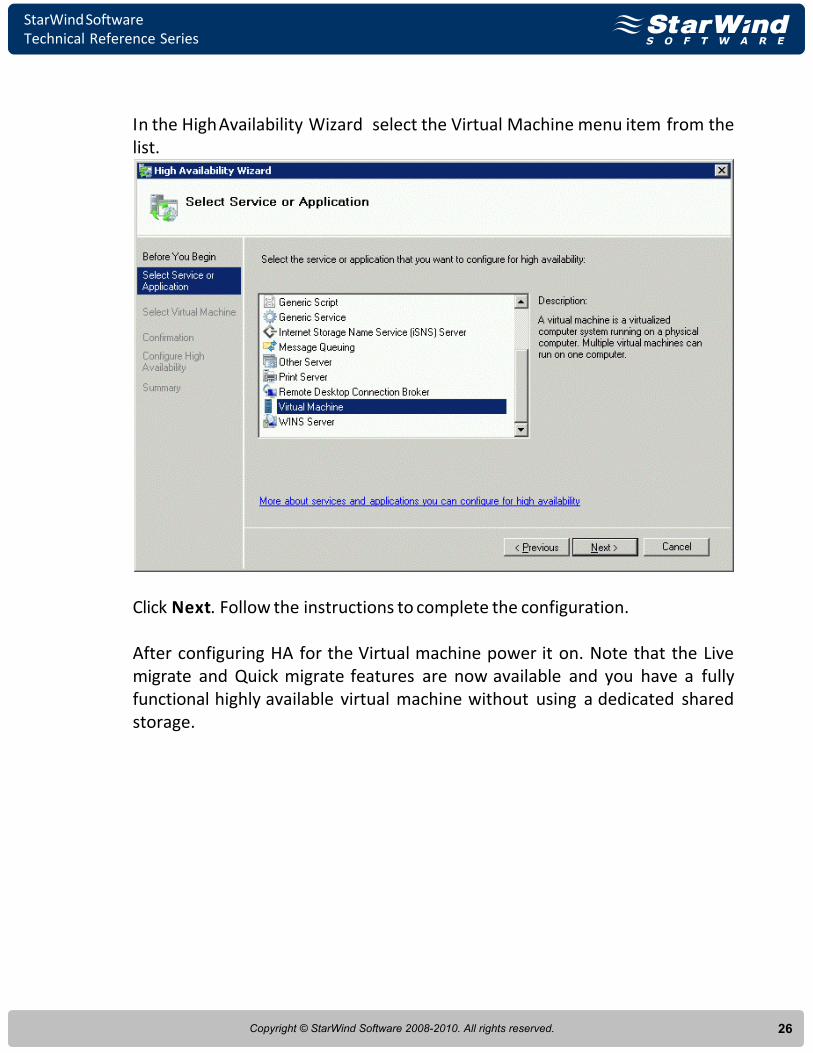
In the High Availability Wizard select the Virtual Machine menu item from thelist.
Click Next. Follow the instructions to complete the configuration.
After configuring HA for the Virtual machine power it on. Note that the Livemigrate and Quick migrate features are now available and you have a fullyfunctional highly available virtual machine without using a dedicated sharedstorage.

StarWind SoftwareTechnical Reference Series
27Copyright © StarWind Software 2008-2010. All rights reserved.

StarWind SoftwareTechnical Reference Series
28Copyright © StarWind Software 2008-2010. All rights reserved.
Conclusion

StarWind SoftwareTechnical Reference Series
Contacts
StarWind Software Inc.
40 Mall Rd., Burlington
MA 01803, USA
www.starwindsoftware.com
Support:
Support Forum:
Sales E-mail:
US Headquarters
EMEA, APAC
www.starwindsoftware.com/support
www.starwindsoftware.com/forums
Direct phone numbers: +44-0-2071936727
+44-0-2071936350
29Copyright © StarWind Software 2008-2010. All rights reserved.
Voice Mail: 1-866-790-2646
Direct phone number: 1-617-449-7717
Fax: 1-617-507-5845