ss3 quick start guide v1 - p6.zdassets.com home screen/track app 2 track button 3 tracking action...
TRANSCRIPT
YOUR SOLOSHOT3 2In the Box 2The Tag 2The Base and Camera 2
GETTING STARTED 3Charging your Base and Tag 3Connecting the Base to your Tripod 3Preparing your SOLOSHOT3 4Update and Registration 4
USING THE TRACK APP 5Begin Tracking 5Tag Manager 6-7Wearing the Tag 7Using the Track App Viewfinder 8Using the Tag Screen 8Tracking 9Recording 9
Live Streaming 10
Quick Start Guide
with Optic65 and Optic25 Cameras
Table of Contents
Connect with us! soloshotvideo@soloshotupdates
FOR OUTDOOR TRACKING ONLY unless used in conjunction with the Indoor Tracking Accessory.
Our category-creating line of personal cameraman products make it easy to capture, edit, share, and manage high-quality video and photos.
CONGRATULATIONS ON SCORING YOUR SOLOSHOT3!
Visit www.soloshot.com to learn more about our full product suite, including our automated editing and live streaming products.
Download the SOLOSHOTapp on the App Store or Google Play.
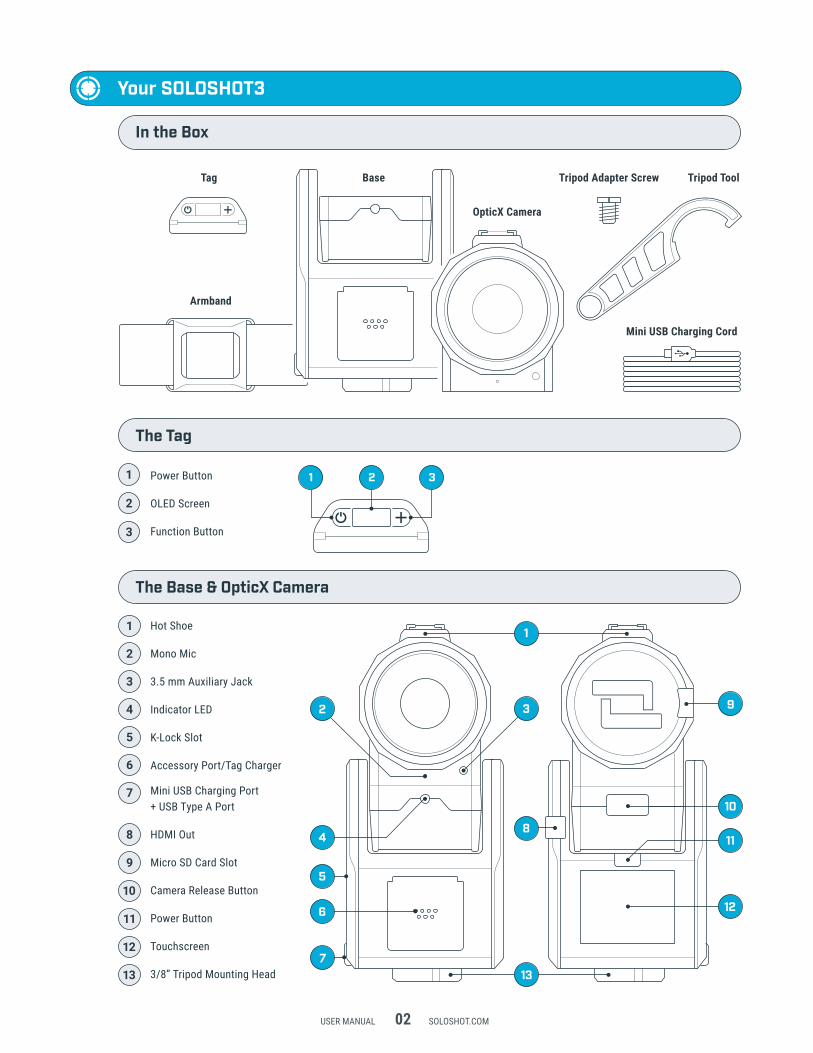
Power Button
OLED Screen
Function Button
Hot Shoe
Mono Mic
3.5 mm Auxiliary Jack
Indicator LED
K-Lock Slot
Accessory Port/Tag Charger
Mini USB Charging Port+ USB Type A Port
HDMI Out
Micro SD Card Slot
Camera Release Button
Power Button
Touchscreen
3/8” Tripod Mounting Head
OpticX Camera
Tripod ToolTripod Adapter Screw
Mini USB Charging Cord
BaseTag
Armband
1
2
3
USER MANUAL 02 SOLOSHOT.COM
1 2 3
The Tag
In the Box
Your SOLOSHOT3
1
2
3
4
5
6
7
8
9
10
11
12
13
The Base & OpticX Camera
2
4
5
6
7
8
13
3
1
9
10
11
12
1 32
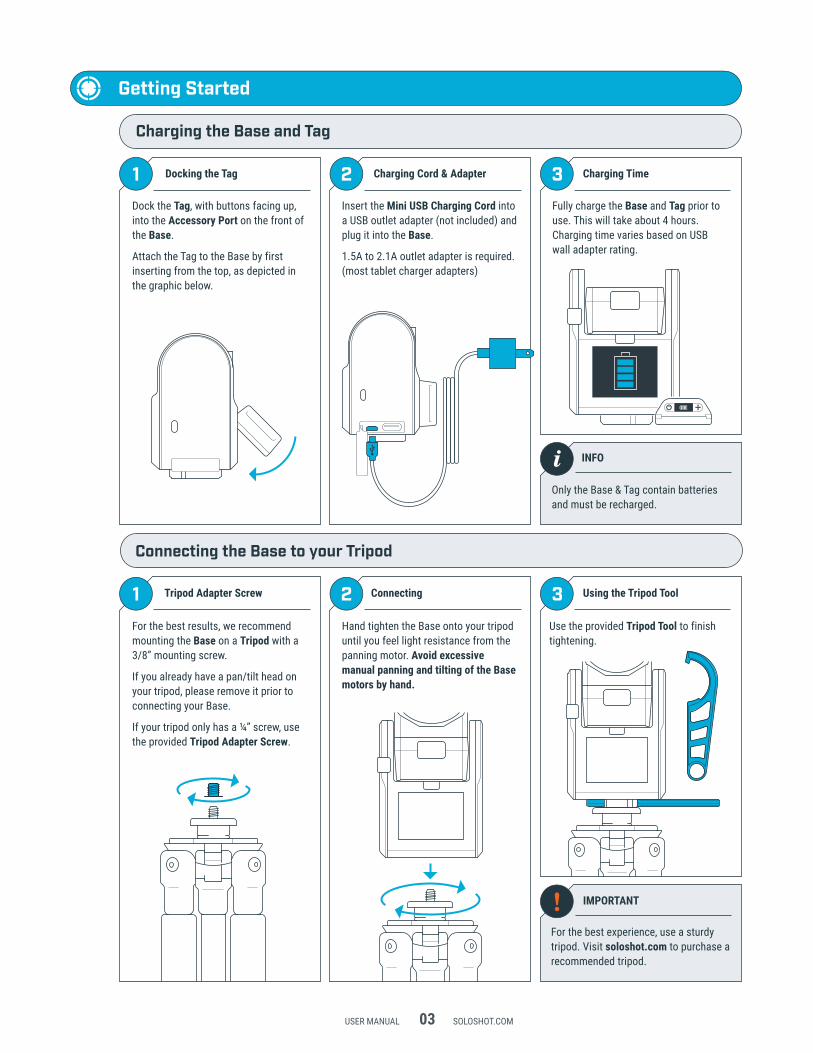
1 32Dock the Tag, with buttons facing up, into the Accessory Port on the front of the Base.
Attach the Tag to the Base by first inserting from the top, as depicted in the graphic below.
Insert the Mini USB Charging Cord into a USB outlet adapter (not included) and plug it into the Base.
1.5A to 2.1A outlet adapter is required. (most tablet charger adapters)
For the best results, we recommend mounting the Base on a Tripod with a 3/8” mounting screw.
If you already have a pan/tilt head on your tripod, please remove it prior to connecting your Base.
If your tripod only has a ¼” screw, use the provided Tripod Adapter Screw.
Fully charge the Base and Tag prior to use. This will take about 4 hours. Charging time varies based on USB wall adapter rating.
Connecting the Base to your Tripod
Hand tighten the Base onto your tripod until you feel light resistance from the panning motor. Avoid excessive manual panning and tilting of the Base motors by hand.
Use the provided Tripod Tool to finish tightening.
USER MANUAL 03 SOLOSHOT.COM
Charging the Base and Tag
Getting Started
Docking the Tag Charging Cord & Adapter
Tripod Adapter Screw Connecting Using the Tripod Tool
Charging Time
i
!For the best experience, use a sturdy tripod. Visit soloshot.com to purchase a recommended tripod.
IMPORTANT
INFO
Only the Base & Tag contain batteries and must be recharged.

1
2
! IMPORTANT
! IMPORTANT
1
! IMPORTANT
32Micro SD Card Docking the Camera Powering On
3Create an Account Update Tag Registration
Dock the OpticX Camera to the Base by guiding it down onto the tilt drum from above, and then pushing it forward until it securely clicks into place.
Preparing your SOLOSHOT3
Insert an approved Micro SD Card into the side of the OpticX Camera.
You will hear a click when fully inserted.
To power on Base, press and hold the Power Button for 3 seconds.
To power on Tag, press the Power Button.
Create a SOLOSHOT account at app.soloshot.com.
Power on the Base and follow the on-screen instructions to update your device.
! IMPORTANT
Your SOLOSHOT3 must be upright and level upon start-up and updating software.
It’s recommend it be connected to a tripod during this process.
The screen will be blank for up to one minute during certain steps of the update process.
Do not power down device during update.
After registering your Tags, you are prompted to select the tracking preferences of the Tag.
USER MANUAL 04 SOLOSHOT.COM
A SOLOSHOT account is required before setup of your SOLOSHOT3.
Preparing Your SOLOSHOT
Preparing your SOLOSHOT3
Your SD card will be completely erased. Make sure to save any content that you don’t want erased!
Visit support.soloshot.com for a list of compatible SD cards.
Update and Registration
321 Home Screen/Track App Track Button Tracking Action Sheet
!54 Track Modes Calibration IMPORTANT
Preparing your SOLOSHOT3Using the Track App
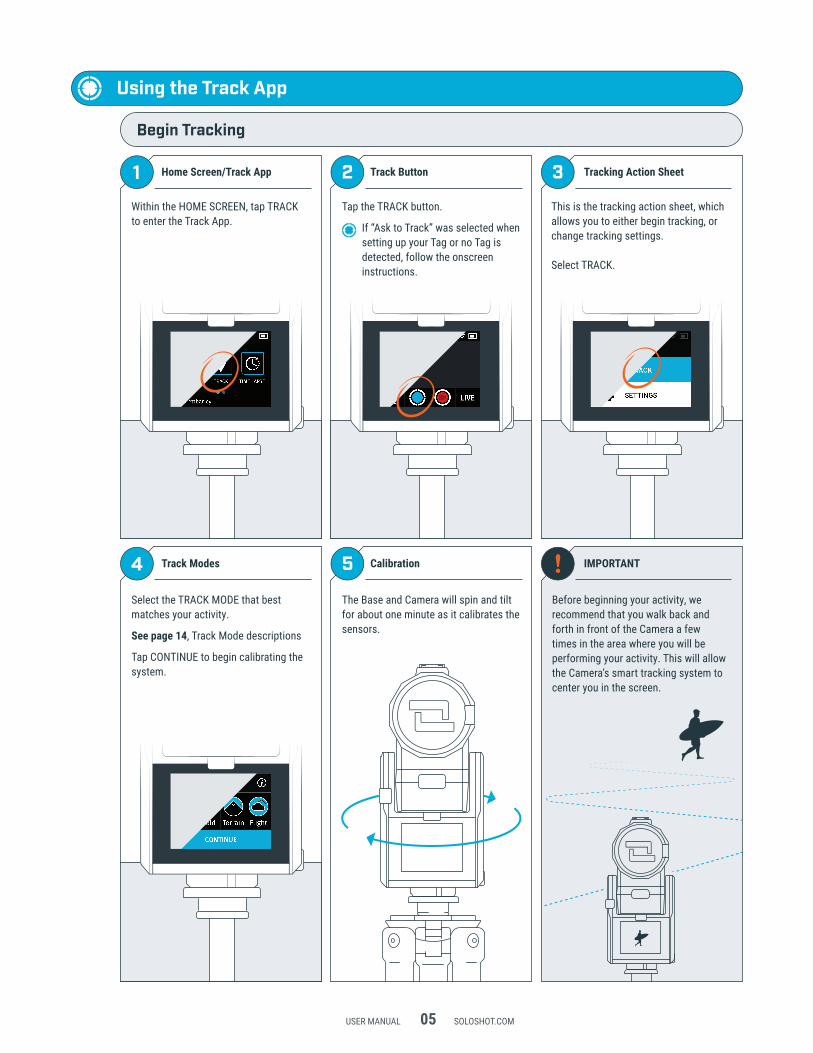
Within the HOME SCREEN, tap TRACK to enter the Track App.
Tap the TRACK button.
If “Ask to Track” was selected when setting up your Tag or no Tag is detected, follow the onscreen instructions.
This is the tracking action sheet, which allows you to either begin tracking, or change tracking settings.
Select TRACK.
The Base and Camera will spin and tilt for about one minute as it calibrates the sensors.
USER MANUAL 05 SOLOSHOT.COM
Select the TRACK MODE that best matches your activity.
See page 14, Track Mode descriptions
Tap CONTINUE to begin calibrating the system.
Before beginning your activity, we recommend that you walk back and forth in front of the Camera a few times in the area where you will be performing your activity. This will allow the Camera’s smart tracking system to center you in the screen.
Begin Tracking
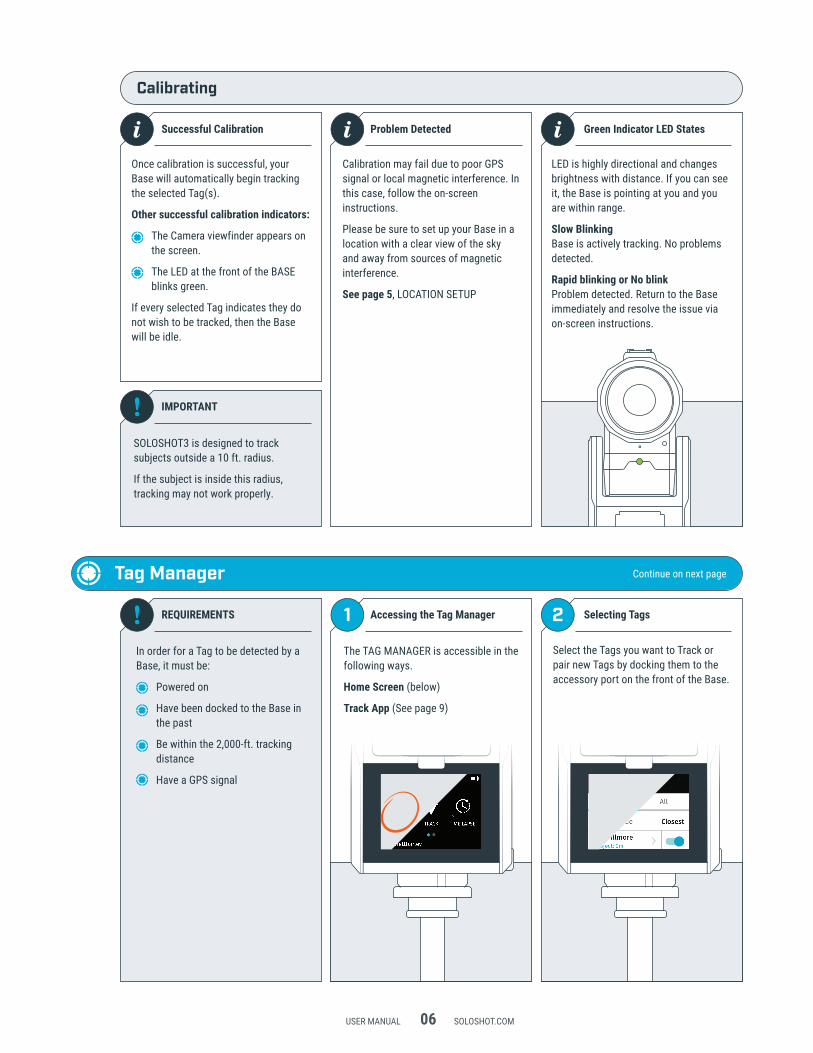
iii Successful Calibration Problem Detected Green Indicator LED States
21! REQUIREMENTS
! IMPORTANT
Accessing the Tag Manager Selecting Tags
Calibrating
Tag Manager
Calibration may fail due to poor GPS signal or local magnetic interference. In this case, follow the on-screen instructions.
Please be sure to set up your Base in a location with a clear view of the sky and away from sources of magnetic interference.
See page 5, LOCATION SETUP
SOLOSHOT3 is designed to track subjects outside a 10 ft. radius.
If the subject is inside this radius, tracking may not work properly.
Once calibration is successful, your Base will automatically begin tracking the selected Tag(s).
Other successful calibration indicators:
The Camera viewfinder appears on the screen.
The LED at the front of the BASE blinks green.
If every selected Tag indicates they do not wish to be tracked, then the Base will be idle.
LED is highly directional and changes brightness with distance. If you can see it, the Base is pointing at you and you are within range.
Slow BlinkingBase is actively tracking. No problems detected.
Rapid blinking or No blinkProblem detected. Return to the Base immediately and resolve the issue via on-screen instructions.
In order for a Tag to be detected by a Base, it must be:
Powered on
Have been docked to the Base in the past
Be within the 2,000-ft. tracking distance
Have a GPS signal
Select the Tags you want to Track or pair new Tags by docking them to the accessory port on the front of the Base.
The TAG MANAGER is accessible in the following ways.
Home Screen (below)
Track App (See page 9)
USER MANUAL 06 SOLOSHOT.COM
Continue on next page
3
321
iiTag Icon to Tag Manager Tag Manager: Session Tag Manager: All
Snapping In Hear the “Click” Buttons Up
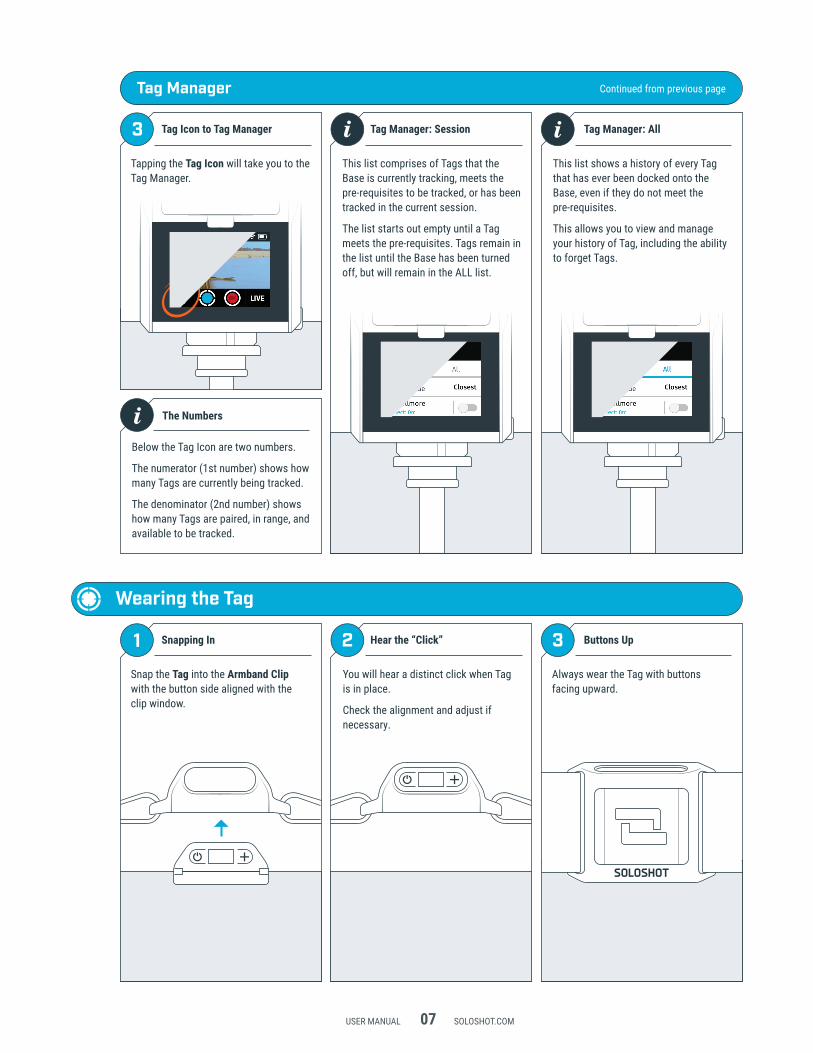
This list shows a history of every Tag that has ever been docked onto the Base, even if they do not meet the pre-requisites.
This allows you to view and manage your history of Tag, including the ability to forget Tags.
This list comprises of Tags that the Base is currently tracking, meets the pre-requisites to be tracked, or has been tracked in the current session.
The list starts out empty until a Tag meets the pre-requisites. Tags remain in the list until the Base has been turned off, but will remain in the ALL list.
Always wear the Tag with buttons facing upward.
Snap the Tag into the Armband Clip with the button side aligned with the clip window.
You will hear a distinct click when Tag is in place.
Check the alignment and adjust if necessary.
USER MANUAL 07 SOLOSHOT.COM
Tapping the Tag Icon will take you to the Tag Manager.
Tag Manager
Wearing the Tag
Continued from previous page
iBelow the Tag Icon are two numbers.
The numerator (1st number) shows how many Tags are currently being tracked.
The denominator (2nd number) shows how many Tags are paired, in range, and available to be tracked.
The Numbers

Tag ManagerDisplays how many Tags are being tracked. Tap to navigate to the Tag Manager.
TrackStart or stop tracking.
RecordStart or stop recording.
LIVEStart or stop live streaming.
Status BarDisplays Wi-Fi strength and battery level.
Pulldown MenuAccess the home screen, Wi-Fi, camera controls, and settings.
SD Card IndicatorAvailable SD Card Space and record time
Pulldown Window
SD Card Storage SpaceDisplays how much recording time or number of photos remain.
HomeExits the Track App, ends tracking/recordingand takes you back to the Home Screen.
Wi-FiOpens WiFi settings.
RefineAllows you to manually adjust the framing of the the subject in the viewfinder.
SettingsOpens the Settings window, allowing you to change camera mode and tracking settings.
6
9
8
Using the Tag Screen
Battery LevelDisplays the remaining battery level.
Tracking StatusDisplays whether the TAG would like to be tracked.
GPS StatusDisplays the status of the TAG’s GPS signal.
RecordDisplays if TAG would like to be recorded.
12
1110
57
32
1
1
2
3
4
1
2
3
4
5
6
7
8
9
10
11
12
4
2 3 41
USER MANUAL 08 SOLOSHOT.COM
Using the Viewfinder
i 21 From the Tag Tag: Record Icon From the Base
Tap the RECORD button to start or stop recording.
Recording Off
Recording On
i 21 From the Tag Tag: Track Icon From the Base
! IMPORTANT
Pause and Resume Tracking
Wearing the Tag
Tap the TRACK button to pause or resume tracking.
Good GPS Signal Poor GPS Signal
Double tap the button to pause or resume tracking.
Tracking Paused
Tracking Active
USER MANUAL 09 SOLOSHOT.COM
i No Tags
The system is smart. If there are no other Tags to track, then the Base will automatically stop recording/tracking.
Users can override this from the Base.
Press and hold the button to toggle record on or off.
A good GPS signal is required for tracking.
Be sure to power-on the Tag and make sure it has a clear view of the sky before beginning your activity.
Start and Stop Recording

4 53 SETTINGS GO LIVE Ending a Live Stream
To stop live streaming, tap the LIVE button, then END LIVE.
If SETTINGS is selected:
Add a Title and Description to your stream. This information will appear on your stream in the SOLOSHOTapp.
If the Title is unchanged, it will default to “Live with #SOLOSHOT3”
Select GO LIVE.
The Base will attempt to connect to the SOLOSHOT network.
Live Stream Started
while live stream is active, the track app interface shows the LIVE highlighted in red.
Live Stream Failed
Check your internet connection and try again.
USER MANUAL 10 SOLOSHOT.COM
21 LIVE The LIVE Action Sheet
The live streaming action sheet allows you to begin live streaming or change live stream settings.
Tap GO LIVE or SETTINGS.
Tap the LIVE button.
! REQUIREMENTS
Connected to Wi-Fi.
Internet Speed Requirements:
• A minimum of 5 Mbps upload speed
• Stream quality depends on the internet connection speed.
Base is calibrated.
See page 8, CALIBRATING
Regardless of recording resolution, the live stream video is compressed at 720p60.
Start and Stop Live Streaming
!All live streams are viewable to the public on the SOLOSHOTapp.
WARNING
iYour live streams appear on the SOLOSHOTapp and app.soloshot.com. Be sure to download the SOLOSHOTapp on the App Store or Google Play!
By streaming, you agree to all terms and conditions including privacy as described at soloshot.com/terms.
The App | Terms & Conditions