sql server 2012 – step-by-step – create the alwayson availability group€¦ · ·...
TRANSCRIPT
SQL Server 2012 – Step-by-Step – Create the
AlwaysOn Availability Group
Brief
The object of this guide is to outline the steps involved in creating a Windows Server 2012
Failover Cluster specifically for use with a SQL Server 2012 Instance utilizing the Always On
Availability Group feature. This will be a wizard install and so will not cover any pre-staged
elements; it will also not cover Cluster Shared Storage for Failover Clusters, or SQL Server 2012
Clusters.
Assumptions
The installation steps assume the following:
1. Two identical virtual machines with Windows Server 2012 R2 installed 2. Administrative Accounts have been created
1. Domain Administrator to perform install 2. SQL Server Account 3. SQL Agent Account
3. Storage has been allocated and assigned as follows: 1. 2 disks for SQL Database storage – 1 drive per server, for Always On AG 2. Both disks should be assigned the same drive letter on both machines
4. IP Address reserved for AG Listener 5. Temporary File Share accessible by SQL Service Account and both Servers 6. Failover Cluster Feature is installed on both machines
Windows Server 2012 R2 Failover Cluster Installation
In Server Manager, Select Tools, Failover Cluster Manager.
In Failover Cluster Manager select Create Cluster.

On the Default Screen click Next.
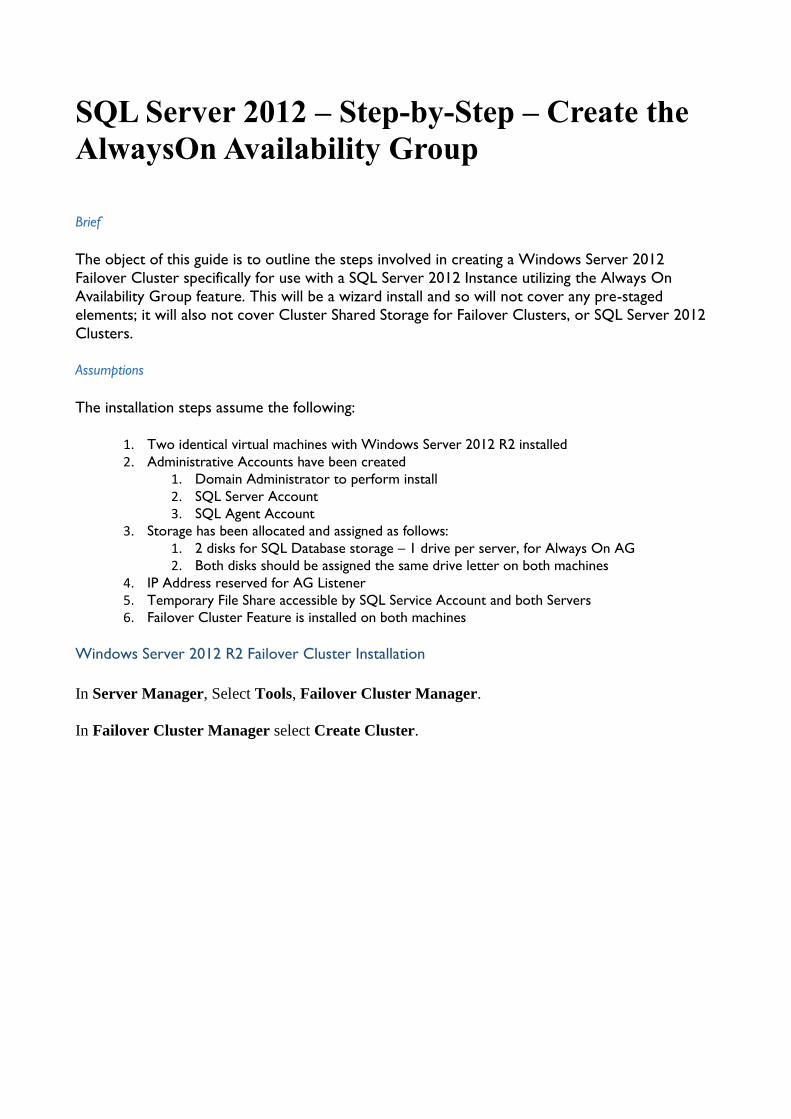
Enter the Server Name for both Servers to be added to the Cluster and Click Add.
If this is for a production environment select Yes, otherwise select No. The report can also be
run on-demand from the Main page of the Failover Cluster Manager. Click Next.
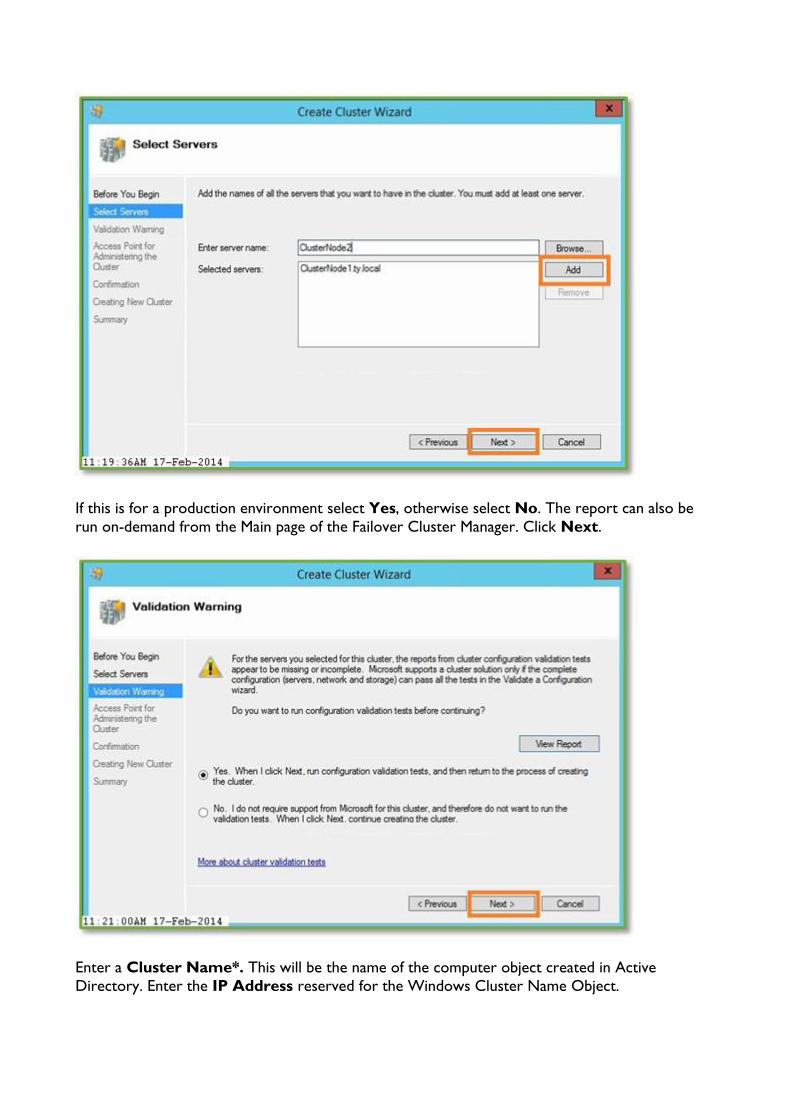
Enter a Cluster Name*. This will be the name of the computer object created in Active
Directory. Enter the IP Address reserved for the Windows Cluster Name Object.
*If the Cluster Name Object needs to be created in an AD container (OU) that is different
from the Computers OU, enter the fully qualified name for the object. For example,
CN=WinCluster,OU=ClusterObjects, DN=ty, DN=local.
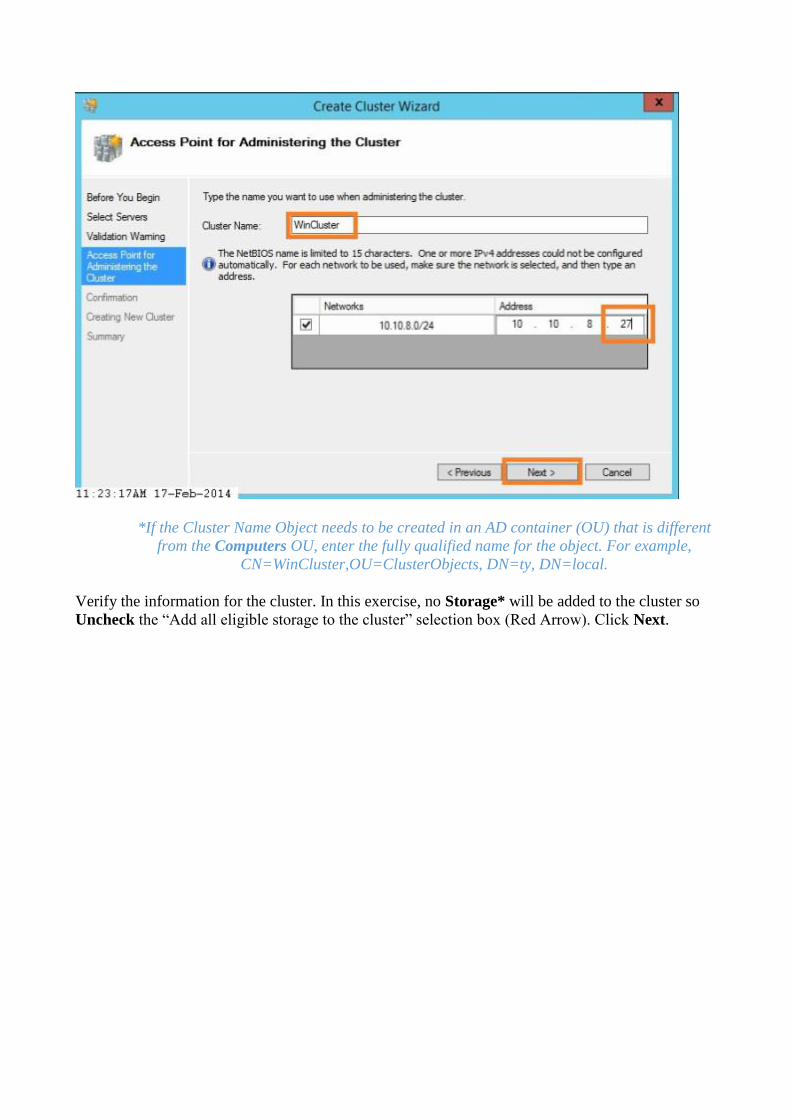
Verify the information for the cluster. In this exercise, no Storage* will be added to the cluster so
Uncheck the “Add all eligible storage to the cluster” selection box (Red Arrow). Click Next.

*The Always On Availability Group does not use a Cluster Shared Volume. Instead it uses
a drive on each server with the same drive letter (i.e. G:\).
The Cluster Creation operation runs.
The Summary page appears when the creation process completes. Click Finish.
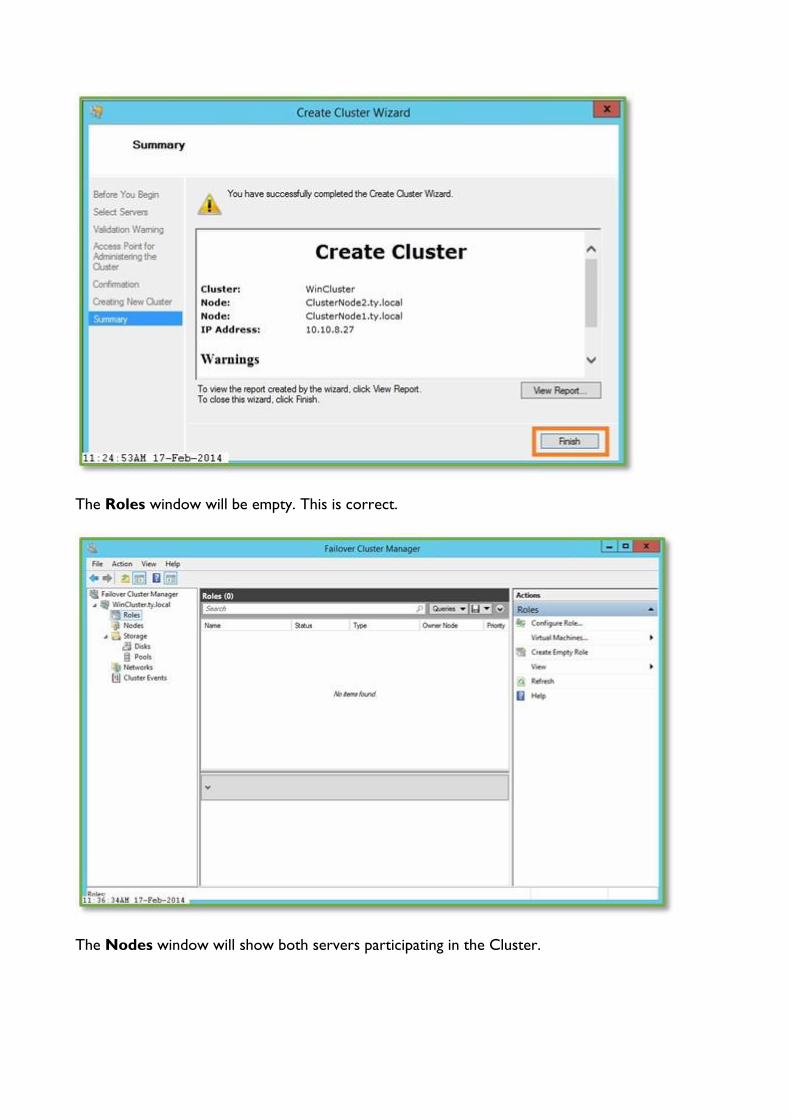
The Roles window will be empty. This is correct.
The Nodes window will show both servers participating in the Cluster.
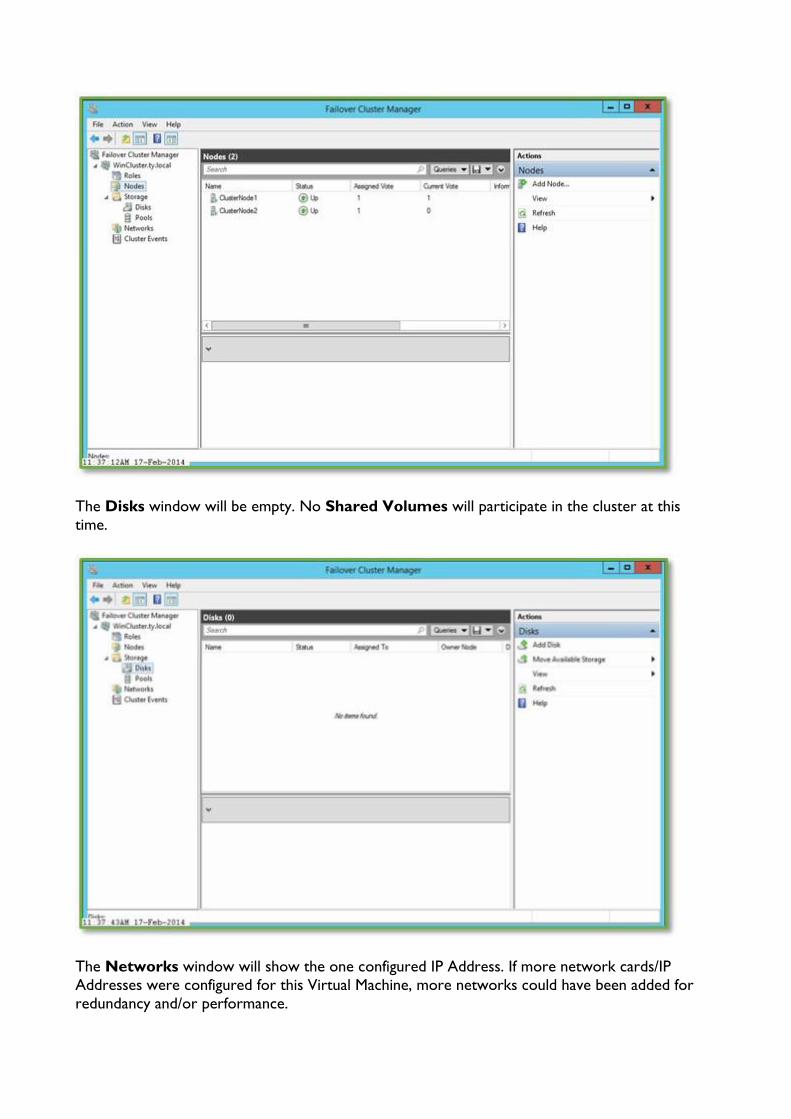
The Disks window will be empty. No Shared Volumes will participate in the cluster at this
time.
The Networks window will show the one configured IP Address. If more network cards/IP
Addresses were configured for this Virtual Machine, more networks could have been added for
redundancy and/or performance.

The Failover Cluster Summary Window.
The Failover Cluster preparation process creates a DNS entry using the Cluster Name
Object’s Name.
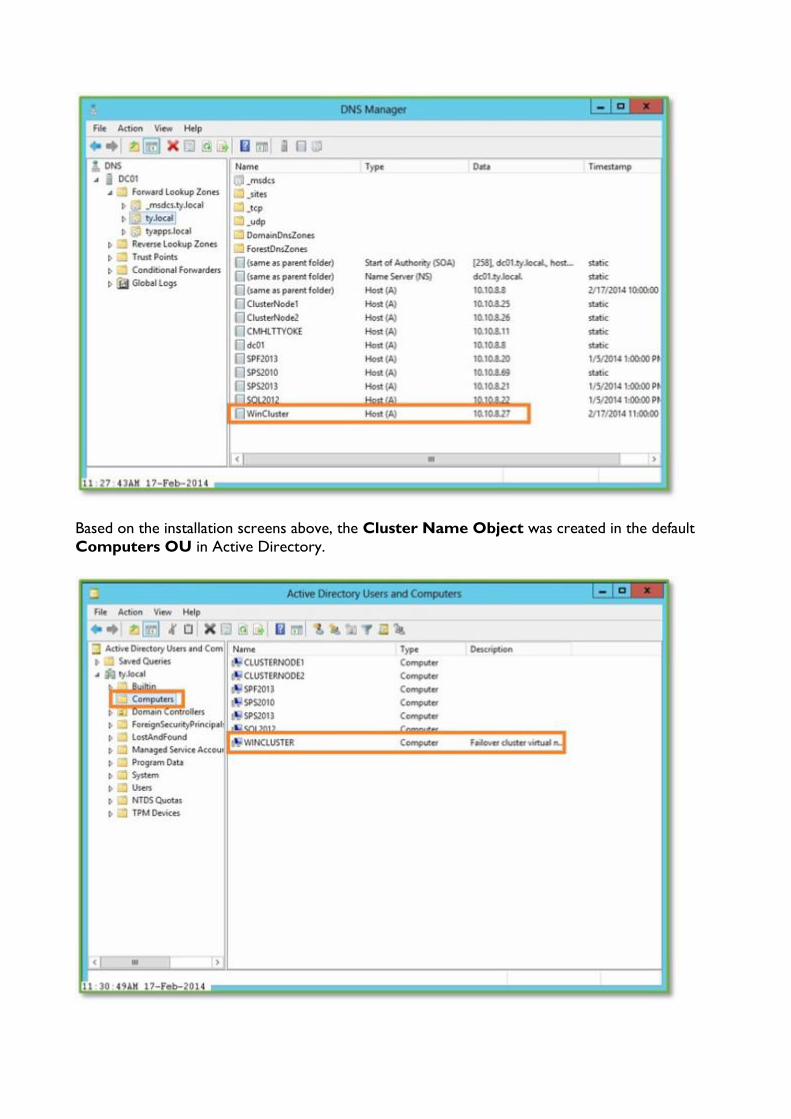
Based on the installation screens above, the Cluster Name Object was created in the default
Computers OU in Active Directory.
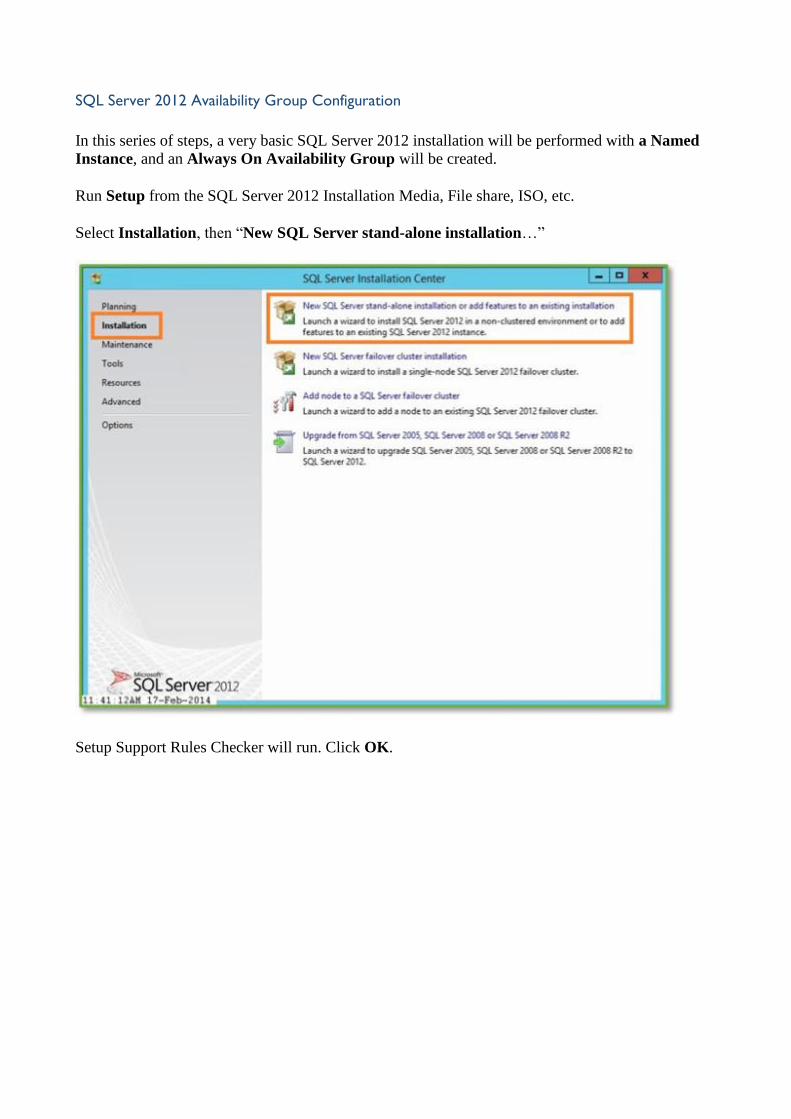
SQL Server 2012 Availability Group Configuration
In this series of steps, a very basic SQL Server 2012 installation will be performed with a Named
Instance, and an Always On Availability Group will be created.
Run Setup from the SQL Server 2012 Installation Media, File share, ISO, etc.
Select Installation, then “New SQL Server stand-alone installation…”
Setup Support Rules Checker will run. Click OK.
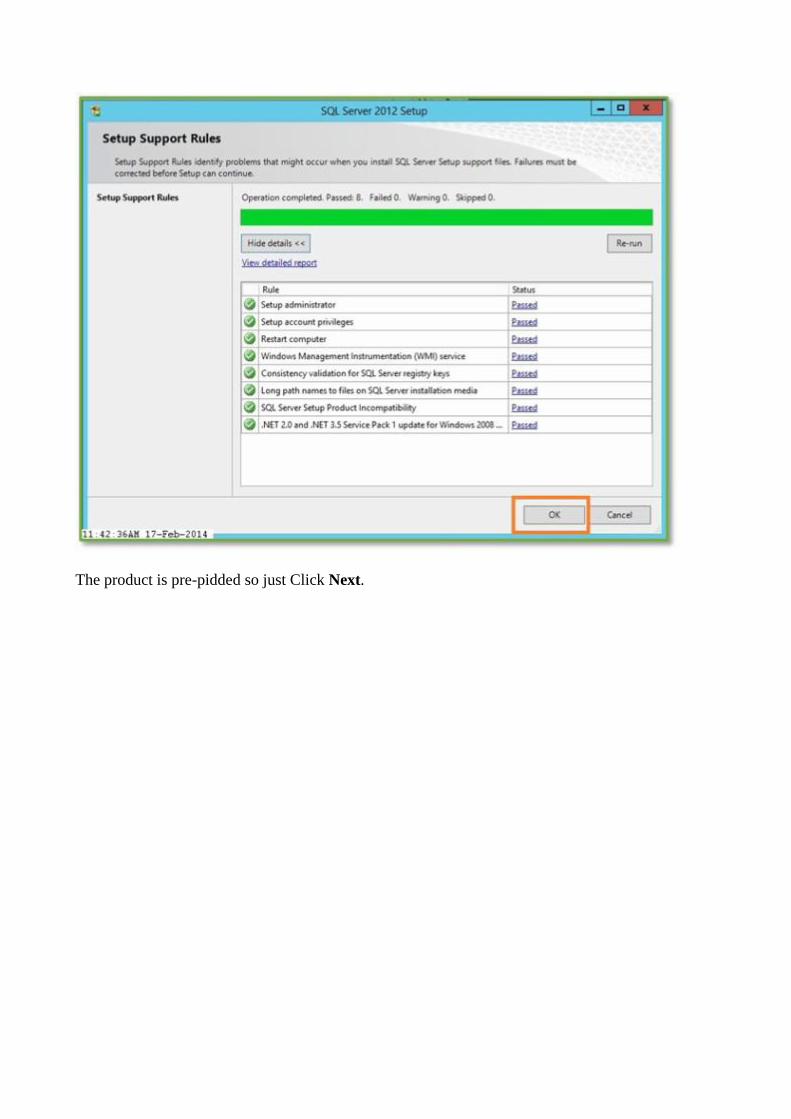
The product is pre-pidded so just Click Next.
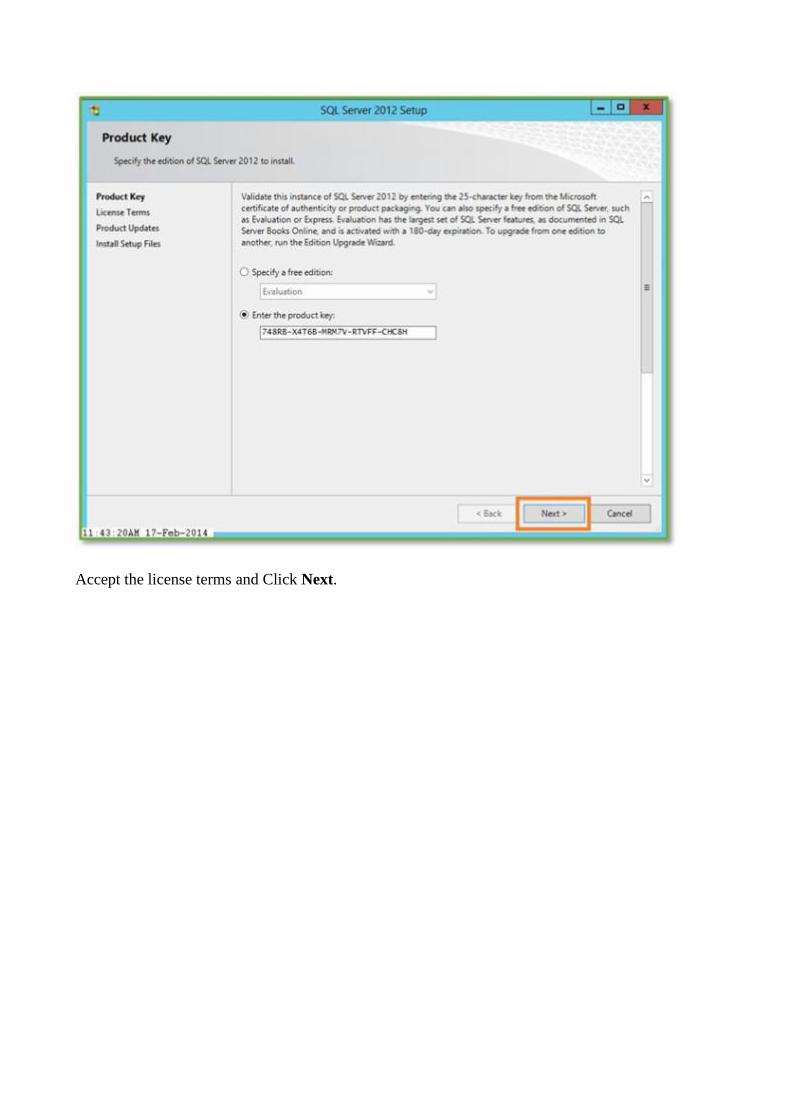
Accept the license terms and Click Next.
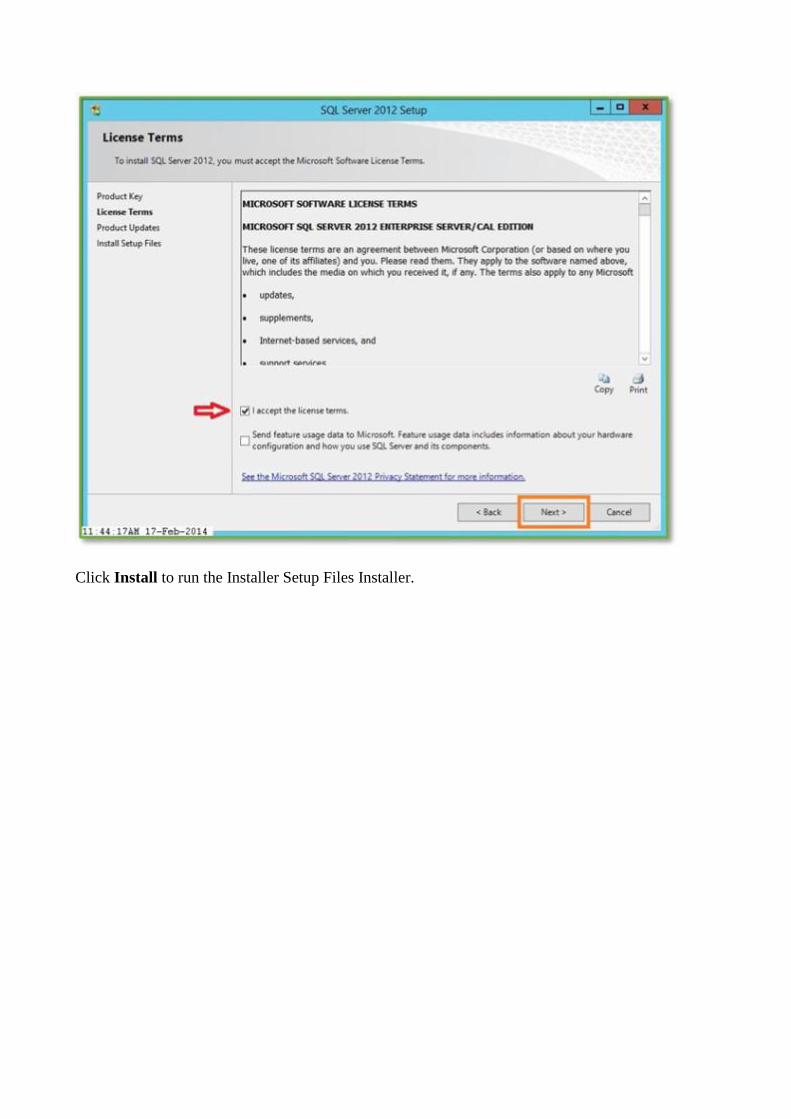
Click Install to run the Installer Setup Files Installer.

The Setup Support Rules Checker will run. Click Next.
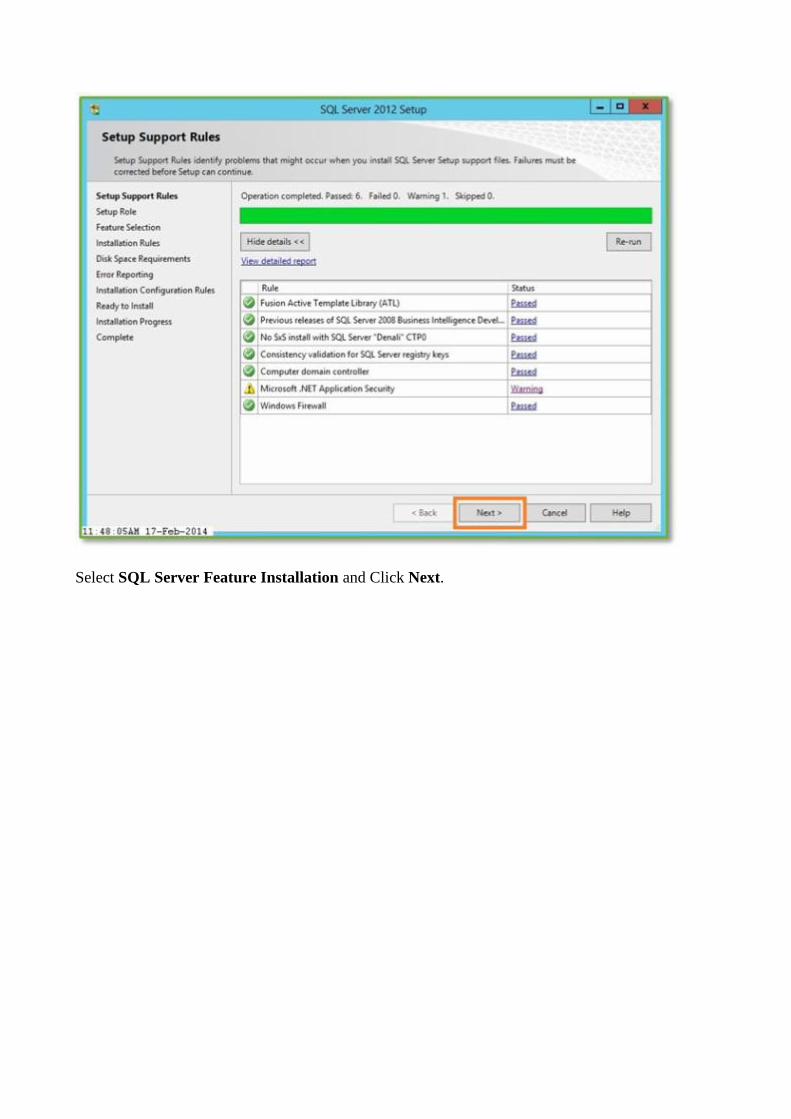
Select SQL Server Feature Installation and Click Next.
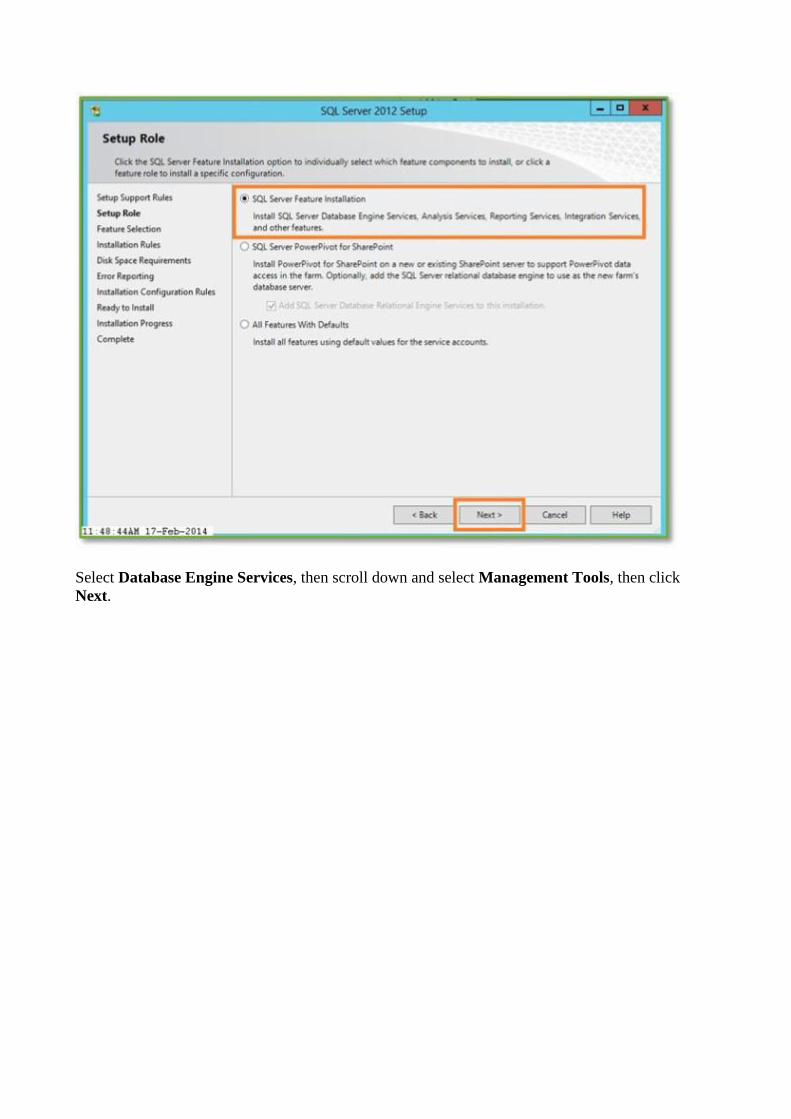
Select Database Engine Services, then scroll down and select Management Tools, then click
Next.
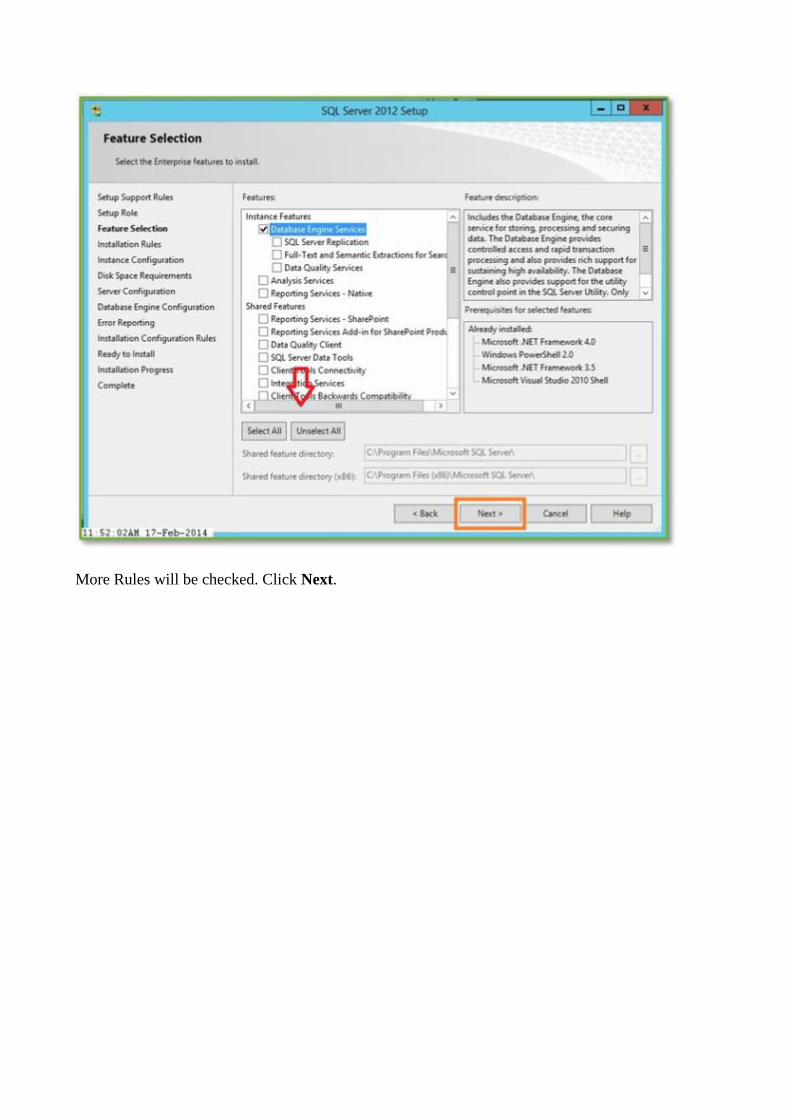
More Rules will be checked. Click Next.
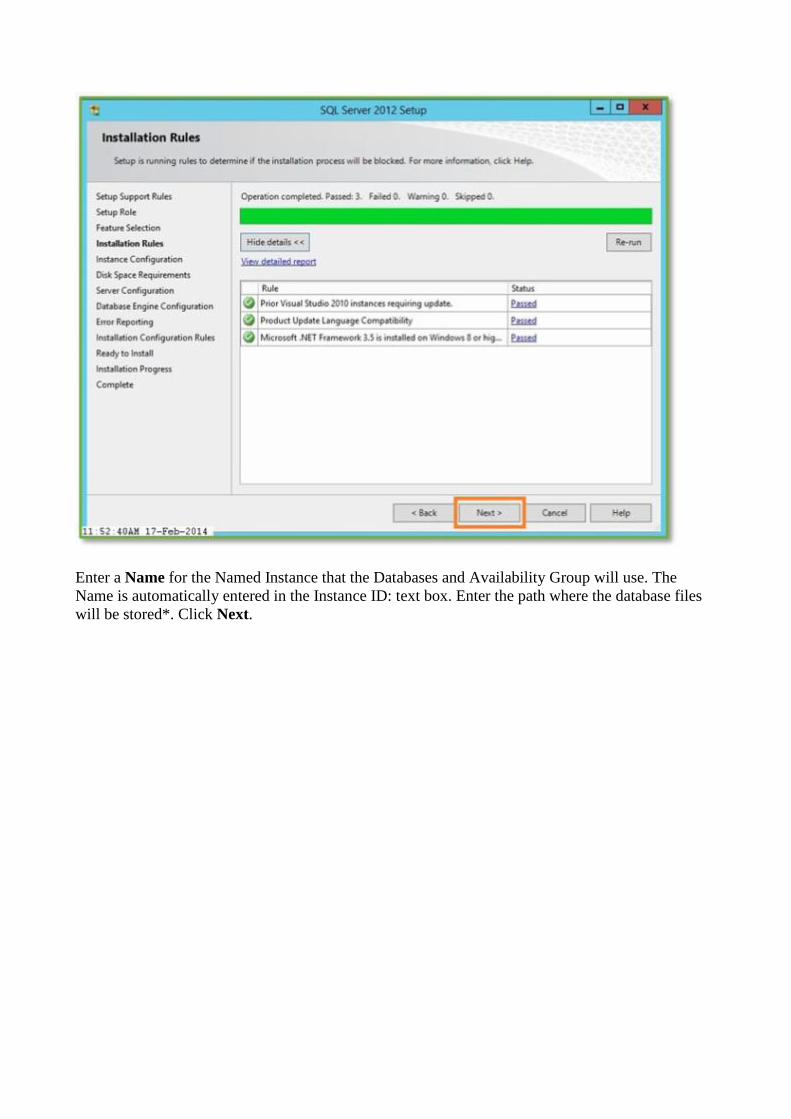
Enter a Name for the Named Instance that the Databases and Availability Group will use. The
Name is automatically entered in the Instance ID: text box. Enter the path where the database files
will be stored*. Click Next.

*Use the browse button or type in the drive letter created in the Failover Cluster
Installation section. This is the drive with the same drive letter on both Servers.
Verify Disk Space Requirements and Click Next.

Accept defaults, or enter a SQL Server Agent domain account/password and SQL Server Database
Engine domain account/password. Click Next.

Select Authentication Mode and Add Users as SQL Server Instance Administrators. Click the
Data Directories tab before clicking Next.

Verify that the Data Directories are correct. Click Next.
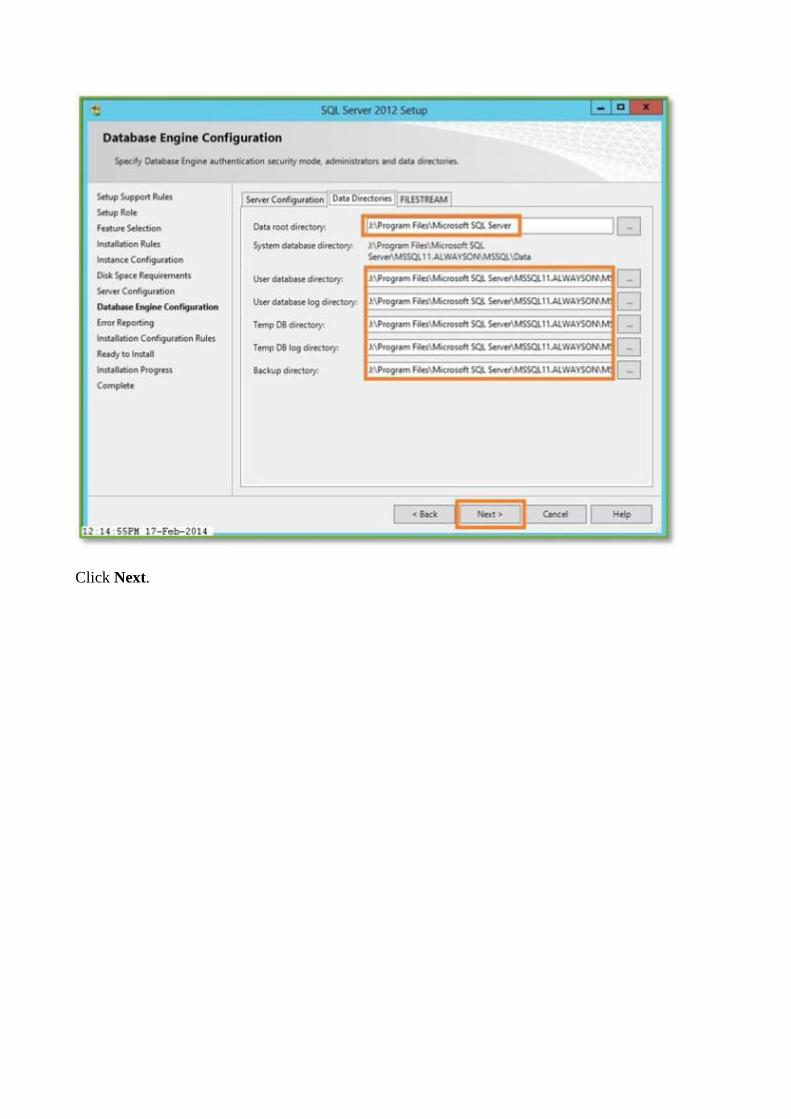
Click Next.
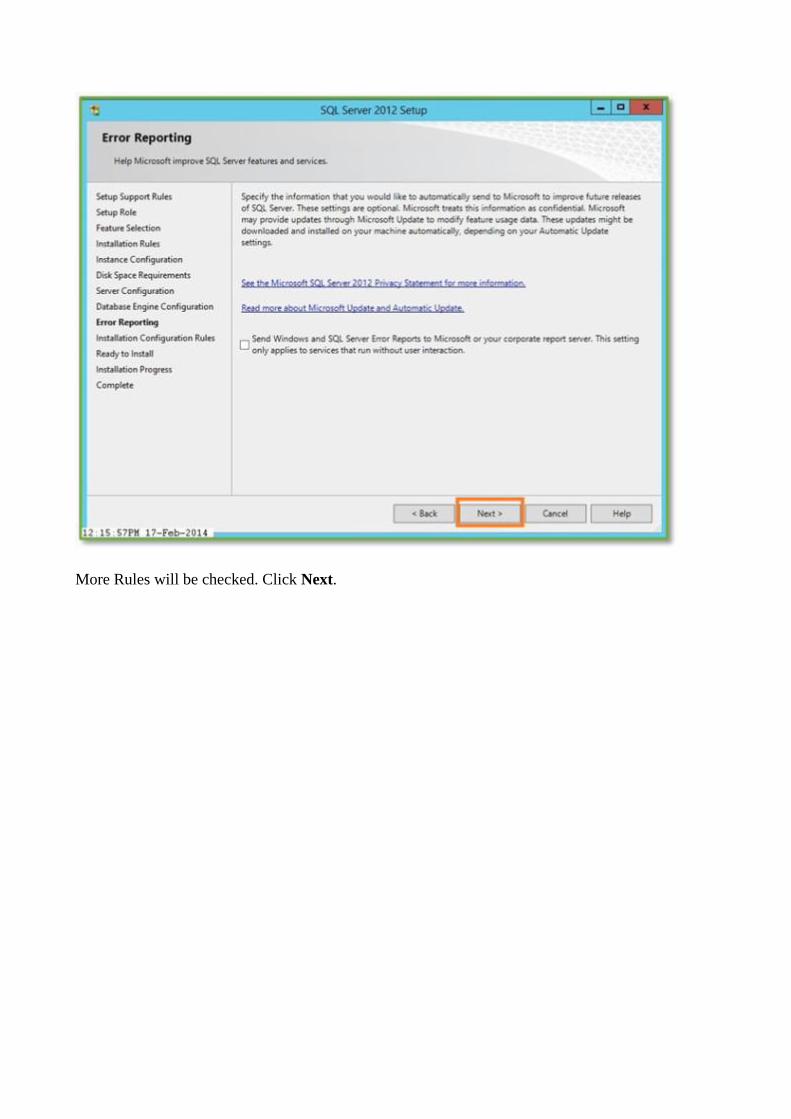
More Rules will be checked. Click Next.

Installation Summary details will be shown. Click Install.
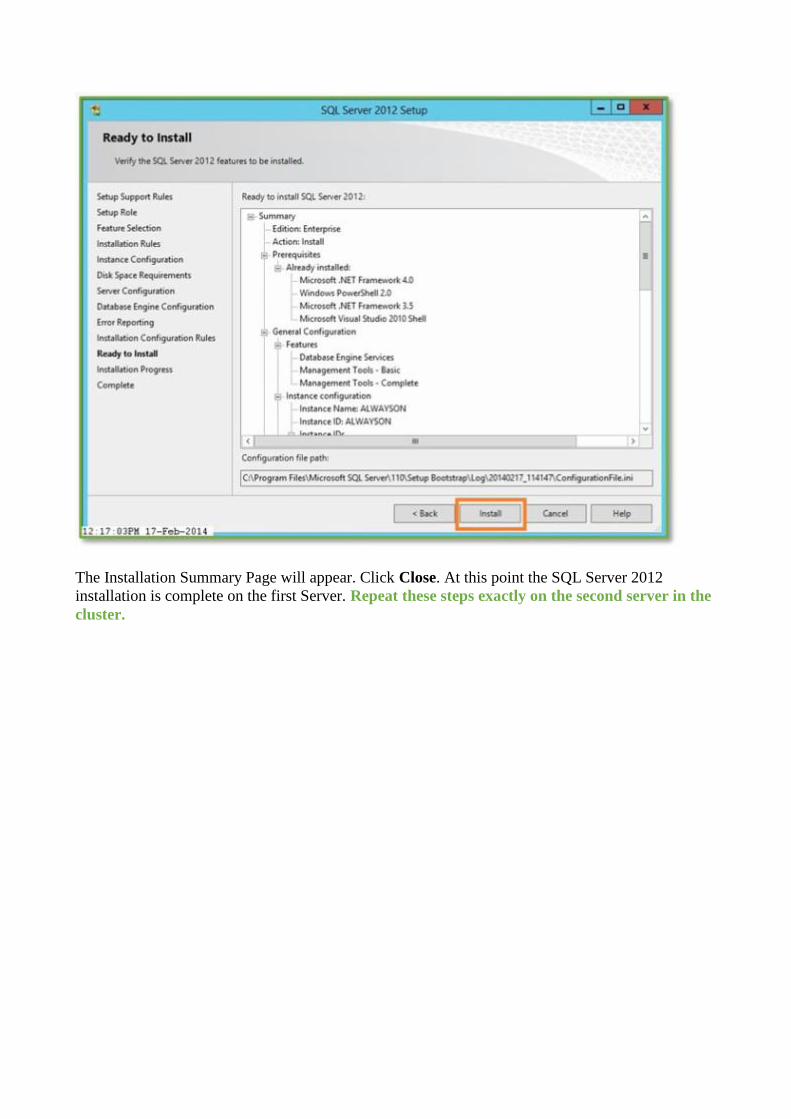
The Installation Summary Page will appear. Click Close. At this point the SQL Server 2012
installation is complete on the first Server. Repeat these steps exactly on the second server in the
cluster.
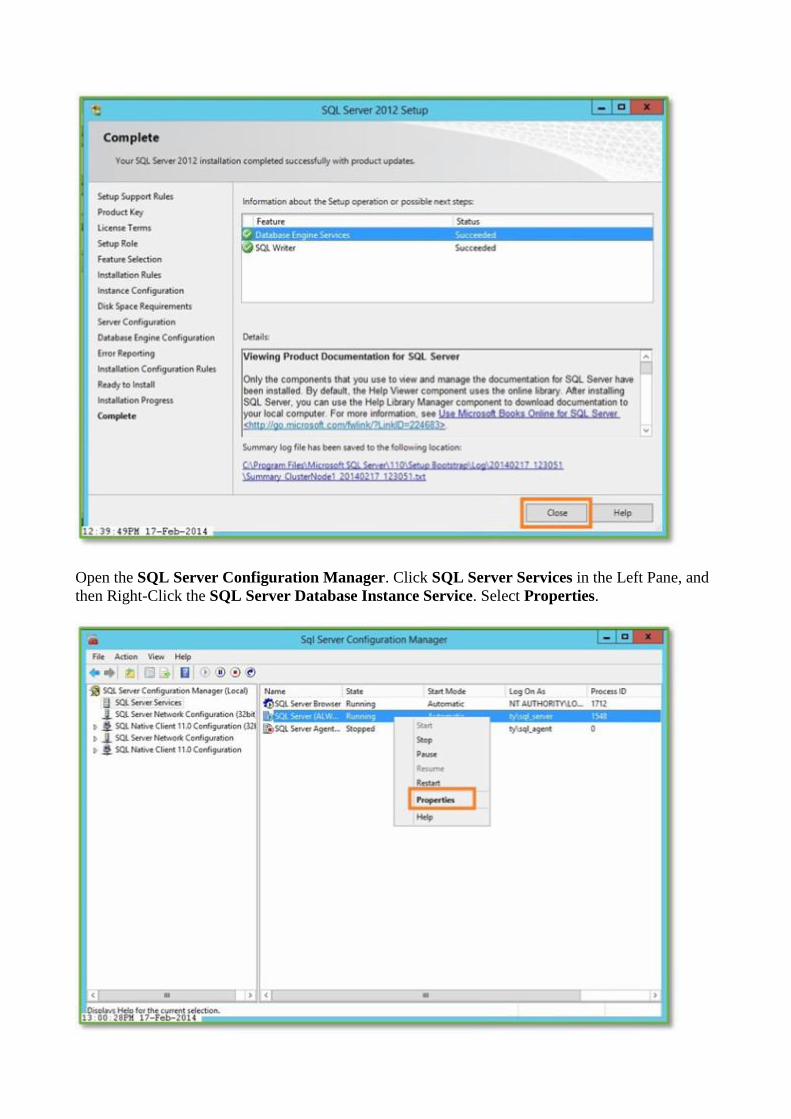
Open the SQL Server Configuration Manager. Click SQL Server Services in the Left Pane, and
then Right-Click the SQL Server Database Instance Service. Select Properties.
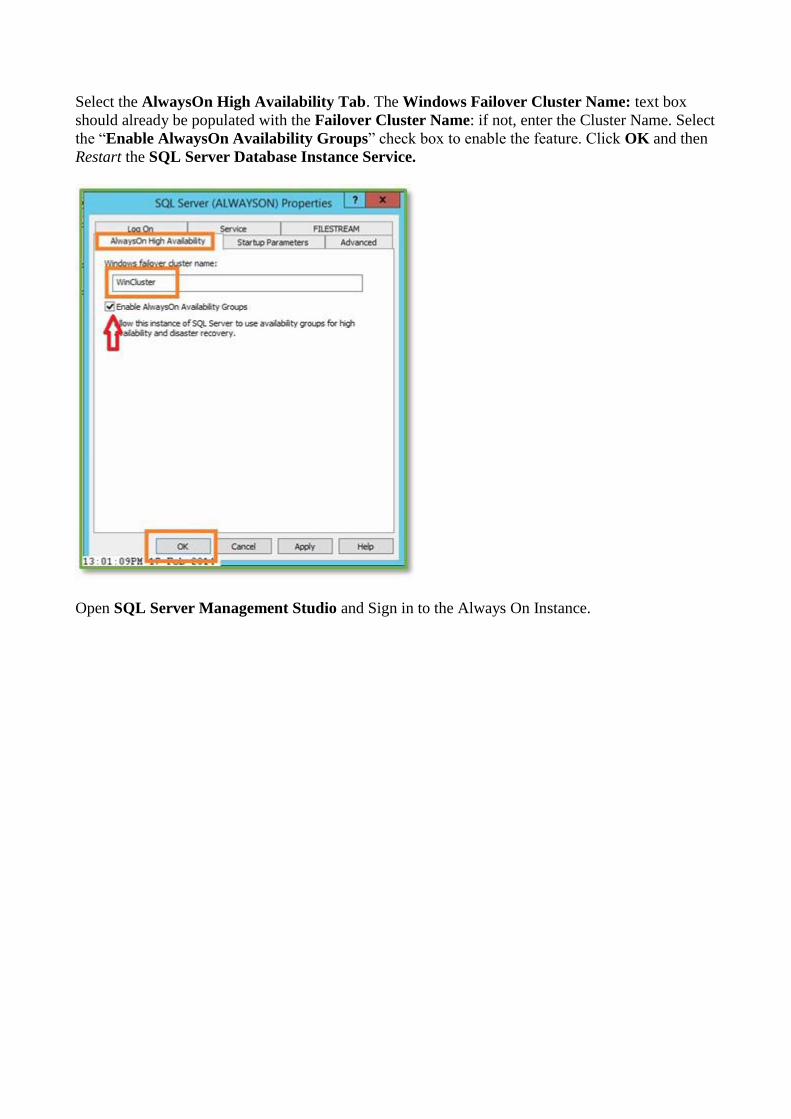
Select the AlwaysOn High Availability Tab. The Windows Failover Cluster Name: text box
should already be populated with the Failover Cluster Name: if not, enter the Cluster Name. Select
the “Enable AlwaysOn Availability Groups” check box to enable the feature. Click OK and then
Restart the SQL Server Database Instance Service.
Open SQL Server Management Studio and Sign in to the Always On Instance.

Right-Click the Server Name/Instance and Select Properties.
Verify the state of the “Is HADR Enabled” property is equal to True.
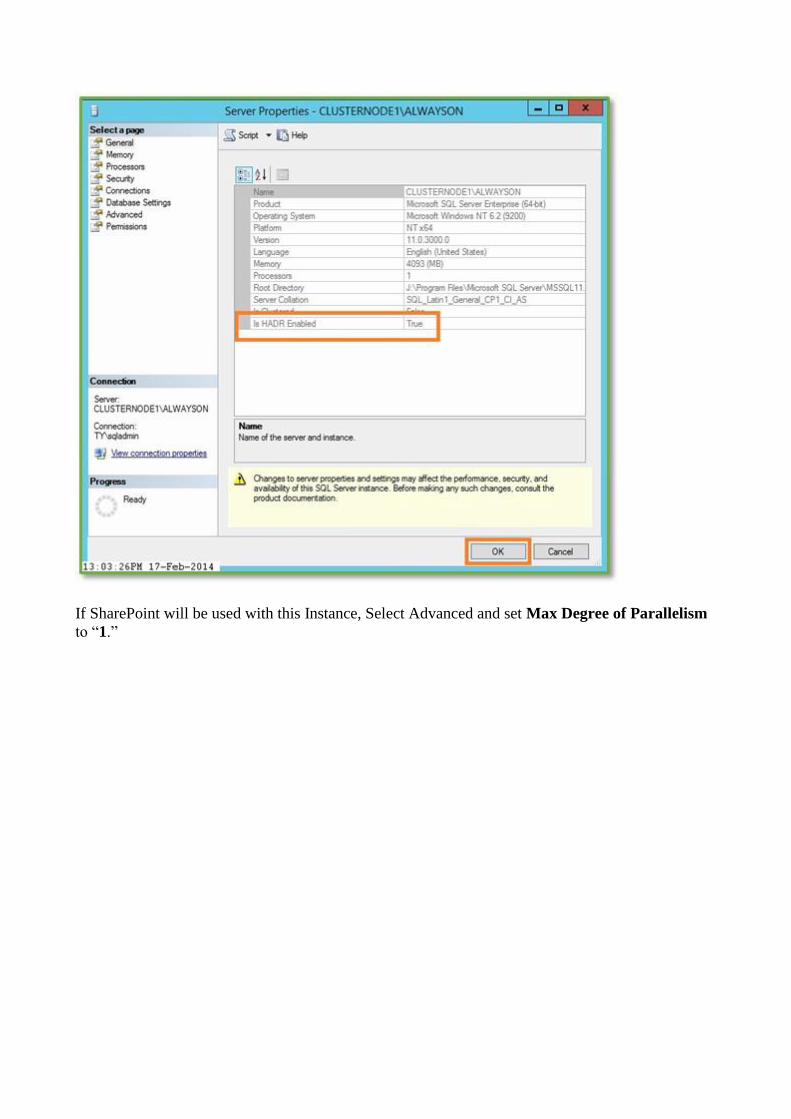
If SharePoint will be used with this Instance, Select Advanced and set Max Degree of Parallelism
to “1.”

Create a New Database for the purpose of the initial setup by right-clicking the Databases folder
and selecting New Database…
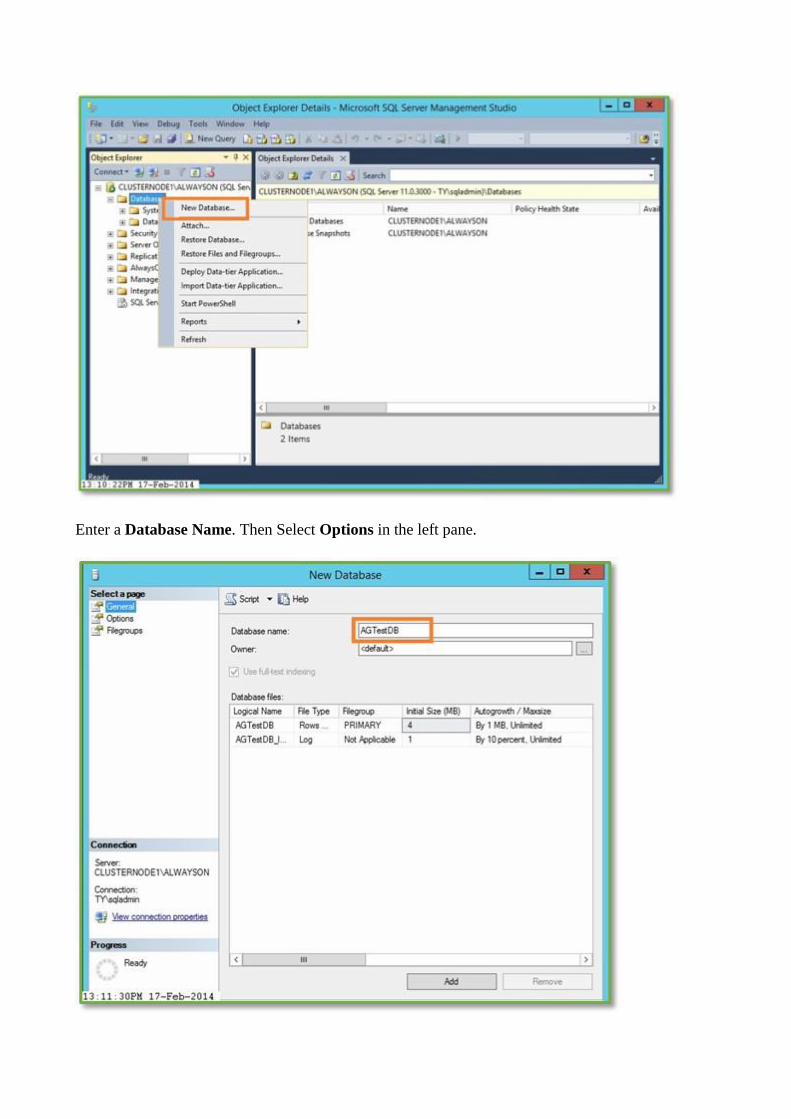
Enter a Database Name. Then Select Options in the left pane.

Ensure the Recovery Model is equal to Full. This is an Availability Group requirement. Click OK.
Another Requirement is an initial Database Backup. Right-click the Database, Select Tasks,
Select Back Up…

Accept the defaults and Click OK.

Click OK. The Database backup is complete.
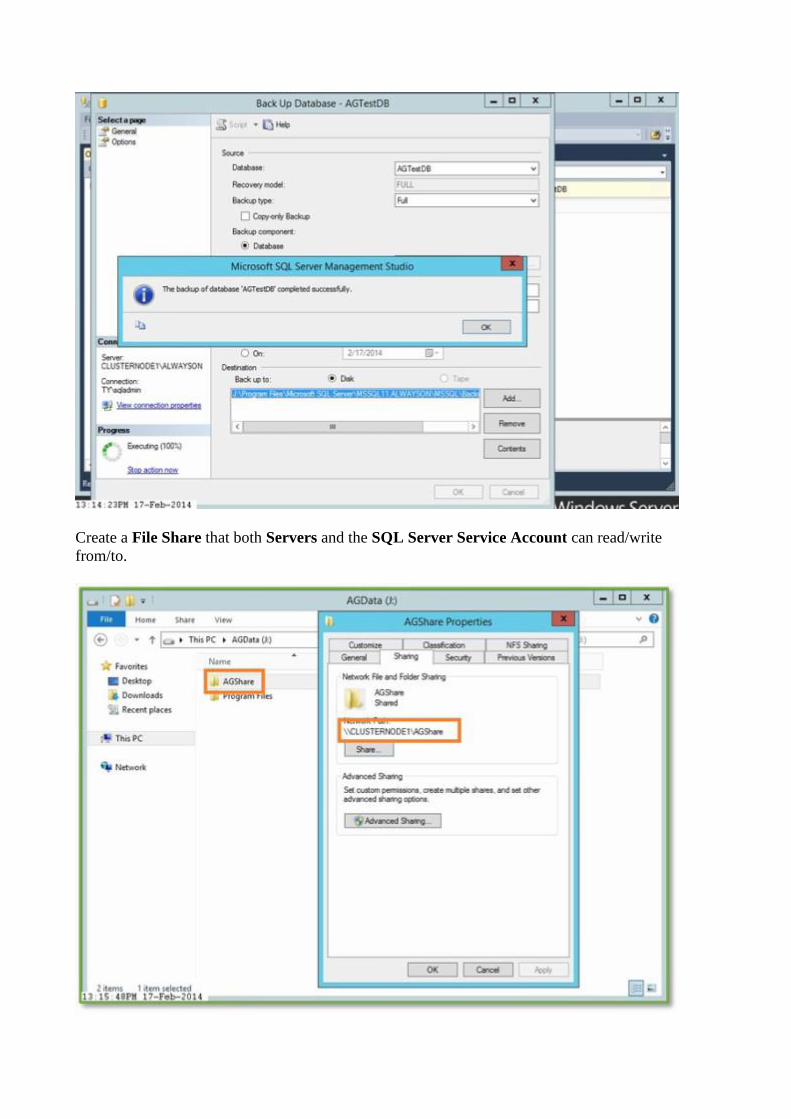
Create a File Share that both Servers and the SQL Server Service Account can read/write
from/to.
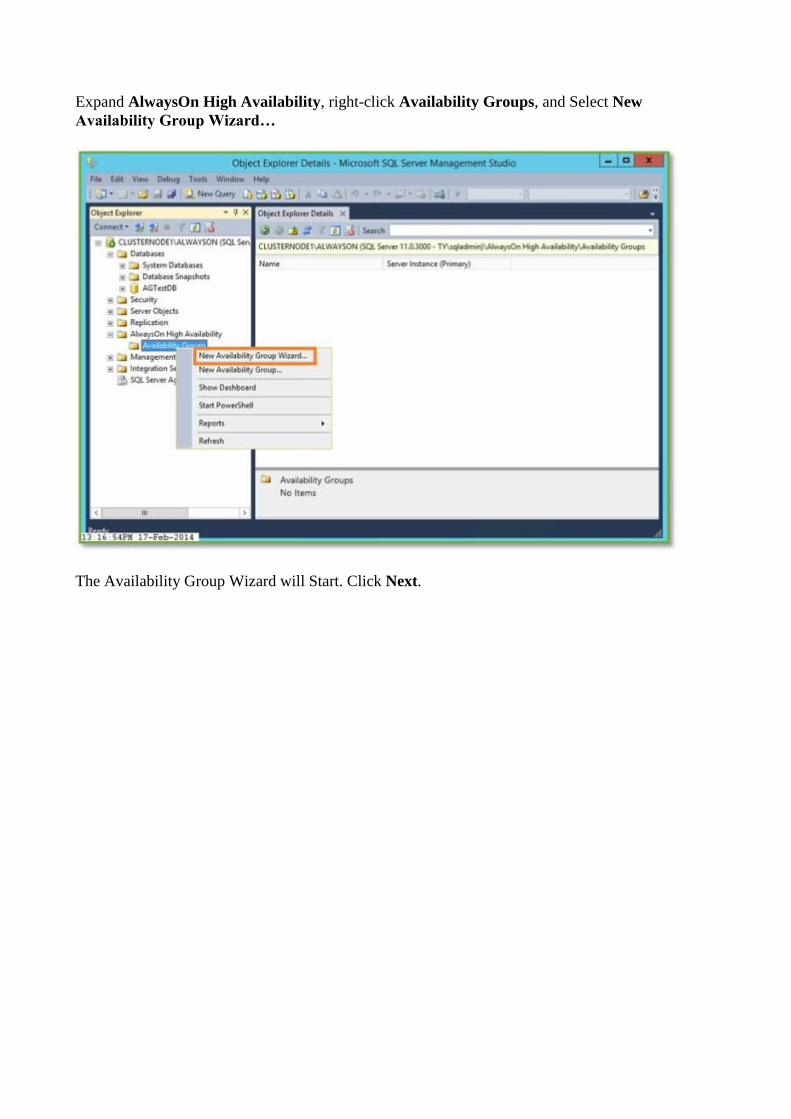
Expand AlwaysOn High Availability, right-click Availability Groups, and Select New
Availability Group Wizard…
The Availability Group Wizard will Start. Click Next.

Enter a Name for the Availability Group. This is a SQL Management Studio Name Only. Click
Next.
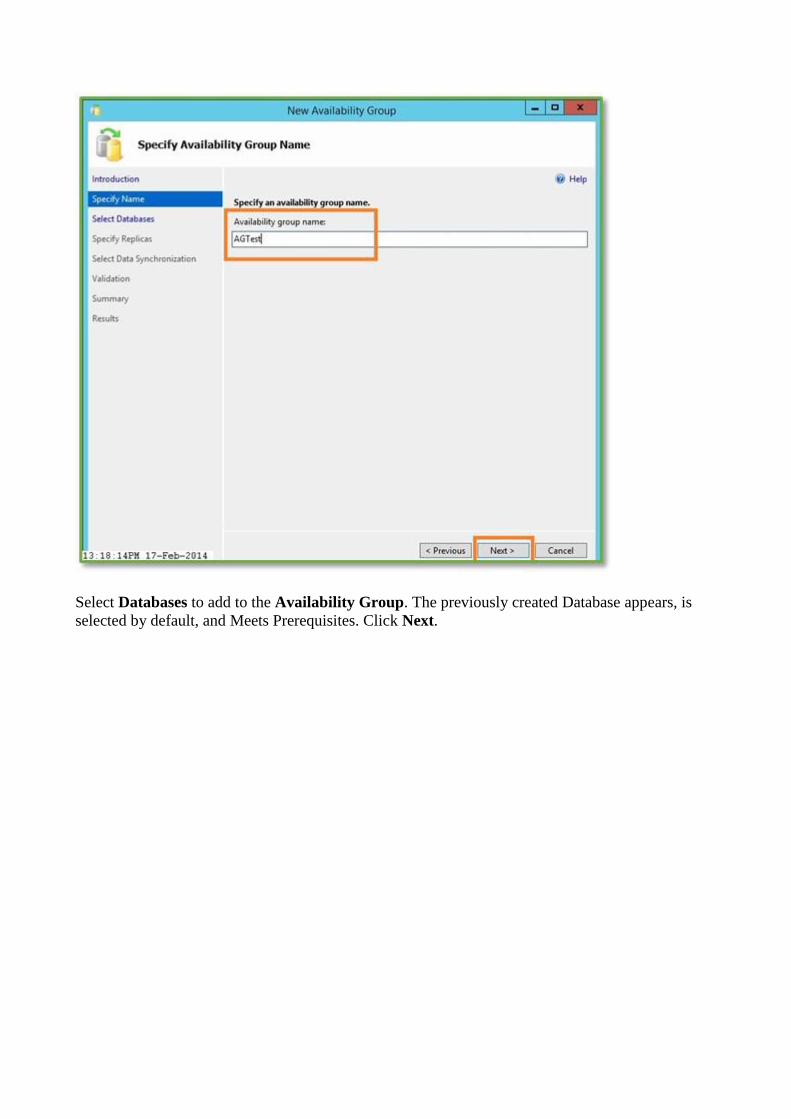
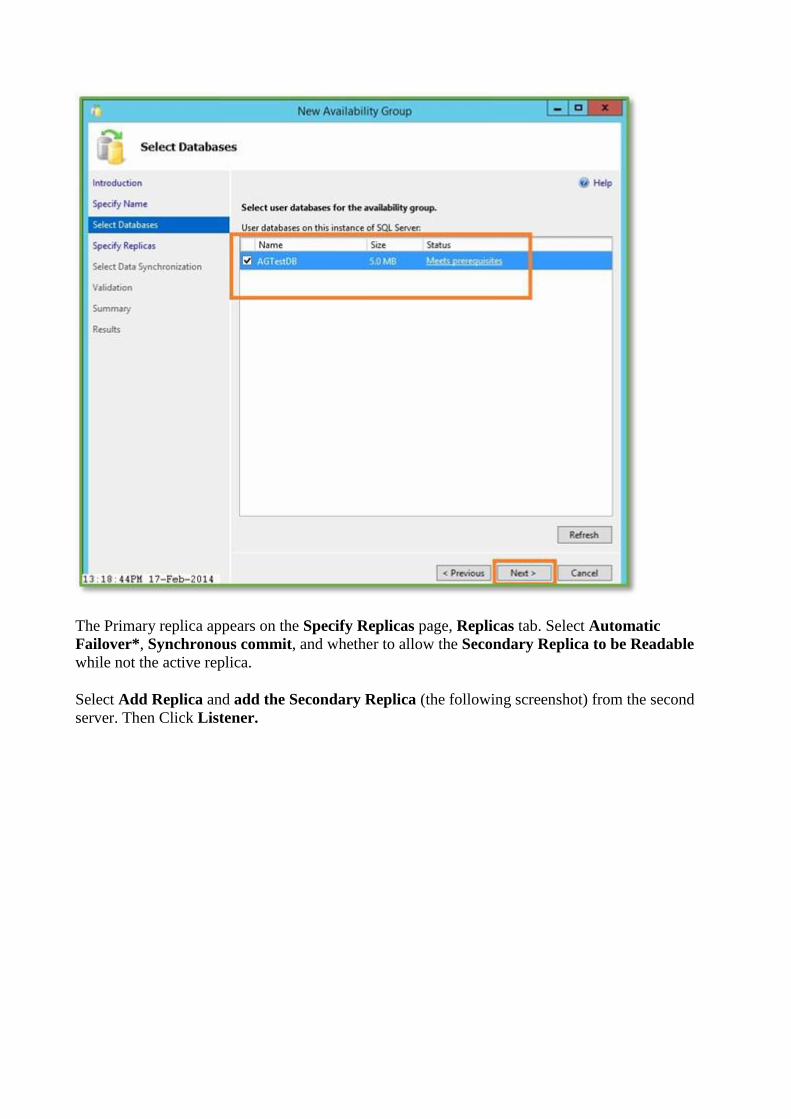
Select Databases to add to the Availability Group. The previously created Database appears, is
selected by default, and Meets Prerequisites. Click Next.
The Primary replica appears on the Specify Replicas page, Replicas tab. Select Automatic
Failover*, Synchronous commit, and whether to allow the Secondary Replica to be Readable
while not the active replica.
Select Add Replica and add the Secondary Replica (the following screenshot) from the second
server. Then Click Listener.
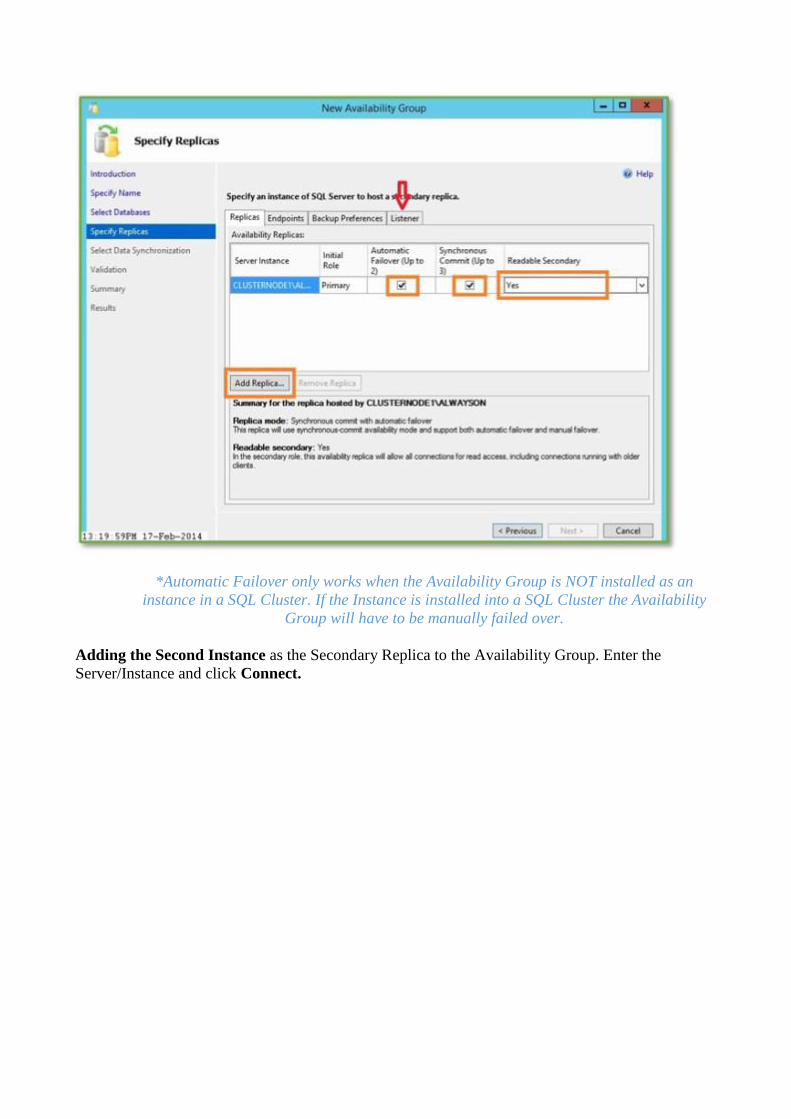
*Automatic Failover only works when the Availability Group is NOT installed as an
instance in a SQL Cluster. If the Instance is installed into a SQL Cluster the Availability
Group will have to be manually failed over.
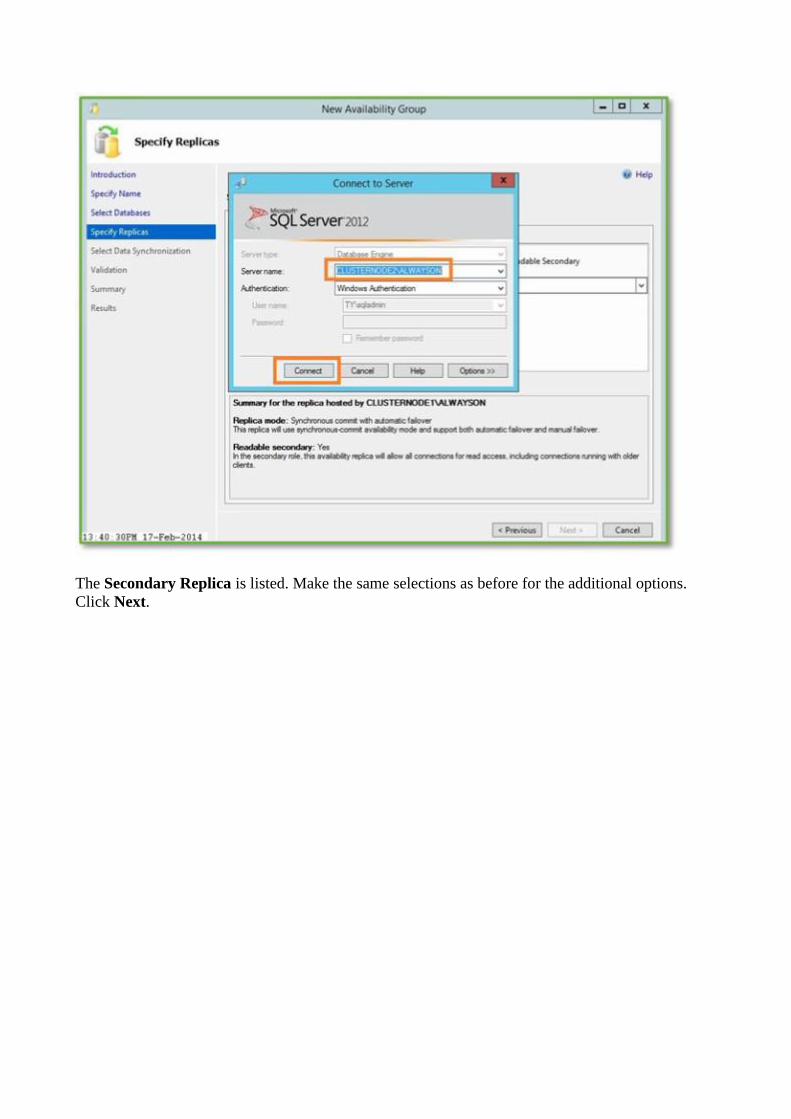
Adding the Second Instance as the Secondary Replica to the Availability Group. Enter the
Server/Instance and click Connect.
The Secondary Replica is listed. Make the same selections as before for the additional options.
Click Next.
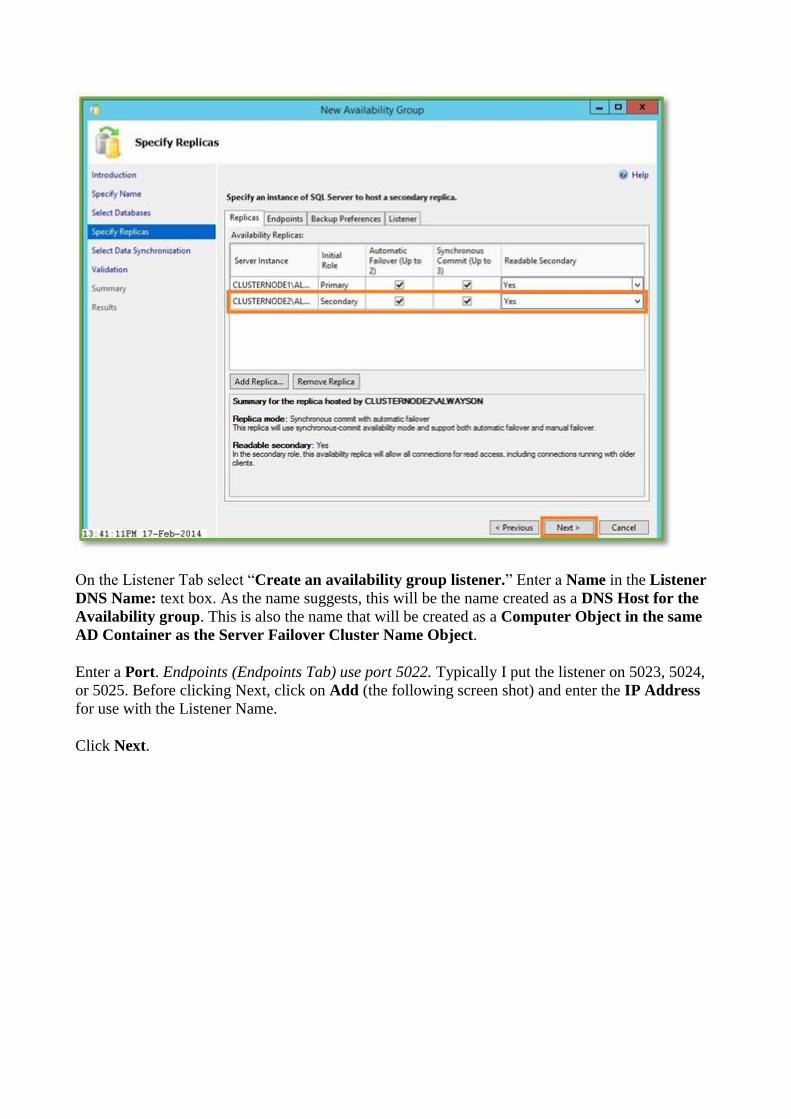
On the Listener Tab select “Create an availability group listener.” Enter a Name in the Listener
DNS Name: text box. As the name suggests, this will be the name created as a DNS Host for the
Availability group. This is also the name that will be created as a Computer Object in the same
AD Container as the Server Failover Cluster Name Object.
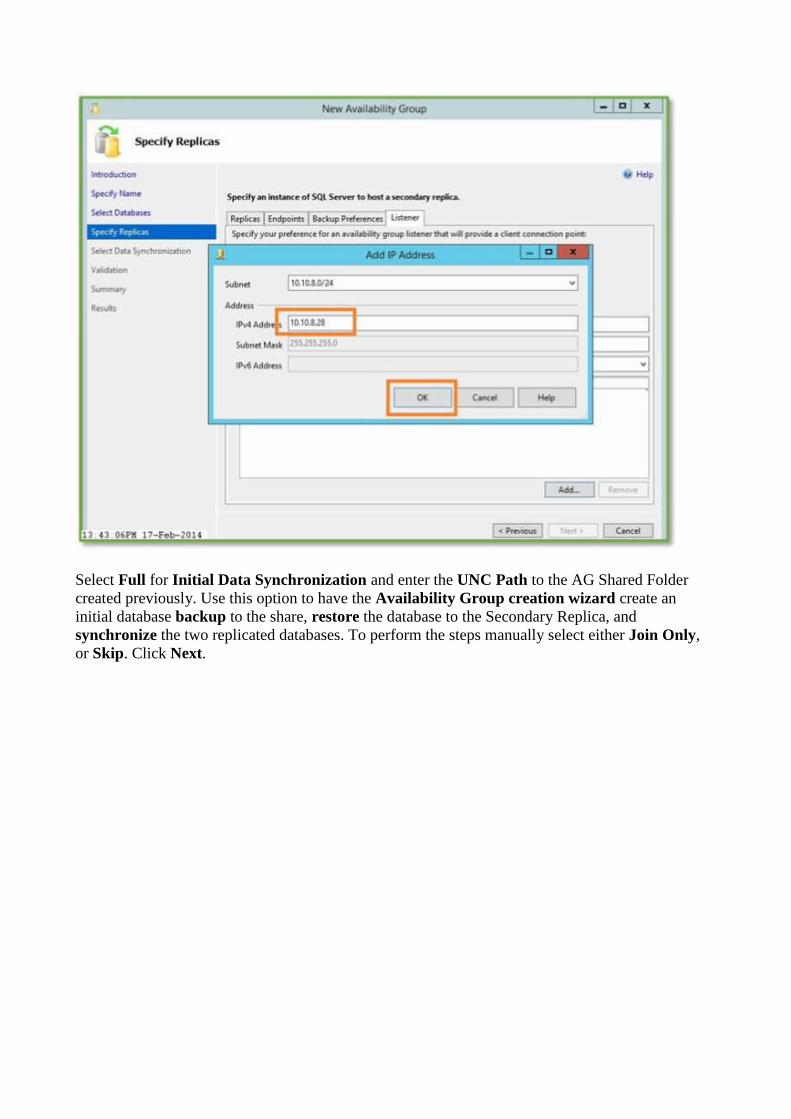
Enter a Port. Endpoints (Endpoints Tab) use port 5022. Typically I put the listener on 5023, 5024,
or 5025. Before clicking Next, click on Add (the following screen shot) and enter the IP Address
for use with the Listener Name.
Click Next.
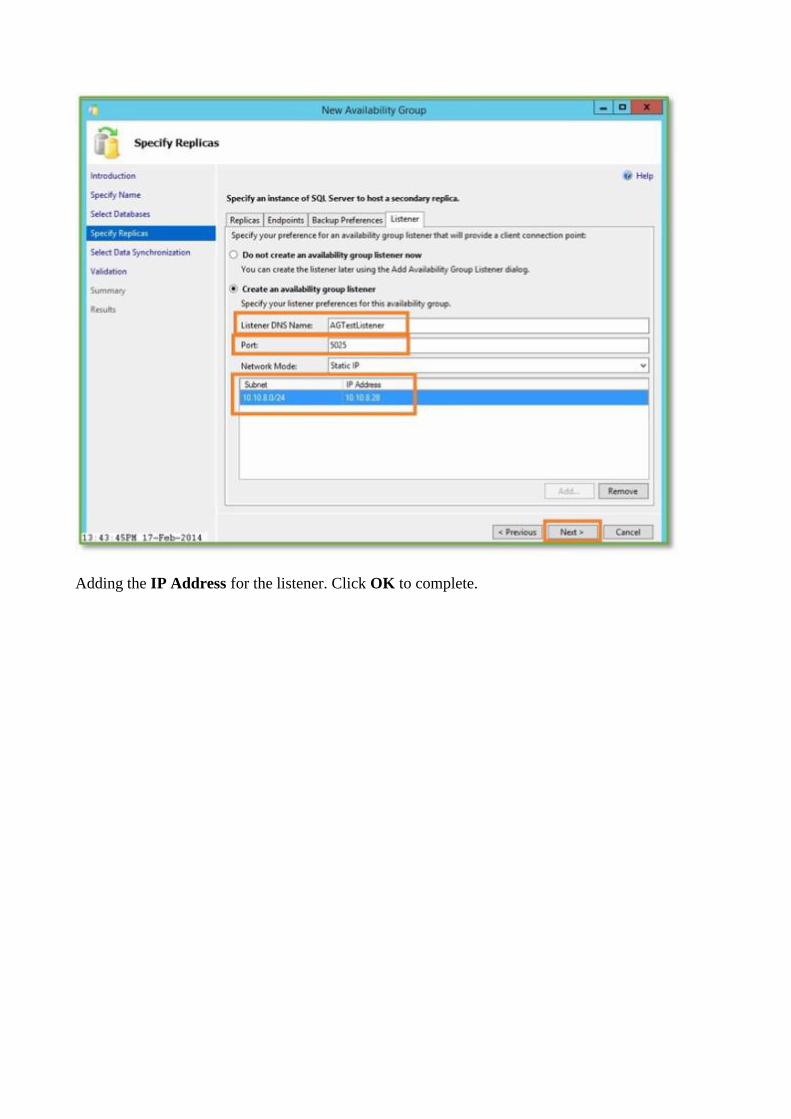
Adding the IP Address for the listener. Click OK to complete.
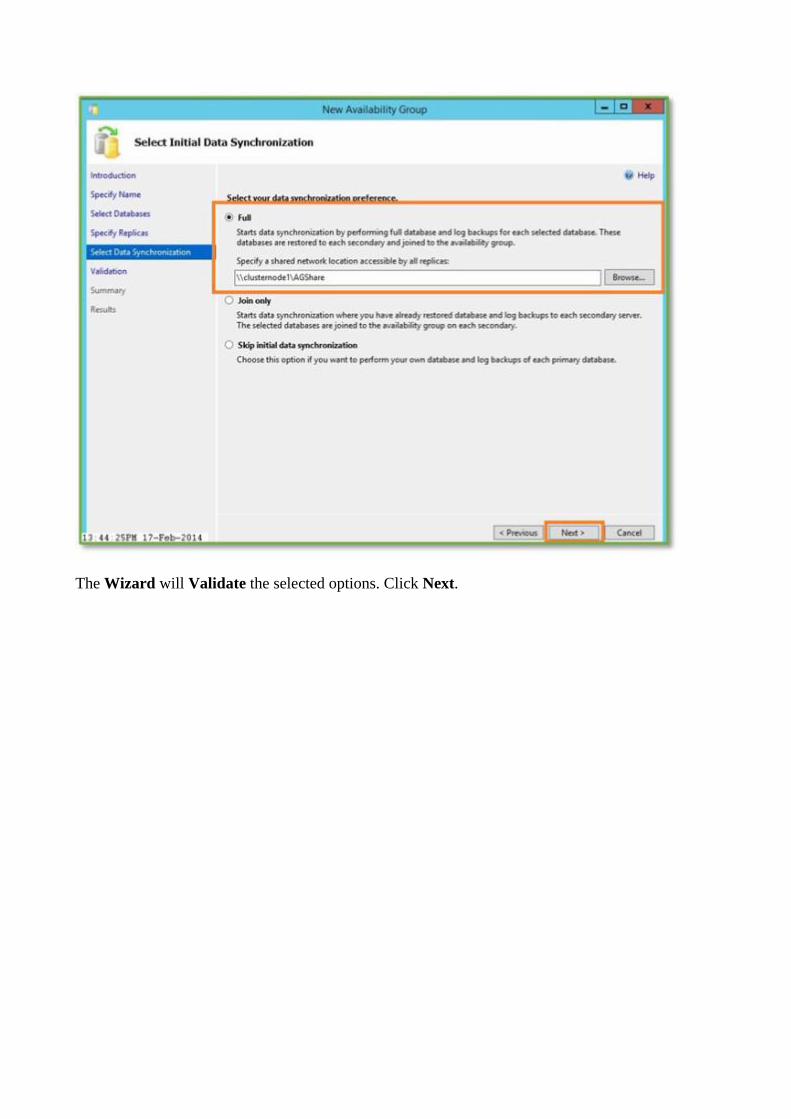
Select Full for Initial Data Synchronization and enter the UNC Path to the AG Shared Folder
created previously. Use this option to have the Availability Group creation wizard create an
initial database backup to the share, restore the database to the Secondary Replica, and
synchronize the two replicated databases. To perform the steps manually select either Join Only,
or Skip. Click Next.
The Wizard will Validate the selected options. Click Next.
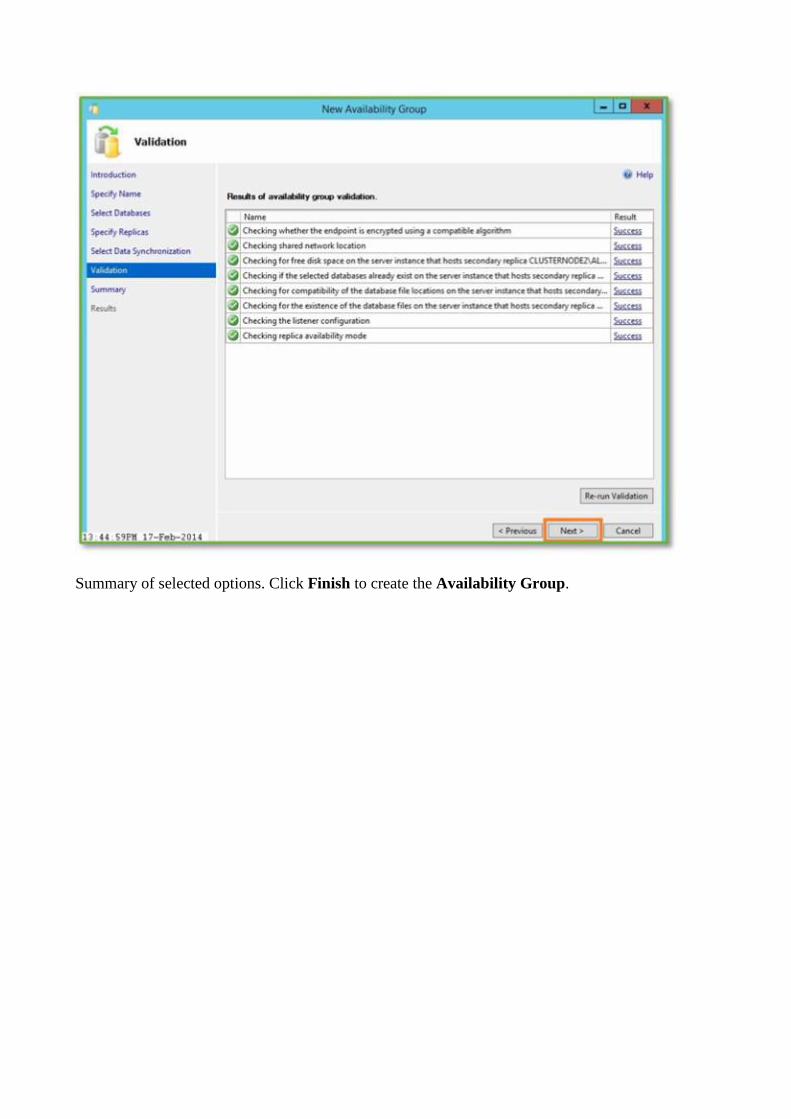
Summary of selected options. Click Finish to create the Availability Group.
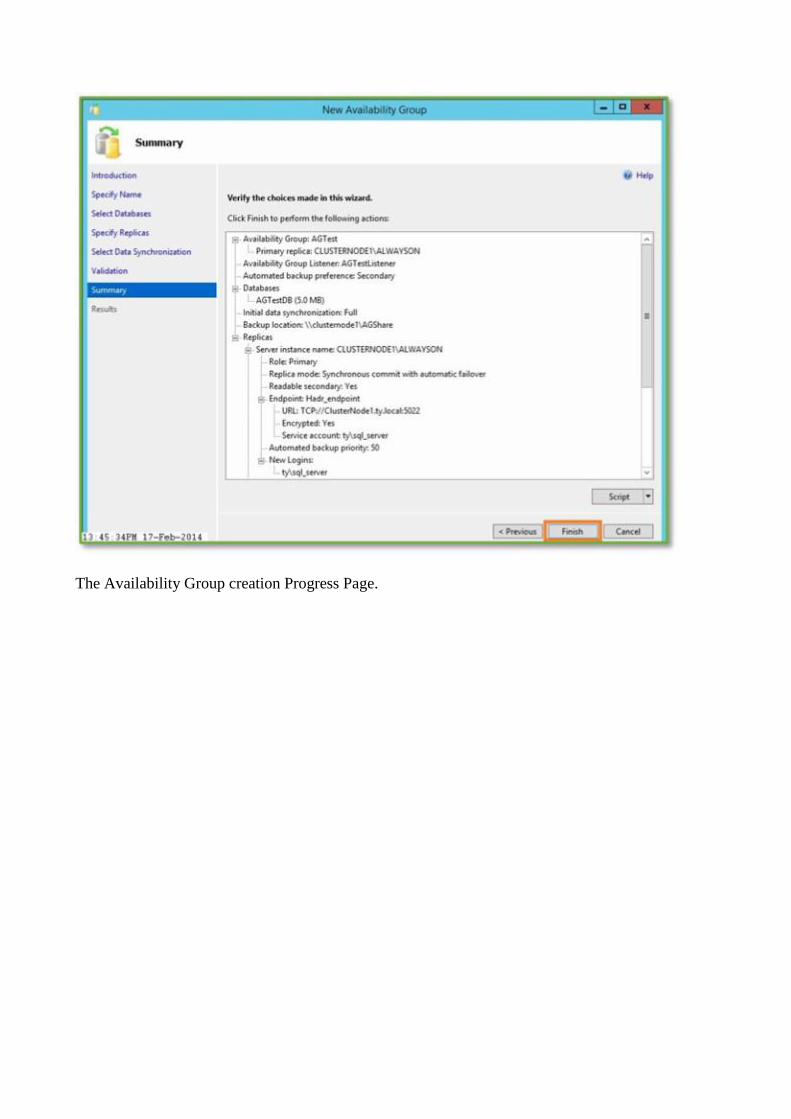
The Availability Group creation Progress Page.

The Availability Group creation Results Page. Click Close. The Availability Group has been
created.
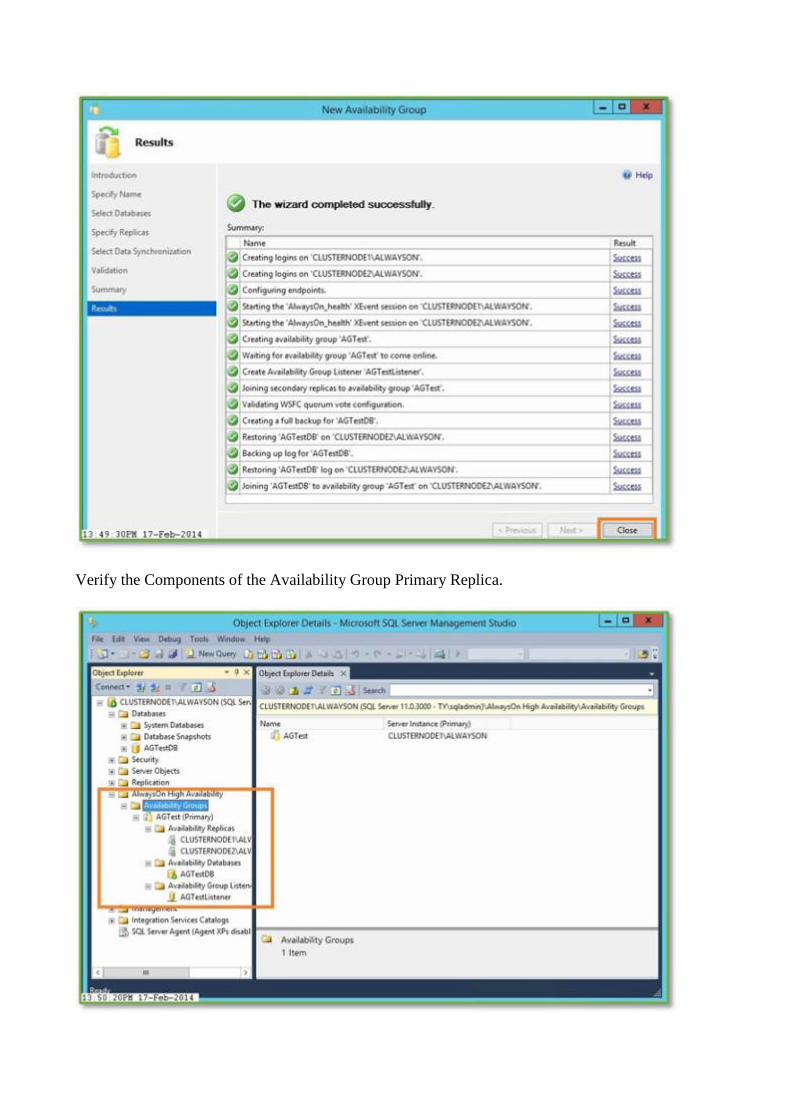
Verify the Components of the Availability Group Primary Replica.
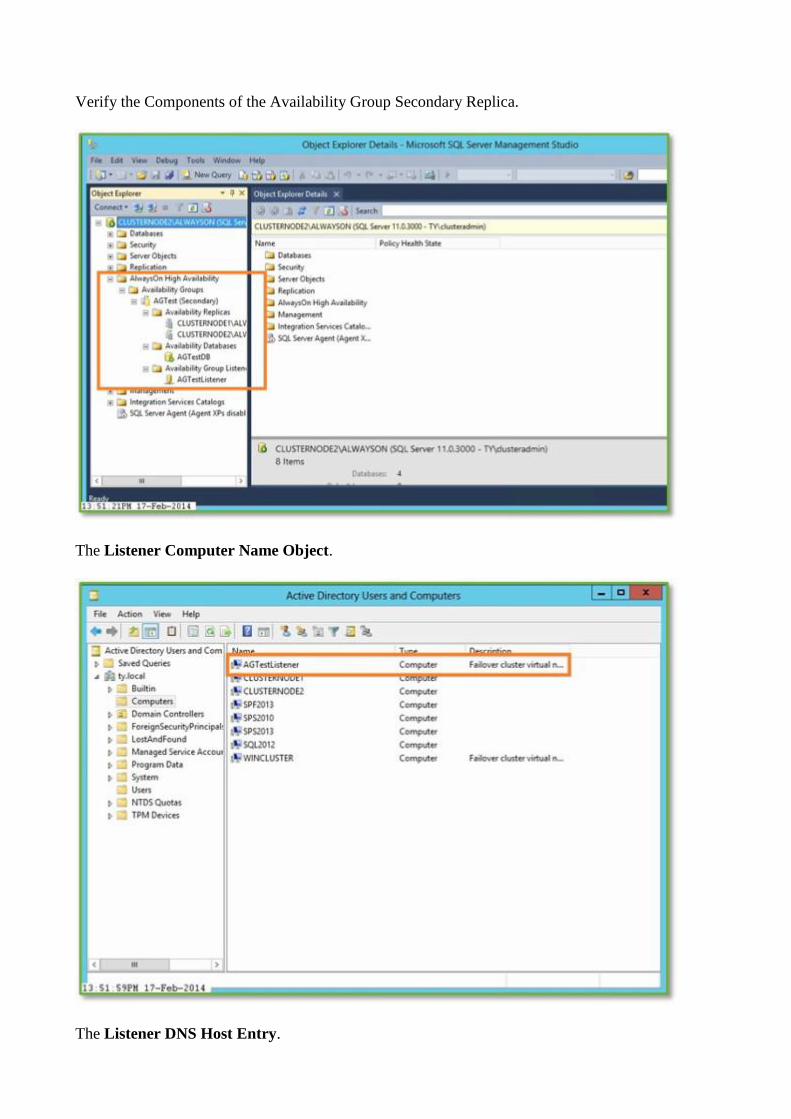
Verify the Components of the Availability Group Secondary Replica.
The Listener Computer Name Object.
The Listener DNS Host Entry.
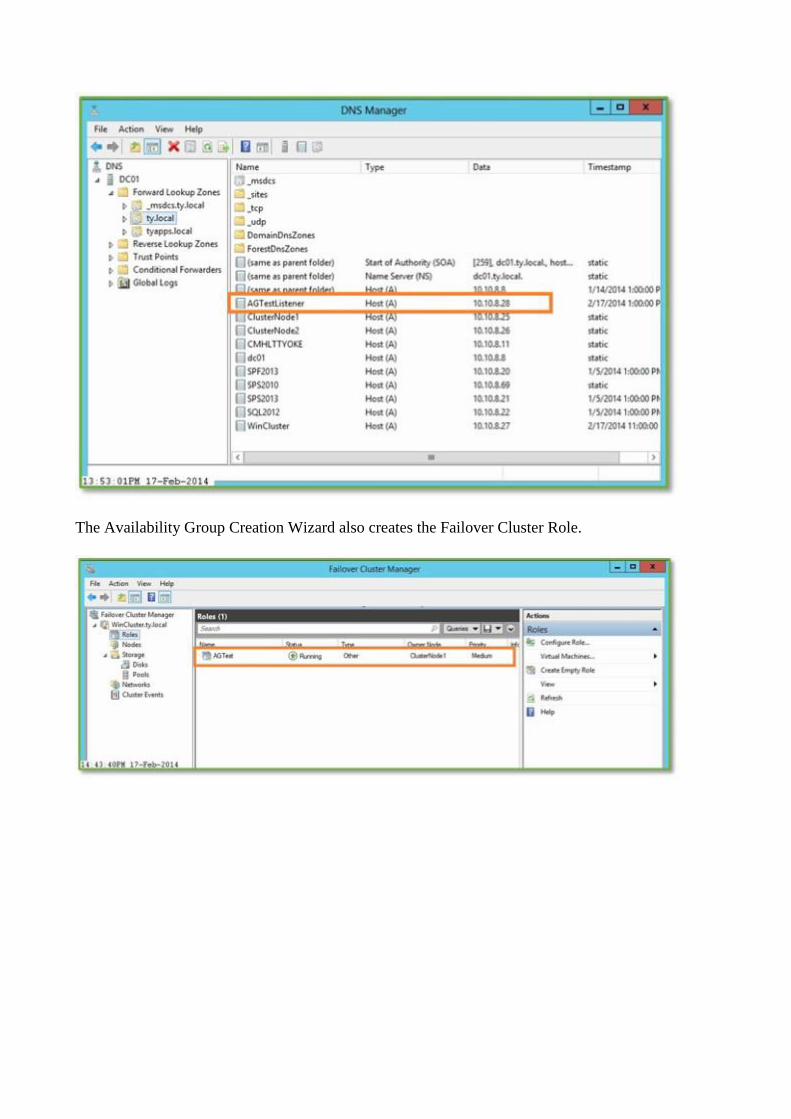
The Availability Group Creation Wizard also creates the Failover Cluster Role.