sprint m900 moment ug eng
TRANSCRIPT

8/6/2019 Sprint M900 Moment Ug Eng
http://slidepdf.com/reader/full/sprint-m900-moment-ug-eng 1/212
©2009 Sprint. SPRINT and the logo are trademarks of Sprint.Other marks are the property of their respective owners.
10/29/09
www.sprint.com
User Guide

8/6/2019 Sprint M900 Moment Ug Eng
http://slidepdf.com/reader/full/sprint-m900-moment-ug-eng 2/212
SPH-M900_UG_CJ05_PS_102909_F2
Consejo: Para encontrar esta guía para usuarios en español,por favor visita a www.sprint.com y haz clic enSupport > Phones & Devices.
To find this user guide in Spanish, please visitwww.sprint.com and click Support > Phones &
Devices.
Important Privacy Message – Sprint’s policies often do notapply to third-party applications. Third-party applications mayaccess your personal information or require Sprint to discloseyour customer information to the third-party applicationprovider. To find out how a third-party application will collect,access, use, or disclose your personal information, check theapplication provider’s policies, which can usually be found on
their website. If you aren’t comfortable with the third-partyapplication’s policies, don’t use the application.

8/6/2019 Sprint M900 Moment Ug Eng
http://slidepdf.com/reader/full/sprint-m900-moment-ug-eng 3/212
Table of Contents
Introduction . . . . . . . . . . . . . . . . . . . . . . . . . . . . . . . iYour Device’s Menu. . . . . . . . . . . . . . . . . . . . . . . . i
Section 1: Getting Started . . . . . . . . . . . . . . . . . 1
1A. Setting Up Service . . . . . . . . . . . . . . . . . . . 2
Setting Up Your Device . . . . . . . . . . . . . . . . . . . . . . 2
Activating Your Device . . . . . . . . . . . . . . . . . . . . . . 3
Setting Up Your Voicemail . . . . . . . . . . . . . . . . . . . 4
Sprint Account Passwords . . . . . . . . . . . . . . . . . . . 5Getting Help . . . . . . . . . . . . . . . . . . . . . . . . . . . . . . . 5
Section 2: Your Device . . . . . . . . . . . . . . . . . . . . 7
2A. Device Basics . . . . . . . . . . . . . . . . . . . . . . . 8
Your Device . . . . . . . . . . . . . . . . . . . . . . . . . . . . . . . . 8
Viewing the Display Screen . . . . . . . . . . . . . . . . . 12
Turning Your Device On and Off . . . . . . . . . . . . . 15
Battery and Charger . . . . . . . . . . . . . . . . . . . . . . . 15
Navigation and Customization . . . . . . . . . . . . . . 17
Displaying Your Phone Number . . . . . . . . . . . . . 29
Making and Answering Calls . . . . . . . . . . . . . . . 29
Entering Text with Onscreen Keyboard . . . . . . . 36
Entering Text using the QWERTY Keyboard . . 39
Creating a Google Account . . . . . . . . . . . . . . . . 43
2B. Settings . . . . . . . . . . . . . . . . . . . . . . . . . . . . 45
Sound Settings . . . . . . . . . . . . . . . . . . . . . . . . . . . 45
Display Settings . . . . . . . . . . . . . . . . . . . . . . . . . . . 48
Location Settings . . . . . . . . . . . . . . . . . . . . . . . . . . 50
Messaging Settings . . . . . . . . . . . . . . . . . . . . . . . 51
Call Settings . . . . . . . . . . . . . . . . . . . . . . . . . . . . . . 52
Airplane Mode . . . . . . . . . . . . . . . . . . . . . . . . . . . . 53
TTY Use With Sprint Service . . . . . . . . . . . . . . . . 53Security Settings . . . . . . . . . . . . . . . . . . . . . . . . . . 54
2C. Call Log . . . . . . . . . . . . . . . . . . . . . . . . . . . . 60
Viewing Call Log . . . . . . . . . . . . . . . . . . . . . . . . . . 60
Call Log Options . . . . . . . . . . . . . . . . . . . . . . . . . . 61
Checking a Missed Call . . . . . . . . . . . . . . . . . . . . 62
Making a Call From Call Log . . . . . . . . . . . . . . . 63
Saving a Number From History . . . . . . . . . . . . . 63Altering a Number From History . . . . . . . . . . . . . 64
Tip: Looking for something? If you don’t see it in the headingslisted here, try the Index on page 191.

8/6/2019 Sprint M900 Moment Ug Eng
http://slidepdf.com/reader/full/sprint-m900-moment-ug-eng 4/212
Erasing the Call Log . . . . . . . . . . . . . . . . . . . . . . . 64
2D. Contacts . . . . . . . . . . . . . . . . . . . . . . . . . . . 65
Adding a New Contacts Entry . . . . . . . . . . . . . . 65
Saving a Phone Number . . . . . . . . . . . . . . . . . . 67
Editing Sync Groups . . . . . . . . . . . . . . . . . . . . . . 67
Contacts Menu Options . . . . . . . . . . . . . . . . . . . 68
Contacts Entry Options . . . . . . . . . . . . . . . . . . . . 69
Editing a Contacts Entry . . . . . . . . . . . . . . . . . . . 70
Adding a Number to a Contacts Entry . . . . . . . 71
Editing a Contacts Entry’s Number . . . . . . . . . . 71
Selecting a Ringer Type for an Entry . . . . . . . . 72
Assigning a Picture to an Entry . . . . . . . . . . . . . 72
Deleting Entries . . . . . . . . . . . . . . . . . . . . . . . . . . . 73Adding Entries to Your Favorites . . . . . . . . . . . . 73
2E. Calendar & Tools . . . . . . . . . . . . . . . . . . . . 74
Before You Begin . . . . . . . . . . . . . . . . . . . . . . . . . 74
Calendar . . . . . . . . . . . . . . . . . . . . . . . . . . . . . . . . 74
File Viewer . . . . . . . . . . . . . . . . . . . . . . . . . . . . . . . 79
Alarm Clock . . . . . . . . . . . . . . . . . . . . . . . . . . . . . . 79
Calculator . . . . . . . . . . . . . . . . . . . . . . . . . . . . . . . . 81Updating Your Device . . . . . . . . . . . . . . . . . . . . . 81
Updating Your Profile . . . . . . . . . . . . . . . . . . . . . . 83
Updating Your PRL . . . . . . . . . . . . . . . . . . . . . . . . 83
2F. Voice Services . . . . . . . . . . . . . . . . . . . . . 84
Automatic Speech Recognition (ASR) . . . . . . . . 84
Sending a Message . . . . . . . . . . . . . . . . . . . . . . . 87
Looking Up a Contact . . . . . . . . . . . . . . . . . . . . . . 89
ASR Menus and Options . . . . . . . . . . . . . . . . . . . 89
2G. microSD Card . . . . . . . . . . . . . . . . . . . . . . 92
Your Device’s microSD Card and Adapter . . . . 92
Connecting Your Device to Your Computer . . . 94
microSD Card Settings . . . . . . . . . . . . . . . . . . . . . 95
Important Connection Information . . . . . . . . . . . 96
2H. Camera . . . . . . . . . . . . . . . . . . . . . . . . . . . . 97
Taking Pictures . . . . . . . . . . . . . . . . . . . . . . . . . . . . 97
Recording Videos . . . . . . . . . . . . . . . . . . . . . . . . 102
2I. Bluetooth . . . . . . . . . . . . . . . . . . . . . . . . . 105
Turning Bluetooth On and Off . . . . . . . . . . . . . . 105
Using the Bluetooth Settings Menu . . . . . . . . . 106
Pairing Bluetooth Devices . . . . . . . . . . . . . . . . . 108
Sending Contacts via Bluetooth . . . . . . . . . . . . 109

8/6/2019 Sprint M900 Moment Ug Eng
http://slidepdf.com/reader/full/sprint-m900-moment-ug-eng 5/212
Disconnecting Bluetooth ConnectionDuring an Active Call . . . . . . . . . . . . . . . . . . . . . 110
Section 3: Sprint Service. . . . . . . . . . . . . . . . 113
3A. Sprint Service: The Basics . . . . . . . . . . 114
Visual Voicemail . . . . . . . . . . . . . . . . . . . . . . . . . . 114
Text Messaging (SMS) . . . . . . . . . . . . . . . . . . . . 119Multimedia Messaging (MMS) . . . . . . . . . . . . . 121
Caller ID . . . . . . . . . . . . . . . . . . . . . . . . . . . . . . . . . 125
Call Waiting . . . . . . . . . . . . . . . . . . . . . . . . . . . . . . 125
Making a 3-Way Call . . . . . . . . . . . . . . . . . . . . . . 126
Call Forwarding . . . . . . . . . . . . . . . . . . . . . . . . . . 126
Roaming . . . . . . . . . . . . . . . . . . . . . . . . . . . . . . . . 127
3B. Web and Data Services . . . . . . . . . . . . . 131Getting Started With Data Services . . . . . . . . . 131
Navigating the Web . . . . . . . . . . . . . . . . . . . . . . . 133
Wi-Fi . . . . . . . . . . . . . . . . . . . . . . . . . . . . . . . . . . . . 138
Email . . . . . . . . . . . . . . . . . . . . . . . . . . . . . . . . . . . 140
Instant Messaging . . . . . . . . . . . . . . . . . . . . . . . . 152
Using the Android Market . . . . . . . . . . . . . . . . . 153
Applications . . . . . . . . . . . . . . . . . . . . . . . . . . . . . 154Data Services FAQs . . . . . . . . . . . . . . . . . . . . . . . 155
3C. Entertainment: TV and Music . . . . . . . 156
TV . . . . . . . . . . . . . . . . . . . . . . . . . . . . . . . . . . . . . . 156
Music – Amazon MP3 . . . . . . . . . . . . . . . . . . . . 157
Streaming Music . . . . . . . . . . . . . . . . . . . . . . . . . 159
NASCAR . . . . . . . . . . . . . . . . . . . . . . . . . . . . . . . . 160
NFL Mobile Live . . . . . . . . . . . . . . . . . . . . . . . . . . 161
YouTube . . . . . . . . . . . . . . . . . . . . . . . . . . . . . . . . 162
3D. GPS Navigation . . . . . . . . . . . . . . . . . . . 164
GPS Services . . . . . . . . . . . . . . . . . . . . . . . . . . . . 164
Google Maps . . . . . . . . . . . . . . . . . . . . . . . . . . . . 164
Sprint Navigation . . . . . . . . . . . . . . . . . . . . . . . . . 166
Getting Driving Directions . . . . . . . . . . . . . . . . . 167
Section 4: Safety and Warranty
Information . . . . . . . . . . . . . . . . . . . . . . . . . . . . 173
4A. Important Safety Information . . . . . . . 174
General Precautions . . . . . . . . . . . . . . . . . . . . . . 174
Maintaining Safe Use of and Access toYour Phone . . . . . . . . . . . . . . . . . . . . . . . . . . . . . 175
Using Your Phone With a Hearing
Aid Device . . . . . . . . . . . . . . . . . . . . . . . . . . . . . . 176Caring for the Battery . . . . . . . . . . . . . . . . . . . . . 178
Radio Frequency (RF) Energy . . . . . . . . . . . . . 179

8/6/2019 Sprint M900 Moment Ug Eng
http://slidepdf.com/reader/full/sprint-m900-moment-ug-eng 6/212
Owner’s Record . . . . . . . . . . . . . . . . . . . . . . . . . 181
User Guide Proprietary Notice . . . . . . . . . . . . . 181
4B. Manufacturer’s Warranty . . . . . . . . . . . . 182
Manufacturer’s Warranty . . . . . . . . . . . . . . . . . . 182
Index. . . . . . . . . . . . . . . . . . . . . . . . . . . . . . . . . . . 191

8/6/2019 Sprint M900 Moment Ug Eng
http://slidepdf.com/reader/full/sprint-m900-moment-ug-eng 7/212
i
Introduction
This User Guide introduces you to Sprint® service andall the features of your new device. It’s divided into four
sections: Section 1: Getting Started
Section 2: Your Device
Section 3: Sprint Service Features
Section 4: Safety and Warranty Information
Your Device’s Menu
The following table outlines your device’s main menustructure. For more information about using your
device’s menus, see “Navigation and Customization”on page 17.
From the Home screen, press to open themenu:
Add ( )
Wallpaper ( )
Search ( )
Notifications ( )
Settings ( )
Device menus with additional options (“sub-options”)appear with adjacent to the list entry.
Tap this onscreen button to reveal these additionaloptions and features.
Note: Because of updates in phone software, this printedguide may not be the most current version for your
phone. Visit www.sprint.com and sign on to My Sprintto access the most recent version of the user guide.
WARNING: Please refer to the Important Safety Information section on page 174 to learn about informationthat will help you safely use your phone. Failure toread and follow the Important Safety Informationin this phone guide may result in serious bodilyinjury, death, or property damage.

8/6/2019 Sprint M900 Moment Ug Eng
http://slidepdf.com/reader/full/sprint-m900-moment-ug-eng 8/212
ii
> Add
1: Shortcuts
1: Applications 2: Bookmark3: Contact 4: Gmail label5: Music playlist
2: Widgets
1: Analog clock 2: Calendar3: Music 4: NFL Mobile Live5: Picture frame 6: Search7: SprintTV 8: WxWidget (large)9: WxWidget (small)
3: Folders
1: New folder 2: All contacts
3: Contacts with phone numbers4: Exchange Contacts 5: My Contacts6: Starred contacts
4: Wallpapers
1: Pictures 2: Wallpaper gallery
> Wallpaper
1: Pictures
2: Wallpaper gallery
> Search
> Notifications
> Settings > Wireless controls
1: Wi-Fi (On/Off)
2: Wi-Fi settings
1: Wi-Fi 2: Network notification (On/Off)3: Add Wi-Fi network
3: Bluetooth (On/Off)
4: Bluetooth settings
1: Bluetooth 2: Device name
3: Discoverable (On/Off) 4: Scan for devices5: <detected Bluetooth devices>
5: Mobile networks
1: Data roaming (On/Off)2: Call Guard (On/Off)3: Data Roaming Guard (Default/Always ask/Never ask)4: System select (Home only/Automatic)
6: Airplane mode (On/Off)

8/6/2019 Sprint M900 Moment Ug Eng
http://slidepdf.com/reader/full/sprint-m900-moment-ug-eng 9/212
ii
> Settings > Call settings
1: Plus code dialing
2: Other Intl. Dialing
3: TTY
1: TTY Off 2: TTY HCO3: TTY VCO 4: TTY Full
> Settings > Sound & display
Sound settings:
1: Silent mode (On/Off)
2: Ringer volume
1: Use Incoming call volume for notifications
3: Media volume
4: Phone ringtone
1: Animato Tone 2: Beat Plucker3: Bell Phone 4: Bentley Dubs5: Carribean Ice 6: Ether Shake7: Friendly Ghost 8: Growl9: Insert Coin 10: Love Flute11: Medieval Jaunt 12: Romancing The Tone13: Samsung Tune 14: Sitar Versus Sitar15: Twirl Away 16: Very Alarmed
5: Phone vibrate (On/Off)
6: Notification ringtone
1: Beat Box Android 2: Caffeinated Rattlesnake3: Captain’s Log 4: Dear Deer5: Don’t Panic 6: Heaven
7: Highwire 8: Kzurb Sonar9: Look At Me 10: Missed It11: On The Hunt 12: Ta Da13: Tinkerbell 14: Voila
7: Audible touch tones (On/Off)
8: Vibrate touch dial pad (On/Off)
9: Audible selection (On/Off)
10: SD card notifications (On/Off)
Display settings:
1: Orientation (On/Off)
2: Animation (On/Off)
3: Auto Brightness (On/Off)
4: Brightness

8/6/2019 Sprint M900 Moment Ug Eng
http://slidepdf.com/reader/full/sprint-m900-moment-ug-eng 10/212
iv
5: Screen timeout
1: 15 seconds 2: 30 seconds3: 1 minute 4: 2 minutes5: 10 minutes 6: Never timeout
> Settings > Data synchronization
> Settings > Exchange ActiveSync
> Settings > Security & location
My Location sources:
1: Use wireless networks (On/Off)
2: Enable GPS satellites (On/Off)
Screen unlock pattern:
1: Require pattern (On/Off)
2: Use visible pattern (On/Off)
3: Use tactile feedback (On/Off)
4: Set unlock pattern
Passwords:
1: Visible passwords (On/Off)
> Settings > Applications
1: Unknown sources (On/Off)
2: Manage applications
3: Development
1: USB debugging (On/Off)2: Stay awake (On/Off)3: Allow mock locations (On/Off)
> Settings > SD card & phonestorage
External SD card:
1: Total space
2: Available space
3: Unmount SD card (On/Off)
4: Format SD card (On/Off)
Internal phone storage:
1: Available space
2: Factory data reset
> Settings > Date & time
1: Automatic (On/Off)

8/6/2019 Sprint M900 Moment Ug Eng
http://slidepdf.com/reader/full/sprint-m900-moment-ug-eng 11/212
v
2: Set date
3: Select time zone
4: Set time
5: Use 24-hour format
6: Select date format
> Settings > Locale & text
Locale & text:
1: Select locale
Text settings:
1: Android keyboard (On/Off)
2: Android keyboard
1: Vibrate on keypress 2: Sound on keypress 3: Auto-capitalization 4: Quick fixes5: Show suggestions 6: Auto-complete
3: Device keyboard
1: Auto-replace 2: Auto-cap 3: Auto-punctuate
4: User dictionary
> Settings >About phone
1: System Updates
1: Update Firmware 2: Update Profile 3: Update PRL
2: Status
1: Battery status 2: Battery level3: Phone number 4: Network5: Signal strength 6: User Name7: PRL 8: Mobile network type9: Service state 10: Roaming11: Mobile network state 12: MEID13: Wi-Fi MAC address 14: Bluetooth address15: Up time
3: Legal information
1: Open source licenses 2: Google legal3: Privacy Alert from Sprint
4: System Tutorial
5: Model number
6: Firmware version
7: Baseband version
8: Kernel version
9: Build number

8/6/2019 Sprint M900 Moment Ug Eng
http://slidepdf.com/reader/full/sprint-m900-moment-ug-eng 12/212
vi
10: Hardware version
In Use Menu
Press to display the following options:
1: Show dialpad 2: Add call 3: End call 4: Mute/Unmute 5: Speaker On/Off 6: Bluetooth On/Off

8/6/2019 Sprint M900 Moment Ug Eng
http://slidepdf.com/reader/full/sprint-m900-moment-ug-eng 13/212
Section 1
Getting Started

8/6/2019 Sprint M900 Moment Ug Eng
http://slidepdf.com/reader/full/sprint-m900-moment-ug-eng 14/212
2 1A. Setting Up Service
Setting Up Your Device (page 2)
Activating Your Device (page 3)
Setting Up Your Voicemail (page 4)
Sprint Account Passwords (page 5)
Getting Help (page 5)
Setting Up Your Device1. Install the battery.
Remove the battery from its packaging.
Insert the battery into the opening in the back ofthe device, making sure the connectors align.Gently press down to secure the battery.
Position the battery cover over the battery
compartment and press down until you hear aclick.
1A. Setting Up Service

8/6/2019 Sprint M900 Moment Ug Eng
http://slidepdf.com/reader/full/sprint-m900-moment-ug-eng 15/212
1A. Setting Up Service 3
2. Press to turn the device on.
If your device is activated, it will turn on, search forSprint service, and enter standby mode.
3. Make your first call.
From the Home screen, touch to access theonscreen dialer.
● If your device is locked, press tounlock the screen.
Use the onscreen dialpad to enter a phonenumber.
Tap . (The phone number appearswithin the Talk button.)
Activating Your Device If you purchased your device at a Sprint Store, it is
probably activated and ready to use.
If you received your device in the mail and it is for a new
Sprint account or a new line of service, it is designed toactivate automatically. To confirm your activation,make a phone call.
1234567
WARNING: If your device has a touch screen display, pleasenote that a touch screen responds best to a lighttouch from the pad of your finger or a non-metallic stylus. Using excessive force or a metallicobject when pressing on the touch screen maydamage the tempered glass surface and void
the warranty. See “Manufacturer’s Warranty” onpage 182.
Note: Your device’s battery should have enough charge foryour device to turn on and find a signal, set up yourvoicemail, and make a call. You should fully chargeyour battery as soon as possible.

8/6/2019 Sprint M900 Moment Ug Eng
http://slidepdf.com/reader/full/sprint-m900-moment-ug-eng 16/212
4 1A. Setting Up Service
If you received your device in the mail and you are
activating a new device for an existing number on your
account, you will need to go online to activate yournew device.
From your computer’s Web browser, go towww.sprint.com/activate and complete theonscreen instructions to activate your device.
When you have finished, make a device call toconfirm your activation. If your device is still notactivated or you do not have access to the Internet,contact Sprint Customer Service at 1-888-211-4727 for assistance.
Setting Up Your Voicemail
Your device automatically transfers all unansweredcalls to your voicemail, even if your device is in use orturned off. You should set up your Sprint Voicemail and
personal greeting as soon as your device is activated.Always use a passcode to protect against unauthorizedaccess.
1. From standby mode, touch and hold .
2. Follow the system prompts to:
Create your passcode.
Record your name announcement.
Record your greeting.
For more information about using your Visual
Voicemail, see “Visual Voicemail” on page 114.
Tip: Do not press while the device is being activated.
Pressing cancels the activation process.
Note: If you are having difficulty with activation, contact SprintCustomer Service by dialing 1-888-211-4727 from anyother phone.
Note: Voicemail Passcode Sprint strongly recommends that you create apasscode when setting up your voicemail to protectagainst unauthorized access. Without a passcode,anyone who has access to your device is able toaccess your voicemail messages.

8/6/2019 Sprint M900 Moment Ug Eng
http://slidepdf.com/reader/full/sprint-m900-moment-ug-eng 17/212
1A. Setting Up Service 5
Sprint Account Passwords
As a Sprint customer, you enjoy unlimited access toyour personal account information, your voicemailaccount, and your data services account. To ensure
that no one else has access to your information, youwill need to create passwords to protect your privacy.
Account Username and Password
If you are the account owner, you will create an accountusername and password when you sign on towww.sprint.com. (Click Need to register for access? to getstarted.) If you are not the account owner (if someoneelse receives the bill for your Sprint service), you canget a sub-account password at www.sprint.com.
Voicemail Password
You’ll create your voicemail password (or passcode)when you set up your voicemail. See “Setting Up YourVoicemail” on page 4 for more information on yourvoicemail password.
Data Services Password
With your Sprint device, you may elect to set up anoptional data services password to control access andauthorize Premium Service purchases.
For more information, or to change your passwords,
sign on to www.sprint.com or call Sprint CustomerService at 1-888-211-4727.
Getting Help
Managing Your Account
Online: www.sprint.com Access your account information.
Check your minutes used (depending on your Sprintservice plan).
View and pay your bill.
Enroll in Sprint online billing and automatic payment
Purchase accessories.
Shop for the latest Sprint phones. View available Sprint service plans and options.

8/6/2019 Sprint M900 Moment Ug Eng
http://slidepdf.com/reader/full/sprint-m900-moment-ug-eng 18/212
6 1A. Setting Up Service
Learn more about data services and other productslike Sprint Picture Mail, games, ringers, screensavers, and more.
From Your Sprint Phone
Tap to check minute usage
and account balance. Tap to make a payment.
Tap to access a summaryof your Sprint service plan or get answers to otherquestions.
From Any Other Phone
Sprint Customer Service: 1-888-211-4727.
Business Customer Service: 1-800-927-2199.
Sprint 411
Sprint 411 gives you access to a variety of servicesand information, including residential, business, andgovernment listings; movie listings or showtimes;driving directions, restaurant reservations, and major
local event information. You can get up to three piecesof information per call, and the operator canautomatically connect your call at no additional charge.
There is a per-call charge to use Sprint 411, and youwill be billed for airtime.
Tap .
Sprint Operator Services
Sprint Operator Services provides assistance when youplace collect calls or when you place calls billed to alocal telephone calling card or third party.
Tap .
For more information or to see the latest in productsand services, visit us online at www.sprint.com.
*4
*3
*2
411
0

8/6/2019 Sprint M900 Moment Ug Eng
http://slidepdf.com/reader/full/sprint-m900-moment-ug-eng 19/212
Section 2
Your Device

8/6/2019 Sprint M900 Moment Ug Eng
http://slidepdf.com/reader/full/sprint-m900-moment-ug-eng 20/212
8 2A. Device Basics
Your Device (page 8) Viewing the Display Screen (page 12)
Turning Your Device On and Off (page 15)
Navigation and Customization (page 17)
Displaying Your Phone Number (page 29)
Making and Answering Calls (page 29)
Entering Text with Onscreen Keyboard (page 36)
Creating a Google Account (page 43)
Your Device
Tip: Device Software Upgrades – Updates to your device’ssoftware may become available from time to time. Sprintwill automatically upload critical updates to your device.You can also use the menu to check for and downloadupdates. From the Applications tab, tap About phone >
System Updates > Update Firmware to search for anddownload available updates.
Device software can also be updated via the SamsungPC Update tool. See “Updating Your Device” on page 81.
2A. Device Basics
Voicemail
3. DisplayScreen
8. ExternalSpeaker
4. MENU Key
1. Earpiece
2. Status BarIcons
5. HOME Key
6. TALK Key
12. Microphone
13. END/POWERKey
14. BACK Key
7. Optical Joystick
9. Mirror
10. CameraLens
11. Flash

8/6/2019 Sprint M900 Moment Ug Eng
http://slidepdf.com/reader/full/sprint-m900-moment-ug-eng 21/212
2A. Device Basics 9
Key Functions
1. Earpiece lets you hear the caller and automatedprompts.
2. Status Bar Icons provide information about yourdevice’s status and options, such as signalstrength, roaming, ringer setting, messaging, andbattery charge.
3. Display Screen displays all the information neededto operate your device, such as the call status, theContacts list, the date and time, and the signal andbattery strength.
4. MENU Key allows you to access your device’s main
functions menu: Add, Wallpaper, Search,Notifications, and Settings. While in a menu, pressto open a list of actions available from the currentscreen or onscreen option.
During an active call, press to open additional calloptions such as: Show dialpad, Add call (3-waycall), End call, Mute/Unmute, Speaker On/Off, orActivate/deactivate Bluetooth.
5. HOME Key returns you to the Home screen. Pressand hold to open the recently-used applicationswindow.
6. TALK Key allows you to place or receive calls,answer Call Waiting, use 3-Way Calling, or activateVoice Dial.
While a Contacts entry or phone number ishighlighted, tap to call that contact or phonenumber.
7. Optical Joystick lets you highlight and select (tap)onscreen items.
8. External Speaker lets you hear the different ringersand sounds. You can mute the ringer when
receiving incoming calls by pressing the volumebutton. The speaker also lets you hear the caller’svoice in speakerphone mode.
9. Mirror, as part of the built-in camera, lets you seeyourself when taking a self-portrait picture.
10. Camera Lens, as part of the built-in camera, this3.2 megapixel camera lets you take pictures and
videos.

8/6/2019 Sprint M900 Moment Ug Eng
http://slidepdf.com/reader/full/sprint-m900-moment-ug-eng 22/212
10 2A. Device Basics
11. Flash, as part of the built-in camera, is used duringlow-light conditions to provide an additional lightsource for pictures.
12. Microphone allows other callers to hear you clearlywhen you are speaking to them.
13. END/POWER Key lets you turn the device on or off,end a call, or turn off the LCD.
While not on an active call, press and hold todisplay the Phone options menu (Silent mode,Airplane mode, Power off).
14. BACK Key deletes characters from the display intext entry mode. When in a menu, pressing theBack key returns you to the previous menu, closes
a dialog box, or exits an onscreen menu/option.
15. Headset Jack allows you to plug in an optionalheadset for convenient, hands-free conversations.CAUTION! Inserting an accessory into the incorrect jack may damage the device.
16. Volume Button allows you to adjust the ringervolume in standby mode or adjust the voicevolume during a call.
17. Camera Button lets you activate the camera andcamcorder and take pictures and videos.
18. Speech to Action Button activates the Speech toAction (Voice Control) function that lets you dialphone numbers, launch applications, and launch
V o i c e m a i l
V o i c e m a i l
16. VolumeButton
15. Headset Jack 20. Light Sensors
18. Speech to ActionButton
17. CameraButton
19. Charger/AccessoryJack

8/6/2019 Sprint M900 Moment Ug Eng
http://slidepdf.com/reader/full/sprint-m900-moment-ug-eng 23/212
2A. Device Basics 1
other actions by speaking a name, command, or aphone number.
19. Charger/Accessory Jack allows you to connect thephone charger or a USB cable (included).CAUTION! Inserting an accessory into the incorrect jack may damage the device.
20. QWERTY Keyboard provides an alphanumericcharacter keyboard layout. Lets you enter numbers,letters, and characters, as well as navigate withinmenus.
21. Light sensors let you use the ambient light level toadjust the screen brightness/contrast.
In a bright light condition (outdoors), the sensors
cause the device to increase the brightness andcontrast for better viewing.
In a dim light condition (while talking on thephone) the sensors detect talk activity and lockthe keypad to prevent accidental key presses.
22. Search Key returns you to the Home screen andactivates the Google™ search field.
23. Shift/Symbols Key lets you toggle alphabetcharacters between mixed case, uppercase andlowercase. Character case remains as selecteduntil the Shift key is pressed again. In combinationwith the , lets you access symbol characters.
Landscape Phone Features
24. fn Key (Function) key, toggle to access thenumbers/symbols atop each key on the QWERTYkeyboard.
Landscape Mode
Voicemail
26. Space Key
28. Delete Key
27. Enter Key
23. Shift/SymbolsKey
22. Search
Key
24. Fn Key
25. Smiley Key
21. QWERTYKeyboard

8/6/2019 Sprint M900 Moment Ug Eng
http://slidepdf.com/reader/full/sprint-m900-moment-ug-eng 24/212
12 2A. Device Basics
25. Smiley Key (when used with the key) lets youaccess Smiley icons (Emoticons).
26. Space Key lets you add spaces between wordsand characters.
27. Enter Key lets you enter additional lines of text.
28. Delete Key deletes characters from the display intext entry mode.
Viewing the Display Screen
Your device’s display screen provides informationabout your device’s status and options. This listidentifies the symbols you’ll see on your device’sdisplay screen:
Status Bar – Service Icons
Activation Not Completed – Your automaticdevice activation process failed, please retry.
Signal Strength – Shows your current signalstrength. (More bars = stronger signal.)
No Service – Your device cannot find a usablesignal.
Airplane Mode On – Your device will not make orreceive calls, or provide data access. Localapplications are still available.
Roaming – Your device is “roaming” off the
Nationwide Sprint Network.3G Available – Sprint 1xRTT data service isactive.
3G Communicating – Sprint 1xRTT data serviceis active and communicating. When active, theicon is animated.
3G Dormant – Sprint 1xRTT data service iscurrently dormant.
Data Service Available – Sprint mobilebroadband data service (EVDO) is available.
Data Service Communicating – Sprint EVDOdata service is active and communicating (seepage 132.)
Data Service Unavailable – Data service iscurrently unavailable.
Status Bar – Service Icons

8/6/2019 Sprint M900 Moment Ug Eng
http://slidepdf.com/reader/full/sprint-m900-moment-ug-eng 25/212
2A. Device Basics 1
Status Bar – Status Icons
Call in Progress – A voice call is in progress.Audio is routed through either the earpiece orexternal speaker.
Bluetooth Call in Progress – A voice call is being
routed through a Bluetooth headset.Missed Call – You have missed an incomingcall.
Call Muted – The device microphone has beenmuted.
Speaker – The device’s speakerphone feature isenabled.
Battery Strength – Shows your current batterycharge level. (Icon shown is fully charged.)
Battery Charging – Shows your current batterycharge level and indicates it is charging.
Battery Low – Shows your current batterycharge level is very low.
Battery Critical – Shows your current batterycharge level requires attention and your devicewill soon shut off.
Device Power Critical – Shows your currentbattery only has three percent power remainingand will immediately shutdown.
Bluetooth Active – Bluetooth technology is
active and enabled.Bluetooth Connected – Bluetooth technology isactive and communicating with an externaldevice.
GPS Location On – Your device’s locationfeature is on and available for location-basedservices such as GPS Navigation (seepage 164).
GPS Communicating – Your device’s locationfeature is on and communicating.
Wi-Fi Connected – Wi-Fi is connected, active,and communicating with a Wireless AccessPoint (WAP).
Wi-Fi Connection Issue – Wi-Fi is active but thereis a communication issue with the targetWireless Access Point (WAP).
Status Bar – Status Icons

8/6/2019 Sprint M900 Moment Ug Eng
http://slidepdf.com/reader/full/sprint-m900-moment-ug-eng 26/212
14 2A. Device Basics
MicroSD Unmounted – The internal microSDcard has been disconnected from the deviceand is now ready for either removal orformatting.
USB Connection – The device has detected anactive USB connection.
Sign-in/Sync Error – There has been an issuewith your connection to the Google server, oryou were not properly signed into your account.In order to use Google application or syncfeatures, you must set up and sign into an activeGoogle account.
Alarm Event– Shows you have an upcomingalarm event.
Silence All – All incoming sounds are turned off.
Vibrate Only – The ringer is set to vibrate only.
Media Playback – A media file is currently beingplayed back on the device.
Data Synchronization – Application sync isactive and synchronization is in progress forGmail, Calendar, and Contacts.
Status Bar – Status Icons
Download Successful – A recent softwaredownload was successfully downloaded.
Calendar Reminder – Shows you have areminder of an upcoming Calendar event.
Status Bar – Messaging Icons
Text Message – You have new text messages.
MMS Message – You have new multimediamessages.
Voicemail Message – You have new voicemailmessages.
Internet Email message – Shows you havereceived a new Intenet email message.
Moxier Outlook Email message – Shows youhave received a new Outlook email message viathe Work Email application.
Status Bar – Status Icons

8/6/2019 Sprint M900 Moment Ug Eng
http://slidepdf.com/reader/full/sprint-m900-moment-ug-eng 27/212
2A. Device Basics 1
Turning Your Device On and Off
Turning Your Device On
Press .
Once your device is on, it may display “Searching forService.” When your device finds a signal, it entersstandby mode – the device’s idle state. At this point,you are ready to begin making and receiving calls.
If your device is unable to find a signal after 15 minutesof searching, a Power Save feature is automaticallyactivated. When a signal is found, your deviceautomatically returns to standby mode.
In Power Save mode, your device searches for a signalperiodically without your intervention. You can alsoinitiate a search for Sprint service by pressing any key(when your device is turned on).
Turning Your Device Off
1. Press and hold for two seconds until yousee the powering-down animation on the displayscreen.
2. Touch to power Off the device.
Your screen remains blank while your device is off(unless the battery is charging).
Battery and Charger
Sprint-approved or Samsung-approved batteries andaccessories can be found at Sprint Stores or throughSamsung; or call 1-866-866-7509 to order. They’realso available at www.sprint.com.
Tip: The Power Save feature conserves your battery powerwhen you are in an area where there is no signal.
WARNING: Use only Sprint-approved or Samsung-approvedbatteries and chargers with your device. Thefailure to use a Sprint-approved or Samsung-approved battery and charger may increase therisk that your device will overheat, catch fire, orexplode, resulting in serious bodily injury, death,or property damage.

8/6/2019 Sprint M900 Moment Ug Eng
http://slidepdf.com/reader/full/sprint-m900-moment-ug-eng 28/212
16 2A. Device Basics
Battery Capacity
Your device is equipped with a Lithium Ion (Li-Ion)battery. It allows you to recharge your battery before it isfully drained. The battery provides up to 5 hours ofcontinuous digital talk time.
When the battery reaches 10% of its capacity, thebattery icon blinks. When there are approximately threepercent power (few minutes of talk time left) , the devicesounds an audible alert, displays a critical charge icon( ), and then turns off.
Installing the Battery
See “Setting Up Your Device” on page 2.
Removing the Battery
1. Make sure the power is off so that you don’t loseany stored numbers or messages.
2. Press the battery cover and slide it away fromcamera lens.
3. Carefully remove the battery from the device.
Note: Long backlight settings, searching for service, vibratemode, browser use, and other variables may reducethe battery’s talk and standby times.
Tip: Watch your device’s battery level indicator and charge thebattery before it runs out of power.
WARNING: Do not handle a damaged or leaking Li-Ionbattery as you can be burned.

8/6/2019 Sprint M900 Moment Ug Eng
http://slidepdf.com/reader/full/sprint-m900-moment-ug-eng 29/212
2A. Device Basics 1
Charging the Battery
Keeping track of your battery’s charge is important. Ifyour battery level becomes too low, your deviceautomatically turns off, and you will lose anyinformation you were just working on.
Always use a Sprint-approved or Samsung-approveddesktop charger, travel charger, or vehicle poweradapter to charge your battery.
Plug the flat end of the charger into the device’scharger jack and the other end into an electricaloutlet.
The device turns on in with the screen locked andindicates both its charge state and percent of
charge.
With the Sprint-approved Li-Ion battery, you canrecharge the battery before it becomes completely rundown.
Navigation and Customization
The Samsung Moment™ by Google™ is a touch-sensitive device which allows you to not only select anonscreen option with a single tap, but also scrollthrough long menu lists. Simply slide up and downthrough the display with your fingertip.
Home Screen Overview
The Home screen is the starting point for manyapplications and functions, and it allows you to additems like application icons, shortcuts, folders, orGoogle widgets to give you instant access toinformation and applications. This is the default page
and accessible from any menu by pressing .
Note: The Optical Joystick on your device lets you scrollthrough onscreen items. Many menus feature a scrollbar on the right to help you keep track of your positionin the menu.
Tip: Some menu options are also accessed by pressing andholding an onscreen item, e.g., a Contact entry from the
Contacts tab.

8/6/2019 Sprint M900 Moment Ug Eng
http://slidepdf.com/reader/full/sprint-m900-moment-ug-eng 30/212
18 2A. Device Basics
Status bar: located at the top of the screen, displaysboth Notification and Status icons.
Notification area displays icons associated withend-user notifications such as: email messages,calls (missed, call in progress), new voicemail,
upcoming event, USB connection, Text/MMS
messages. See “Using the Notifications Panel” onpage 28.
Status area displays icons associated with thestatus of the device such as communication,coverage, Bluetooth and Wi-Fi communication,battery levels, GPS, etc.
Main Home Screen: a customizable screen thatprovides information about notifications and devicestatus, allows access to application Widgets.
Extended Home Screens: (page 19) the Home screenextends beyond the visible screen width to providemore space for adding icons, widgets, and more.Press to access the main Home screen (1)which appears as the default “page” on the device
and then slide your finger horizontally across thescreen to go to the left or right side of the extendedHome screen (2). There are two "additional" screensapart from the main Home screen.
Think of it as having a desktop so wide that yourscreen can only display a portion at a time.
Status bar
Main Home
Shortcuts
Applicationstab
Notification area
Status area
Screen
Google search
Widget
Note: You cannot add more screens.
Tip: While on an extended Home screen, press toreturn to the main Home screen.

8/6/2019 Sprint M900 Moment Ug Eng
http://slidepdf.com/reader/full/sprint-m900-moment-ug-eng 31/212
2A. Device Basics 1
Google search: an onscreen Internet search enginepowered by Google™.
Widgets: are self-contained onscreen applications(not shortcuts). These can be placed onto any of theavailable screens (Home or Extended). See “Addingand Removing Widgets” on page 24.
Shortcuts: are shortcut icons that launch availabledevice applications such as Voicemail, Contacts,Dialer, Email, Alarm Clock, etc. Although some arealready found on each of the three Extended HomeScreens, the majority can be found within theApplications tab. Shortcuts can be pulled out fromthis tab or pulled into it (removed from an ExtendedHome screen). See “Creating Shortcuts” on page 23
Applications tab: houses all of your availableapplications. Some of these applications also exist asWidgets that can be actively placed onto an availablescreen. See “Using the Applications Tab” onpage 20.
Note: The Status bar is visible across all Home screens.
Home Screens
Extended Screen
(left)
Extended Screen
(right)
S O

8/6/2019 Sprint M900 Moment Ug Eng
http://slidepdf.com/reader/full/sprint-m900-moment-ug-eng 32/212
20 2A. Device Basics
Using the Applications Tab
All of your device’s applications are located within theApplications tab. This tab houses shortcuts to yourcurrently available applications.
1. Press and tapto open the tab.
To close the Applicationstab, tap again orpress .
2. Scroll though the list and tapan icon to launch theassociated application.
The tab contains deviceapplications such as AlarmClock, Browser, Calculator,Camera, Camcorder,Market, NASCAR Sprint
Cup Mobile, NFL Mobile Live, Sprint Navigation,Sprint TV, YouTube, The Weather Channel, andmuch more.
Shortcut Icon Overview
The following is a listing of the current applicationshortcuts available on both the Home screens and viathe Applications tab.
Note: This tab houses all default and downloaded
applications (installed from Android Market or from theWeb).
Shortcut Icons
Alarm Clock – Allows access to the Alarm Clockapplication (page 79).
Amazon MP3 – Launches the Amazon MP3music download service (page 157).
Bejeweled Demo – Your device cannot find ausable signal.
Browser – Launches the Sprint Powerdeck
browser (page 131).Calculator – Launches the onscreen calculatorapplication (page 81).
Calendar – Launches the Calendar applicationsthat syncs itself to either your Google orOutlook™ Work calendar (page 74).
Camcorder – Launches the built-in camcorder(page 102).
Camera – Launches the built-in camera(page 97).

8/6/2019 Sprint M900 Moment Ug Eng
http://slidepdf.com/reader/full/sprint-m900-moment-ug-eng 33/212
2A. Device Basics 2
CNN – Launches the CNN Web page via thebrowser (page 133).
Contacts – Displays the Contacts tab listing yourcurrent contacts, synced from either your
Google or Outlook account (page 65).Device Self Service – Launches a built-inservicing application that can assist you witheither activating your new device, updatingsoftware (over the air), or connecting to ecare.
Dialer – Launches the phone dialer (page 29).
Email – Provides access to your Internet email
accounts (such as Google, Yahoo, etc).(page 140).
ESPN – Launches the ESPN Web page via thebrowser (page 133).
Facebook – Launches the Facebook Web pagevia the browser (page 133).
File Viewer – Launches a file browser that allowsyou to view only supported image files and text
files (page 79).
Shortcut Icons
Gallery – Displays a Gallery of camera imagesand video stored both on the device and in themicroSD card (page 99).
Gmail – Provides access to your previously
created Gmail account (page 141).Google Maps – Launches a Web-baseddynamic map that helps you find localbusinesses, locate friends, view maps and getdriving directions. (page 164).
Google Talk – Launches a Web-basedapplication that lets you chat with family andfriends over the Internet for free.
Instant Messaging – Provides access to popularInstant Message applications (page 152).
Market – Browse and search for applications onAndroid Market (page 153).
Messaging – Access your test messagingapplication (SMS) (page 119).
Music – Launches the built-in Music Player(page 158).
NASCAR Sprint Cup Mobile – Launches theWeb-based NASCAR application (page 154).
Shortcut Icons

8/6/2019 Sprint M900 Moment Ug Eng
http://slidepdf.com/reader/full/sprint-m900-moment-ug-eng 34/212
22 2A. Device Basics
Customizing Your Home ScreenYou can customize your Home screen by doing thefollowing: Creating Shortcuts
Adding and Removing Widgets on the Home Screen
Repositioning Widgets
Creating Folders
Changing the Background (Wallpaper)
NFL Mobile Live – Launches the Web-basedNFL application (page 154).
Photo & Video Place – Manage your varioussocial networking spaces or places.
Settings – Access the device’s built-in Settingsmenu (page 45).
Sprint Navigation – Launches a built-in GPScapability gives you access to a number oflocation-based services (page 166).
Sprint TV – Allows you to listen to audio clipsand to view video clips right from your device’sdisplay (page 156).
The Weather Channel – Launches a WeatherChannel application, you can also update thisfrom the Market (page 153).
Voice Control – Launches your device’s built-inautomatic speech recognition (ASR) software,called Voice Control, to dial a phone number inyour Contacts or to launch phone functions(page 84).
Voicemail – Launches Visual Voicemail(page 114).
Shortcut Icons
Work Email – Provides access to your Outlookemail account (page 146).
Work Tasks – Provides access to your Outlooktasks.
YouTube – Launches the YouTube webpage viathe browser (page 133).
Note: The Work Email shortcut only provides access to yourOutlook email account. The Email shortcut providesaccess to POP3 and other Internet email clients (suchas Gmail™, Yahoo™, etc.)
Shortcut Icons
CreatingShortcuts Applications tab The new shortcut then appears to

8/6/2019 Sprint M900 Moment Ug Eng
http://slidepdf.com/reader/full/sprint-m900-moment-ug-eng 35/212
2A. Device Basics 2
Creating Shortcuts
Shortcuts are different than the current Home screenWidgets that only launch an application. Shortcutsactivate a feature, action, or launch an application.
To add a shortcut from the Applications tab:
1. Press to activatethe Home screen.
2. Tap the Applications tab ( ) to reveal
all your currentapplications.
3. Scroll down throughthe list and locate yourdesired application.
4. Touch and hold theonscreen icon. Thiscreates an immediate
shortcut of the selectedicon and closes the
Applications tab. The new shortcut then appears tohover over the Home screen.
5. While still holding the onscreen icon, position it onthe current page. Once complete, release thescreen to lock the new shortcut into its newposition on the current screen.
To add a shortcut via the Add to Home screen:
1. Press to activate the Home screen.
2. Touch and hold on an empty area of the screen.
3. From the Add to Home screen window tapShortcuts.
4. Tap a selection from theavailable list:
Applications
Bookmark
Contact
Gmail label
Music playlist
5. Follow the onscreen instructions to add the newshortcut to your current Home screen.
Note: To move a shortcut from one screen to another, it must
first be deleted from its current screen. Activate the newscreen, then add the shortcut.
Delete (Shortcut or Widget)
To delete a shortcut : 4 Tap an available Widget to place it on your current

8/6/2019 Sprint M900 Moment Ug Eng
http://slidepdf.com/reader/full/sprint-m900-moment-ug-eng 36/212
24 2A. Device Basics
To delete a shortcut :
1. Press to activate the Homescreen.
2. Touch and hold the desired shortcut. This unlocksit from its location on the current screen.
3. Drag the icon over the Delete tab ( ) andrelease it.
Adding and Removing Widgets
Widgets are self-contained applications that reside ineither your Applications tab or on the main or extendedHome screens. Unlike a shortcut, this Widget appearsas an onscreen application.
To add a Widget:
1. Press to activate the Home screen.
2. Touch and hold on an empty area of the screen.
3. From the Add to Home screen window tap Widgets.
4. Tap an available Widget to place it on your currentscreen.
Choices include: Analog clock, Calendar, Music,NFL Mobile Live, Picture frame, Search (Google),Sprint TV, WxWidget (Weather Channel [small orlarge]).
To remove a Widget:
1. Touch and hold a Widget until you can move itaround on the screen.
2. In a single motion, drag it over the Applications tab,which then converts into a Trash icon ( ) .
As you place the Widget into the Trash, both itemsturn red.
This action does not delete the Widget, justremoves it from the current screen.
To place a Widget onto a different screen:
1. Follow the steps to remove the Widget from thecurrent screen (page 24).
Note: To move a Widget from one screen to another, it mustfirst be deleted from its current screen. Activate the newscreen, then add the shortcut.
Note: A Widget cannot be dragged from a current screen toan adjacent screen. It must first be removed from itscurrent location, then added back to a new currentscreen.
2 Touch and drag across your screen to view Accessing Recently Used Applications

8/6/2019 Sprint M900 Moment Ug Eng
http://slidepdf.com/reader/full/sprint-m900-moment-ug-eng 37/212
2A. Device Basics 2
2. Touch and drag across your screen to viewanother available screen (there are three availablescreens [1 Home and 2 Extended screens]), seepage 18.
3. Follow the steps to add a Widget to the currentscreen (page 24).
Creating and Managing Folders
Folders are located on any of the three availablescreens and can contain both files (such as data andimages) and Contact information or entries.
To create a folder onscreen:
1. Press to activate the Home screen.
2. Touch and hold on an empty area of the screen.
3. From the Add to Home screen window tap Folders.
4. Tap an available folder type to place it on yourcurrent screen.
Choices include New folder, All contacts, Contacts
with phone numbers, Exchange Contacts, My
Contacts, or Starred contacts.
Accessing Recently-Used Applications
Your device keeps a running list of your six mostrecently used applications.
1. Press and hold toopen the recently-used
applications window.2. Tap an icon to open the
related application.
Menu Navigation
There are three ways tonavigate through a menu:
Using your finger Using the Optical Joystick
Using the built-in arrow keys
Note: Starred contacts are those Contact entries tagged asvery important.
Selecting Menu Items Using your Fingers This allows the device to change the onscreen content

8/6/2019 Sprint M900 Moment Ug Eng
http://slidepdf.com/reader/full/sprint-m900-moment-ug-eng 38/212
26 2A. Device Basics
Selecting Menu Items Using your Fingers
As you navigate through the menu, youactivate menu options by tapping theonscreen entry. Select any option bytapping it.
1. Tap an onscreen icon tolaunch a menu or feature.
2. Scroll your finger across thescreen to navigate through amenu list (bottom up or topdown).
3. Tap a menu item to make aselection or activate a field.
For example, to launch the Dialer:
Tap from the Homescreen.
Changing the Screen Orientation
The Samsung Moment™ is capable of automaticallychanging the orientation of some onscreen content.
The device’s built-in accelerometer senses movementand changes its angle/orientation.
This allows the device to change the onscreen content(images, video, Web pages) to properly display basedon the current angle (some screens may notautomatically change).
Although most screens will change orientation oncethe QWERTY keyboard is opened, this feature can bemanually enabled to change the orientation for all
applicable screens when rotation is detected.
To activate the auto-rotate feature:

8/6/2019 Sprint M900 Moment Ug Eng
http://slidepdf.com/reader/full/sprint-m900-moment-ug-eng 39/212
2A. Device Basics 2
To activate the auto rotate feature:
1. Press > and tap > Sound &
display.
2. Tap Orientation. A checkmark indicates the featureis enabled.
Selecting Menu Items Using your OpticalJoystick
The Optical Joystick works much like any standardmouse. Scroll your finger across the surface of theOptical Joystick to move around the screen or navigateup or down a list.
The direction of your onscreen movements while using
the Optical Joystick is determined by the currentorientation of your device.
When your QWERTY keyboard is visible, yourdevice is placed into Landscape mode.
When the keyboard is hidden, your device isplaced into Portrait mode.
As you navigate through the menu by scrolling across
your Optical Joystick, menu options are highlighted.Select any option by highlighting it and pressing .
Scroll over the Optical Joystick to move around thescreen.
Press the Optical Joystick to select an onscreenoption or entry.
For example, to launch the Dialer:1. From the Home screen, use your finger to scroll
over the Optical Joystick.
2. Highlight . Scrolling over the Optical Joystickhighlights the Dialer icon on the screen.
3. Press .
Up
Left Right
Down
Up
Left Right
Down
Landscape Mode Portrait Mode
SelectingMenuItemsUsing yourKeyboard Backing Up Within a Menu

8/6/2019 Sprint M900 Moment Ug Eng
http://slidepdf.com/reader/full/sprint-m900-moment-ug-eng 40/212
28 2A. Device Basics
Selecting Menu Items Using your Keyboard
Access the QWERTY keyboard and locate thenavigation buttons, located at the right of the keyboard.
For example, to launch the Dialer:1. Slide open the device and access the QWERTY
keyboard.
2. From the Home screen, press the Optical Joystickto highlight the different Widgets.
3. Highlight and then press .
Backing Up Within a Menu
To go to the previous menu:
Press .
To return to Home screen:
Press .
Using the Notifications Panel
The Notification area indicates new message events(data sync status, new messages, calendar events, callstatus, etc). You can expand this area to provide moredetailed information about the current onscreennotification icons.
1. Touch and hold the Status bar, then slide yourfinger down the screen.
2. Tap a notification entry to open the associatedapplication.
Up
Left Right
Enter
Down
Note: The Notifications panel can also be opened on theHome screen by pressing and tapping
Notifications.
Making and Answering Calls

8/6/2019 Sprint M900 Moment Ug Eng
http://slidepdf.com/reader/full/sprint-m900-moment-ug-eng 41/212
2A. Device Basics 2
Displaying Your Phone Number
Press > and tap >
About phone > Status. (Your phone number andother information about your device and account isdisplayed.)
Making and Answering Calls
Making Calls
1. Press and then tap .
2. Enter a phone number using the onscreendialpad. (If you make a mistake while dialing, pressto erase the numbers.)
3. Tap . (To make a call when you areroaming and Call Guard is enabled, select Roam
Call and tap . See “Call Guard” onpage 128.)
4. Press when you are finished.
Tip: To redial your last outgoing call, press twice.
To redial other recent numbers, press , tap anumber from the Call log list, and press again.
When making calls off the Nationwide Sprint Network,always dial using 11 digits (1 + area code + phonenumber).
1234567
1234567
You can also place calls from your device by speed Answering Calls

8/6/2019 Sprint M900 Moment Ug Eng
http://slidepdf.com/reader/full/sprint-m900-moment-ug-eng 42/212
30 2A. Device Basics
p y y pdialing numbers from your Contacts (page 35) andusing your History listings (page 63).
Dialing Options
When you enter numbers
within the Dialer, you will seethree onscreen options.
To initiate an option, tap theonscreen button.
Mute: To mute themicrophone.
Speaker: To route the
device’s audio through thespeaker (On) or through theearpiece (Off).
Dialpad: To enter dial tonesusing the onscreen dialpad.
Answering Calls
1. Make sure your device is on. (If your device is off,incoming calls go to voicemail.)
2. Press to answer an incoming call.
Your device notifies you of incoming calls in thefollowing ways:
The phone rings or vibrates.
The backlight illuminates.
The screen displays an incoming call message.
If the incoming call is from a number stored in yourContacts, the entry’s name is displayed. You may alsosee the caller’s phone number, if available.
To select an option, use the corresponding action.
Volume Down button to mute the ringer.
to send the call to your voicemail box.
Answering a Roam Call With Call Guard Enabled
Call Guard is an option that helps you manage yourroaming charges when making or receiving calls while
outside the Nationwide Sprint Network. Please see“Roaming” on page 127 for more information.
Select OK to answer the call. (See “Call Guard” on Calling Emergency Numbers

8/6/2019 Sprint M900 Moment Ug Eng
http://slidepdf.com/reader/full/sprint-m900-moment-ug-eng 43/212
2A. Device Basics 3
page 128 for additional information.)
Ending a Call
Press .
Missed Call Notification
When you do not answer an incoming call, the Statusbar indicates .
To display a Missed Call entry from the Home screen:
1. Touch and hold the Status bar, then slide your
finger down the screen.2. Tap the Missed Calls entry ( ). This opens the
Call log screen.
3. Tap an entry and select Return call.
– or –
4. Highlight an entry using the Optical Joystick andpress to return the call.
Ca g e ge cy u be s
You can place calls to 911 (dial ),even if your device is locked or your account isrestricted.
During an emergency call, press to displayyour options. Select an option.
Speaker On to activate speakerphone mode. (If youare in speakerphone mode, the option is displayedas Speaker Off to deactivate.)
Hide dialpad to hide the onscreen dialpad.
End call to end the current call.
To exit Emergency mode:
1. Press to end a 911 call.
2. Tap Exit on the Emergency Call Back mode.
Note: When your device is off, calls go directly to voicemail.
Note: When you place an emergency call, your device
automatically enters Emergency mode.
Tip: Press My Phone to display your phone number duringan emergency call.
In-Call OptionsNote: When you end the 911 call you are returned to the

8/6/2019 Sprint M900 Moment Ug Eng
http://slidepdf.com/reader/full/sprint-m900-moment-ug-eng 44/212
32 2A. Device Basics
Enhanced 911 (E911) Information
This device features an embedded Global PositioningSystem (GPS) chip necessary for utilizing E911emergency location services where available.
When you place an emergency 911 call, the GPSfeature of your device seeks information to calculateyour approximate location. Depending on severalvariables, including availability and access to satellite
signals, it may take up to 30 seconds or more todetermine and report your approximate location.
p
Touch and drag up on theDialpad tab (bottom of theactive call screen) to use theonscreen dialpad to enteradditional numbers, forexample, an extension oraccess code.
For example: When youcall your bank’s 800number, use your dialpadto enter your accountnumber and PIN.
Pressing during a calldisplays a list of availablein-call features. To select anoption, tap the corresponding option.
Show/Hide dialpad to toggle the appearance of theonscreen dialpad.
Add call press and hold to initiate a 3-way call(page 126).
Join to join to currently active calls (conference). End call to end the current call.
Note: When you end the 911 call, you are returned to theEmergency Call Back mode.
Within the Emergency Call Back mode, tap OK orpress the Home key to use the another menu.
Important: Always report your location to the 911 operator
when placing an emergency call. Somedesignated emergency call takers, known asPublic Safety Answering Points (PSAPs) may notbe equipped to receive GPS location informationfrom your device.
Call routed through
Bluetooth headset
Mute to mute the microphone during an active call.T i h i h
When turned off, the call is routed through eitherh i k h ll i

8/6/2019 Sprint M900 Moment Ug Eng
http://slidepdf.com/reader/full/sprint-m900-moment-ug-eng 45/212
2A. Device Basics 3
Tap again to unmute the microphone.
Speaker to route the device’s audio through thespeaker (On) or through the earpiece (Off ).
Activate Speaker to route the device’s audiothrough the speaker. (You can adjust the speakervolume using the volume keys.)
Deactivate Speaker to use the device’s earpiece.
Bluetooth to route the device’s audio through theconnected Bluetooth headset (On) or through thespeaker (Off ).
When the call is routed to a Bluetooth headset,the current call area is surrounded by a blue boxand shows the Bluetooth call icon ( ).
the earpiece or speaker, the call area issurrounded by a green box and shows ( ).
End-of-Call Options
After you receive a call from or make a call to a phonenumber that is not in your Contacts, the device displaysthe phone number and the duration of the call withinthe Call log screen.
From the Call log tab, tap an entry from the list:
<Call type> to view the category of the selected call:Incoming call, Outgoing call, or Missed call.
Call back or Call again to redial the selected numberand callback the recipient.
Send SMS message to send the selected number anSMS (text) message.
Note: If Mute is activated, the speaker mode is deactivated.
WARNING: Because of higher volume levels, do not placethe device near your ear during speakerphoneuse.
Bluetooth routed Device routed
Add to contacts to add the new number to yourC t t (S “S i Ph N b ”
To save a number from the Home screen:

8/6/2019 Sprint M900 Moment Ug Eng
http://slidepdf.com/reader/full/sprint-m900-moment-ug-eng 46/212
34 2A. Device Basics
Contacts. (See “Saving a Phone Number” onpage 34.)
View contact to view the Contacts listing for thenumber. After you receive a call from or make a callto a device number that is already in your Contacts,
the device displays the entry name, phone number,and the duration of the call.
Saving a Phone Number
The number of Contacts entries you can store in yourdevice is limited only by available memory space. Yourdevice automatically sorts the Contacts entriesalphabetically. Each entry’s name can contain anunlimited number of characters. Your deviceautomatically sorts the Contacts entries alphabetically.(For more information, see “2D. Contacts” on page 65.)
1. Tap and enter a number into the onscreendialer.
2. Press and tap Add to contacts > Create new
contact.
3. Tap either Google or Work to synchronize the newcontact to either your Gmail account or Outlookcontact list.
4. Touch the First and Last field and use the onscreenor QWERTY keyboard to enter the new contactname.
5. Press and tap to save the new entry.
Finding a Phone Number You can search Contacts for entries by name.
1. Press and tap .
– or –
From the Dialer screen, tap .
2. Press and tap Search.
Note: The End-of-Call options are not displayed for callsidentified as No ID, Restricted, or Unknown.
Done
3. Enter the first letter or letters of an entry. (The moreletters you enter the more specific the search )
To speed dial a contact from Favorites:

8/6/2019 Sprint M900 Moment Ug Eng
http://slidepdf.com/reader/full/sprint-m900-moment-ug-eng 47/212
2A. Device Basics 3
letters you enter, the more specific the search.)
4. To display contact details, tap an entry from the list.
Dialing From the Contacts List
1. Press and tap .
2. Scroll through the list and tap the entry you want tocall and tap Call mobile or press to dial theentry’s default phone number.
– or –
To dial another number from the same entry,tap the other number and tap Call mobile orpress .
Speed Dialing from Favorites
You can speed dial contacts you call frequently byadding them to your Favorites list. You must first assigna Contacts entry to your Favorites list. See “Adding
Entries to Your Favorites” on page 73.
1. Press and tap > Favorites.
2. Scroll through the list and tap the contact.
3. Tap to place a call or send a text to the contact.
Dialing a number from the Favorites tab is similar to
dialing one from the Contacts tab. See “Dialing Fromthe Contacts List” on page 35.
Plus (+) Code Dialing
When placing international calls, Plus Code Dialingautomatically enters the international access code foryour location (for example, 011 for international callsmade from the U.S.). See “Activating Plus CodeDialing” on page 52.
1. From the onscreen dialpad, touch and holduntil you see a “+” on the display screen.
2. Dial the country code and phone number, andthen tap . (The device automaticallyprepends the access code for international dialing,followed by the country code and phone number.)
Shortcut: From Dialer screen, tap Contacts ( ) to listentries.
1234567
Entering Text with Onscreen 1. Press > and tap > Sound &
display

8/6/2019 Sprint M900 Moment Ug Eng
http://slidepdf.com/reader/full/sprint-m900-moment-ug-eng 48/212
36 2A. Device Basics
Keyboard
When you activate a field where you can enter text,numbers, symbols, etc., you can either use theonscreen keyboard or QWERTY keyboard.
Onscreen keyboard entry can be done in either Portraitor Landscape orientations. The Landscape orientationprovides more space and results in slightly biggeronscreen keys. If you find that you prefer to enter textvia the onscreen keyboard, and need bigger keys, it isrecommended you use this orientation.
Activating the Landscape Keyboard
Although the device will automatically rotate its screenorientation to Landscape once the QWERTY keyboardslides out, the Samsung Moment™ can also be set toautomatically change its orientation. To use theonscreen keyboard in Landscape mode, this featuremust first be enabled.
display.
2. Tap Orientation. A checkmark indicates the featureis enabled.
Selecting a Text Input Mode
Your device provides convenient ways to enter letters,numbers, and symbols whenever you are prompted toenter text (for example, when adding a Contacts entryor when using email and text messaging).
In this section we’ll cover the steps necessary to entertext using the onscreen keyboard, where the touchscreen is the primary method of both text andcharacter entry.
1. From a screen where you can enter text, tap theinput field to reveal the onscreen keyboard.
2. Select one of the following options:
ABC to use alphabetic characters from theonscreen keyboard (See page 38.)
Note: Some characters and types, such as some symbolsand emoticons, are not accessible from the onscreenkeyboard.
?123 to enter numbers by pressing the numberson the onscreen keyboard (See page 39 )
Entry field: a field where text, number, or othercharacters can be entered

8/6/2019 Sprint M900 Moment Ug Eng
http://slidepdf.com/reader/full/sprint-m900-moment-ug-eng 49/212
2A. Device Basics 3
on the onscreen keyboard. (See page 39.)
Onscreen Keyboard Overview
characters can be entered.
Suggested Word choices: a row of selectable wordchoices based on the current set of entered text. Tapan onscreen choice to insert the selection into yourcurrent entry field. Tap the left and right arrows on
this field to reveal additional word choices. Delete: deletes characters from the entry field.
Next: moves the cursor to the next entry field.
CAPS/ALT: When in ABC mode, this key changes thecapitalization of the subsequent entered characters.When in ?123 mode, this key can show additionalsymbol characters.
Capitalization in Abc mode can be altered byusing the Caps button. See “ABC Mode” onpage 38.
Symbol use in ?123 mode can be enhanced byaccessing additional symbol characters. See“Entering Numbers and Symbols” on page 39.
Tip: When entering text, tap to change lettercapitalization (ABC > Abc > abc).
Entry field
Delete
Suggested word
Caps/ALT
Text mode
Next
choices
Text mode: There are two available modes; ABC and?123
ABC Mode

8/6/2019 Sprint M900 Moment Ug Eng
http://slidepdf.com/reader/full/sprint-m900-moment-ug-eng 50/212
38 2A. Device Basics
?123.
ABC mode contains only characters. Text modebutton indicates .
?123 mode contains only symbols. Text modebutton indicates .
Suggested Word Selection
Suggested Word selection, also known as predictivetext, is activated by default and uses an intuitive worddatabase to analyze the letters you enter and create asuitable word. (The word may change as you type.)This features is enabled by default and can providequicker word selection by entering the first few letters.
Tap onscreen alphabetic characters to begin yourword entry. (If you make a mistake, tap toerase a single character. Touch and hold toerase an entire word.)
If the word you want is not displayed after you haveentered all the letters, tap to scroll throughadditional word selections. To accept a word and insert
a space, touch it.
In ABC mode, you can enter only alphabeticcharacters from the onscreen keyboard. The text modeshows .
1. Select the Abc mode. (See “Selecting a Text Input
Mode” on page 36.) Capitalization in Abc mode can be altered byusing the Caps button. indicates lowercase(abc), indicates only the next character isuppercase (Abc), indicates all subsequentcharacters are entered in uppercase (ABC).
2. Tap the corresponding onscreen keys to begintyping your word.
As you type, if the desired word already appearsin the T9Word choice bar, tap it to enter theselection into your text entry field.
If you make a mistake, tap to erase a singlecharacter. Touch and hold to erase an entireword.)
?123
ABC
DEL
DEL
?123
DEL
DEL
By default, the first letter of an entry is capitalized andthe following letters are lowercased After a character is
2. Tap the appropriate numeric key.
or
8/6/2019 Sprint M900 Moment Ug Eng
http://slidepdf.com/reader/full/sprint-m900-moment-ug-eng 51/212
2A. Device Basics 3
the following letters are lowercased. After a character isentered, the cursor automatically advances to the nextspace after two seconds or when you enter a characteron a different key.
Entering Numbers and Symbols
By using the onscreen keyboard in Portrait mode,some symbols are not available (such as Emoticons orSmileys). In ?123 mode, you can only enter symbolscharacters from the onscreen keyboard. The text modeshows .
To enter numbers:
1. Tap to enter the ?123 mode.
2. Tap the appropriate numeric key. (See “Selecting aText Input Mode” on page 36.)
To enter symbols:
1. Tap to enter the ?123 mode.
– or –
Tap to select from additional symbolcharacters. The key shows when theadditional character set is active.
Entering Text using the QWERTY Keyboard
Accessing the QWERTY Keyboard
The Samsung Moment™ has a built-in, keyboard-stylekeypad, referred to as a full QWERTY keyboard. The
keyboard is located beneath the display screen and isaccessed by sliding it open. This orients the device'sdisplay to Landscape (widescreen) mode.
Using the QWERTY keyboard, you can type letters,numbers, punctuation, and other special charactersinto text entry fields or other applications simpler andfaster than using the onscreen keyboard.
ABC
ABC
ABC
ALT
ALT
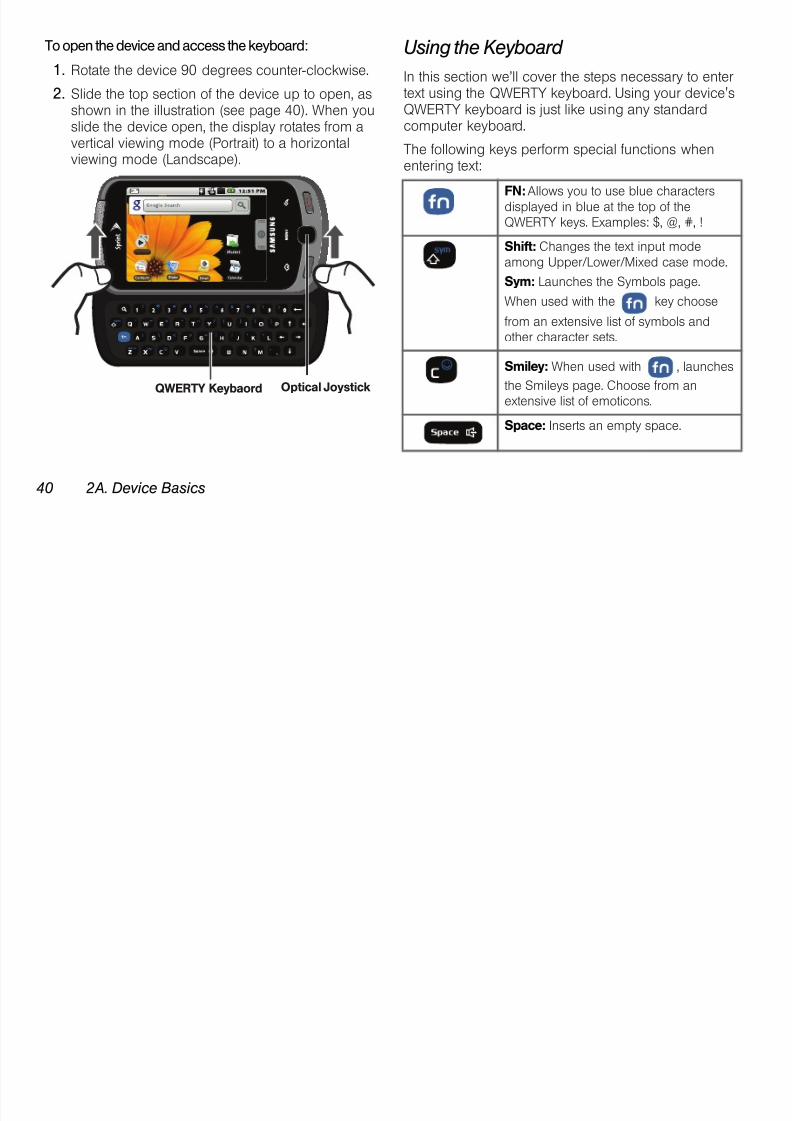
To open the device and access the keyboard:
1 R t t th d i 90 d t l k i
Using the Keyboard

8/6/2019 Sprint M900 Moment Ug Eng
http://slidepdf.com/reader/full/sprint-m900-moment-ug-eng 52/212
40 2A. Device Basics
1. Rotate the device 90 degrees counter-clockwise.
2. Slide the top section of the device up to open, asshown in the illustration (see page 40). When youslide the device open, the display rotates from avertical viewing mode (Portrait) to a horizontal
viewing mode (Landscape).
In this section we’ll cover the steps necessary to entertext using the QWERTY keyboard. Using your device'sQWERTY keyboard is just like using any standardcomputer keyboard.
The following keys perform special functions whenentering text:
Voicemail
QWERTY Keybaord Optical Joystick
FN: Allows you to use blue charactersdisplayed in blue at the top of theQWERTY keys. Examples: $, @, #, !
Shift: Changes the text input modeamong Upper/Lower/Mixed case mode.
Sym: Launches the Symbols page.
When used with the key choose
from an extensive list of symbols andother character sets.
Smiley: When used with , launches
the Smileys page. Choose from anextensive list of emoticons.
Space: Inserts an empty space.
Entering CharactersOK/Enter: Moves the insertion point to thenext line in a message

8/6/2019 Sprint M900 Moment Ug Eng
http://slidepdf.com/reader/full/sprint-m900-moment-ug-eng 53/212
2A. Device Basics 4
From a text entry screen, use the keyboard to enterdifferent character types. Select one of the followingcharacter types:
Letters to enter the alphabetic charactersassociated with each key. (See page 41.)
Numbers to enter numbers by pressing thenumbers on the keyboard. (See page 42.)
Symbols to enter symbols. (See page 42.)
Smileys to enter smileys or “emoticons.” (Seepage 42.)
The keyboard provides dual-use keys labeled withalphabetic characters on the lower half and numbersand symbols on the upper half. Press the key
corresponding to the character you want to enter.
The entered character (of a field or new sentence) isalways an initial uppercase letter. By default, text isentered in lowercase characters unless altered bypressing .
To enter uppercase and lowercase characters:1. Press to make the next character uppercase.
Characters revert back to lowercase after the nextcharacter is typed.
– or –
Press twice to make all subsequentcharacters uppercase (all new characters are inuppercase).
Pressing cycles through the capitalizationmodes (all lowercase, initial uppercase, and alluppercase).
2. Press the corresponding keys:
For example, to enter the word “Bill” within a textfield, type the keypad sequence below.
If you make a mistake, press to erase a
single character. Press and hold to erase allpreviously entered text.
next line in a message.
Delete: Deletes the previous character,similar to the backspace key on acomputer keyboard.
Tip: When entering text, press to change lettercapitalization (ABC > Abc > abc).
For example, to enter “9:30,” you would use thekeyboard sequence shown below.

8/6/2019 Sprint M900 Moment Ug Eng
http://slidepdf.com/reader/full/sprint-m900-moment-ug-eng 54/212
42 2A. Device Basics
To enter all uppercase characters, press
twice.
Entering Numbers
The keyboard can be used to enter numbers, letters,and symbols. The number keys are located along thetop on the QWERTY keyboard.
1. Press the numeric key corresponding to yourdesired number choice
If you make a mistake, press to erase asingle character. Press and hold to erase all
previously entered text.
y q
Symbols and Smileys
Symbols are accessed by combining the key orthe with the correct number key. These symbolsappear in blue above the keyboard keys.
Smileys (emoticons) are accessed by pressingand then selecting an image from the Smileys page
that is then inserted at your current cursor position.To enter symbols:
1. Position the cursor where you want the symbol toappear within your message.
2. Press and then press the key correspondingto the symbol you want to insert.
For example, to enter “I’m #1,” you would use the
keyboard sequence shown below.
B i l l
B I L L
9 : 3 0
1. From a computer, launch your preferred Webbrowser and navigate to www.google.com.

8/6/2019 Sprint M900 Moment Ug Eng
http://slidepdf.com/reader/full/sprint-m900-moment-ug-eng 55/212
2A. Device Basics 4
To enter “smileys” (emoticons):
1. Position the cursor where you want the symbol toappear within your message.
2. Press to open the onscreen smileypage.
3. Scroll through the list and select a smiley by
touching the onscreen icon.
Creating a Google Account
You will need a Google account to access severaldevice features such as Gmail, Google Maps, GoogleTalk, and the Android Market. Before you are able toaccess Google applications, you must enter your
account information. These applications sync betweenyour device and your online Google account.
2. On the main page, click Sign-in > Create an
account now.
3. Follow the onscreen prompts to create your freeaccount.
4. Log into your provided email address, locate theemail from Google, and respond to the new emailto both confirm and activate your new account.
Signing Into Your Google Account
1. Launch the application that requires a Googleaccount (such as Android Market).
2. Click Next > Sign in.
3. Touch either the Username and Passsword fieldsand enter your information. See “Entering Textusing the QWERTY Keyboard” on page 39.
I’m #1
Note: If you do not already have a Google account, touchCreate and follow the onscreen prompts to create yournew account.
4. Click Sign in. Your device then communicates withthe Google servers to confirm your information.

8/6/2019 Sprint M900 Moment Ug Eng
http://slidepdf.com/reader/full/sprint-m900-moment-ug-eng 56/212
44 2A. Device Basics
5. Create a new Gmail username by entering a prefixfor your @gmail.com email address.
Selecting Ringer Types for Voice Calls
Your device provides a variety of ringer options that2B Settings

8/6/2019 Sprint M900 Moment Ug Eng
http://slidepdf.com/reader/full/sprint-m900-moment-ug-eng 57/212
2B. Settings 4
Sound Settings (page 45)
Display Settings (page 48)
Location Settings (page 50)
Messaging Settings (page 51)
Airplane Mode (page 53)
TTY Use With Sprint Service (page 53)
Security Settings (page 54)
Sound Settings
Ringer Types
Ringer types help you identify incoming calls andmessages. You can assign ringer types to individualContacts entries, types of calls, and types of messages.
Your device provides a variety of ringer options thatallow you to customize your ring and volume settings.
1. Press > and tap > Sound &
display.
2. Tap Phone ringtone.3. Tap a ringtone from the available list. The ringtone
briefly plays when selected.
4. Tap OK to assign a ringer.
Selecting Audible Touch Tones
Your device provides the ability to play a sound whenyou are both using the dialpad and tapping the screen
1. Press > and tap > Sound &
display.
2. Tap Audible touch tones (to place a checkmark onthe option).
2B. Settings
Selecting Ringer Types for Notifications
The notification area displays icons associated with
Audible touch tones plays a tone while using thedialpad.

8/6/2019 Sprint M900 Moment Ug Eng
http://slidepdf.com/reader/full/sprint-m900-moment-ug-eng 58/212
46 2B. Settings
The notification area displays icons associated withend-user notifications such as: email messages, callsmissed, new voicemail, upcoming event, USBconnection, Text/MMS messages. You can select theringtone that plays when your device receives new
notifications.1. Press > and tap > Sound &
display.
2. Tap Notification ringtone.
3. Tap a notification ringtone from the available list.The ringtone then briefly plays when selected.
4. Tap OK to assign a ringer.
Assigning Sounds to Touches
When tapping onscreen items, dialpad, or SD cardnotifications, you can enable whether an audible soundplays as those items are tapped.
1. Press > and tap > Sound &
display.
2. Tap Audible touch tones, Audible selection, SD cardnotifications to activate the feature.
Audible selection plays a sound when making anyonscreen selection.
SD card notifications plays a sound when an SDcard notification event occurs.
Adjusting the Volume Settings
Adjust the volume settings of both the device andMedia playback to suit your needs and yourenvironment.
1. Press > and tap .
2. Tap either Ringer volume or Media volume.
3. Touch and drag the onscreen slider, adjust thevolume level, and tap OK .
Tap the Use incoming call volume for notifications field to assign the current volume setting to theNotification ringtone.
Tip: You can adjust the ringer volume in standby mode (orthe earpiece volume during a call) by using the volumebutton on the left side of your device.
Vibrate
To set your device to vibrate for incoming calls and silent
Silence All
The Silence All option allows you to mute all sounds

8/6/2019 Sprint M900 Moment Ug Eng
http://slidepdf.com/reader/full/sprint-m900-moment-ug-eng 59/212
2B. Settings 4
To set your device to vibrate for incoming calls and silent
for notifications:
Press the volume button down in standby modeuntil you see on the screen.
To set your device to always vibrate for incoming calls:
1. Press > and tap > Sound &
display.
2. Tap Phone vibrate. (If you have already checked theoption, tapping it again deselects the option.)
To set your device to vibrate while using the dialpad:
1. Press > and tap > Sound &
display.
2. Tap Vibrate touch dial pad. (If you have alreadychecked the option, tapping it again deselects theoption.)
The Silence All option allows you to mute all soundswithout turning your device off (except for Mediavolume).
To activate Silence All:
Press and hold the volume button down in standbymode until you see on the screen.
To deactivate Silence All:
Press the volume button up repeatedly to select avolume level.
To set your device to silent mode:
1. Press > and tap > Sound &
display.
2. Tap Silent mode. This option silences all audio onthe device except for media and alarms. (If youhave already checked the option, tapping it againdeselects the option.)
Display Settings Changing the Backlight Time Length
Select how long the display screen remains lit after you

8/6/2019 Sprint M900 Moment Ug Eng
http://slidepdf.com/reader/full/sprint-m900-moment-ug-eng 60/212
48 2B. Settings
Changing the Screen Orientation
Although most screens will change orientation oncethe QWERTY keyboard is opened, this feature can be
manually enabled to change the orientation for allscreens when rotation is detected. See “Changing theScreen Orientation” on page 26.
1. Press > and tap > Sound &
display.
2. Tap Orientation (enabled by default). A checkmarkindicates the feature is enabled.
Clear the Orientation checkmark to disable thisautomatic orientation adjustment.
Window Animation
1. Press > and tap > Sound &
display.
2. Tap Animation. A checkmark indicates the featureis enabled and as windows are opened and
closed, their transition is animated.
Select how long the display screen remains lit after youpress any key. This is the delay time before the screenautomatically turns off.
1. Press > and tap > Sound &
display > Screen timeout.
2. Tap a time setting.
Changing the Brightness
Adjust your screen’s brightness to suit your
surroundings.1. Press > and tap > Sound &
display.
2. Scroll down and tap Brightness.
3. Touch and drag Brightness slider left or right toadjust the screen contrast and tap OK .
Note: Long backlight settings reduce the battery’s talk andstandby times.
Note: Not available when the Auto Brightness is enabled.
Changing the Automatic Brightness
Automatically adjusts your screen’s brightness to
“Assigning a Picture to an Entry” on page 72 tolearn how to crop the picture.
id l i f b il i

8/6/2019 Sprint M900 Moment Ug Eng
http://slidepdf.com/reader/full/sprint-m900-moment-ug-eng 61/212
2B. Settings 4
Automatically adjusts your screen s brightness toprovide the best display within the current lightingcondition.
1. Press > and tap > Sound &
display.
2. Tap Auto Brightness. A checkmark indicates thefeature is enabled.
Enabling this feature disables the manualBrightness option.
Changing the Display Screen
Choose what you see on the back of the whilepowering on or off and when in standby mode (Homescreen).
1. Press > and tap .
2. Tap either Pictures or Wallpaper Gallery.
Pictures taken using the built-in camera or copiedto your device as a wallpaper. You can crop thepicture before setting it as a wallpaper. See
Wallpaper Gallery provides a selection of built-inwallpaper images.
3. Scroll through available images and tap aselection to preview it.
4. Tap Set Wallpaper to assign an image.
Adjusting the Date and Time
Your device obtains its time and date information byusing the network-provided date, time, and time zone.These values can be manually altered.
1. Press > and tap >
Date & time.2. Tap Automatic to disable the feature.
3. Tap Set date. Adjust the date, month, and year bytapping or . Tap Set when finished.
4. Tap Select time zone, then select a time zone fromthe onscreen list. Scroll down the list to viewadditional time zones.
5. Tap Set time. Adjust the hour and minute bytapping or . Tap the AM or PM icon tochange the al e Tap S t hen finished
Note: Turning Location on will allow the network to detectyour position using GPS technology, making someS i t li ti d i i t T i

8/6/2019 Sprint M900 Moment Ug Eng
http://slidepdf.com/reader/full/sprint-m900-moment-ug-eng 62/212
50 2B. Settings
change the value. Tap Set when finished.
6. Tap Use 24-hour format to toggle between using a12-hour or a 24-hour format.
7. Tap Select date format to select how the dateinformation is displayed on your device. Theselected date format is also applied to the datedisplayed within the device’s Alarm Clock.
Location Settings
Your device is equipped with a Location feature for usein connection with location-based services.
The Location feature allows the network to detect yourposition. Turning Location off will hide your locationfrom everyone except 911.
To enable your device’s GPS Location feature:
1. Press > and tap >
Security & location.
2. Tap Enable GPS satellites. A checkmark indicatesthe GPS location feature is enabled.
To enable Location via wireless networks:
1. Press > and tap >
Security & location.
2. Tap Use wireless networks. A checkmark indicatesthe feature is enabled.
This service uses available wireless networks topinpoint your location within certain applications
such as Google Maps (page 164).
Sprint applications and services easier to use. TurningLocation off will disable the GPS location function for allpurposes except 911, but will not hide your generallocation based on the cell site serving your call. Noapplication or service may use your location without
your request or permission. GPS-enhanced 911 is notavailable in all areas.
3. Tap Agree. Enabling this feature allows Google tocollect anonymous location data regardless if anylocation application or other related feature is
indicates a new text message was received.
1 P d

8/6/2019 Sprint M900 Moment Ug Eng
http://slidepdf.com/reader/full/sprint-m900-moment-ug-eng 63/212
2B. Settings 5
location application or other related feature isactive or in use.
Tap Use wireless networks > disagree to disablethe collection of data. Enabling this feature canutilize more resources and slow performance.
Messaging Settings
Your device’s advanced messaging capabilities let yousend and receive many different kinds of textmessages without placing a voice call. (For moreinformation, see “Text Messaging (SMS)” on page 119.)
Messaging settings allow you to decide how you wouldlike to be notified of new messages, create a signaturewith each sent message, and create your own presetmessages.
Viewing Notifications of Received Messages
When you receive a message, your device notifies youby displaying an icon within the Notification area at the
top left of your Home screen.
1. Press > and tap .
– or –
Touch and hold the Status bar, then slide yourfinger down the screen. See “Using the
Notifications Panel” on page 28.
2. Tap a message entry to open the Messagingapplication.
Deleting Old Text Messages
Delete messages you have read whenever you like, orhave your device delete them automatically for you. Athread is a series of text conversations between twoparties. A single thread occurs between two parties;selecting all threads chooses your stored textconversations with all past contacts.
To delete a specific message thread:
1. Press and tap and tap Messaging.
Tip: To access the Messaging menu, you can also press> Messaging.
2. Use the Optical Joystick to highlight a singlemessage thread and press to view thecontents of that thread.
2. Tap Plus code dialing to activate the feature (acheckmark appears in the adjacent field).

8/6/2019 Sprint M900 Moment Ug Eng
http://slidepdf.com/reader/full/sprint-m900-moment-ug-eng 64/212
52 2B. Settings
contents of that thread.
3. Press and tap Delete thread.
To delete all stored messages:
1. Press and tap and tap Messaging.
2. Press and tap Delete threads.
Call Settings
Your device allows you to configure call settings suchas Plus code dialing usage, Other International Dialingoptions, and TTY configuration.
Activating Plus Code Dialing
Plus Code dialing allows you assign a presetinternational dialing prefix (code) for outgoinginternational calls to . See “Plus (+) Code Dialing”on page 35.
1. Press > and tap >
Call settings.
Changing the International Dialing Code
By default, the international dialing prefix (code) is setto 011. To change this number you must first
temporarily deactivate the plus code dialing.1. Press > and tap >
Call settings.
2. Tap Plus code dialing to deactivate the feature. Thisenables the Other Intl. Dialing field.
3. Tap Other Intl. Dialing.
4. Tap the entry field and press from the
onscreen keyboard to delete the previous value.5. Enter a new value and tap OK .
6. Tap Plus code dialing to reactivate the feature. Thisdisables the Other Intl. Dialing field.
DEL
Airplane Mode
Ai l M d ll t f d i ’
3. Press > and tap >
Wireless Controls.
4 Tap Airplane mode to remove the checkmark

8/6/2019 Sprint M900 Moment Ug Eng
http://slidepdf.com/reader/full/sprint-m900-moment-ug-eng 65/212
2B. Settings 5
Airplane Mode allows you to use many of your device’sfeatures, such as Games, Notepad, and Voice Memos,when you are in an airplane or in any other area wheremaking or receiving calls or data is prohibited. When
you set your device to Airplane Mode, it cannot send orreceive any calls or access online information.
1. Press and hold to reveal the Phone options.
2. Tap ( Airplane Mode is OFF).
– or –
3. Press > and tap >
Wireless Controls.
4. Tap Airplane mode to place a checkmark in theadjacent field.
While in Airplane Mode, your device’s Status area willdisplay ( ).
To deactivate Airplane Mode:
1. Press and hold to reveal the Phone options.
2. Tap ( Airplane Mode is ON).– or –
4. Tap Airplane mode to remove the checkmark.
TTY Use With Sprint Service
A TTY (also known as a TDD or Text Telephone) is atelecommunications device that allows people who aredeaf, hard of hearing, or who have speech or languagedisabilities, to communicate by telephone.
Your device is compatible with select TTY devices.Please check with the manufacturer of your TTY deviceto ensure that it is compatible with digital cell phones.Your device and TTY device will connect via a special
cable that plugs into your device’s headset jack. If thiscable was not provided with your TTY device, contactyour TTY device manufacturer to purchase theconnector cable.
When establishing your Sprint service, please callSprint Customer Service via the stateTelecommunications Relay Service (TRS) by firstdialing . Then provide thestate TRS with this number: 866-727-4889.
1234567
To turn TTY Mode on or off:
1. Press > and tap > Call settings
> TTY (You will see an informational message )
Security Settings

8/6/2019 Sprint M900 Moment Ug Eng
http://slidepdf.com/reader/full/sprint-m900-moment-ug-eng 66/212
54 2B. Settings
> TTY. (You will see an informational message.)
2. Read the onscreen disclaimer and tap Yes.
3. Tap TTY mode and select from one of the followingoptions: TTY Off, TTY HCO, TTY VCO, or TTY Full.
Accessing the Security Menu
All of your device’s security settings are availablethrough the Security menu. You can secure your data
and limit phone access by requiring a screen unlockpattern every time your device is turned on or everytime it wakes up from sleep mode (screen where thescreen turns off).
Press > and tap >
Security & location.
Your Device’s Lock Feature
Locking Your Device
When your device is locked, you can only receiveincoming calls or make calls to 911.
Press . Locking the screen preventsaccidental screen touches from activating phonefunctions.
Note: When enabled, TTY mode may impair the audio qualityof non-TTY devices connected to the headset jack.
WARNING: 911 Emergency Calling Sprint recommends that TTY users makeemergency calls by other means, includingTelecommunications Relay Services (TRS),analog cellular, and landline communications.
Wireless TTY calls to 911 may be corruptedwhen received by public safety answering points(PSAPs), rendering some communicationsunintelligible. The problem encountered appearsrelated to software used by PSAPs. This matterhas been brought to the attention of the FCC,and the wireless industry and the PSAPcommunity are currently working to resolve this.
Unlocking Your Device
1. Press to awaken the device.
5. Draw your pattern by touching your first onscreenpoint, then, without removing your finger from the
screen, drag your finger over adjacent points until

8/6/2019 Sprint M900 Moment Ug Eng
http://slidepdf.com/reader/full/sprint-m900-moment-ug-eng 67/212
2B. Settings 5
2. From lock screen, press .
Your Device’s Unlock Pattern Feature
You can increase your device’s security by creating ascreen unlock pattern (disabled by default). Whenenabled, you must draw the correct unlock pattern onthe screen to unlock and regain access to the device.
Creating an Unlock Pattern
1. Press > and tap >
Security & location.
2. Scroll down to the menu list and tap Set unlockpattern.
3. Read the information on the screen, then tap Next.
4. Review the onscreen tutorial on pattern creation,then tap Next.
the grey trace line overlaps each point and they arehighlighted with a green circle.
6. When you have connected at least four dots in avertical, horizontal or diagonal direction, lift yourfinger from the screen when finished.
7. Tap Continue to record the pattern.
8. Confirm the new pattern by redrawing it and then
tapping Confirm.
Once the feature is enabled, additional unlock patternoptions are then enabled from within the Security &
location menu list.
Important: You must slide your finger on the screen to createthe pattern and not touch individual dots. If youmake a mistake or a point is not properlyselected, a red circle will appear.
To remove the unlock pattern from the Lock screen:
1. Press > and tap >
Security & location

8/6/2019 Sprint M900 Moment Ug Eng
http://slidepdf.com/reader/full/sprint-m900-moment-ug-eng 68/212
56 2B. Settings
Configuring the Unlock Pattern Settings
To require the pattern for access:
1. Press > and tap >
Security & location.
2. Place a checkmark adjacent to the Require pattern field.
Security & location.
2. Remove the checkmark adjacent to the Use visible
pattern field.
Removing this checkmark prevents the unlock
pattern from displaying on the unlock screen.
What to do if you have forgotten your pattern:
If you fail to draw the correct unlock pattern on thescreen after five attempts, you are prompted to wait for30 seconds before you can try again.
If you have forgotten your screen unlock pattern,tap Forgot pattern.
Sign in using your Google Account name andpassword, and create a new screen unlockpattern before regaining access to the Homescreen.
Changing the Unlock Pattern
1. Press > and tap >
Security & location > Change unlock pattern
Managing Your Available Memory
You can manage the information and configurationl t d t b th i SD d d b ilt i d i

8/6/2019 Sprint M900 Moment Ug Eng
http://slidepdf.com/reader/full/sprint-m900-moment-ug-eng 69/212
2B. Settings 5
Security & location > Change unlock pattern.
2. Draw the current pattern on the screen.
3. Draw a new pattern. See “Creating an UnlockPattern” on page 55.
Calling in Lock Mode
When your device is locked, you can only receiveincoming calls or make calls to 911or Sprint CustomerService.
1. Press to reveal the lock screen.
2. Tap Emergency call to reveal the Emergency Dialer
to place your emergency call. Draw your unlock pattern to regain access to thefull dialer.
related to both your microSD card and built-in devicestorage memory. The available device memoryprovided by these two locations is called Internal phone
storage.
To view your device’s total available memory:
1. Press > and tap >
SD card & phone storage.
2. Review the Available space fields for the twomemory sections for available space:
External SD card displays the memory informationspecific to an internally installed microSD card.
This amount of space can be altered by replacingthe current microSD card.
Internal phone storage displays the memoryinformation specific to the built-in device memory.This memory amount can not be altered becauseit is part of the device hardware.
To view your microSD card storage information:
1. Press > and tap >
SD card & phone storage.
Erasing Device Content
Use the Manage applications menu to quickly erasel t d t t d i t ll thi d t li ti

8/6/2019 Sprint M900 Moment Ug Eng
http://slidepdf.com/reader/full/sprint-m900-moment-ug-eng 70/212
58 2B. Settings
SD card & phone storage.
2. Locate the External SD card section.
3. Review both the Total space and Available space fields:
Total space indicates the total size of the currentlyinserted microSD card. This includes bothavailable and used space information.
● To determine the currently amount of usedmemory on the card, take the Total space andsubtract the remaining available space.
Available space indicates only the amount ofremaining free memory space available on themicroSD card.
selected content and uninstall third-party applicationsstored in your device.
To clear an application’s cache:
1. Press > and tap > Applications> Manage applications.
2. Press and tap Sort by size. This option sortsthe current Manage applications listing to displaythose applications by amount of memory or cacheusage.
3. Tap the application whose cache you wish todelete.
4. From the Application info screen, tap Clear data and/or Clear cache.
Note: Not all of the microSD card is registered in the available
space as a small percentage of the storage is unread.A 2GB microSD card will show approximately 1.89GBavailable.
Note: Those applications with the largest usage appear at thetop of the sorted list.
To uninstall third-party applications:
1. Press > and tap > Applications
> Manage applications.
4. If you are certain that you would like to restore allfactory settings, tap Erase everything.

8/6/2019 Sprint M900 Moment Ug Eng
http://slidepdf.com/reader/full/sprint-m900-moment-ug-eng 71/212
2B. Settings 5
> Manage applications.
2. Tap the third-party application, and from the Application info screen, tap Uninstall.
Resetting Your Device
Resetting the device restores all the factory defaults,including the ringer types and display settings. All data,including downloaded applications are deleted.
1. Press > and tap >
SD card & phone storage > Factory data reset. (Youwill see a disclaimer.)
2. Read the disclaimer and tap Reset phone.
3. If required, draw your unlock pattern to confirm the
reset process.
Important: Only third-party applications can be uninstalled.Applications preinstalled on the device can not beremoved.
Important: Back up your important data before you performa factory reset of the device.
The Notification area of the Home screen (upper-left)displays phone notifications, status, or alerts such as:
2C. Call LogCall in progress: Indicates there is

8/6/2019 Sprint M900 Moment Ug Eng
http://slidepdf.com/reader/full/sprint-m900-moment-ug-eng 72/212
60 2C. Call Log
Viewing Call Log (page 60)
Call Log Options (page 61)
Checking a Missed Call (page 62)
Making a Call From Call Log (page 63)
Saving a Number From History (page 63)
Altering a Number From History (page 64)
Erasing the Call Log (page 64)
Viewing Call Log
Call Log (History) is a list of the phone numbers (orContacts entries) for calls you placed, accepted, ormissed. Call Log makes redialing a number fast andeasy. It is continually updated as your deviceautomatically adds new numbers to the beginning ofthe list and removes the oldest entries from the bottom
of the list.
From within the Call log screen, each entry contains thephone number (if it is available) and Contacts entryname (if the number is in your Contacts).
p g
a call currently active and in progress.
Missed Call: Indicates an incoming call was missed.
Dialed: Indicates all outgoing calls made from your device.
Received: Indicates any received calls that were answered.
Missed: Indicates any missed calls. These are routed to your voicemail.
To access the Call log:
1. Press and tap > Call log.
2 Tap an entry to view available options
call options
Notification area
(tap)

8/6/2019 Sprint M900 Moment Ug Eng
http://slidepdf.com/reader/full/sprint-m900-moment-ug-eng 73/212
2C. Call Log 6
2. Tap an entry to view available options.
Call Log Options
This list provides easy access to redial an entry, or youcan also choose to access two types of history entry
lists depending on how they are touched. Tap to quickly redial the selected entry. See“Making a Call From Call Log” on page 63. Highlight a contact entry name or number and
press (or tap) to reveal the following call
options:
● Call information (Incoming/Outgoing call)provides the time and date of the call and itsduration.
Shortcut: You can also press from the Home screen todisplay your recent calls.
Note: History records only calls that occur while the device isturned on. If a call is received while your device isturned off, it will not be included in history.
entry-specific options
(touch and hold)
● Call [Name or Number] again allows you toredial the entry by name or number.
● Send SMS message allows you to create a newt t t th l t d t
● Add to contacts to save the number if it is notalready in your Contacts. (See “Saving aNumber From History” on page 63.)
R f ll l t d l t th t f

8/6/2019 Sprint M900 Moment Ug Eng
http://slidepdf.com/reader/full/sprint-m900-moment-ug-eng 74/212
62 2C. Call Log
text message to the selected entry.
● View contact provides information about theentry if it already exists in your Contacts list.Press to gain access to other optionssuch as: Edit contact, Copy to other account,Move to other account, and Delete Contact.
● Add to contacts to save the number if it is notalready in your Contacts. (See “Saving aNumber From History” on page 63.)
Touch and hold an entry to display the followingentry-specific options:
● Call [Number] to redial the current phonenumber. (See “Saving a Number FromHistory” on page 63.)
● Edit number before call to make alterations tothe current phone number prior to redial.Altering a Number From History (page 64).
● Send SMS message allows you to create a newtext message to the selected entry.
● Remove from call log to delete the entry fromthe Call log list.
Checking a Missed Call 1. Locate from the Notifications area of the
Status bar.
2. Touch and hold the Status bar, then slide yourfinger down the screen.
3. Tap the Missed call entry to open the Call logscreen.
4. Tap an entry. See “Using the Notifications Panel”on page 28.
Making a Call From Call Log
1. Press and tap > Call log.
2. From the Contacts screen, tap Create new contact or tap an existing Contact entry name to save thenumber to an existing entry.
3

8/6/2019 Sprint M900 Moment Ug Eng
http://slidepdf.com/reader/full/sprint-m900-moment-ug-eng 75/212
2C. Call Log 6
2. Tap adjacent to a desired entry.
– or –
Tap an entry name/number from the list, then tapCall [Name or Number].
Saving a Number From History
The number of Contacts entries you can store in your
device is limited only by available memory space. Yourdevice automatically sorts the Contacts entriesalphabetically. Each entry’s name can contain anunlimited number of characters.
1. Tap a Call log entry > Add to contacts.
– or –
Touch and hold an entry > Add to contacts.
3. Tap either Google or Work to synchronize the newcontact to either your Gmail account or Outlookcontact list.
4. Tap the First and Last field to create a newContacts entry.
5. Use either the onscreen keypad or slide out thekeyboard to type in the new entry name.
After you have saved the number, your device displaysthe new Contacts entry in place of the previousnumber. (See “Contacts Entry Options” on page 69.)
Note: You cannot make calls from History to entries identifiedas Unknown, No ID, Restricted or Private Number.
Note: You cannot save phone numbers already in yourContacts or from calls identified as Unknown, No ID,Restricted or Private Number.
Altering a Number From History
If you need to make a call from History and you areid l l d d l h
Erasing the Call Log
You can delete either an individual call log entry or alli f h C ll L li

8/6/2019 Sprint M900 Moment Ug Eng
http://slidepdf.com/reader/full/sprint-m900-moment-ug-eng 76/212
64 2C. Call Log
outside your local area code, or you need to alter thenumber prior to dialing, you can add the appropriateprefix by prepending the number.
1. Press and tap > Call log.2. Touch and hold an entry to access the
entry-specific options menu.
3. Tap Edit number before call.
4. Edit the number using the onscreen dialpad ordelete digits by pressing to erase the numbers.
5. Tap once the number has been
changed. Press and tap Add to contacts to save thenew number as an additional contact or anadditional number to an existing entry.
current entries from the Call Log list.
To clear a single entry from the Call Log list:
1. Press and tap > Call log.
2. Touch and hold an entry to access theentry-specific options menu.
3. Tap Remove from call log.
To clear all entries from the Call Log list:
1. Press and tap > Call log.
2. Press and tap Clear call log.1234567
Adding a New Contacts Entry
Your device automatically sorts the Contacts entriesl h b ti ll E h t ’ t i
2D. Contacts

8/6/2019 Sprint M900 Moment Ug Eng
http://slidepdf.com/reader/full/sprint-m900-moment-ug-eng 77/212
2D. Contacts 6
Adding a New Contacts Entry (page 65)
Saving a Phone Number (page 67) Contacts Menu Options (page 68)
Contacts Entry Options (page 69)
Editing a Contacts Entry (page 70)
Adding a Number to a Contacts Entry (page 71)
Editing a Contacts Entry’s Number (page 71)
Selecting a Ringer Type for an Entry (page 72)
Assigning a Picture to an Entry (page 72)
Deleting Entries (page 73)
Adding Entries to Your Favorites (page 73)
alphabetically. Each entry’s name can contain anunlimited number of characters. You can create eithera Google or Work contact.
Google contacts are shared with your existingGoogle account and can also be imported to yourdevice after you have created a Google Mail account.
The Edit Sync Groups feature allows you to add anew or existing contact from your online Googleaccount to your device.
If not syncing, use the New contact option tocreate a new entry.
Work contacts are those contacts that are intended tobe shared with either an Exchange Server or fromwithin Microsoft ®Outlook®.
To create a new Google contact:
1. Press and tap .
– or –
Press and tap > Contacts.
2. Press and tap New contact. 7. Enter additional information such as: Emailaddresses, Chat addresses, Postal addresses,Organizations, Notes, Ringtone assignment,Incoming call direction.
Shortcut: Enter the phone number from the Dialer and press> Add to contacts. Proceed with steps 4–5.

8/6/2019 Sprint M900 Moment Ug Eng
http://slidepdf.com/reader/full/sprint-m900-moment-ug-eng 78/212
66 2D. Contacts
3. Select Google and tap OK .
4. Tap the First and Last field, and enter a name forthe new entry and tap Next. (See “Entering Text
with Onscreen Keyboard” on page 36.)
5. Tap the Phone number field and enter a phonenumber using the onscreen dialpad.
Tap to enter additional phone numbers forthe new Contacts entry.
Tap to remove a previously entered phonenumber.
6. Tap the label button (to the left of the Phone
number field) to select from additional categoriessuch as: Home, Mobile [default], Work, Work Fax,Home Fax, Pager, Other, or tap Custom to createyour own unique category type.
g
Use your finger to slide the page up or down tosee additional fields and categories.
8. Tap Done to complete and store the new entry.
After saving the number, your device displays the newentry within the Contact list. (See “Contacts EntryOptions” on page 69.)
Note: Use the predictive text row to shortcut a name selectionby tapping the word.
Tip: ICE – In Case of Emergency To make it easier for emergency personnel to identifyimportant contacts, you can list your local emergencycontacts under “ICE” in your device’s Contacts list. Forexample, if your mother is your primary emergencycontact, list her as “ICE–Mom” in your Contacts. To listmore than one emergency contact, use “ICE1–___,”“ICE2–___,” etc.
Saving a Phone Number
To save a number from the Home screen:
account with current Contact entries, and be signedinto your account via the device.
With syncing, any Contacts entries (with phonenumbers email addresses pictures etc ) are updated

8/6/2019 Sprint M900 Moment Ug Eng
http://slidepdf.com/reader/full/sprint-m900-moment-ug-eng 79/212
2D. Contacts 6
1. Press and tap .
2. Enter a phone number and press .
3. Tap Add to contacts > Create new contact.4. Tap either Google or Work to synchronize the new
contact to either your Gmail account or Outlookcontact list.
5. Tap the First and Last field, and enter a name forthe new entry and tap Next. (See “Entering Textwith Onscreen Keyboard” on page 36.)
6. Make any necessary changes.
7. Tap Done to complete and store the new entry.
Editing Sync Groups
This feature allows you to add a new or existing contactfrom your online Google account to your device. Priorto syncing, you must first have an active Google
numbers, email addresses, pictures, etc.) are updatedand synced with your Samsung Moment™.
1. Press and tap .
2. Press and tap Edit sync groups. If not already signed in, tap Next > Sign in.
Enter your Google Username and Password andtap Sign in.
3. Verify Sync all contacts is selected and tap OK .
4. Your Contacts tab then reflects any updatedContact information.
Note: Any change on either side (Phone or Gmail Contacts),is reflected on the other side after a sync process.
The process of updating your Contacts tab can takeseveral minutes. If after 10-20 minutes, your list has notupdated with updates from your Gmail Contacts page,repeat step 3.
This update process works both ways. Anychanges on the device are updated to your GmailContacts list after sync.
Contacts Menu OptionsContact entry’s
Note: Syncing of contacts requires you are logged into yourGmail account via the device.

8/6/2019 Sprint M900 Moment Ug Eng
http://slidepdf.com/reader/full/sprint-m900-moment-ug-eng 80/212
68 2D. Contacts
Contacts Menu Options
1. Press > .
2. Tap an entry to display the Contact entry’soverview page. This page contains Name, Contact
type, Call [number], and Text [number] options.
3. Press and select from the available options:
Edit contact to edit the currently selected Contactsentry. See “Editing a Contacts Entry” on page 70.
Copy to another account to copy the details for the
current Contacts entry into another availableaccount, such as Work. The original entry iscopied into its new location.
Move to another account to cut and paste thedetails for the current Contacts entry it intoanother available account as a new entry, such as
Work. The original entry is deleted from its currentlocation.
Contacts tabContact entry s
Overview page
Contact Group Contact Details
Delete contact to edit the currently selectedContacts entry. See “Deleting Entries” onpage 73.
Send SMS/MMS to begin the creation of new text(SMS) or multimedia message (MMS) that is sentto this entry.
Send Voicemail to send a voicemail message.

8/6/2019 Sprint M900 Moment Ug Eng
http://slidepdf.com/reader/full/sprint-m900-moment-ug-eng 81/212
2D. Contacts 6
Contacts Entry Options
To display a Contacts entry:
1. Press and tap .
2. Touch and hold a Contactentry from the Contactstab list to reveal theoptions menu specific tothis entry.
3. Tap an available option:
View contact to displaythe Contact’s overviewpage.
Call <default label> to dialthe main phone number used by the entry. Thecategory corresponds to the first phone numberlisted for the Contacts entry.
Se d o ce a to se d a o ce a essage
Send via Bluetooth to send the current Contact’sinformation to an external recipient via Bluetooth.See “Sending Contacts via Bluetooth” on
page 109.
Add to favorites to copy the current Contacts entry
to the list within the Favorites tab (page 73).
Edit contact to access the details page for theentry and begin editing its information.
Delete contact to delete the current Contacts entryfrom your device (page 73).
Note: Prior to using this feature, Bluetooth must first beenabled, and the recipient’s device must be visible.
Only Contacts can be sent via Bluetooth. No other filetype (video, image, or audio) can be sent usingBluetooth.
Editing a Contacts Entry
1. From the Contact’soverview page press
Chat address to assign an existing IM clientcontact name. Tap > label button [Google talk by default].
Postal addresses to enter a physical streetlabel button

8/6/2019 Sprint M900 Moment Ug Eng
http://slidepdf.com/reader/full/sprint-m900-moment-ug-eng 82/212
70 2D. Contacts
overview page, pressand tap Edit
contact. Tap an option tobegin editing.
[image icon] to assign apicture to the entry. See“Assigning a Picture toan Entry” on page 72.
First and Last to edit thecurrent name.
Phone numbers to add or
delete a phone numberto the entry. (See
“Adding a Number to aContacts Entry” onpage 71.)
Email addresses to addor delete an emailaddress.
p yaddress.
Organizations to enter business information suchas company name and position.
Notes to add a note to the entry.
Ringtone to assign a custom ringtone to the entry.This custom ringtone is played when an incomingcall from this entry is announced.
● Tap to choose an available ringtone.Tap OK to complete the assignment.
Incoming calls to automatically route calls from
this Contacts entry directly to your voicemail.2. Tap Done to store your changes.
Add/Delete
Adding a Number to a ContactsEntry
1 F h C ’ i
Editing a Contacts Entry’s Number
1. From the Contact’s overview page, pressand tap Edit contact.

8/6/2019 Sprint M900 Moment Ug Eng
http://slidepdf.com/reader/full/sprint-m900-moment-ug-eng 83/212
2D. Contacts 7
1. From the Contact’s overview page, pressand tap Edit contact.
2. From the Phone numbers area, tap to create a
new empty Phone number field.
3. Tap the field’s adjacent label button and selectfrom an onscreen category such as: Home, Mobile [default], Work, Work Fax, Home Fax, Pager, Other,or tap Custom to create your own unique categorytype.
If you have chosen Custom, enter your new labeland tap OK .
4. Tap the Phone number field and use the onscreendialpad to enter the new number
5. Scroll to the bottom of the page and tap Done orpress and tap Done.
and tap Edit contact.
2. Tap an existing phone number field.
3. Tap to clear one digit at a time.
4. Re-enter or edit the number using the onscreendialpad.
5. Scroll to the bottom of the page and tap Done orpress and tap Done.
Note: Touch and hold the Phone number field to activate the
Edit text menu, from where you can choose severalediting options such as: Select all, Select text, Cut all,Copy all, Paste, or Input Method.
Note: To hide an onscreen keypad, dialpad or keyboard,
press .
DEL
Selecting a Ringer Type for an Entry
Assign a ringer type to a Contacts entry so you canidentify the caller by the ringer type. (See “Ringer
Assigning a Picture to an Entry
Assign a picture to display each time a certain contactcalls you.

8/6/2019 Sprint M900 Moment Ug Eng
http://slidepdf.com/reader/full/sprint-m900-moment-ug-eng 84/212
72 2D. Contacts
y y g yp ( gTypes” on page 45.)
1. From the Contact’s overview page, press >
Edit contact.
2. Use either your finger or the Optical Joystick toscroll down the page and select the Ringtone fieldto display the Ringtones menu.
3. Scroll through available ringers. (To hear a sampleringer, highlight or tap a ringer entry.)
4. Tap OK to save the new ringer type.
y
Assigning a picture via the device:
1. From the Contact’s overview page, press
and tap Edit contact.2. Tap a contact image (upper-left).
Tap an onscreen image to prepare it for use.
– or –
Press the camera key to use the camera to take anew picture and assign it to this entry. (See “2H.Camera” on page 97 for details.)
● Press to return to the Select picturepage where you can now select the newimage.
3. Tap the image and begin cropping the desiredarea, then tap Save to assign selected picture.
Applying a picture from within your online Gmail:
1. Log into your Gmail account and go to yourContacts page.
2 Select your Contacts entry (with a checkmark) and
Adding Entries to Your Favorites
The Favorites tab is a listing that can help you quicklyaccess your most used or preferred Contacts entries.

8/6/2019 Sprint M900 Moment Ug Eng
http://slidepdf.com/reader/full/sprint-m900-moment-ug-eng 85/212
2D. Contacts 7
2. Select your Contacts entry (with a checkmark) andclick the image area (Change Picture).
3. Click Browse to locate a local copy of your image.
You can also choose an image from othersources such as Picasa Web.
4. Crop the visible area of your selected picture andclick Apply Changes.
5. Sync your new contact from your online Gmail toyour device. See “Editing Sync Groups” onpage 67.
Deleting Entries
1. From the Contact’s overview page, pressand tap Delete Contact.
2. Tap OK to confirm the deletion.
y p
1. Press and tap .
2. Touch and hold the entry name from the Contacts
tab listing.3. From the Contacts Entry options page, tap Add to
favorites.
Calendar
Adding an Event to the Calendar 2E. Calendar & Tools

8/6/2019 Sprint M900 Moment Ug Eng
http://slidepdf.com/reader/full/sprint-m900-moment-ug-eng 86/212
74 2E. Calendar & Tools
Before You Begin (page 74)
Calendar (page 74) File Viewer (page 79)
Alarm Clock (page 79)
Calculator (page 81)
Updating Your Device (page 81)
Updating Your Profile (page 83)
Updating Your PRL (page 83)
Before You Begin
Prior to using Google applications such as calendar,you will need to have an active Google account(page 43). Google Calendar is an application thatsynchronizes new and existing entries between yourdevice and your online Google account.
Your Calendar helps organize your time and remindsyou of important events.
1. Press and tap
.Note: If you have not already signed into your Google
account via your device, you may be asked to do soprior to gaining access to the Google Calendar.
Calendar Menu Options
2. Tap a day to which you would like to add an eventand press and tap New event.
Tapping a day activates the Agenda view.
The default view for the Calendar is the Month
5. Select a From/To date for the event by tapping thecorresponding fields, and adjusting the month, day,and year by tapping or .
Tap Set when finished.

8/6/2019 Sprint M900 Moment Ug Eng
http://slidepdf.com/reader/full/sprint-m900-moment-ug-eng 87/212
2E. Calendar & Tools 7
view.
To change the view, press to select from Agenda, Day, Week, and Today.
Press to hide the menu options.
3. Select a calendar category: Google or Work andtap OK . For this example we are choosing Google.
Google calendar entries are synchronizedbetween your device and your online Googleaccount.
Work calendar entries are synchronized betweenyour device and either an Exchange Server oravailable from within Microsoft ®Outlook®.
4. Tap the Event name field and enter a title for theevent. (See “Entering Text with OnscreenKeyboard” on page 36.)
6. Select a time for the event by tapping the time fieldand then adjusting the hour and minute by tapping
or .
Tap the AM or PM button to change the value.
Tap Set when finished.
7. Tap the All day field to assign this as an all dayevent. If assigned as an all day event, the timefields are removed as options.
8. Enter a location for the event in the Event location field.
9. Enter a description for the event in the Description field.
10. Tap the Calendar field to synchronize this Calendarevent with an alternate Gmail account.
11. Select a recurrence cycle for the event by tappingthe Repetition field:
Select One-time event, Daily, Every weekday
(Mon-Fri), Weekly (every [day]), Monthly (every
[N mber Da ]) Monthl (on da [N mber]) and
Event Reminders
When your device is turned on and you have an eventalarm scheduled, there are several ways your devicealerts you to scheduled events:

8/6/2019 Sprint M900 Moment Ug Eng
http://slidepdf.com/reader/full/sprint-m900-moment-ug-eng 88/212
76 2E. Calendar & Tools
[Number Day]), Monthly (on day [Number]), and Yearly (on [Month Day]).
12. Select an alarm time by tapping the Reminders
field.
Select 5 minutes,10 minutes, 15 minutes,20 minutes, 25 minutes, 30 minutes, 45 minutes, 1
hour, 2 hours, 3 hours, 12 hours, 24 hours, 2 days,or 1 week.
Each time you set a reminder, an additional fieldis made available.
Tap to remove any extra Reminder fields. Tap to enter additional Reminder fields.
13. Tap Done to save the event.
alerts you to scheduled events:
By playing a short beep.
By illuminating the backlight.
By indicating a icon within the Status bar.
To view additional options, press the appropriate softkey:
1. Tap the Status bar, then slide your finger down thescreen to open the Notifications panel.
2. Tap the upcoming event name from the onscreenlist to display the event within the Calendarnotification screen.
3. Tap one of the following options:
Snooze all to snooze all event reminders for fiveminutes.
Dismiss all to dismiss all event reminders.
Press to keep these reminders in placeand close the Notifications panel.
Note: A maximum of five Reminder fields can be added.
To configure event reminder settings:
1. Press and tap .
2. Press and tap More > Settings. This iswhere you are notified of upcoming calendar
Tap Select ringtone to select an audio ringtonethat will sound once the event’s reminder criteriais met (ex: 10 minutes before an event).
● Tap a ringtone to hear an audio sample.

8/6/2019 Sprint M900 Moment Ug Eng
http://slidepdf.com/reader/full/sprint-m900-moment-ug-eng 89/212
2E. Calendar & Tools 7
where you are notified of upcoming calendarevents.
3. Configure the following
fields: Tap Hide declined events to remove any declinedevents from reappearingin the Notificationspanel.
Appointment sync range indicates the date range
for which events arebeing synchronized withyour Exchange server.
Tap Set alerts & notifications to configure how youare reminded of upcoming events. You must havea reminder assigned to an event for this to beactive. Options include: Alert (audio), Status bar
notification (Status bar icon), or Off (no
notification).
● Tap OK to accept the ringtone assignment.
Tap Vibrate to add a vibration feature to thereminder. This is useful if your device is muted oryou are in a loud environment.
Tap Set default reminder to assign a default timefor every new event reminder. This becomes thedefault reminder time.
4. Press to return to the calendar.
Viewing Events
1. Press and tap
. Once an event hasbeen created, entries are shown in the Agendaview where all upcoming calendar events inchronological order.
2. To view Calendar event farther out, pressand tap Week or Month.
3. Tap the day for which you would like to viewevents. (Your device lists events in chronologicalorder.)
4. To display an event’s details, tap it from the Agendaview
Tap Privacy and select Default, Private, or Public.
6. Scroll to the bottom of the event details page andtap Done.
Erasing a Day’s Events

8/6/2019 Sprint M900 Moment Ug Eng
http://slidepdf.com/reader/full/sprint-m900-moment-ug-eng 90/212
78 2E. Calendar & Tools
view.
Going to the Current Day’s Calendar Menu
1. Press and tap .
2. Press and tap Today.
Editing an Existing Event
1. Press and tap .
2. Tap the event to reveal the event details.
3. Press and tap Edit event.
4. Make your modifications (name, location,repetition, reminders, etc).
5. Make other field modifications by accessingadditional options.
Press and tap Show extra options.Additional fields are Presence and Privacy.
Tap Presence and select Busy or Available.
Erasing a Day s Events
1. Press and tap .
2. Tap the event to reveal the event details.
3. Press and tap Delete event. (You will see analert notifying you of the deletion.)
4. Tap OK .
Tip: In the Month view, days with events scheduled are shownwith a green bar.
Note: If the day for which you are erasing events contains a
repeating event, you will receive the following options:Only this event, This & future events, or All events.Select Only this event to erase a single occurrence,
This & future events to erase this event going forward, All events to erase all occurrences of the event (past/present/future), or Cancel to cancel the deletion of therepeating event.
File Viewer
File viewer allows you to view supported image filesand text files.
Alarm Clock
Your device comes with a built-in alarm clock that hasmultiple alarm capabilities. There is no limit to thenumber of alarm events you can create

8/6/2019 Sprint M900 Moment Ug Eng
http://slidepdf.com/reader/full/sprint-m900-moment-ug-eng 91/212
2E. Calendar & Tools 7
Accessing File Viewer
From the Home screen, tap > File Viewer.Navigation in this viewer works on a hierarchystructure with folders, subfolders, etc.
Opening Files in File Manager 1. From the Home screen, tap > File Viewer.
2. Tap a folder and scroll down or up until you locateyour selected file.
3. Once you have located your file, tap the file nameto launch the associated application.
number of alarm events you can create.
1. Press and tap > .
2. Tap the time field of a default alarm event.
3. Activate the alarm by tapping the Turn on alarm
field.4. Tap the Time field to begin adjustment of the alarm
time.
Adjust the hour and minute by tapping or.
Tap the AM or PM button to change the value.
Tap Set when finished.
Note: The following files can be viewed on the SamsungMoment™, image (JPG, BMP, GIF) and text (PDF, XLA,TXT, DOC).
Playable music files include: WAV, MP3, and WMA.Note: Upon your first launch of the Alarm Clock application,
three alarms are set up by default and ready for you tocustomize. These alarms are turned off by default.
Note: A new alarm can also be created from the Alarm pageby pressing > Add alarm.
5. Tap Ringtone to select an audio ringtone that will
To delete an Alarm event:
1. Press and tap > .
2. Tap the time field for the desired alarm event.
3 Press and tap Delete alarm
Note: The number of hours and minutes left before the alarmgoes off is briefly displayed onscreen after you set thenew alarm time.

8/6/2019 Sprint M900 Moment Ug Eng
http://slidepdf.com/reader/full/sprint-m900-moment-ug-eng 92/212
80 2E. Calendar & Tools
sound with the alarm.
Tap a ringtone to hear an audio sample.
Tap OK to accept the ringtone assignment.6. Tap Vibrate to add a vibration feature to the alarm.
7. Tap the Repeat field to select a repeating status forthe alarm.
Place a checkmark adjacent to the desiredrepetition days Monday, Tuesday, Wednesday,
Thursday, Friday, Saturday or Sunday and tap OK .
8. Select a unique name for this alarm event bytapping the Label field, entering a new label, andtapping OK .
9. Press to return to Alarm screen where thenew alarm event is shown with a checkmark.
3. Press and tap Delete alarm.
To customize the onscreen clock:
1. Press and tap
> .2. Tap the onscreen alarm clock.
3. Scroll your finger across the bottom field totemporarily view each selection.
4. Tap the desired image to activate the new clockface.
To hide the onscreen clock:
1. Press and tap > .
2. Press and tap Hide clock.
Note: To allow the alarm to sound even while the device is insilent mode, press and tap Settings and activatethe Alarm in silent mode field.
Calculator
Your device comes with a built-in calculator.
1. Press and tap > .
The device’s Update Firmware option allows you todownload and update the software in your deviceautomatically. Only the internal software version isupdated; no Contacts entries or other storedinformation saved to your device is deleted.

8/6/2019 Sprint M900 Moment Ug Eng
http://slidepdf.com/reader/full/sprint-m900-moment-ug-eng 93/212
2E. Calendar & Tools 8
2. Enter numbers using your keyboard or by tappingan onscreen key.
Touch and hold CLEAR to clear all numbers.
Press and tap Advanced panel to accessmore advanced features such as sin (Sine), cos (Cosine), tan (Tangent) etc.
Updating Your Device
You can update your device's software using either theUpdate Firmware options or the Samsung PC Update
Tool, which is a part of the Samsung New PC StudioTM application.
When you connect your device to the computer (see“Connecting Your Device to Your Computer” on page
94), you can use the Samsung PC Update Tool (part ofthe Samsung New PC Studio™ application), to updatethe software version of your device.
Download the application from either:
www.sprint.com/support.
– or –
www.samsung.com/us/PCstudio.
To download software updates to your device:
1. Press > and tap >
About phone > System Updates.
2. Tap Update Firmware. (Your device automaticallydownloads and installs any available updates. Youmay be required to power your device off andback on to complete the software upgrade.)
Note: Tapping CLEAR only deletes one number at a time.
Note: If your device can not initiate an update, enable theUSB debugging option and launch the NEW PC StudioTool to start the update process.
To install the Samsung PC Update Tool:
1. Launch the New PC Studio executable file.
To update your device via the Samsung PC Update Tool:
This Samsung New PC Studio™ application allows youto update your Samsung Moment™ software from yourcomputer.

8/6/2019 Sprint M900 Moment Ug Eng
http://slidepdf.com/reader/full/sprint-m900-moment-ug-eng 94/212
82 2E. Calendar & Tools
2. Select a language and click OK .
3. Follow the onscreen prompts to select a country,
agree to the license agreement, choose adestination folder for the software and completethe installation process.
Device drivers are also installed as part of thisprocess.
1. On your computer, click Start > Programs >Samsung New PC Studio > Samsung New PC Studio.
2. Plug the USB cable from your Samsung Moment™to your computer and turn on the device.
3. Click (Update tool).
4. From the Update popup, click the Update device tab.
5. Select the SPH-M900 from the drop-down list.
Note: If the program’s onscreen User Guide appears, closethis page to proceed to the application’s main screen.
Note: If the connection Wizard appears, click Close.
The USB debugging option should be checked withinSettings > Applications > Development prior toconnecting your device to PC studio (for use as anupdate tool.)
6. If your device has an available software update,click the Update button and follow the onscreeninstructions.
– or –
If the Update button is greyed-out there is currently
Updating Your PRL
This option allows you to download and update thePRL (preferred roaming list) automatically.
1 P > d t >

8/6/2019 Sprint M900 Moment Ug Eng
http://slidepdf.com/reader/full/sprint-m900-moment-ug-eng 95/212
2E. Calendar & Tools 8
If the Update button is greyed-out, there is currentlyno available update, click Close.
Updating Your Profile
This option allows you to automatically update youronline user profile information. If you choose to changeyour user name and select a new one online, you mustthen update the user name on your device.
1. Press > and tap >
About phone > System Updates > Update Profile.2. Follow the onscreen instructions.
1. Press > and tap >
About phone > System Updates > Update PRL.
2. Follow the onscreen instructions.
Activating ASR
1. Press and hold , you will then hear a prompt.
– or –
Press and tap > .
2F. Voice Services

8/6/2019 Sprint M900 Moment Ug Eng
http://slidepdf.com/reader/full/sprint-m900-moment-ug-eng 96/212
84 2F. Voice Services
Automatic Speech Recognition (ASR) (page 84)
Sending a Message (page 87)
Looking Up a Contact (page 89)
ASR Menus and Options (page 89)
Automatic Speech Recognition
(ASR)You can use your device’s built-in automatic speechrecognition (ASR) software, called Voice Control, to diala phone number in your Contacts or to launch phonefunctions. All you have to do is to talk into the phone,and ASR will recognize your voice and complete tasksby itself.
Press and tap > .
The screen displays “Say a command” and the phoneprompts you to say the name of the command youwant to use. To complete your task, simply follow thevoice prompts or touch an onscreen option.
Available ASR commands include:
Call <Name or #> to call an entry in your Contactslist or a spoken phone number. (See “Making aVoice Call With ASR” on page 85.)
Send Text <Name or #> to send a new text message
to an entry in your Contacts list or a spoken phonenumber (page 87.)
Send Picture <Name or #> to send a new picturemessage to an entry in your Contacts list or a spokenphone number (page 87.)
Important: The Voice Control (Speech to Action) feature willnot launch if you are currently in an active menu.
Send Video <Name or #> to send a new videomessage to an entry in your Contacts list or a spokenphone number (page 88.)
Send Email <Name> to send a new email to an entryin your Contacts list (page 88.)
Making a Voice Call With ASR
1. Press and hold , you will then hear a prompt.
2. When you hear “Say a command,” say “Call”followed by the name and the label for the phone

8/6/2019 Sprint M900 Moment Ug Eng
http://slidepdf.com/reader/full/sprint-m900-moment-ug-eng 97/212
2F. Voice Services 8
Lookup <Name> to call an entry in your Contacts listor a spoken phone number (page 89.)
Go To <Menu> to jump directly to menu items orapplications. (See “Opening Menus With ASR” onpage 89.)
Play <Playlist> to select from a list of current musicplaylists and then initiate the Music player.
Check <item> to check your phone’s status. (See“Checking Phone Status Using ASR” on page 90.)
number you wish to call. For example, say “Call
John Smith Mobile.” The device dials the number
stored for the contact “John Smith” with the label“Mobile.”
You can also touch the onscreen Call <Name or
#> field to activate the function.
If the location is not recognized or the name doesnot have a phone number stored in Contacts,your phone will play the message “No match
found,” and then return you to the previous
screen.3. When you hear “Say the name or number,” say a
name or a phone number.
If a name has only a single number, or if youknow the name but are not sure which number tocall, say “Call” followed by the name only. Forexample, say “Call John.” If the name isrecognized and there is only one phone number
Tip: Use ASR in a quiet environment so it can accuratelyrecognize your commands.
During ASR operation, press Menu and tap Help to getinstructions using the software.
for the name, your device immediately places thecall.
4. When you hear “ Which location?,” say a numbertype (for example, “Mobile”).
If there are multiple numbers stored for the
Calling a Phone Number With ASR
1. Press and hold , you will then hear a prompt.
2. When you hear “Say a command,” say “Call”followed immediately by a valid string of digits to

8/6/2019 Sprint M900 Moment Ug Eng
http://slidepdf.com/reader/full/sprint-m900-moment-ug-eng 98/212
86 2F. Voice Services
If there are multiple numbers stored for thecontact, the phone prompts you with “ Which
Number?” and displays a list of options. You can
select an option by saying it or by touching thecorresponding phone number onscreen.
be dialed, for example, say “Call 555 555 5555.”
3. If the correct number is repeated, say “ Yes” to dial
the number. If the number is not recognized, the phone willplay the message “Did you say call?”
If the announced number is not correct, either say“ Yes,” “No,” or “Cancel.” When the correct numberis announced, say or touch “ Yes” to dial thenumber.
Speak naturally and clearly and remember to speakone digit at a time—1-800 should be pronounced “OneEight Zero Zero.”
Tip: You can skip steps 3 and 4 by saying a name andlocation after “Call” without pausing (for example, “Call
John Jones mobile”).
Note: If ASR does not recognize the name or number, it willfind the most likely matches and display a list of up to
three names or numbers. You will hear “Did you say…”followed by the name or number. You can confirm bysaying or tapping “ Yes.” Say or tapping “No” to changethe selection.
Note: If the phone does not hear a command withinapproximately eight seconds, it deactivates Speech toAction without taking any action.
Sending a Message
Use a single voice command to launch messaging onyour device and specify a recipient for the message.
Tosend a text message:
6. Tap the Type to compose field to enter text.
7. Tap Send to complete the process.
To send a picture message:
1. Press and hold , you will then hear a prompt.

8/6/2019 Sprint M900 Moment Ug Eng
http://slidepdf.com/reader/full/sprint-m900-moment-ug-eng 99/212
2F. Voice Services 8
To send a text message:
1. Press and hold , you will then hear a prompt.
2. When you hear “Say a command,” say “Send Text”followed by the name or phone number of therecipient. For example, say “John Smith” or“9725551212.” The entry information for thespecified contact is displayed.
3. If the device did not properly recognize thecommand, it prompts you with “Did you say, send
text to?”
4. Respond by saying one of the following: Yes, No,Repeat, or Cancel.
5. Press and tap Add subject and tap theSubject field to enter a subject text.
2. When you hear “Say a command,” say “Send
Picture” followed by the name or phone number of
the recipient. For example, say “John Smith” or“9725551212.” The entry information for thespecified contact is displayed.
3. If the device did not properly recognize thecommand, it prompts you with “Did you say, send
text to?”
4. Respond by saying one of the following: Yes, No,
Repeat, or Cancel.5. Press and tap Attach.
6. Tap either Pictures or Capture picture. Onceattached, you can View, Replace, or Remove theattached image.
Pictures: Opens the Gallery application. Use theonscreen navigation to locate the picture you wishto send with the outgoing Picture Mail message.
Note: If a name contains multiple numbers and you do notspecify the number type (work, mobile, etc.), yourdevice chooses the mobile number by default.
Capture picture: Follow the onscreen prompts totake a new picture and then attach it to the newmessage.
7. Press and tap Add subject and tap theSubject field to enter a subject text.
6. Tap either Videos or Capture video. Once attached,you can View, Replace, or Remove the attachedimage.
Videos: Opens the Gallery application. Use theonscreen navigation to locate the video you wishto send ith the o tgoing Video Mail message

8/6/2019 Sprint M900 Moment Ug Eng
http://slidepdf.com/reader/full/sprint-m900-moment-ug-eng 100/212
88 2F. Voice Services
8. Tap the Type to compose field to enter text.
9. Tap Send to complete the process.To send a video message:
1. Press and hold , you will then hear a prompt.
2. When you hear “Say a command,” say “Send
Video” followed by the name or phone number ofthe recipient. For example, say “John Smith” or“9725551212.” The entry information for the
specified contact is displayed.3. If the device did not properly recognize the
command, it prompts you with “Did you say, send
video to?”
4. Respond by saying one of the following: Yes, No,Repeat, or Cancel.
5. Press and tap Attach.
to send with the outgoing Video Mail message.
Capture video: Follow the onscreen prompts to
shoot a new video and then attach it to the newmessage.
7. Press and tap Add subject and tap theSubject field to enter a subject text.
8. Tap the Type to compose field to enter text.
9. Tap Send to complete the process.
To send an email message:
1. Press and hold , you will then hear a prompt.
2. When you hear “Say a command,” say “Send
Email” followed by the name of the recipient. Forexample, say “John Smith”. The entry informationfor the specified contact is displayed.
Note: If a name contains multiple email addresses and youdo not specify the account (Gmail, work, etc.), your
device chooses the first email account by default.
3. Tap an email account to use for the new outgoingemail message: Compose (Gmail) or Work Email.
Tap Use by default for this action to assign theselection as your new default choice for outgoingemail messages via the ASR.
Looking Up a Contact
Use a single voice command to lookup an existingcontact and view their information.
1. Press and hold , you will then hear a prompt.

8/6/2019 Sprint M900 Moment Ug Eng
http://slidepdf.com/reader/full/sprint-m900-moment-ug-eng 101/212
2F. Voice Services 8
4. Tap the Subject field to enter subject text.
5. Tap the Compose Mail field to enter the email text.
6. Press to select from the following options:
Send: to deliver the current email message.
Add Cc/Bcc: to add more recipients to youroutgoing email message.
Attach: to attach a current picture or take a newone ( > Capture picture).
Edit subject: to alter the current subject text field. Discard: to delete the current email message.
7. Tap Send to complete the process.
1. Press and hold , you will then hear a prompt.
2. When you hear “Say a command,” say “Lookup”
followed by the name.
ASR Menus and Options
Opening Menus With ASR
You can jump directly to many menu items orapplications by saying “Go to” followed by a menu
option.1. Press and hold , you will then hear a prompt.
2. When you hear “Say a command,” say “Go To.” Alist of valid destinations is displayed and you areprompted with “ Which shortcut?”
The phone opens the selected menu.
If the list is too long to fit on one screen, you can
say the name of a destination.
Examples can include: Alarm Clock, AmazonMP3, Bejeweled Demo, Browser, Calculator,Calendar, Camcorder, Camera, etc.
3. Say the name of the application you want thedevice to activate.
1. Press and hold , you will then hear a prompt.
2. When you hear “Say a command,” say “Check.”
3. If you hear “ Which status item?,” say an item.
Tip: Touch and scroll through the onscreen list to reveal moreoptions

8/6/2019 Sprint M900 Moment Ug Eng
http://slidepdf.com/reader/full/sprint-m900-moment-ug-eng 102/212
90 2F. Voice Services
Checking Phone Status Using ASR
You can use ASR to obtain information about yourphone:
Status
Voicemail
Messages
Missed Calls
Time
Signal Strength
Network
Battery
My Phone Number
Volume
ASR OptionsTo change ASR confirmation:
1. Press and hold .
2. Press and tap Settings > Confirmation andselect an option.
Automatic to ask for confirmation only when thesystem is not sure what you said.
Always Confirm to always ask for confirmation.
Never Confirm to never ask for confirmation.
To adapt the system to your voice:
1. Press and hold .
2. Press and tap Settings > Adaptation >
Adapt Voice.
Tip: Tap and scroll through the onscreen list to reveal moreoptions.
options.
3. Press the onscreen Start and repeat each word,phrase, or telephone number you hear.
To reset the adaptation:
1. Press and hold .
2 Press and tap Settings > Adaptation >

8/6/2019 Sprint M900 Moment Ug Eng
http://slidepdf.com/reader/full/sprint-m900-moment-ug-eng 103/212
2F. Voice Services 9
2. Press and tap Settings > Adaptation >
ResetVoice > Yes.
To change the ASR mode:
1. Press and hold .
2. Press and tap Settings > Audio Modes andselect an option.
Expert Mode to sound a beep only.
Prompt Mode to prompt for required information.
Readout Mode to prompt for required informationand to read aloud the content displayed on themain screen.
R i h i SDC d
2G. microSD Card Important: Camera, Camcorder, and Music playback
features are dependant on having a microSDmemory card installed. Although the SamsungMoment™ comes with a 2GB card (pre-installed),it can support microSD cards of up to 16GB.

8/6/2019 Sprint M900 Moment Ug Eng
http://slidepdf.com/reader/full/sprint-m900-moment-ug-eng 104/212
92 2G. microSD Card
Your Device’s microSD Card and Adapter (page 92)
Connecting Your Device to Your Computer (page 94)
microSD Card Settings (page 95)
Important Connection Information (page 96)
Your Device’s microSD Card and Adapter
The microSD Card Your device is equipped with a preinstalled 2GBmicroSDTM (Secure Digital) memory card. It allows youto store images, videos, music, and voice data in yourdevice.
Removing the microSD Card
1. Remove the cover. Press down on the battery cover.
While applying pressure, slide the cover awayfrom the camera lens.
2. Remove the battery.
3. Locate the memory slot between the lens andbattery compartment.
Note: You can easily damage the microSD card and itsadapter by improper operation. Please be careful wheninserting, removing, or handling it.
6. Place the battery back into its compartment.
7. Replace the battery cover and firmly slide it in untilyou hear a click.
microSD card
Note: Be sure to use only recommended microSD cards(<16GB). Using non-recommended microSD cards
ld d t l d d d i

8/6/2019 Sprint M900 Moment Ug Eng
http://slidepdf.com/reader/full/sprint-m900-moment-ug-eng 105/212
2G. microSD Card 9
4. Make sure the microSD card's gold contacts arefacing down.
5. Place your fingernail along the curved edge of themicroSD card (closest to the battery compartment),and gently pull it out of the slot.
Re-inserting the microSD Card
Refer to the procedures in the previoussection. The battery must be removedprior to installation of a microSD card.
microSD Icon Indicators
You will only see a microSD-related icon if the card hasbeen unmounted (released from use) from the device( ):
WARNING: Do not over-insert the card as this can damagethe contact pins.
could cause data loss and damage your device.
WARNING: The microSD card and its adapter can be easilydamaged by improper operation. Please becareful when inserting, removing, or handling it.
Write Protection
The microSD adapter has a built-in Write Protectionlock to prevent accidental overwriting or removal ofyour data when the microSD card and adapter areinserted in another device.
WARNING: DO NOT remove a microSD card while thedevice is accessing or transferring files. Doing sowill result in loss or damage of data. Make sureyour battery is fully charged before using themicroSD card. Your data may become damagedor lost if the battery runs out while you are usingth i SD d

8/6/2019 Sprint M900 Moment Ug Eng
http://slidepdf.com/reader/full/sprint-m900-moment-ug-eng 106/212
94 2G. microSD Card
microSD Adapter The supplied microSD adapter allows you to usemicroSD cards in other SD-compatible devices, likecomputers, cameras, and printers. Before using themicroSD card with an SD-compatible device, you willneed to insert the microSD card into the microSDadapter.
To insert the microSD card into the microSD adapter: With the label side of the microSD card facing up,
insert the card into the supplied microSD adapter,and gently slide the card until it is fully inserted.
To remove the microSD card from the microSD adapter:
Hold the front edge of the microSD card, andgently pull it out to remove it from the adapter.
Slide the Write Protection lock tab down into the“Lock” position to prevent overwriting of data. To
allow data to be added or removed from themicroSD card, slide the Write Protection lock tabup into the normal position.
Connecting Your Device to Your Computer
Before using your device’s mass storage capabilities,you need to prepare your device’s data services tosynchronize with your desktop or laptop computer.Once you have connected the device to the computer,you can transfer your data to or from the microSD card.
the microSD card.
Before You Begin
Here is what you will need to have before you cansuccessfully establish a connection between yourSamsung Moment™ and PC.
microSD card (internally installed prior to start)
To remove the connection:
When you have finished transferring data, click theUSB device icon on you computer's taskbar, andfollow the onscreen instructions to safely unplugthe USB cable.

8/6/2019 Sprint M900 Moment Ug Eng
http://slidepdf.com/reader/full/sprint-m900-moment-ug-eng 107/212
2G. microSD Card 9
compatible USB cable (included)
1. With the microSD card installed, connect yourdevice to your computer using a compatible USBcable. (Wait for the connection to be completed.When connected, the host computer willautomatically detect your device.)
2. The USB icon ( ) now appears in the top leftNotifications area on your device.
3. Touch and drag down the Status screen to revealthe Notifications page (or from the Home screenpress and tap Notifications).
4. Tap USB connected > Mount to copy files betweenyour computer and your device's microSD card.
5. Locate the newly created Drive letter on yourcomputer. You can now begin to use the microSDcard as a storage device.
microSD Card Settings
Viewing Memory in the microSD Card
The Samsung Moment™ allows you to review thememory allocation of both your device’s internalstorage and that of the microSD card.
1. Press > and tap >
SD card & phone storage.
2. Review the available information.
The storage capacity page is divided into twosections: External SD card and Internal phone
storage.
3. Press to return to the previous page.
Formatting the microSD Card
Formatting a microSD card permanently removes allfiles stored on the card.
1. Press > and tap >
SD card & phone storage.
Important Connection Information
To avoid loss of data, DO NOT remove the USBcable, the microSD card, or the battery whileaccessing or transferring files.
DO NOT use your computer to change or edit folder

8/6/2019 Sprint M900 Moment Ug Eng
http://slidepdf.com/reader/full/sprint-m900-moment-ug-eng 108/212
96 2G. microSD Card
2. Touch Unmount SD card to release the microSD
card from its use by the device. The iconappears within the Notifications area to indicate anunmounted internal microSD card.
3. Once released, tap Format SD card > Format SD
card > Erase everything.
Once completely formatted, the card isautomatically re-mounted (reconnected for use by
the device).
DO NOT use your computer to change or edit folderor file names on the microSD card, and do not
attempt to transfer large amounts of data from thecomputer to the microSD card. Doing so may causethe microSD card to fail.
DO NOT turn off or restart your computer, or put itinto standby mode, while using a mass storagedevice. Doing so will result in loss or damage of data.
The internal microSD card can only be mounted foruse by either the device or a connected computer.
Prior to accessing the card via a different method, itmust first be unmounted from its current device(phone or computer-USB).
Important: The formatting procedure erases all the data onthe microSD card, after which the files CANNOT be retrieved. To prevent the loss of important data,please check the contents before you format thecard.
Important: The internal microSD card can only share aconnection with one device at a time, either yourdevice or your computer (via its USB connection),not both.
Taking Pictures (page 97)
Taking Pictures
Taking pictures with your device’s built-in camera is assimple as choosing a subject, pointing the lens, andpressing a button.
To take a picture:
2H. Camera

8/6/2019 Sprint M900 Moment Ug Eng
http://slidepdf.com/reader/full/sprint-m900-moment-ug-eng 109/212
2H. Camera 9
Taking Pictures (page 97)
Recording Videos (page 102)
To take a picture:
1.Press and tap
>to activatecamera mode. (Additional camera options are
available through the camera settings page. See“Camera Settings” on page 98 for moreinformation.)
2. Using the device’s display screen as a viewfinder,
aim the camera lens at your subject.
Note: The storage card that comes installed on your deviceallows you to use the camera and camcorder features.All pictures and videos are stored on the internal 2GBmicroSD card. The Samsung Moment™ supportscards of up to 16GB.
Shortcut: To activate camera mode, you can also press andhold the camera button ( ).
Camera Settings
1. From camera mode, press and adjust anyof the following options:
Switch to Video to switch to the Camcorder mode(to record videos).

8/6/2019 Sprint M900 Moment Ug Eng
http://slidepdf.com/reader/full/sprint-m900-moment-ug-eng 110/212
98 2H. Camera
3. Press or or until the shuttersounds. (Your device automatically saves thepicture to the DCIM folder on the microSD card.)
Gallery to access the Gallery of stored camera
images.● Tapping Gallery and pressing reveals
gallery-specific options such as Capture
picture, Capture video, Slideshow, or Settings.
● Tapping Gallery while in the Camera modeopens the Camera pictures gallery.
● Tap an image to open it, and press foroptions such as Slideshow, Share, Rotate,
Delete, Crop, and More.● Press to return to the previous screen.
Settings to access camera hardware settings:
● Store location in pictures to activate theon-board GPS hardware and attach currentlocation information to any new pictures.
● Select video quality to adjust the image quality.
Options include Low and High.
● Select camera flash to activate the built-in flashand provide an additional light source for newpictures taken with the Samsung Moment™.
2. Press to return to the previous screen.
Flash
Capture video to switch to the camcorder modeand shoot a new video.
Slideshow to activate the picture slideshow. Thisturns your Samsung Moment™ into a pictureframe.
Settings to adjust general settings and make

8/6/2019 Sprint M900 Moment Ug Eng
http://slidepdf.com/reader/full/sprint-m900-moment-ug-eng 111/212
2H. Camera 9
1. From camera mode, press and tap
Settings > Select camera flash.2. Tap an option:
On to activate the flash for one shot.
Off to deactivate the flash.
Camera Gallery Options
When the device is in camera mode, accessing the
gallery provides access to pictures on your device.1. Press and tap Gallery to display the gallery
of images taken on your device and stored on themicroSD card.
2. Press to reveal gallery-specific options:
Capture picture to return to the camera mode andtake another picture.
g j g gmodifications to the slideshow parameters.
● Display size to change the size of the image orvideo preview images on the gallery page.Options include: Large (default) or Small.
● Sort order to change the order in which theimages or videos are displayed on theCamera pictures gallery page. Optionsinclude: Newest first (default) or Newest last.
● Confirm deletions to require an additional
onscreen notification prior to completing thedeletion of an image or video.
● Slideshow interval to change the length of timeeach slide appears onscreen during theslideshow. Options include: 2 seconds, 3
seconds (default), or 4 seconds.
● Slideshow transition to change the transitionused between each image displayedonscreen during the slideshow. Optionsinclude: Fade in & out (default), Slide left - right,Slide up - down or Random selection.
● Repeat slideshow to enable the repetition ofth lid h O th l t i i th
4. Press to display the following image menuoptions:
Note: Picture options can also be accessed by touchingand holding the image from the gallery. These optionsinclude: View, Share, Rotate, Delete, Crop, Set as,Details and Slideshow.

8/6/2019 Sprint M900 Moment Ug Eng
http://slidepdf.com/reader/full/sprint-m900-moment-ug-eng 112/212
100 2H. Camera
the slideshow. Once the last image in thecurrent gallery is displayed, the slideshowbegins again with the first image in the list.
● Shuffle slides to display the slideshow imagesin a random fashion and not by the order inwhich they appear in the gallery.
3. Press to return to the previous screen.
Camera Image Settings
1. Press and tap > to activatecamera mode.
2. Press and tap Gallery.
3. From Camera pictures gallery, tap an image icon toopen the image.
Use the zoom buttons (below the image) to zoomin or out.
p
Slideshow to activate the slidehsow feature. See
“Camera Gallery Options” on page 99. Share to activate the picture share menu fromwhich you can choose to share the current imagevia one of many options:
● Email to attach your image to a new Outlookemail message.
● Gmail to attach your image to a new Gmail
email message.● Messaging to insert your image into a new
outgoing MMS message (multimedia textmessage).
● Moxier Mail to attach your image to a newoutgoing email via the Moxier Mail application.Moxier Mail provides a secure emailapplication using direct push synchronization
with a Microsoft®
Exchange Server.
● My Places to upload your current image to aselected target Web community location.Options include: My PC/Email, Photobucket,Facebook, My Space, and YouTube.
● Picasa to upload your current image to yourPicasa account. Tap Upload to complete theprocess
● Settings to adjust general settings for thepicture gallery and make modifications to theslideshow parameters. See “Camera GalleryOptions” on page 99.
Assigning Pictures

8/6/2019 Sprint M900 Moment Ug Eng
http://slidepdf.com/reader/full/sprint-m900-moment-ug-eng 113/212
2H. Camera 1
process.
Rotate to rotate the current image. Optionsinclude: Rotate left or Rotate right.
Delete to delete the current image.
Crop to crop the current image. Crop the imageand tap Save to a new version of the original.
More to access additional image options such as:Set as, Details, and Settings.
● Set as to assign the current image to either acurrent Contact’s display image or as theHome screen background wallpaper(page 101).
● Details to display image details such as filename, file size, resolution and date taken.
After taking a picture, assign it as a picture ID for a
Contacts entry or as the Home screen backgroundimage (wallpaper).
1. Take a picture. (See “Taking Pictures” on page 97.)
2. Press and tap Gallery.
3. From Camera pictures gallery, tap an image icon toopen the image.
4. With the picture displayed, press and tap
More > Set as, and select an option. Contact icon to assign the picture to a Contactsentry as a picture ID. Tap an entry from theContacts tab, crop the image and tap Save toassign the picture.
Wallpaper to assign the picture as a backgroundimage, crop the image and tap Save to assign thepicture.
Recording Videos
In addition to taking pictures, you can record, view, andsend videos with your device’s built-in video camera.
1. Press and tap > to activatecamcorder mode. (Additional camera options are
Camcorder Settings
1. From camcorder mode, press and adjustany of the following options:
Switch to camera to switch to the Camera mode(to shoot pictures).
G ll t th G ll f t d id

8/6/2019 Sprint M900 Moment Ug Eng
http://slidepdf.com/reader/full/sprint-m900-moment-ug-eng 114/212
102 2H. Camera
( pavailable through the camera settings page. See
“Camera Settings” on page 98 for moreinformation.)
2. Using the device’s display screen as a viewfinder,aim the camera lens at your subject.
3. Press or or to begin recording.
4. Press or or to stop recording. (Yourdevice automatically saves the video within theDCIM folder on the microSD card.)
Gallery to access the Gallery of stored videos.
● Tapping Gallery while in Camcorder modeopens the Camcorder videos gallery fromwhich you can play, share, delete, or viewdetails for stored videos.
● From the Camera videos gallery, press andhold a video icon to display video menuoptions such as Play, Share, Delete, and viewDetails.
● Press to return to the previous screen. Settings to access camera/camcorder hardwaresettings:
● Store location in pictures to activate theon-board GPS hardware and attach currentlocation information to any new pictures.
● Select video quality to adjust the video quality.Options include Low and High.
Shortcut: To activate camera mode, you can also press andhold the camera key ( ).
● Select camera flash to activate the built-in flashand provide an additional light source for newpictures taken with the Samsung Moment™.
2. Press to return to the previous screen.
Camcorder Gallery Options
Video Settings
1. Press and tap > to activatecamcorder mode.
2. Press and tap Gallery.
3. From Camera videos gallery, tap a video icon to

8/6/2019 Sprint M900 Moment Ug Eng
http://slidepdf.com/reader/full/sprint-m900-moment-ug-eng 115/212
2H. Camera 1
When the device is in camcorder mode, accessing the
gallery provides access to videos on your device.1. Press and tap Gallery to display the gallery
of videos taken on your device and stored on themicroSD card.
2. Press to reveal gallery-specific options forthe Camera videos:
Capture picture to return to the camera mode and
take another picture. Capture video to switch to the camcorder modeand shoot a new video.
Settings to adjust general settings and makemodifications to the slideshow parameters. See“Camera Gallery Options” on page 99.
3. Press to return to the previous screen.
begin video playback.
4. Press and hold the video icon
to display thefollowing video menu options:
Play to begin playback of the current video file.
Share to activate the Share video as menu fromwhich you can choose to share the current videovia one of many options:
● Email to attach your video to a new Outlook
email message.● Gmail to attach your video to a new Gmail
email message.
● Messaging to insert your video file into a newoutgoing MMS message (multimedia textmessage). See “Multimedia Messaging(MMS)” on page 121.
● Moxier Mail to attach your video file to a newoutgoing email via the Moxier Mail application.Moxier Mail provides a secure emailapplication using direct push synchronizationwith a Microsoft® Exchange Server.
● My Places to upload your current video file to aselected target Web community location
8/6/2019 Sprint M900 Moment Ug Eng
http://slidepdf.com/reader/full/sprint-m900-moment-ug-eng 116/212
104 2H. Camera
selected target Web community location.Options include: My PC/Email, Photobucket,
Facebook, and My Space.● YouTube to upload your current video file to a
YouTube page. Tap Upload to complete theprocess.
Delete to delete the current video.
Details to display image details such as Filename, File size, Resolution, Duration, Frame rate,
Bit rate, Format, and Date taken.
Turning Bluetooth On and Off (page 105) Turning Bluetooth On and Off
2I. BluetoothNote: When connecting to Bluetooth headset, the Voice
Control application will not work. While using the BTHeadset key, you can only receive a call and send thelast call.

8/6/2019 Sprint M900 Moment Ug Eng
http://slidepdf.com/reader/full/sprint-m900-moment-ug-eng 117/212
2I. Bluetooth 1
Using the Bluetooth Settings Menu (page 106)
Pairing Bluetooth Devices (page 108)
Sending Contacts via Bluetooth (page 109)
Disconnecting Bluetooth Connection During an Active
Call (page 110)
About Bluetooth
Bluetooth is a short-range communications technology
that allows you to connect wirelessly to a number ofBluetooth devices, such as headsets and hands-freecar kits, and Bluetooth-enabled handhelds, computers,printers, and wireless devices. The Bluetoothcommunication range is usually up to approximately30 feet.
By default, your device’s Bluetooth feature is set to Off .Turning Bluetooth on makes your device“discoverable” by other in-range Bluetooth devices.
To turn Bluetooth on:
1. Press > and tap >
Wireless controls.
2. Tap the Bluetooth field to activate the feature(checkmark indicates active). When active,appears within the Status area.
Note: Activating Bluetooth can drain your battery faster andreduce your available usage times. It is recommendedthat if you do not need it active, turn it off.
It is also recommended to turn off your Bluetooth withinlocations that prohibit its use.
To turn Bluetooth off:
Press > and tap >
Wireless controls > Bluetooth.
Tap to remove the green checkmark anddeactivate Bluetooth.
BluetoothStatus Indicators
Using the Bluetooth Settings Menu
The Bluetooth settings menu allows you to set up manyof the characteristics of your device’s Bluetooth service,including:
Entering or changing the name your device uses forBl t th i ti d d i ti

8/6/2019 Sprint M900 Moment Ug Eng
http://slidepdf.com/reader/full/sprint-m900-moment-ug-eng 118/212
106 2I. Bluetooth
Bluetooth Status Indicators
The following icons show your Bluetooth connectionstatus at a glance:
– Bluetooth is active
– Bluetooth is connected (paired) and communicating
[no icon] – Bluetooth is disabled (default status)
Bluetooth communication and description
Setting your device’s visibility (or “discoverability”) forother Bluetooth devices
Displaying your device’s Bluetooth address
To access the Bluetooth Settings menu:
1. Press > and tap >
Wireless controls > Bluetooth settings.
2. Set your Bluetooth options: Device name,Discoverable, and Scan for devices.
To change your Bluetooth name:
1. Verify your Bluetooth is active.
2. From the Bluetooth settings page, tap Device name
3. Tap the Device name field, enter a new name.
4. Tap OK (or Done) to complete the rename process
Bluetooth Active

8/6/2019 Sprint M900 Moment Ug Eng
http://slidepdf.com/reader/full/sprint-m900-moment-ug-eng 119/212
2I. Bluetooth 1
To make your device visible:
1. Verify your Bluetooth is active.
2. From the Bluetooth settings page, tap Discoverable
Making your device visible allows it to bedetected by other devices for pairing andcommunication.
To scan for Bluetooth devices:
1. Verify your Bluetooth is active.
2. From the Bluetooth settings page, tap Scan for
devices to search for visible external Bluetooth-compatible devices such as Headsets, devices,printers, and computers.
Bluetooth Mono
Bluetooth Phone
Bluetooth Computer
Bluetooth Settings
Bluetooth Stereo
Headset
Headset
Note: Your device is visible for up to 120 seconds(2 minutes). This value appears as a countdown within
this field.
Pairing Bluetooth Devices
Paired Devices
The Bluetooth pairing process allows you to establishtrusted connections between your device and anotherBluetooth device. When you pair devices, they share a
Once successfully paired to an external device,appears within the Status area.
Note: Due to different specifications and features of otherBluetooth-compatible devices, display and operationsmay be different, and functions such as transfer orexchange may not be possible with all Bluetooth-compatible devices.

8/6/2019 Sprint M900 Moment Ug Eng
http://slidepdf.com/reader/full/sprint-m900-moment-ug-eng 120/212
108 2I. Bluetooth
passkey, allowing for fast, secure connections while
bypassing the discovery and authentication process.
To pair your device with another Bluetooth device:
1. Verify your Bluetooth is active.
2. From the Bluetooth settings page, tap Discoverable.Your device must be visible to successfully pairwith an external device.
3.Tap
Scan for devices. (Your device will display a listof discovered in-range Bluetooth devices,
page 106.)
4. Tap a device from the list to initiate pairing.
5. Enter the passkey or PIN code and tap Done > OK .
6. The external device will then have to also acceptthe connection and enter your device’s PIN code.
To disconnect a paired device:
Disconnecting a paired device breaks the connectionbetween the device and your Samsung Moment™, but
retains the knowledge of the pairing. At a later pointwhen you wish to reconnect the device, there is noneed to setup the connection information again.
1. Verify your Bluetooth is active.
2. From the Bluetooth settings page, touch thepreviously paired device (from the bottom of thepage).
Note: Pairing between two Bluetooth devices is a one-timeprocess. Once a pairing has been created, the deviceswill continue to recognize their partnership andexchange information without having to re-enter apasscode again.
3. Tap OK to confirm disconnection.
– or –
From the Bluetooth settings page, touch and holdthe name of the previously paired device, andselect Disconnect.
To access a paired device’s settings:
1. Verify your Bluetooth is active.
2. From the Bluetooth settings page, touch and hold
the name of the previously paired device.
3. Tap Options... and configure the desired options.
4 Press to return to the previous pageNote: Disconnections are manually done but often occur
t ti ll if th i d d i t f f

8/6/2019 Sprint M900 Moment Ug Eng
http://slidepdf.com/reader/full/sprint-m900-moment-ug-eng 121/212
2I. Bluetooth 1
To delete a paired device (unpair):
Deleting a device from your list removes its “connectionrecord” and upon reconnection would require that youre-enter all the previous pairing information.
1. Verify your Bluetooth is active.
2. From the Bluetooth settings page, touch and holdthe name of the previously paired device (from thebottom of the page). This opens the connecteddevice’s menu options.
3. Tap Disconnect & unpair to confirm deletion.
4. Press to return to the previous page.
Sending Contacts via Bluetooth
Depending on your paired devices’ settings andcapabilities, you may be able to send pictures,Contacts information, or other items using a Bluetoothconnection.
automatically if the paired device goes out of range of
your Samsung Moment™ or it is powered off.
Note: Prior to using this feature, Bluetooth must first be
enabled, and the recipient’s device must be visible.
Only Contacts can be sent via Bluetooth. No other filetype (video, image, or audio) can be sent usingBluetooth.
1. Press and tap
.
2. Touch and hold aContact entry from theContacts tab list toreveal the options menuspecific to this entry.
Disconnecting BluetoothConnection During an Active Call
1. During an active call,where the audio is beingrouted through aconnected Bluetooth
Call routed through
Bluetooth headset

8/6/2019 Sprint M900 Moment Ug Eng
http://slidepdf.com/reader/full/sprint-m900-moment-ug-eng 122/212
110 2I. Bluetooth
3. Tap a paired device. The external Bluetoothdevice must be visibleand communicatingfor the pairing to besuccessful.
connected Bluetooth
device (headset or hands-free connection), tapBluetooth to route thedevice’s audio through theconnected Bluetoothheadset (On) or throughthe speaker (Off).
When the call is routed to
a Bluetooth headset, thecurrent call area issurrounded by a blue box,the Bluetooth button indicates it’s on, and showsthe Bluetooth call icon ( ).
When turned off, the call is routed through eitherthe earpiece or speaker, the call area issurrounded by a green box, the Bluetooth buttonindicates its off, and shows ( ).
Bluetooth routed Device routed

8/6/2019 Sprint M900 Moment Ug Eng
http://slidepdf.com/reader/full/sprint-m900-moment-ug-eng 123/212
2I. Bluetooth 1

8/6/2019 Sprint M900 Moment Ug Eng
http://slidepdf.com/reader/full/sprint-m900-moment-ug-eng 124/212
Section 3

8/6/2019 Sprint M900 Moment Ug Eng
http://slidepdf.com/reader/full/sprint-m900-moment-ug-eng 125/212
Section 3
Sprint Service
Visual Voicemail (page 114)
Text Messaging (SMS) (page 119)
then populates a list with the caller name and number,along with the length of time and priority level of thevoicemail message. Always use a passcode to protectagainst unauthorized access.
Setting Up Your Visual Voicemail
Your device automatically transfers all unanswered
3A. Sprint Service:
The Basics

8/6/2019 Sprint M900 Moment Ug Eng
http://slidepdf.com/reader/full/sprint-m900-moment-ug-eng 126/212
114 3A. Sprint Service: The Basics
Text Messaging (SMS) (page 119)
Multimedia Messaging (MMS) (page 121)
Caller ID (page 125)
Call Waiting (page 125)
Making a 3-Way Call (page 126)
Call Forwarding (page 126)
Roaming (page 127)
Visual Voicemail
Visual Voicemail gives you a quick and easy way toaccess your voicemail. Now you can find exactly themessage you are looking for without having to listen toevery voicemail message first. This new featureperiodically goes out to your voicemail, and gathers thecaller information from all of the current voicemails. It
calls to your voicemail, even if your device is in use orturned off. You should set up your Sprint Voicemail andpersonal greeting as soon as your device is activated.
1. Press and tap .
2. Tap Personalize now and follow the systemprompts to:
Create your passcode.
Record your name announcement.
Record your greeting.
3. When prompted to enter information, pressand tap Show dialpad to bring up the onscreendialpad that can be used to input your numericresponses.
– or –
Tap from the bottom of the active callwindow.
Timeline provides a visual timeline for the currentmessage. Touch and drag this bar to scrubthrough the message to different points. Tapto pause the playback, tap to resume.
Speaker Off/On to either turn the speakerphoneon or off during playback. If the speakerphonefeature was enabled within the Voicemail Settingsmenu the speakerphone will always be
Note: Voicemail Passcode Sprint strongly recommends that you create apasscode when setting up your voicemail to protectagainst unauthorized access. Without a passcode,anyone who has access to your device is able toaccess your voicemail messages.

8/6/2019 Sprint M900 Moment Ug Eng
http://slidepdf.com/reader/full/sprint-m900-moment-ug-eng 127/212
3A. Sprint Service: The Basics 1
4. Once you havecompleted the setupprocess, return to theVoicemail page (seestep 1).
5. Tap the Welcome to
Voicemail message onthe screen to play a
brief explanation of theVoicemail services.
The following is adescription of the featuresavailable while reviewing aVoicemail message.
menu, the speakerphone will always be
automatically enabled during voicemail playback(page 116).
Delete to delete the current voicemail message.Tap OK to confirm the deletion process.
Older/Newer to replay either the previousvoicemail or continue to the next availablemessage.
Configuring Voicemail OptionsTo access the Voicemail menu options:
1. Press and tap .
2. Press and select from the following:
Compose to compose a new voicemail message.
y g
Play all new to playback all new (unlistened)voicemail messages.
Undelivered to display a list of currentlyundelivered outgoing voicemail messages.
Delete to delete selected messages from yourcurrent list of available voicemail messages.
Settings to configure your Voicemail application
Forward to forward the current voicemail toanother recipient.
Configuring Voicemail Settings
1. Press and tap .
2. Press and tap Settings. From the Settingsmenu, you can:

8/6/2019 Sprint M900 Moment Ug Eng
http://slidepdf.com/reader/full/sprint-m900-moment-ug-eng 128/212
116 3A. Sprint Service: The Basics
settings.To access a Voicemail message’s options:
1. Press and tap .
2. Tap an onscreen voicemail message and pressand select from the following:
Lock/Unlock to prevent deletion of the selectedvoicemail message.
Text message to create and deliver a new textmessage to the current sender’s phone number.
Reply to reply to current voicemail. You can thenreply to the sender or forward it to anyone witheither an email or phone number. This allows youto send this voicemail message to severalrecipients at the same time.
menu, you can:
Tap Speakerphone to automatically activate whenyou review your Visual Voicemail (page 116).
Tap Change greeting to adjust your voicemailgreeting (page 117).
Tap From name to enter a name or number that isattached to your outgoing voicemails as part ofan identification string (page 117).
TapCheck for upgrade
to search for an upgradeto your Visual message software.
Automatically Enabling the Speakerphone
Every time you access a selected message from yourVisual Voicemail list, you can configure the device toautomatically launch the built-in speakerphone so thatyou can clearly hear the message.
1. Press and tap .2. Press and tap Settings to make your
alterations.
Tap Speakerphone field (placing a checkmarkadjacent to the option) to activate the feature.
Tap Speakerphone field again to deactivate thespeakerphone.
Editing the From Name via the Voicemail Menu
From your device menu, you can quickly change thename or number attached to your voice messages.
1. Press and tap .
2. Press and tap Settings > From name.

8/6/2019 Sprint M900 Moment Ug Eng
http://slidepdf.com/reader/full/sprint-m900-moment-ug-eng 129/212
3A. Sprint Service: The Basics 1
p p
Changing your Main Greeting via the
Voicemail Menu
Your main greeting can be changed directly via thedevice menu system. This direct access saves youfrom having to navigate within the voicemail menu.
1. Press and tap .
2. Press and tap Settings > Change greeting.
3. Tap OK and follow the prompts to change yourcurrent greeting.
2. Press and tap Settings > From name.
3. Tap the existing identification field and enter a newidentifying name or number (used to identify youto recipients of your voice messages).
4. Tap OK to save your information.
Voicemail Notification
There are several ways your device alerts you to a new
message: By sounding the assigned ringer type.
By displaying within the Notifications area ofthe Status bar.
New Voicemail Message Alerts
When you receive a new voice message, your devicealerts you and prompts you to check your voicemail.
To access your voicemail:
1. Press and tap .
2. Press and hold .
Retrieving Your Voicemail Messages
You can review your messages directly from yourwireless device or from any other touch-tone phone. Todial from your wireless device, either speed dial yourvoicemail or use the menu keys.
Using the Voicemail Menu to Access Your
Messages

8/6/2019 Sprint M900 Moment Ug Eng
http://slidepdf.com/reader/full/sprint-m900-moment-ug-eng 130/212
118 3A. Sprint Service: The Basics
2. Press and hold .
To display your Missed Log:
Press and tap > Call log.
Messages
1. Press and tap .
2. Tap an onscreen entry to listen to your selectedmessage.
– or –
Touch and hold a voicemail entry and select Play.
Using Another Phone to Access Messages
1. Dial your wireless phone number.
2. When your voicemail answers, tap .
3. Enter your passcode.
Note: When you are roaming off the Nationwide SprintNetwork, you may not receive notification of newvoicemail messages. Sprint recommends that youperiodically check your voicemail by dialing 1 + areacode + your wireless phone number. When yourvoicemail answers, tap and enter your passcode.Roaming rates apply when you access voicemail whileroaming off the Nationwide Sprint Network.
Your device accepts messages even when it is turnedoff. However, your device notifies you of new messagesonly when it is turned on and you are in a Sprint servicearea.
Note: You are charged for airtime minutes when you are
accessing your voicemail from your wireless device.
Using the Voicemail Menu to Delete YourMessages
1. Press and tap .
2. Touch and hold a voicemail entry and select Delete
this message > OK .
Text Messaging (SMS)
Composing Text Messages1. Press and tap > .
2. Press and tap Compose.
3. Tap the To: field and enter your phone number or
Note: From the Messages screen, you can also touch New
message to begin creating a new outgoing message.

8/6/2019 Sprint M900 Moment Ug Eng
http://slidepdf.com/reader/full/sprint-m900-moment-ug-eng 131/212
3A. Sprint Service: The Basics 1
Text Messaging (SMS)
With text messaging (SMS), you can send and receiveinstant text messages between your wireless deviceand another messaging-ready phone. When youreceive a new message, it will automatically display onyour device’s screen.
Messaging is available via the Messaging application
( ) in your Applications tab.
p y u p u b
email information using either the onscreen orQWERTY keyboards.
Contacts as you enter either a phone number oremail address, if the information matches acurrent contact’s entry information, you will see amatch. When you see a match, touch theassociated name to complete the addressing.
Mobile to use the keypad to enter a wireless
phone number directly. Email to enter the recipient’s email address.
4. Tap Next when you have finished enteringrecipients. (There is no limit to the number ofrecipients per message.)
Note: See your service plan for applicable charges for textmessaging and SMS voice messaging.
5. Touch the Type to compose field and enter yourmessage. enter a message. (See “Entering Textwith Onscreen Keyboard” on page 36.)
6. Insert an Emoticon or a Smiley.
To enter an emoticon, touch and hold fromthe onscreen keyboard.
To enter a smiley from the onscreen keyboard,
To reply to a text message:
1. While the message is open, tap the Type to
compose field and then type your reply message.
2. Compose your reply or use the preset messagesor icons.
To type a message, use your keypad to enter yourmessage. (See “Entering Text with Onscreen
:-)

8/6/2019 Sprint M900 Moment Ug Eng
http://slidepdf.com/reader/full/sprint-m900-moment-ug-eng 132/212
120 3A. Sprint Service: The Basics
press and tap Insert smiley or pressand from the QWERTY keyboard.
Make a selection from the onscreen list to theninsert it into your current message.
7. Review your message and tap Send.
Accessing Text Messages
To read an SMS Text message:
When you receive a text message, you will see itlisted within the Messaging screen. Touch themessage or use your Optical Joystick to open themessage and then scroll down and view its entirecontent.
Keyboard” on page 36.)3. Insert an emoticon or a Smiley.
To enter an emoticon, touch and hold fromthe onscreen keyboard.
To enter a smiley from the onscreen keyboard,press and tap Insert smiley or pressand from the QWERTY keyboard.
4. Review your reply and press Send. (You may selectadditional messaging options by pressing .)
Options include: Call, Add subject, Attach, Insert
Smiley, Delete thread, or More).
:-)
Multimedia Messaging (MMS)
With multimedia messaging (MMS), you can send andreceive instant text messages that contain text, pictures,audio, recorded voice, or a picture slideshow.
Messaging is available via the Messaging application( ) in your Applications tab.
4. Touch the Type to compose field and enter yourmessage. (See “Entering Text with OnscreenKeyboard” on page 36.)
5. Press and tap Attach.
6. Select a multimedia attachment type:
Pictures: Opens the Gallery application. Use theonscreen navigation to select the picture you wish

8/6/2019 Sprint M900 Moment Ug Eng
http://slidepdf.com/reader/full/sprint-m900-moment-ug-eng 133/212
3A. Sprint Service: The Basics 1
Composing MMS Messages
1. Press and tap > .
2. Press and tap Compose.
3. Tap the To: field and enter your phone number oremail information. As you enter the phone numberor email address, matching contacts appearonscreen. Tap an available matching recipient orcontinue entering the phone number or emailaddress.
to send with the outgoing message. Capture picture: Opens the camera application.Take a picture, then tap Attach to use this imagein your message. See “Taking Pictures” onpage 97.
Videos: Opens the Gallery application. Use theonscreen navigation to select a video and attachit to your outgoing message.
Capture Video: Opens the camcorder application.Shoot a video, then tap Attach to use this video inyour message. See “Recording Videos” onpage 102.
Audio: Opens the Select audio menu. Use theonscreen navigation to select an audio file andtap OK .
Note: See your service plan for applicable charges for textmessaging and MMS voice messaging.
Note: From the Messages screen, you can also touch New
message to begin creating a new outgoing message.
● Stop: stops the recording. Once stopped, tapeither Use this recording (attach it to yourmessage), or Discard (delete the currentrecording and re-record).
Slideshow: Opens the Edit slideshow menu.
● Touch Add slide to create a new slide (this is aplaceholder for new images to be added,similar to a playlist).
Recording durationVolume Meter

8/6/2019 Sprint M900 Moment Ug Eng
http://slidepdf.com/reader/full/sprint-m900-moment-ug-eng 134/212
122 3A. Sprint Service: The Basics
Record Audio: Opens the message recorder(shown above).
● Record Duration: length of the recorded voicemessage.
● Volume Meter: displays the current recording’svolume level.
● Record: starts recording your message.
● Play: plays back the current recording.
s a to a p ay st)
ControlsRecord Play Stop
This was a great time....
Image Navigation
Caption Field
Current Image
Slideshow Controls
● Touch the created slide (example, Slide 1), tap Add picture, and then select the picture youwant to add to the slide.
● Tap the text field below the image to enter acaption for the picture.
● Press and tap Preview (to preview theslide), Remove (to delete the currently selectedpicture), Add music, Add slide, or change the
To reply to a multimedia message:
1. Press and tap > .
2. From the message list, tap a multimedia message
Tip: The file attachment on the MMS message can be savedto the microSD card. To save the attachment, touch andhold the file and touch Copy attached to SD card fromthe options menu.

8/6/2019 Sprint M900 Moment Ug Eng
http://slidepdf.com/reader/full/sprint-m900-moment-ug-eng 135/212
3A. Sprint Service: The Basics 1
p ), , , g
slide Duration or layout.● When finished, touch Done to attach the
slideshow to your message.
7. When you are finished creating your new MMS
message, touch Send.To view and play a multimedia message:
1. Press and tap > .
2. From the message list, tap a multimedia messageto open its contents.
3. While the message is open, tap Play (adjacent tothe attachment).
2. From the message list, tap a multimedia message
to open its contents.
3. While the message is open, tap the Type to
compose field and then type your reply message.
4. Once complete, tap Send.Note: To remove or replace a picture or an audio attachment,on the Compose screen, tap the Remove button nextto the attachment. Note: When replying to an SMS message with an MMS
message, first open the text message, press andtap Add subject or Attach. The original text message is
then automatically converted into a multimediamessage.
Deleting a Message or Message Thread 1. Press and tap > .
2. From the message list, use the Optical Joystick( ) to highlight a message.
3. Press and tap Delete threads. Onceprompted, tap OK to complete the process.
Roaming auto-retrieve: Disable this option if youonly desire the MMS message headers todownload while roaming. Enable this option toautomatically download your completemultimedia messages even while roaming.
Notifications: Enable this option if you wish toreceive a notification in the status bar when a newtext or multimedia message arrives.

8/6/2019 Sprint M900 Moment Ug Eng
http://slidepdf.com/reader/full/sprint-m900-moment-ug-eng 136/212
124 3A. Sprint Service: The Basics
Adjusting Message Settings1. Press and tap > .
2. From within the message list, press and tapSettings.
3. Adjust the following fields according to your needs:
Auto-retrieve: Enable this option to automatically
retrieve the entire content of your MMS message.When checked, the MMS message header,message body, and any attachments willautomatically download to your device. If youdisable this option, only the MMS messageheader will be retrieved and shown in themessage list.
Select ringtone: Allows you to select a ringer tosound when a new message is received. Tap thisoption, and then select a ring tone that is specificto new text and multimedia messages. A samplewill briefly be played upon selection.
Vibrate: Enable this option if you want the deviceto vibrate when a new text or multimediamessage is received.
Caller ID
Caller ID allows people to identify a caller beforeanswering the phone by displaying the number of theincoming call. If you do not want your numberdisplayed when you make a call, follow these steps.
1. Press and tap to access the onscreendialer
Call Waiting
When you’re on a call, CallWaiting alerts you to incomingcalls by sounding two beeps.Your phone’s screen informsyou that another call is comingin and displays the caller’s
New Incoming Call

8/6/2019 Sprint M900 Moment Ug Eng
http://slidepdf.com/reader/full/sprint-m900-moment-ug-eng 137/212
3A. Sprint Service: The Basics 1
dialer.
2. Tap .
3. Use the onscreen dialpad to enter a phonenumber.
4. Tap . (The phone number appearswithin the Talk button.)
To permanently block your number, call Sprint
Customer Service.
phone number (if it is availableand you are in digital mode).
To respond to an incoming call
while you’re on a call:
Press and tap acall option.
Answer Waiting Call puts
the first caller on holdand answers the secondcall.
Ignore Waiting Call sends the incoming caller toyour voicemail.
To switch back to the first caller:
Press and tap Switch calls.
1234567
Current Call Call Options
Making a 3-Way Call
With 3-Way calling, you can talk to two people at the
4. When you’re connected to the second party, pressand tap Join to combine both calls into a
single 3-way call.
If one of the people you called hangs up during yourcall, you and the remaining caller stay connected. If youinitiated the call and are the first to hang up, all callersare disconnected.
Tip: For those calls where you don’t want to be interrupted,you can temporarily disable Call Waiting by pressing
before placing your call. Call Waiting isautomatically reactivated once you end the call.

8/6/2019 Sprint M900 Moment Ug Eng
http://slidepdf.com/reader/full/sprint-m900-moment-ug-eng 138/212
126 3A. Sprint Service: The Basics
y g, y p psame time. When using this feature, the normal airtimerates will be charged for each of the two calls.
1. Enter a number and tap.
2. Once you have establishedthe connection, press
and tap Add call.
3. Enter and tapor select a number fromyour Contacts tab. (Your firstcall is automatically put onhold.)
Call Forwarding
Call Forwarding lets you forward all your incoming callsto another phone number – even when your device isturned off. You can continue to make calls from yourphone when you have activated Call Forwarding.
To activate Call Forwarding:
1. Press and tap to access the onscreendialer.
2. Tap .
3. Enter the area code and phone number to whichyou want your calls forwarded.
1234567
1234567
4. Tap . (The phone number appearswithin the Talk button.) (You will see a messageand hear a tone to confirm the activation of CallForwarding.)
To deactivate Call Forwarding:
1. Press and tap to access the onscreendialer.
Roaming on Other Digital Networks
When you’re roaming on digital networks, your callquality and security is similar to the quality you receivewhen making calls on the Nationwide Sprint Network.
1234567
Tip: Remember, when you are using your phone off theNationwide Sprint Network, always dial numbers using 11digits (1 + area code + number).

8/6/2019 Sprint M900 Moment Ug Eng
http://slidepdf.com/reader/full/sprint-m900-moment-ug-eng 139/212
3A. Sprint Service: The Basics 1
2. Tap .3. Tap . (You will see a message and
hear a tone to confirm the deactivation.)
Roaming
Roaming Icon
Your display screen always lets you know when you’reoff the Nationwide Sprint Network. Anytime you areroaming, the phone displays the roaming icon ( ). Ifyou are roaming on a digital system, you will see theroaming icon along with the text – Digital Roam – .
However, you may not be able to access certainfeatures, such as data services, depending on theavailable network.
Checking for Voicemail Messages While
Roaming
When you are roaming off the Nationwide SprintNetwork, you may not receive on-phone notification ofnew voicemail messages. Callers can still leavemessages, but you will need to periodically check your
Note: You are charged a higher rate for calls you haveforwarded.
1234567
Note: If you’re on a call when you leave the Nationwide SprintNetwork, your call is dropped. If your call is dropped inan area where you think Sprint service is available, turnyour phone off and on again to reconnect to thenetwork.
voicemail for new messages if you are in a roamingservice area for an extended period of time.
1. Dial 1 + area code + your phone number.
2. When you hear your voicemail greeting, tap .
3. Enter your passcode at the prompt and follow thevoice prompts.
When you return to the Nationwide Sprint Network,
3. Tap System select to change the CDMA roamingmode.
Home Only to access only the home area mobilenetwork, which is the Nationwide Sprint Network.This option also prevents roaming on othernetworks.
Automatic to seek service on the NationwideSprint Network. When Sprint service is

8/6/2019 Sprint M900 Moment Ug Eng
http://slidepdf.com/reader/full/sprint-m900-moment-ug-eng 140/212
128 3A. Sprint Service: The Basics
voicemail notification will resume as normal.
Setting Roam Mode
Your device allows you to control your roamingcapabilities. By using the Roaming menu option, youcan determine which signals your device accepts.
Choose from three different settings on your dual-band
device to control your roaming experience.1. Press > and tap Settings > Wireless
controls > Mobile networks.
2. Tap Data roaming to connect to data service whileroaming.
unavailable, the device searches for an alternatesystem.
Call Guard
Your device has two ways of alerting you when you areroaming off the Nationwide Sprint Network: theonscreen roaming icon and Call Guard. Call Guardmakes it easy to manage your roaming by requiring an
extra step before you can place or answer a roamingcall. (This additional step is not required when youmake or receive calls while on the Nationwide SprintNetwork.)
To turn Call Guard on or off:1. Press > and tap Settings > Wireless
controls > Mobile networks.
2. Touch Call Guard to toggle the active state of thisfunction. When active, an extra key press isrequired for dialing when in a roaming area.
Data Roam Guard Depending on service availability and roamingagreements, your device may be able to access dataservices while roaming on certain digital systems. Youcan set your device to alert you when you are roamingoff the Nationwide Sprint Network and try to use dataservices such as messaging.
Note: Call Guard is turned on by default on your device.

8/6/2019 Sprint M900 Moment Ug Eng
http://slidepdf.com/reader/full/sprint-m900-moment-ug-eng 141/212
3A. Sprint Service: The Basics 1
To place roaming calls with Call Guard on:
1. From standby mode, dial 1 + area code + theseven-digit number and tap .
2. Touch OK .
To answer incoming roaming calls with Call Guard on:
1. Tap . (A message is displayednotifying you that roaming charges will apply.)
2. Tap OK .
To set your Data Roam Guard notification:
1. Press > and tap Settings > Wireless
controls > Mobile networks.
2. Tap Data Roaming Guard.
3. Tap an onscreen option.
Default sets your device’s Data Roam Guardfeature to its default state (Always Ask).
Always Ask sets your device’s Data Roam Guardfeature on. You will see a prompt and are requiredto respond anytime you access data serviceswhile roaming.
Voice dialing and speed dialing are not available whenyou are roaming with Call Guard enabled.
Note: If the Call Guard feature is set to On, you need to takeextra steps to make and receive roaming calls.
1234567
1234567
Note: Data Roam Guard is turned on by default on yourdevice.
Never Ask turns your device’s Data Roam Guardfeature off. You will not be notified of your roamingstatus when accessing data services.
To use data services when Data Roam Guard is active:
When a pop-up notification appears informing youthat data roam charges may apply, tap Connect or
Always Connect to connect.

8/6/2019 Sprint M900 Moment Ug Eng
http://slidepdf.com/reader/full/sprint-m900-moment-ug-eng 142/212
130 3A. Sprint Service: The Basics
Getting Started With Data Services (page 131)
Navigating the Web (page 133)Your User Name
3B. Web and Data ServicesImportant: Certain data services requests may require
additional time to process. While your device isloading the requested service, the touchscreen orQWERTY keyboard may appear unresponsivewhen in fact they are functioning properly. Allowthe device some time to process your data usagerequest.

8/6/2019 Sprint M900 Moment Ug Eng
http://slidepdf.com/reader/full/sprint-m900-moment-ug-eng 143/212
3B. Web and Data Services 1
Wi-Fi (page 138) Email (page 140)
Instant Messaging (page 152)
Using the Android Market (page 153)
Applications (page 154)
Data Services FAQs (page 155)
Getting Started With Data ServicesWith your Sprint service, you are ready to start enjoyingthe advantages of data services. This section will helpyou learn the basics of using your data services,including managing your user name, launching a dataconnection, and navigating the Web with your device.
When you buy your device and sign up for service,you’re automatically assigned a user name, which istypically based on your name and a number, followedby “@sprintpcs.com.” (For example, the third JohnSmith to sign up for Sprint data services might have [email protected] as his user name.)
When you use data services, your user name is
submitted to identify you to the Nationwide SprintNetwork. Your user name is automatically programmedinto your device. You don’t have to enter it.
Finding Your User NameIf you aren’t sure what your user name is, you caneasily find it on your device.
Press > and tap >
About phone > Status. The Phone number and User
Name fields display your information.
Updating Your User Name
While connecting, you may see an animation. Oncecomplete, you are connected to the default Web page(Google).
Tip: To change the default launch page to a current page,press and tap More> Settings > Set home page.
Note: The Browser automatically launches when a Web linkis touching from within either an email or text message.

8/6/2019 Sprint M900 Moment Ug Eng
http://slidepdf.com/reader/full/sprint-m900-moment-ug-eng 144/212
132 3B. Web and Data Services
If you choose to change your user name and select anew one online, you must then update the user nameon your device.
Press > and tap >
About phone > System Updates.
Tap Update Profile.
Launching a Web Connection Press and tap > (Browser).
(Your data connection starts and you see thehome page.)
Data Connection Status and Indicators
Your device displays the current status of your dataconnection through indicators at the top of the screen.The following symbols are used:
Your device is connected to the high-speedSprint Mobile Broadband Network (EVDO).
When the arrows are animated, your device istransferring data (for example, when you areopening a Web page); when the triangles aregray, your device is connected to the networkbut is not currently transferring data (forexample, when you are viewing a Web pagethat is completely open). In either state, you canreceive incoming calls.
Note: Connected to the Internet can be done via either yourMobile network or via Wi-Fi (configured via theSettings > Wireless controls page).
Your device is on and is connected to the Sprint1xRTT data network. When the arrows areanimated, your device is transferring data (forexample, when you are opening a Web page)and you cannot receive calls. When the arrowsare gray, your device is connected to the networkbut is not currently transferring data (for example,when you are viewing a Web page that is
l l ) d i ll
To scroll line by line through websites: Use the Optical Joystick to scroll over each
available line within a Web page or to move theonscreen cursor around the page.
To scroll through a website’s page:
In a single motion, touch and drag across thepage.
S l ti

8/6/2019 Sprint M900 Moment Ug Eng
http://slidepdf.com/reader/full/sprint-m900-moment-ug-eng 145/212
3B. Web and Data Services 1
completely open), and you can receive calls.
If you do not see an indicator, your phone does nothave a current data connection. To launch aconnection, see “Launching a Web Connection” onpage 132.
Navigating the Web
Navigating through menus and websites during a datasession is easy once you have learned a few basics.
Scrolling
As with other parts of your device’s menu, you’ll have todrag up and down to see everything on somewebsites.
Selecting
Once you have learned how to use the Optical Joystickto scroll and drag around a page, you can startnavigating the Web.
To select onscreen items or links:
Drag across a page, then either touch an onscreenlink or use your Optical Joystick to select the linkand then press the joystick.
Links, which are displayed as underlined text, allow youto jump to Web pages, select special functions, or evenplace phone calls.
Going BackTo go back one page:
Press on your device. Repeat this processto keep going back through your Web page historyof recently visited pages.
Opening the Browser MenuThe browser menu may be opened anytime you havean active data session, from any page you are viewing.
From any open Webpage, press .(You will see thebrowser menu.)
O ti il bl ithi th
Note: You can use for deleting text (like a BACKSPACEkey) when you are entering text.
DEL

8/6/2019 Sprint M900 Moment Ug Eng
http://slidepdf.com/reader/full/sprint-m900-moment-ug-eng 146/212
134 3B. Web and Data Services
Going to a Web Page
1. Press and tap Go.
2. Tap the Address field and enter a new Webaddress.
3. Tap Go to launch the new page.
Browser MenuThe browser menu offers additional options to expandyour use of the Web on your device.
Options available within thebrowser menu include:
Go. Allows you to navigatedirectly to a website byentering its URL (websiteaddress).
Bookmarks. Allows you toaccess and manage your
bookmarks. New window. Launches a
new Internet window while maintaining the currentWeb page active.
Refresh. Reloads the current Web page.
Forward. Returns you to a previously viewed page.
More. Provide additional browser options:
Find on page (Menu+f). Searches the current Webpage for a word.
Select text. Selects text from the current Webpage.
Page info (Menu+g). Displays the Name and URL(website address) of the site you’re currentlyviewing.
Share page. Allows you to send a URL via Gmail,
SMS W k E il (O tl k)
3. Enter a website address and tap Go.
Adjusting Browser Page Settings
1. Press to open the browser menu.
2. Tap More > Settings.
3. Navigate to the Page content settings area and
l t f f th f ll i tti
Note: Not all websites are viewable on your device.

8/6/2019 Sprint M900 Moment Ug Eng
http://slidepdf.com/reader/full/sprint-m900-moment-ug-eng 147/212
3B. Web and Data Services 1
SMS, or Work Email (Outlook). Downloads (Menu+d). Keeps a list of previouslydownloaded content.
Settings (Menu+p). Lets you configure andmanage your browser settings.
Going to a Specific Website
To go to a particular website by entering a URL (website
address):
1. Press to open the browser menu.
2. Tap Go and highlight the URL field.
select from one of the following page settings: Set text size. Adjusts the current onscreen textsize. Options include: Tiny, Small, Normal, Large,or Huge.
Set text encoding. Adjusts the current textencoding.
Block pop-up windows. Prevents popupadvertisement or windows from appearingonscreen. Remove the checkmark to disable thisfunction.
Load images. Allows web page images to beloaded along with the other text components of aloaded website.
Auto-fit pages. Allows web pages to be resized tofit as much of the screen as possible.
Note: These additional options can also be accessed via theQWERTY keyboard by using a combination of the
Menu button ( ) and the specified key combination.
Enable Javascript. Enables javascript for thecurrent Web page. Without this feature, somepages may not display properly. Remove thecheckmark to disable this function.
Open in background. New pages are launched ina separate page and displayed behind thecurrent one. Remove the checkmark to disablethis function.
Set home page Sets the current home page for
Clear all cookie data. Clears all current browsercookie files.
Remember form data. Allows the device to storedata from any previously filled out forms. Removethe checkmark to disable this function.
Clear Form data. Deletes any stored data frompreviously filled out forms. Tap OK to complete theprocess.
4 Press to return to the browser

8/6/2019 Sprint M900 Moment Ug Eng
http://slidepdf.com/reader/full/sprint-m900-moment-ug-eng 148/212
136 3B. Web and Data Services
Set home page. Sets the current home page forthe Web browser (page 137).
Adjusting Browser Privacy Settings
1. Press to open the browser menu.
2. Tap More > Settings.
3. Navigate to the Privacy settings area and select
from one of the following privacy settings: Clear cache. Deletes all currently cached data. Tap
OK to complete the process.
Clear history. Clears the browser navigationhistory. Tap OK to complete the process.
Accept cookies. Allows sites, that require cookies,to save and read cookies from your device.
4. Press to return to the browser.
Adjusting Browser Security Settings
1. Press to open the browser menu.
2. Tap More > Settings.
3. Navigate to the Security settings area and selectfrom one of the following privacy settings:
Remember passwords. Stores usernames andpasswords for visited sites. Remove thecheckmark to disable this function.
Clear passwords. Deletes any previously storedusernames or passwords. Tap OK to complete theprocess.
Show security warnings. Notifies you if there is asecurity issue with the current website. Removethe checkmark to disable this function.
4. Press to return to the browser.
Setting the Browser Home Page
1. Press to open the browser menu.
2. Tap More > Settings > Set home page.
Creating Bookmarks1. From any open Web
page, press .(You will see thebrowser menu.)
2. Tap Bookmarks. Threetabs are revealed:
Bookmarks: Displays ali f W b

8/6/2019 Sprint M900 Moment Ug Eng
http://slidepdf.com/reader/full/sprint-m900-moment-ug-eng 149/212
3B. Web and Data Services 1
3. Delete the current address and enter a new webpage.
4. Tap OK to complete the process.
Resetting the Browser to Default
1. Press to open the browser menu.
2. Tap More > Settings > Reset to default.
3. Tap OK to complete the process.
Bookmarks: Displays alist of your current Webbookmarks.
Most visited: Displays alist of your mostfrequently visitedwebsites. Tap an entryto launch the selectedpage.
History: Displays a record of your browsinghistory. These records are organized into folders:
Today, Yesterday, and 5 days ago.
3. Tap Add bookmarks (first entry in the Bookmarkstab).
4. Enter a descriptive name for the new bookmarkand tap OK to store the new entry to yourBookmarks list.
Creating Bookmarks from other Tabs
1. From any open Web page, press .
2. Tap either Most visited or History.
3. Touch and hold an entry from the list to display anonscreen popup menu
3. Touch and hold an entry from the list to display anonscreen popup menu.
4. Tap Add shortcut to Home to add the selected entryto your Home screen.
Wi-Fi
About Wi Fi

8/6/2019 Sprint M900 Moment Ug Eng
http://slidepdf.com/reader/full/sprint-m900-moment-ug-eng 150/212
138 3B. Web and Data Services
onscreen popup menu.
4. Tap Bookmark to add the selected entry to yourcurrent list of bookmarks.
– or –
5. Repeat steps 1 and 2.
6. Tap the star icon adjacent to a website address.
The star now turns gold. This adds the “starred”website to your current Bookmarks list.
Adding Bookmarks to Your Home Screen
1. From any open Web page, press .
2. Tap any of the available tabs: Bookmarks, Most
visited, or History.
About Wi-Fi Wi-Fi (short for "wireless fidelity") is a term used forcertain types of wireless local area networks (WLAN).These device types use an 802.11 wirelessspecification to transmit and receive wireless data.
Wi-Fi communication requires access to an existingand accessible Wireless Access Point (WAP). TheseWAPs can either be Open (unsecured) as within mostHot Spots, or Secured (requiring knowledge of theRouter name and password).
Turning Wi-Fi On and Off
By default, your device’s Wi-Fi feature is turned off.Turning Wi-Fi on makes your device able to discoverand connect to compatible in-range WAPs.
Turn Wi-Fi on:1. Press > and tap >
Wireless controls.
2. Tap the Wi-Fi field to activate the feature(checkmark indicates active). The device will scanfor available in-range wireless networks.
To turn Wi-Fi off:
1 Press > and tap >
2. To manually add your new network connection:
Touch Add Wi-Fi network.
Enter the Network SSID. This is the name of yourWireless Access Point.
Tap the Security field and select a security option.
This must match the current security setting on
Note: When you select an open network, you will beautomatically connected to the network.

8/6/2019 Sprint M900 Moment Ug Eng
http://slidepdf.com/reader/full/sprint-m900-moment-ug-eng 151/212
3B. Web and Data Services 1
1. Press > and tap > Wireless controls > Wi-Fi.
2. Tap to remove the green checkmark anddeactivate Wi-Fi.
To connect to a Wi-Fi network:
1. Press > and tap >
Wireless controls > Wi-Fi settings.
The network names and security settings (Opennetwork or Secured with WEP) of detected Wi-Finetworks are displayed in the Wi-Fi networkssection.
This must match the current security setting onyour target WAP.
If secured, you will also need to enter your WAP’spassword. The show password option, reveals thepassword as you type it vs only showing asterisks(****).
Tap Save to store the new information andconnect to your target WAP.
Note: Use of wireless data connections such as Wi-Fi andBluetooth can cause an added drain to your batteryand reduce your use times.
Note: The next time your device connects to a previouslyaccessed or secured wireless network, you are notprompted to enter the WAP key again, unless you resetyour device back to its factory default settings.
To manually scan for a Wi-Fi network:1. Press > and tap >
Wireless controls > Wi-Fi settings.
2. Press and tap Scan.
Wi-Fi Status Indicators
The following icons show your Wi-Fi connection statusat a glance:
Wi Fi i t d d ti
To access the Bluetooth Settings menu:1. Press > and tap >
Wireless controls > Wi-Fi settings.
2. Press and tap Advanced.
Your device’s Email applications let you access andmanage multiple email accounts simultaneously in one

8/6/2019 Sprint M900 Moment Ug Eng
http://slidepdf.com/reader/full/sprint-m900-moment-ug-eng 152/212
140 3B. Web and Data Services
– Wi-Fi is connected and active.
– Wi-Fi active but there is a communicationissue with the target Wireless Access Point (WAP).
Using the Wi-Fi Settings Menu
The Wi-Fi settings - Advanced menu allows you to setup many of your device’s Wi-Fi service, including:
Setting your Wi-Fi sleep policy
Viewing your device’s MAC Address
Configuring use of either a DHCP or Static IP
Your device s Email applications let you access andmanage multiple email accounts simultaneously in oneconvenient location.
Although the two main email applications are Google(Gmail™) and Work Email (Outlook™), the device canalso be manually configured to connect to other emailsystems.
If you want to send and receive email messagesthrough an ISP (Internet Service Provider) account(such as Outlook), or if you wish to use your device toaccess your corporate email through a VPN (VirtualPrivate Network), you will first need to set up an IMAPor POP account.
Note: If you have multiple email accounts, you must configure
each account with its own settings.
IMAP (Internet Message Access Protocol) - Thismail retrieval protocol is frequently used in largenetworks and commercial and institutionalsettings. IMAP4 is the current standard.
POP (Post Office Protocol) - This protocol issupported by most ISPs and is currently morecommon among consumer applications. POP3 isthe current standard.
Google Mail (Gmail)This email client is Google’s web-based email service.A Gmail/Google Mail is created once you sign-up for anew Google account online. See “Creating a GoogleAccount” on page 43.
From a computer, launch your preferred Webbrowser and navigate to www.google.com.
Depending on your synchronization settings GoogleM il ( l ith l d t h b d
Note: For more information, review your email carrier’sli IT d i i

8/6/2019 Sprint M900 Moment Ug Eng
http://slidepdf.com/reader/full/sprint-m900-moment-ug-eng 153/212
3B. Web and Data Services 1
Email Icons/Shortcuts
– IMAP/POP3 Internet Mail shortcut (such as Google, Yahoo, Gmail, and AOL)
– Work Email (Outlook) shortcut
– Gmail shortcut
– Work Tasks (Outlook Tasks) shortcut
Status Bar - Notifications
– New Internet email message received
– New Work Email (Outlook) received
Depending on your synchronization settings, GoogleMail (along with calendar events, phone numbers andother contact information) on your device areautomatically synchronized between your device andyour Gmail/Google Mail account on the Web.
Note: For more information, review your email carrier sliterature or contact your IT administrator.
Note: You must have a valid and active Google account priorto using this email client.
Important: You must log into Goolge after every power cycleof your device. Logging into Gmail (via the device)does not sign you into your Google account.Gmail logging and access are separate from yourmain Google account.
Setting Up a Gmail Account via the Device1. Press and tap > (Gmail).
– or –
Press and tap .
2. Follow the onscreen instructions to setup a Gmailaccount.
Tap Manual setup to configure your connection
settings manually (POP3 or IMAP). Follow the
Opening Gmail1. Press and tap > .
– or –
Press and tap .
2. Log into your account via the device.
3. The first time you connect, you are asked to givethis Internet mail account a unique onscreen nameand enter From name (displayed in your outgoing

8/6/2019 Sprint M900 Moment Ug Eng
http://slidepdf.com/reader/full/sprint-m900-moment-ug-eng 154/212
142 3B. Web and Data Services
settings manually (POP3 or IMAP). Follow theonscreen prompts and enter the informationspecific to your carrier.
See “Adding Additional Internet Email Accounts”on page 146.
and enter From name (displayed in your outgoingemails within the From field).
The unique account name is used to differentiatethis account from other email accounts accessedby your device.
4. Tap Done to store the new information andcomplete your connection.
Upon initial access, your Gmail Inbox categoriesare: Inbox, Personal, Receipts, Travel, Work,[Gmail]/All Mail, [Gmail]/Drafts, [Gmail]/Sent Mail,[Gmail]/Spam, [Gmail]/Starred, and [Gmail]/Trash.
To refresh your Gmail messages:
Press and tap Refresh.
Note: You must have a valid and active Google account( [email protected]) prior to Gmail email setupand configuration.
Your Gmail address is then used to log into youraccount via the device.
Note: Signal interruptions or incorrect username or passwordinformation can cause completion issues.
Create and Send Email1. Press and tap .
2. Tap Inbox to open thecontents of your Gmailinbox.
3. Press and tapCompose.
4. Enter the message
6.Tap the
Compose Mailfield and compose youremail.
To add a picture attachment, press andtap Attach.
Select the picture you want to attach.
Tap to delete a selected attachment fromyour current email.
7. Once complete, tap Send.
Tap Save as draft or press to save the
Unread Email

8/6/2019 Sprint M900 Moment Ug Eng
http://slidepdf.com/reader/full/sprint-m900-moment-ug-eng 155/212
3B. Web and Data Services 1
Enter the messagerecipient’s emailaddress in the To field.
If you are sending theemail to severalrecipients, separate theemail addresses with acomma.
You can add as manymessage recipients asyou want.
5. Tap the Subject field and enter the email subject.
Tap Save as draft or press to save thecurrent email as a draft. To later view your draftemail messages, from the Inbox, tap the Drafts folder.
To delete the current email message, tap Discard.
Creating a Gmail Email Signature
1. From a computer, launch your preferred Webbrowser and navigate to www.google.com.
2. From within your Gmail Settings page, navigate tothe General tab and enter your signature into theSignature field. By default, signature is turned off.
Note: To send a carbon copy (Cc) or a blind carbon copy(Bcc) of the current email to other recipients, press
and tap Add Cc/Bcc.
Accessing Email MessagesDepending on your email type, account settings, Emailnotifications, ringtone notification, etc, the devicedisplays the email message briefly in the status barwhen you receive a new email.
A new Internet email message ( ) icon appearswithin the Notifications area of the Status bar to notifyyou of a new email.
Toview a new email:
Loving my new Samsung Moment
Well I have one too and you’re right. Easyto use. So many available apps...
----- Original Message -----
From: Pat
Sent: Thursday October 26, 2009 1:15 PMTo: Steve@yahoo com
Steven
Pat S.
1:16 PM
Status bar
Main Home
New Gmail
View next email
Screen
message

8/6/2019 Sprint M900 Moment Ug Eng
http://slidepdf.com/reader/full/sprint-m900-moment-ug-eng 156/212
144 3B. Web and Data Services
To view a new email:
1. Press > and tap .
– or –
Touch and hold the Status bar, then slide yourfinger down the screen. See “Using theNotifications Panel” on page 28.
2. Tap the new email from the Notifications list.3. Scroll up and down the email by either dragging
your finger up and down the screen or rolling yourOptical Joystick ( ) up or down.
To reply to an email message:
1. With the email message displayed, tap either Reply or Reply all.
2. Enter a new message body and tap Send.
To delete an email message:
With the email message displayed, tap Delete.
Loving my new Samsung Moment
Just got my new Samsung M900 googlephone and I can’t put it down. you shouldtry it....
To: [email protected]:
Email functions
Previous Email
Configuring Gmail Settings1. Press and tap .
2. Tap Inbox to open thecontents of your Gmailinbox.
3. Press and tap Account settings.
4. This menu providesb th fi ld i f ti
● Options include: Every 5 minutes, Every 10
minutes, Every 15 minutes, Every 30 minutes,and Every hour.
Default account: Assign this account as the defaultemail used for outgoing messages.
Email notifications: Activates the email notificationicon to appear within the Notifications area of theStatus bar when a new Internet mail (Gmail, etc..)
is received.Select ringtone: Plays a selected ringtone once a
Unread Email

8/6/2019 Sprint M900 Moment Ug Eng
http://slidepdf.com/reader/full/sprint-m900-moment-ug-eng 157/212
3B. Web and Data Services 1
pboth field informationand settings:
Account name: displaysyour uniquely createdaccount display name.
Your name : displays thename used in the From
field of your outgoingemails.
Email check frequency: Tap to adjust the timeinterval used by your device to check your Gmailaccount for new emails.
Select ringtone: Plays a selected ringtone once anew email message is received.
Vibrate: Activates a vibration once a new emailmessage is received.
Incoming settings: Adjusts the incoming emailparameters, such as username, password, andother incoming connection parameters (ex: IMAP
server). Outgoing settings: Adjusts the outgoingparameters, such as username, password, andother incoming connection parameters (ex: SMTOserver).
Add another account: Allows you to add anadditional Internet email account (such as Gmail,or Yahoo, etc..)
Adding Additional Internet Email Accounts
Using only reveals all currently added Emailaccounts. By default, Gmail is already added to this listof available Internet email providers. To view additionalemail accounts, they must first be added.
1 Press and tap >
Work Email application to wirelessly synchronize youremail, Contacts, and Task information directly with yourcompany’s Exchange server.
Setting Up a Work Email
1. Press and tap > ( Work Email).
– or –
Press and tap from the Home screen.
See “Creating Shortcuts” on page 23.

8/6/2019 Sprint M900 Moment Ug Eng
http://slidepdf.com/reader/full/sprint-m900-moment-ug-eng 158/212
146 3B. Web and Data Services
1. Press and tap > .
– or –
Press and tap .
2. Press and tap Account settings > Add
another account.
3. Follow the onscreen prompts to add additional
Internet-based email accounts such as Yahoo,Gmail, AOL, etc..
Work Email (Outlook)
The Moxier Work Email application provides access toyour Outlook Exchange server via your device. If yourcompany uses Microsoft Exchange Server 2003 and2007 as the corporate email system, you can use the
g p g2. Read the onscreen information and tap to
continue.
3. Enter your Email address, User ID, and Password information, then tap . Consult your NetworkAdministrator for further details.
User ID: typically your network access username.
Password: typically your network accesspassword (Case-sensitive).
4. If prompted to provide additional detailedinformation, tap OK .
5. Enter a Domain and Exchange Server informationand tap .
If your network requires SSL encryption, tap theUse SSL field to place a checkmark in the boxand activate this additional level of security.
If your exchange server requires this feature,leaving this field unchecked, can preventconnection.
Opening Work Email1. Press and tap > .
– or –
Press and tap .
2. Tap a message to read, manage, and reply to youremail messages.
Press to select messaging options, such
as New Message, Change folder, Search, SyncEdit or A t S tti
Note: Signal interruptions or incorrect username or passwordinformation can cause completion issues

8/6/2019 Sprint M900 Moment Ug Eng
http://slidepdf.com/reader/full/sprint-m900-moment-ug-eng 159/212
3B. Web and Data Services 1
6. Read the onscreen activation disclaimer and tapOK . The first screen visible after activation is theExchange ActiveSync Settings menu.
messages, Edit, or Account Settings.
Create and Send Email
1. From the Inbox, press and tap New
message.
2. Enter the message recipient’s email address in the To field.
If you are sending the email to several recipients,separate the email addresses with a comma.
You can add as many message recipients as youwant.
information can cause completion issues.
Important: You can sync with an Exchange Server runningMicrosoft Exchange Server 2003 Service Pack 2(SP2) or Microsoft Exchange Server 2007.
Note: You can only have one Work Email (MicrosoftExchange ActiveSync) account active on your device.
Note: Although called Exchange ActiveSync, this is not thesame application used on Windows Mobile devices.
Note: To send a carbon copy (Cc) or a blind carbon copy(Bcc) of the current email to other recipients, press
and tap Add Cc/Bcc.
3. Tap the Subject field and enter the email subject.
4. Tap the Body field and compose your email.
To add a picture attachment, press andtap Add attachment..
You have several options:
● Pictures: Attach a stored picture from theGallery.
● Select music track: Adds an available musicfile. Tap OK to complete the attachment.
Recording durationVolume Meter

8/6/2019 Sprint M900 Moment Ug Eng
http://slidepdf.com/reader/full/sprint-m900-moment-ug-eng 160/212
148 3B. Web and Data Services
p p
● Sound Recorder: Opens the sound recorderfrom where you can record an audiomessage.
● Record Duration: Displays the length of therecorded voice message.
● Volume Meter: Displays the current recording’s
volume level.● Record: Starts recording your message.
● Play: Plays back the current recording.
To reply to an email message:
1. From the Inbox, tap an email message.
2. With the email message displayed, pressand tap either Reply or Reply all.
3. If you select Forward, you must specify themessage’s recipients.
4. Enter a new message body and tap Send.
ControlsRecord Play Stop
To delete an email message:
1. With the email message displayed, pressand tap Delete.
2. Tap OK to confirm the deletion.
Configuring Work Email Settings
After your initial setup, you
are taken to the Settingsmenu for your new Work
Email Settings: configuressend and receive settings,such as email signature,notifications, BCC rules,Deletion confirmation, etc.
ActiveSync settingscan be accessed fromyour Work Emails
Settings menu bypressing and
8/6/2019 Sprint M900 Moment Ug Eng
http://slidepdf.com/reader/full/sprint-m900-moment-ug-eng 161/212
3B. Web and Data Services 1
Email account.
Work Email contains twoseparate components:
ActiveSync: handles thesynchronization parametersbetween your device and
your exchange server.
p gtappingGo to Moxier Sync.
To configure ActiveSync:
1. Press > and tap > Exchange
ActiveSync.
2. Configure any of the following parameters bytapping (Settings).
Account: Change the current email connectionsettings.
Setting Options
Profile: Adjusts the synchronization profile. Defaultis Direct push (any changes on the remoteexchange server are “pushed” to your device).
● Tap Enable in roaming mode to allow thecurrent profile to remain active even whileroaming.
E-mail: Access the Email settings menu whereyou can configure the send, receive, and
miscellaneous configuration settings (page 150). Calendar: Configure the synchronization
● Select ringtone: Assigns an audible ringtonewhen a new or upcoming event is pending.
● Vibrate: Assigns a vibration when a new orupcoming event is pending.
● Set default reminder: Alerts you of anupcoming event at a defined time before theevent occurs. Options include intervals from15 minutes to 1 week before the event.
Contacts: Determines how your Outlook contactsare displayed in the Contacts listing. Options

8/6/2019 Sprint M900 Moment Ug Eng
http://slidepdf.com/reader/full/sprint-m900-moment-ug-eng 162/212
150 3B. Web and Data Services
Calendar: Configure the synchronizationparameters of your Work Email calendar.
● Hide declined events: When enabled, declinedevents are not shown within your syncedcalendar events.
● Appointment sync range: Tap to assign thesync range for your calendar events. Any
events in this range are added to your device’scalendar. Options include: All, 2 weeks ago,1 month ago, 3 months ago, or 6 months ago.
● Set alerts & notifications: Assign the alertmethod used for new or upcoming calendarevents. options include: Alert, Status bar
notification, or Off .
are displayed in the Contacts listing. Optionsinclude: Last, First, Last First, LastFirst, First Last,Company, etc.
Tasks: Sets how your Outlooks tasks are filteredand sorted.
● Filter Type: All, Complete, or In progress.
● Sort by: Subject or Date.
3. Press to store your changes and return tothe Home screen.
To configure Email settings:
1. Press and tap > ( Work Email).
– or –
Press and tap from the Home screen.
2. From your Inbox, press and tap Settings.
3. Tap any of the three available tabs and modify thedesired settings:
Receive tab: Adjusts the parameters for incomingemails.
● Tap New mail notification to enable a visualnotification of new incoming email within theNotification area of the Status bar.
● Tap Select a ringtone to assign an audibleringtone when an incoming email is received
Send tab: Adjusts outgoing email settings such asBCC and email signature (see page 151).
Misc tab: Adjusts other remaining email settingssuch as delete confirmation and viewing scale.
● Ask before deleting requires an onscreenconfirmation to be accepted prior to deletionof a current email. This prevents you fromaccidentally erasing any work email.
● Viewer scale allows you to set the defaultmagnification used when viewing an email.

8/6/2019 Sprint M900 Moment Ug Eng
http://slidepdf.com/reader/full/sprint-m900-moment-ug-eng 163/212
3B. Web and Data Services 1
ringtone when an incoming email is received.
● Tap Vibrate to enable a vibration when a newemail is received.
● Tap Mail days to sync to assign the sync rangefor your incoming and outgoing emailsbetween your device and your externalexchange server.
● Tap Select folders to sync to enable thosefolders you wish to sync between your deviceand your external exchange server. By default,the Inbox folder is the only automaticallysynced folder. Tap a folder field to enable thesynching of that folder.
g g
4. Press to store your changes and return tothe Home screen.
To create a Work Email Signature:
This signature can differ from any current Emailsignature on your local Outlook client. This signature is
applied to any outgoing emails originating on yourdevice.
1. Press and tap from the Home screen.
2. From your Inbox, press and tap Settings >
Send tab > Signature.
3. Delete the current default text and enter your newemail signature.
4. Tap Save to store the new signature.
Configuring Data Synchronization Settings
This feature allows you to determine which currentapplications are synchronized with external server andat what intervals.
1. Press > and tap >Data synchronization. These settings can affect
Application sync settings: Lists the currentapplications utilizing the synchronization feature.
● Disabling an application prevents it fromreceiving updated information.
● Re-enabling an applications’ synchronizationcapability initiates a new synchronization ofdata between your device and the remoteserver.
3. Press and tap Sync now to manually syncselected applications.

8/6/2019 Sprint M900 Moment Ug Eng
http://slidepdf.com/reader/full/sprint-m900-moment-ug-eng 164/212
152 3B. Web and Data Services
Data synchronization. These settings can affectdata minute usage, please refer to your currentdata plan for more details.
2. Tap any of the following options:
Background data: Allows data synchronization tooccur as a background function. It allows this tooccur behind the scenes and does not affect anycurrent use of the device.
Auto-sync: Requires the device to maintainsynchronized with the remote server providingdata to your selected applications.
selected applications.
4. Press to store your changes and return tothe Home screen.
Instant Messaging
Sprint provides you with access to popular mobileinstant messaging (IM) clients, including AIMTM, MSN® Messenger, and Yahoo!® Messenger.
1. Press and tap > (Instant
Messaging).
2. Select an IM provider by touching an onscreenentry, such as AIM, MSN Messenger, or Yahoo!
Messenger.
3. Tap OK to continue.
4. Use your keyboard to enter the required sign-ininformation for the selected provider, such as username or password, and tap Sign In. (Your IMscreen for the selected provider is displayed.)
5. Follow the onscreen instructions to read, reply to,compose, send messages, and manage your IMaccount
3. Tap Sign in and enter your Google accountinformation.
4. Touch Accept to agree to the Android Market termsof service.
Selecting and Installing an Application
1. Tap the desired onscreen application.
2. Read the application descriptions.
3. Tap Install.
Note: The information required to sign in will vary dependingon the instant messaging provider you are accessing.

8/6/2019 Sprint M900 Moment Ug Eng
http://slidepdf.com/reader/full/sprint-m900-moment-ug-eng 165/212
3B. Web and Data Services 1
account.
Using the Android Market
The Android Market provides direct access to a largeselection of applications which you can download andinstall on your device.
Accessing the Market
1. Press and tap > .
2. If not already logged in with your Google account,tap Next.
4. If prompted, follow the onscreen instructions to payfor the application.
5. Check the progress of the current download byopening the Notifications panel.
6. After the item is downloaded and installed on yourdevice, the content download icon appears in thenotification area of the status bar.
Note: Use caution with applications which request access toany personal data, functions, or significant amounts ofdata usage times.
7. On the Android Market screen, tap My downloads,tap the installed application in the list, and then tapOpen.
Launching an Installed Application
1. Press > and tap the newly installedapplication.
2. Read the application descriptions.
– or –Press and tap > > My
To get started with applications:
1. Press > and tap either(NASCAR Sprint Cup Mobile) or (NFL Mobile).(The browser will start and take you to thedownload menu for the application.) (If prompted,select Always Allow to allow the application toaccess the Web.) See “NASCAR” on page 160. See “NFL Mobile Live” on page 161.
2. Follow the instruction to customize your application( h l ti f it t d i ) d

8/6/2019 Sprint M900 Moment Ug Eng
http://slidepdf.com/reader/full/sprint-m900-moment-ug-eng 166/212
154 3B. Web and Data Services
Press and tap > > My
downloads.
Applications
You can access a wide variety of applications in manydifferent categories with your phone and data service.
Your phone comes preloaded with links to thefollowing applications:
NFL Mobile Live
NASCAR Sprint Cup Mobile
(such as selecting a favorite team or driver) andthen use the navigation key or press toexplore your options.
Important Privacy Message – Sprint’s policies often do noapply to third-party applications. Third-party applications mayaccess your personal information or require Sprint to discloseyour customer information to the third-party application
provider. To find out how a third-party application will collect,access, use, or disclose your personal information, check theapplication provider’s policies, which can usually be found ontheir website. If you aren’t comfortable with the third-partyapplication’s policies, don’t use the application.
Data Services FAQsHow will I know when my device is ready for data service? Your user name (for example, [email protected]
)will be displayed when you access > >
About phone > Status > User Name.
How do I sign in for the first time? You are automatically signed in to access data services
when you turn on your device.How do I know when my device is connected to data
When is my data connection dormant? If your device receives no data for 10 seconds, theconnection goes dormant. When the connection isdormant, you can make and receive voice calls. (Theconnection may become active again quickly.) If yourdevice receives no data for an extended period, theconnection will terminate.

8/6/2019 Sprint M900 Moment Ug Eng
http://slidepdf.com/reader/full/sprint-m900-moment-ug-eng 167/212
3B. Web and Data Services 1
How do I know when my device is connected to data
services? Your device automatically connects when you use dataservice or an incoming message arrives. You will alsosee the or indicator.
Can I make calls and use data services at the same time? Yes you can use voice and data services
simultaneously.
When is my data connection active? Your connection is active when data is beingtransferred. Outgoing calls are allowed; incomingcalls go directly to voicemail. When active, the
or indicator is animated on the displayscreen.
TV (page 156)
Music – Amazon MP3 (page 157)
Streaming Music (page 159)
NASCAR (page 160)
* Sprint TV coverage not available everywhere. Content and
lineup subject to change. Select channels also availablefor casual usage. Visit www.sprint.com/tvguide for moreinformation.
TV
Your Sprint TV Channel Options
The Sprint TV application offers a wide variety ofaccessible channels. Subscription options includecomprehensive basic packages as well as a full menu
3C. Entertainment:TV and Music

8/6/2019 Sprint M900 Moment Ug Eng
http://slidepdf.com/reader/full/sprint-m900-moment-ug-eng 168/212
156 3C. Entertainment: TV and Music
NFL Mobile Live (page 161)
YouTube (page 162)
Sprint TV gives you the ability to listen to audio clipsand to view video clips right from your device’s display.Watch live TV and catch up on episodes of yourfavorite shows – anywhere on the Nationwide Sprint
Network.*
Amazon MP3 lets you preview, purchase, download,and listen to over a million songs right on your device.You can even add songs from your own library toround out your on-the-go playlist.
comprehensive basic packages as well as a full menuof “a la carte” channels. Visit www.sprint.com/tvguide formore information on channels and pricing.
Some of the available categories may include:
Sprint Radio Sprint Power View
Primetime TV Music Videos
Sprint TV Live Music & Radio
Sports Entertainment
Cartoons News & Weather
Movies & Shorts Mobile Previews
Note: Available categories and content are subject to change.
Watching TV
1. Press and tap > (SprintTV).Depending on your settings, your device mayprompt you to accept a data connection.
2. Select TV, Radio, Favorites, or More... to displaychannel options.
3. Tap an entry to select a channel from the Sprint TV
listings or to select an available category.
Music – Amazon MP3The Amazon MP3 store lets you purchase anddownload digital music files to play on your device orcomputer. (You must have an amazon.com account topurchase and download music from Amazon MP3.)
Purchasing and Downloading Music
1. Press and tap > .2 Select an onscreen category (Top 100 Albums TopNote: The first time you access a channel, the system will

8/6/2019 Sprint M900 Moment Ug Eng
http://slidepdf.com/reader/full/sprint-m900-moment-ug-eng 169/212
3C. Entertainment: TV and Music 1
4. Tap a desired clip to view the program. The clip willautomatically load and begin playing.
2. Select an onscreen category ( Top 100 Albums, Top
100 Tracks, Browse by Genre, or Search).
3. Follow the onscreen instructions to locate thedesired track or album.
4. Tap the title to listen to an audio preview of thesong. Tap the song title again to stop playback.
Preview allows you to play an audio clip of theselected song.
5. Once you have located a desired song title oralbum, tap [price] > Buy.
Pressing BUY allows you to purchase the songand download it to your device’s microSD card.
prompt you to purchase access (unless the channeldoesn't have a monthly fee). Tap Subscribe topurchase access, or tap Preview to view a preview ofthe selected channel.
Tip: Scroll through the channels to view more selections.Once you find a channel that you want to watch or listento, simply touch it and wait approximately three seconds,and the channel begins loading.
● When you select Buy, you will need to log into
your Amazon account. (If there is no microSDcard installed or if there is not enough freememory space on the card, you will see analert.)
● Once the song has been downloaded to yourmicroSD card, you can use the Musicapplication to playback the file.
Accessing the Music Player1. Press and tap > (Music).
3. Once you’ve displayed a list of songs, you can
browse through your available titles. To play a song, tap it to display the title and trackinformation.
To listen to a song or playlist, tap it to beginplaying from the selected song. (You can alsohighlight the playlist to begin listening.)
is displayed within the Notifications area of
your Status bar.Creating a Playlist

8/6/2019 Sprint M900 Moment Ug Eng
http://slidepdf.com/reader/full/sprint-m900-moment-ug-eng 170/212
158 3C. Entertainment: TV and Music
1. Press and tap > (Music).
2. From the Music display, select an option:
Artists to display your current local music filessorted by artist.
Albums to display your current local music filessorted by album.
Songs to browse through all of your downloadedmusic and any additional songs you have loadedonto your microSD card from your computer.
Playlist to select a customized playlist you’vecreated to organize your music.
Creating a Playlist
1. Press and tap > > Songs. Yourdevice searches through your device and microSDcard for compatible music files and then displaysthem onscreen.
2. Touch and hold a song you’d like to add to a
playlist. This action reveals an onscreen popupmenu.
3. Tap Add to playlist and select either a Current
playlist or select New (to create a new playlist).
If you select New, delete the current default name,enter a name for your new playlist, and tap Save.
Assigning a Song as a Ringtone
1. Press and tap > > Songs.
2. Touch and hold a song you’d like to use as yournew ringtone. This action reveals an onscreenpopup menu.
3. Tap Use as phone ringtone to store the selectedsong as your new default ringtone.
4. Confirm the song has been successfully assignedby navigating to your Phone ringtone menu.
Streaming Music Sprint offers a variety of musical options through theRadio category in the Sprint TV menu, includingSIRIUS Music, Music Choice, VH1, and many others.Choose from rock, pop, hip-hop, and R&B, and accessexclusive video clips, music industry news,performances, and interviews with your favorite artists.
1. Press and tap > > Radio >[selection].

8/6/2019 Sprint M900 Moment Ug Eng
http://slidepdf.com/reader/full/sprint-m900-moment-ug-eng 171/212
3C. Entertainment: TV and Music 1
Press > and tap > Sound &
display > Phone ringtone.
5. Confirm the new song is selected.
2. Select Preview to see and hear a preview of yourselected channel (if available).
– or –
Select Subscribe to purchase a monthlysubscription to your selected channel.
Once you have purchased access to a music or radiochannel, you can select from a variety of stations tolisten to your favorite music or get caught up on what’snew in music.
NASCARNow you have the ability to get every bit of NASCARcoverage, news, and stats right on your device.
1. Press and tap > .
2. Enter a Car or Driver Name and tap the onscreenGo button.
– or –
Touch Select from a list (select a driver from theavailable list) and tap YES Follow any onscreen
Home to return to the main NASCAR homepage
where you can view stats on a current race,choose to follow a specific driver, view specialNASCAR promotions and other NASCAR-specificmultimedia content.
My Driver to customize your NASCAR experienceby following specific drivers. Customizableoptions also include: My Driver News, My Driver
Stats, and My Driver Profile. Choosing available
drivers from this screen places them on yourNASCAR home page for quick access and

8/6/2019 Sprint M900 Moment Ug Eng
http://slidepdf.com/reader/full/sprint-m900-moment-ug-eng 172/212
160 3C. Entertainment: TV and Music
available list) and tap YES. Follow any onscreenprompts to continue.
3. Follow the onscreen prompts.
4. Press and drag across the bottom of thescreen to reveal various options (or use yourOptical Joystick to scroll). Each of the following
categories is also called a “drawer”. Each drawercan be opened (revealing much more details), orclosed (to save space). Choose from the followingfeatures by touching an onscreen button:
review.
News provides you with quick access toNASCAR-specific news, photos, and driver stats.To get news specific to your desired driver, youmust touch the My Driver News button at thebottom of the page.
Stats & Schedule lets you track race informationsuch as: Leaderboard standing, My Driver standing, Driver standings, Point Standings,Season Settings, and Driver Profiles.
NASCAR on SPEED plays video clips specific tothe “This week in Nascar” series.
Audio/Video displays a list of selectable
multimedia content. Other features includestreaming multimedia content from NASCARradio stations or other racing radio shows.
Sprint FanZone lets you take part in fan-specificactivities such as online fantasy racing, accessGames, take part in Polls, and access otherSpecial Promotions.
Fantasy allows fantasy players to monitor theperformance of every driver in real-time directlyfrom your device.
NFL Mobile LiveGet the NFL live on your device. It lets you be right inthe middle of your favorite game by being a part ofpreviews, blogs, discussions groups, fantasy football,etc.
1. Press and tap > .
2. Tap either the AFC or NFC icons to specify a
conference.3. Tap your desired team.

8/6/2019 Sprint M900 Moment Ug Eng
http://slidepdf.com/reader/full/sprint-m900-moment-ug-eng 173/212
3C. Entertainment: TV and Music 1
y
Alerts & Personalization allows you to customizealerts for new information such as: Change MyDriver, Setup Alerts, Today’s Alerts, Race DayAudio Settings, and Race Weekend Settings.
Help displays help information for usage of theNASCAR application and features.
Exit to quit the NASCAR application.
3. Tap your desired team.
4. Press and drag across the bottom of thescreen to reveal various options (or use yourOptical Joystick to scroll):
NFL Central launches the NFL homepage whereyou not only have access to your favorite teams
but to all of the current news, network, fantasyleagues, scores & schedules, but also stats, alertsand other NFL multimedia content.
FanZone lets you take part in fan-specific activitiessuch as online fantasy football, access Games,take part in Polls, and access other Special
Promotions.
NFL Network launches an onscreen program from
the NFL. This is the official NFL network providingdaily news, interviews, and analysis from allaround the league. Touch Watch NOW to beginviewing the content.
My Team launches a team-specific page withcontent such as standings, news and Photos,Audio and Video, roster and Stats, and TeamAlerts.
Fantasy allows fantasy players to monitor theperformance of every player in real-time directly
Audio & Video displays a list of selectable
multimedia content. Other features includestreaming multimedia content from NFL stationsor other football programming.
Statistics lets you track Offense and Defense statsacross the NFL and its teams.
Alerts & Personalization allows you to customizealerts for new information such as: News, GameAlerts, Player Alerts, Fantasy Alerts, Team Alerts,Promo Alerts, and other Team Information.
Help displays help information for usage of the

8/6/2019 Sprint M900 Moment Ug Eng
http://slidepdf.com/reader/full/sprint-m900-moment-ug-eng 174/212
162 3C. Entertainment: TV and Music
from your device.
Teams & Standings displays standings for both theNFC and AFC teams via two onscreen tabs.
Scores & Schedules displays both pieces ofinformation based on weekly schedules for yourselected teams. Schedule By Team lets you viewteam-specific schedules. Schedule By Week letsyou view details about NFL games based on theselected week.
News & Photos provides league news and otherNFL related information and photos.
Help displays help information for usage of theNFL Mobile Live application and features.
Exit to quit the NFL application.
YouTube
YouTube™ is a video sharing website on which userscan upload and share videos. The site is used todisplay a wide variety of user-generated video content,including movie clips, TV clips, and music videos, aswell as video content such as video blogging,informational shorts and other original videos.
1. Press and tap > .
2. Read the disclaimer regarding data usage andtouch Continue.
3. Press and tap Search field to search forspecific videos, scroll down to browse through themain page thumbnails, or scroll to the bottom toexplore additional options.
Note: You Tube is a data intensive feature and isrecommended that you upgrade to an unlimited dataplan to avoid additional data charges.

8/6/2019 Sprint M900 Moment Ug Eng
http://slidepdf.com/reader/full/sprint-m900-moment-ug-eng 175/212
3C. Entertainment: TV and Music 1
p p
4. To view a video, touch an available previewthumbnail or touch the title link.
5. Press to return to the previous page.
Note: It is not necessary to sign in to the You Tube site to viewcontent. However, if you wish to sign in to access
additional options, access the page via the Webbrowser and tap Sign in at the top right corner, enteryour YouTube or Google username and password, andtap Sign in.
GPS Services (page 164)
Google Maps (page 164)
Sprint Navigation (page 166)
Getting Driving Directions (page 167)
Activating Use Wireless Networks
This additional location feature uses open Wi-Fi andmobile network connections to assist in providingadditional location accuracy.
1. Press > and tap Settings > Security &
location > Use wireless networks.
Since this feature is based on Google’s location
3D. GPS NavigationNote: Enabling the GPS hardware can drain your batteryfaster.

8/6/2019 Sprint M900 Moment Ug Eng
http://slidepdf.com/reader/full/sprint-m900-moment-ug-eng 176/212
164 3D. GPS Navigation
GPS Services
Your device’s built-in GPS capability gives you accessto a number of location-based services, includingGoogle Maps and Sprint Navigation.
Activating Location Mode
Before using any of the location-based services, youmust turn on your device’s location mode.
Press > and tap Settings > Security &
location > Enable GPS satellites.
gservice, you will need to agree to allow Google tocollect anonymous information.
2. Tap Agree to accept the terms of service.
Google Maps
Use this application to gain directions, locationinformation, business addresses, etc., all right from yourSamsung Moment™. Determine your current locationwith or without GPS, get driving and transit directions,get phone numbers and addresses for localbusinesses.
Before you begin using this feature you must activate
your GPS hardware and agree to share locationinformation with Google.
To enable your device’s GPS Location feature:
1. Press > and tap >
Security & location.
2. Tap Enable GPS satellites. A checkmark indicatesthe GPS location feature is enabled. For additional
location information, see “Location Settings” onpage 50.
i h N ifi i h h
To utilize Google Maps: 1. Press and tap
> . 2. Tap the magnification icons
to zoom in or out of thecurrent map view.
– or –
Press to utilize other
Google Map features.
To search for a keyword:

8/6/2019 Sprint M900 Moment Ug Eng
http://slidepdf.com/reader/full/sprint-m900-moment-ug-eng 177/212
3D. GPS Navigation 1
appears in the Notification area when theGPS is active.
appears in the Notification area when theGPS is communicating.
To launch the Google Maps application:
Press and tap
> .
o o y o
1. Press and tap
> .
2. Press and tap Search.
3. Tap the example field (at the top of the screen),
enter a keyword, and tap . This keyword can be a category name (such aspizza, steak, burger), a business name (Samsung,Sprint), or a Google friend who is sharing theirlocation.
4. Tap to reveal a detailed list of information
corresponding to those matches now displayed onyour screen with lettered pins.
Sprint Navigation
Sprint Navigation gives you turn-by-turn directionsonscreen and over speakerphone.
If using the onscreen keyboard, tap Next to store
your information.4. Tap Continue to register your information.
5. Tap Yes to take a brief tour of the Navigationfeatures and functionality, or No, Skip Tour tocontinue to the main navigation screen.
Using Sprint Navigation
1. Press and tap
> .
2. Select an option and follow the onscreen
Note: Depending on your service plan, Sprint Navigation mayrequire a monthly subscription. Contact Sprint forinformation and pricing.

8/6/2019 Sprint M900 Moment Ug Eng
http://slidepdf.com/reader/full/sprint-m900-moment-ug-eng 178/212
166 3D. GPS Navigation
Registering Sprint Navigation
Before you can use Sprint Navigation, your device andservice must be registered.
1. Press and tap > .
2. Read the disclaimer and touch Accept toacknowledge the terms of use.
3. Tap each of the onscreen registration fields andenter the required information.
First Name, Last Name, and Email.
pinstructions to take advantage of SprintNavigation’s full suite of features.
Drive To lets you get driving directions fromwherever you are to wherever you’re going.Choices include:
● My Favorites: user-defined favorite locations.● Recent Places: recently entered locations.
● Address: manually entered street addresses.
● Intersection: map based on manually aentered street intersection.
● City: display a city map based on selected city.
● Business: locations based on business
categories.● Airport: local airports based on current GPS
location.
● Contacts: those local addresses assigned topreviously entered Contacts.
Search lets you search for locations from dozensof options such as Food/Coffee, Gas Stations,Gas by Price, Banks/ATMs, WiFi Spots, ParkingLots, Hotels & motels, Movie Theaters, etc..
Maps & Traffic provides access to 2D and 3D
Getting Driving Directions
The built-in GPS hardware (when enabled) allows youto get driving directions to selected locations orestablishments based on your current location.
Using a Physical Address
1. Press and tap > .
2. Tap Type It to manually enter the new address andreceive driving directions from the GPS network.

8/6/2019 Sprint M900 Moment Ug Eng
http://slidepdf.com/reader/full/sprint-m900-moment-ug-eng 179/212
3D. GPS Navigation 1
p pmaps for your current location and for severalcategories of locations such as Airports andContacts.
Share & More offers additional options, such assharing your location with contacts, creating and
storing My Favorites locations, accessing theproduct tour, and setting detailed applicationpreferences.
– or –
Tap Speak It In to place a call to the TeleNav™operator where you will speak the desired address.This is similar to calling 411 for directoryassistance. (A fee may be incurred.)
3. Tap Address then tap any of the address fields tothen enter respective information (Address, City,State/ZIP, and Country) .
4. Tap Done to initiate your search.:
5. Follow both the onscreen and audio directions.
Note: For more information about Sprint Navigation, visitwww.sprint.com/navigation.
Once you have entered your desired location and the
device has begun providing you with driving directions,you can alter the information being displayed by usingone of three other driving options: Traffic, Summary,and Search.
To review real-time traffic information along your route:
1. Press and tap
> > Drive To >
Address.
2. Tap Type It, enter the physical address information,and tap Done.
Real-time traffic alerts along your route areautomatically displayed at the bottom-right of yourscreen and announced vocally by the device.
– or –
Press and tap > > Maps &
Distance to Destination
Magnification
Distance to next turn

8/6/2019 Sprint M900 Moment Ug Eng
http://slidepdf.com/reader/full/sprint-m900-moment-ug-eng 180/212
168 3D. GPS Navigation
p Traffic.
To receive turn by turn directions (2D):
1. Press and tap > > Drive To >
Address.
2. Tap Type It, enter the physical address information,and tap Done.
3. Press and tap Summary to receive both anoutlined map view and a detailed turn by turndescription for navigating to your desired location.
Distance
Current Street Location Your Location
To search nearby locations based on type:
1. Press and tap
> > Drive To >
Address.
2. Tap Type It, enter the physical address information,and tap Done.
3. Press and tap Search to search for alocation based on a category such as Food/Coffee, etc.
Using a Local Business Category
The Moment™ can also cross-reference your current
Tap the Category field and then choose from one
of the available category entries by touching anonscreen entry such as: Food/Coffee, Gas Stations,Gas by Price, Banks/ATMs, WiFi Spots, Hospitals,etc..
Entries with more than one available category (asubcategory) appear with an adjacent gray arrow.These entries can be expanded and then closed.
3. Tap Search to store your information and begin thesearch.
To search for the least expensive gas in your area:

8/6/2019 Sprint M900 Moment Ug Eng
http://slidepdf.com/reader/full/sprint-m900-moment-ug-eng 181/212
3D. GPS Navigation 1
The Moment can also cross-reference your currentlocation with local business and points of interest, suchas Grocery Stores, Gas Stations, Wi-Fi Spots, Malls,Hospitals, etc.
1. Press and tap > > Drive To >
Businesses.
2. Enter a keyword into the What field to beginretrieving matches. Once you see a matchingbusiness name, touch the entry.
– or –
1. Press and tap > > Drive To >
Businesses > Category > Gas By Price.
2. Touch a selected grade of gasoline: Any, Regular,Plus 89, Premium, or Diesel.
By default the Search Results page lists the BestPrice at the top of the list.
3. Touch Search to begin the search.
4. Touch an entry from the list to be provided with anew route to the selected gas station.
Creating a My Favorites Location
Once you have begun using Sprint Navigation to findyour destination, you can then either recall thoselocations and add them to your list of favoritedestinations or create a new entry from one of theavailable location categories (Address, Business,Airport, or Contacts).
To create a My Favorites location from your Current
Location:1. Press and tap > > Share & More
> Record Location
Sharing a Recent Location with Others
Recently queried locations can be saved to your MyFavorites list and also shared with other cellulardevices.
1. Press and tap > > Drive To >
Recent Places.
2. Tap a previous destination from the list and tap
Share Address.
3. Touch the Send To: field and then enter a mobilenumber or email address:

8/6/2019 Sprint M900 Moment Ug Eng
http://slidepdf.com/reader/full/sprint-m900-moment-ug-eng 182/212
170 3D. GPS Navigation
> Record Location.
2. Tap Done to complete the process.
To create a My Favorites location from a Recent Place:
1. Press and tap > > Share & More
> My Stuff > Recent Places.
2. Tap a previous destination location from the listand tap Save to Favorites.
Save to Favorites: to save the current location toyour My Favorites list.
4. Touch Send Now to complete the delivery process.
Configuring Your Navigation Preferences
1. Press and tap > >
Share & More > Preferences.
2. Touch an entry to change its current setting:
General: allows change general settings,including:
● My Name: allows you to alter the current firstand last name registered with the service, aswell as email address.
● Distance Units: allows you to alter the
descriptions used for distances: Mi/Ft orKm/Meters.
● Tips: allows you to display onscreen tips: Always On or Always Off .
● Initial Volume: allows you to alter the initialvolume level for the readouts: Very Soft, Soft,
Normal, Loud or Very Loud.
● Map Colors: allows you to change the displaycolors of the onscreen map: Daytime,Nightime, or Auto.
i i i
● Backlight: allows you to configure the
Backlight setting between Always On or PowerSave (times out after a few seconds).
● Traffic Alerts: allows you to either enable (On)or disable (Off ) real-time traffic alerts alongyour current route.
Navigation Audio: allows you to choose whetherthe street names are announced during yournavigation.
● Settings: allows you to change the audioreadouts. Options include: Full Audio,Instructions Only or No Audio

8/6/2019 Sprint M900 Moment Ug Eng
http://slidepdf.com/reader/full/sprint-m900-moment-ug-eng 183/212
3D. GPS Navigation 1
Navigation: lets you change navigation settings,including:
● Route Style: allows you to choose the methodwhich is used to provide you directions fromPoint A to Point B. The default is Always use
fastest.● Avoid: allows you to specific which obstacles
should be avoided when mapping a route:HOV Lanes, Tools or Traffic Delays.
● Moving Maps: allows you to select the defaultmap type displayed for your navigation: 3D or2D.
Instructions Only, or No Audio.
● Guide Tones: allows you to change thelanguage currently used for announcementsbetween either English Female(US) or Spanish.
Launching the Product Tour
Press and tap > >
Share & More > Product Tour.

8/6/2019 Sprint M900 Moment Ug Eng
http://slidepdf.com/reader/full/sprint-m900-moment-ug-eng 184/212
Section 4
Safety and Warranty Information
8/6/2019 Sprint M900 Moment Ug Eng
http://slidepdf.com/reader/full/sprint-m900-moment-ug-eng 185/212
Information
General Precautions (page 174)
Maintaining Safe Use of and Access to Your Phone
(page 175)
Using Your Phone With a Hearing Aid Device (page 176)
Caring for the Battery (page 178)
Radio Frequency (RF) Energy (page 179)
General Precautions
There are several simple guidelines to operating your phoneproperly and maintaining safe, satisfactory service.
To maximize performance, do not touch the bottom portionof your phone where the internal antenna is located whileusing the phone.
Speak directly into the mouthpiece.
Avoid exposing your phone and accessories to rain or liquidspills. If your phone does get wet, immediately turn the
power off and remove the battery. Do not expose your phone to direct sunlight for extended
periods of time (such as on the dashboard of a car).
Although your phone is quite sturdy it is a complex piece of
4A. Important Safety Information

8/6/2019 Sprint M900 Moment Ug Eng
http://slidepdf.com/reader/full/sprint-m900-moment-ug-eng 186/212
174 4A. Important Safety Information
Radio Frequency (RF) Energy (page 179)
Owner’s Record (page 181)
User Guide Proprietary Notice (page 181)
This phone guide contains important operational and
safety information that will help you safely use your
phone. Failure to read and follow the informationprovided in this phone guide may result in seriousbodily injury, death, or property damage.
Although your phone is quite sturdy, it is a complex piece ofequipment and can be broken. Avoid dropping, hitting,bending, or sitting on it.
Any changes or modifications to your phone not expresslyapproved in this document could void your warranty for thisequipment and void your authority to operate thisequipment.
Note: For the best care of your phone, only Sprint-authorizedpersonnel should service your phone and accessories. Failureto do so may be dangerous and void your warranty.
Maintaining Safe Use of and Accessto Your Phone
Do Not Rely on Your Phone for Emergency Calls Mobile phones operate using radio signals, which cannotguarantee connection in all conditions. Therefore you shouldnever rely solely upon any mobile phone for essentialcommunication (e.g., medical emergencies). Emergency callsmay not be possible on all cellular networks or when certain
network services or mobile phone features are in use. Checkwith your local service provider for details.
Using Your Phone While Driving Talking on your phone while driving (or operating the phone
Using Your Phone Near Other Electronic Devices Most modern electronic equipment is shielded from radiofrequency (RF) signals. However, RF signals from wirelessphones may affect inadequately shielded electronicequipment.
RF signals may affect improperly installed or inadequatelyshielded electronic operating systems or entertainmentsystems in motor vehicles. Check with the manufacturer or theirrepresentative to determine if these systems are adequatelyshielded from external RF signals. Also check with the
manufacturer regarding any equipment that has been added toyour vehicle.
Consult the manufacturer of any personal medical devices,such as pacemakers and hearing aids to determine if they are

8/6/2019 Sprint M900 Moment Ug Eng
http://slidepdf.com/reader/full/sprint-m900-moment-ug-eng 187/212
4A. Important Safety Information 1
Talking on your phone while driving (or operating the phonewithout a hands-free device) is prohibited in some jurisdictions.Laws vary as to specific restrictions. Remember that safetyalways comes first.
Following Safety Guidelines To operate your phone safely and efficiently, always follow anyspecial regulations in a given area. Turn your phone off in areaswhere use is forbidden or when it may cause interference ordanger.
such as pacemakers and hearing aids, to determine if they areadequately shielded from external RF signals.
Turning Off Your Phone Before Flying Turn off your phone before boarding any aircraft. To preventpossible interference with aircraft systems, the U.S. FederalAviation Administration (FAA) regulations require you to havepermission from a crew member to use your phone whilethe plane is on the ground. To prevent any risk of interference,FCC regulations prohibit using your phone while the plane is inthe air.
Tip: Purchase an optional hands-free accessory at your local SprintStore, or call Sprint at 1-866-866-7509. You can also dial # 2 2 2
on your phone.
Note: Always turn off the phone in healthcare facilities, and requestpermission before using the phone near medical equipment.
Turning Off Your Phone in Dangerous Areas To avoid interfering with blasting operations, turn your phoneoff when in a blasting area or in other areas with signsindicating two-way radios should be turned off. Constructioncrews often use remote-control RF devices to set of f explosives.
Turn your phone off when you’re in any area that has apotentially explosive atmosphere. Although it’s rare, your phoneand accessories could generate sparks. Sparks can cause anexplosion or fire, resulting in bodily injury or even death. Theseareas are often, but not always, clearly marked. They include:
Fueling areas such as gas stations. Below deck on boats.
Fuel or chemical transfer or storage facilities.
A eas he e the ai contains chemicals o pa ticles s ch
Warning Regarding Display The display on your handset is made of glass or acrylic andcould break if your handset is dropped or if it receivessignificant impact. Do not use if screen is broken or cracked asthis could cause injury to you.
Using Your Phone With a Hearing Aid Device
A number of Sprint phones have been tested for hearing aiddevice compatibility. When some wireless phones are usedwith certain hearing devices (including hearing aids andcochlear implants), users may detect a noise which can

8/6/2019 Sprint M900 Moment Ug Eng
http://slidepdf.com/reader/full/sprint-m900-moment-ug-eng 188/212
176 4A. Important Safety Information
Areas where the air contains chemicals or particles suchas grain, dust, or metal powders.
Any other area where you would normally be advised toturn off your vehicle’s engine.
Restricting Children’s Access to Your Phone Your phone is not a toy. Do not allow children to play with it asthey could hurt themselves and others, damage the phone ormake calls that increase your Sprint invoice.
cochlear implants), users may detect a noise which caninterfere with the effectiveness of the hearing device.
Some hearing devices are more immune than others to thisinterference noise, and phones also vary in the amount ofinterference noise they may generate. ANSI standard C63.19was developed to provide a standardized means of measuring
both wireless phone and hearing devices to determine usabilityrating categories for both.
Ratings have been developed for mobile phones to assisthearing device users find phones that may be compatible withtheir hearing device. Not all phones have been rated forcompatibility with hearing devices. Phones that have beenrated have a label located on the box. Your SPH-M900 has an
M4 rating.
Note: Never transport or store flammable gas, flammable liquids, orexplosives in the compartment of your vehicle that contains
your phone or accessories.
These ratings are not guarantees. Results will vary depending
on the user’s hearing device and individual type and degree ofhearing loss. If a hearing device is particularly vulnerable tointerference noise; even a phone with a higher rating may stillcause unacceptable noise levels in the hearing device. Tryingout the phone with your hearing device is the best way toevaluate it for your personal needs.
M-Ratings: Phones rated M3 or M4 meet FCC requirements forhearing aid compatibility and are likely to generate lessinterference to hearing devices than unrated phones. (M4 is thebetter/higher of the two ratings.)
T-Ratings: Phones rated T3 or T4 meet FCC requirements andare likely to be more usable with a hearing device’s telecoil (“TSwitch”or “Telephone Switch”) than unrated phones (T4 is the
Thus, if you pair an M3 hearing aid with an M3 phone, you will
have a combined rating of six for “excellent use.” This issynonymous for T ratings.
Sprint further suggests you experiment with multiple phones(even those not labeled M3/T3 or M4/T4) while in the store tofind the one that works best with your hearing aid device.Should you experience interference or find the quality ofservice unsatisfactory after purchasing your phone, promptlyreturn it to the store within 30 days of purchase. (A restockingfee may be applied to exchanges. Visit www.sprint.com/returns for details.) More information about hearing aid compatibilitymay be found at: www.fcc.gov, www.fda.gov, andwww.accesswireless.org.
G i h B H i D i

8/6/2019 Sprint M900 Moment Ug Eng
http://slidepdf.com/reader/full/sprint-m900-moment-ug-eng 189/212
4A. Important Safety Information 1
Switch or Telephone Switch ) than unrated phones. (T4 is thebetter/higher of the two ratings. Note that not all hearingdevices have telecoils in them.)
Hearing aid devices may also be measured for immunity tointerference noise from wireless phones and should haveratings similar to phones. Ask your hearing healthcare
professional for the rating of your hearing aid. Add the rating ofyour hearing aid and your phone to determine probableusability:
Any combined rating equal to or greater than six offersexcellent use.
Any combined rating equal to five is considered normal use.
Any combined rating equal to four is considered usable.
Getting the Best Hearing Device
Experience With Your Phone
To further minimize interference:
Set the phone’s display and keypad backlight settings to
ensure the minimum time intervals.1. Press > and touch Settings > Sound &
display > Brightness, or Screen timeout.
2. Touch the minimum time interval setting.
Position the phone so the internal antenna is farthest fromyour hearing aid.
Move the phone around to find the point with leastinterference.
Caring for the Battery
Protecting Your Battery The guidelines listed below help you get the most out of yourbattery’s performance.
Recently there have been some public reports of wirelessphone batteries overheating, catching fire, or exploding. Itappears that many, if not all, of these reports involvecounterfeit or inexpensive, aftermarket-brand batteries with
k i bl f i d d S i i
Keep the metal contacts on top of the battery clean.
Don’t attempt to disassemble or short-circuit the battery. The battery may need recharging if it has not been used for
a long period of time.
It’s best to replace the battery when it no longer providesacceptable performance. It can be recharged hundreds oftimes before it needs replacing.
Don’t store the battery in high temperature areas for longperiods of time. It’s best to follow these storage rules:
Less than one month: -4° F to 140° F (-20° C to 60° C)
More than one month: -4° F to 113° F (-20° C to 45° C)
Disposal of Lithium Ion (Li-Ion) Batteries D t h dl d d l ki Li I b tt

8/6/2019 Sprint M900 Moment Ug Eng
http://slidepdf.com/reader/full/sprint-m900-moment-ug-eng 190/212
178 4A. Important Safety Information
unknown or questionable manufacturing standards. Sprint isnot aware of similar problems with Sprint phones resultingfrom the proper use of batteries and accessories approvedby Sprint or the manufacturer of your phone. Use only Sprint-approved or manufacturer-approved batteries andaccessories found at Sprint Stores or through your phone’smanufacturer, or call 1-866-866-7509 to order. They’re also
available at www.sprint.com — click Accessories. Buying theright batteries and accessories is the best way to ensurethey’re genuine and safe.
In order to avoid damage, charge the battery only intemperatures that range from 32° F to 113° F (0° C to 45° C).
Don’t use the battery charger in direct sunlight or in highhumidity areas, such as the bathroom.
Never dispose of the battery by incineration.
Do not handle a damaged or leaking Li-Ion battery as you canbe burned.
For safe disposal options of your Li-Ion batteries, contact yournearest Sprint authorized service center.
Special Note: Be sure to dispose of your battery properly. In
some areas, the disposal of batteries in household or businesstrash may be prohibited.
Radio Frequency (RF) Energy
Understanding How Your Phone Operates Your phone is basically a radio transmitter and receiver. Whenit’s turned on, it receives and transmits radio frequency (RF)signals. When you use your phone, the system handling yourcall controls the power level. This power can range from 0.006watt to 0.2 watt in digital mode.
Knowing Radio Frequency Safety The design of your phone complies with updated NCRP
standards described below.
In 1991–92, the Institute of Electrical and Electronics Engineers(IEEE) and the American National Standards Institute (ANSI)
S
Sprint-approved carrying case, holster or other body-worn
accessory. If you do not use a body-worn accessory, ensurethe antenna is at least 7/16 inch (1.5 centimeters) from yourbody when transmitting. Use of non-Sprint-approvedaccessories may violate FCC RF exposure guidelines.
For more information about RF exposure, visit the FCC websiteat www.fcc.gov.
Specific Absorption Rates (SAR) for Wireless
Phones
The SAR value corresponds to the relative amount of RFenergy absorbed into the head of a user of a wireless handset.
The SAR value of a phone is the result of an extensive testing,

8/6/2019 Sprint M900 Moment Ug Eng
http://slidepdf.com/reader/full/sprint-m900-moment-ug-eng 191/212
4A. Important Safety Information 1
joined in updating ANSI’s 1982 standard for safety levels withrespect to human exposure to RF signals. More than 120scientists, engineers and physicians from universities,government health agencies and industries developed thisupdated standard after reviewing the available body ofresearch. In 1993, the Federal Communications Commission
(FCC) adopted this updated standard in a regulation. In August1996, the FCC adopted hybrid standard consisting of theexisting ANSI/IEEE standard and the guidelines published bythe National Council of Radiation Protection andMeasurements (NCRP).
Body-Worn Operation To maintain compliance with FCC RF exposure guidelines, ifyou wear a handset on your body, use a Sprint-supplied or
measuring and calculation process. It does not represent howmuch RF the phone emits. All phone models are tested at theirhighest value in strict laboratory settings. But when inoperation, the SAR of a phone can be substantially less thanthe level reported to the FCC. This is because of a variety offactors including its proximity to a base station antenna, phone
design and other factors. What is important to remember is thateach phone meets strict federal guidelines. Variations in SARsdo not represent a variation in safety.
All phones must meet the federal standard, which incorporatesa substantial margin of safety. As stated above, variations inSAR values between different model phones do not meanvariations in safety. SAR values at or below the federal standardof 1.6 W/kg are considered safe for use by the public.
The highest reported SAR values of the SPH-M900 are:
Cellular CDMA mode (Part 22): Head: 0.68 W/kg; Body-worn: 1.16 W/kg
PCS mode (Part 24): Head: 0.61 W/kg; Body-worn: 0.88 W/kg
FCC Radio Frequency Emission
This phone meets the FCC Radio Frequency EmissionGuidelines.
FCC ID number: A3LSPHM900.More information on the phone’s SAR can be found from thefollowing FCC website: http://www.fcc.gov/oet/ea/.
FCCN i
These limits are designed to provide reasonable protection
against harmful interference in a residential installation. Thisequipment generates, uses and can radiate radio frequencyenergy and, if not installed and used in accordance with theinstructions, may cause harmful interference to radiocommunications.
However, there is no guarantee that interference will not occurin a particular installation.
If this equipment does cause harmful interference to radio ortelevision reception, which can be determined by turning the
equipment off and on, the user is encouraged to try to correctthe interference by one or more of the following measures:
Reorient the direction of the internal antenna.
Increase the separation between the equipment and

8/6/2019 Sprint M900 Moment Ug Eng
http://slidepdf.com/reader/full/sprint-m900-moment-ug-eng 192/212
180 4A. Important Safety Information
FCC Notice
This device complies with Part 15 of the FCC Rules. Operationis subject to the following two conditions: (1) this device maynot cause harmful interference, and (2) this device must acceptany interference received, including interference that may
cause undesired operation.Changes or modifications not expressly approved by the partyresponsible for compliance could void the user’s authority tooperate the equipment.
Increase the separation between the equipment andreceiver.
Connect the equipment into an outlet on a circuit differentfrom that to which the receiver is connected.
Consult the dealer or an experienced radio/TV technician forhelp.
Note: This equipment has been tested and found to comply with thelimits for a Class B digital device, pursuant to Part 15 of theFCC Rules.

8/6/2019 Sprint M900 Moment Ug Eng
http://slidepdf.com/reader/full/sprint-m900-moment-ug-eng 193/212
Manufacturer’s Warranty (page 182)
Your phone has been designed to provide you withreliable, worry-free service. If for any reason you have a
problem with your equipment, please refer to themanufacturer’s warranty in this section.
For information regarding the terms and conditions ofservice for your phone please visit www sprint com or
Manufacturer’s Warranty
STANDARD LIMITED WARRANTY
What is Covered and For How Long?
SAMSUNG TELECOMMUNICATIONS AMERICA, LLC("SAMSUNG") warrants to the original purchaser ("Purchaser")that SAMSUNG's Phones and accessories ("Products") are freefrom defects in material and workmanship under normal useand service for the period commencing upon the date of
purchase and continuing for the following specified period oftime after that date:
Phone 1 Year
Batteries 1 Year
4B. Manufacturer’s Warranty

8/6/2019 Sprint M900 Moment Ug Eng
http://slidepdf.com/reader/full/sprint-m900-moment-ug-eng 194/212
182 Manufacturer’s Warranty
service for your phone, please visit www.sprint.com orcall Sprint Customer Service at 1-888-211-4727.
Batteries 1 Year
Leather Case/Pouch/Holster 90 Days
Game Pad 90 Days
Other Phone Accessories 1 Year
What is Not Covered? This Limited Warranty is conditioned upon proper use ofProduct by Purchaser. This Limited Warranty does not cover: (a)defects or damage resulting from accident, misuse, abuse,neglect, unusual physical, electrical or electromechanicalstress, or modification of any part of Product, including antenna,or cosmetic damage; (b) equipment that has the serial numberremoved or made illegible; (c) any plastic surfaces or otherexternally exposed parts that are scratched or damaged due to
Note: In addition to the warranty provided by your phone’smanufacturer, which is detailed on the following pages, Sprintoffers a number of optional plans to cover your equipment for
non-warranty claims. Sprint Total Equipment Protection provides the combined coverage of the Sprint EquipmentReplacement Program and the Sprint Equipment Serviceand Repair Program, both of which are available separately.Each of these programs may be signed up for within 30 daysof activating your phone. For more details, please visit yournearest Sprint Store or call Sprint at 1-800-584-3666.
normal use; (d) malfunctions resulting from the use of Productin conjunction with accessories, products, or ancillary/peripheral equipment not furnished or approved bySAMSUNG; (e) defects or damage from improper testing,operation, maintenance, installation, or adjustment; (f)installation, maintenance, and service of Product, or (g) Productused or purchased outside the United States or Canada.
This Limited Warranty covers batteries only if battery capacityfalls below 80% of rated capacity or the battery leaks, and thisLimited Warranty does not cover any battery if (i) the batteryhas been charged by a battery charger not specified orapproved by SAMSUNG for charging the battery, (ii) any of theseals on the battery are broken or show evidence of tampering,or (iii) the battery has been used in equipment other than theSAMSUNG phone for which it is specified
use rebuilt, reconditioned, or new parts or components whenrepairing any Product or replace Product with a rebuilt,reconditioned or new Product. Repaired/replaced leathercases, pouches and holsters will be warranted for a period ofninety (90) days. All other repaired/replaced Product will bewarranted for a period equal to the remainder of the originalLimited Warranty on the original Product or for 90 days,whichever is longer. All replaced parts, components, boardsand equipment shall become the property of SAMSUNG.
If SAMSUNG determines that any Product is not covered by thisLimited Warranty, Purchaser must pay all parts, shipping, andlabor charges for the repair or return of such Product.
What Are the Limits on SAMSUNG’s Liability? EXCEPT AS SET FORTH IN THE EXPRESS WARRANTYCONTAINED HEREIN PURCHASER TAKES THE PRODUCT

8/6/2019 Sprint M900 Moment Ug Eng
http://slidepdf.com/reader/full/sprint-m900-moment-ug-eng 195/212
Manufacturer’s Warranty 1
SAMSUNG phone for which it is specified.
What are SAMSUNG’s Obligations?
During the applicable warranty period, SAMSUNG will repair orreplace, at SAMSUNG's sole option, without charge toPurchaser, any defective component part of Product. To obtainservice under this Limited Warranty, Purchaser must return
Product to an authorized phone service facility in an adequatecontainer for shipping, accompanied by Purchaser's salesreceipt or comparable substitute proof of sale showing the dateof purchase, the serial number of Product and the sellers'name and address. To obtain assistance on where to deliverthe Product, call Samsung Customer Care at 1-888-987-4357.Upon receipt, SAMSUNG will promptly repair or replace thedefective Product. SAMSUNG may, at SAMSUNG's sole option,
CONTAINED HEREIN, PURCHASER TAKES THE PRODUCT"AS IS," AND SAMSUNG MAKES NO WARRANTY ORREPRESENTATION AND THERE ARE NO CONDITIONS,EXPRESS OR IMPLIED, STATUTORY OR OTHERWISE, OF ANYKIND WHATSOEVER WITH RESPECT TO THE PRODUCT,INCLUDING BUT NOT LIMITED TO:
THE MERCHANTABILITY OF THE PRODUCT OR ITSFITNESS FOR ANY PARTICULAR PURPOSE OR USE;
WARRANTIES OF TITLE OR NON-INFRINGEMENT;
DESIGN, CONDITION, QUALITY, OR PERFORMANCE OFTHE PRODUCT;
THE WORKMANSHIP OF THE PRODUCT OR THECOMPONENTS CONTAINED THEREIN; OR
COMPLIANCE OF THE PRODUCT WITH THEREQUIREMENTS OF ANY LAW, RULE, SPECIFICATION ORCONTRACT PERTAINING THERETO.
NOTHING CONTAINED IN THE INSTRUCTION MANUAL SHALLBE CONSTRUED TO CREATE AN EXPRESS WARRANTY OFANY KIND WHATSOEVER WITH RESPECT TO THE PRODUCT.ALL IMPLIED WARRANTIES AND CONDITIONS THAT MAYARISE BY OPERATION OF LAW, INCLUDING IF APPLICABLETHE IMPLIED WARRANTIES OF MERCHANTABILITY ANDFITNESS FOR A PARTICULAR PURPOSE, ARE HEREBYLIMITED TO THE SAME DURATION OF TIME AS THE EXPRESS
WRITTEN WARRANTY STATED HEREIN. SOME STATES/PROVINCES DO NOT ALLOW LIMITATIONS ON HOW LONGAN IMPLIED WARRANTY LASTS, SO THE ABOVE LIMITATIONMAY NOT APPLY TO YOU. IN ADDITION, SAMSUNG SHALL
LIMITATION OF INCIDENTAL OR CONSEQUENTIAL DAMAGES,SO THE ABOVE LIMITATION OR EXCLUSION MAY NOT APPLYTO YOU. THIS WARRANTY GIVES YOU SPECIFIC LEGALRIGHTS, AND YOU MAY ALSO HAVE OTHER RIGHTS, WHICHVARY FROM STATE TO STATE/PROVINCE TO PROVINCE. THISLIMITED WARRANTY SHALL NOT EXTEND TO ANYONEOTHER THAN THE ORIGINAL PURCHASER OF THISPRODUCT AND STATES PURCHASER'S EXCLUSIVE REMEDY.IF ANY PORTION OF THIS LIMITED WARRANTY IS HELDILLEGAL OR UNENFORCEABLE BY REASON OF ANY LAW,SUCH PARTIAL ILLEGALITY OR UNENFORCEABILITY SHALL
NOT AFFECT THE ENFORCEABILITY FOR THE REMAINDEROF THIS LIMITED WARRANTY WHICH PURCHASERACKNOWLEDGES IS AND WILL ALWAYS BE CONSTRUED TOBE LIMITED BY ITS TERMS OR AS LIMITED AS THE LAW

8/6/2019 Sprint M900 Moment Ug Eng
http://slidepdf.com/reader/full/sprint-m900-moment-ug-eng 196/212
184 Manufacturer’s Warranty
NOT BE LIABLE FOR ANY DAMAGES OF ANY KINDRESULTING FROM THE PURCHASE, USE, OR MISUSE OF, ORINABILITY TO USE THE PRODUCT OR ARISING DIRECTLY ORINDIRECTLY FROM THE USE OR LOSS OF USE OF THEPRODUCT OR FROM THE BREACH OF THE EXPRESSWARRANTY, INCLUDING INCIDENTAL, SPECIAL,CONSEQUENTIAL OR SIMILAR DAMAGES, OR LOSS OFANTICIPATED PROFITS OR BENEFITS, OR FOR DAMAGESARISING FROM ANY TORT (INCLUDING NEGLIGENCE ORGROSS NEGLIGENCE) OR FAULT COMMITTED BYSAMSUNG, ITS AGENTS OR EMPLOYEES, OR FOR ANYBREACH OF CONTRACT OR FOR ANY CLAIM BROUGHTAGAINST PURCHASER BY ANY OTHER PARTY. SOMESTATES/PROVINCES DO NOT ALLOW THE EXCLUSION OR
PERMITS. THE PARTIES UNDERSTAND THAT THEPURCHASER MAY USE THIRD-PARTY SOFTWARE OREQUIPMENT IN CONJUNCTION WITH THE PRODUCT.SAMSUNG MAKES NO WARRANTIES OR REPRESENTATIONSAND THERE ARE NO CONDITIONS, EXPRESS OR IMPLIED,STATUTORY OR OTHERWISE, AS TO THE QUALITY,CAPABILITIES, OPERATIONS, PERFORMANCE ORSUITABILITY OF ANY THIRDPARTY SOFTWARE OREQUIPMENT, WHETHER SUCH THIRD-PARTY SOFTWARE OREQUIPMENT IS INCLUDED WITH THE PRODUCTDISTRIBUTED BY SAMSUNG OR OTHERWISE, INCLUDINGTHE ABILITY TO INTEGRATE ANY SUCH SOFTWARE OREQUIPMENT WITH THE PRODUCT. THE QUALITY,CAPABILITIES, OPERATIONS, PERFORMANCE AND
SUITABILITY OF ANY SUCH THIRD-PARTY SOFTWARE OREQUIPMENT LIE SOLELY WITH THE PURCHASER AND THEDIRECT VENDOR, OWNER OR SUPPLIER OF SUCH THIRD-PARTY SOFTWARE OR EQUIPMENT, AS THE CASE MAY BE.
This Limited Warranty allocates risk of Product failure betweenPurchaser and SAMSUNG, and SAMSUNG's Product pricingreflects this allocation of risk and the limitations of liabilitycontained in this Limited Warranty. The agents, employees,distributors, and dealers of SAMSUNG are not authorized tomake modifications to this Limited Warranty, or make additionalwarranties binding on SAMSUNG. Accordingly, additionalstatements such as dealer advertising or presentation, whetheroral or written, do not constitute warranties by SAMSUNG andshould not be relied upon.
End User License Agreement for Software
IN THIS EULA, YOU MUST CLICK THE "DECLINE" BUTTON,DISCONTINUE USE OF THE SOFTWARE.
1. GRANT OF LICENSE. Samsung grants you the followingrights provided that you comply with all terms and conditions ofthis EULA: You may install, use, access, display and run onecopy of the Software on the local hard disk(s) or otherpermanent storage media of one computer and use theSoftware on a single computer or a mobile device at a time,and you may not make the Software available over a networkwhere it could be used by multiple computers at the sametime. You may make one copy of the Software in machine-readable form for backup purposes only; provided that thebackup copy must include all copyright or other proprietarynotices contained on the original.
2 RESERVATION OF RIGHTS AND OWNERSHIP Samsung

8/6/2019 Sprint M900 Moment Ug Eng
http://slidepdf.com/reader/full/sprint-m900-moment-ug-eng 197/212
Manufacturer’s Warranty 1
End User License Agreement for Software
IMPORTANT. READ CAREFULLY: This End User LicenseAgreement ("EULA") is a legal agreement between you (eitheran individual or a single entity) and Samsung Electronics Co.,Ltd. for software owned by Samsung Electronics Co., Ltd. andits affiliated companies and its third party suppliers andlicensors that accompanies this EULA, which includescomputer software and may include associated media, printedmaterials, "online" or electronic documentation ("Software").BY CLICKING THE "I ACCEPT" BUTTON (OR IF YOU BYPASSOR OTHERWISE DISABLE THE "I ACCEPT", AND STILLINSTALL, COPY, DOWNLOAD, ACCESS OR OTHERWISE USETHE SOFTWARE), YOU AGREE TO BE BOUND BY THETERMS OF THIS EULA. IF YOU DO NOT ACCEPT THE TERMS
2. RESERVATION OF RIGHTS AND OWNERSHIP. Samsungreserves all rights not expressly granted to you in this EULA.The Software is protected by copyright and other intellectualproperty laws and treaties. Samsung or its suppliers own thetitle, copyright and other intellectual property rights in theSoftware. The Software is licensed, not sold.
3. LIMITATIONS ON END USER RIGHTS. You may not reverseengineer, decompile, disassemble, or otherwise attempt todiscover the source code or algorithms of, the Software (exceptand only to the extent that such activity is expressly permittedby applicable law notwithstanding this limitation), or modify, ordisable any features of, the Software, or create derivative worksbased on the Software. You may not rent, lease, lend,
sublicense or provide commercial hosting services with theSoftware.
4. CONSENT TO USE OF DATA. You agree that Samsung andits affiliates may collect and use technical information gatheredas part of the product support services related to the Softwareprovided to you, if any, related to the Software. Samsung mayuse this information solely to improve its products or to providecustomized services or technologies to you and will notdisclose this information in a form that personally identifies you.
5. UPGRADES. This EULA applies to updates, supplements
and add-on components (if any) of the Software that Samsungmay provide to you or make available to you after the date youobtain your initial copy of the Software, unless we provide otherterms along with such upgrade. To use Software identified asan upgrade you must first be licensed for the Software
7. EXPORT RESTRICTIONS. You acknowledge that theSoftware is subject to export restrictions of various countries.You agree to comply with all applicable international andnational laws that apply to the Software, including the U.S.Export Administration Regulations, as well as end user, enduse, and destination restrictions issued by U.S. and othergovernments.
8. TERMINATION. This EULA is effective until terminated. Yourrights under this License will terminate automatically withoutnotice from Samsung if you fail to comply with any of the termsand conditions of this EULA. Upon termination of this EULA,you shall cease all use of the Software and destroy all copies,full or partial, of the Software.
9. DISCLAIMER OF WARRANTIES. You expressly acknowledgeand agree that use of the Software is at your sole risk and that

8/6/2019 Sprint M900 Moment Ug Eng
http://slidepdf.com/reader/full/sprint-m900-moment-ug-eng 198/212
186 Manufacturer’s Warranty
an upgrade, you must first be licensed for the Softwareidentified by Samsung as eligible for the upgrade. Afterupgrading, you may no longer use the Sof tware that formed thebasis for your upgrade eligibility.
6. SOFTWARE TRANSFER. You may not transfer this EULA or
the rights to the Software granted herein to any third partyunless it is in connection with the sale of the mobile devicewhich the Software accompanied. In such event, the transfermust include all of the Software (including all component parts,the media and printed materials, any upgrades, this EULA) andyou may not retain any copies of the Software. The transfer maynot be an indirect transfer, such as a consignment. Prior to thetransfer, the end user receiving the Software must agree to allthe EULA terms.
and agree that use of the Software is at your sole risk and thatthe entire risk as to satisfactory quality, performance, accuracyand effort is with you. TO THE MAXIMUM EXTENT PERMITTEDBY APPLICABLE LAW, THE SOFTWARE IS PROVIDED "AS IS"AND WITH ALL FAULTS AND WITHOUT WARRANTY OF ANYKIND, AND SAMSUNG AND ITS LICENSORS (COLLECTIVELY
REFERRED TO AS "SAMSUNG" FOR THE PURPOSES OFSECTIONS 9, 10 and 11) HEREBY DISCLAIM ALLWARRANTIES AND CONDITIONS WITH RESPECT TO THESOFTWARE, EITHER EXPRESS, IMPLIED OR STATUTORY,INCLUDING, BUT NOT LIMITED TO, THE IMPLIEDWARRANTIES AND/OR CONDITIONS OF MERCHANTABILITY,OF SATISFACTORY QUALITY OR WORKMANLIKE EFFORT, OFFITNESS FOR A PARTICULAR PURPOSE, OF RELIABILITY OR
AVAILABILITY, OF ACCURACY, OF LACK OF VIRUSES, OFQUIET ENJOYMENT, AND NON-INFRINGEMENT OF THIRDPARTY RIGHTS. SAMSUNG DOES NOT WARRANT AGAINSTINTERFERENCE WITH YOUR ENJOYMENT OF THESOFTWARE, THAT THE FUNCTIONS CONTAINED IN THESOFTWARE WILL MEET YOUR REQUIREMENTS, THAT THEOPERATION OF THE SOFTWARE WILL BE UNINTERRUPTEDOR ERROR-FREE, OR THAT DEFECTS IN THE SOFTWAREWILL BE CORRECTED. NO ORAL OR WRITTEN INFORMATIONOR ADVICE GIVEN BY SAMSUNG OR A SAMSUNGAUTHORIZED REPRESENTATIVE SHALL CREATE A
WARRANTY. SHOULD THE SOFTWARE PROVE DEFECTIVE,YOU ASSUME THE ENTIRE COST OF ALL NECESSARYSERVICING, REPAIR OR CORRECTION. SOMEJURISDICTIONS DO NOT ALLOW THE EXCLUSION OFIMPLIED WARRANTIES OR LIMITATIONS ON APPLICABLE
OTHER SERVICES, INFORMATION, SOFTWARE, ANDRELATED CONTENT THROUGH THE SOFTWARE OROTHERWISE ARISING OUT OF THE USE OF THE SOFTWARE,OR OTHERWISE UNDER OR IN CONNECTION WITH ANYPROVISION OF THIS EULA, HOWEVER CAUSED,REGARDLESS OF THE THEORY OF LIABILITY (CONTRACT,TORT OR OTHERWISE) AND EVEN IF SAMSUNG HAS BEENADVISED OF THE POSSIBILITY OF SUCH DAMAGES. SOMEJURISDICTIONS DO NOT ALLOW THE LIMITATION OFLIABILITY FOR PERSONAL INJURY, OR OF INCIDENTAL ORCONSEQUENTIAL DAMAGES, SO THIS LIMITATION MAY NOT
APPLY TO YOU.11. LIMITATION OF LIABILITY. Notwithstanding any damagesthat you might incur for any reason whatsoever (including,without limitation, all damages referenced herein and all direct

8/6/2019 Sprint M900 Moment Ug Eng
http://slidepdf.com/reader/full/sprint-m900-moment-ug-eng 199/212
Manufacturer’s Warranty 1
IMPLIED WARRANTIES OR LIMITATIONS ON APPLICABLESTATUTORY RIGHTS OF A CONSUMER, SO THESEEXCLUSIONS AND LIMITATIONS MAY NOT APPLY TO YOU.
10. EXCLUSION OF INCIDENTAL, CONSEQUENTIAL ANDCERTAIN OTHER DAMAGES. TO THE EXTENT NOT
PROHIBITED BY LAW, IN NO EVENT SHALL SAMSUNG BELIABLE FOR PERSONAL INJURY, OR ANY INCIDENTAL,SPECIAL, INDIRECT OR CONSEQUENTIAL DAMAGESWHATSOEVER, OR FOR LOSS OF PROFITS, LOSS OF DATA,BUSINESS INTERRUPTION, OR FOR ANY PECUNIARYDAMAGES OR LOSSES, ARISING OUT OF OR RELATED TOYOUR USE OR INABILITY TO USE THE SOFTWARE, THEPROVISION OF OR FAILURE TO PROVIDE SUPPORT OR
or general damages in contract or anything else), the entireliability of Samsung under any provision of this EULA and yourexclusive remedy hereunder shall be limited to the greater ofthe actual damages you incur in reasonable reliance on theSoftware up to the amount actually paid by you for the Software
or US$5.00. The foregoing limitations, exclusions anddisclaimers (including Sections 9, 10 and 11) shall apply to themaximum extent permitted by applicable law, even if anyremedy fails its essential purpose.
12. U.S. GOVERNMENT END USERS. The Software is licensedonly with "restricted rights" and as "commercial items"consisting of "commercial software" and "commercial softwaredocumentation" with only those rights as are granted to allother end users pursuant to the terms and conditions herein.
13. APPLICABLE LAW. This EULA is governed by the laws ofTEXAS, without regard to conflicts of laws principles. This EULAshall not be governed by the UN Convention on Contracts forthe International Sale of Goods, the application of which isexpressly excluded. If a dispute, controversy or difference is notamicably settled, it shall be finally resolved by arbitration in
Seoul, Korea in accordance with the Arbitration Rules of theKorean Commercial Arbitration Board. The award of arbitrationshall be final and binding upon the parties.
14 ENTIRE AGREEMENT; SEVERABILITY This EULA is the
To avoid unintended information leaks and other problems ofthis sort, it is recommended that the device be returned toSamsung’s Customer Care Center for an Extended File System(EFS) Clear which will eliminate all user memory and return allsettings to default settings. Please contact the Samsung
Customer Care Center for details.
Customer Care Center:
1000 Klein Rd.
Pl TX 75074
Important: Please provide warranty information (proof ofpurchase) to Samsung’s Customer Care Centerin order to provide this service at no charge. If thewarranty has expired on the device, charges mayapply.

8/6/2019 Sprint M900 Moment Ug Eng
http://slidepdf.com/reader/full/sprint-m900-moment-ug-eng 200/212
188 Manufacturer’s Warranty
14. ENTIRE AGREEMENT; SEVERABILITY. This EULA is theentire agreement between you and Samsung relating to theSoftware and supersedes all prior or contemporaneous oral orwritten communications, proposals and representations withrespect to the Software or any other subject matter covered bythis EULA. If any provision of this EULA is held to be void,
invalid, unenforceable or illegal, the other provisions shallcontinue in full force and effect.
Precautions for Transfer and Disposal
If data stored on this device is deleted or reformatted using thestandard methods, the data only appears to be removed on asuperficial level, and it may be possible for someone to retrieveand reuse the data by means of special software.
Plano, TX 75074
Toll Free Tel: 1.888.987.HELP (4357)
Samsung Telecommunications America, LLC:
1301 East Lookout Drive
Richardson, Texas 75082Phone: 1-800-SAMSUNG (726-7864)
Important: If you are using a handset other than a standardnumeric dialpad, dial the numbers listed inbrackets.
©2009 Samsung Telecommunications America. All rightsreserved.
No reproduction in whole or in part allowed without priorwritten approval. Specifications and availability subject tochange without notice.

8/6/2019 Sprint M900 Moment Ug Eng
http://slidepdf.com/reader/full/sprint-m900-moment-ug-eng 201/212
Manufacturer’s Warranty 1

8/6/2019 Sprint M900 Moment Ug Eng
http://slidepdf.com/reader/full/sprint-m900-moment-ug-eng 202/212
Index
Numerics
3-Way Call 1263-way call 32
A
ab 151
Activation 3ActiveSync
Configuring 149Adapter
Hiding the Onscreen Clock
80Alarm Clock 79Creating a New Alarm 79
Amazon MP3 157Android Market 153
Accessing 153Installing an Application 153Launching an Application
154My Downloads 154Selecting an Application 153
Email Messaging 88
Expert Mode 91Number Dialing 86Picture Messaging 87Prompt Mode 91Readout Mode 91Settings 90Speech to Action button 84Text Messaging 87Video Messaging 88Voice Control 84Voice Dialing 85

8/6/2019 Sprint M900 Moment Ug Eng
http://slidepdf.com/reader/full/sprint-m900-moment-ug-eng 203/212
Index 1
AdaptermicroSD Card 94
Add another account 146Airplane Mode 53
Activating 53Deactivating 53Alarm
Customizing the OnscreenClock 80
Delete an Existing Alarm 80
Animation 48Answering Calls 30Applications 154Applications Tab
Using 20ASR
Activation 84Confirmation 90
Assigning Pictures 101Audible Touch Notifications 46
Audible selection 46Audible touch tones 46
SD card notifications 46Automatic Speech Recognition
(ASR) 84
B
Backlight 48Battery 15–17Capacity 16Charging 17Disposal 178Installing 16
Bluetooth 105–111Accessing the Paired
Device’s Settings 109Changing Your Bluetooth
Name 107
Browser
Adding Bookmarks to HomeScreen 138Clear cache 136Clear history 136Cookies 136Creating Bookmarks 137Creating Bookmarks from
other Tabs 138Enable Javascript 136Home Page 137Navigation 135
C
Calculator 81Advanced panel 81Calendar 74–78
Adding Events 74Event Reminders 76
CallAdd call 32Conference 32Join 32Three-way call 32
Call Forwarding 126

8/6/2019 Sprint M900 Moment Ug Eng
http://slidepdf.com/reader/full/sprint-m900-moment-ug-eng 204/212
192 Index
Deleting Paired Devices 109Disconnecting Paired
Devices 108Making Your Device Visible
107Pairing 108Scanning for Bluetooth
Devices 107Sending Items 109Settings 106
Page Settings 135Passwords 136Pop-up Windows 135Privacy Settings 136
Resetting to Default 137Security Settings 136Select Text 135Text Size 135
Browser Menu 134–138
Call Guard 128Call Log 60–64
Altering a Number 64Checking a Missed Call 62
Erasing 64Making a Call 63Options 61Saving a Number 63
Call Waiting 125Caller ID 125
Calling in Lock Mode 57
CamcorderGallery 102Gallery Options 103My places 104Quality 102Settings 102Share 103YouTube 104
Camcorder GalleryCapture Picture 103Capture Video 103
Share 100
Store location in pictures 98Taking Pictures 97Camera Gallery
Capture Picture 99Capture Video 99Confirm deletions 99Display size 99 , 103Options 99Repeat slideshow 100Settings 99Shuffle slides 100
Assigning a Picture from
Device 72Assigning a Picture fromonline Gmail 73
Assigning Ringers 72Contact Menu Options 68Deleting Entries 73Dialing From 35Editing 70Editing a Number 71Entry Options 69Saving a Phone Number 67

8/6/2019 Sprint M900 Moment Ug Eng
http://slidepdf.com/reader/full/sprint-m900-moment-ug-eng 205/212
Index 1
Options 103Settings 103
Camera 97–104see also Pictures
Flash 99 , 103Gallery 98Gallery Options 99Image Settings 100Quality 98Settings 98
Slideshow 99Slideshow interval 99Slideshow transition 100Sort order 99
Contacts 65–73Adding a Number 71Adding an Entry 65Adding Entries to Your
Favorites 73Assigning a Picture 72
Sending Via Bluetooth 109D
Data Roam Guard 129Data Services 131–155
see also WebFAQs 155Launching the Web 132Password 5User Name 131
Data Synchronization
Configuring 152Delete thread 52Device (illus.) 8Device Settings 45–59
Airplane Mode 53Display Settings 48–50Location Settings 50Messaging Settings 51–52Sound Settings 45–47TTY Use 53
Device Updates 81 , 83Di li O ti 30
Editing Sync Groups 67
Gmail 67Sync all contacts 67Email 140
Icons/Shortcuts 141Notifications 141
Emergency call 57Emergency Numbers 31Emoticons 12 , 40 , 120End-of-Call Options 33Enhanced 911 (E911) 32Entering Text 36–43
ABC M d 38
Event Reminders 76
Settings 77F
Factory data reset 59Favorites 35 , 73FCC Notice 180File Viewer 79
Accessing 79Flash 99Folders
Creating and Managing 25Forgot My Unlock Pattern 56
G

8/6/2019 Sprint M900 Moment Ug Eng
http://slidepdf.com/reader/full/sprint-m900-moment-ug-eng 206/212
194 Index
Dialing Options 30Disconnecting a Bluetooth
Device 108Display Screen 12 , 49
E
Edit Sync GroupsAssiging a Picture to Device
73Edit text menu 71
ABC Mode 38Emoticons 43Numbers 39 , 42Onscreen Keyboard 36
QWERTY Keyboard 39Selecting Mode 36Smileys 42 , 43Suggested Word 38Symbols 39 , 42
Erasing Device Content 58
G
Gmail 68Accessing Email Messages
144
Account Settings 145Assinging a Contacts Image
73Create and Send 143Creation 142Deleting 144
Email Signature 143
Opening 142Refresh 142Replying 144Viewing a New Email 144
GoogleAccount Signin 43Creating an Account 43
Google Maps 164Enabling the GPS 165Launching 165Searching 165
GPS N i ti 166
Extended Screens 18
Overview 17I
In-Call Options 32Instant Messaging 152International Dialing Code
Changing 52Internet
see WebInternet Email
Adding Additional Accounts 146
K
M
Making Calls 29Media volume 46Memory
Clearing Application Cache
58External SD card 57Internal phone storage 57Management 57Uninstalling Third-Party
Applications 59Menu i
N i ti 17

8/6/2019 Sprint M900 Moment Ug Eng
http://slidepdf.com/reader/full/sprint-m900-moment-ug-eng 207/212
Index 1
GPS Navigation 166GPS satellites 50 , 165GPS Services 164
H
History 60Home Screen
Adding Web Bookmarks 138
Customizing 22
K
Key Functions 9L
Location Mode
Activating 164Location Settings 50Lock Mode
Calling 57Locking Your Device 54
Navigation 17Menu Navigation 25
Using Your Fingers 26Using your Keyboard 28
Using your Optical Joystick 27
MessageSettings 124
Message ThreadsDeleting 124
Messages
Threads 51MessagingDeleting Old Text Messages
51Email 140Instant Messaging 152Multimedia Messaging 121Notification 51Text Messaging 119Visual Voicemail 114
microSD 92 , 93Before You Begin 95
Missed Calls 31
MMS Text Messaging 121Multimedia Messaging 121Composing 121Opening 123Replying to 123Settings 124
Music 157–159Assigning a New Ringtone
159Creating a Playlist 158Player 158Playlist 158
My Favorites
Creating from a Category 170Creating from a Recent Place
170My Places 101 , 104
N
NASCAR 160Alerts 161Audio/Video 161Exit 161Fantasy 161Help 161

8/6/2019 Sprint M900 Moment Ug Eng
http://slidepdf.com/reader/full/sprint-m900-moment-ug-eng 208/212
196 Index
Before You Begin 95microSD Card 92–96
Adapter 94File Viewer 79
Formatting 96Re-insertion 93Removal 92Write Protection 94
Playlist 158Purchasing and
Downloading 157Streaming Music 159
Using a Song as a Ringtone 159
My Downloads 154My Driver 160
Help 161My Driver 160NASCAR on SPEED 160News 160
Sprint FanZone 161Stats & Schedule 160
NASCAR Sprint Cup Mobile
154Navigating the Menus 17Navigating the Web 133
Navigation
Business 169Finding the Cheapest Gas
169Navigation Preferences 170Navigation, GPS 166NFL
Alerts & Personalization 162Audio & Video 162Exit 162Fantasy 162FanZone 161Help 162
O
Orientation 48Outlook Email 146Owner’s Record 181
P
Pairing Bluetooth Devices 108PC Studio 82Phone Book
see ContactsPhone Number
Displaying 29Finding 34Saving 34 67
Predictive Text 38
PRL UpdatesDownloading 83Product Tour 171Profile Updates
Downloading 83R
Recent LocationAdding to My Favorites 170Sharing 170
Recently-Used ApplicationsAccessing 25
Resetting Your Device 59

8/6/2019 Sprint M900 Moment Ug Eng
http://slidepdf.com/reader/full/sprint-m900-moment-ug-eng 209/212
Index 1
Help 162My Team 162News & Photos 162NFL Central 161
NFL Network 162Scores & Schedules 162Statistics 162Teams & Standings 162
NFL Mobile Live 154 , 161
Saving 34 , 67Phone vibrate 47Picasa 101Picture frame 99
Picture ID 101Pictures 49
Sending Via Bluetooth 109Taking Pictures 97
Plus Code Dialing 35 , 52
Resetting Your Device 59Ringer volume 46Ringers
Assigning to Contacts 72
Setting Audible Touch Tones 45
Setting for Messages 46Setting for Notifications 46Setting for Voice Calls 45Silence All 47
Types 45
Vibrate 47Roaming 127–130Call Guard 128Data Roam Guard 129Roam Mode 128
S
Safety Information 174–181Samsung PC Update Tool
Installation 82Updating 82
Saving a Phone Number 34 , 67Screen Orientation 48
Via Add to Home screen 23
Via Applications Tab 23Silence All 47Silent mode 47Slideshow
Interval 99Repeat 100Transition 100
Smiley 12 , 120Smileys 40SMS Text Messaging 119Software Updates
Downloading 81
Operator Services 6
Sprint 411 6Sprint TV 156Streaming Music 159Suggested Word Choices 37
T
Taking Pictures 97Text Entry
see Entering Text 39Text Input 38Text Messaging 119
Settings 124Third Party Applications

8/6/2019 Sprint M900 Moment Ug Eng
http://slidepdf.com/reader/full/sprint-m900-moment-ug-eng 210/212
198 Index
Screen Orientation 48Screen timeout 48Security 54–57
Menu 54
Set Wallpaper 49Settings 45–59Shortcuts
Creating 23Deleting 24
Downloading 81Speech to Action
see ASR and Voice Control 84
Speed DialingFavorties 35
Sprint Navigation 166Sprint Service
Account Passwords 5Activation 3
Third-Party ApplicationsUninstalling 59
Three-Way Calling 126TTY Use 53
Turning Your Device On andOff 15
TV 156
U
Unlock Pattern 55Changing the Pattern 57Configuring Settings 56Creating 55Forgotten Your Pattern 56Require pattern 56Use visible pattern 56
Unlocking Your Device 55Unpairing a Bluetooth Device
109Updating Your Device 81Updating Your PRL 83
Videos
Recording 102Settings 103Visual Voicemail
Changing your MainGreeting 117
Editing the From Name 117Enabling the Speakerphone
116Options 115Setting Up 114Settings 116
Voice Control 84
Volume
Media 46Ringer 46 W
Wallpaper 49Home screen 101
Wallpaper Gallery 49Warranty 182Web 131–138
see also Data ServicesBrowser Menu 134–138Email 140Going to a Web page 134

8/6/2019 Sprint M900 Moment Ug Eng
http://slidepdf.com/reader/full/sprint-m900-moment-ug-eng 211/212
Index 1
Updating Your PRL 83Updating Your Profile 83Use Wireless Networks
Activating 164
User Name 131Finding 132Updating 132
V
Vibrate 47Vibrate touch dial pad 47
Voice Control 84see ASR and Speech to
Action 84Voice Dialing 85
VoicemailNotification 117Retrieving 118Setting Up 4
Going to a Web page 134Instant Messaging 152Launching 132Navigating 133
User Name 131Web Bookmarks 137Wi-Fi
Connecting to a Network
139Manually Scanning 140
Settings 140
Status Indicators 140Turning Off 139Turning On 139
Window Animation 48Wireless Networks 50Work Email 146
ActiveSync 149ActiveSync Settings 149
Configuration 149Configuring Settings 150Create and Send 147Creating a Signature 151
Write Protection 94 Y
YouTube 162

8/6/2019 Sprint M900 Moment Ug Eng
http://slidepdf.com/reader/full/sprint-m900-moment-ug-eng 212/212
200 Index
Creating a Signature 151Creation 146Deleting 149Email Settings 149
Misc tab 151Opening 147Receive tab 151Replying 148Send tab 151Viewer scale 151