sportster 34” sport trike kit - mcworx install guide_final1.pdf · included in your trike kit:...
TRANSCRIPT

Sportster 34” Sport Trike Kit
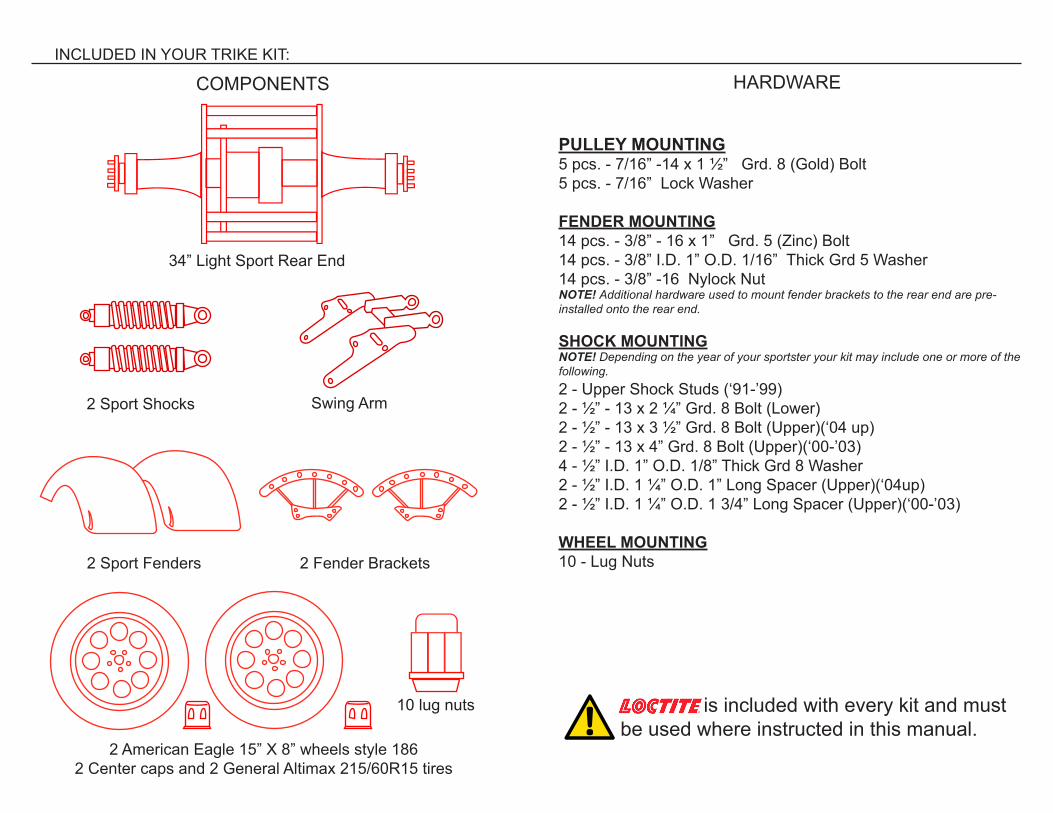
INCLUDED IN YOUR TRIKE KIT:
COMPONENTS HARDWARE
34” Light Sport Rear End
2 Sport Shocks
2 Sport Fenders 2 Fender Brackets
Swing Arm
2 American Eagle 15” X 8” wheels style 186 2 Center caps and 2 General Altimax 215/60R15 tires
10 lug nuts is included with every kit and must be used where instructed in this manual.
PULLEY MOUNTING5 pcs. - 7/16” -14 x 1 ½” Grd. 8 (Gold) Bolt 5 pcs. - 7/16” Lock Washer
FENDER MOUNTING14 pcs. - 3/8” - 16 x 1” Grd. 5 (Zinc) Bolt 14 pcs. - 3/8” I.D. 1” O.D. 1/16” Thick Grd 5 Washer 14 pcs. - 3/8” -16 Nylock Nut NOTE! Additional hardware used to mount fender brackets to the rear end are pre-installed onto the rear end.
SHOCK MOUNTINGNOTE! Depending on the year of your sportster your kit may include one or more of the following.2 - Upper Shock Studs (‘91-’99)2 - ½” - 13 x 2 ¼” Grd. 8 Bolt (Lower)2 - ½” - 13 x 3 ½” Grd. 8 Bolt (Upper)(‘04 up)2 - ½” - 13 x 4” Grd. 8 Bolt (Upper)(‘00-’03)4 - ½” I.D. 1” O.D. 1/8” Thick Grd 8 Washer2 - ½” I.D. 1 ¼” O.D. 1” Long Spacer (Upper)(‘04up)2 - ½” I.D. 1 ¼” O.D. 1 3/4” Long Spacer (Upper)(‘00-’03)
WHEEL MOUNTING10 - Lug Nuts

1. Secure front wheel so motorcycle won’t tip, set jack under the mo-torcycle and raise the jack to take the weight off of the rear wheel.
2. Remove upper and lower belt guards.3. Loosen axle adjusters on both sides.
4. Remove axle from wheel and swing arm. Slide the belt off of the pulley.
5. Raise the jack high enough to remove the rear wheel.6. Remove front pulley cover.
7.Remove both shocks from the motorcycle.
8.Remove the allen bolt that holds the rear brake master cylin-der reservoir, let the reservoir hang out of the way.
9.Remove swing arm pivot bolt on both sides. Remove swing arm.
115
6
7
8
7
9
2
2
34
STAGE 1. Motorcyle Preperation: Shown - 2004 Sportster your bike may vary depending on the year
Remove factory exhaust. If you have short exhaust you can leave them attached. (as shown below)
Factory exhaust will be to long for your Frankenstein Trike Kit.

5. Remove spoke that is marked with the green tape. Install spacer on spigot of the differential housing.
shown ‘99 and downshown ‘00 and up
6. Install axle, axle housing and star plate as a unit, Line up points of the star plate with the green tape. Install bolts through star plate to the spokes.
5 6
1. With swing arm and rear wheel removed, have a friend help set a wheel and tire on the brake side of the rear end. Install with lug nuts.
2. Set the rear end on the wheel that was previously installed. Remove the five bolts to the spokes, Remove axle, axle housing and star plate as a unit.
3. If your Sportster is 1999 and down, take your pulley and differential spacer to a machine shop. Have them measure the thickness of your pulley and remove that amount from the differential spacer. If your Sportster is 2000 and up go to next step.
4. Install Pulley. Install 7/16” pulley bolts with lock washers provided apply blue loctite and torque the pulley bolts. Have friend help hold the center section of the rear end with a screw driver through a hole in the rotor through one of the holes in the star plate. Torque the pulley bolts 55 to 65 ft. lbs. Install belt over pulley as shown, the belt should be inside of all spokes except the one that is marked with the green tape.
STAGE 2. Rear End Preperation/Installation:
Do not remove green tape, it will be used as a reference point in the following instructions.
3
1
2
4

11. Install swing arm pivot shaft and allen bolt (‘03 and down) or pivot bolts (‘04 and up) apply loctite.
11
8. Have a friend help hold the swing arm. Install spoke previously removed as shown. Do not tighten the bolts that mount the swing arm to the rear end.
8
9. Install other wheel and tire on the axle. Install with lug nuts.
10. Roll the rear end and position it behind the bike.
9
10
7. Install swing arm on rear end. Refer to diagram for placement of washers and spacers.
Rear End Mounting Bolts
Lock Washer
1/4” Thick Washer Weldedto Swing Arm Each Side
1/4” ThickWasher
1/2” ThickSpacer
1/4” Thick
Green Reference tape
Washer
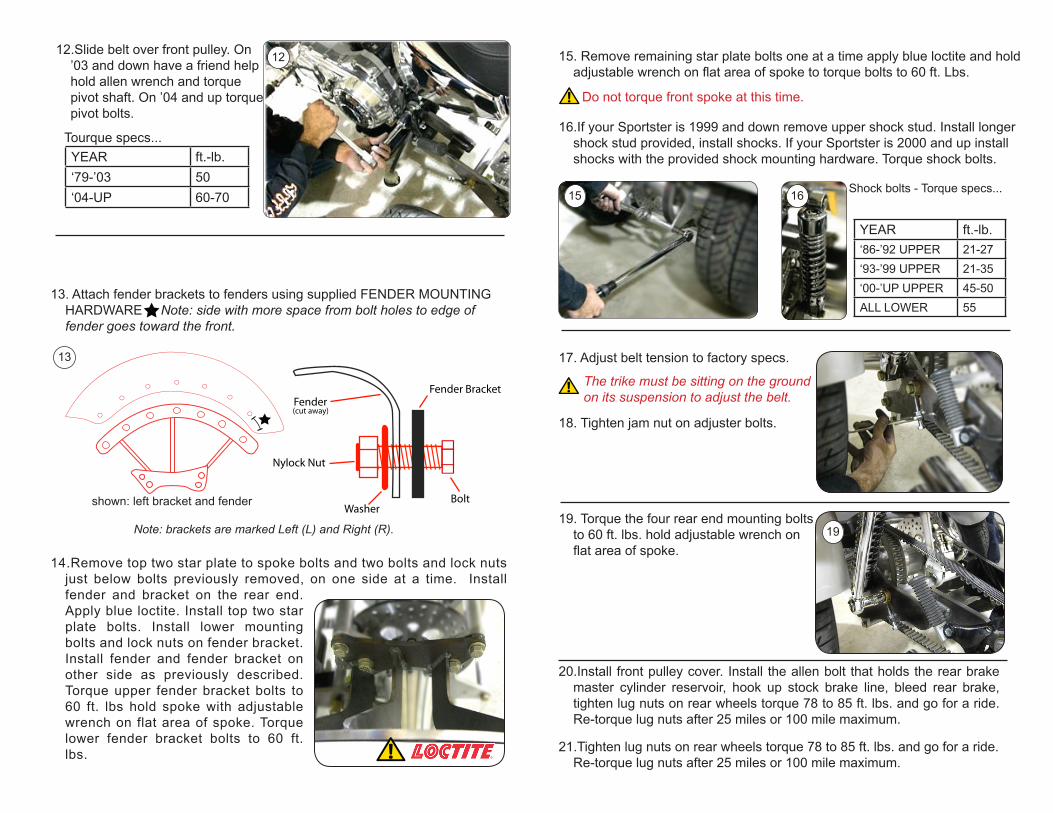
19. Torque the four rear end mounting bolts to 60 ft. lbs. hold adjustable wrench on flat area of spoke.
20.Install front pulley cover. Install the allen bolt that holds the rear brake master cylinder reservoir, hook up stock brake line, bleed rear brake, tighten lug nuts on rear wheels torque 78 to 85 ft. lbs. and go for a ride. Re-torque lug nuts after 25 miles or 100 mile maximum.
21.Tighten lug nuts on rear wheels torque 78 to 85 ft. lbs. and go for a ride. Re-torque lug nuts after 25 miles or 100 mile maximum.
19
17. Adjust belt tension to factory specs.
18. Tighten jam nut on adjuster bolts.
The trike must be sitting on the ground on its suspension to adjust the belt.
15
16.If your Sportster is 1999 and down remove upper shock stud. Install longer shock stud provided, install shocks. If your Sportster is 2000 and up install shocks with the provided shock mounting hardware. Torque shock bolts.
16
YEAR ft.-lb.‘86-’92 UPPER 21-27‘93-’99 UPPER 21-35‘00-’UP UPPER 45-50ALL LOWER 55
Shock bolts - Torque specs...
15. Remove remaining star plate bolts one at a time apply blue loctite and hold adjustable wrench on flat area of spoke to torque bolts to 60 ft. Lbs.
Do not torque front spoke at this time.
12.Slide belt over front pulley. On ’03 and down have a friend help hold allen wrench and torque pivot shaft. On ’04 and up torque pivot bolts.
Tourque specs...
13. Attach fender brackets to fenders using supplied FENDER MOUNTING HARDWARE Note: side with more space from bolt holes to edge of fender goes toward the front.
14.Remove top two star plate to spoke bolts and two bolts and lock nuts just below bolts previously removed, on one side at a time. Install fender and bracket on the rear end. Apply blue loctite. Install top two star plate bolts. Install lower mounting bolts and lock nuts on fender bracket. Install fender and fender bracket on other side as previously described. Torque upper fender bracket bolts to 60 ft. lbs hold spoke with adjustable wrench on flat area of spoke. Torque lower fender bracket bolts to 60 ft. lbs.
Note: brackets are marked Left (L) and Right (R).
shown: left bracket and fender
YEAR ft.-lb.‘79-’03 50‘04-UP 60-70
12
13
Washer
Nylock Nut
Fender BracketFender
(cut away)
Bolt

Our Trike rear ends are made from all 6061 T6 billet aluminum, except for our Sport Trike rear end, which has 3/8” thick steel star plates, powder coated silver, instead of 1” thick billet aluminum star plates that we use on all our other Trike rear ends.
All of our rear ends have a Dana 30 differential, packed with Moly EP grease. 9” Ford street/strip axles with a bolt pattern of 5 studs on 4 ½” bolt circle, wheel studs are ½” -20. HHI/Frankenstein 4 piston billet caliper, 11” stainless steel brake rotor, or optional outboard Brakes with two HHI/Frankenstein 4 piston billet calipers and two 11 ½” stainless steel brake rotors.We only use top quality new parts in our manufacturing of “Frankenstein Trikes” rear ends.
Differential seal: National oil seal # 481213 $3.50 each Differential Bearing: # 62102RS $15.00 each Axle Bearing: BCA # RW207-CCRA $30.00 each
Brake Pads: HHI-101-001 $29.00 pair
prices subject to change
Replacement Parts