spectroradiometer specbos 1211 - 5lab.co.jp · operating instructions jeti – spectroradiometer...
TRANSCRIPT

Short Instructions
Spectroradiometer
specbos 1211
JETI Technische Instrumente GmbH Tatzendpromenade 2D-07745 JenaTel. +49-3641-225 680Fax. +49-3641-225 681e-mail: sales @ jeti.comInternet: www.jeti.com

Operating Instructions JETI – Spectroradiometer specbos 1211
- 2 -

Operating Instructions JETI – Spectroradiometer specbos 1211
License Agreement for JETI Technische Instrumente GmbH Software ProductsIMPORTANT -- READ CAREFULLY BEFORE USING THE JETI SOFTWAREJETI hereby grants to you a non-exclusive license to use one copy of the delivered JETI software program (the "software") on a single computer according to the following items:The software is in "use" on the computer when it is loaded into temporary memory (i.e. RAM) or installed into permanent memory (e.g. hard disk, CD-ROM, or other storage device) of the computer. However, installation on a network server for the sole purpose of distribution to one or more other computer(s) shall not constitute "use" for which a separate license is required, provided you have separate license for each computer to which the software is distributed.It is only allowed to use the software in connection with the JETI product (instrument, spectrometer or OEM electronics), which was delivered with this software. For additional JETI products you need an extra software license.The software is owned by JETI or its suppliers and is protected by German copyright laws and international treaty provisions and all other applicable national laws. Therefore, you must treat the software like any other copyrighted material (e.g. a book or musical recording) except that if the software is not copy protected you may either
(a) make one copy of the software solely for backup or archival purposes, or (b) transfer the software to a singlehard disk provided you keep the original solely for
backup or archival purposes. You may not copy the user documentation provided with the software and the connected JETI product.
You may not: (i) permit other individuals to use the software except under the terms listed above; (ii) modify, translate, reverse engineer, decompile, disassemble (except to the extent that
this restriction is expressly prohibited by law) or create derivative works based upon the software or documentation;
(iii) copy the software or documentation (except for back-up or archival purposes); (iv) rent, lease, transfer, or otherwise transfer rights to the software or documentation; (v) remove any proprietary notices or labels on the software or documentation.
Any such forbidden use shall immediately terminate your license to the Software. (a) You agree that you shall only use the software and documentation in a manner that
complies with all applicable laws in the jurisdictions in which you use the software and documentation, including, but not limited to, applicable restrictions concerning copyright and other intellectual property rights.
(b) You may not use the software in an attempt to, or in conjunction with, any device, program or service designed to circumvent technological measures employed to control access to, or the rights in, a content file or other work protected by the copyright laws of any jurisdiction.
(c) If you receive the first copy of the software electronically and a second copy on physical media (e.g., CD, diskette, etc.), the second copy may be used for archival purposes only and may not be transferred to or used by any other person. This license does not grant you any right to any enhancement or update.
The software may include certain external software components ("Add-Ons"), including the Lab Windows user interface and drivers. You may only call to or otherwise use such Add-Ons through the use of the JETI applications. Any direct use of Add-Ons through a non-JETI proprietary application, including a custom or user-written application is prohibited by this Agreement. If you have purchased JETI software in connection with a JETI product, you have the right of purchasing a software update, if it is available, for a priority price.Title, ownership, rights, and intellectual property rights in and to the software and documentation shall remain in JETI and/or its suppliers. Title, ownership rights and intellectual property rights in and to the content accessed through the software including the content contained in the software media demonstration files shall be retained by the applicable content owner and may be protected by applicable copyright or other law. This license gives you no rights to such content. For the JETI operating environment, the following terms apply:
- 3 -

Operating Instructions JETI – Spectroradiometer specbos 1211
JETI warrants that for a period of ninety (90) days from the date of acquisition the software, if operated as directed, will substantially achieve the functionality described in the documentation. JETI does not warrant however that your use of the software will be uninterrupted or that the operation of the software will be error-free or secure. JETI also warrants that the media containing the software, if provided by JETI, is free from defects in material and workmanship and will so remain for ninety (90) days from the date you acquire the software. To the maximum extend permitted by applicable law JETI and its suppliers disclaim all other warranties either express or implied including but not limited to implied warranties of merchantability and fitness for a particular purpose with regard to the software, the accompanying written materials and any accompanying hardware.If the media is subjected to accident abuse or improper use during the warranty period; or if you violate the terms of this License Agreement, this warranty shall immediately terminate. This warranty shall not apply if the software is used on or in conjunction with hardware or software other than the unmodified version of hardware and software with which the software was designed to be used as described in the documentation. This limited warranty gives you specific legal rights. Your remedies: JETI's sole liability for a breach of this warranty shall be in JETI's sole discretion:
(i) to replace your defective media; or (ii) to advise you how to achieve substantially the same functionality with the software as
described in the documentation through a procedure different from that set forth in the documentation; or
(iii) if the above remedies are impracticable, to refund the license fee, if any, you paid for the software. Repaired, corrected or replaced software and documentation shall be covered by this limited warranty for the period remaining under the warranty that covered the original software or if longer for thirty (30) days after the date JETI either shipped to you the repaired or replaced software or advised you as to how to operate the software so as to achieve the functionality described in the documentation, whichever is applicable. Only if you inform JETI of the problem with the software during the applicable warranty period and provide evidence of the date you acquired the software will JETI be obligated to honor this warranty.
Under no circumstances and under no legal theory whether in tort contract or otherwise shall JETI or its suppliers or resellers be liable to you or any other person for any indirect, special, incidental or consequential damages of any character including without limitation damages for loss of goodwill, work stoppage, computer failure or malfunction or any and all other commercial damages or losses even if JETI shall have been informed of the possibility of such damages or for any claim by any other party. Further, in no event shall JETI´s liability under any provision of this agreement exceed the license fee paid to JETI for the software and documentation. This software is intended for use only with properly licensed media, content, and content creation tools. It is your responsibility to ascertain whether any copyright, patent or other licenses are necessary and to obtain any such licenses to serve and/or create, compress or download such media and content. You agree to record, play back and download only those materials for which you have the necessary patent, copyright and other permissions, licenses, and/or clearances. You agree to hold harmless, indemnify and defend JETI, its officers, directors and employees, from and against any losses, damages, fines and expenses (including attorneys' fees and costs) arising out of or relating to any claims that you have
(a) viewed, downloaded, encoded, compressed, copied or transmitted any materials (other than materials provided by JETI) in connection with the software in violation of another party's rights or in violation of any law, or
(b) violated any terms of this License Agreement. This License Agreement will automatically terminate if you fail to comply with any term hereof. No notice shall be required from JETI to effect such termination.
- 4 -

Operating Instructions JETI – Spectroradiometer specbos 1211
Technical support for the software, as made available by JETI, is given directly from the JETI office in Jena, Germany. This License Agreement shall constitute the complete and exclusive agreement between JETI, it’s resellers and the end user, notwithstanding any variance with any purchase order or other written instrument submitted by you, whether formally rejected by JETI or not. The acceptance of any purchase order you place is expressly made conditional on your consent to the terms set forth herein. The terms and conditions contained in this License Agreement may not be modified except in a writing duly signed by you and an authorized representative of JETI. If any provision of this License Agreement is held to be unenforceable for any reason, such provision shall be reformed only to the extent necessary to make it enforceable, and such decision shall not affect the enforceability of such provision under other circumstances, or of the remaining provisions hereof under all circumstances. This License Agreement shall be governed by the laws of Germany, without regard to conflicts of law provisions, and you hereby consent to the exclusive jurisdiction of the provincial and federal courts sitting in Germany. Any and all unresolved disputes relating in any way to, or arising out of, the software, your use of the software or this License Agreement shall be submitted to arbitration in Germany; except that, to the extent that you have breached or have indicated your intention to breach this License Agreement in any manner which violates or may violate JETI's intellectual property rights, or may cause continuing or irreparable harm to JETI (including, but not limited to, any breach that may impact JETI's intellectual property rights, or a breach by reverse engineering), JETI may seek injunctive relief, or any other appropriate relief, in any court of competent jurisdiction.
Copyright (c) 2012 JETI Technische Instrumente GmbH and/or its suppliers. JETI Technische Instrumente GmH, Tatzendpromenade 2, 07745 Jena, Germany. All rights reserved.
- 5 -

Operating Instructions JETI – Spectroradiometer specbos 1211
- 6 -

Operating Instructions JETI – Spectroradiometer specbos 1211
Table of Contents1. Introduction 9
2. Installation of Driver Software 11
2.1. Installation of Driver Software 112.1.1 Installation under Windows XP 112.1.2 Installation under Windows Vista and Windows 7 and
8 11
2.2. PC- Software 122.2.1 Installation under Windows 12
3. Operation of Device 13
3.1. specbos 1211 13
3.2. specbos 1211-BT 13
4. Installation of Hardware 15
4.1. Installation of USB Device 15
4.2. Installation of Bluetooth Device (specbos 1211 BT)15
4.3. Installation of RS Device (specbos 1211 RS) 19
4.4. Network settings for specbos 1211 LAN 19
4.5. Installing RealPort Driver 21
5. Start the Software 24
6. Measurement 26
6.1. Procedure 266.1.1 Measurement with specbos 1211-BT 276.1.2 Finishing the Program 29
7. Software Settings 30
7.1. Measurement Settings 307.1.1 Integration Time 307.1.2 Continuous measurement 317.1.3 Change measurement name 317.1.4 Delete Measurements 327.1.5 Calculation Range 33
7.2. Display Settings 337.2.1 Zoom 337.2.2 Diagram Options 347.2.3 Snap-to-Point Cursor 387.2.4 Screen Mode 38
7.3. Special Calculations 38
- 7 -

Operating Instructions JETI – Spectroradiometer specbos 1211
7.4. Snapshot 39
8. Data Storage 40
8.1. Data Transfer 40
8.2. Data Export 42
9. Shortcut Keys 44
10. Trigger Functions 45
11. Maintenance and Error Messages 46
12. Technical Data 47
12.1. Mechanical Dimensions 48
12.2. Battery charging (only specbos 1211-BT) 48
13. CE – Declaration of Conformity 50
14. Certificate of Warranty 51
15. Service 53
- 8 -

Operating Instructions JETI – Spectroradiometer specbos 1211
1. Introductionspecbos 1211 is an easy to use spectroradiometer for various applications. Its miniaturized shape makes it suitable for laboratory as well as industrial use. The spectroradiometer specbos 1211 can measure luminance/ radiance as well as illuminance/ irradiance. Furthermore colorimetric data (CCT, chromaticity, color purity, dominant wavelength, CRI) are calculated from the spectral data. Therefore it is suited for the test of light sources as CRT screens, for the measurement of projectors and of room illuminance.specbos 1211 covers the wavelength range of 350 … 1000 nm and is suitable for low light measurements due to its high sensivity.The version specbos 1211 UV extends the wavelength range to 250 nm.The indication of the measuring spot on the target in case of luminance/ radiance measurements will be proceeded with a pilot laser circle. Irradiance measurements are done with a cosine corrector head-piece. The software switches automatically to the appropriate measuring mode depending from the attached measuring head.
Acquisition and analysis of data is done by the PC software JETI LiMeS. The connection to the PC is via USB interface (virtual COM port). It is also possible to communicate directly with the instrument without the PC program. Virtual Instruments for LabView are contained on the CD as well as radiometric and spectrometric DLLs. Detailed helping information for both applications is included. Furthermore the instrument can be driven by the SCPI compatible firmware commands. The command list is also available on the CD.
specbos 1211 is available with additional interfaces: Serial interface specbos 1211 RS232Bluetooth interface specbos 1211 BT
PC requirements:
• Pentium 4 / AMD Athlon XP or higher, min. 512 MB RAM
• Graphic resolution: 1024*768, 16 bit color depth recommended
• Windows XP (SP3); Vista or Windows 7, Windows 8; Excel 2000 (for data transfer)
- 9 -

Operating Instructions JETI – Spectroradiometer specbos 1211
The specbos 1211 packages includes:
• Basic device specbos 1211 with protection cap
• Cosine corrector head-piece
• Operating instructions
• Tripod
• Transport box
• CD-ROM with PC software JETI LiMeS, DLLs, LabView Virtual Instruments, operating instructions and firmware command list
• USB cable
• Trigger connector
additionally:
specbos 1211-BT
• Bluetooth antenna, bluetooth adapter and a rechargeable lithium polymer battery EasyPack 3.7V (EZPack XL)
specbos 1211-RS
• serial cable
• Power supply 9V
specbos 1211- LAN
• Power supply 5V
- 10 -

Operating Instructions JETI – Spectroradiometer specbos 1211
2. Installation of Driver Software
2.1. Installation of Driver SoftwareDon't connect the device during driver installation.Please note that you must have administrator privileges to install the device driver!This chapter describes the installation procedure of the USB driver.
2.1.1 Installation under Windows XP1. Insert CD-ROM delivered with your device into the
CD/DVD drive.2. If Autorun is enabled on your PC an installation program
starts automatically. Please exit this program by pressing Exit Install.
3. Open directory 'Driver' on the installation CD-ROM.4. Run 'install.bat' and follow the instructions.5. After finishing connect your device to an USB-port.6. A ‘New Hardware found’ wizard should appear. If it asks to
connect to Windows Update answer with No.7. Select Install software automatically (recommended) and
press Next.8. Windows should complete the driver installation
automatically.If the driver couldn’t be installed successfully please read chapter Fehler: Referenz nicht gefunden “Uninstall driver software” and try again.
2.1.2 Installation under Windows Vista and Windows 7 and 81. Insert CD-ROM delivered with your device into the
CD/DVD drive.2. If Autorun is enabled on your PC an installation program
starts automatically. Please exit this program by pressing Exit Install.
3. Open directory 'Driver' on the installation CD-ROM.4. Run 'install.bat' and follow the instructions.5. After finishing connect your device to an USB-port.6. Windows should complete the driver installation
automatically.
- 11 -

Operating Instructions JETI – Spectroradiometer specbos 1211
If the driver couldn’t be installed successfully please read chapter Fehler: Referenz nicht gefunden “Uninstall driver software” and try again.
- 12 -

Operating Instructions JETI – Spectroradiometer specbos 1211
2.2. PC- Software
2.2.1 Installation under WindowsPlease note that you must have administrator privileges to install the device driver!Execute the following steps on the PC to install the software JETI LiMeS :
• Start Windows 7/ 8/ XP/ Vista
• Insert the CD in the CD-ROM drive
• The following window appears, if the autostart function of Windows is activated.Otherwise press install.exe in the Install folder of the CD ROM.
• Click the Install JETILiMeS... and follow the instructions to install the program.
- 13 -

Operating Instructions JETI – Spectroradiometer specbos 1211
3. Operation of Device
3.1. specbos 1211The instrument is switched on automatically when the USB connection to the PC is established.Attention: The USB driver must be installed at first without connected instrument.Pressing the illuminated switch switches on the target marking if the instrument is in Radiance mode. Repeated pressing switches the target marking off.
3.2. specbos 1211-BTThe specbos 1211-BT will be powered by battery if the wireless interface is used. The battery will be charged when the instrument is connected to the PC via USB. Alternatively it can be charged with the power supply. The switch on the rearside has the following functions:
• Pressing if instrument is switched off: Switch on the instrument
• Short pressing if the instrument is switched on: Switch on/ off the target marking
• Long pressing if the instrument is switched on: Switch off the instrument
• If the instrument is switched off and connected to power supply or to PC by USB:
•Short flashing – battery will be charged
•Continuous illumination – battery is fully charged
• If the instrument is switched on:•Continuous illumination with short breaks – battery will be
charged•Continuous illumination – battery is fully charged
Remark: The USB connection between PC and instrument needs to be established if the battery shall be charged via USB.
Automatic switch off:
- 14 -

Operating Instructions JETI – Spectroradiometer specbos 1211
The instrument will be switched off if there is no connection to the PC for more than 15 min., e.g. if the operator forgot to switch it off. If the software LiMeS is running the instrument will be not switched off automatically.The battery powered specbos 1211-BT will be automatically switched off if the defined operating time of 15 min. without any communication is elapsed. The device send in this case a enquire code (0x05). Battery down:If the battery charge is below the low value an enquire code (0x05) will be sent, and a timer for time out starts. (see chapter Measurement with specbos 1211-BT)After time out the device send again the enquire code and switched power off.
- 15 -

Operating Instructions JETI – Spectroradiometer specbos 1211
4. Installation of Hardware
4.1. Installation of USB DeviceUnpack the spectroradiometer specbos 12x1 carefully and check the delivered parts.
trigger connector USB connector power supply
Attention: The USB driver must be installed at first without connected instrument.Connect the device to an USB interface of a PC or laptop using the enclosed USB cable.
4.2. Installation of Bluetooth Device (specbos 1211 BT)specbos 1211 BT can be used alternatively via bluetooth or USB. Press the rearside switch until it is shinning in blue.
illuminated switch battery bluetooth adapter
trigger connector USB connector power supply
- 16 -

Operating Instructions JETI – Spectroradiometer specbos 1211
The package of the device includes the bluetooth antenna. Please connect it to the instrument as it is shown below. The bluetooth interface is often integrated into modern computers. If your computer is not equipped with it you need to use the bluetooth dongle (included in the delivery). The software guides you through the installation.
• Click on the symbol
• Click Add a Device
- 17 -
bluetooth antenna

Operating Instructions JETI – Spectroradiometer specbos 1211
• Click Continue and select JETI specbos 1211
• Click Enter the device's pairing code and Next
- 18 -

Operating Instructions JETI – Spectroradiometer specbos 1211
• Insert the device pairing code: 0000 and click Next
The next window finalizes the installation.
- 19 -

Operating Instructions JETI – Spectroradiometer specbos 1211
4.3. Installation of RS Device (specbos 1211 RS)Connect the device to a PC or laptop using the enclosed RS cable and the power supply (9 V):
power supply RS232 connector
4.4. Network settings for specbos 1211 LAN
The specbos device and the controlling PC have to use the same network address to communicate with the specbos 1211 LAN via a network connection space.The default network setting of the specbos device is set to DHCP (obtain network settings automatically). If a DHCP server is running in your network the device will obtain an IP address from within the local network address space, and no further steps are required.If no DHCP server is available (e.g. direct connection to a PC) or you want to give the device a fixed IP address for some other reasons, the network setting of the specbos device has to be changed by a tool called "Digi Device Discovery", which is available on the installation CD.
Please note that you must have administrator privileges!
1. Connect specbos 1211 LAN to the power supply and to the LAN (1:1 as well as crossed cables can be used)
2. Go to directory 'Tools\Device Discovery' on the installation CD and run 'dgdiscvr.bat
- 20 -
illuminated switch
mini USB connector power supply 5Vtrigger connector
Operating Instructions JETI – Spectroradiometer specbos 1211
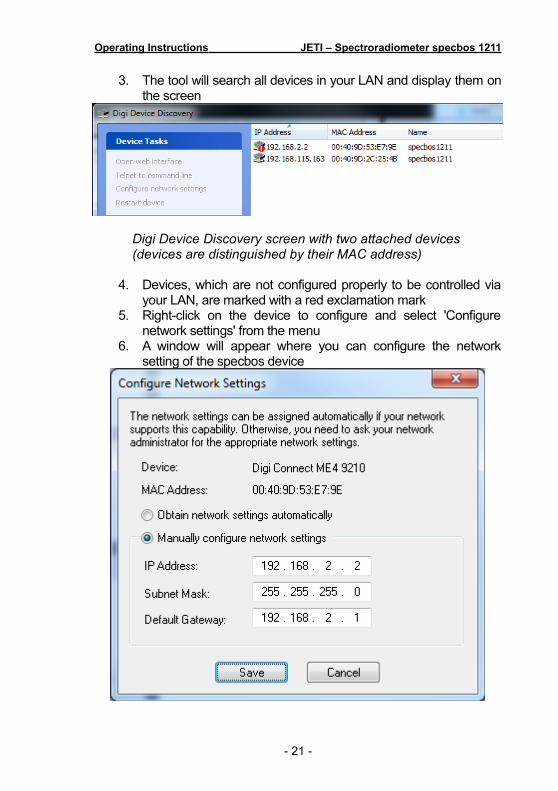
3. The tool will search all devices in your LAN and display them on the screen
Digi Device Discovery screen with two attached devices (devices are distinguished by their MAC address)
4. Devices, which are not configured properly to be controlled via your LAN, are marked with a red exclamation mark
5. Right-click on the device to configure and select 'Configure network settings' from the menu
6. A window will appear where you can configure the network setting of the specbos device
- 21 -

Operating Instructions JETI – Spectroradiometer specbos 1211
7. After clicking on 'Save' a message appears that the device must be restarted
8. If no more red exclamation mark is visible, the device is configured properly to work in your LAN
Remark: The IP address of a PC can be found using cmd.exe in the command line and the command ipconfig.
4.5. Installing RealPort DriverPlease note that you must have administrator privileges to install the driver!If you want to run JETI LiMeS software controlling a specbos 1211 LAN device via a network connection, a special driver has to be installed. This so-called 'RealPort Driver' provides a virtual serial COM-port, which JETI LiMeS and also serial terminal programs can use to communicate.This chapter describes the installation procedure of the RealPort driver.
1. Go to directory 'RealPort Driver' on the installation CD and run 'setup.exe'
2. Select 'Add a New Device' and click on 'Next'
- 22 -

Operating Instructions JETI – Spectroradiometer specbos 1211
3. A list with the found network devices will appear. Please select the device a RealPort driver shall be installed and click 'Next'.
4. If the desired device didn't appear in the list, you have to check the network settings of the device. See chapter "Network Settings For Specbos 1211" for details.
5. Don't change the suggested settings and click 'Finish' to start the installation.
- 23 -

Operating Instructions JETI – Spectroradiometer specbos 1211
6. In a little while a dialog box should appear that the driver was successfully installed.
- 24 -
Operating Instructions JETI – Spectroradiometer specbos 1211
5. Start the Software
• Start Windows and then activate the Start menu
• Select JETI LiMeS under Programs
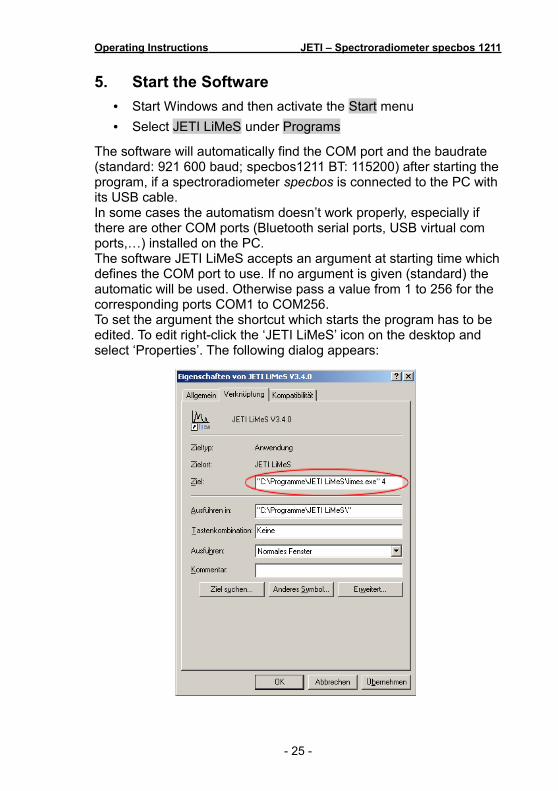
The software will automatically find the COM port and the baudrate (standard: 921 600 baud; specbos1211 BT: 115200) after starting the program, if a spectroradiometer specbos is connected to the PC with its USB cable.In some cases the automatism doesn’t work properly, especially if there are other COM ports (Bluetooth serial ports, USB virtual com ports,…) installed on the PC.The software JETI LiMeS accepts an argument at starting time which defines the COM port to use. If no argument is given (standard) the automatic will be used. Otherwise pass a value from 1 to 256 for the corresponding ports COM1 to COM256.To set the argument the shortcut which starts the program has to be edited. To edit right-click the ‘JETI LiMeS’ icon on the desktop and select ‘Properties’. The following dialog appears:
- 25 -

Operating Instructions JETI – Spectroradiometer specbos 1211
Type the number of the COM port to be used after the filename of the executable in the ‘Target’ box (4 for COM4 in this example). Use a space sign between the filename and the COM port number.If no device can be found on the specified port the software asks to perform an automatic scan.In case of an error, this error will be displayed (see chapter Maintenance and Error Messages).
About
Click Info/About! shows the following window with the software version, the serial numbers, the used COM port, the baudrate and the firmware version.
Press x to close the window.
- 26 -

Operating Instructions JETI – Spectroradiometer specbos 1211
6. Measurement
6.1. ProcedureThe measurement procedure consists of a first spectra acquisition with a fixed integration time, a subsequent calculation of the best integration time for a well-driven spectrum, a second measurement with this time and a final dark spectrum measurement. In some cases more adaptation steps are necessary. You will be informed about the status of the measurement (Adaption to exposure, Performing measurement) and about the remaining time. The maximum integration time is 60 s, therefore the maximum measuring time for low intensity sources is approx. 120 s (adaption time + max. integration time + max. dark measuring time). The measured spectrum as well as the radiometric, photometric and colorimetric data, calculated from the spectrum are displayed. Furthermore the number of the measurement is shown in the legend.Following measurements will be shown with their values. Clicking on the spectrum line displays the data of former measurements. A thick line always indicates the actual spectrum. Pressing Esc can interrupt a started measurement.
- 27 -

Operating Instructions JETI – Spectroradiometer specbos 1211
6.1.1 Measurement with specbos 1211-BTThe specbos 1211-BT will be powered by battery if the wireless interface is used. The battery will be charged when the device is connected to the PC via USB. Alternatively it can be charged with the power supply. The switch on the rearside has the following functions:
• Pressing if device is switched off: Switch on the device• Short pressing if the device is switched on:
Switch on/ off the target marking• Long pressing if the device is switched on:
Switch off the device• If the device is switched off and connected to power supply or
to PC by USB:• Short flashing – battery will be charged• Illumination off – battery is fully charged
• If the device is switched on:• Continuous illumination with short breaks – battery will
be charged• Continuous illumination – battery is fully charged
Remark: The USB connection between PC and device needs to be established if the battery shall be charged via USB.
The battery status is shown in the software JETI LiMeS in the title bar.
Automatic switch off:
The device will be switched off if there is no connection to the PC for more than 15 min., e.g. if the operator forgot to switch it off. If the software JETI LiMeS is running the device will not switched off automatically.
Battery down:
If the battery is down during operation the following window will appear:
- 28 -

Operating Instructions JETI – Spectroradiometer specbos 1211
After 3 minutes the connection will be cut and JETI LiMeS goes to offline mode. Now it is possible
• to save all previous measured data and finish JETI LiMeSor
• to connect the device to external power (USB or power supply), press CRTL I to reconnect and continue the measurements with JETI LiMeS.
Operate without software JETI LiMeS
- 29 -

Operating Instructions JETI – Spectroradiometer specbos 1211
The battery powered specbos 1211-BT will be automatically switched off if the defined operating time without any communication is elapsed. The device send an enquire code (0x05) in this case . If the battery charging status is reaches the minimum value an enquire code (0x05) will be sent, and a timer for time out starts.After time out the device send again the enquire code and the power will be switched off.
6.1.2 Finishing the ProgramThe program can be closed by selecting the Quit button or by typing Alt Q on the keyboard. If one or more measurements were not stored the following window appears to avoid data loss.
- 30 -

Operating Instructions JETI – Spectroradiometer specbos 1211
7. Software Settings
7.1. Measurement Settings
7.1.1 Integration TimeThe devices adapt the integration time automatically according to the light level of the source.
It is possible to hold an once determined integration time for further measurements. This is mainly interesting in case of measuring objects with similar intensity. Simply click the box Hold Integration Time. There will shown a warning if over and underexposure occurs (Couldn’t hold integration time). Then a new adaptation will be processed and the new time will be hold for further measurements.
In some cases it is desirable to set the integration time to a fixed value. This can be done with CTRL T. Afterwards write the desired time (in ms) into the appearing window. Following measurements will use this integration time without any adaption. A suitable value for the integration time can be found after a first measurement with activated adaption by pressing the F12 button (Tint). The information of adapted integration time and the related counts will appear in upper right corner of the spectral diagram.
- 31 -

Operating Instructions JETI – Spectroradiometer specbos 1211
Deactivate the fixed integration time function by pressing CTRL T again.
7.1.2 Continuous measurementIf you want to measure continuously you have two options. If you select Continuous Scan and the interval [s] the measurement procedure is as described in chapter 6.1. If you select Hold Integration Time and Continuous Scan the measurement will be done without adaption. Normally the integration time at start will be hold for all subsequent measurements. It will be adapted without warning in case of over or under exposure. This can influence the difference of time between the successive measurements. If you want to get a constant repetition rate you have to use the CTRL T option (fixed integration time).
7.1.3 Change measurement nameThe proceeded measurements will be named with consecutive numbers. It is possible to change this standard name.
• Make a right mouse click on the desired measurement name in the legend to open a panel
• Rename changes the measurement name• Change Plot Options open the following window:
- 32 -

Operating Instructions JETI – Spectroradiometer specbos 1211
The plot color can be change and also the line style. • Delete deletes the measurement• Pressing the DEL key also deletes the actual or marked
measurementThere will always appear a confirmation window before the data will be deleted.
7.1.4 Delete MeasurementsThe active measurement or all measured data can be deleted under the menu point File.A single measurement can also be deleted with the DEL key after selecting it in the legend with a left mouse click. It is also possible to delete a number of measurements using the CTRL or SHIFT keys in the usual manner. All measurements can be deleted together with CTRL DEL.
There will appear a confirmation window before the data will be deleted.
- 33 -

Operating Instructions JETI – Spectroradiometer specbos 1211
7.1.5 Calculation RangeThe menu point Options/ Calculation Range allows to specify if the radiometric value will be calculated from the entire calibrated wavelength range (specbos 1201 380 … 780 nm; specbos 1211 350 … 1000 nm) or only from the limited (displayed) range (user selected range).
See chapter Spectra Calculations how to change the wavelength range.
7.2. Display Settings
7.2.1 ZoomDiagrams can be zoomed with the cursor by pressing CTRL. The kind of zoom can be selected in the pop up menu left to the JETI logo. X-Zoom and Z-Zoom is only valid for the spectrum diagram. Zoom out by pressing RESET below the Zoom pop up menu.The start and the end of the displayed spectrum can alternatively be adjusted at the screen edge below the diagram with Start of Spectrum and End of Spectrum. In addition of using the up/down arrows, the displayed spectral limits can be typed in using the keyboard number pad. The maximum interval for specbos 1x01 is between 380 nm and 780 nm. Always the full spectral range of the device is used for a measurement.
- 34 -

Operating Instructions JETI – Spectroradiometer specbos 1211
Remark: The start and end wavelength settings will be used for the calculation of the radiometric value if its calculation range is set to user selected range.
7.2.2 Diagram OptionsSelecting View/ Diagram in the menu bar opens a window, where the display of the spectral data, the xy and u´v´ diagrams, the classification screen or the display of enlarged numerical values can be selected.
• The menu item View/ Diagram/ Raw spectrum allows to display the raw data of the measurement. This can be useful sometimes, e.g. if the general characteristics of the measured spectrum outside the calibrated range is of interest. The raw spectrum is the basis for all radiometric calculations.
- 35 -

Operating Instructions JETI – Spectroradiometer specbos 1211
• The colour coordinate diagrams contain the Planckian curvature for orientation (if the observer is set to 2°). The actual measuring values will be indicated in the diagrams.
In both colour diagrams zooming is possible with the Zoom function appearing left of the JETI logo.
• It is possible to switch on and off the dominant wavelength scale at the curved border of both colourimetric diagrams with Options/ Diagrams/ Labelled xy- and u´v´-diagram.
- 36 -

Operating Instructions JETI – Spectroradiometer specbos 1211
• The Rank view shows the result of the classification after defining and enabling it in the Extra/ Rank… menu point. (Chapter Fehler: Referenz nicht gefunden)
• Numeric values switches to a large display mode of selected values. The kind of data can be selected in the pop up menu above the values.
- 37 -

Operating Instructions JETI – Spectroradiometer specbos 1211
The number format for luminance/ radiance, illuminance / irradiance, luminous/ radiant flux (with specbos 13x1) and luminous/ radiant intensity (with specbos 1401) can be changes between scientific and floating point notation.The last item of the View menu is the data table (View/Diagram/ Table view). It can be used to display the measuring data and to save them in .xls or .csv files.
- 38 -

Operating Instructions JETI – Spectroradiometer specbos 1211
See chapter Shortcut Keys for shortcut keys to switch between different display modi.
7.2.3 Snap-to-Point CursorSingle data points of the acquired spectrum can be viewed using the Snap-to-Point Cursor option, if the spectral diagrams are displayed. The respective wavelength and the spectral value of the selected data point are displayed below the wavelength axis.
7.2.4 Screen ModeThere are different spectrum display options that can be selected in the View/ Spectrum view menu:
All Measurements All measured spectra are displayed in the diagram.
Active Measurement Only the active measured spectrum is displayed in the diagram.
7.3. Special Calculations
- 39 -

Operating Instructions JETI – Spectroradiometer specbos 1211
7.4. SnapshotIt is possible using the menu Extra/ Snapshot to store the actual screen in a file or to print it.
Choose between the full screen or the diagram only. JPG, BMP and PNG files are possible. In case of printing to select the printer settings.The alternative keys are F11 and Shift F11, respectively.
- 40 -

Operating Instructions JETI – Spectroradiometer specbos 1211
8. Data Storage
8.1. Data Transfer
• Open the data table (View/Diagram/ Table view).
• The table will be empty in the beginning.• Click Transfer to export the data to a table (F8 shows the
table)• See chapter Shortcut Keys for shortcut keys to switch
between different display modi.
• The marked measurement will be transferred. It is possible to mark several measurements simultaneously by using CTRL or Shift as usual; using CTRL marks single measurements and Shift marks a block of measurements.
• If a measurement was already identified by an individual name this name will be used as column header in the table. If not changed the automatically generated measurement number will be used.
• It is also possible to store loaded reference spectra in the same manner.
• If the button Auto is activated, all following measurements will be transferred automatically.
- 41 -

Operating Instructions JETI – Spectroradiometer specbos 1211
• Select Export/ Setup Output and choose the desired quantities to be shown in the table.
• The cells of the first lines can be edited. The number of these lines has to be selected in the “Line Offset” setting. Remark: The boxes Spectral Radiance/ Irradiance; Luminance/ Illuminance and Radiance/ Irradiance appear in dependence from the attached measuring head.
• In case of selection of the spectral data the user has to click on the desired wavelength step width for the transfer (1 or 5 nm). Line Offset in Table shifts the transferred data downwards. Finally click on the OK button to close the window.
- 42 -

Operating Instructions JETI – Spectroradiometer specbos 1211
8.2. Data Export
• Measuring data transferred into the table view can be stored in csv, xls or xlsx file format (Excel 97 or higher).
Remark: Excel installation isn't necessary.• Use Export/ Save Table, select the file name, format and
storage location of the file and press OK.
- 43 -

Operating Instructions JETI – Spectroradiometer specbos 1211
Remark: The selected quantities are the same which were selected under setup output.
- 44 -

Operating Instructions JETI – Spectroradiometer specbos 1211
9. Shortcut KeysF1 About box (including product/ vendor ID,
virtual COM port number, baudrate, firmware version)
F2 Display of spectrumF3 Display of xy diagramF4 Display of u´v´diagramF5 Display of raw spectrum (dark signal
corrected)F6 Rank viewF7 Large display of numerical valuesF8 Open the data tableF9 Start of measurementF11 Snapshot into fileShift F11 Snapshot to printerF12 Display of actual integration time and
maximum counts in spectrum (including dark counts)
Alt Q Finish the programCTRL D Open the distance panel of luminous
intensity measurementCTRL Del Clear all measurements (with accepting
window)CTRL T Open/ Close the panel for fixed
integrating timeDel Clear actual/ activated measurementESC Abort a running measurementCTRL + left mouse key Zoom in (xy and u´v´diagrams)Space Start of measurement (only if
measurement button is active)
- 45 -

Operating Instructions JETI – Spectroradiometer specbos 1211
10. Trigger FunctionsIt is possible to trigger the measurement externally or to initiate a flash of a pulse light source.The trigger female connector at the rear side of the device has the following pin out:
The fitting male connector is included in the scope of the device delivery.
External Control of Measurement
A measurement can be initiated externally by a short cut between pin 5 and 8. This can be done e.g. by a foot push-button. Furthermore it is possible to use a TTL signal to start a measurement. This is done with the falling edge of the signal.Both triggering versions act similarly as pressing the green Measurement button of the software.
See the firmware description to change the settings.
- 46 -
Mini DIN 8
1
3
6
2
4
7
5
8
3
6
5
8
Mini DIN 4
Pin out (view to female connector of the device): 3 Lamp out 5 V TTL signal (flash lamp trigger)5 Measuring trigger input6 not used8 Ground

Operating Instructions JETI – Spectroradiometer specbos 1211
11. Maintenance and Error MessagesThe instrument needs no permanent maintenance, if you use it carefully. It is recommended to recalibrate it every year. Ask your dealer or the producer (see chapter 15) for details.
Error message Reason RemovalDevice not found! Switched to offline-mode
Device not connected or USB driver not installed correctly.
Connect the device to the PC or check the installation of the device driver (see install.txt on Setup-CD).
Could not read calibration data from device!
It was not possible to read the data stored inside the instrument.
Contact your supplier.
Could not write calibration data!
Repeat calibration process.
Wrong lamp file! Lamp file was not readable or did not fit the requirements.
Change lamp file or ensure the correct file access.
Overexposure! Measurement failed.
The measuring object overexposed the instrument.
Reduce the measuring intensity by calibrated filters.
Could not read parameter.
The software can not read the necessary parameters from the instrument.
Contact your supplier.
Could not read file! It was not possible to read a selected reference file.
Check the readability of the file.
Could not write file! It was not possible to write a measured file as reference.
Error on USB-Transfer
It was not possible to read or write data via USB
Check the USB-connection and restart the software
- 47 -
Operating Instructions JETI – Spectroradiometer specbos 1211
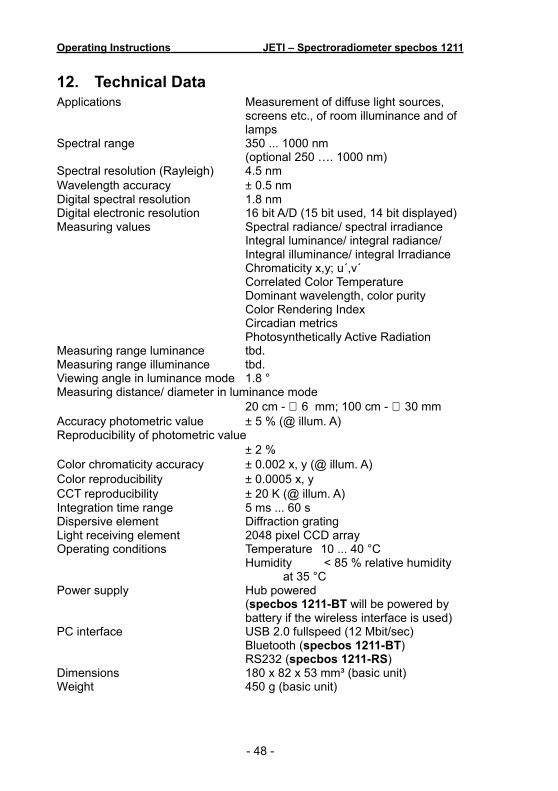
12. Technical DataApplications Measurement of diffuse light sources,
screens etc., of room illuminance and of lamps
Spectral range 350 ... 1000 nm (optional 250 …. 1000 nm)
Spectral resolution (Rayleigh) 4.5 nm Wavelength accuracy ± 0.5 nmDigital spectral resolution 1.8 nm Digital electronic resolution 16 bit A/D (15 bit used, 14 bit displayed)Measuring values Spectral radiance/ spectral irradiance
Integral luminance/ integral radiance/Integral illuminance/ integral IrradianceChromaticity x,y; u´,v´Correlated Color TemperatureDominant wavelength, color purityColor Rendering IndexCircadian metricsPhotosynthetically Active Radiation
Measuring range luminance tbd.Measuring range illuminance tbd.Viewing angle in luminance mode 1.8 °Measuring distance/ diameter in luminance mode
20 cm - ∅ 6 mm; 100 cm - ∅ 30 mmAccuracy photometric value ± 5 % (@ illum. A) Reproducibility of photometric value
± 2 %Color chromaticity accuracy ± 0.002 x, y (@ illum. A)Color reproducibility ± 0.0005 x, yCCT reproducibility ± 20 K (@ illum. A)Integration time range 5 ms ... 60 sDispersive element Diffraction gratingLight receiving element 2048 pixel CCD arrayOperating conditions Temperature 10 ... 40 °C
Humidity < 85 % relative humidity at 35 °C
Power supply Hub powered (specbos 1211-BT will be powered by battery if the wireless interface is used)
PC interface USB 2.0 fullspeed (12 Mbit/sec)Bluetooth (specbos 1211-BT)RS232 (specbos 1211-RS)
Dimensions 180 x 82 x 53 mm³ (basic unit)Weight 450 g (basic unit)
- 48 -

Operating Instructions JETI – Spectroradiometer specbos 1211
Pilot laser Laser class 1, λ= 650 … 670nm(classific. Accord. to EN60825-1/ Oct. 2003)
Transfer module R47F2M03GX Free2move AB (only specbos 1211-BT)FCC identifier
12.1. Mechanical DimensionsThe following drawings show the positions of the threads downside the device and some general dimensions of the instrument.
specbos 1211:
12.2. Battery charging (only specbos 1211-BT)The battery can be charged using the power supply or using the USB port of a PC. In this case the instrument has to be installed via this interface to the computer.The menu point Info/ Battery status shows the charging level of the battery:
- 49 -

Operating Instructions JETI – Spectroradiometer specbos 1211
The charging level can also be seen in the active title bar of the main window.
If the instrument is in charging status the following window appears:
The battery is fully charged if the illuminated switch isn't flashing any more.
- 50 -

Operating Instructions JETI – Spectroradiometer specbos 1211
13. CE – Declaration of Conformity
No : No : 101261076/ 101261077/ 101261078We :
declare that the product serie
Spectroradiometer
specbos1211
to which this declaration relates is in conformity with the requirements of following documents:
• EU Electromagnetic Compatibility (EMC) Directive (December 2004) 2004/108/EC
• Low voltage directive 2006/95/EC
EU Harmonised standards:
EN 61326-1 (2006-10)
IEC 61000-4-2, IEC 61000-4-3, IEC 61000-4-4, IEC 61000-4-5, IEC 61000-4-6, IEC 61000-4-11
CISPR 11
The conformity of the product with the standards and directives mentioned above, is confirmed by the CE sign.
Jena, January 2011
- 51 -
JETI Technische Instrumente GmbHTatzendpromenade 207745 JenaGERMANY
Dr. Steffen GörlichGeneral Manager

Operating Instructions JETI – Spectroradiometer specbos 1211
14. Certificate of WarrantyCertificate of Warranty for
Model: Spectroradiometer
Type: specbos 1211
JETI Technische Instrumente GmbH (referred to as JETI) hereby warrants this equipment as follows:
If any part of this unit (except as described below) fails due to poor workmanship or material (determined by JETI) within TWO (2) years from date of delivery, that part will be exchanged at no charge.
This warranty is valid only when the unit is installed and adjusted according to factory specifications and serviced by competent authorized personnel.
JETI does not assume responsibility for any of the following, all of which are excluded from the coverage of this warranty:
1. Damage due to ordinary wear and tear, abusive use, or lack of proper maintenance
2. Damage due to harsh mechanical shock, e.g. falling to the floor
3. Loss or damage due to adverse environmental conditions or acts of God
4. Loss of wages or income due to repair, replacement, malfunction or damage
Warranty becomes void if serial number is removed or defaced, or the instrument was opened by the customer.
If a defect appears which the customer feel is covered by this warranty, a written notice describing the defect must be sent to JETI's office at the current address of record.
Upon receipt of customers written report of a defect, if the defective items are covered by this warranty, JETI will repair or replace it at no charge to the customer, within 30 days after receipt of the returned unit (provided there are no labor problems or materials shortages to cause delays). The choice between repair and replacement shall be determined by JETI based on actual conditions or circumstances. JETI reserves the right to substitute new and improved equipment or parts at any time. The obligation to replace defective parts does not require replacement of the complete unit.
NO OTHER WARRANTY EXPRESSED OR IMPLIED IS APPLICABLE TO THIS UNIT .
- 52 -

Operating Instructions JETI – Spectroradiometer specbos 1211
This warranty shall be in effect for a period of 24 months, beginning one week after the date of delivery.
- 53 -

Operating Instructions JETI – Spectroradiometer specbos 1211
15. ServicePlease contact in case of any question or technical problem:
Copyright (c) 2012 JETI Technische Instrumente GmbH. All rights reserved.Software and operating instruction are delivered with respect to the License agreement and can be used only in accordance with this License agreement. The hard and software as well as the operating instruction are subject to change without notice. JETI Technische Instrumente GmbH assumes no liability or responsibility for inaccuracies and errors in the operating instruction. It is not allowed to copy this documentation or parts of it without previous written permission by JETI Technische Instrumente GmbH.
- 54 -
04 March 2013
JETI Technische Instrumente GmbHTatzendpromenade 2D-07745 JenaTel. +49 3641 225 680Fax +49 3641 225 681e-mail: [email protected] Internet: www.jeti.com

Operating Instructions JETI – Spectroradiometer specbos 1211
Table of Contents
1. Introduction 11
2. Installation of Driver Software 13
2.1. Installation of Driver Software 132.1.1 Installation under Windows XP 132.1.2 Installation under Windows Vista and Windows 7 and
8 13
2.2. PC- Software 142.2.1 Installation under Windows 14
3. Operation of Device 15
3.1. specbos 1201 15
3.2. specbos 1211 15
3.3. specbos 1211-BT 15
4. Installation of Hardware 17
4.1. Installation of USB Device 17
4.2. Installation of Bluetooth Device (specbos 1211 BT)17
4.3. Installation of RS Device (specbos 1211 RS) 21
4.4. Network settings for specbos 1211 LAN 21
4.5. Installing RealPort Driver 23
5. Start the Software 26
6. Quick Start 28
7. Measurement 30
7.1. Procedure 30
7.2. Measurement with Additional Interfaces 317.2.1 Measurement with specbos 1211-BT 317.2.2 Finishing the Program 33
7.3. Measuring Modi 337.3.1 Luminance Mode 337.3.2 Illuminance Mode 347.3.3 Luminous Flux Mode – specbos1301 and 1311 357.3.4 Luminous Intensity Mode – specbos1401 36
7.4. Special Measurements 377.4.1 Small Luminance Sources 377.4.2 Pulsed Sources 39
- 55 -

Operating Instructions JETI – Spectroradiometer specbos 1211
7.4.3 Luminous Flux measurement mode with self absorption correction 41
7.5. Special Calculations 447.5.1 Colour Rendering Index (CRI) 447.5.2 Circadian Metrics 467.5.3 Photosynthetically Active Radiation (PAR) 467.5.4 LED Values 487.5.5 RGB Values 497.5.6 Colour Values 507.5.7 Spectra Calculation 507.5.8 Ratio Calculation 537.5.9 Metamerism 53
8. Software Settings 55
8.1. Measurement Settings 558.1.1 Integration Time 558.1.2 Continuous measurement 568.1.3 Change measurement name 568.1.4 Delete Measurements 578.1.5 Averaging 588.1.6 Observer 588.1.7 Calculation Range 588.1.8 SI Units/ Imperial Units 598.1.9 Number Format 598.1.10 Target 59
8.2. Display Settings 608.2.1 Zoom 608.2.2 Diagram Options 608.2.3 Snap-to-Point Cursor 648.2.4 Screen Mode 64
9. Selection Procedures 65
9.1. Pass/ Fail Monitoring 65
9.2. Classification (Ranking) 66
10. Data Storage 70
10.1. Data Transfer 70
10.2. Data Export 72
10.3. Reference files 7310.3.1 Store as Reference 7310.3.2 Work with Reference files 74
10.4. Snapshot 76
- 56 -

Operating Instructions JETI – Spectroradiometer specbos 1211
11. Calibration 77
12. Shortcut Keys 80
13. Trigger Functions 81
14. See and Click 82
14.1. Significance of the color Code 82
14.2. Software Installation 82
14.3. Start the Program 88
14.4. Measuring Mode Luminance 89
14.5. Illuminance mode 92
14.6. Luminous Flux mode – specbos13x1 94
14.7. Luminous Intensity mode – specbos1401 95
14.8. Export 97
14.9. Finishing the Program 100
15. Technical Data 101
15.1. Mechanical Dimensions 103
15.2. Battery charging (only specbos 1211-BT) 103
16. Maintenance and Error Messages 105
17. JETI USB Driver V2.08.28 Installation Guide 107
17.1. Installation of Driver Software 10717.1.1 Installation under Windows XP 10717.1.2 Installation under Windows Vista and Windows 7 and
8 107
17.2. Uninstall Driver Software 10817.2.1 Uninstall Driver using CDM Uninstaller 108
17.3. Determine Driver Software Version 109
17.4. How to open the Windows Device Manager 10917.4.1 Windows XP 10917.4.2 Windows Vista 11017.4.3 Windows 7 and 8 110
18. CE – Declaration of Conformity 111
19. CE – Declaration of Conformity 112
20. Certificate of Warranty 113
21. Service 115
- 57 -