spar - itlaq.com workflow installation guide.pdf · lick on “reate” button to initiate the...
TRANSCRIPT
0
SPAR Workflow for SharePoint Installation Guide
ITLAQ Technologies www.itlaq.com

ITLAQ Technologies - SPARK Workflow for SharePoint Installation Guide
1
Table of Contents…
I. System Requirements ......................................................................................................................................2
II. Install SPARK Workflow on your environment ...............................................................................................2
III. Obtain SPARK Workflow License ...................................................................................................................7
IV. Activate SPARK Workflow feature on SharePoint sites .................................................................................9
V. Confirm SPARK Workflow installation ............................................................................................................9
VI. Configure SPARK Workflow To Work on your Farm. .................................................................................. 10

ITLAQ Technologies - SPARK Workflow for SharePoint Installation Guide
2
Following are the system requirements for SPARK Workflow for SharePoint.
Type SPARK Workflow for SharePoint 2013 and SharePoint 2016
Operating system Microsoft Windows Server 2008 R2 or Microsoft Windows Server 2012 (R2 is supported) system
Browser To design workflows, use the following browser versions. Minimum required: Microsoft Internet Explorer 9.x Recommended: Microsoft Internet Explorer 10 or greater, Google Chrome
(latest released version), Mozilla Firefox (latest released version), Apple Safari (latest released version)
Software SQL Server 2008 R2 SP1, SQL Server 2012, or SQL Server 2014 Microsoft SharePoint Foundation 2013, Microsoft SharePoint Server 2013
(SP1 is supported) or Microsoft SharePoint Foundation 2016
1. To install SPARK Workflow for SharePoint, the installer must be run on front-end servers.
2. Download the installer package (SPARK Workflow.exe). (The Installation Package contains no viruses or malwares, and was produced in a safe environment and secured network).
3. Double-click the installer to display the installation dialog box. Note: In order to run the installation package successfully you need to login with a high privileges account. To run the installer with a user account other than the logged-in user account, press and hold SHIFT, right-click the installer file, select Run as different user, and then enter the credentials for the desired account.
II. Install SPARK Workflow on your environment
I. System Requirements
ITLAQ Technologies - SPARK Workflow for SharePoint Installation Guide
3
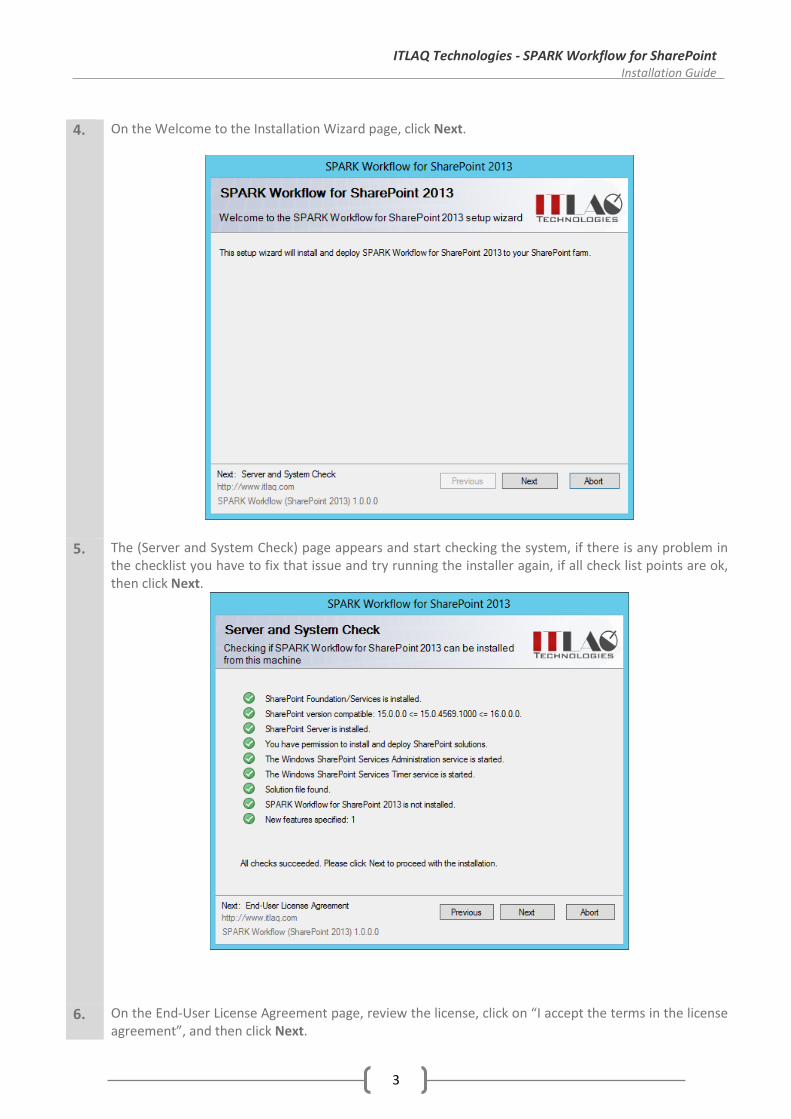
4. On the Welcome to the Installation Wizard page, click Next.
5. The (Server and System Check) page appears and start checking the system, if there is any problem in the checklist you have to fix that issue and try running the installer again, if all check list points are ok, then click Next.
6. On the End-User License Agreement page, review the license, click on “I accept the terms in the license agreement”, and then click Next.

ITLAQ Technologies - SPARK Workflow for SharePoint Installation Guide
4
7. The Web Application Deployment Targets page appears, showing a list of your SharePoint environment available web applications, the central administration web application will be checked by default and its check box will be disabled as this web application is mandatory for deploying SPARK. At this point, you have to specify the web applications you need SPARK Workflow to be installed on. Check the web applications you want and click Next.

ITLAQ Technologies - SPARK Workflow for SharePoint Installation Guide
5
8. Installation status is indicated by messages and a progress bar.
9. When installation is complete, click Next to view the installation results page.

ITLAQ Technologies - SPARK Workflow for SharePoint Installation Guide
6
10. In the results page, you can view all the information about the installation process, and verify that everything has been successfully installed; you can click Close to close the installation dialog box.
Note: The installer installs SPARK Workflow-named assemblies, resource files and SharePoint features locally. At this point, the solutions licensing system and SPARK Workflow features are now available for activation on your SharePoint farm.

ITLAQ Technologies - SPARK Workflow for SharePoint Installation Guide
7
Always make sure that your SPARK Workflow license file is up to date. Make sure that the product license is explicitly activated for the functionality that you want, such as Enterprise Edition. If you have questions about your license file, contact us at [email protected]
1. Open your SharePoint central administration web application.
2. In the central administration main page, locate “SPARK Workflow Management” and click on the “Activation Details” link.
Steps to obtain your license:
III. Obtain SPARK Workflow License

ITLAQ Technologies - SPARK Workflow for SharePoint Installation Guide
8
3. In the “Activation Details” page locate the “FARM ID” field, copy this field and send it to [email protected] in order to obtain your license.
4. The Licensing Department will send you a license file by email, upload this file by going to “Manage License” page in “SPARK Workflow Management” then activate the license by clicking on the “Activate” button.

ITLAQ Technologies - SPARK Workflow for SharePoint Installation Guide
9
5. Now and as you have licensed SPARK Workflow, you can activate its feature on the desired sites. In case you face any problem in your license, contact ITLAQ Technologies through the following emails: [email protected] or [email protected] Note: after installing SPARK Workflow and if you couldn’t find “SPARK Workflow Management” section in the central administration page, go to “System Settings” and open “Manage Farm Solutions” page, locate SPARKWorkflow.wsp solution and make sure it has been deployed on the correct Central Administration web application, (if not) then deploy it manually and check again if SPARK Workflow has been activated on the central administration web application and that “SPARK Workflow” section appears on the Quick launch menu.
"SPARK Workflow" must be activated on relevant sites. 1. From your site home page, access Site Settings (in SharePoint 2013, use the gear icon).
2. In the Site Administration section, click "Manage Site features".
3. Locate "SPARK Workflow 2013" or "SPARK Workflow 2016" and click Activate to activate.
To confirm that SPARK Workflow has been installed and activated properly, go to any list or library in the site you have activated the feature on, click on the list tab on the top ribbon, you must see now “SPARK Workflow” Menu button on the (Settings) group.
IV. Activate SPARK Workflow feature on SharePoint sites
Steps to activate features on each relevant site in your SharePoint
environment
V. Confirm SPARK installationSteps to activate features on each relevant site in
your SharePoint environment
V. Confirm SPARK installationSteps to activate features on each relevant site in
your SharePoint environment
V. Confirm SPARK installationSteps to activate features on each relevant site in
your SharePoint environment
V. Confirm SPARK installationSteps to activate features on each relevant site in
your SharePoint environment
V. Confirm SPARK installationSteps to activate features on each relevant site in
your SharePoint environment
V. Confirm SPARK installationSteps to activate features on each relevant site in
V. Confirm SPARK Workflow installation

ITLAQ Technologies - SPARK Workflow for SharePoint Installation Guide
10
You need to configure the following settings on your SharePoint farm’s Central Administration, these
configurations are mandatory for SPARK Workflow functionality.
After you successfully install and deploy SPARK Workflow on your SharePoint Farm, you need to activate it
on your Web Applications; this procedure will authorize its components to work on that designated web
applications without any limitation or security issues. Follow the next steps in order to activate it on your
farm’s web applications:
1. Open the Central Administration page and click on SPARK Workflow Management.
2. Click on Activate Web Application link, the following page will appear to you:
3. Select your web application from the drop down list, or check “All contents web applications” then click on “Activate” button . Note: In order to deactivate SPARK Workflow on your web application and return it to the state it was before SPARK’s got activated on it; just repeat the above points except you have to click the “Deactivate” button instead.
When installing SPARK Workflow for the first time, you need to create its special internal instances tracking database. Follow the next steps in order to create a new database:
1. Open the Central Administration page and click on SPARK Workflow Management.
2. Click on Manage Database Settings link, the following page will appear to you:
VI. Configure SPARK Workflow To Work on your Farm.
Activate SPARK Workflow on Web Applications
V. Confirm SPARK installationSteps to activate features on each relevant site in
your SharePoint environment
V. Confirm SPARK installationSteps to activate features on each relevant site in
your SharePoint environment
V. Confirm SPARK installationSteps to activate features on each relevant site in
your SharePoint environment
V. Confirm SPARK installationSteps to activate features on each relevant site in
your SharePoint environment
V. Confirm SPARK installationSteps to activate features on each relevant site in
your SharePoint environment
V. Confirm SPARK installationSteps to activate features on each relevant site in
your SharePoint environment
V. Confirm SPARK installationSteps to activate features on each relevant site in
your SharePoint environment
V. Confirm SPARK installationSteps to activate features on each relevant site in
your SharePoint environment
V. Confirm SPARK installationSteps to activate features on each relevant site in
your SharePoint environment
Create and Configure SPARK Workflow Database
V. Confirm SPARK installationSteps to activate features on each relevant site in
your SharePoint environment
V. Confirm SPARK installationSteps to activate features on each relevant site in
your SharePoint environment
V. Confirm SPARK installationSteps to activate features on each relevant site in

ITLAQ Technologies - SPARK Workflow for SharePoint Installation Guide
11
3.
4.
5.
6.
By Default your SharePoint farm’s default server’s database name will appear in the “Server Name” field, and the default database name will appear in “Database Name” field as will, we do recommend keeping the default values; however you could change them the way you want according to your environment specifications and configurations. On the Authentication section you could choose either “Windows Authentication” which is the default choice or “SQL Authentication” in case you have a special SQL Account to access your database server, if you select “SQL Authentication” then you need to fill the Account and the Password fields. Select “Create a new DB” checkbox in order to create a new database. Click on “Create” button to initiate the database creation process. Note: In order to modify any of the above settings you could get back to page again and modify any value, SPARK Workflow will support the new values and ignore the old ones.
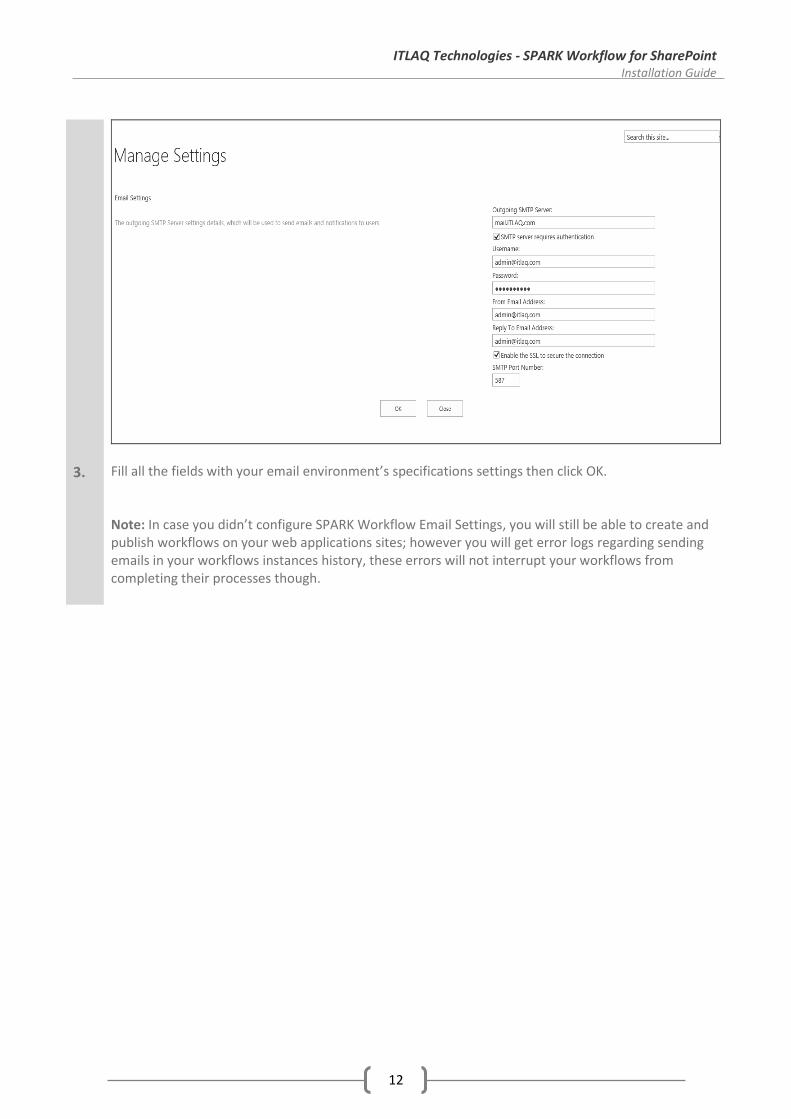
SPARK Workflow depends on a special configuration to send emails to internal and external users; you need to follow the following steps in order to be able to send emails through workflows:
1. Open the Central Administration page and click on SPARK Workflow Management.
2. Click on Manage Email Settings link, the following page will appear to you:
Configure SPARK Workflow Email Settings
V. Confirm SPARK installationSteps to activate features on each relevant site in
your SharePoint environment
V. Confirm SPARK installationSteps to activate features on each relevant site in
your SharePoint environment
V. Confirm SPARK installationSteps to activate features on each relevant site in
your SharePoint environment
ITLAQ Technologies - SPARK Workflow for SharePoint Installation Guide
12
3.
Fill all the fields with your email environment’s specifications settings then click OK. Note: In case you didn’t configure SPARK Workflow Email Settings, you will still be able to create and publish workflows on your web applications sites; however you will get error logs regarding sending emails in your workflows instances history, these errors will not interrupt your workflows from completing their processes though.