solarventi standard (sv) · solarventi standard (sv) roof installation manual dach...
TRANSCRIPT

January 2017
SolarVenti Standard (SV) Roof Installation Manual
Dach Installationsanleitung Tag Installationsvejledning
Manuel d'installation en toiture Tak Installationsanvisningar
Tejado Manual de instalación
Střecha - Montážní instrukce
UK DE DK FR ES CZ SE

Find more languages on: www.solarventi.com
……
?

January 2017 - SolarVenti ®
I. Roof Kit ............................................................................................ 1
Dachmontagesatz Tagsæt Kit de toiture Taksats
Kit de tejado Střešní sada
I.I Stand Assembly ………………………………………………………….………4
Zusammenbau der Dachstützen Samling af tagstativer Support d'assemblage Hopsättning av takstativ Ensamblaje de soportes
Skládání stojanu
II. Additional installation tips..............................................................9
Weitere Montage-Tipps.........................................................................................................10 Précisions complémentaires d'installation ……………………………………………………………………….11 Más consejos para la instalación...........................................................................................12
Další instalační tipy................................................................................................................13
Yderligere tips til installationen .............................................................................................14 Fler tips för installation .........................................................................................................15
(*)

General information
January 2017 - SolarVenti ®
General information
(*) Check reference on page 9
Weitere Erläuterungen siehe Seite 10 Se noter på side 14 Reportez vous à la page 11 Se anmärkningarna på sidan 15 Comprobar referencias en el pagina 12 Další informace naleznete na straně 13

I. Roof Kit
January 2017 - SolarVenti ®
1
I. Roof Kit
Type 1
Type 2
S

I. Roof Kit
January 2017 - SolarVenti ®
2
1
[mm] I II III IV
SV7 900 ± 100 320 ± 100 350 ± 100 Max. 600
SV14 1874 ± 100 320 ± 100 350 ± 100 Max. 900
SV20 1874 ± 100 320 ± 100 500 ± 100 Max. 900
SV30 2800 ± 100 375 ± 100 500 ± 100 Max. 900
(*)
Option 2
I. Roof Kit
January 2017 - SolarVenti ®
3
(*)

I.I Stand Assembly
January 2017 - SolarVenti ®
4
I.I Stand Assembly

I.I Stand Assembly
January 2017 - SolarVenti ®
5
SV7-14 SV20-30
x 35 - 45° 27 - 45°
y 20° 28°
Option 3
Option 2
Option 1

I. Roof Kit
January 2017 - SolarVenti ®
6
2

I. Roof Kit
January 2017 - SolarVenti ®
7
(*)

I. Roof Kit
January 2017 - SolarVenti ®
8
3
30 cm S C
II. Additional installation tips
January 2017 - SolarVenti ®
9
UK
s. 2 s. 2 s. 3 s. 7
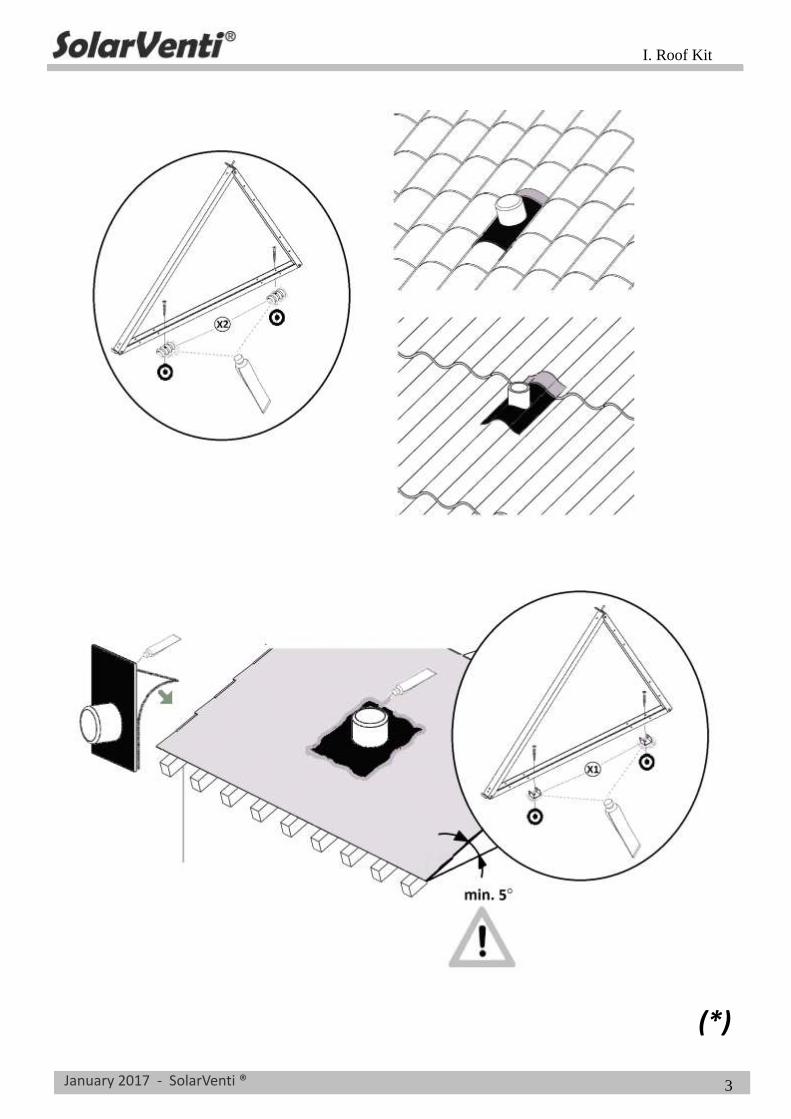
Installation Manual for mounting SV standard to the roof Additional installation tips The maintenance & cleaning instructions as well as the installation manual for controller/switch, ventilation kit and other SolarVenti accessories is found in the wall manual that comes with the solar air collector. The hole: Drilling through a roof can be challenging and the tools needed to make the hole will depend on the roof material. Contact your local SolarVenti installer for further advice regarding the drilling and the installation. Take care not to drill into cables, power sockets, etc. The optimal diameter of the hole is Ø133 mm on the inside and Ø140 mm on the outside. However, it is possible to use a diameter of Ø135 mm both inside and outside. NB! SolarVenti cannot be held liable for any invalidation of warranty on tiles or asphalt roofing in connection with the breaking through of a roof. However, SolarVenti’s supplier SabetoFLEX, provides a 10-year warranty against water permeation by the correct assembly of the roof lead-in. See building codes in force for further information. Measurements: All measurements in this installation manual apply to SolarVenti standard models. Measurements do NOT apply to SolarVenti (K) basement models. Racks: Drill two holes in the long aluminum rod (Ev3) (see assembly instructions for the racks on page 4-5) and secure it (Ev3) on the roof - follow the instructions on page 3. Only then, finish assembling the racks on the roof. Corrugated roof (brick, fiber cement, etc.): Use pressure pads (X2). Avoid leaks: Make sure that the roof ducting (W) is firmly secured and without any bubbles. The upper edge of the ducting must be placed under a roof tile. Its other edges must always finish in a downward roof wave – if necessary cut with a utility knife to fit. Non-corrugated roof types (eg. roofing felt, slate, etc.): Use spacers (X1). Avoid leaks: Apply glue on the underside of the roof ducting (W) within the white tape edge and fasten the ducting (W) to the roof within 2-5 min. – Take care to avoid formation of bubbles. Apply glue around the ducting foil, put water on your finger and smooth out the glue with your finger. Waterproof cabling: Pull the cord through the flex hose (Iv) and down through a small hole which you make in the ducting (W) close to aluflex tube (T). Leave a small piece (5-10 cm) of cord hanging loose beside the collector on the outside of the flexible hose so that water can drain away here. Apply glue around the cable entry to make it waterproof. Place the armaflex strip (Dv) around the aluflex tube and the cable, and ensure that the flex hose (Iv) covers the cable. The plastic strips (Jv) are to be tightened around the flexible hose (Iv) approximately in the middle of the armaflex fitting (Dv).

II. Additional installation tips
January 2017 - SolarVenti ®
10
DE
S. 2 S. 2 S. 3 S. 7
Installationsanleitung für SolarVenti Standard Modell Weitere Montage-Tipps Anweisungen zur Instandhaltung und Reinigung des SolarVenti, sowie die Montage der Steuerung, des Belüftungssets und des anderen SolarVenti Zubehörs finden Sie in der Installationsanleitung, die dem SolarVenti beigelegt ist. Die Durchführung: Welche Werkzeuge für die Bohrung durch ein Dach benötigt werden, hängt von der Beschaffenheit ab. Die Bohrung kann sich als schwierig erweisen. Sind Sie unsicher bezüglich der Bohrung oder Installation eines SolarVentis, ist die Installation durch einen SolarVenti Fachbetrieb durchzuführen. Stellen Sie sicher, dass Sie nicht in Kabel u.Ä. bohren. Der optimale Durchmesser des Loches im Innenraum beträgt Ø133 mm und an der Außenwand Ø140 mm. Haben Sie nur einen Bohraufsatz, können Sie stattdessen Ø135 mm sowohl für den Innen- und Außenbereich benutzen. NB! SolarVenti haftet nicht für einen eventuellen Verlust der Garantie des Daches, die durch die Montage des SolarVenti herbeigeführt werden kann. Bei korrekter Montage der Dachdurchführung, gibt unser Lieferant SabetoFLEX jedoch 10 Jahre Garantie gegen jegliche Wassereindringung. Beachten Sie die geltende Bauregelung. Maße: Alle hier angegebenen Maße sind passend zu den SolarVenti Standard Modellen. Die Maße passen somit NICHT zu den SolarVenti (K) Keller Modellen. Wandgestelle: Bohren Sie zwei Löcher in die langen Aluminiumsstangen (Ev3) (siehe Seite 4-5) und befestigen Sie (Ev3) auf dem Dach – folgen Sie den Instruktionen auf Seite 3. Bauen Sie erst danach das Gestell auf dem Dach zusammen. Welliges Dach (Ziegelstein, Eternit u.Ä.): Benutzen Sie Druckentlaster (X2). Vermeiden Sie Undichtigkeiten: Die Dachdurchführung (W) muss gut befestigt werden und darf keine Blasen schlagen. Die oberste Kante der Dachdurchführung muss von einem Dachziegel abgedeckt werden. Die übrigen Kanten müssen auf einer heruntergehenden Welle enden – schneiden Sie evtl. überschüssige Folie ab. Andere Dachtypen (Dachpappe, Schiefereternit u.Ä.): Benutzen Sie Abstandshalter (X1). Vermeiden Sie Undichtigkeiten: Verteilen Sie ein Streifen Kleber auf der Rückseite der Dachdurchführung (W) innerhalb der weißen Tapekante. Befestigen Sie (W) auf dem Dach innerhalb von 2-5 min. – vermeiden Sie dabei Blasen. Schmieren Sie Kleber um die Folie der Dachdurchführung und glätten Sie es mit einem befeuchteten Finger aus. Wasserdichte Kabelführung: Führen Sie das Kabel durch den Luftschlauch (Iv) und das kleine Loch, dass Sie nahe des Aluflexrohres (T) machen. Lassen Sie einen Überschuss von 5-10 cm Kabel aus dem Luftschlauch hängen, so dass Regenwasser hier abtropfen kann. Machen Sie die Kabeldurchführung wasserdicht, indem Sie das Loch mit Kleber abdecken. Befestigen Sie den Armaflex-Streifen (Dv) um das Aluflexrohr (T) und decken Sie das Kabel mit der Luftschlange (Iv) ab. Befestigen Sie die Kabelbinder (JV) um den Luftschlauch (Iv) mittig auf (DV).

II. Additional installation tips
January 2017 - SolarVenti ®
11
FR
p. 2 p. 2 p. 3 p. 7
Manuel d’installation pour un SV standard sur un toit Précisions complémentaires d'installation
Vous trouverez dans le manuel livré avec le Solarventi: des instructions concernant la maintenance de l'appareil, de son nettoyage, du kit de ventilation, de la régulation ou de l'interrupteur et des autres accessoires. Le trou: Le forage d’un mur peut présenter quelques difficultés Il est nécessaire d’avoir les outils adéquats selon la nature de la construction. Prenez garde de ne pas endommager des câbles électriques, tuyaux divers, etc... Le diamètre nécessaire du trou est de 133mm du côté intérieur et 140 mm côté extérieur. Un percement d’un diamètre de 135 mm des deux côtés est correct. NB! SOLARVENTI ne peut être tenu responsable des conséquences liées à la casse de tuiles ou revêtement de toiture lors de l'installation. Cependant, le fournisseur de SOLARVENTI - SabetoFLEX - donne une garantie de 10 ans contre les infiltrations d'eau sous réserve d'une installation respectant les préconisations d'installation fournies et les règles de la construction. Ces précisions et explications dans ce manuel ne s’appliquent qu’aux modèles standards de la gamme SOLARVENTI à l’exclusion des modèles spécifiques destinés aux sous-sols. Supports: realisez deux trous dans le long profilé en aluminium (Ev3) (voir les instructions d'assemblage pour les supports en page 4-5), le fixer sur le toit- suivez les instructions en page 3. Ensuite et seulement, terminez l'assemblage du support sur le toit. Pour les toits à « vagues » en fibro ciment, etc ) utilisez les protections de pression (X2). Pour éviter les fuites : le bord supérieur d ela toile doit être placé sous une tuile ou sous une plaque qui constitue la couverture. Les autres bords doivent toujours être positionné dans le sens de la vague, vous pouvez découper la toile si un ajustement est nécessaire. Pour les autres toit non ondulés (goudronnés, ardoises, tuiles) utilisez les entretoises (X1) pour éviter les fuites. Appliquer la colle sous de la toile souple de toit (w) sous la partie adhésive et maintenez la pendant 2 à 5 min. Evitez la formation de bulles. Appliquez d ela colle tout autour de la toile, avec votre doigt mouillé, aplanissez la toile pour une bonne finition. Câblage imperméabilisé: Passez le câble sortant du capteur entre la protection qui entoure la gaine d’alu extensible (Iv) et en bas par un petit trou que vous ferez dans la toile souple (w) près de la gaine d’alu (T). Laisez un petit marceau (10cm) de câble libre à côté du capteur à l’extérieur du tuyau flexible pour que l’eau puisse s’écouler ici. Appliquez la colle tout autour de l’entrée de câble pour le rendre imperméable. Placez la bande (Dv) autour de la protection de la gaine alu et du câble. Le collier de serrage se positionne approximativement au milieu du point de fixation.

II. Additional installation tips
January 2017 - SolarVenti ®
12
ES
pag. 2 pag. 2 pag. 3 pag. 7
Manual de instalación SV standard en el tejado Consejos adicionales de instalación Instrucciones para la limpieza y mantenimiento del sistema SolarVenti y manual de instalación del regulador/interruptor, kit de ventilación y otros accesorios SolarVenti se encuentran en el Manual de instalación en pared, que vienen con el colector. Orificio de entrada de aire: La perforacion de un orificio en un tejado puede ser un reto. Las herramientas necesarias dependeran del tipo de tejado. Pongase en contacto con su instalador SolarVenti local para que le puedan aconsejar. Al hacer cualquier tipo de perforacion, hay que tener cuidado de no dañar ningun cable, tuberia etc... El diametro óptimo del orificio de entrada de aire es de Ø133 por la cara interior y Ø140 en la exterior. Sin embargo es posible utilizar un unico diametro de Ø135. ¡NOTA! Solarventi no se hace responsable de cualquier pérdida de una posible garantía del tejado, su construcción o impermeabilización al penetrar el tejado. Sin embargo, el proveedor externo de SolarVenti, SabetoFLEX ofrece 10 años de garantía contra la entrada de agua si el montaje se ha hecho correctamente. Para obtener más información, ver los códigos de construcción aplicables. Medidas: Todas las medidas dadas en este manual son exclusivamente para SV standar y NUNCA se pueden aplicar a SVxxK. (modelos para sótanos) Soportes: Perforar dos agujeros en el perfil de alumino Ev3 (ver instrucciones paginas 4 y 5) y fijarlo en el tejado (pag 3). Una vez fijado Ev3 al tejado, acabar el montage de los soporte (pag 4‐5) Tejados de chapa, teja,uralita...(ACANALADOS): Usar las almohadas de presión (X2). Evitar goteras: Asegurarse de que los conductos para el tejado (W) estan firmemente aderidos y sin burbujas. El borde superior de (W) debe quedar bajo la teja superior. Los bordes laterales de (W) deben siempre acabar en la parte baja/descendente de la onda de la teja, uralita... Tejados PLANOS (no acanalados): Usar las almohadas de presión (X1). Evitar goteras: Aplicar el pegamento (P) en la cara inferior de los conductos para el tejado (W) a 2‐3mm de sus bordes. Evitar la formacion de burbujas. Una vez (W)esta sujeto al tejado, hacer un segundo sellado con el pegamento (P). Aplicar el pegamento (P) en los bordes de (W).Con un dedo mojado, repasar el pegamento (P) para asegurar el sellado. Impermiavilizar cableado: A la salida del ventilador, dejar una pequeña catenaria (50‐100 mm) para que el agua pueda drenar. Para la entrada del cable a traves de (W), perforar (W) a 5‐15 mm de la entrada de aire. Introducir el cable y una vez ajustado, impermeabilizar cubriendolo con pegamento (P). Al final del proceso la entrada del cable debe quedar cubierta por el aislamiento (Iv) Bridas (Jv): Deben ser colocadas de tal forma que ejerzan presion a la vez sobre (Iv),(Dv) y (Jv) para que asi los conductos queden sellados.

II. Additional installation tips
January 2017 - SolarVenti ®
13
CZ
s. 2 s. 2 s. 3 s. 7
Standardní montážní instrukce Další montážní tipy Návody k údržbě a čištění SolarVenti panelu a návod k instalaci regulátoru/vypínače, ventilační sady a dalšího příslušenství k Solarventi najdete v montážních instrukcích, které jsou součástí panelu. Otvor do střechy: Nářadí k tomuto účelu je speciální dle materiálu a složení střechy. Zeptejte se svého prodejce či technika, pokud si přejete rady s vrtání otvoru. Zde lze využít korunkový vrták s průměrem Ø135-150 mm. Pro vrtání otvoru do stropu lze využít korunkový vrták s průměrem Ø133-142 mm. Pokud jsou střešní krytinou tašky, je možné pouze jednu tašku vyndat a nahradit průchodkou, a tím se vyhnout vrtání do střechy. POZOR! SolarVenti není zodpovědné a nemůže nést zodpovědnost za případný zánik záruky na střešní krytinu, kvůli prostupu střešní krytinou. SabetoFLEX, dodavatel SolarVenti, však poskytuje záruku 10 let na vodotěsnost při správné montáži průchodky. Rozměry: Všechny rozměry, které jsou zde uvedené, platí pro standardní modely SolarVenti. Rozměry NESEDÍ na sklepní modely. Stativy: Vyvrtejte nejdřív 2 dírky do dlouhého hliníkového profilu (Ev3)(podívejte se na instrukce ke skládání stativů na straně 4-5) a upevněte (Ev3) do střechy – postupuje del instrukcí na straně 3. Teprve poté dosestavte stativy na střeše. Vlnité střechy (tašky, eternit a pod.): Použijte pryžové podložky (x2). Zabraňte netěsnostem: Zajistěte, aby průchodka byla dobře připevněna ke střeše a nikde se nevytvořily žádné bubliny. Horní hrana průchodky musí být trochu zastrčena pod tašky/šablony. Postraní hrany průchodky musí končit na klesající části vlny –pokud to nevychází, upravte velikost průchodky tak, aby to sedělo. Rovné střechy (např. lepenka, šablony eternitu a pod.): Použijte distanční držáky (X1). Zabraňte netěsnostem: Naneste tmel na spodní stranu průchodky (W) v rozmezí bílého lepícího okraje a přidržte průchodku (W) na střeše 2-5 min.-dejte pozor, aby se nikde nevytvořily žádné bubliny. Naneste tmel kolem dokola celé průchodky a namočeným prstem tmel uhlaďte. Protažení kabelu: protáhněte kabel přes flexibilní hadici (lv) a pak dolů zkrz malou dírku, kterou zhotovíte v průchodce (W) blízko aluflex hadice (T). Nechte kousek kabelu (5-10cm) viset u panelu, mimo flexi hadici, tak aby zde mohla odkapávat voda. Naneste tmel kolem kolem prostupu kabelu, tak aby se stala dírka vodotěsnou.Upevnetě černé těšnění (Dv) kolem aluflex roury a kabelu a zakryjte to celé šedivým izolačním návlekem (lv). Stahovací pásky (Jv) je třeba utáhnout kolem flexihadice(lv) zhruba uprostřed (Dv).

II. Additional installation tips
January 2017 - SolarVenti ®
14
DK
s. 2
s. 2 s. 3 s. 7
Installationsvejledning til tagmontage Yderligere tips til installationen Anvisninger til rengøring og vedligeholdelse af SolarVenti anlægget samt installationsvejledning til regulator/afbryder, ventilationssæt og andet SolarVenti tilbehør findes i vægvejledningen, der følger med luftsolfangeren. Hullet: At bore et hul gennem taget kan være vanskeligt. Dertil kommer, at værktøjet, der skal bruges til at lave hullet, afhænger af tagets beskaffenhed. Få råd og vejledning hos din lokale SolarVenti installatør, hvis du er i tvivl om installationen. Sørg for, at der ikke er nogen ledninger, stikkontakter e.l., hvor boringen skal foretages. Den optimale diameter af hullet er Ø133 mm på indersiden og Ø140 mm på ydersiden. I tilfælde af, at du kun har en borekrone, kan du dog bruge Ø135 mm til både det indvendige og udvendige hul. NB! SolarVenti kan ikke drages til ansvar for eventuelt bortfald af garanti på tagplader eller tagpap ved gennembrud i taget. SolarVentis leverandør SabetoFLEX yder dog 10 års garanti mod vandindtrængning ved korrekt montage af taggennemføringen. For yderligere se gældende bygningsreglementer. Mål: Alle mål angivet i denne montagevejledning gælder for SolarVenti standard modeller. Målene gælder IKKE for SolarVenti (K) kældermodeller. Stativer: Bor først to huller i den lange aluminiumsstang (Ev3) (se samlevejledning for stativerne side 4-5) og fastgør (Ev3) på taget – følg instruktioner på side 3. Saml først herefter stativerne færdig på taget. Bølget tag (tegl, eternit o.l.): Brug trykaflastere (X2). Undgå utætheder: Sørg for at taggennemføringen (W) sidder godt fast og ikke slår bobler. Taggennemføringens øverste kant skal ligge ind under en tagplade/teglsten. Dens øvrige kanter skal altid slutte på en nedadgående tagbølge – skær evt. til med en hobbykniv. Ikke-bølgede tagtyper (fx tagpap, skiffereternit o.l.): Brug afstandsholdere (X1). Undgå utætheder: Smør lim på undersiden af taggennemføringen (W) indenfor den hvide tapekant og sæt taggennemføringen (W) fast på taget inden for 2-5 min. – undgå, at den slår bobler. Smør lim rundt om taggennemførings-folien, kom vand på din finger og glat limen ud med fingeren. Vandtæt kabelføring: Træk ledningen gennem flexslangen (Iv) og ned gennem et lille hul, du laver i gennemføringen (W) tæt på aluflexrøret (T). Lad et lille overskud (5-10 cm) af ledningen hænge løst ved luftsolfangeren udenfor flexslangen, så vand kan dryppe af her. Påfør lim rundt om kabelgennemføringen, så det bliver vandtæt. Sæt armaflexstrimlen (Dv) rundt om aluflexrøret og kablet, og få flexslangen (Iv) til at dække kablet. Plaststripsene (Jv) skal strammes rundt om flexslangen (Iv) ca. midt på (Dv).

II. Additional installation tips
January 2017 - SolarVenti ®
15
SE
s. 2 s. 2 s. 3 s. 7
Installationsanvisning för takmontage Fler tips för installation Underhålls & rengöringsinstruktionerna samt installationsmanualen för: regulatorn / strömbrytaren, ventilationssatsen och andra SolarVenti tillbehör finns i Vägg Installationsanvisningsmanualen som följer med i paketet med luftsolfångaren. Hålet: Att borra hål i taket kan vara vanskligt. Därtill kommer att verktyget, som skall användas för att göra hålet, beror på takets beskaffenhet. Ta råd och vägledning från din lokala SolarVenti-installatör ifall du är tveksam inför installationen. Säkerställ att det inte är några ledningar, stickkontakter eller liknande där borrningen skall utföras. Den optimala diametern för hålet är Ø133 mm på insidan och Ø140 mm på utsidan. Ifall du enbart har ett borr kan du använda Ø135 mm för både det invändiga och det utvändiga hålet. OBS! SolarVenti kan inte hållas ansvarig för eventuellt förlorad garanti på takpannor eller takpapp vid genomföring i tak. SolarVentis leverantör SabetoFLEX lämnar dock 10 års garanti mot vatteninträngning vid korrekt montering av takgenomföringen. För ytterligare information se gällande byggregler. Mått: Alla måttangivelser i denna monteringsanvisning gäller för SolarVenti standardmodeller. Måtten gäller INTE för SolarVenti (K) källarmodeller. Stativ: Borra först två hål i det långa aluminiumstaget (Ev3) (se monteringsanvisningen för stativen på sidorna 4-5) och fäst (Ev3) på taket – följ instruktionerna på sidan 3. Montera först därefter stativen på taket. Vågigt tak (tegel, eternit och liknande): Använd tryckavlastare (X2). Undvik otätheter: Säkerställ att takgenomföringen (W) sitter fast och utan bubblor. Takgenomföringens övre kant skall ligga inunder en takplatta/tegelpanna. Dess övriga sidor skall alltid luta mot en nedåtgående takbåge –skär eventuellt till med en hobbykniv. Icke-vågiga taktyper (t.ex. takpapp, eternit och liknande): Använd distansen (X1). Undvik otätheter: Stryk lim på undersidan av takgenomföringen (W) innanför den vita tejpkanten och sätt fast takgenomföringen (W) inom 2-5 min. Undvik att det blir bubblor. Stryk lim runt om takgenomföringfolien, med vatten på fingret och jämna ut limmet med fingret. Vattentät kabelgenomföring: Drag kabeln genom flexslangen (lv) och ned genom ett litet hål, som du gör i genomföringen (W) intill aluflexröret (T). Låt ett litet överskott (5-10 cm) av kabeln hänga löst vid luftsolfångaren utanför flexslangen, så att vattnet kan droppa av. Stryk på lim runt om kabelgenomföringen, så att det blir vattentätt Sätt armaflexbandet (Dv) runt om aluflexröret och kabeln och låt flexslangen (lv) täcka kabeln. Fästbanden (Jv) skall spännas runt flexslangen (lv) ca: mitt på (Dv).

Produced in Denmark SolarVenti A/S Fabriksvej 8 DK - 8881 Thorsø Tlf. +45 8696 6700 www.solarventi.dk / www.solarventi.com
Your local dealer / installer:
SolarVenti® provides a healthy indoor climate in your home
Avoid humidity Avoid stale smell Avoid mould and fungus
We are regularly tested by different national and international institutes in order to remain the best on the market.